I hope you had a wonderful and joyous Christmas! Ours was filled with plenty of smiles, laughs, and hugs. The kids were thrilled with their gifts from Santa and they have been quite occupied (which makes mama happy treasuring the quiet moments). We’re off to see more family this coming weekend, but in the meantime, I have something fun to share…
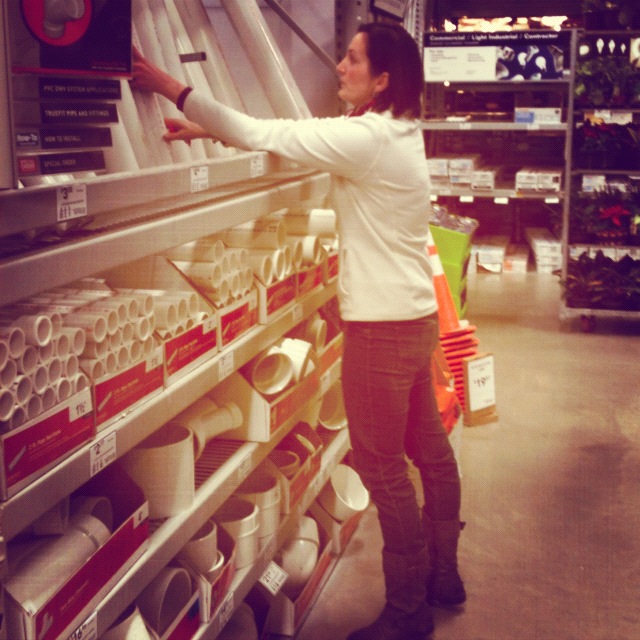
In the midst of all the Holiday Hoopla, Lowe’s sent me on another challenge this month to scour their aisles and create SOMETHING SPARKLY for New Years. This one surely threw me for a loop (especially since I don’t usually decorate for New Years), but I arose to the challenge and feel that I hit this one out of the ballpark!
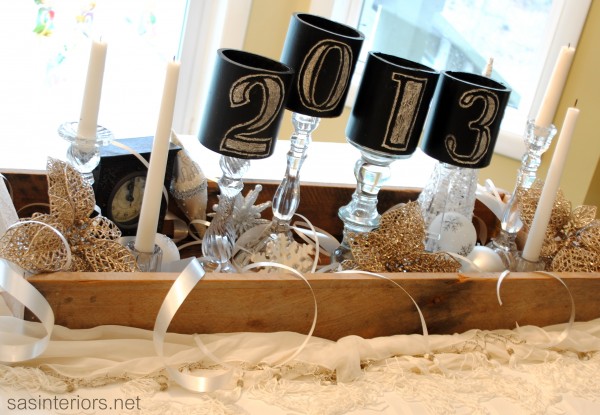
Thus the creation of my New Years 2013 Sparkly Tablescape…
An idea struck when I was in the plumbing aisle looking at PVC pipe. Isn’t that where all your ideas start too??
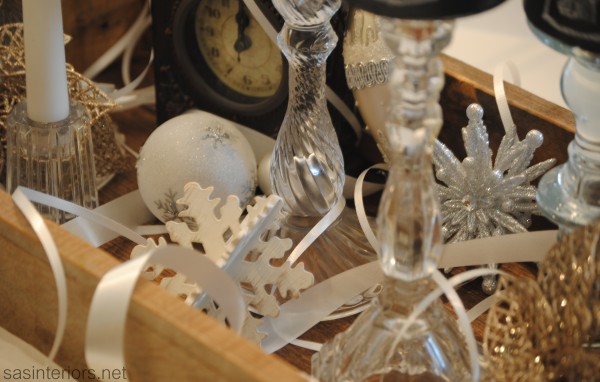
In knowing that I had a bunch of crystal candlesticks (which are missing mates and are all random sizes and heights) in the china cabinet, I thought that would be a good place to start to bring in the glitz, glitter, and sparkly! And then I would add PVC pipe into the mix.
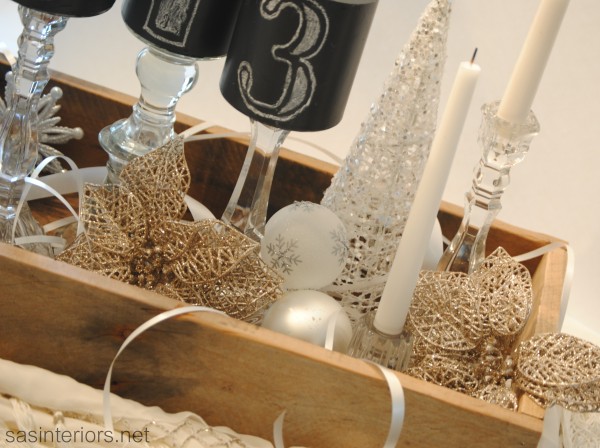
Ok, but seriously… I had the thought to cut the PVC pipe, paint them with chalkboard paint, and add the numbers 2-0-1-3. So I was off and shopping for my materials.
I ended up buying:
(1) 2′ long PVC pipe
(4) PVC caps (which I think were around 25 cents each)
chalkboard paint
nuts (for napkin rings – keep on reading)
Once home, I started off by cutting the PVC pipe with a miter box so I had 4 pieces that were 4″ high each.
It was bitter in the garage, so the Mister and I cut them indoors. I’ll tell you, it was a mess – beware! After cutting the PVC to the needed size, I handsanded the edges to get rid of the plastic shavings and to make them somewhat smooth.
I added the PVC cap on one end which would be the part that sits on top of the candlestick.
Then using Rustoleum chalkboard paint, I painted the exterior, interior, and the edges.
Lastly, with white chalk, I freehanded the number 2-0-1-3 on each PVC cylinder.
Believe me, up close it isn’t perfect, but it’s unique and cute!
Once the Chalkboard PVC holders were done, I was ready to decorate my tablescape. To start, I shopped my home. I gathered anything silver and sparkly. I grabbed ornaments from the Christmas tree, the new sparkly Christmas cones from the mantel, a clock (so apropos for New Years), along with white ribbon in different sizes and many of my crystal candles.
After that it was ready to start playing. After a few moves and some edits, the centerpiece was complete.
As the moveable base for the centerpiece, I used the pallet wooden box that I recently created for my Christmas setting. It’s nice because it holds everything in place and can easily move so the table can actually be used for meals. Beauty + Function!
Under the wood box is a pretty white scarf that I’ve had for years (and don’t ever wear). When I was hunting around my home, I thought it would be the perfect addition to bring in some sparkle.
And of course we couldn’t have a New Years table without some bubbly…
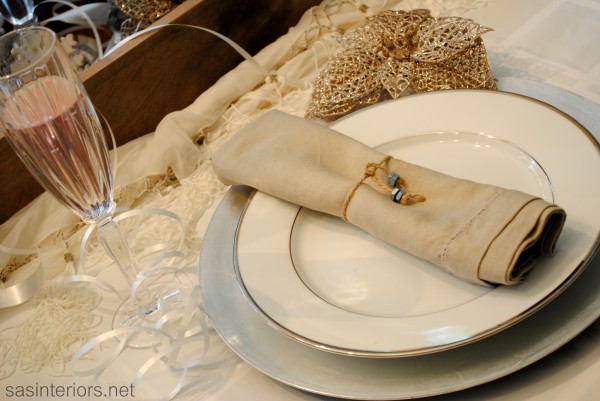
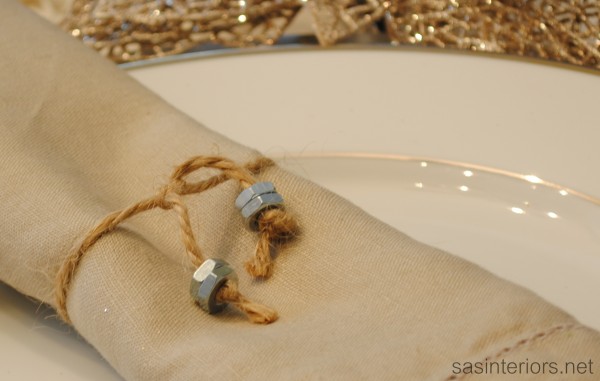
For each seat setting, I added a silver charger with our china plates on top (a simple white plate with silver edging). For the napkin, I added a linen cloth and tied it with a piece of jute and added a few nuts for fun. I was going to create an entire napkin ring with nuts, but didn’t have time, but it could be an idea for a future project.
And one last look at my fun, whimsical, and sparkly New Years Tablescape.
Is it pin-worthy?
After wracking my brain for a bit on the ideal project for New Years, I’m thrilled with the outcome of my sparkly creation. It wasn’t easy, but I feel when I’m put to the challenge, something great always results!
Cheers to a happy, healthy, joyous, prosperous, and amazing 2013!
Onto the giveaway, which is HUGE!
Now’s your chance to tackle a new project in your home in 2013. Lowe’s is generously giving one winner a $75 Gift Card to their store – how cool?!
Disclosure: I am part of the Lowe’s Creative Team and was provided with a Lowe’s gift card to purchase items for my project. I was also compensated for my time to use the products. No one told me what to create, what to buy, how to use the product, or what to write. All opinions are 100% mine!
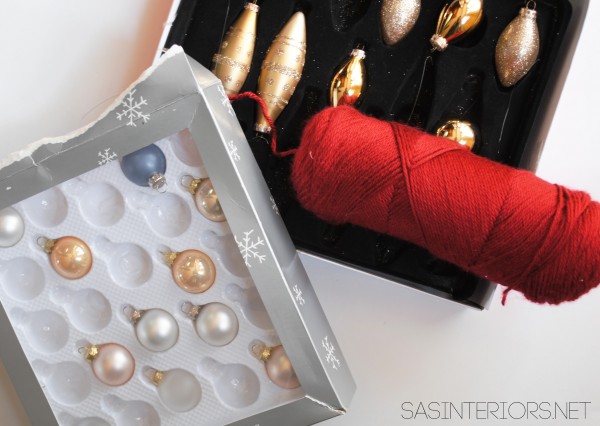
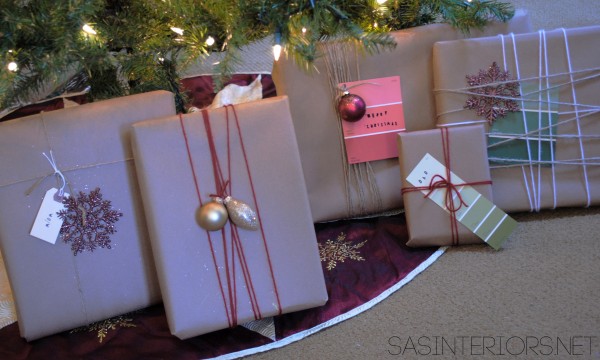
With a yummy glass of wine in hand, I wrapped quite a few last evening. It brings me joy to give to others.
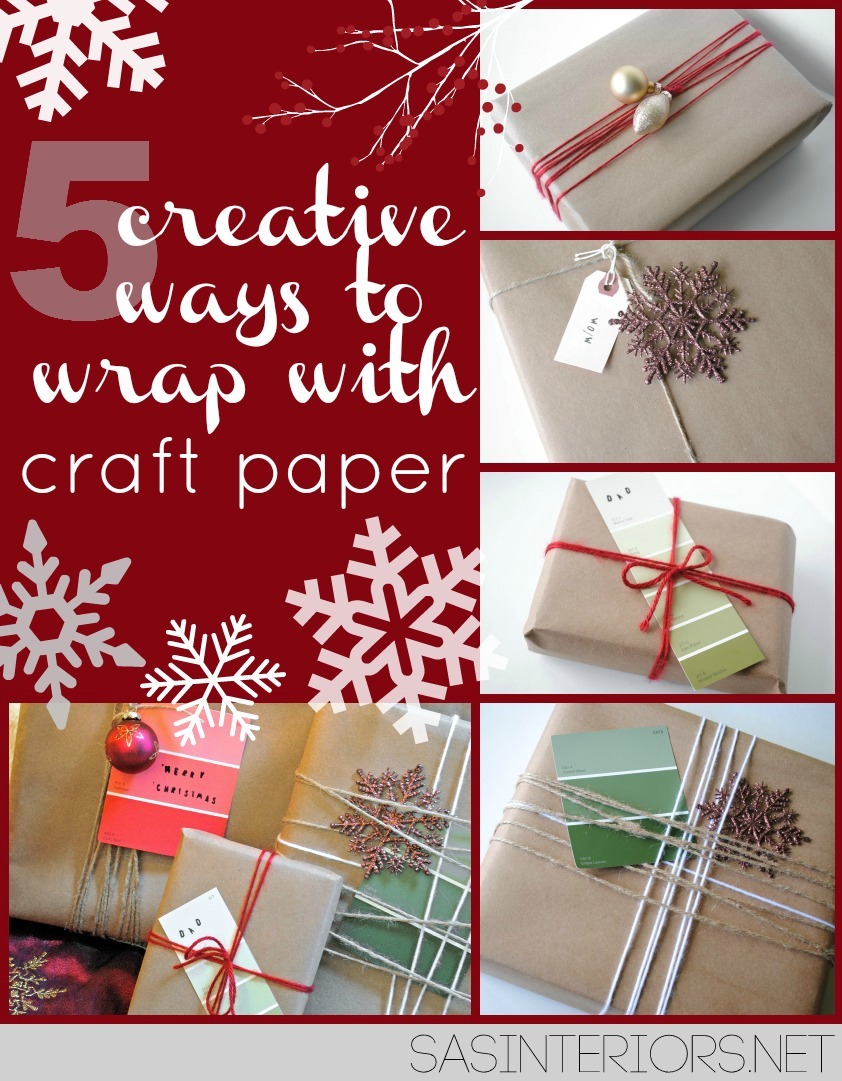
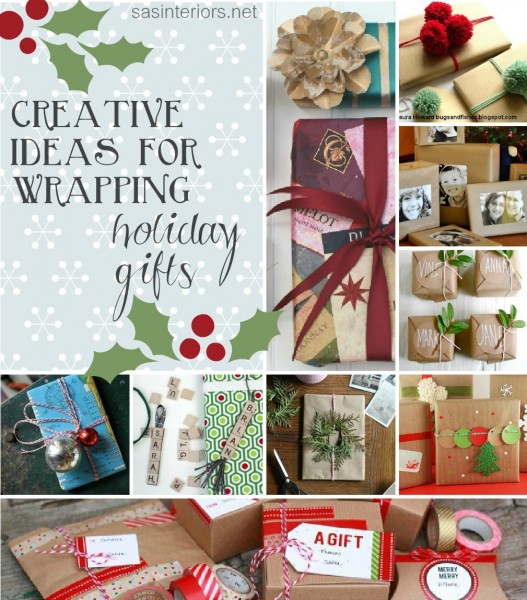
Until this year, I used the typical fun and festive paper that you see in the holiday aisles at most big-box stores. Papers come in a variety of colors, lengths, and themes, but there is something impersonal about it. Just like a front door to a home, the packaging on a present sets the tone for what’s the come. Wrapping doesn’t have to be expensive, but creative is key. Earlier this week, I shared 15 unique ways to wrap holiday giftsand today I’m sharing how the gifts I will be giving this year will be wrapped.
From the graphic and title of this post you can pretty much figure out what I used for wrapping gifts this year, but if not, it’s… Craft Paper.
I love it! Why? It’s inexpensive, you’ll never run out, it can be used and customized for any occasion, it’s multi-functional, and is super thick/heavy (like high-end pricey papers at $6/$8 a roll).
And let me say it again… you’ll never run out (well eventually you will but not for at least 5 or 10 years)! I purchased a 500′ roll of brown craft paper for $8 at Lowes. Pretty awesome, right?!
Let’s dig right in to see how my presents will be wrapped for Christmas 2012…
After wrapping my presents in the brown craft paper, I got started with the embellishments a.k.a. the fun part!
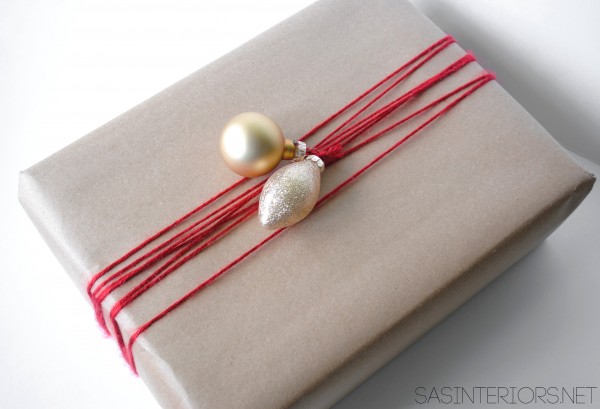
Craft Paper Idea #1
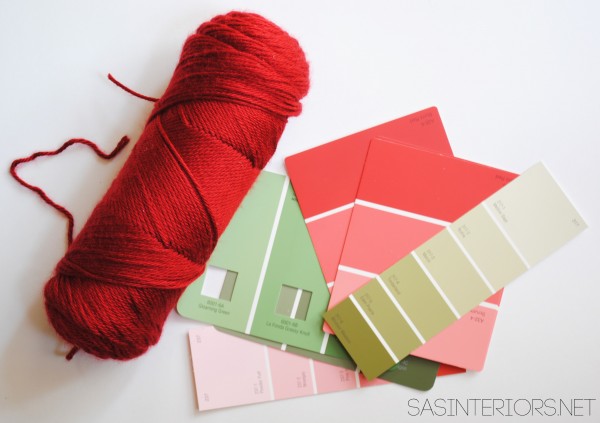
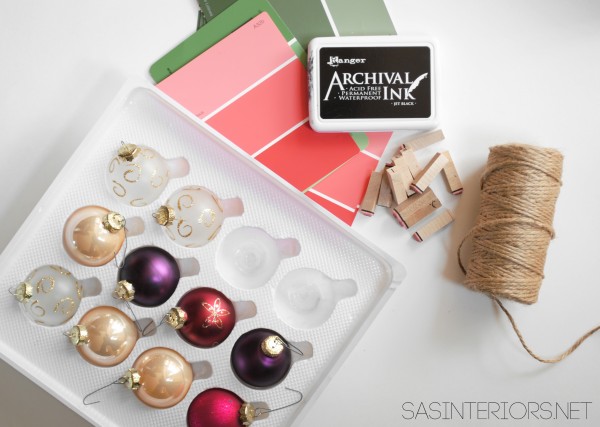
Materials
Yarn
Paint Chip samples or other gift tags
As a DIYer and crafter, paint chip samples seemed unique and so appropriate to add to a gift that came from me. I picked a few up that seemed Christmas-like in a range of red and green hues.
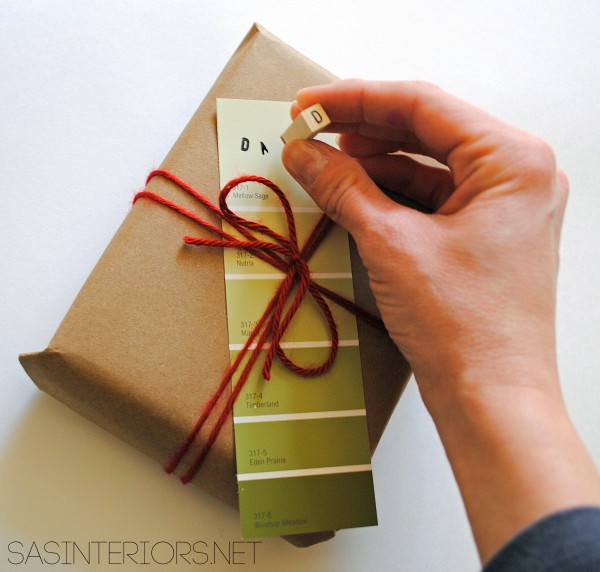
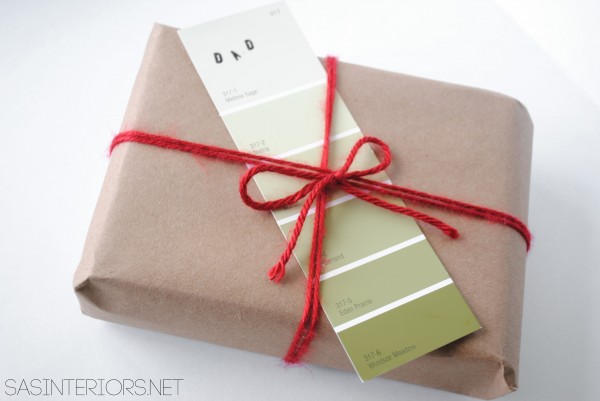
You really can do so much with paint chip samples! After I wrapped my present in brown craft paper, I then wrapped two layers of red yarn around and finished it off with a long green paint chip sample. I added the words DAD on it with individual letter stamps that I got at AC Moore for $1. Super cheap and so pretty!
And the result…
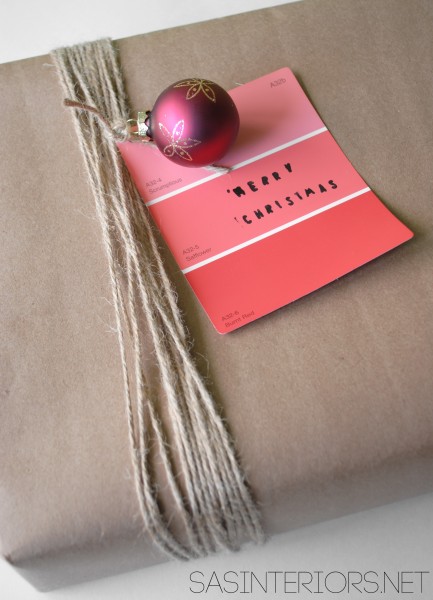
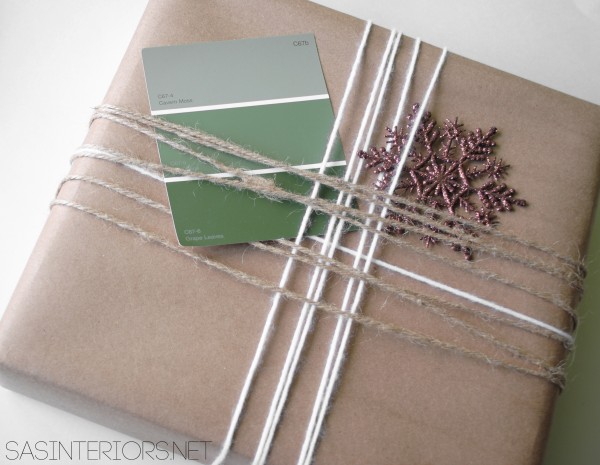
Craft Paper Idea #2
Materials
Jute
Leftover (non-used) small ornaments
Paint Chip samples
Letter Stamps
Again super easy to make and some of the supplies are a repeat from the last gift idea. Instead of using the yarn this time, I decided on jute, which again is very inexpensive. I got this roll at Walmart for $3 and have used it for many things around the house.
After wrapping and adding the embellishments, here’s the result…
It was so simple to make! I wrapped a loooong strand of jute towards the end of the box (not centered) with an ornament and paint chip sample, and it was complete. With the individual letter stamps, you can say anything and add as many words as you’d like. The options are endless. For this present I wrote Merry Christmas.
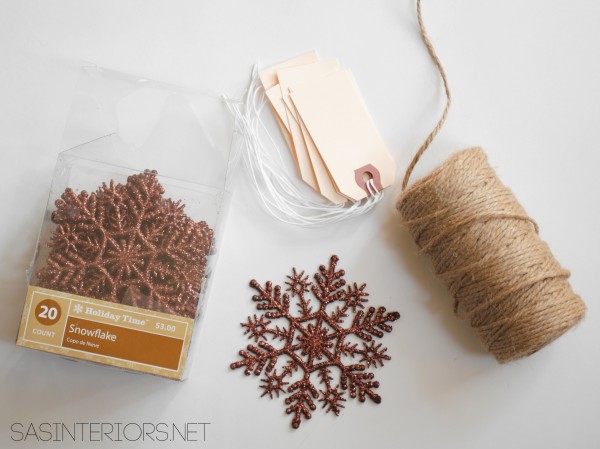
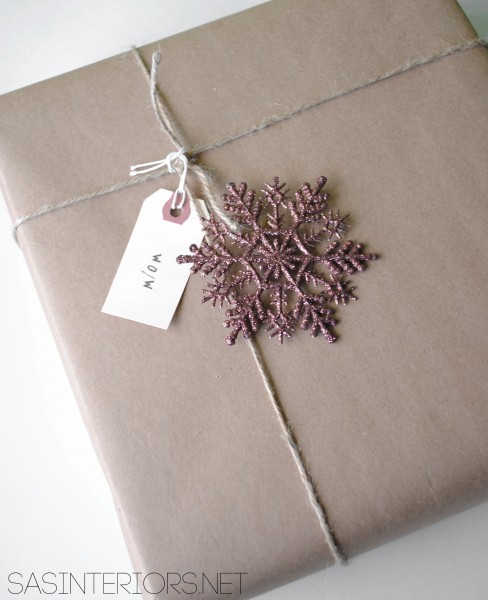
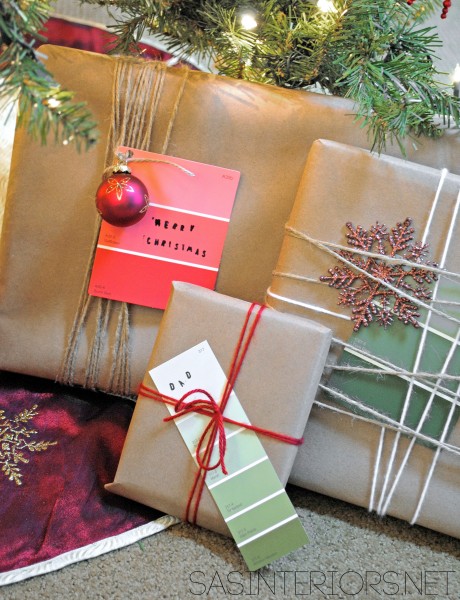
Craft Paper Idea #3
Materials
Jute
A simple tag
Any ornament
Using any ornament – I loved how these chocolate snowflakes sparkled – add it to a present for a creative embellishment. I wrapped one layer of jute around the box, added a tag, and the simple snowflake ornament, and my present was complete.
This special one is for my mom…
Craft Paper Idea #4
Materials
Yarn – I chose red
Small Ornaments
A minute later, the result…
For this present in particular, I simply wrapped a looong strand of red yarn around the box and finished it with two small ornaments. So easy.
Craft Paper Idea #5
Materials
All of the above!
To create this last idea, I used it all… Jute, yarn, an ornament, and a paint chip sample.
As you see, each present has similar materials, but is put together differently each time to truly make a one-of-a-kind gift. How special? And what recipient wouldn’t appreciate the time you took to think outside of the box?!
Pretty, simple, and O so fun and unique to create!
The hustle and bustle of the Holidays are in full swing, but I was able to step back from the craziness of it all this past weekend to revamp my mantel and deck it out for Christmas.
As a Blogger, I feel so lucky to have a platform to share my new creations. When the time comes to create a new mantel composition, I push myself to always try something new and different, and raise the bar from the previous year. Thus the result of my new JOYful Christmas Mantel…
Like with every mantel, I cleared off all the decor from my Fall mantel so I could see the space free and clear! This always helps start the ball-rolling for my latest montage. I’ll tell you, I don’t usually go into decorating my mantels (or many areas of my home) with a plan. Once I see a blank slate, somehow it all starts coming together.
I will say though, I’ve had the idea to create this JOY sign for a while. I thought it would look beautiful leaning against the new ebony stained wood board backdrop. Thankfully all came together and I’m so pleased with the result – I’ll be sharing a quick and easy tutorial on how I created the sign very soon.
Going for an asymmetrical look, I added a gorgeous boxwood wreath next to the JOYful sign. I scored this totally faux, but looks totally real, wreath at Lowe’s – I’m in love, I’m in love, I’m in love. I love decorating with boxwood and cedar branches, and when I saw this, I grabbed it. Well actually I thought about making it at first, but after figuring out the cost, this was a better deal.
In creating the mantel, I mixed in a few Christmas elements with a few non-Holiday pieces. I couldn’t dare put away my fabulous white ginger jar that I enjoy looking at everyday, so of course there it is… (along with my easy-peasy presto-chango-with-spray-paint candle stick). And I think they look great amongst everything else.
Some of the fun, festive decor that I added around it are the: three sparkly mod Christmas trees, two brushed nickel Christmas stocking holders (which I got forever ago from Target), and one piece of birch log.
My burnt orange wall is a show-stopper in itself, but I always like to add a burst of color in another way. With this mantel, I brought in a pop of yellow with a few sprigs of forsythia (totally wrong flower for the season, but I love the yellow with the red in the JOY sign). In the same vase, I added some faux red berries. Yellow + Red = Perfect Compliment!
The mantel is simple, elegant, and festive. O, I truly wish you could see it in person!
The drop cloth and felt stockings are still a favorite of mine. I made them last year and added metallic gold ornaments to give a little accent.
And here’s the overall space…
O, how I love thee!
Thanks for taking a tour of my Christmas Mantel 2012. Similar to my recent tablescape creation, I mixed in items from around my home with dollar store deals and DIY projects.
Have you decorated your mantel for Christmas yet? If so, please share the link below so I can visit.
Looking for tips on how to decorate a mantel? {click here}
I had alot of fun creating this vignette and we actually enjoyed a scrumptious dinner Saturday night on this beautifully decorated table. It was a little pre-Christmas meal to start off the countdown to the special Holiday. As you can see, we also lit the first candle on our Advent wreath.
The base of the table started with my DIY chevron table runner that I created. I actually never shared a tutorial on this specific runner, but it’s similar to the drop cloth runner that I made.
Since this is the table where we have dinner most every night, I needed a centerpiece that could easily move. A few weekends ago, the Mister and I created this box (using the same technique from the monogrammed chevron tray) using leftover pallet scraps. The size is 16″ wide X 26″ long and it’s the perfect size for a large scale (yet easily moveble) center focal point.
Inside the box I added advent candles, gold sparkly Christmas trees from Dollar General, and a ceramic bowl filled with cinnamon sticks, all surrounded by natural greenery that I trimmed from trees in our backyard. The cinnamon sticks smell so good – they give such a yummy fragrant scent when you pass by.
Dollar stores (like Dollar General) are a great place to find inexpensive items to decorate with. By ‘shopping your home’ and mixing dollar-store-deals with thrift-store-finds, you can truly create a gorgeous and elegant tablescape or vignette for very little money.
For each table setting, I added a round bamboo charger on top of the drop cloth placemats that I created last year. The bamboo weave gives nice texture and contrast to the neutral colored plates and placemats. I then added my everyday cream with black line rimmed dinner plates (a wedding gift from Crate and Barrel) and a buttercup-colored napkin (from Target) threaded through a festive bell ring. The seasonal bell ring was a great find from Dollar General. I don’t think they are actually napkin rings, but who cares – they work perfectly!
To add alittle more pizazz to the table, I draped a long strand of red Christmas bead garland around the perimeter of the pallet box. The bright hue was a perfect accent to the red bells on the napkins and the berries in the centerpiece.
A few loose Christmas ornaments completed the festive look.
Inviting and fun!
I’m really happy with the result of this tablescape. And the best part is that it’s practical because the main decor is in a box, which can easily move. I plan on using this newly created tray centerpiece for many upcoming Holidays and occasions – I’m thinking Easter baskets, Spring decor, and Fall foilage.
Were you wondering where I put my log centerpiece this year? Well it’s not here on the table (like last year) and it’s not on the mantel either, but instead I decided to use it as the backdrop for our village. The log centerpiece made for an AMAZING focal point, but wasn’t so easy to move = not practical. Since the buffet gets left alone, it was the perfect spot to admire it. That log centerpiece has been around the block and back, so it couldn’t be stuck away.
I love our little miniature village… and so do my kids. Each night, they drag over the stool and love to peak inside. It’s magical.
It would be nice to have each of you enjoy a delicious meal with me here at my table, but at least we can dream, right?!
I hope you’ve liked taking a glimpse at my tablescape for this Christmas – especially since it cost so little to create. Dollar General really had some great deals and you connect with them even more to see what they have to offer on the Dollar General Facebook Page. I sure have enjoyed sharing my tablescape with you!
I hope you had a wonderful Thanksgiving weekend and stuffed your tummies full of turkey and mashed potatoes (with butter of course) – my personal favorite. We traveled and enjoyed the Holiday very much, but the only bummer about not hosting was the lack of leftovers. Anyway, let’s get on to something fun…
I’m super excited for today because I have so much to share with you! I’ve been busy preparing for the Christmas season (yes, already – I know for some it’s early), but wanted to let Thanksgiving pass before bombarding you with all my Christmas inspiration. Now that the Holiday season countdown has begun, brace yourself for a fun few weeks ahead with DIY creations and decorating ideas and tips!
Now that Thanksgiving is over, the first Christmas cards started trickling in over the weekend and since my December Lowe’s Challenge was to create something for the upcoming Holiday season, a new Christmas Card Holder seemed so apropos.
This card holder is one of my favorite projects I’ve ever made. I got the idea when creating the family pallet photo holder a few weeks ago. At the time, I mentioned how I felt the photo holder was so versatile and didn’t have to just hold family photos, but also christmas cards during the holidays, as well as invitations, announcements, etc anytime of year. Thus my Christmas Card Holder was created…
I started off my hitting the lumber and paint aisles of my local Lowe’s and picked up a few must-have items:
6′ long X 12″ wide wood board
clothes pins (30 – 35)
spray paint (I chose Valspar Glossy Cut Ruby)
stencil (purchased at AC Moore / a silhouette would work too)
white paint & stain (for the distressing)
paint for the letter (I chose metallic gold)
I began by…
1.Distressing the Wood
I was going for a worn look and wanted the wood to look old and distressed, so I banged-it-up a bit and layered it with a combo of paint and stain.
I began by using nails, chain, and a hammer to bang up the surface to make it “used and abused”. This is a great way to get out some of that pent-up aggression – hehe.
Once I achieved the desired “wear”, I added one coat of white paint. I used a semi-gloss finish paint that I had laying around, but any kind will do. Once dry, I sanded the wood thoroughly so some areas of the raw wood showed through and the surface was smooth. I added a light coat of stain focusing more on the edges and ends. I applied it in small sections and quickly wiped it away so only a thin layered remained. Then I added another coat of white paint and sanded the surface once more. This layering process resulted in just the right amount of wear.
Old to New in 30 minutes!
2. Stencil
I found a pretty stencil at AC Moore which I got for about $3+ (using a 50% off coupon). The letters are 3″ high and the words CHRISTMAS BLESSINGS fit just right on the 6′ board.
3.Paint
Once I outlined the stenciled letters with a pencil, I filled them in with a nice metallic gold craft paint. At first, I was going to use red or green for the letters, but I am so glad I chose gold – I’m loving the hue, especially with the other goldtones in my other holiday decor.
4. Adding the Clothespins
While the letters were drying, I spray painted the clothes pins with Valspar Glossy Cut Ruby. Once they were ready, I attached them to the wood board with hot glue. The spacing between each clothespin is about 5-6″ and there are 16 on each side.
And it’s done…
I’ll admit, the Christmas cards are from last year – I haven’t received that many yet. I always keep my cards and then use them the next year as tags for presents, so that’s what these will be used for in a few short weeks.
My new card holder is such a unique and fun addition to our Christmas decor. I have it situated right next to the Christmas tree so we can enjoy the treasures that are sent from family and friends – true Christmas Blessings!
If you’re looking for more ideas on how to display Christmas Cards, check out the roundup I did last year, by clicking on the link: 15 Creative Ways to Display Christmas Cards.
And I created another card holder last year if you want to see that as well. I love this one too, but with all the cards we receive, it ended up not being large enough. This new one though, has lots of room! Click to see: Holiday Card Holder.
I’m still working on putting the finishing touches on the rest of the house, and hope to share a Christmas Tour next week. In the meantime, I’ll be showing you a few more DIY projects, as well as some easy and fun decorating ideas.
Have you decorated for the Holidays yet? How to you display your Christmas cards?
Disclosure: I am part of the Lowe’s Creative Team and was provided with a Lowe’s gift card to purchase items for my project. I was also compensated for my time to use the products. No one told me what to create, what to buy, how to use the product, or what to write. All opinions are 100% mine!
Last week I was vying to create something for my front door to transition the time between now and Christmas.
I’ve had my Fall wreath up for a while and I was ready for a lil’ change. Then while driving over the weekend, I spotted a large wood star on an old, distressed barn. It got me thinking and inspired my latest creation… a Stick Star which I’m now donning on my apple green front door.
In the front of my home is a 20’+ weeping willow tree and it’s beautiful in the summer, but this time of year with all the wind, the soft, thin branches often easily break off leaving lots of piles. When cleaning up the yard on Sunday, we collected a bunch of branches and I knew they’d be perfect for the foundation of the stick star.
With my son helping out, we collected a good pile of branches and I started out making my new door decor. With my ruler in hand, I trimmed the soft branch to 30″ long. And cut 49 more to have a total of 50.
The branches didn’t have to be exactly 30″, but close to it. After 50 were cut, then I broke them into 5 groups of 10. The 5 groups were used for each “leg” of the star.
This was a dry run and I was pretty happy with the direction it was looking. Surprisingly it actually looked like a star, ha!
It was time to put it together!
I disassembled the star mock-up and separated each star “leg”. Using floral wire (or any thin wire would do), I tied each end of the stick grouping so it was secure and “one”.
Once each “leg” was secure on each end, I put them together to create the star. Once the star was layed out, I secured them together with more floral wire.
Since the floral wire is close to the color of the sticks, it really isn’t visible unless you are close to the arrangement.
And honestly within about 10 minutes, it was done. It was really simple to create and something different than I’ve ever created before. And I have to say, once the sticks are together in a bunch, they are really secure as “one”.
It still needed something though, so I trimmed a few branches and berries from my yard and tucked them within the branches.
This pretty and easy to create stick star can be used all year round and dressed up for any occasion. It can be used on a door (like I used it for), indoors, or outdoors.
For my stick star door decor, I cut a 3″ strip of burlap, attached it with floral wire to the back of the branches and secured the top onto the head of the door with push pins. There’s no damage to the door and it can easily be switched out.
And here is the result…
My stick star was super simple to create and didn’t cost a penny! The perfect door decor for the coming Holidays or any time of year. I just love simple, just stylish creations!
I’ve shared my ideas and thoughts on how to create a well styled bookcase and today I’m back sharing simple, affordable, and stylish tips on how to create a beautiful table vignette (or any horizontal surface – could be a dresser, buffet, window sill, etc). I just love the word vignette – it sounds so she-she and regal – but getting down to basics, it simply means a pulled together and balanced composition (that’s my meaning, not Webster’s, so please don’t head to your dictionary and quote me- hehe).
A well-styled table vignette is the perfect way to add warmth, interest, and unique character to your home. Inexpensive elements can easily be introduced to create a beautiful and balance composition. It’s really not about the value of the items you display (I have things that have cost mere pennies) , but instead how it’s put together!
Let’s get inspired (and dissect)…
To start off, this vignette atop an antique dresser is fun because of the variety of color. I like color, but that’s my opinion. Color isn’t always needed to achieve a well-styled vignette, but I would suggest adding in a splash here or there – a small dose is better than nothing. This composition works so well because of the layers, as well as varying heights and sized objects – 3 key elements to achieving a stylish vignette. The overall setting is engaging and interesting because of the different textures and unique objects. Vignette via House and Home
Tip 1. Once you’ve chosen your perfect horizontal table to create a vignette, clear everything off. When decorating ANYTHING, it’s a must to start with a blank slate. It’s not only easy to add elements and move them around, but also to see the space in a different way – believe me, it works! I start every revamp (a room or a vignette) by clearing out and then bringing elements in.
Basically a beautiful vignette can be created on any horizontal surface, even a nightstand. Don’t you just love this space? I sure do! In this vignette there is a little pop of color and it goes a long way. It’s nice to make a nightstand look pretty, but I come from the school of thought that it also has to be functional. Meshing the two isn’t difficult. One favorite way is to use a decorative or antique bowl for holding jewelry, which can be layered on top of the book(s) you’re reading. Of course you need lighting – again the lamp is not only functional, but also adds height to the table. Additionally, flowers bring a touch of freshness to a simple vignette. Inspirational Vignette found via Cape Code Collegiate
If you’ve noticed, there is a common theme with each of the three above pictures, and it’s my 3 key elements again – layers, varying heights, and varying sized objects. Instead of a lamp in this vignette, this space has a tall plant filled urn with layered black and white framed photos behind. In front is a nice-sized tray filled with colorful boxes (there is the pop of color again), with more interesting objects of varying sizes and heights to the right.
Tip 2.Choose an anchor: Starting with and positioning an anchor object is the ideal way to begin a vignette. What’s an anchor object? A lamp, floral arrangement, sculpture, etc – basically the dominate piece in the vignette. It’s the focal point of the horizontal surface and brings height to the overall composition.
Tip 3.Layer: Add elements – pictures, artwork, accessories – from the back to the front of the horizontal surface. If there is a wall behind, have something large (picture, photo, mirror) on the wall or a smaller grouping, then layer objects in front on the surface. Again start with the anchor object and layer around. Ideas: Position small pictures in front of large ones. Add a small bowl, vase, or accessory on top of a stack of books. Create a grouping of candles layered in front of each other.
A simple and elegant side table next to the bed. Again the lamp is the dominate feature in this vignette with layered pictures leaning against the wall. Books are layed on their side with a small flower arrangement atop. This table isn’t overloaded with “stuff” (what nightstand should be?), but all the elements are here to create a well-styled table vignette. Vignette via Traditional Home
Love this entryway by my friend, Pamela. It has all the elements to create a complete composition. She started with her large mirror behind, then added a beautiful tall lamp in front to anchor the vignette. Continuing, she introduced inexpensive elements of varying heights and layered them on the top of the table, as well as on the shelf underneath.
A little bit different type of vignette, but still using the same techniques. The large bowl filled with rope is such a strong element in this vignette and is nicely balanced with 2 other elements – a smaller rope filled glass jar and an interesting sea creature (do you know what that is? looks kinda like a porcupine). This grouping has awesome texture and would be simple and inexpensive to create! Vignette found via Pinterest (original source unfound)
Tip 4. Varying Heights and Sizes: Accessories and elements used in a vignette shouldn’t be all the same height and size – that would just look strange. Play with the idea of introducing objects where some are smaller, some are larger, some are thin and tall, some are short and stout. This will allow the layering to be more obvious and easy to create.
Just as you were probably getting comfortable with the idea of 1 major object, layer, and size variation, I throw you a curve-ball.
This table vignette has 2 major focal objects. But it works because they’re the same. If you had one lamp and one large vase on the other said that would have been dominance overload, but this nautical composition works. Also because of the intense main objects, the center accessories are minimal which gives a nice balance. Vignette Inspiration found via Brunch at Saks
Tip 5. Mix it up: Introduce different kinds of interesting elements / objects. Display a mixture of books, accessories, collectibles, DIY creations, and photos.
Tip 6. Display in odds: For some reason, designing in odd numbers (3 or 5 work best) makes better sense than even numbers. Plus you can create a great layered composition with 3 rather than 2.
Tip 7.Affordable Vignettes: Creating a well-styled vignette doesn’t have to be expensive. Honestly it could cost you nothing depending on what you already have on hand. I’m always changing and revamping my vignettes by “shopping my home”. I move objects and accessories from table to table and purchase new pieces when I see something eye-catching and/or on sale. I rarely go to a store specifically to find something. 9 out of 10 times, I see something I like, buy it, and somehow incorporate it now or in the future. Aside from shopping-your-home, Craigslist, thrift stores, estate sales, garage sales, and of course discount stores like Home Goods or TJs are great go-to hot spots.
Tip 8.Enjoy and trust yourself: Just go for it! Don’t hesitate and say you’ll do it later. Go for now and you’ll be so satisified once it’s done. Again, clear everything off to start fresh and new. Then start layering and moving things around. Trust yourself in knowing what you like. Use the images I provided to help you or find inspiration in magazines and pinterest of course. And if you need extra help, I can always be of assistance!
Creating a table vignette can be thought of as tricky or challenging for some, but once those anxieties are lost a beautiful display can be achieved – patience and practice helps too! Hopefully my tricks, tips, and ideas have helped you to create a well-styled table vignette.
If you’re interested in creating a well-styled bookcase, click to this post:
Just last week I finished up a really cute project for a client (which I was super close to keeping, but she was glad I didn’t) and I’m excited to share it with you today!
I’ve been making my way through the huge stash of pallets that I’ve had stored in the garage for quite some time. Pallets are great for projects like this when you’re looking for a distressed, worn result and want to spend little (or no) money. Most pallets, a.k.a. shipping crates, have already been used-and-abused, so they are easy to dismantle and start upcycling.
When finishing up the final details on this clients family room, I showed her this picture of a similar pallet project and her response was YES! And off I was creating this Pallet Picture Holder…
I started off by looking through my pallets (some were new and some had been picked through) to choose the 8 that looked best with each other.
Every pallet that I’ve taken apart (except one), has been constructed using twisted nails, and they are a BIG PAIN! A typical crowbar or hammer won’t be helpful here and so I always use a reciprocating saw. It’s a lifesaver! Actually during this project, my original reciprocating saw broke – what a bummer. Understandable though since I use it ALOT + it wasn’t top of the line (lesson learned: buy quality, buy once).
Anyway, once I took apart the pallet, I gathered the planks I needed (8 total which were about 40″ long) and then cut two pieces for the back that would hold the planks in position.
The overall size of this pallet picture holder is (about) 40″ x 28″.
Using finishing nails, I nailed two in each plank on each side into the back plank.
This was the result when done (from the back)…
I tell ya, this bad boy is heavy! I forgot to take a picture of the picture hanging wire I added to the back, but if you try something similar, make sure the hardware is for at least 100 lbs+. The last thing you’d want is this falling down. It doesn’t weigh 100 lbs, but it’s better to be safe than sorry!
This wall decor picture holder is going on a soon-to-be dark chocolate colored wall, so we (the client and I) decided that it’d look best to have the planks be lighter in color. To do this, I added a quick sweep of paint to the surface. The wood of the planks still show through underneath, giving it a rustic worn aesthetic.
This was the point where the pallet went from a blank canvas to a picture holder. And the simple way that happened was by adding clothes pins. Before that though, I gave them a little color. I used a slightly darker color taupe – Annie Sloan French Linen to be exact.
Once the clothes pins were dry, they were ready to be placed onto the pallet.
I wanted to give the option to use 4×6 or 5×7 sized pictures, and with the size of the pallet, I’d determined that 3 rows or 5 across would be the magical number.
Using a tape measure and starting off in the center, I marked where each clothes pin would be placed.
Once the positioning was just right, I added hot glue to the backs of the clothes pins and stuck them in place. They were good as gold!
The last step was personalizing it a bit and adding {our family}. My client is a photographer and huge picture-person, so this totally fit the bill!
And then to finish it all, I gave it a quick sanding with my orbital sander to distress the words and edges.
And the Pallet Picture Holder was complete!
It’s nice “naked”, but pictures make it pretty!
I also had a thought that this would make a great Holiday Card Holder too!
Many of us have a door in our home that leads to the garage. It’s a metal door and so it’s magnetized, leaving the perfect opportunity to jazz it up, bring color into the room, and display kids artwork, coupons, or much more.
I’m always looking for new nooks and crannies to organize and make life easier! The entrance door to the garage is a perfect spot because it’s the way many of us enter and exit our homes.
As I mentioned (and gave you a sneak peak on) the other day when sharing my new foyer floor, our foyer space is not only the entrance area, but also the spot where the powder room, laundry, coat closet, and pantry are located. Lots of functions in just one area and a place I spend alot of time in (mostly doing laundry!)
The door before was a blah white and with the old darker floor, it was a cavernous hallway. Once deciding to paint the door, I chose the same color as my front door – Valspar Olive Tree WV34010. I really love the cheerful apple green color and with all the other vibrant colors going on, adding another hue would be overload.
So here’s the before & after…
It’s amazing what a little paint can do! I started off by grabbing a small trial size container of Valspar paint at Lowe’s. Since the door has no texture, I used a foam roller to apply the paint. It took quite a few coats – about 5 in all.
Once it was finally done, the space already looked so different, but it still needed more.
I had seen this cute idea a while back and thought it would be fun to try it out on this door.
I wanted to make “sections” for the kids artwork, plus a spot for pictures, coupons, and/or school announcements and invitations. Using a ruler and pencil, I outlined the “sections”.
And then painted over the lines with chalkpaint in old white.
Okay, so after it was done, I wasn’t loving the result. I liked the look in the inspiration picture, but it wasn’t working with my white-against-green door. Onto idea #2.
Isn’t it truly incredible what a little paint can do?! Plus this is such a nice area to display some of the kids artwork, especially since the new refrigerator is stainless and non-magnetized.
Do you have a splash of color on your garage entry door? Do you hang anything on it?
I hope you had a nice weekend and if you’re in Sandy’s path, stay safe! We’ll see what she brings our way later today and tomorrow.
In the meantime, I spent much of last week working on my next Lowe’s Creative Team challenge. This month’s project was a “create anything” project and it was the perfect opportunity to redo the foyer floor. This project has been one that I’ve wanted to tackle since moving into our home. The difficulty always has been, how.
The entrance into our home is not only the foyer, but also the space that leads to the garage, our laundry room, pantry, coat closet, and powder room. As being the major entrance and exit path into the home + all these important spaces, I couldn’t grasp the idea of a long period of downtime for this area. With 2 kids and a busy schedule, it was mere impossible to not make this an easy 1 day project. So that’s where the how came in. How could it happen?
Well about a year ago, I learned about Groutable Luxury Vinyl Tile. This treasure has changed my life and saved a whole lotta headaches! I shared my first LVT project earlier this year when I redid my parents floor, and since have used it in many other spots like my bathroom and the kids.
When the time came to tackle this project, it was really the only product that would provide the desired look of ceramic tile (you would never know it’s vinyl) , plus the quick turnaround of starting and finishing in ONE DAY.
What’s incredible about this tile is that once it’s finished, it looks and feels EXACTLY like ceramic tile. You would never know it’s vinyl. Believe me, I would not use something that has a fake look!
My existing floor was in really good condition. None of the tiles were cracked or chipped, and the real reason for the new floor was to aesthetically update the space.
If you plan on tackling this project, it’s important to evaluate the condition of your existing floor. You may need to remove the existing floor or put down a leveler before installing the new floor. Chat with your local Lowe’s customer service peeps. My local guy was really helpful in directing me in the right direction.
To start off, I gathered my supplies for the tile installation part:
Triangle Ruler
X-acto Blade
Spacers ( I used 1/8 spacers)
A pencil
Snips
Cutting surface
There are various ways to start laying the tile. Most commonly, experts say to start the first tile in the center of the room, but for me I wanted a whole tile when you walk into the front door, so I started at that point. Since the room isn’t a perfect square, there really is no “center”.
Installing the tiles is really easy. Similar to regular peel-and-stick tiles (even though these luxury vinyl tiles are much thicker and more durable), you do just that…
Peel the backing off the corner edge (not the entire tile).
Using spacers, lay down the tile starting at the corner edge.
Once the tile is positioned in place, peel off the remainder of the paper backing.
For my foyer floor, I layed as many whole tiles first, then went back and tackled all the tiles that needed to be cut afterwards.
For the tiles that need to be cut, here’s how I tackled them…
Mark the cut with a pencil.
Use a triangle to draw a line and mark the cut.
Score the tile surface 2-3 times with an X-acto blade.
Gently snap the tile where it was scored.
For difficult, none straight cuts, here’s how I tackled them…
Sketch the design to be cut on the tile surface.
Cut out the design using an X-acto blade.
See if it fits and make needed adjustments.
Stick it down. It doesn’t need to be perfect because once it’s grouted, many imperfections aren’t obvious.
I put together a quick video (it’s pretty amateur, so don’t poke fun please) of how I cut the pieces if you need more know-how!
Ok, so once the tiles are set, you can move RIGHT ON TO GROUTING. That’s one of the beauties about groutable vinyl tile – there’s no downtime or waiting like with ceramic tile or natural stone.
To prep for grouting, it’s important to cover the areas where you don’t want grout. Basically that’s the base mouldings around the room. For this, I find it easiest and best to apply painters tape around the perimeter of the room.
Onto my favorite part because at this point, you’re more than halfway done 🙂
For the grouting steps, I gathered my supplies of:
Bowl of water
Tile sponge (one side has a sponge, the other side is abrasive)
Tile float
Luxury Vinyl Tile Grout
The tiling process for vinyl tile is exactly the same as if it were ceramic, but the grout itself is different. There is specially made pre-mixed grout specific for luxury vinyl tile. I used pre-mixed grout made by Precision Components which I found at Lowe’s in the same section as the groutable vinyl tiles. This premixed sanded acrylic grout has “good flexural strength and adhesion†and is recommended to use over traditional cement grouts.
*Don’t use sanded grout that you mix yourself!
I started applying the grout by the stairs, so I knew I could back out of the space without stepping on what I just grouted. Even though it’s okay to walk on the tiles, the grout does need time to set and dry. Once ready to apply the grout, I found it best to use a low angle and then a higher angle to wipe the excess away. Once the joint is filled with grout, you want to wipe as much away as possible so not to have huge clumps of grout left on the tile – it just makes more work to clean up.
Once you’ve got a section of about 3′ x 3′ covered in grout, use a damp sponge to wipe away the grout.
You can easily notice the areas that have been grouted and the areas that haven’t (yet).
Once the grout is completed, I took the tape off. It’s very important – and I’m only sharing this from a bad experience – to remove the tape when the grout is still somewhat wet otherwise once it’s hardened it’s near impossible (been there, done that).
Once the tape is off, the floor was done! YES. Major Project COMPLETE. This is a huge checkmark off my DIY list. Here’s the result…
This is the hallway that leads to the garage with the doors to the washer/dryer on the left and the doors to the coat closet/pantry on the right. I recently added a splash of color to this door and since it’s metal, it’s been a great place to display the kids artwork, coupons, etc. I’ll share more on that in a future post.
Do you see a little something sitting at the front door? That’s our new little 4 month old kitty. She’s so cute and she loves the new floor – hehe!
Groutable Vinyl Tile PROS and CONS
Affordable – Luxury Vinyl Tile runs about $1.00 – $2.00 sq. ft. and compared to ceramic or natural stone, it is very inexpensive. The tiles which I purchased from Lowe’s were $1.18 and the premixed grout (for my 200 sq. ft. space, I used 2 tubs) cost $8/each. Ceramic tile is available in a range of prices, but usually starts at $2 per sq. ft. , so the savings right there is 50%.
No Experience Required – And I’m completely being honest with you. It’s easy and if you’ve never tiled before, you can do it! I think a person with little experience can complete this project with ease. Measuring and cutting is really the most difficult part of the project, so take your time and measure correctly! Installing ceramic tile is not difficult, but it is tricky and experience is helpful. Cutting ceramic tile can often be difficult and time consuming. For prior ceramic tile projects, I’ve used tile snips, a tile cutter, and a wet saw. A wet saw is the best for cutting ceramic tile, but it’s not easy – I’ve made alot of mistakes. In my estimation, ceramic tile would take about double the time for installation compared to installing groutable vinyl tile.
Grout Right Away – Immediately after you install the groutable vinyl tiles, you can start the grouting process. This makes the entire process possible to complete in one day. With ceramic tile, after you finish laying it, you have to let the adhesive dry for 24 hours before grouting, which results in a 2+ day project, so essential ceramic tile takes double the time.
Availability and Selection – I purchased this groutable vinyl tile at Lowe’s, but other home improvement stores also offer similar products. The selection is not as vast as ceramic tile (which is a con), but I was surprised by the wide range of colors and textures.
One important part to mention is that the surface must be level underneath. If there is any flexibility in the subfloor, ie: gaps between the tiles and the subfloor, then the grout could crack and pull away from the tiles – this could happen with ceramic tile and LVT. Overall though, it’s a great product with an amazing result. As being a huge part of our home, this new floor sure brings a smile to my face!
Onto the giveaway, which is HUGE!
Now’s your chance to try this project in your home or something completely new and different. Lowe’s is generously giving one winner a $100 Gift Card to their store – how cool?!
This is the first giveaway that I’m using rafflecopter, so please email me if you’re having trouble – jburger.design@gmail.com (fingers crossed it works!).
Disclosure: I am part of the Lowe’s Creative Team and was provided with a Lowe’s gift card to purchase items for my project. I was also compensated for my time to use the products. No one told me what to create, what to buy, how to use the product, or what to write. All opinions are 100% mine!


 Is it pin-worthy?