
Month: April 2013

Craft Room: Progress Update 1

This morning, I mentioned that I was headed out early for a site visit to check on the progress of the mega craft room /office space that I’ve been working on for the last few months.  It’s a local project which I shared details about a few weeks ago and the transformation has been amazing.

In the last post about this project, the construction hadn’t even begun, but since then alot has happened, including:

  • Removal of the popcorn ceiling
  • Removal of old carpet and installation of new hardwood floor (in this room and throughout the entire house)
  • Removal of old window treatments
  • New recessed lighting / hi-hats
  • New painted walls
  • New crown moulding
  • And last, but not least GORGEOUS NEW BUILT-INS!

Here are some progress pictures…

Craft Room: Progress of Client Project _ Designed by @Jenna_Burger

Still in progress, but better than before…

Creative and Inspiring Craft Room Mood Board by @Jenna_Burger, WWW.JENNABURGER.COM

Crazy that it’s the same space, right?

Here are some more teasers…

The turquoise backs are gorgeous and all those cubbies are going to give plenty of room for storage!

Wait until you see what is going on the sides of that awesome built-in. {Major Goodness}

Craft Room: Progress of Client Project _ Designed by @Jenna_Burger

This is a view from the craft studio into the office.  It used to be a small doorway, but now it’s a large opening that lets in a huge amount of light and gives a unified flow to the overall space.

Craft Room: Progress of Client Project _ Designed by @Jenna_Burger

More turquoise.  This is just the beginning of how fabulous this room is going to look…

Craft Room: Progress of Client Project _ Designed by @Jenna_Burger

And the bench.  A 6′ long X 30″ deep heavenly haven.  Don’t you want one of these for your home??  And the little book nook is adorbs!

Craft Room: Progress of Client Project _ Designed by @Jenna_Burger

Last but not least, a few of the details.

Like the chandelier…

Craft Room: Progress of Client Project _ Designed by @Jenna_BurgerDoes it get better?!

And this darling fuschia C-table.  How can you not love it.  The fabulous contractor that I’m working with built-in using these Ana White plans. I so want one for myself!

Craft Room: Progress of Client Project _ Designed by @Jenna_Burger

More updates to come soon!

Powder Room Remodel – Phase 1: Removing the Existing Toilet and Pedestal Sink

My feet are sore and my fingers have a few blisters, but it’s well worth the pain for how much work around the house was accomplished this past weekend.  It was the first days of really nice weather and aside from a baseball game and a birthday celebration, much of the weekend was spent cleaning out the garage, sprucing up the exterior, and starting the powder room remodel.

I shared details of my plans for the powder room a few weeks ago and was thrilled to finally get started. To begin the process the old had to come out before the new goes in, so the Mister and I got our tools out and got to work on removing the existing toilet and pedestal sink. I actually didn’t know the process of how to remove either plumbing fixture, but thankfully the Mister has done this before and helped me out – of course with a few bumps along the way – can’t be a DIY project without…

Powder Room Remodel- Phase 1: Tutorial on how to remove an existing toilet and pedestal sink. It's not as difficult as it may seem. Pin NOW, check out later. @Jenna_Burger, WWW.JENNABURGER.COM #powderroomremodel

Do you know where and how to start the process of removing a toilet and sink?  If not, this post is for you! Keep on reading, but I’ll worn you, this tutorial is ultra detailed, but the pictures aren’t pretty.

Removing an existing toilet.

1. Turn off the water supply.  The oval valve at the side or back of the toilet is the water supply.  Using a vice grip or adjustable wrench, turn the valve so you turn off the water.  Then flush the toilet a few times to empty the tank.  Using old rags, put them in the tank and/or bowl to soak up any left over water.  It’s best to use gloves during the process as the toilet bowl isn’t a pretty place.

Powder Room Remodel- Phase 1: Tutorial on how to remove an existing toilet and pedestal sink. It's not as difficult as it may seem. Pin NOW, check out later. @Jenna_Burger, WWW.JENNABURGER.COM #powderroomremodelYup, that’s a closeup of my toilet… Not something you probably expected to see on a Monday mornin’

2. Remove the tank bolts. Remove the (2) plastic caps on each side of the toilet base.  Once exposed, you will see the tank bolts, also sometimes referred to as “Johnny Bolts”.  Remove the nut, which is easiest to do using a vice grip or adjustable wrench, and the bolt will be exposed.

Then carefully loosen the toilet, rocking it from side to side to loosen the wax seal, and lift it up. Residual water may spill, but that’s fine.

 Powder Room Remodel- Phase 1: Tutorial on how to remove an existing toilet and pedestal sink. It's not as difficult as it may seem. Pin NOW, check out later. @Jenna_Burger, WWW.JENNABURGER.COM #powderroomremodel

I warned you this post wasn’t pretty, BUT it sure will be helpful when you want to upgrade that sad looking toilet.  There surely isn’t a need to hire a plumber because you CAN do it yourself.

Powder Room Remodel- Phase 1: Tutorial on how to remove an existing toilet and pedestal sink. It's not as difficult as it may seem. Pin NOW, check out later. @Jenna_Burger, WWW.JENNABURGER.COM #powderroomremodel

3. Remove the old wax. Once the toilet is lifted, the existing wax will need to be removed.  Using a putty knife, scrape away the wax from the pipe flange. It’s definitely important to use gloves too (of course we didn’t, but I suggest you do).

Powder Room Remodel- Phase 1: Tutorial on how to remove an existing toilet and pedestal sink. It's not as difficult as it may seem. Pin NOW, check out later. @Jenna_Burger, WWW.JENNABURGER.COM #powderroomremodel

We also removed the tank bolts and plan on replacing them when we install the new toilet.

Here is the hole, free and clear of wax.

Pretty sight, right?

NOT! But at least you now know it’s not that difficult of a process.

Powder Room Remodel- Phase 1: Tutorial on how to remove an existing toilet and pedestal sink. It's not as difficult as it may seem. Pin NOW, check out later. @Jenna_Burger, WWW.JENNABURGER.COM #powderroomremodel

If there is a time lapse between removing and installing a new toilet, it is very important to plug the drain opening with a rag to prevent sewer gases leaking into your home.

Removing an existing pedestal sink.

Toilets are toilets, and are fairly similar, but there are a range of sink configurations, so I’m sharing the details of my situation, but yours may be different.

The process of removing our pedestal sink was tricky because we could not get our hand in the back to turn off the water supply.  After years of wear, the valve had rusted making it very difficult to turn off.  So what did we do?  We broke the sink.  Not what we anticipated doing, but it had to be done.

Powder Room Remodel- Phase 1: Tutorial on how to remove an existing toilet and pedestal sink. It's not as difficult as it may seem. Pin NOW, check out later. @Jenna_Burger, WWW.JENNABURGER.COM #powderroomremodel

After that we…

1. Turn off the water supply. Just like the toilet, turn the oval valve at the back of the sink so the water is shut off.  Remove the nut from the water supply.  Then put a bucket under the drain trap to collect any residual water, and loosen the nut to remove the trap.

Powder Room Remodel- Phase 1: Tutorial on how to remove an existing toilet and pedestal sink. It's not as difficult as it may seem. Pin NOW, check out later. @Jenna_Burger, WWW.JENNABURGER.COM #powderroomremodel

Disconnect any additional plumbing connections and remove the sink.  For us, we had to unscrew the sink bowl section of the pedestal from the wall and then remove the tile backsplash I added a few years ago.  New sheetrock will need to be installed before anything else.

Powder Room Remodel- Phase 1: Tutorial on how to remove an existing toilet and pedestal sink. It's not as difficult as it may seem. Pin NOW, check out later. @Jenna_Burger, WWW.JENNABURGER.COM #powderroomremodel

And this is the result…

Powder Room Remodel- Phase 1: Tutorial on how to remove an existing toilet and pedestal sink. It's not as difficult as it may seem. Pin NOW, check out later. @Jenna_Burger, WWW.JENNABURGER.COM #powderroomremodel

Powder Room Remodel- Phase 1: Tutorial on how to remove an existing toilet and pedestal sink. It's not as difficult as it may seem. Pin NOW, check out later. @Jenna_Burger, WWW.JENNABURGER.COM #powderroomremodel

The entire room will look pretty in no time…

Powder Room Makeover Phase 1: Tutorial on how to remove an existing toilet and pedestal sink. It's not as difficult as it may seem. Pin NOW, check out later. @Jenna_Burger, WWW.JENNABURGER.COM #powderroomremodel

Plan of Action for #powderroomremodel:

  • Choose and buy sink
  • Choose and buy toilet
  • Choose and buy faucet
  • Remove sink
  • Remove toilet
  • Repair hole with new sheetrock
  • Repair floor @ sink and toilet
  • Hang wallpaper
  • Paint
  • Add crown moulding (yes, my 1st moulding ever)
  • Assemble sink
  • Install sink and faucet
  • Install toilet
  • Accessorize – mirror, pictures, etc.

That’s quite a list for a little space…

Please tell me you’ve found this post helpful.  The Mister thought I was kinda insane for taking pictures of a toilet, one of the ickiest parts of the home.  I know it’s not the prettiest post ever, but who knows when it’ll come in handy.

Before you read this post did you know the details on how to remove a toilet or sink?  Not to difficult, right?!

Happy Monday to ya!

DIY: Vertical Pallet Garden

The warmer weather has got me movin’ and groovin’ outdoors.  This past weekend I got my DIY mojo on for this months Lowe’s challenge and created (what I think) is something pretty cool.  Check out my newly created Vertical Pallet Garden using colorful pots…

DIY: Vertical Pallet Garden by @Jenna_Burger, WWW.JENNABURGER.COM

Though the flowers are finally starting to peak through around the yard, I was in need of color NOW to start decorating my front porch for Spring.  I, of course, hit up my local Lowe’s garden center to get my color fix.  It’s still the early days of Spring, so the selection (at my local Lowe’s in NY) was limited, but I was able to find a few perennials for shaded areas that would be ideal for under the front covered porch.  I chose a few colorful perennials & vines because they could easily be transplanted to the garden at the end of the season (smart & savvy thinking).

Pallets have been all-the-rage for a while, but I just don’t get tired of them – probably because they’re free.  I’ve created so many DIY projects with pallets and I just love their old, worn texture and aesthetic.  When thinking about this seasons porch, my major desire was to add height.  Height = drama, and that was my goal. 

DIY: Vertical Pallet Garden by @Jenna_Burger, WWW.JENNABURGER.COM

For this project, the materials I used were:

  • Pallet (which I snagged – with their permission of course – for free in the back on my local Lowe’s)
  • (4) Eye hooks for 100 lbs+
  • 3′ of metal chain
  • Plastic pots (I used lime green and turquoise from Lowe’s)
  • Drill with 1/4″ drill bit
  • 3″ S hooks (found in the outdoor section of Lowe’s)
  • Vise Grip

DIY: Vertical Pallet Garden by @Jenna_Burger, WWW.JENNABURGER.COM

Here’s the DL (downlow for short) on how I created the Vertical Pallet Garden

1. At the top of the pallet (slats oriented horizontally), screw in (1) eye hook at about 2-3″ in from each end. It’s best to start out by using a large nail to start the hole.  Once the hole is started, screw in the eye hooks with the help of a vise grip to get leverage.  Unless you’re the Hulk, it’ll probably be impossible with just your bare hands.

2. With the Misters help, we then unlinked one of the chain links and linked it through the eye hook. (one side only – the other side has to wait until hung)

DIY: Vertical Pallet Garden by @Jenna_Burger, WWW.JENNABURGER.COM

3. Heading over to the house, we installed the eye hooks (using a drill to start the hole) through the siding and into the house about 2″ below the ceiling plane at the same distance apart as the hooks in the pallet.

DIY: Vertical Pallet Garden by @Jenna_Burger, WWW.JENNABURGER.COM

4. Once the eye hooks were in, we took the loose end of the chain of the pallet, slipped it through the eye hooks, and secured the chain on the other side.

DIY: Vertical Pallet Garden by @Jenna_Burger, WWW.JENNABURGER.COM

The pallet base is complete!

DIY: Vertical Pallet Garden by @Jenna_Burger, WWW.JENNABURGER.COM

Then it was time to create the “garden”.

5. Using varying sized plastic pots in fun colors, drill a 1/4″ hole about 1″ down from the top rim. Using a 3″+/- S hook, slip it through the hole.

DIY: Vertical Pallet Garden by @Jenna_Burger, WWW.JENNABURGER.COM

6. Plant the pretty flowers…

DIY: Vertical Pallet Garden by @Jenna_Burger, WWW.JENNABURGER.COM

…And it was complete!

DIY: Vertical Pallet Garden by @Jenna_Burger, WWW.JENNABURGER.COM

DIY: Vertical Pallet Garden by @Jenna_Burger, WWW.JENNABURGER.COM

DIY: Vertical Pallet Garden by @Jenna_Burger, WWW.JENNABURGER.COM

The vertical pallet garden adds so much color to the front porch.

DIY: Vertical Pallet Garden by @Jenna_Burger, WWW.JENNABURGER.COM

S-hooks make it easy to move the flower pots around or bring them into the sun.

DIY: Vertical Pallet Garden by @Jenna_Burger, WWW.JENNABURGER.COM

A beautiful focal point for the porch.

DIY: Vertical Pallet Garden by @Jenna_Burger, WWW.JENNABURGER.COM

If you’re wondering about the pretty white wreath, that was a DIY project that was featured on Jen’s blog.  It was created for Valentine’s Day, but I took off the paint chip flowers and just hung the wreath plain and simple.  Who knows how I will transform it for another holiday or season to come.

DIY: Vertical Pallet Garden by @Jenna_Burger, WWW.JENNABURGER.COM

I’m still working on the rest of the porch since it’s still in need of more color and pizazz.  By late May, I hope to have that done and ready to share.  Right now we’re still getting alot of rain and most nights are still way too chilly to get my gardening-on.

DIY: Vertical Pallet Garden by @Jenna_Burger, WWW.JENNABURGER.COM

I couldn’t be more thrilled with the outcome of this fun and easy DIY project.  It’s brought gorgeous height and beautiful color to my Spring front porch.

To see more creations of mine using pallets, click on the links below:
How-To Make a Pallet Shelf
Monogrammed Pallet Chevron Tray
Pallet Picture Holder
Eclectic Family Gallery Wall

Disclosure: I am part of the Lowe’s Creative Team and was provided with a Lowe’s gift card to purchase items for my project.  I was also compensated for my time to use the products.  No one told me what to create, what to buy, how to use the product, or what to write.  All opinions are 100% mine!

DIY: Stenciled Shower Curtain using Drop Cloth

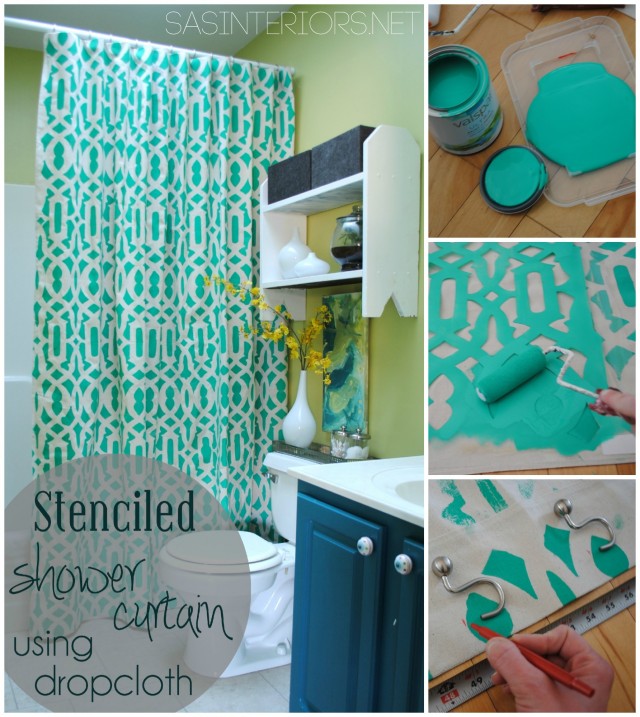
I hope you’re having a wonderful week so far.  Now that I’m coming off my amazing moment high and getting back into my DIY groove, I’m excited to show you the new stenciled shower curtain panel that I recently made for the kids bathroom.

You may have seen a sneak peak of the shower curtain a few weeks ago when I shared some Spring updates.  A few of you even commented saying you loved the color choice (I do too).

It’s bright.

It’s bold.

It’s an eye-catcher…

DIY: Stenciled Shower Curtain Using Drop Cloth Material - super simple & inexpensive to create! @Jenna_Burger, SASinteriors.net

…And I made it myself.  It was super easy, inexpensive, and something you can absolutely do too!

The materials I started off with were:

  • 6′ x 9′ Canvas drop cloth (from Lowe’s)
  • Stencil – I used the same design from Cutting Edge Stencils that I used in the foyer
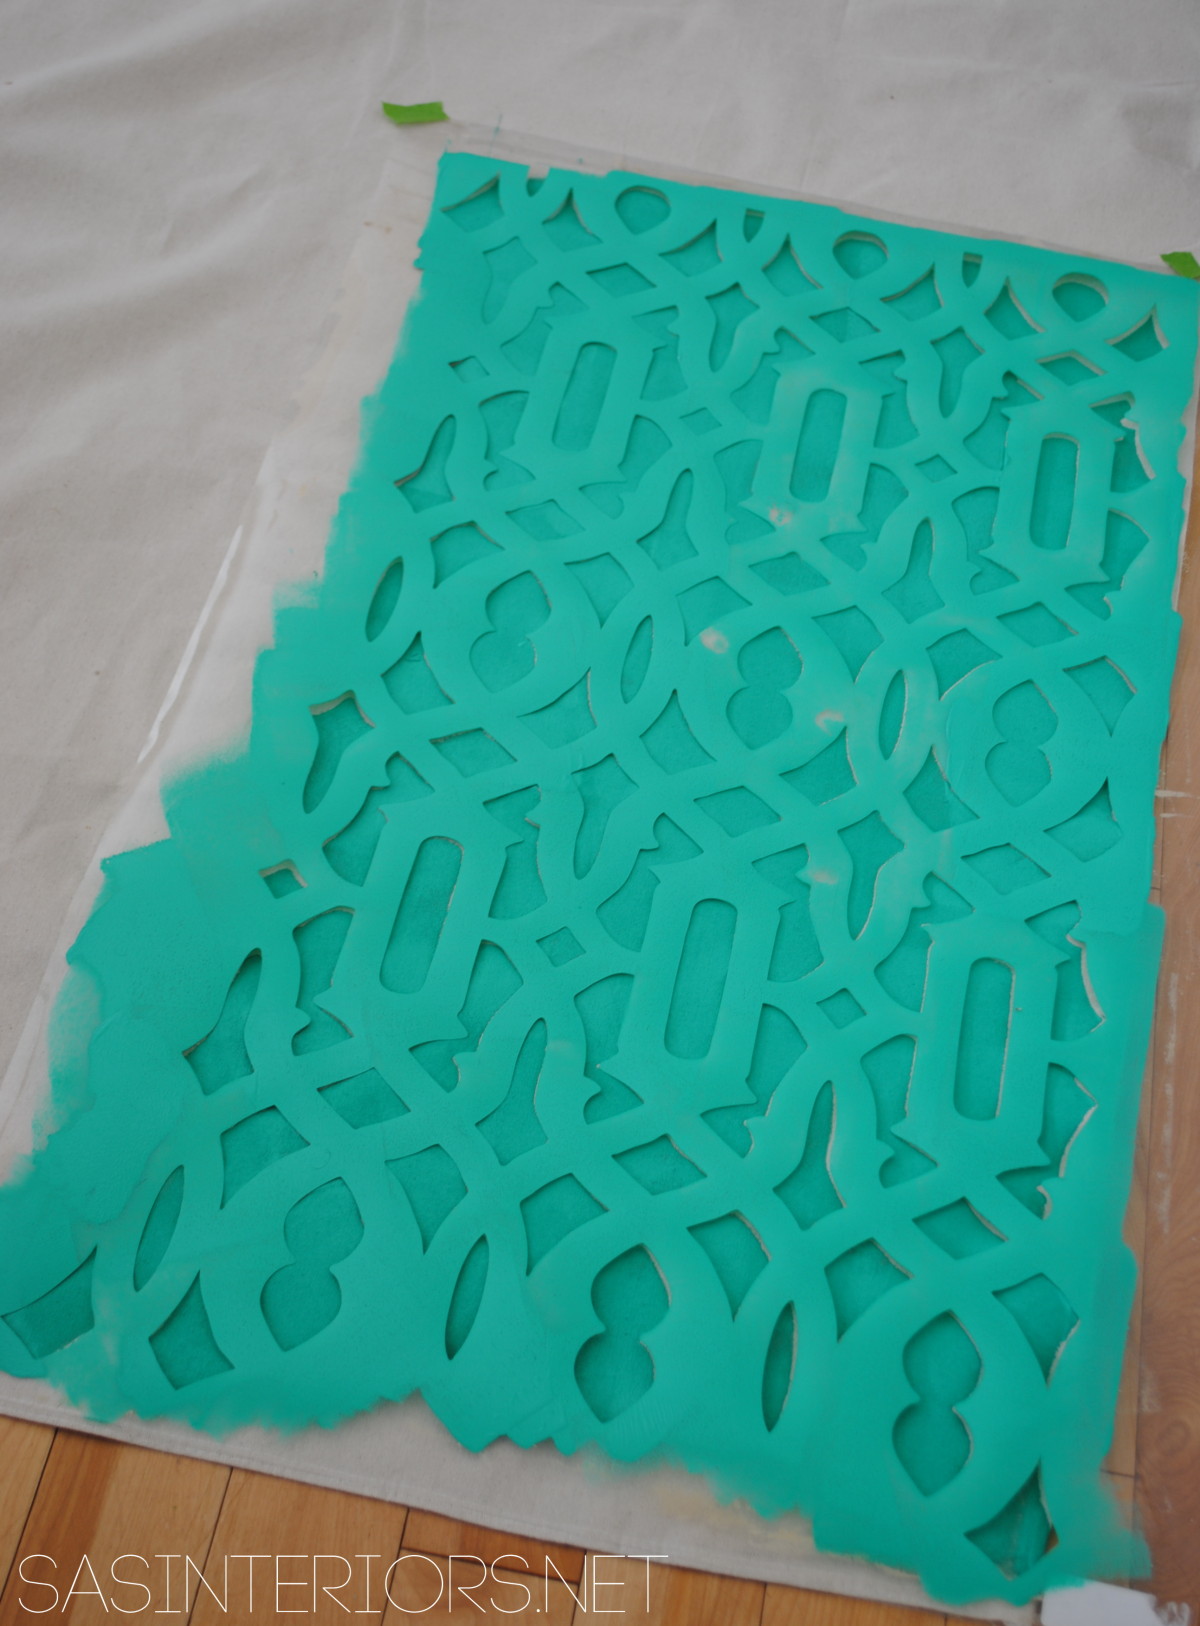
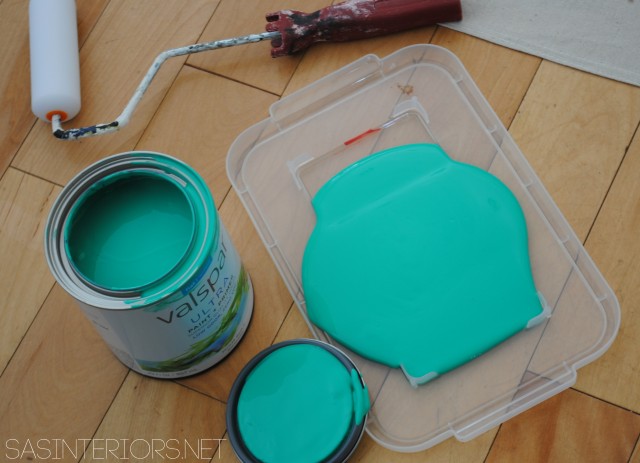
  • Paint – Valspar Pantone Emerald – #PN9055
  • Shower tension rod
  • Ball style shower curtain hooks
  • Foam roller
  • Tape measure
  • Scissors

Before I begin, here’s my beef with the typical store bought shower curtains… 

They’re too short.

Every shower curtain on the market is 72″ x 72″.  I like my shower curtains to sit just slightly above the floor, but then there is SO much space left above the curtain area, so it looks strange and you can see the showerhead.  You know how I feel about window panels being placed as high as they can go, well I feel the same with shower curtains.  When I redid my master bathroom, I ended up using two curtain panels to create a shower curtain.  It was an awesome solution! Since the panels were taller than a typical shower curtain, they heightened the space allowing the room to feel much larger.

That being said, this DIY drop cloth shower curtain is 7′ tall; much higher than the norm and there is only about 12″ from the top of the panel to the ceiling plane versus 24″+.

NOW, let’s begin.  Here’s how I made this dynamic shower curtain…

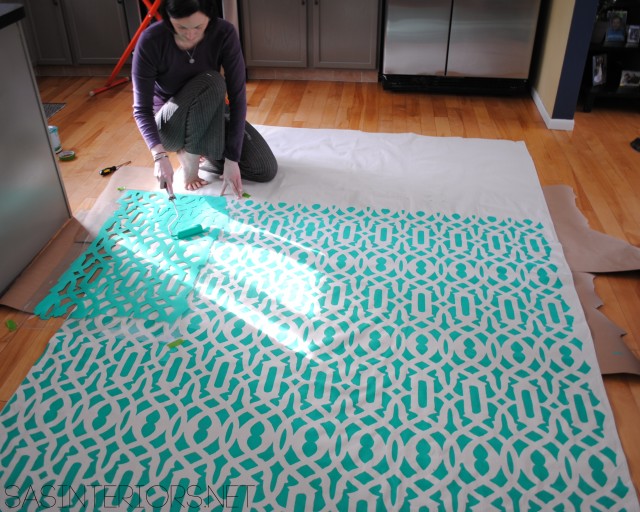
1. The canvas drop cloth size I found at Lowe’s was the perfect size (6′ x 9′), so there was essentially no trimming needed.  I started off by laying out the large panel on a flat surface – my kitchen /dining area is a large open space and is the ideal spot for big projects. 

I placed the stencil in the upper corner of the drop cloth and secured it with painters tape.

DIY: Stenciled Shower Curtain Using Drop Cloth Material - super simple & inexpensive to create! @Jenna_Burger, WWW.JENNABURGER.COM

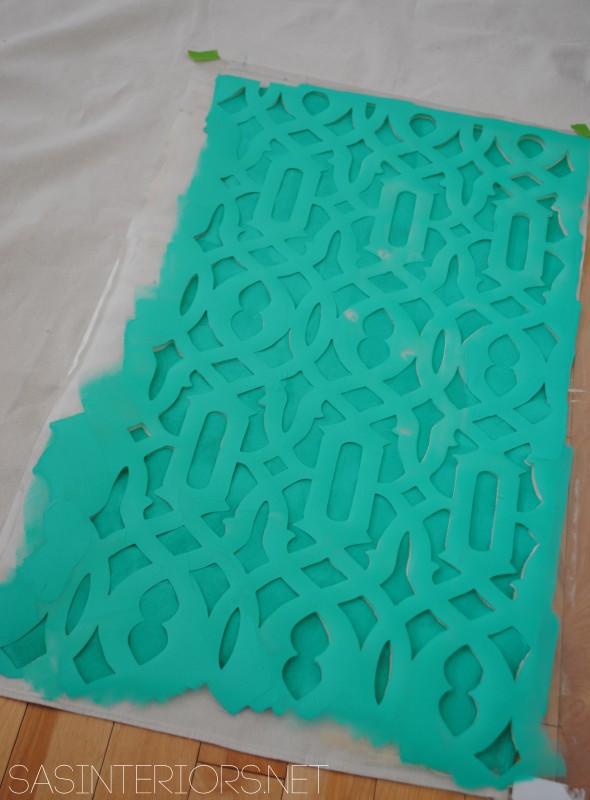
2. Using the vibrant Emerald color and a foam roller, I carefully rolled the color over the stencil putting enough pressure on the roller so the paint adhered to the fabric, but not too much so the paint seeped under the stencil.  Believe me, up close it’s not perfect.

DIY: Stenciled Shower Curtain Using Drop Cloth Material - super simple & inexpensive to create! @Jenna_Burger, WWW.JENNABURGER.COM

DIY: Stenciled Shower Curtain Using Drop Cloth Material - super simple & inexpensive to create! @Jenna_Burger, WWW.JENNABURGER.COM

3. Once the first section was done, I waited about 1-2 minutes and then carefully lifted the stencil and positioned it in the right place next to the previously painted area.  The Cutting Edge Stencils designs are awesome because they create each of the stencils so it easily matches up as you move it along your painting surface.

DIY: Stenciled Shower Curtain Using Drop Cloth Material - super simple & inexpensive to create! @Jenna_Burger, WWW.JENNABURGER.COM

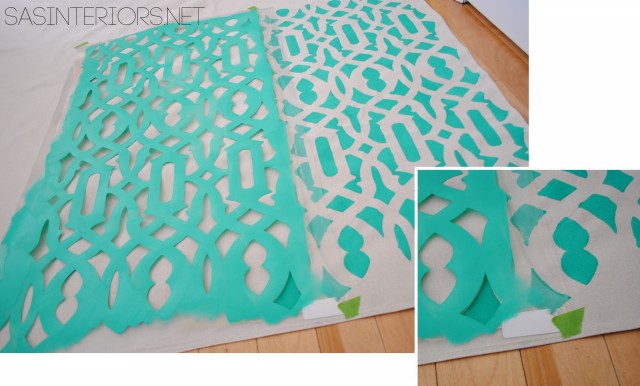
4. I worked my way across and down. And then…

DIY: Stenciled Shower Curtain Using Drop Cloth Material - super simple & inexpensive to create! @Jenna_Burger, WWW.JENNABURGER.COM

…realized I made a huge boo-boo!  At first, I didn’t put anything under the drop cloth and when I went to reposition it, I realized the paint seeped through.  UGH!  Thankfully it was still damp and the steamer took the paint right off.

Lesson Learned: Put something under your drop cloth before painting!
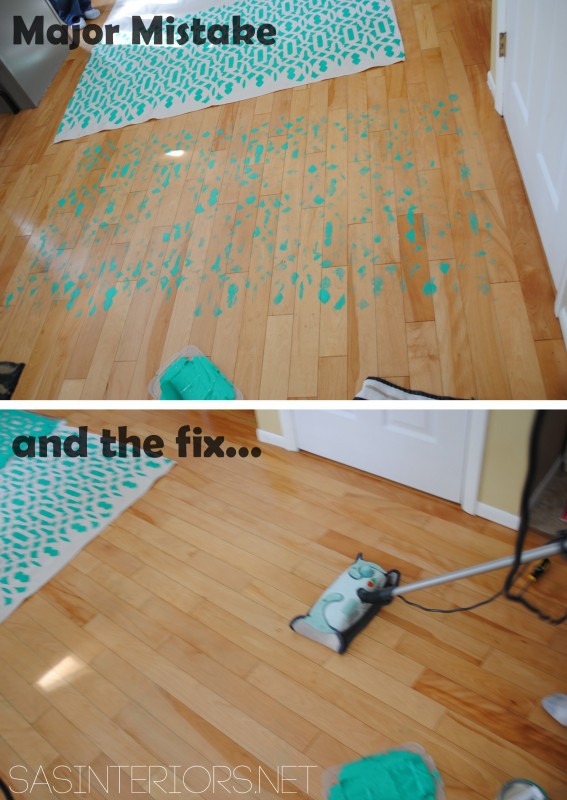
DIY: Stenciled Shower Curtain Using Drop Cloth Material - super simple & inexpensive to create! @Jenna_Burger, WWW.JENNABURGER.COMYou live and learn!

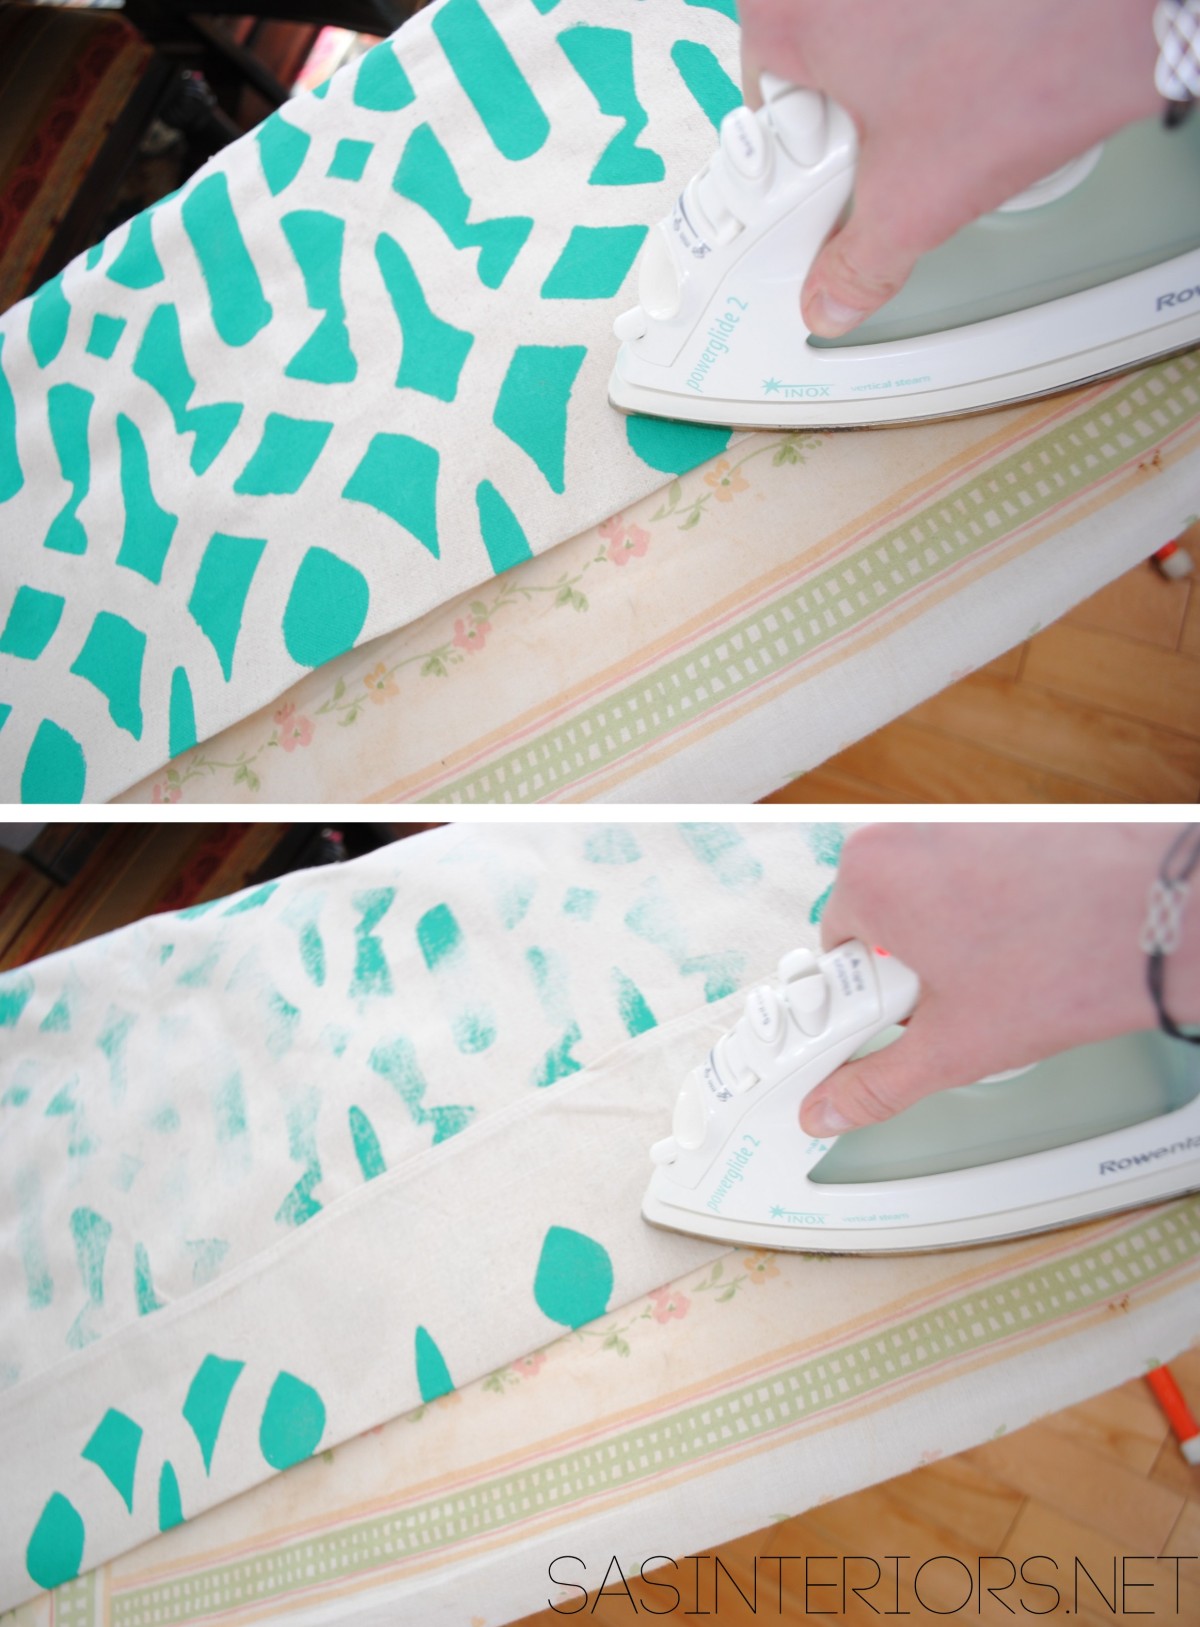
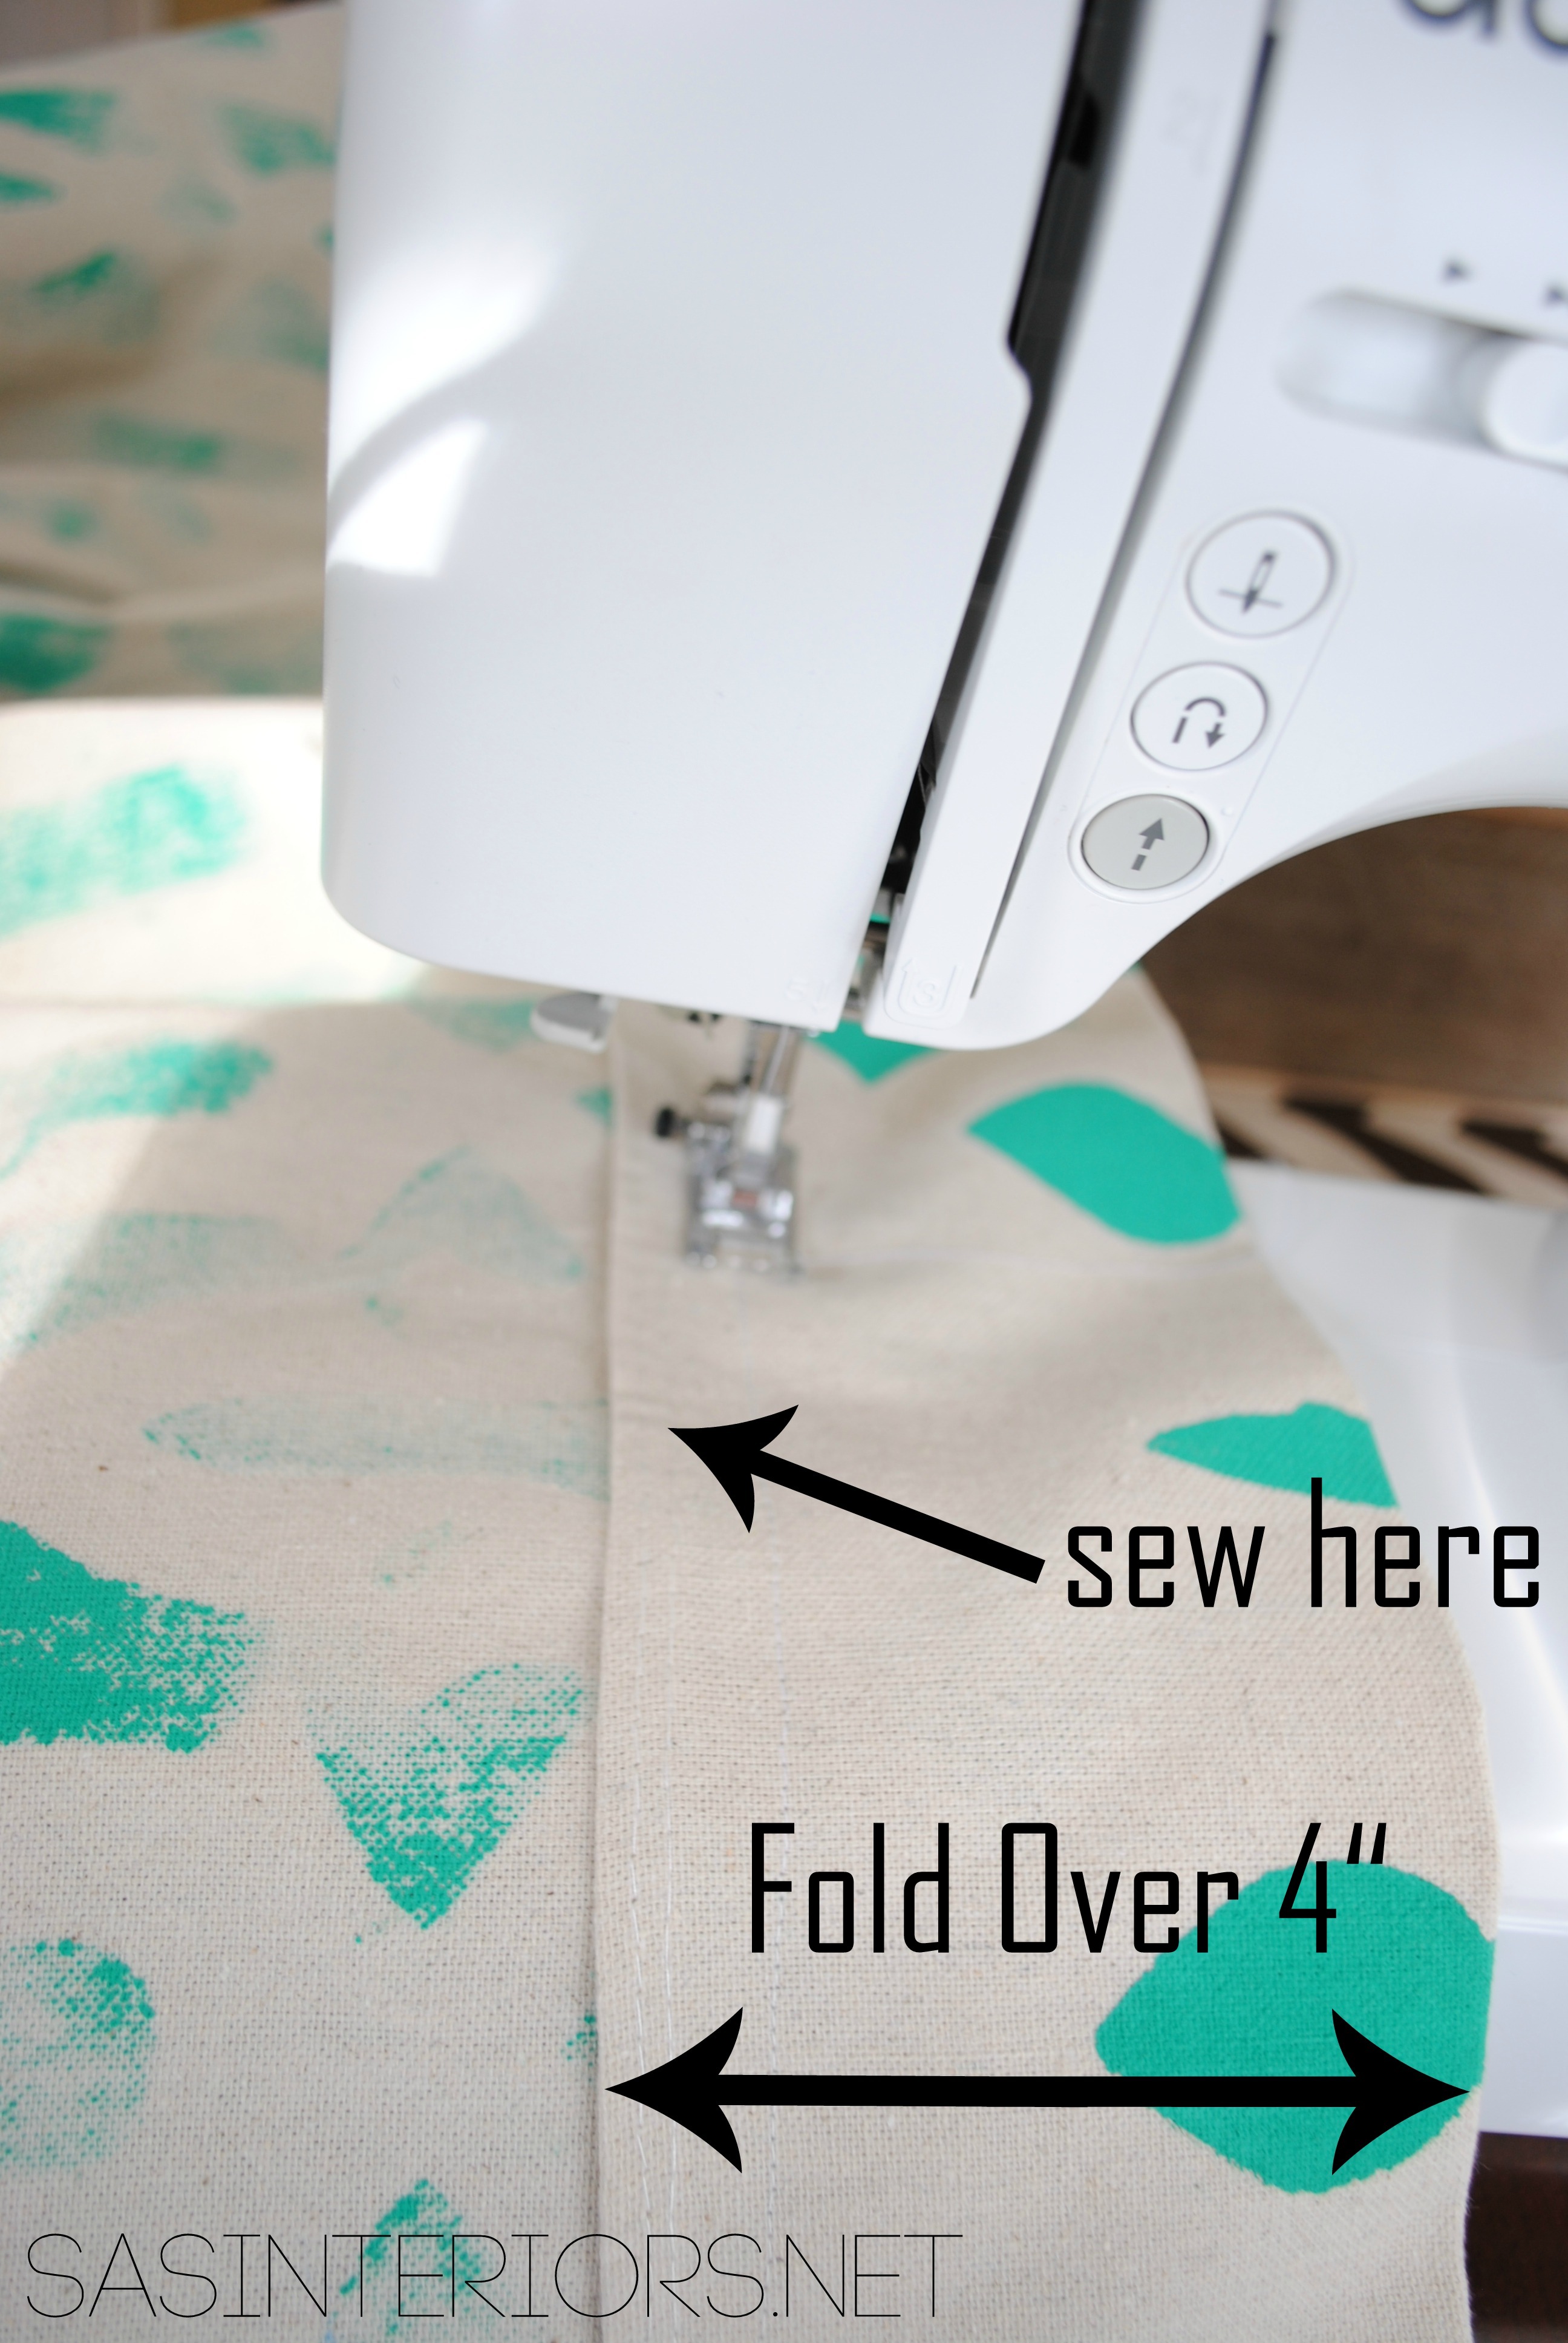
5. After the debacle, I was back on track!  Once all the stenciling was done, it was time to make the large panel into a shower curtain.   With the 6 end, I took the top edge and rolled it over about 4″ (alittle more or less is fine), and ironed a crease.  This edge will create the top part of the shower curtain.

DIY: Stenciled Shower Curtain Using Drop Cloth Material - super simple & inexpensive to create! @Jenna_Burger, WWW.JENNABURGER.COM

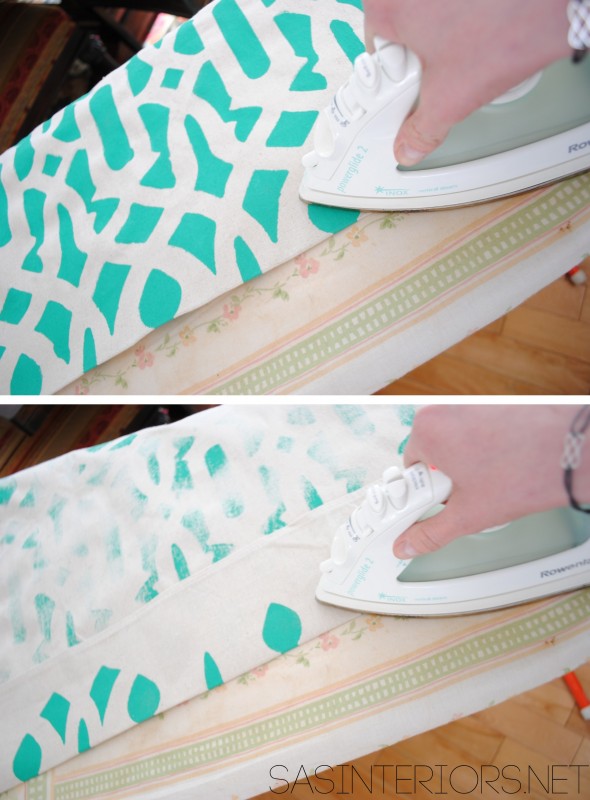
6. Once the crease was created, I took it over to the sewing machine and sewed the edge.  Take a look at the graphic for the specific spot to sew – this is important!

DIY: Stenciled Shower Curtain Using Drop Cloth Material - super simple & inexpensive to create! @Jenna_Burger, WWW.JENNABURGER.COM

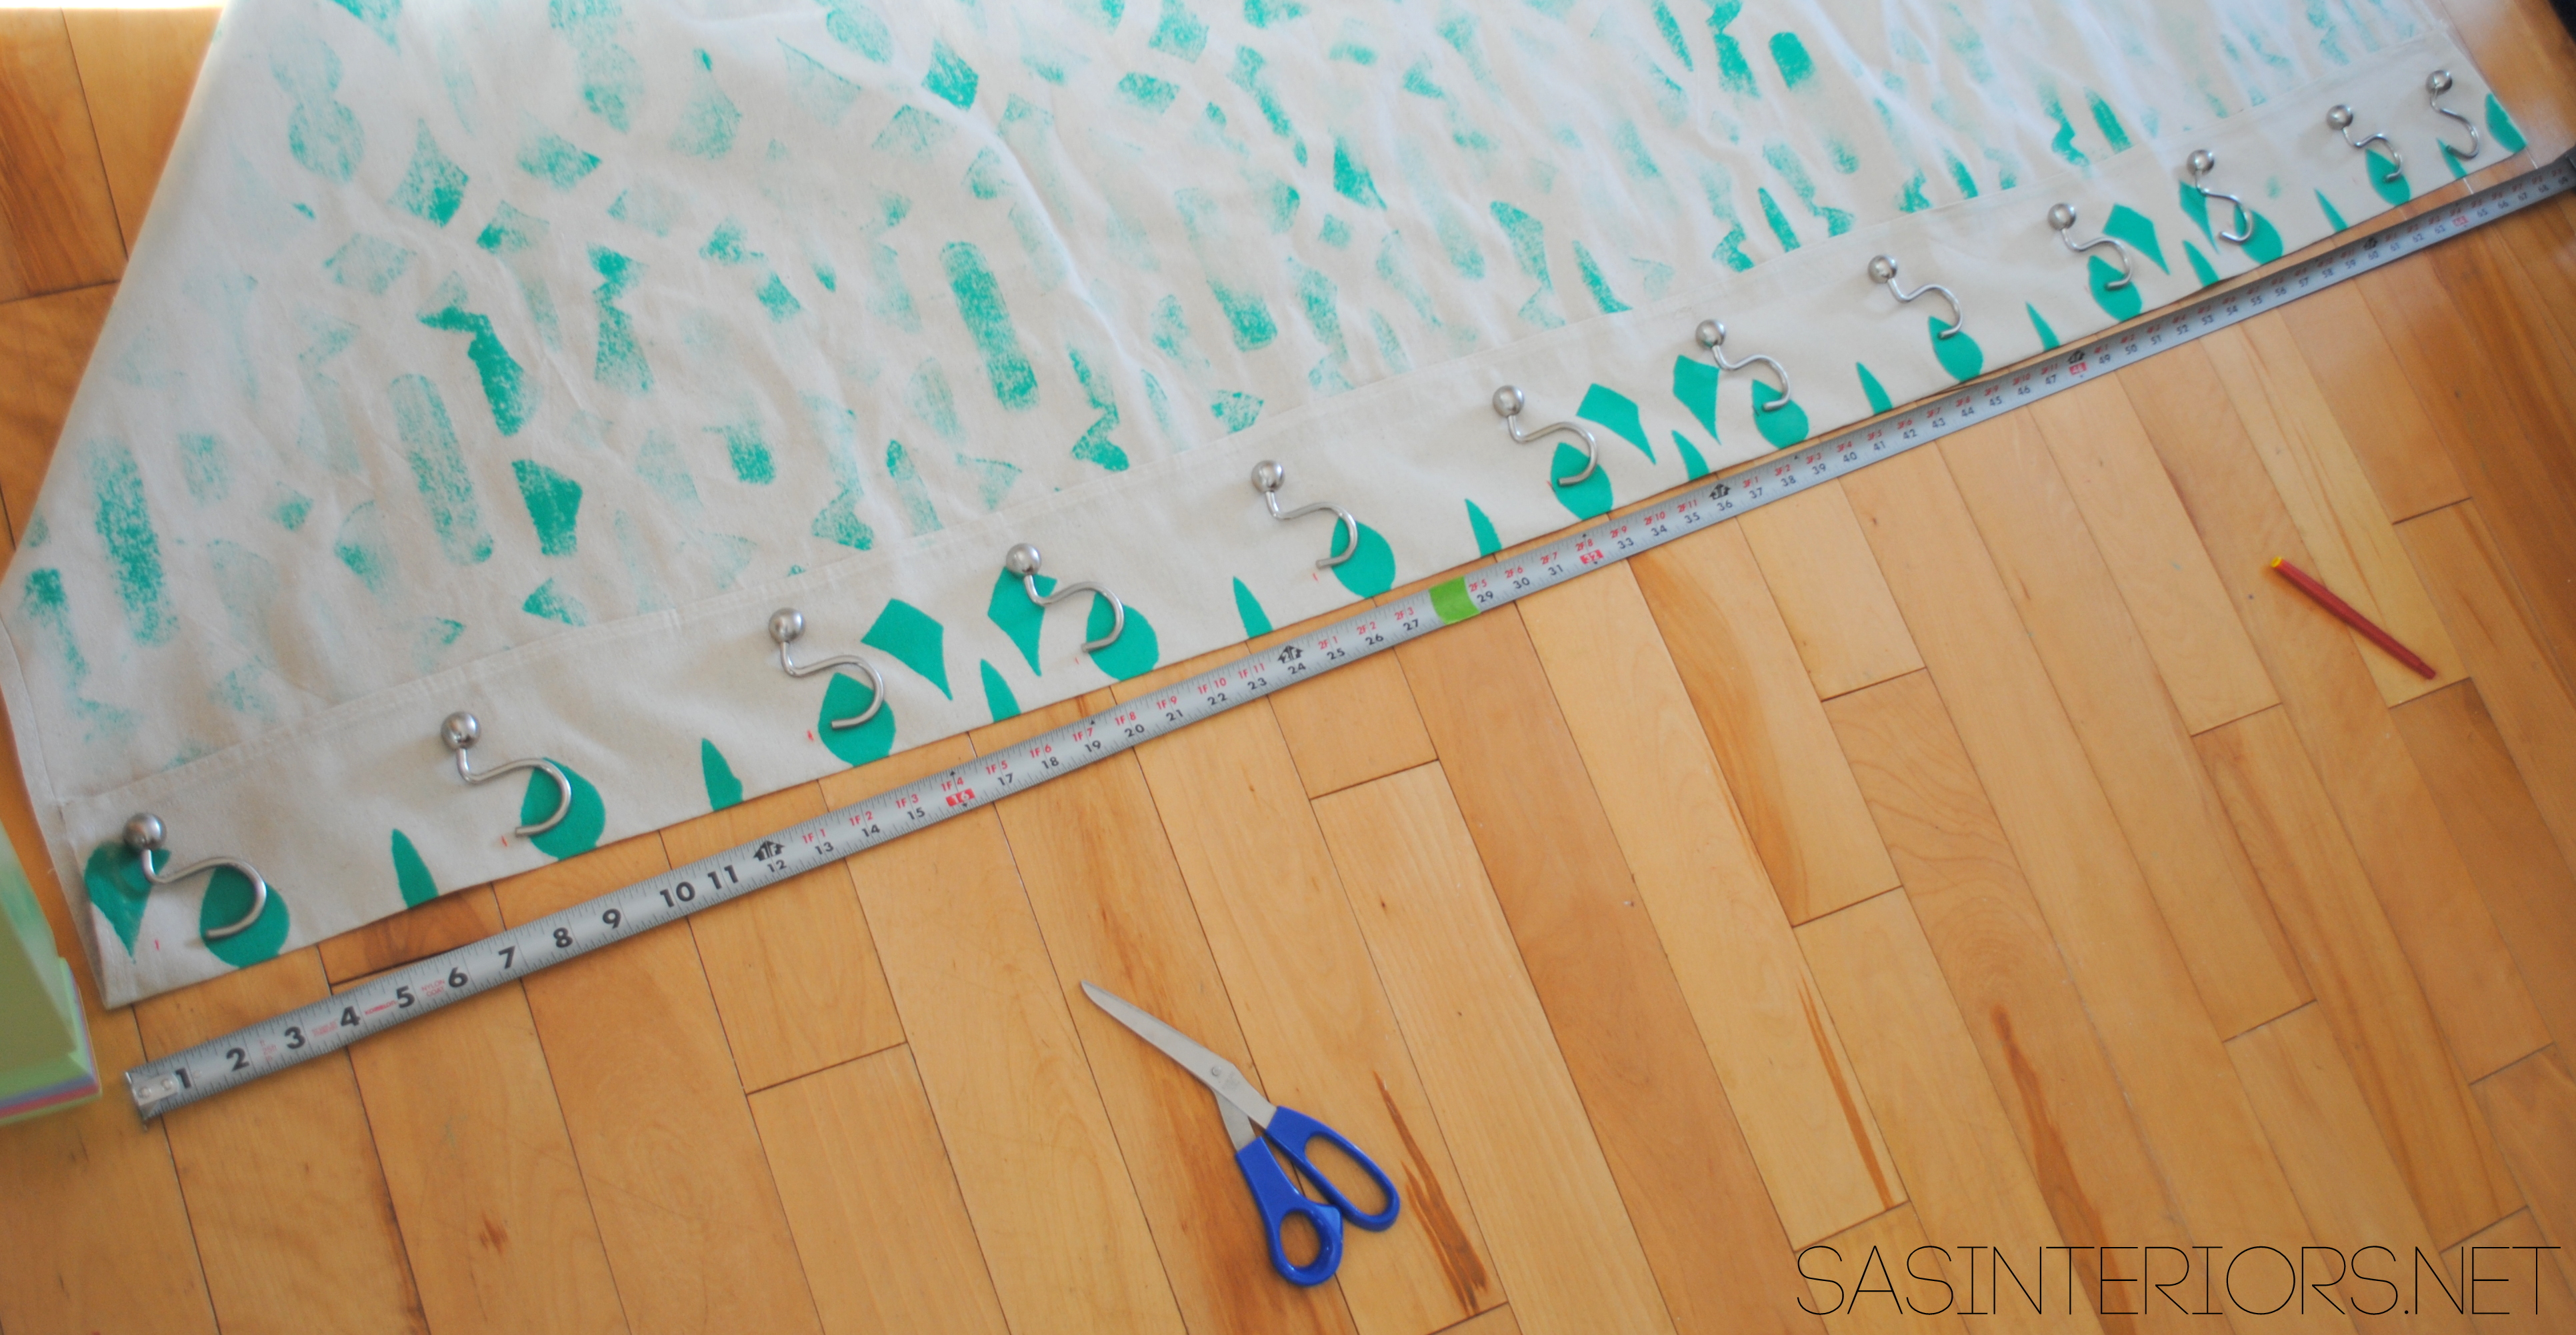
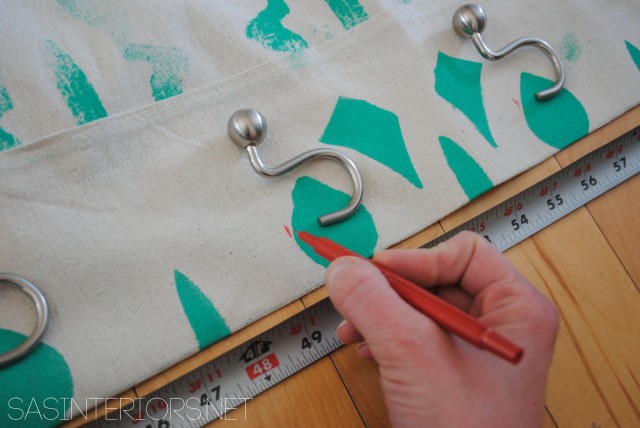
7. Once the edge was sewn,  I layed the large panel out on the floor again.  I took the 12 ball style shower hooks and equally positioned them along the newly created hemmed edge.

DIY: Stenciled Shower Curtain Using Drop Cloth Material - super simple & inexpensive to create! @Jenna_Burger, WWW.JENNABURGER.COM

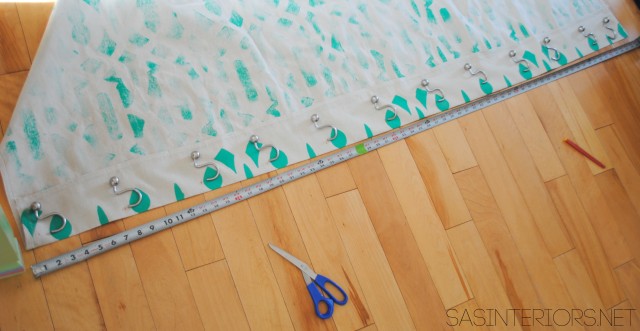
8. I marked the locations of where the ball style hooks layed.  Again, make sure they are equally spaced.

DIY: Stenciled Shower Curtain Using Drop Cloth Material - super simple & inexpensive to create! @Jenna_Burger, WWW.JENNABURGER.COM

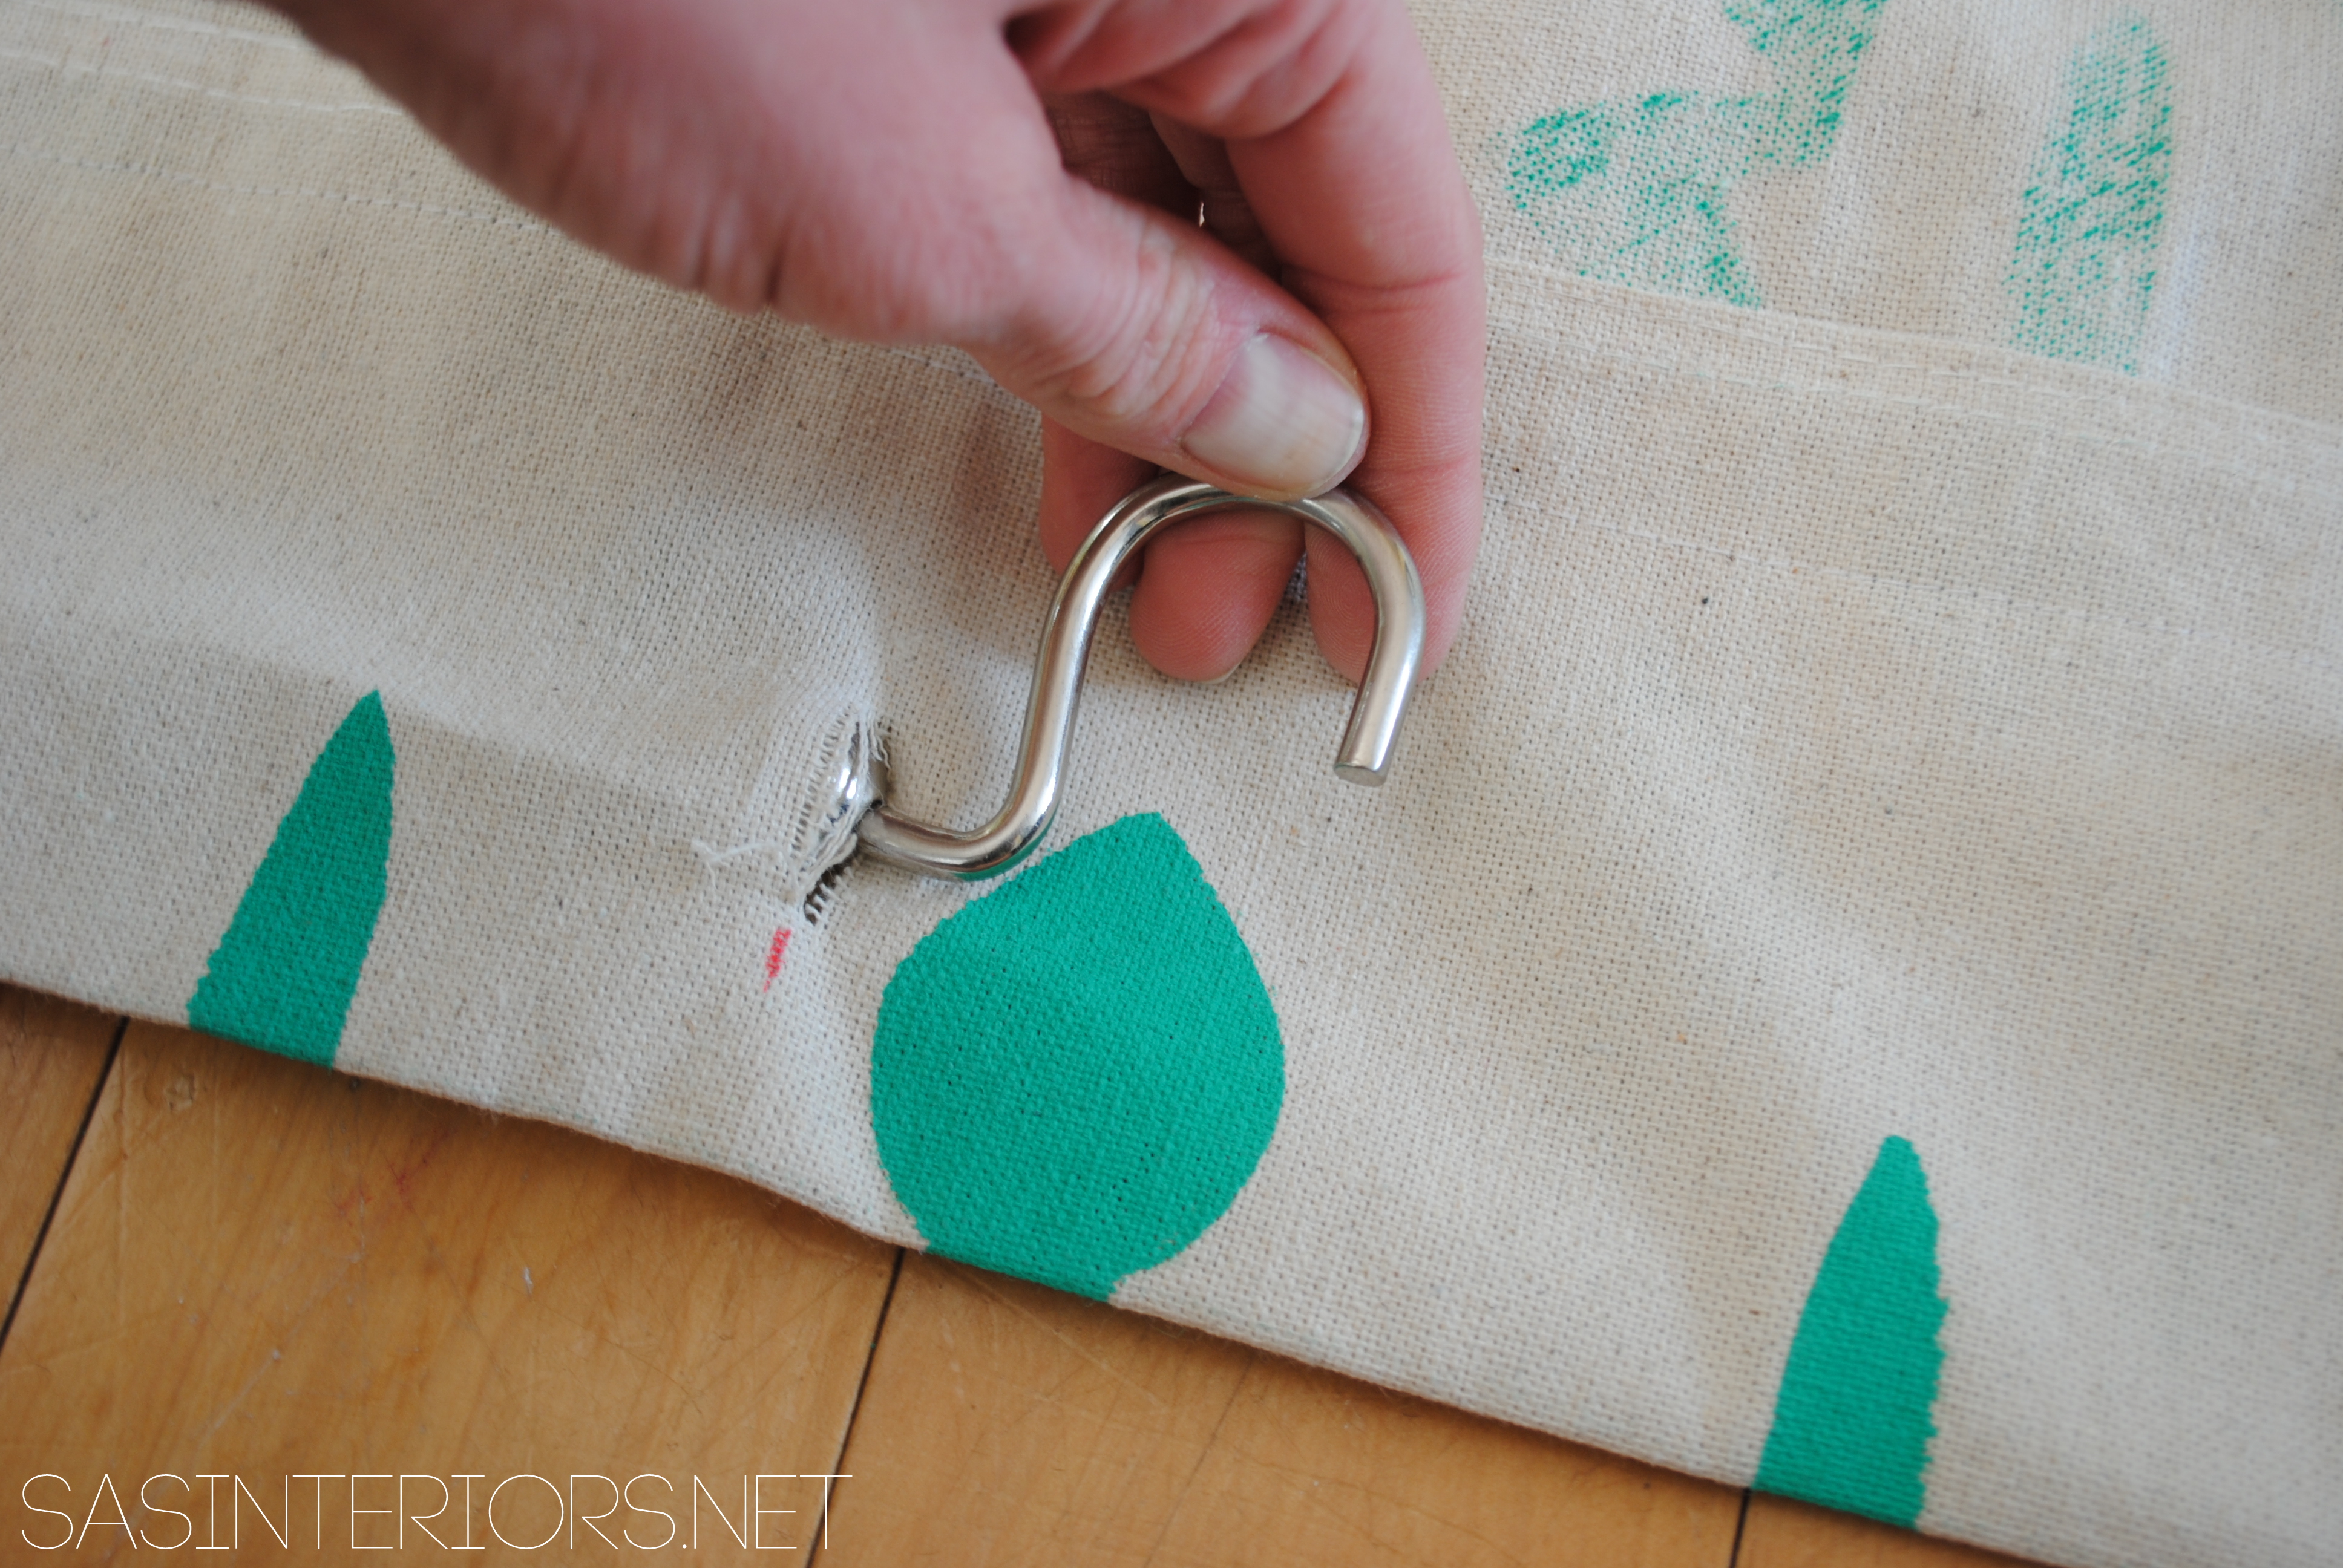
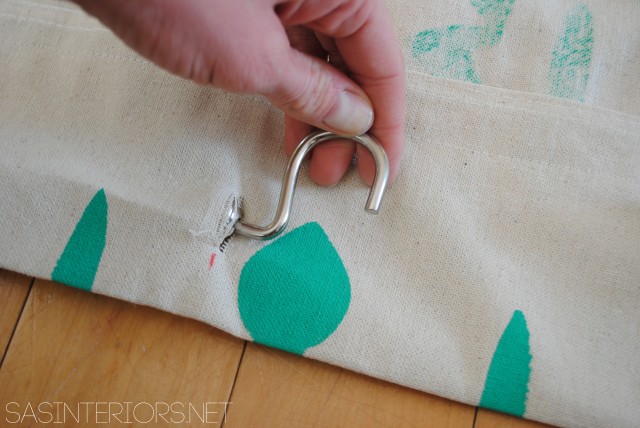
9. Then it was time to create the hole for the ball style hook to fit into. Only trim through the first layer, not through the finished side of the panel.

DIY: Stenciled Shower Curtain Using Drop Cloth Material - super simple & inexpensive to create! @Jenna_Burger, WWW.JENNABURGER.COM

10.  Slip the hook into the hole. If you decide to tackle this project, you could create a true button opening so the fabric doesn’t fray, but I took the easy way out and didn’t, hehe.

DIY: Stenciled Shower Curtain Using Drop Cloth Material - super simple & inexpensive to create! @Jenna_Burger, WWW.JENNABURGER.COM

DIY: Stenciled Shower Curtain Using Drop Cloth Material - super simple & inexpensive to create! @Jenna_Burger, WWW.JENNABURGER.COM

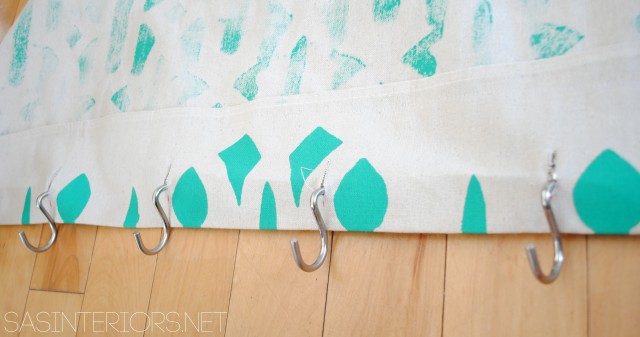
It’s almost finished!

11. Once the hooks were in place, I put the curtain on the shower curtain rod.  This was the part of the project where I decided the exact length of my newly created shower curtain.  If you remember before, I mentioned I purchased a 9′ long piece of canvas drop cloth, so it definitely needed to be trimmed a bit.  Once hung, I put a few pins in to mark the finished length that I wanted.

DIY: Stenciled Shower Curtain Using Drop Cloth Material - super simple & inexpensive to create! @Jenna_Burger, WWW.JENNABURGER.COM

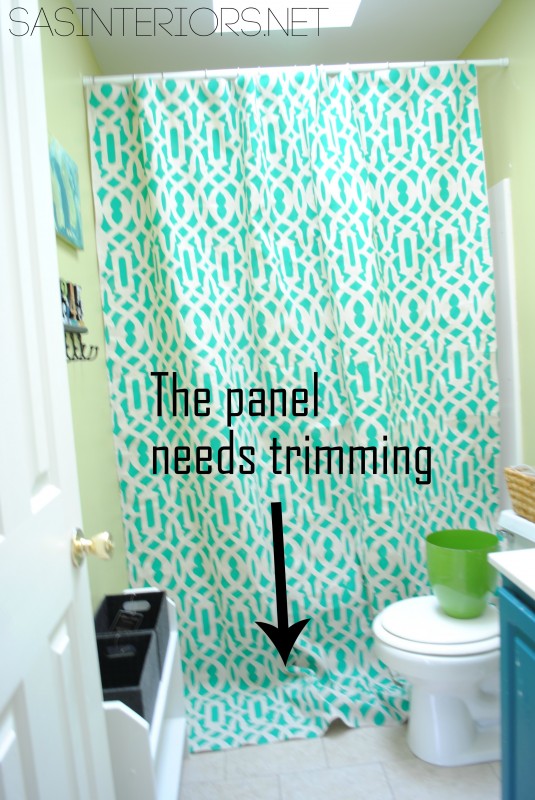
12. Leaving about 4″ extra to create a bottom hem, I trimmed the excess fabric.

DIY: Stenciled Shower Curtain Using Drop Cloth Material - super simple & inexpensive to create! @Jenna_Burger, WWW.JENNABURGER.COM

13. Lastly, I ironed and sewed the bottom hem so the crease was at the exact spot that I marked with the pins.

DIY: Stenciled Shower Curtain Using Drop Cloth Material - super simple & inexpensive to create! @Jenna_Burger, WWW.JENNABURGER.COM

And then it was done!  Trimmed, sewn, and sitting high on the wall.  Perfecto.

DIY: Stenciled Shower Curtain Using Drop Cloth Material - super simple & inexpensive to create! @Jenna_Burger, WWW.JENNABURGER.COM

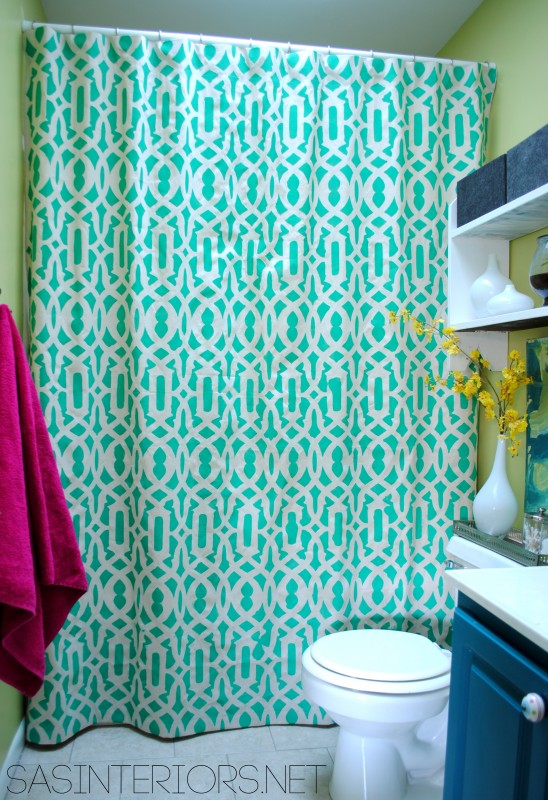
The kids bathroom is right at the top of the stairs so this is the first sight you see. (another reason why I wanted something taller than the typical too-low shower curtains).

It surely is dynamic, fun, and unexpected!

DIY: Stenciled Shower Curtain Using Drop Cloth Material - super simple & inexpensive to create! @Jenna_Burger, WWW.JENNABURGER.COM

What a breathe of fresh air!  Don’t ya think?!  Canvas drop cloth is a favorite of mine to work with and I’m thrilled with the outcome of the project.

Here are more DIY projects I created using canvas drop cloth:
Placemats with Decorative Top Stitch
Drop Cloth Table Runner
Faux Roman Shade using Drop Cloth
Christmas Stockings
Simple Lined Window Panels with Drop Cloth Lining
Personalized Envelope Pillow