
Month: November 2013

Christmas in a Minute: Vintage-Inspired JOYful Sign

Happy Monday!  What a busy week upon us with Thanksgiving, Hanukkah, and the official start to the holiday season.  As the crazy Christmas sprint begins, I’m thinking simple, easy, and quick.  So this weekend, I created this fun + easy vintage-inspired JOYful sign.  Scraps of wood and a little bit of paint makes this a simple and very inexpensive creation.  It would be great for the mantel, outside patio, or as a gift.

Here’s the breakdown…

Christmas in a Minute: Vintage-Inspired JOYful Sign created by @Jenna_Burger, WWW.JENNABURGER.COM

Simple-to-follow tutorial on how to create a JOY sign

1. Cut the wood to your desired height and width. I used leftover pallet scraps to create this sign, but you could also use new wood instead.  I like the old pallets because they’re free, plus they have a distressed, worn look, which means no “beating up” the new wood.

2. Create the sign and sand.  If you have more than one piece of wood, you’ll need to attach them from the back.  Across the two pieces of pallet boards, I nailed two smaller pieces of pallet scraps on the back so the sign stayed together. Then I gave the wood a good sanding on the top and sides.

3. Paint the sign.  I painted the base of the sign with plain ole’ white paint leaving some of the raw wood to show through.

4. Outline letters.  I freehand sketched the letters J – O – Y on the sign.  You could use a stencil or silhouette if you wanted.

5. Paint the letters. Then I filled in the letters with red craft paint.  I used about 3-4 coats, but it dried quickly.  To give an even more distressed look, I gently went over the surface with a piece of sandpaper (by hand).

And that’s it.  Pretty simple, right?!

Pallet Christmas Countdown

Christmas is a comin’!

In less than 10 days, we’ll be counting down the 25 days till the arrival of Christmas.  To make the countdown a bit more fun and bearable, since for every child (and maybe a few adults) thinks the 25 days leading to the special day are SO LONG, I created a Countdown Calendar in the shape of a tree using my favorite material, pallets and a few other leftover scraps of wood.  Check it out…

Christmas Countdown Calendar using pallets and scraps of leftover wood.  Created by @Jenna_Burger, www.sasinteriors.net

Isn’t it so colorful?  The ornaments truly make it come alive.

When Lowe’s challenged the Creative Team to come up with something for the Holidays, I was so excited to create something unique and perfect to celebrate the coming holiday.  Last year, my December project was a creation for holding cards and this year, I wanted to create something just as dynamic.  When thinking about a project, I realized we didn’t have a countdown calendar, so that’s what this years project would be.

The project started out by taking 10 steps outside to the garage.  Yup, this creation was put together using only materials I already had on hand.  This is what I gathered…

  • Pallet and wood scraps – the more dented and imperfect, the better
  • Nails (3/4″ – 1″ deep)
  • Number stencil
  • Black Sharpie
  • Hammer
  • Circular Saw
  • (25) Colorful ornaments

1. I first started out by looking through my wood scrap pile and leftover pallet scraps.  I collected a bunch of pieces all in different colors and sizes.  The more imperfect the better.

Then I took some time and put a drawing together to figure out how many rows of wood would be needed and how the 25 ornaments would sit on the “tree”.  In the end, 7 tiers worked best and 2 of the rows have 4 nails, creating the 25 spots.

A little math is needed, but it wasn’t tough…

Christmas Countdown Calendar using pallets and scraps of leftover wood.  Created by @Jenna_Burger, WWW.JENNABURGER.COM

2. Now that the hardest part was over (a little mathematical equations), I laid out the pieces of wood to determine what looked nice next to each other and then the widths of each tier.

On the backs, I then labeled each row.

Christmas Countdown Calendar using pallets and scraps of leftover wood.  Created by @Jenna_Burger, www.sasinteriors.net

3. Then using a circular saw, I cut each piece to form the “tree” shape. Once that was complete, I added a scrap piece of wood to the backs of the pieces to attach them together.

Hammer, hammer, hammer using 3-4/” – 1″ nails.

Christmas Countdown Calendar using pallets and scraps of leftover wood.  Created by @Jenna_Burger, www.sasinteriors.net

I added a few more pieces of scraps (old paint sticks, to be specific) to the back.  This looks kinda messy, but hey, who’s lookin’ at the back???

Christmas Countdown Calendar using pallets and scraps of leftover wood.  Created by @Jenna_Burger, www.sasinteriors.net

No more looking at the back.  Let’s turn it over to the front where it’s prettier looking.

Now to the nails + the numbers.

4.  By eye (no more math needed), I marked the locations for the 25 ornaments.  Then I added a nail at each location leaving about 1/2″ exposed for the ornament to hang.

Christmas Countdown Calendar using pallets and scraps of leftover wood.  Created by @Jenna_Burger, www.sasinteriors.net

5. Once the nails were in, it was time for the numbers.  Using stencils I had from a previous Martha Stewart project, I outlined the numbers with a black sharpie.  Again, the more imperfect the better.

Christmas Countdown Calendar using pallets and scraps of leftover wood.  Created by @Jenna_Burger, www.sasinteriors.net

Once the numbers were done, the project was complete.  And here’s the result…

Plain + Decorated.

Christmas Countdown Calendar using pallets and scraps of leftover wood.  Created by @Jenna_Burger, WWW.JENNABURGER.COM

I love how it came out…

Christmas Countdown Calendar using pallets and scraps of leftover wood.  Created by @Jenna_Burger, WWW.JENNABURGER.COM

It’s so colorful and brings such whimsy to our holiday home decor.

Christmas Countdown Calendar using pallets and scraps of leftover wood.  Created by @Jenna_Burger, WWW.JENNABURGER.COM

Christmas Countdown Calendar using pallets and scraps of leftover wood.  Created by @Jenna_Burger, WWW.JENNABURGER.COM

The kids love it too and they can’t wait for the 1st of December to arrive to start adding an ornament each day.  While we wait, the ornaments that all came from this years Lowe’s collection, sit in the brass light turned container.

Christmas Countdown Calendar using pallets and scraps of leftover wood.  Created by @Jenna_Burger, WWW.JENNABURGER.COM

Christmas Countdown Calendar using pallets and scraps of leftover wood.  Created by @Jenna_Burger, WWW.JENNABURGER.COM

I hope you enjoyed my latest creation as much as I.  It was fairly easy to make, and I loved that I was able to create it using materials I already had.  How much better does it get?!  The anticipation and excitement leading to Christmas day can be a bit challenging, but hopefully my countdown calendar makes it a tiny bit more fun.

Christmas Countdown Calendar using pallets and scraps of leftover wood.  Created by @Jenna_Burger, WWW.JENNABURGER.COM

To gather even more unique, fun, and creative ideas for your indoor and outdoor Winter spaces, I would definitely suggest downloading the Lowe’s Creative Ideas app on your iphone and/or ipad.  I’m always checking out the FREE app for great seasonal + do-it-yourself inspiration. And even better, this Pallet Christmas Countdown creation will be featured in the upcoming Winter guide – how cool, right?!

Lowes Creative Team Member

Also consider following Lowe’s on Facebook, Pinterest, and Instagram as well.

 Disclosure: I am part of the Lowe’s Creative Team and was provided with a Lowe’s gift card to purchase items for my project.  I was also compensated for my time to use the products.  No one told me what to create, what to buy, how to use the product, or what to write.  All opinions are 100% mine!

Easiest + Fastest + Cheapest Tree Skirt EVER

Monday Morning Confession: I already started decorating for Christmas.  It might seem early for some, but I have a few surprises up my sleeve that I wanted to prep early for this year.  While many of my daily favorites get tucked away for the next 6 weeks, the holiday decor is once again making it’s debut for another year.  As some ‘old’ traditional elements remain, there are many new projects and vignettes that I’ll be sharing over the coming weeks.  One in particular is my new tree skirt.  Definitely the easiest + fastest + cheapest tree skirt you ever did see…

Easiest, Fastest, + Cheapest Christmas Tree Skirt.  Use 1.5 yd of fabric and wrap around tree.  Follow easy instructions by @Jenna_Burger of WWW.JENNABURGER.COM

For the last few years I’ve wanted a new tree skirt.  I had grand plans of making something beautiful and chic, but honestly it just never happened.  And anyway, is something pretty + most likely expensive, even worth it?  I’ve found over the years that the tree skirt ends up getting thrown around either from the kids or the cats, and then once the presents are added, you don’t even see it.  Well this is in my house anyway. maybe it’s different in your casa…

So after living with no tree skirt for a few days once the tree was up, I thought let me test out this pretty black and white striped fabric.  I threw it under the tree and loved it’s whimsical, non-perfect, simple look.  Plus it cost me nothing. So here we go… The black and white striped fabric I had on-hand was 1 yard, but I would recommend using 1.5 yards or even 2 yards for a fuller look. I placed the fabric in front of the tree.

Easiest, Fastest, + Cheapest Christmas Tree Skirt.  Use 1.5 yd of fabric and wrap around tree.  Follow easy instructions by @Jenna_Burger of WWW.JENNABURGER.COM

Then took the two top corners and wrapped them around the  bottom of the tree so they meet in the back.

Easiest, Fastest, + Cheapest Christmas Tree Skirt.  Use 1.5 yd of fabric and wrap around tree.  Follow easy instructions by @Jenna_Burger of WWW.JENNABURGER.COM

Easiest, Fastest, + Cheapest Christmas Tree Skirt.  Use 1.5 yd of fabric and wrap around tree.  Follow easy instructions by @Jenna_Burger of WWW.JENNABURGER.COM

Lastly, I tucked the bottom corners and all the loose edges underneath.

Easiest, Fastest, + Cheapest Christmas Tree Skirt.  Use 1.5 yd of fabric and wrap around tree.  Follow easy instructions by @Jenna_Burger of WWW.JENNABURGER.COM

Literally, this took all of 30 seconds and it was done.

Easiest, Fastest, + Cheapest Christmas Tree Skirt.  Use 1.5 yd of fabric and wrap around tree.  Follow easy instructions by @Jenna_Burger of WWW.JENNABURGER.COM

By the end of the day, the tree skirt is all dishuffled anyway, so within seconds it looks good again.  There really is no right or wrong to this tree skirt, which makes it perfect for me!

And the best part is, it cost nothing and the fabric can be used for something else after the Holidays.  Next year, I may want a totally different pattern and I won’t be married to something store-bought or a creation that took hours. I hope you enjoyed my 30 second tree skirt creation.  Sometimes the easiest things are the best!

Be sure to check back next Monday when I’ll be partnering with a few Blogging friends who will all be sharing super simple holiday projects for our Christmas in a Minute series.  Cheers to a festive season. xo

DIY: Wood Spice Rack

Earlier this week, I shared my newly organized kitchen cabinet interiors where I added multiple materials to make the vertical space on the interiors of the doors super useful.  One specific element that made a world of difference, as far as storage, are the 2 wood spice racks that I made from scratch.

DIY: Wood Spice Rach Holder for inside the kitchen cabinets; Less than $8 to make, in 15 minutes by @Jenna_Burger, WWW.JENNABURGER.COM

While originally gathering materials for the project, I was on the search for pre-made spice holders.  I didn’t have a specific style in mind but was hoping for wood.  In the end, I didn’t find anything, so instead I DIYed them.

One of the best sponsor gifts I came away with from Haven over the Summer was my new Kreg Jig Jr.  I had been eyeing a jig for a while because it makes building furniture so much easier by allowing for the screws to be concealed.  When the wood spice holder came to mind, I knew this was the perfect first project for using my jig.

Kreg Jig Jr.  Great tool for small do it yourself projects.  Made a spice rack for my first project.

But before getting to that, I headed to Lowe’s for my materials.  I purchased (1) 1″ x 3″ x 8′ piece of wood, which are the actual dimensions of 3/4″ x 2.5″.

And here is the breakdown of the pieces needed:

  • (2) Side Pieces – 3″ high x 2.5″ wide
  • Bottom Piece – 2.5″ wide x 11.5″ long (length to be adjusted depending on cabinet door width)
  • Dowel – 1/4″ round x 12″ long (length to be 1/2″ longer than bottom piece)

A picture to explain it further…

Wood components that make up creating a DIY Wood Spice Holder by @Jenna_Burger

And a quick drawing to explain it even more…

This is a front on view of the cabinet and the spice rackComponents that make up creating a DIY Wood Spice Holder by @Jenna_Burger

The first step when using a kreg jig is to figure out the depth of the wood to set the jig placement.  My wood depth was 3/4″, so the jig and depth collar on the kreg drill bit were set to 3/4″.  Kreg really makes using this handy-dandy gadget SO EASY!

Setting the jig and depth collar on the kreg drill bit to the width of the wood

After securing the wood and the jig with a clamp, I drilled a hole on each end of the base piece.

DIY: Wood Spice Rach Holder for inside the kitchen cabinets; Less than $8 to make, in 15 minutes by @Jenna_Burger, sasinteriors.net

Once that was complete, it was time to add the (2) end pieces + the dowel.

Sorry for the lack of pictures for this part.  I was so excited about my new jig I forgot to grab my camera.  Anyway, positioning about 1/2″ down from the top of the end piece and 1/2″ in from the front, I drilled a 1/4″ hole about 1/4″ deep for the dowel to fit in.

Then I put the dowel in the two end pieces and connected the end pieces with the bottom piece using the Kreg screws specifically made for 90 degree connections.

DIY: Wood Spice Rach Holder for inside the kitchen cabinets; Less than $8 to make, in 15 minutes by @Jenna_Burger, sasinteriors.net

DIY: Wood Spice Rach Holder for inside the kitchen cabinets; Less than $8 to make, in 15 minutes by @Jenna_Burger, sasinteriors.net

After filling in the holes with paintable putty, it was complete.

DIY: Wood Spice Rach Holder for inside the kitchen cabinets; Less than $8 to make, in 15 minutes by @Jenna_Burger, sasinteriors.net

I decided to add some color to the new spice holder and used Valspar Spring Sprout in Satin.

DIY: Wood Spice Rach Holder for inside the kitchen cabinets; Less than $8 to make, in 15 minutes by @Jenna_Burger, WWW.JENNABURGER.COM

In about 10-15 minutes, this was the result…

DIY: Wood Spice Rach Holder for inside the kitchen cabinets; Less than $8 to make, in 15 minutes by @Jenna_Burger, WWW.JENNABURGER.COM

I attached the newly made wood spice holders using a very very very strong adhesive – Loctite Epoxy Instant Mix.  Basically it’s two formulas that mix together and provide a major adhesive mixture. DO NOT TOUCH IT.  I carefully applied the mixture to the back of the wood holder and placed it on the interior of the cabinet.  I held it in place for about 3-5 minutes until it was completely adhered to the surface.  I will be honest, the wood started to slide a few times, but I was close by and slid it back into place.  There are other epoxy mixtures that dry even quicker – 1 minute of less.

DIY: Wood Spice Rach Holder for inside the kitchen cabinets; Less than $8 to make, in 15 minutes by @Jenna_Burger, WWW.JENNABURGER.COM

I was a total novice at using a jig and I was very happy with the results.  I couldn’t believe how easy it was.  Now I can’t wait to get my hands dirty with even more furniture projects.  Boy, do I have a list!

DIY: Wood Spice Rach Holder for inside the kitchen cabinets; Less than $8 to make, in 15 minutes by @Jenna_Burger, WWW.JENNABURGER.COM

To see how I organized the rest of this cabinet, plus more of my kitchen interiors, head over to Kitchen Organization: Ideas for the Inside of the Cabinet Doors.

How do you organize your spices? In a cabinet or in a drawer?  Is this project something you think you would tackle?  With every new tool, there is a learning curve, but it was fairly easy.

Kitchen Organization: Ideas for the Inside of the Cabinet Doors

Happy Monday!  I was feeling a bit under the weather last week which is why the blog and my other favorite places to share + converse on the ‘net’ – IG, FB, etc – were quiet.  I’m still not feeling 100%, but am excited to share something I’ve been working on lately…  getting my kitchen organized.

For me, organization is a never ending battle.  I never feel like everything completely has a home, but I’ve accepted that and continually try to work towards creating a more efficient, more organized home.

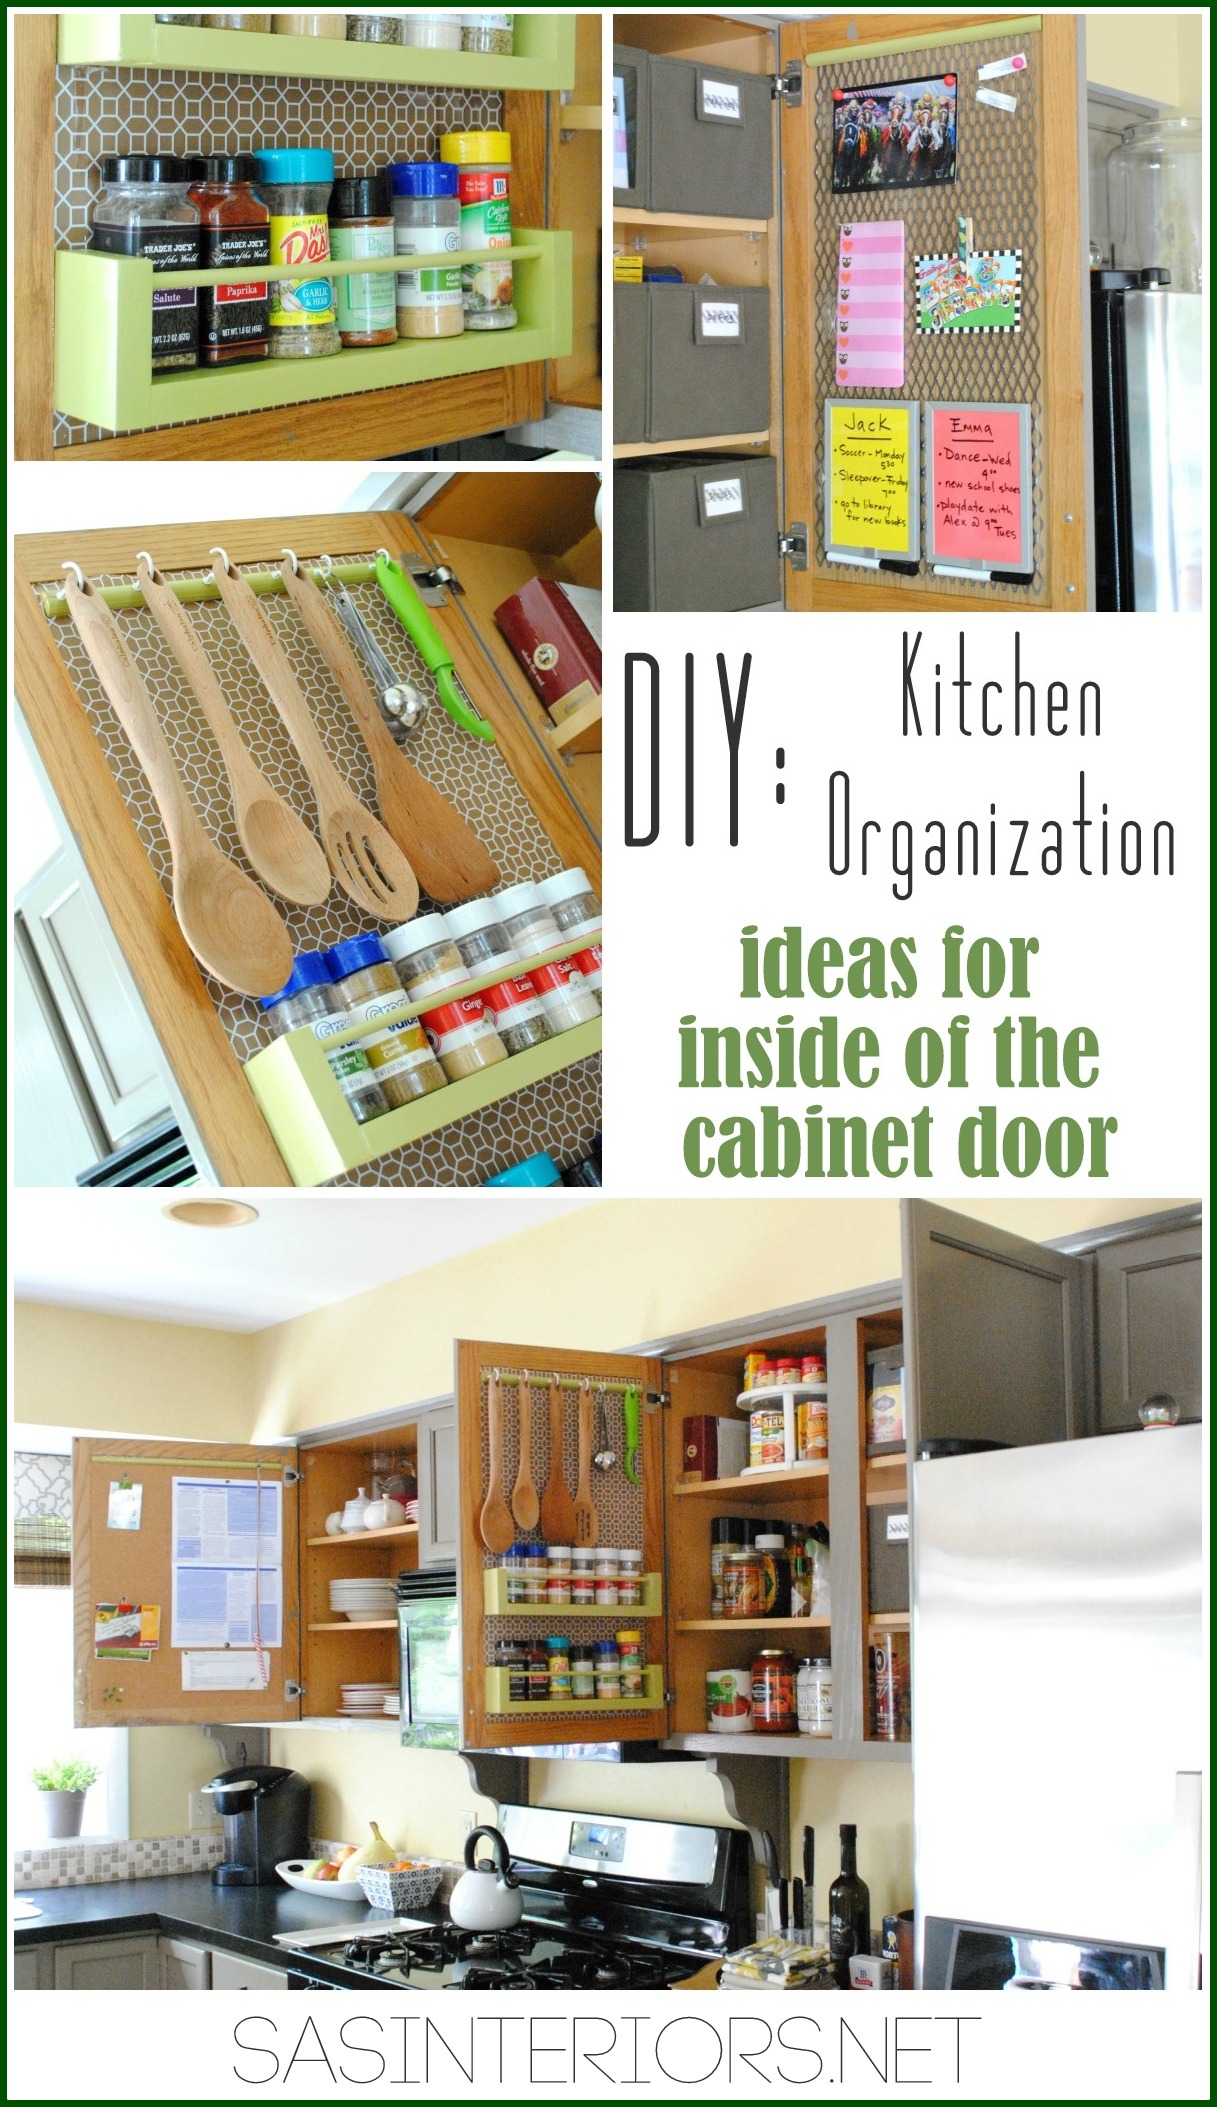
When Lowe’s put to me to the challenge this month to tackle the kitchen, I knew it was a win-win.  To start off, I took a step back to analyze how the space could be more organized and user-friendly for cooking and storage.  I made a few moves of pots and pans, but what I really wanted to put-to-good-use was the insides of the kitchen cabinets. All that vertical space going unused?  The ideas started to flow…

Kitchen Organization: Ideas for storage on the inside of the kitchen cabinets by @Jenna_Burger, WWW.JENNABURGER.COM

My kitchen isn’t small, but it isn’t huge either.  With no pantry or extra storage for food, I’m always thinking about how to best store the food / “pantry items” in the cabinets.  For the most part, we eat real food / very little processed food.  That means no snacks that have to be stored for a long period of time because the food I buy has little “shelf time”.  Good for me, that the food we buy takes up less shelf area.  Bad for me, I go food shopping a lot.

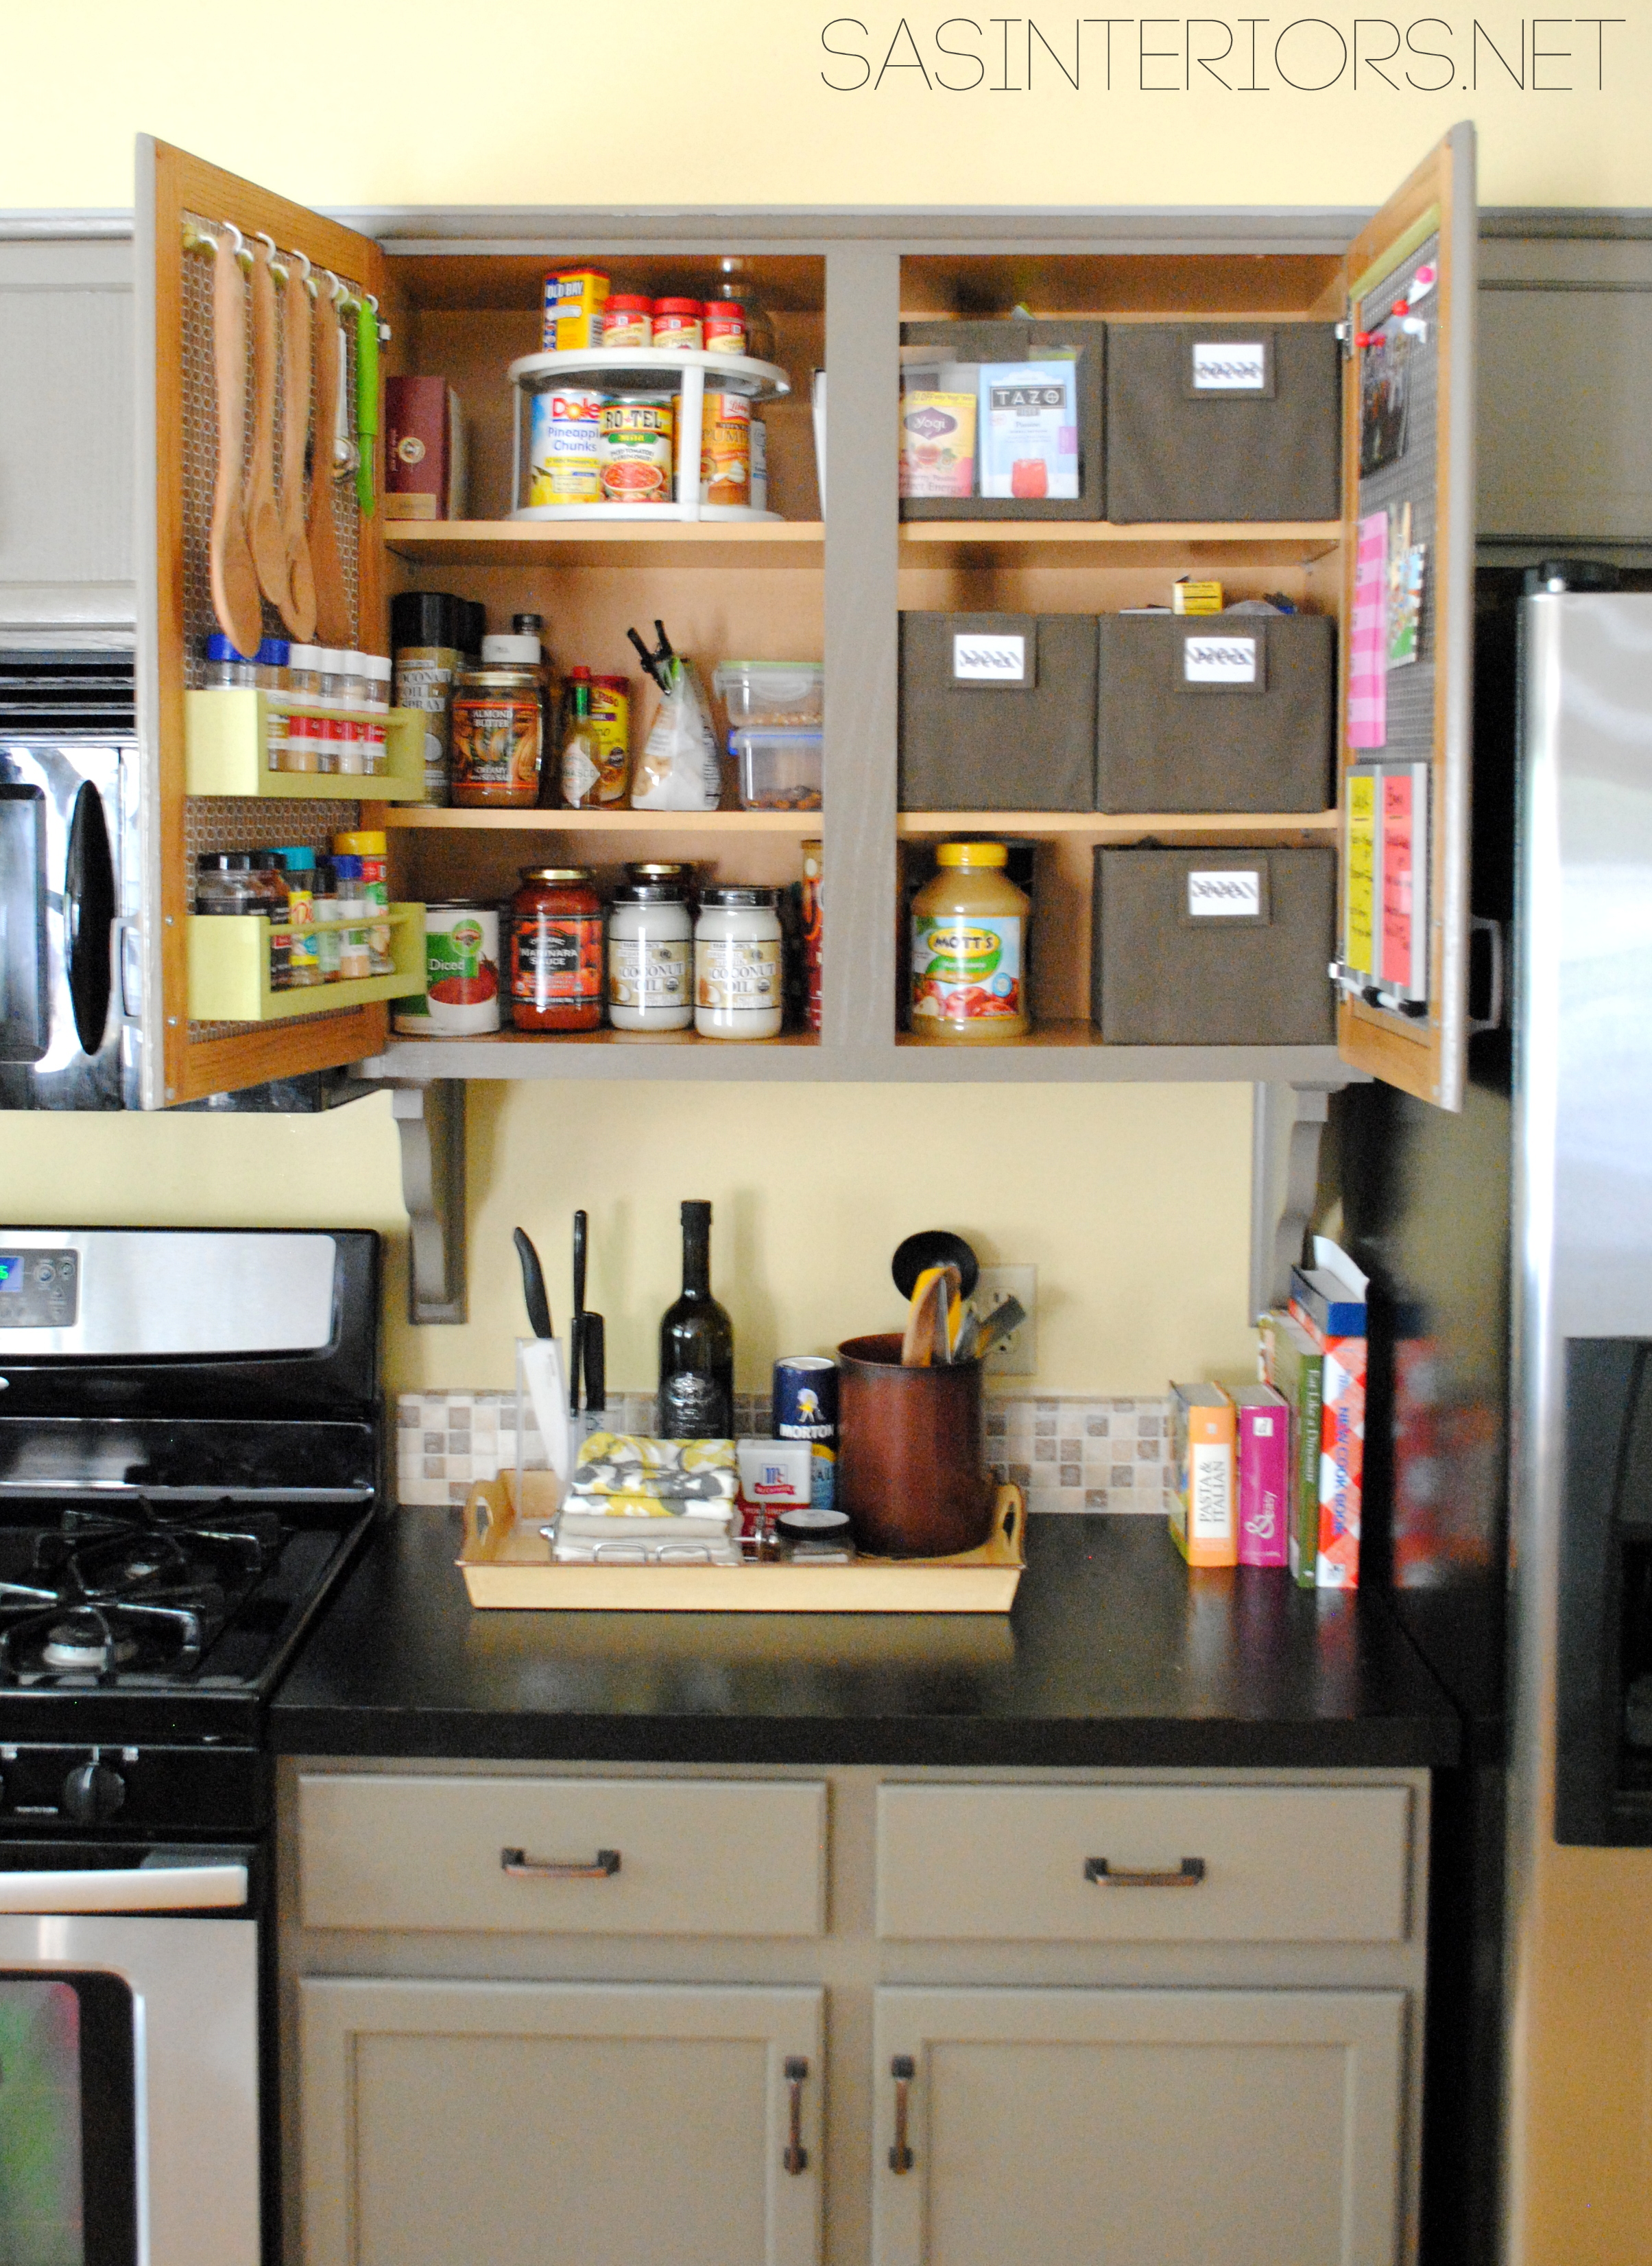
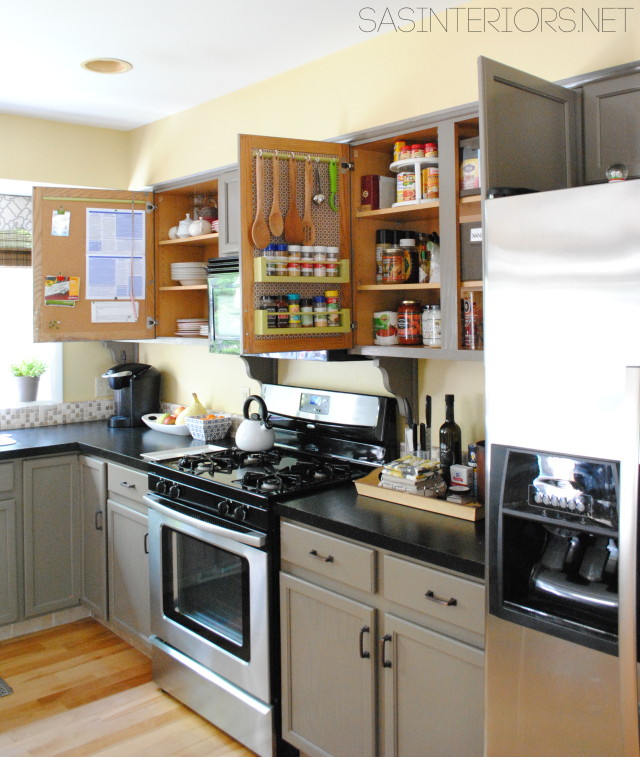
Anyway, there is one large cabinet that all the food is stored in.  It’s a large cabinet at about 30″ wide with (2) doors.  Take a look…

Kitchen Organization: Ideas for storage on the inside of the kitchen cabinets by @Jenna_Burger, WWW.JENNABURGER.COM
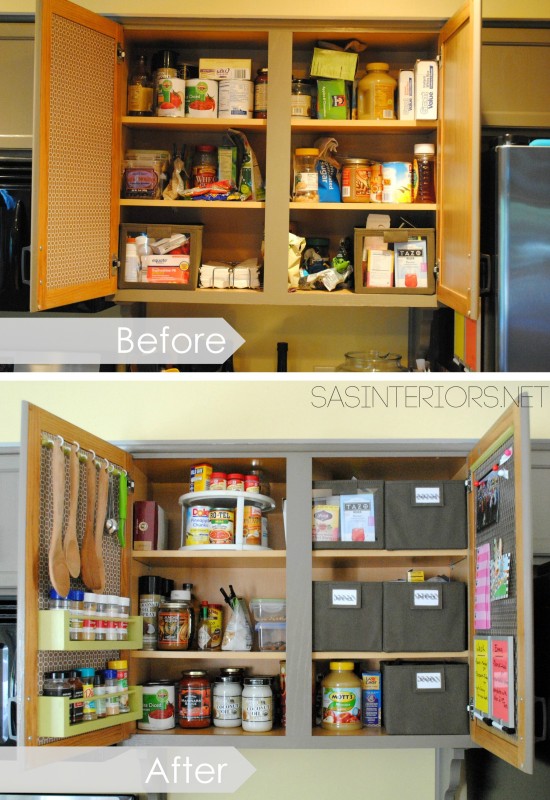
don’t you just love peaking into other peoples cabinets??? What are they eating?  What do they buy?  We use a lot of coconut oil – 3 jars right there in front.

Great change, right?!  Nothing from this space had to go, but instead everything was reorganized to be easier to get at in an instant.

Let me show you a bit more of what I did…

On the inside of the left cabinet, I lined the inset panel with stylish geometric patterned contact paper.  Similar to what I did for my TV cabinet back in the Summer.  I purchased the roll of contact paper at TJ Maxx for about $5 – what a great score.

Once I aligned the contact paper on the cabinet and pulled off the backing, I used a straight edge to trim the excess.

Kitchen Organization: Ideas for storage on the inside of the kitchen cabinets by @Jenna_Burger, www.sasinteriors.net

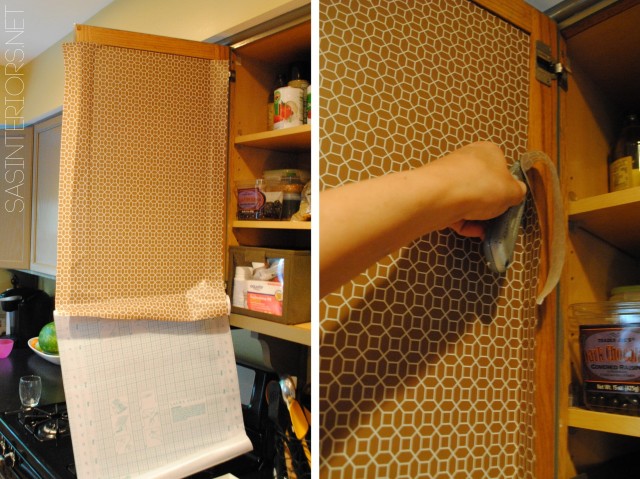
Once the contact paper was adhered, it was time to dress it up.

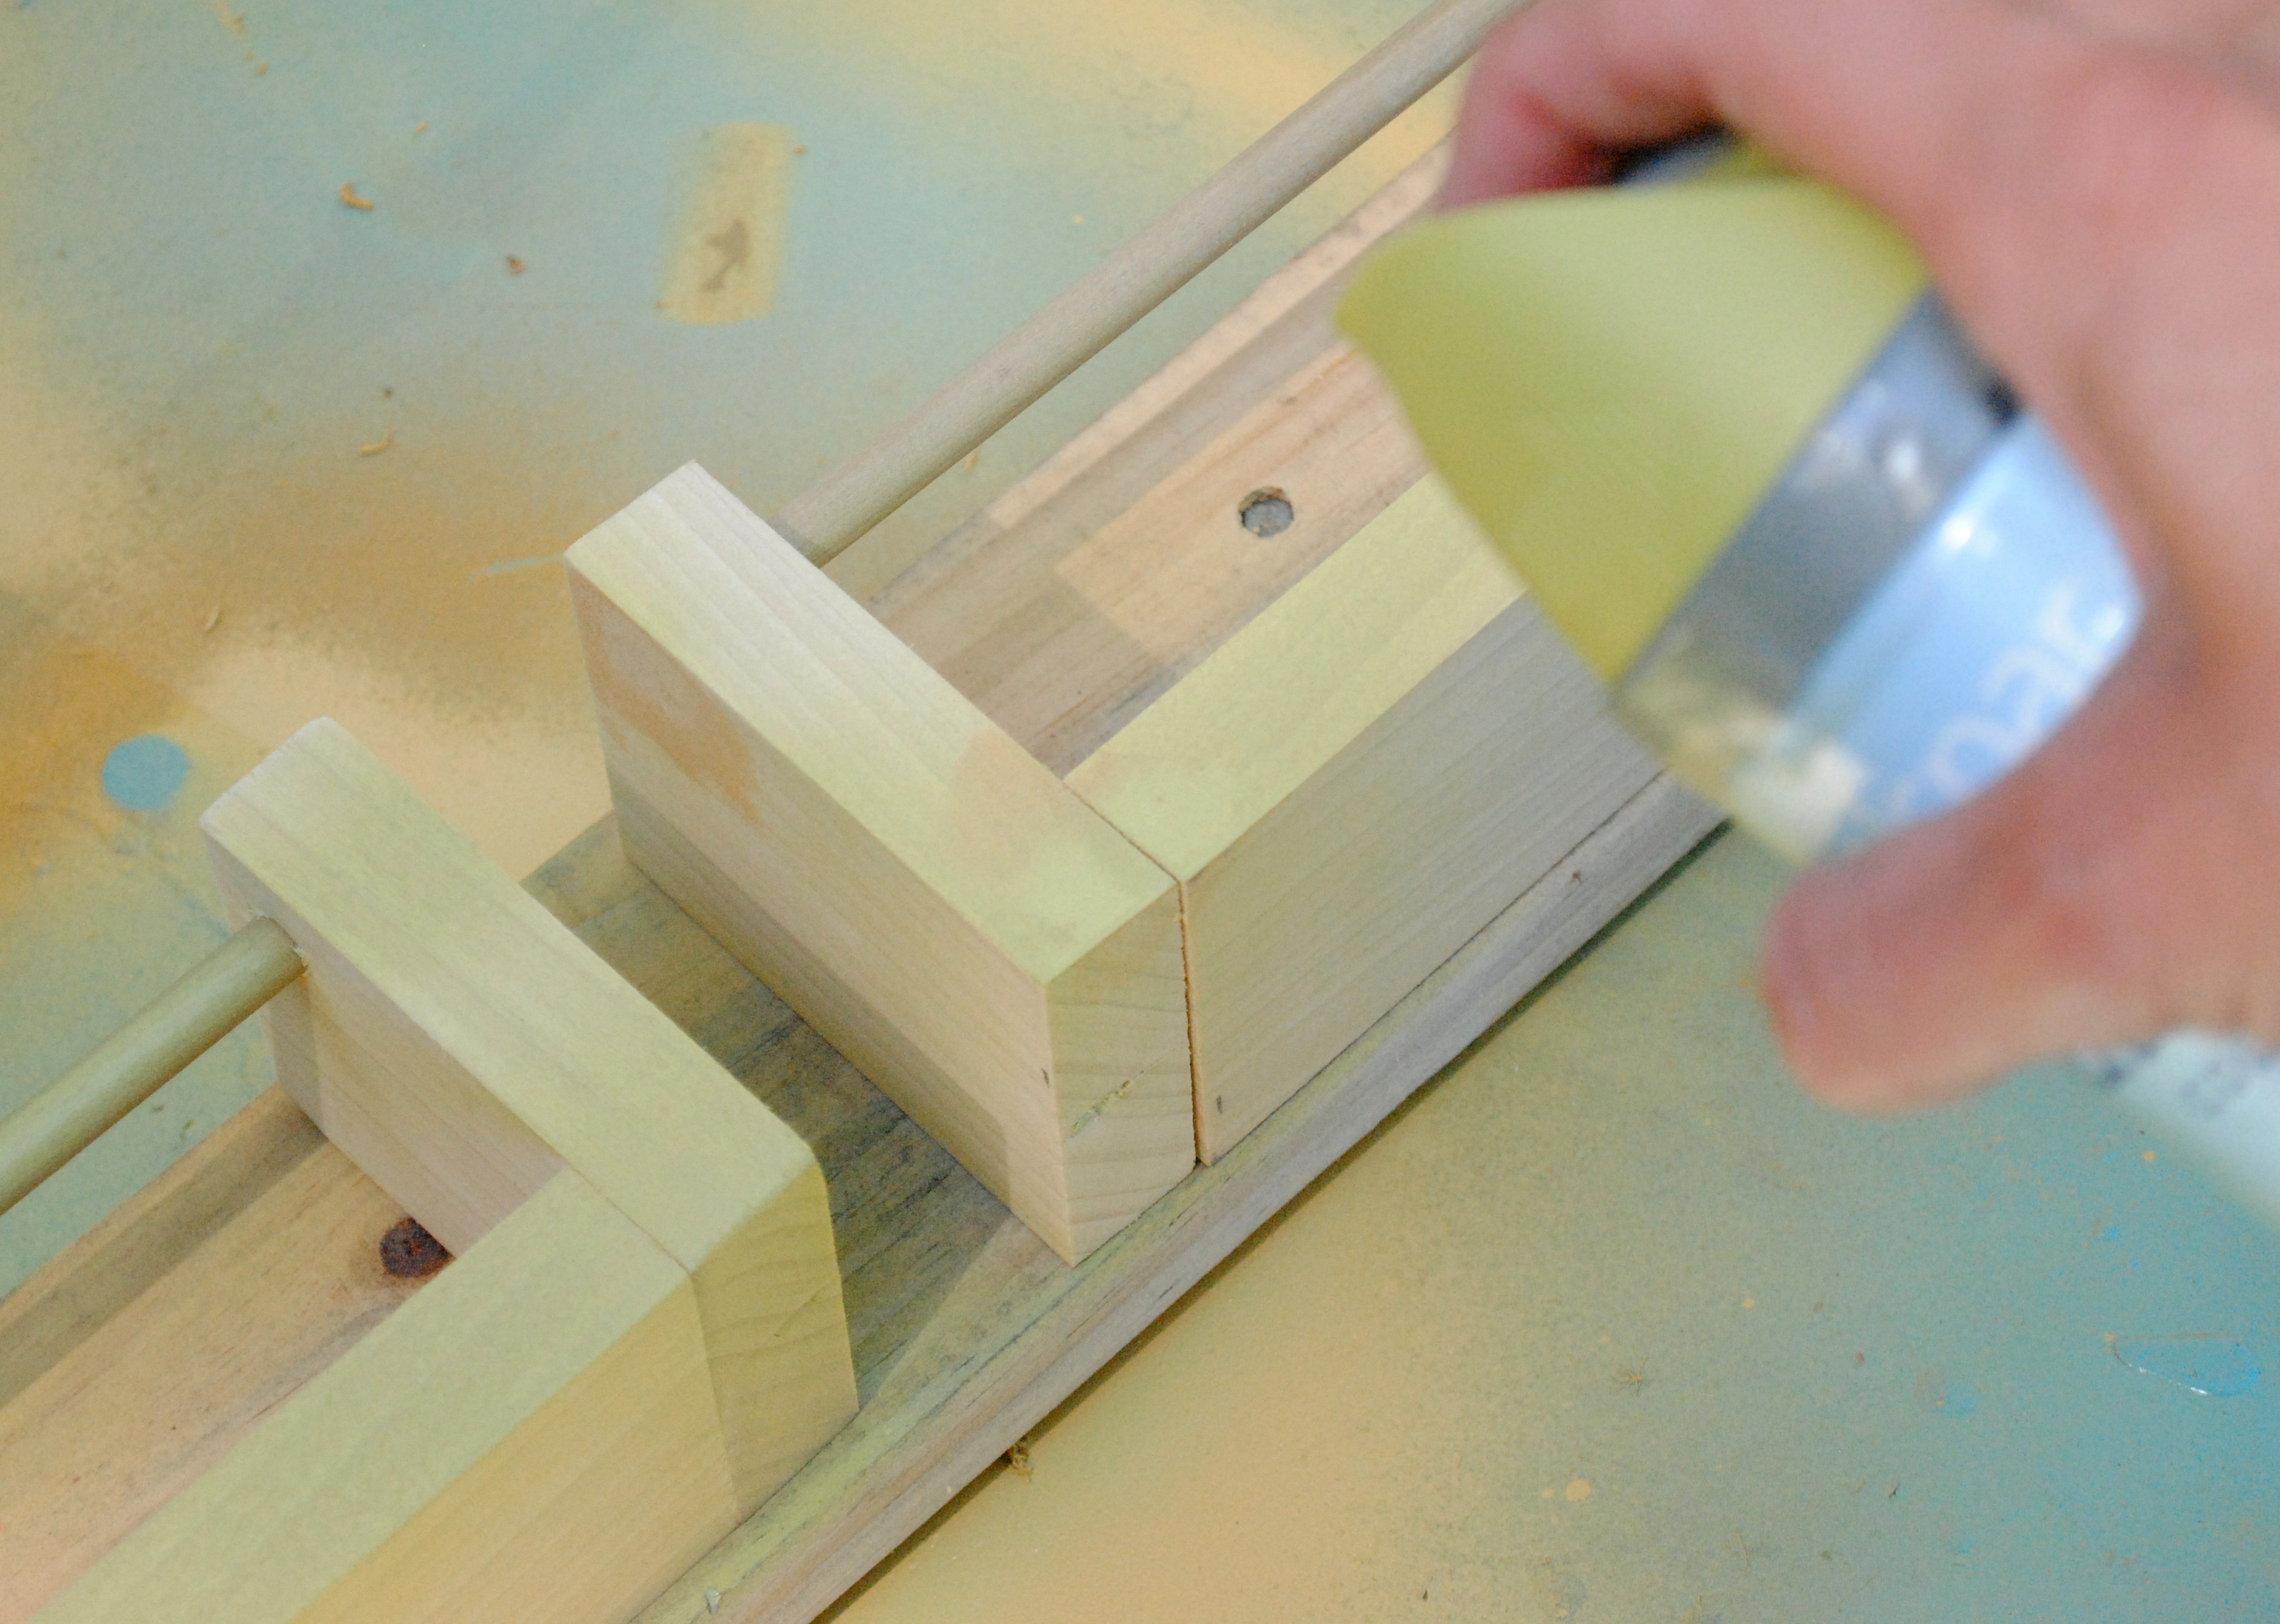
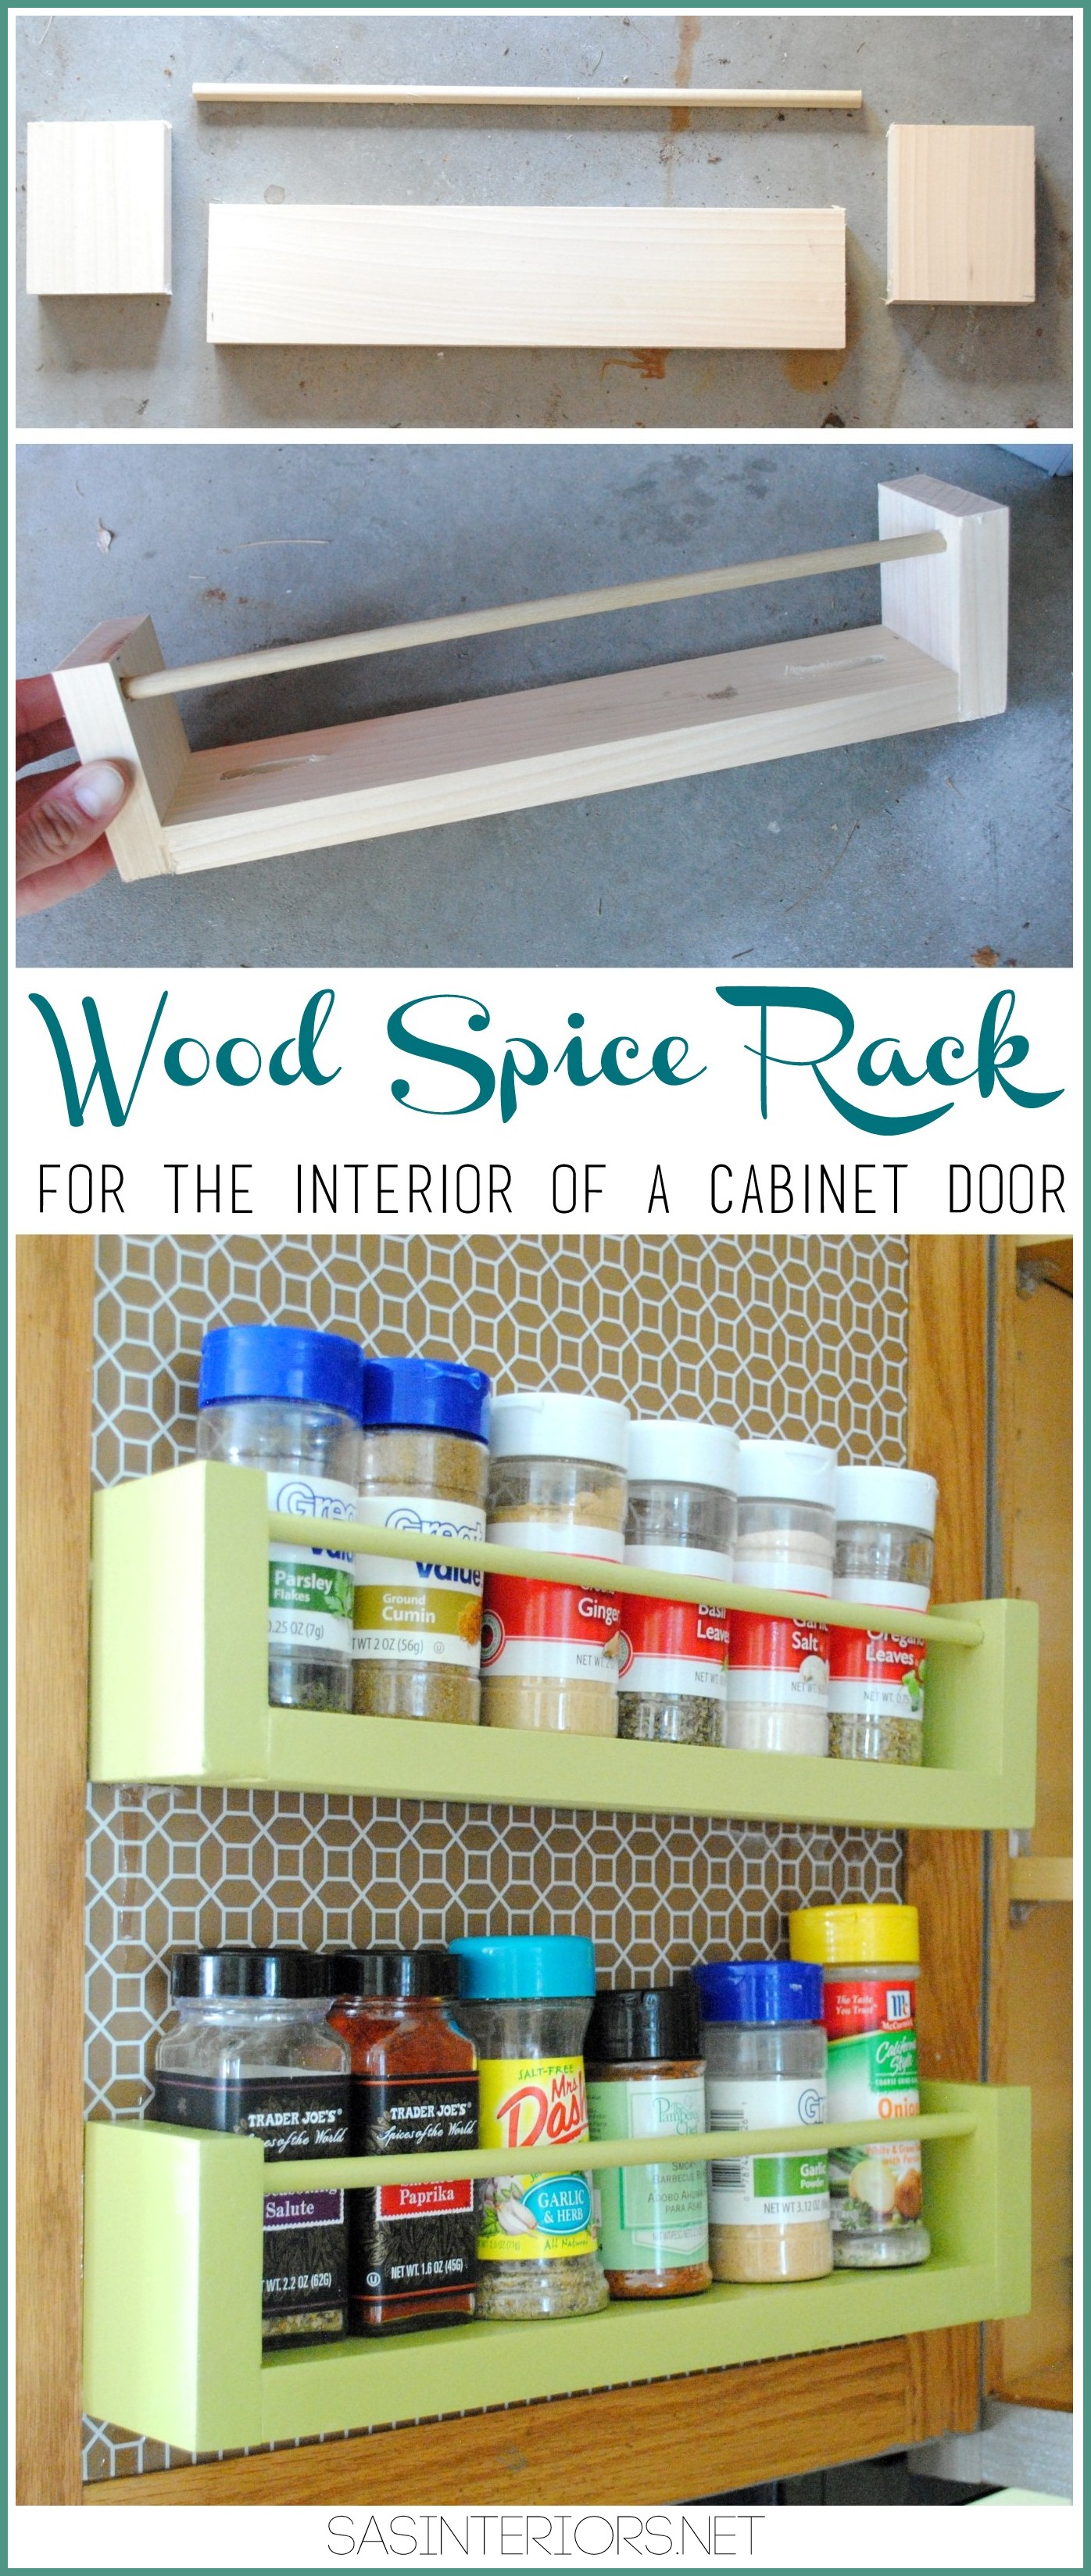
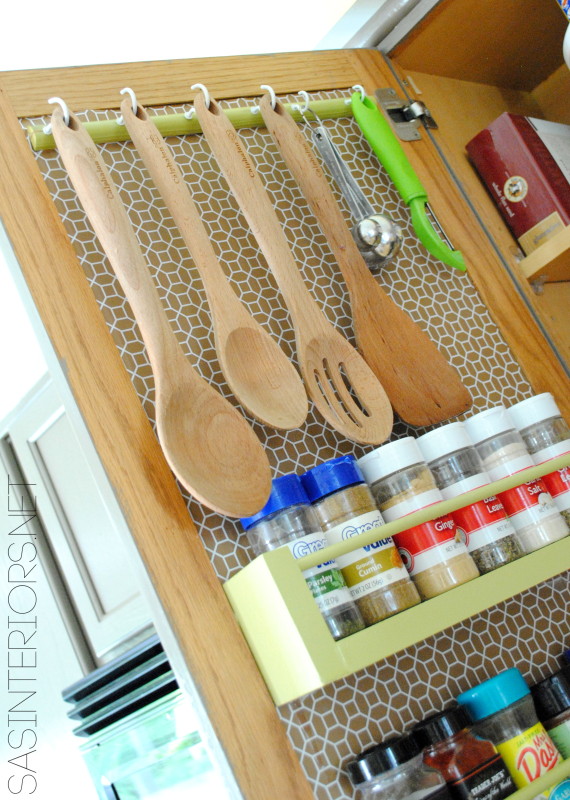
Before my interior cabinet updo, I never had a great place for spice storage, so that was a major need on my list.  I looked around for pre-made styles, but nothing fit the bill just right, so I made my own.  I’ll show you more on that in an upcoming tutorial, but this is the result…

Kitchen Organization: Ideas for storage on the inside of the kitchen cabinets by @Jenna_Burger,WWW.JENNABURGER.COM

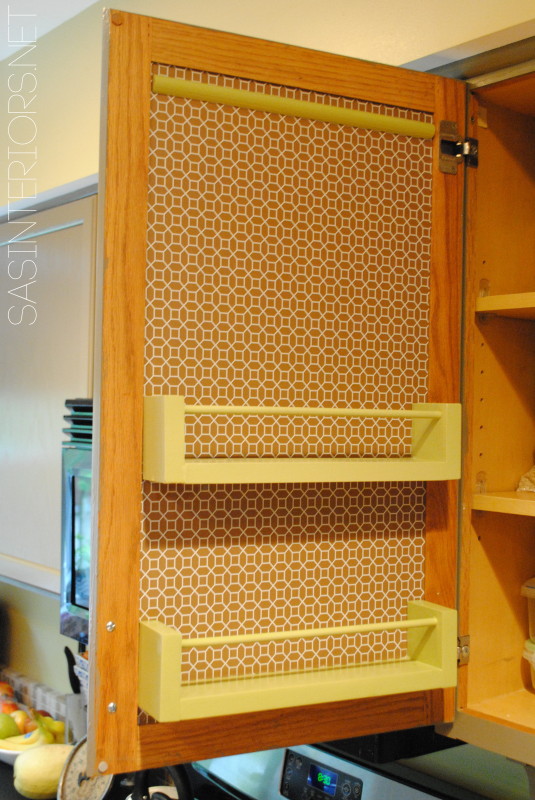
For less than $8, I created 2 fit-to-size wood spice racks.

Kitchen Organization: Ideas for storage on the inside of the kitchen cabinets by @Jenna_Burger, WWW.JENNABURGER.COM

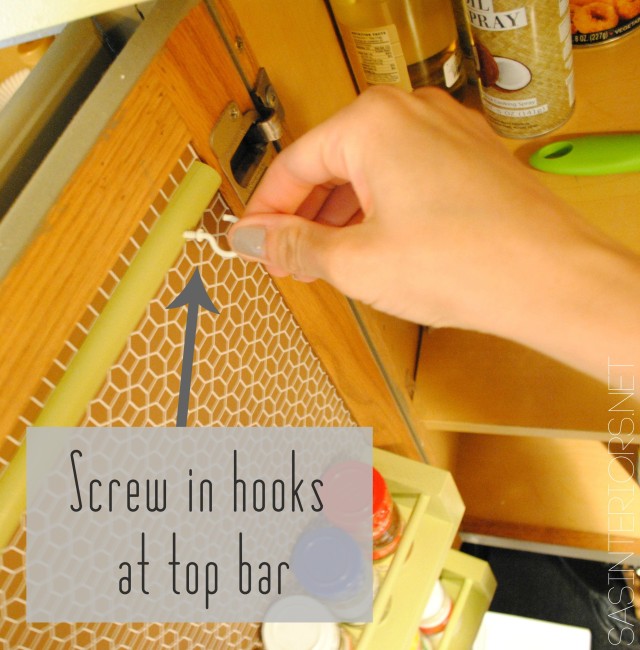
At the top of the interior of the cabinet, I added a half round piece of trim, which I then added metal screw-in hooks to.

Kitchen Organization: Ideas for storage on the inside of the kitchen cabinets by @Jenna_Burger, WWW.JENNABURGER.COM

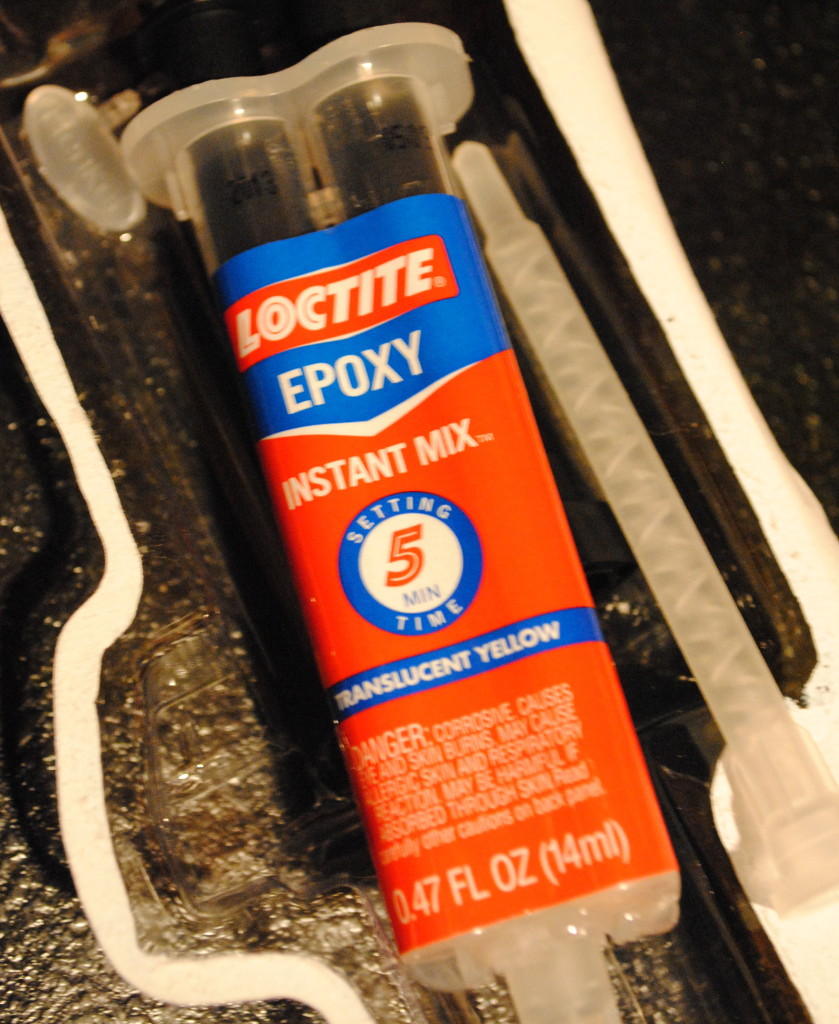
I attached the half round piece of trim + the newly made wood spice holders using a very very very strong adhesive – Loctite Epoxy Instant Mix.  Basically it’s two formulas that mix together and provide a major adhesive mixture. DO NOT TOUCH IT.  I carefully applied the mixture to the back of the trim and spice holder, then placed it on the interior of the cabinet.  I held it in place for about 3-5 minutes until it was completely adhered to the surface.  I will be honest, the wood started to slide a few times, but I was close by and slid it back into place.  There are other epoxy mixtures that dry even quicker – 1 minute of less.

DIY: Wood Spice Rach Holder for inside the kitchen cabinets; Less than $8 to make, in 15 minutes by @Jenna_Burger, WWW.JENNABURGER.COM

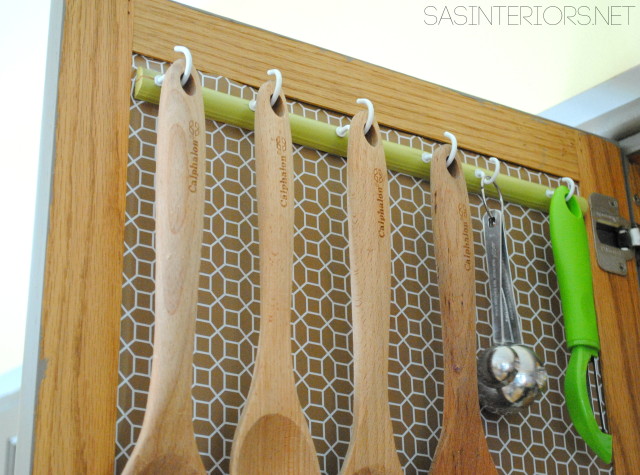
It really is the perfect spot to hang many of the kitchen utensils.  Here’s the result…

Kitchen Organization: Ideas for storage on the inside of the kitchen cabinets by @Jenna_Burger, WWW.JENNABURGER.COM

Kitchen Organization: Ideas for storage on the inside of the kitchen cabinets by @Jenna_Burger, WWW.JENNABURGER.COM

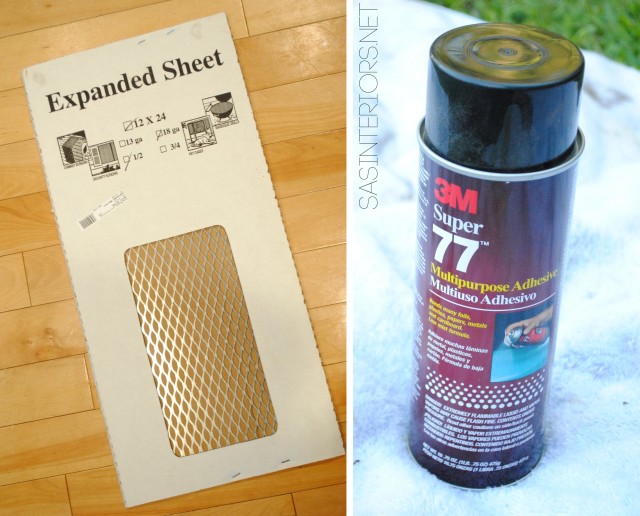
Heading over to the other cabinet, the right side, I added a decorative magnetic metal sheet that I found at Lowe’s and adhered it to the inset panel with 3M 77 Multipurpose Adhesive.  I sprayed the adhesive outside on a towel and then ran brought it indoors and positioned it.  All went to plan and my fingers only stuck together a little, phew…

Kitchen Organization: Ideas for storage on the inside of the kitchen cabinets by @Jenna_Burger, WWW.JENNABURGER.COM

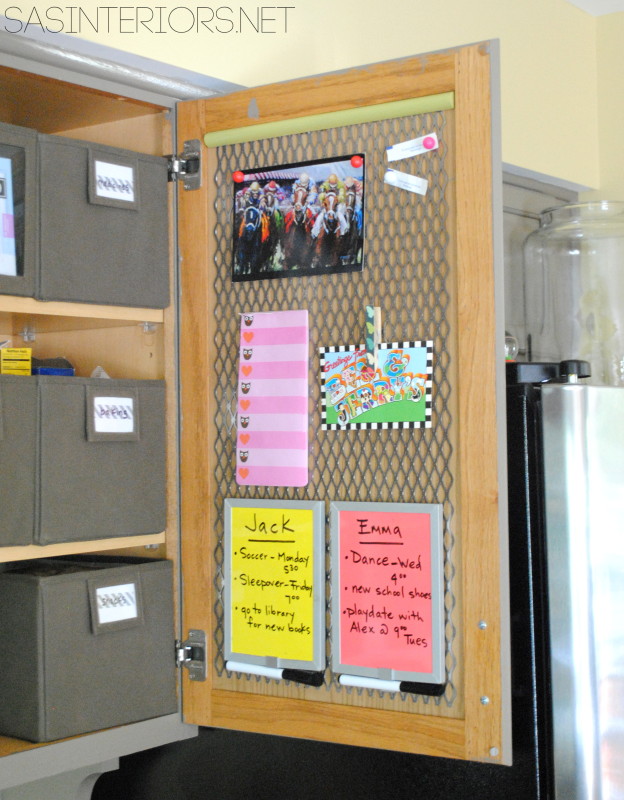
Having the magnetic sheet on the inside of the cabinet door has been GREAT! This large vertical spot is great to keep my grocery list, to do’s with the kids, and of course our random chinese fortunes…

Kitchen Organization: Ideas for storage on the inside of the kitchen cabinets by @Jenna_Burger, WWW.JENNABURGER.COM

For the interior of the cabinets, I took everything out and simply organized it all.  Well, it wasn’t simple, but it sure was worth it!  For things that could be grouped – like snacks, baking supplies, medicines, teas, etc. – I added bins and labeled them with washi tape.  So easy.  The bins are from ClosetMaid available at Target and they are leftovers from when I reorganized the kids rooms.  They are the ideal size for a typical kitchen cabinet.

For the rest of the food items, I grouped them and organized them as I saw best for how / when I would use them.  Really no rhyme or reason…

Kitchen Organization: Ideas for storage on the inside of the kitchen cabinets by @Jenna_Burger, WWW.JENNABURGER.COM

On to the other large cabinet, the space that holds ALL the dishes.  Another material that I thought would be extra helpful in staying organized in the kitchen was cork.  I purchased a roll of cork and double layered it, then added it to the inside panel of the cabinet interior, again using the 3M Multipurpose Adhesive.

Kitchen Organization: Ideas for storage on the inside of the kitchen cabinets by @Jenna_Burger, WWW.JENNABURGER.COM

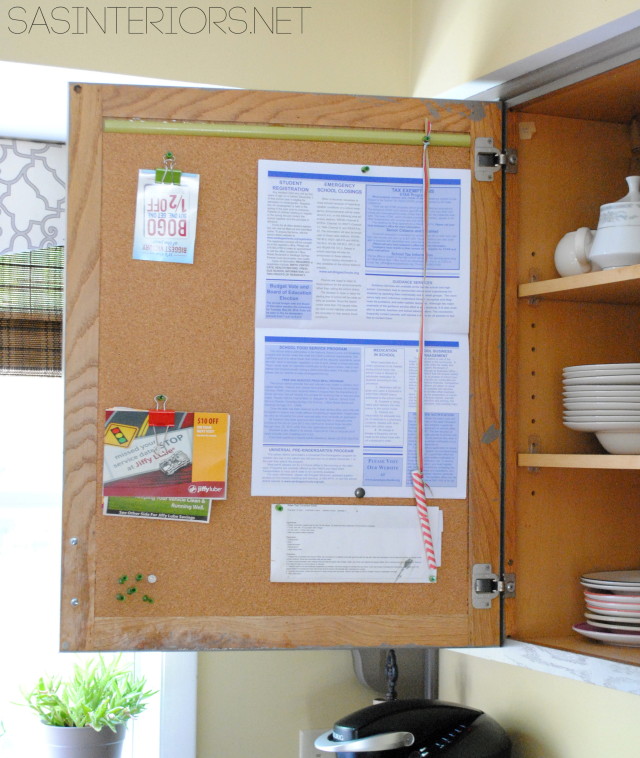
This is such a great spot for the school calendar, plus random coupons, and reminders.  I also use the cork board when following a recipe.  I pin it on the board and it’s right in front ready to follow as I’m prepping.

Also on this inside cabinet, I added another half round trim piece for added storage.  Right now all I have is a pin with a pen hanging, but it can be used for so many other things.  Maybe more kitchen utensils???

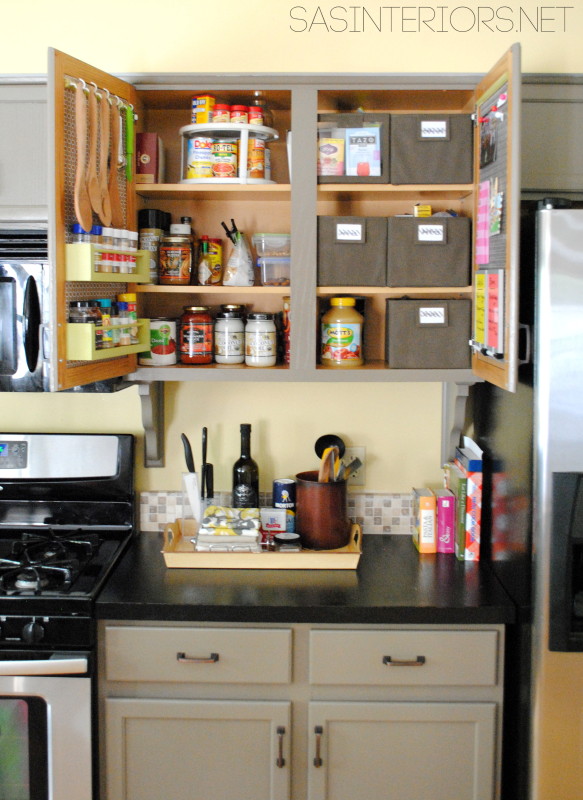
Here is the result of my kitchen organization, with all the doors open…

Kitchen Organization: Ideas for storage on the inside of the kitchen cabinets by @Jenna_Burger, WWW.JENNABURGER.COM

Inside and out, I’m loving this space.

If you haven’t been following along with my blog from the beginning, you might not know that I redid the entire kitchen by hand (total down-and-dirty do it yourself) a little over 2 years ago.  It included painting cabinets, painting the countertop, adding backsplash tile, adding decorative brackets,and more.  See the before and after by clicking here.

I’m still on a path for more organization, but I feel one step closer to a more efficient space.  On to the next room…

I truly love using every square inch of a space.  Vertical surfaces often are forgotten as the ideal spot for storage.  If you use all the interiors of your kitchen cabinets, how much more could you store??  Ask yourself.

To gather even more unique, fun, and creative ideas for your indoor and outdoor Fall and Winter spaces, I would definitely suggest downloading the Lowe’s Creative Ideas app on the iphone and ipad.  I’m always checking out the FREE app for great seasonal + do-it-yourself inspiration.

Lowes Creative Idea Network Creator & Influencer

Also consider following Lowe’s on Facebook, Pinterest, and Instagram as well.

 Disclosure: I am part of the Lowe’s Creative Team and was provided with a Lowe’s gift card to purchase items for my project.  I was also compensated for my time to use the products.  No one told me what to create, what to buy, how to use the product, or what to write.  All opinions are 100% mine! Fall Blogger Badge 1