
Color Trends 2019

2018 was a busy year hustlin’ and bustlin’ with projects.  Unfortunately though not on my home, but for others (my home upgrades have been minimal and I still have so much to share since moving into our brick ranch fixer upper a year ago.  All in due time.)  The real focus for ’18 was on my client roster of about 40 for the calendar year.  This breaks down to about 125+ rooms that I designed, so I’ve had my fair share of time flipping through paint color swatches.

Throughout the year of choosing paint colors for kitchens, bathrooms, bedrooms, and beyond, I found that I keep gravitating toward the same specific colors or a general color palette.  I thought it would be fun to share a post of what’s trending now (in my world) and what colors I love…

Note: All the paint colors I’m sharing are from Benjamin Moore, but this isn’t a sponsored post.  I just typically use BM as my-go to paint company.  I know their colors the best and I personally have used their paint and love them.  Other designers + pros use other companies, which I’m sure are equally great, but I’ve found my niche with Benjamin Moore.


WYTHE BLUE / HC-143
One of my favorites of the year is Wythe Blue, which is a soft green hue with blue undertones.  Years ago, I used to adore sage green, and this is an updated version of that hue, but with slightly more cooler blues included. It’s ideal for a mudroom, bathroom, or bedroom!
WEDGEWOOD BLUE / HC-146
This green-blue hue is very similar to wythe blue, but whereas wythe blue is green with slight blue undertones, wedgewood blue is more blue with green undertones.  The blue is more dominate in this color, but mixed with the green it has such a rich tone.  Perfect for a bathroom or bedroom, this color is so versatile and serene.
COLLINGWOOD / OC-28
If there is a now color, it’s Collingwood.  I first used this color in my own living room last year and I’ve used it in at least a dozen applications since.  It is the most beautiful soft gray that has slight warm undertones so it isn’t too cool. It’s light enough in color, but gives great contrast to white mouldings.  In my book, this is the best neutral and color of the year!
BALTIC SEA / CSP-680
Another favorite paint color that I’ve used over and over… baltic sea.  This turquoise hue is so engaging and strong, yet isn’t gaudy or overwhelming.  The deep color is so striking, yet inviting.  Recently, I’ve used this color on an accent wall, on the front door (inside and outside), in a laundry space, and on a bookcase built-in.
SNOWFALL WHITE / OC-118
There is no such thing, as just white.  When you flip through the paint colors, it can be overwhelming.  There are so many whites to chose from.  Snowfall white is one of my favorites.  It’s a very true white with no real warm or cool undertones, which delivers a true white.  Some whites can be very warm with red undertones, while others are very cool with blue undertones, but this hue is a great mix giving a gorgeous balance resulting in a true white.
BLACKTOP / 2135-10
Opposite from above, this black hue is amazing and striking, but not harsh or confining.  Blacktop is one of my favorite black paint colors because it’s ideal to use to balance lighter hues in a space, but it has a soft feel so it’s not overwhelming.  I recently used this color on my garage door and on the brick fireplace .  And let’s not forget the black wall in my previous home.  I most definitely heart black!
CUSHING GREEN / HC-125
This is a new hunter green hue is a new color for me this year.  I am so drawn to the rich, dynamic quality of the green color and it appears amazing with soft tones like blush, cream, and lilac.  I recently worked with a Client who had a sofa with a floral fabric that had a feminine aesthetic. To balance the soft hues, I introduced darker elements in this hunter green palette along with lighter layers like soft creams.  The result was a mix of darks and lights which created depth and intrigue to the space.
In all honesty, I started this blog post over a month ago and life got in the way.  In the meantime, the Pantone Color of the Year was announced and the in-trend color LIVING CORAL made it’s debut.  It’s slightly brighter, but similar to this next favorite of mine…
TOMATO CREAM SAUCE / 2089-40
Hues of coral have been in my pocket for a long time.  The vibrant color range that mixes red, orange, and some brown to create a striking coral hue is so unexpected and engaging.  Tomato Cream Sauce is a favorite for layering or a pop of color on an accent wall or door. This is the perfect hue for layering and pairing with navy, turquoise, or lime green!
GERBERA DAISY / 2015-60
Let’s stay in the family and turn a little more orange towards a peach hue.  I used this recently in a girls bedroom and paired it with this fun wallpaper.  This popsicle peach color was ideal for pairing with navy, coral, and truly any color in the rainbow.
HALE NAVY / HC-154
Be still my heart.  My love for navy is still so strong.  If I had one color to choose of all out there, it would be navy.  A favorite navy of mine is Hale Navy because of it’s bold, rich quality.  I stand by this color for so many applications.  It would work on the walls of any room complimented by white mouldings and furnishings.  In my house, I used the dynamic color on my kitchen cabinets and the barn doors.  Again, contrasted with white or light layers, this deep blue is so striking.
KENDALL CHARCOAL / HC-166
This is one of my favorite colors this year.  I’ve used it so many places! From cabinets to garage doors, this color is incredibly rich and savory.  It’s an amazing hue that is grey mixed with undertones of brown to bring warmth.

SUNBURST / 2023-40

Certainly the boldest of the bunch, I’m rounding out my favorite colors for 2018 with a punch!  Yes, it may be too bright for an entire room, but this striking yellow is amazing.  I love color and this bold hue is perfect in small doses.  You’ve seen my vibrant yellow in our pajama lounge.  When I first told other that I was going to paint it yelloe, they thought I was crazy, but look at the result.  The yellow door makes the room.   Sunburst is striking, hands down.  It’s a winner!

All these colors have a quality that are rich, striking, and engaging!  I have the luck of choosing paint colors daily and I feel blessed to have the experience of pairing colors that I know will work with each other.  Over the last year of flipping through many paint fan decks, I have found these 12 hues to be my favorite.

My school of thought and mission for design is to incorporate classic, timeless, unique, and eclectic elements that are in – trend, but not trendy.  I think all these colors evoke that philosophy.  BUt as always, trends are continually changing and influencing our likes.  It’ll be interesting where the next year takes us in the world of color.

Front Door: New Style + New Color

Typically I can choose a paint color within minutes.  Rarely do I sit, ponder, question, and debate.  But my wham-bam-paint-color-decision-making streak is over since I had the most difficult dilemma choosing a color for our new front door.

Choosing a new paint color for the front door

Late last year we said farewell to our solid front door and in it’s place we welcomed a new beauty that now fills our foyer with lots of light all year round!  The door arrived primed in a drear barn red hue.  At the time of installation, it was too chilly outside to paint, so for 6 months it stayed as is. When the temps finally got above 50 degrees about 2 weeks ago (even though we had snowshowers last week – #forreal), it was finally time to give life to our new addition.

I was so excited to give a splash of color to our entryway, but I could not for the life of me choose a color…  What color would suit our home best – inside and out?…  Turquoise? Coral? Red? Navy? Yellow? Apple Green?

Inspiration + color swatches filled my world for days…

Front Door-012

Then one moment I had a revelation.  I finally chose a color.

Taking into account the other colors on the porch + tying in the colors inside of our home to make a cohesive thread, I chose…

My tried & true APPLE GREEN!

New paint color on the front door: Valspar Crushed Oregano

It may be a surprising choice because I like change & am continually making updates to our home with new colors + new layers.  For years our front door was apple green and with a new door, you would probably think, choice a new color.  Many of you said hues of blue would be your color of choice, which I love too, but in the end the apple green, pistachio hue was me.  This color is just who I am – bold, vibrant, surprising.  All the other colors that I oh-so-badly photoshopped on our front door (take a look at this post to see the other colors I considered), would have looked great too, but this green color just made the most sense.

Take a look…

New paint color on the front door: Valspar Crushed Oregano

The color is a bit different than the previous apple green colored front door.  This time I chose the color Valspar Crushed Oregano 6000-6C in a semi-gloss finish.

New paint color on the front door: Valspar Crushed Oregano

New paint color on the front door: Valspar Crushed Oregano

I’ll tell you, with the glass, this front door took a bit more time to paint.

Using painters tape @ the edge, I covered all the glass…

New paint color on the front door: Valspar Crushed Oregano

Then used an angled brush to apply the paint.  No roller for this small job…

New paint color on the front door: Valspar Crushed Oregano

New paint color on the front door: Valspar Crushed Oregano

About 3 coats later, the door was complete and the result from before to after was huge!

New paint color on the front door: Valspar Crushed Oregano

What a simple + fast weekend (it really can be done in one day) project to give new life to the entry of your home!   Choosing a color that expresses you, your style, and your interior can truly set the stage for what’s to come on the inside.

I am so happy that I went back to my original inspiration to guide me to make the decision that I feel fits best with our home…

Green Door Inspiration

Now that the color is set, I’ve got some work to do to spruce up this porch for Spring!  More on that coming soon…

Top Paint Colors for Black Walls + Painting a Black Wall in the Living Room

Black has been on the brain and here are my TOP PAINT COLORS FOR BLACK WALLS

TOP BLACK PAINT COLORS for any room in the home! Paint Color roundup by Jenna Burger Design, www.jennaburger.com

From bronchitis to a broken furnace to dealing with bitter below-zero temps, it has been a bustling few weeks.  But the biggest focus of my spare time around work & kids activities has been going BLACK in the living room.

Black is bold.  Black is neutral.  HOW TO MAKE BLACK WALLS WORK in every space of the home. I chose Valspar Black Heron for the living room fireplace wall and the color is a soft charcoal black! More @ www.jennaburger.com

A few weeks back, I mentioned my plan of action to completely change the living room upon selling almost all my furniture to a friend.  Even though they were material things and didn’t work for the space, I held on to them way too long.  Once the room was cleared out, I felt freed.  It was an interesting feeling to feel liberated by furniture.  Typically I give the advice to others to just let it go, but it ‘s easier said than done.  Anyway, part of the plan for changing the space was to paint the walls + the mantel.  Over the years as the paint hues around our home have evolved to more cooler tones, the living room space was one of the last to be updated.

Ever since choosing navy for my office (check out my favorite navy paint colors), I have had a passion for deep + dark hues with whites + lights layered in.  I’ve also been dying to paint a wall black.  Crazy sounding to some, yes, but it’s such a dramatic, fierce, and strong color (here are 23 inspirational spaces that black on the wall is awesome).  I knew black was finally going to get it’s moment in the new living room space of our humble abode.

By-Bye orange…

Black is bold.  Black is neutral.  HOW TO MAKE BLACK WALLS WORK in every space of the home. I chose Valspar Black Heron for the living room fireplace wall and the color is a soft charcoal black! More @ www.jennaburger.com

Hello Black! I know it looks blue in the pictures, but it’s black.

Black is bold.  Black is neutral.  HOW TO MAKE BLACK WALLS WORK in every space of the home. I chose Valspar Black Heron for the living room fireplace wall and the color is a soft charcoal black! More @ www.jennaburger.com

A before and after of the overall wall will give a better sense of the change in color…

Black is bold.  Black is neutral.  HOW TO MAKE BLACK WALLS WORK in every space of the home. I chose Valspar Black Heron for the living room fireplace wall and the color is a soft charcoal black! More @ www.jennaburger.comThe color I chose for the fireplace wall is Valspar Black Heron and it’s a soft, charcoal black that in my opinion resembles the coloring of a chalkboard.  It has a slightly blue undertone and looks awesome with the other lighter hues I used in the room – Valspar Silver Thistle Down on the other walls and Valspar New Ream for the fireplace.

Even though the wall is darker now with the black paint color, the overall room feels so much larger.

With the in-progress picture above, you are seeing a sneak peek of what is to come.  Here are more details on what will be going on with this wall…

Black is bold.  Black is neutral.  HOW TO MAKE BLACK WALLS WORK in every space of the home. I chose Valspar Black Heron for the living room fireplace wall and the color is a soft charcoal black! More @ www.jennaburger.com

Moulding.  Accessories.  Layers.  A lot more is to come before this room is complete, but progress is being made starting with the fabulous, new black wall!

Choosing the Best Black

Black paint for walls is a great neutral choice other than the typical gray, taupe, or beige.  Black is bold, unexpected, and a beautiful hue to add white + lighter layers.

Like the array of white paint colors to choose from, there are just as many blacks and there are a few things to consider to deciding on the best black for you…

Tips for choosing the BEST BLACK paint color for your room!

3 factors to choosing how a black wall color will read in a space depends on:

1. the natural light filtering in during the day

2. the artificial light in the evening

3. the undertones of the paint color

After looking at too-many-to-remember black paint colors, here are my favorites:

TOP BLACK PAINT COLORS for any room in the home! Paint Color roundup by Jenna Burger Design, www.jennaburger.com> 1 – Valspar Black Raven (a soft black with a slight blue undertone)
> 2 – Benjamin Moore Black Satin
> 3 – Valspar Kettle Black
> 4 – Behr Totally Black (a true black hue as seen in the boy room makeover by the Hunted Interior)
> 5 – Farrow & Ball Off-Black
> 6 – Valspar Black Heron (the color I chose)
> 7 – Benjamin Moore Black Suede
> 8 – Benjamin Moore Oynx
> 9 – Benjamin Moore Black Beauty (a warm black that works beautifully with stained wood as seen in the home of Making it Lovely)
> 10 – Valspar Dark Kettle Black (a deep black as seen in the bedroom makeover of Oh Happy Day)
> 11 – Sherwin Williams Caviar
> 12 – Benjamin Moore Black Berry
> 13 – Behr Cracked Pepper

You know you want to paint something black now…   So what black will you choose for your next painting project?! 

Bathroom Makeover: Plan of Action {Day 1}

I’m at it again…  another project!  And this is a biggie.  I know, I know…. I haven’t even waited 0.05 seconds before starting something new, but this project has been in the works for over a year and I’m thrilled that my thoughts + ideas are actually coming to fruition!  So the next big remodel… the hall/kids bathroom.

This bathroom got a mini DIY revamp about 3 years ago, but it’s been used & abused by two kiddos, so it was time to put my design expertise to work and create a space that would handle the everyday splashes & wear of two busy bees.

Of course, I can’t start the remodel without a plan of action.  So here it is.  My creative vision board for the new bathroom space…

Bathroom Makeover: Creative Vision Board for the new space. Filled with basics + layers of bold. An entire DIY bathroom remodel.

I’m thrilled to be partnering with Lowe’s on this bathroom renovation and they’ve put me to the test to create a dynamic, on-trend space using their in-stock products (items that can be found in store versus online).   My vision for this revamp is to mix my design style of classic eclectic – classic for the background with bold elements layered in!   Since the tile is the dominate feature (shower + 3′ up all the walls) in this bathroom, that’s where I started…

My design philosophy when creating any space is to go classic for the elements that are expensive and/or difficult to change.  Similar to buying a sofa (which I typically go neutral in color and pattern), I wanted a tile that could “live” a long time…  I DO NOT plan on changing the tile in a year or two (or even 5), so it had to be something that I would like now & in the future.   There is nothing more classic and beautiful than 3 x 6 subway tile.  The bonus, it’s only .22 cents a tile – one of the least expensive Lowe’s has.  But (there’s always a but), I wanted something more.  I needed to create a wow-factor.  So along with the classic subway tile, I am also going to incorporate a gorgeous herringbone carrara marble.  Crossing my fingers that it looks as good on the wall as I envision it in my head {squeal}.

White subway tile - the most classic, most beautiful (an one of the least expensive) tile you can get!

Lowes Herringbone Carrera Marble

But you all know me, I need color somehow, someway.  That’s where the layers in the space come in.  I’ve selected a dynamic wallpaper that is really give an incredible contract against the classic white subway.  It’s bold.  It’s unexpected.  It’s me.

Serena and Lily Palmetto Wallpaper – Inkwell Blue/Khaki

The classic and the bold are covered!  The other elements in this new proposed bathroom are all going to enhance the beautiful classic and bold selections.  The old builder-grade vanity will be headed curbside and a new, more modern vanity in an espresso finish will be installed in it’s place.  For the lighting, I wanted to introduce another unexpected element and chose an oversized single exterior industrial-style light fixture.

Here’s the catch… I’m doing 95% of this bathroom renovation on my own.   I’m crazy, right?!  Nutso, but I’m determined.  The part that I will not be tackling is the install of the new tub and shower components.  The mister nor I have ever installed a tub or shower fittings and are too nervous to tackle it on our own and want to avoid any possible leaks.  We know when to call in the pros and the tub install is not within our skill-set.  I am sure we could do it, but who wants to take the chance?  Not Us!  Beyond that though, it’s all on me.  Tile, toilet, vanity, lighting… All DIY baby!

Since this bathroom makeover is almost an entirely DIY job, it’s going to take longer than typical, so our goal is to tackle it in 30 days.  30 days start to finish, complete!  Can we do it?  Let’s see.  I hope you’ll follow along on another crazy DIY adventure…

{Day 1} Plan on Action – Complete!  29 more days to go…

From start to finish, these are all the posts pertaining to this bathroom remodel
Plan of Action
Demo: Removal + Installation of the Tub & Walls
How-To Tile + Grout the Bathroom Walls
Installing Wallpaper
Adding a Tile Accent Border
Creating a Tiled Niche
Bathroom Makeover Reveal
Resources

This post is sponsored by Lowe’s, but all thoughts and opinions are 100% my own.  I am thrilled (and a bit nervous) about tackling this project, but very excited to be partnering with Lowe’s on creating an entirely new bathroom space.  I’d love for you to follow along on this new project!

China Cabinet Makeover {Reveal}

It’s done!  What a journey it’s been for this china cabinet.

Upon finding this diamond-in-the-rough on Craigslist and rescuing it from a dilapidated garage that housed chickens, roosters, and a few other unknown animals (I was afraid to even look around), the once trash-bound cabinet now sits beautifully in my dining room with a vibrant new color & a complete designer makeover…

China Cabinet before & after >>> The process of giving this piece of a furniture a complete makeover!

It has been quite the task of getting her to this point, but she’s complete!

We can’t appreciate the ‘after’ without looking at the ‘before’.  Remember what she looked like a few short weeks ago…

China Cabinet >>> before - details prior to the makeover

China Cabinet >>> before - details prior to the makeover

>>> read more on The Backstory + Choosing a Color <<<

Like I said, it’s been quite a journey. Let’s reminisce…

I was psyched to bring her home.  Once she landed in our garage, I started the prep work by removing all the hardware, the doors, and the shelves.

China Cabinet before & after >>> The process of giving this piece of a furniture a complete makeover!

I cleaned her up a bit + lightly sanded all the surfaces.

China Cabinet before & after >>> The process of giving this piece of a furniture a complete makeover!

>>> read more on Prep + Sanding Wood Furniture <<<

Once all the surfaces were ready, it was time to prime!  As I’ve shared over & over, priming is SO IMPORTANT.  The purpose of paint is to provide color, but the purpose of primer is to provide the ideal base for the paint to be applied.  The paint + primer in one is fine for walls, but a true primer like Glidden Gripper (which is what I used) will block the stain from bleeding through and will provide the needed base for the paint to adhere!  If you’re painting furniture, YOU MUST USE PRIMER.

China Cabinet before & after >>> The process of giving this piece of a furniture a complete makeover!

China Cabinet before & after >>> The process of giving this piece of a furniture a complete makeover!

>>> read more on Why & How-To Prime Wood Furniture <<<

After the key step of priming all the surfaces, it was time to PAINT!  Finally, right?!  I chose the color Red Red Rose by Glidden using the Glidden’s new simplified color palette.China Cabinet before & after >>> The process of giving this piece of a furniture a complete makeover!This is a real wow-factor color and even before finding the china cabinet, I knew this rosy, raspberry hue would be perfection.  Typically I have the piece before choosing the color, but not in this case.  The other hues + layers in the dining space are fairly minimal and neutral, so I knew a focal point piece that would be the eye-catcher of the room would make a real impact.  It’s all about the contrast and the balance between neutrals and bolds.

The process of painting this beauty was laborious, but O So Worth the time + effort!

China Cabinet before & after >>> The process of giving this piece of a furniture a complete makeover!

China Cabinet before & after >>> The process of giving this piece of a furniture a complete makeover!

>>> read more on How-To Paint Wood Furniture <<<

Once the china cabinet was painted & sealed, I wanted to add a few fun, unexpected details.  I chose to add self-adhesive, contact paper to the back of the cabinet interior which provided a beautiful backdrop for all my dishes, platters, and china.

China Cabinet before & after >>> The process of giving this piece of a furniture a complete makeover!

When I couldn’t find the exact hardware I had envisioned, I DIYed it to create exactly what I wanted at a fraction of the cost.

China Cabinet before & after >>> The process of giving this piece of a furniture a complete makeover!

Once the jewels hardware was set, it was time to style this gorgeous gal!

It’s now all filled up with our collected plates, glasses, and platters…  Believe me, not one new thing was bought for this revamped beauty.

China Cabinet before & after >>> The process of giving this piece of a furniture a complete makeover!

>>> read more on the Details + Hardware + Styling <<<

a recap of the process…

China Cabinet before & after >>> The process of giving this piece of a furniture a complete makeover!

And then she was complete!

The ‘after’…

China Cabinet before & after >>> The process of giving this piece of a furniture a complete makeover!

China Cabinet before & after >>> The process of giving this piece of a furniture a complete makeover!

China Cabinet before & after >>> The process of giving this piece of a furniture a complete makeover!

Styling Tips: Adding unique, one-of-a-kind details to the finish the china cabinet makeover!

Let’s compare one more time…

China Cabinet before & after >>> The process of giving this piece of a furniture a complete makeover!

What do you think?  Pretty major change, right?!

Thank you so much for following along on this Tale of a China Cabinet Makeover!  I’ve received countless emails, comments, and messages on how the multiple posts and step-by-step breakdown of the process has been an inspiration.  From your notes, it sounds like many of you have had the urge to paint that piece of furniture but either didn’t know how, weren’t sure of the process, or didn’t have the inspiration needed to get started.  I hope I’ve pushed you enough to make the move!

Here are the many posts related to this before and after
Backstory + Choosing a Color
Prepping & Sanding Wood Furniture
Why & How to Prime Wood Furniture
Tips + Tricks to Painting Wood Furniture
Accessories, Details, & Styling {China Cabinet Makeover}
China Cabinet Makeover {Reveal}

This post is sponsored by Glidden paint, but all thoughts and opinions are 100% my own.  I am so excited about this project & was thrilled to partner with Glidden paint on this furniture makeover.

How-To Paint Wood Furniture

Prep is done.

Sanding is complete. >>> [tutorial here]

Priming is finished. >>> [tutorial here]

Now on to the painting.  This was definitely the longest + most tedious part of the makeover, but absolutely the most important step to focus on.  With all the work that has gone in to prepping this cabinet, or any piece of furniture for that matter, painting it right really makes all the difference in the world to achieve a nice looking end product.

This post is completely dedicated to sharing the steps I took + tips & tricks on how-to successfully paint wood furniture.

DIY Tutorial: tips + tricks on How-To Successfully Paint Wood Furniture. Follow along on this multi-post blog series of transforming a china cabinet. Easy-to-follow directions and all the steps fully explained!

As I’ve explained and stressed in the previous two posts, the prep work + priming is very important before paint is applied.  To achieve a successful end result, a primer is a must.  For this project, I used Glidden Gripper primer (a picture of it + more details can be found in the last post).  Once the primer is dry, which typically takes little time (about a day), painting can begin.

Before Painting.

  • The Magic Formula. One of my secrets for painting wood furniture is to use floetrol (<- affiliate link).  With all furniture painting projects,  I always add my favorite “formula” to eliminate brushstrokes. It works like a charm to achieve a clean, brushstroke-free surface! (And I wasn’t even paid to say that – I truly just love it ;)
  • The Brush.  The brush used for painting really does make a difference.  I always use Purdy brushes because they truly make for an easier, better painting result. Yes they are expensive, but it’s worth the cost.  Most of the time I use a new brush when starting a project. (Again, I wasn’t paid to say that)

DIY Tutorial: tips + tricks on How-To Successfully Paint Wood Furniture. Follow along on this multi-post blog series of transforming a china cabinet. Easy-to-follow directions and all the steps fully explained!

The Color.

The paint color I chose for this cabinet makeover is Red Red Rose by Glidden.

How-To Paint Wood Furniture.

When painting furniture, like this china cabinet, I started on one side of the base cabinet and continued across to the other side while working in small sections.  I always continually look at what was just painted to check for drips, which you want to avoid as much as possible!

Typically I will add paint to the overall surface and then go back to smooth it out so all the strokes are in one direction (usually you want to follow the grain of the wood, but it’s not a must since with paint you don’t see the grain).

DIY Tutorial: tips + tricks on How-To Successfully Paint Wood Furniture. Follow along on this multi-post blog series of transforming a china cabinet. Easy-to-follow directions and all the steps fully explained!

Even if you try to avoid them, drips are normal.  To deal with those nasty, inevitable paint drips, I sand them off once they are completely dry.  Using an orbital sander is easiest, but sanding the spot by hand also works.  If you catch the drip before it’s dry, then go over it with your paint brush to smooth it out.

DIY Tutorial: tips + tricks on How-To Successfully Paint Wood Furniture. Follow along on this multi-post blog series of transforming a china cabinet. Easy-to-follow directions and all the steps fully explained!

I didn’t take a picture of me sanding that drip, but here is one from another section of the cabinet…

Once the paint was dry, I lightly went over the drip to smooth out the section of cabinet.

DIY Tutorial: tips + tricks on How-To Successfully Paint Wood Furniture. Follow along on this multi-post blog series of transforming a china cabinet. Easy-to-follow directions and all the steps fully explained!

Another issue I encountered  which I didn’t like was the result of the buffet top once the first coat of paint was on.  I guess when I added the primer, I didn’t continue my brush stroke from on side to the other, so the top surface looked bumpy.  Once the first coat of paint was dry, I lightly sanded the surface. This left the top very smooth and ready for coat #2.

DIY Tutorial: tips + tricks on How-To Successfully Paint Wood Furniture. Follow along on this multi-post blog series of transforming a china cabinet. Easy-to-follow directions and all the steps fully explained!

Coat #2

DIY Tutorial: tips + tricks on How-To Successfully Paint Wood Furniture. Follow along on this multi-post blog series of transforming a china cabinet. Easy-to-follow directions and all the steps fully explained!

In all the top got about 3-4 coats.  All the other areas of the cabinet got 3 coats.  Because of the intense color 2 coats wasn’t enough.

Here are some more outtakes while painting…

The cabinet fronts.

DIY Tutorial: tips + tricks on How-To Successfully Paint Wood Furniture. Follow along on this multi-post blog series of transforming a china cabinet. Easy-to-follow directions and all the steps fully explained!

The cabinet top.

DIY Tutorial: tips + tricks on How-To Successfully Paint Wood Furniture. Follow along on this multi-post blog series of transforming a china cabinet. Easy-to-follow directions and all the steps fully explained!

The base cabinet after one coat.

DIY Tutorial: tips + tricks on How-To Successfully Paint Wood Furniture. Follow along on this multi-post blog series of transforming a china cabinet. Easy-to-follow directions and all the steps fully explained!

I will tell you, painting the cabinet took a good 3 solid days of off and on work.  It was tiring, but well worth it in the end.  Most of the painting took place at night after the kiddos went to bed which is why the coloring of the cabinet in the pictures looks a bit off.

Here’s a peak at what was my crazy life for a few days.  Just keeping it real…

Once every surface, nook, and cranny were done, it was time to add a coat of polyurethane.

Applying polyurethane is similar to primer… a little goes a long way.  It’s also a lot thinner than paint, so it can easily run creating those annoying drips.  Applying a light coat and fanning it over the surface is best.  It goes on as a white milky liquid, but as you work it into the surface it will be come clear.  And of course it dries clear.

For this cabinet, I used a semi-gloss polyurethane.

DIY Tutorial: tips + tricks on How-To Successfully Paint Wood Furniture. Follow along on this multi-post blog series of transforming a china cabinet. Easy-to-follow directions and all the steps fully explained!

And then it was done.

DIY Tutorial: tips + tricks on How-To Successfully Paint Wood Furniture. Follow along on this multi-post blog series of transforming a china cabinet. Easy-to-follow directions and all the steps fully explained!

Well almost. The painting is complete, but there are still some details that I need to work on, like the hardware and another secret surprise.

But back to the painting result, here are a few closeups…

DIY Tutorial: tips + tricks on How-To Successfully Paint Wood Furniture. Follow along on this multi-post blog series of transforming a china cabinet. Easy-to-follow directions and all the steps fully explained!

DIY Tutorial: tips + tricks on How-To Successfully Paint Wood Furniture. Follow along on this multi-post blog series of transforming a china cabinet. Easy-to-follow directions and all the steps fully explained!

DIY Tutorial: tips + tricks on How-To Successfully Paint Wood Furniture. Follow along on this multi-post blog series of transforming a china cabinet. Easy-to-follow directions and all the steps fully explained!

You see that one piece of hardware on there?  I couldn’t resist giving you a peak at what it will look like once it’s all done.

Next up… styling this pretty gal.  Here’s a peak at the start of the process…

Let’s rewind and take a look at where I started and the progress I’ve made.

DIY Tutorial: tips + tricks on How-To Successfully Paint Wood Furniture. Follow along on this multi-post blog series of transforming a china cabinet. Easy-to-follow directions and all the steps fully explained!

Not too shabby.  More to come.  Stay tuned.

Follow along on this makeover with these other posts
Backstory + Choosing a Color
Prepping & Sanding Wood Furniture
Why & How to Prime Wood Furniture
Tips + Tricks to Painting Wood Furniture
Accessories, Details, & Styling {China Cabinet Makeover}

Check out the  >>> FINAL REVEAL


Why + How to Prime Wood Furniture

It’s been a busy few days around my neck of the woods.  With revamping the china cabinet + another BIG project coming down the pipeline (which I can’t wait to share details about), I haven’t had 5 minutes to sit.  No worries though, I’ll sit when I’m old, ha.

So my last post was all about the beginning steps of prepping & sanding a piece of wood furniture.  The next step, which is what this post is dedicated to, is priming.  Primer is SO important!  I can not stress enough that primer is a must when painting something. anything.  YOU NEED PRIMER.

China Cabinet Makeover: PRIMING! An entire post on Why & How-To Prime a Wood Surface. Priming any surface before painting is so important & it can save you money. Come see the result of how what prime can do & follow along on this furniture makeover

Why Prime.

Whether a room or a piece of furniture, paint is truly one of the easiest & most affordable ways to update and/or change the look of something.   It’s amazing what a fresh coat of paint can do to a wall or a surface.  I read once, “Don’t expect paint to do a primer’s job”.   The purpose of paint is to provide color, but the purpose of primer is to provide the ideal base for the paint to be applied.  Without, the result can fall short.

What does Primer Do?

> Blocks Stain  Primers are made to block the natural pigments (tannin) of the wood and/or original stain from bleeding through the new paint.

> Hides Color  Priming the surface before painting hides / blocks the previous color from showing through.  Using a primer will also sometimes eliminate the need for multiple coats (cost savings!)

> Seals the surface  Priming before painting seals the surface so the paint doesn’t get soaked in.  The prime provides the perfect base for the paint to be applied.  Primer also provides the ideal surface for paint to adhere to.  Typically with a stained piece of furniture, like my china cabinet, the original surface is glossy which paint wouldn’t adhere to.  Adding a primer to a glossy surface will give the provide the ideal underlayment for a beautiful new color.  This same technique can be used for tile, glass, vinyl siding, and aluminum – all slick surfaces that wouldn’t be paintable without primer!

Do you recall when I was painting my laminate bookcase?  I failed to prime a spot and the paint just bubbled and didn’t stick to the surface.  Here’s a picture…

Priming is a must before applying paint!

> Lasting Result  Without primer, paint could easily chip or scrape off very easily + quickly.  Using one (thin) coat of primer + two (typically, maybe more) coats of paint you should have a long lasting, durable result!

The Right Primer.

There are many primers on the market and the decision on the right one for the job can be tricky.  When painting over furniture, you want to choose a primer that indicates on the can that it will block the stain and seal the surface.  The primer that I chose for this china cabinet makeover was Glidden Gripper because it truly grips to the surface and seals the stain from coming through.  It also created the perfect base for the new WILD color I chose.

Glidden Gripper

Applying Primer.

a how-to tutorial on applying primer.  Its so easy…

Note: This is the most important tip I can share about priming (told to me by someone – a pro – in the painting world), primer does not need to be applied like paint. A thin coat of primer is fine and actually better than “globbing” it on.  Primer does not need to fully cover the surface underneath, meaning you can still have wood showing through.  As long as the surface area has a thin coat (one coat), you are set to paint!

When painting a piece of furniture, I always start at one end and make my way across. Why?  Paint dries fairly fast and to avoid drips + brush strokes, it’s important to work in small sections and apply thin coats.
China Cabinet Makeover: PRIMING! An entire post on Why & How-To Prime a Wood Surface. Priming any surface before painting is so important & it can save you money. Come see the result of how what prime can do & follow along on this furniture makeover

Typically I apply the paint to the surface.  Then spread it out.  Then go back over it with my brush, using light stokes and following the wood grain.

China Cabinet Makeover: PRIMING! An entire post on Why & How-To Prime a Wood Surface. Priming any surface before painting is so important & it can save you money. Come see the result of how what prime can do & follow along on this furniture makeover

When painting furniture, the piece is typically vertical, so paint could drip.   Around the detailed edges and ornate areas, the less paint the better to avoid paint from dripping.  And once an area is done, always continue to look back to make sure paint isn’t seeping down.

China Cabinet Makeover: PRIMING! An entire post on Why & How-To Prime a Wood Surface. Priming any surface before painting is so important & it can save you money. Come see the result of how what prime can do & follow along on this furniture makeover

For this china cabinet, there were 3 doors, which I removed and are painting laying down.  It’s much easier to paint + drips don’t occur as much.

China Cabinet Makeover: PRIMING! An entire post on Why & How-To Prime a Wood Surface. Priming any surface before painting is so important & it can save you money. Come see the result of how what prime can do & follow along on this furniture makeover

For this piece, it took me about 40 minutes to prime.  To me, it’s very relaxing. This is the result…

China Cabinet Makeover: PRIMING! An entire post on Why & How-To Prime a Wood Surface. Priming any surface before painting is so important & it can save you money. Come see the result of how what prime can do & follow along on this furniture makeover

That’s a wrap… for now.

She’s ready for paint!

Want a peak?  Here you go…

Sneak Peak at the new color for the China Cabinet

I’m off to paint some more…

Follow along on this makeover with these other posts
Backstory + Choosing a Color
Prepping & Sanding Wood Furniture
Why & How to Prime Wood Furniture
Tips + Tricks to Painting Wood Furniture
Accessories, Details, & Styling {China Cabinet Makeover}

Coming up (still to do)
China Cabinet Makeover {Reveal}

China Cabinet Makeover: Prepping + Sanding Wood Furniture {Step 1}

#chinacabinetmakeover

Last week I shared the latest + greatest project that I’m throwing myself into.  Since the baby arrived, I kind of lost my DIY mojo, but this project has me back!  I can not express how excited I am about this project because I’ve been thinking about it for so long.  Have you ever had a moment like that when you are thinking about something so much, but are unsure of how all the details could possibly come together?  Well that was me with this project…  I knew exactly the cabinet I wanted, I knew the color I wanted it to be, but no cabinet.  UNTIL, I found her.

Somehow, someway the stars were aligned and last week she came home!  To be specific, my husband and I went to the seller’s home (it’s a must to always go with someone on a Craigslist excursion!) and thankfully he had a pickup, so for $20 extra he delivered it to our house.  Lesson learned?  It never hurts to ask.  We don’t have a pickup and would have had to rent one.  This was much easier!

Thinking back, I haven’t tackled a large-scale furniture makeover project like this since the painting of the laminate bookcases and that was a LONG time ago.  Whether large or small though, the steps for painting a piece of furniture are typically the same and that’s what I am dedicating my next few posts to… rehabbing a piece of furniture to achieve a dynamic result.

First up, details on how to begin the process of paint a piece of furniture including how-to prep + how-to sand.

China Cabinet Makeover: How-To Prep and Sand Wood Furniture {easy to follow tutorial - multiple blog posts to explain how easy it is}

The china cabinet was in a pretty sad place before landing in my garage.  It was dusty and had lots of grime in the corners, so a good ole’ cleaning was a must!

1. First up… the hardware.  I removed all the hardware using a screwdriver and am still on the fence about reusing or replacing the existing pieces.  Some of the hardware (knobs) were missing, so I’m not sure what I will do.  – TBD –

China Cabinet Makeover: How-To Prep and Sand Wood Furniture {easy to follow tutorial - multiple blog posts to explain how easy it is}

2. Once the hardware was removed, I used a vacuum to clean all the nooks + crannies of the cabinet.  Not only was it dusty, but it was dirty.

China Cabinet Makeover: How-To Prep and Sand Wood Furniture {easy to follow tutorial - multiple blog posts to explain how easy it is}

Then following that, I used a dampened rag and went over all the surfaces.  It was amazing the grime that came off this piece!

China Cabinet Makeover: How-To Prep and Sand Wood Furniture {easy to follow tutorial - multiple blog posts to explain how easy it is}

3. After taking a few minutes to clean the surface, it was time for sanding.

Using my orbital sander (it really is the best tool for sanding large areas – I use it SO MUCH) I went over the areas that I could.  The orbital sander is somewhat large so it worked great for the larger flat surfaces like the top, sides, and doors.  For the more detailed, intricate areas, I used a piece of sandpaper (by hand).  The very detailed areas I just left (without sanding) and will be using a primer that ‘grips’ to the surface so the paint will adhere.  The gripper paint I will be using (more on that in an upcoming post) actually says no sanding is needed, but I like to give a quick sanding for better adhesion.  If I were staining this piece, I would have needed to go down to the original surface.  Since I am painting it though, a quick sanding (+ a good primer) is all that is needed.

China Cabinet Makeover: How-To Prep and Sand Wood Furniture {easy to follow tutorial - multiple blog posts to explain how easy it is}

sanding, sanding, sanding…

China Cabinet Makeover: How-To Prep and Sand Wood Furniture {easy to follow tutorial - multiple blog posts to explain how easy it is}

When sanding wood, it’s important that you do not put too much pressure on the wood surface.  I started with a 120 grit paper and then used a 220 grit paper for a smoother finish.  A light sanding is just enough and always continue to rotate and move the sander so you are not concentrating on one section for a long time.

Sections of the china cabinet where I could not use the orbital sander, I sanded by hand.  Areas like the buffet top and the legs were very worn (natural wear + tear) and needed to be smoothed out.

China Cabinet Makeover: How-To Prep and Sand Wood Furniture {easy to follow tutorial - multiple blog posts to explain how easy it is}

China Cabinet Makeover: How-To Prep and Sand Wood Furniture {easy to follow tutorial - multiple blog posts to explain how easy it is}

4. Sanding took about 10-15 minutes and then I cleaned all the surfaces again.  Lastly before painting this girl of mine, I taped off the glass.  Using painters tape, I taped off the edge where the wood meets the glass.  This will make painting much easier!

China Cabinet Makeover: How-To Prep and Sand Wood Furniture {easy to follow tutorial - multiple blog posts to explain how easy it is}

And that’s it.  For now!

This china cabinet is still in transition mode from blah to pretty.  Next up?  Primer, which is the key to a good paint job.  Stay tuned for my next post on Why & How to Prime Wood Furniture.

Follow along on this makeover with these other posts
Backstory + Choosing a Color
Prepping & Sanding Wood Furniture
Why & How to Prime Wood Furniture
Tips + Tricks to Painting Wood Furniture
Accessories, Details, & Styling {China Cabinet Makeover}

Coming up (still to do)
China Cabinet Makeover {Reveal}


China Cabinet Makeover: Backstory + Choosing a Color

Craigslist China Cabinet - Before the makeover: The backstory + the choosing of a color

In the past 2 days, a project that I’ve been dreaming about for months has magically come to fruition! Somehow the stars aligned and I’m freaking excited about this one…

So a long while back, about 5-6 months ago to be specific, I had the itch to spice up the dining room.  At the time, I was in the last weeks of my pregnancy so no real action could take place, but I had lots & lots of thoughts brewing in my brain.  My mind immediately went to changing everything, but I decided to start off slow (truly the best way to makeover a space).  First up, the bench.  I snagged a gorgeous navy Ikat patterned fabric earlier in the year and the bench at our dining table was reupholstered.  Next up, the end chairs.  I ditched the leather matchy-matchy chairs and scored a new wicker style from Target.  They’re actually outdoor seats and perfect for a family with a load of kids – yes, that’s us now.  Here’s a recent shot…Dining Room makeover

What’s next?

The buffet.

We’ve had our current buffet for years (here’s a peak from last years Christmas spread) and remember how I mentioned recently that sometimes it’s difficult for the Mister to let go of things (to sell or to update), well this is one of those pieces.  After some thought, we both agreed the buffet had to go and something else – something new – was needed.  So the search began…

Craigslist.  Local thrift stores.  Garage sales.

And then I found IT.  ‘She’ was perfect and just what I was thinking to spice this space up!

I found her on Craiglist and the “purchase” story is something I won’t forget.  Miraculously, we got it home.  Somehow.  Someway.  She now sits in our garage.

Craigslist China Cabinet - Before the makeover

Check out the details…

Craigslist China Cabinet - Before the makeover

I love that there is a pull-out drawer in the lower cabinet.  What a great spot for storing silverware or cloth napkins!

Craigslist China Cabinet - Before the makeover

Craigslist China Cabinet - Before the makeover

The hardware is so true to the time of this piece.  Not all the hardware came with the piece, so I may have to keep some & find some new…

Craigslist China Cabinet - Before the makeover

So let’s take a few steps back for a moment…

Before I had even acquired her, I had a vision.  A bright + bold + eye popping vision.  A raspberry vision to be exact.   Even before she came home, I knew what color she’d be…

In the midst of my emails & calls to get my china cabinet home, Glidden paint reached out to me about collaborating on a project.  I love Glidden paint colors (my favorite orange wall is a fabulous Glidden hue) & was excited about their new simplified color palette.

Glidden's simplified palette - Choosing color made easy

I jumped on board and found THE PERFECT  COLOR in their red & magenta section.  I knew I wanted a mix of something not too red, but not too pink.  And then I found IT – the perfect shade of raspberry called Red Red Rose.

Glidden's simplified palette - Choosing color made easy

Perfect Cabinet + Perfect Color = Makeover Heaven

I’ve got big plans for this lady of mine.  She’s going to be fabulous and I can’t wait to spice this space up with a pop of color.

Looking for the perfect color for your space or the ideal color for a furniture makeover?  Check out Color My Room where you can preview a space with a color you love.

Color My Room on Glidden paint will help choose the best color for your space

Or are you inspired by a picture and love the colors in it?  Click on over to My Image Inspiration where a color palette will be created using hues from your image.

My Image Inspiration is a Glidden paint tool where a color palette will be created using hues from a picture

There are so many great tools that Glidden paint has to offer to help choose the perfect color!  I’m off to paint.  If you need me, I’ll be in the garage with a paint brush in hand.  I can’t wait to see how this all comes together…

Follow along on this makeover with these other posts
Backstory + Choosing a Color
Prepping & Sanding Wood Furniture
Why & How to Prime Wood Furniture
Tips + Tricks to Painting Wood Furniture
Accessories, Details, & Styling {China Cabinet Makeover}

Coming up (still to do)
China Cabinet Makeover {Reveal}

This post is sponsored by Glidden paint, but all thoughts and opinions are 100% my own.  I am so excited about this project & thrilled to be partnering with Glidden paint on this furniture makeover.  I’d love for you to follow along on this new project!

Boy Bedroom Makeover: Reveal

Right before baby #3 arrived only a few short weeks ago, I finished the final touches for my sons new space.  The window treatments had me hung up (no pun intended, hehe) for a while as they were the last item to finish.  I just couldn’t decide what to do, but I finally went simple and I am thrilled with the less is more design decision.

I adore the result of this cool room and honestly, I often walk in, sit down, and stare to soak it all up.  It feels so bright and cheerful.

Come have a look.

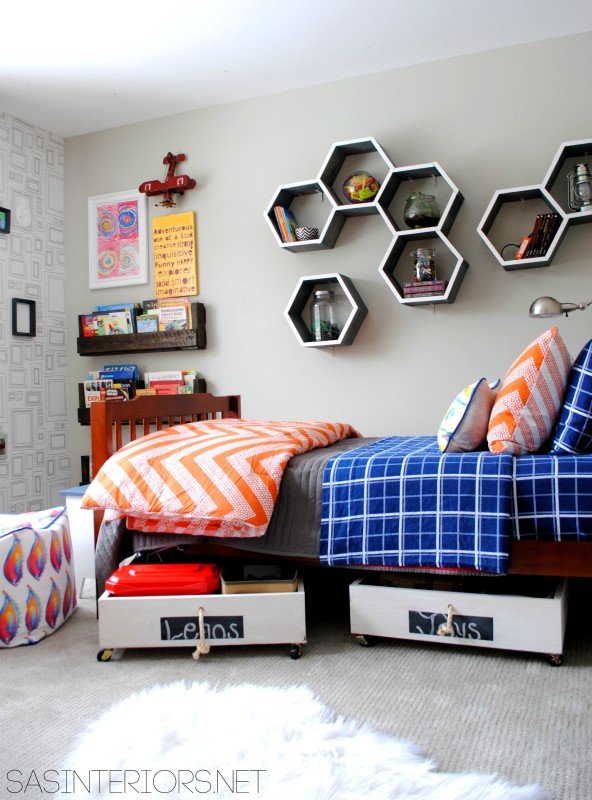
This is the view when you walk in to the space… Welcome.

Boy Bedroom {MAKEOVER} - Gray walls, picture frame wallpaper, pops of orange & blue. The perfect space for a young boy to teen. You won't want to miss all the creative DIY ideas in this room!

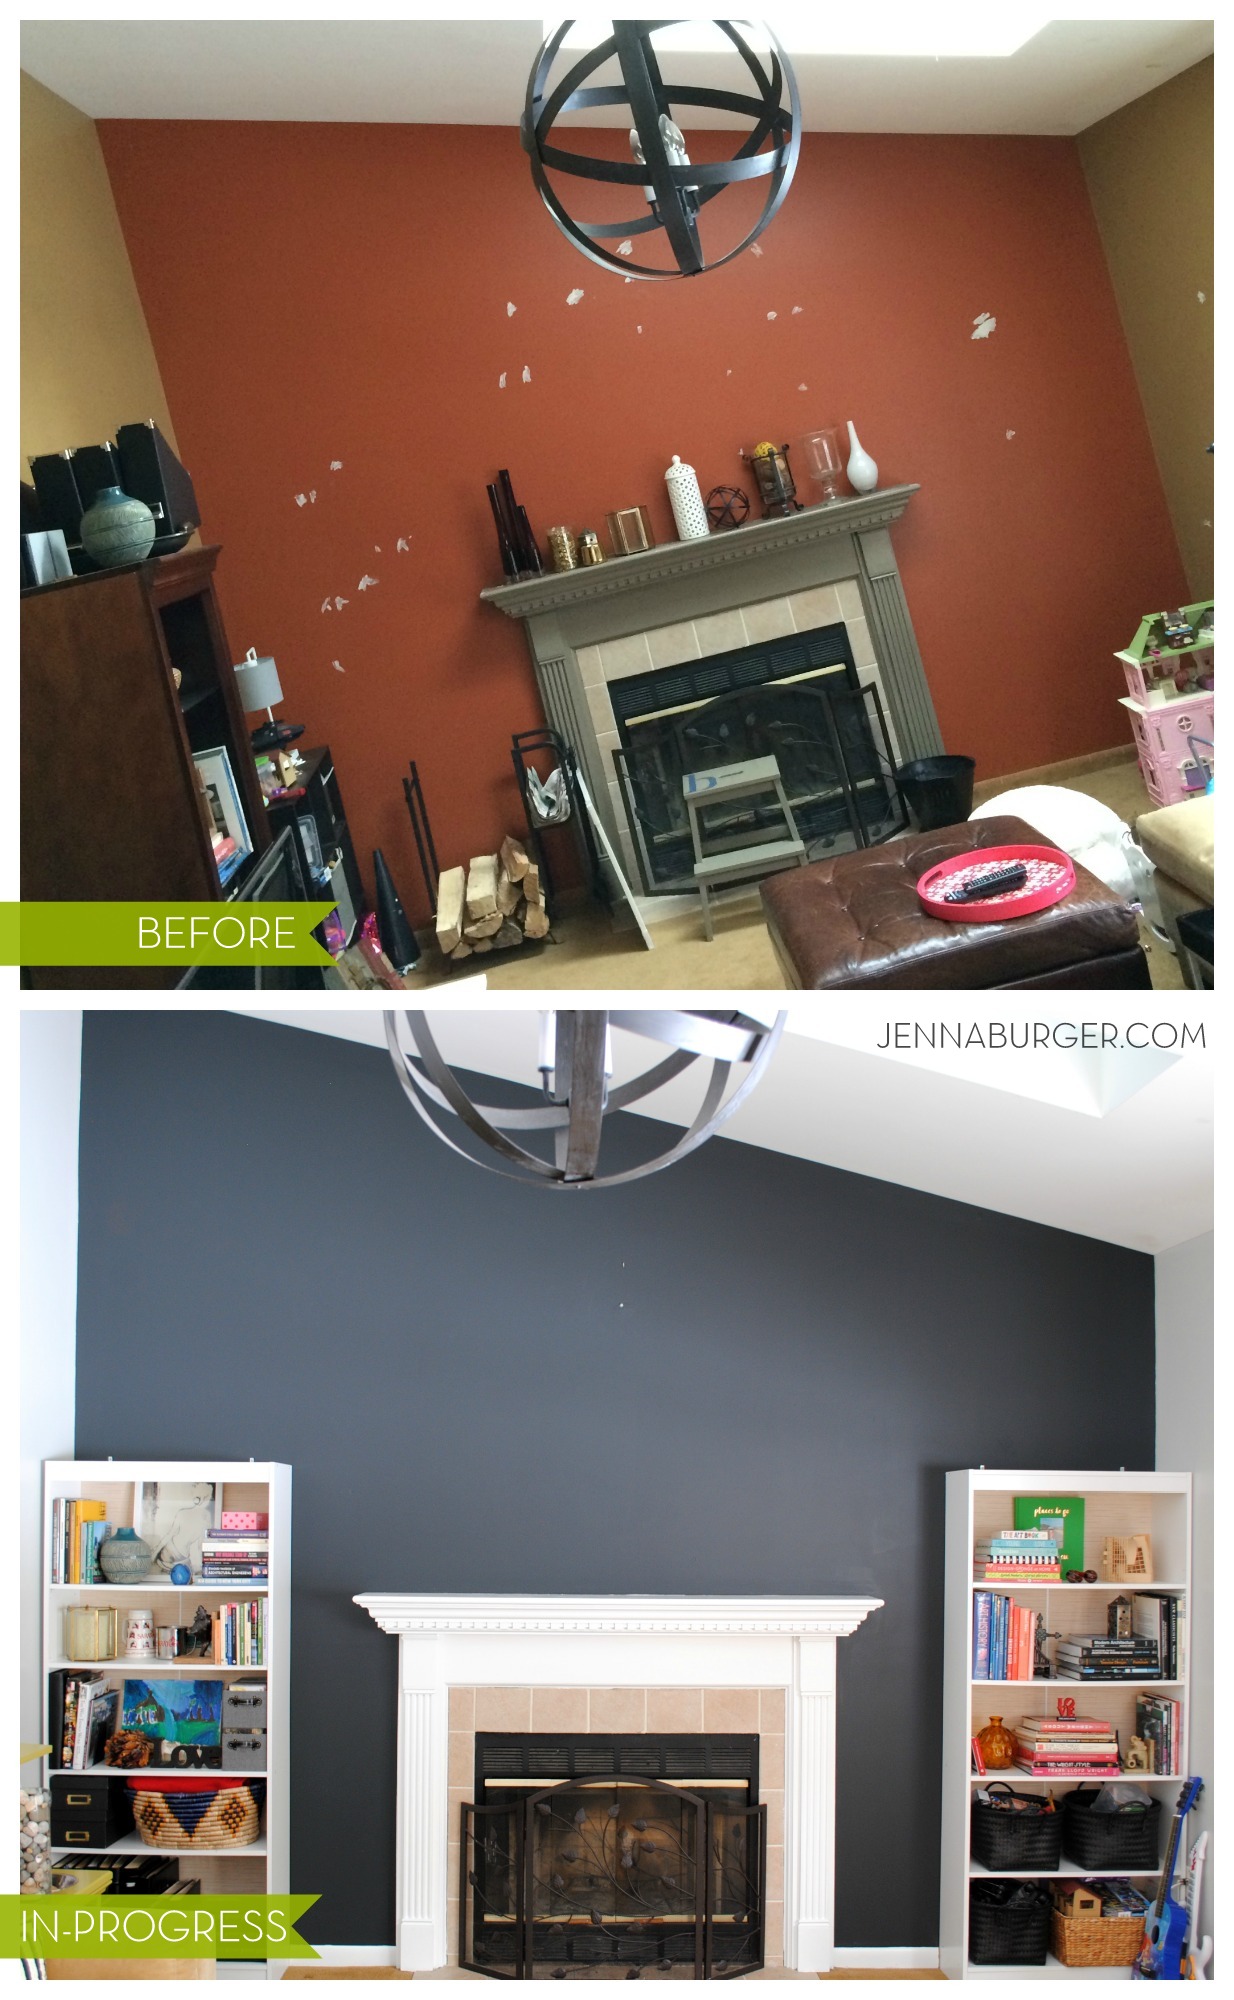
My son’s room has had many evolutions (take a look what it used to look like here & here) over the past 4 years, but I feel with the creation of this new space, he’ll be able to grow with it through the teen years (unless I change it again…).  It’s versatile, engaging, and a fun place to hang out!

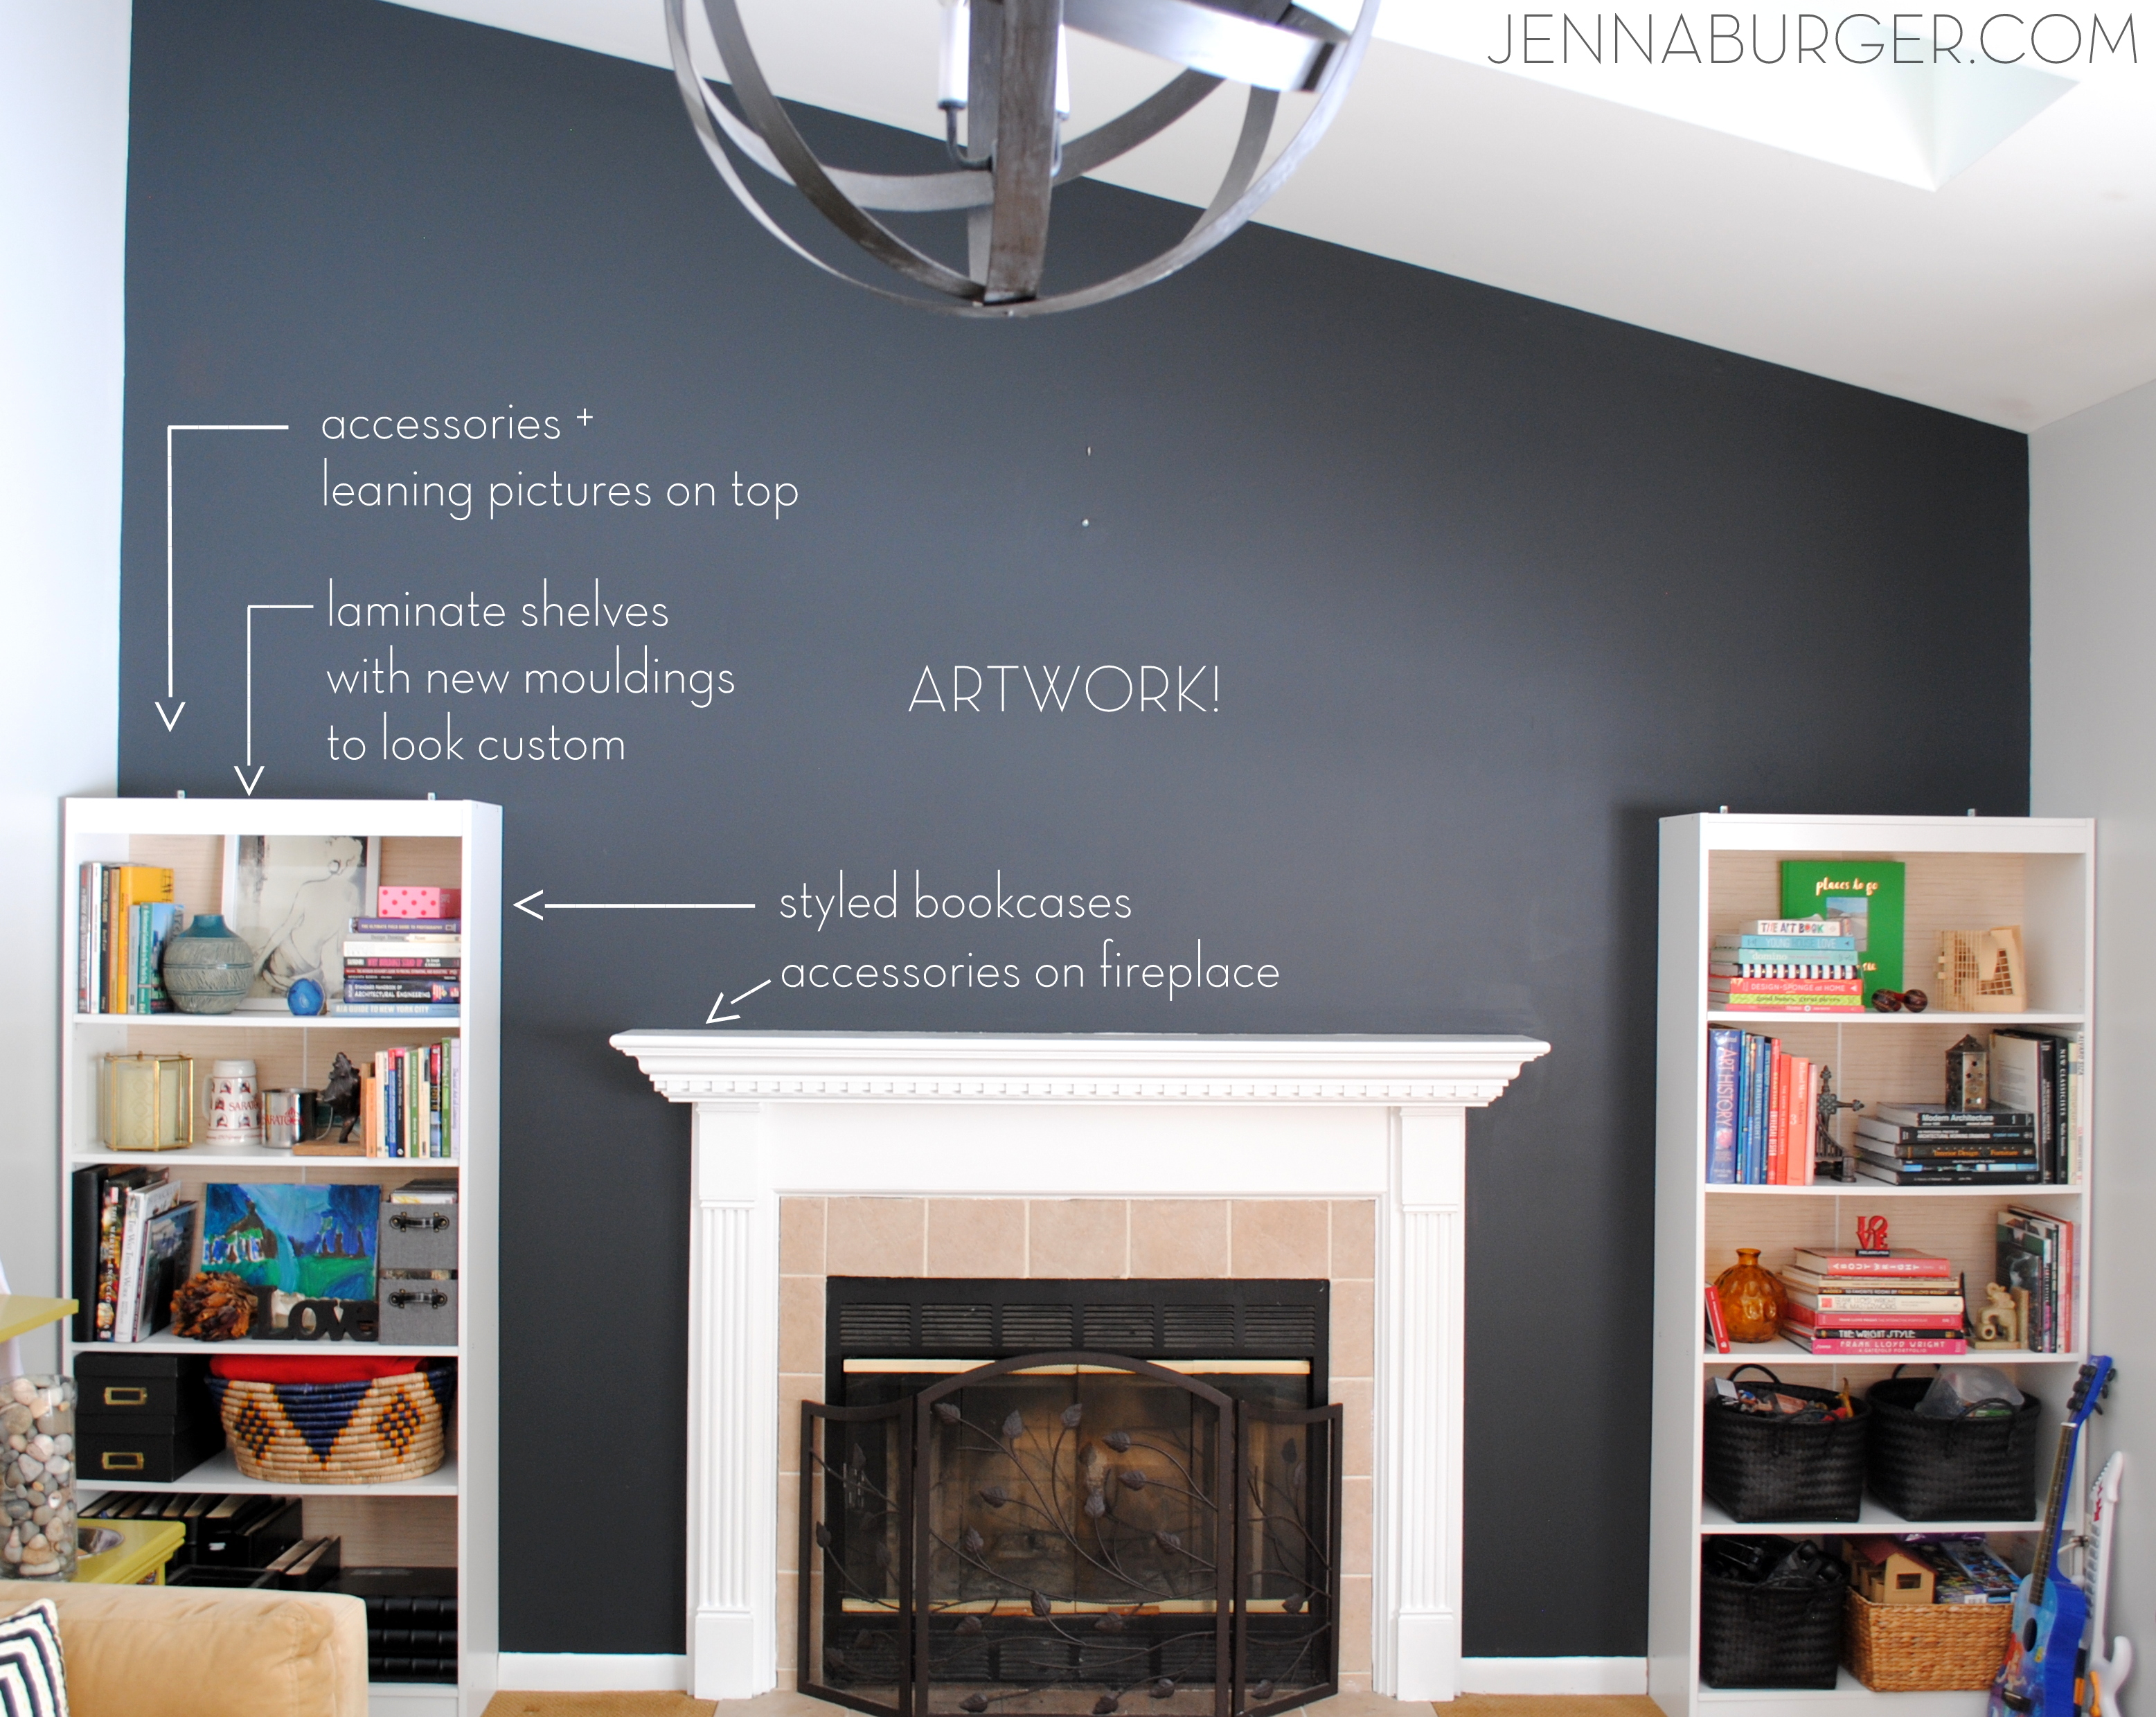
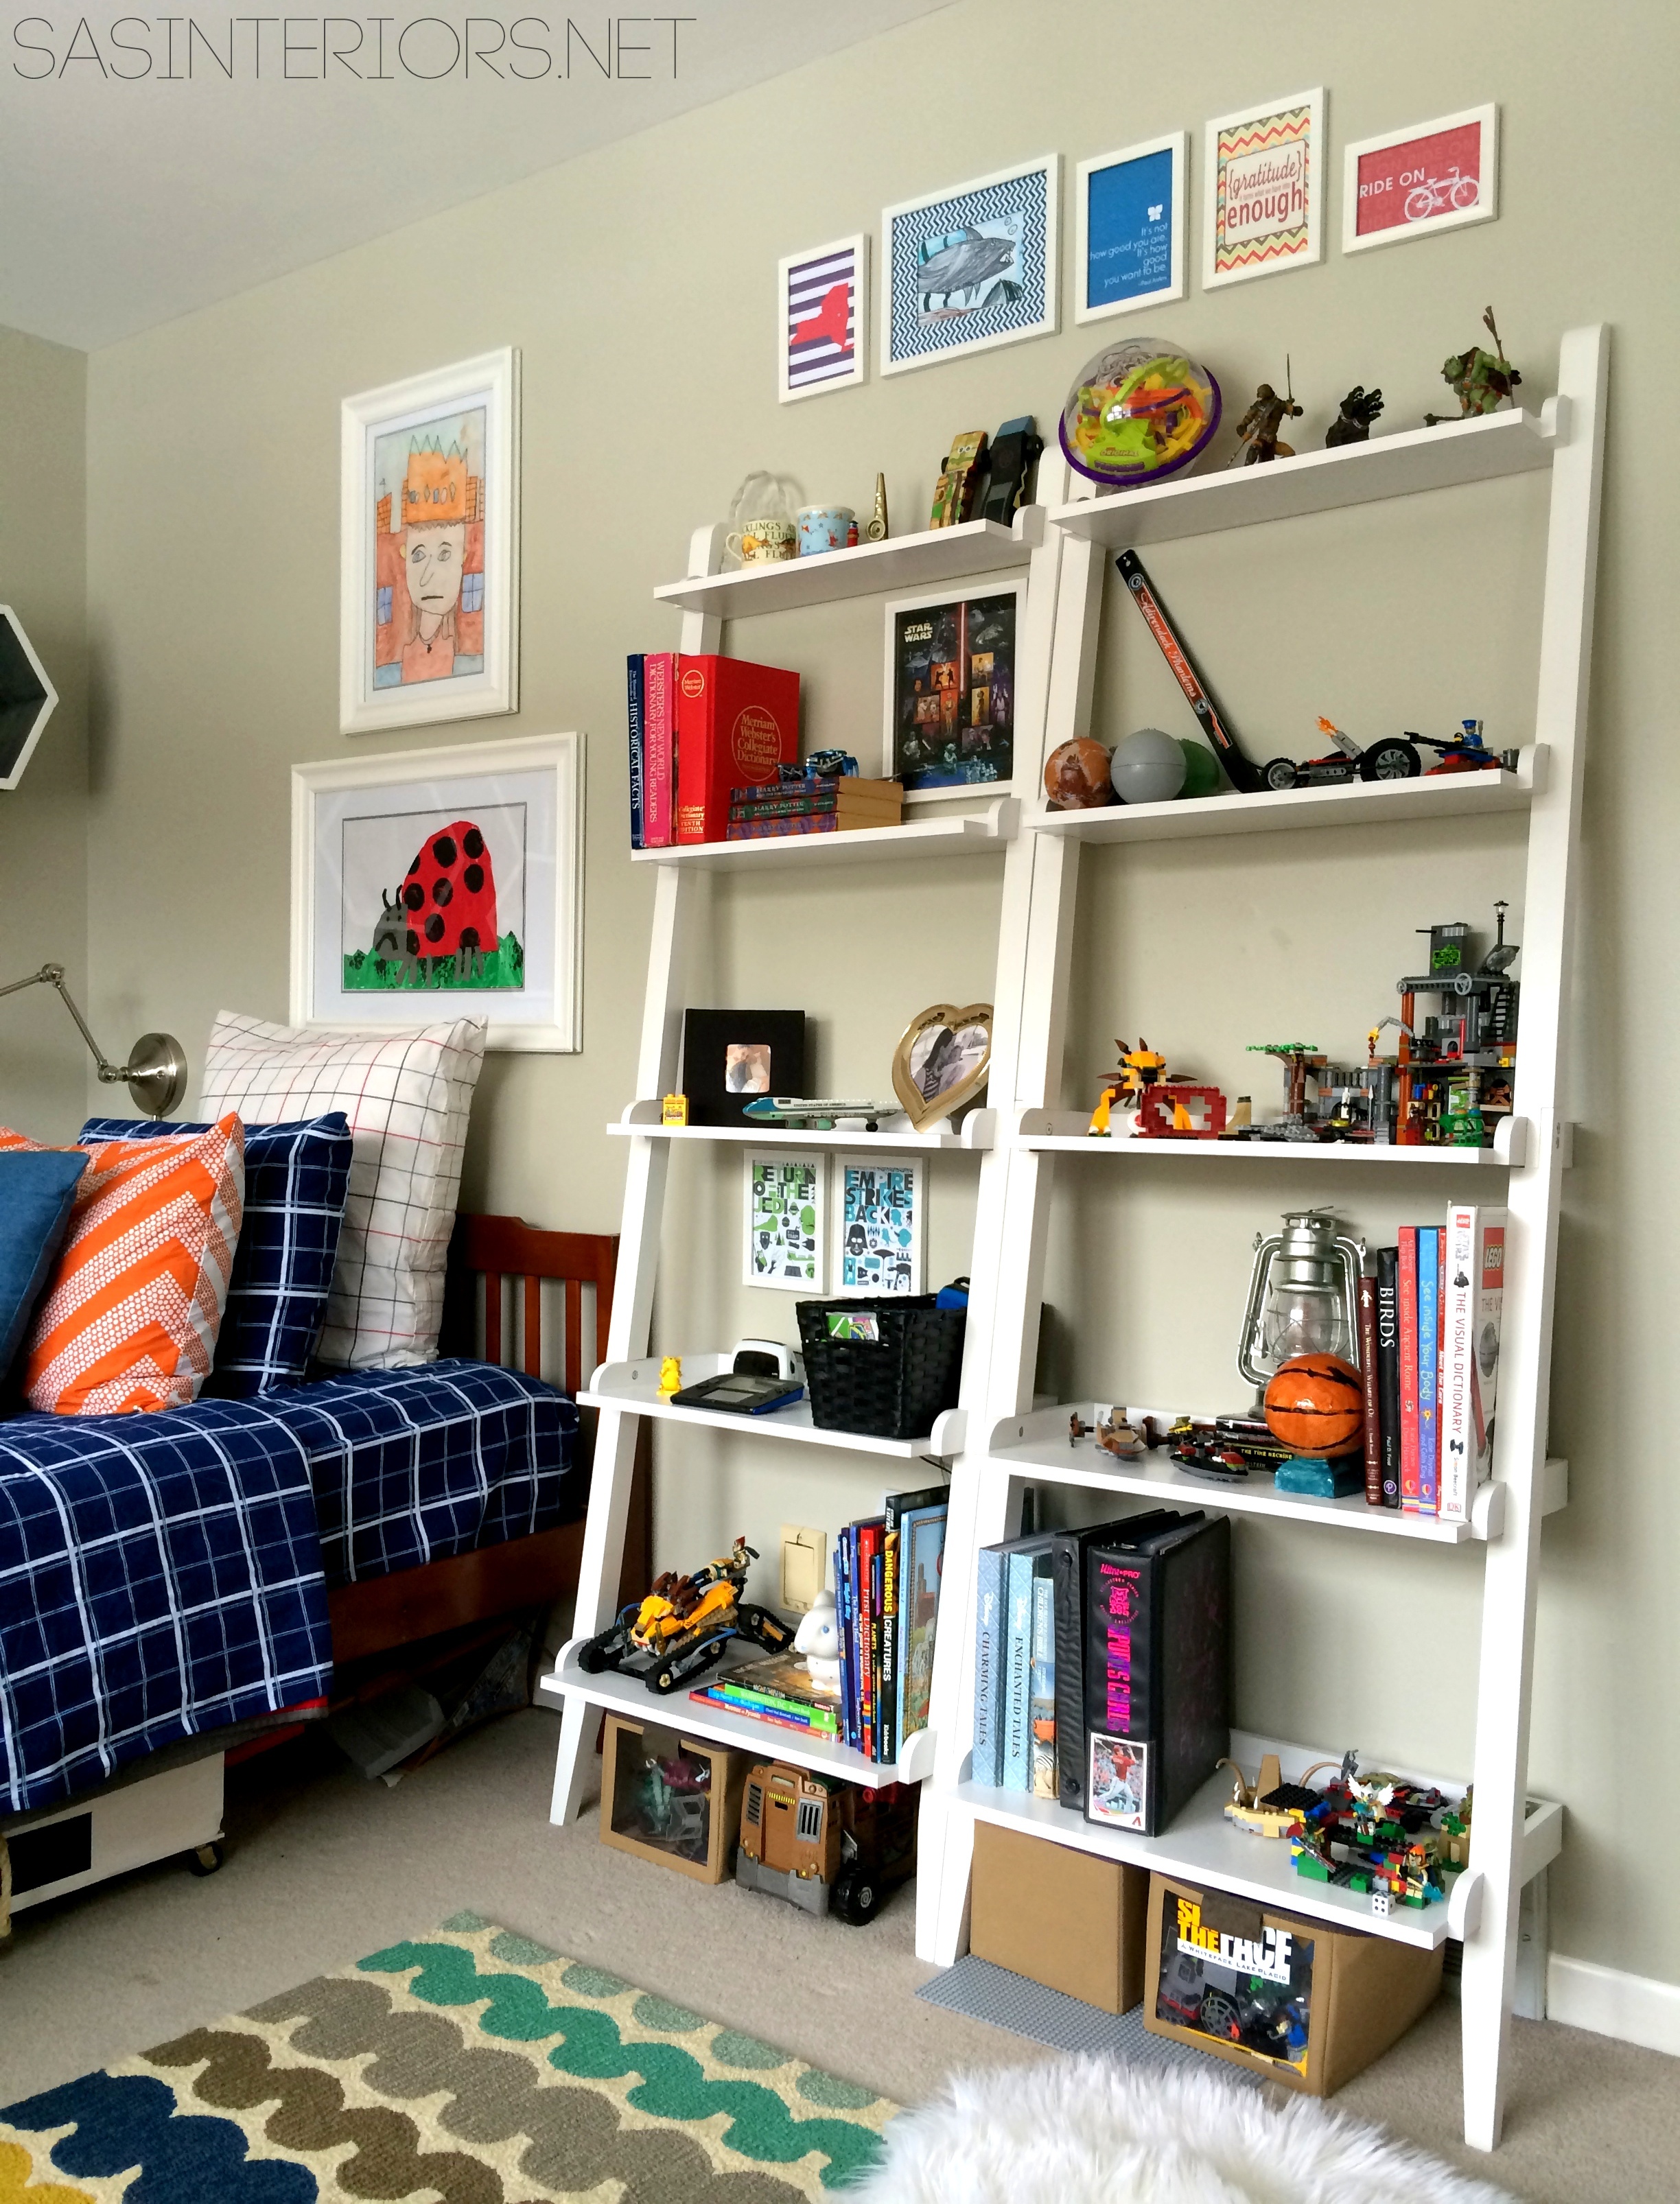
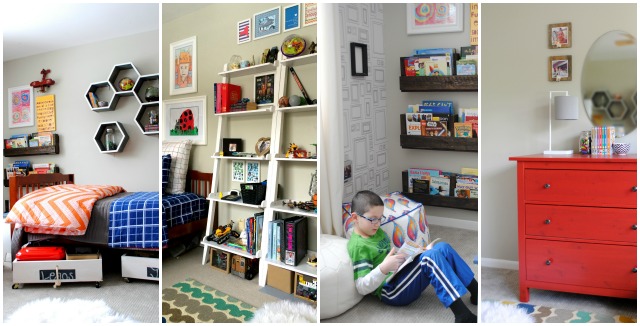
When you step into the room, directly to the right are 2 white leaning shelves filled with books, toys, and important (to my son) keepsakes!  I shared my love for leaning shelves a while back and I think this new element in the room has not only provided a ton of storage, but has introduced height, openness, and color.  The shelves are from Target and were super affordable at around $100/each!

[check out my favorite leaning shelves to decorate with here]

Boy Bedroom {MAKEOVER} - Gray walls, picture frame wallpaper, pops of orange & blue. The perfect space for a young boy to teen. You won't want to miss all the creative DIY ideas in this room!

Most of the artwork in my boy’s room was repurposed from his last space.  The inspirational quotes that used to be above his desk are now lined up over the leaning shelves and some of the artwork – made by him – is above his bed.  I love decorating with items that have beautiful meaning and he loves to wake up seeing things he’s created.

Boy Bedroom {MAKEOVER} - Gray walls, picture frame wallpaper, pops of orange & blue. The perfect space for a young boy to teen. You won't want to miss all the creative DIY ideas in this room!

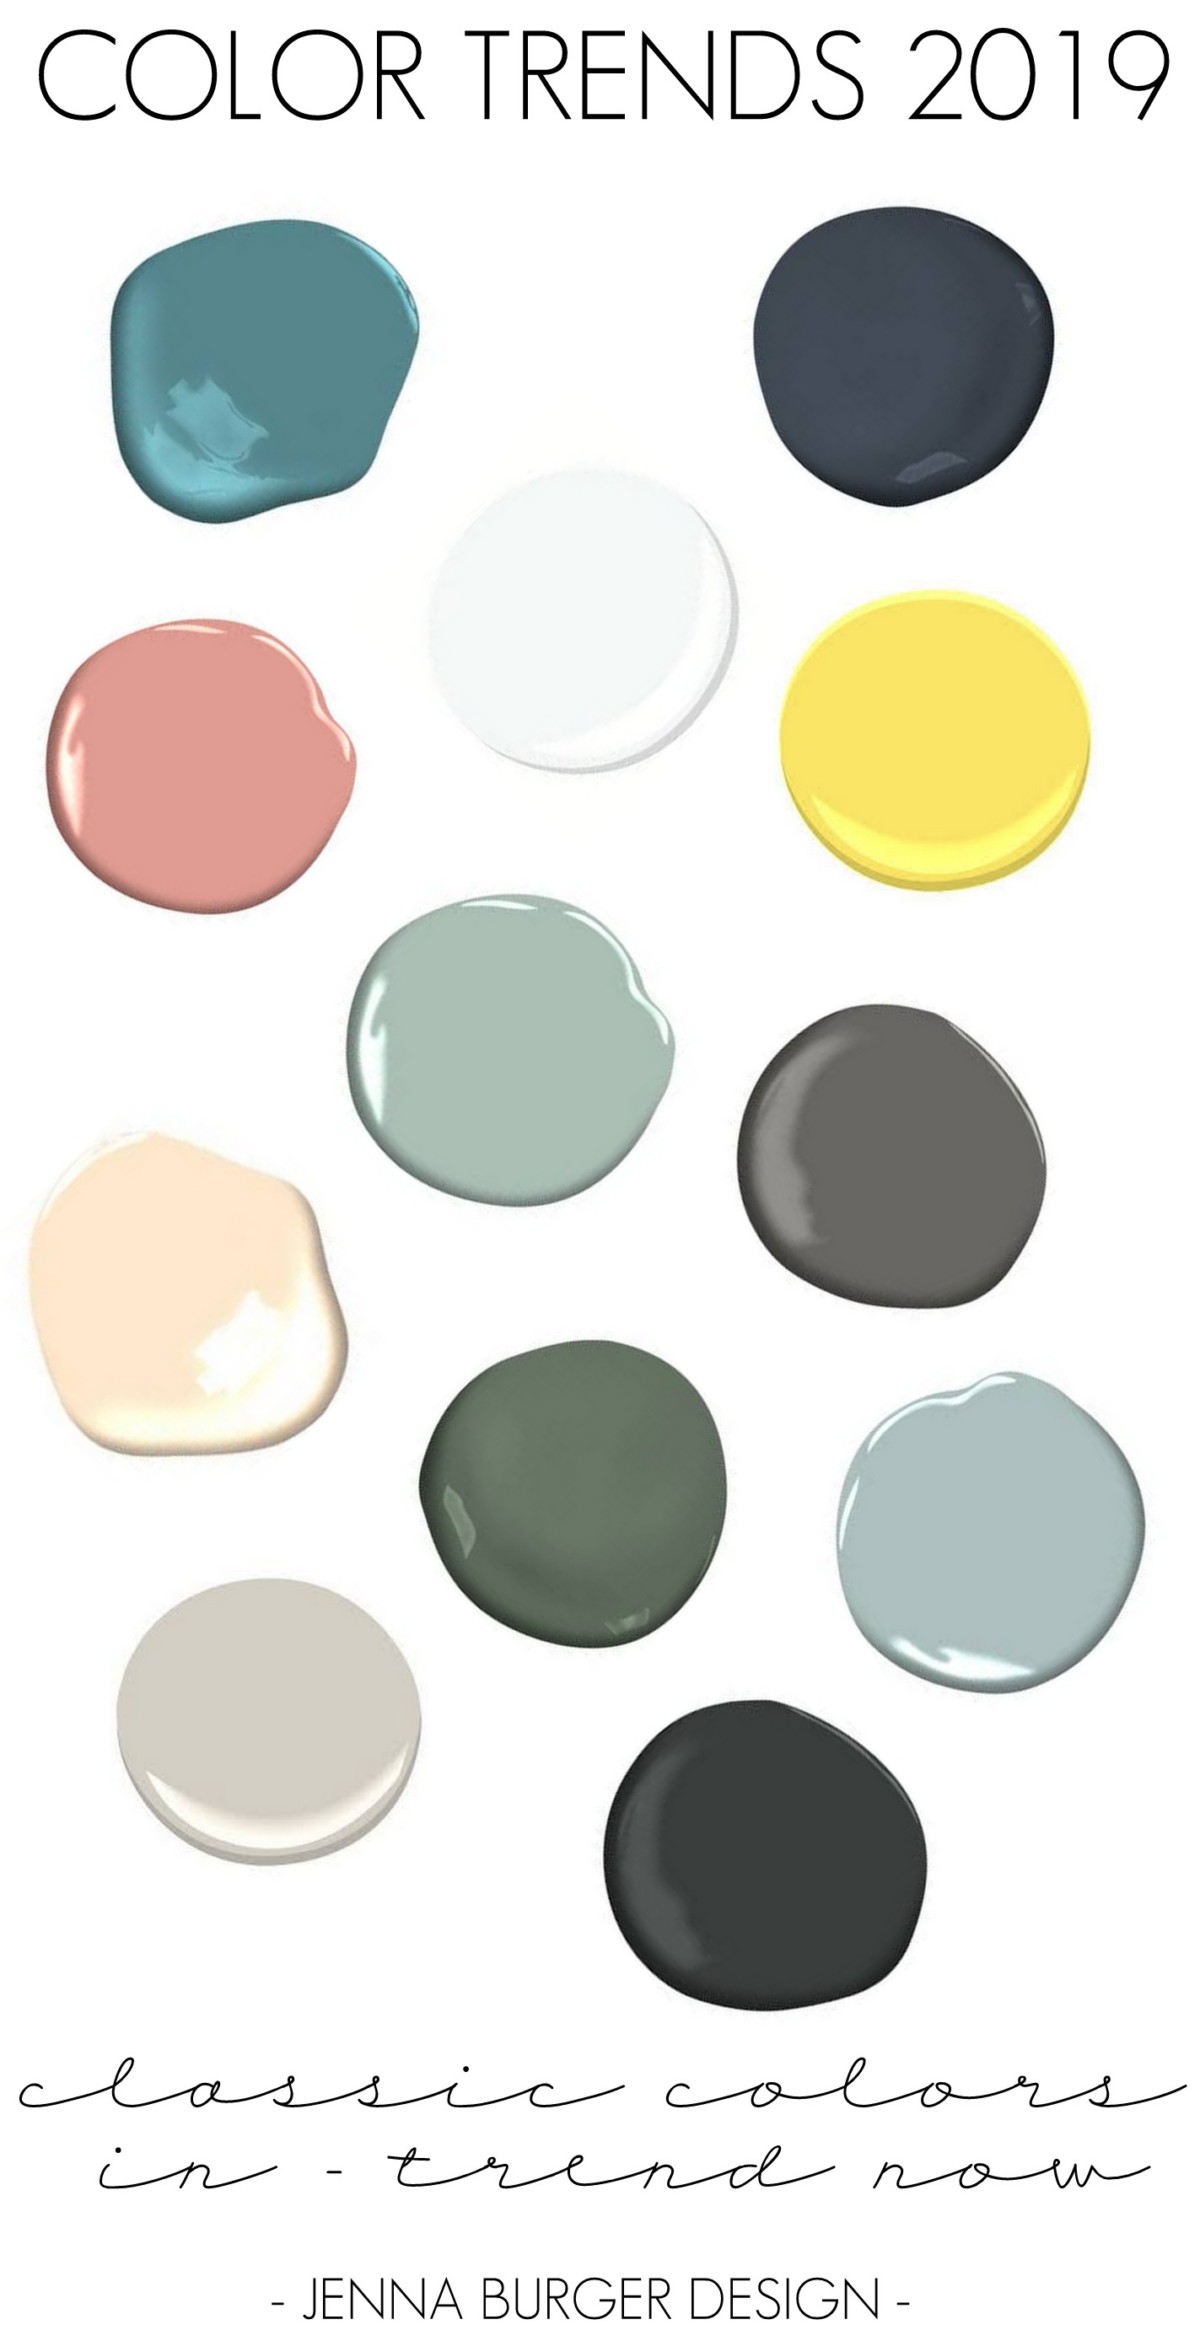
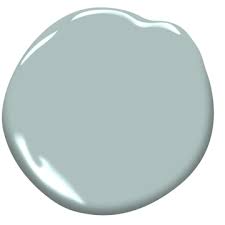
Even though it took some time to get used to, I’m happy with the decision of the lighter wall hue – Benjamin Moore Hazy Skies.  It really is a beautiful gray tone and provides the perfect backdrop for the layers of colors in the books, toys, and artwork.

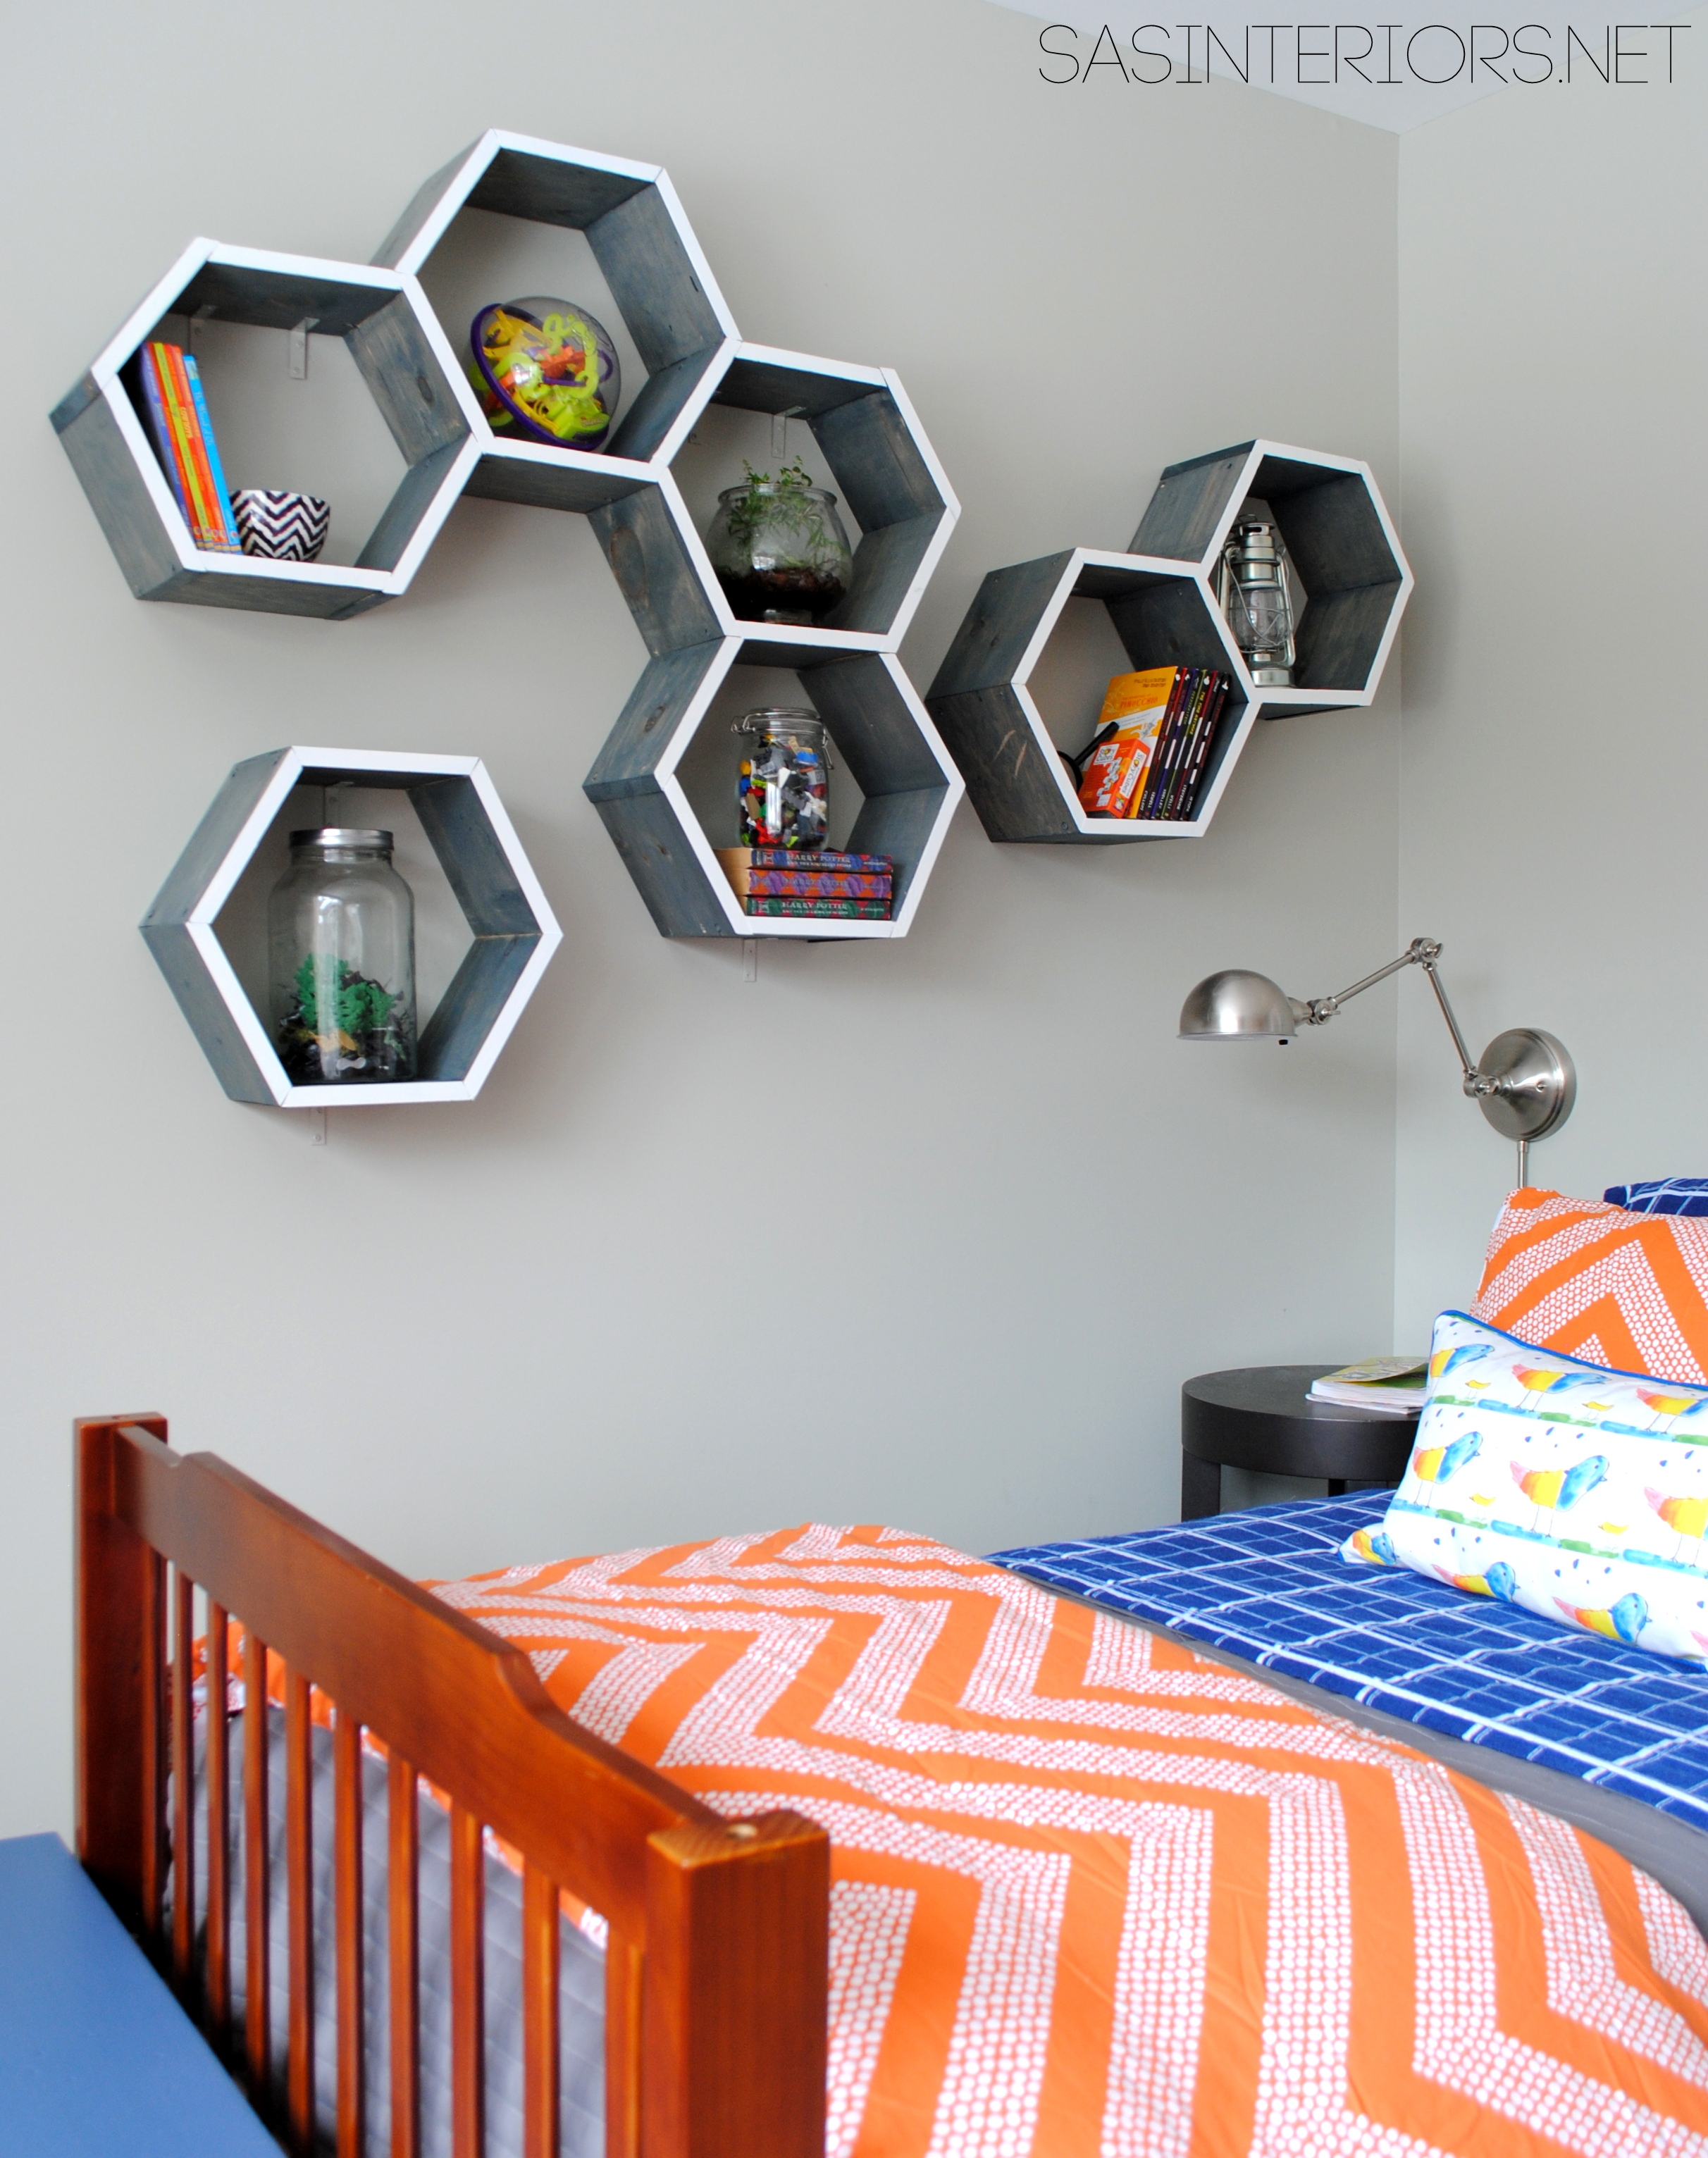
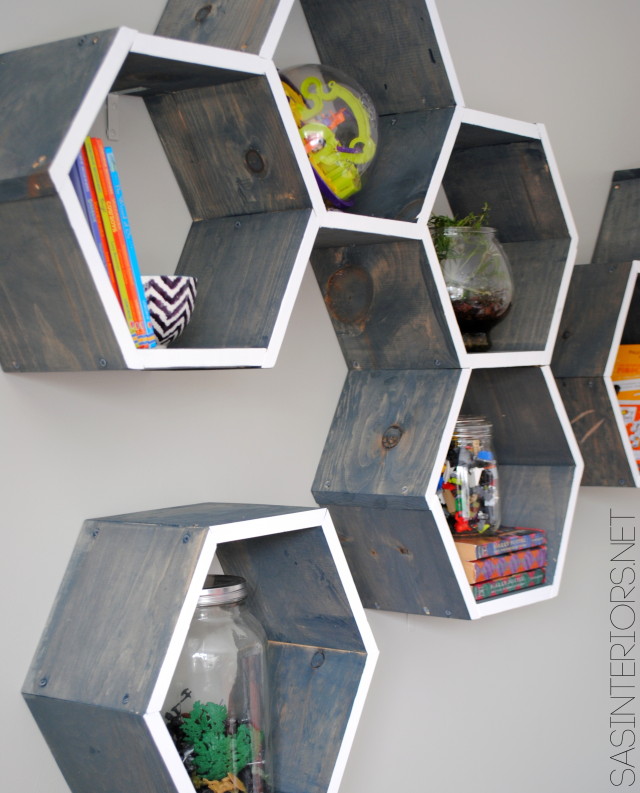
The honeycomb shelves… the honeycomb shelves…  The biggest, most difficult, yet THE MOST REWARDING do it yourself endeavour yet.  When creating the design for this new space, my son had his heart set on honeycomb shelves after I showed him the Land of Nod style.  And since this mama can’t let her boy down, I had to pull through.  Instead of buying, what did I do?  DIYed them, of course.  They are absolutely the focal point of the new room…

{click for the tutorial of the honeycomb shelves}

Boy Bedroom {MAKEOVER} - Gray walls, picture frame wallpaper, pops of orange & blue. The perfect space for a young boy to teen. You won't want to miss all the creative DIY ideas in this room!

The bed is actually part of the bunkbeds we had and dismantled a few years ago.  He used to have the other twin in his room too, but to provide more floor space, we took it out.  The bedding is a new addition and was a great score from Target – orange comforter set and blue plaid flannel sheets (similar style).  The arm light on the wall, which I found at Lowe’s, was such a smart solution instead of a table lamp.  There is limited room on his nightstand, so this gives him the light needed for reading yet doesn’t clutter up the table surface.  Speaking of nightstand… it’s actually a side table from West Elm that I “found” in the basement that didn’t have a home.  It might not be the forever nightstand, but it serves the purpose for now.

Boy Bedroom {MAKEOVER} - Gray walls, picture frame wallpaper, pops of orange & blue. The perfect space for a young boy to teen. You won't want to miss all the creative DIY ideas in this room!

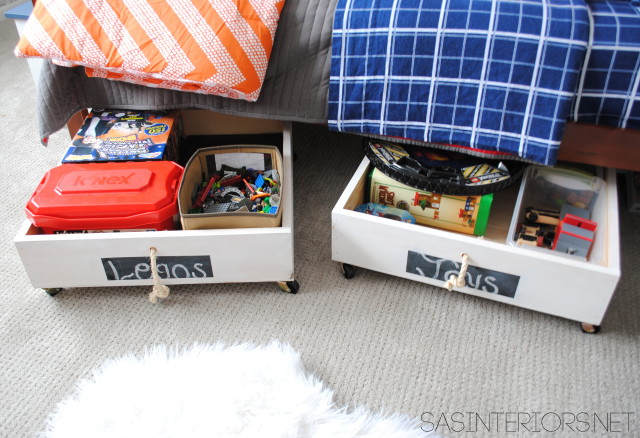
One of the ways we’ve resolved toys ALL OVER THE PLACE is with the addition of the new under-the-bed toy storage bins I made. They large wood boxes are on wheelies and easy to roll in and out from under the bed.

{click for the tutorial of the under-the-bed toy storage bins}

Boy Bedroom {MAKEOVER} - Gray walls, picture frame wallpaper, pops of orange & blue. The perfect space for a young boy to teen. You won't want to miss all the creative DIY ideas in this room!

As you make your way around the room, we come to The Book Nook.  We still love the stained pallet shelves that I created a few years ago, so they had to stay.  I removed them from the old location next to the door and repositioned them towards the end of the bed to create our new little ‘reading nook’ spot.  My boy loves to gather his poufs (the colorful one is by MiraJean Designs) and ‘chill’.  It’s his escape and relaxation place (and the spot he can hide from his sister)!

Boy Bedroom {MAKEOVER} - Gray walls, picture frame wallpaper, pops of orange & blue. The perfect space for a young boy to teen. You won't want to miss all the creative DIY ideas in this room!

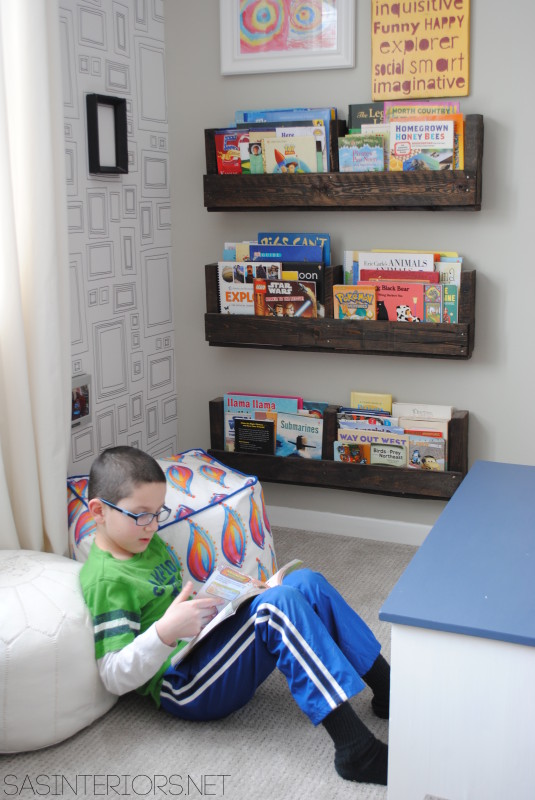
{click for the tutorial of the pallet shelves}

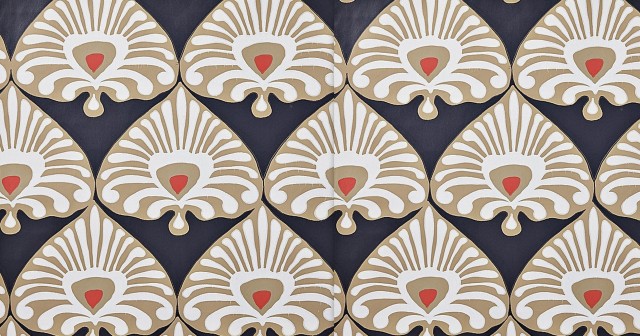
One of the most exciting additions in the room is the picture frame wallpaper.  I went with a lighter tone wall color – Benjamin Moore Hazy Skies – so the wallpaper could ‘speak’ and have ‘it’s moment’.  An entire room of this wallpaper could have been a bit overwhelming, but one wall of it is fun, unique, and just enough.  Here’s a progress shot of the paper going up…

Boy Bedroom {MAKEOVER} - Gray walls, picture frame wallpaper, pops of orange & blue. The perfect space for a young boy to teen. You won't want to miss all the creative DIY ideas in this room!

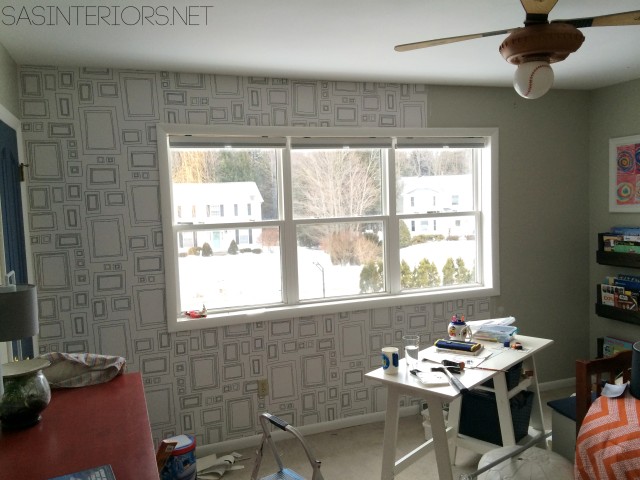
{click for the tutorial of how to hang wallpaper like a PRO!}

And here it is complete…

Boy Bedroom {MAKEOVER} - Gray walls, picture frame wallpaper, pops of orange & blue. The perfect space for a young boy to teen. You won't want to miss all the creative DIY ideas in this room!

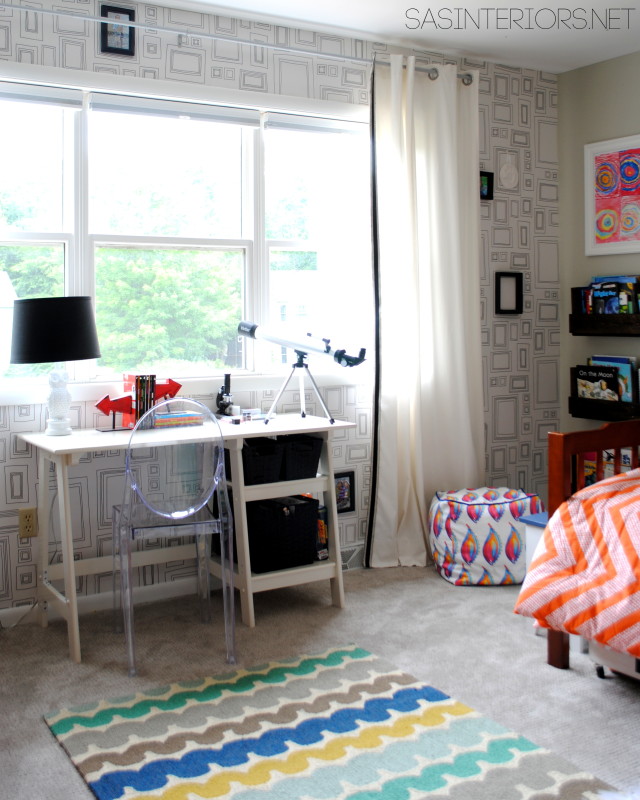
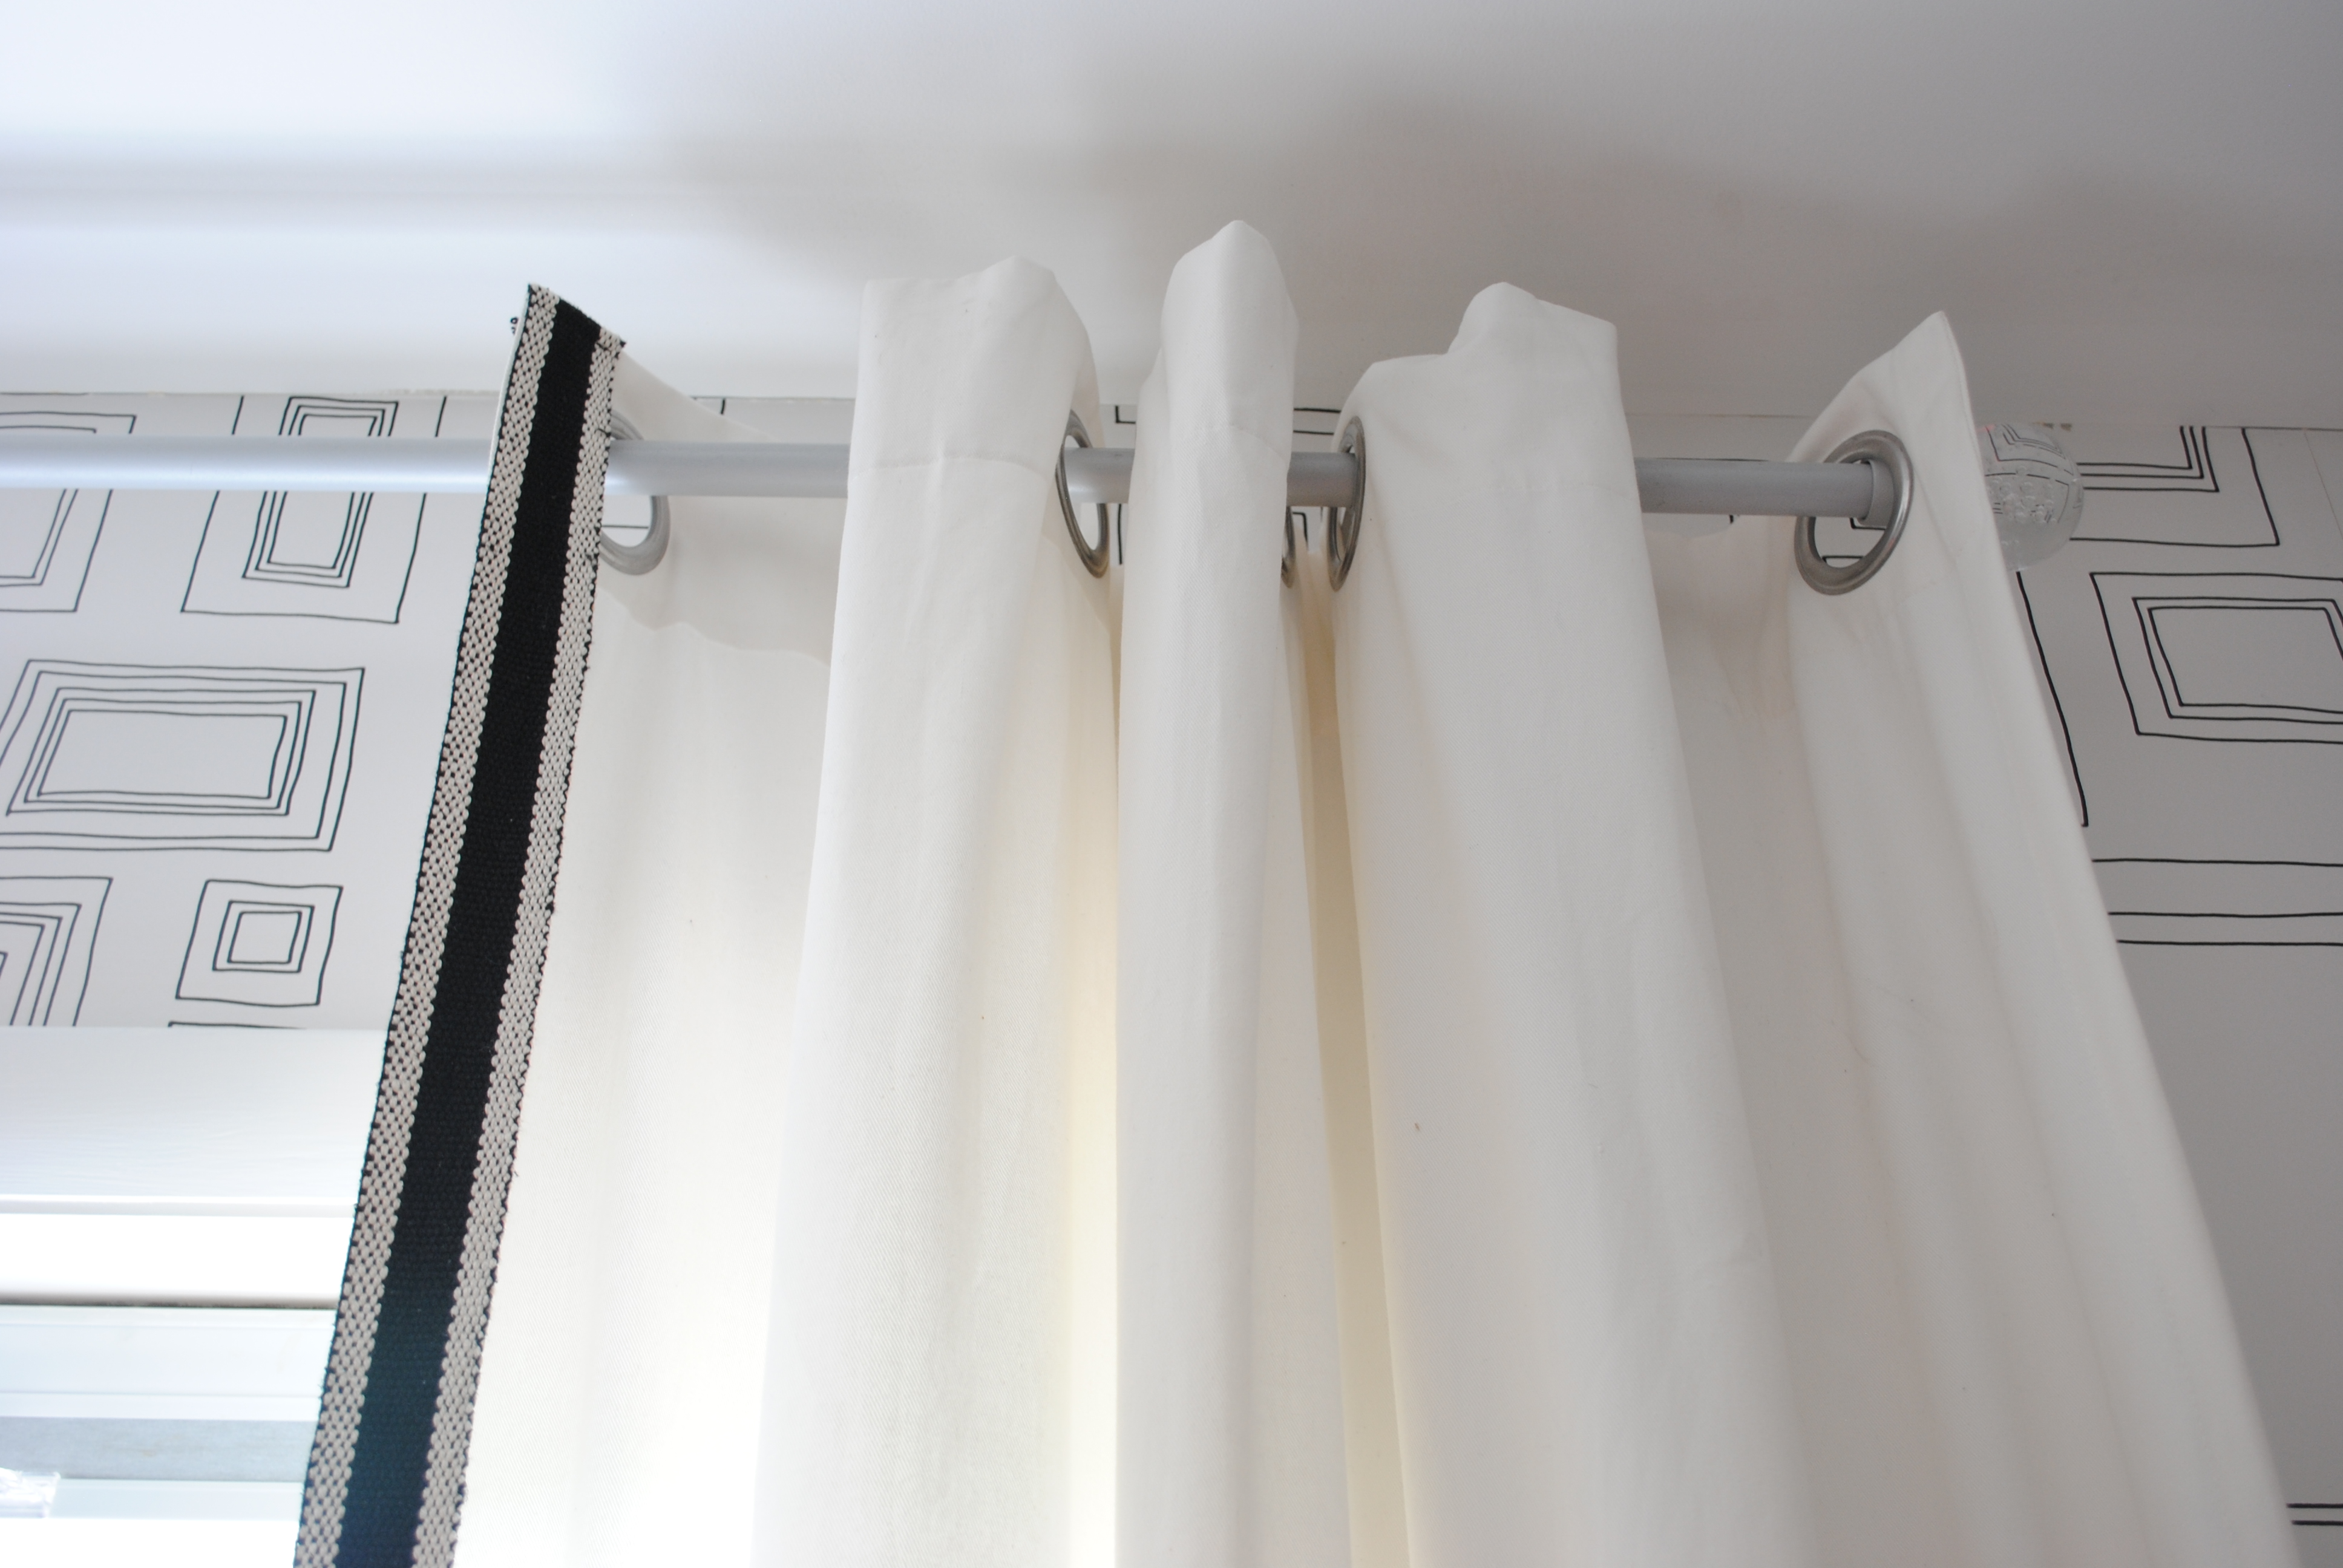
With the window treatments, I decided to go understated and reuse what was already there.  How much easier can you get?!  To jazz up the existing white drapes that I purchased from Ikea about 8 years ago, I added a woven trim to the leading edge.  The trim that I found at Hobby Lobby is black and is a great contrast to the all-white panels.  I simply sewed the trim onto the panel edge and it was complete.  This is an easy & very inexpensive way to customize window treatments to give them a designer look!

Boy Bedroom {MAKEOVER} - Gray walls, picture frame wallpaper, pops of orange & blue. The perfect space for a young boy to teen. You won't want to miss all the creative DIY ideas in this room!

{click for a similar project tutorial on adding a leading edge}

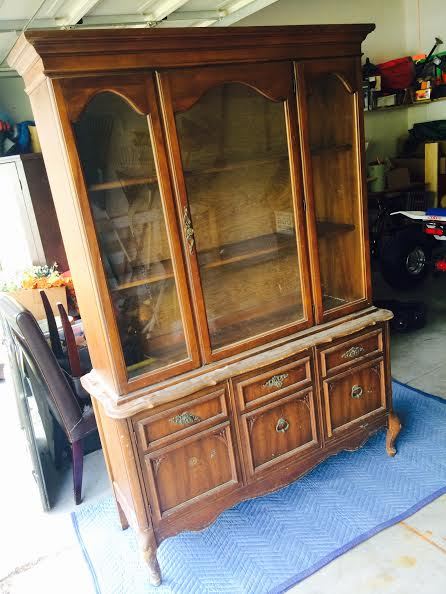
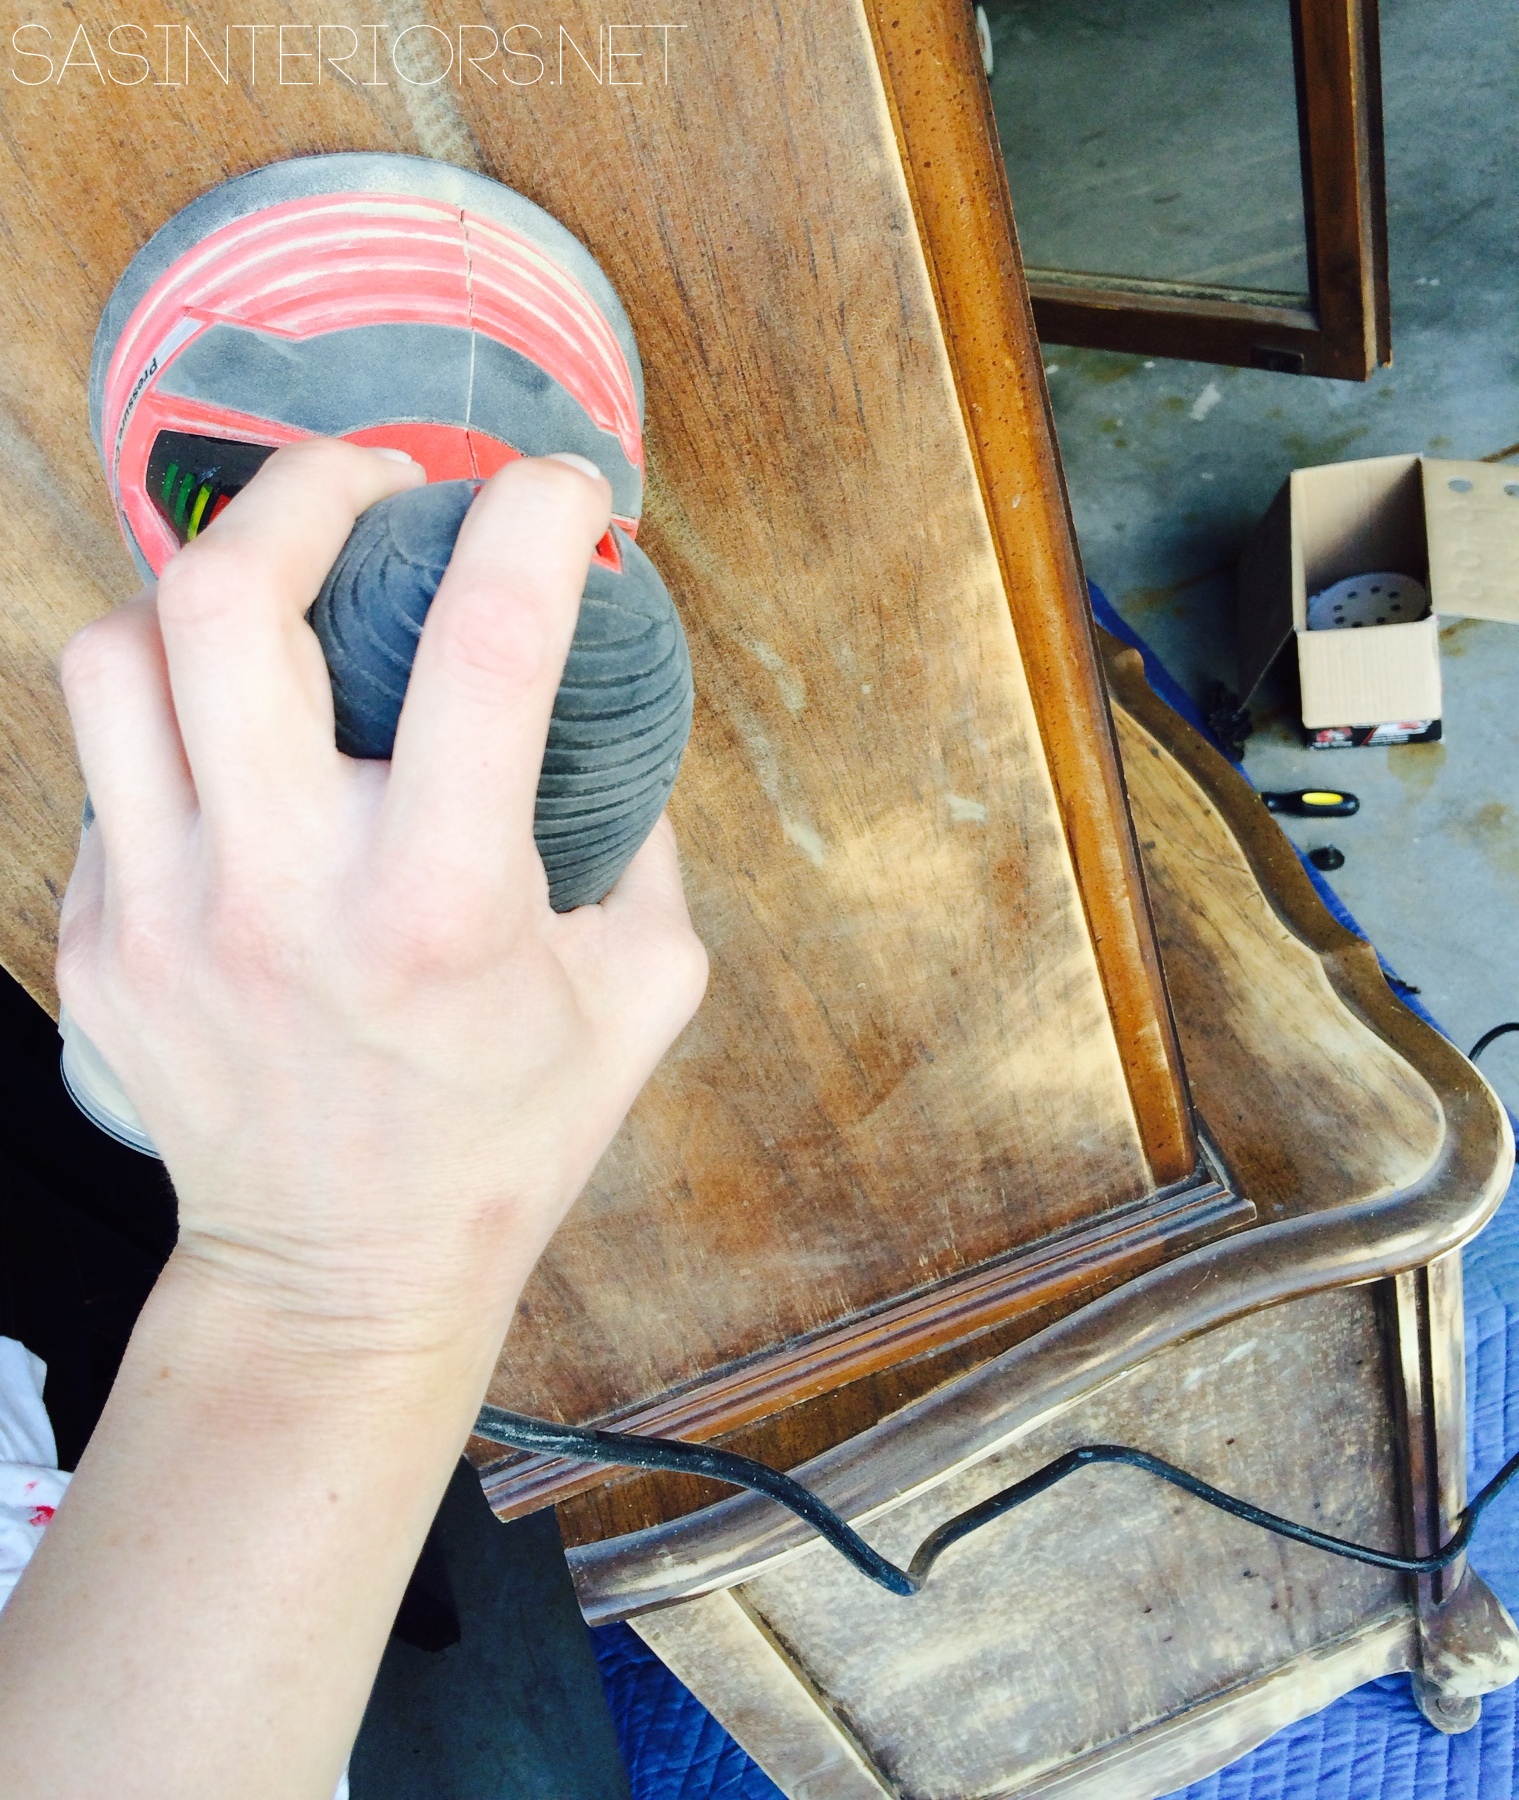
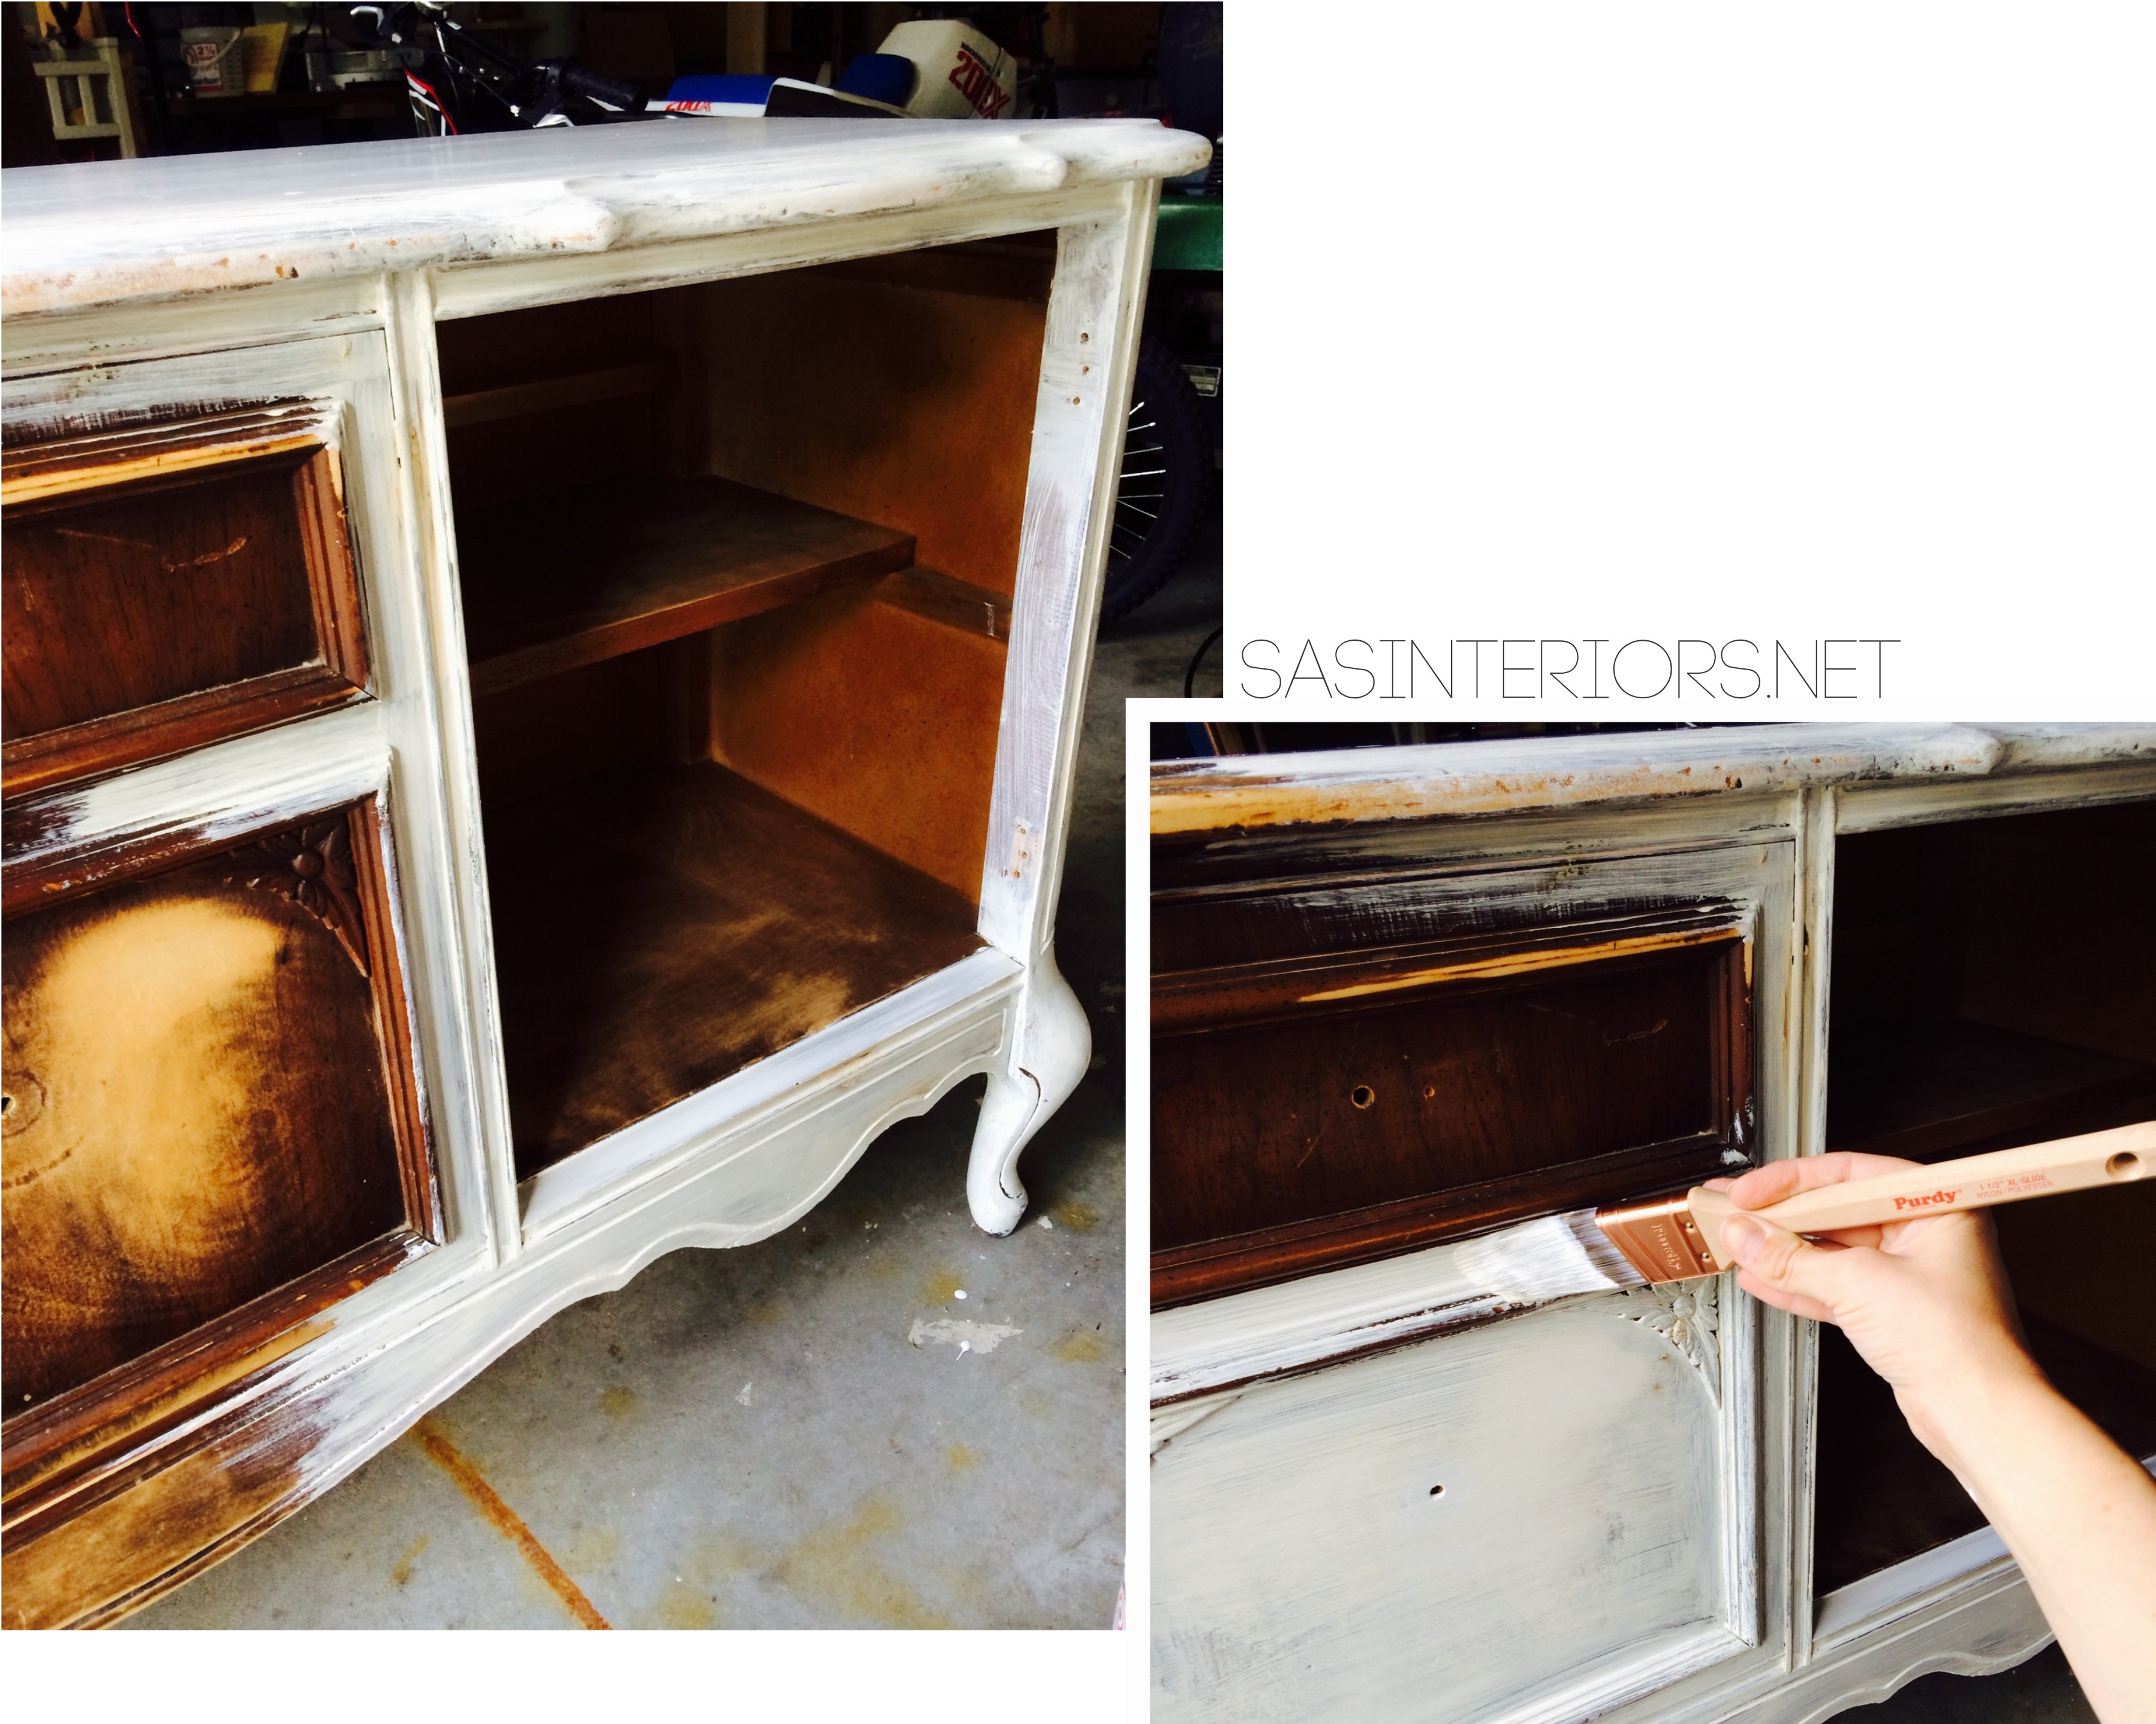
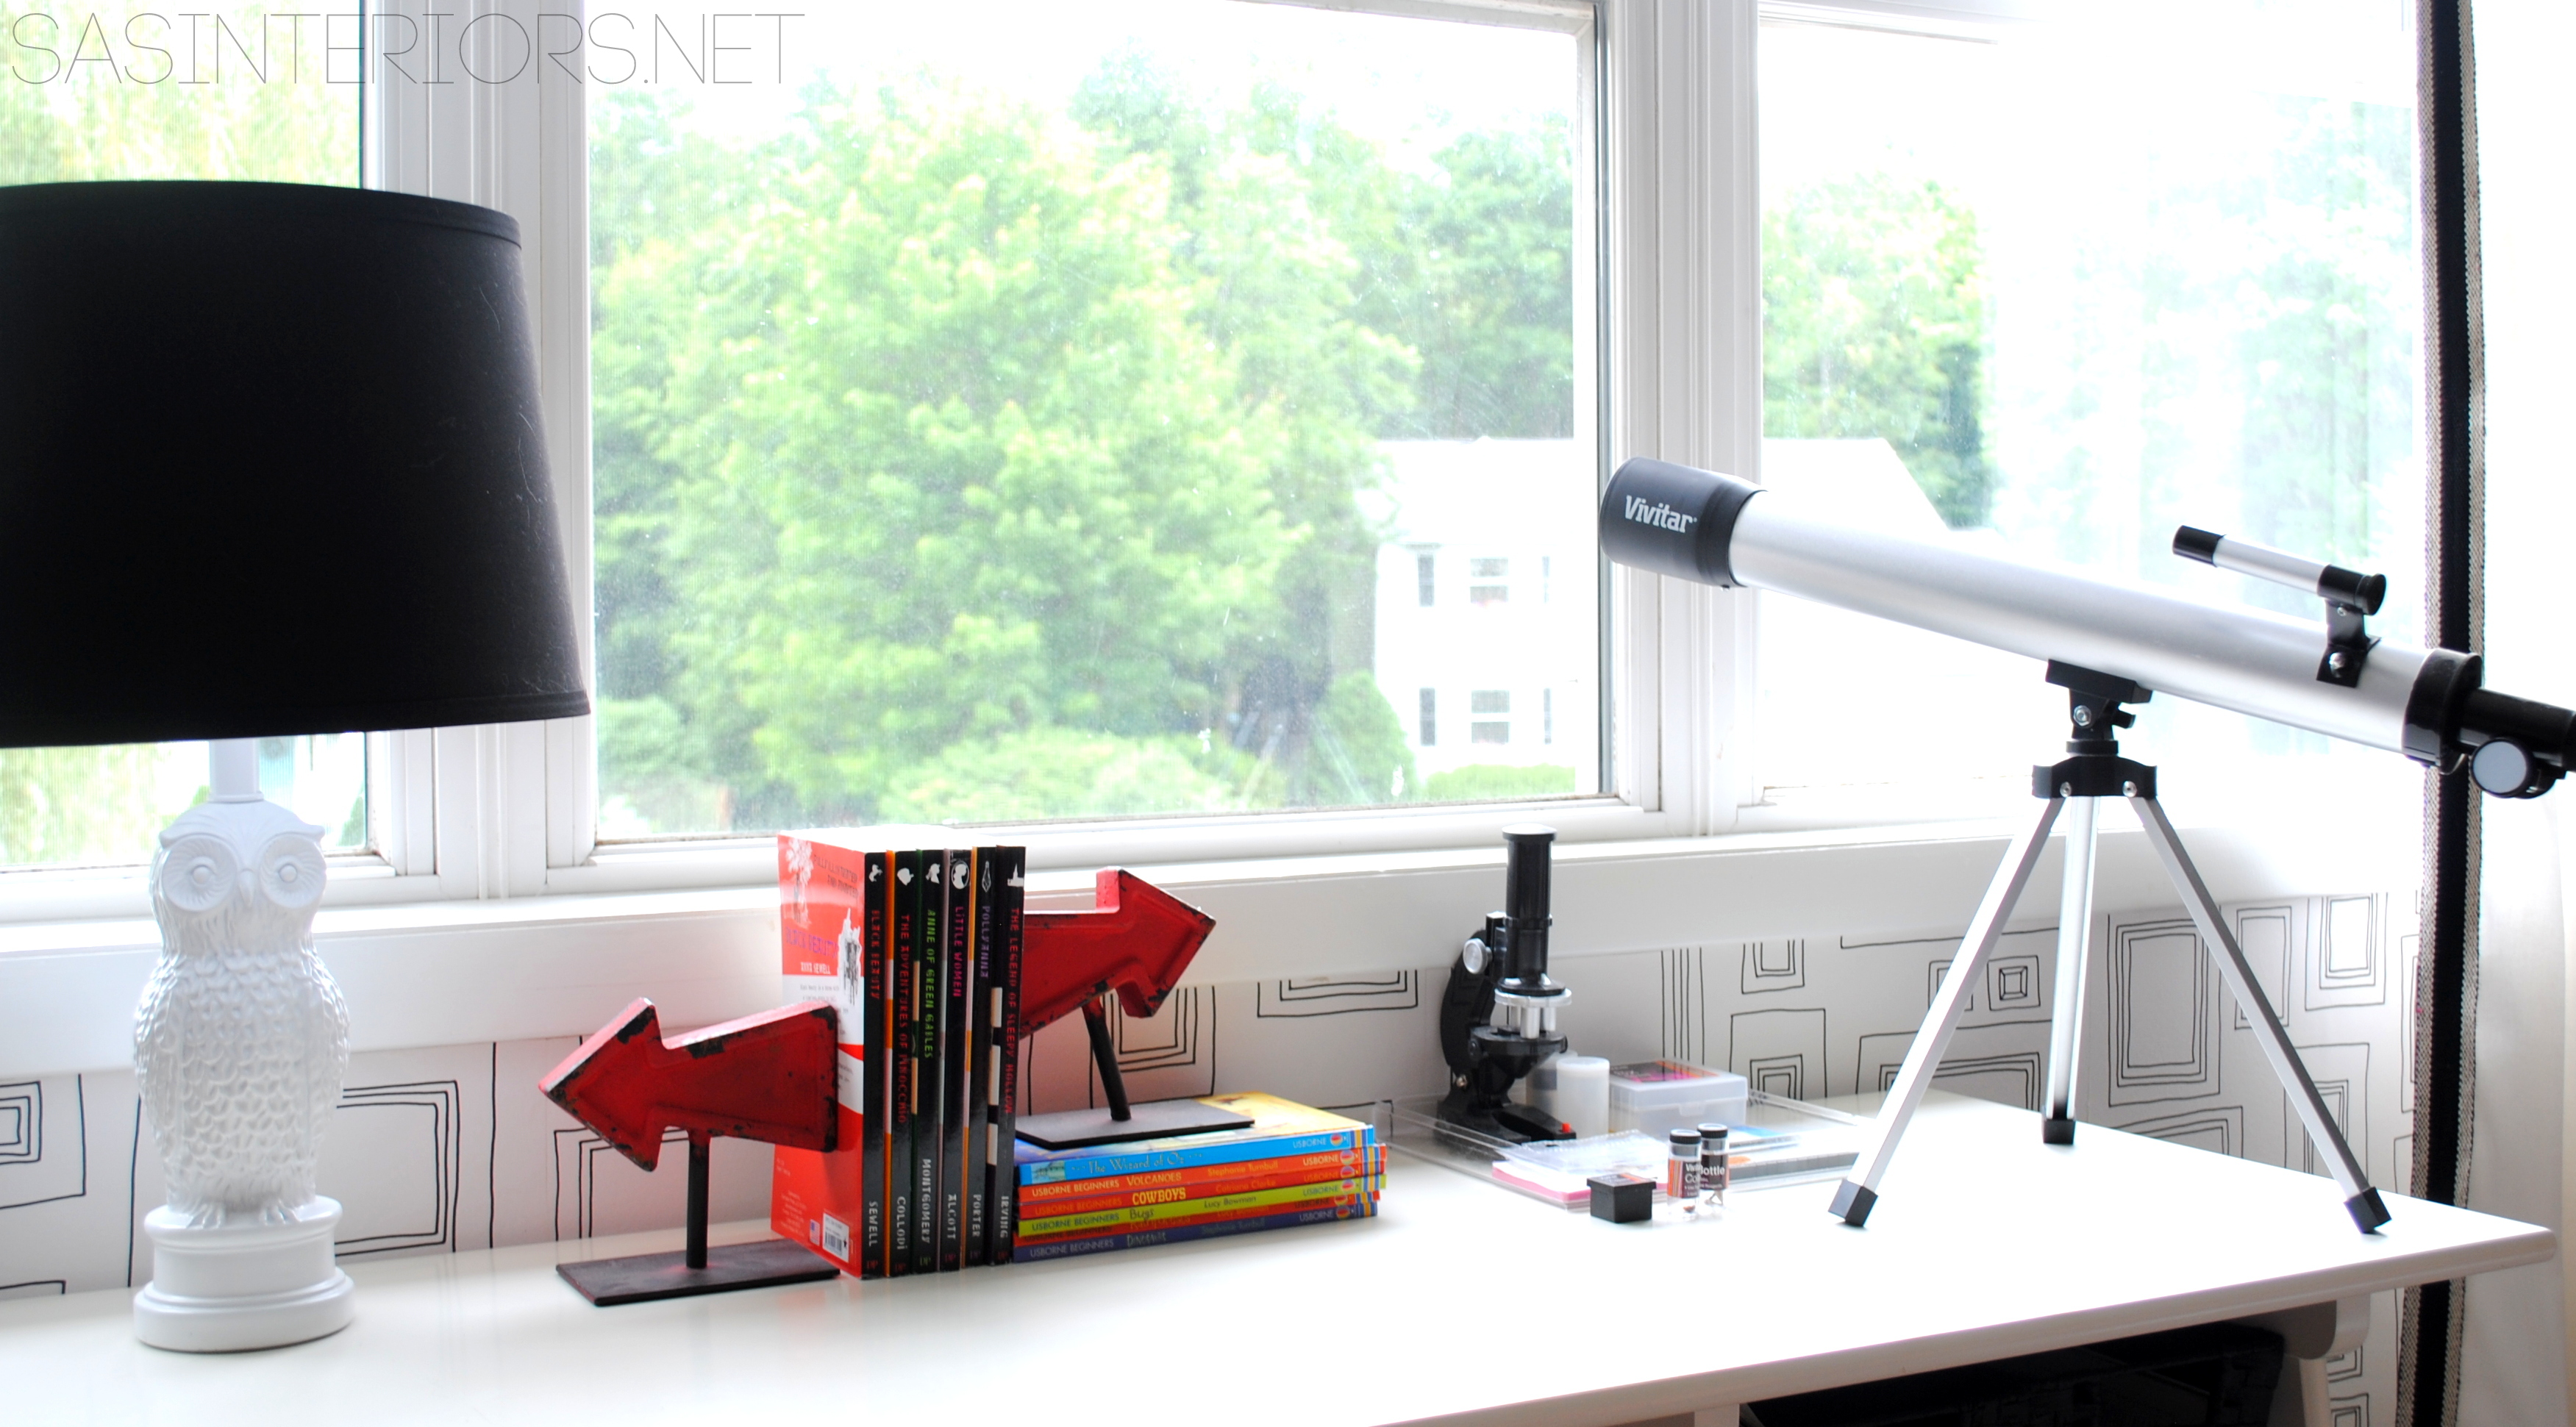
When rearranging the furniture, I liked the idea of positioning the desk so my boy can look outside the window.  The desk that was in his room was moved out and is now in the garage (I have plans for using it in another room in the future).  Since it was big and clunky, I didn’t want it to hide the new, fun wallpaper.  So in it’s place, I purchased a white, more modern desk from Target and chose to pair it with a clear ghost chair.  Again, letting the wallpaper have “it’s moment”.  A few black storage bins that I found at Lowe’s completed the look.

Boy Bedroom {MAKEOVER} - Gray walls, picture frame wallpaper, pops of orange & blue. The perfect space for a young boy to teen. You won't want to miss all the creative DIY ideas in this room!

On the desk top, I added the most adorable owl lamp that I found at Walmart and paired it with a black shade (again, playing with contrasts).  Also on the desk are a few of my boys favorite books and the cutest metal arrow bookends that I got from The Painted Fox, when I worked with them on creating The Nursery Nook.  A telescope and microscope are a few other favorite, everyday things he loves.

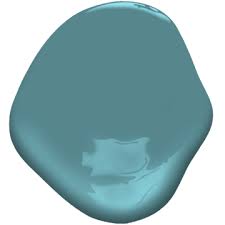
As we continue around the room, we can take a look at the closet and the dresser.  I had some fun with the closet door and chose to give it a splash of color with a deep blue hue.  Because the walls are neutral, adding a pop of color as I did for the door, is a fun way to add depth to a space.

Boy Bedroom {MAKEOVER} - Gray walls, picture frame wallpaper, pops of orange & blue. The perfect space for a young boy to teen. You won't want to miss all the creative DIY ideas in this room!

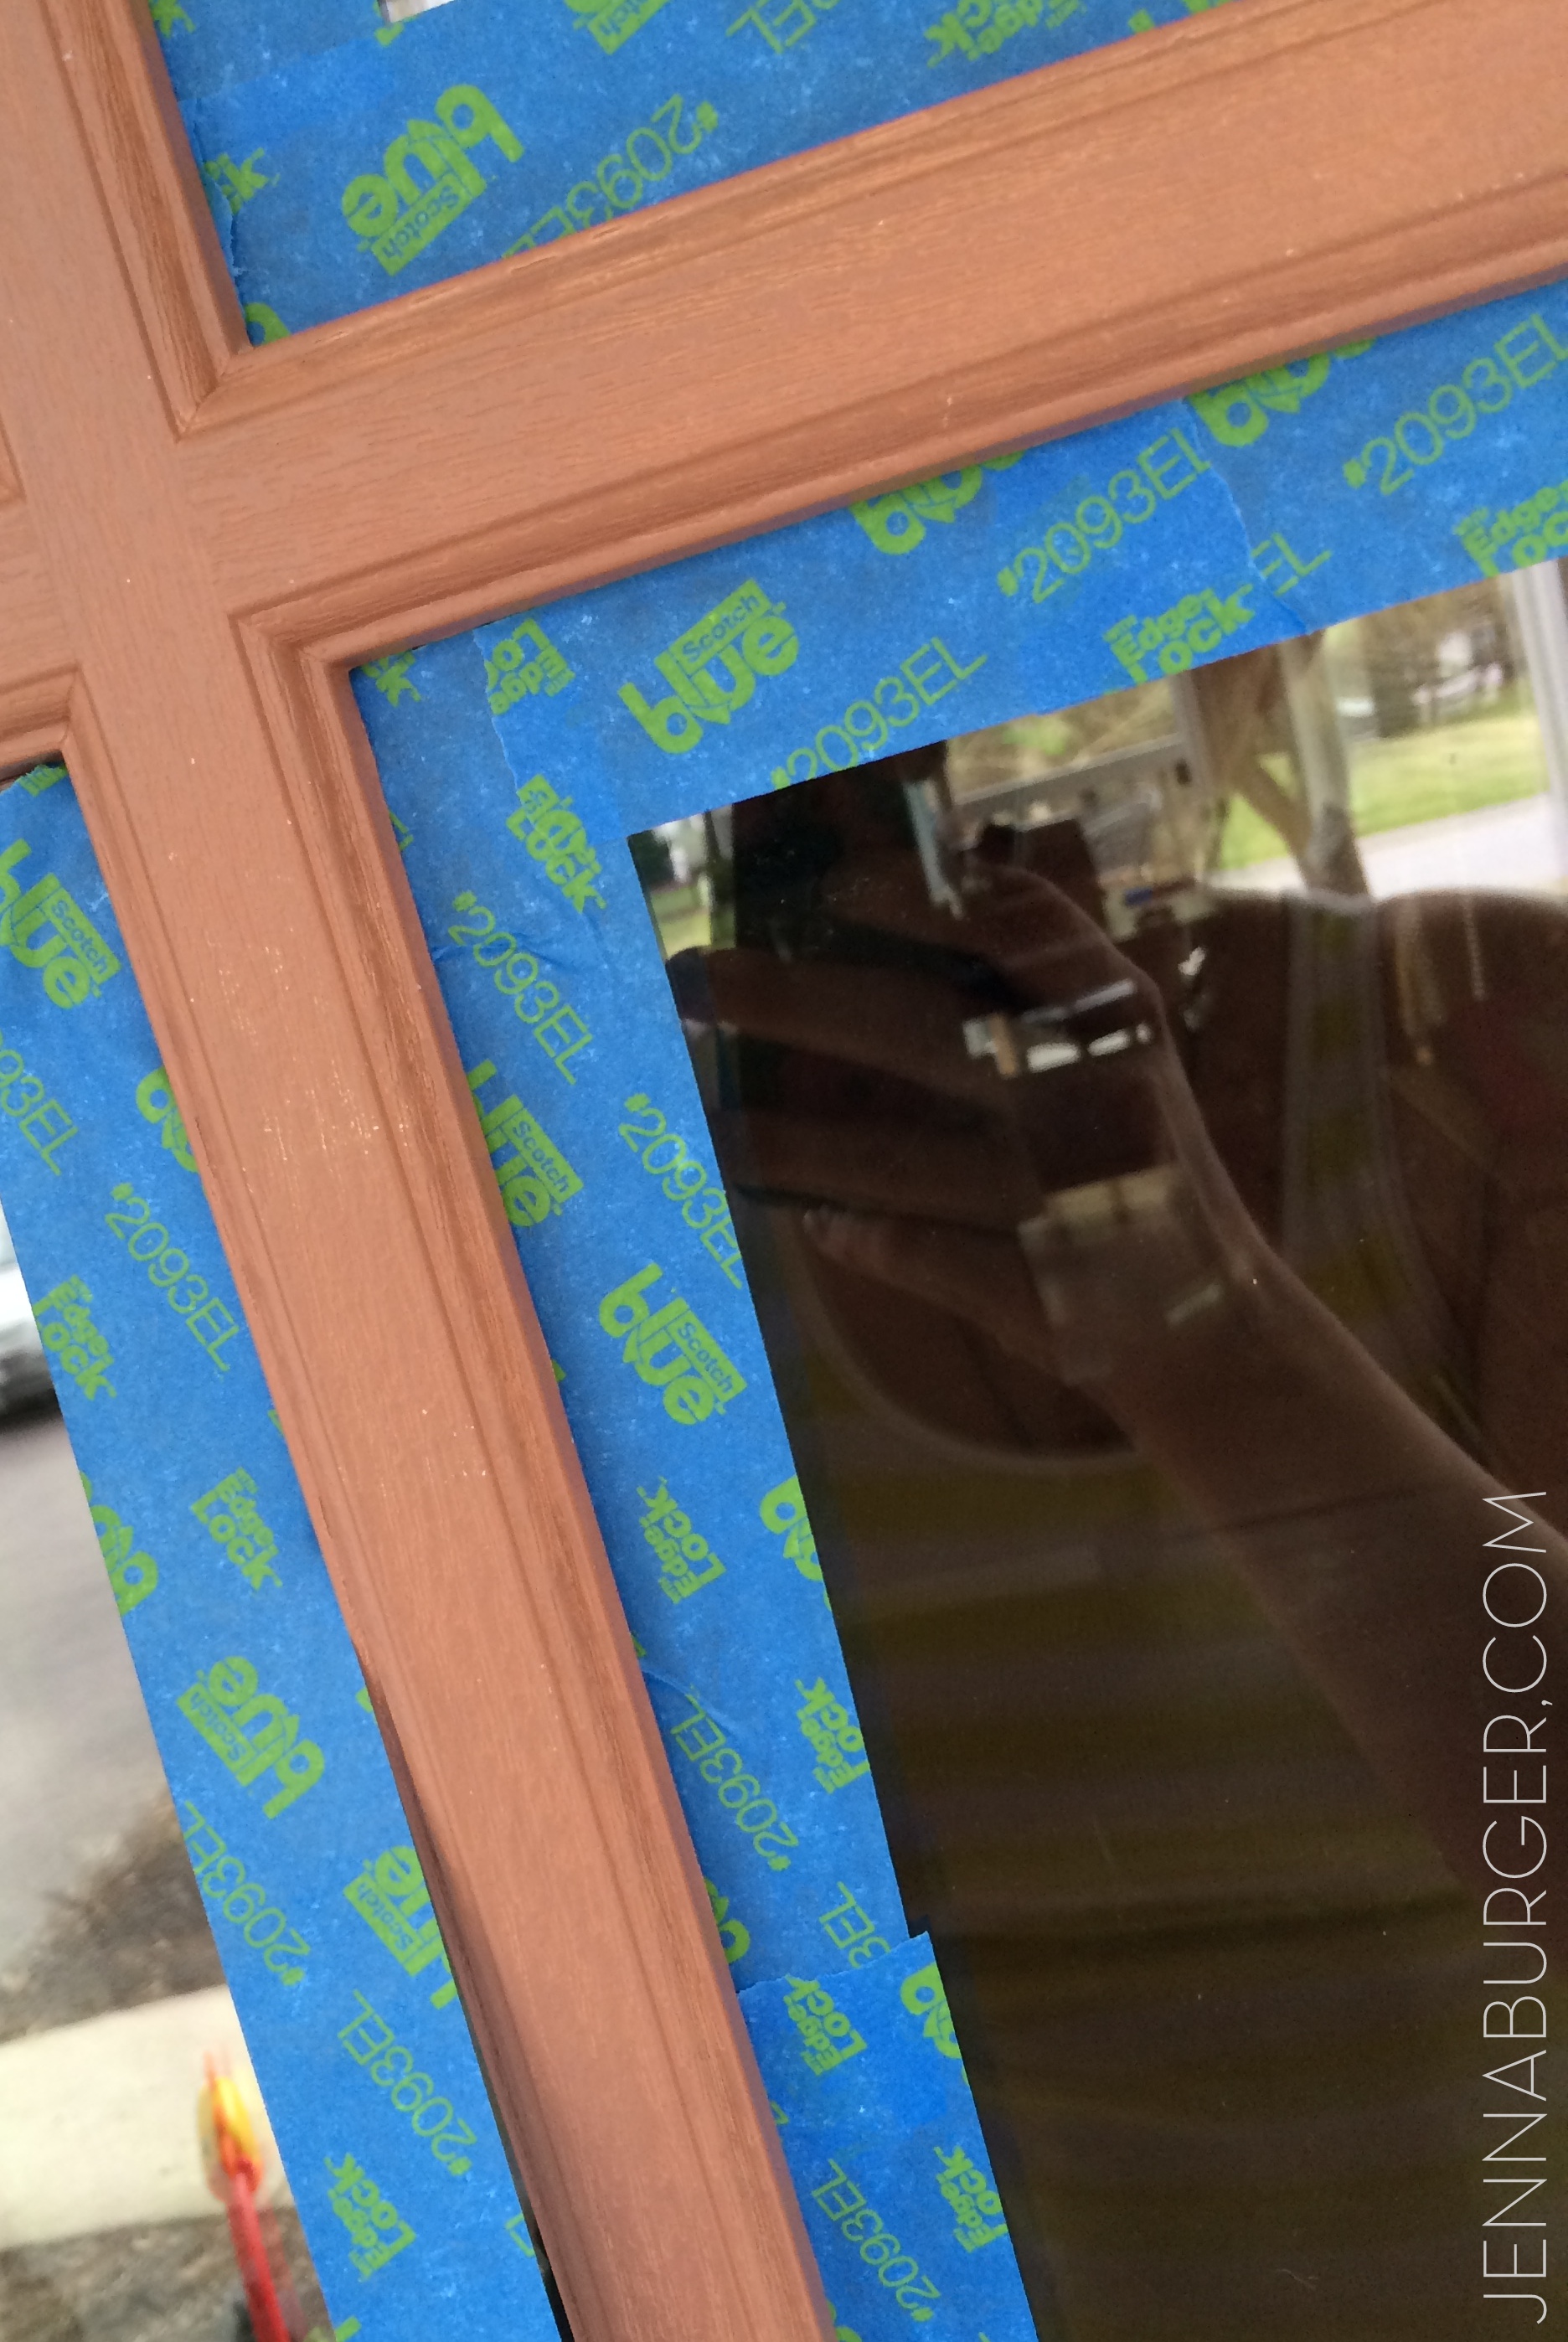
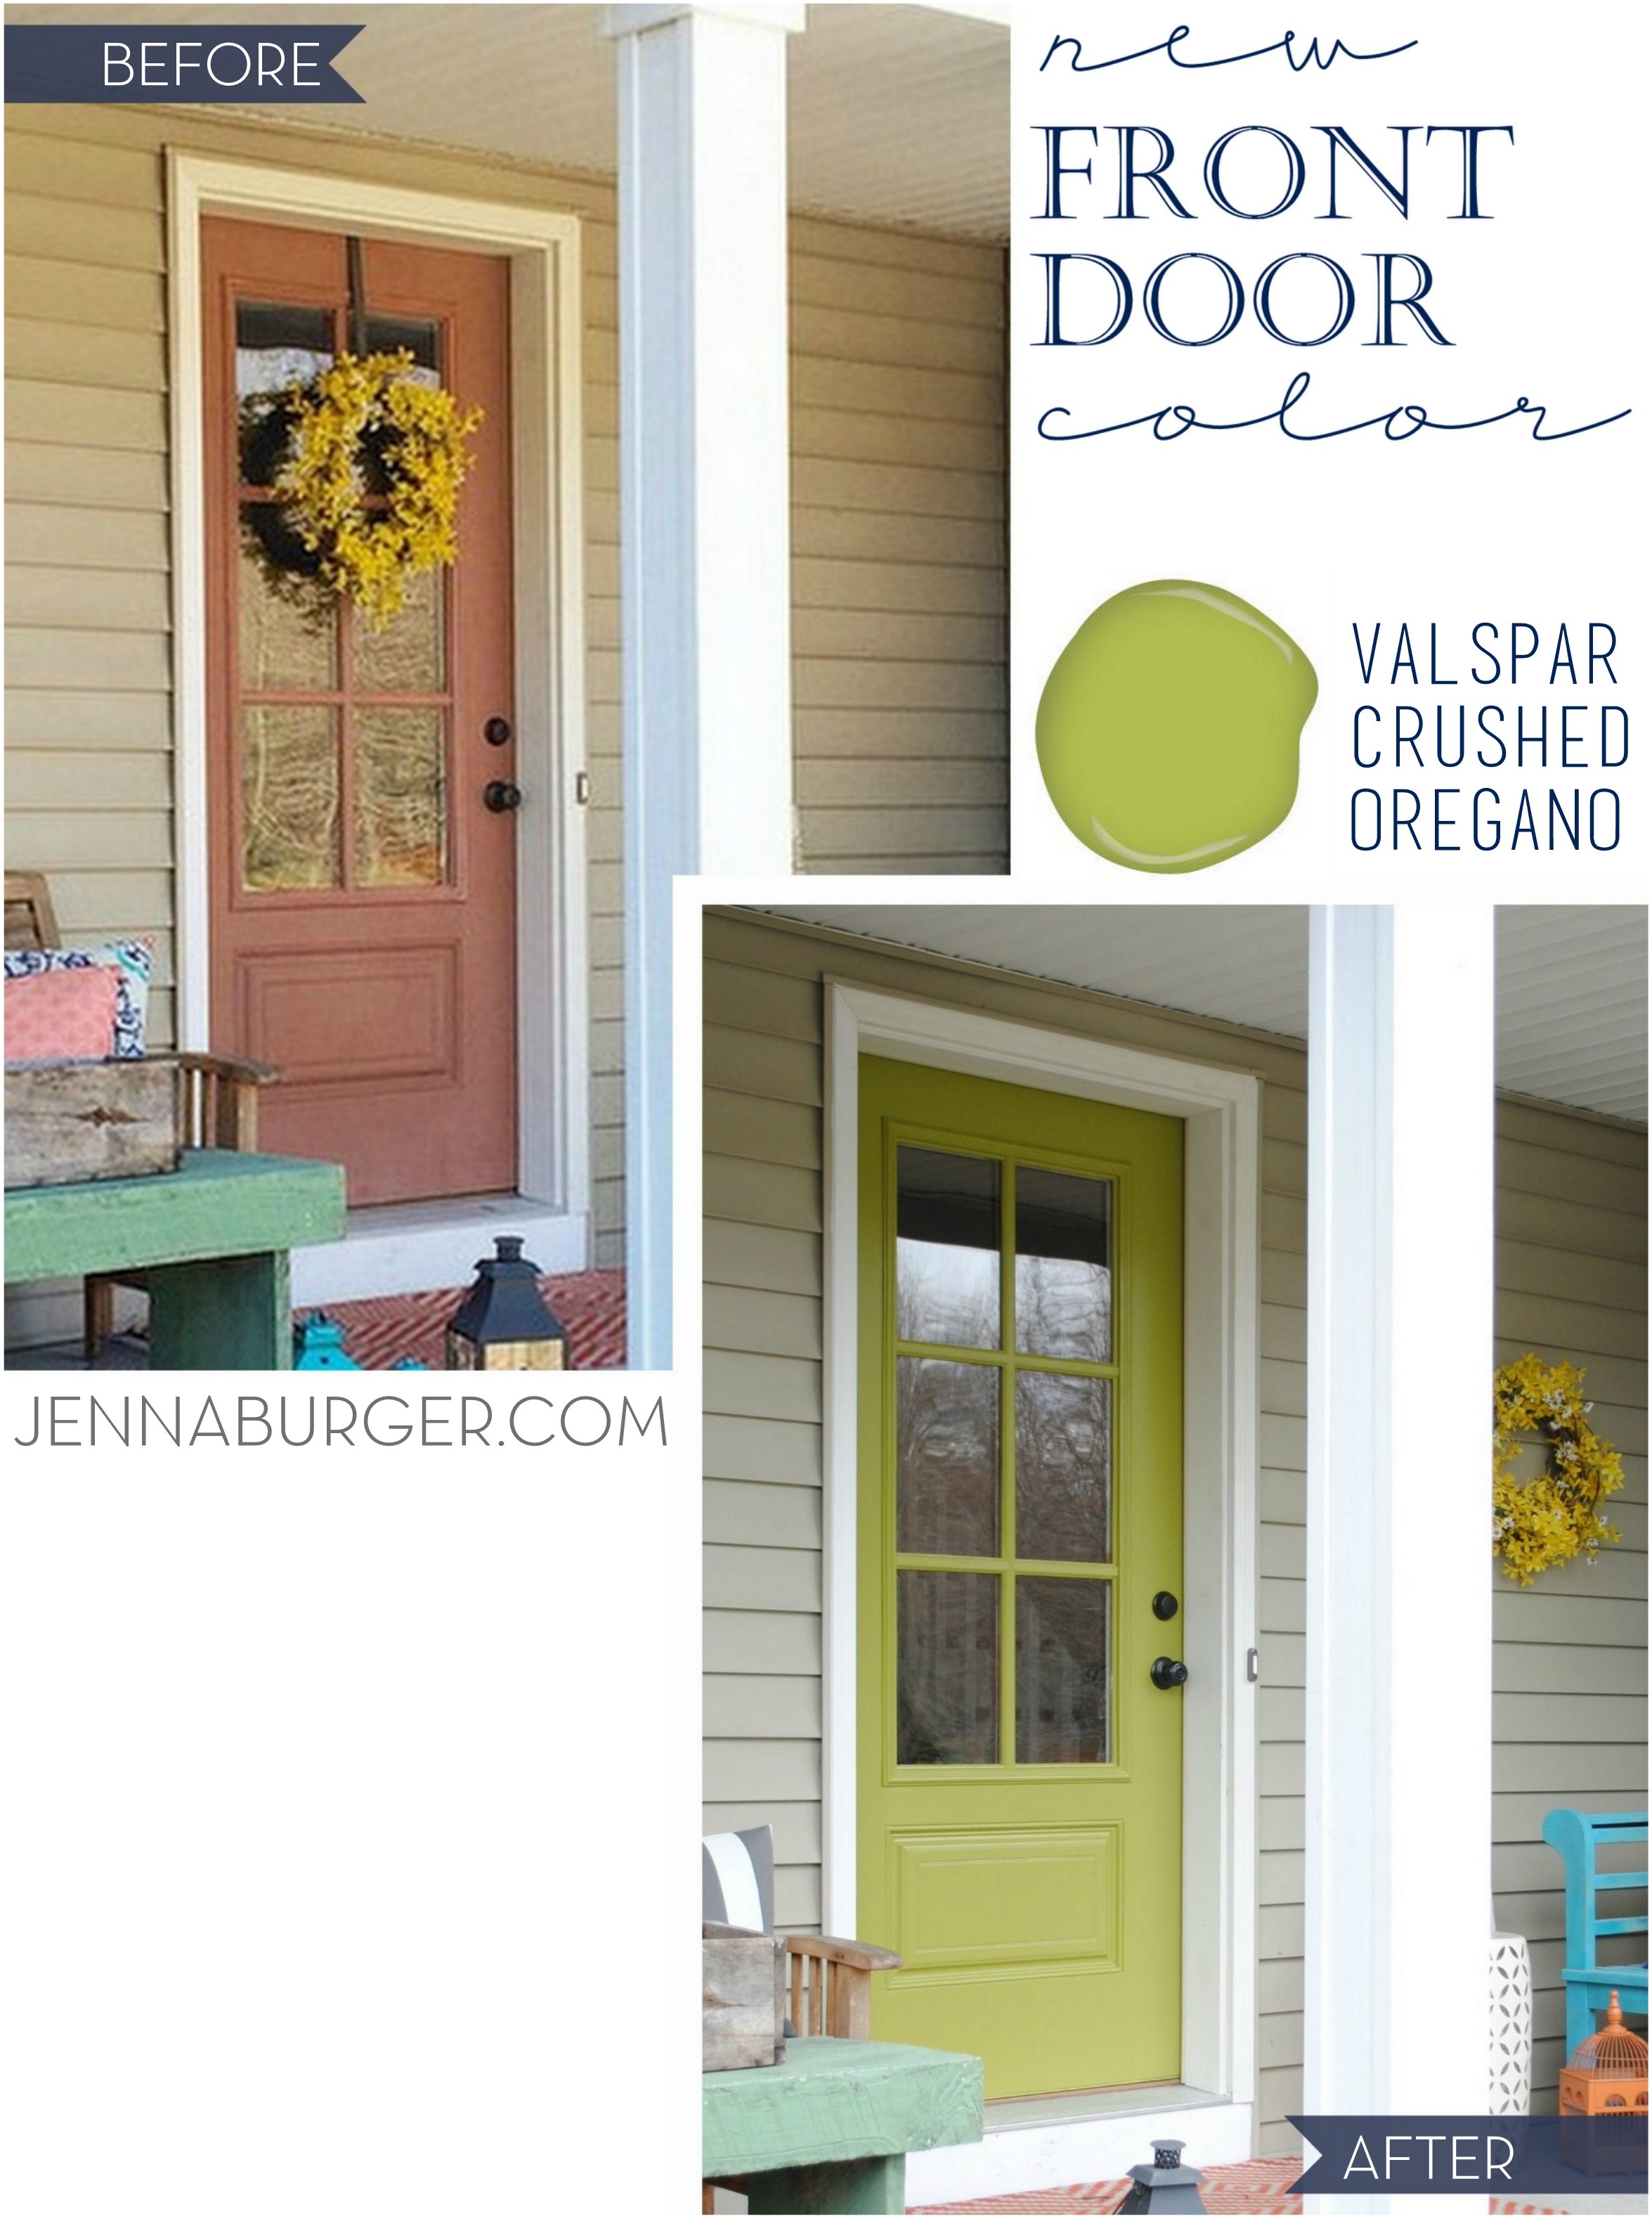
[click for the tutorial on how to paint a door]

Boy Bedroom {MAKEOVER} - Gray walls, picture frame wallpaper, pops of orange & blue. The perfect space for a young boy to teen. You won't want to miss all the creative DIY ideas in this room!

Opposite of the bed / honeycomb wall is the dresser.  This dresser has had many lives and even though it’s a bold color (red/orange mix) it’s lived through all the room updates.  It’s from Ikea and was purchased about 8 years ago.  For the dresser top I got 2 new lamps – clearance from Target – that flank each end and added some books + a clear jar of Legos… my boys favorite!

The rug.  The rug. From preview pics of this space, many of you have loved & commented on it.  I got it from Joss and Main through one of their flash sales.  Sorry that I don’t have more info to share 🙁  Isn’t it fun though?  I love how it brings all the colors together.

Boy Bedroom {MAKEOVER} - Gray walls, picture frame wallpaper, pops of orange & blue. The perfect space for a young boy to teen. You won't want to miss all the creative DIY ideas in this room!

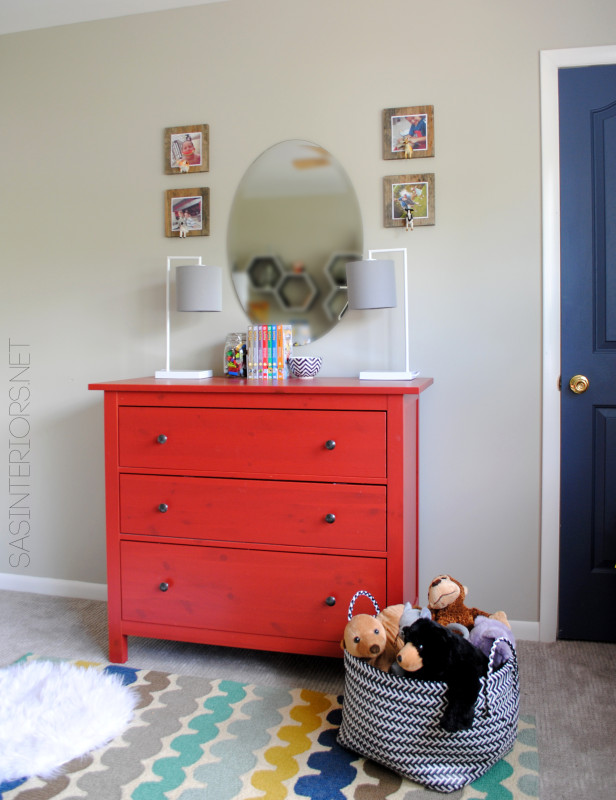
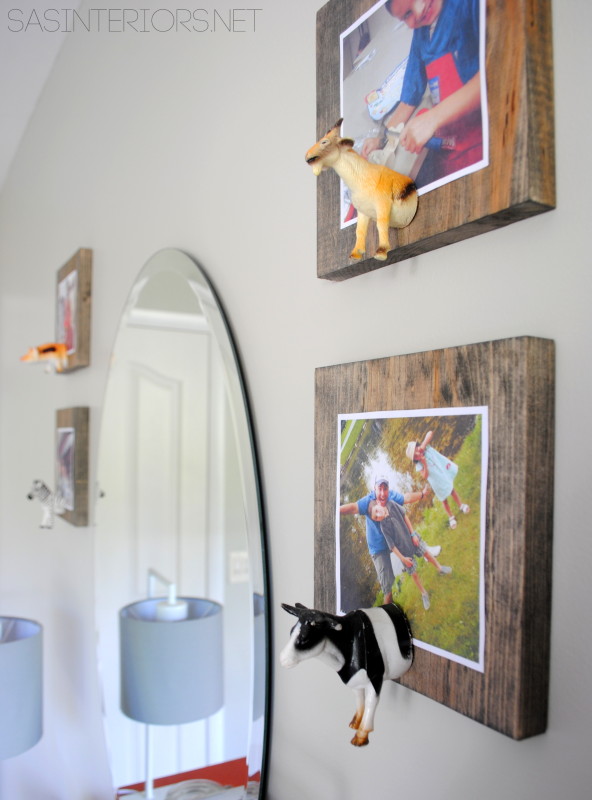
Above the dresser is an oval mirror (which is from Lowe’s) that I took from the kids bath (which is now mirrorless, hehe – it happens…) and the new instagram picture holders I made.

Boy Bedroom {MAKEOVER} - Gray walls, picture frame wallpaper, pops of orange & blue. The perfect space for a young boy to teen. You won't want to miss all the creative DIY ideas in this room!

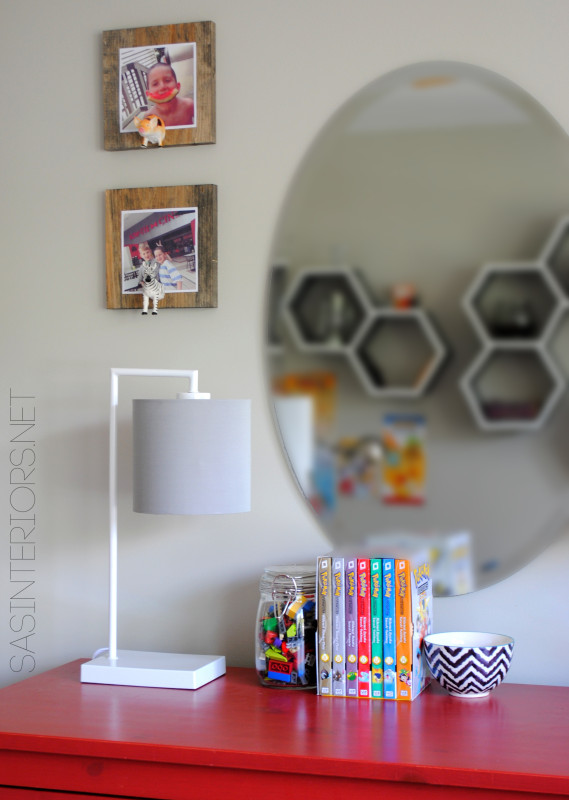
{click for the tutorial of the toy animal instagram photo holders}

Boy Bedroom {MAKEOVER} - Gray walls, picture frame wallpaper, pops of orange & blue. The perfect space for a young boy to teen. You won't want to miss all the creative DIY ideas in this room!

And there you have it… an awesome boy bedroom makeover filled with DIY projects & repurposed items.  Thankfully my son loves his new room, as do I.  It’s a keeper (for now, lol).

Boy Bedroom {MAKEOVER} - Gray walls, picture frame wallpaper, pops of orange & blue. The perfect space for a young boy to teen. You won't want to miss all the creative DIY ideas in this room!

Thanks for stopping by for a tour. To see more spaces in my home, along with other room reveals, head on over to my House Tour!