
Tag: China Cabinet Makeover

China Cabinet Makeover {Reveal}

It’s done!  What a journey it’s been for this china cabinet.

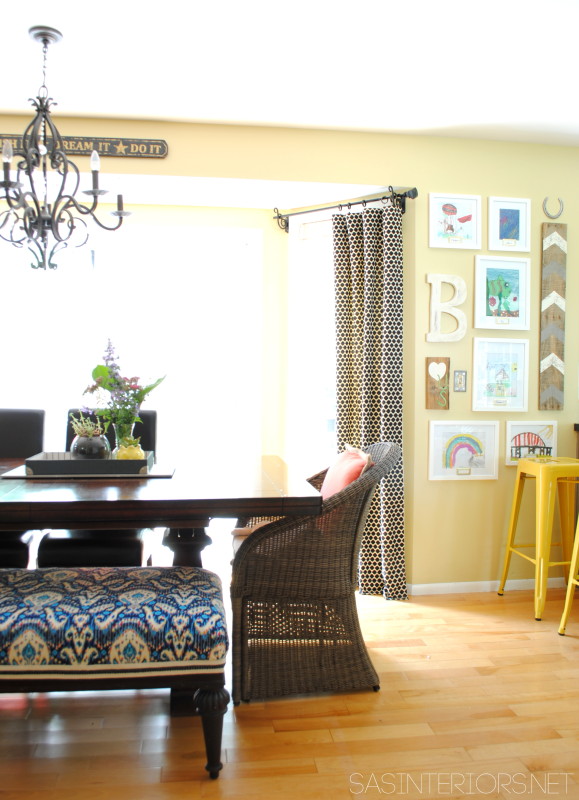
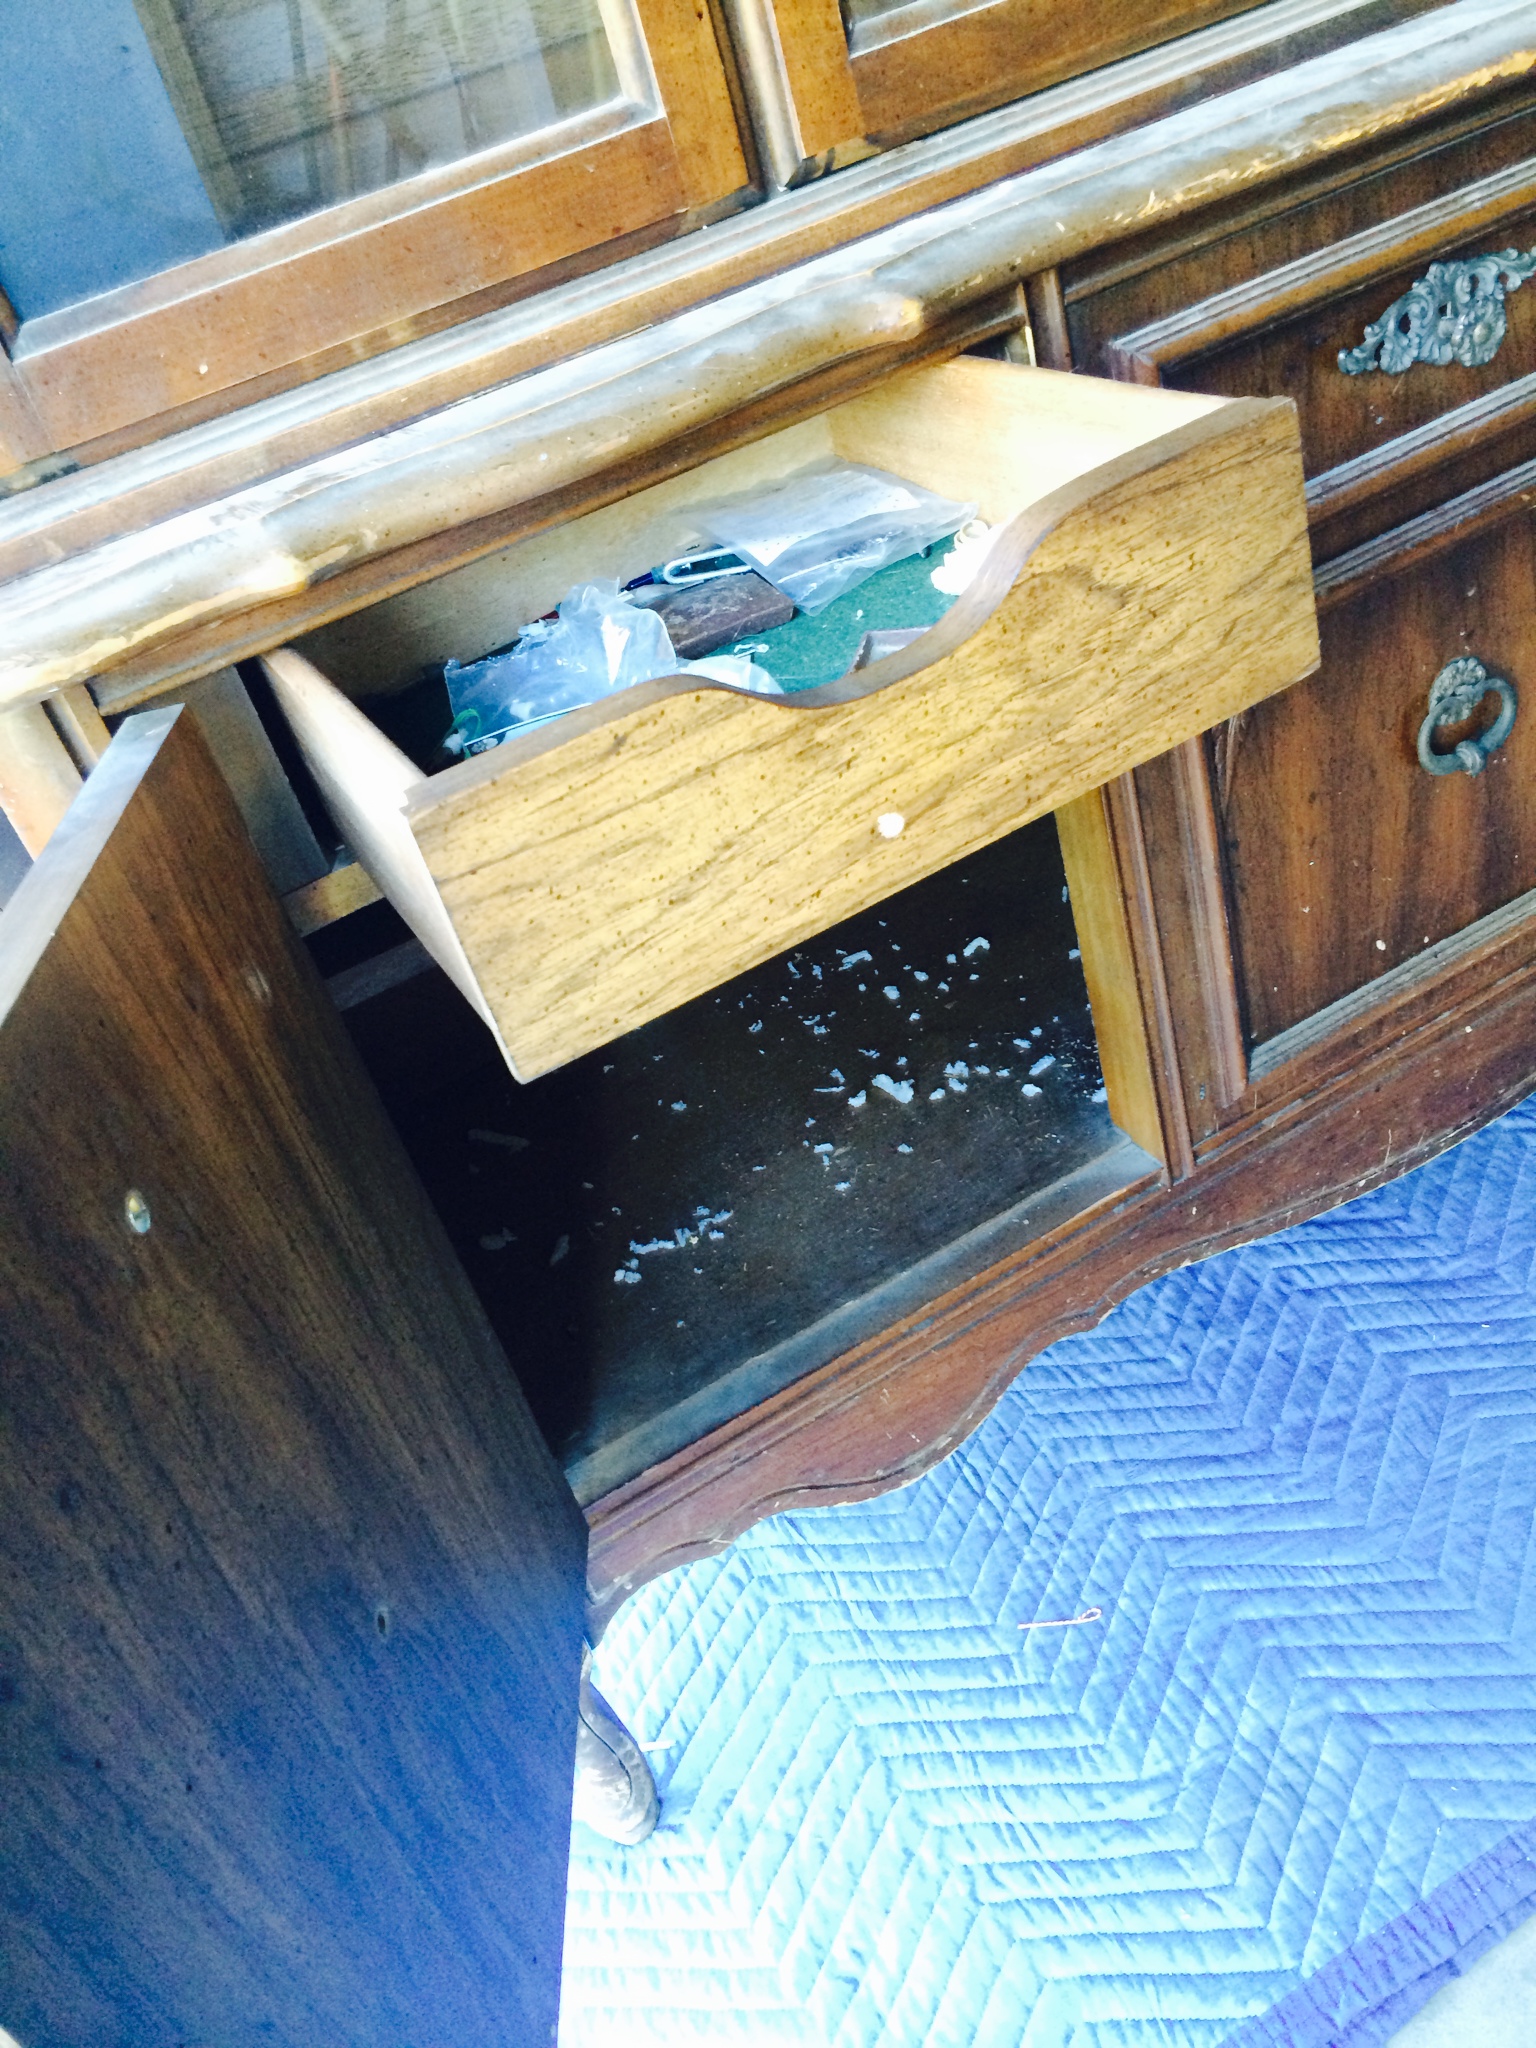
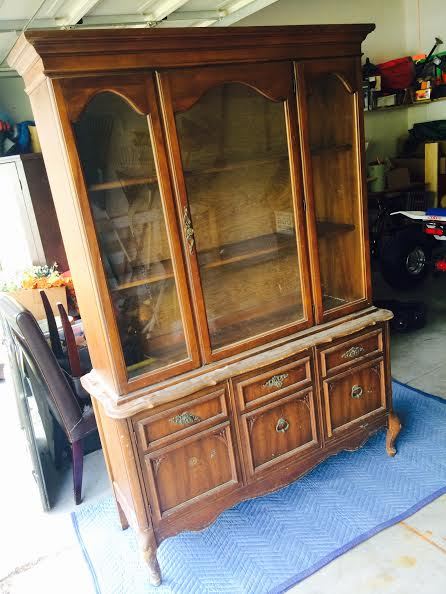
Upon finding this diamond-in-the-rough on Craigslist and rescuing it from a dilapidated garage that housed chickens, roosters, and a few other unknown animals (I was afraid to even look around), the once trash-bound cabinet now sits beautifully in my dining room with a vibrant new color & a complete designer makeover…

China Cabinet before & after >>> The process of giving this piece of a furniture a complete makeover!

It has been quite the task of getting her to this point, but she’s complete!

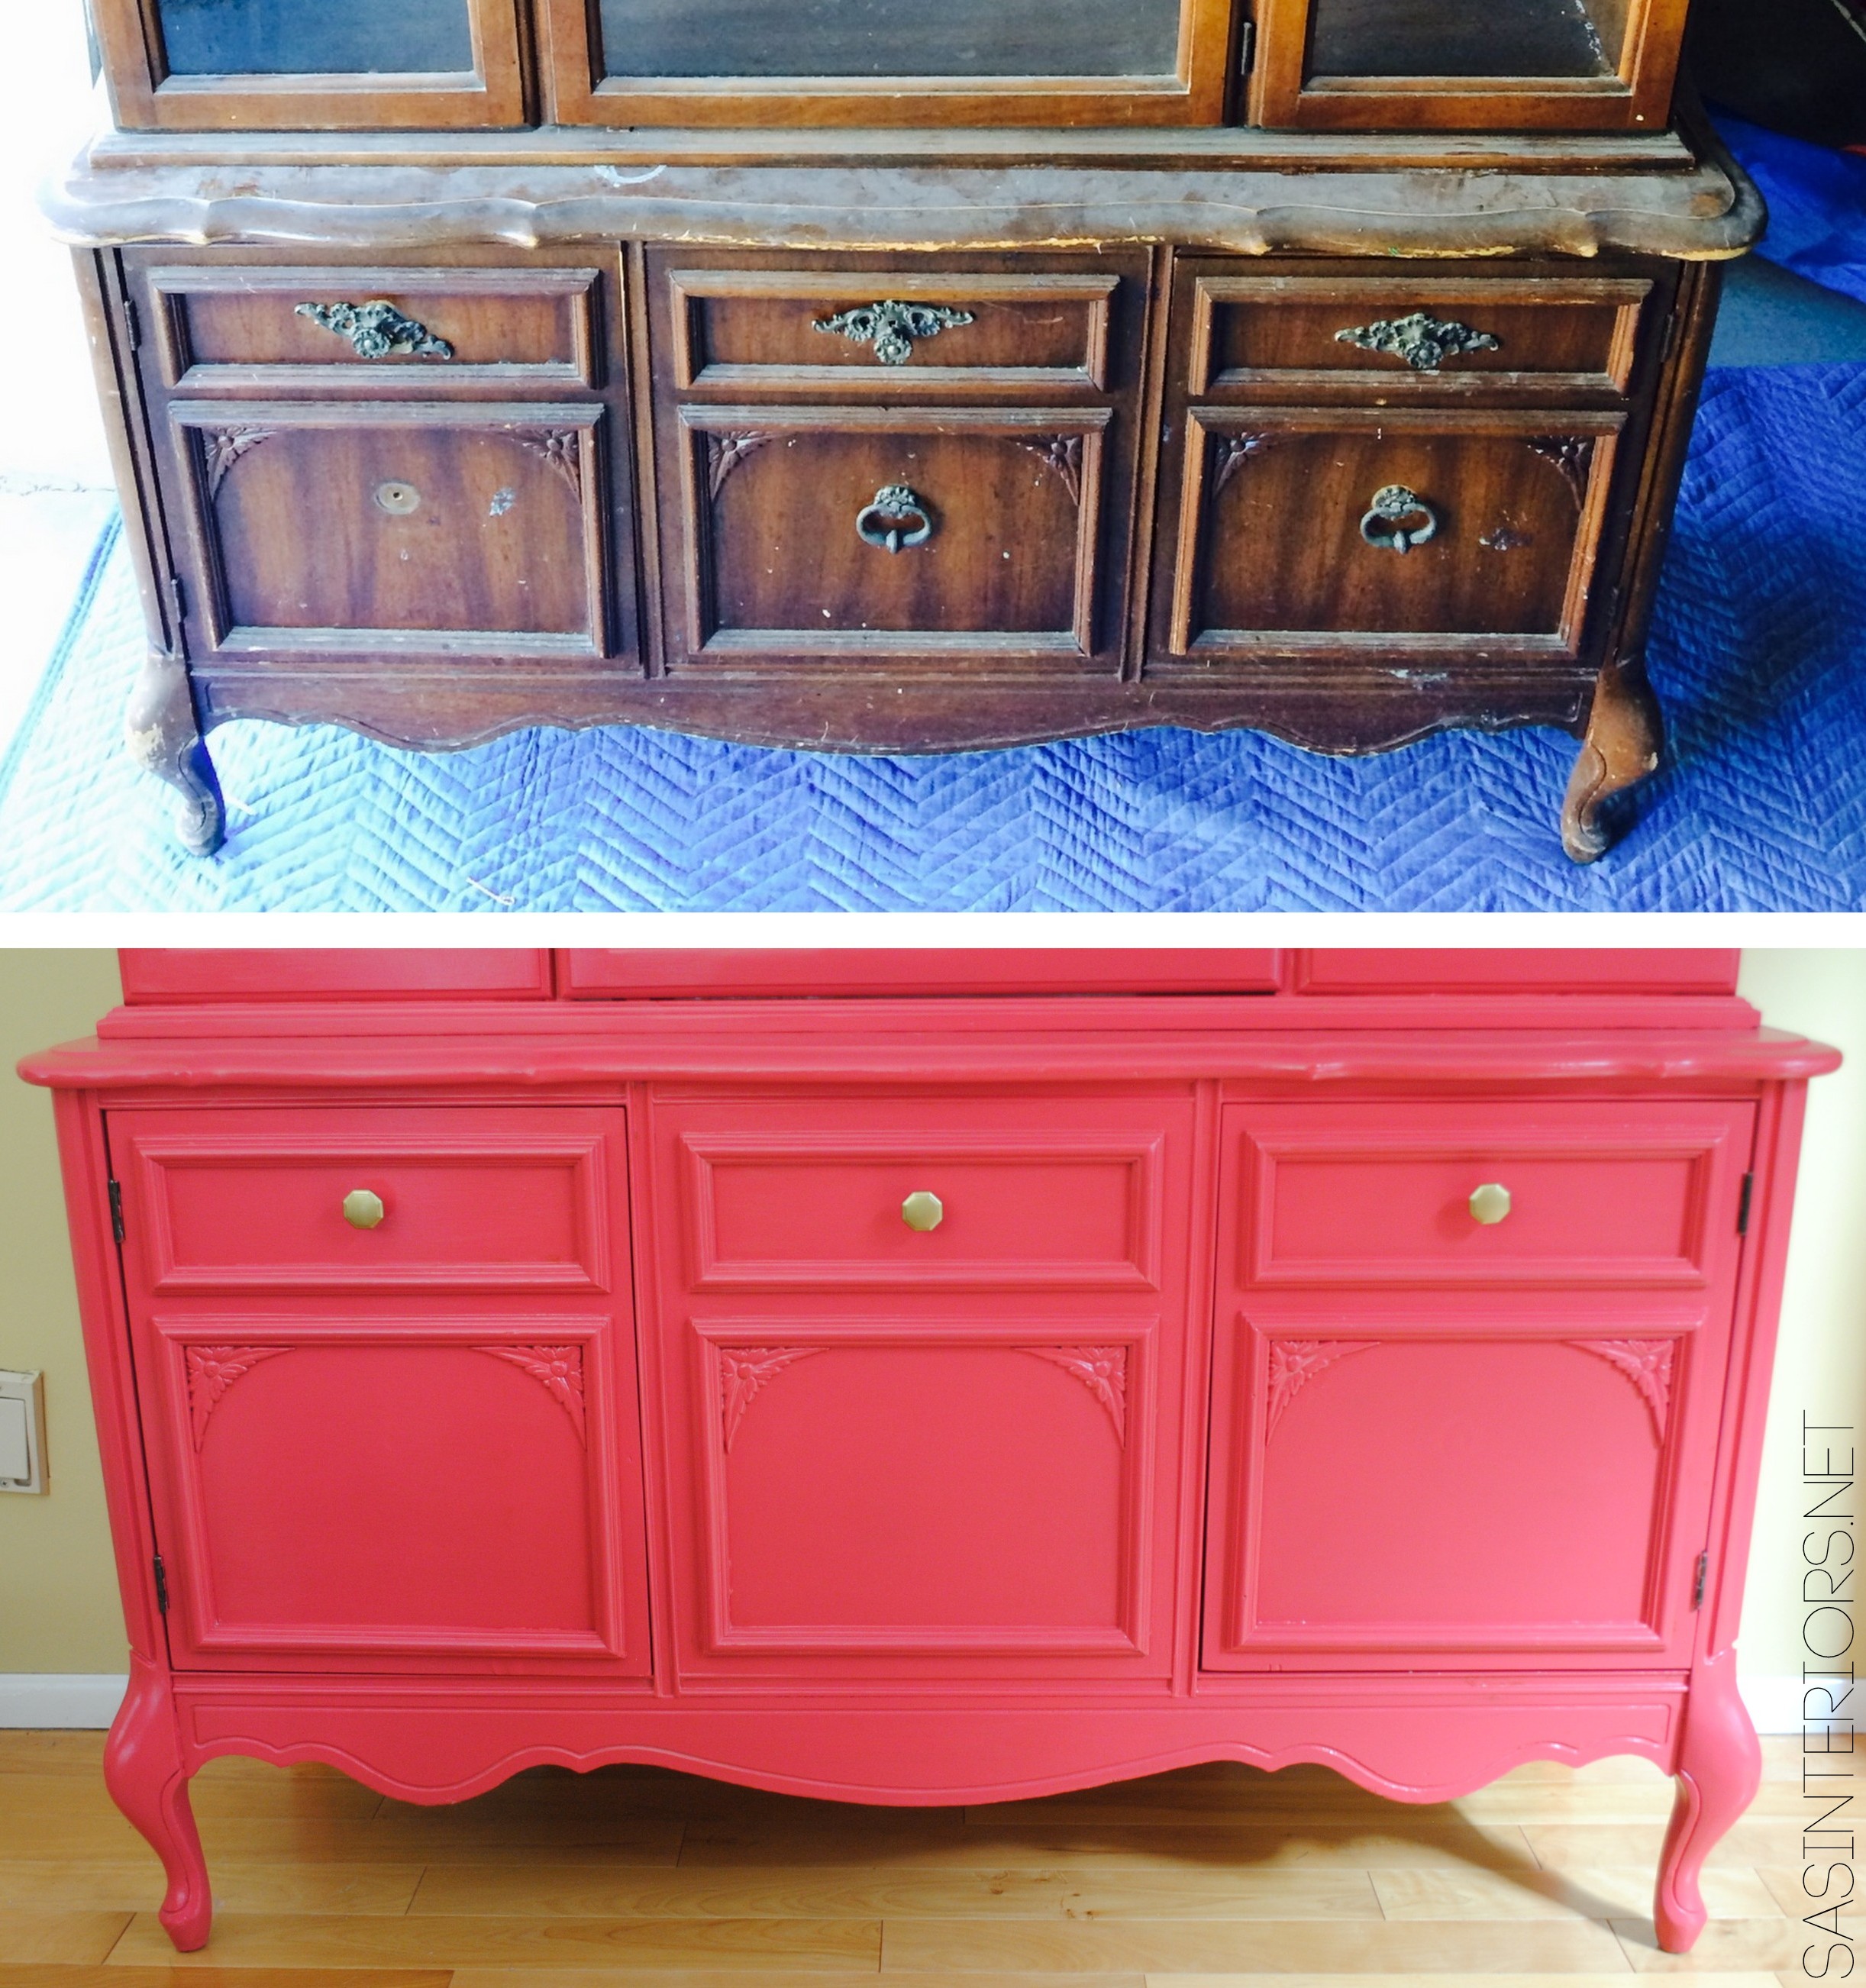
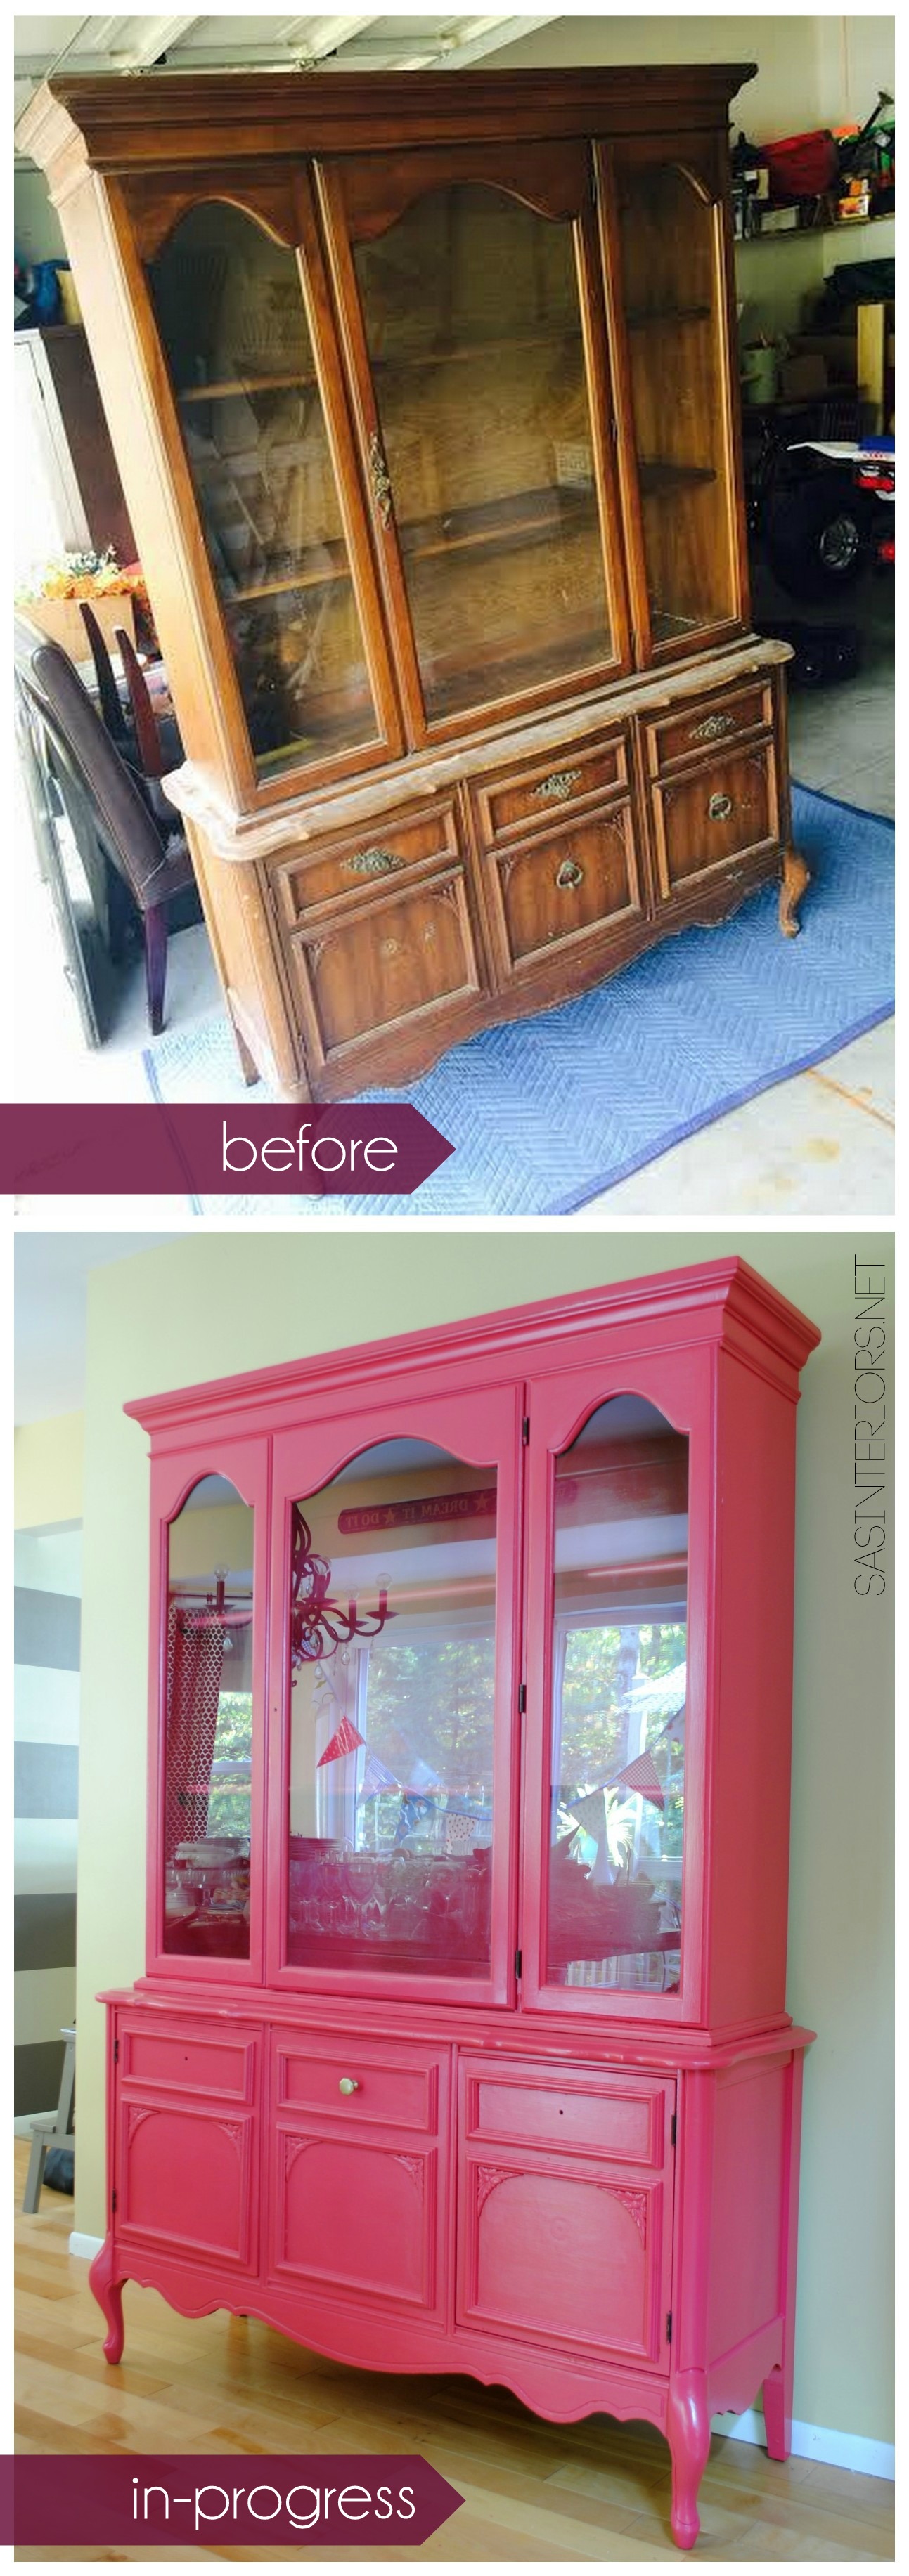
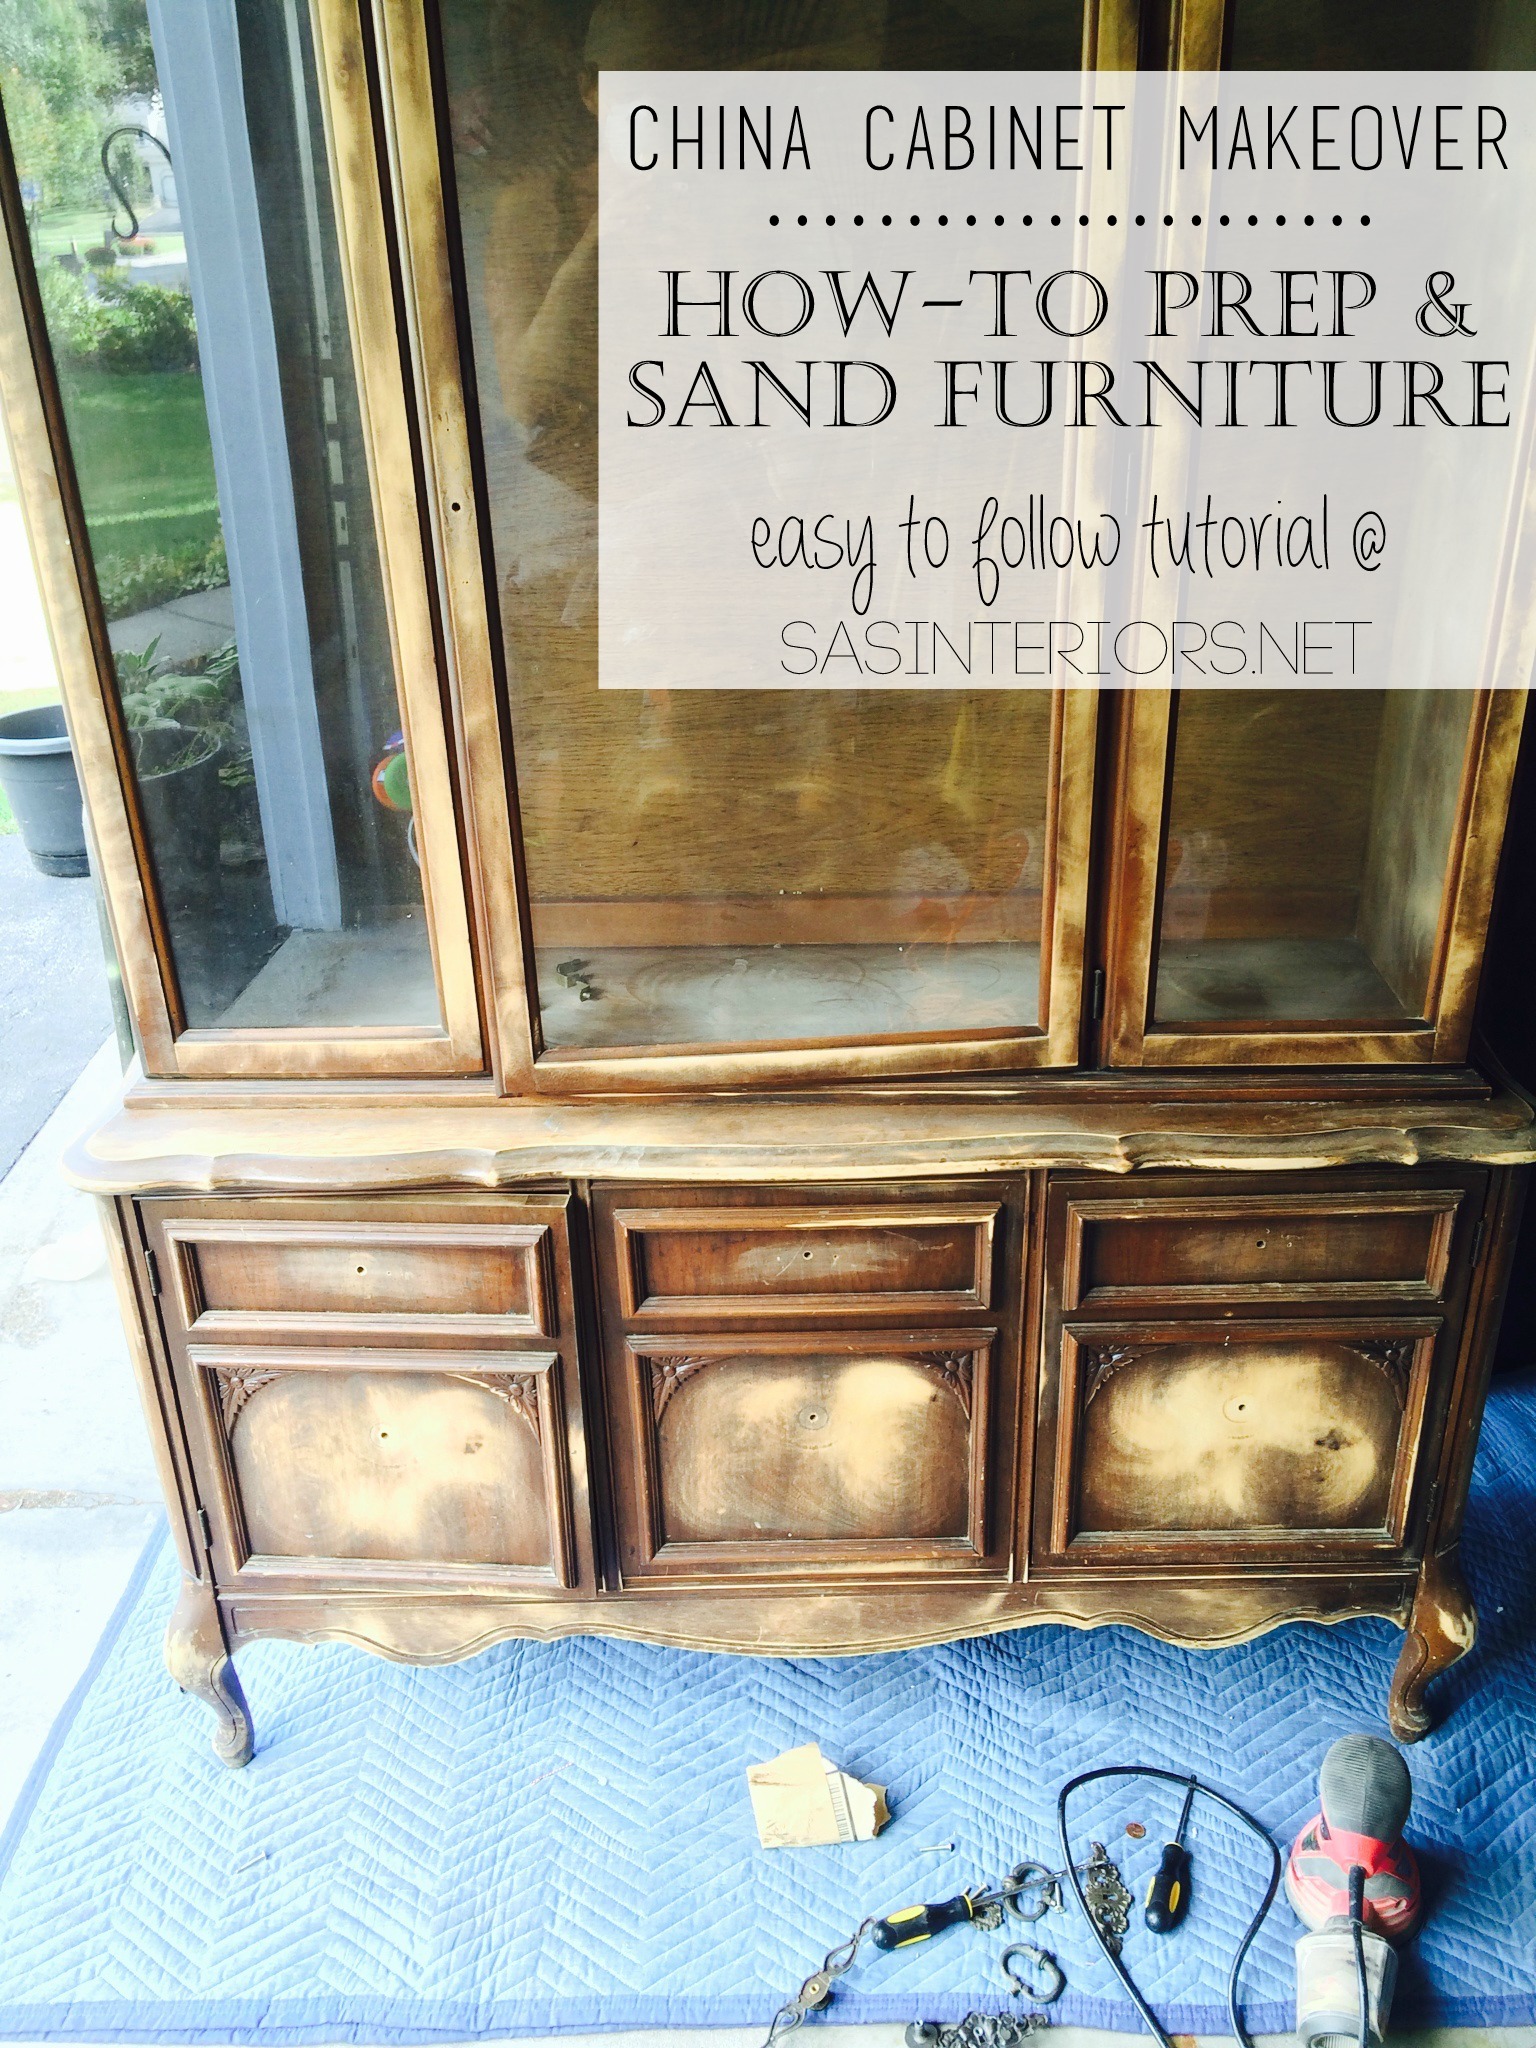
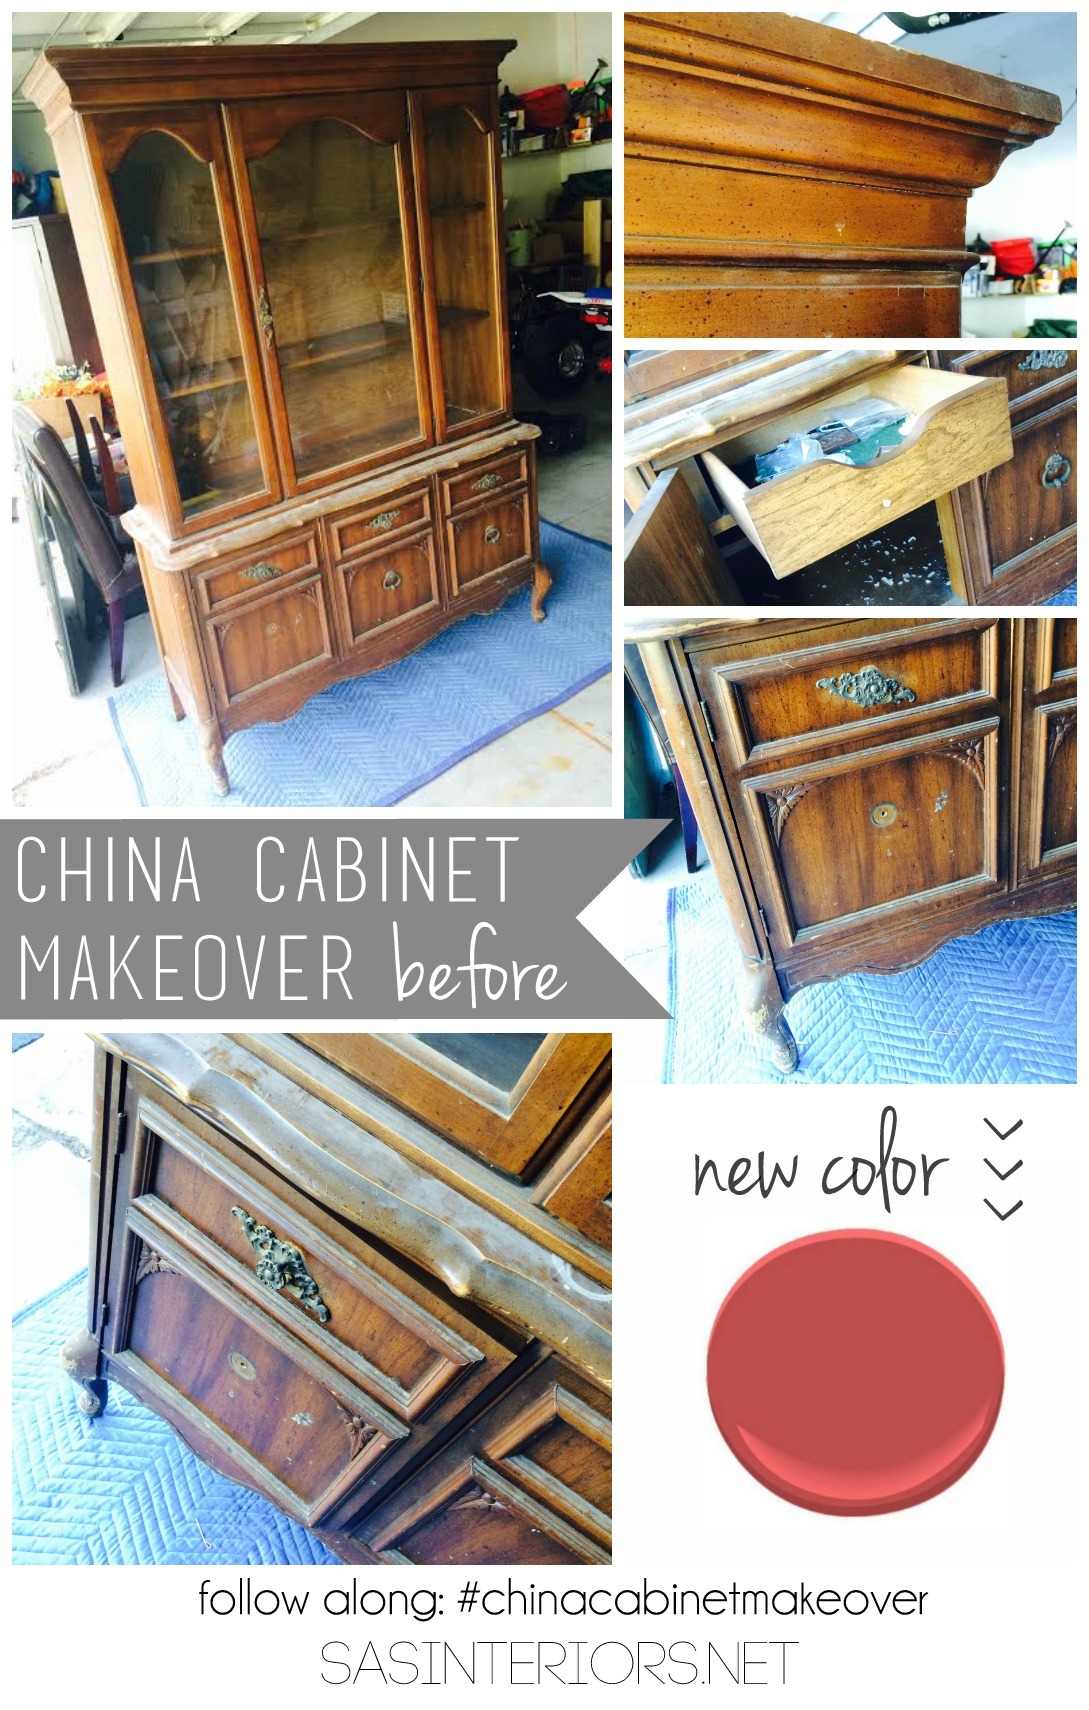
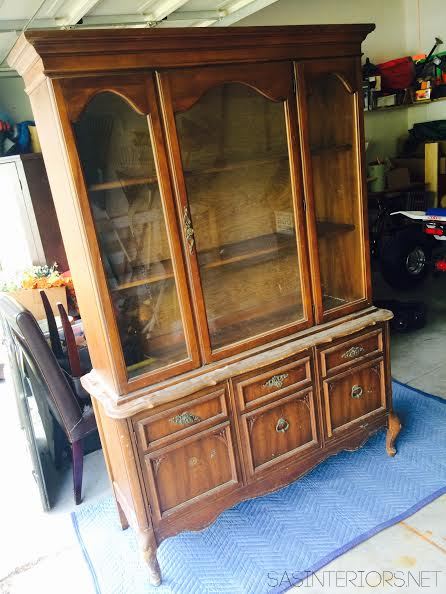
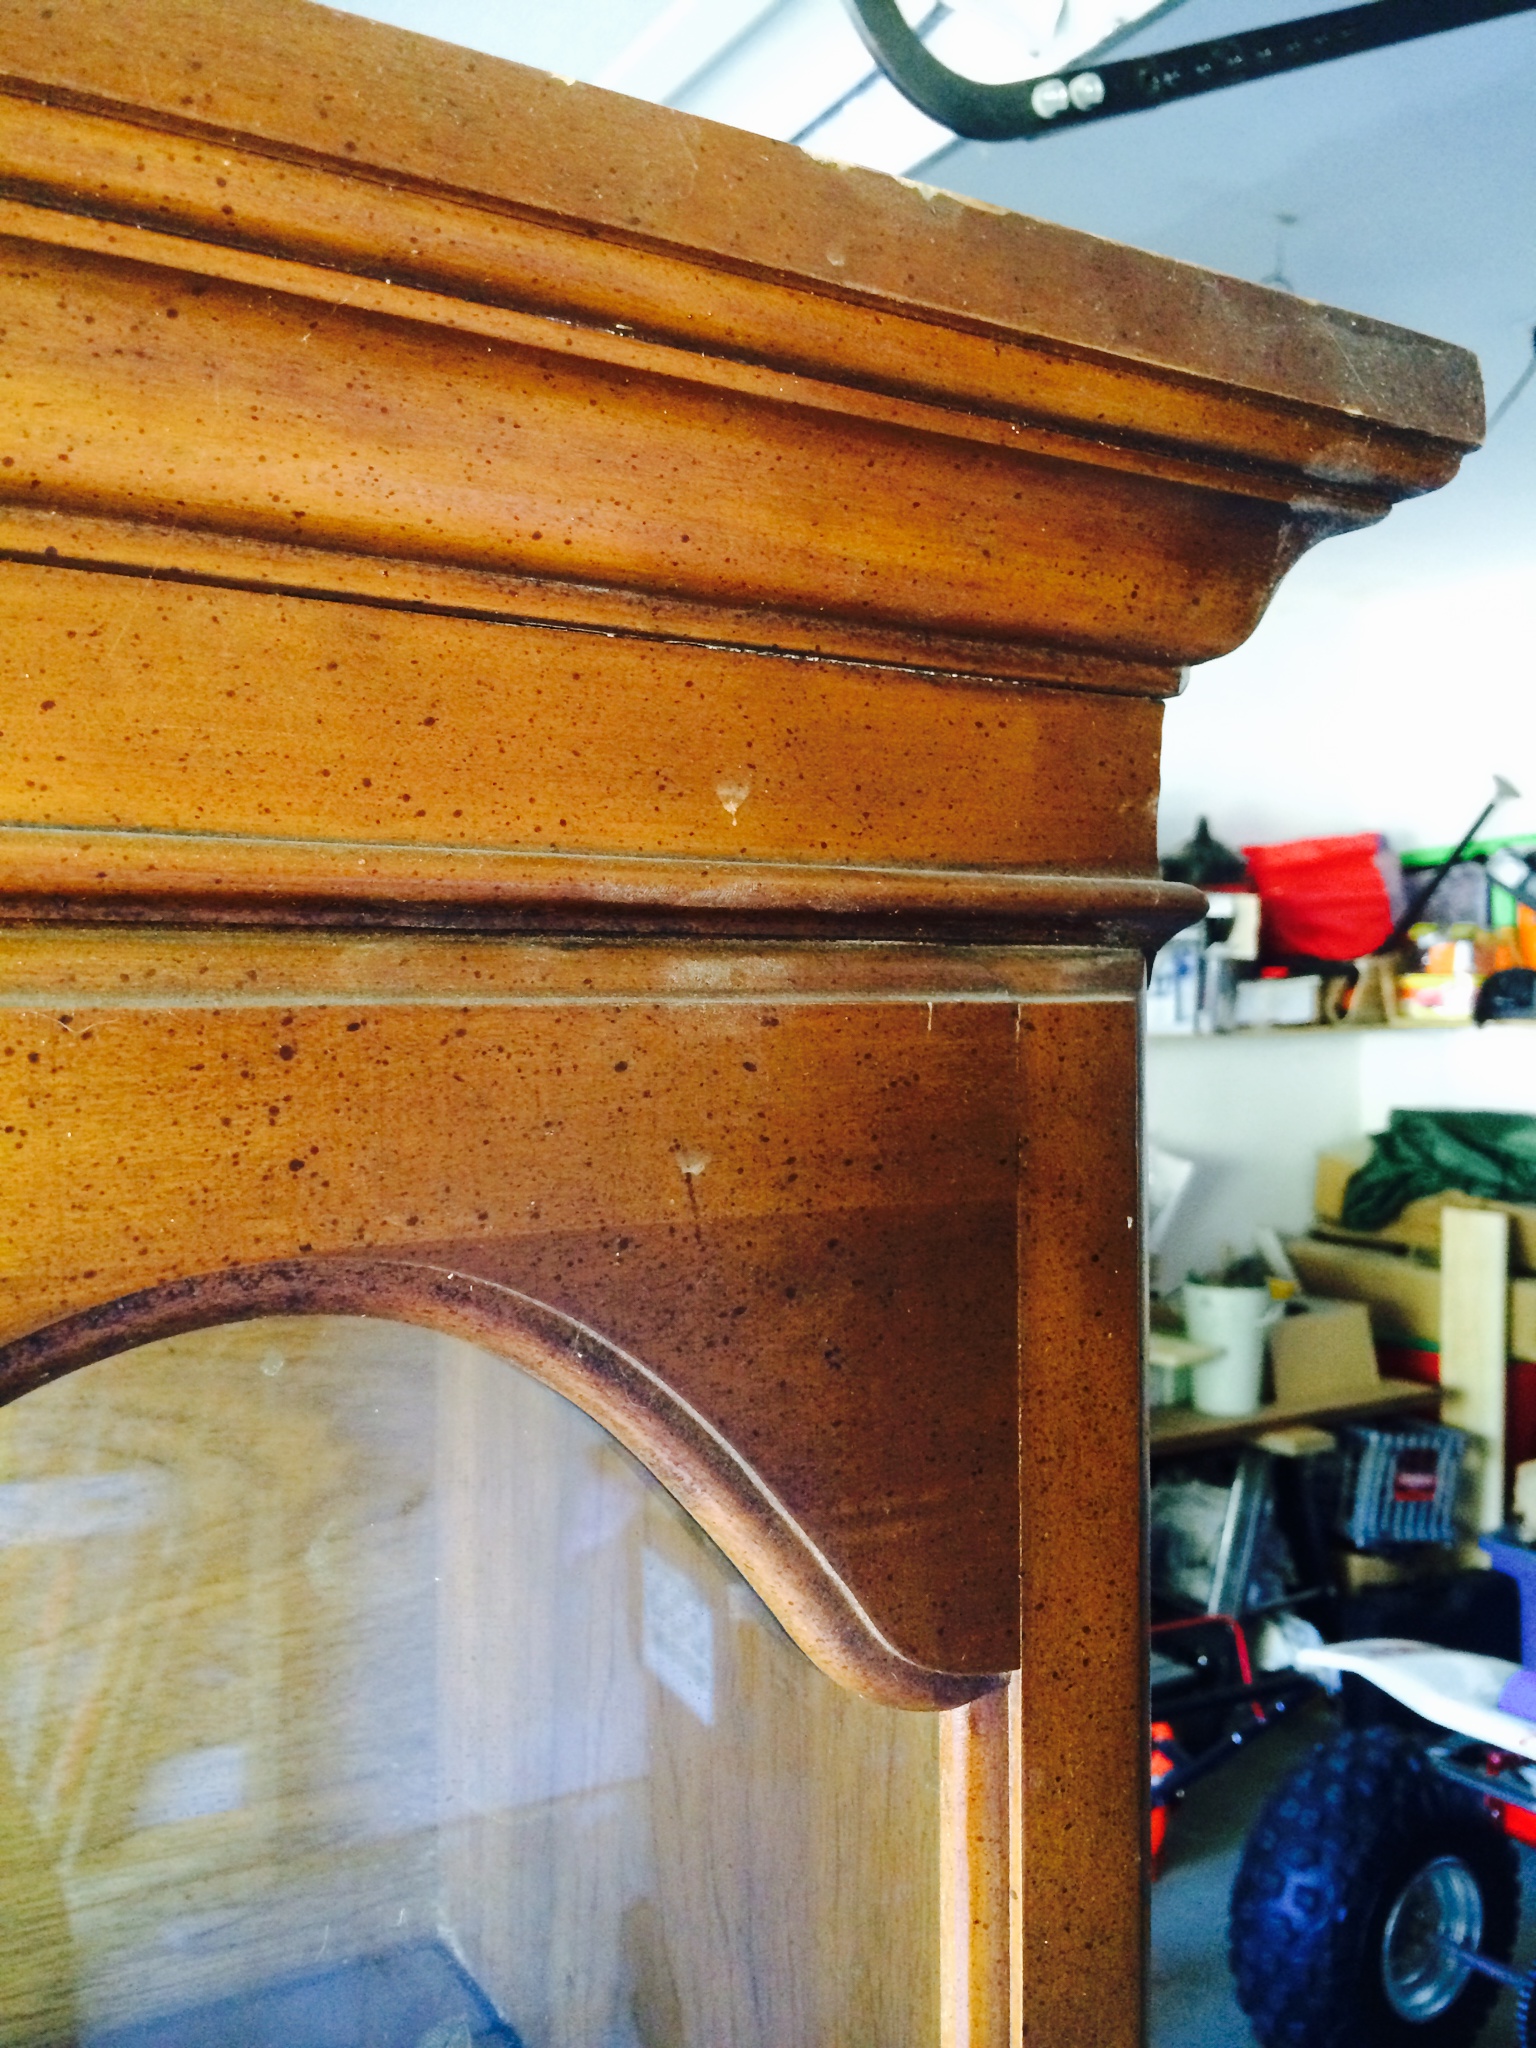
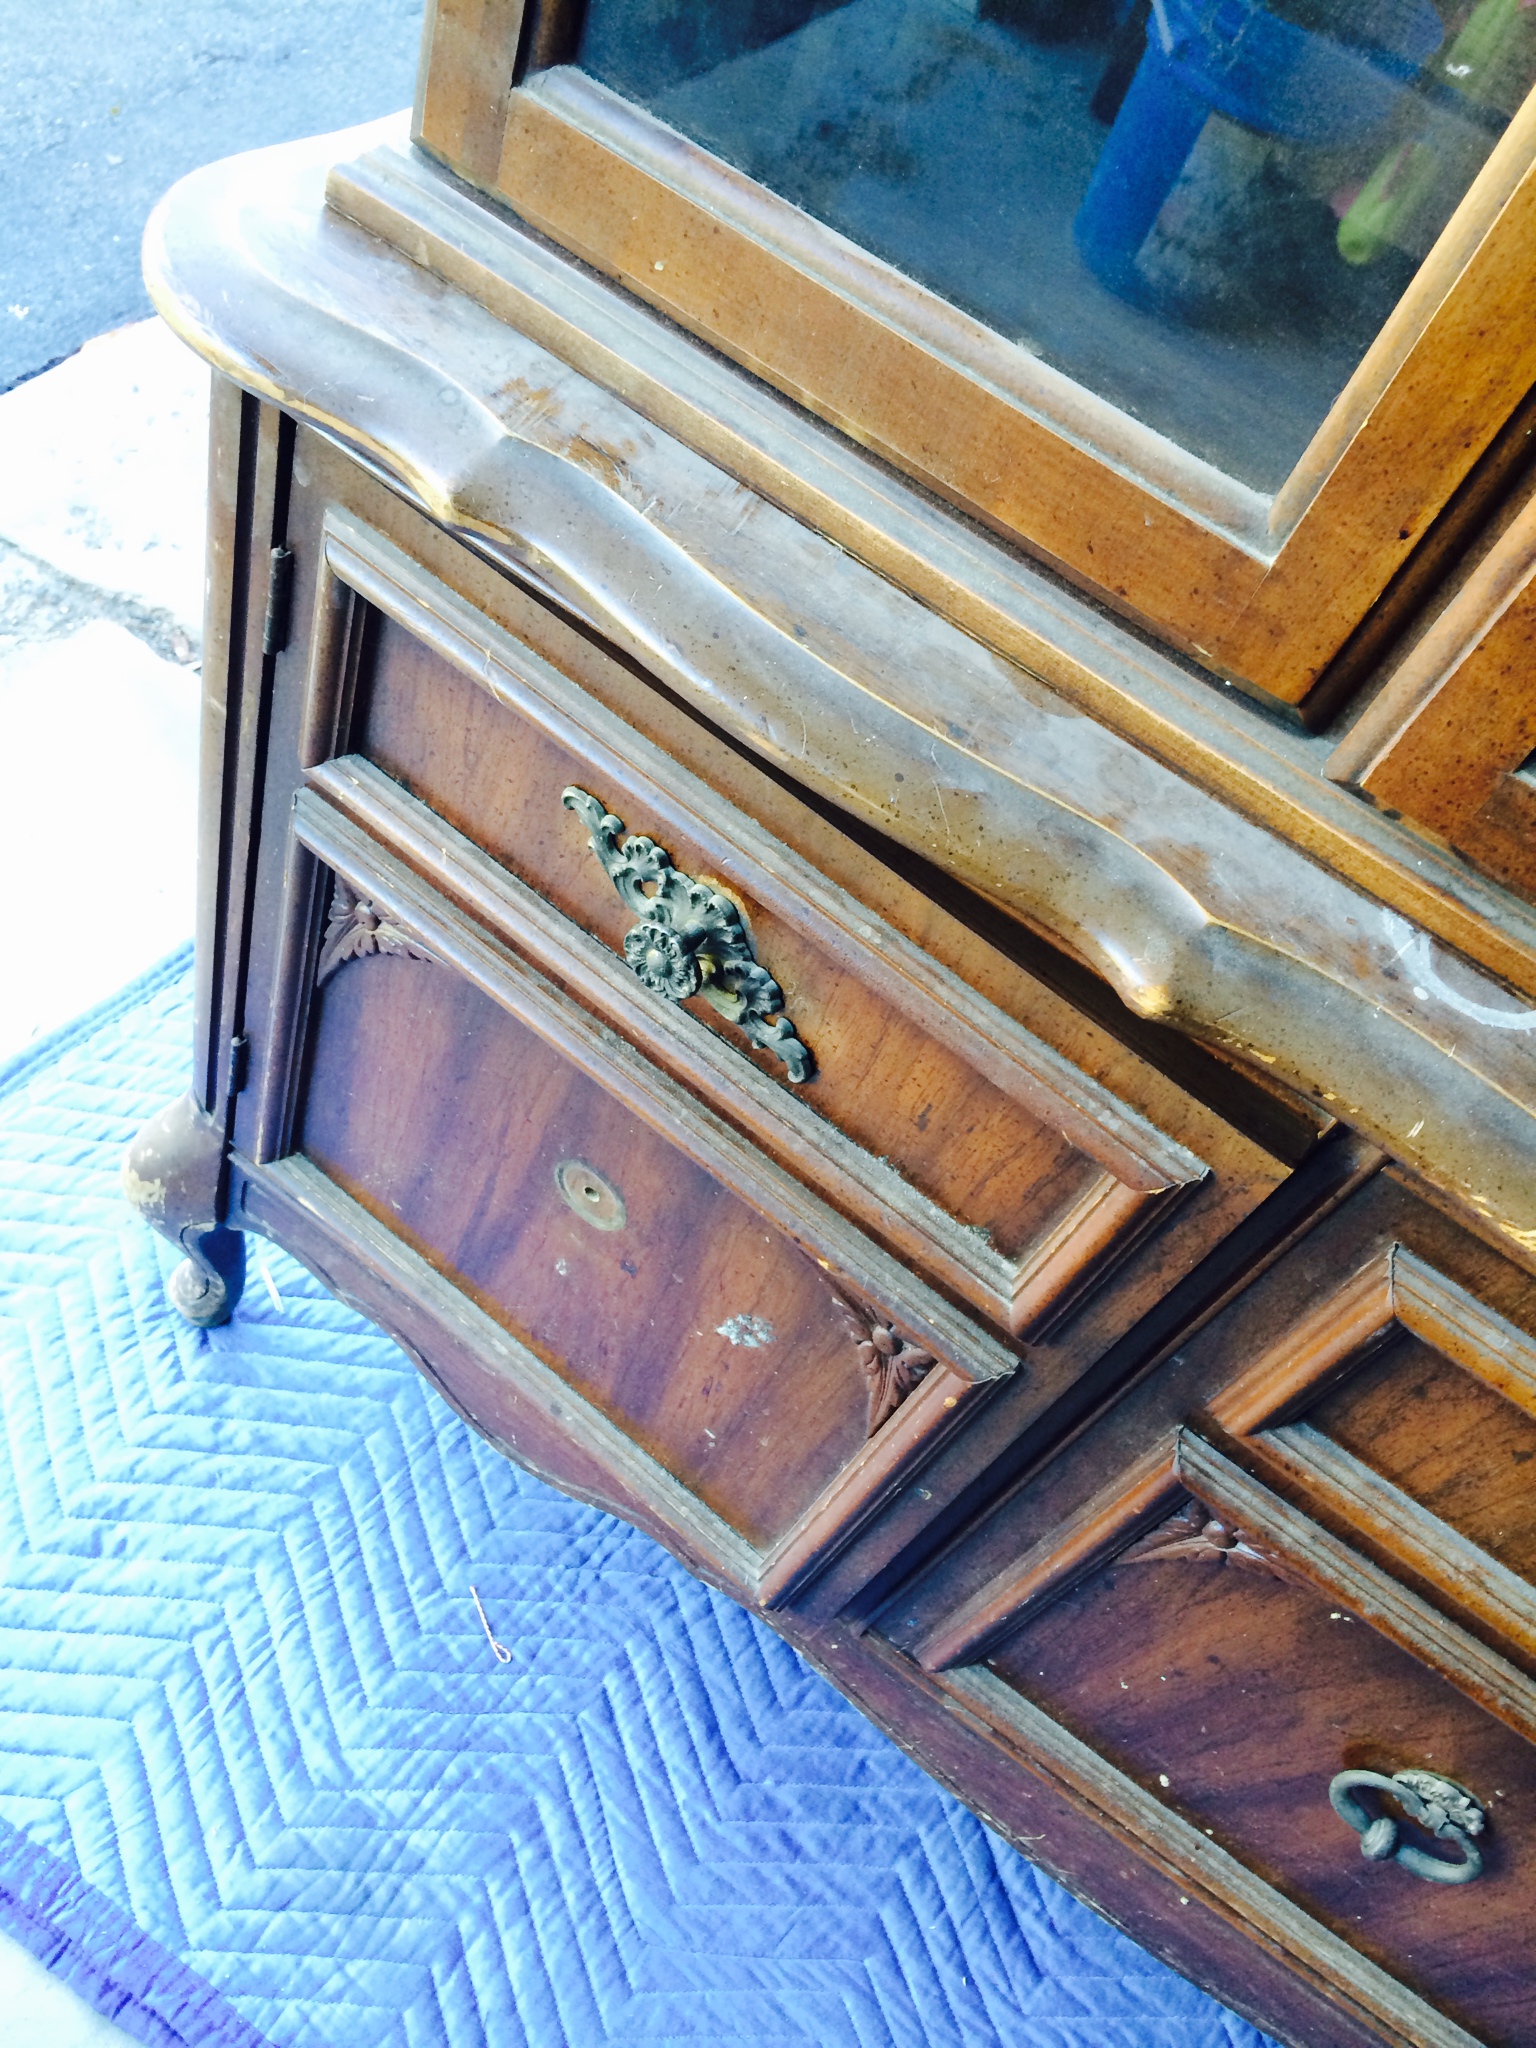
We can’t appreciate the ‘after’ without looking at the ‘before’.  Remember what she looked like a few short weeks ago…

China Cabinet >>> before - details prior to the makeover

China Cabinet >>> before - details prior to the makeover

>>> read more on The Backstory + Choosing a Color <<<

Like I said, it’s been quite a journey. Let’s reminisce…

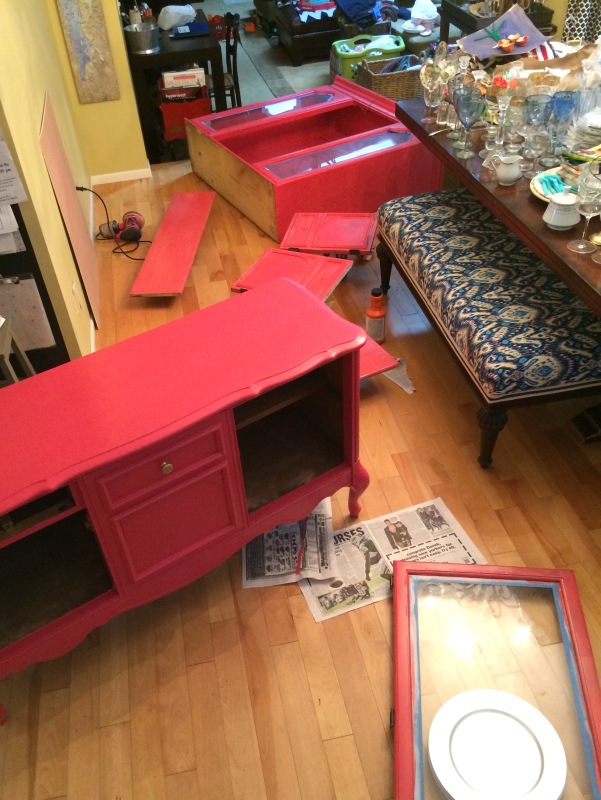
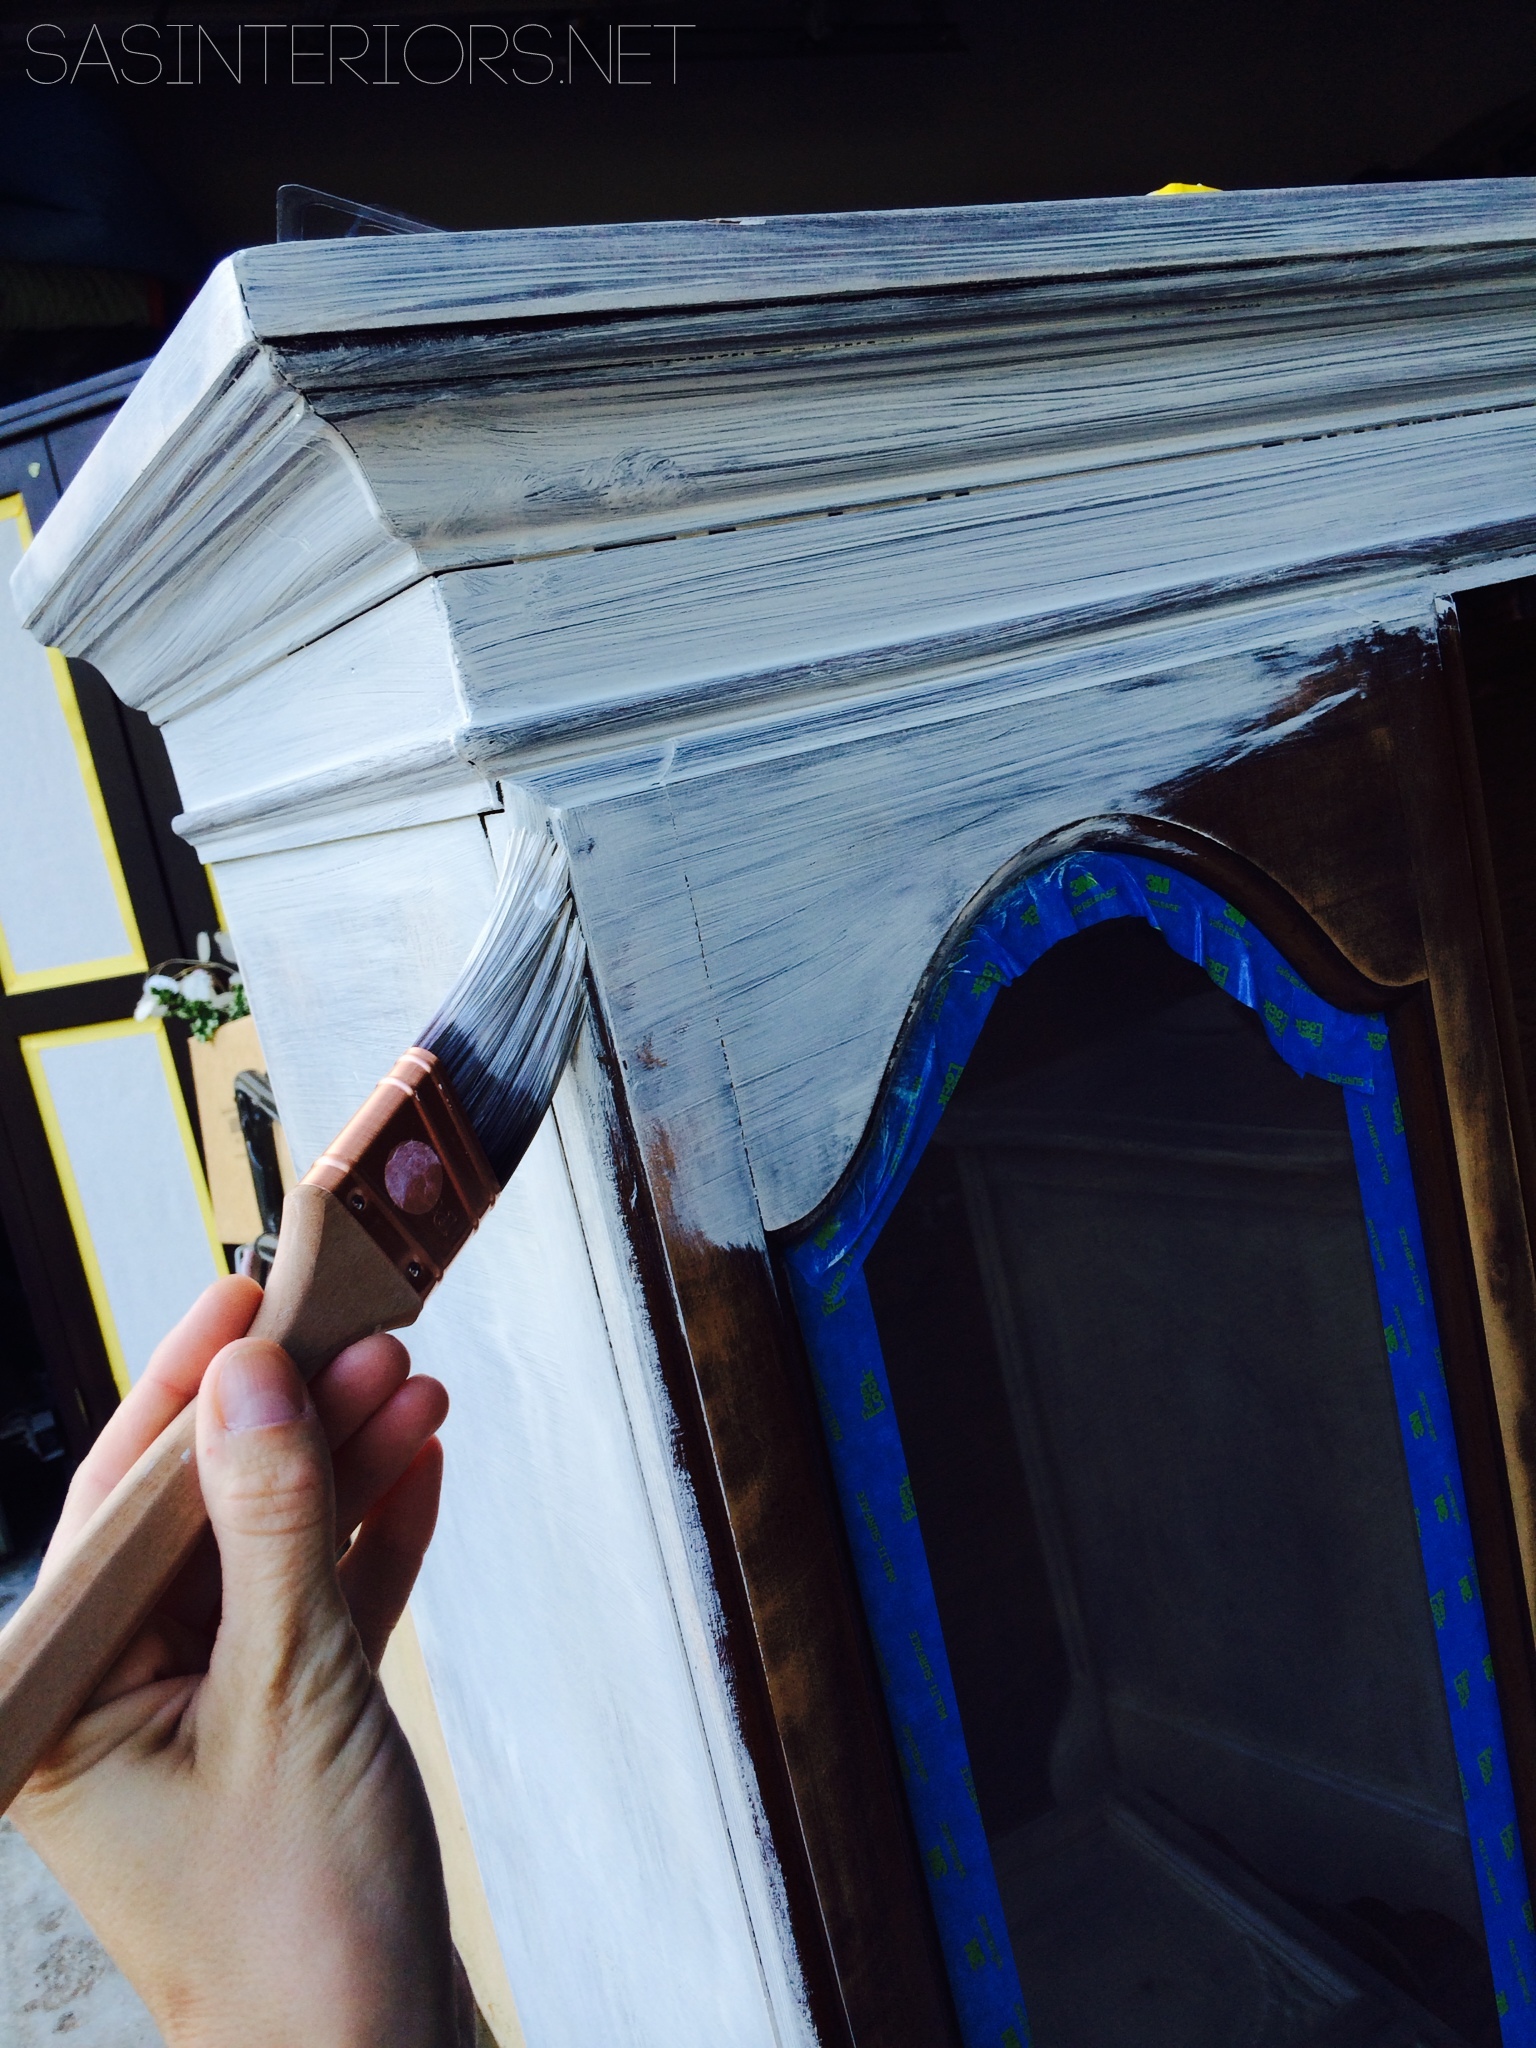
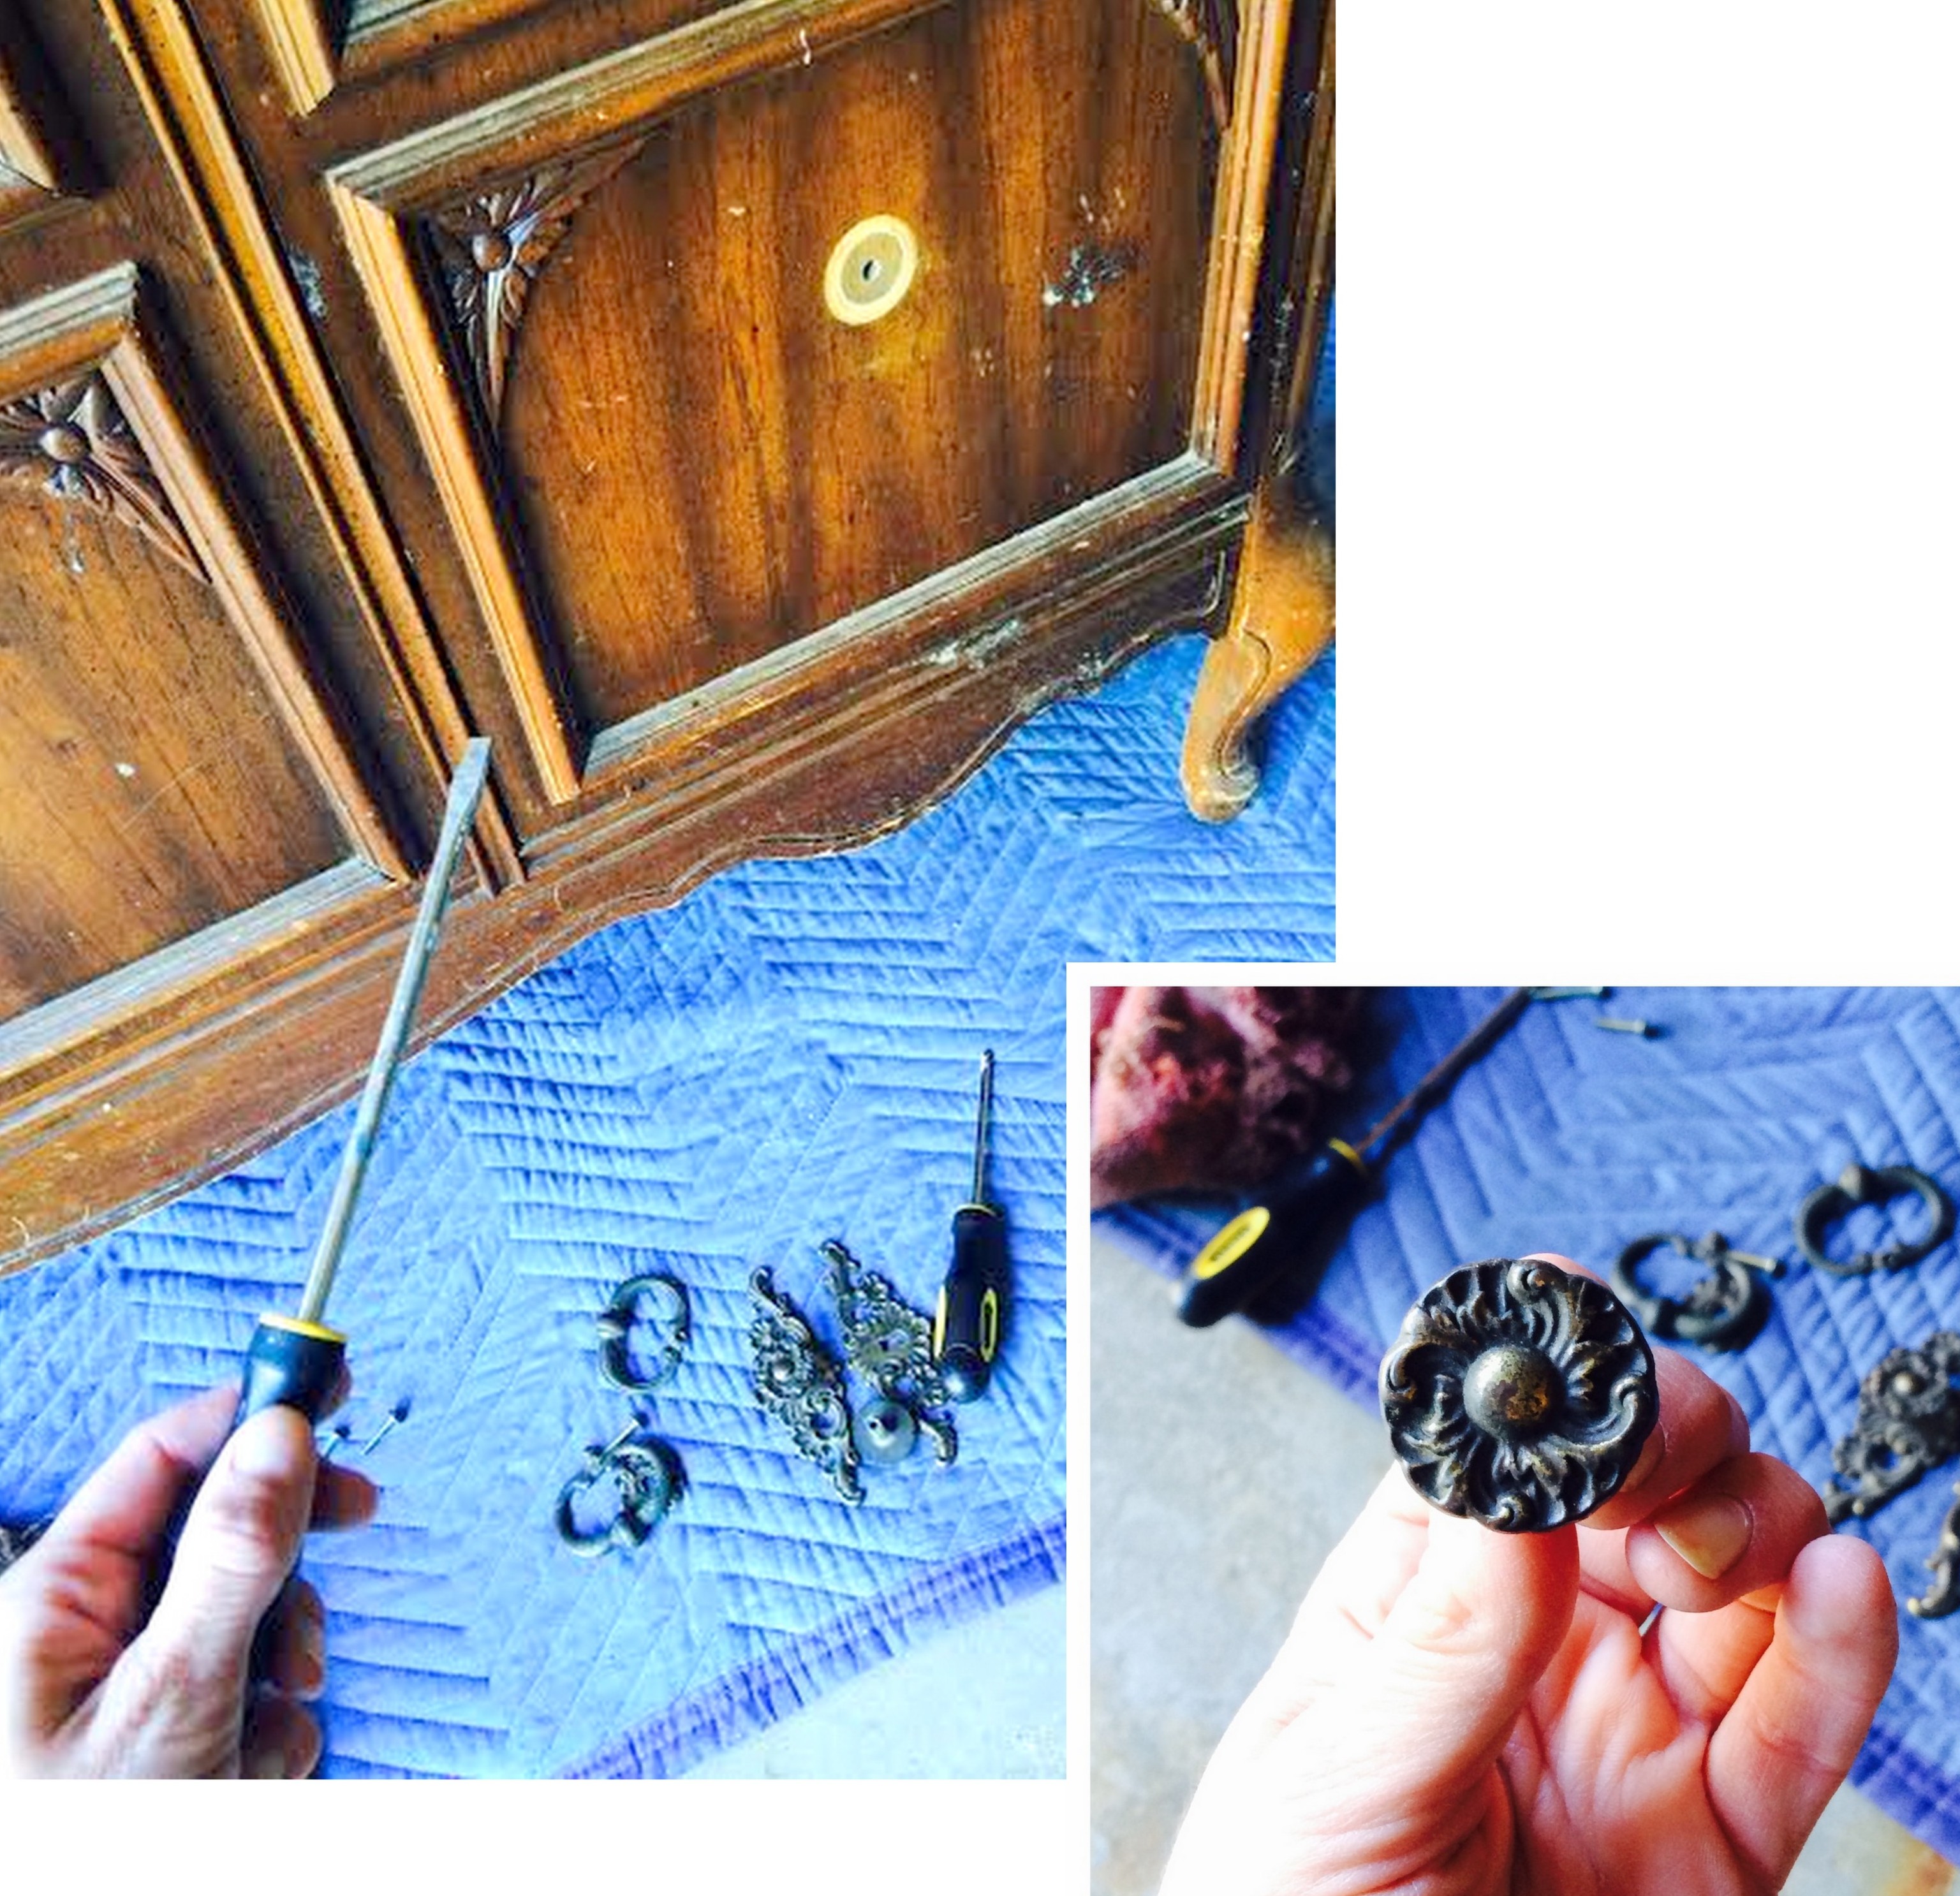
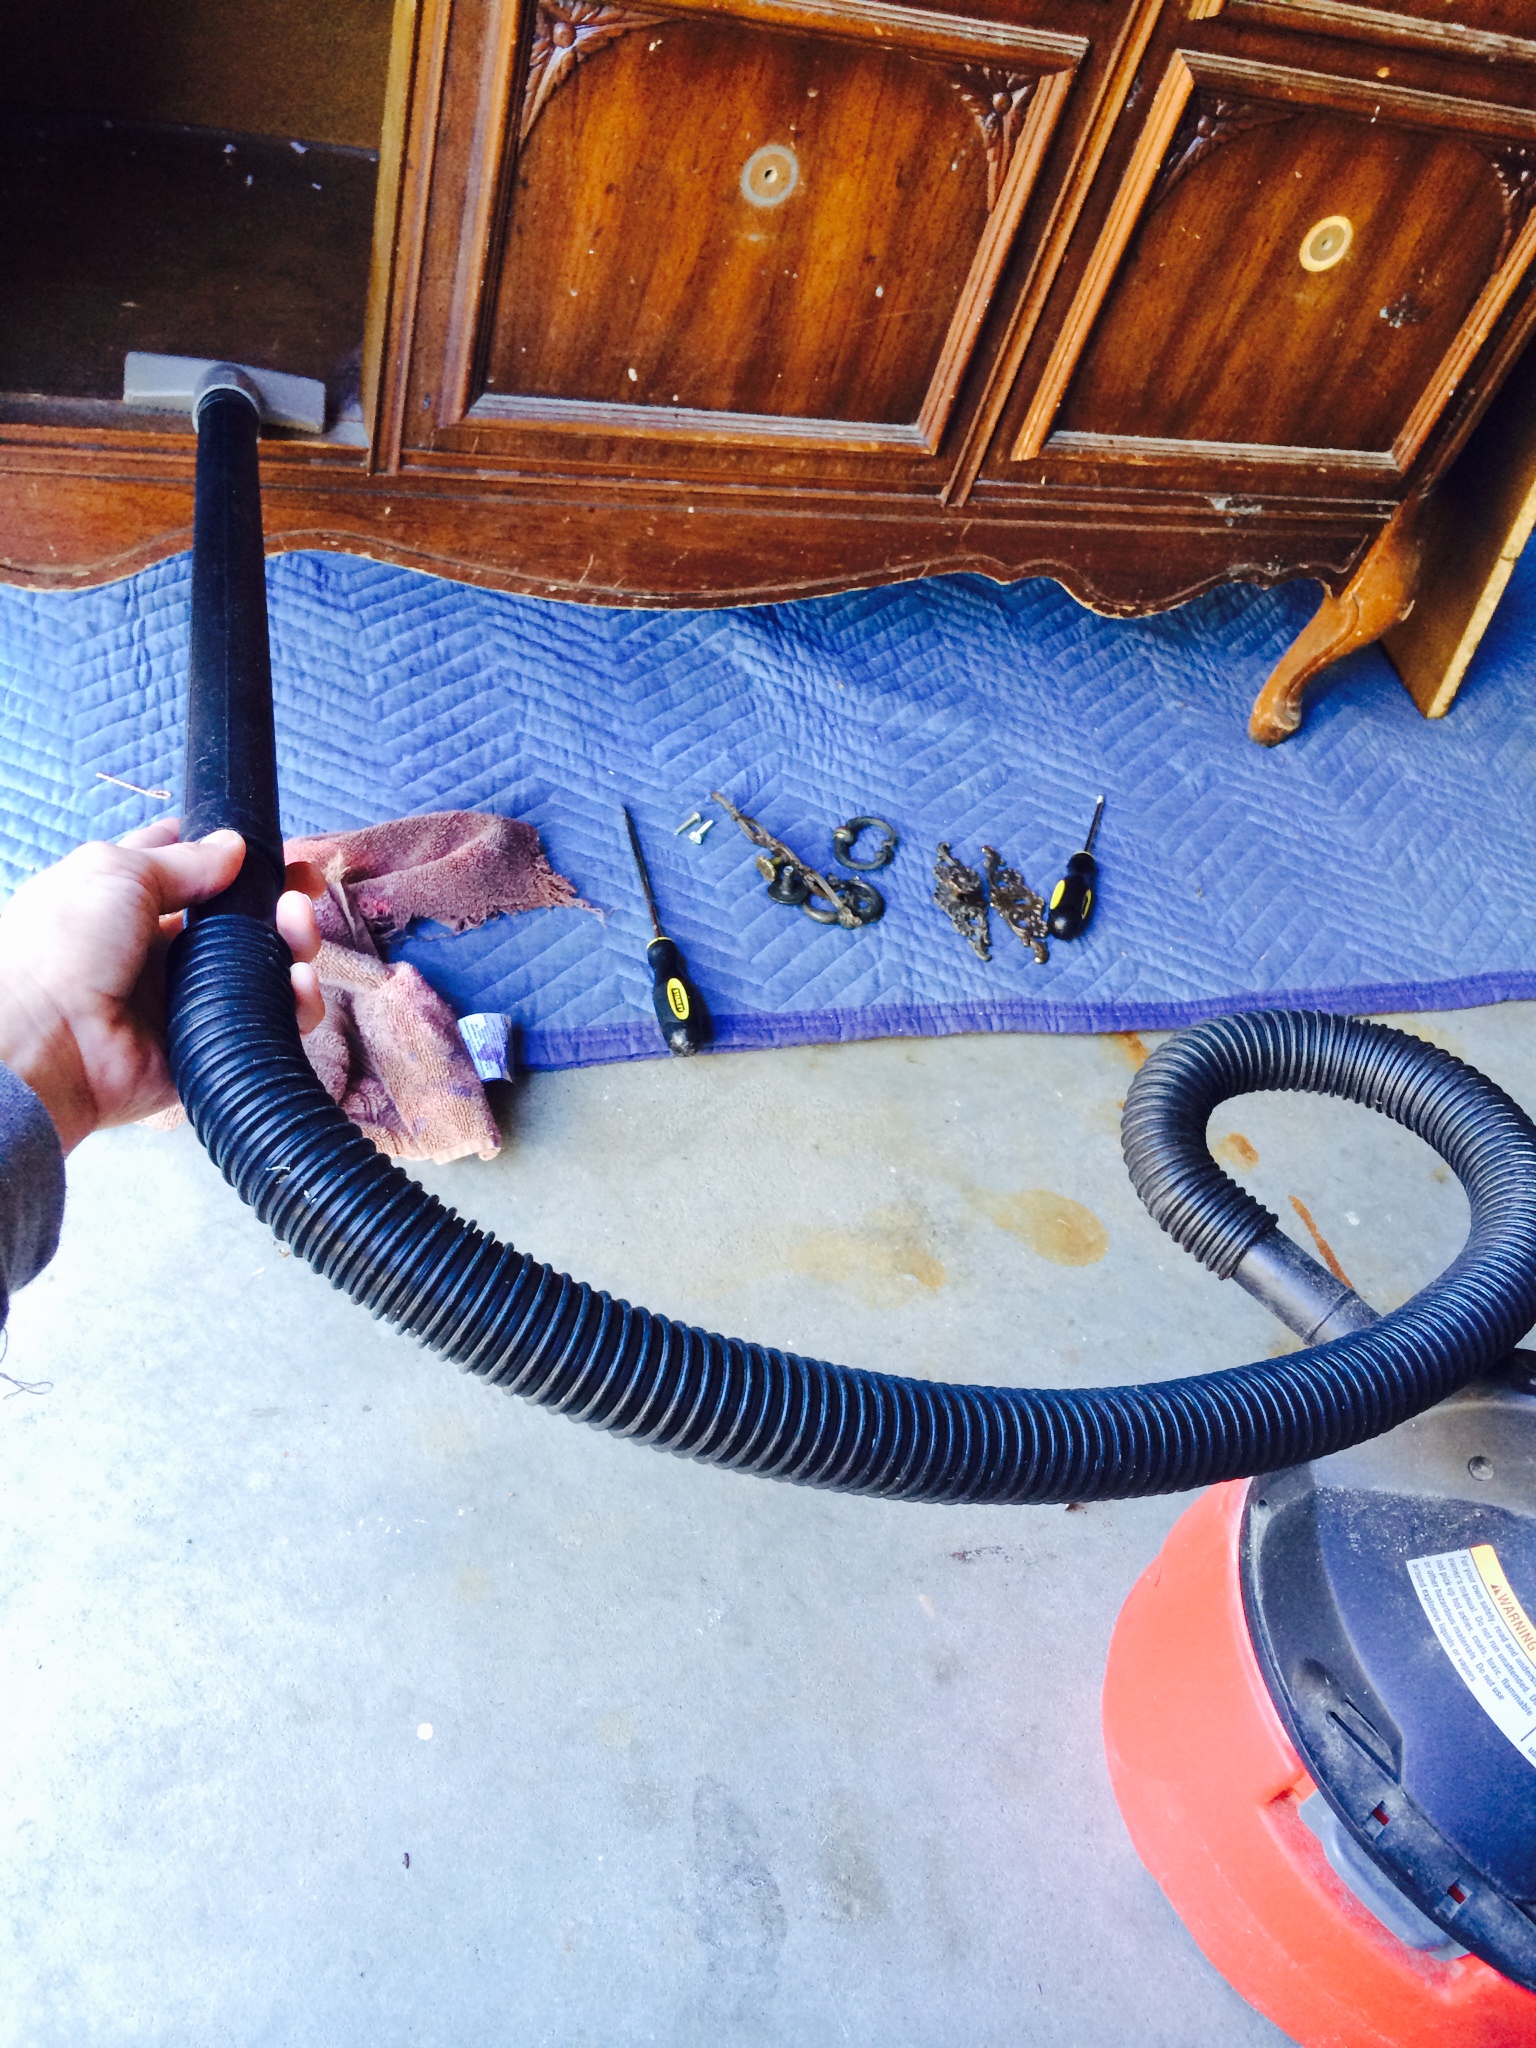
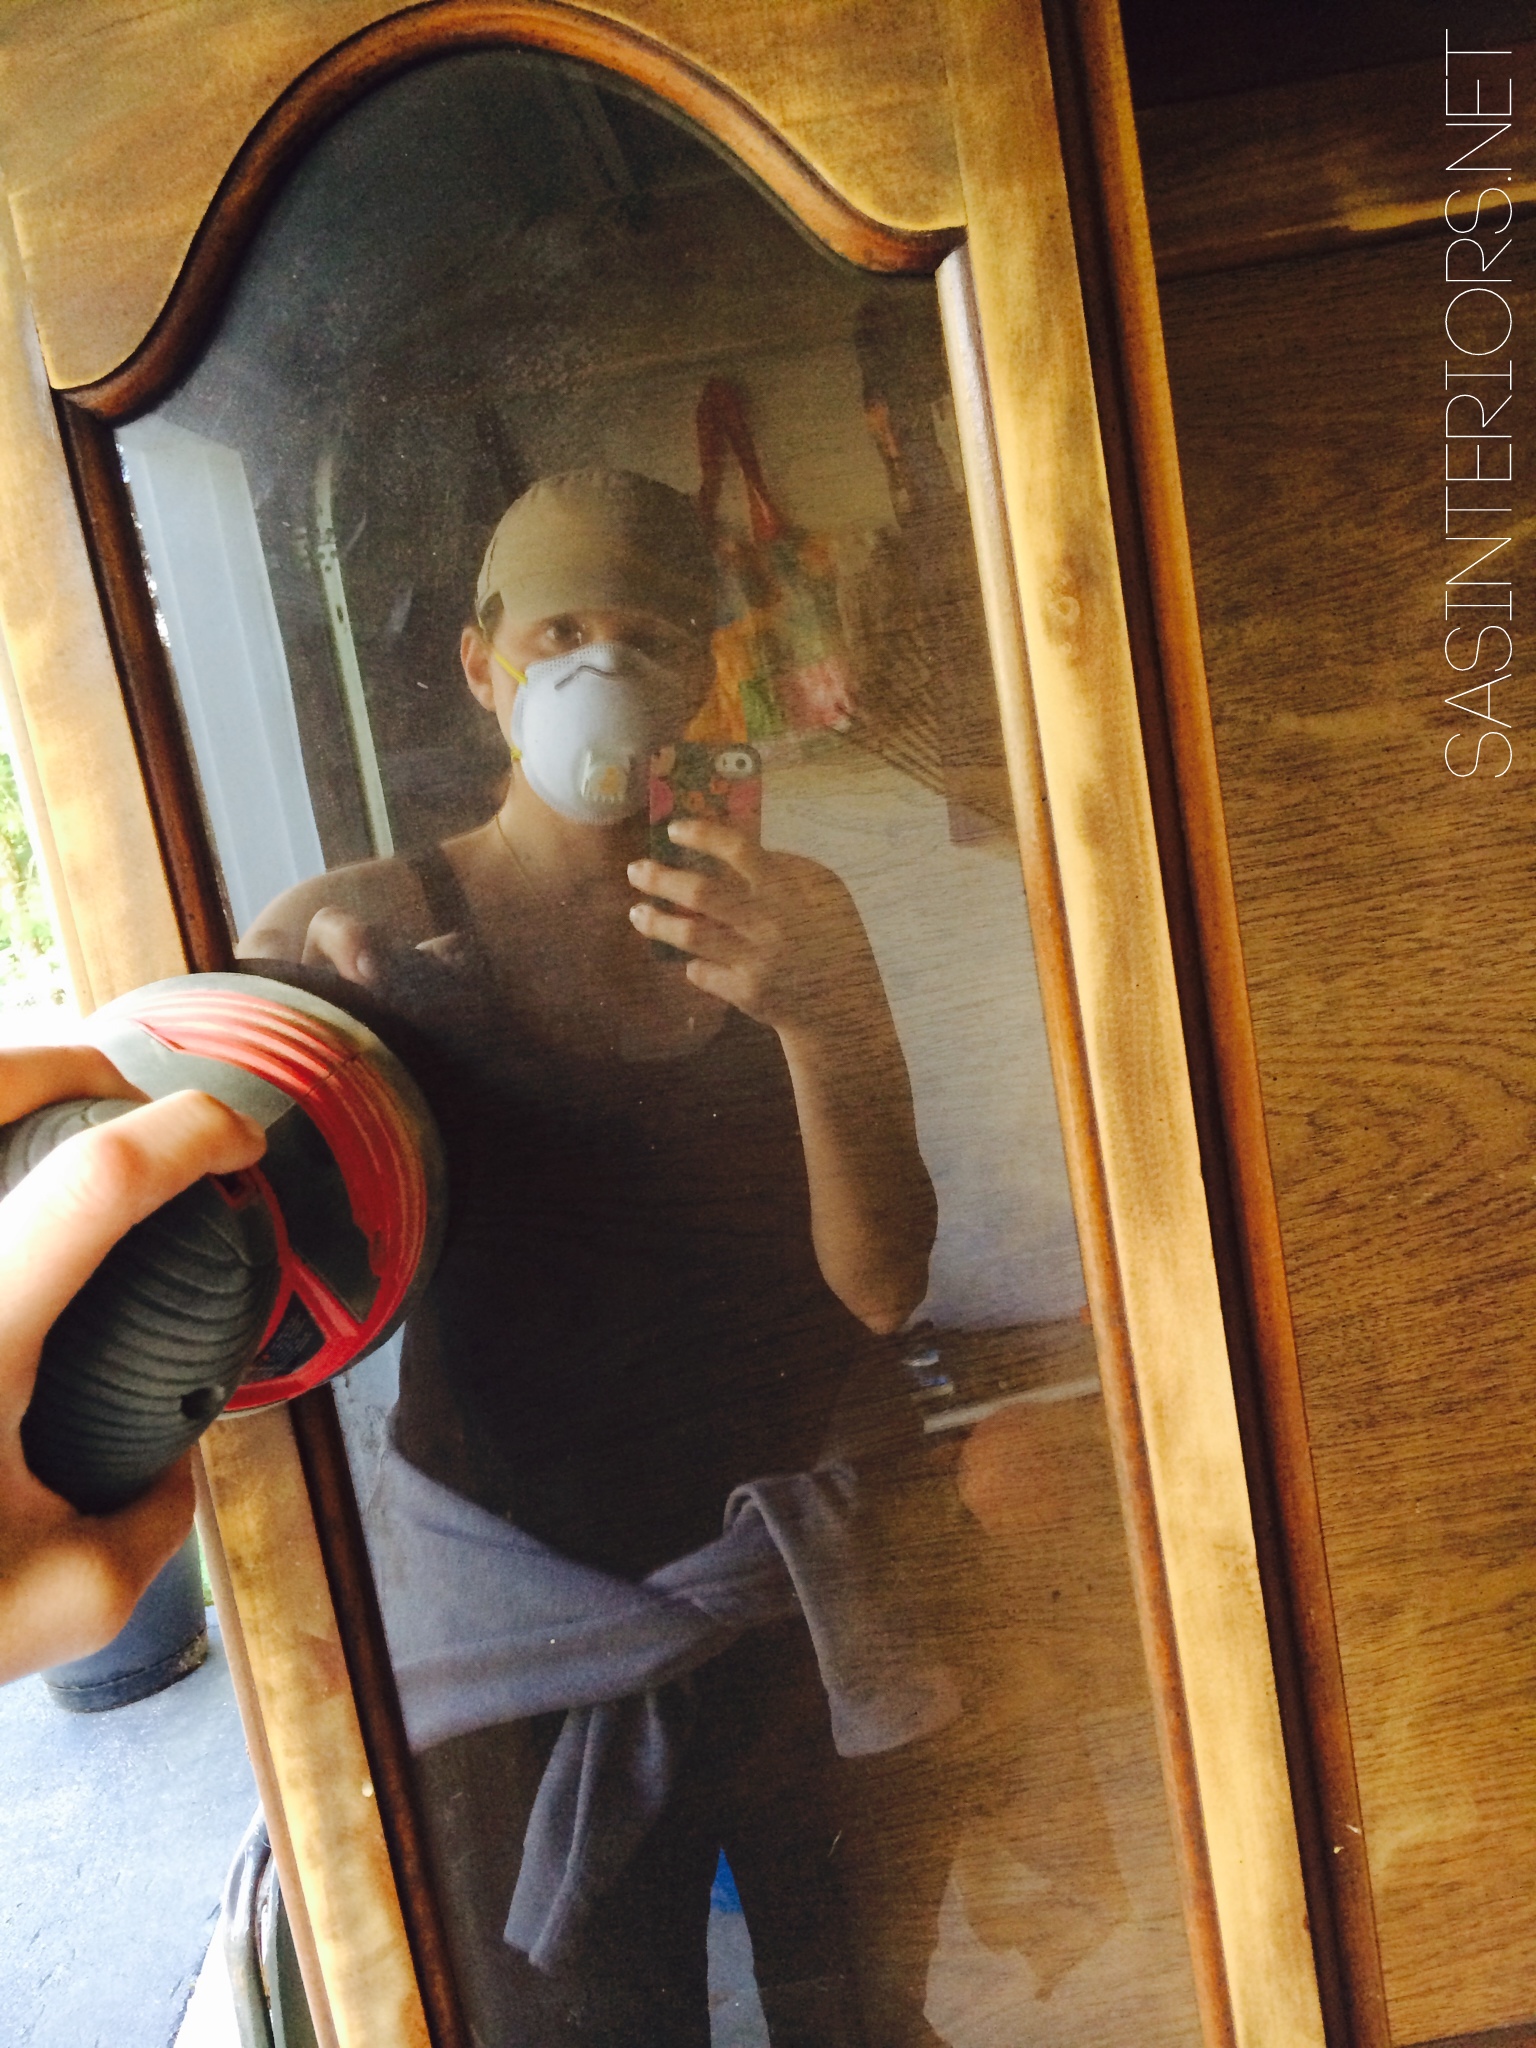
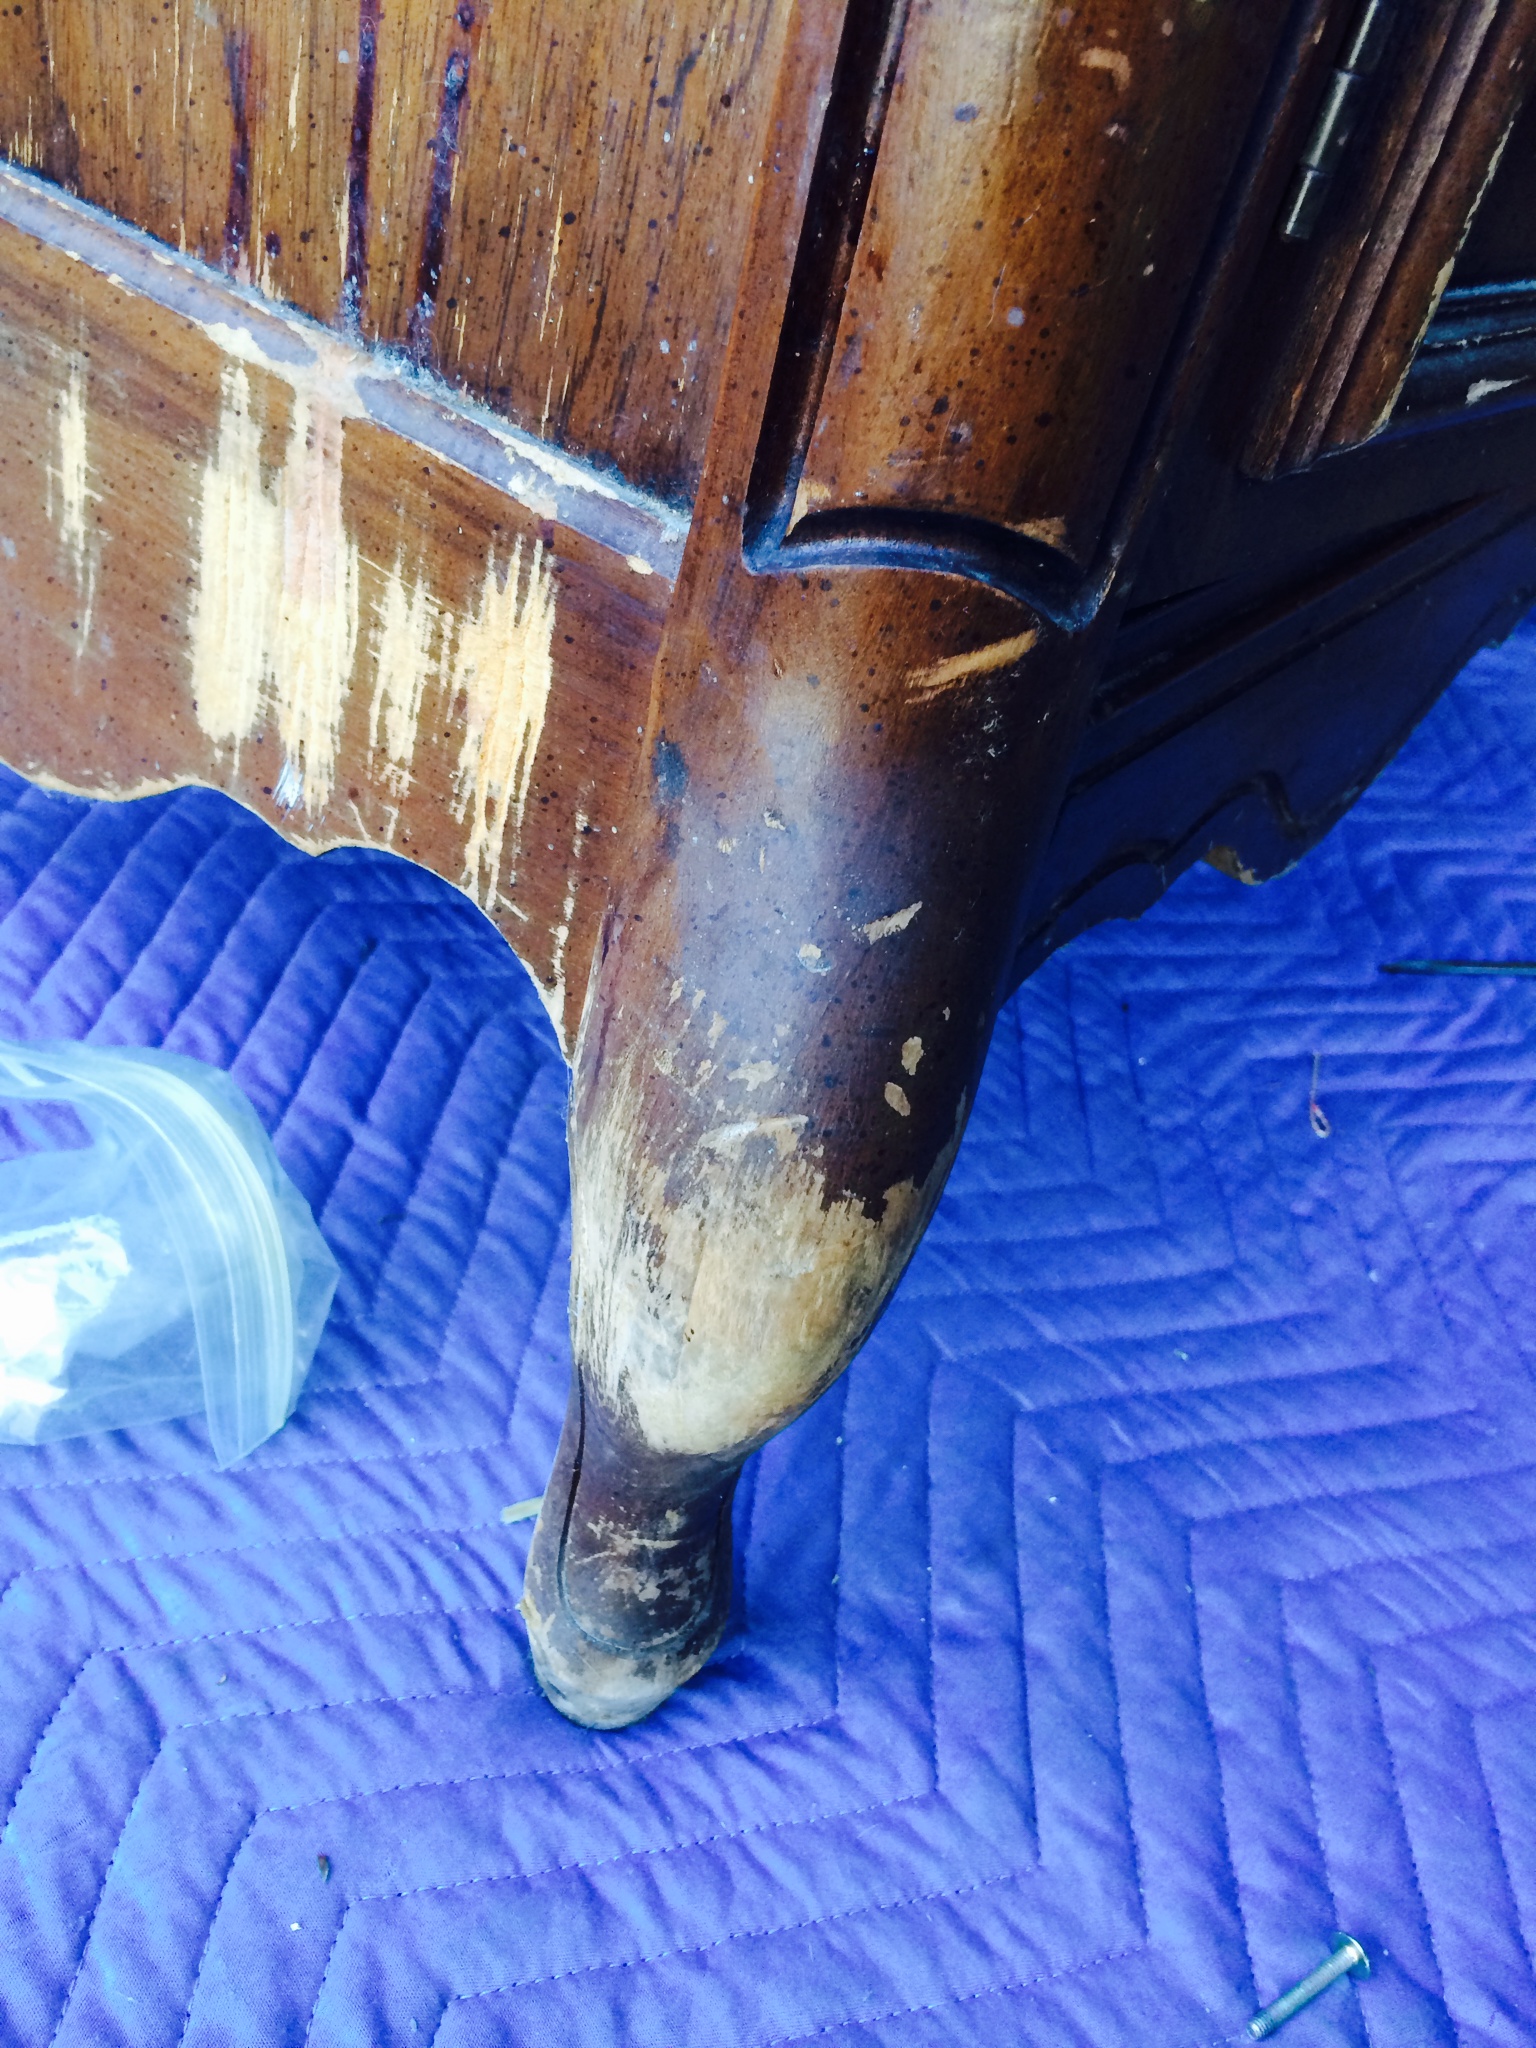
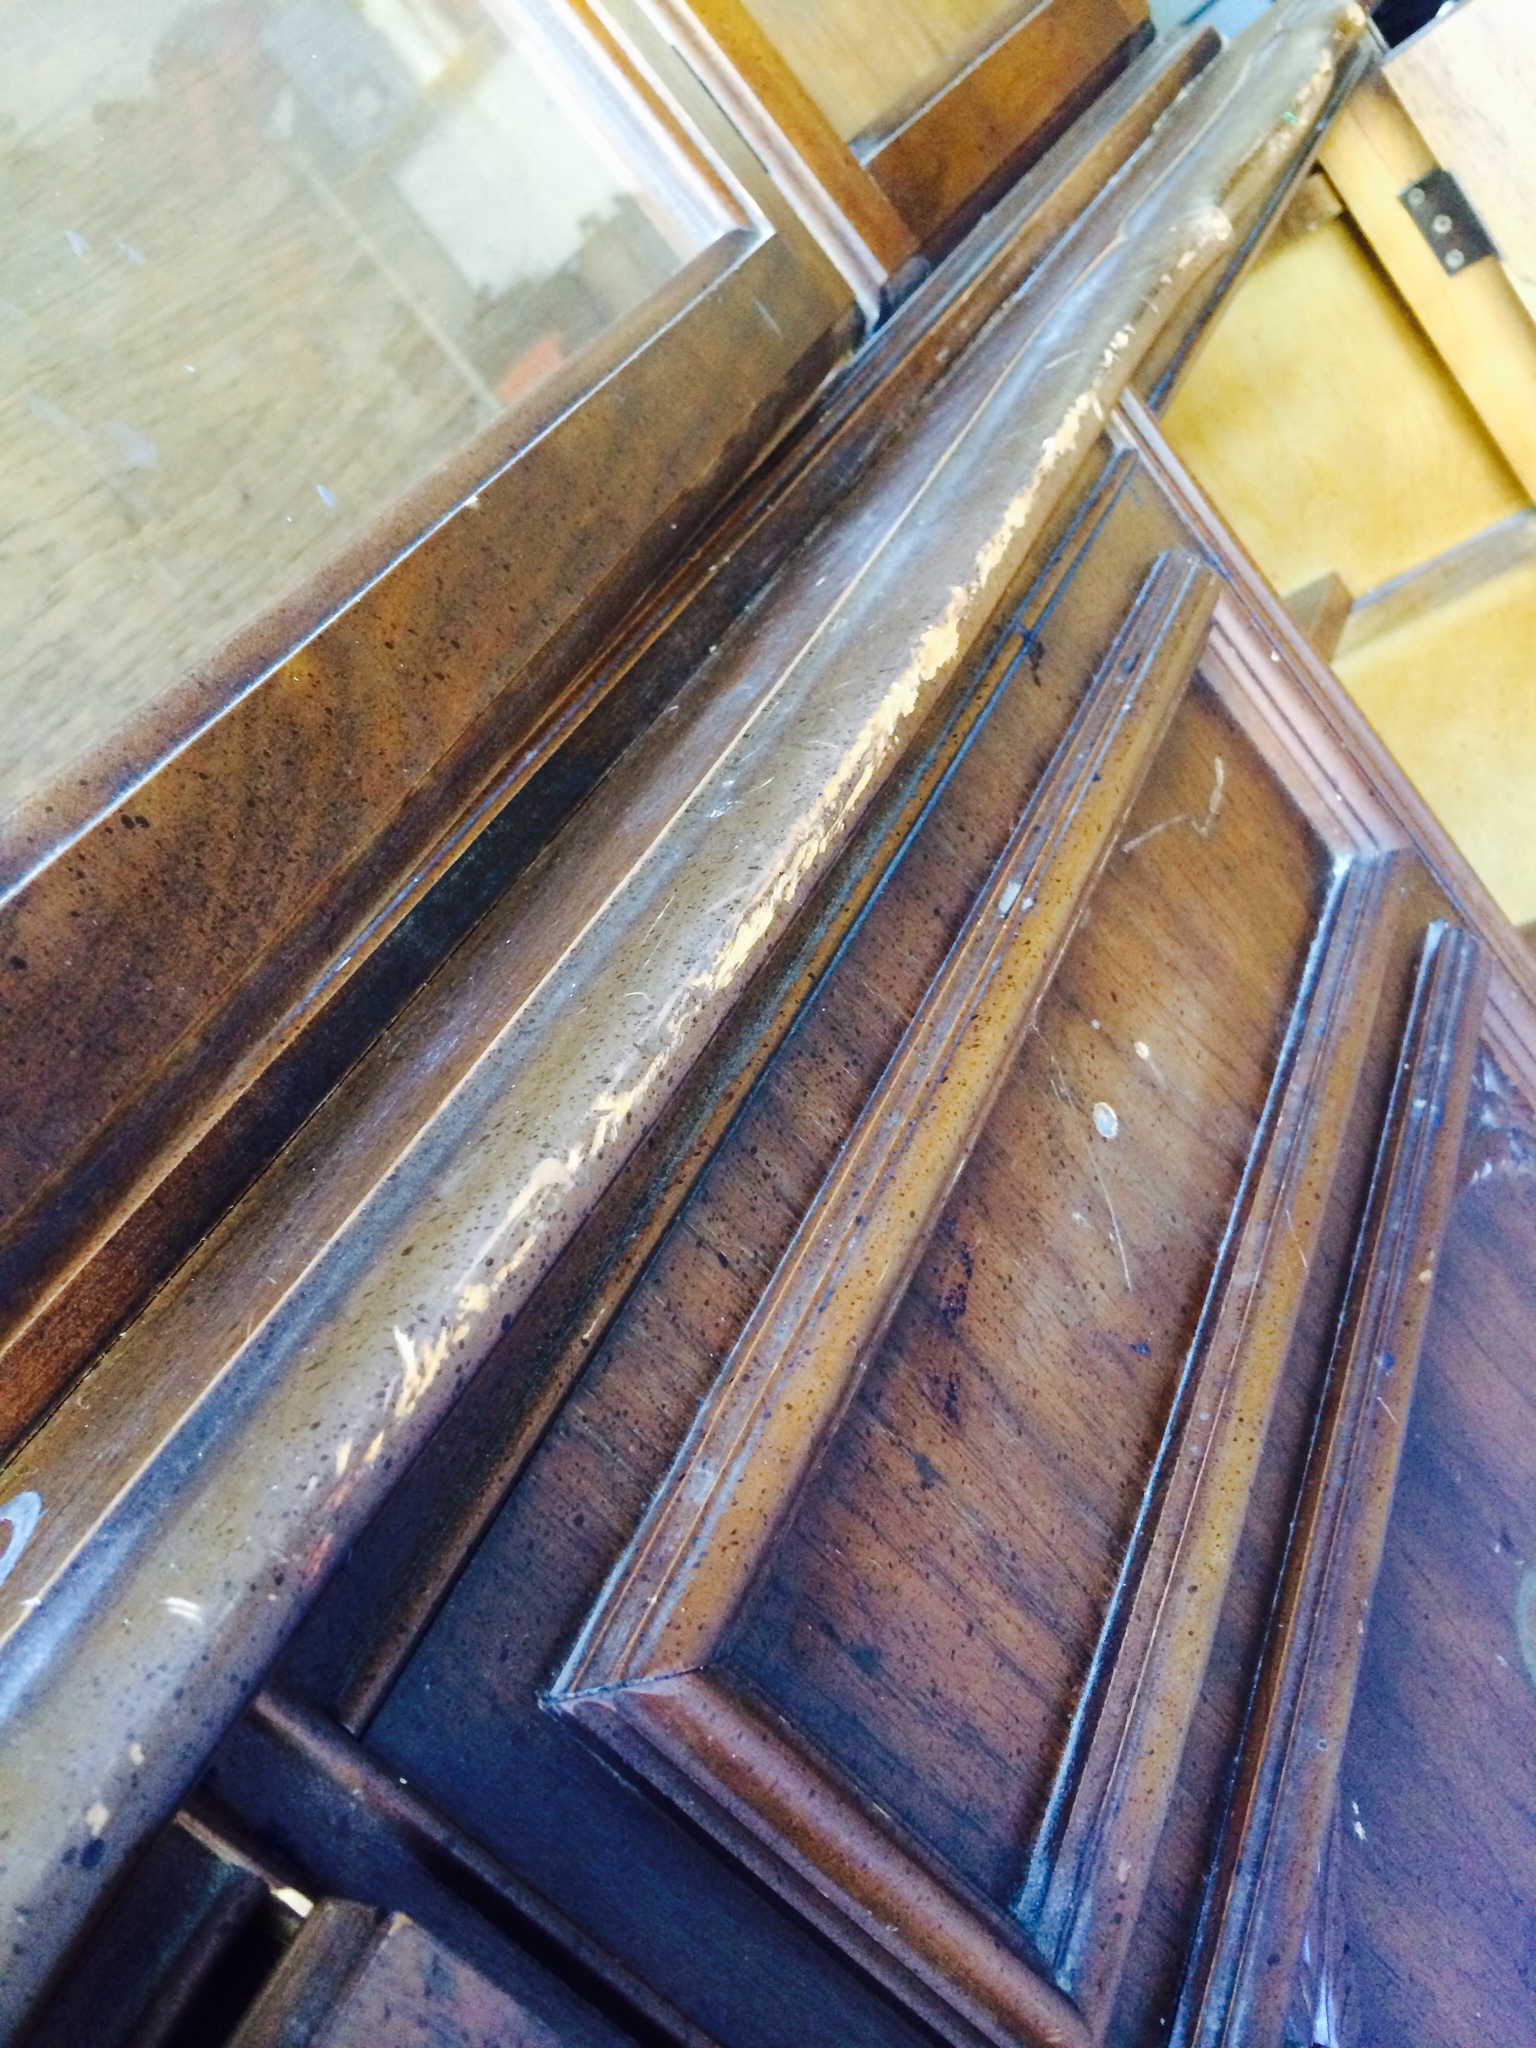
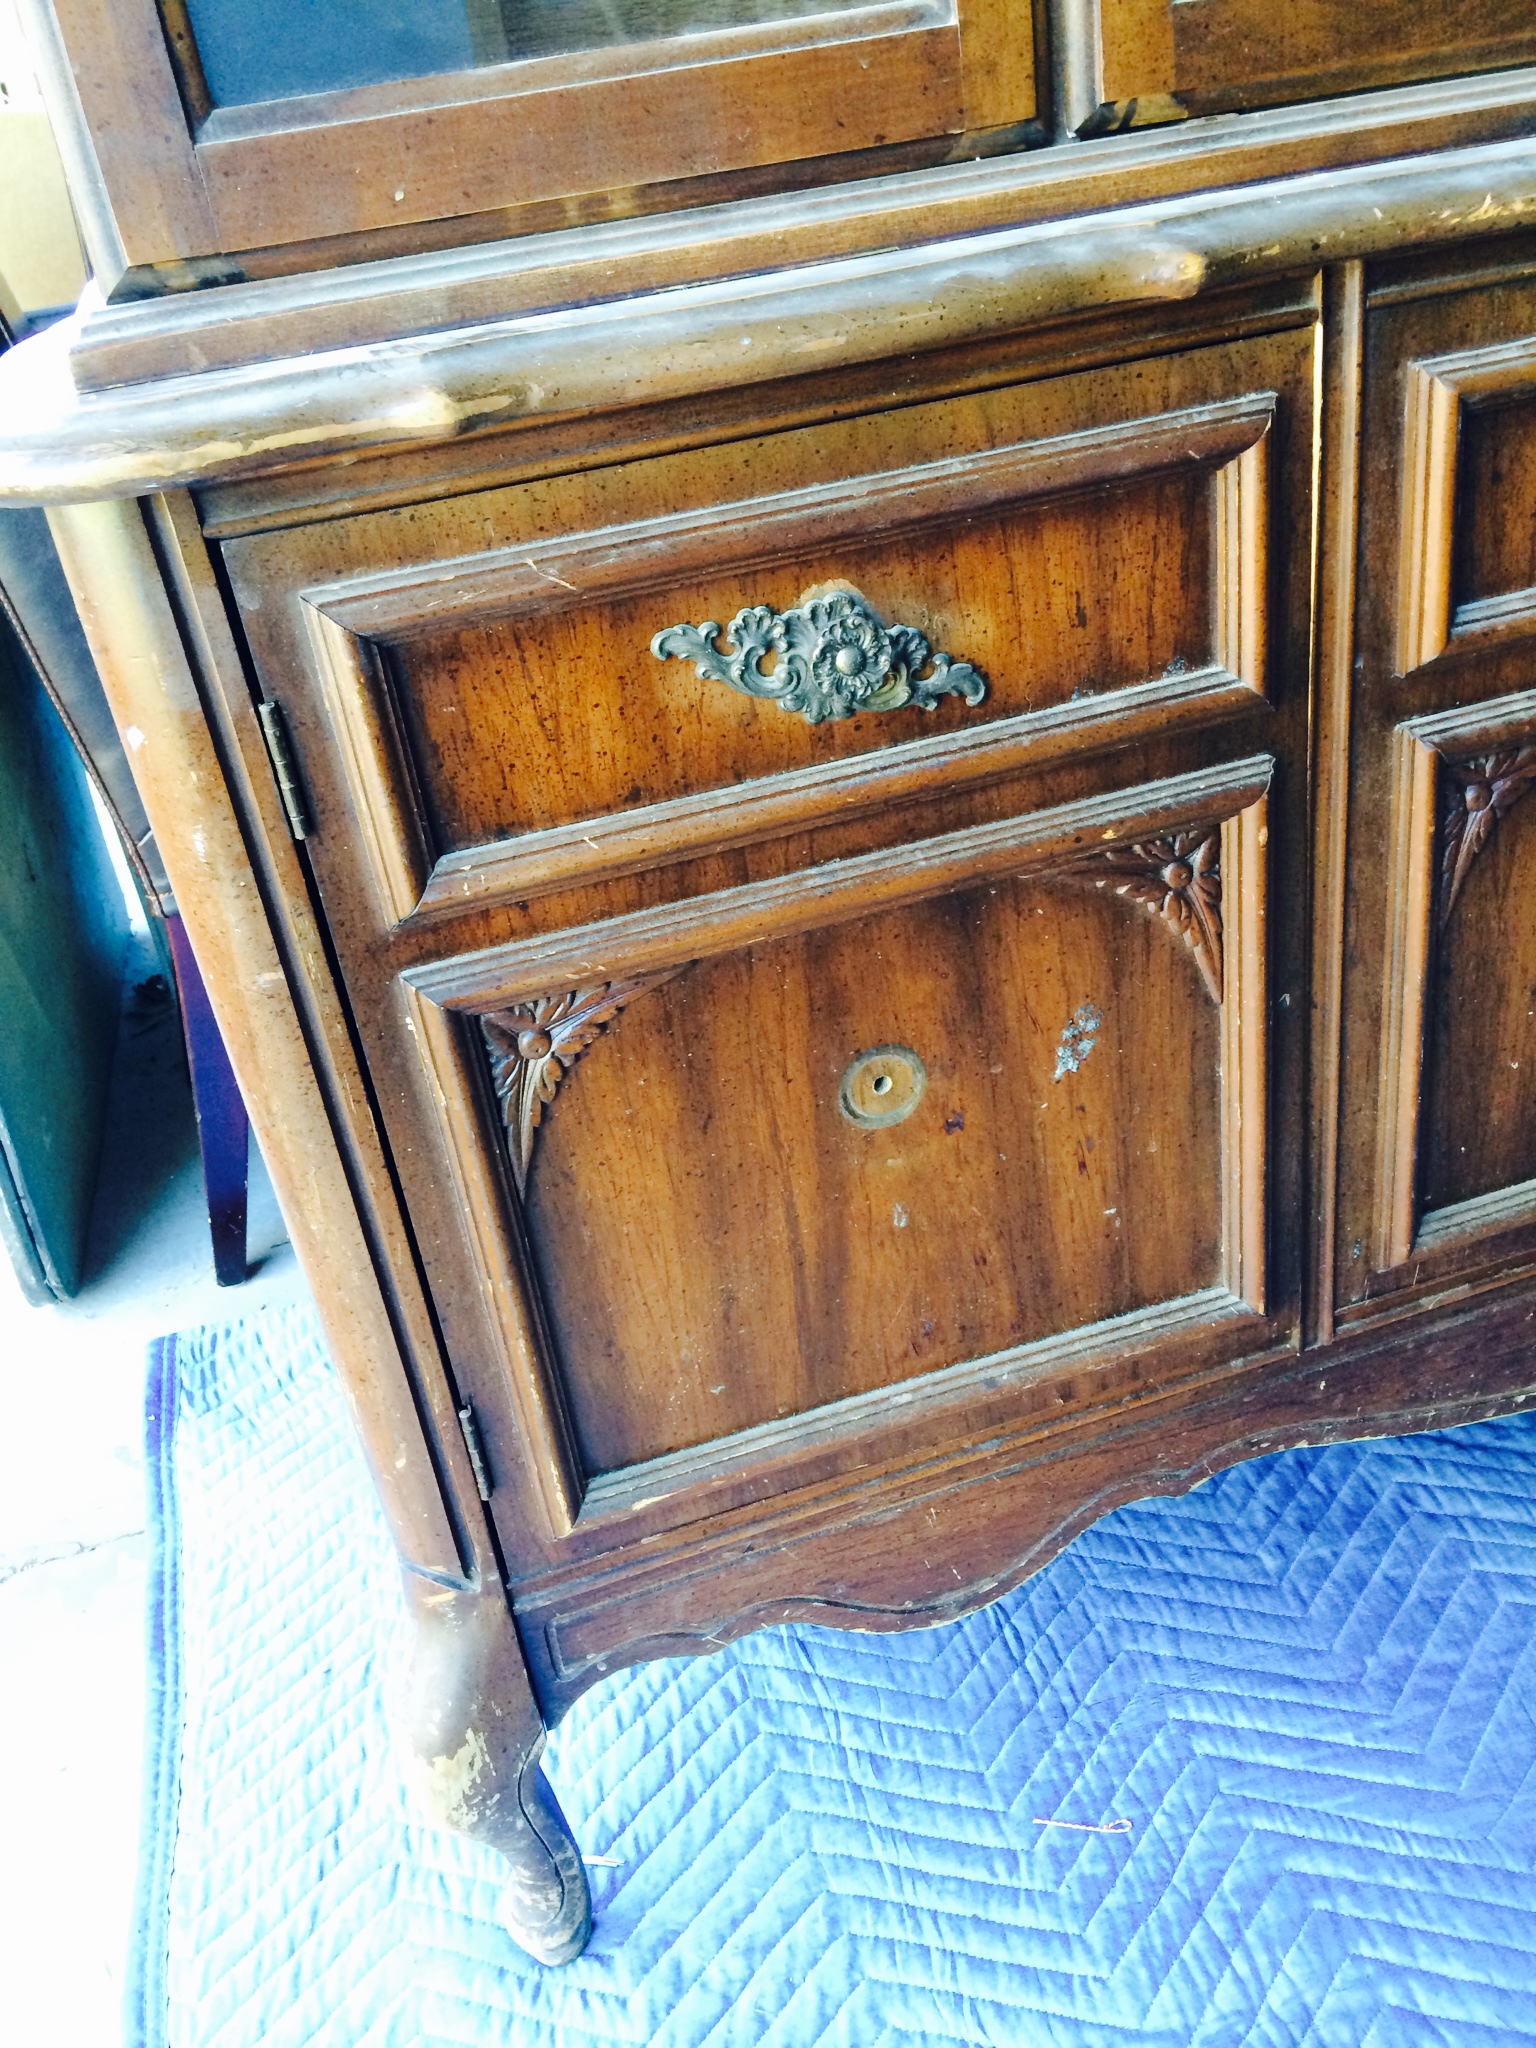
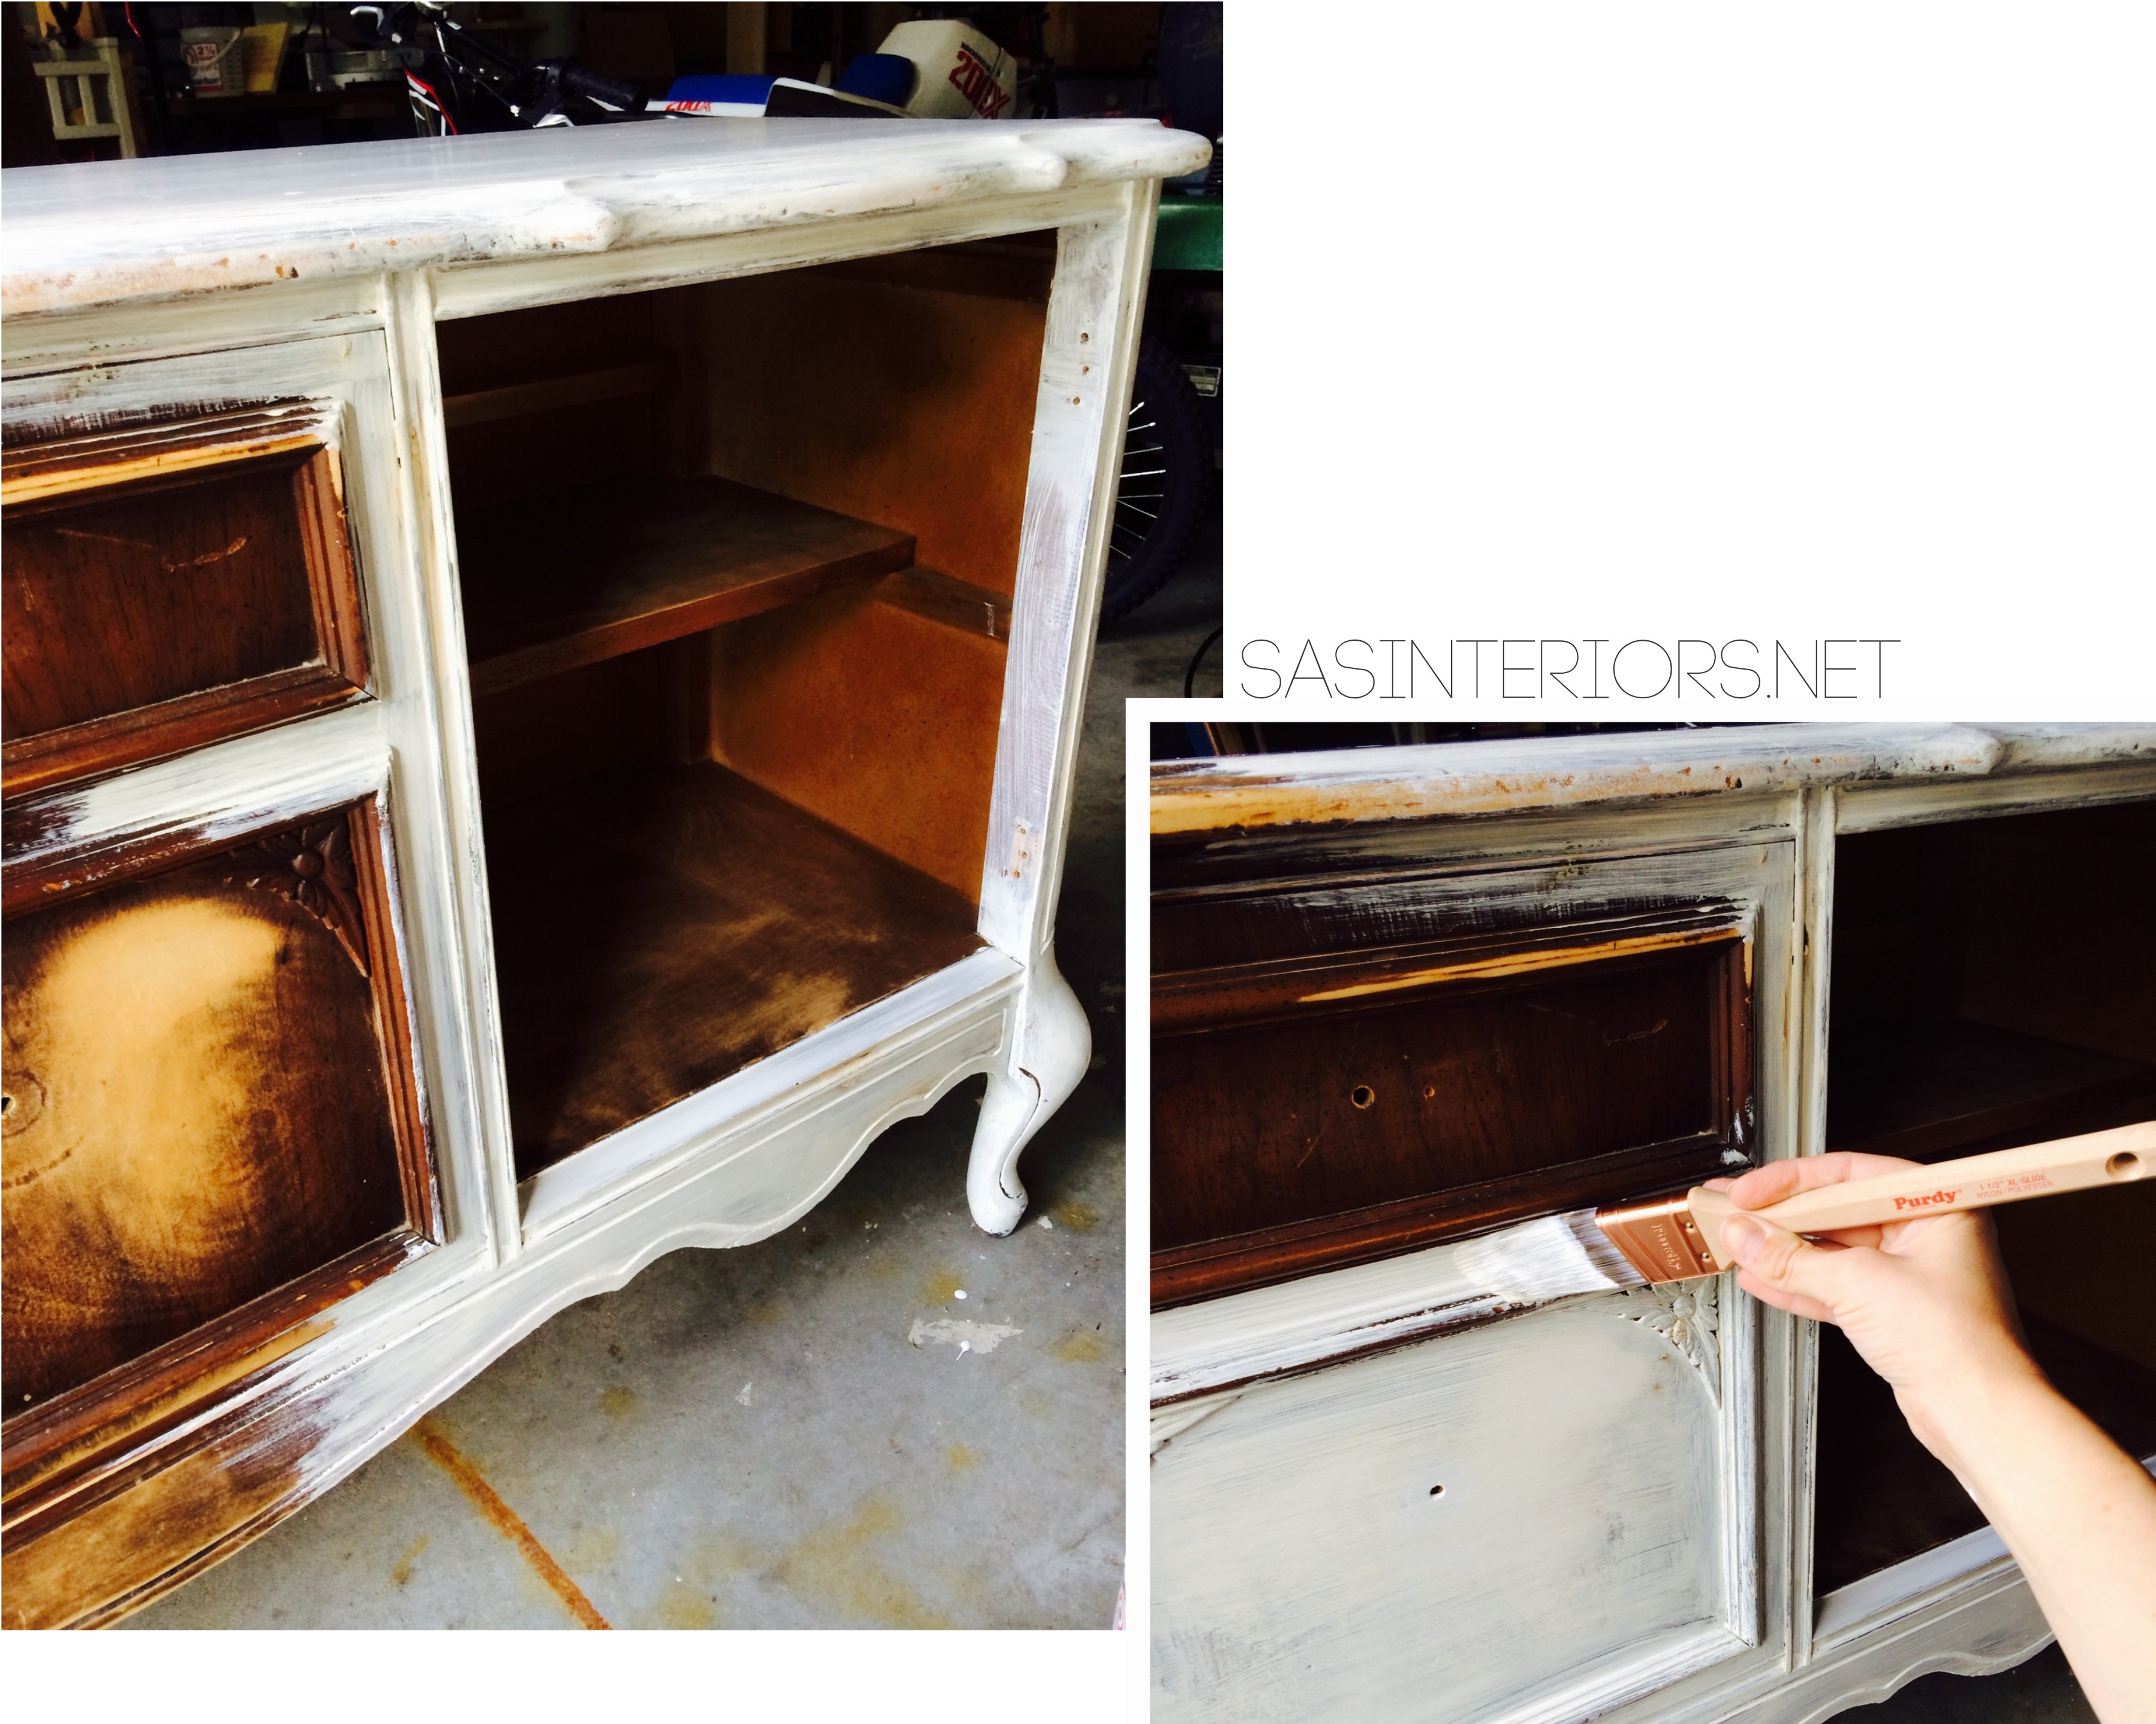
I was psyched to bring her home.  Once she landed in our garage, I started the prep work by removing all the hardware, the doors, and the shelves.

China Cabinet before & after >>> The process of giving this piece of a furniture a complete makeover!

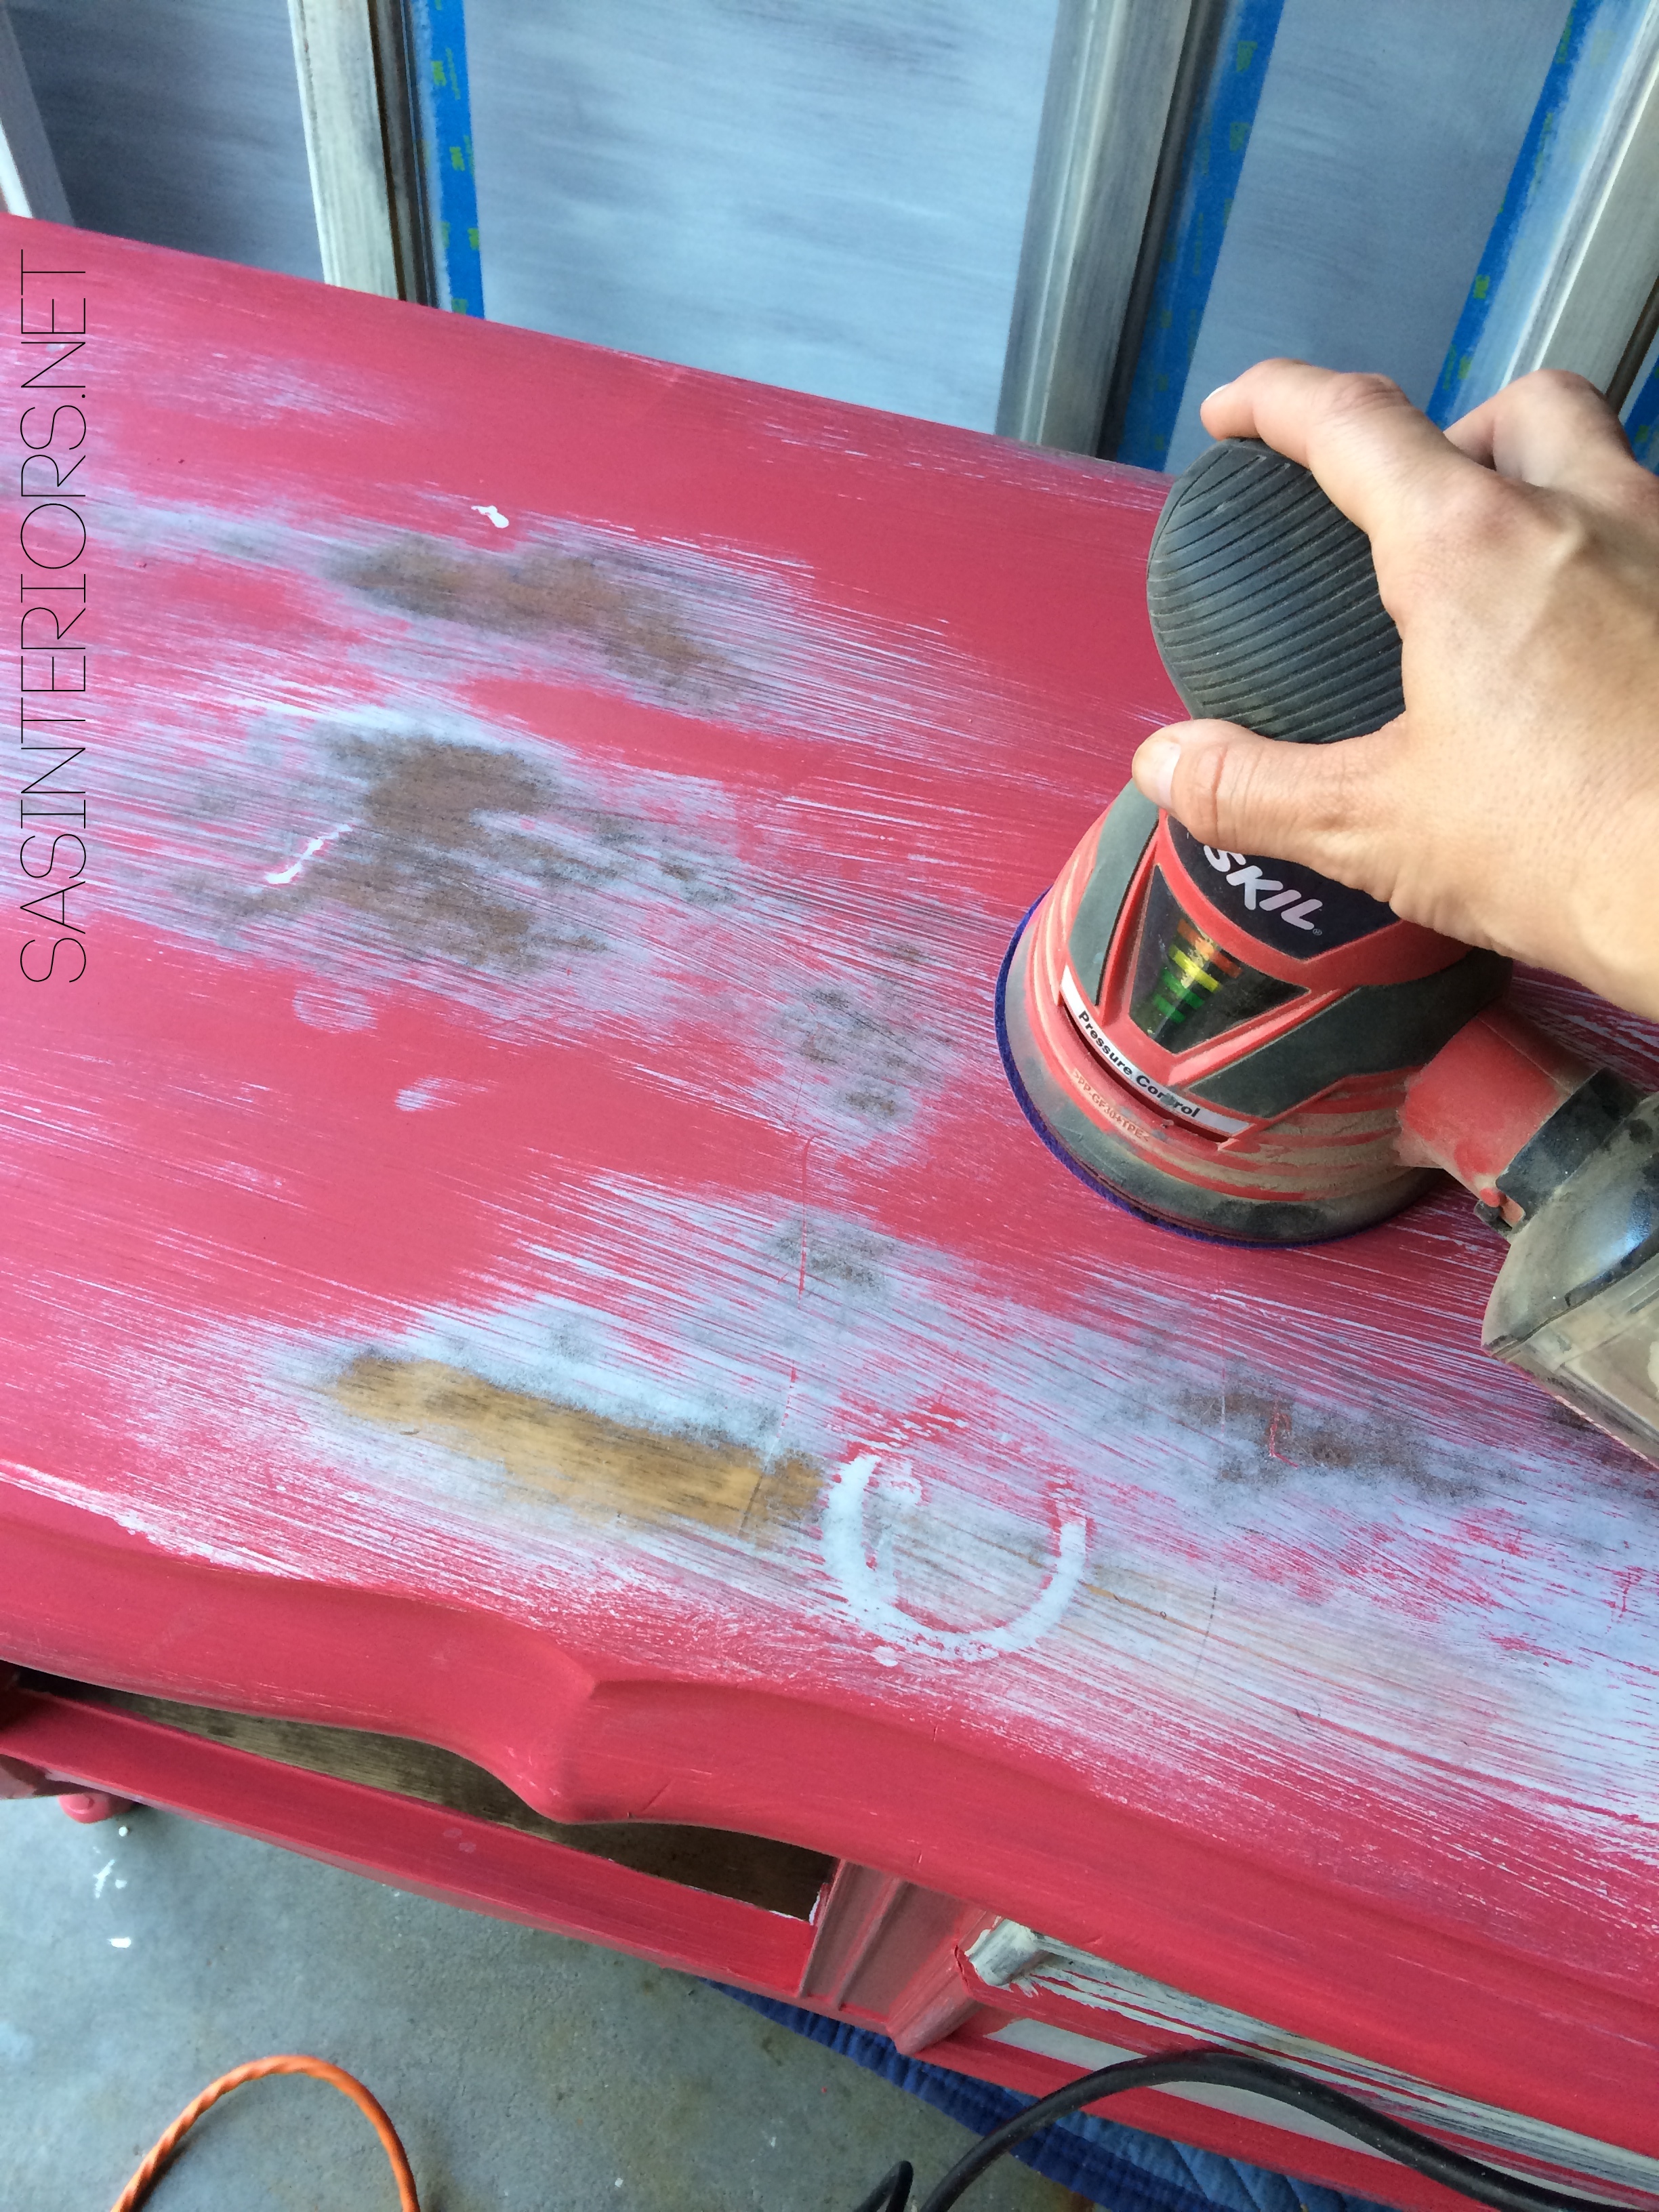
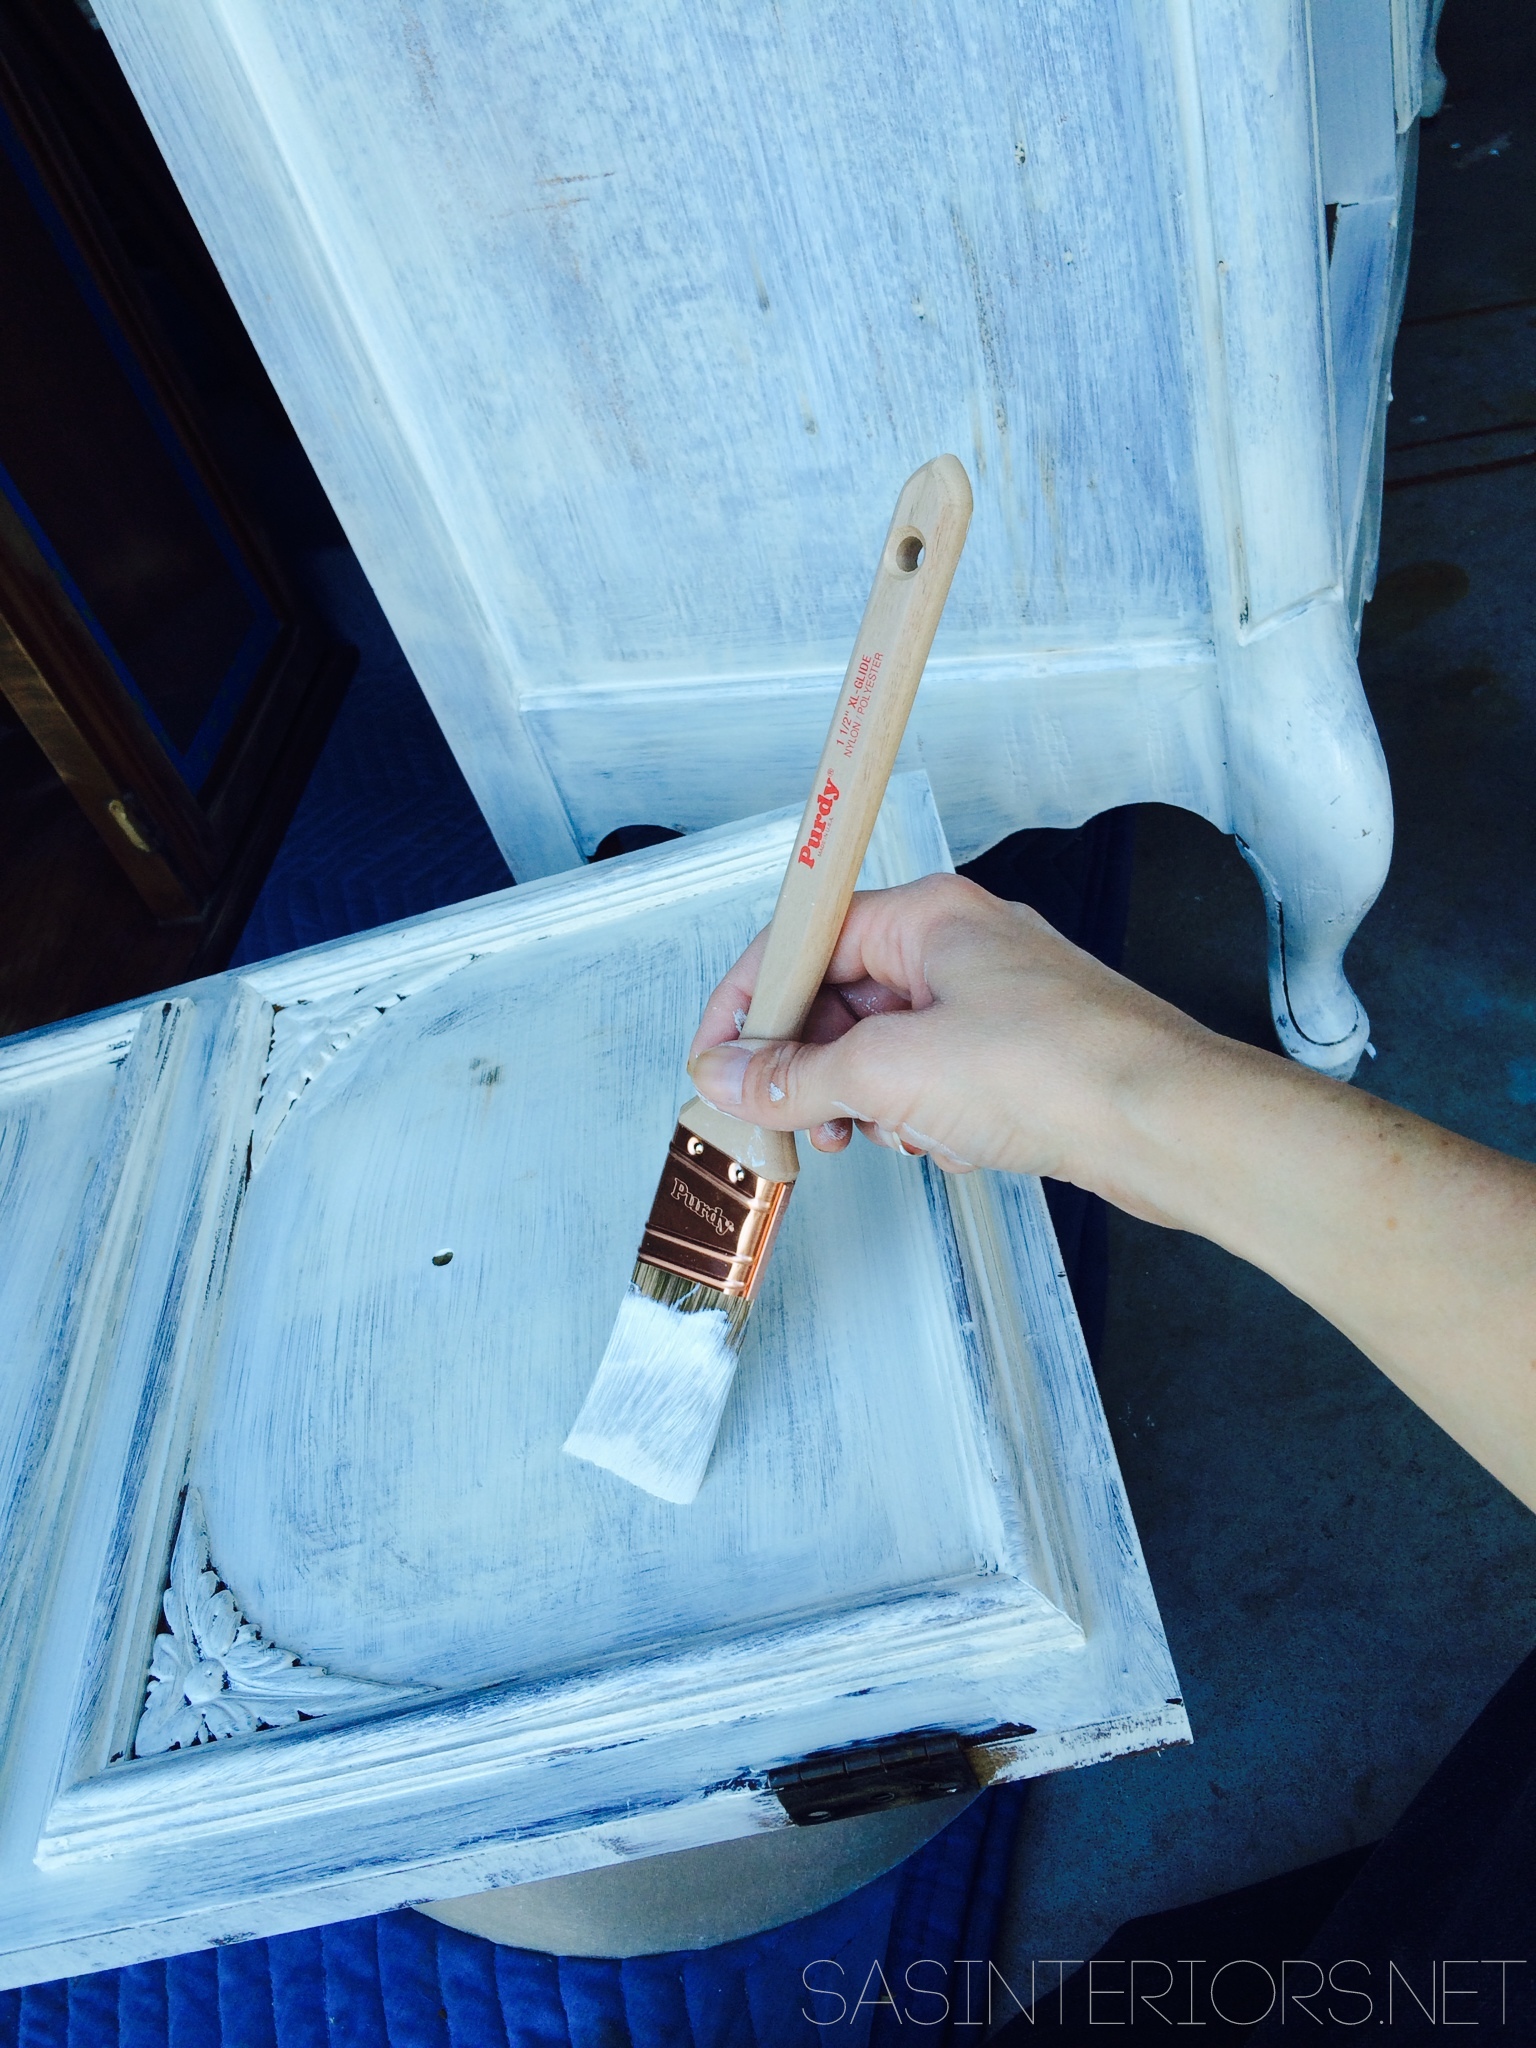
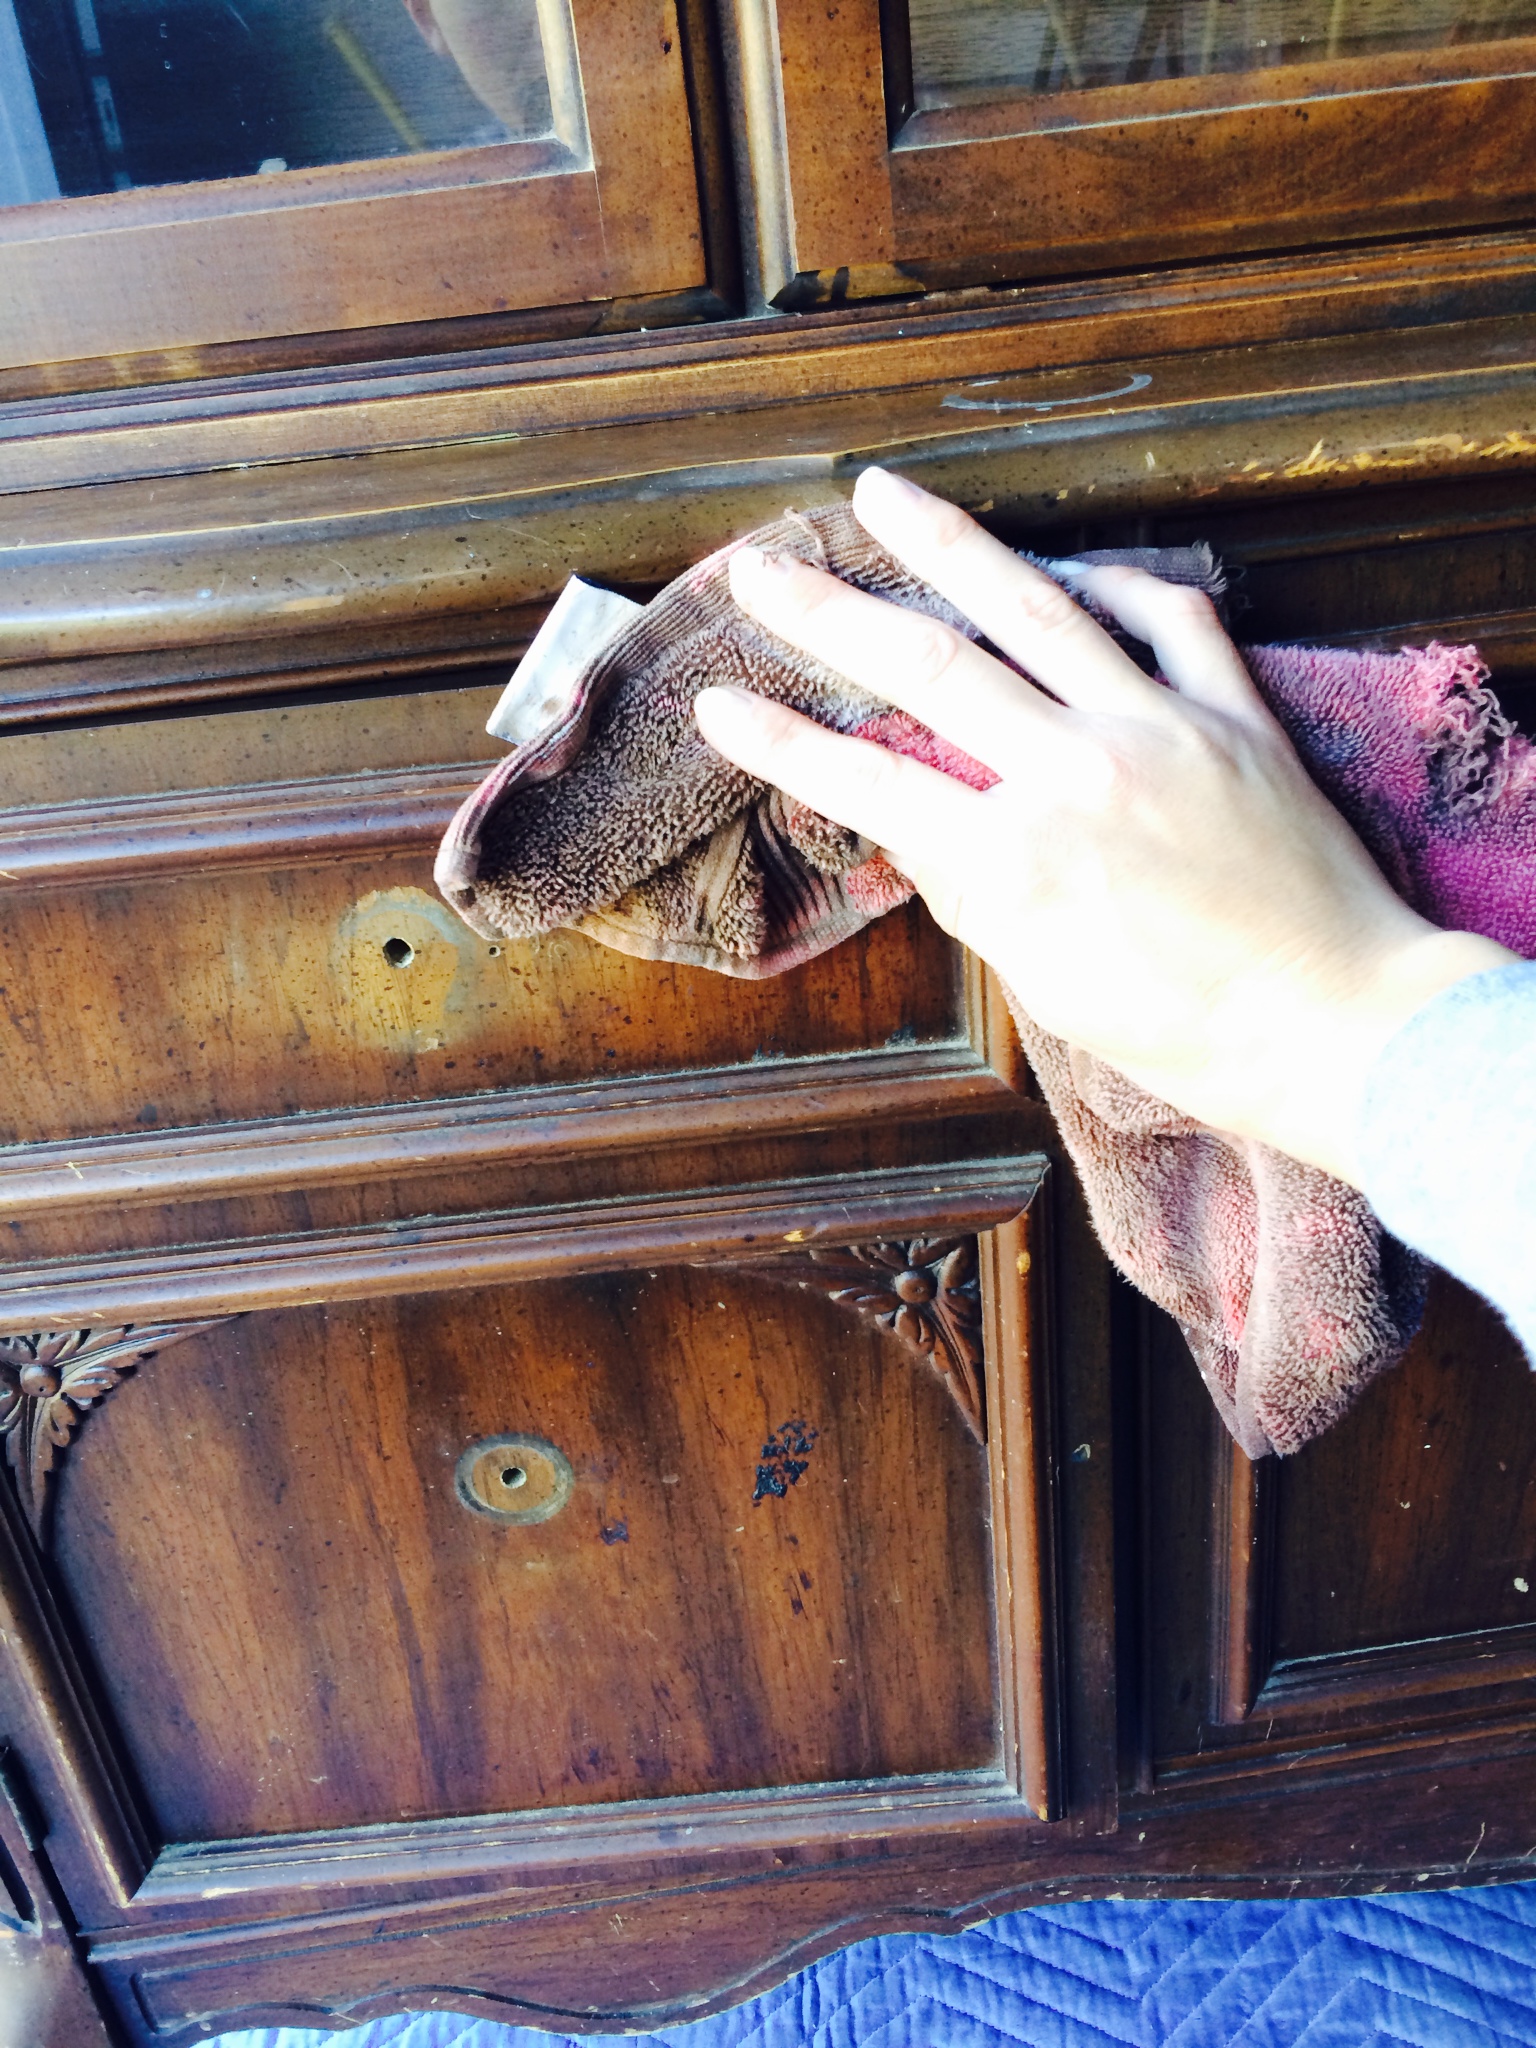
I cleaned her up a bit + lightly sanded all the surfaces.

China Cabinet before & after >>> The process of giving this piece of a furniture a complete makeover!

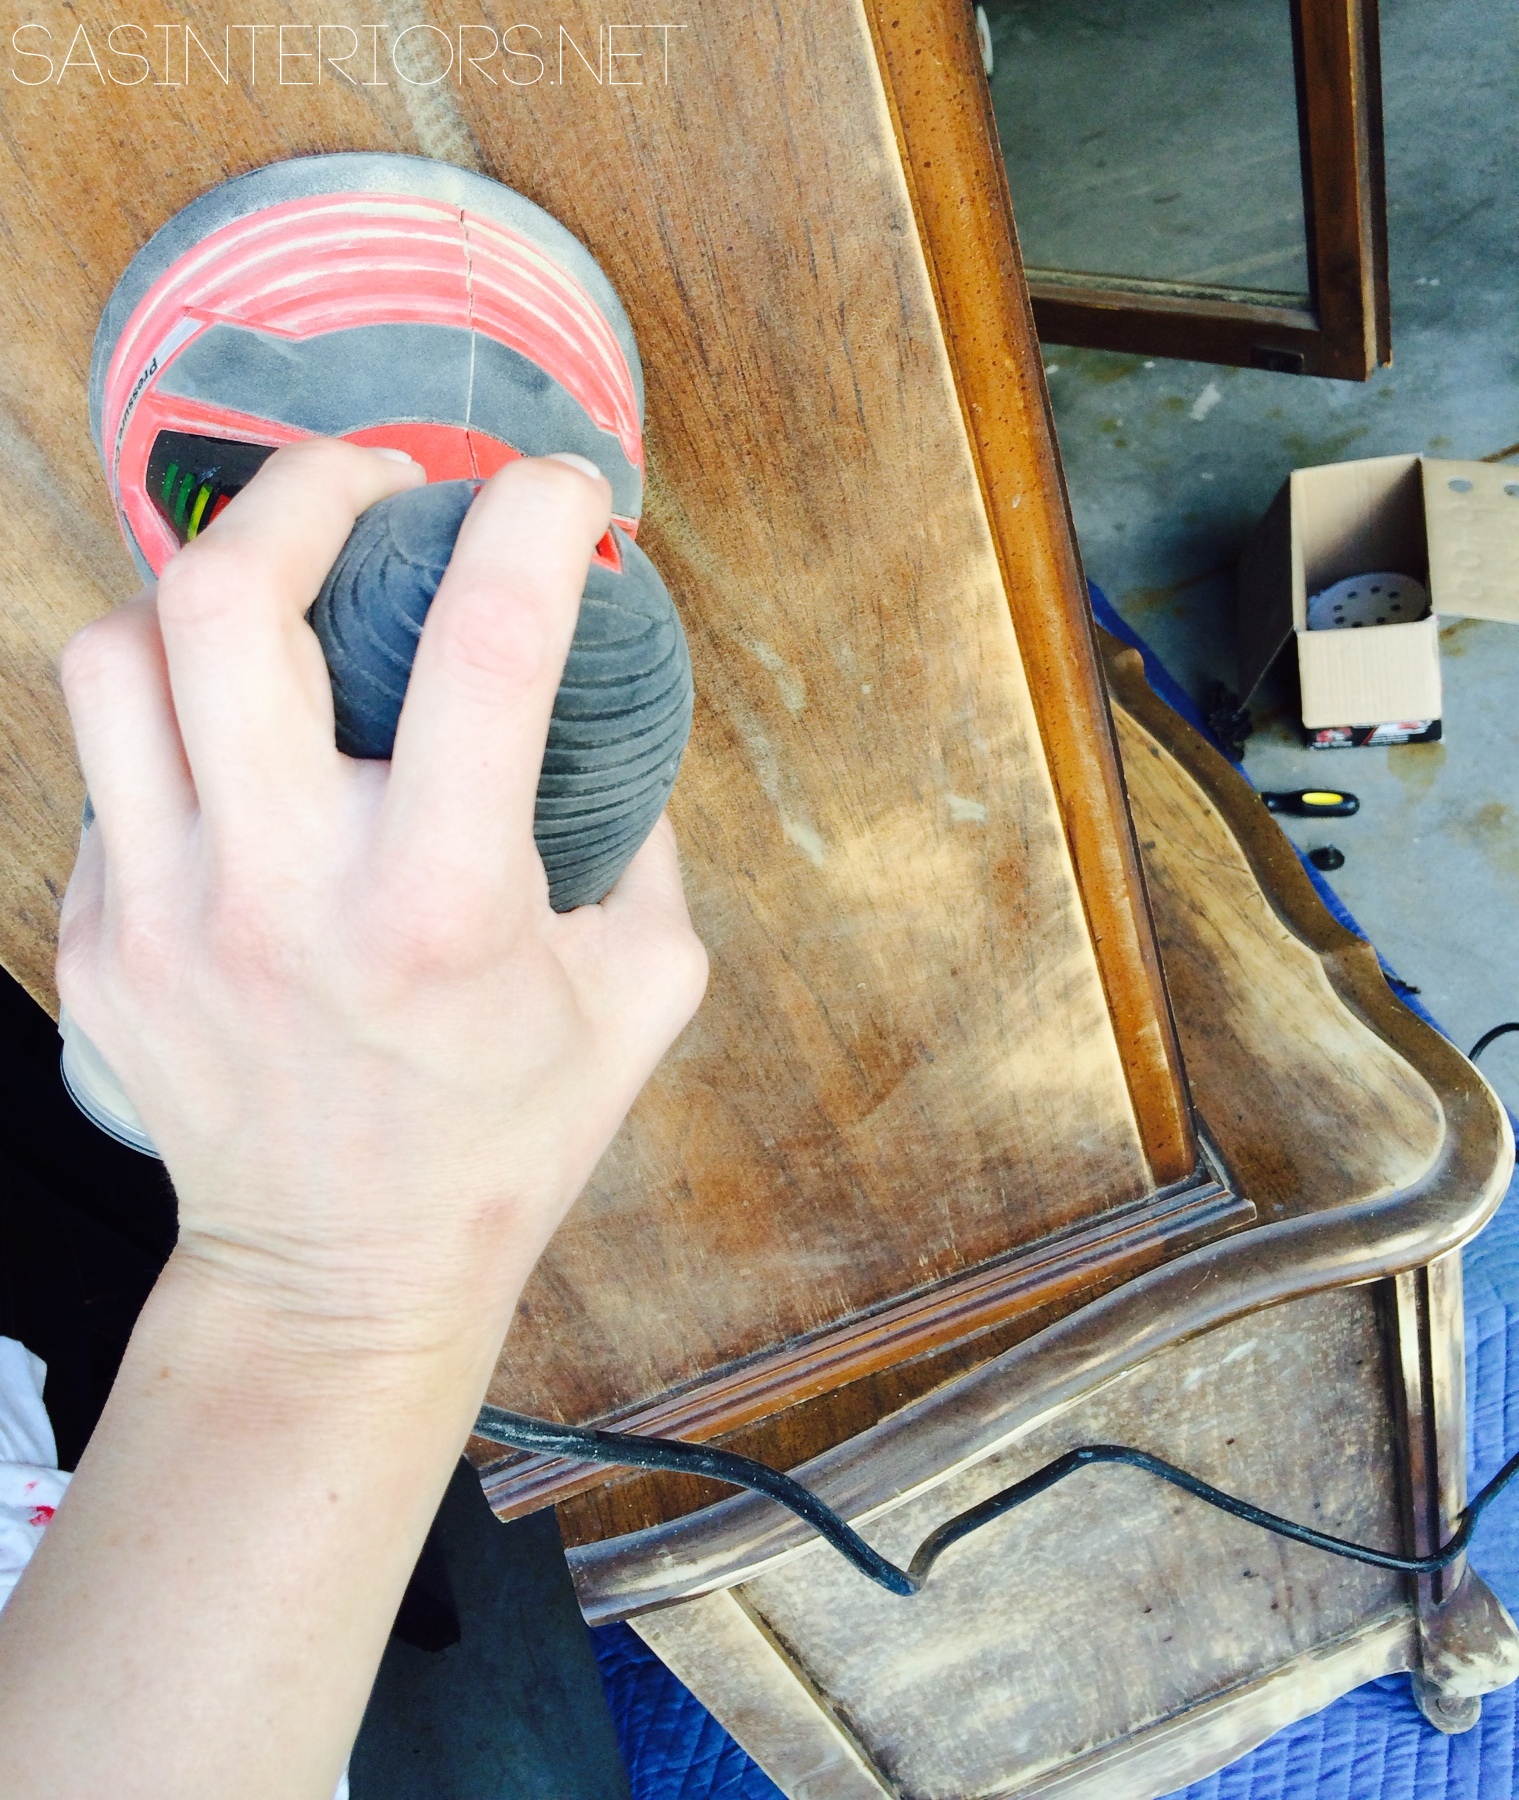
>>> read more on Prep + Sanding Wood Furniture <<<

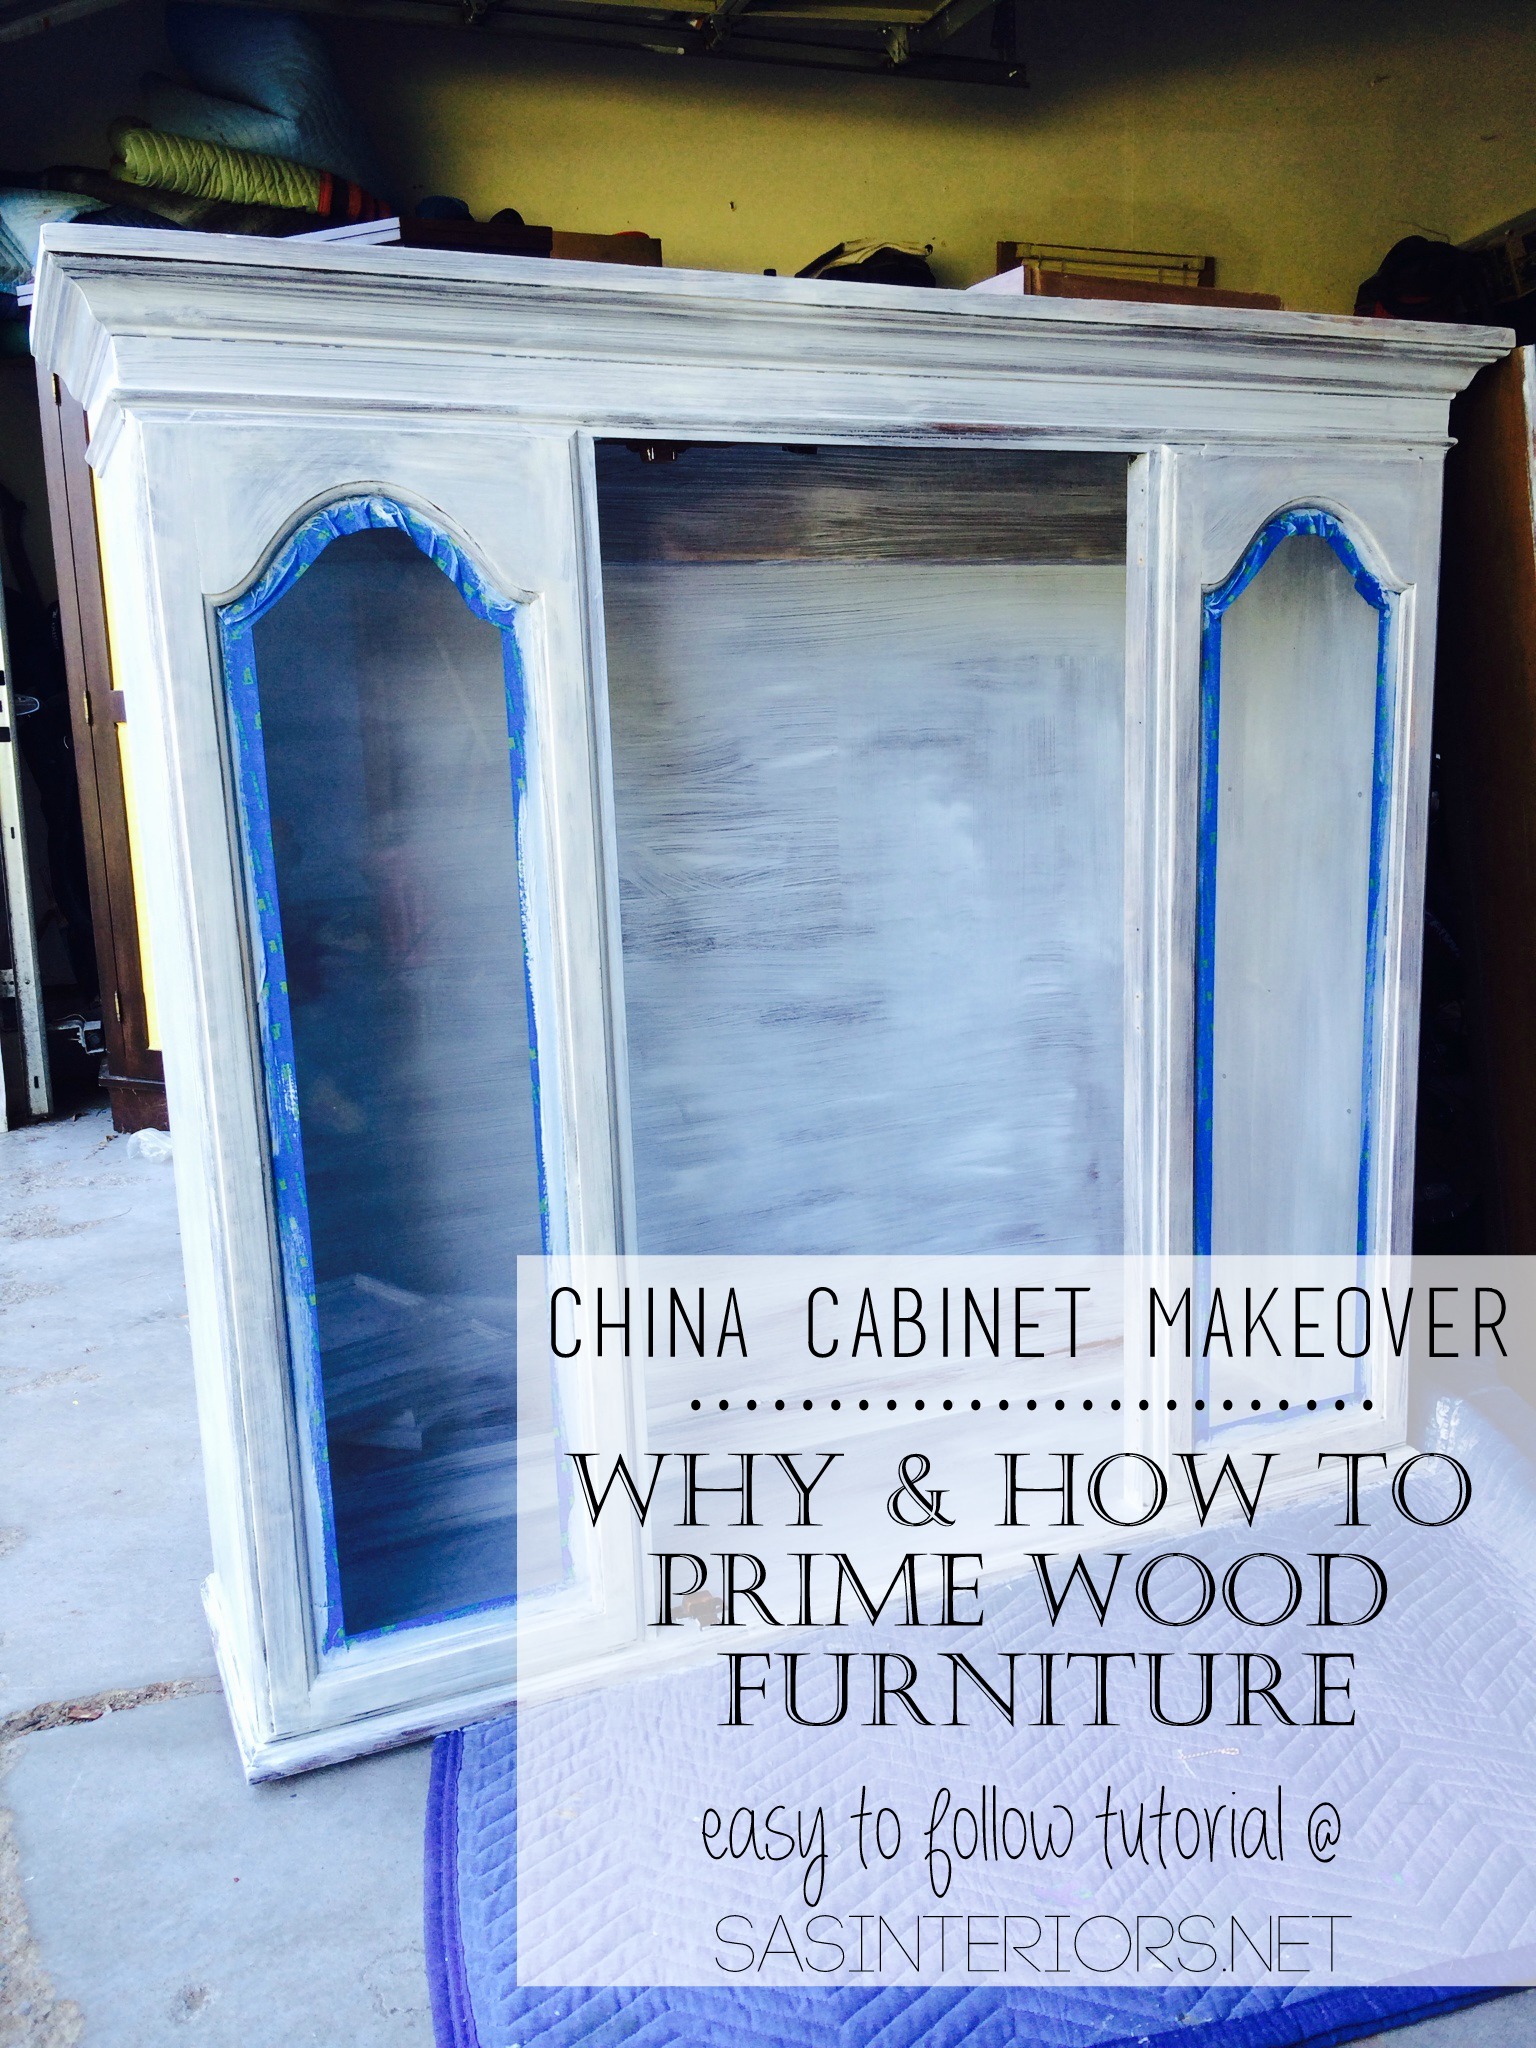
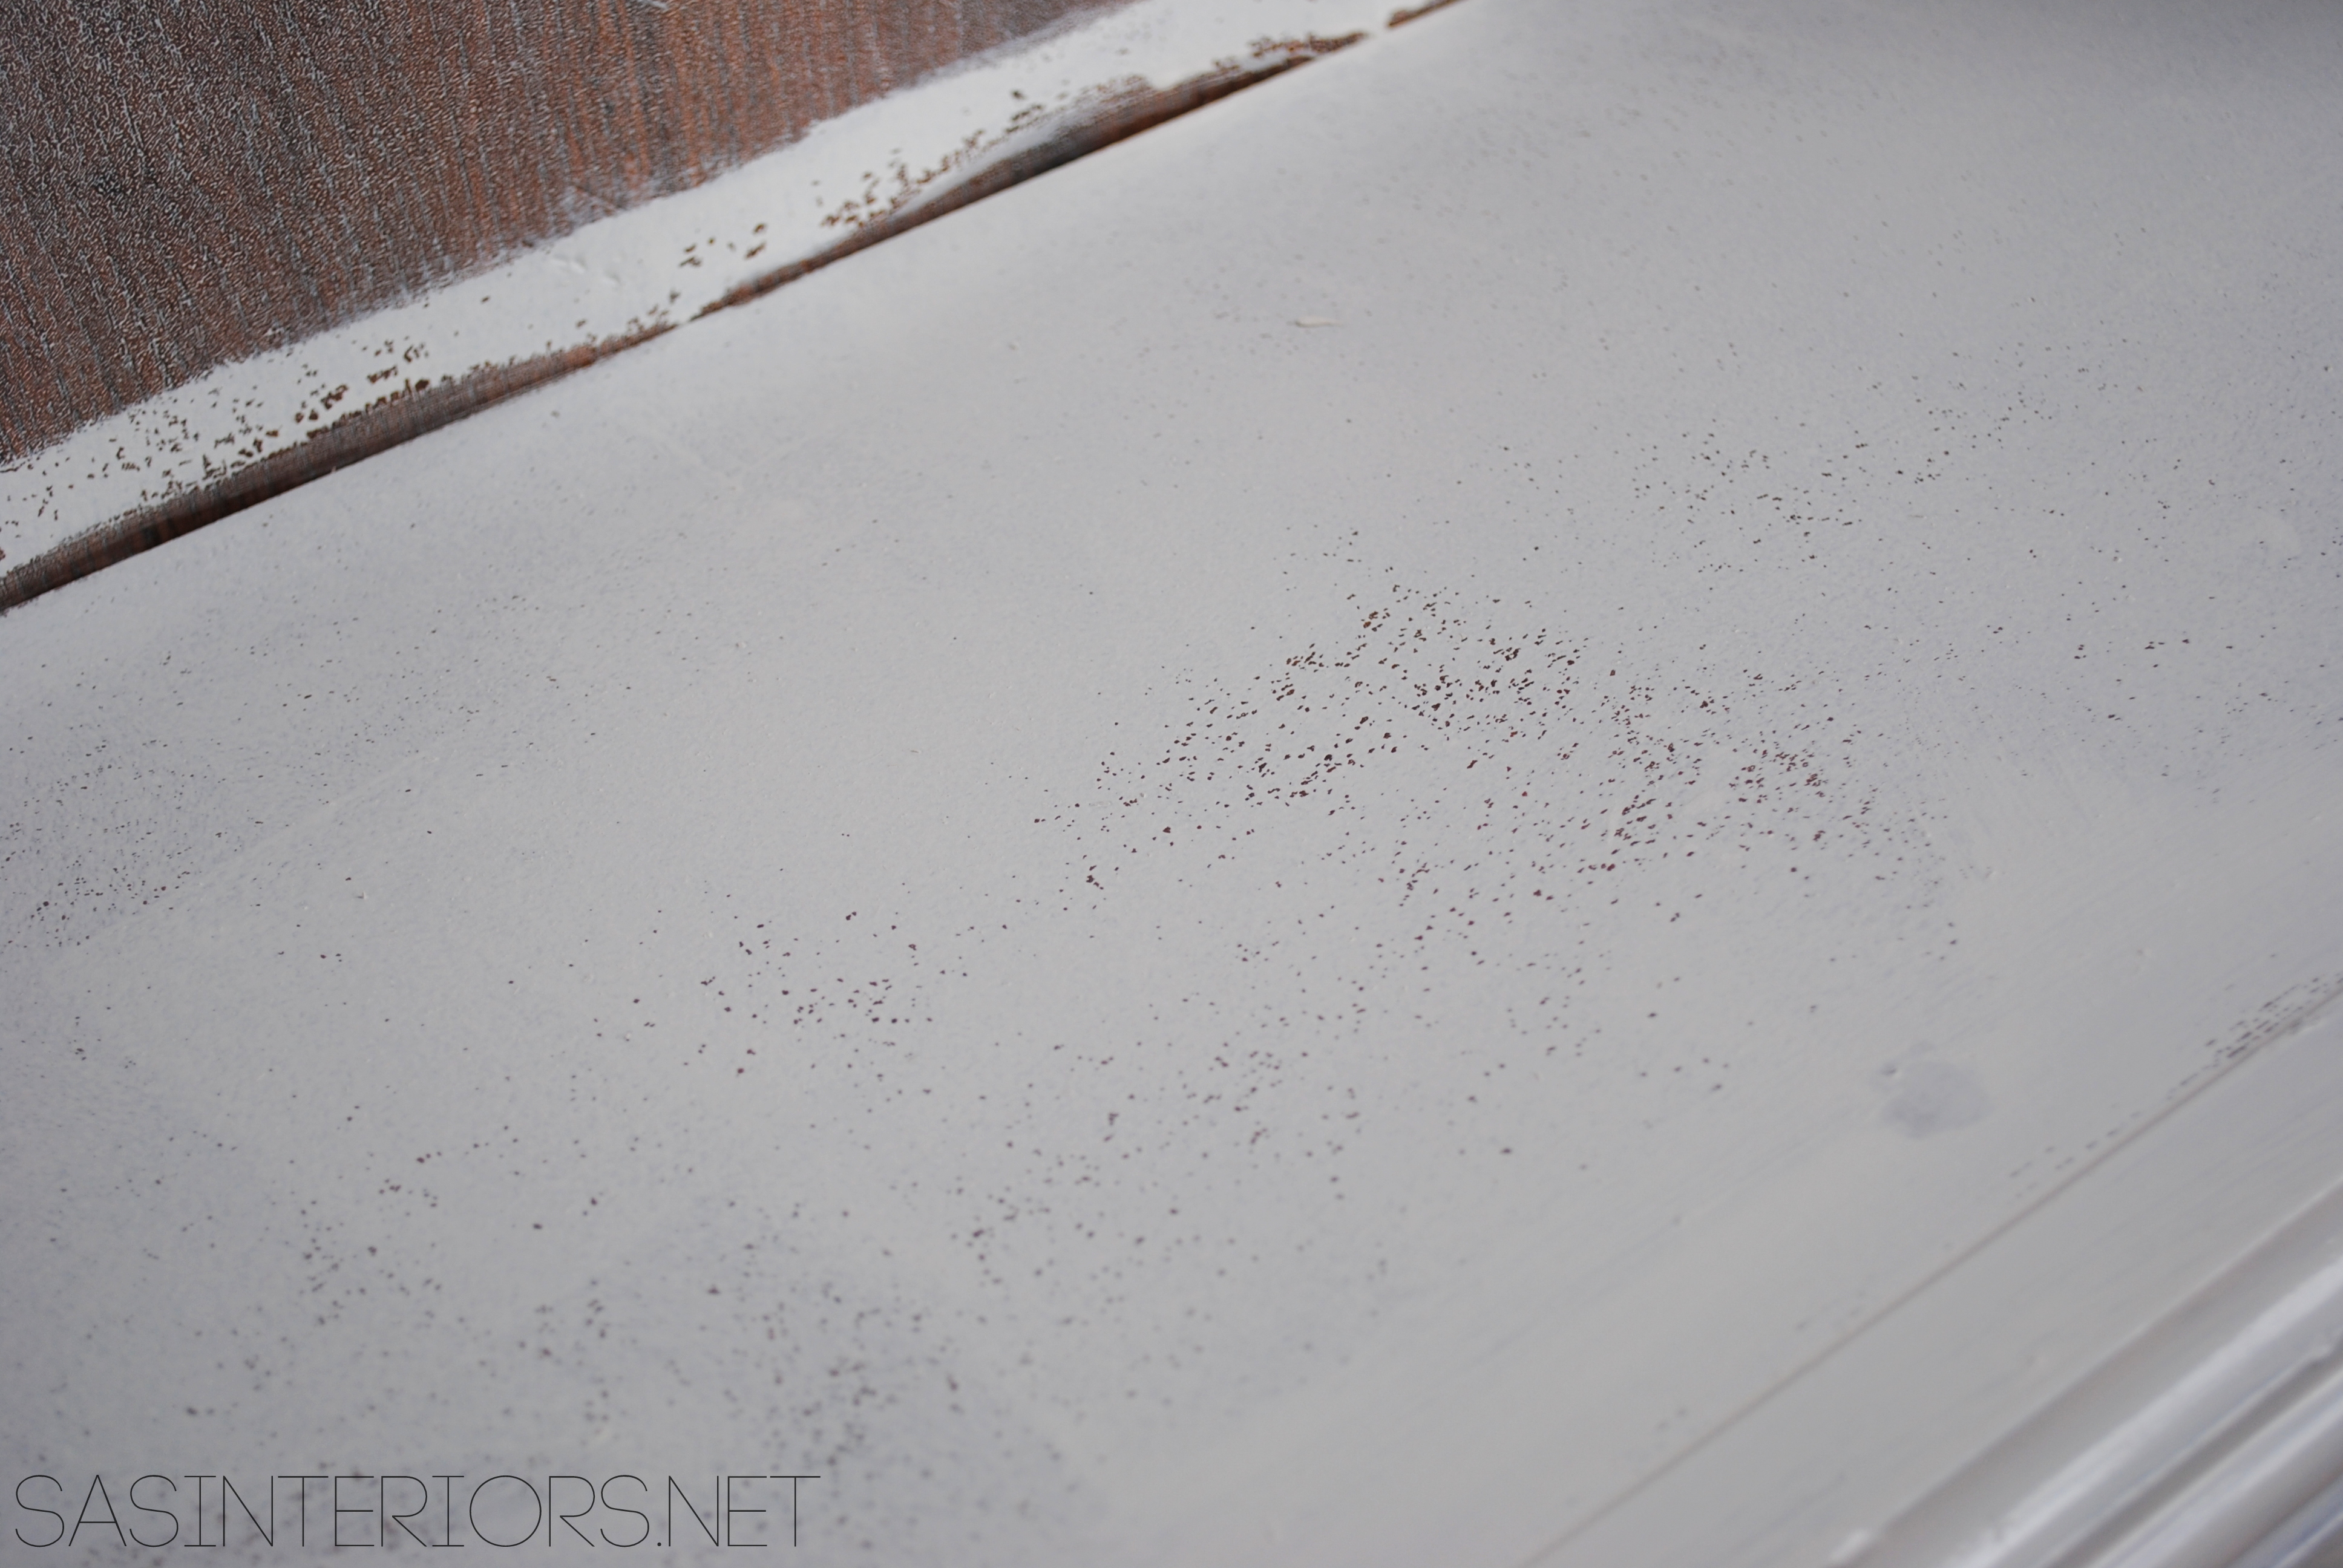
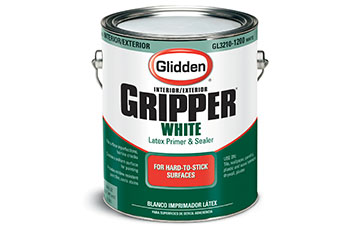
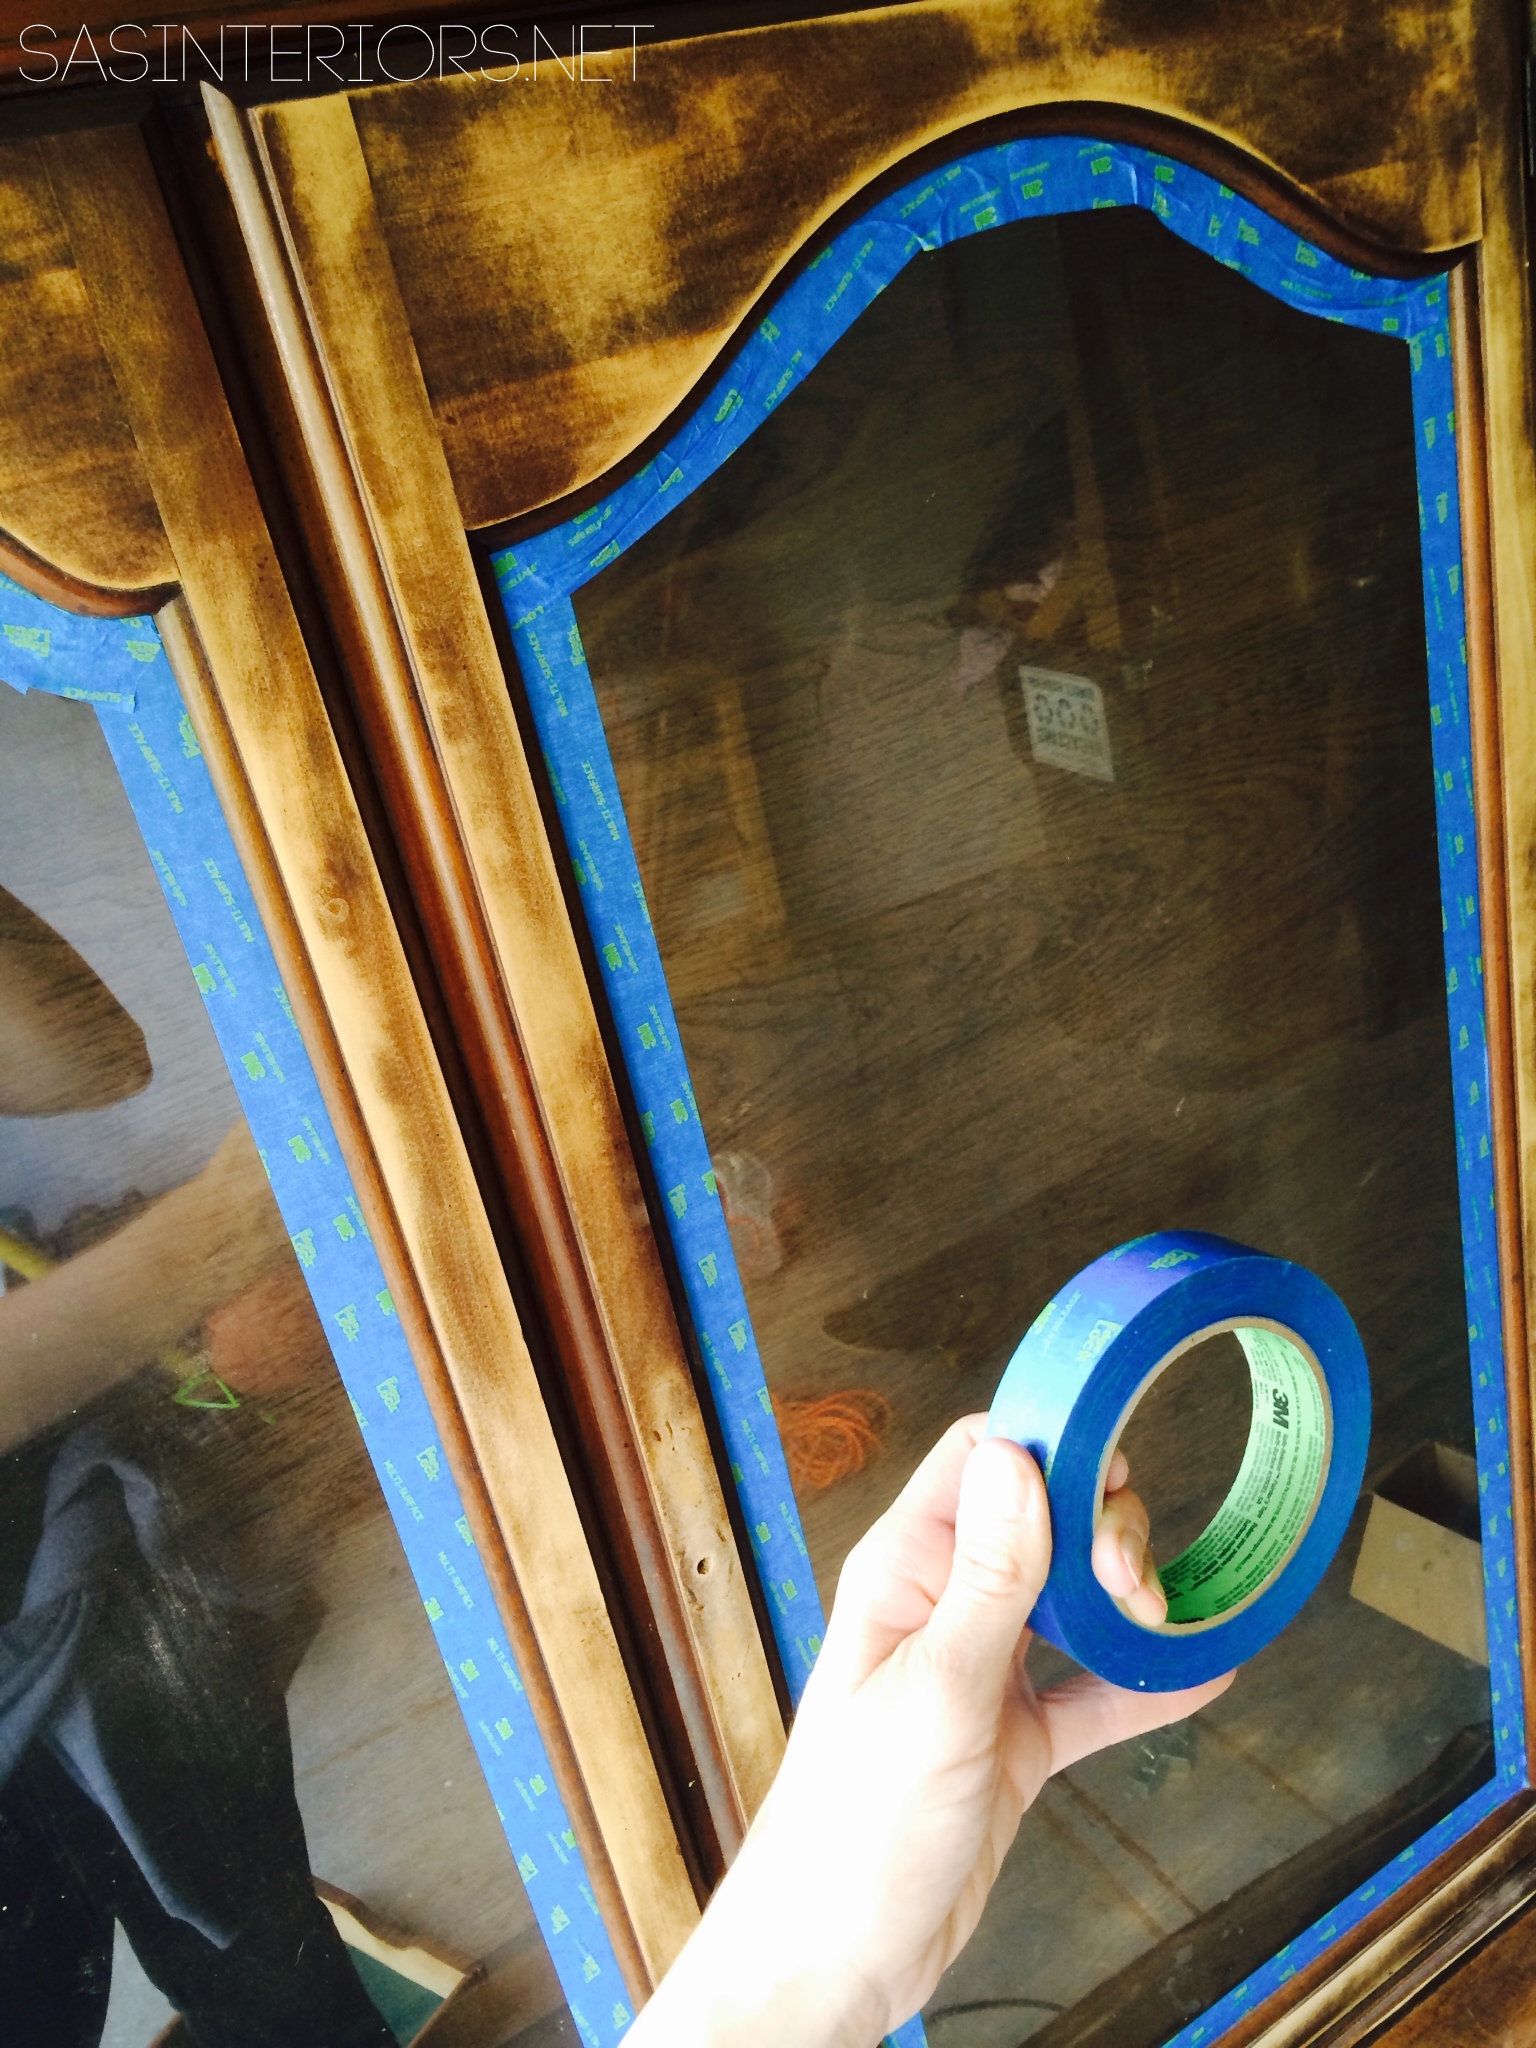
Once all the surfaces were ready, it was time to prime!  As I’ve shared over & over, priming is SO IMPORTANT.  The purpose of paint is to provide color, but the purpose of primer is to provide the ideal base for the paint to be applied.  The paint + primer in one is fine for walls, but a true primer like Glidden Gripper (which is what I used) will block the stain from bleeding through and will provide the needed base for the paint to adhere!  If you’re painting furniture, YOU MUST USE PRIMER.

China Cabinet before & after >>> The process of giving this piece of a furniture a complete makeover!

China Cabinet before & after >>> The process of giving this piece of a furniture a complete makeover!

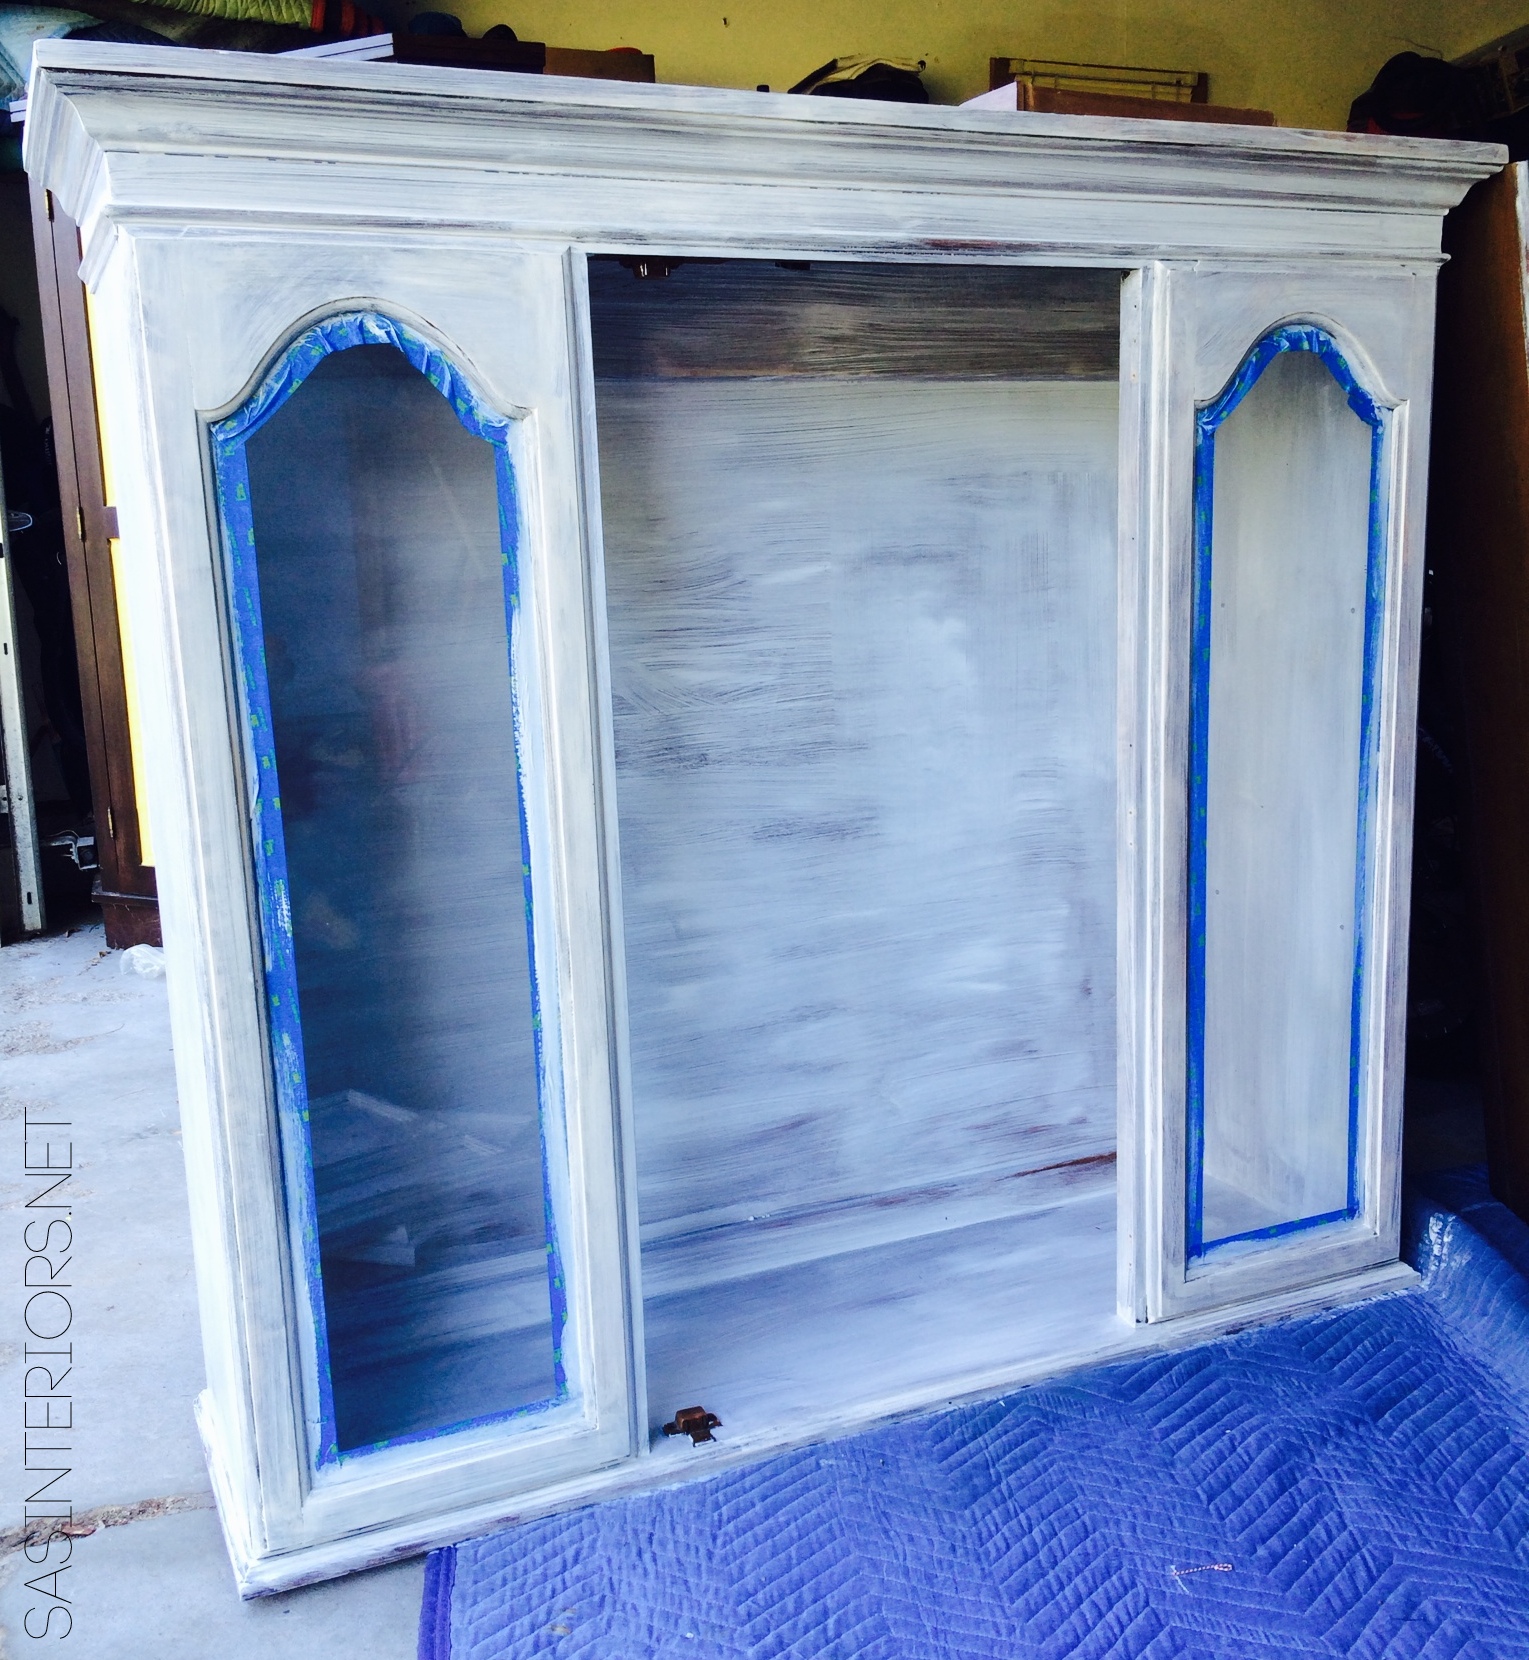
>>> read more on Why & How-To Prime Wood Furniture <<<

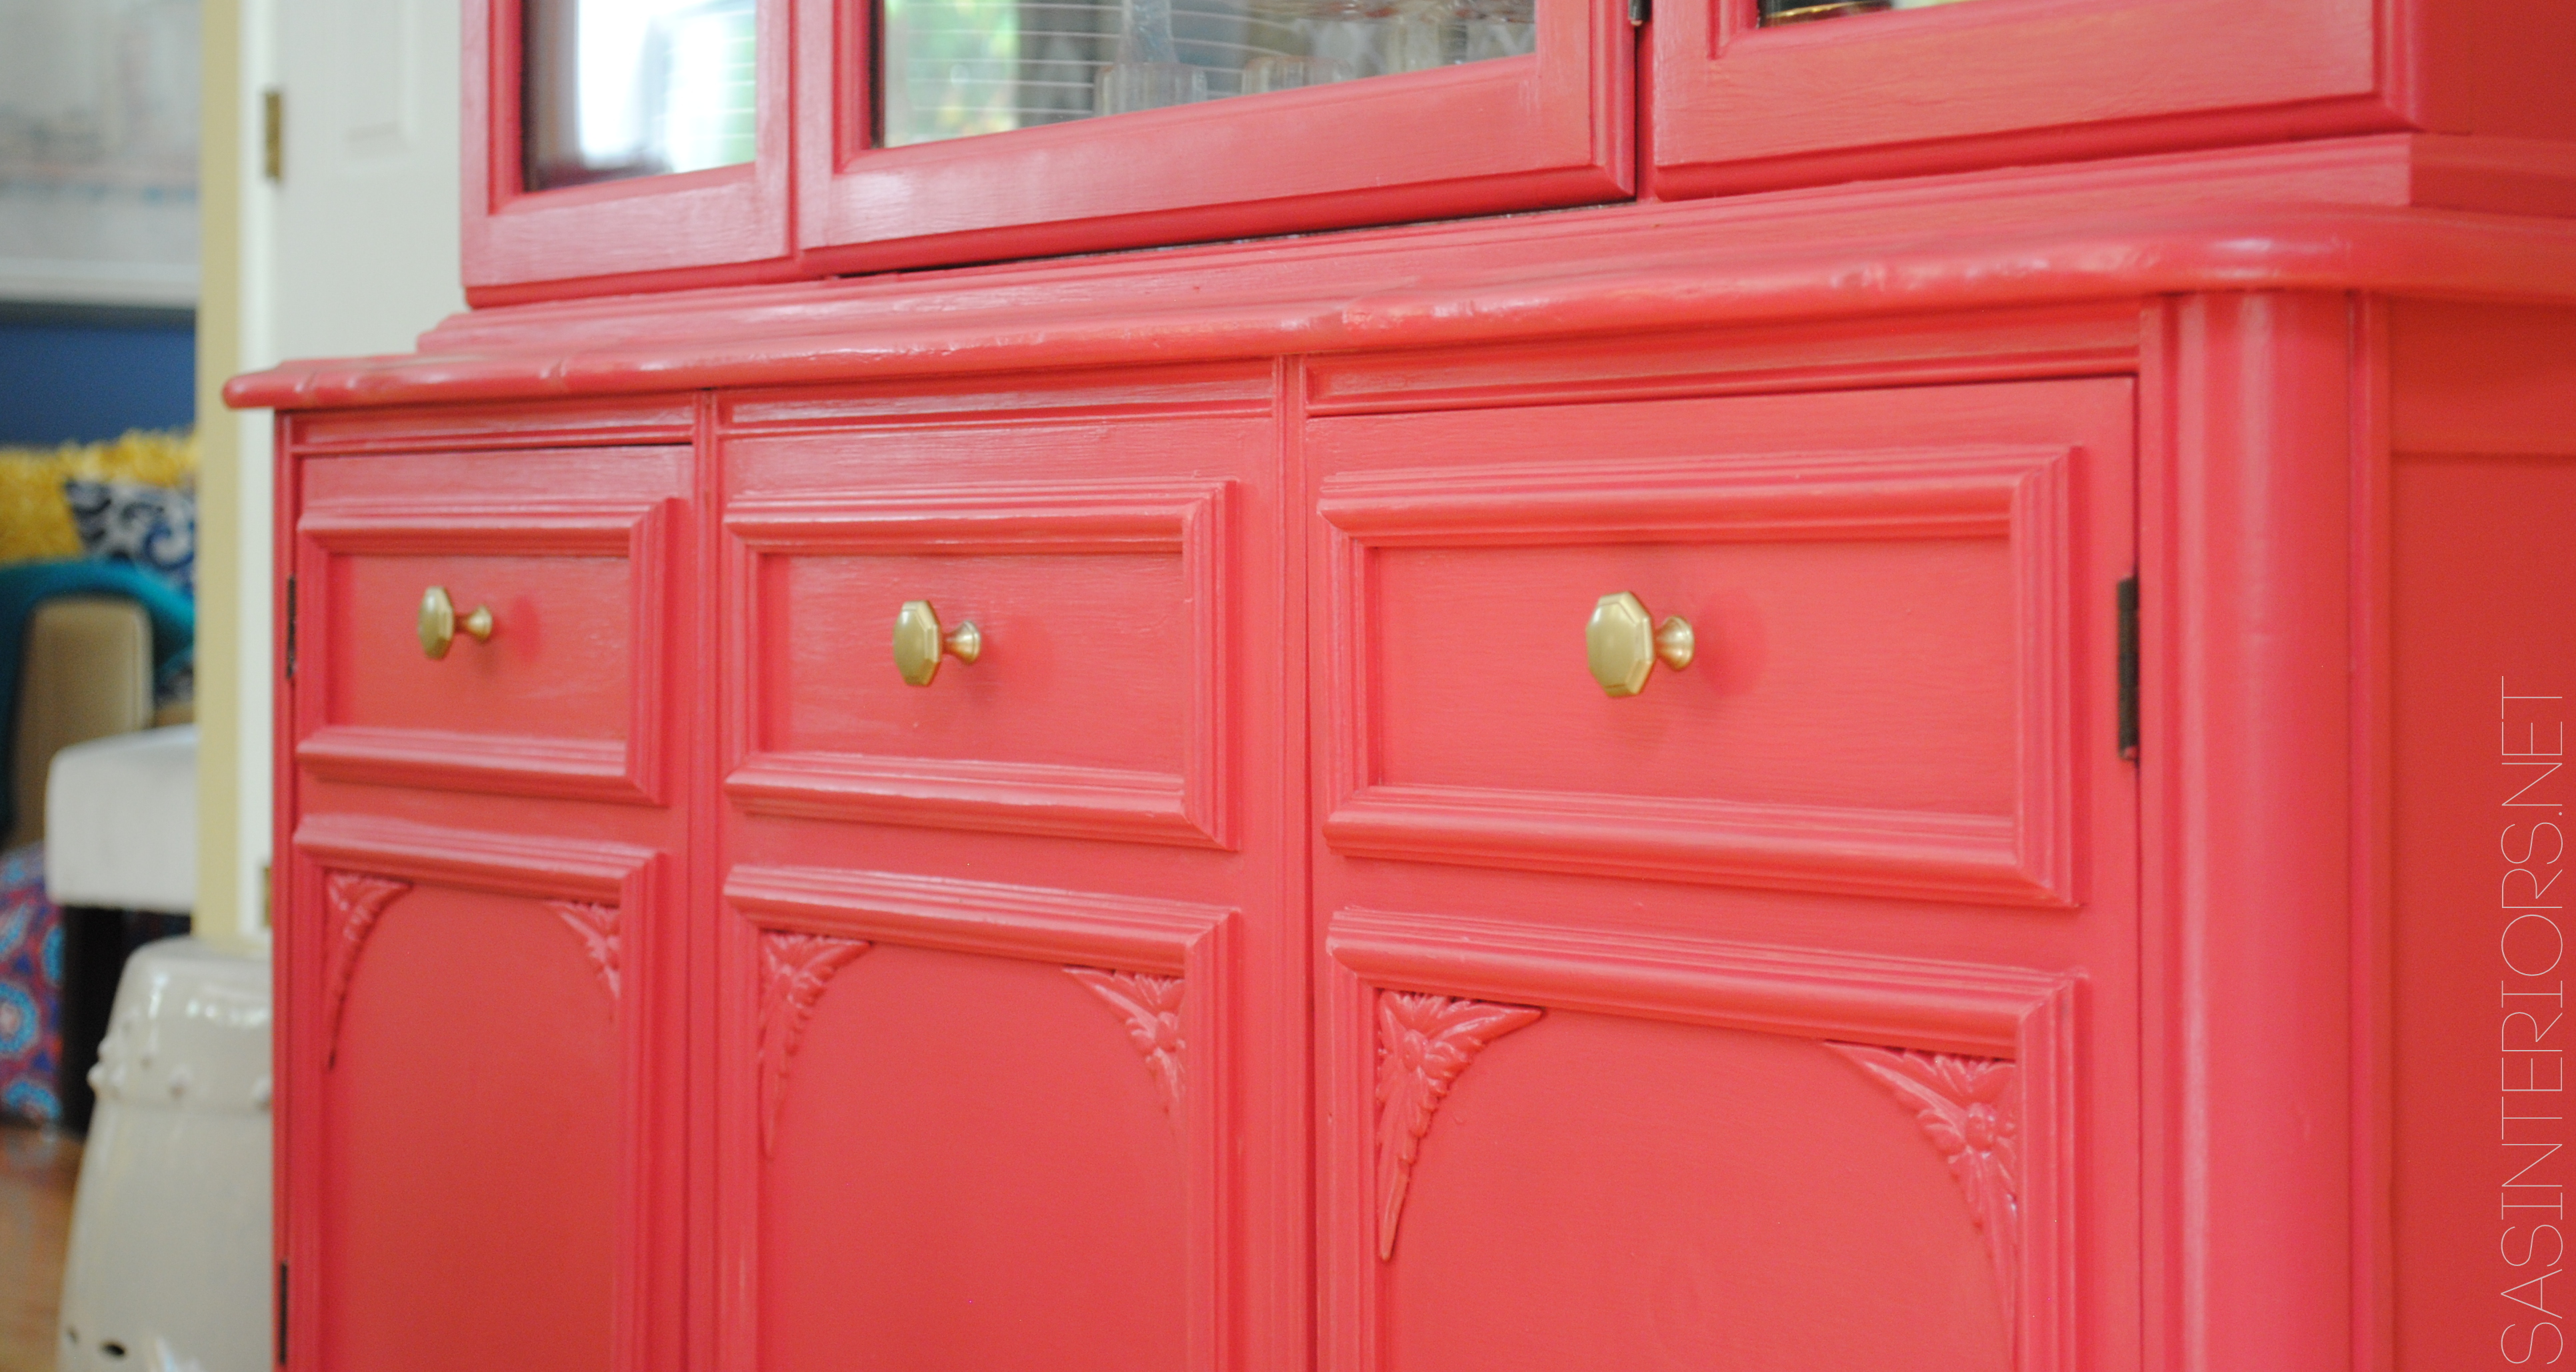
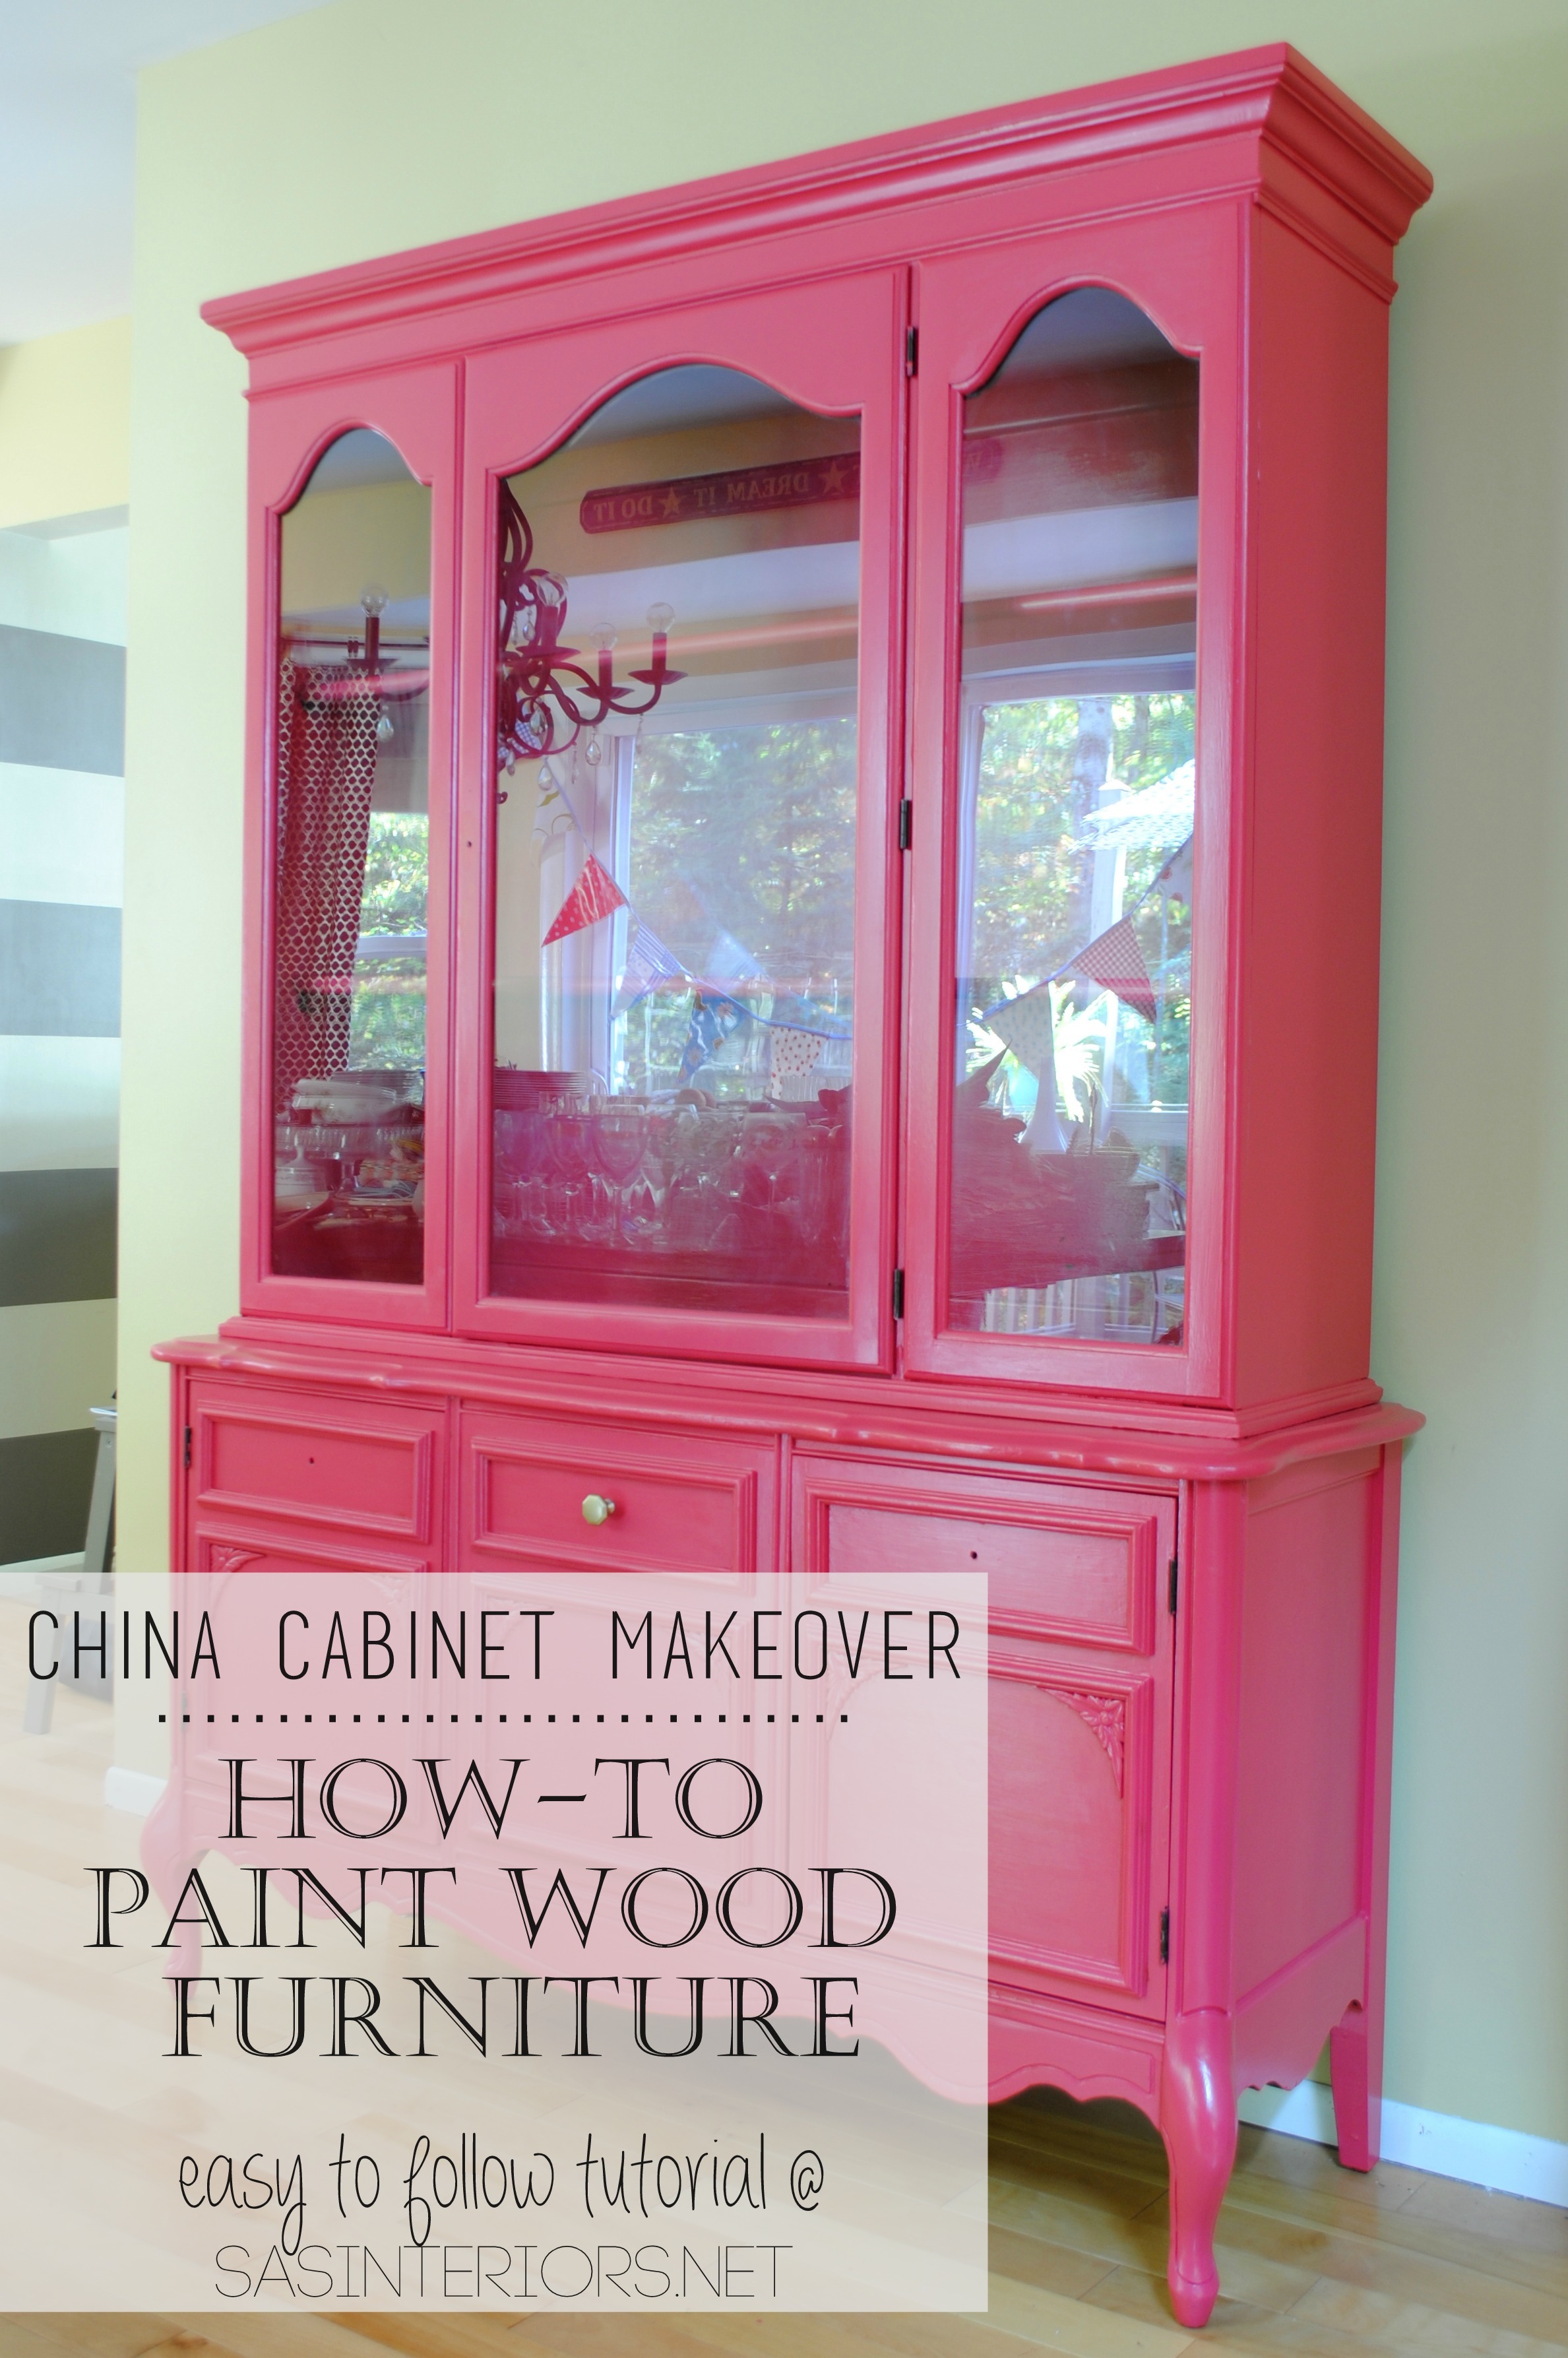
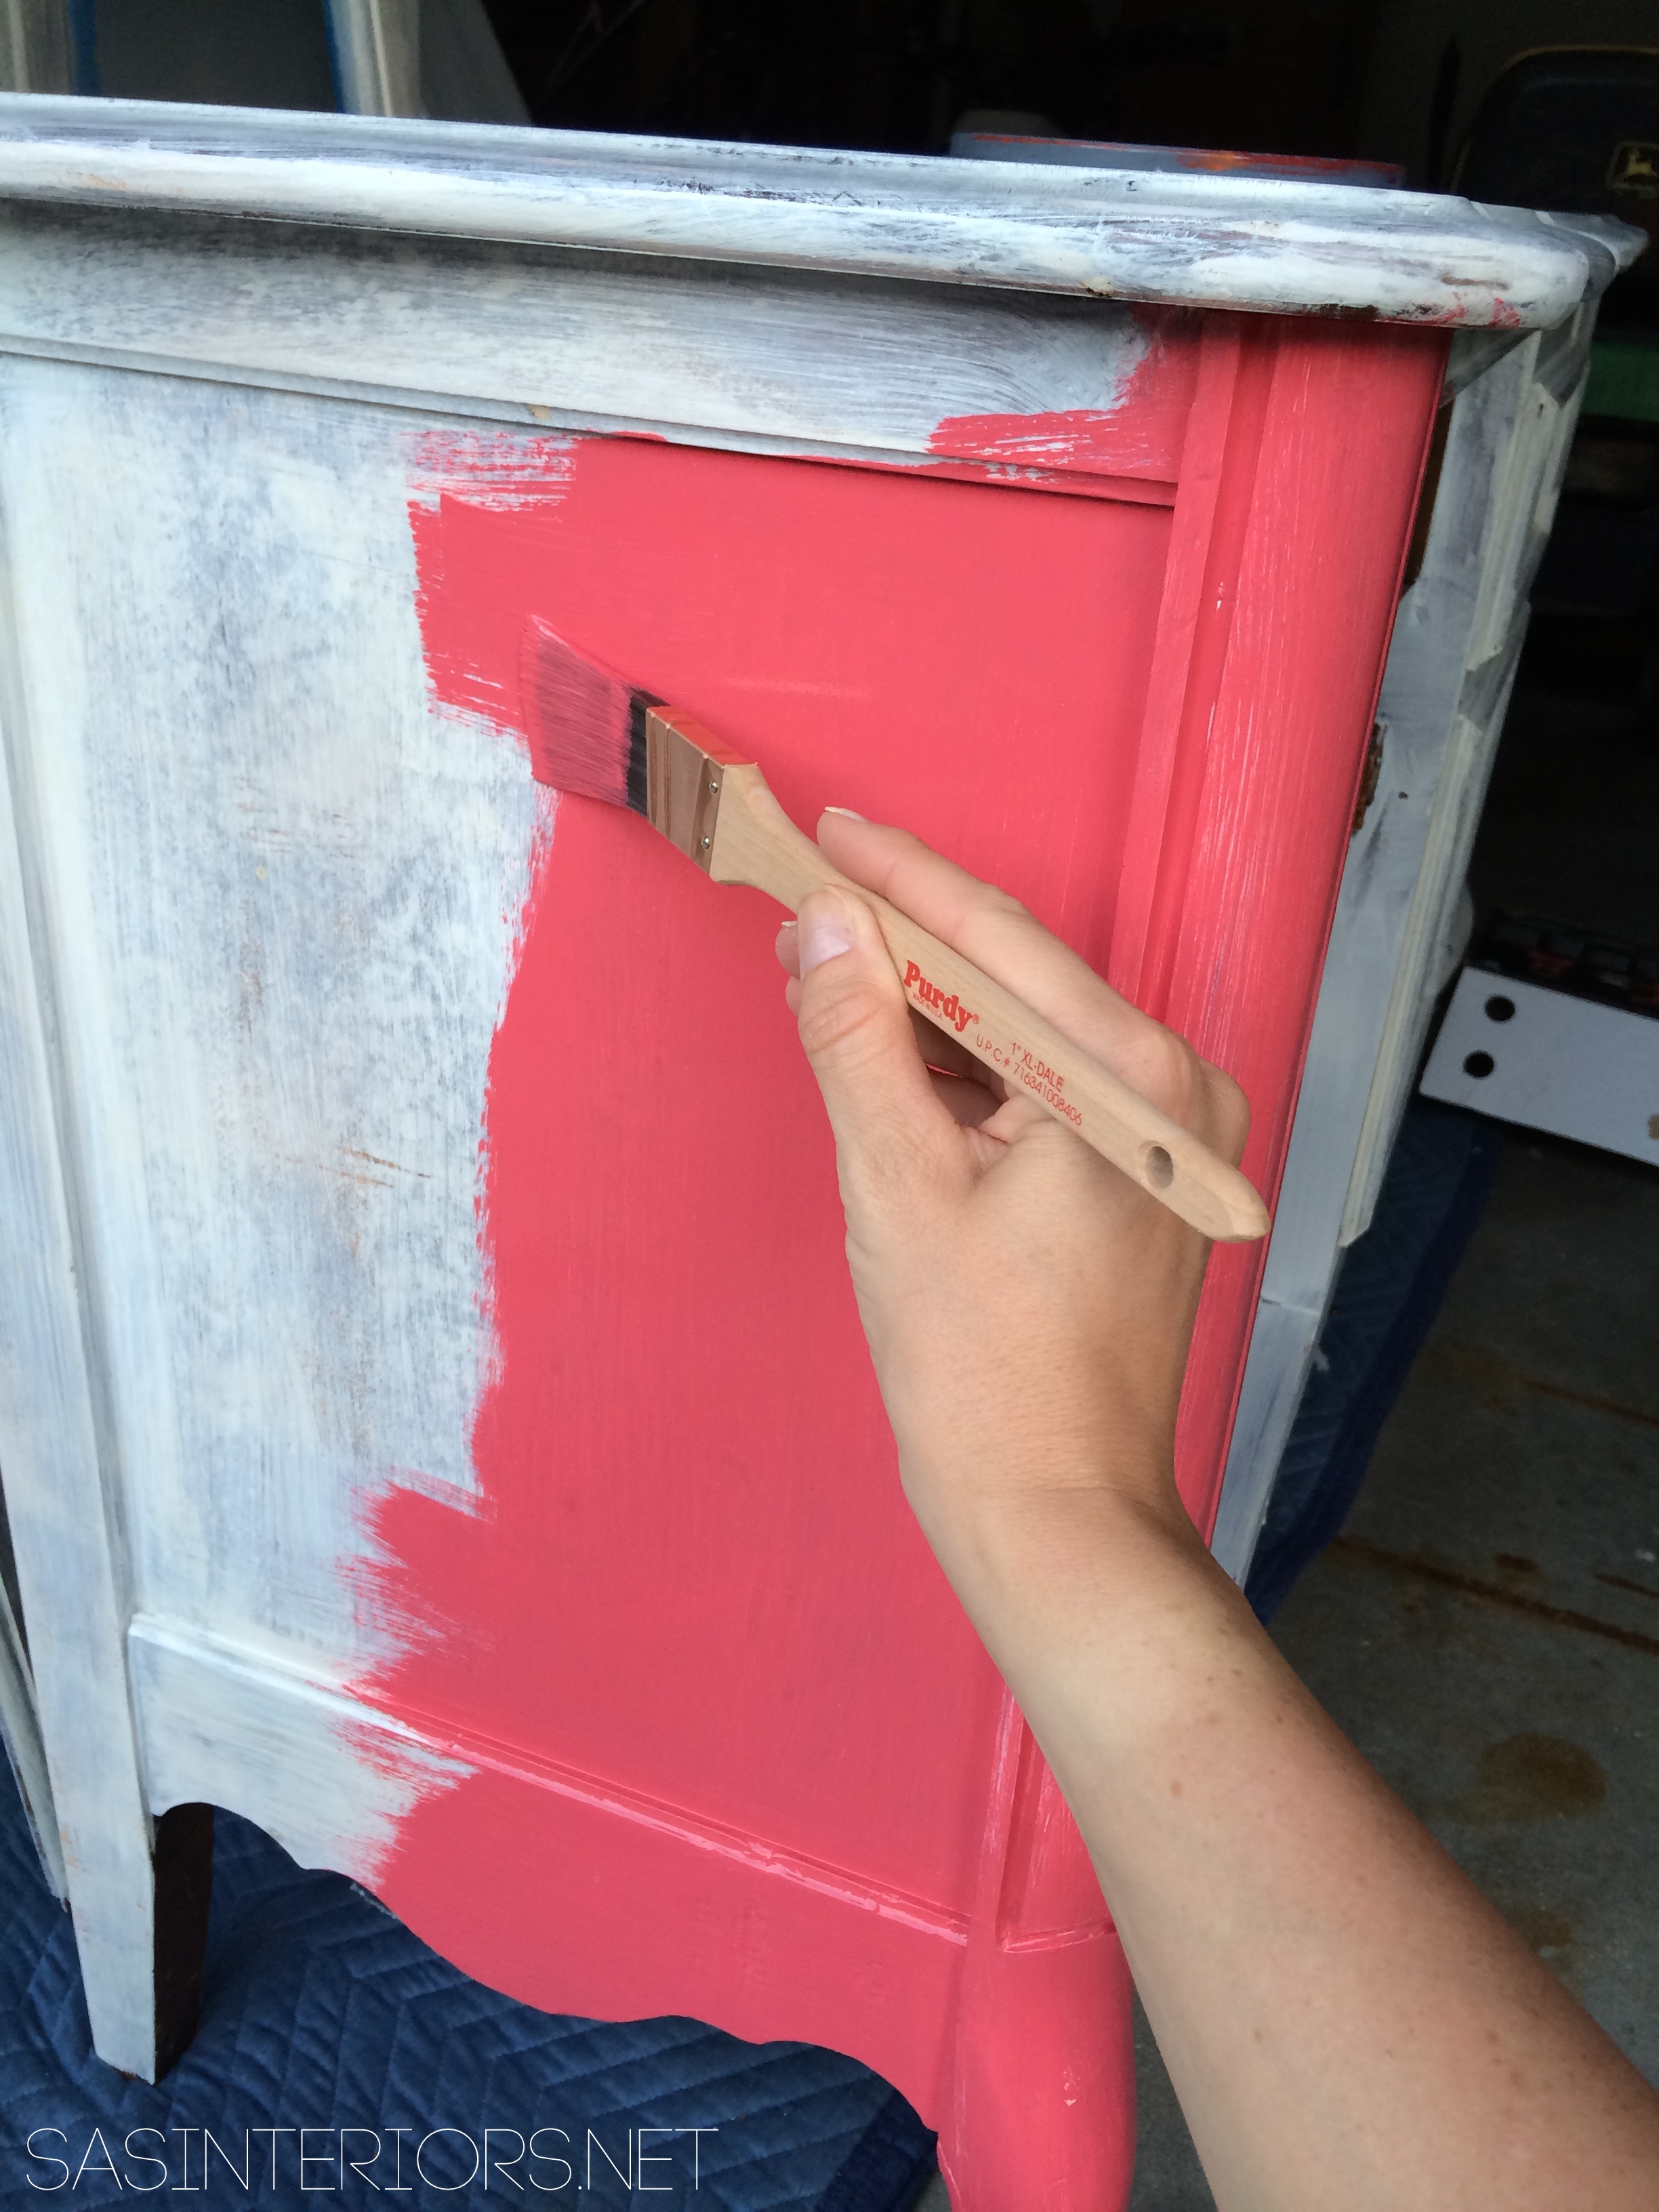
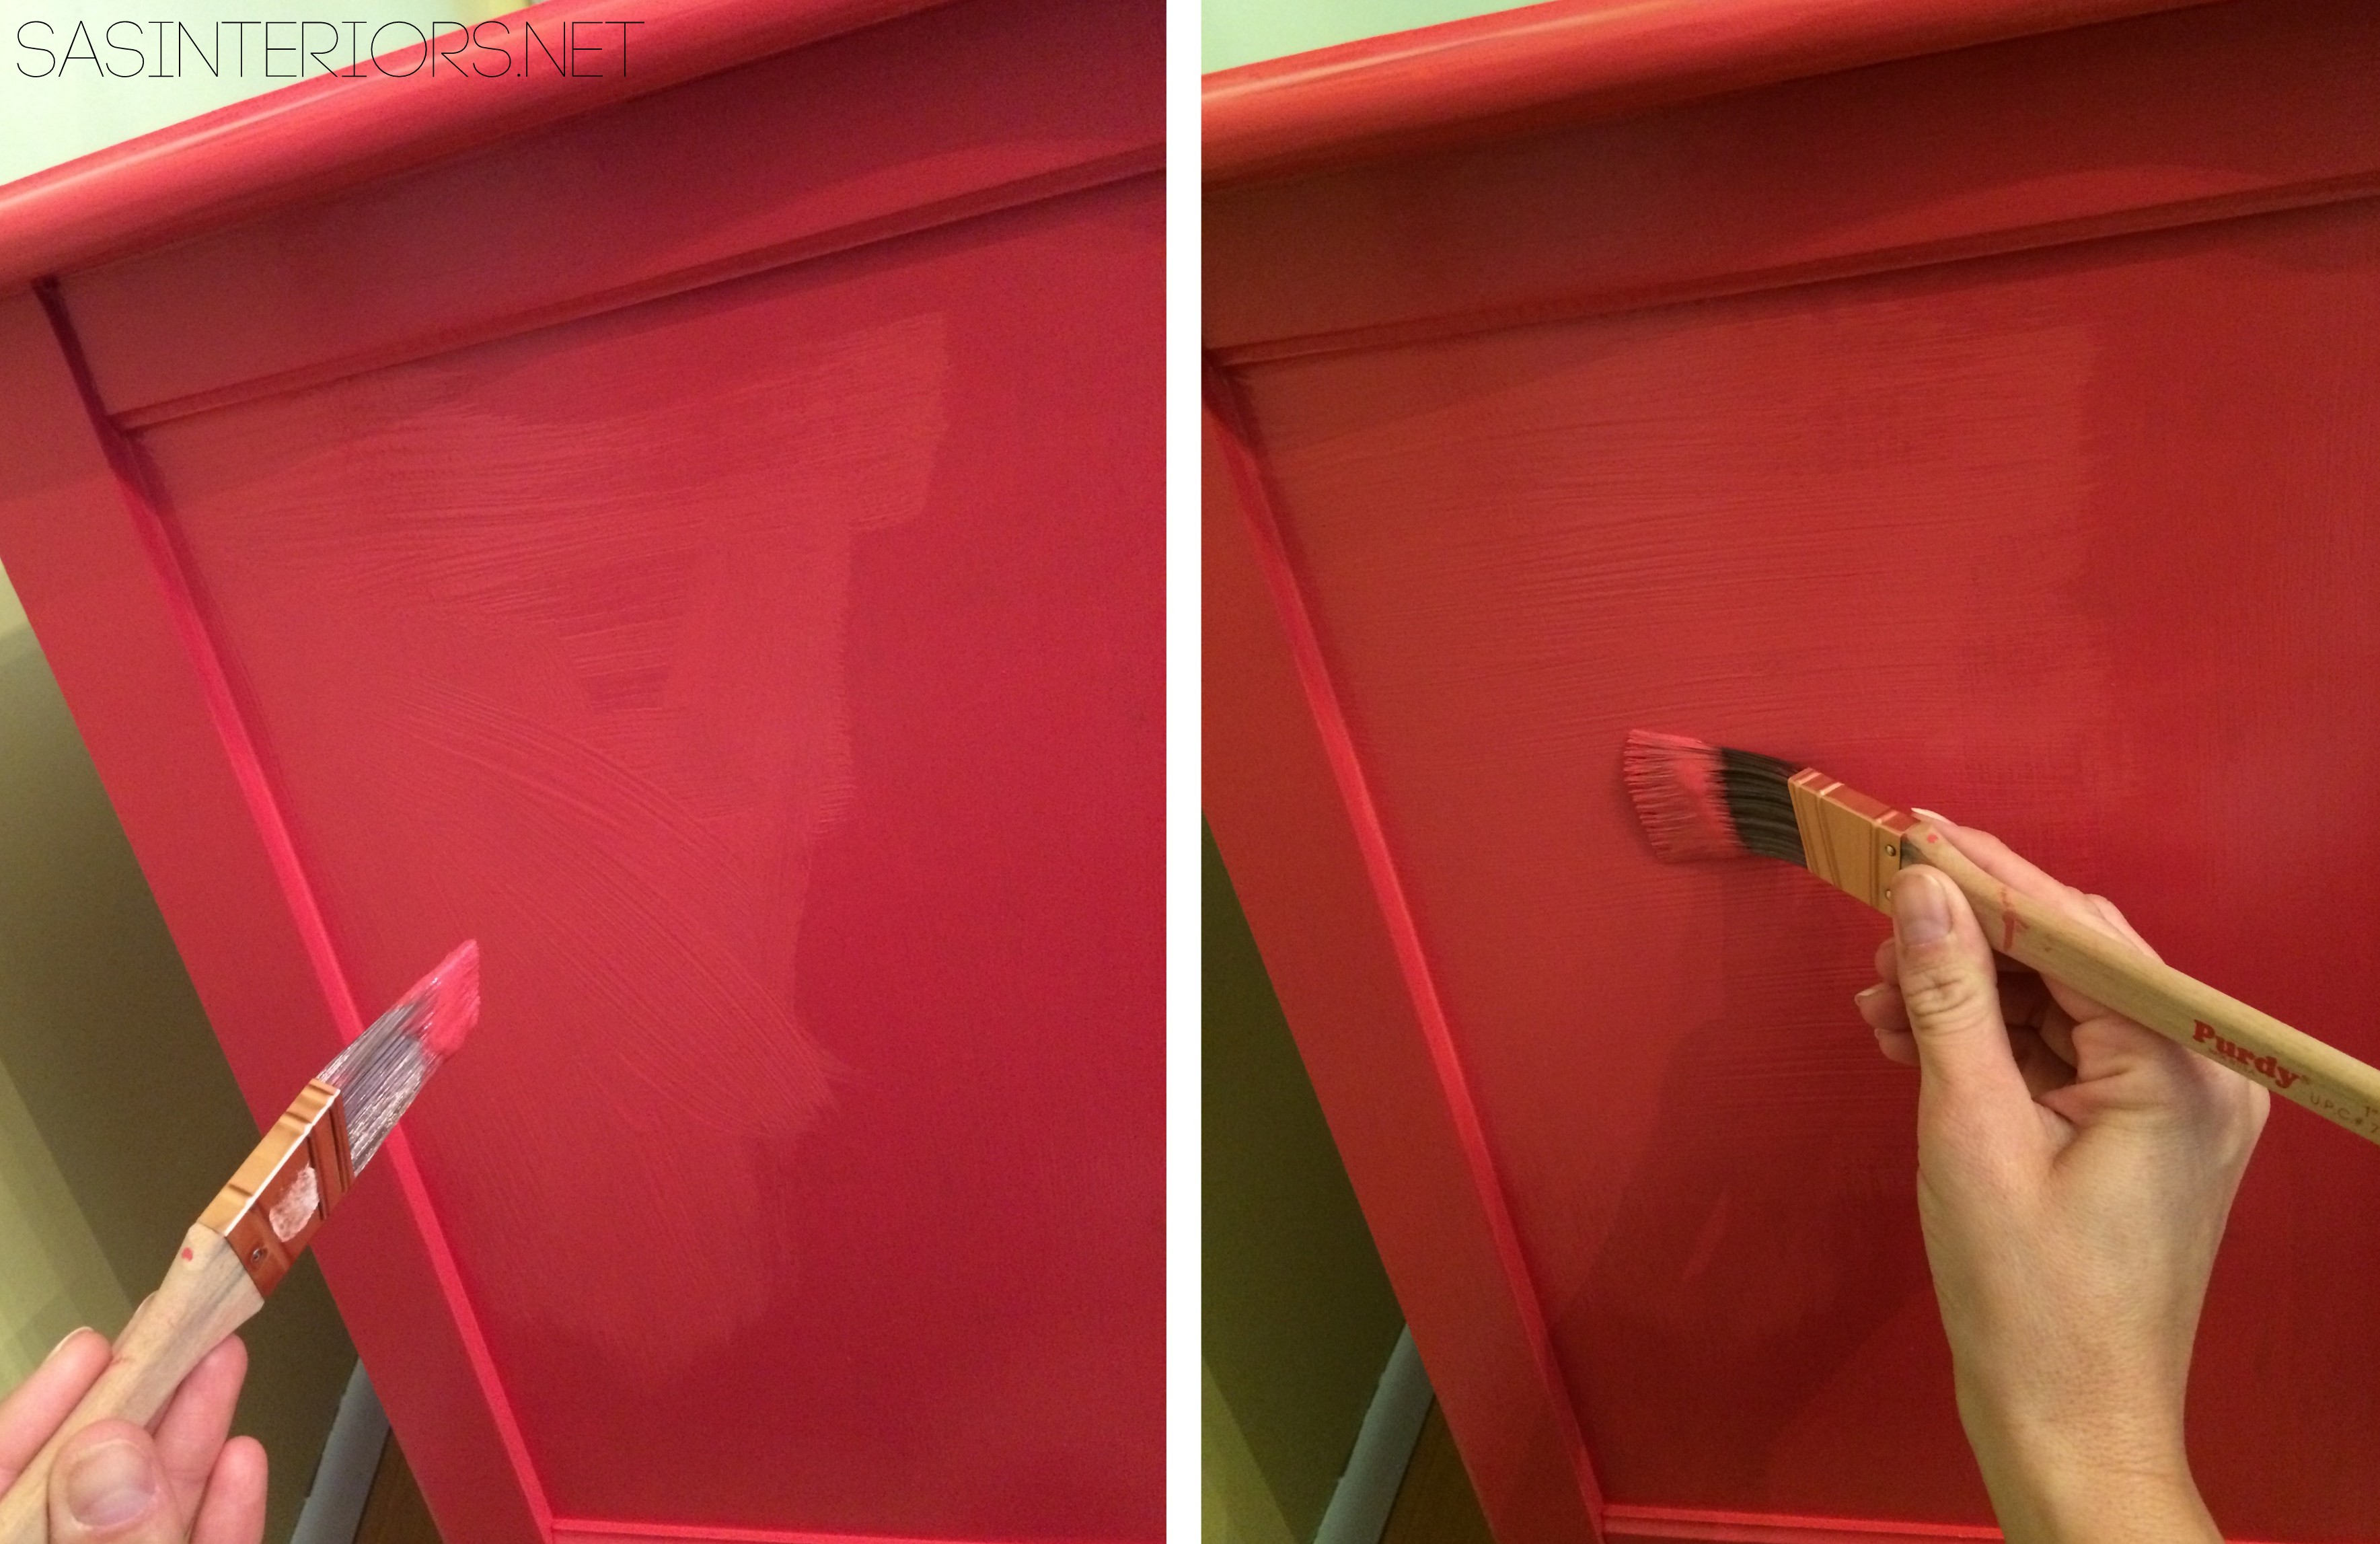
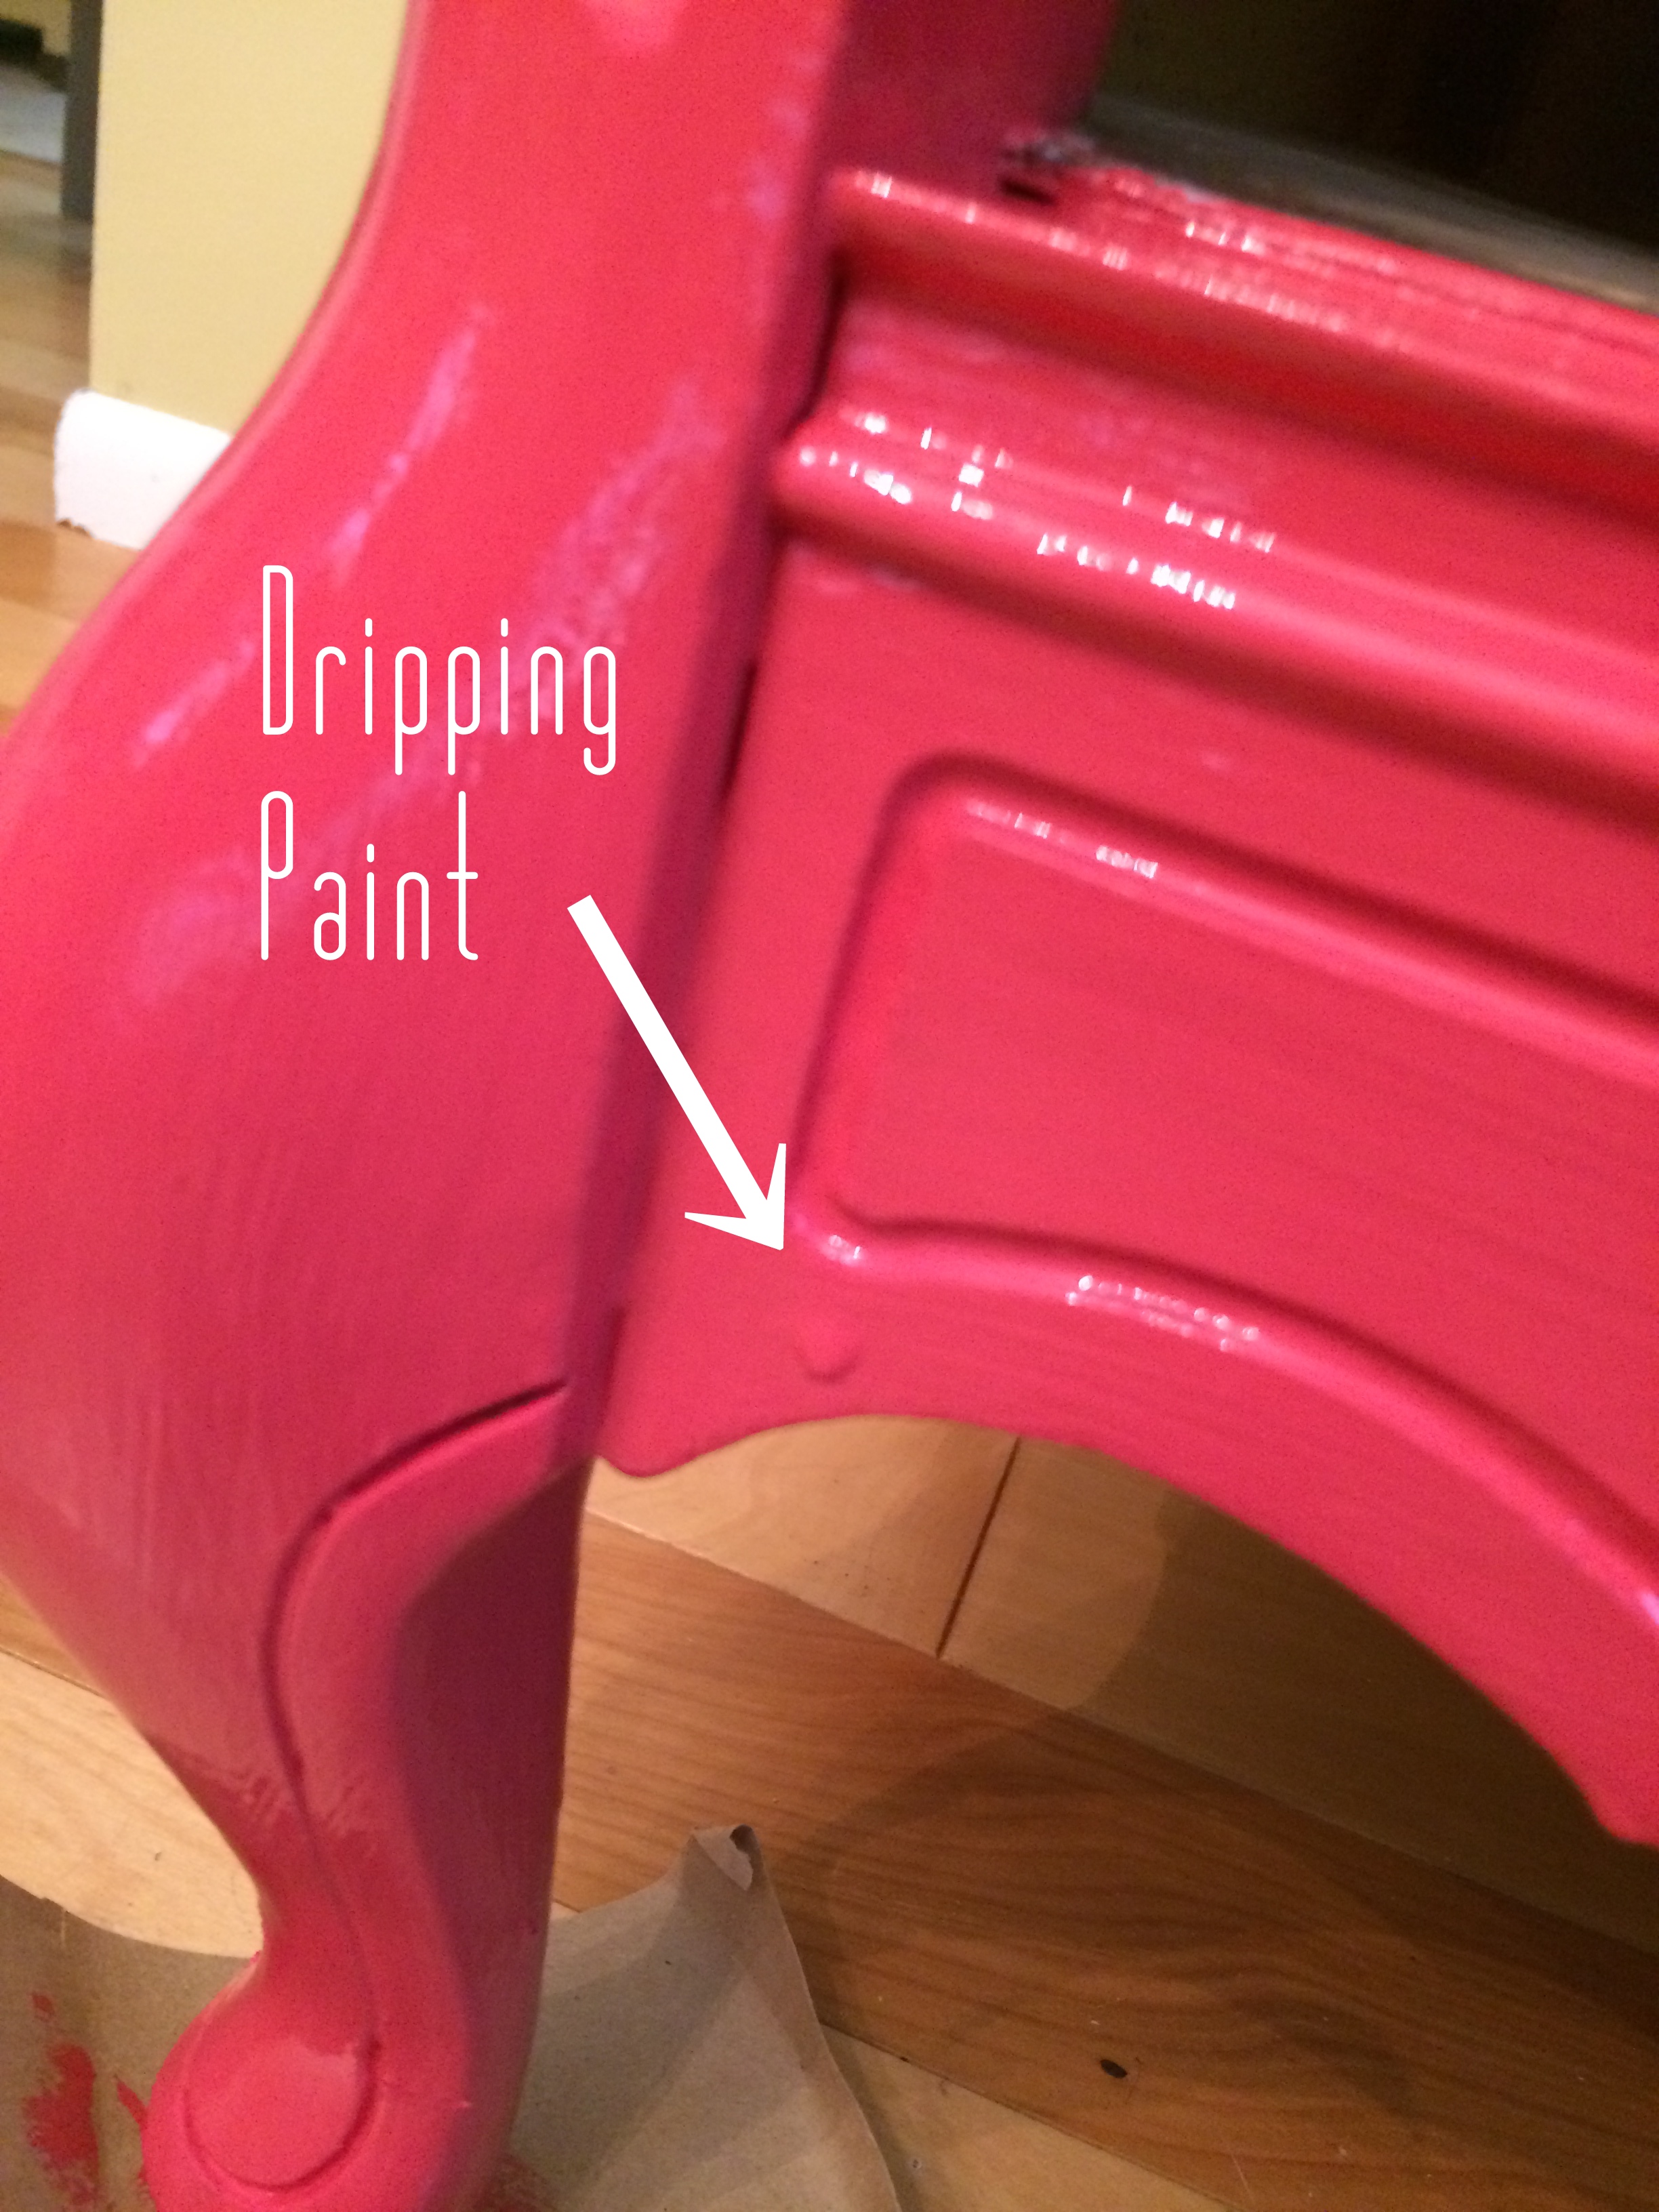
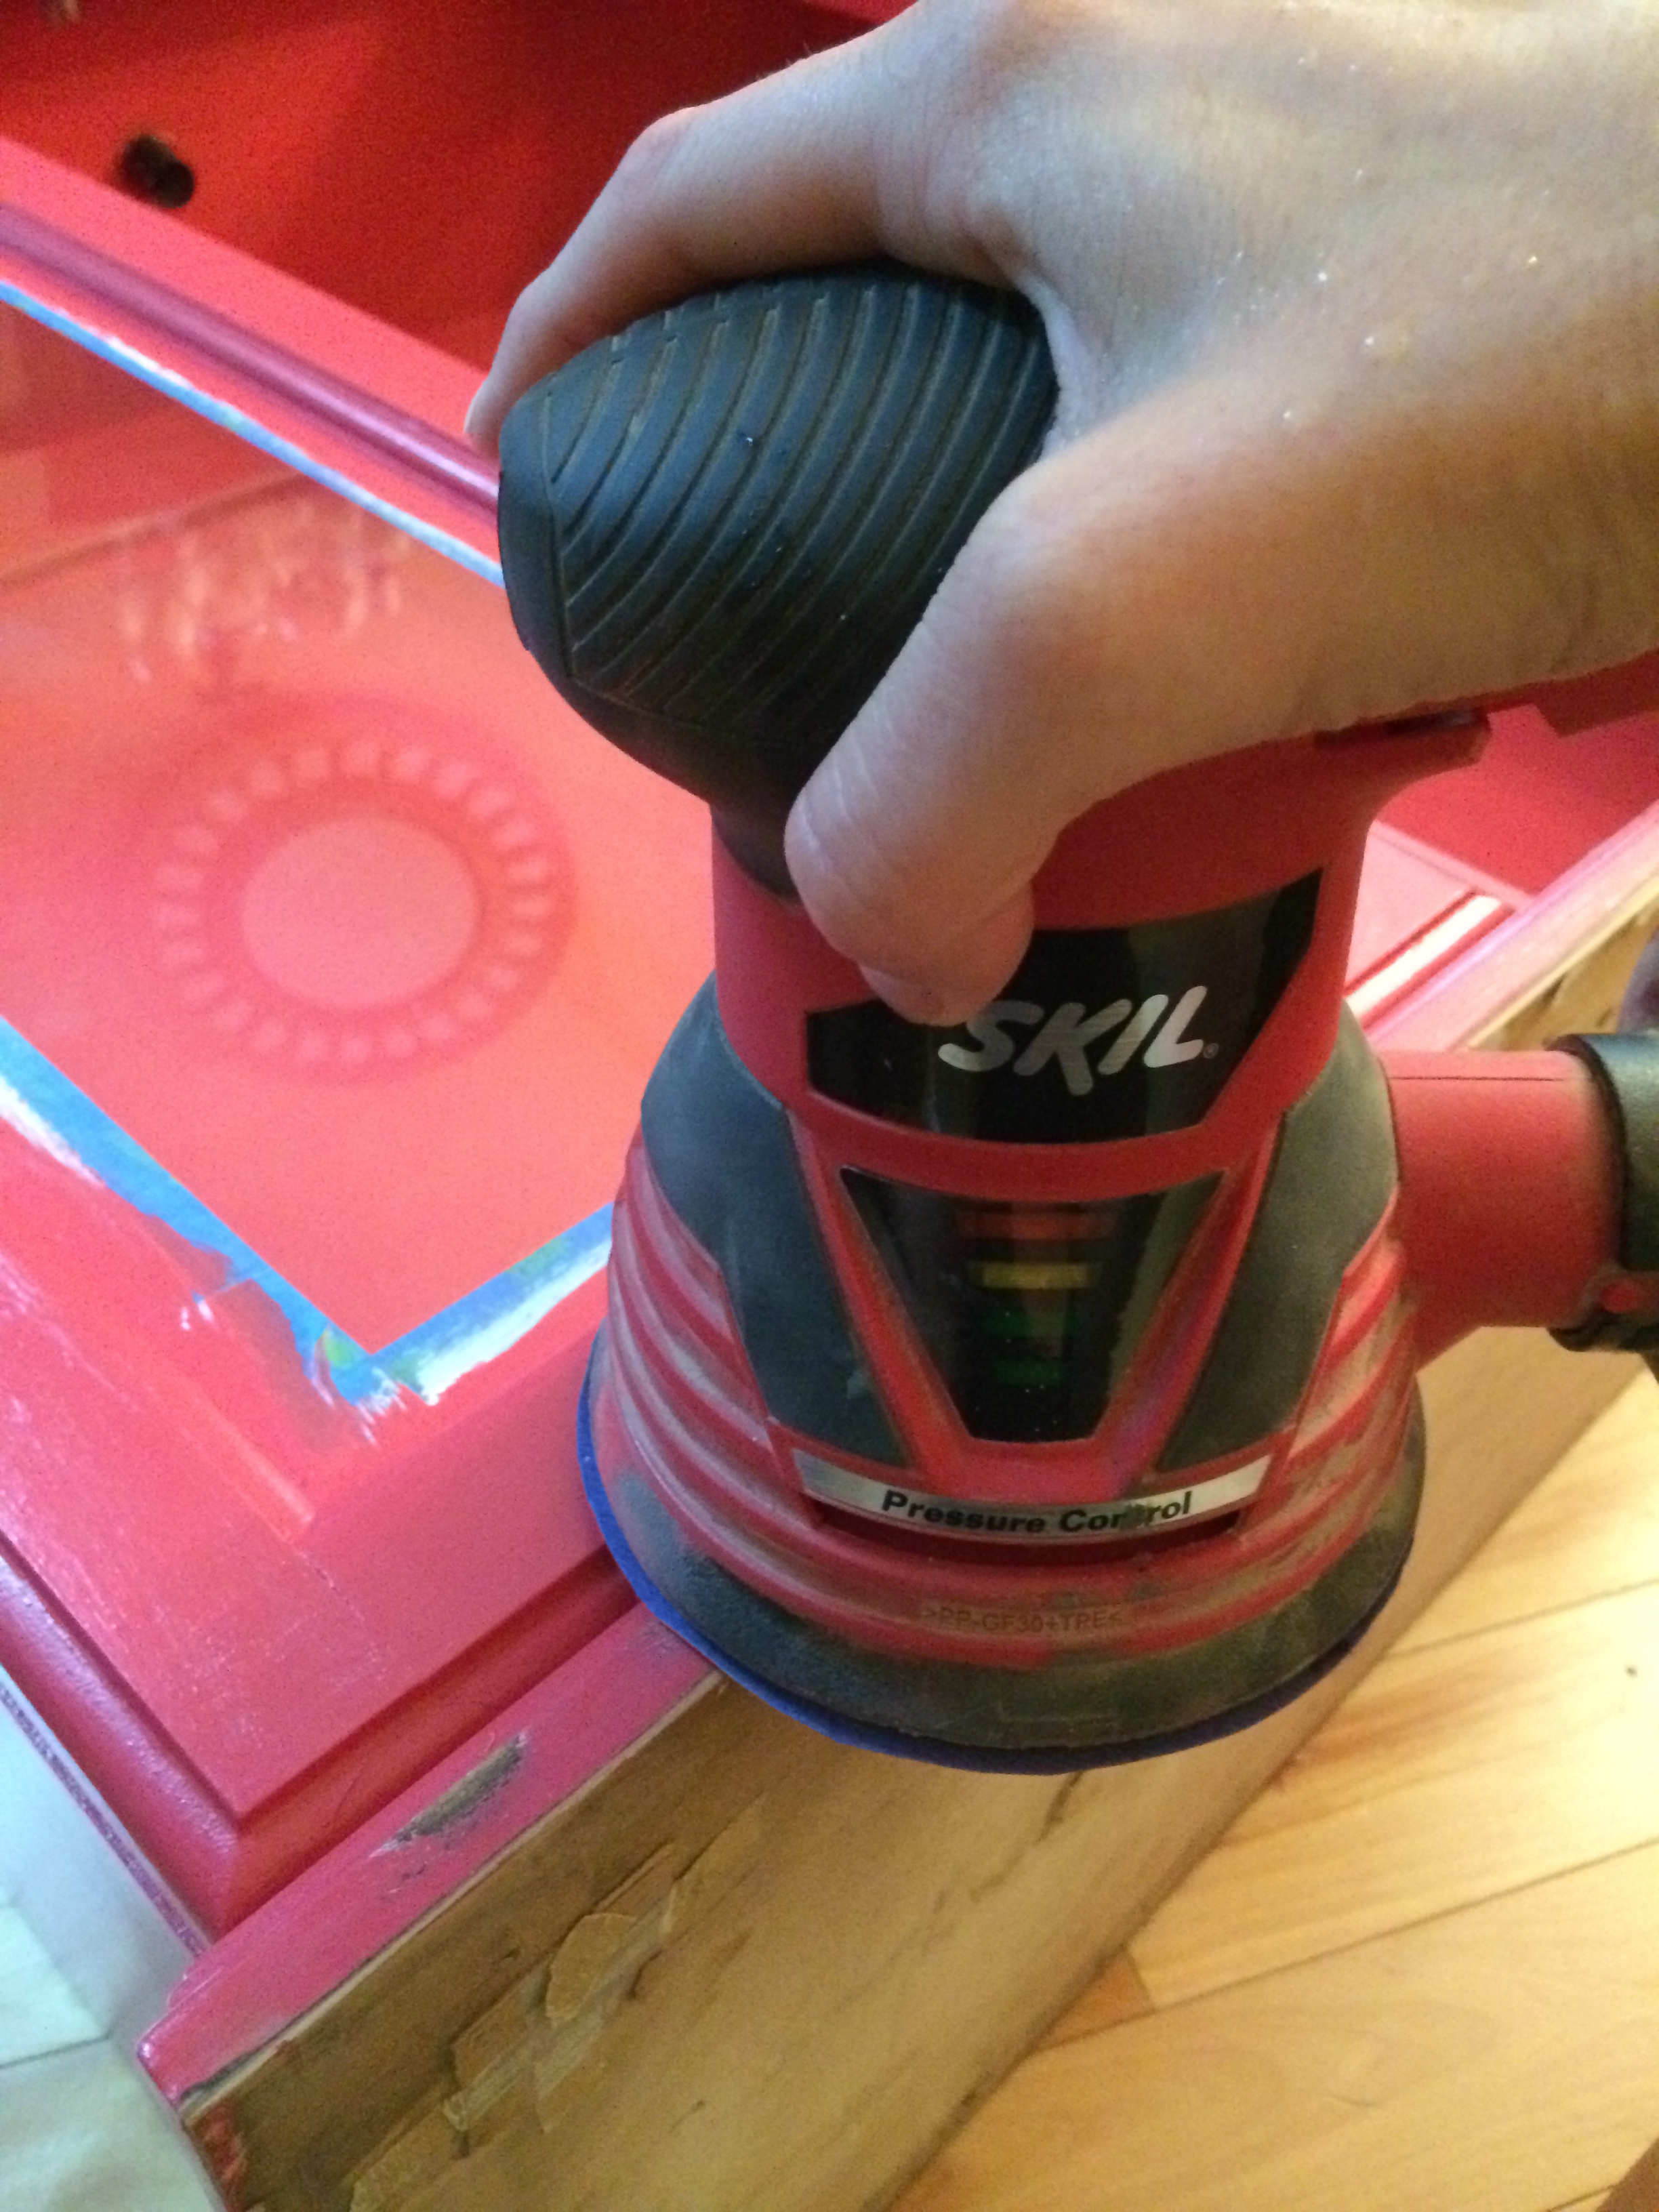
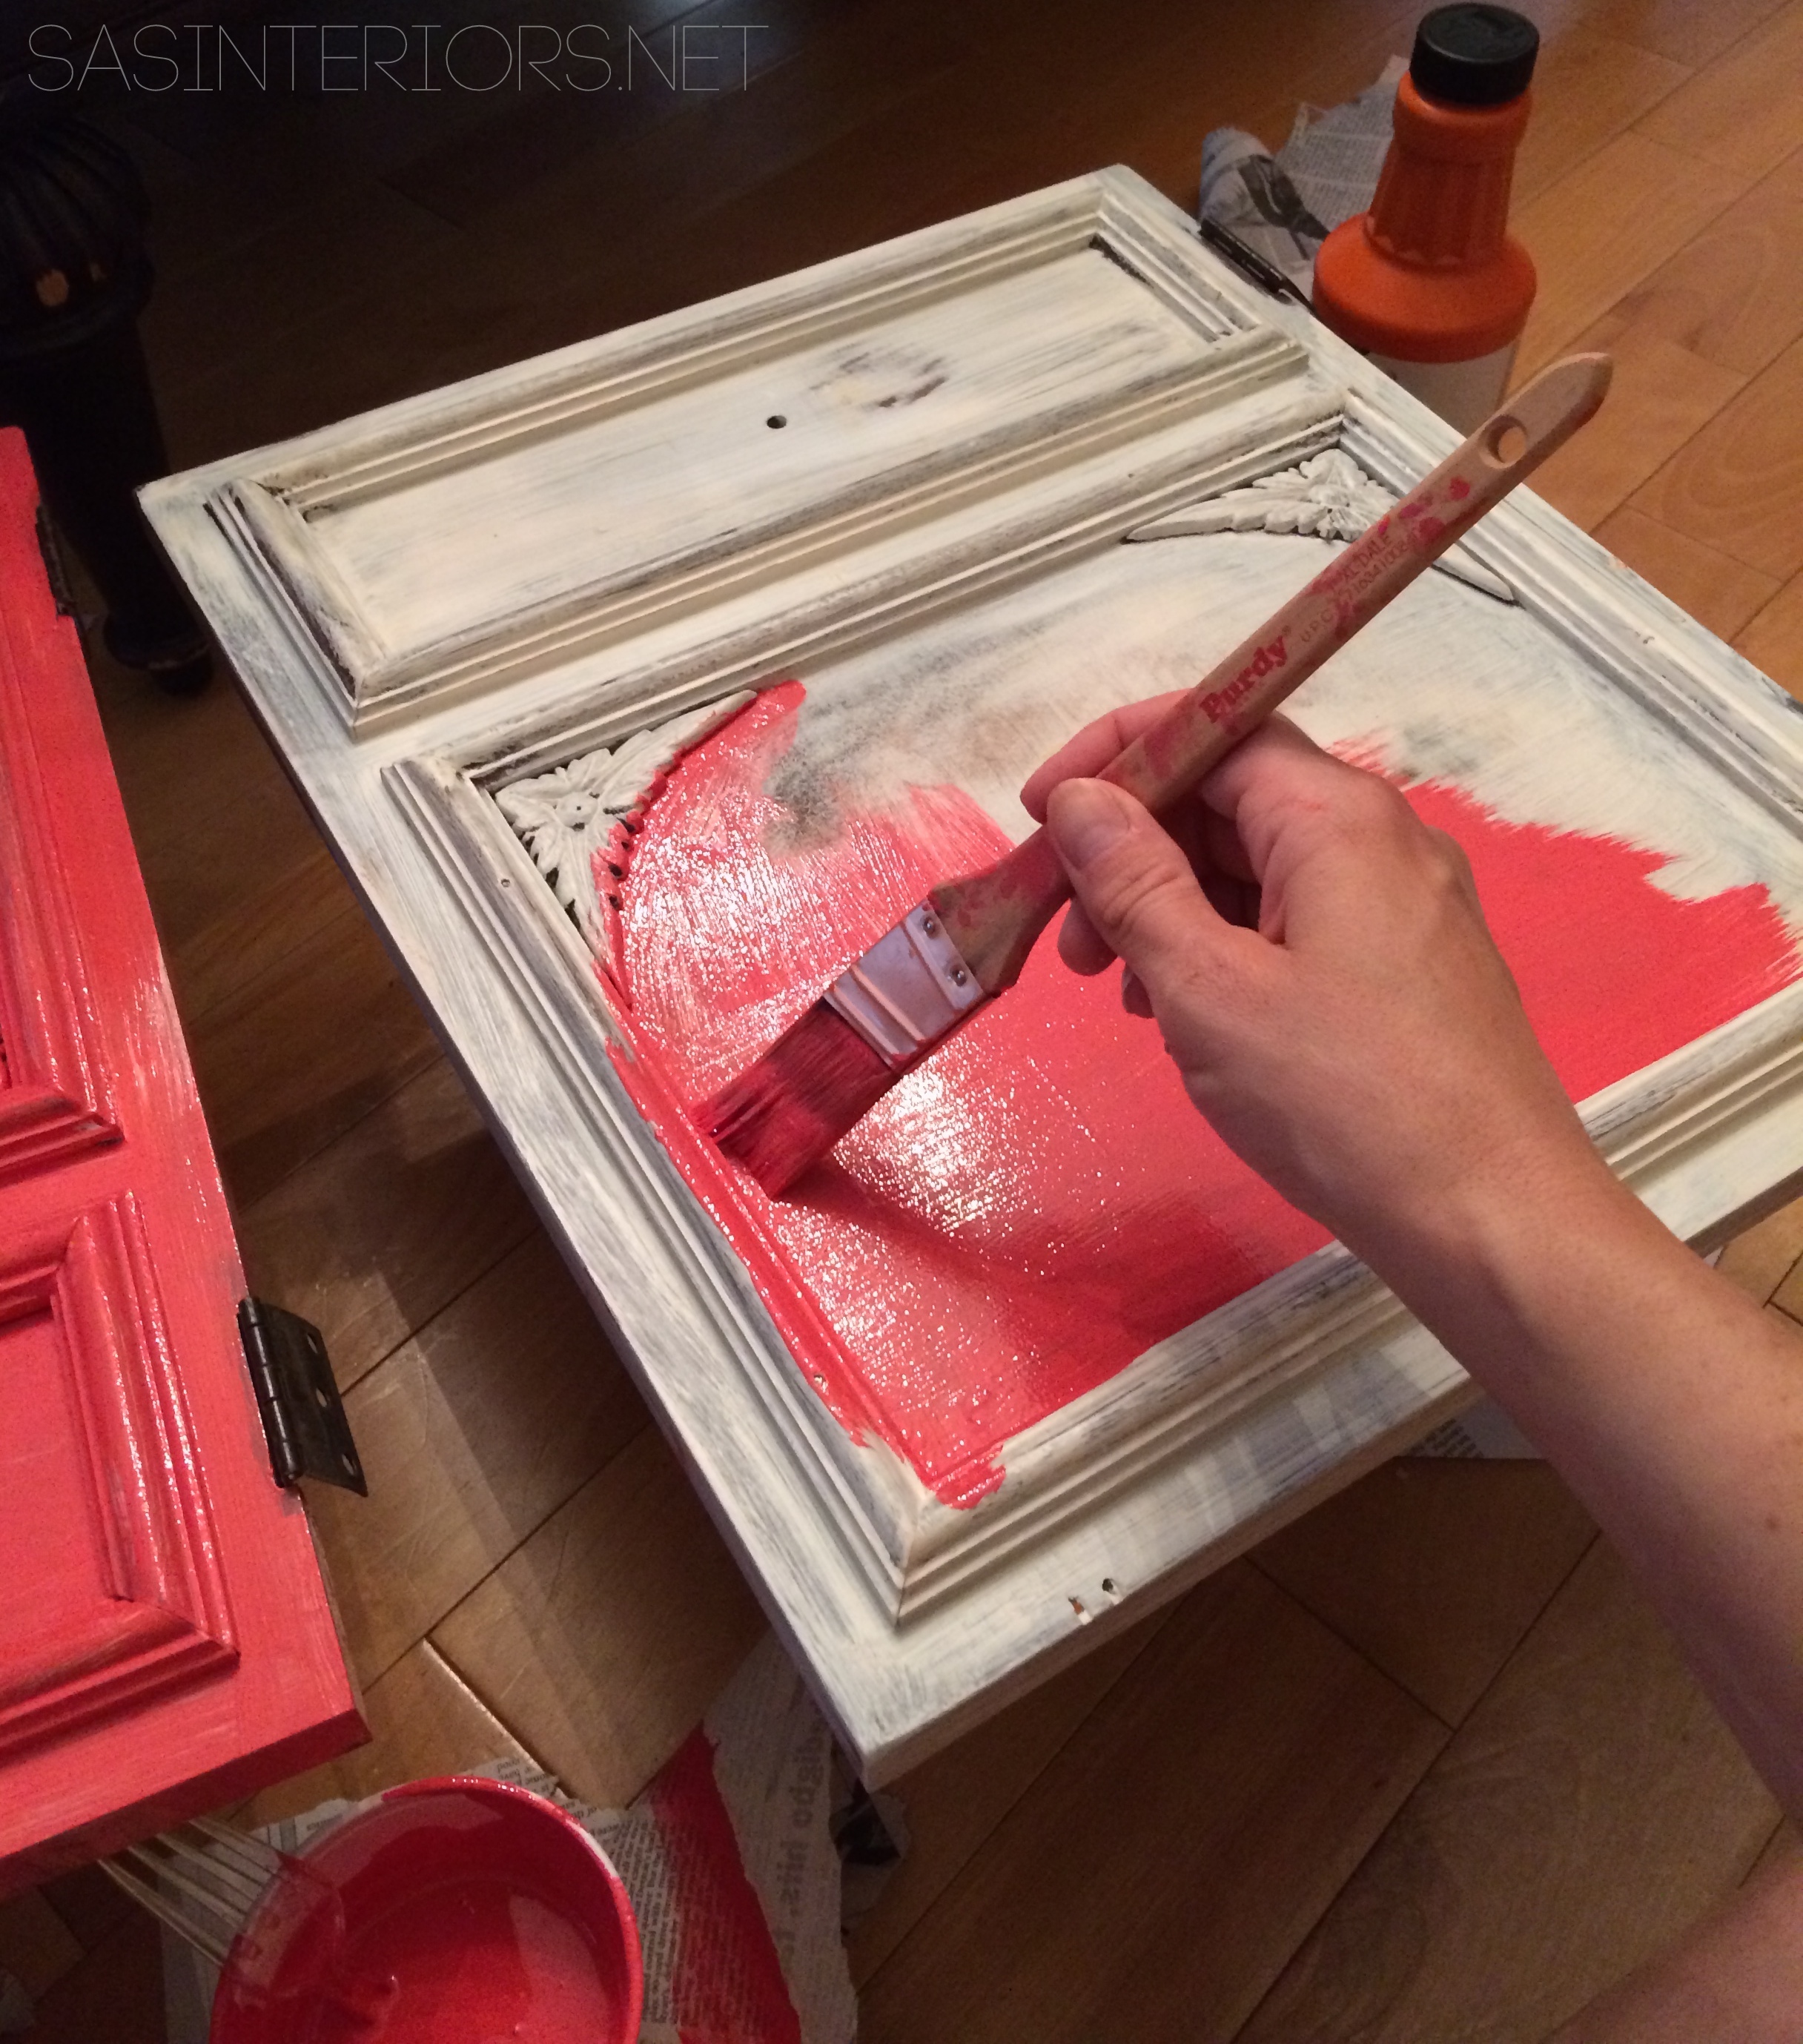
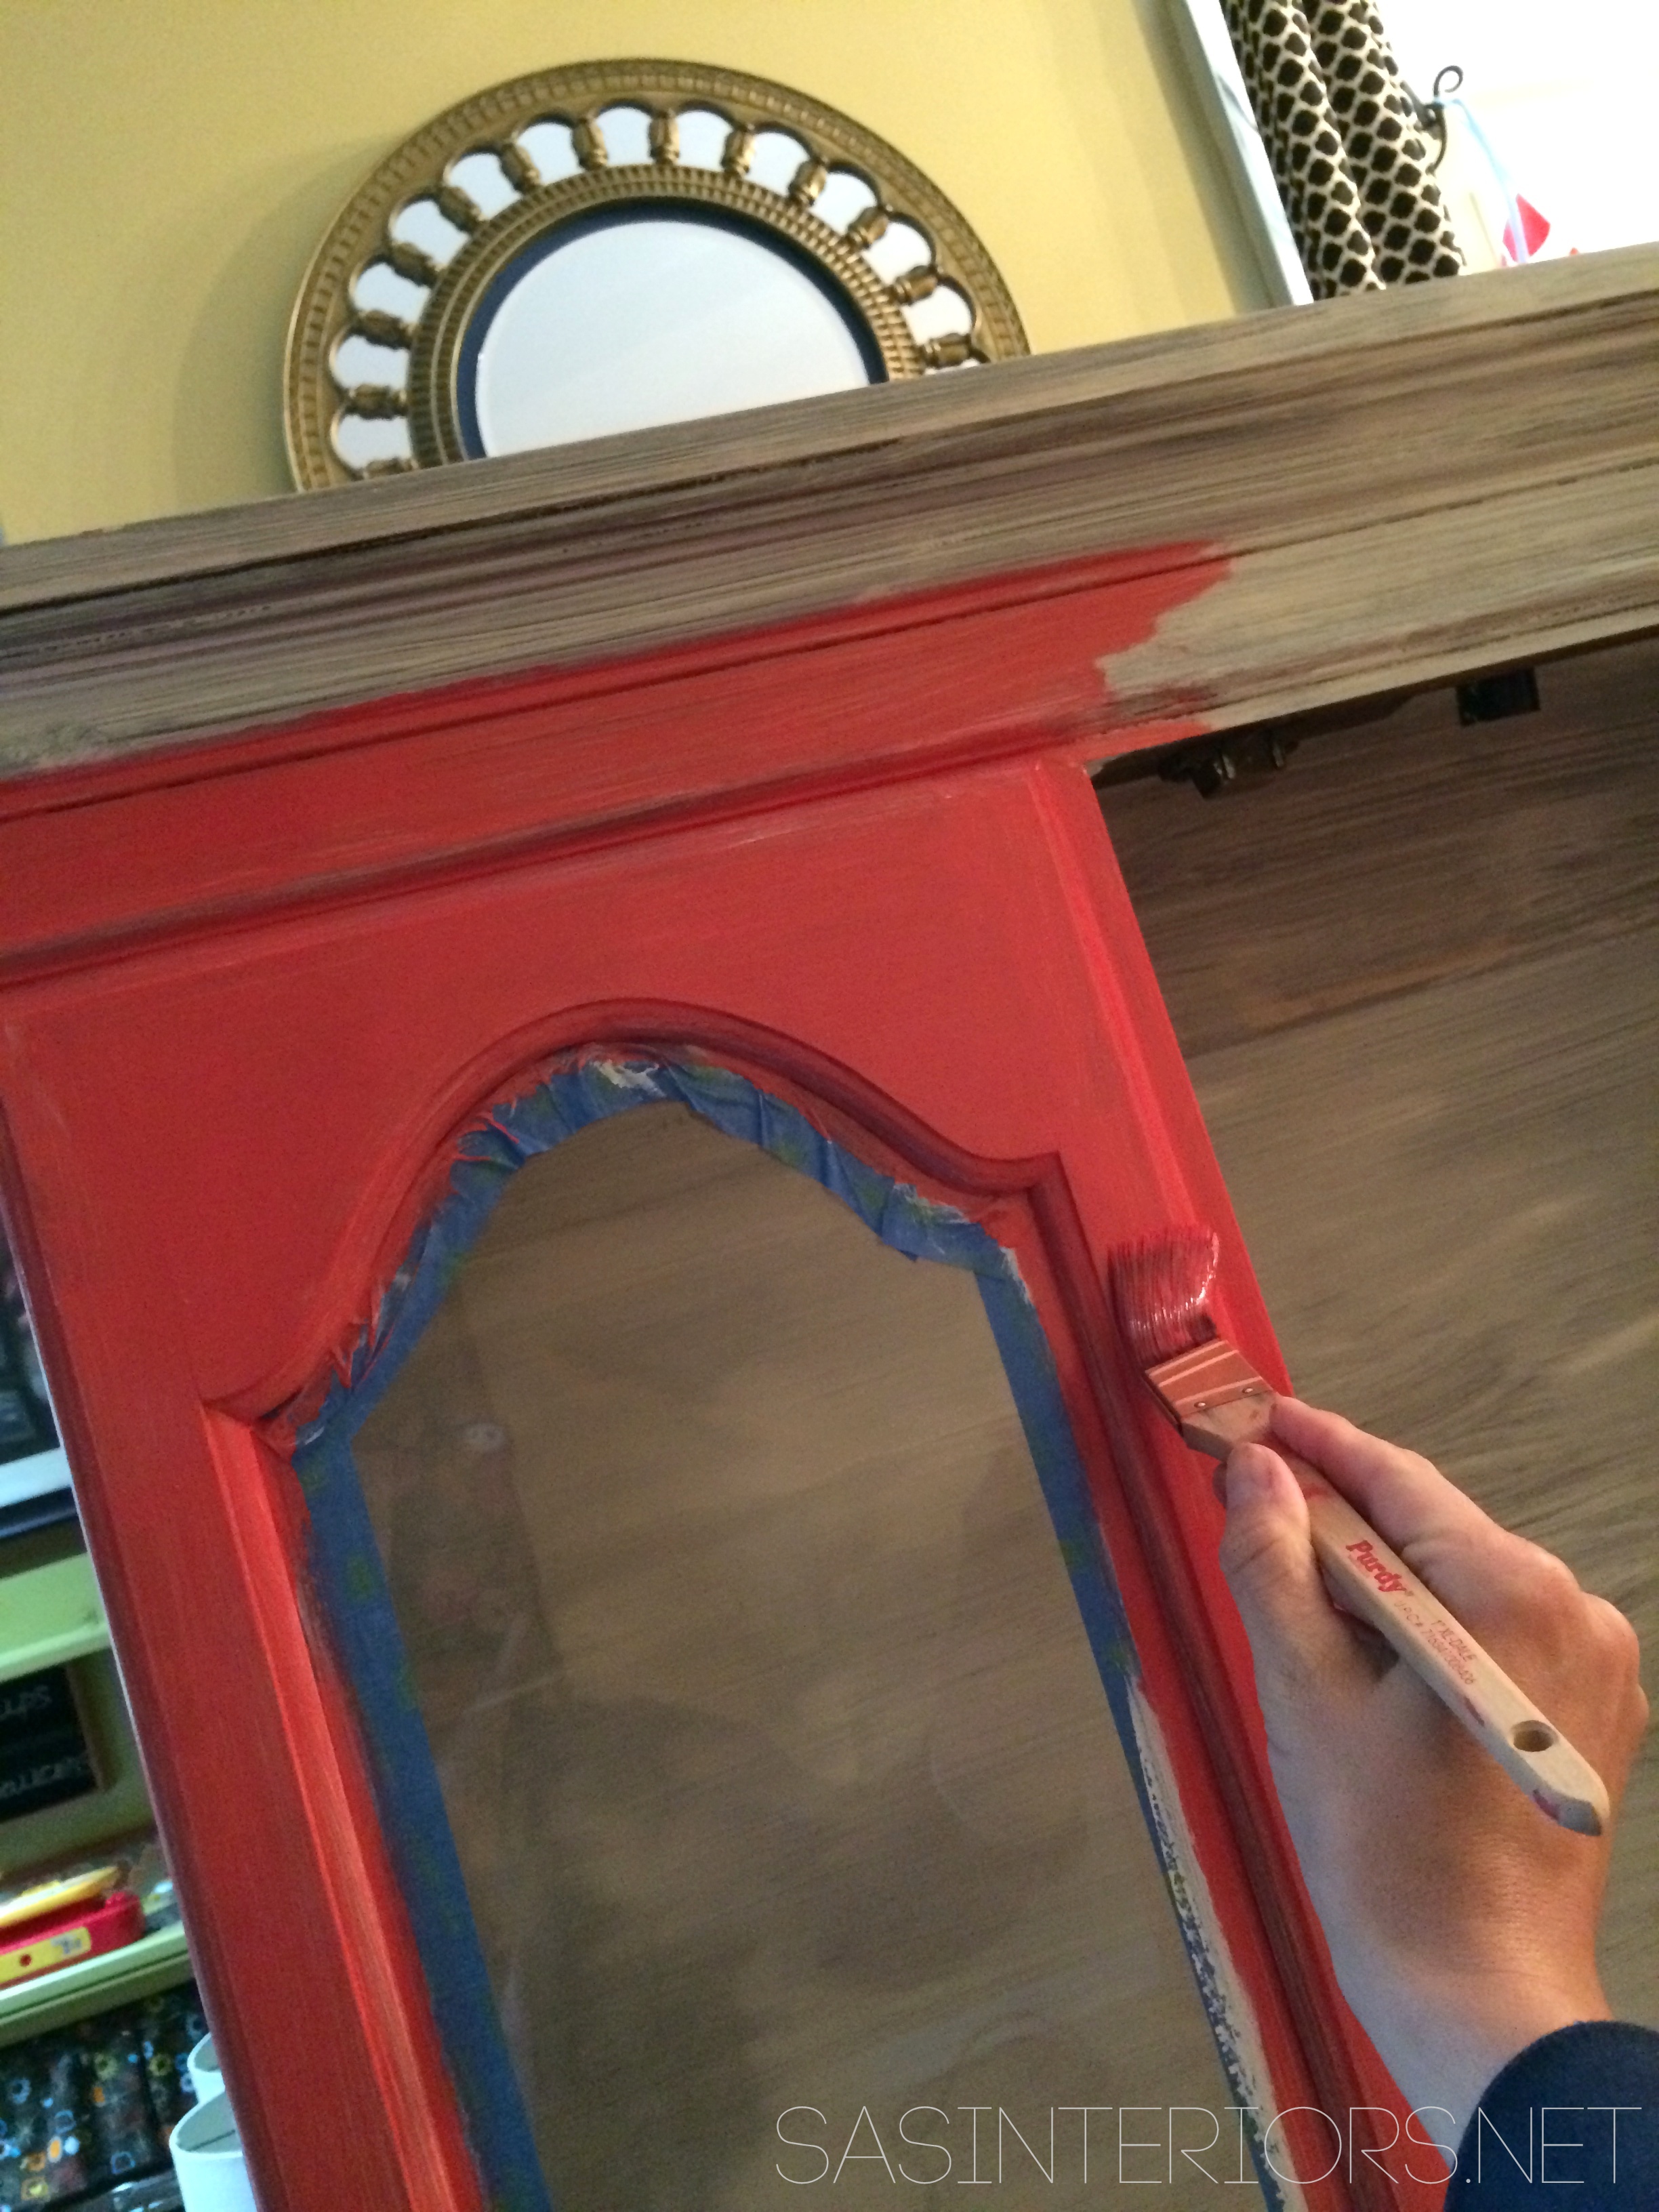
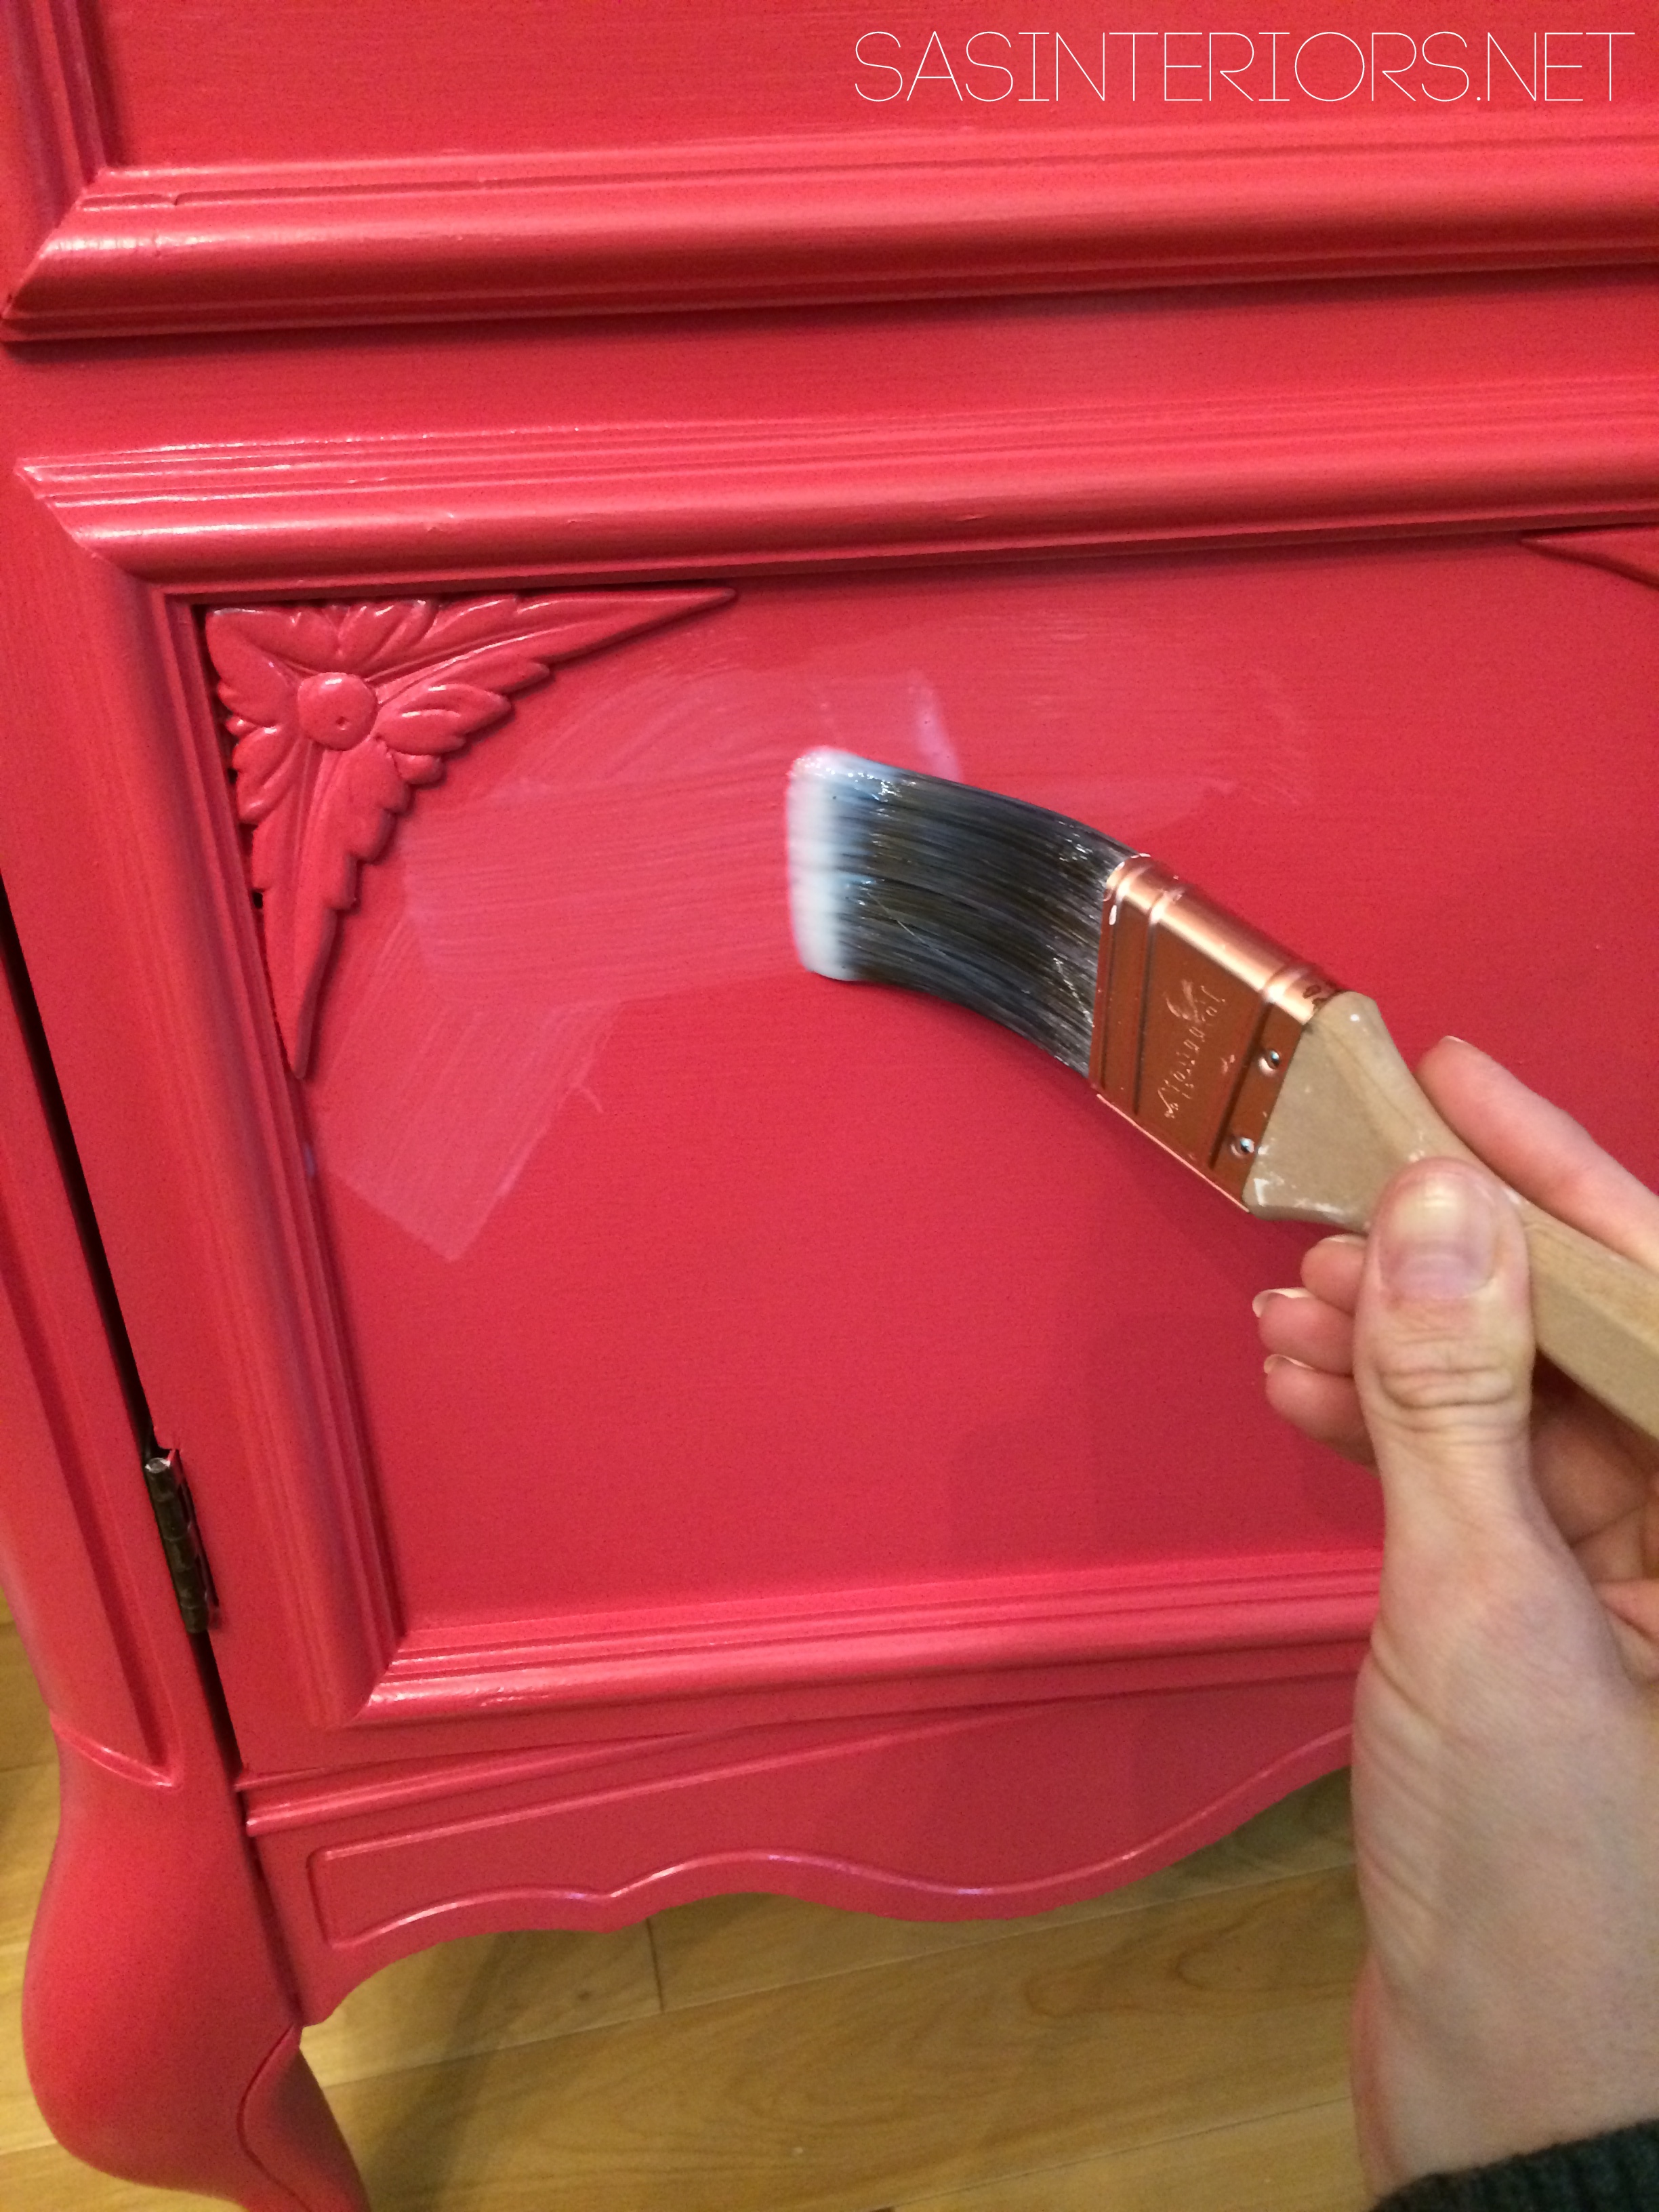
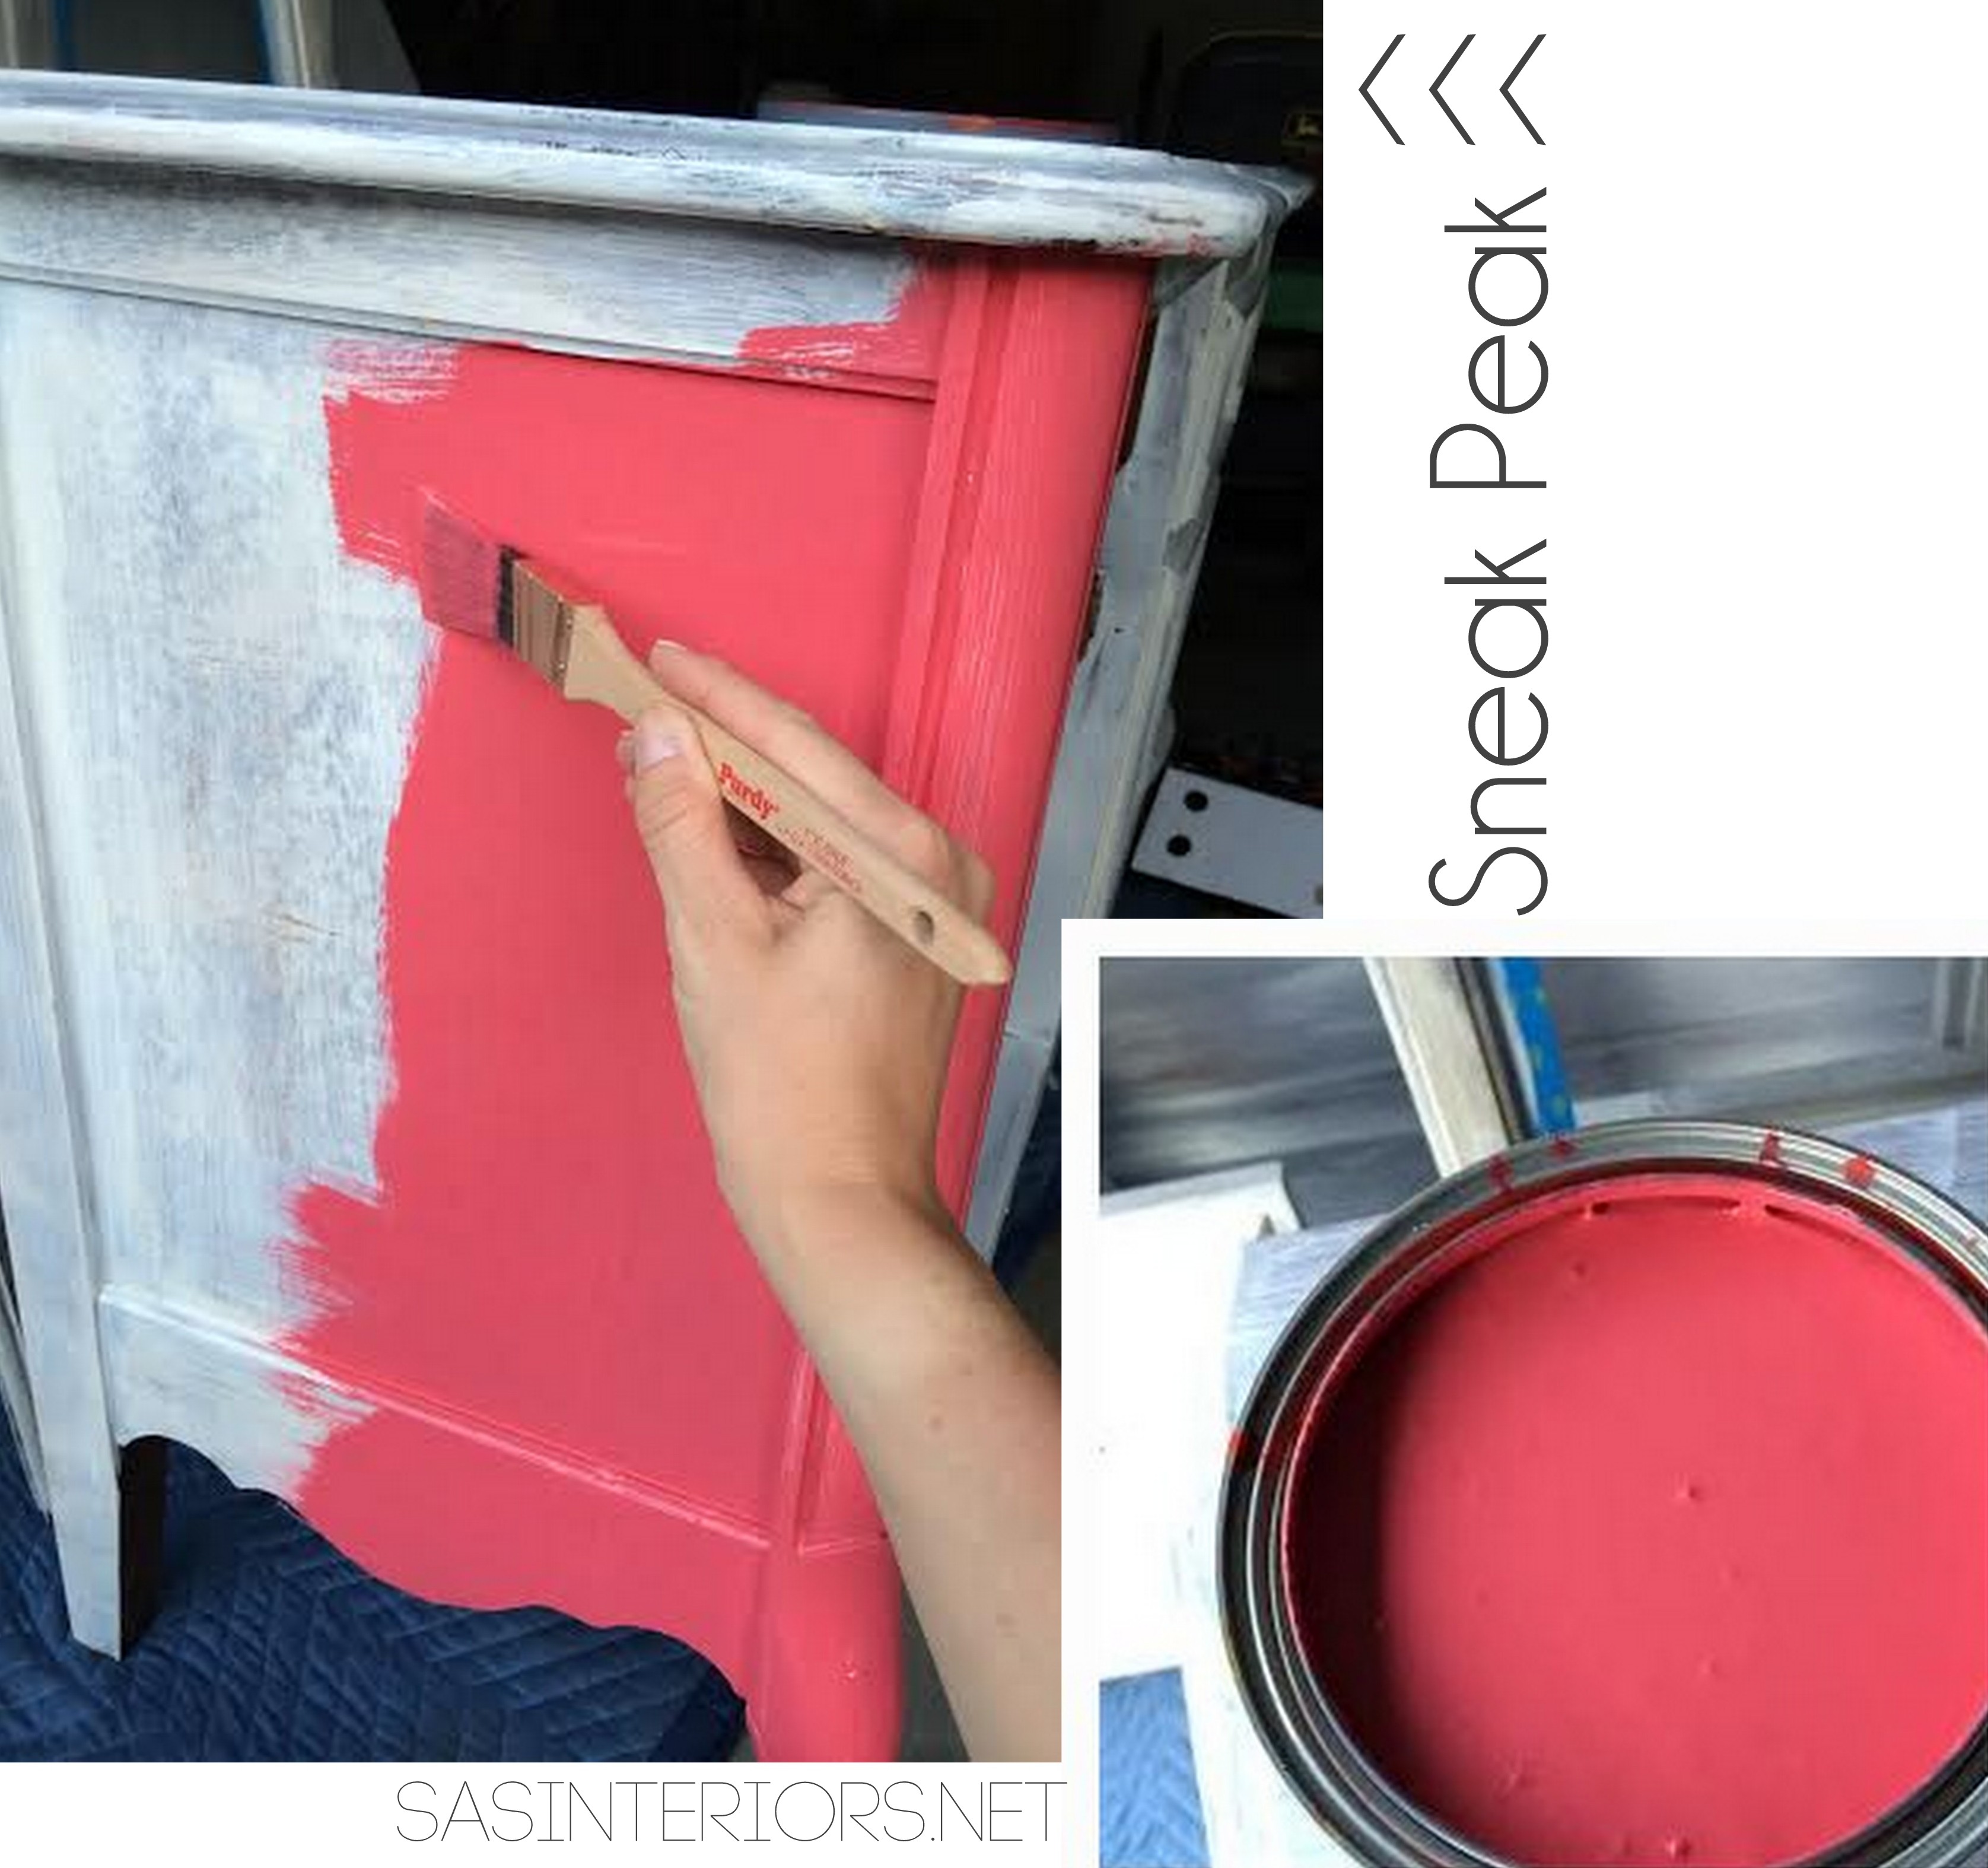
After the key step of priming all the surfaces, it was time to PAINT!  Finally, right?!  I chose the color Red Red Rose by Glidden using the Glidden’s new simplified color palette.China Cabinet before & after >>> The process of giving this piece of a furniture a complete makeover!This is a real wow-factor color and even before finding the china cabinet, I knew this rosy, raspberry hue would be perfection.  Typically I have the piece before choosing the color, but not in this case.  The other hues + layers in the dining space are fairly minimal and neutral, so I knew a focal point piece that would be the eye-catcher of the room would make a real impact.  It’s all about the contrast and the balance between neutrals and bolds.

The process of painting this beauty was laborious, but O So Worth the time + effort!

China Cabinet before & after >>> The process of giving this piece of a furniture a complete makeover!

China Cabinet before & after >>> The process of giving this piece of a furniture a complete makeover!

>>> read more on How-To Paint Wood Furniture <<<

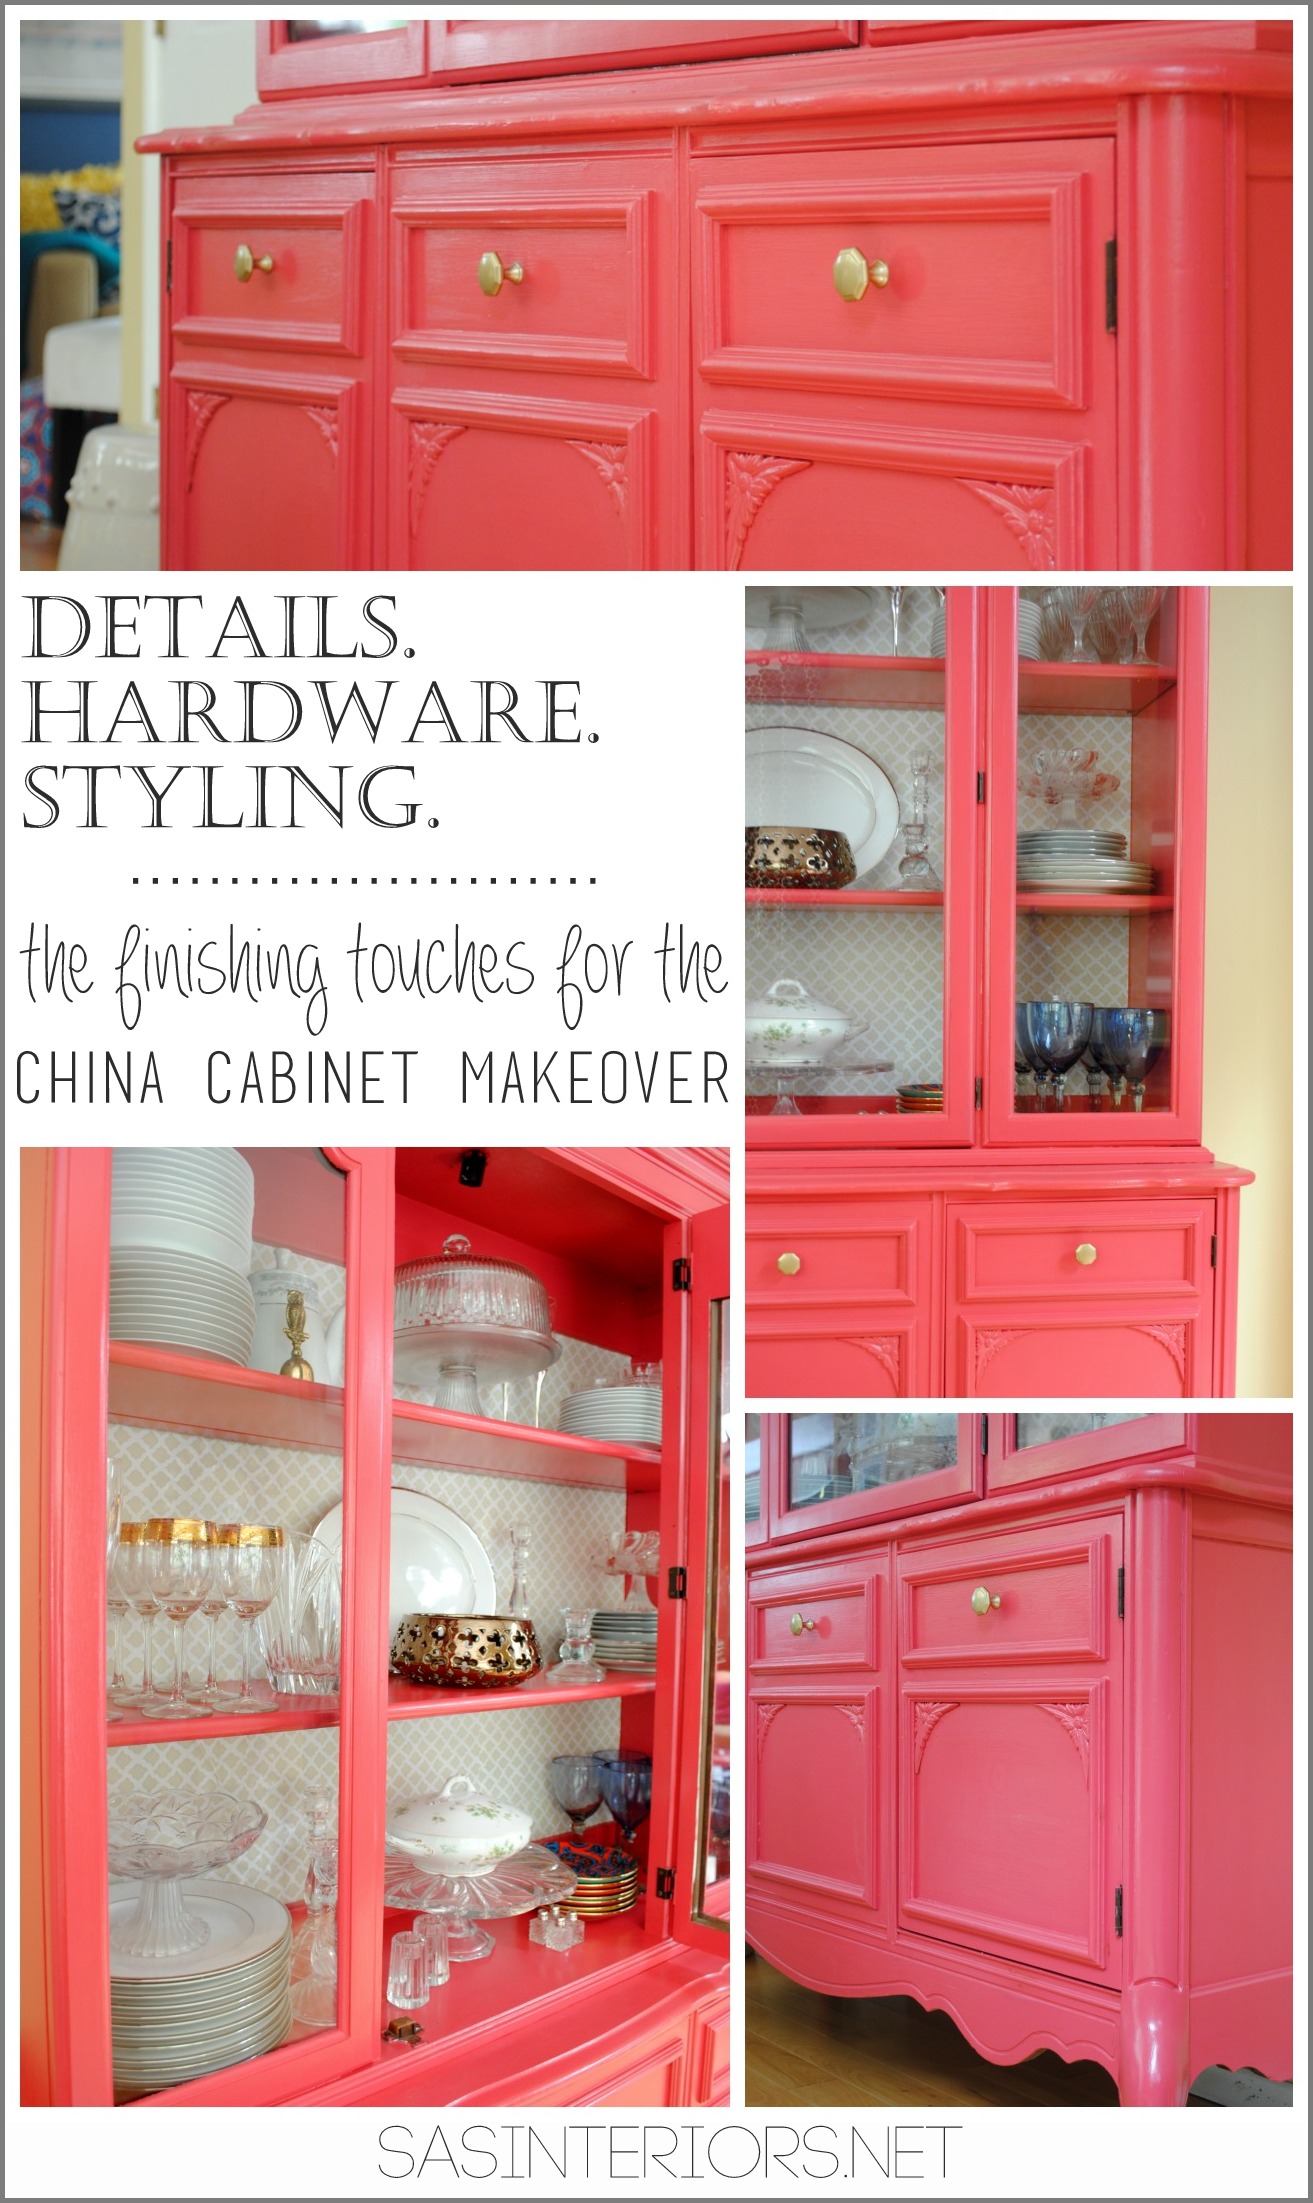
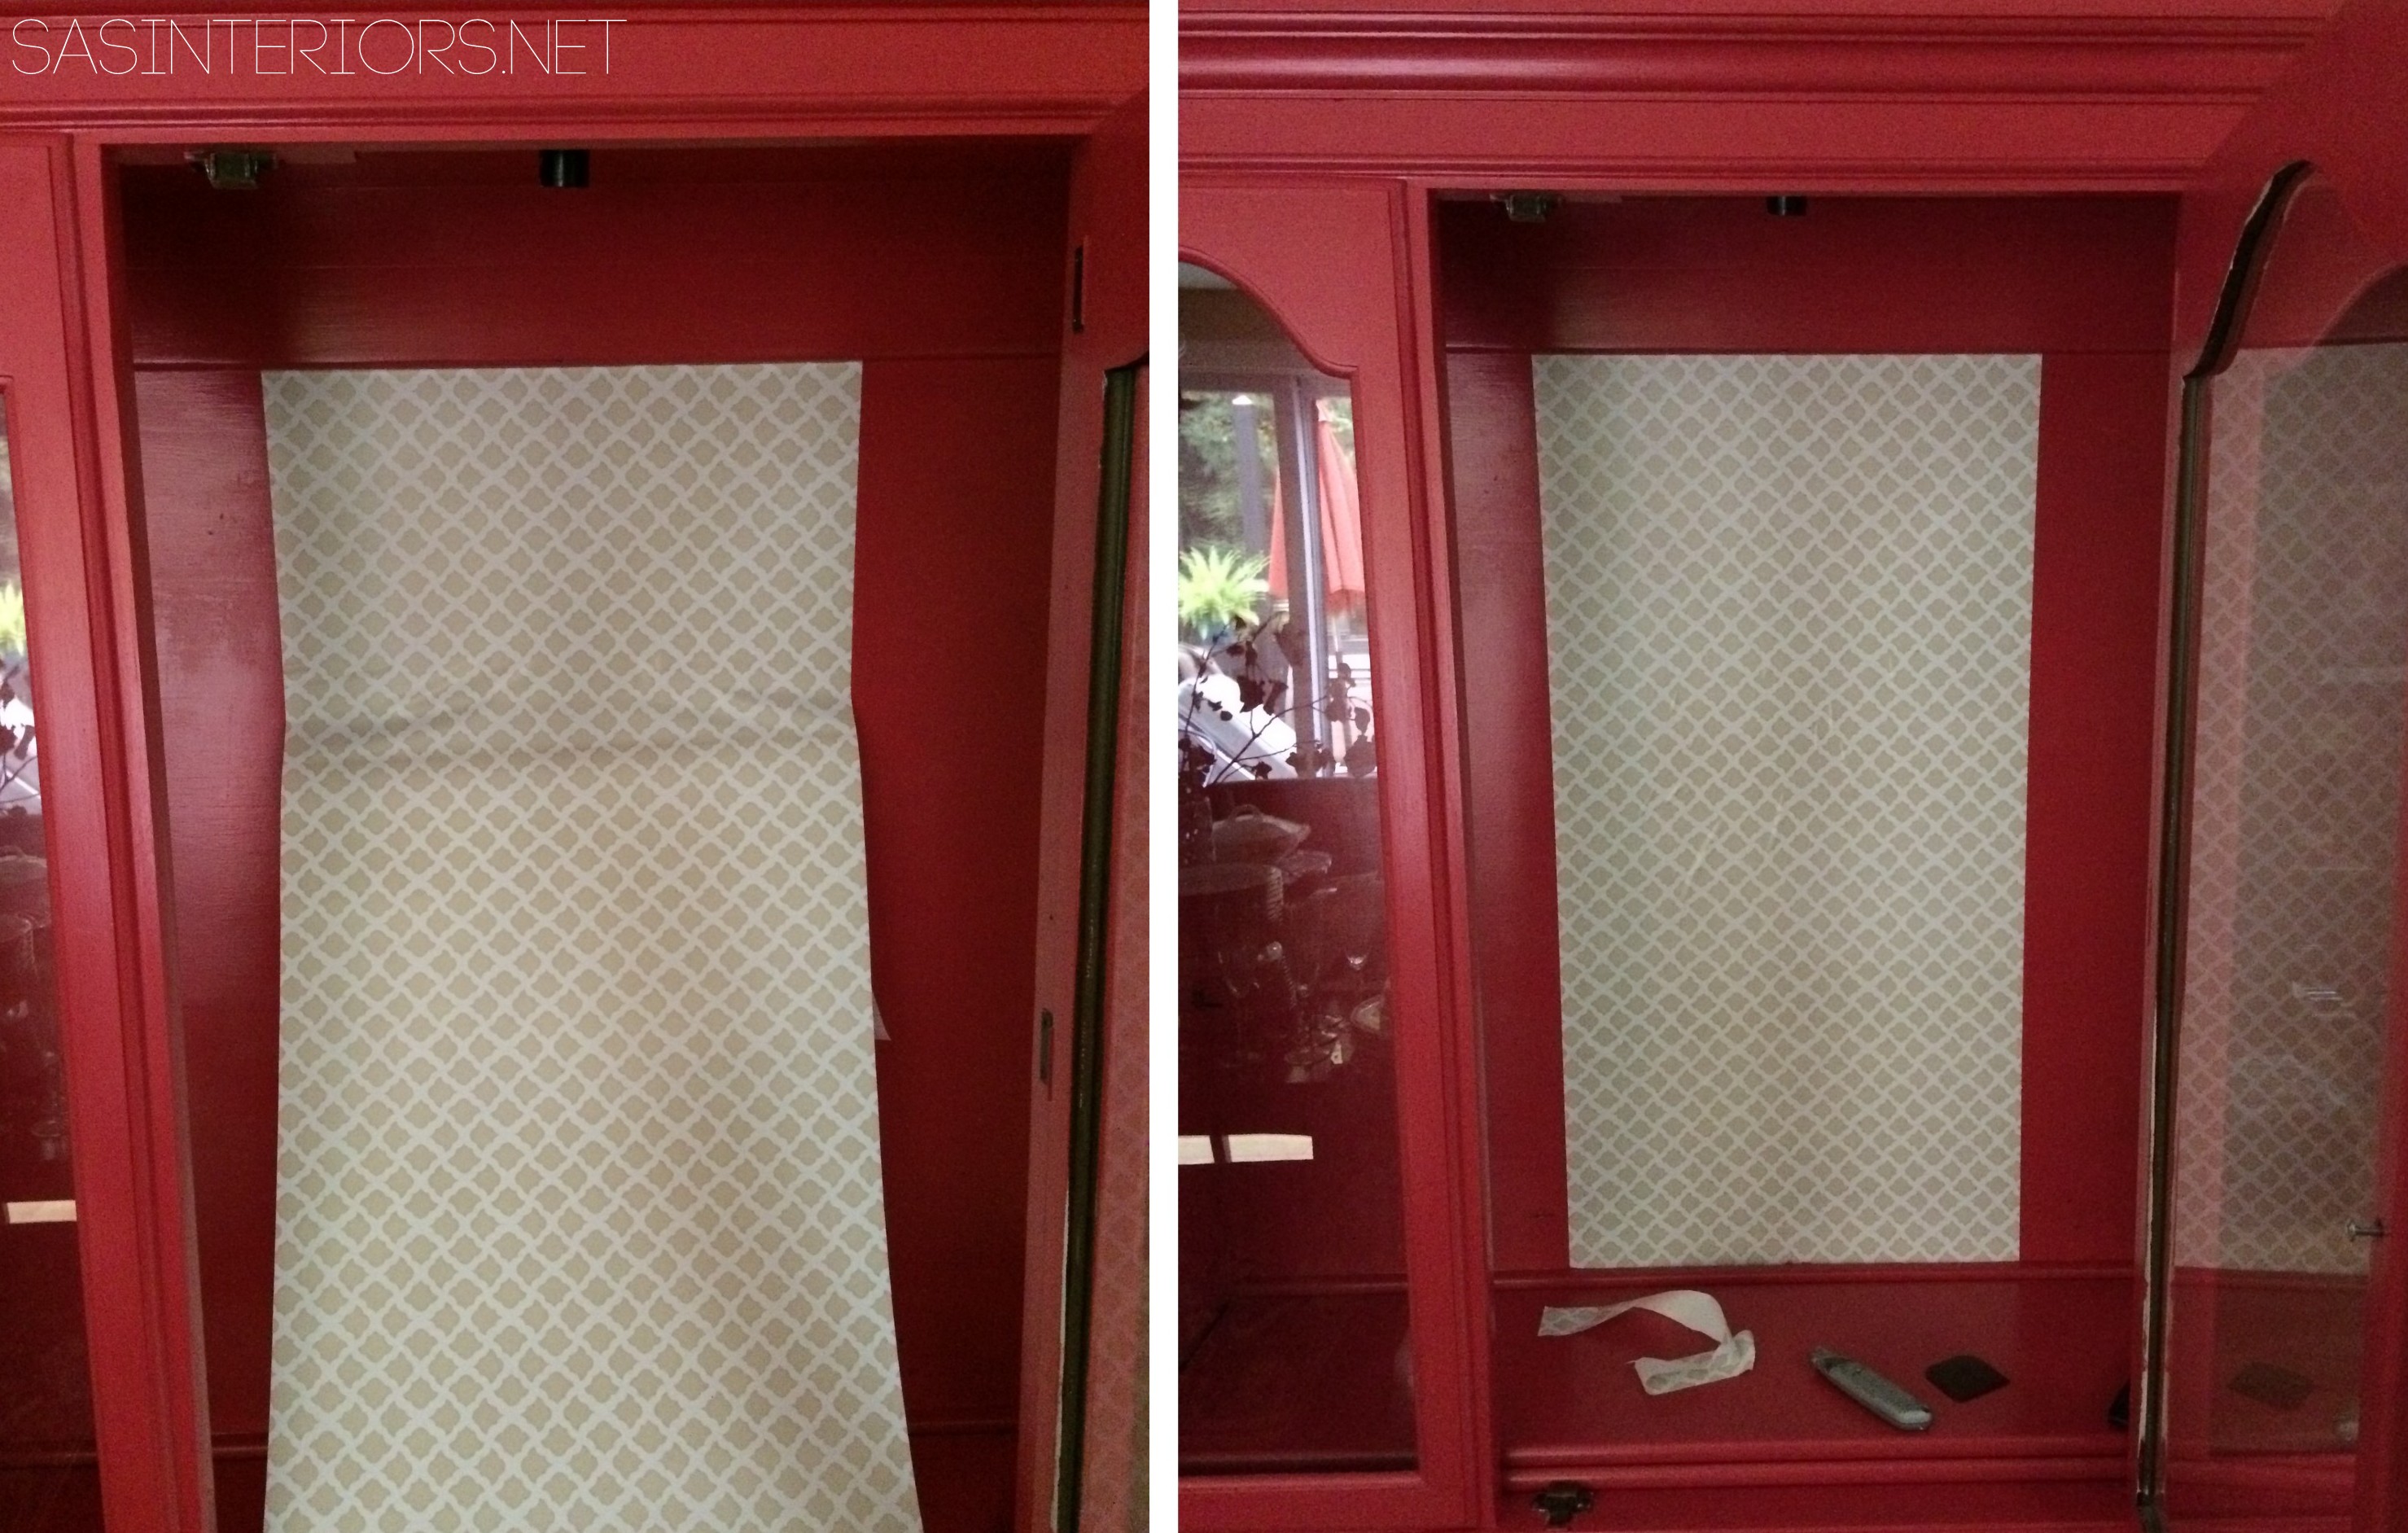
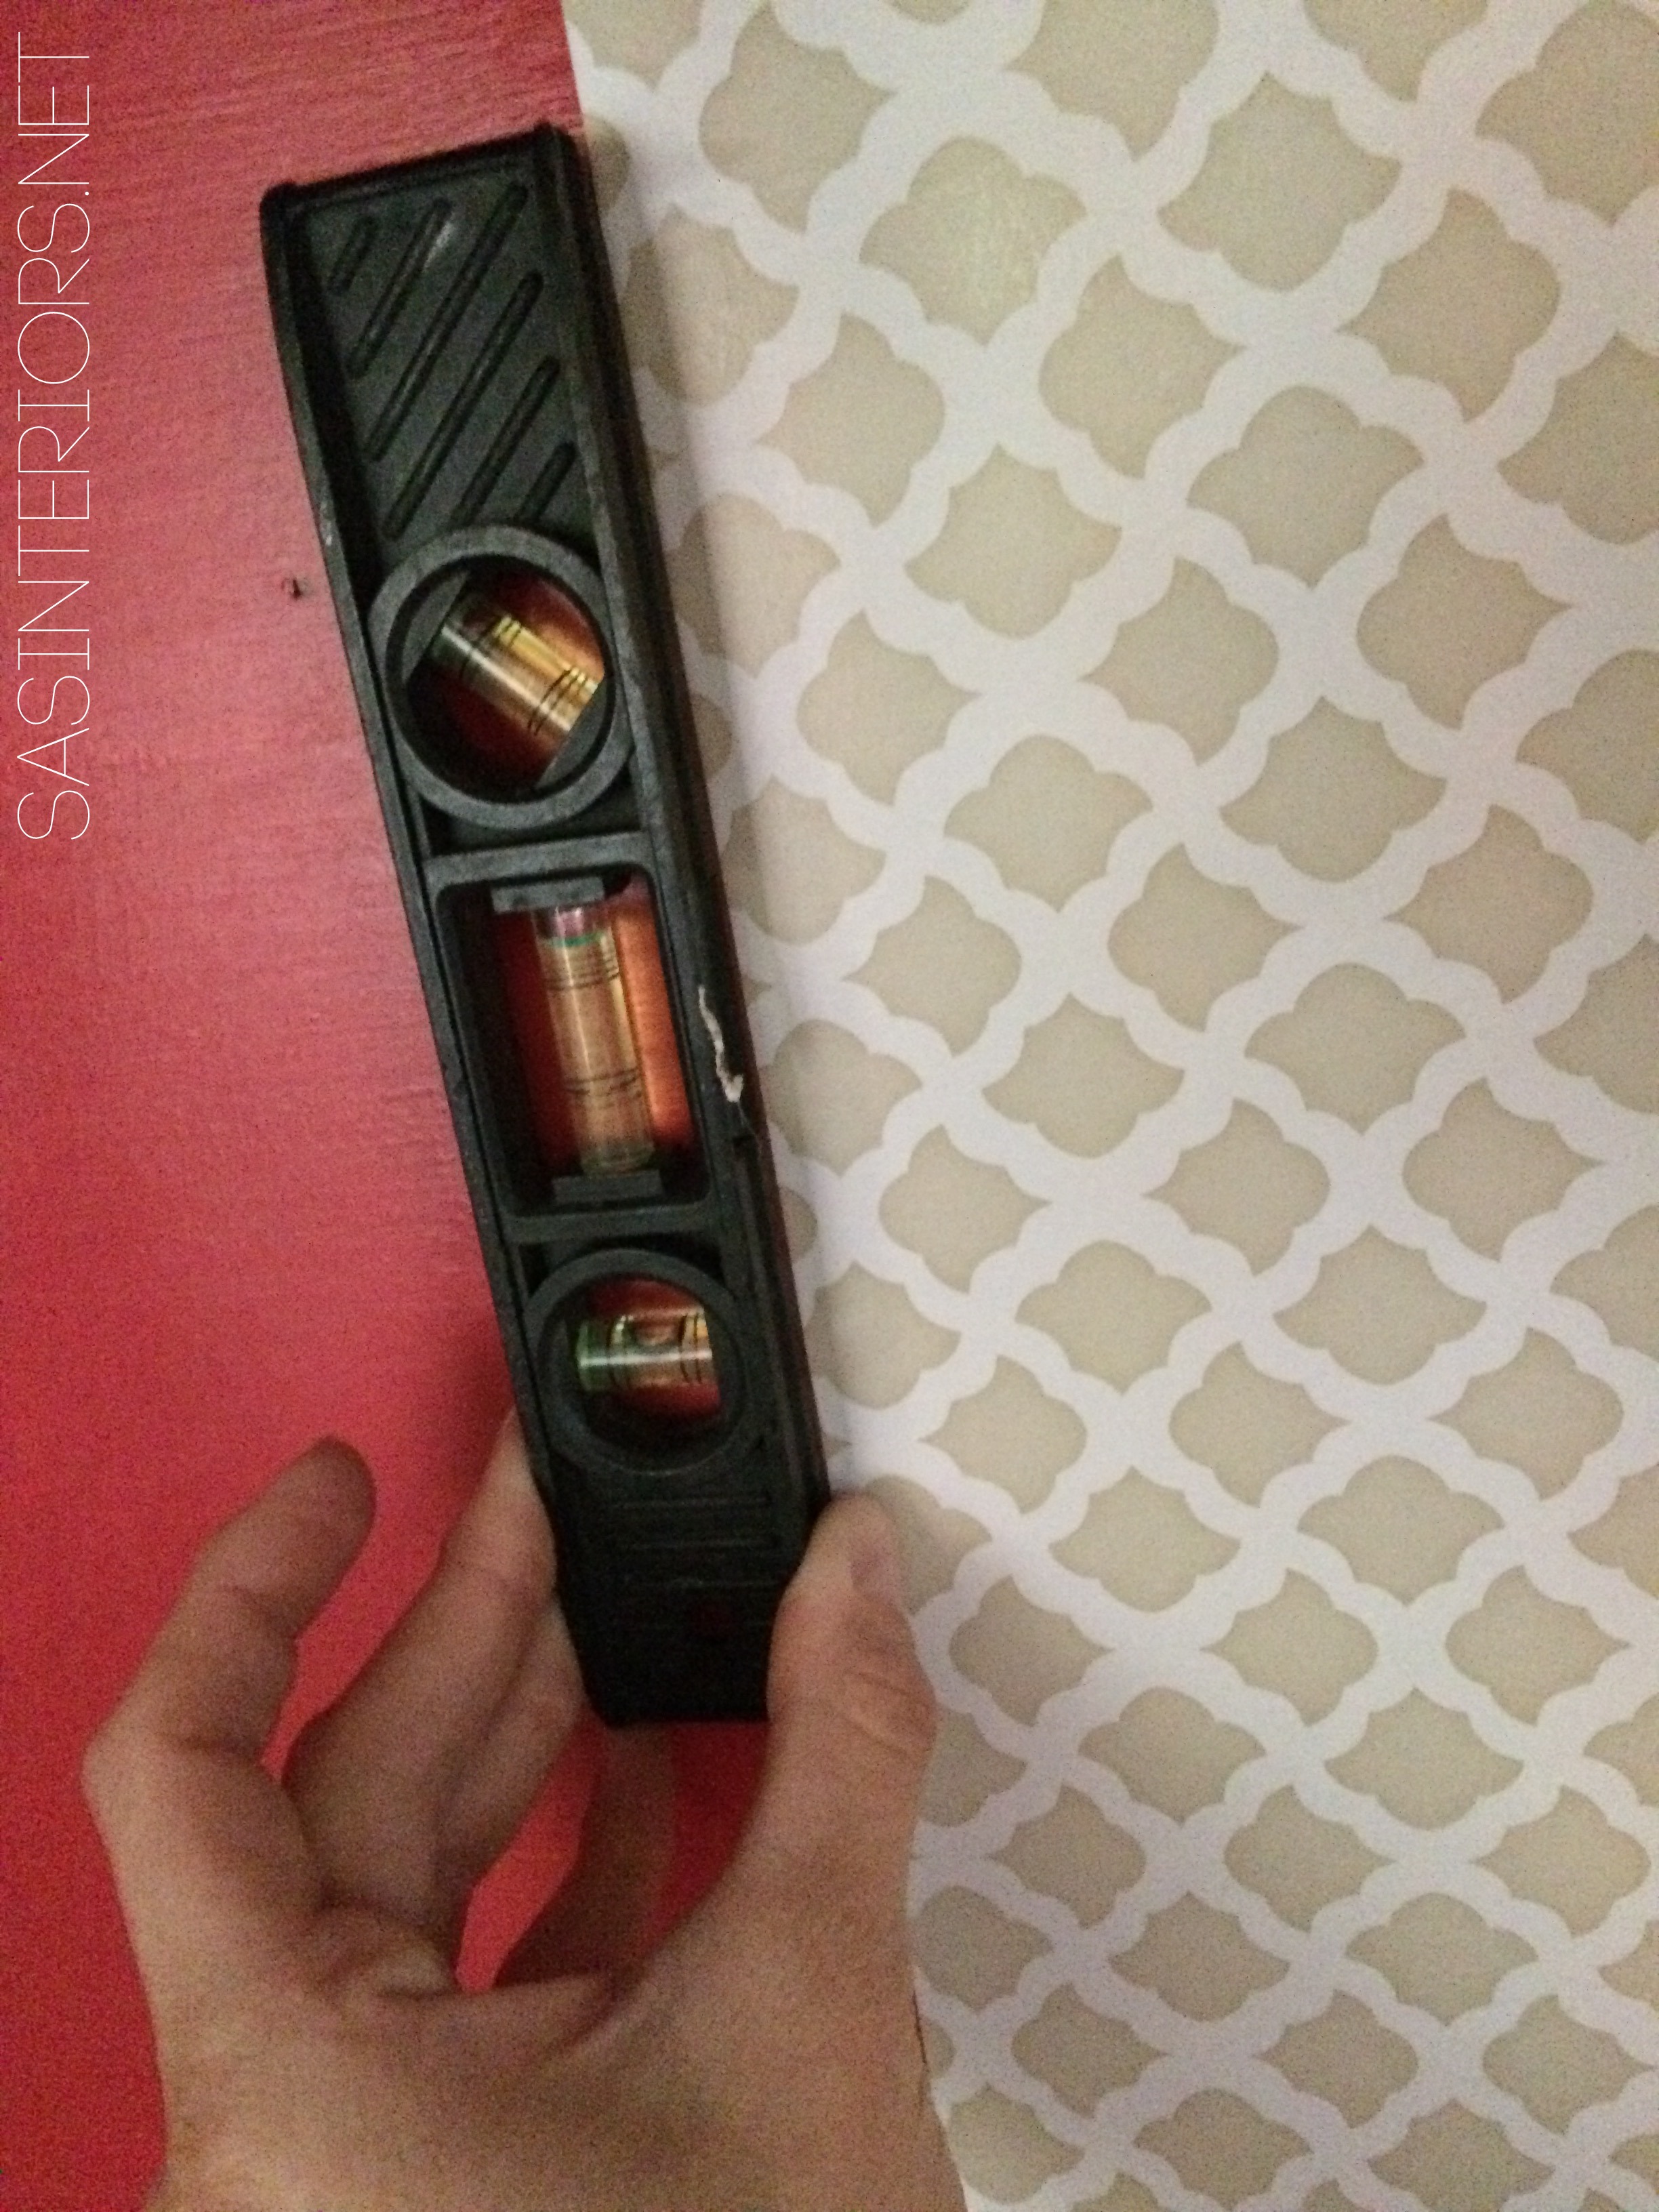
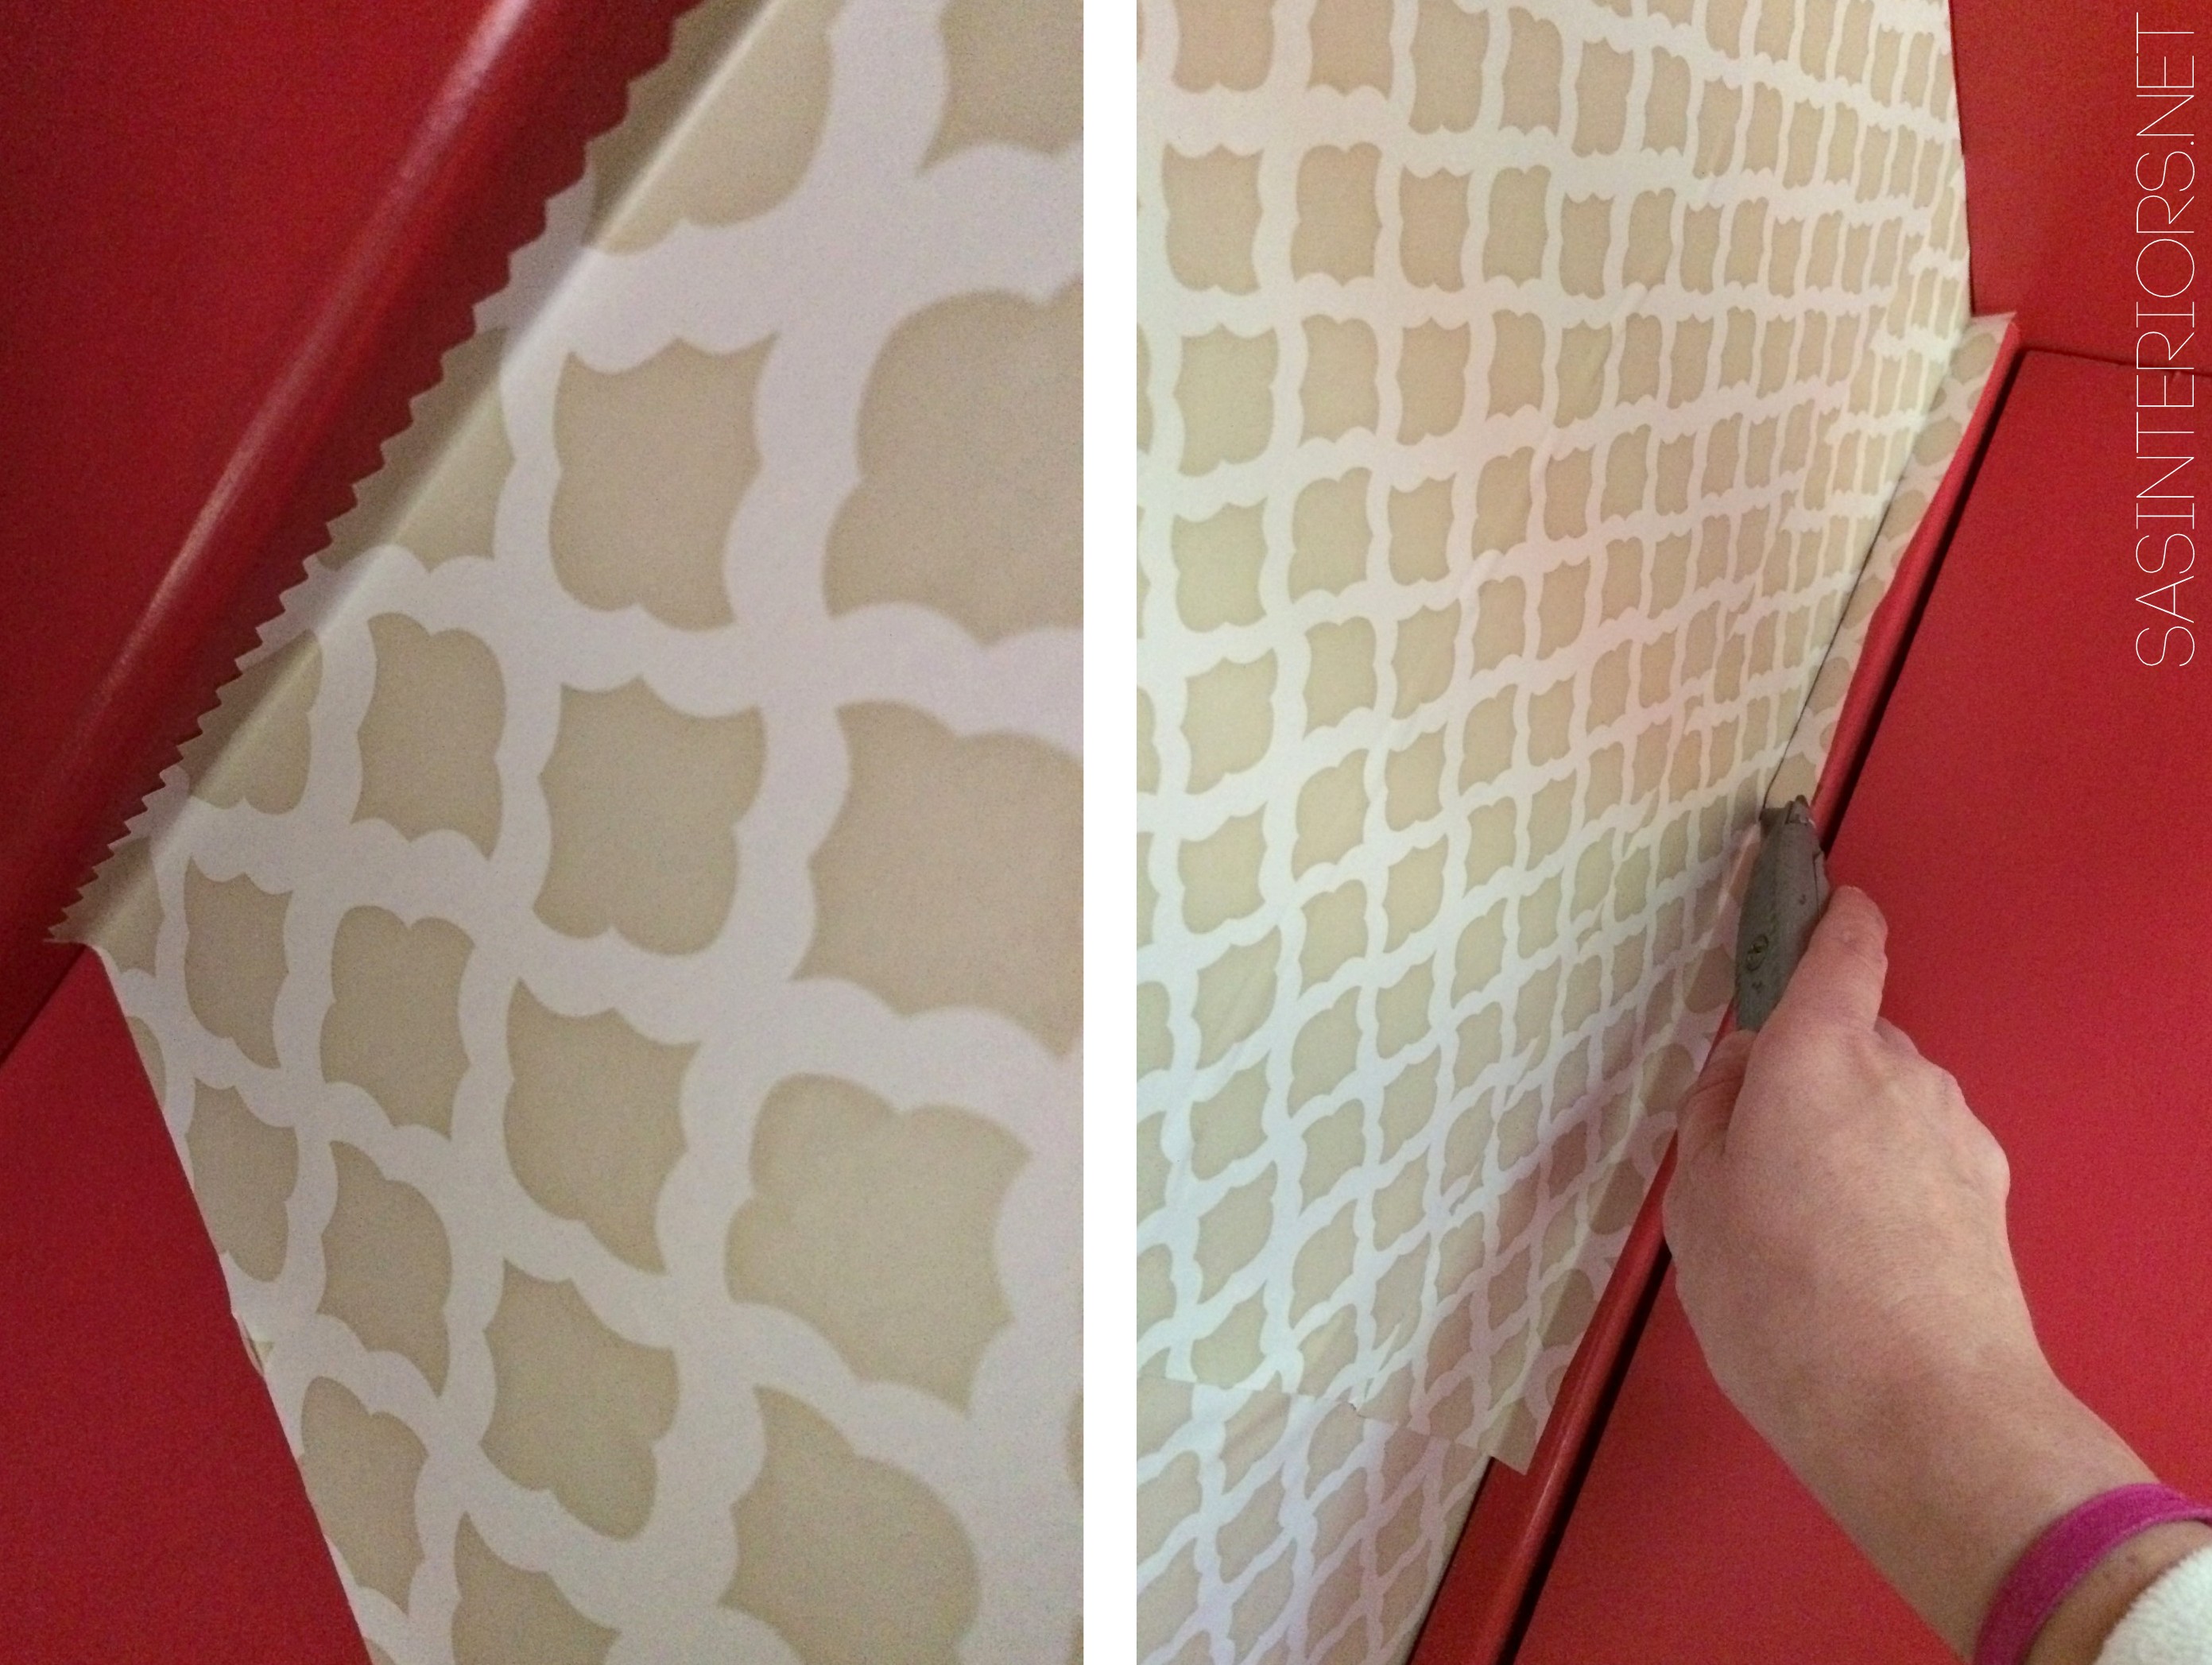
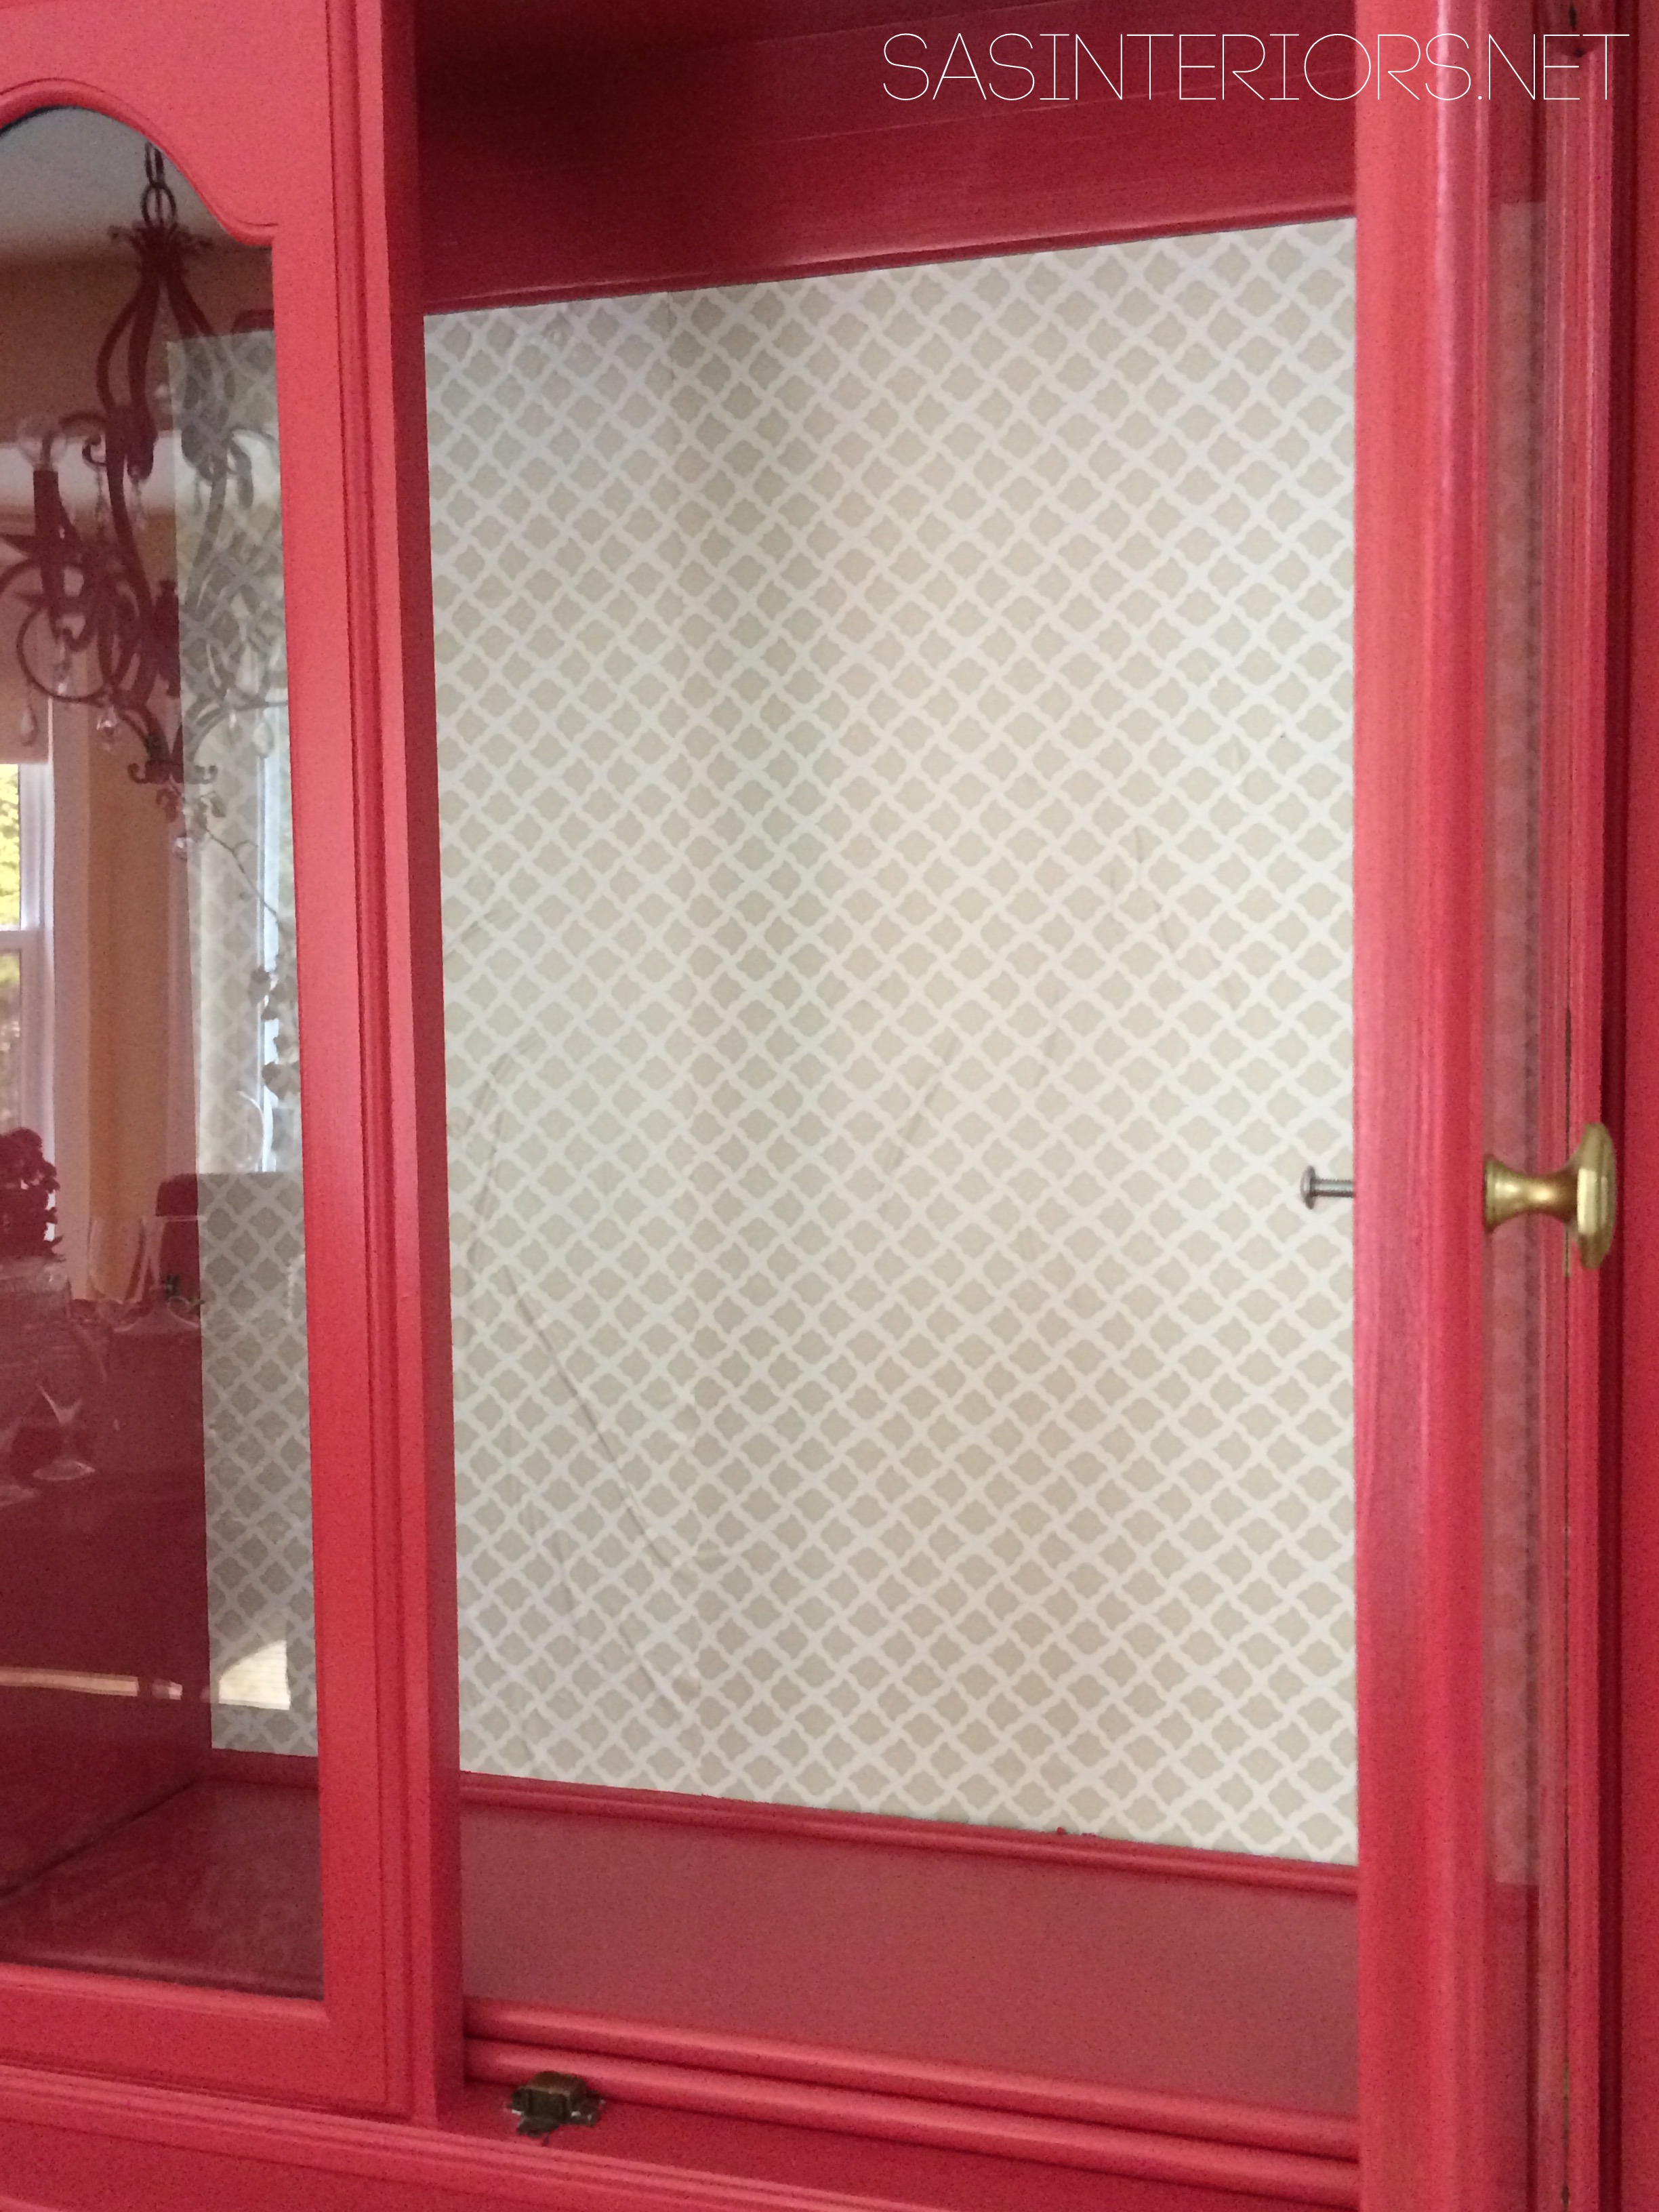
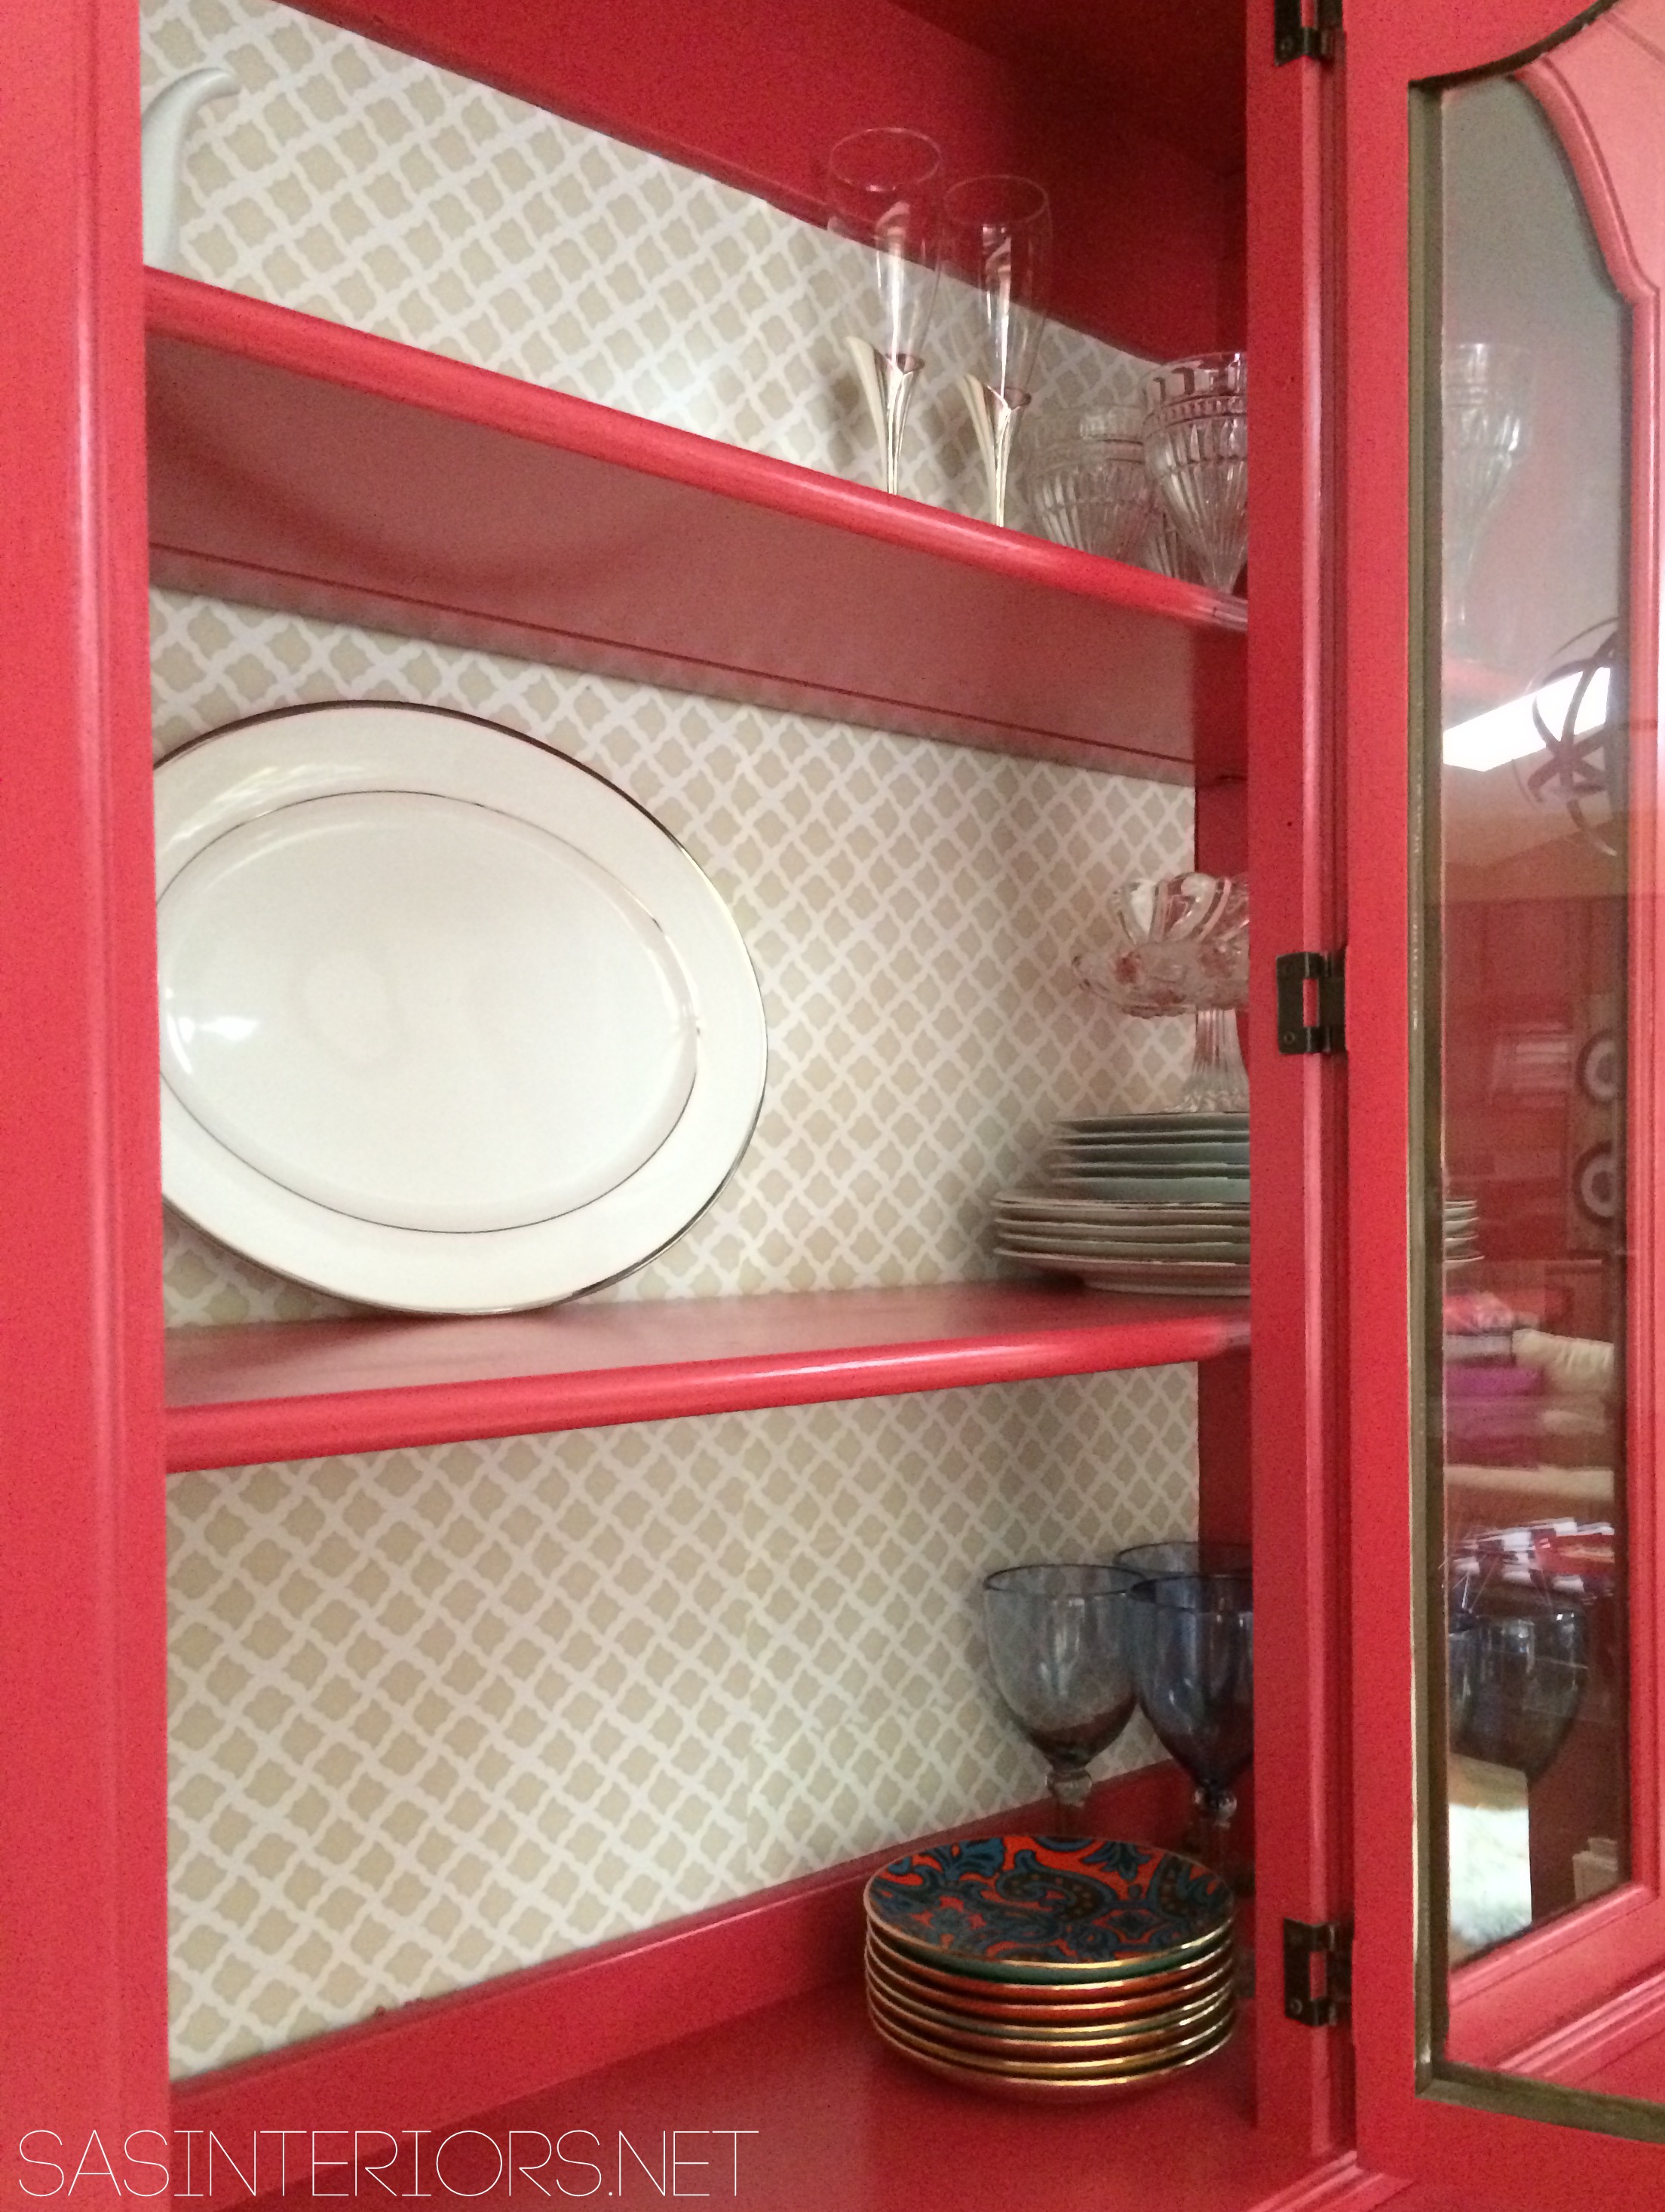
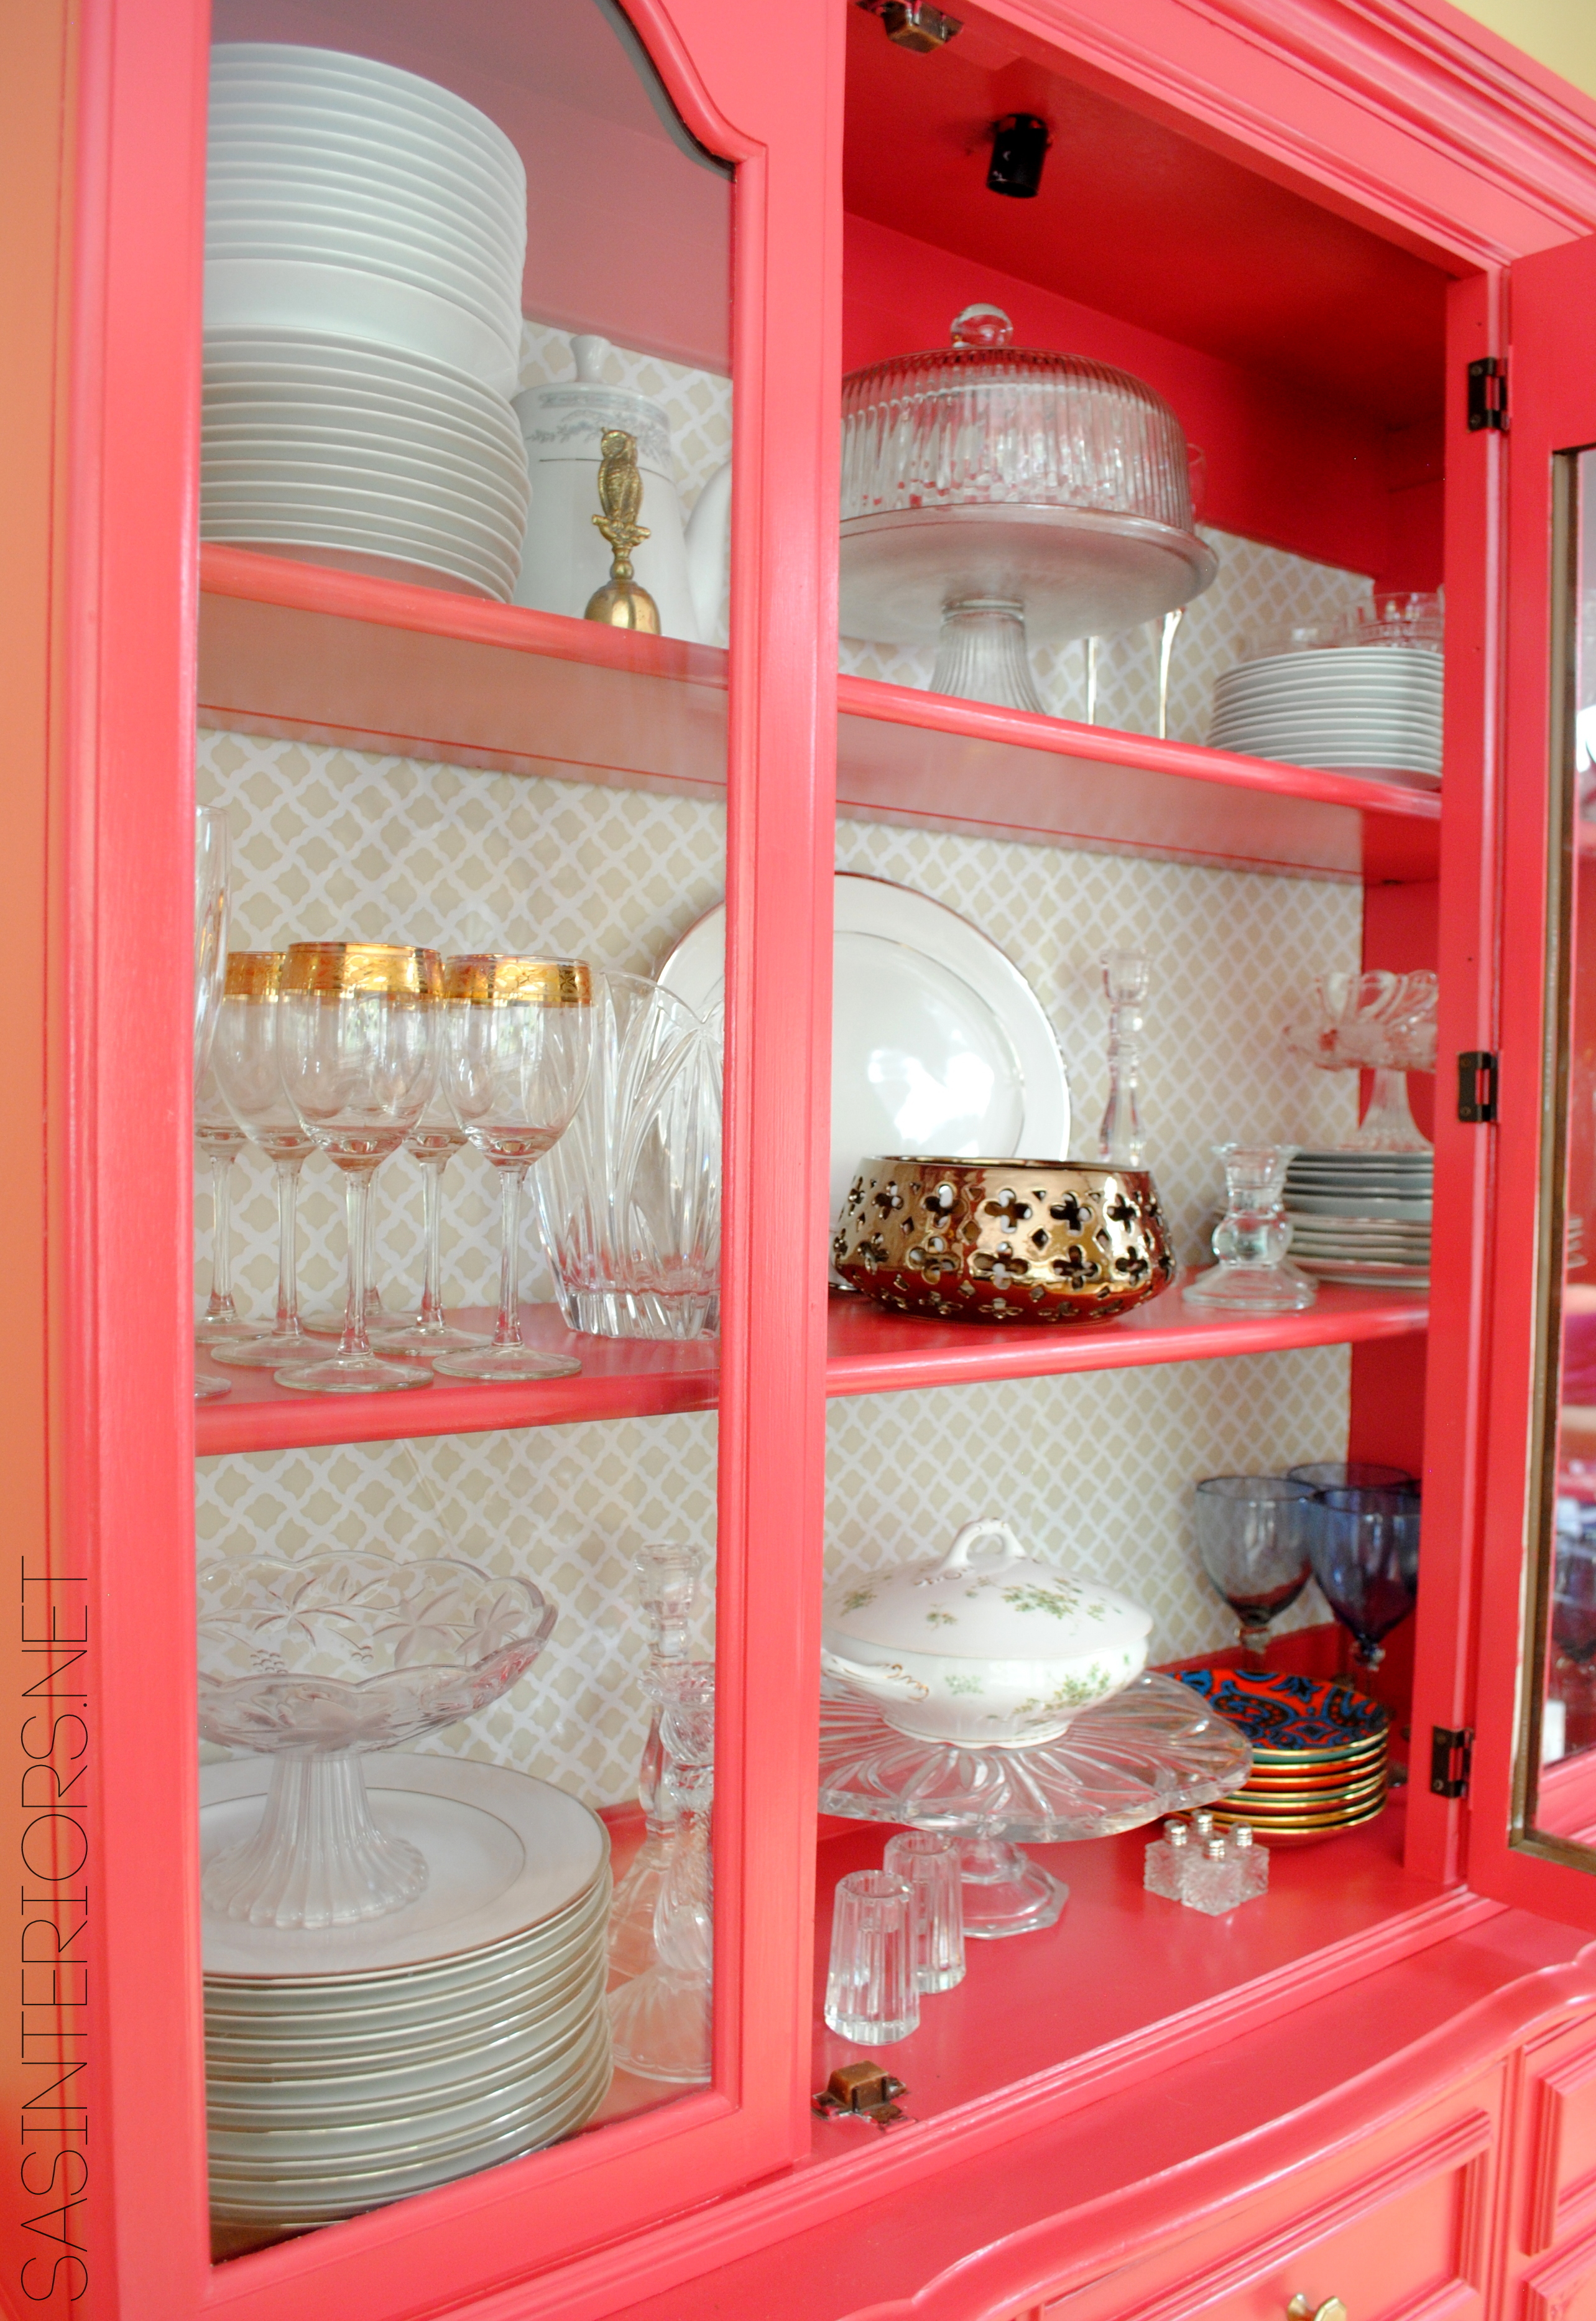
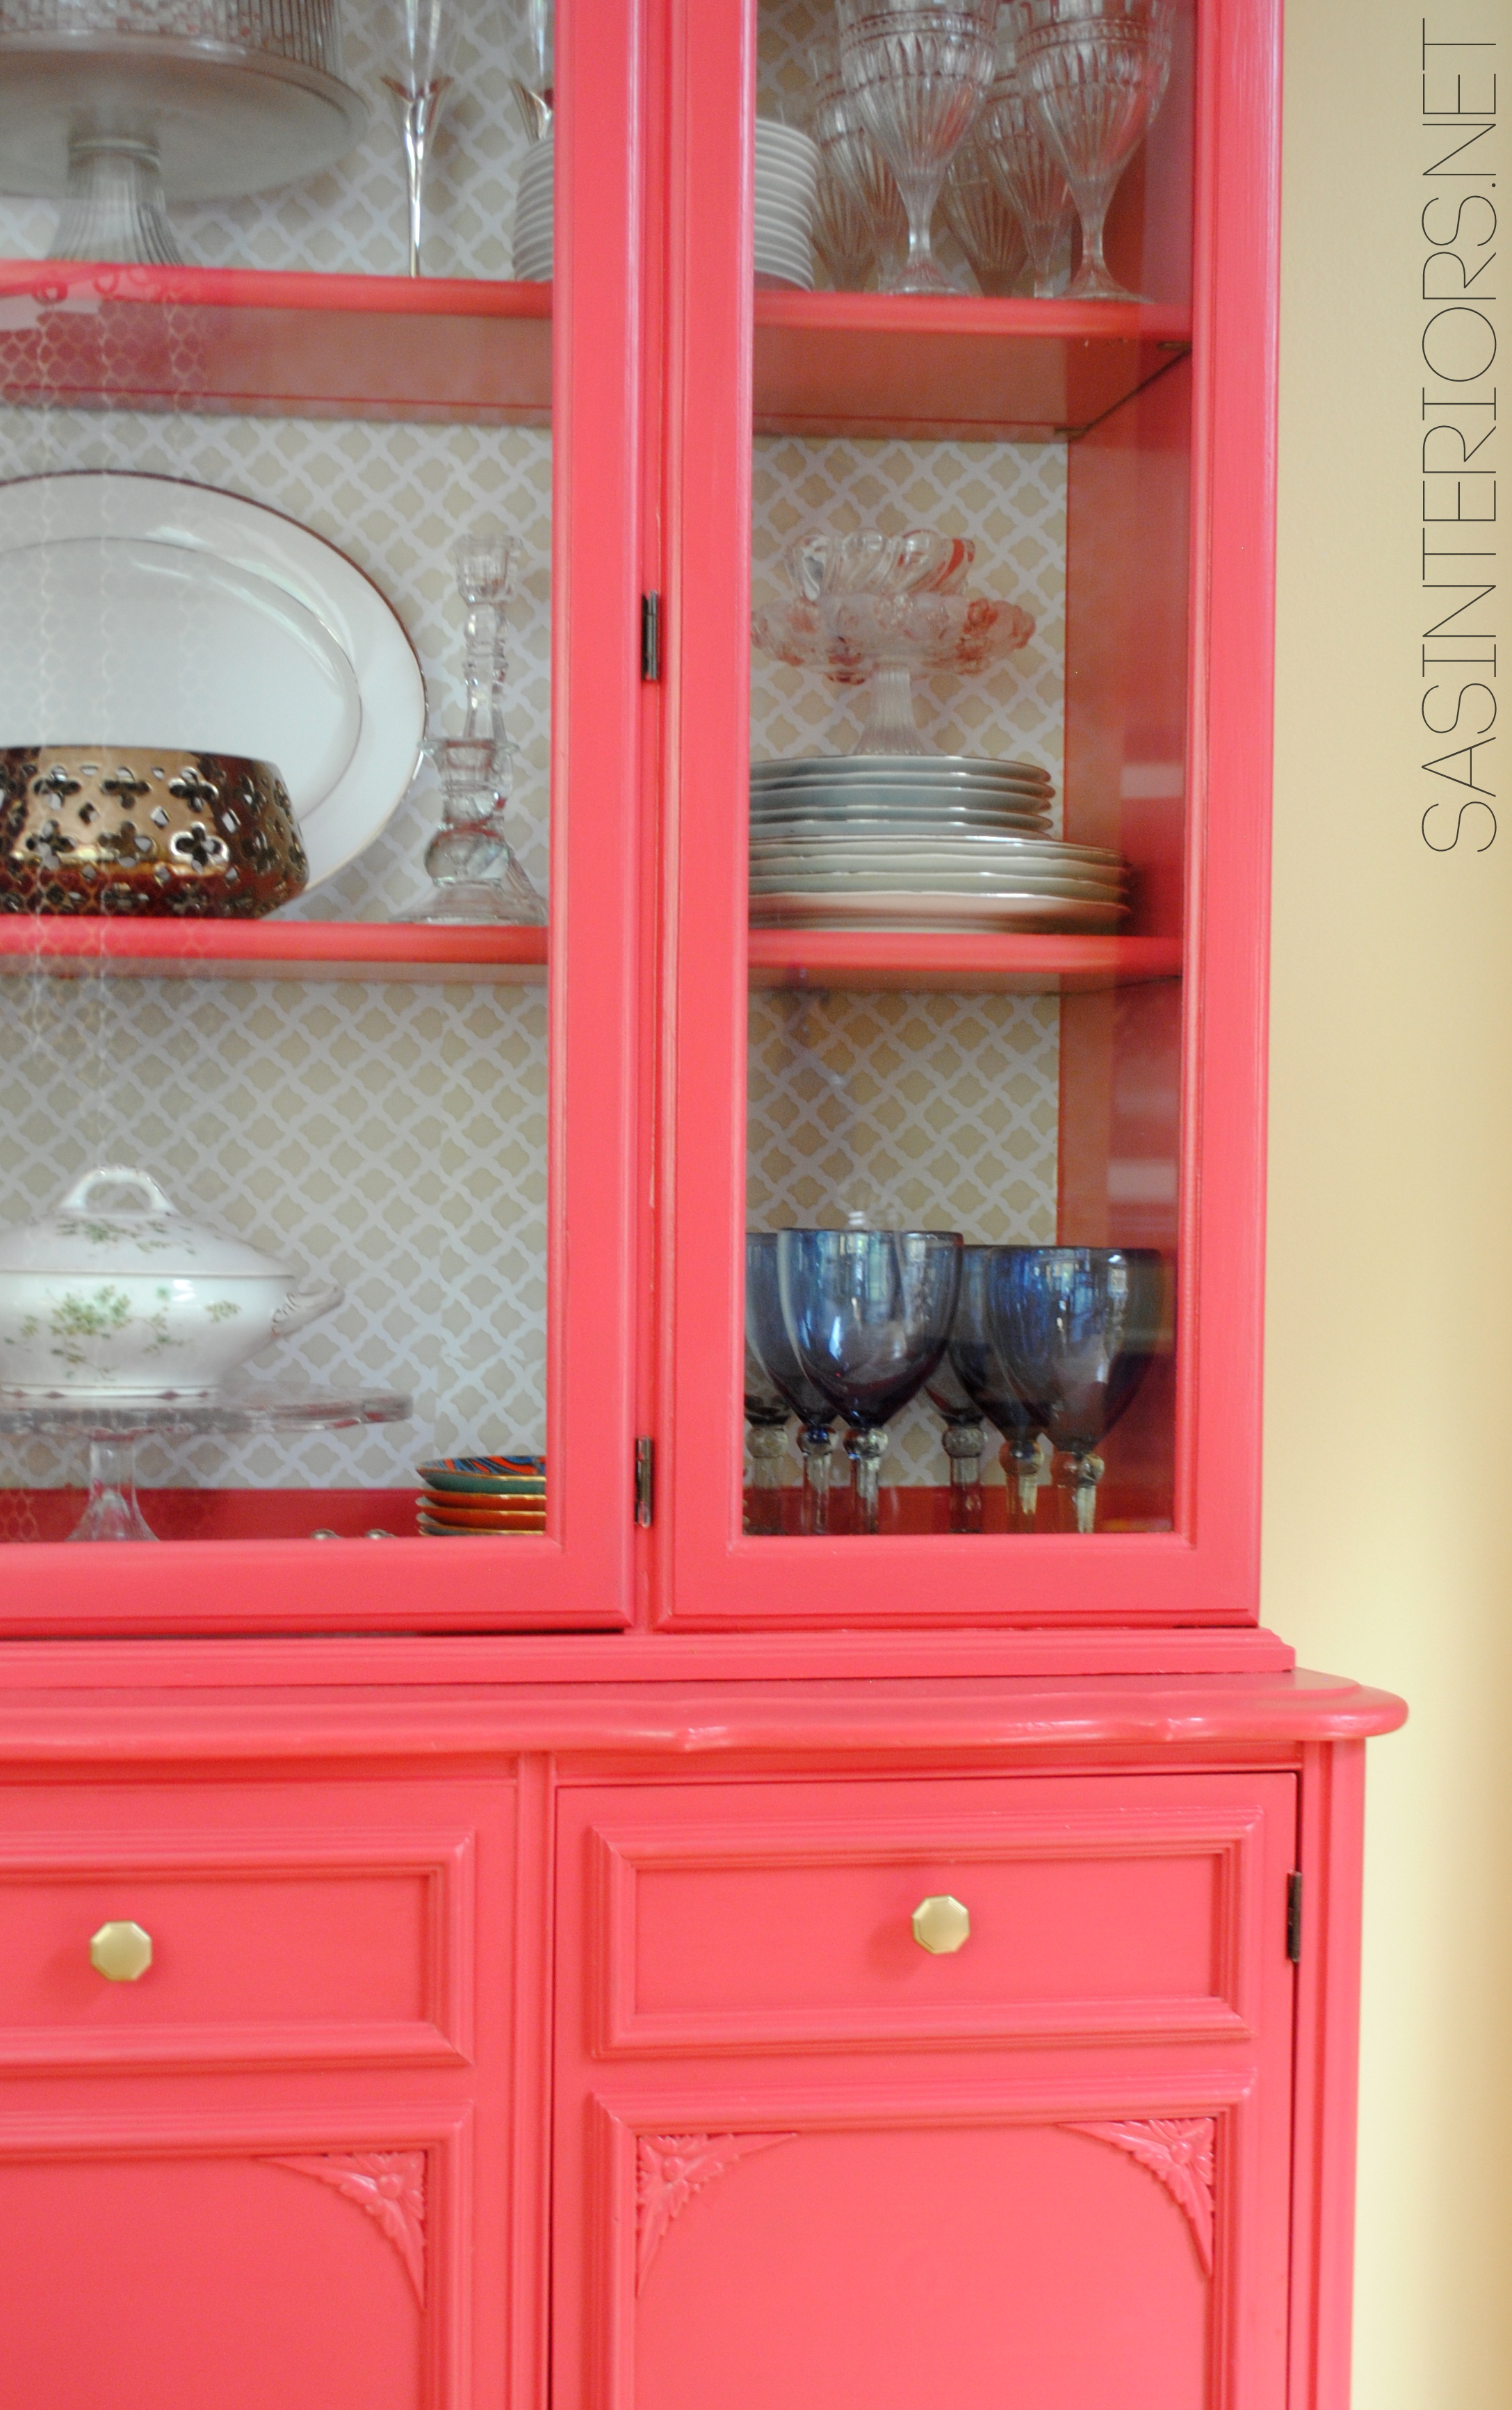
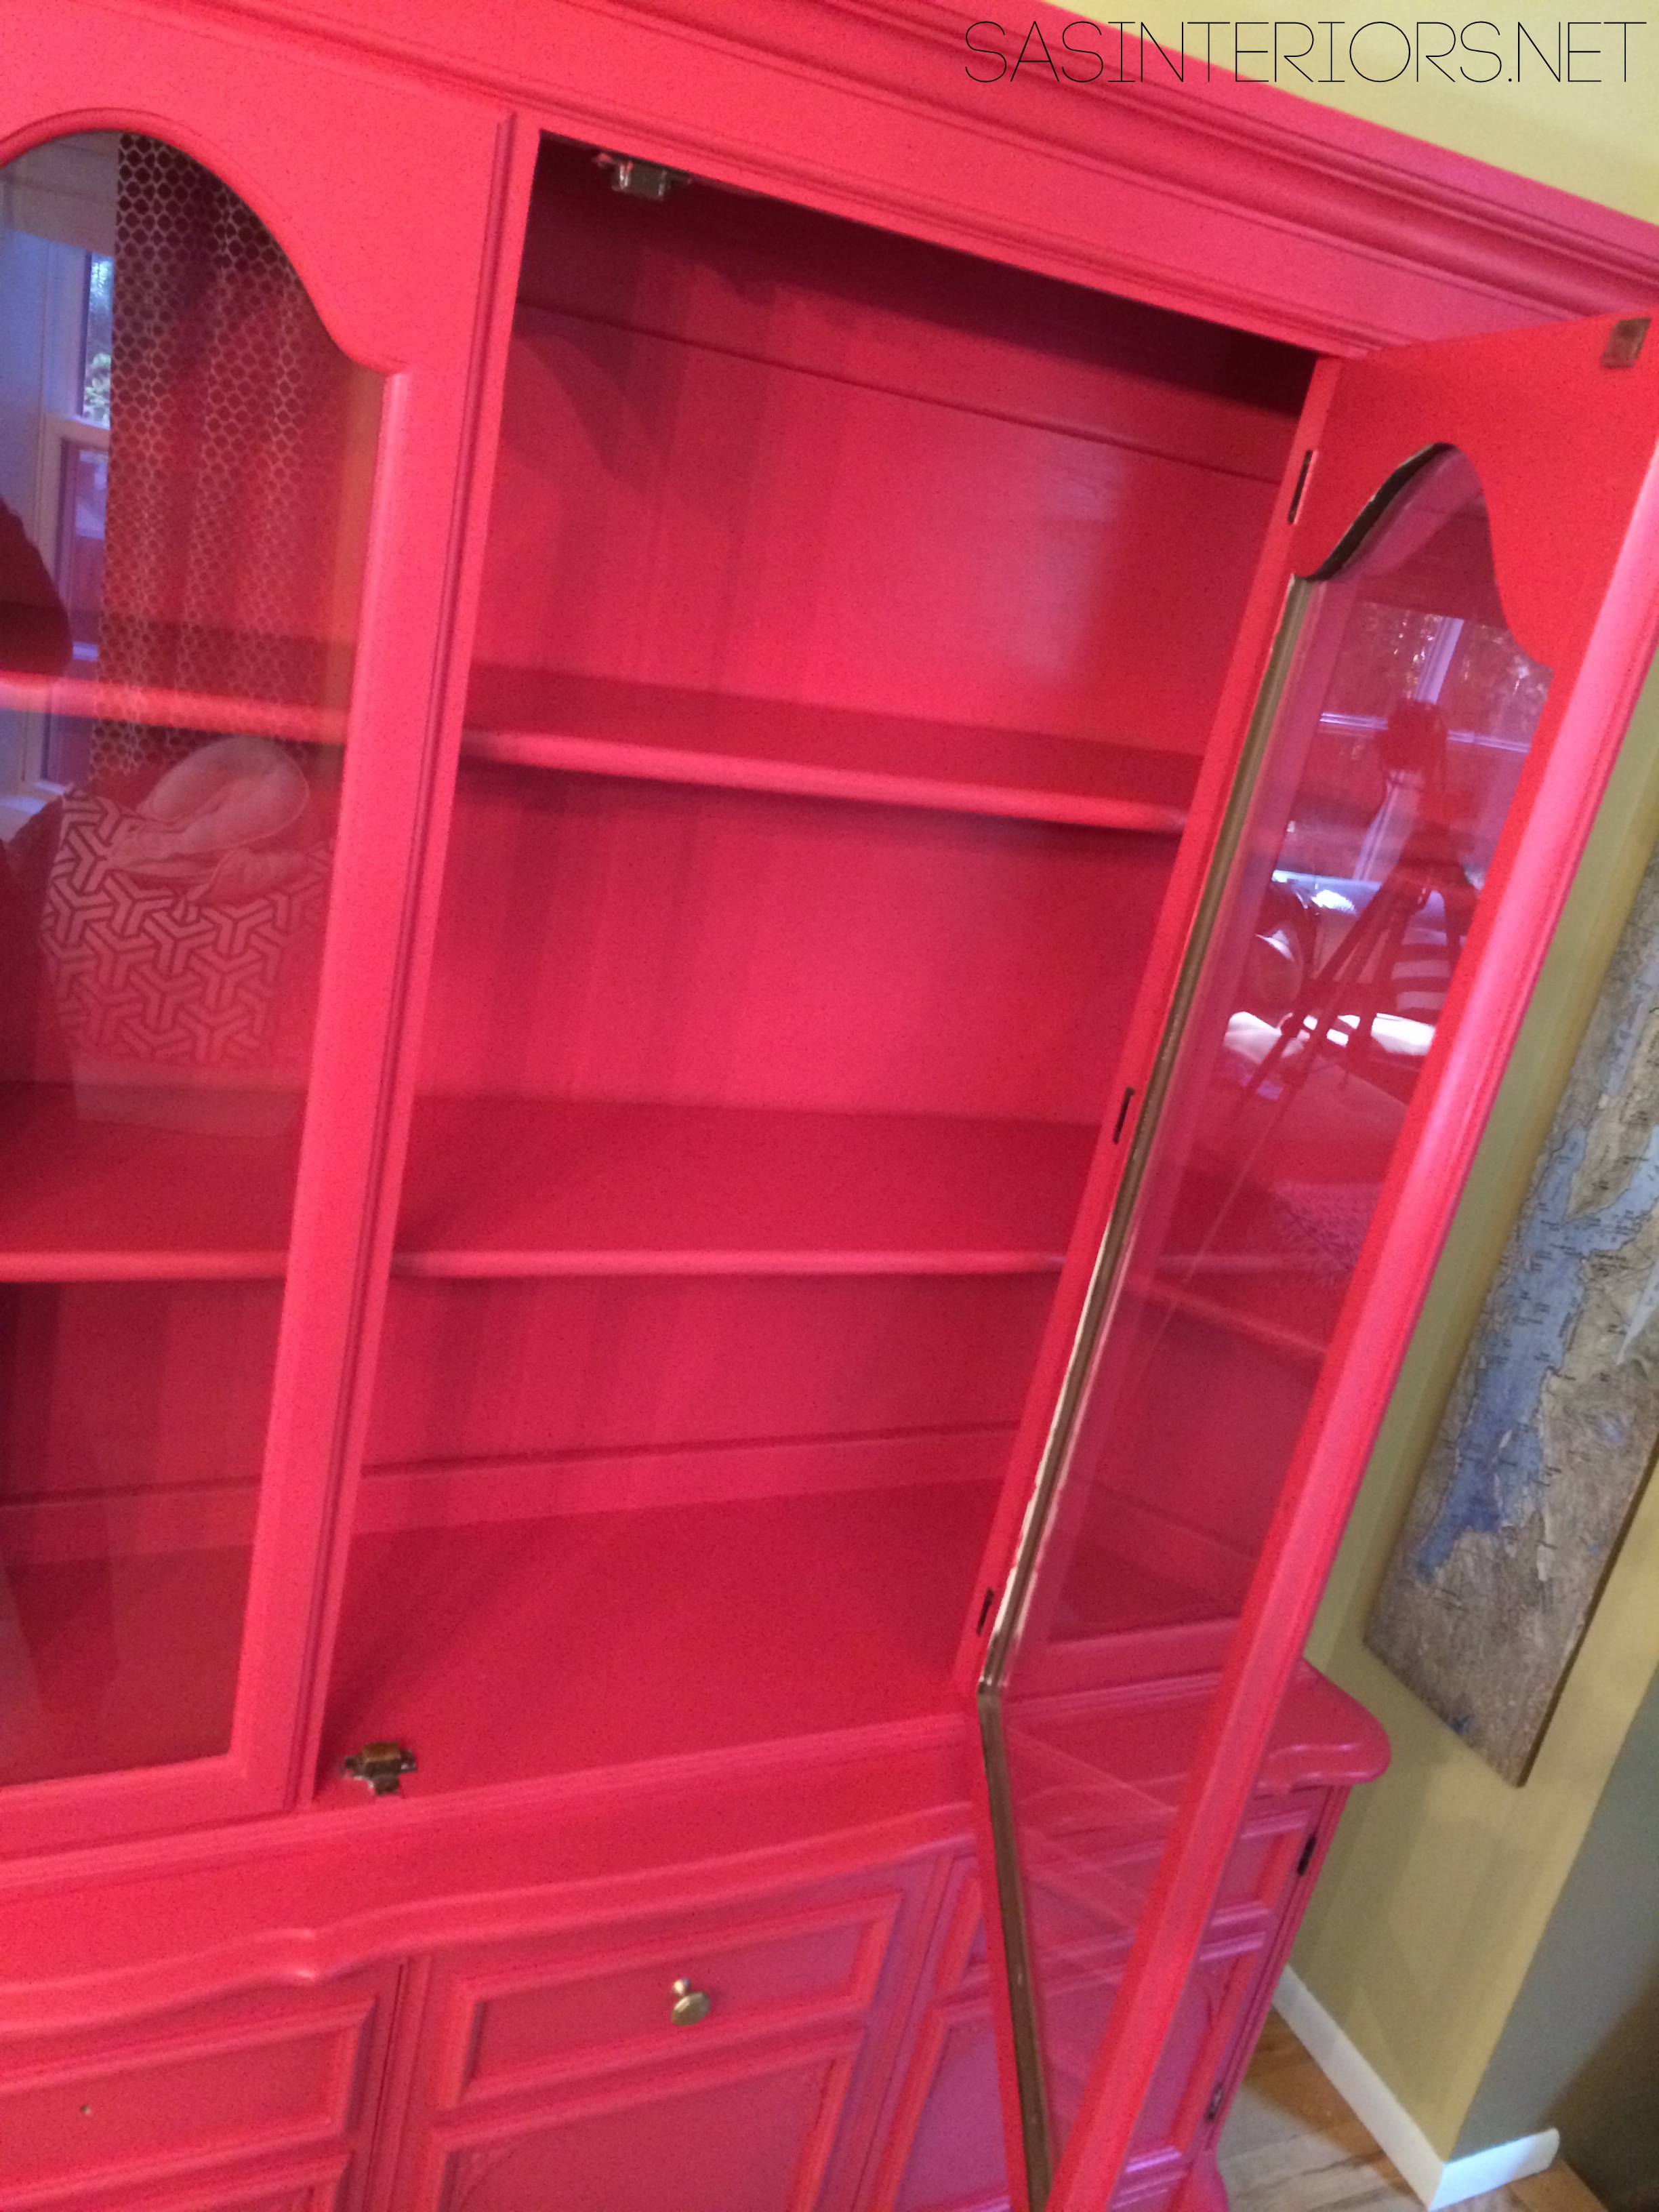
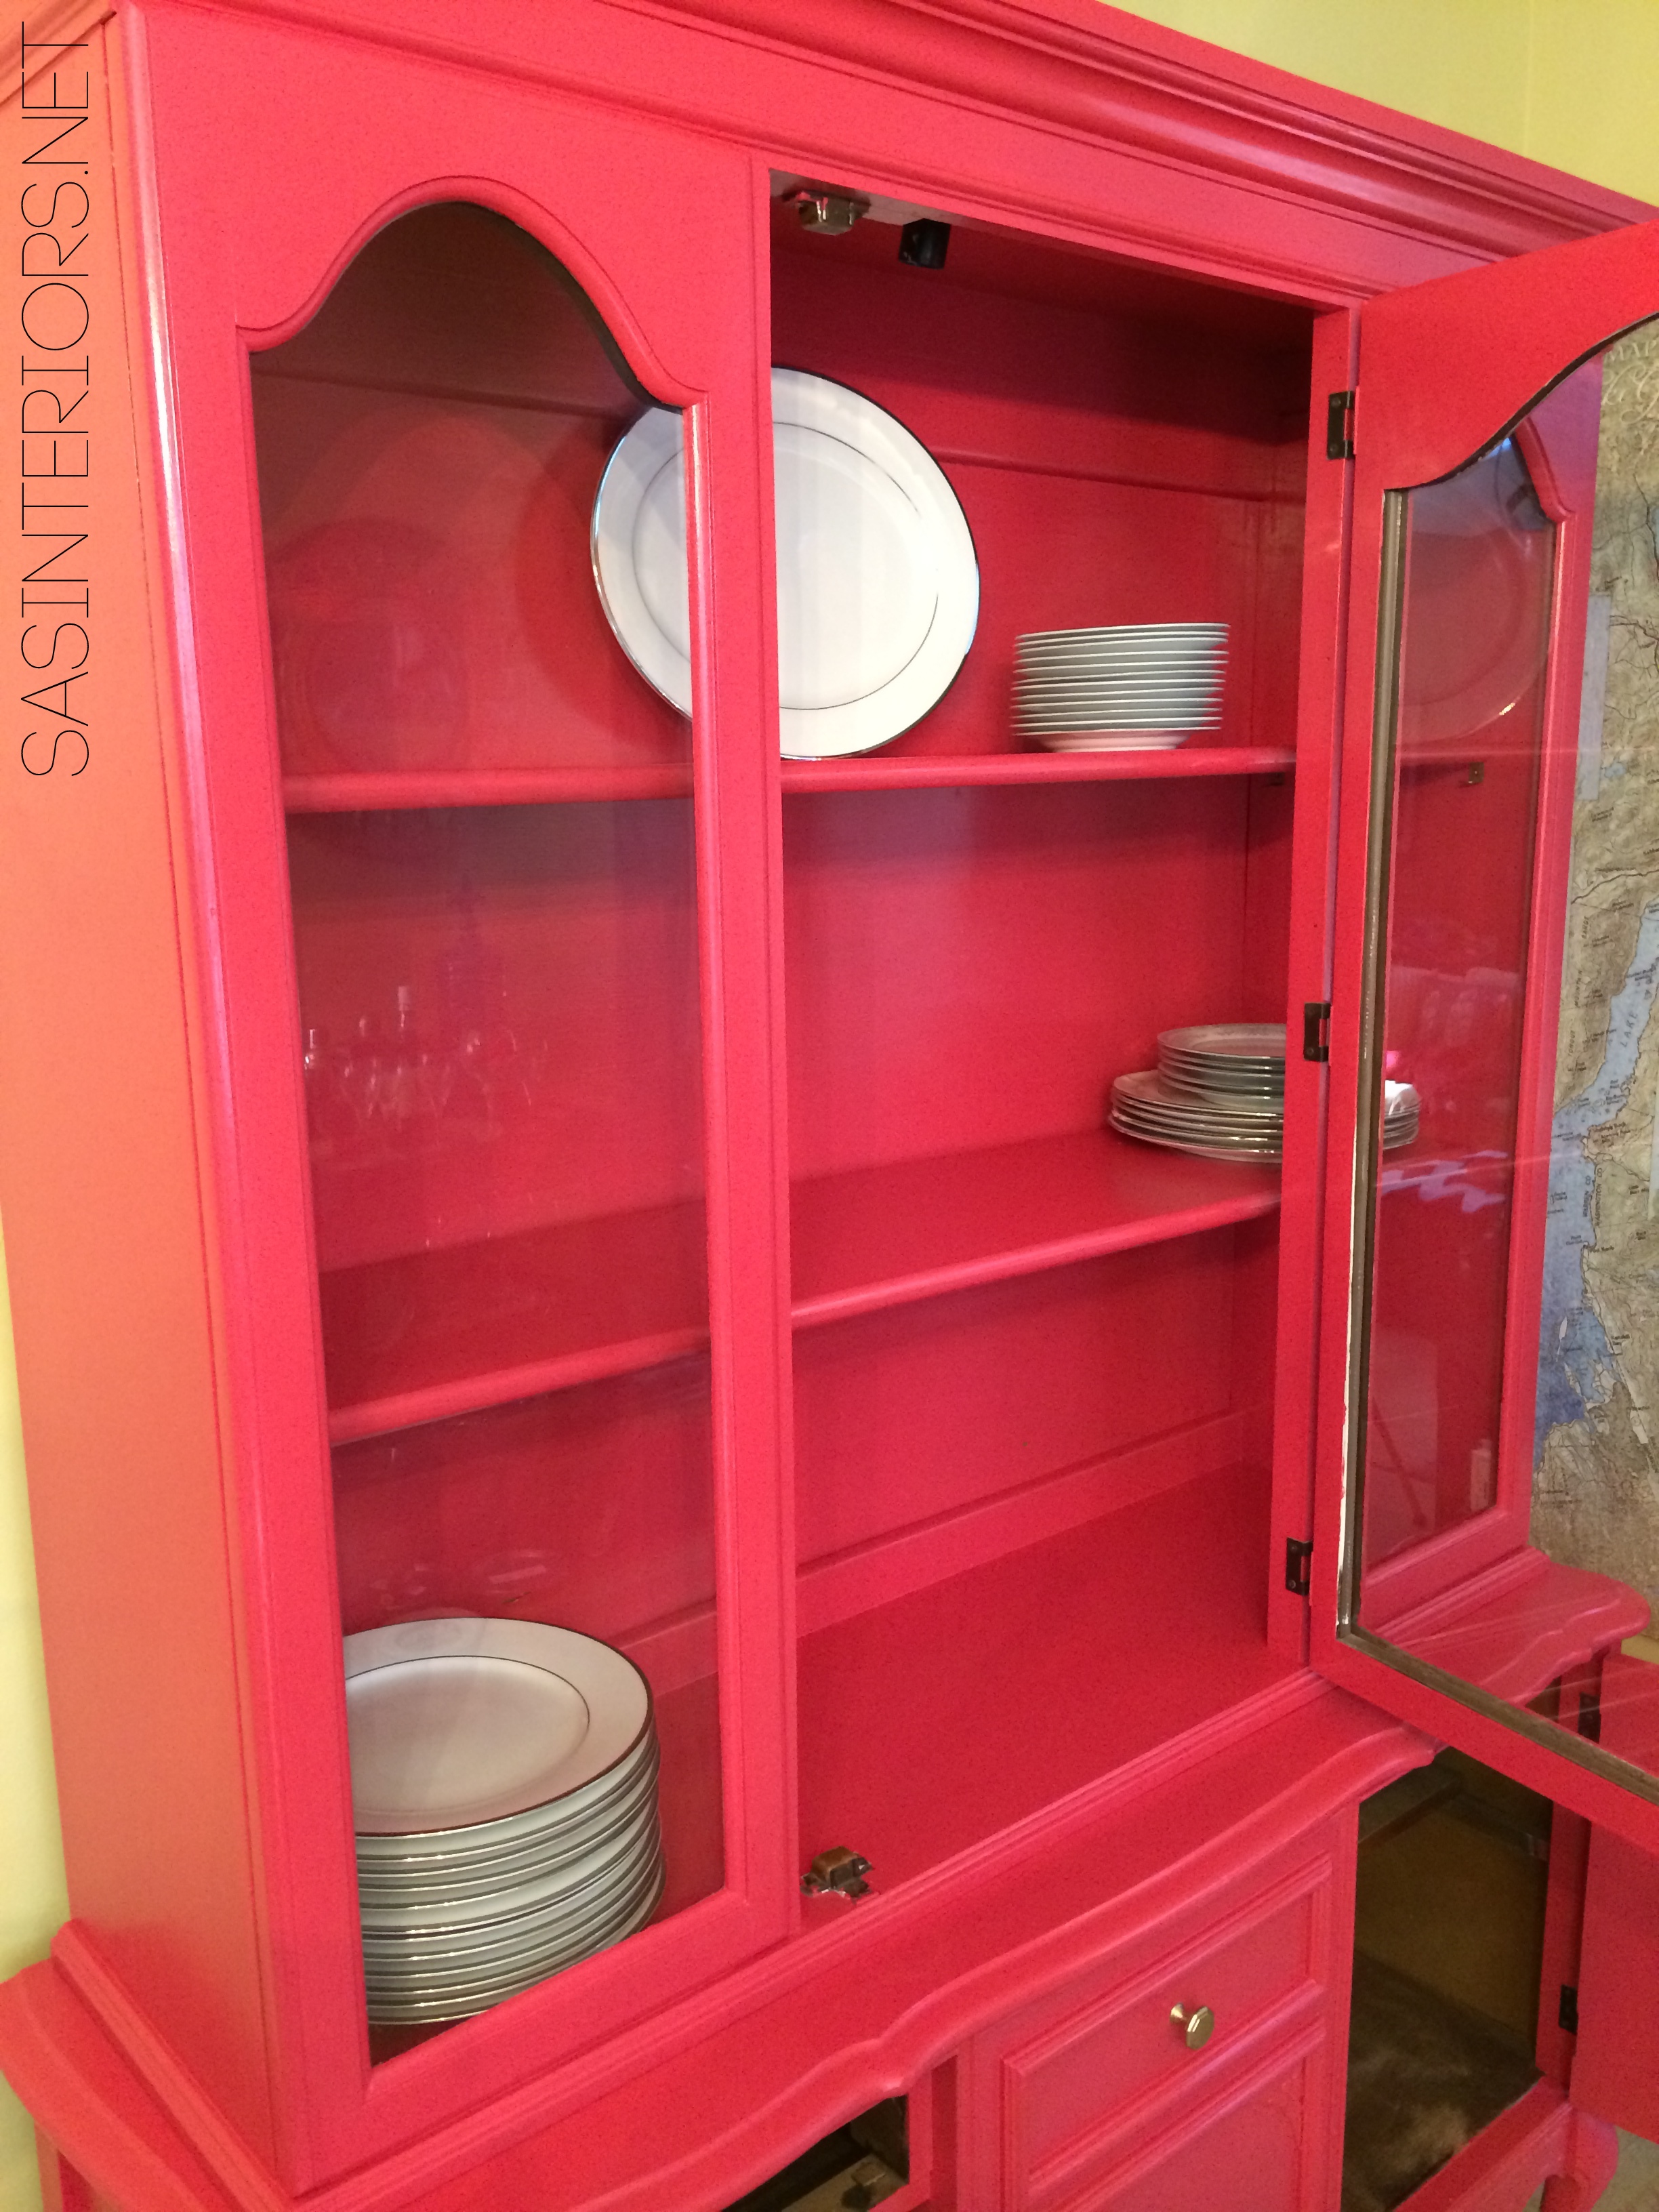
Once the china cabinet was painted & sealed, I wanted to add a few fun, unexpected details.  I chose to add self-adhesive, contact paper to the back of the cabinet interior which provided a beautiful backdrop for all my dishes, platters, and china.

China Cabinet before & after >>> The process of giving this piece of a furniture a complete makeover!

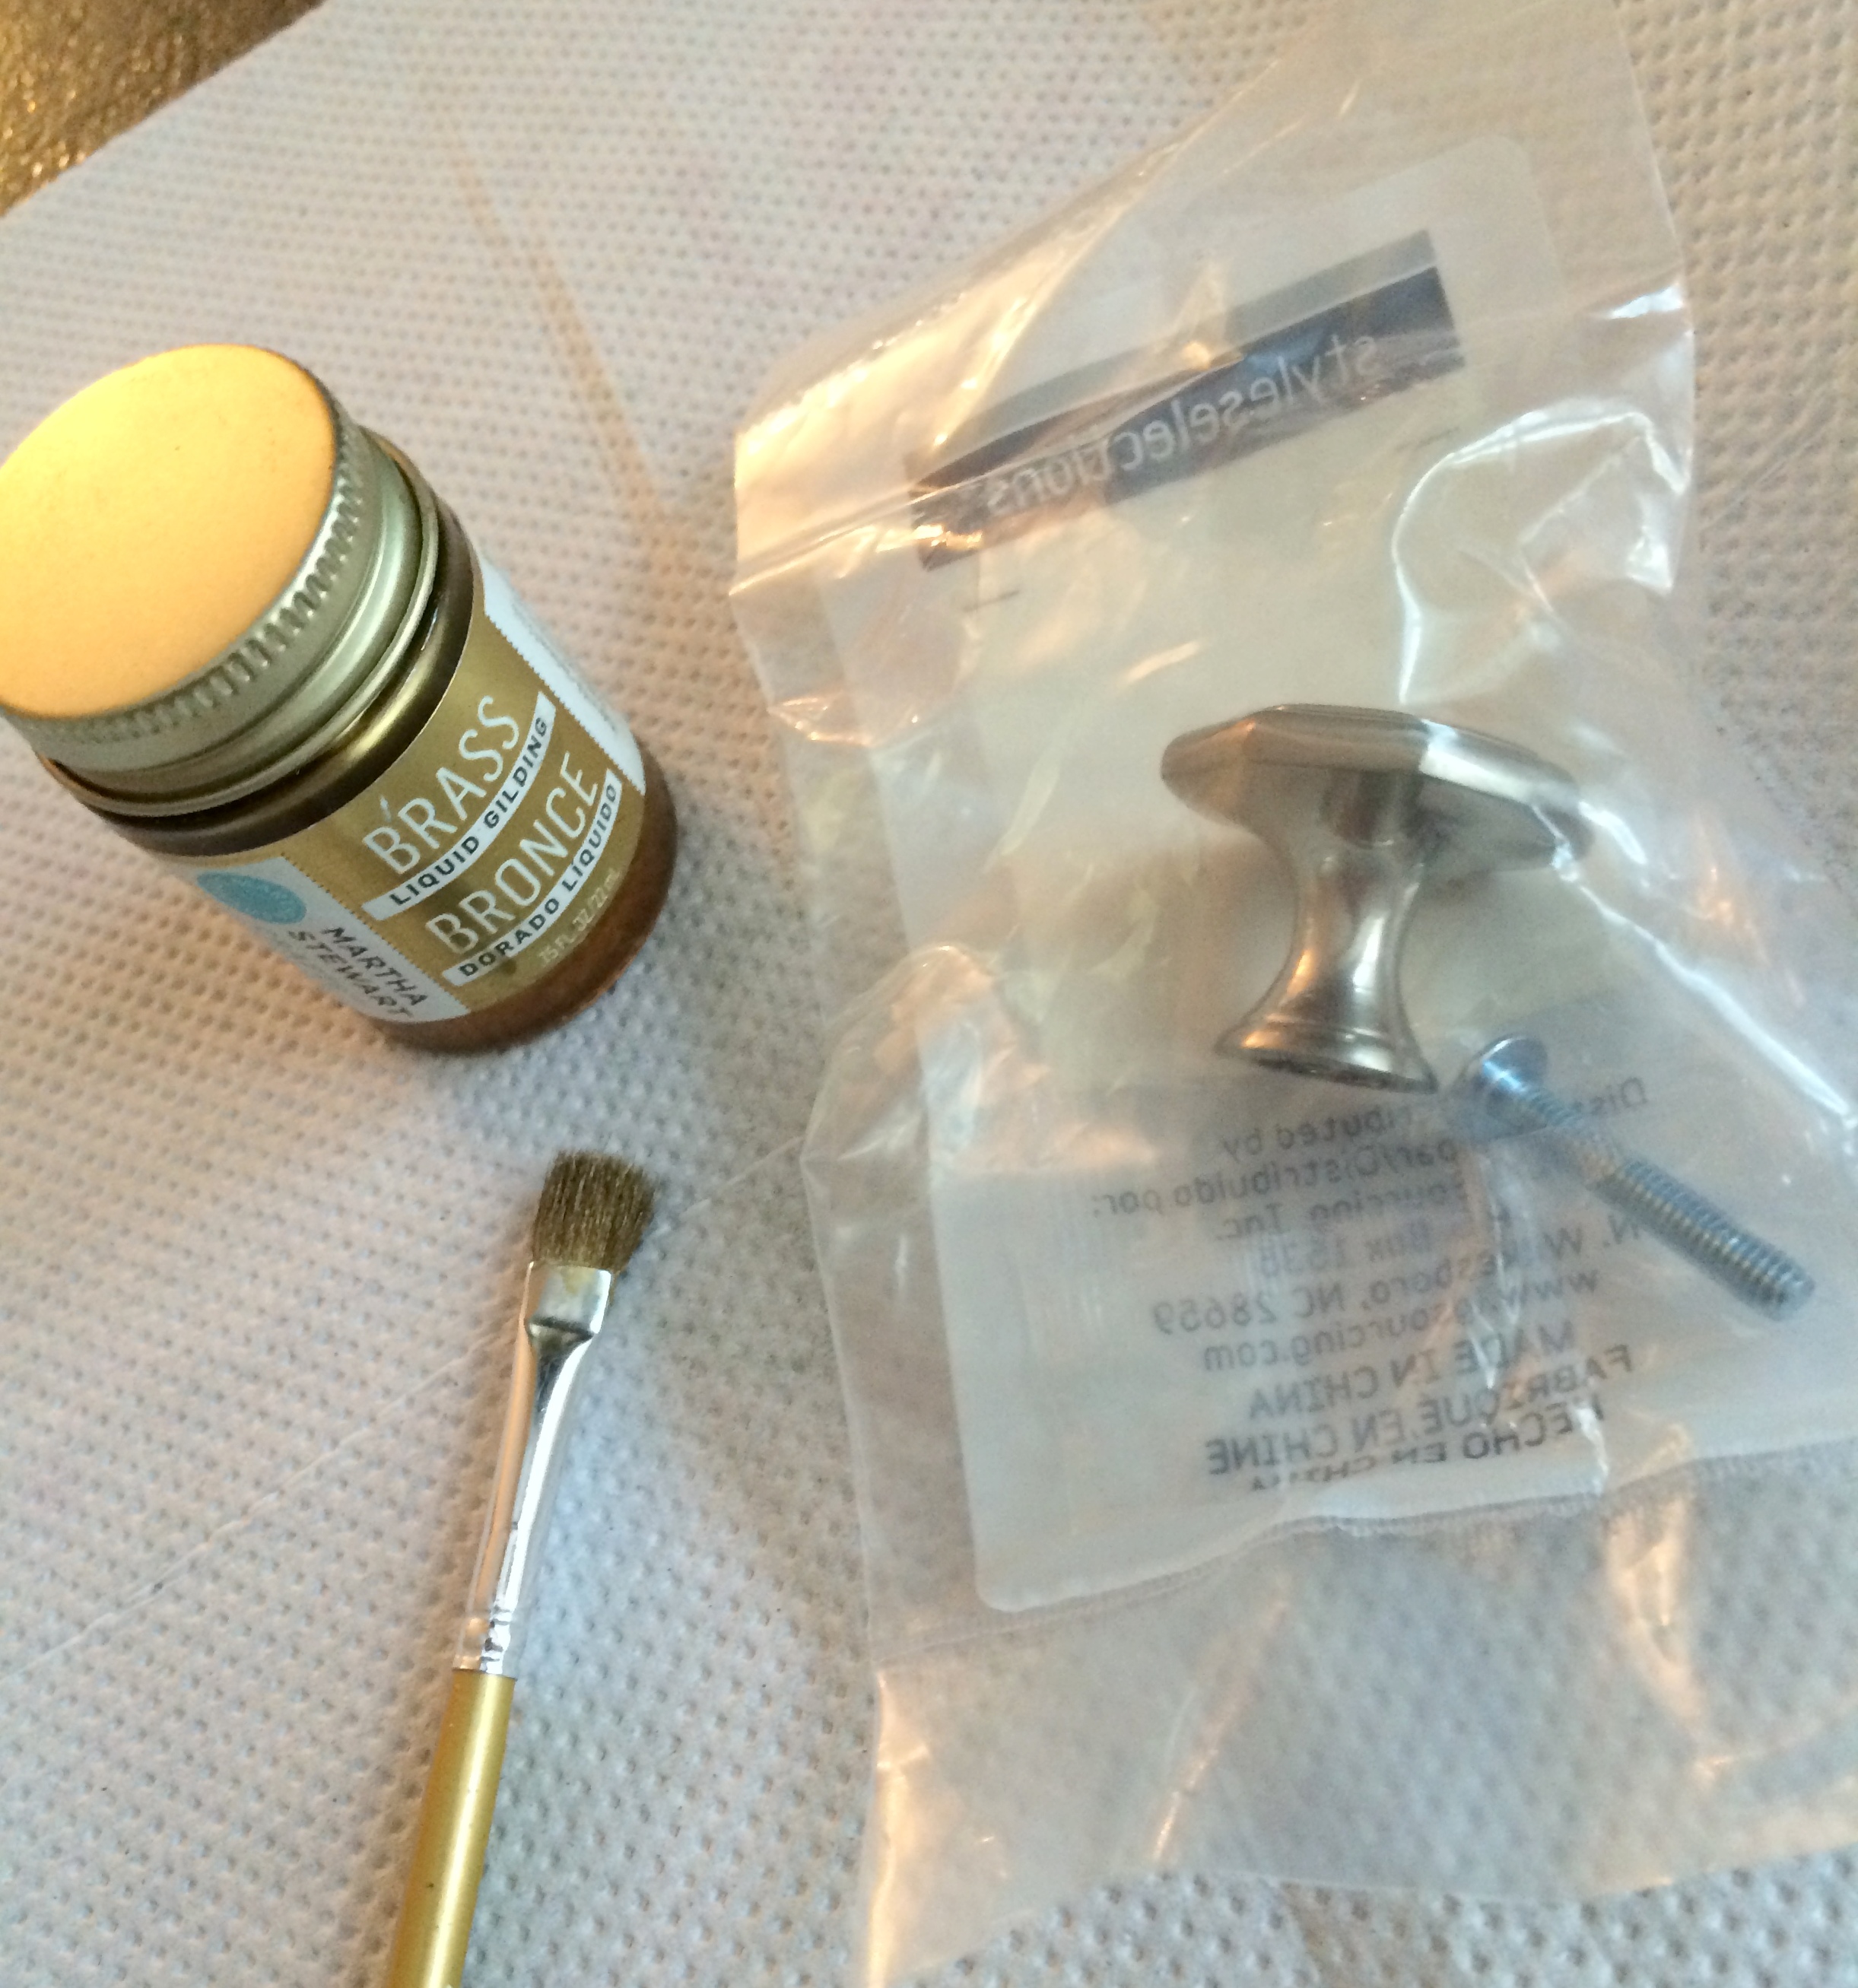
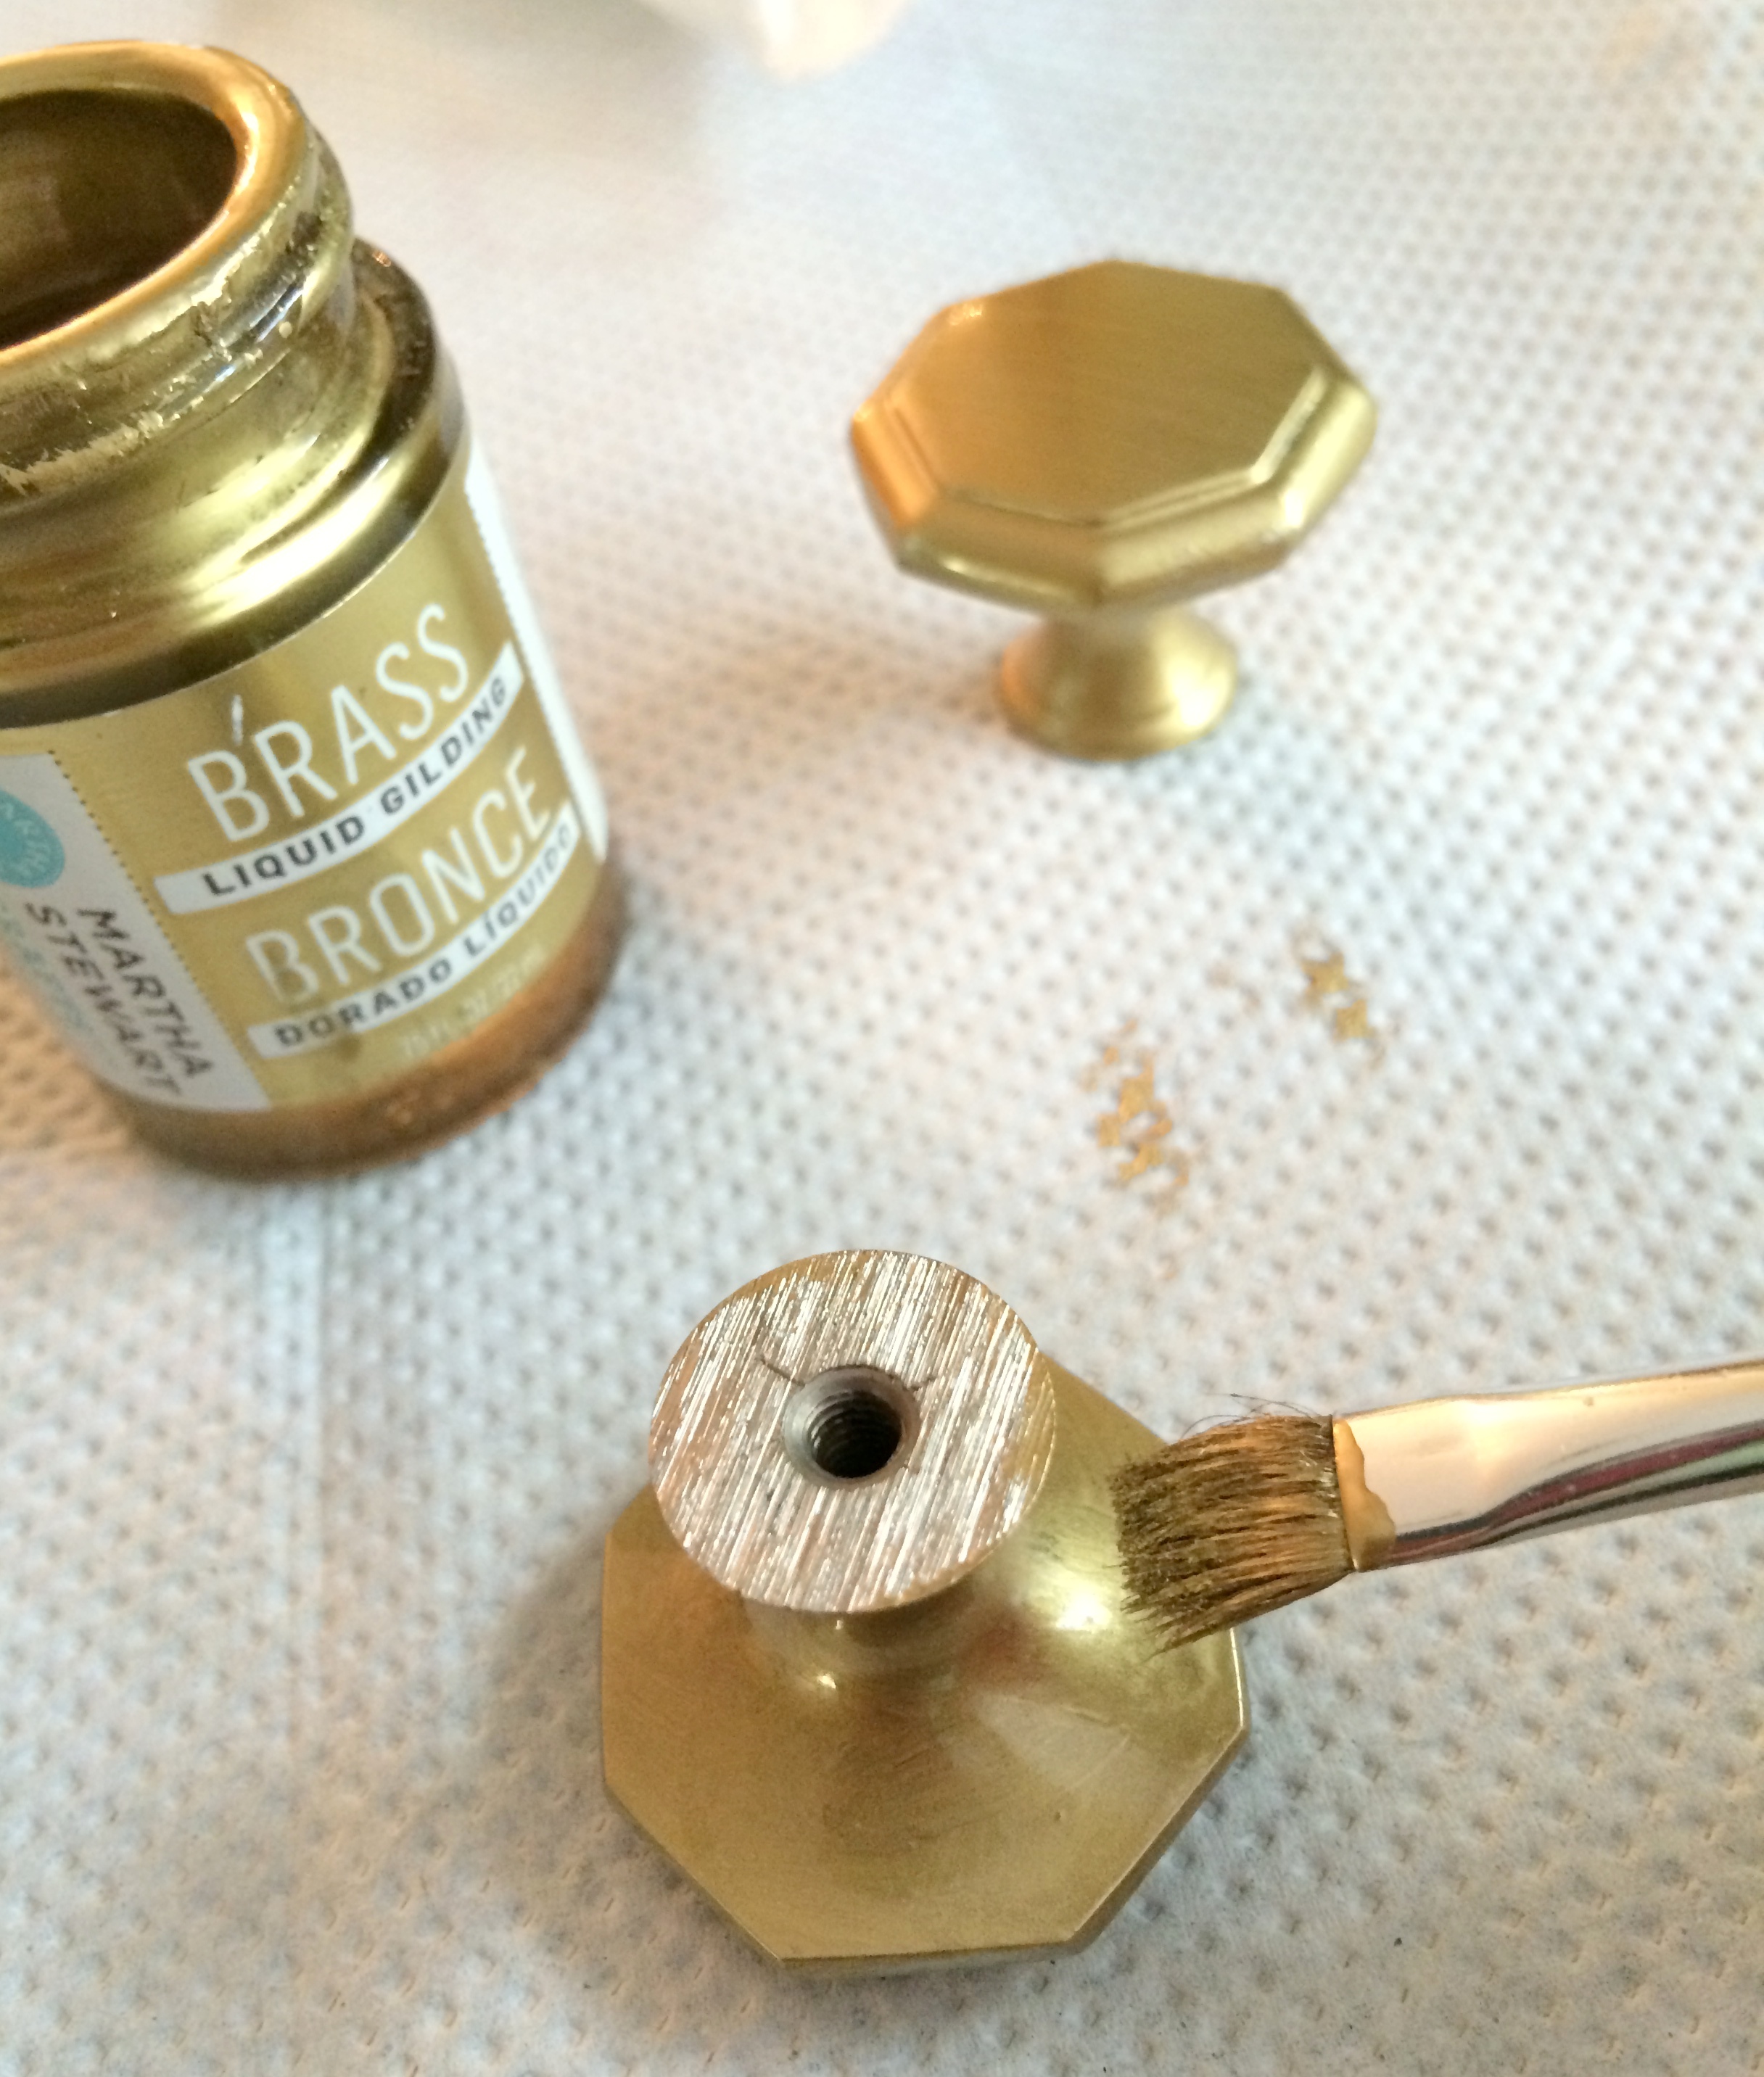
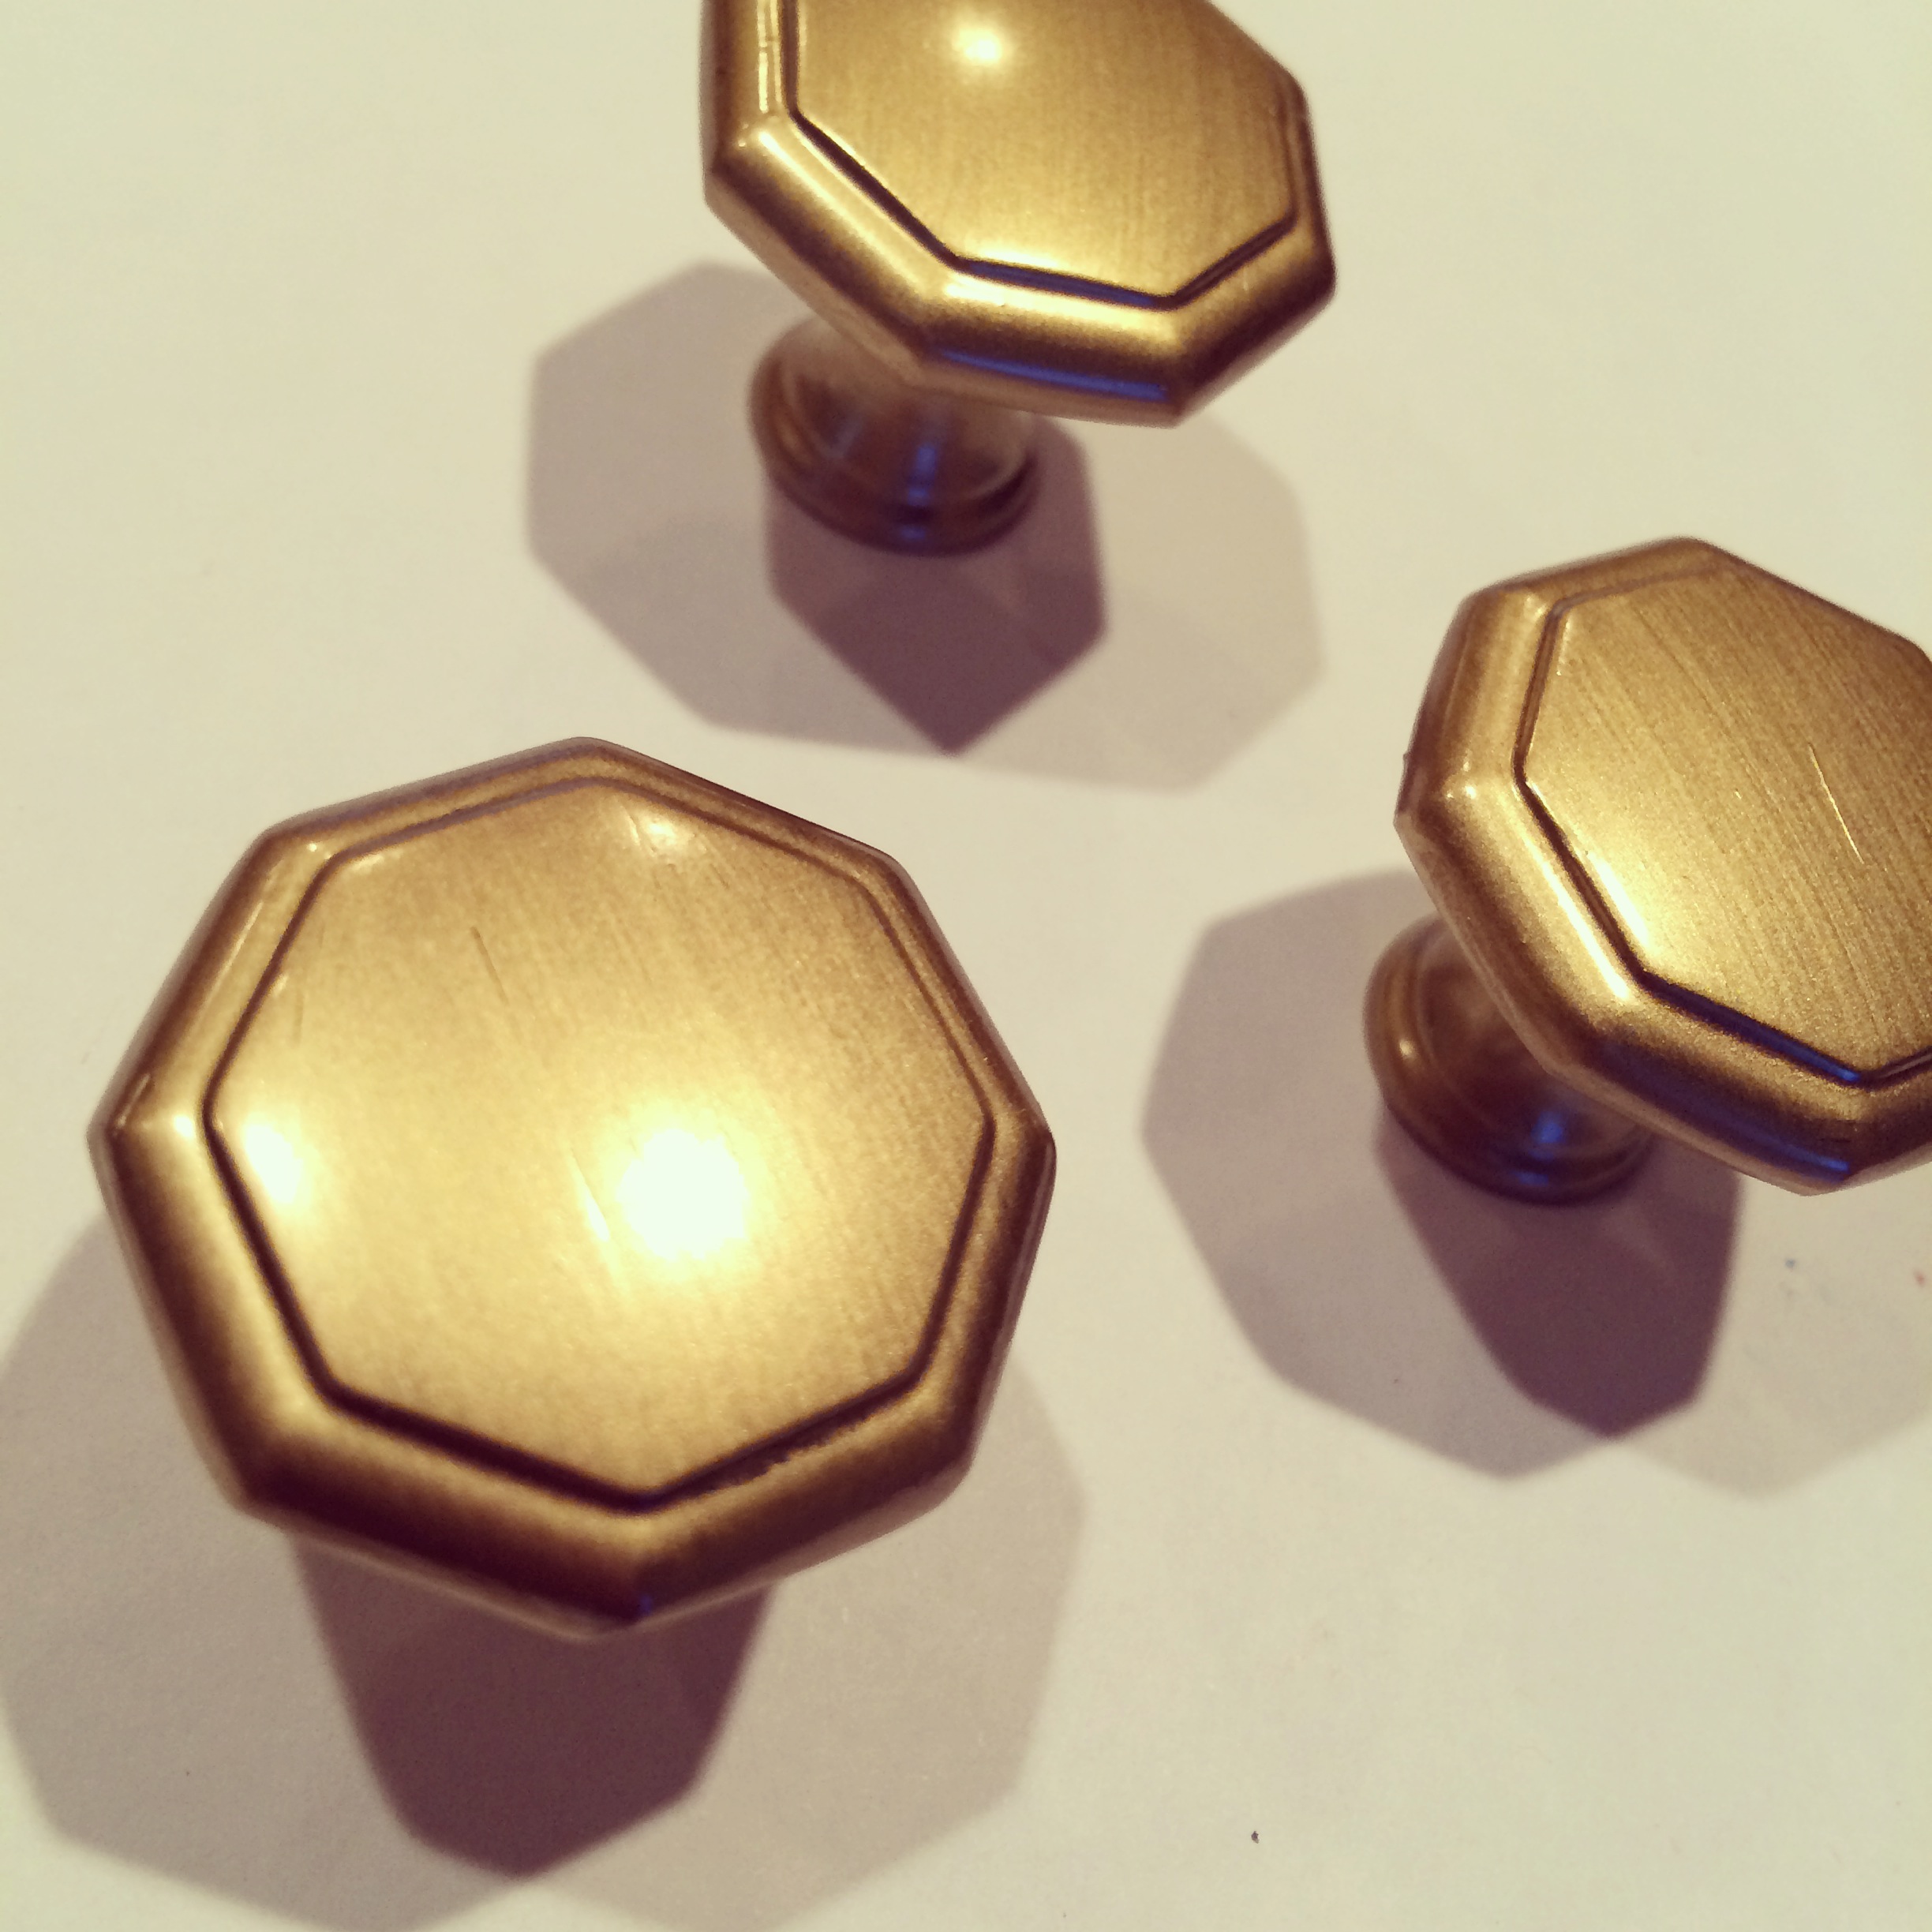
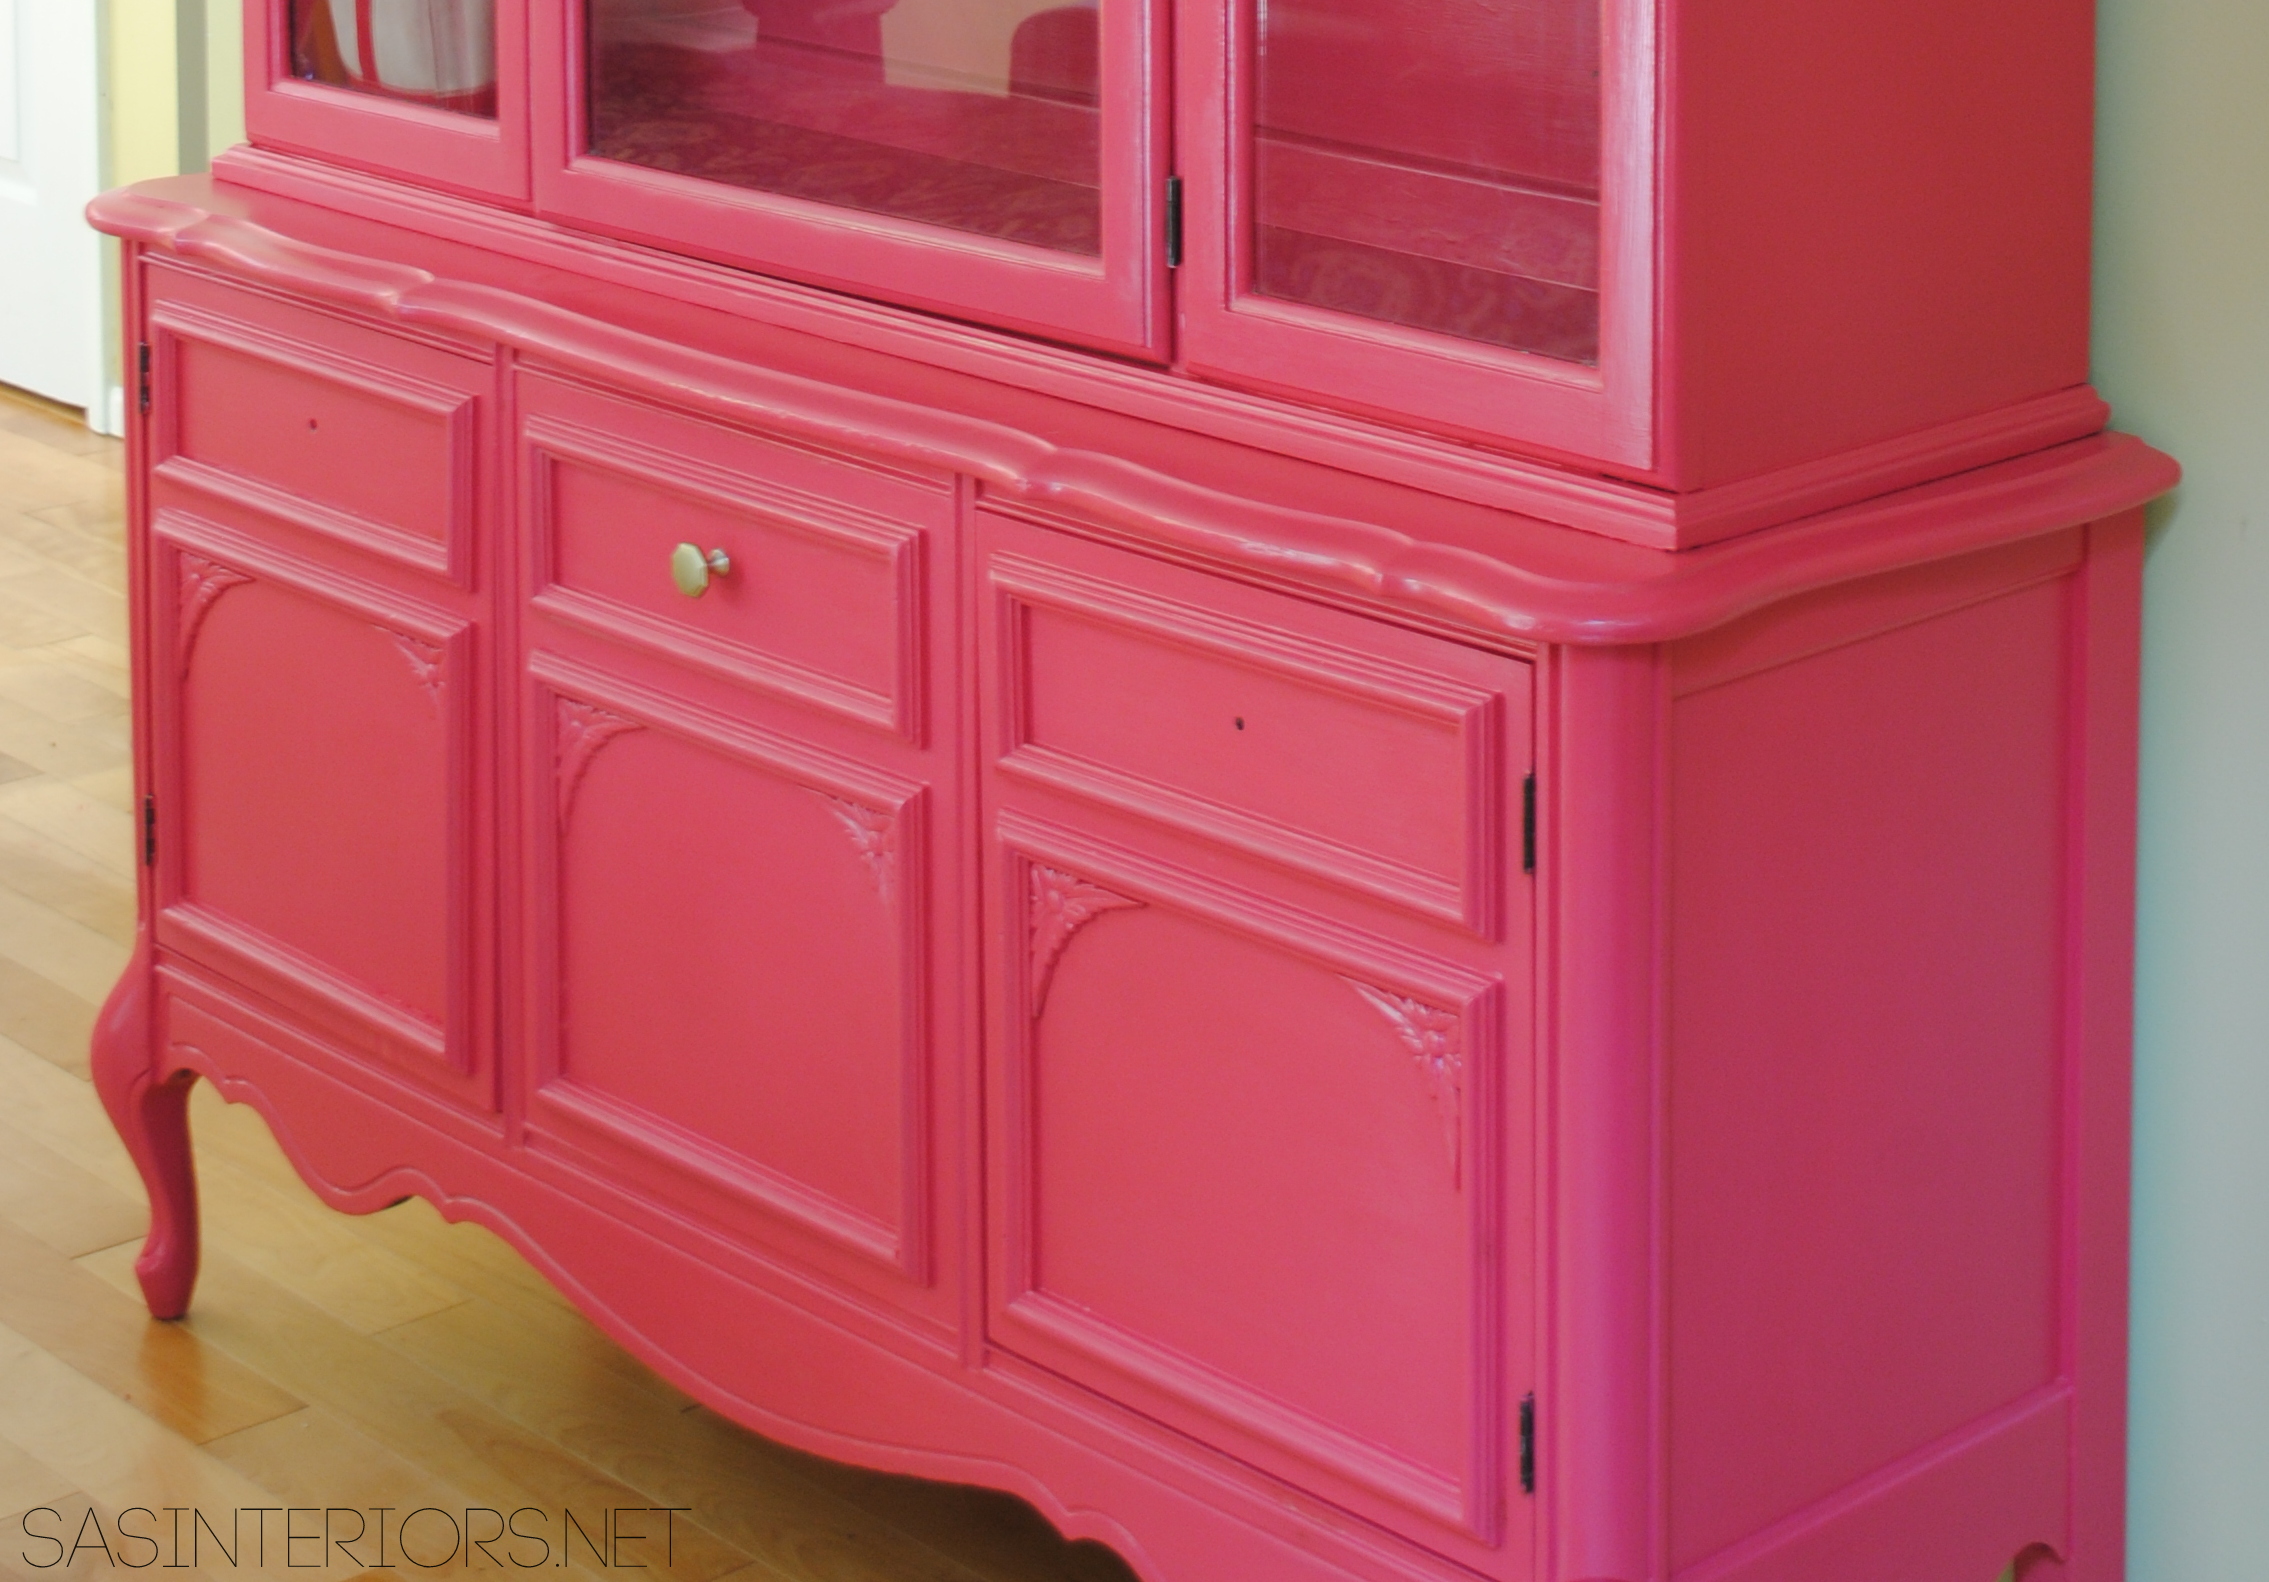
When I couldn’t find the exact hardware I had envisioned, I DIYed it to create exactly what I wanted at a fraction of the cost.

China Cabinet before & after >>> The process of giving this piece of a furniture a complete makeover!

Once the jewels hardware was set, it was time to style this gorgeous gal!

It’s now all filled up with our collected plates, glasses, and platters…  Believe me, not one new thing was bought for this revamped beauty.

China Cabinet before & after >>> The process of giving this piece of a furniture a complete makeover!

>>> read more on the Details + Hardware + Styling <<<

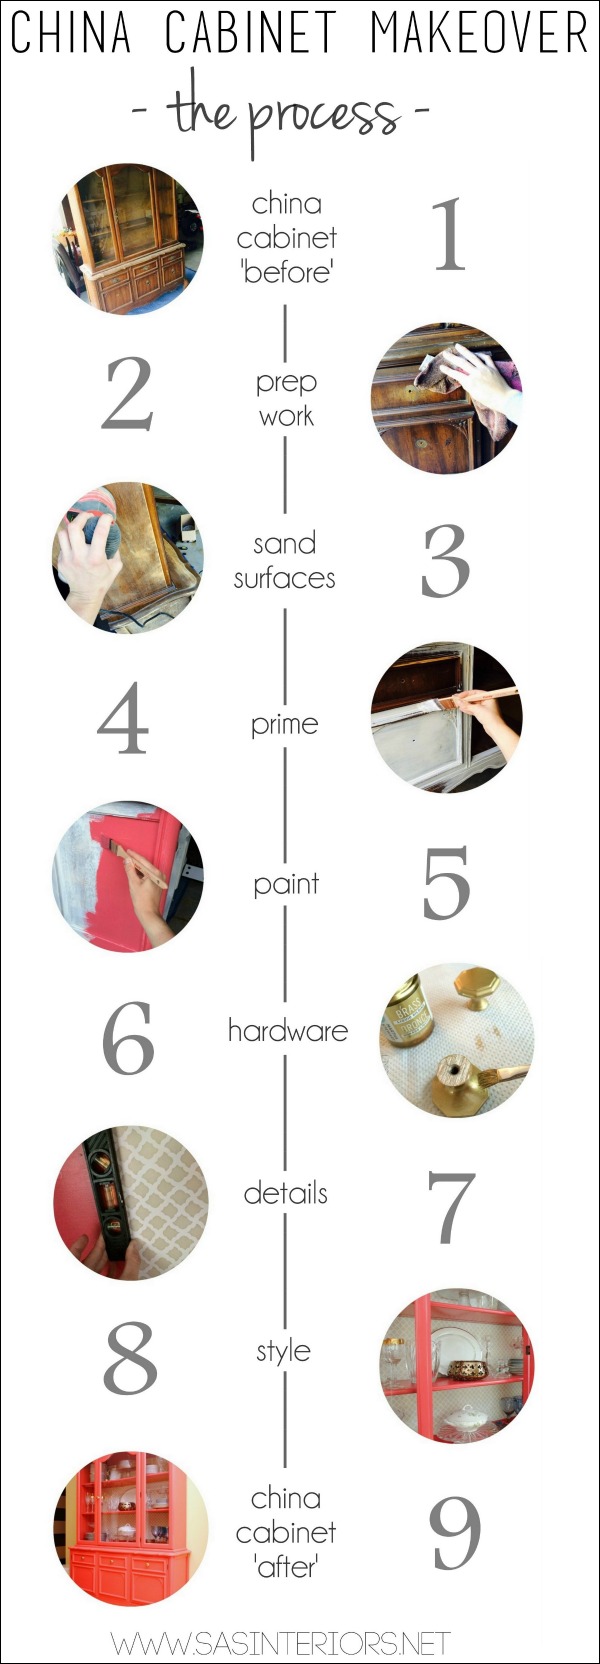
a recap of the process…

China Cabinet before & after >>> The process of giving this piece of a furniture a complete makeover!

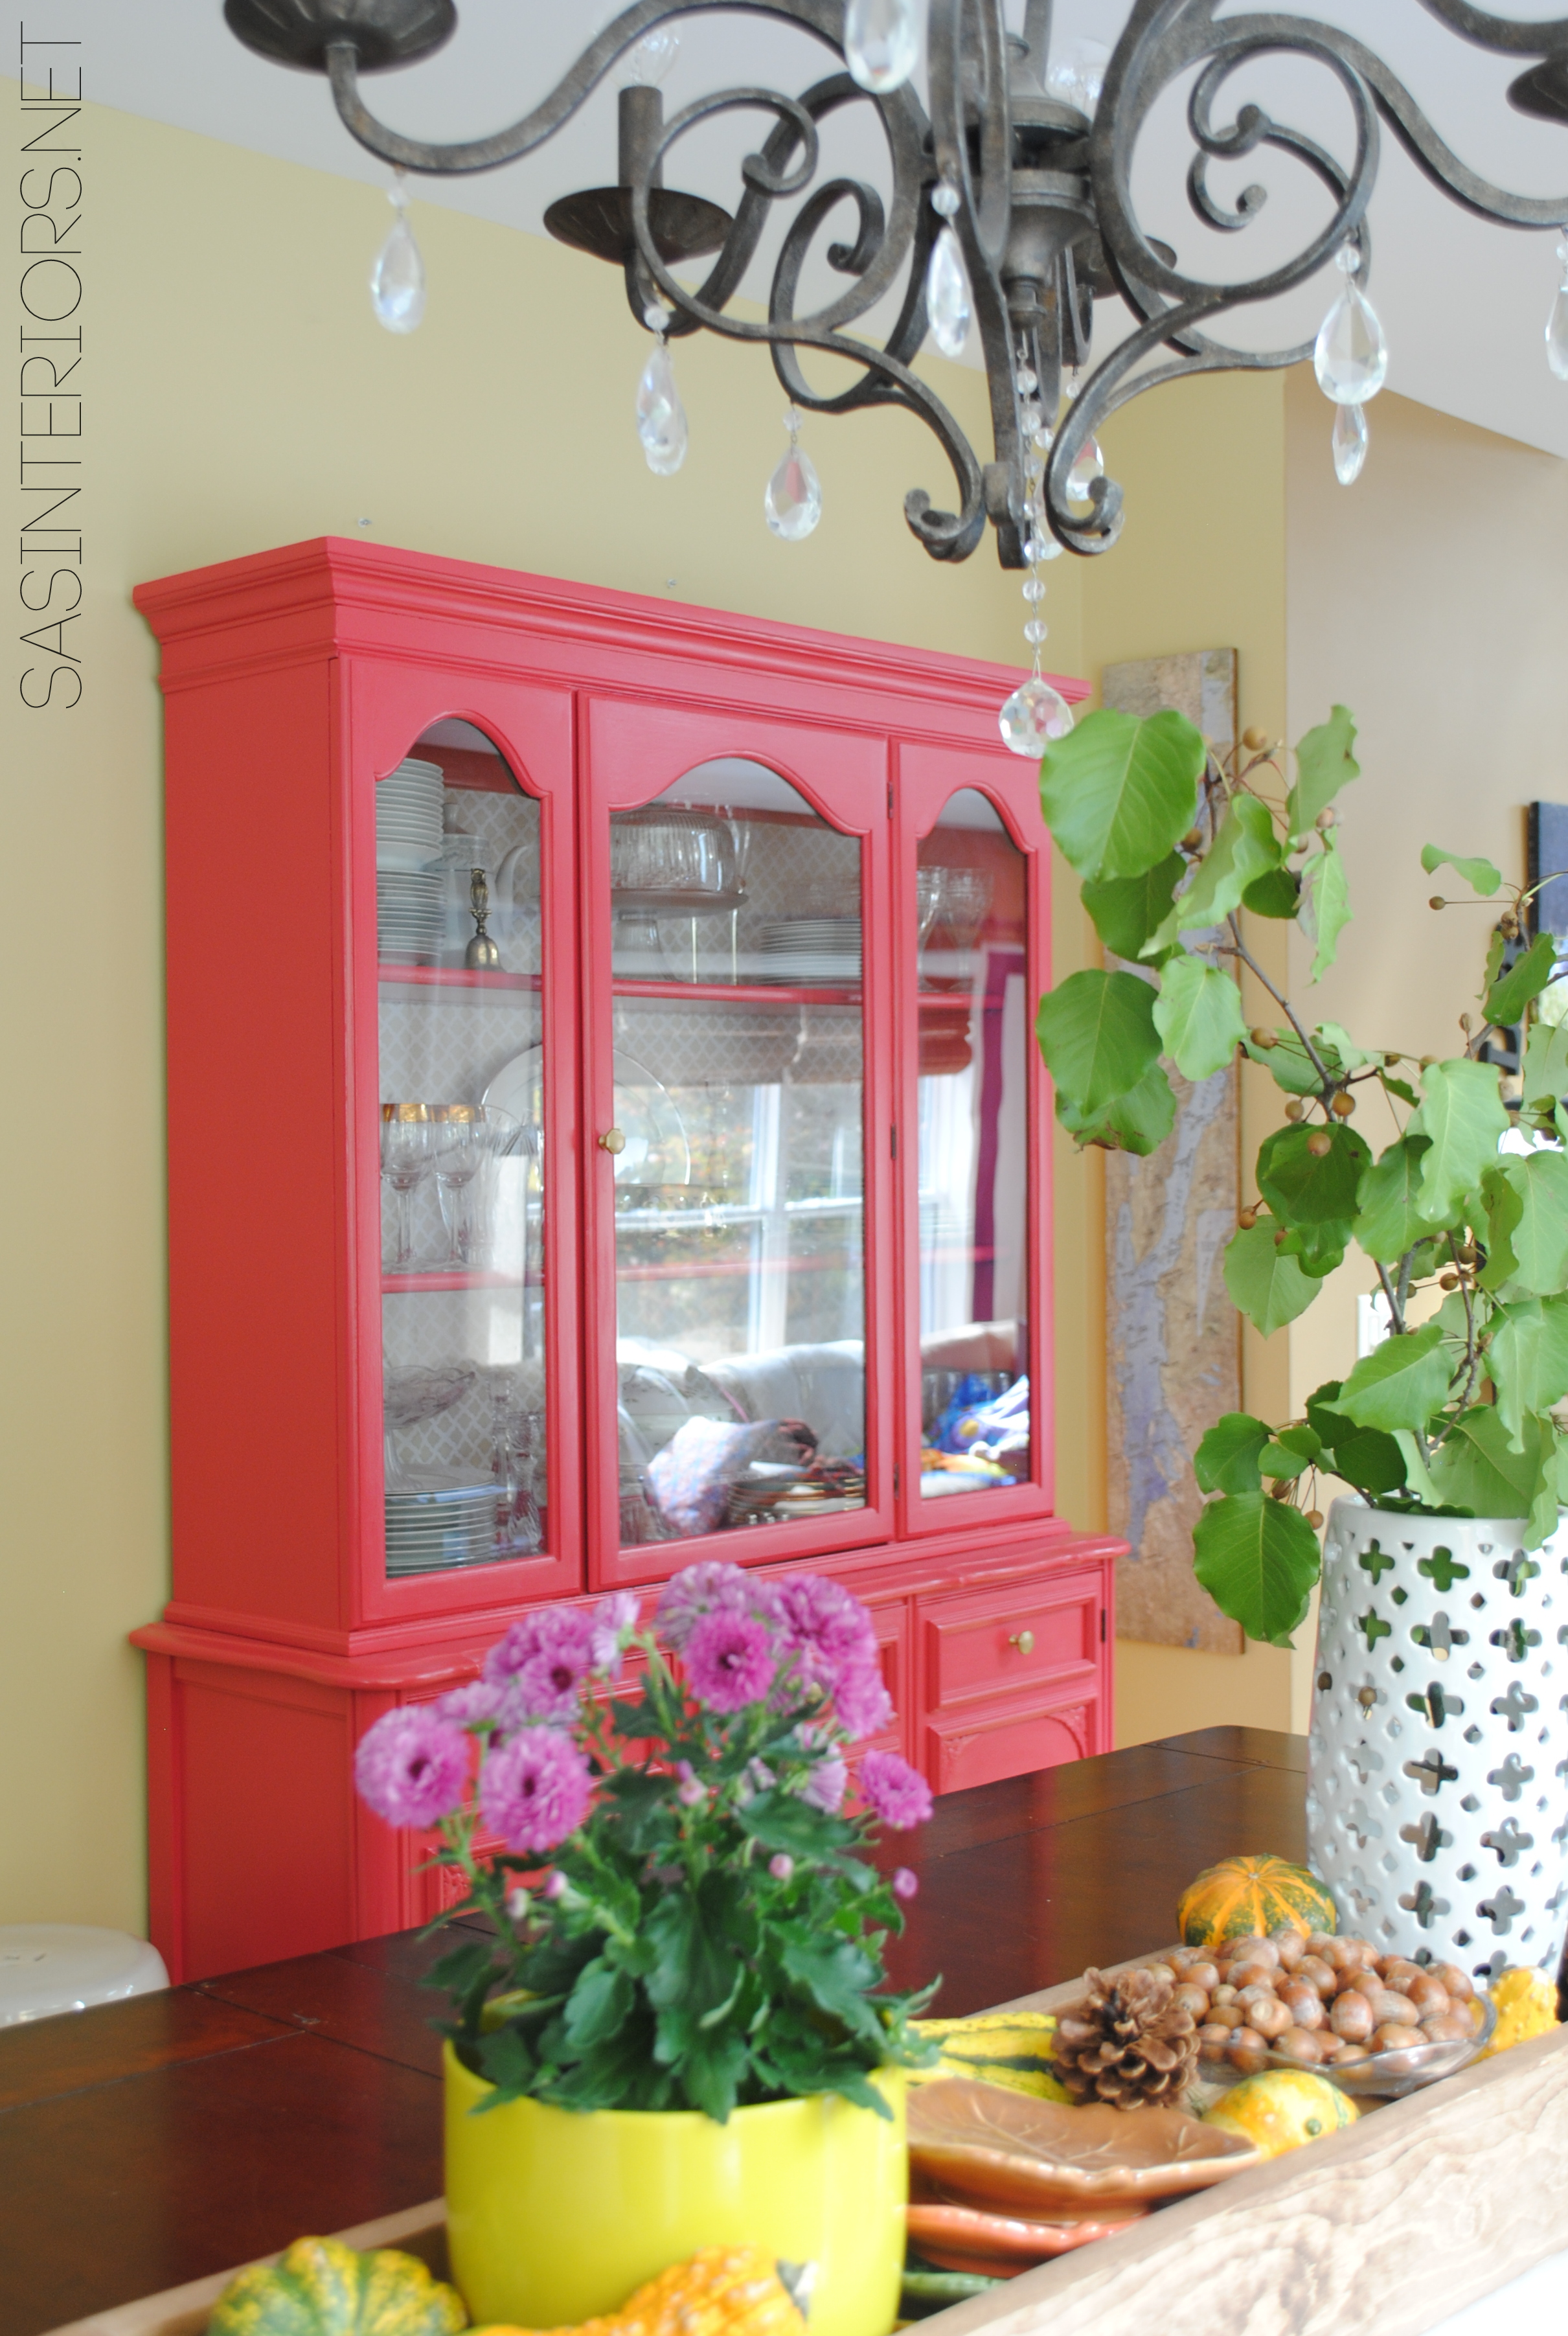
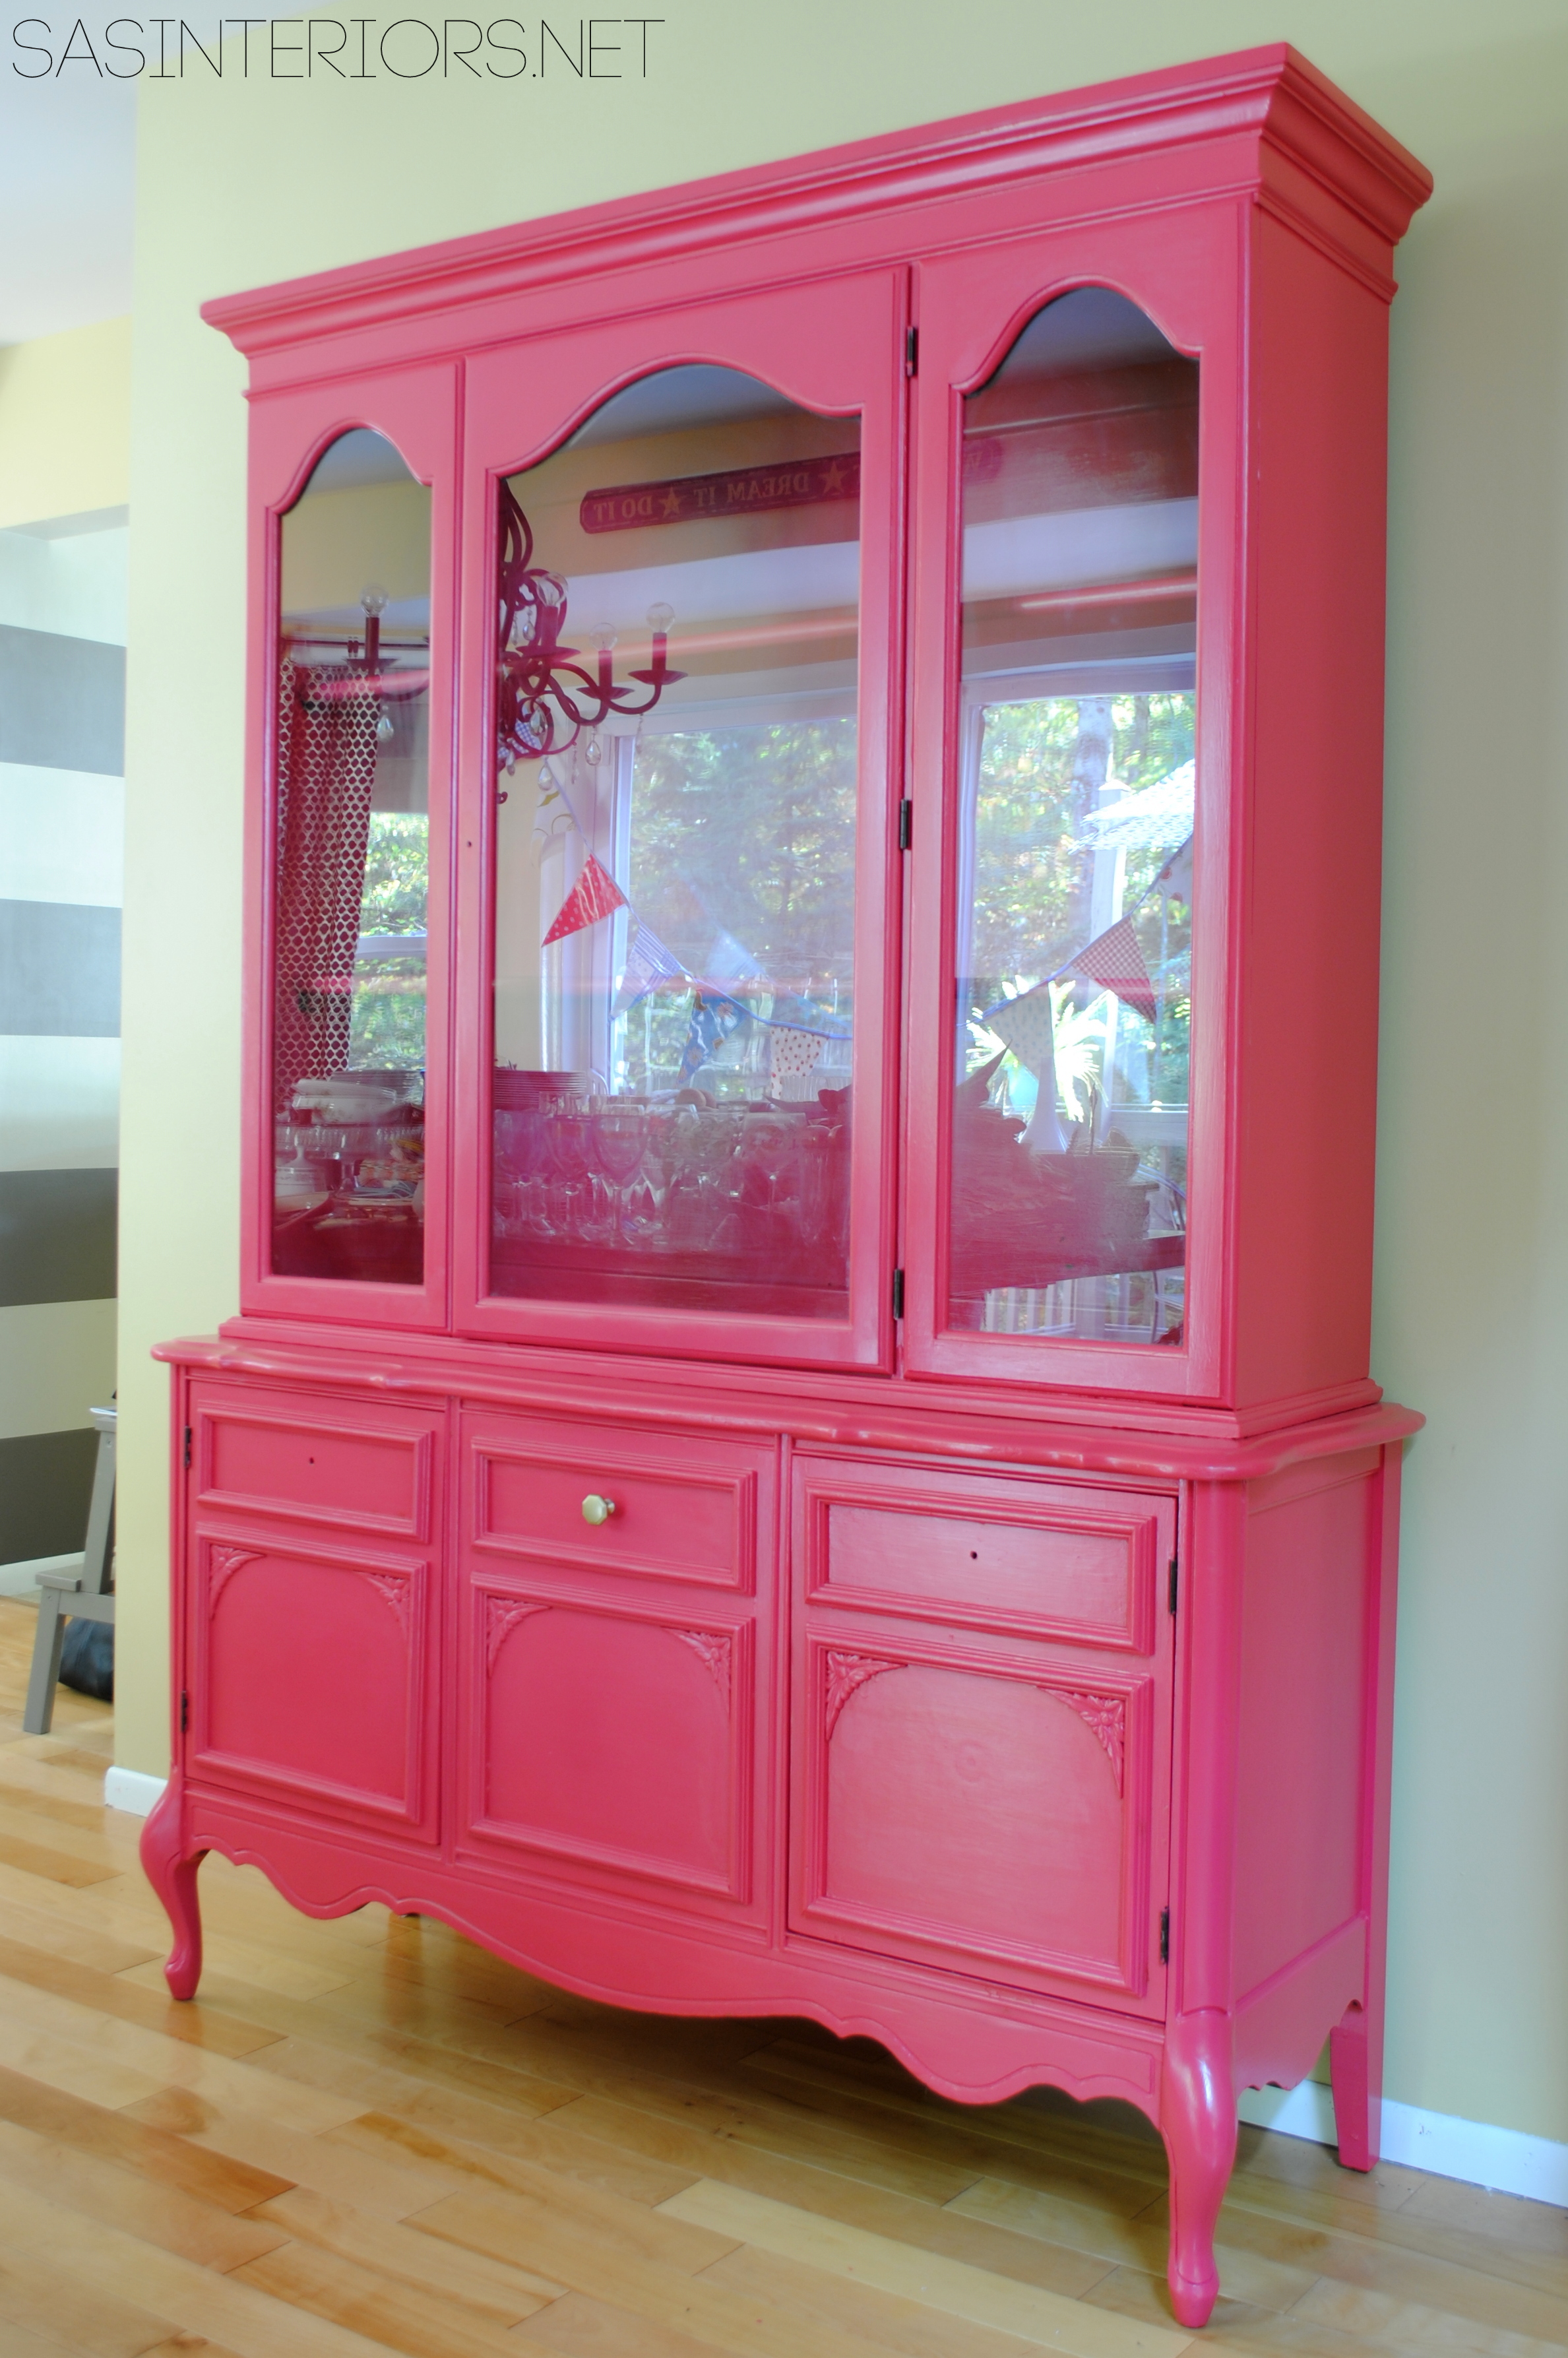
And then she was complete!

The ‘after’…

China Cabinet before & after >>> The process of giving this piece of a furniture a complete makeover!

China Cabinet before & after >>> The process of giving this piece of a furniture a complete makeover!

China Cabinet before & after >>> The process of giving this piece of a furniture a complete makeover!

Styling Tips: Adding unique, one-of-a-kind details to the finish the china cabinet makeover!

Let’s compare one more time…

China Cabinet before & after >>> The process of giving this piece of a furniture a complete makeover!

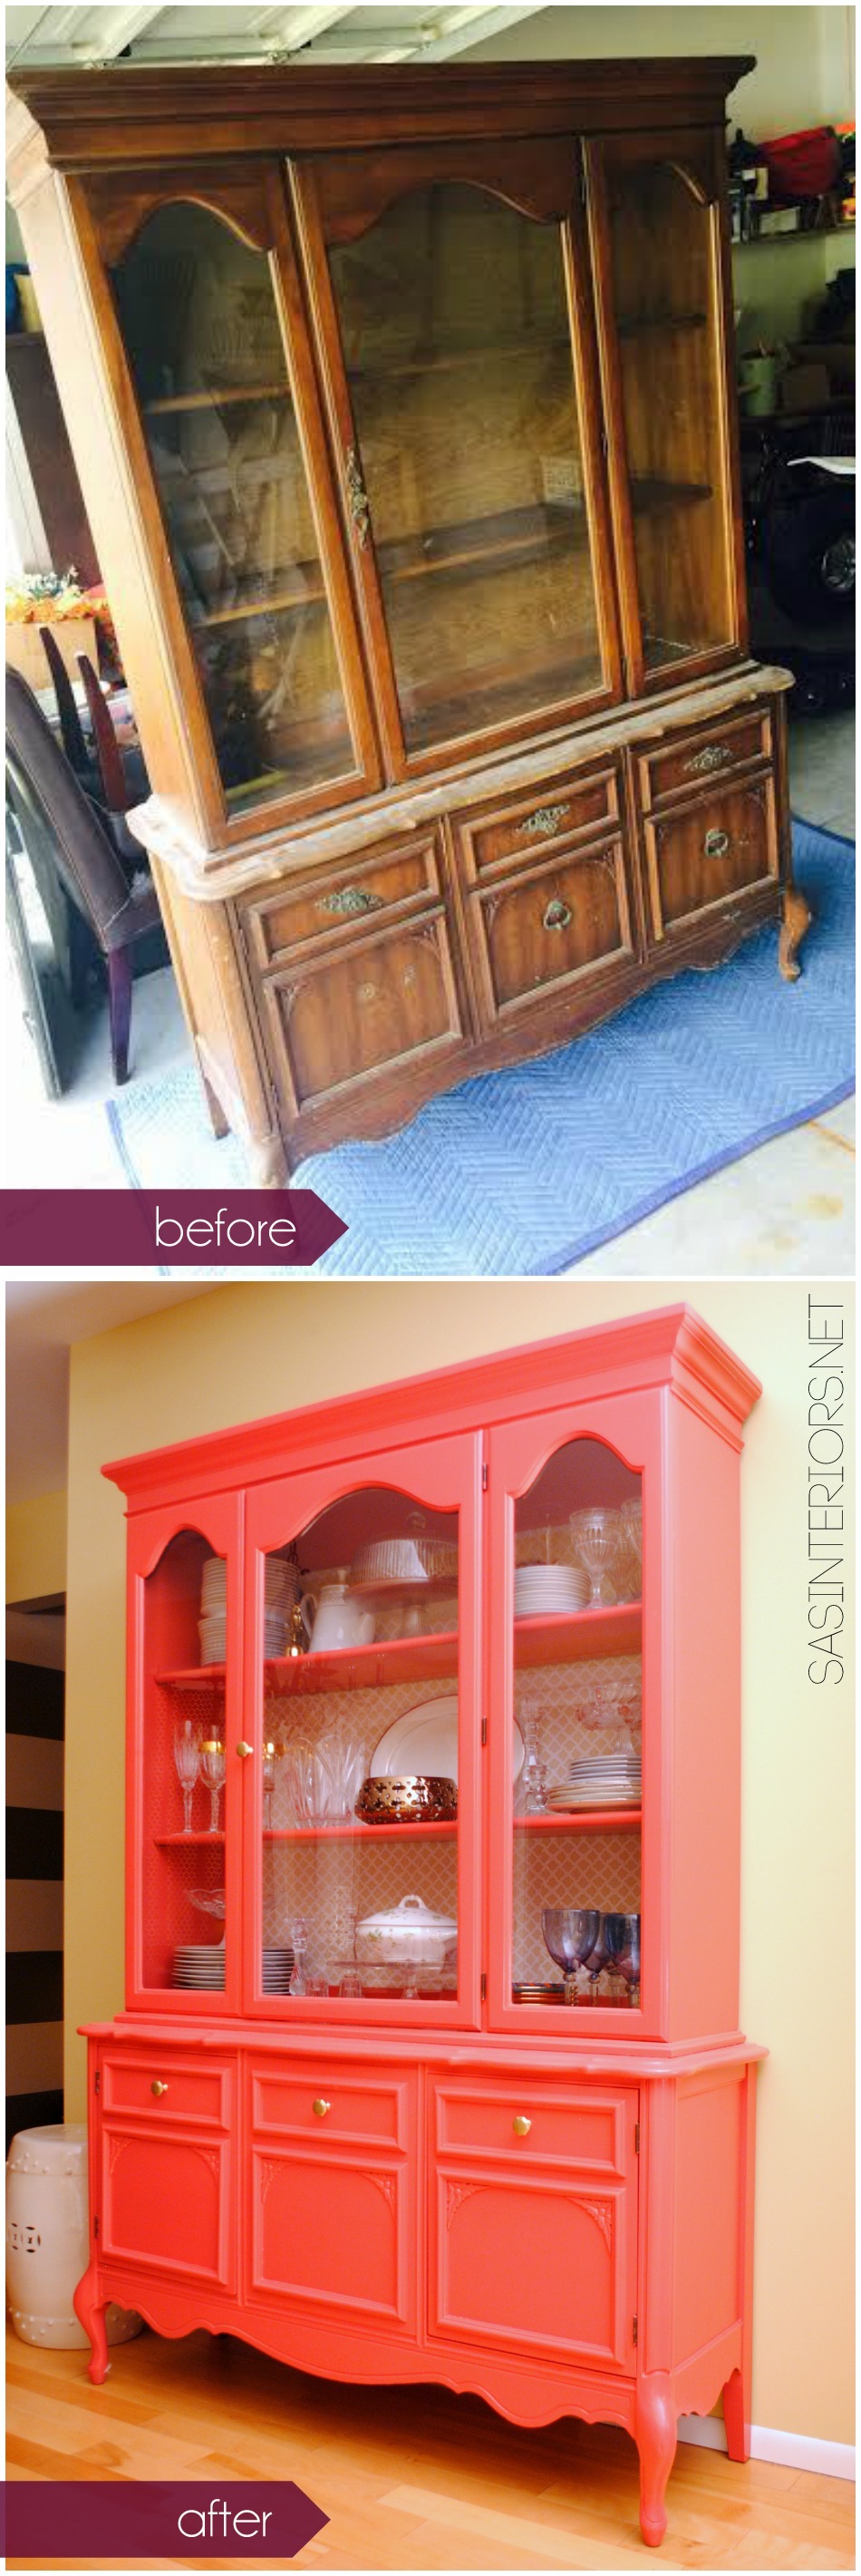
What do you think?  Pretty major change, right?!

Thank you so much for following along on this Tale of a China Cabinet Makeover!  I’ve received countless emails, comments, and messages on how the multiple posts and step-by-step breakdown of the process has been an inspiration.  From your notes, it sounds like many of you have had the urge to paint that piece of furniture but either didn’t know how, weren’t sure of the process, or didn’t have the inspiration needed to get started.  I hope I’ve pushed you enough to make the move!

Here are the many posts related to this before and after
Backstory + Choosing a Color
Prepping & Sanding Wood Furniture
Why & How to Prime Wood Furniture
Tips + Tricks to Painting Wood Furniture
Accessories, Details, & Styling {China Cabinet Makeover}
China Cabinet Makeover {Reveal}

This post is sponsored by Glidden paint, but all thoughts and opinions are 100% my own.  I am so excited about this project & was thrilled to partner with Glidden paint on this furniture makeover.

Details + Hardware + Styling {China Cabinet Makeover}

Yes, the paint color is unexpected, but adding a few other unique details to the china cabinet makeover has really made it a one-of-a-kind, perfect piece (in my eyes).

Last week I finished the most tedious part of the makeover which was painting the cabinet.  It took a few days and lots of patience, but the effort was absolutely worth the result in my book!  Once the cabinet was complete and dry, I started styling the interior.  After living with it for a few days (and sharing a peak on IG), I knew it needed something.  I loved the overall dramatic color, but I did want to pare it down a bit and decided to add a special something to the back + this bad boy needed some hardware!  Take a look…

Adding unique, one-of-a-kind details to the finish the china cabinet makeover!

Most of my china dishes and platters are plain white (with simple detailing on the edges) so I thought sitting against a dark background they’d look great.  Unfortunately though, the interior seemed kind of cavernous, so bringing in something lighter for the back of the cabinet made sense. I found this pretty patterned contact paper and thought it would be the ideal addition to lighten and brighten the cabinet.

Con-Tact Brand Creative Covering Self-Adhesive Shelf Liner, Talisman Pale Grey

Details.

This is a similar project/process to when I added the geometric contact paper to my media cabinet

After finding the center of the cabinet, I started off by adding the contact paper at the top edge.  I then slowly peeled off the backing, section by section, and adhered the paper to the cabinet back while pushing out the air bubbles with my hand.

Adding unique, one-of-a-kind details to the finish the china cabinet makeover!

I also made sure it was vertically plumb so it was hung straight.

Adding unique, one-of-a-kind details to the finish the china cabinet makeover!

Once I was towards the bottom, I left about an 1-2″ extra and cut the contact paper with scissors.  I followed that by using a straight edge blade and trimmed the paper so it fit perfectly at the bottom.  I also did the same at the top…

Adding unique, one-of-a-kind details to the finish the china cabinet makeover!

Once the center panel was done, I added the self-adhesive paper to the other two sides.  In the end, just being honest, there were a few air bubbles that I could not get out.  O well, it’s not perfect…  The dishes and layered accessories will hide those messy spots.

Adding unique, one-of-a-kind details to the finish the china cabinet makeover!

Once that was complete, I was able to accessorize!  But before that, I want to show you what I did with the hardware.

Hardware.

Remember at the beginning of this project I wasn’t sure what to do with the hardware… go with new or use what was original?  Well I decided on new.  Why? 2 reasons.  (1) Some of the hardware was missing – good reason for new, right? (2) I really wanted this piece to be a mix of old and new.  I adore the traditional lines of this cabinet (old), yet the color and the added details are more modern (new)… thus my style, Classic Eclectic!

For the hardware, I wanted a bit bling-bling, but on a budget.  On one of my daily trips to Lowe’s, I found these beautiful octagonal shaped knobs.  I really wanted a brass finish, but they didn’t have them, but for $3 +/- a knob, I couldn’t leave them.  So I painted them…

DIY Hardware: Adding unique, one-of-a-kind details to the finish the china cabinet makeover!

Using brass paint (liquid brass gilding, to be exact) that I had from another project, I painted them using a small brush.  It dried within minutes and this unique detail was added to the cabinet.

Adding unique, one-of-a-kind details to the finish the china cabinet makeover!

Adding unique, one-of-a-kind details to the finish the china cabinet makeover!

Check out the before and after of the hardware…

Hardware for the china cabinet makeover before & after

As I shared in the first post [prepping & sanding], I removed the existing hardware before getting started on the makeover.  To hide the holes that were on the door fronts, I used wood filler and then sanded once it was dry.  The holes that are on the sections that look like drawers, but really aren’t, remained and that is where the new knobs were installed.

What a change, right?!

Hardware for the china cabinet makeover before & after

Styling.

The last part of the makeover was beautifying it with all my stuff… my treasures!  Instead of showcasing my china + bowls + glasses the traditional way – by the set (plate/dish/bowl/cup) – I went for a more casual, non-symmetrical route of stacking the plates and dishes, and ‘displaying’ the glasses in groups.  This allowed me to maximize the space provided, plus achieve a simpler, less tailored look.

When I started the styling process, I began with the large stack of dinner plates and because they were the heaviest (physically and visually), I put those on the bottom shelf.  Then on the middle shelf on the other side, I added in some other random larger + smaller plates and stacked a few glass bowls on top.  After adding in some wine glasses (groups of 3 or 6 looked best) on the each side , I stepped back and it looked like this…

Styling Tips: Adding unique, one-of-a-kind details to the finish the china cabinet makeover!

I then added in some more pieces to balance out what I had started with.  Basically, the plates and glasses are mixed together on each side.  Neither side is weighted with only plates and/or only glasses.

Achieving balance is key to successful styling or a successful visual vignette!

Styling Tips: Adding unique, one-of-a-kind details to the finish the china cabinet makeover!

I saved the center section of the top cabinet for serving pieces, platters, and bowls.  I centered some of the elements, which gives a traditional feel, but other elements are off-center which brings a casual, organic feel.

After adding, editing, moving, and contemplating, it was finished.  Styling can be a little tricky, but go with what feels/looks right.

Styling Tips: Adding unique, one-of-a-kind details to the finish the china cabinet makeover!

For those not-so-pretty pieces or one-offs, I stored them in the closed section below.  I love space with doors… perfect for the not-to-seen decor.

Confession time…  I tried getting a picture of the overall styled cabinet, but it was impossible without capturing the reflection as well.   I’m not the best photographer, but I try 🙂

Styling Tips: Adding unique, one-of-a-kind details to the finish the china cabinet makeover!

I adore how the dining space is coming together and looks so beautiful for Fall…

Adding unique, one-of-a-kind details to the finish the china cabinet makeover!

What a transformation, right?!  Now that the cabinet is styled, it’s 99% complete.  The next post on this china cabinet makeover will be the reveal – yay!  Coming Soon…

Follow along on this makeover with these other posts
Backstory + Choosing a Color
Prepping & Sanding Wood Furniture
Why & How to Prime Wood Furniture
Tips + Tricks to Painting Wood Furniture
Accessories, Details, & Styling {China Cabinet Makeover}

Coming up (still to do)
China Cabinet Makeover {Reveal}

How-To Paint Wood Furniture

Prep is done.

Sanding is complete. >>> [tutorial here]

Priming is finished. >>> [tutorial here]

Now on to the painting.  This was definitely the longest + most tedious part of the makeover, but absolutely the most important step to focus on.  With all the work that has gone in to prepping this cabinet, or any piece of furniture for that matter, painting it right really makes all the difference in the world to achieve a nice looking end product.

This post is completely dedicated to sharing the steps I took + tips & tricks on how-to successfully paint wood furniture.

DIY Tutorial: tips + tricks on How-To Successfully Paint Wood Furniture. Follow along on this multi-post blog series of transforming a china cabinet. Easy-to-follow directions and all the steps fully explained!

As I’ve explained and stressed in the previous two posts, the prep work + priming is very important before paint is applied.  To achieve a successful end result, a primer is a must.  For this project, I used Glidden Gripper primer (a picture of it + more details can be found in the last post).  Once the primer is dry, which typically takes little time (about a day), painting can begin.

Before Painting.

  • The Magic Formula. One of my secrets for painting wood furniture is to use floetrol (<- affiliate link).  With all furniture painting projects,  I always add my favorite “formula” to eliminate brushstrokes. It works like a charm to achieve a clean, brushstroke-free surface! (And I wasn’t even paid to say that – I truly just love it ;)
  • The Brush.  The brush used for painting really does make a difference.  I always use Purdy brushes because they truly make for an easier, better painting result. Yes they are expensive, but it’s worth the cost.  Most of the time I use a new brush when starting a project. (Again, I wasn’t paid to say that)

DIY Tutorial: tips + tricks on How-To Successfully Paint Wood Furniture. Follow along on this multi-post blog series of transforming a china cabinet. Easy-to-follow directions and all the steps fully explained!

The Color.

The paint color I chose for this cabinet makeover is Red Red Rose by Glidden.

How-To Paint Wood Furniture.

When painting furniture, like this china cabinet, I started on one side of the base cabinet and continued across to the other side while working in small sections.  I always continually look at what was just painted to check for drips, which you want to avoid as much as possible!

Typically I will add paint to the overall surface and then go back to smooth it out so all the strokes are in one direction (usually you want to follow the grain of the wood, but it’s not a must since with paint you don’t see the grain).

DIY Tutorial: tips + tricks on How-To Successfully Paint Wood Furniture. Follow along on this multi-post blog series of transforming a china cabinet. Easy-to-follow directions and all the steps fully explained!

Even if you try to avoid them, drips are normal.  To deal with those nasty, inevitable paint drips, I sand them off once they are completely dry.  Using an orbital sander is easiest, but sanding the spot by hand also works.  If you catch the drip before it’s dry, then go over it with your paint brush to smooth it out.

DIY Tutorial: tips + tricks on How-To Successfully Paint Wood Furniture. Follow along on this multi-post blog series of transforming a china cabinet. Easy-to-follow directions and all the steps fully explained!

I didn’t take a picture of me sanding that drip, but here is one from another section of the cabinet…

Once the paint was dry, I lightly went over the drip to smooth out the section of cabinet.

DIY Tutorial: tips + tricks on How-To Successfully Paint Wood Furniture. Follow along on this multi-post blog series of transforming a china cabinet. Easy-to-follow directions and all the steps fully explained!

Another issue I encountered  which I didn’t like was the result of the buffet top once the first coat of paint was on.  I guess when I added the primer, I didn’t continue my brush stroke from on side to the other, so the top surface looked bumpy.  Once the first coat of paint was dry, I lightly sanded the surface. This left the top very smooth and ready for coat #2.

DIY Tutorial: tips + tricks on How-To Successfully Paint Wood Furniture. Follow along on this multi-post blog series of transforming a china cabinet. Easy-to-follow directions and all the steps fully explained!

Coat #2

DIY Tutorial: tips + tricks on How-To Successfully Paint Wood Furniture. Follow along on this multi-post blog series of transforming a china cabinet. Easy-to-follow directions and all the steps fully explained!

In all the top got about 3-4 coats.  All the other areas of the cabinet got 3 coats.  Because of the intense color 2 coats wasn’t enough.

Here are some more outtakes while painting…

The cabinet fronts.

DIY Tutorial: tips + tricks on How-To Successfully Paint Wood Furniture. Follow along on this multi-post blog series of transforming a china cabinet. Easy-to-follow directions and all the steps fully explained!

The cabinet top.

DIY Tutorial: tips + tricks on How-To Successfully Paint Wood Furniture. Follow along on this multi-post blog series of transforming a china cabinet. Easy-to-follow directions and all the steps fully explained!

The base cabinet after one coat.

DIY Tutorial: tips + tricks on How-To Successfully Paint Wood Furniture. Follow along on this multi-post blog series of transforming a china cabinet. Easy-to-follow directions and all the steps fully explained!

I will tell you, painting the cabinet took a good 3 solid days of off and on work.  It was tiring, but well worth it in the end.  Most of the painting took place at night after the kiddos went to bed which is why the coloring of the cabinet in the pictures looks a bit off.

Here’s a peak at what was my crazy life for a few days.  Just keeping it real…

Once every surface, nook, and cranny were done, it was time to add a coat of polyurethane.

Applying polyurethane is similar to primer… a little goes a long way.  It’s also a lot thinner than paint, so it can easily run creating those annoying drips.  Applying a light coat and fanning it over the surface is best.  It goes on as a white milky liquid, but as you work it into the surface it will be come clear.  And of course it dries clear.

For this cabinet, I used a semi-gloss polyurethane.

DIY Tutorial: tips + tricks on How-To Successfully Paint Wood Furniture. Follow along on this multi-post blog series of transforming a china cabinet. Easy-to-follow directions and all the steps fully explained!

And then it was done.

DIY Tutorial: tips + tricks on How-To Successfully Paint Wood Furniture. Follow along on this multi-post blog series of transforming a china cabinet. Easy-to-follow directions and all the steps fully explained!

Well almost. The painting is complete, but there are still some details that I need to work on, like the hardware and another secret surprise.

But back to the painting result, here are a few closeups…

DIY Tutorial: tips + tricks on How-To Successfully Paint Wood Furniture. Follow along on this multi-post blog series of transforming a china cabinet. Easy-to-follow directions and all the steps fully explained!

DIY Tutorial: tips + tricks on How-To Successfully Paint Wood Furniture. Follow along on this multi-post blog series of transforming a china cabinet. Easy-to-follow directions and all the steps fully explained!

DIY Tutorial: tips + tricks on How-To Successfully Paint Wood Furniture. Follow along on this multi-post blog series of transforming a china cabinet. Easy-to-follow directions and all the steps fully explained!

You see that one piece of hardware on there?  I couldn’t resist giving you a peak at what it will look like once it’s all done.

Next up… styling this pretty gal.  Here’s a peak at the start of the process…

Let’s rewind and take a look at where I started and the progress I’ve made.

DIY Tutorial: tips + tricks on How-To Successfully Paint Wood Furniture. Follow along on this multi-post blog series of transforming a china cabinet. Easy-to-follow directions and all the steps fully explained!

Not too shabby.  More to come.  Stay tuned.

Follow along on this makeover with these other posts
Backstory + Choosing a Color
Prepping & Sanding Wood Furniture
Why & How to Prime Wood Furniture
Tips + Tricks to Painting Wood Furniture
Accessories, Details, & Styling {China Cabinet Makeover}

Check out the  >>> FINAL REVEAL


Why + How to Prime Wood Furniture

It’s been a busy few days around my neck of the woods.  With revamping the china cabinet + another BIG project coming down the pipeline (which I can’t wait to share details about), I haven’t had 5 minutes to sit.  No worries though, I’ll sit when I’m old, ha.

So my last post was all about the beginning steps of prepping & sanding a piece of wood furniture.  The next step, which is what this post is dedicated to, is priming.  Primer is SO important!  I can not stress enough that primer is a must when painting something. anything.  YOU NEED PRIMER.

China Cabinet Makeover: PRIMING! An entire post on Why & How-To Prime a Wood Surface. Priming any surface before painting is so important & it can save you money. Come see the result of how what prime can do & follow along on this furniture makeover

Why Prime.

Whether a room or a piece of furniture, paint is truly one of the easiest & most affordable ways to update and/or change the look of something.   It’s amazing what a fresh coat of paint can do to a wall or a surface.  I read once, “Don’t expect paint to do a primer’s job”.   The purpose of paint is to provide color, but the purpose of primer is to provide the ideal base for the paint to be applied.  Without, the result can fall short.

What does Primer Do?

> Blocks Stain  Primers are made to block the natural pigments (tannin) of the wood and/or original stain from bleeding through the new paint.

> Hides Color  Priming the surface before painting hides / blocks the previous color from showing through.  Using a primer will also sometimes eliminate the need for multiple coats (cost savings!)

> Seals the surface  Priming before painting seals the surface so the paint doesn’t get soaked in.  The prime provides the perfect base for the paint to be applied.  Primer also provides the ideal surface for paint to adhere to.  Typically with a stained piece of furniture, like my china cabinet, the original surface is glossy which paint wouldn’t adhere to.  Adding a primer to a glossy surface will give the provide the ideal underlayment for a beautiful new color.  This same technique can be used for tile, glass, vinyl siding, and aluminum – all slick surfaces that wouldn’t be paintable without primer!

Do you recall when I was painting my laminate bookcase?  I failed to prime a spot and the paint just bubbled and didn’t stick to the surface.  Here’s a picture…

Priming is a must before applying paint!

> Lasting Result  Without primer, paint could easily chip or scrape off very easily + quickly.  Using one (thin) coat of primer + two (typically, maybe more) coats of paint you should have a long lasting, durable result!

The Right Primer.

There are many primers on the market and the decision on the right one for the job can be tricky.  When painting over furniture, you want to choose a primer that indicates on the can that it will block the stain and seal the surface.  The primer that I chose for this china cabinet makeover was Glidden Gripper because it truly grips to the surface and seals the stain from coming through.  It also created the perfect base for the new WILD color I chose.

Glidden Gripper

Applying Primer.

a how-to tutorial on applying primer.  Its so easy…

Note: This is the most important tip I can share about priming (told to me by someone – a pro – in the painting world), primer does not need to be applied like paint. A thin coat of primer is fine and actually better than “globbing” it on.  Primer does not need to fully cover the surface underneath, meaning you can still have wood showing through.  As long as the surface area has a thin coat (one coat), you are set to paint!

When painting a piece of furniture, I always start at one end and make my way across. Why?  Paint dries fairly fast and to avoid drips + brush strokes, it’s important to work in small sections and apply thin coats.
China Cabinet Makeover: PRIMING! An entire post on Why & How-To Prime a Wood Surface. Priming any surface before painting is so important & it can save you money. Come see the result of how what prime can do & follow along on this furniture makeover

Typically I apply the paint to the surface.  Then spread it out.  Then go back over it with my brush, using light stokes and following the wood grain.

China Cabinet Makeover: PRIMING! An entire post on Why & How-To Prime a Wood Surface. Priming any surface before painting is so important & it can save you money. Come see the result of how what prime can do & follow along on this furniture makeover

When painting furniture, the piece is typically vertical, so paint could drip.   Around the detailed edges and ornate areas, the less paint the better to avoid paint from dripping.  And once an area is done, always continue to look back to make sure paint isn’t seeping down.

China Cabinet Makeover: PRIMING! An entire post on Why & How-To Prime a Wood Surface. Priming any surface before painting is so important & it can save you money. Come see the result of how what prime can do & follow along on this furniture makeover

For this china cabinet, there were 3 doors, which I removed and are painting laying down.  It’s much easier to paint + drips don’t occur as much.

China Cabinet Makeover: PRIMING! An entire post on Why & How-To Prime a Wood Surface. Priming any surface before painting is so important & it can save you money. Come see the result of how what prime can do & follow along on this furniture makeover

For this piece, it took me about 40 minutes to prime.  To me, it’s very relaxing. This is the result…

China Cabinet Makeover: PRIMING! An entire post on Why & How-To Prime a Wood Surface. Priming any surface before painting is so important & it can save you money. Come see the result of how what prime can do & follow along on this furniture makeover

That’s a wrap… for now.

She’s ready for paint!

Want a peak?  Here you go…

Sneak Peak at the new color for the China Cabinet

I’m off to paint some more…

Follow along on this makeover with these other posts
Backstory + Choosing a Color
Prepping & Sanding Wood Furniture
Why & How to Prime Wood Furniture
Tips + Tricks to Painting Wood Furniture
Accessories, Details, & Styling {China Cabinet Makeover}

Coming up (still to do)
China Cabinet Makeover {Reveal}

China Cabinet Makeover: Prepping + Sanding Wood Furniture {Step 1}

#chinacabinetmakeover

Last week I shared the latest + greatest project that I’m throwing myself into.  Since the baby arrived, I kind of lost my DIY mojo, but this project has me back!  I can not express how excited I am about this project because I’ve been thinking about it for so long.  Have you ever had a moment like that when you are thinking about something so much, but are unsure of how all the details could possibly come together?  Well that was me with this project…  I knew exactly the cabinet I wanted, I knew the color I wanted it to be, but no cabinet.  UNTIL, I found her.

Somehow, someway the stars were aligned and last week she came home!  To be specific, my husband and I went to the seller’s home (it’s a must to always go with someone on a Craigslist excursion!) and thankfully he had a pickup, so for $20 extra he delivered it to our house.  Lesson learned?  It never hurts to ask.  We don’t have a pickup and would have had to rent one.  This was much easier!

Thinking back, I haven’t tackled a large-scale furniture makeover project like this since the painting of the laminate bookcases and that was a LONG time ago.  Whether large or small though, the steps for painting a piece of furniture are typically the same and that’s what I am dedicating my next few posts to… rehabbing a piece of furniture to achieve a dynamic result.

First up, details on how to begin the process of paint a piece of furniture including how-to prep + how-to sand.

China Cabinet Makeover: How-To Prep and Sand Wood Furniture {easy to follow tutorial - multiple blog posts to explain how easy it is}

The china cabinet was in a pretty sad place before landing in my garage.  It was dusty and had lots of grime in the corners, so a good ole’ cleaning was a must!

1. First up… the hardware.  I removed all the hardware using a screwdriver and am still on the fence about reusing or replacing the existing pieces.  Some of the hardware (knobs) were missing, so I’m not sure what I will do.  – TBD –

China Cabinet Makeover: How-To Prep and Sand Wood Furniture {easy to follow tutorial - multiple blog posts to explain how easy it is}

2. Once the hardware was removed, I used a vacuum to clean all the nooks + crannies of the cabinet.  Not only was it dusty, but it was dirty.

China Cabinet Makeover: How-To Prep and Sand Wood Furniture {easy to follow tutorial - multiple blog posts to explain how easy it is}

Then following that, I used a dampened rag and went over all the surfaces.  It was amazing the grime that came off this piece!

China Cabinet Makeover: How-To Prep and Sand Wood Furniture {easy to follow tutorial - multiple blog posts to explain how easy it is}

3. After taking a few minutes to clean the surface, it was time for sanding.

Using my orbital sander (it really is the best tool for sanding large areas – I use it SO MUCH) I went over the areas that I could.  The orbital sander is somewhat large so it worked great for the larger flat surfaces like the top, sides, and doors.  For the more detailed, intricate areas, I used a piece of sandpaper (by hand).  The very detailed areas I just left (without sanding) and will be using a primer that ‘grips’ to the surface so the paint will adhere.  The gripper paint I will be using (more on that in an upcoming post) actually says no sanding is needed, but I like to give a quick sanding for better adhesion.  If I were staining this piece, I would have needed to go down to the original surface.  Since I am painting it though, a quick sanding (+ a good primer) is all that is needed.

China Cabinet Makeover: How-To Prep and Sand Wood Furniture {easy to follow tutorial - multiple blog posts to explain how easy it is}

sanding, sanding, sanding…

China Cabinet Makeover: How-To Prep and Sand Wood Furniture {easy to follow tutorial - multiple blog posts to explain how easy it is}

When sanding wood, it’s important that you do not put too much pressure on the wood surface.  I started with a 120 grit paper and then used a 220 grit paper for a smoother finish.  A light sanding is just enough and always continue to rotate and move the sander so you are not concentrating on one section for a long time.

Sections of the china cabinet where I could not use the orbital sander, I sanded by hand.  Areas like the buffet top and the legs were very worn (natural wear + tear) and needed to be smoothed out.

China Cabinet Makeover: How-To Prep and Sand Wood Furniture {easy to follow tutorial - multiple blog posts to explain how easy it is}

China Cabinet Makeover: How-To Prep and Sand Wood Furniture {easy to follow tutorial - multiple blog posts to explain how easy it is}

4. Sanding took about 10-15 minutes and then I cleaned all the surfaces again.  Lastly before painting this girl of mine, I taped off the glass.  Using painters tape, I taped off the edge where the wood meets the glass.  This will make painting much easier!

China Cabinet Makeover: How-To Prep and Sand Wood Furniture {easy to follow tutorial - multiple blog posts to explain how easy it is}

And that’s it.  For now!

This china cabinet is still in transition mode from blah to pretty.  Next up?  Primer, which is the key to a good paint job.  Stay tuned for my next post on Why & How to Prime Wood Furniture.

Follow along on this makeover with these other posts
Backstory + Choosing a Color
Prepping & Sanding Wood Furniture
Why & How to Prime Wood Furniture
Tips + Tricks to Painting Wood Furniture
Accessories, Details, & Styling {China Cabinet Makeover}

Coming up (still to do)
China Cabinet Makeover {Reveal}


China Cabinet Makeover: Backstory + Choosing a Color

Craigslist China Cabinet - Before the makeover: The backstory + the choosing of a color

In the past 2 days, a project that I’ve been dreaming about for months has magically come to fruition! Somehow the stars aligned and I’m freaking excited about this one…

So a long while back, about 5-6 months ago to be specific, I had the itch to spice up the dining room.  At the time, I was in the last weeks of my pregnancy so no real action could take place, but I had lots & lots of thoughts brewing in my brain.  My mind immediately went to changing everything, but I decided to start off slow (truly the best way to makeover a space).  First up, the bench.  I snagged a gorgeous navy Ikat patterned fabric earlier in the year and the bench at our dining table was reupholstered.  Next up, the end chairs.  I ditched the leather matchy-matchy chairs and scored a new wicker style from Target.  They’re actually outdoor seats and perfect for a family with a load of kids – yes, that’s us now.  Here’s a recent shot…Dining Room makeover

What’s next?

The buffet.

We’ve had our current buffet for years (here’s a peak from last years Christmas spread) and remember how I mentioned recently that sometimes it’s difficult for the Mister to let go of things (to sell or to update), well this is one of those pieces.  After some thought, we both agreed the buffet had to go and something else – something new – was needed.  So the search began…

Craigslist.  Local thrift stores.  Garage sales.

And then I found IT.  ‘She’ was perfect and just what I was thinking to spice this space up!

I found her on Craiglist and the “purchase” story is something I won’t forget.  Miraculously, we got it home.  Somehow.  Someway.  She now sits in our garage.

Craigslist China Cabinet - Before the makeover

Check out the details…

Craigslist China Cabinet - Before the makeover

I love that there is a pull-out drawer in the lower cabinet.  What a great spot for storing silverware or cloth napkins!

Craigslist China Cabinet - Before the makeover

Craigslist China Cabinet - Before the makeover

The hardware is so true to the time of this piece.  Not all the hardware came with the piece, so I may have to keep some & find some new…

Craigslist China Cabinet - Before the makeover

So let’s take a few steps back for a moment…

Before I had even acquired her, I had a vision.  A bright + bold + eye popping vision.  A raspberry vision to be exact.   Even before she came home, I knew what color she’d be…

In the midst of my emails & calls to get my china cabinet home, Glidden paint reached out to me about collaborating on a project.  I love Glidden paint colors (my favorite orange wall is a fabulous Glidden hue) & was excited about their new simplified color palette.

Glidden's simplified palette - Choosing color made easy

I jumped on board and found THE PERFECT  COLOR in their red & magenta section.  I knew I wanted a mix of something not too red, but not too pink.  And then I found IT – the perfect shade of raspberry called Red Red Rose.

Glidden's simplified palette - Choosing color made easy

Perfect Cabinet + Perfect Color = Makeover Heaven

I’ve got big plans for this lady of mine.  She’s going to be fabulous and I can’t wait to spice this space up with a pop of color.

Looking for the perfect color for your space or the ideal color for a furniture makeover?  Check out Color My Room where you can preview a space with a color you love.

Color My Room on Glidden paint will help choose the best color for your space

Or are you inspired by a picture and love the colors in it?  Click on over to My Image Inspiration where a color palette will be created using hues from your image.

My Image Inspiration is a Glidden paint tool where a color palette will be created using hues from a picture

There are so many great tools that Glidden paint has to offer to help choose the perfect color!  I’m off to paint.  If you need me, I’ll be in the garage with a paint brush in hand.  I can’t wait to see how this all comes together…

Follow along on this makeover with these other posts
Backstory + Choosing a Color
Prepping & Sanding Wood Furniture
Why & How to Prime Wood Furniture
Tips + Tricks to Painting Wood Furniture
Accessories, Details, & Styling {China Cabinet Makeover}

Coming up (still to do)
China Cabinet Makeover {Reveal}

This post is sponsored by Glidden paint, but all thoughts and opinions are 100% my own.  I am so excited about this project & thrilled to be partnering with Glidden paint on this furniture makeover.  I’d love for you to follow along on this new project!