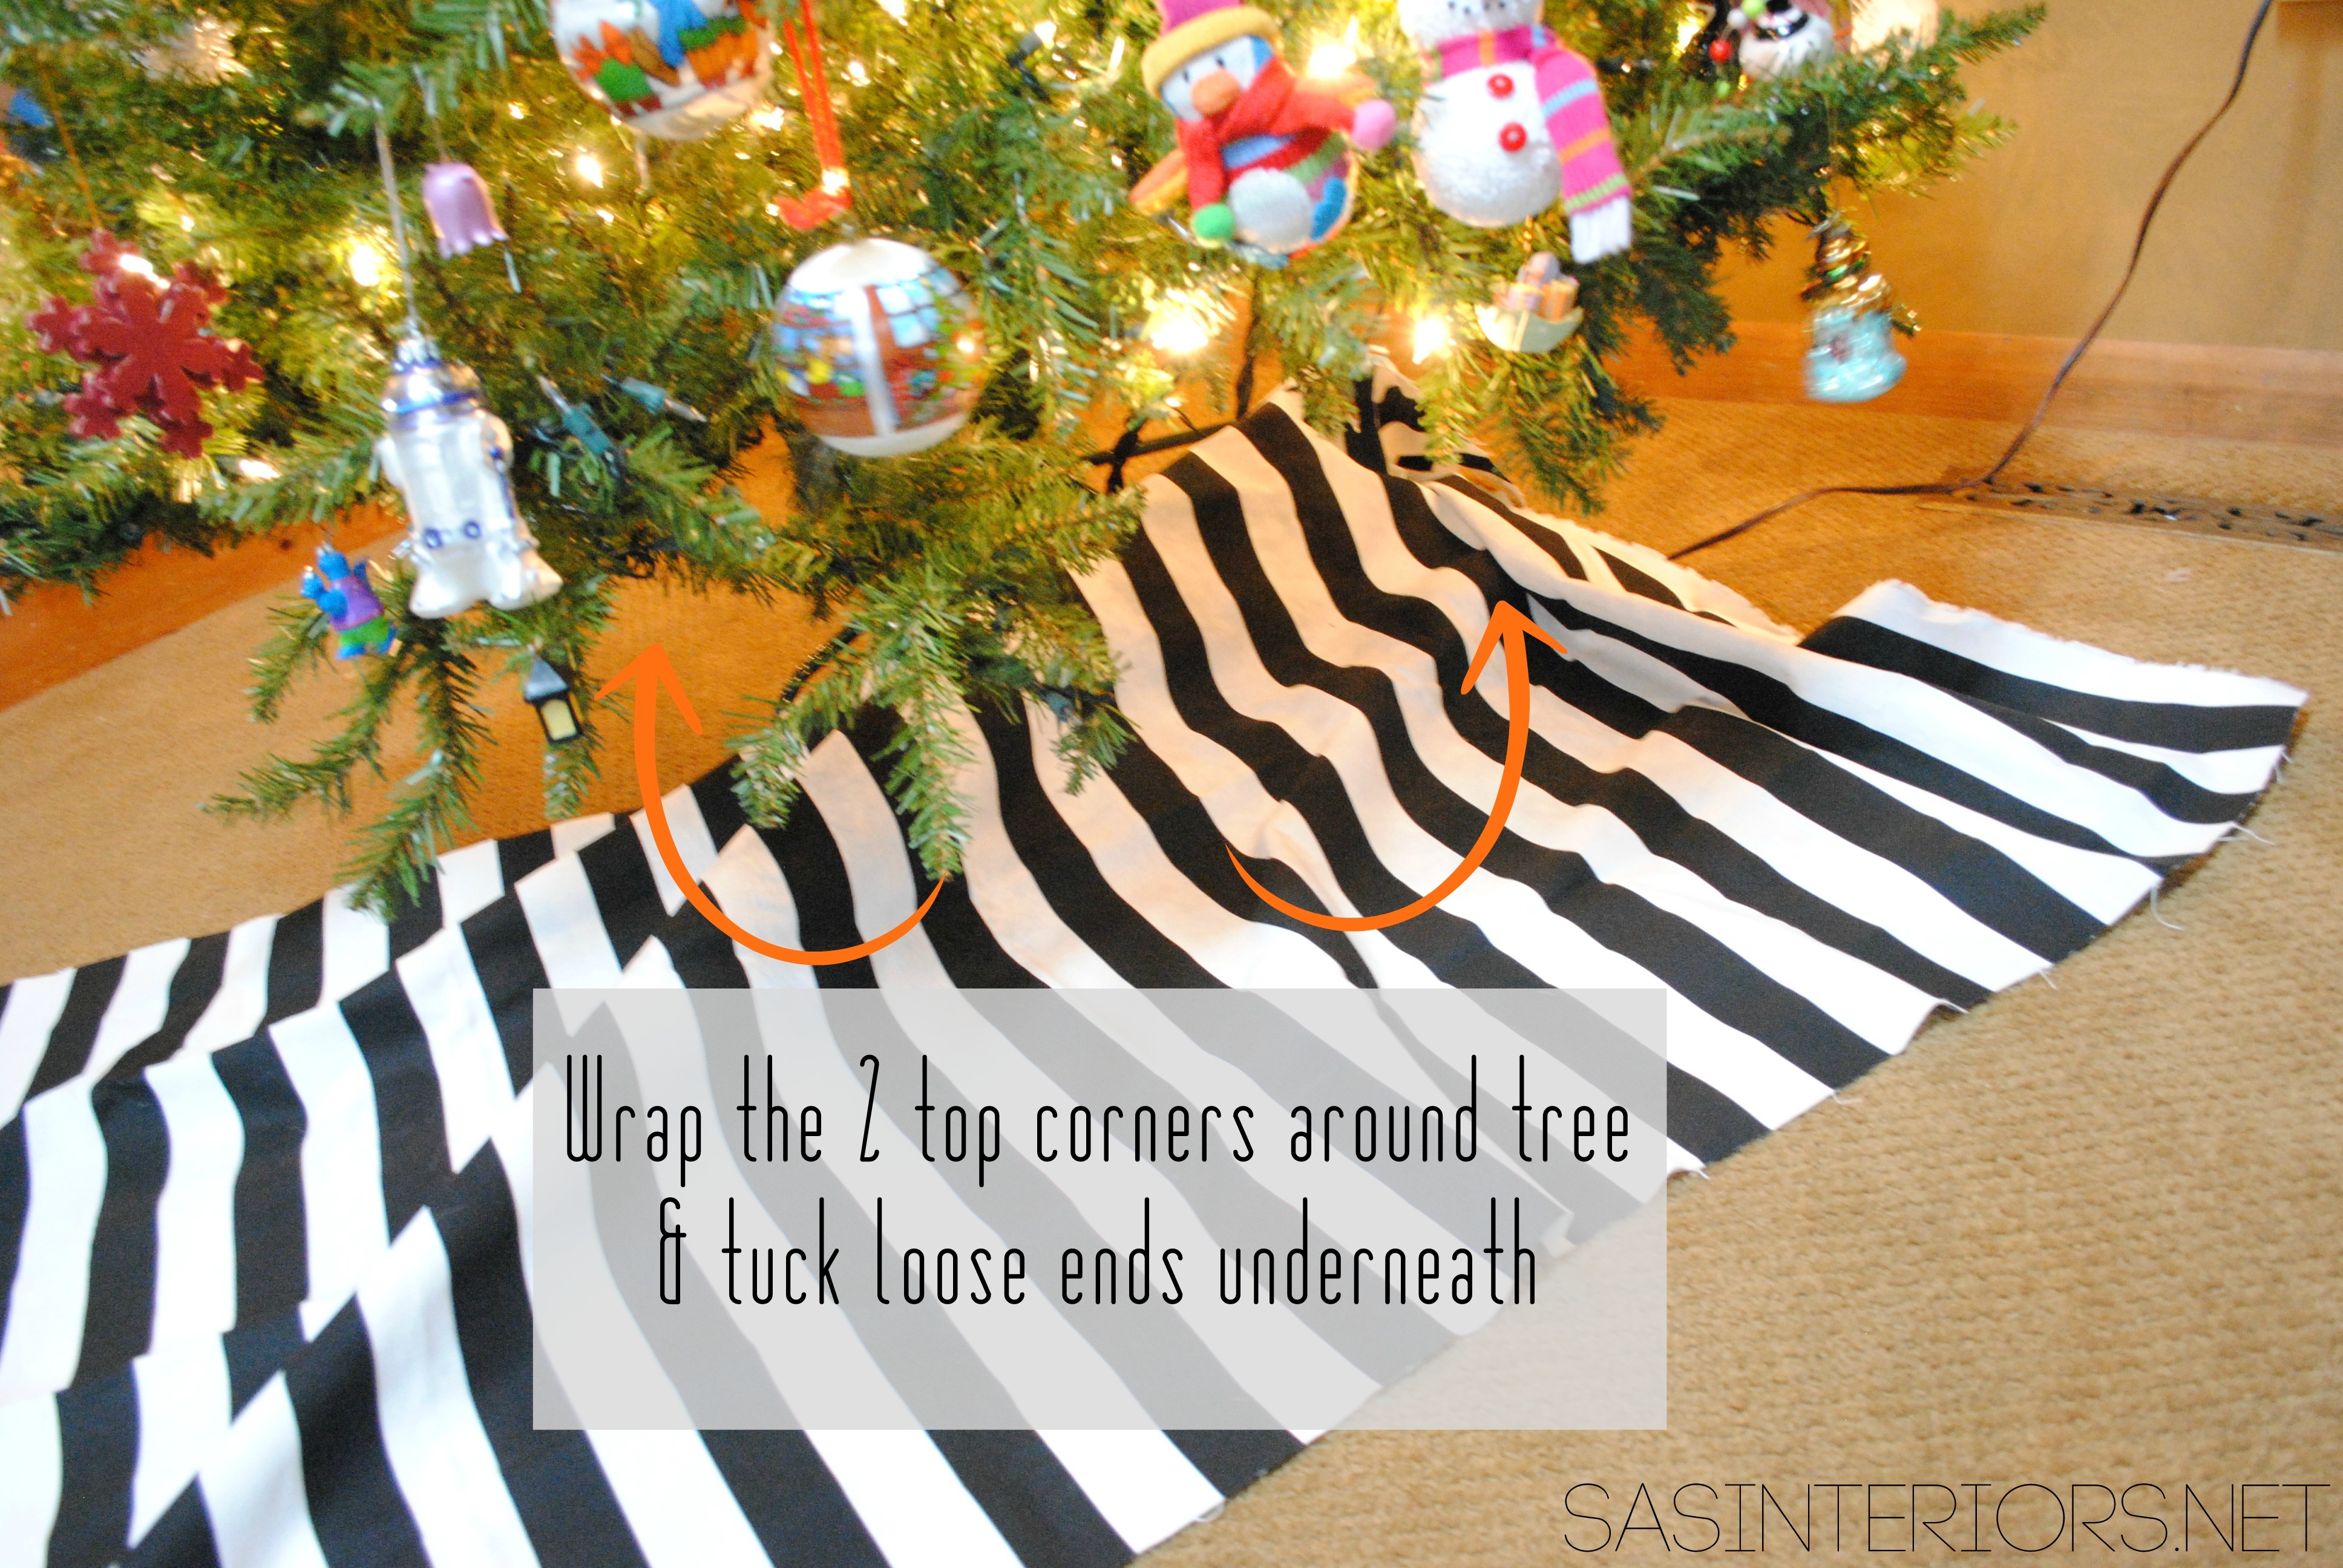
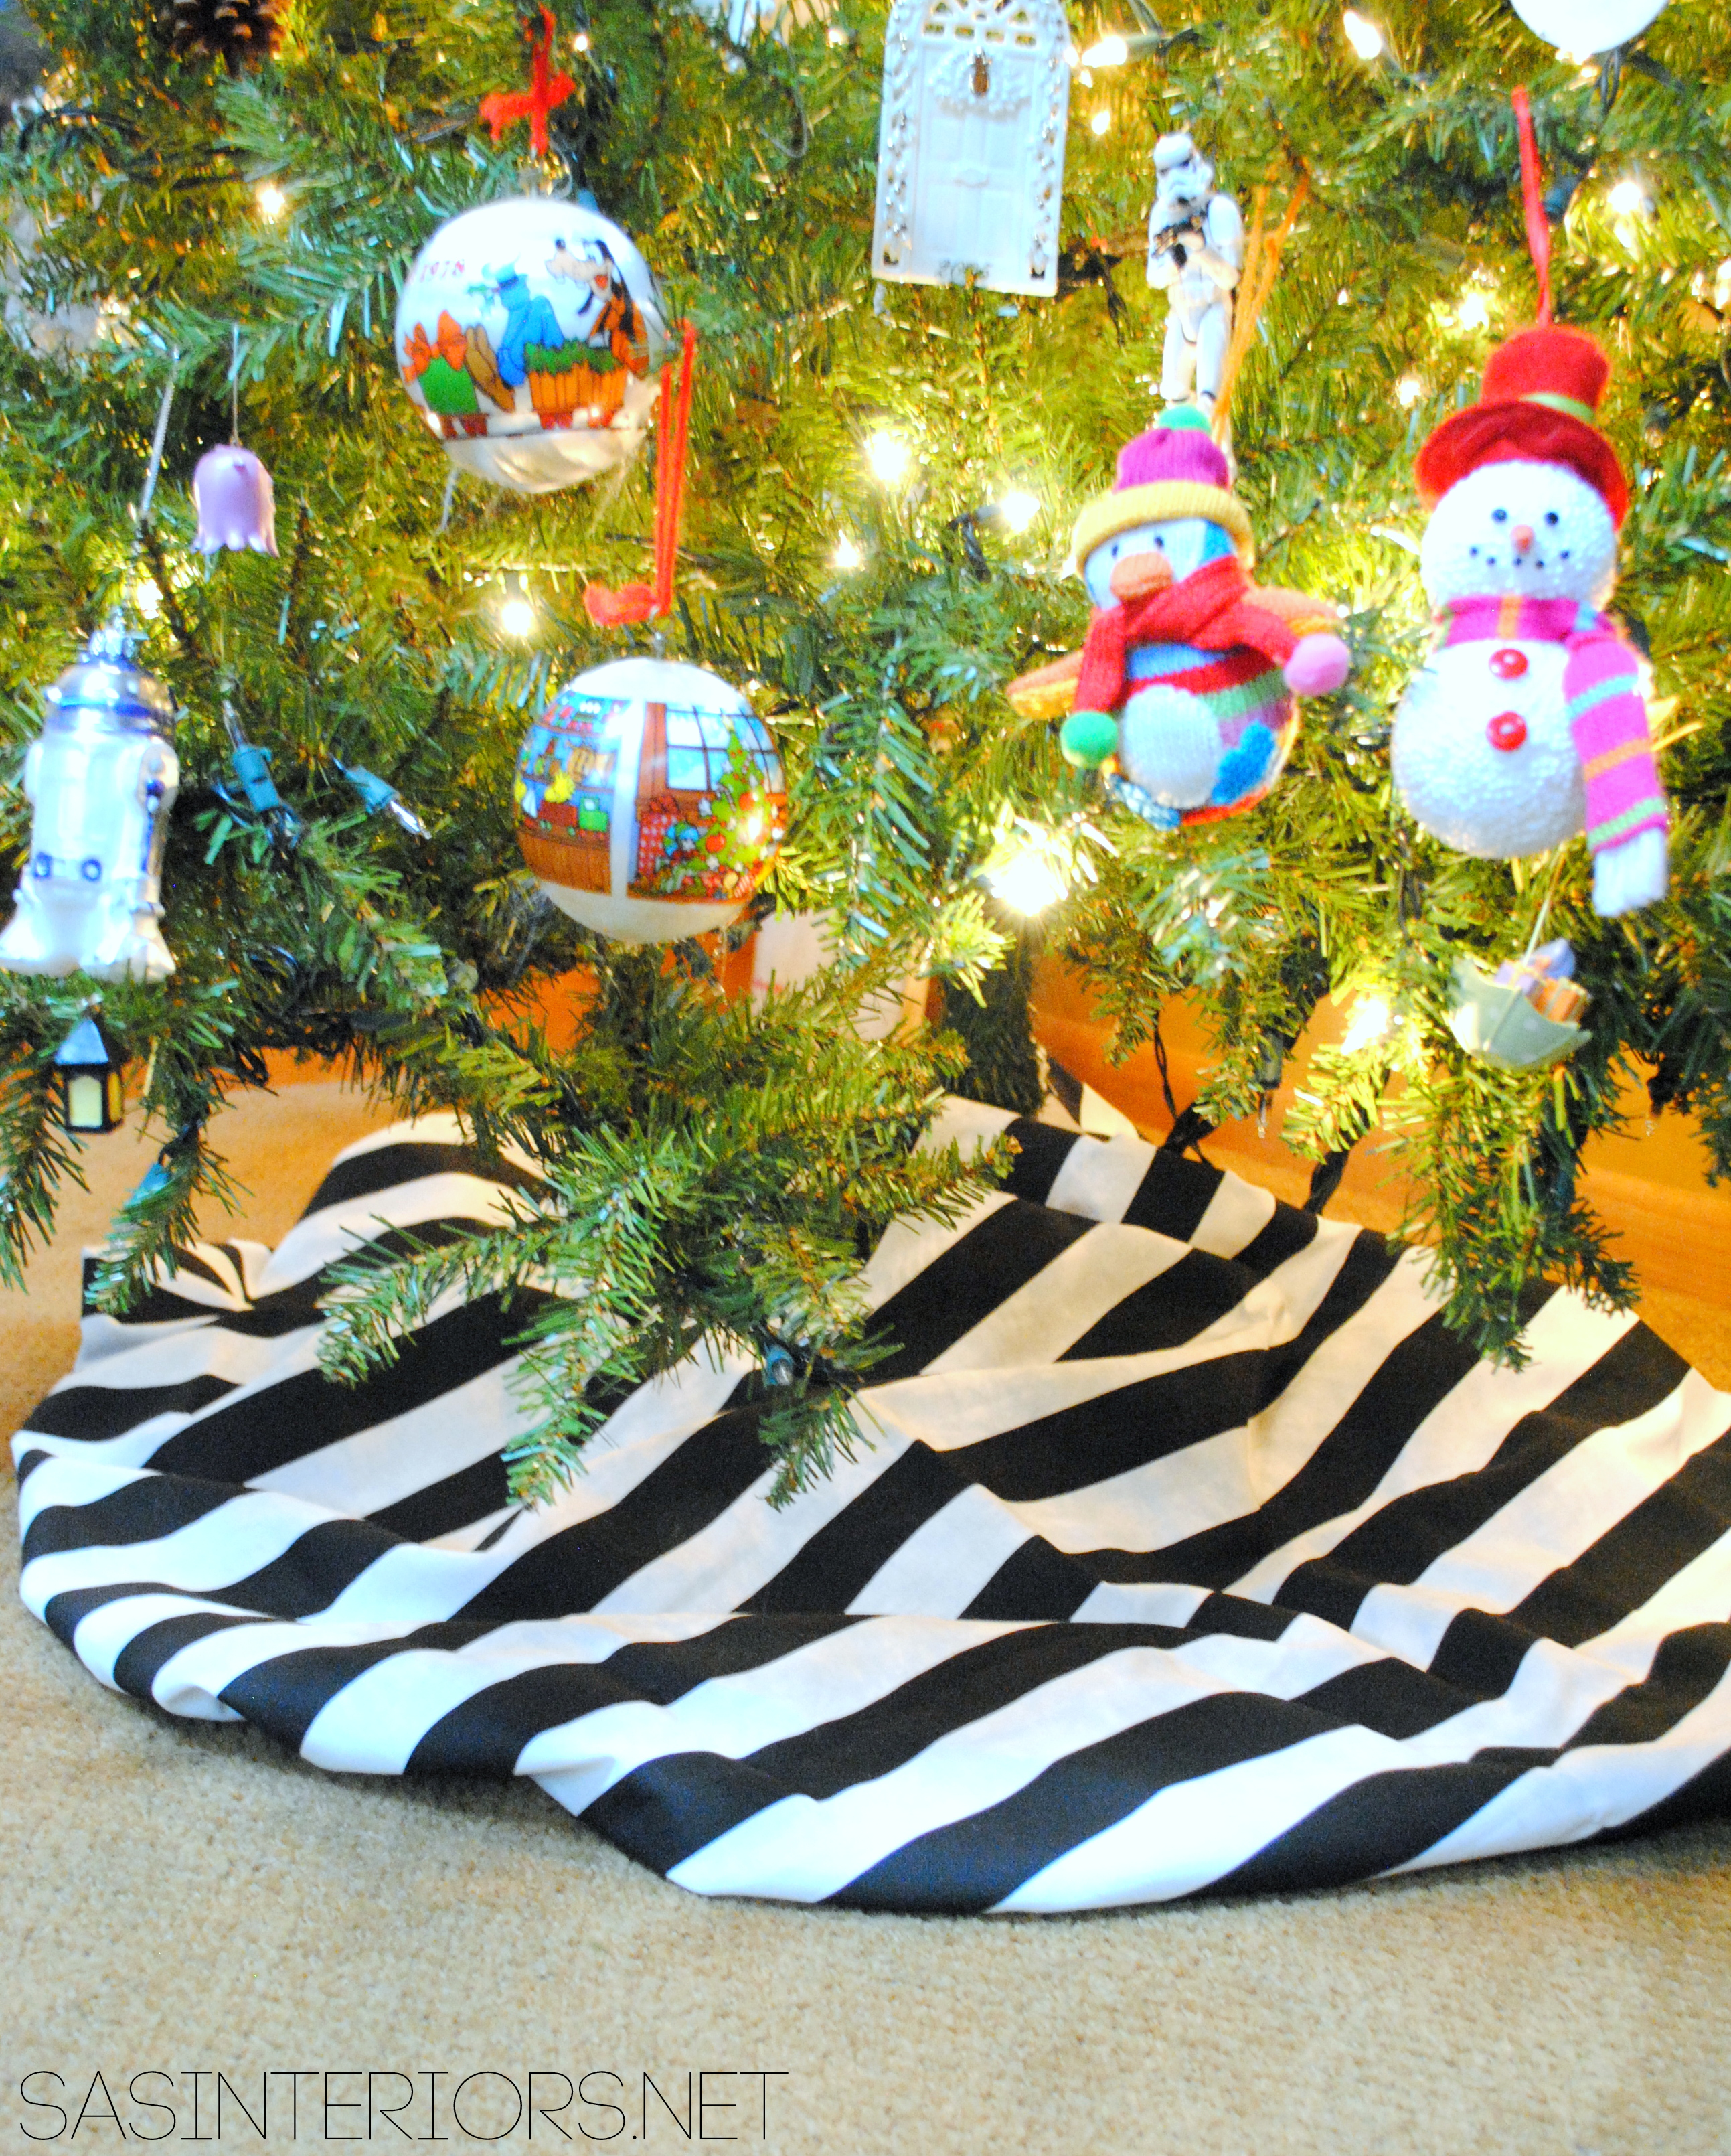
Tag: christmas decorating

Christmas Mantel

Christmas Mantel filled with old & new. Created by www.jennaburger.com

The Holiday season is underway – yay!

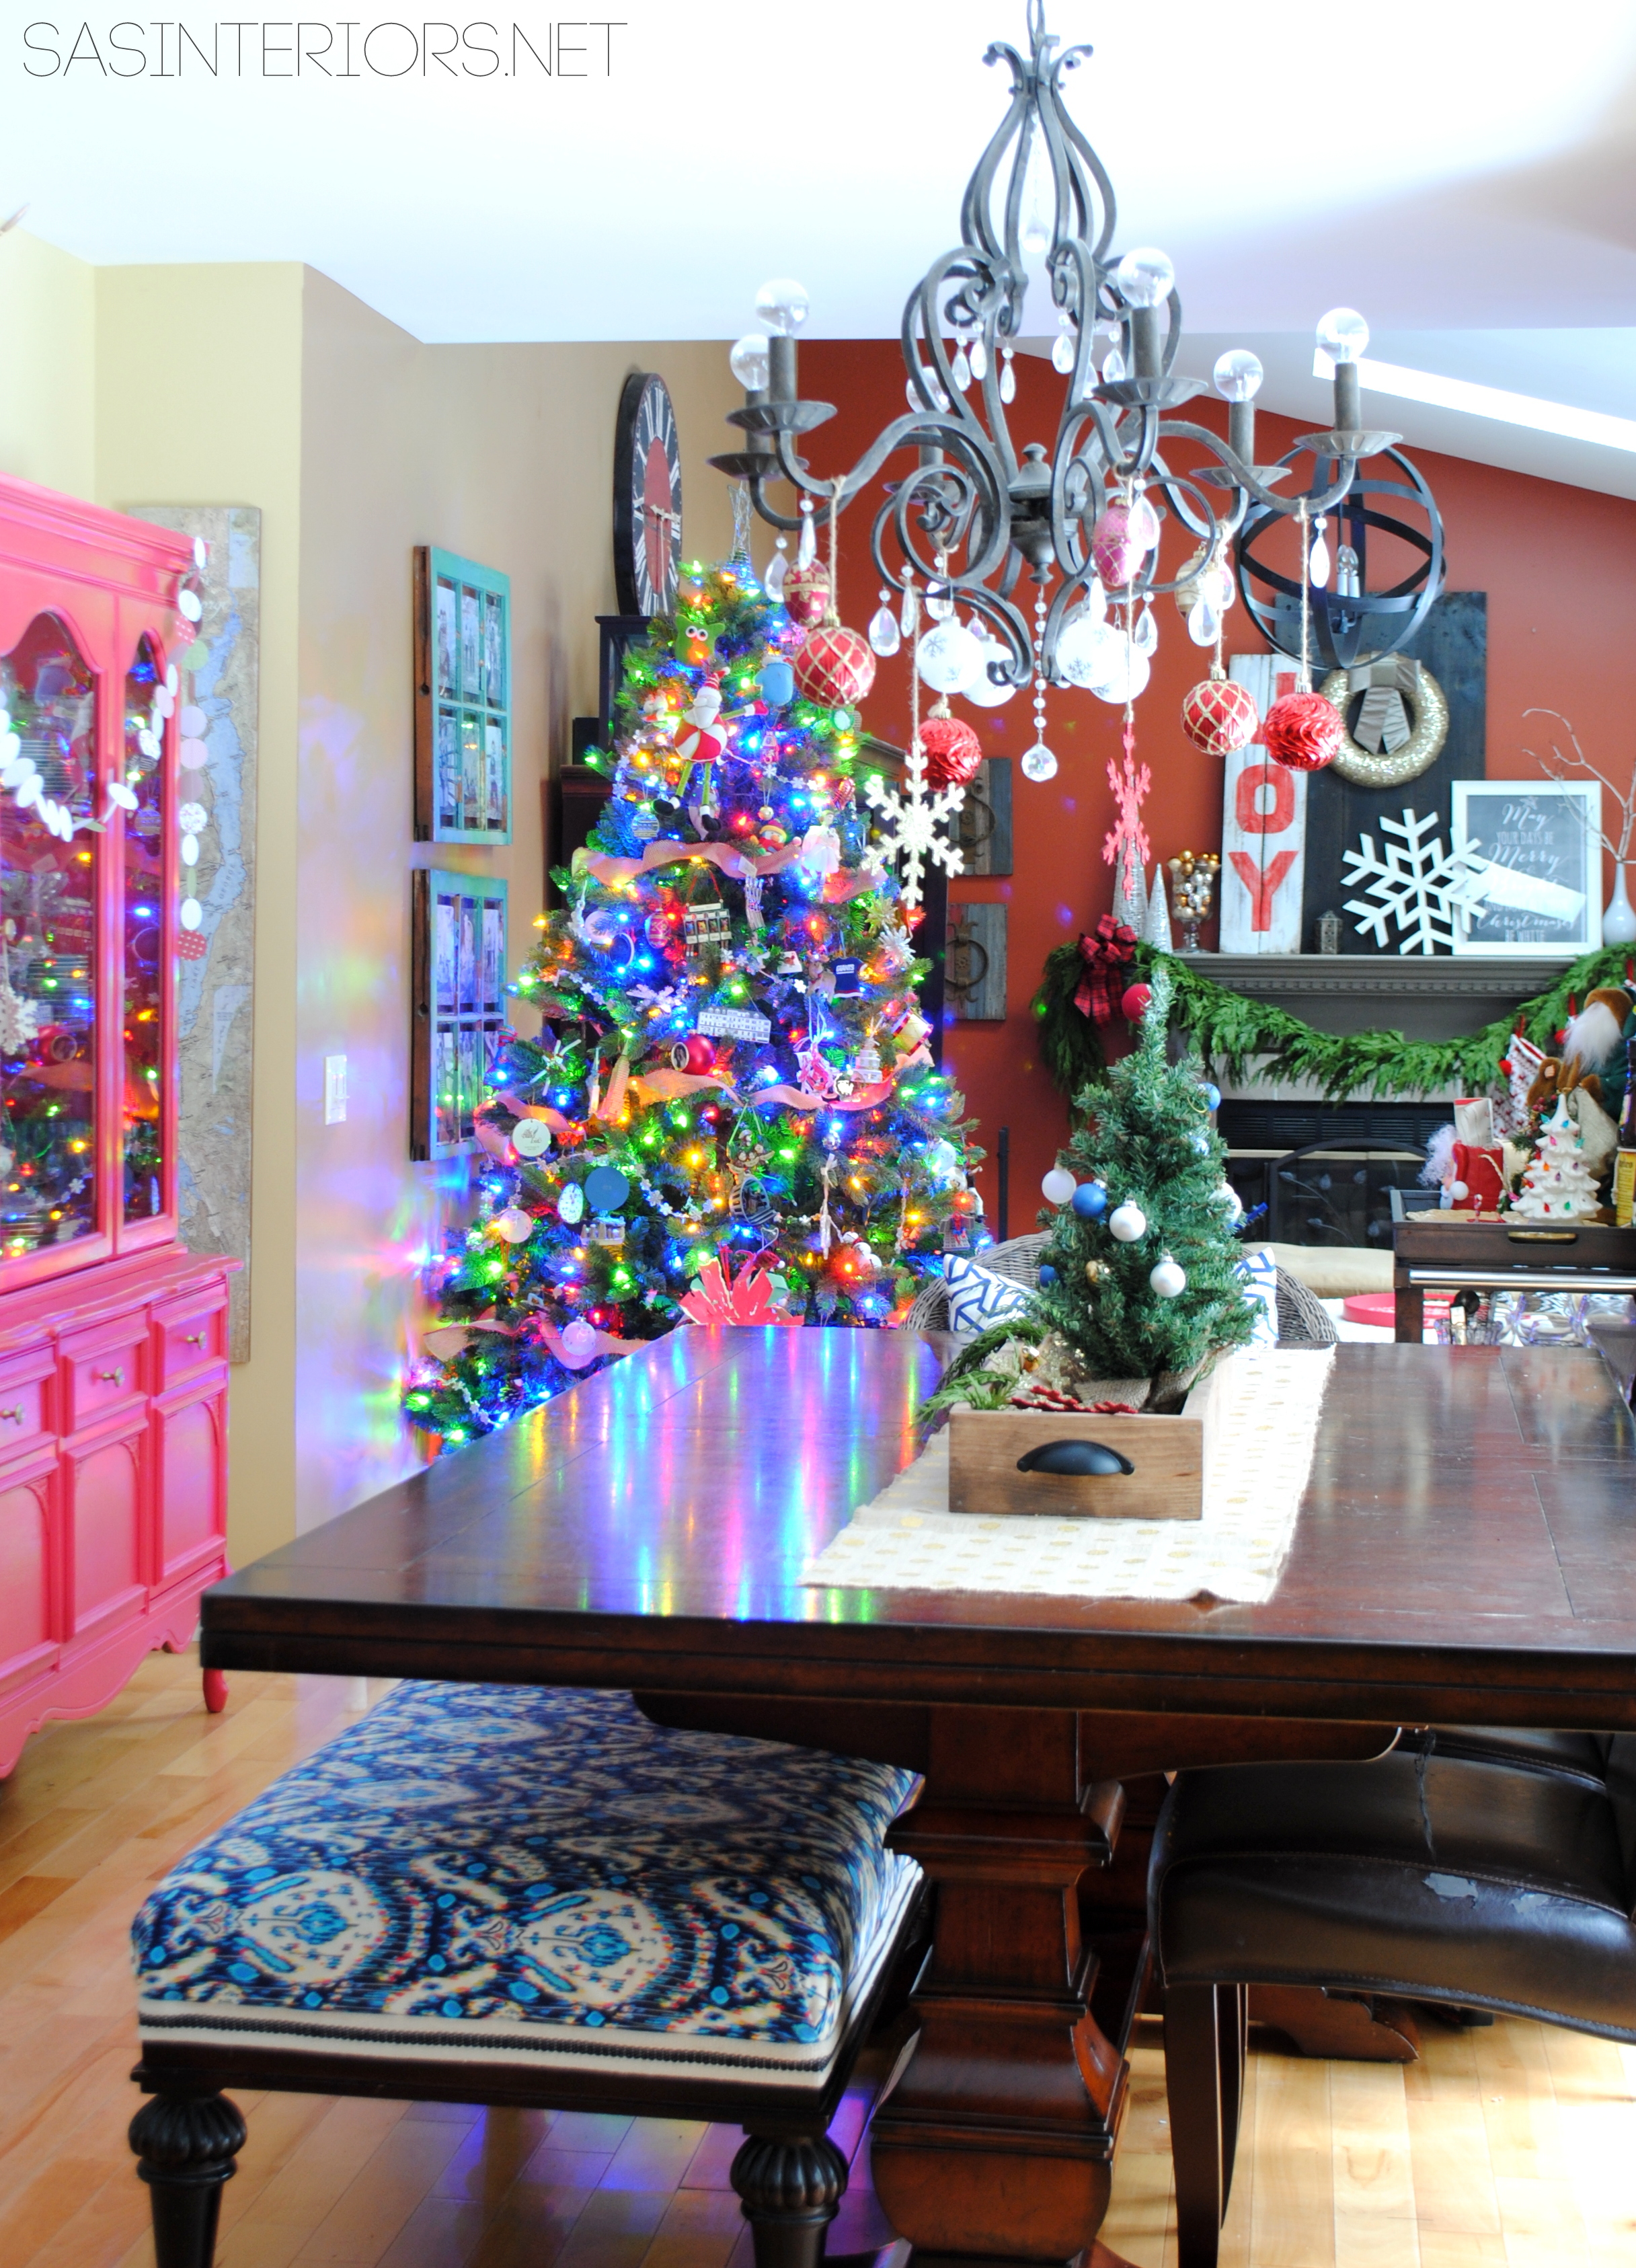
Since Friday – the day after Thanksgiving – we’ve been hustling + bustling indoors and out decorating for Christmas.  This year has been a bit tricky with the kitchen renovation (walls are still being painted & the hardwood floors are still curing), but we are making do with the areas that we can add our festive favorites…

One area of our home that’s been decorated for a few weeks is the mantel.

I got the Christmas bug a few weeks ago after making my way into the Christmas section of Lowe’s and leaving with a handful of new fun finds.  They’re selection of seasonal decor this year is stellar.

I incorporated a lot of new with the old…

Christmas Mantel filled with old & new. Created by www.jennaburger.com

Christmas Mantel filled with old & new. Created by www.jennaburger.com

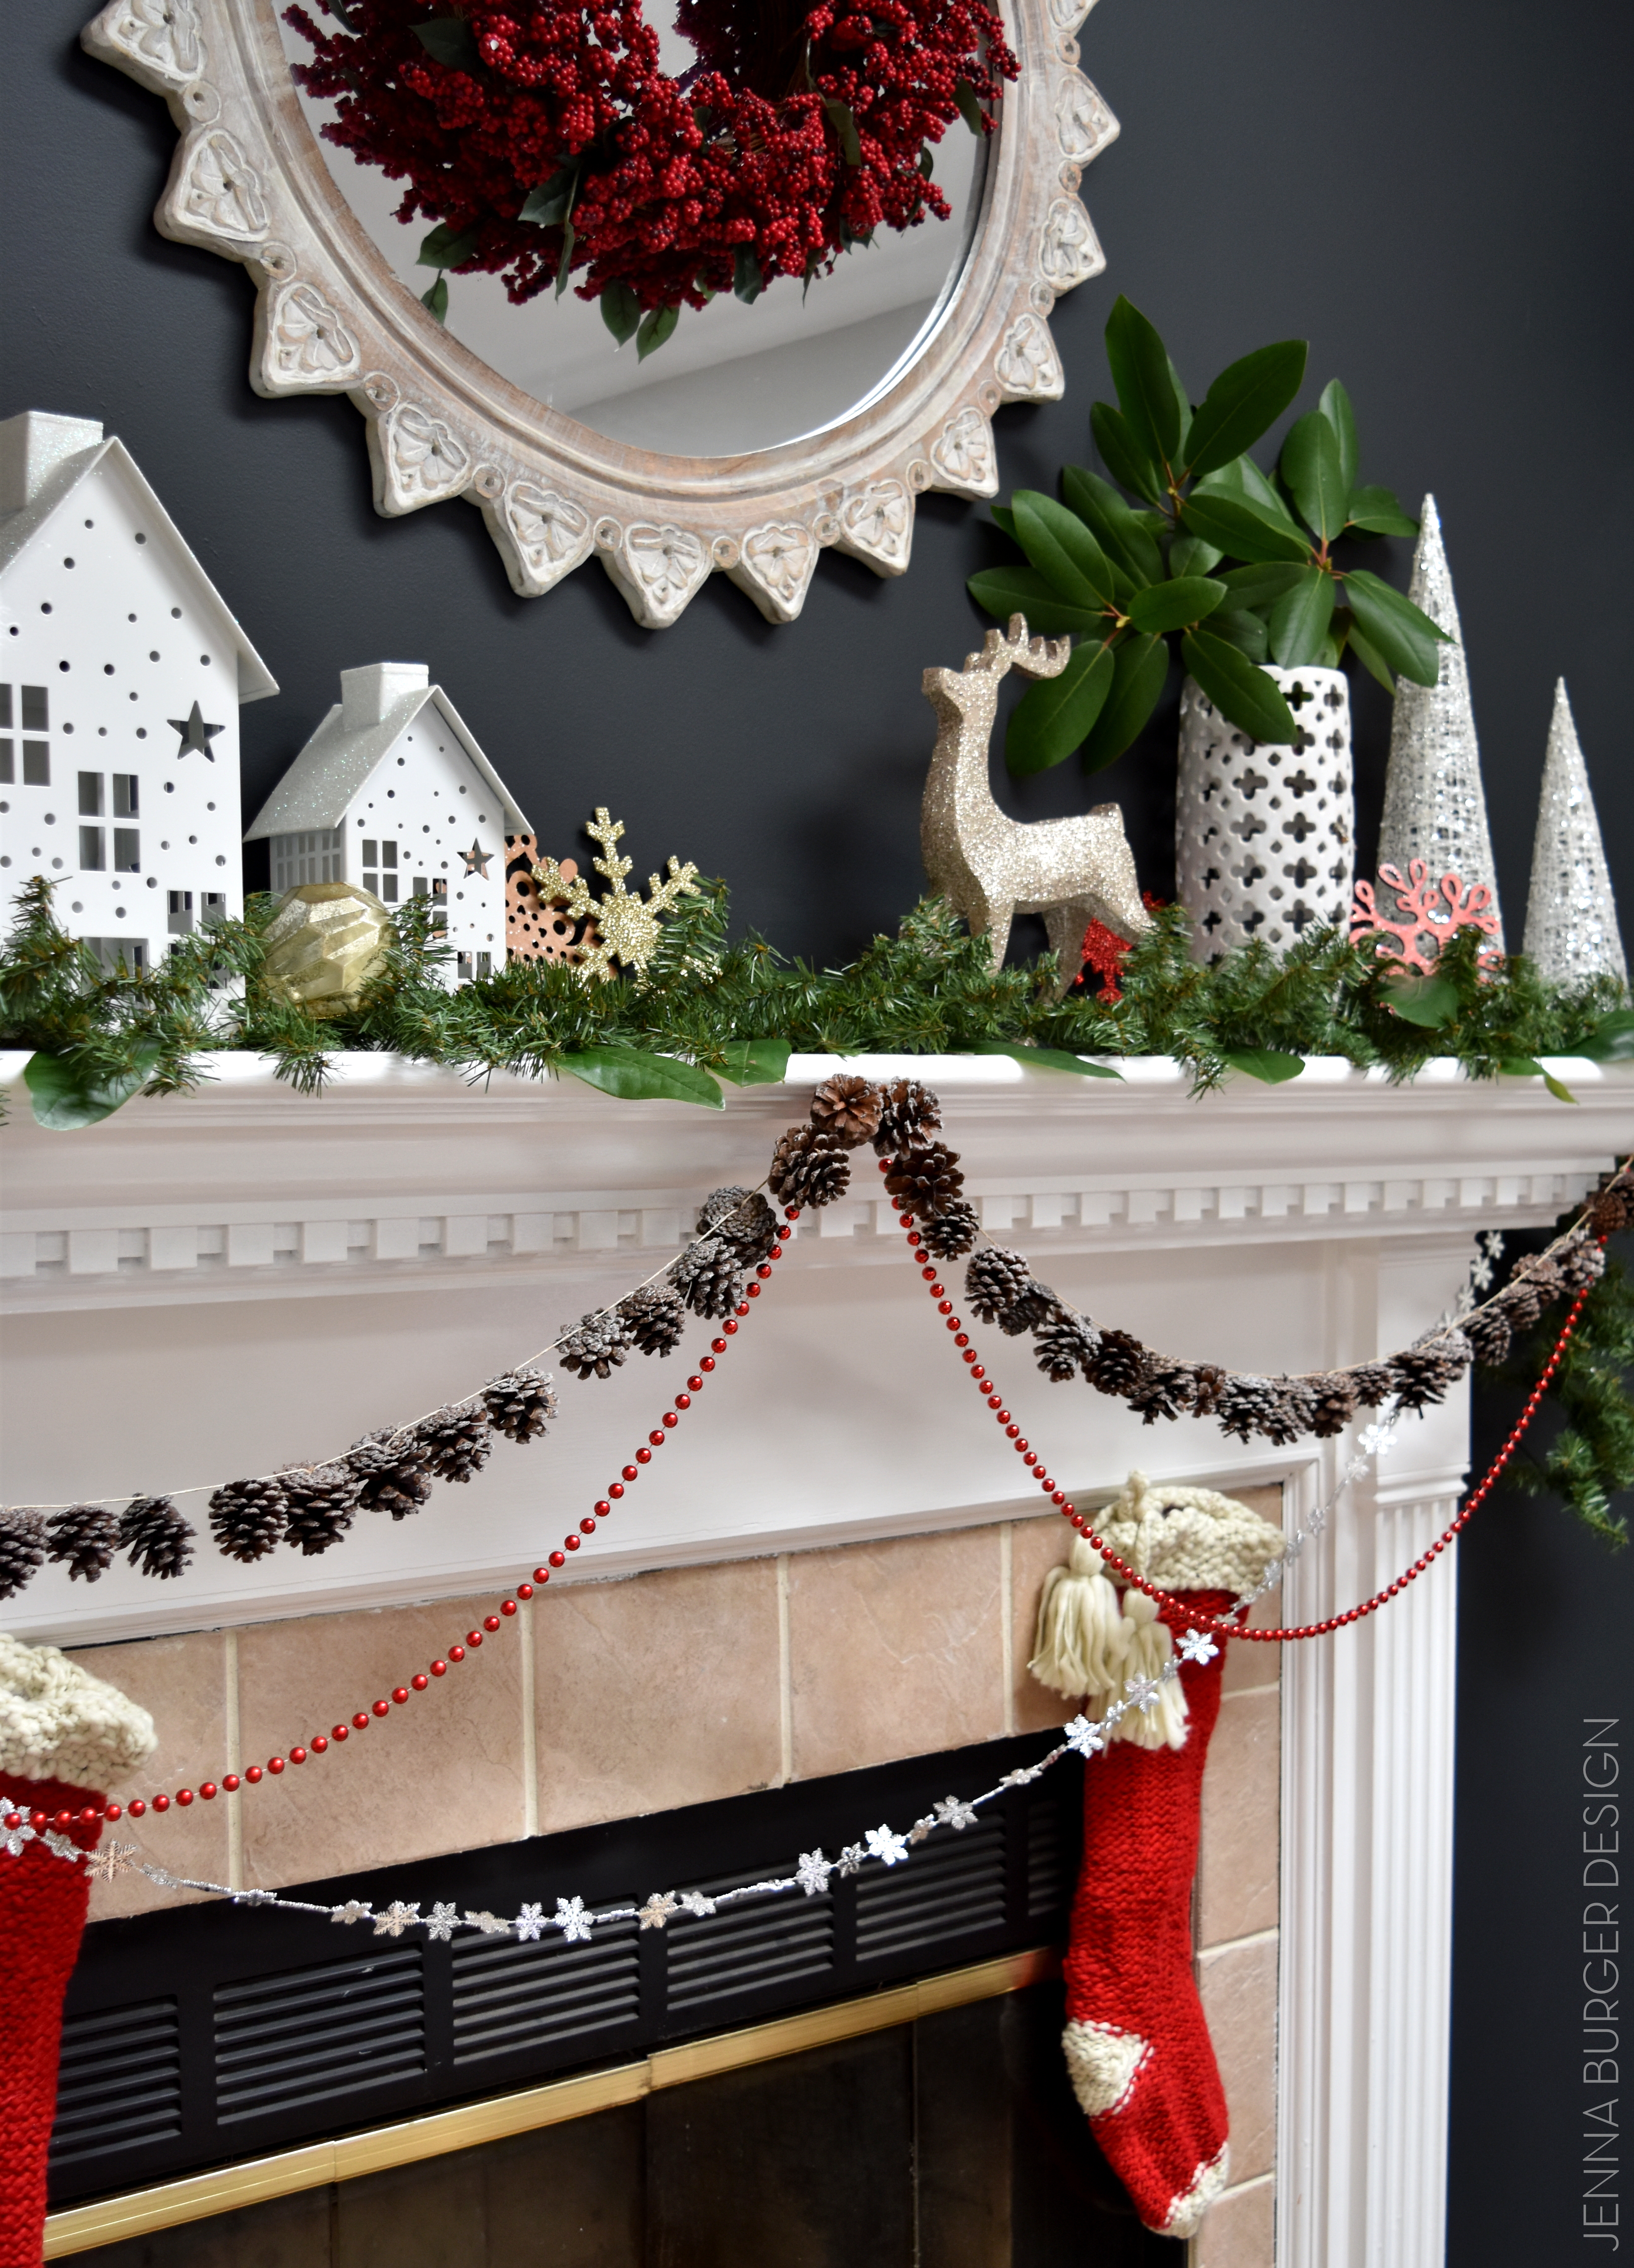
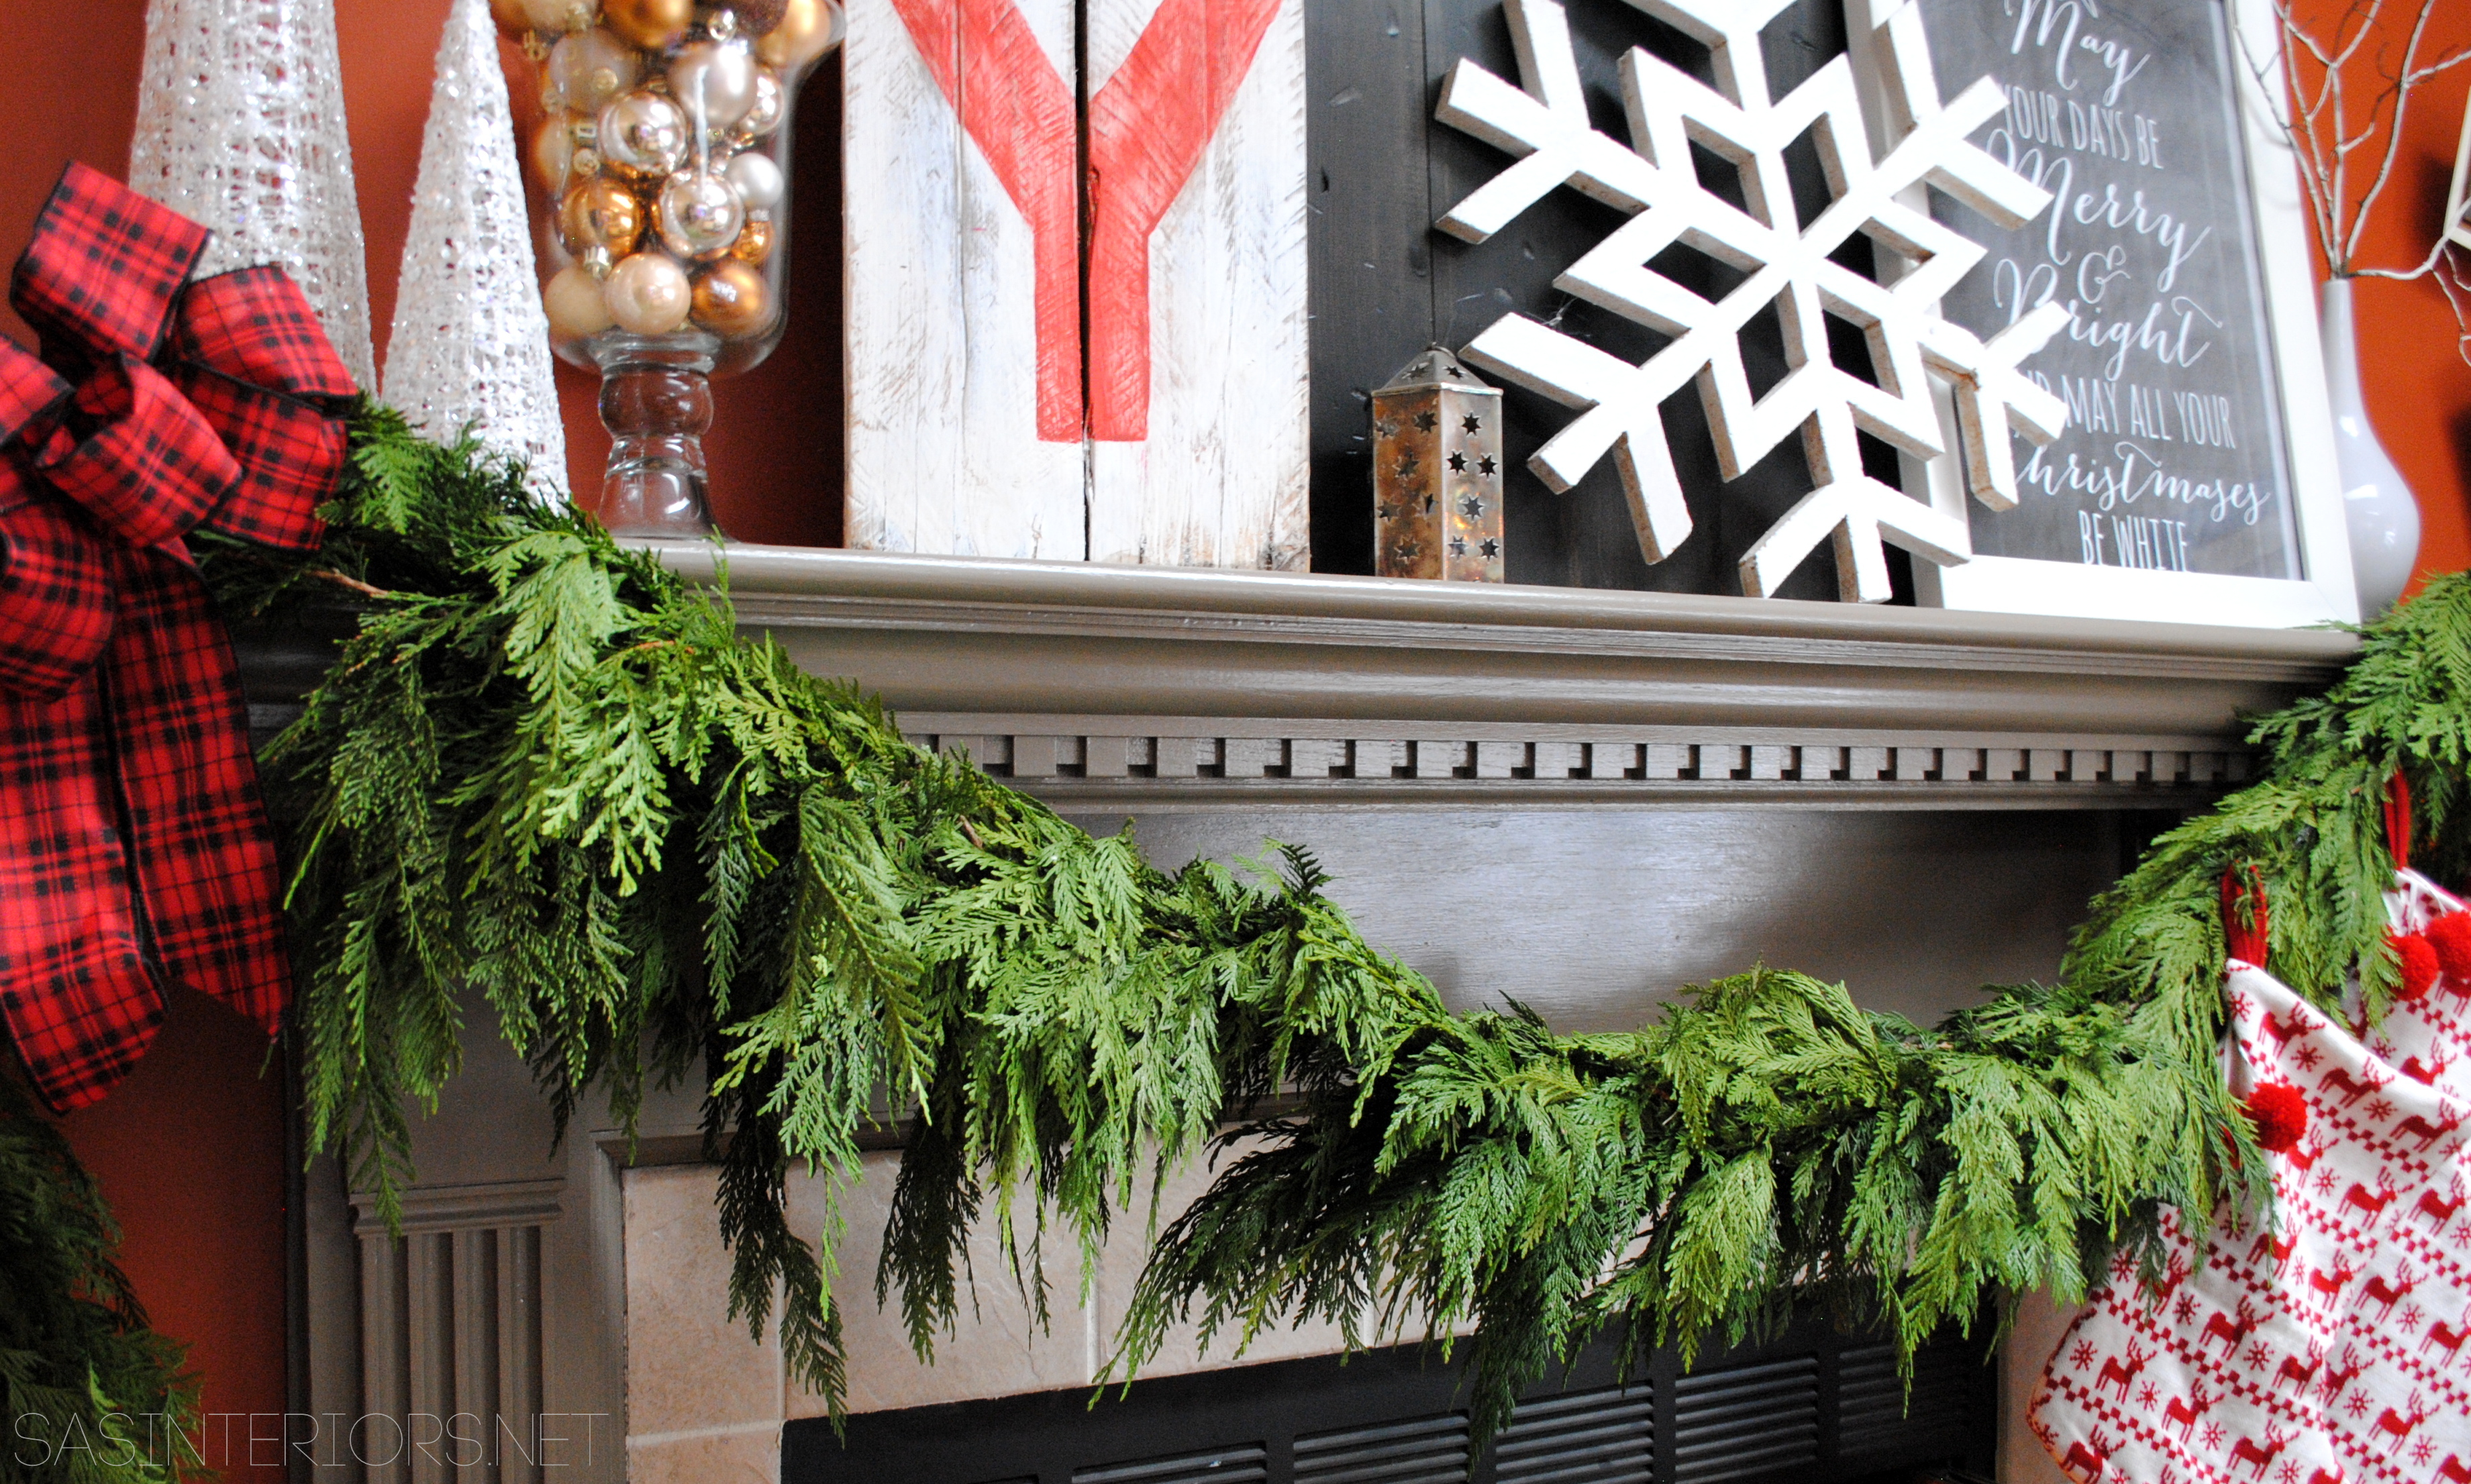
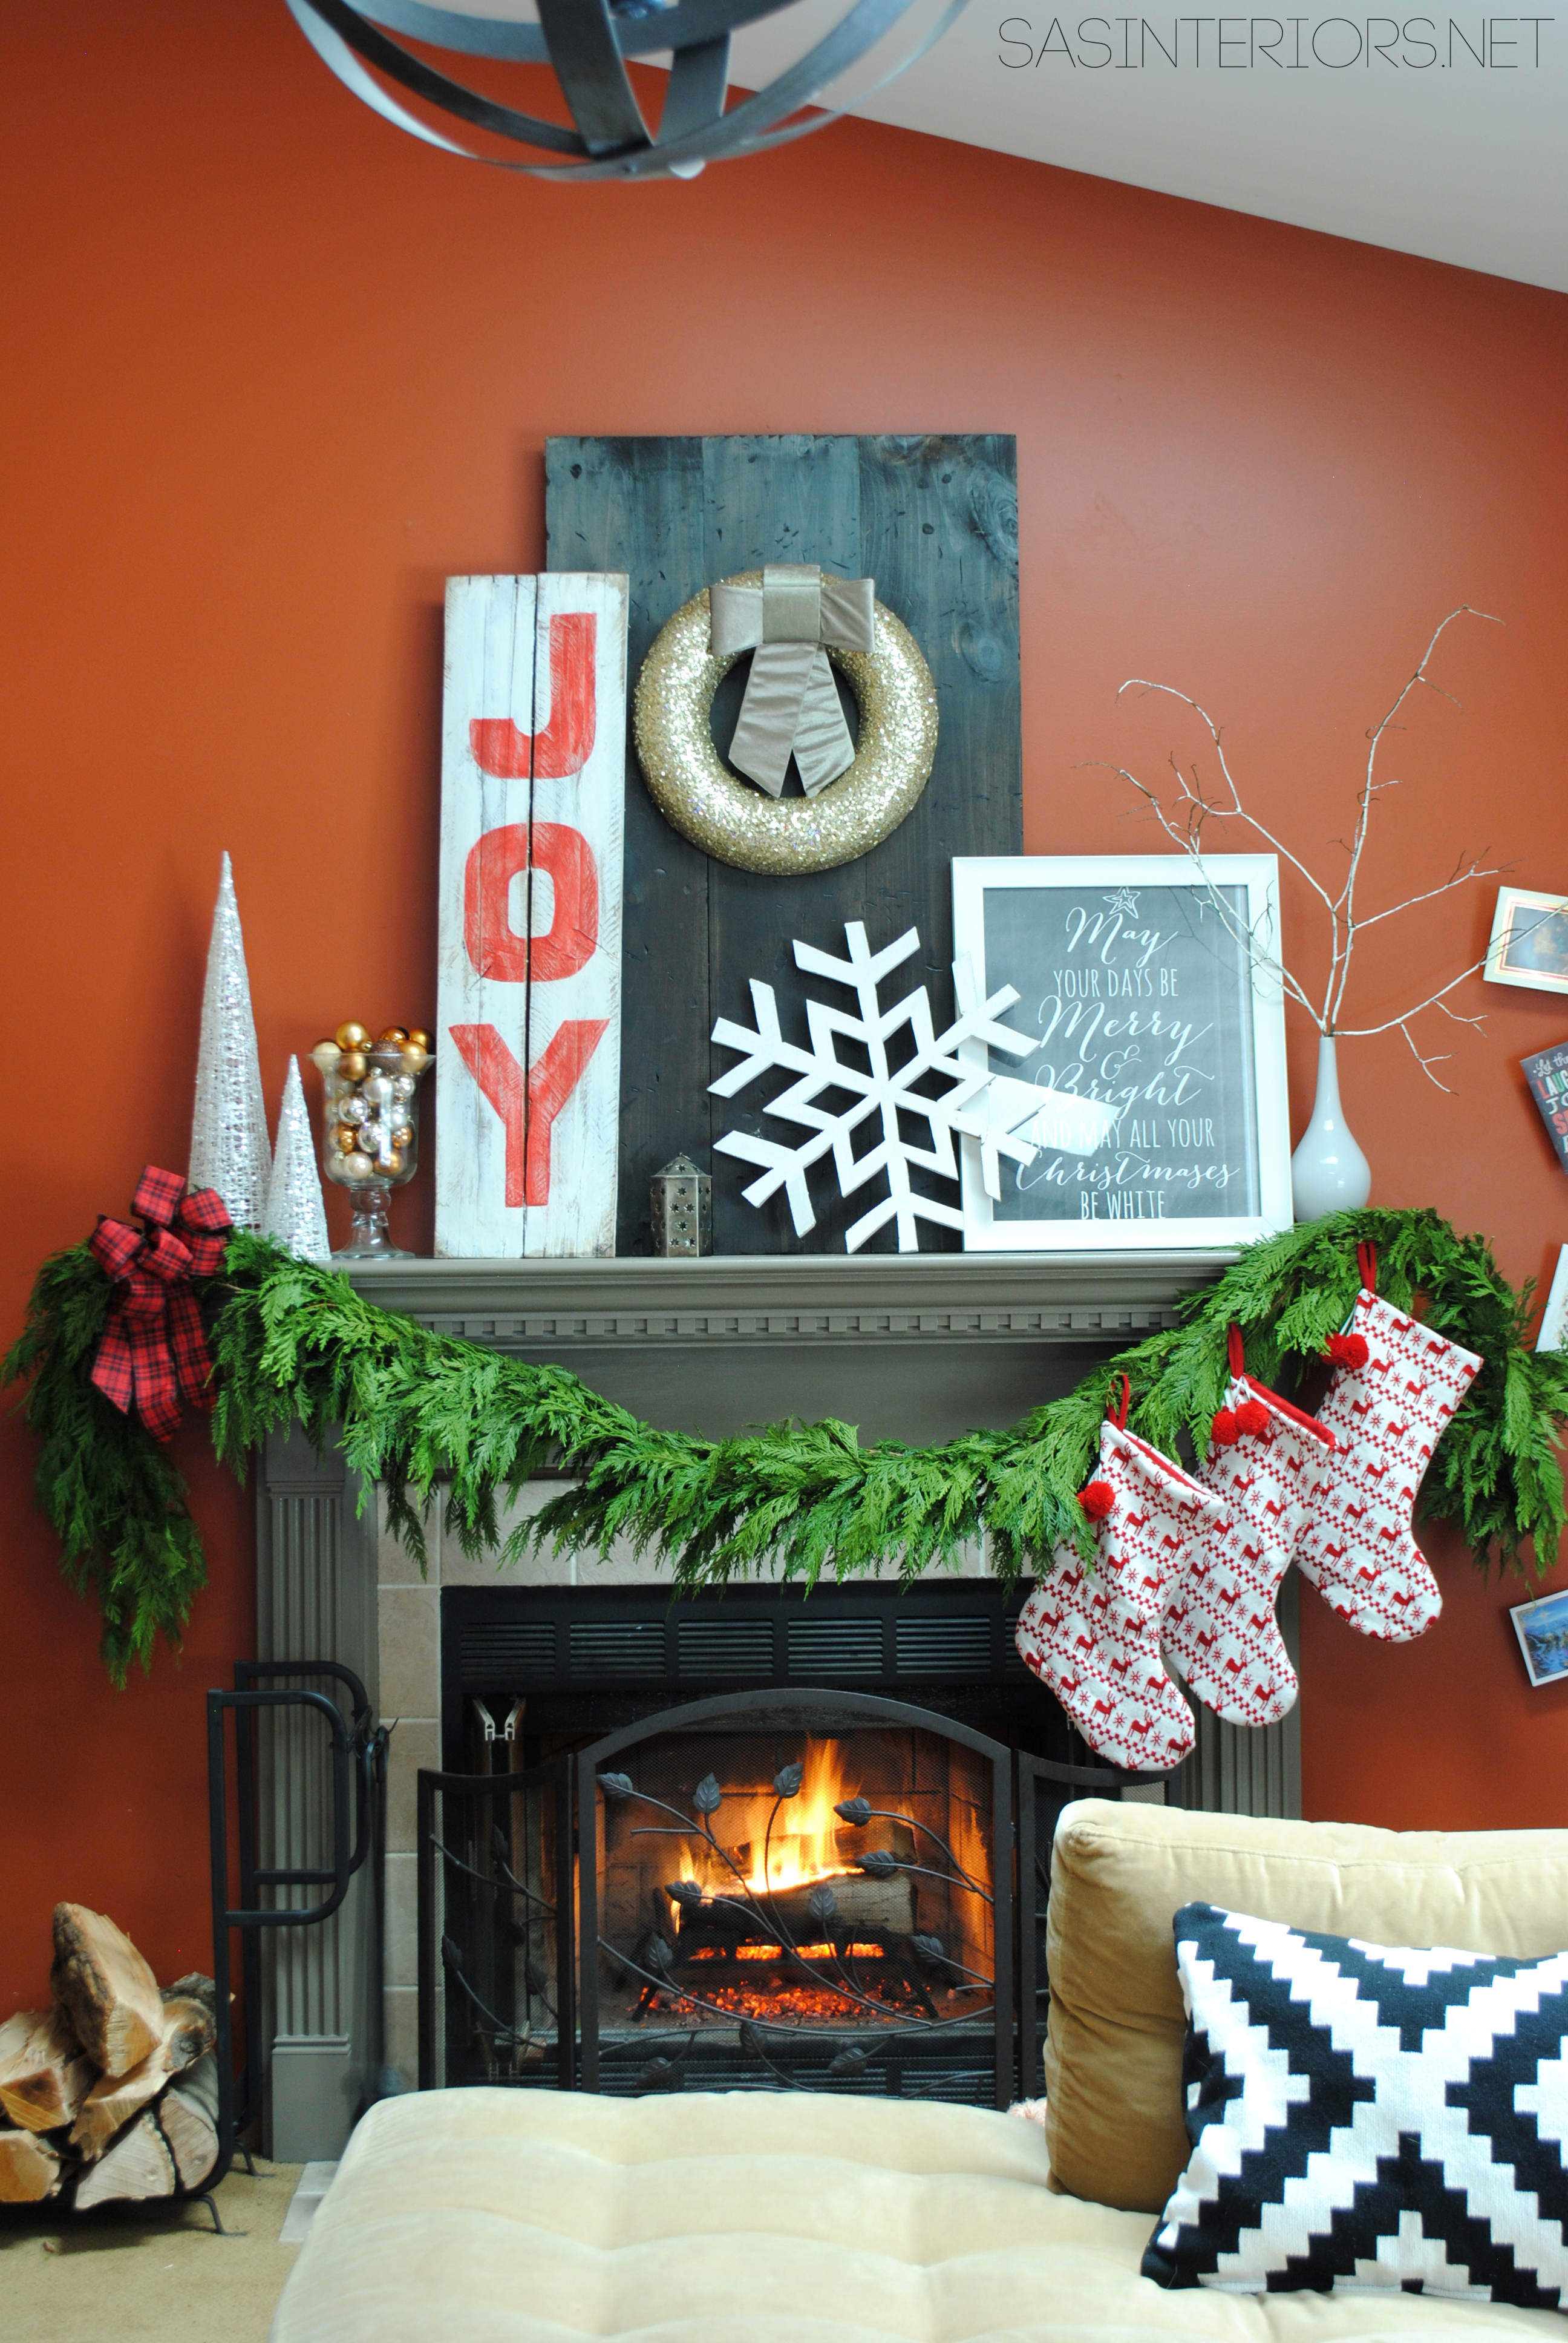
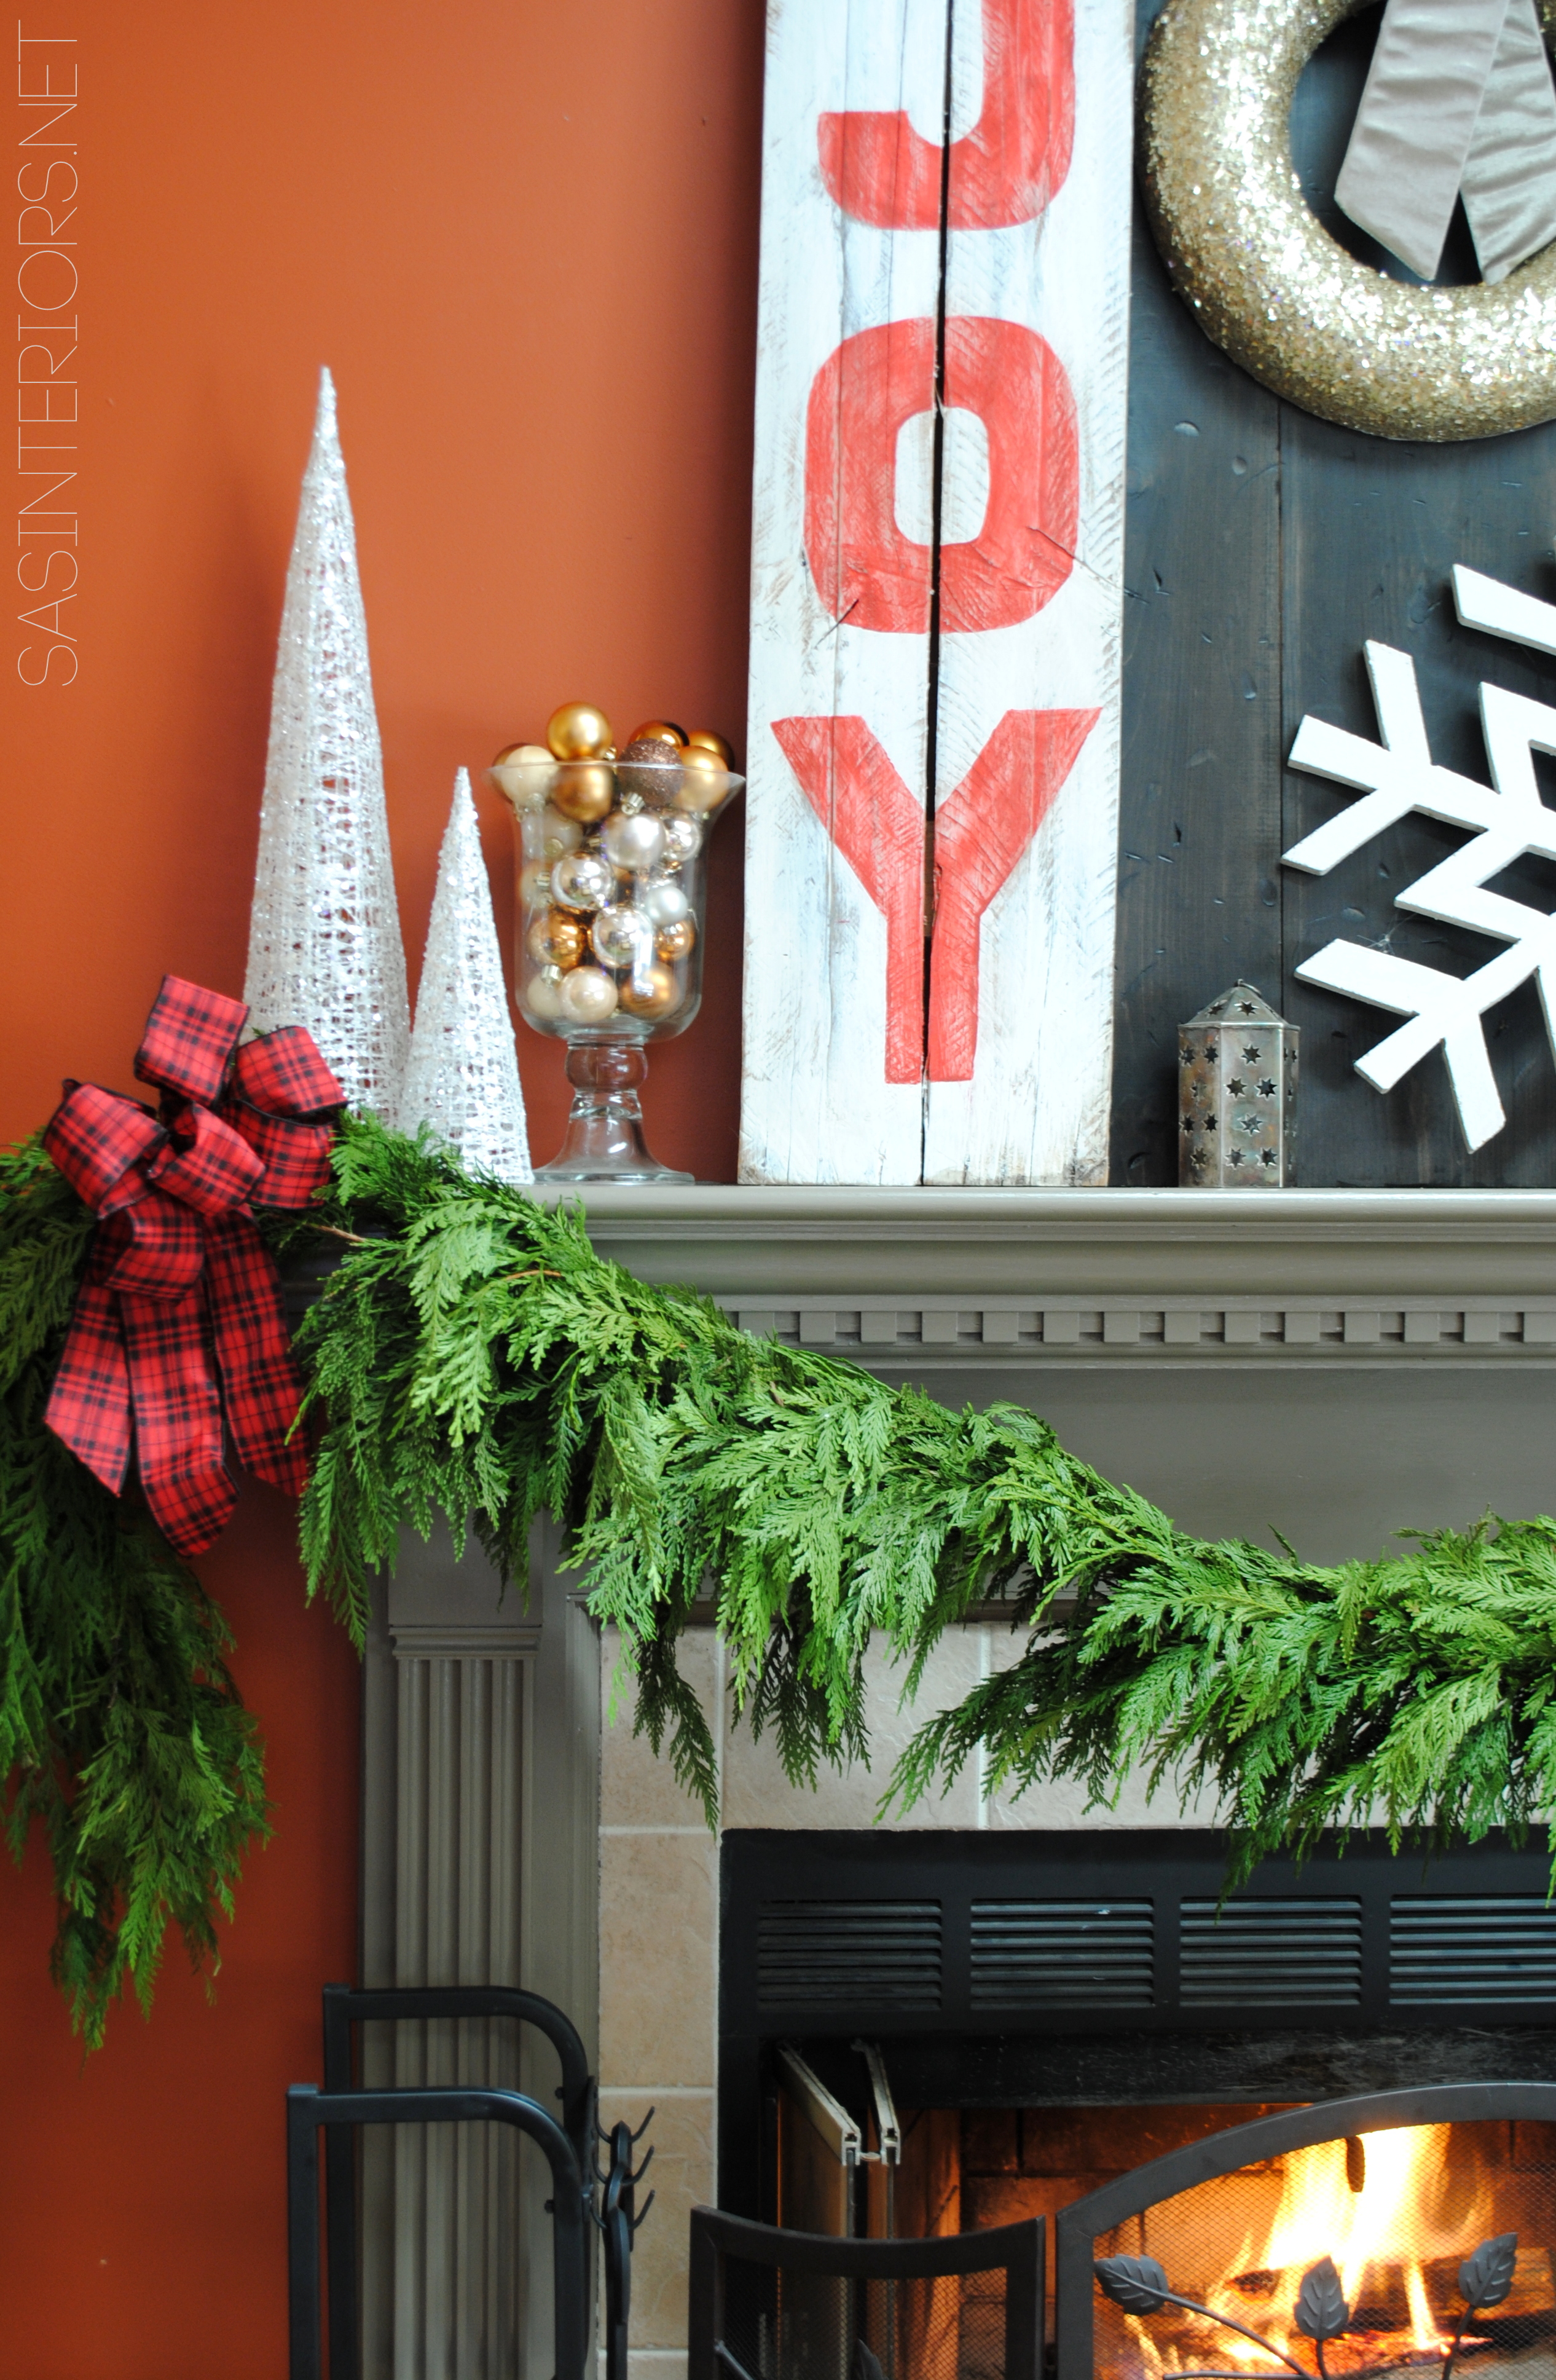
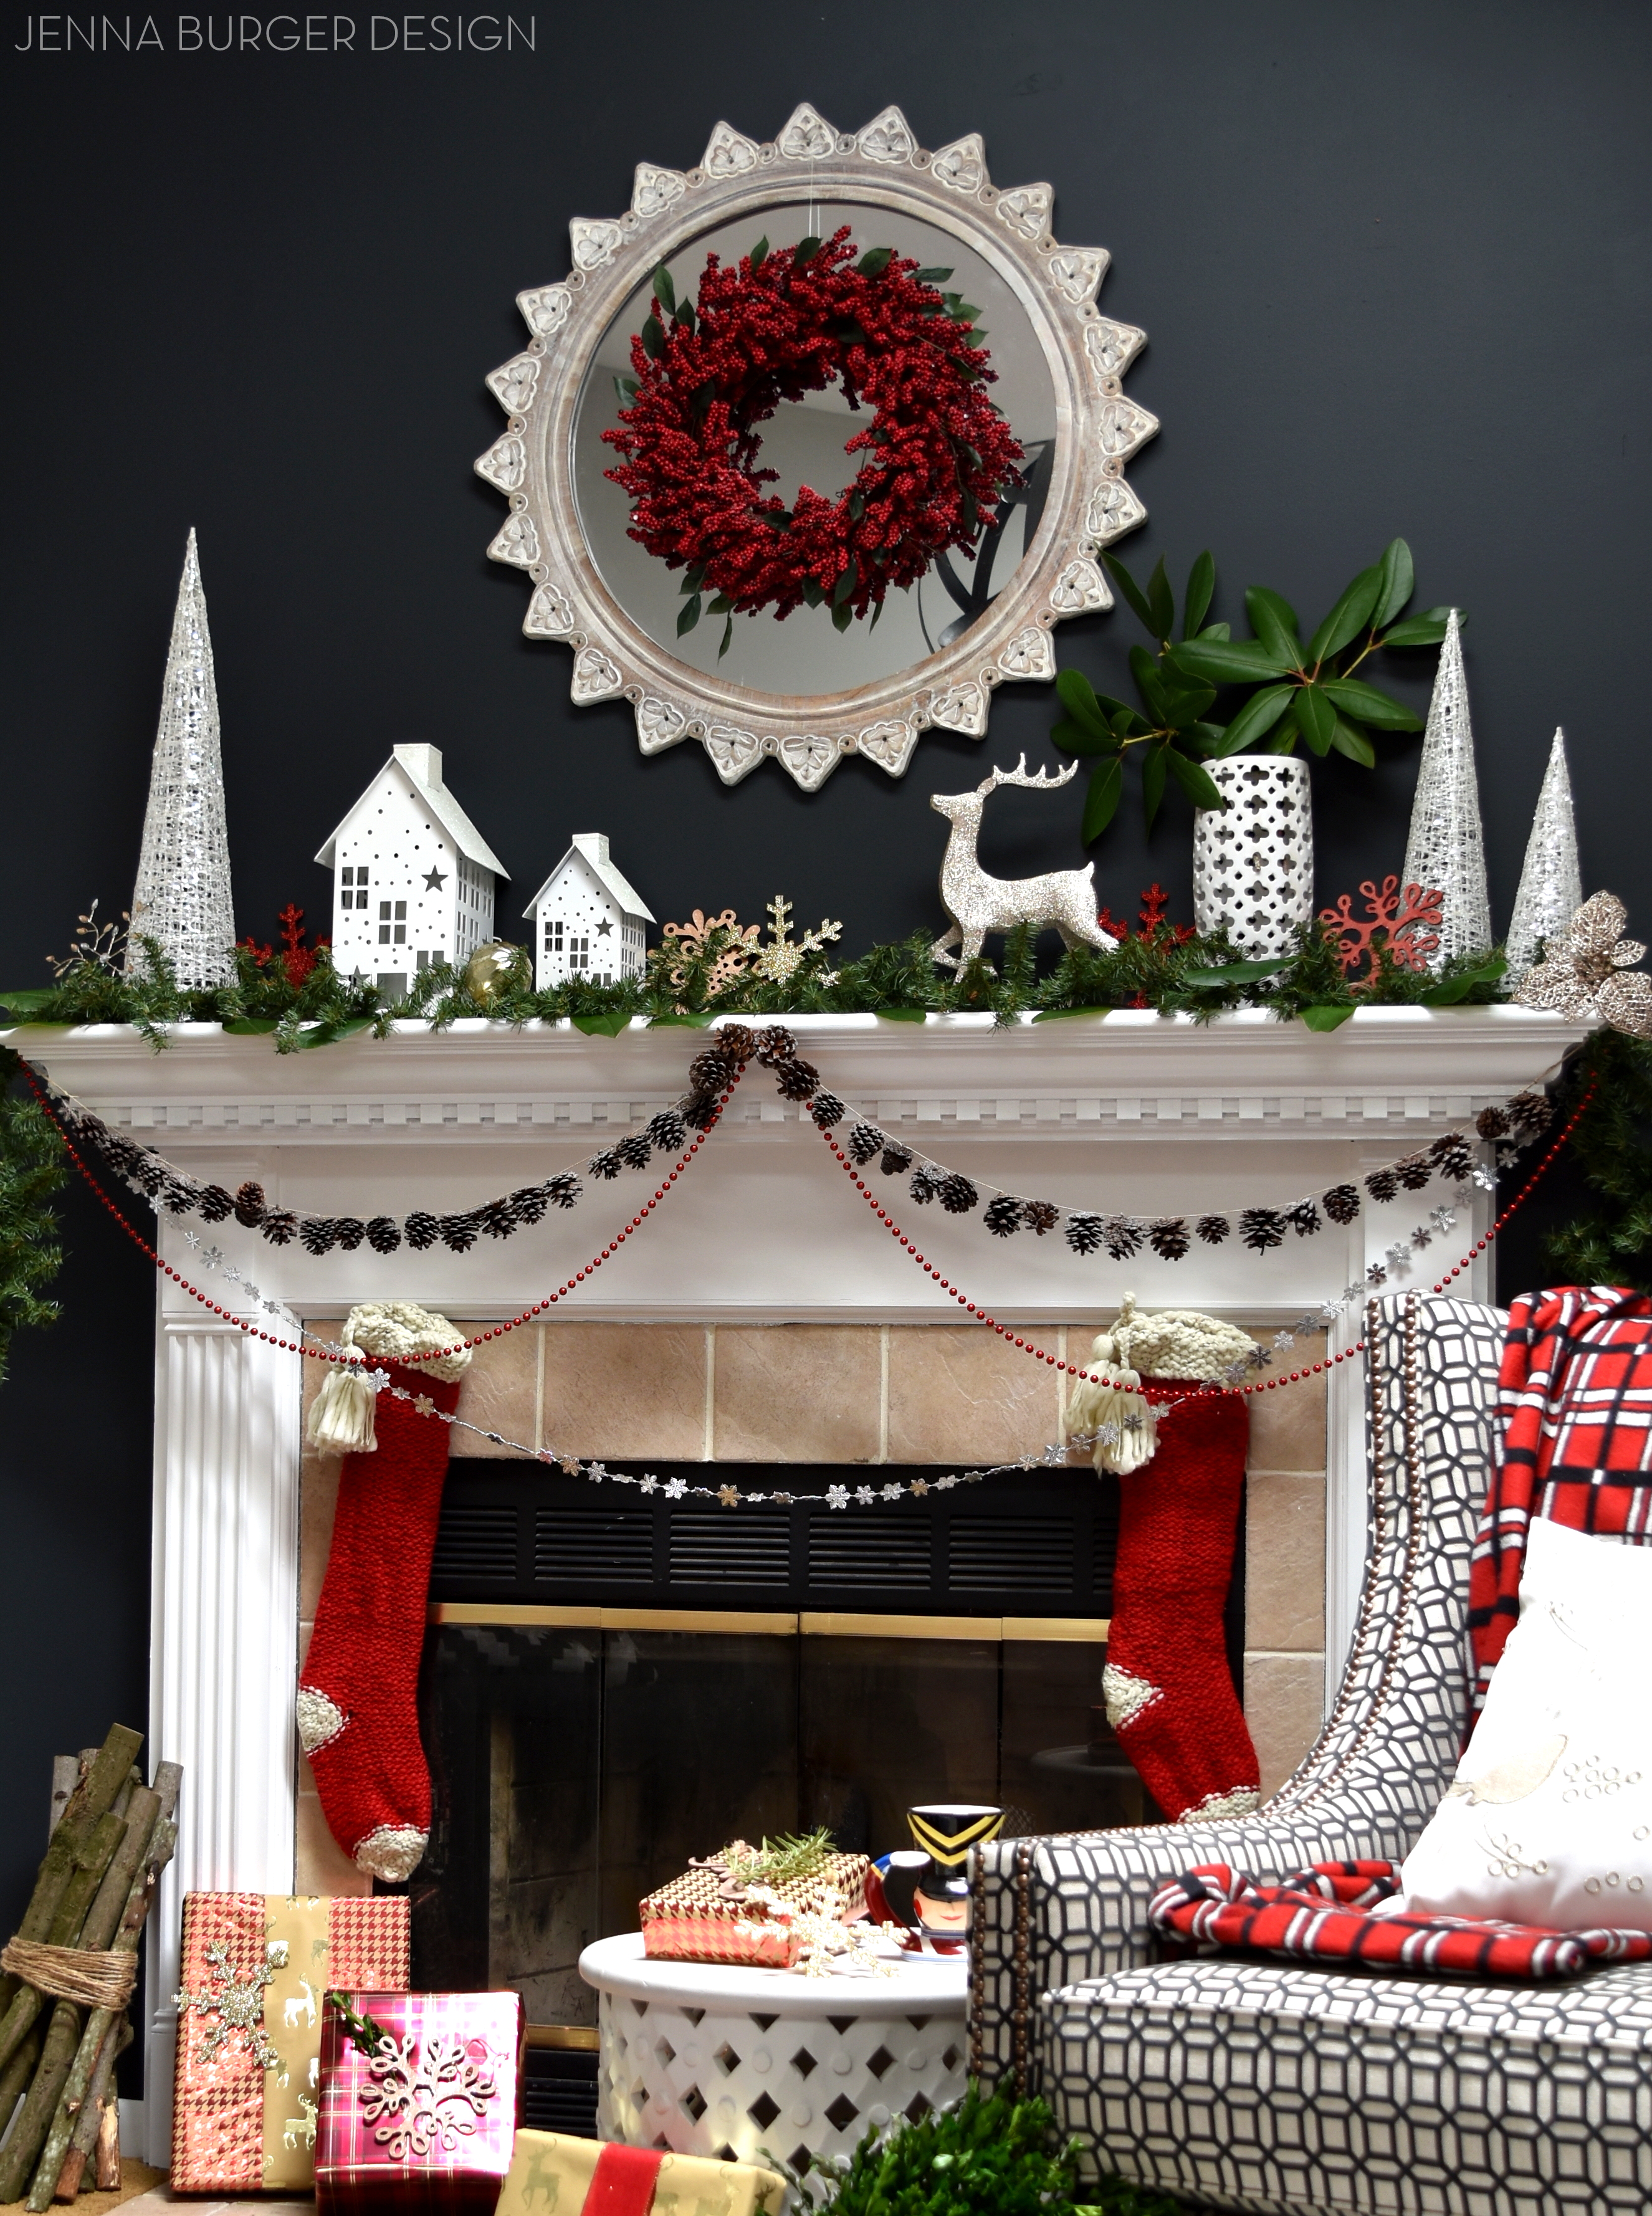
I had such a fun + relaxing (well kinda in my OCD way) time creating this years Christmas mantel.  It was enjoyable to have a different backdrop to work with since this room, specifically the fireplace wall, got a revamp for burnt orange to black earlier this year >>> check out the living room transformation

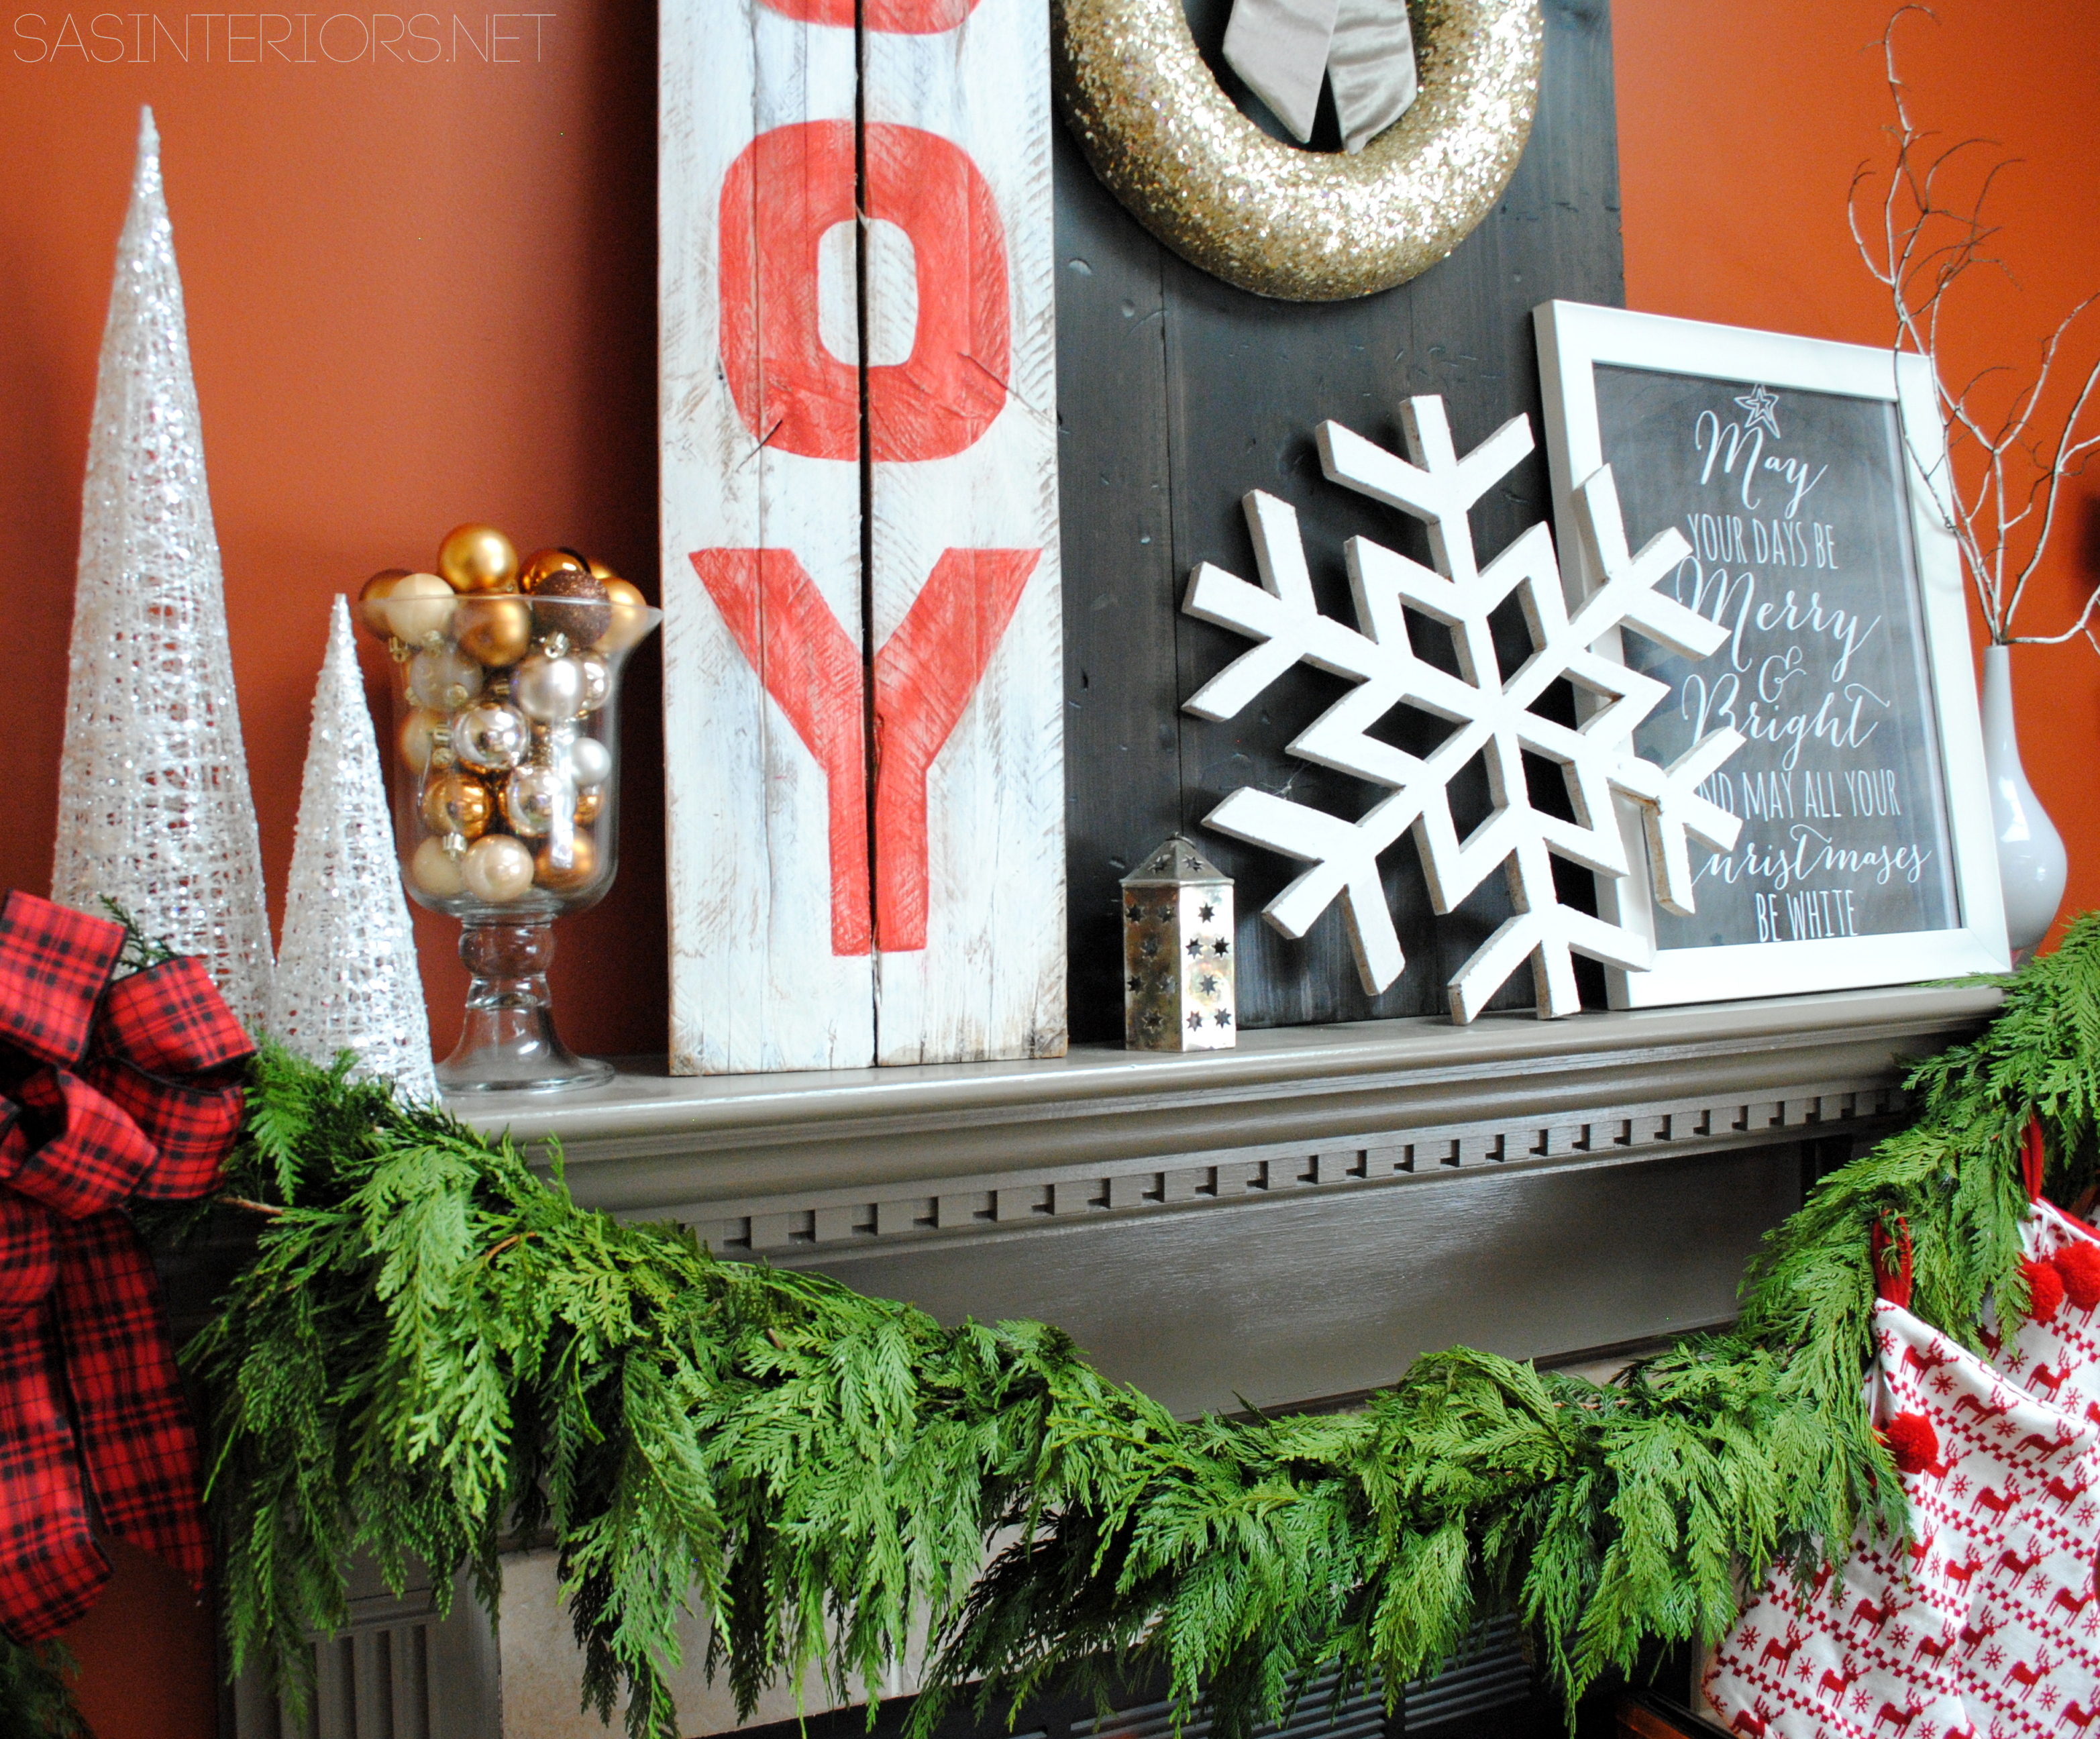
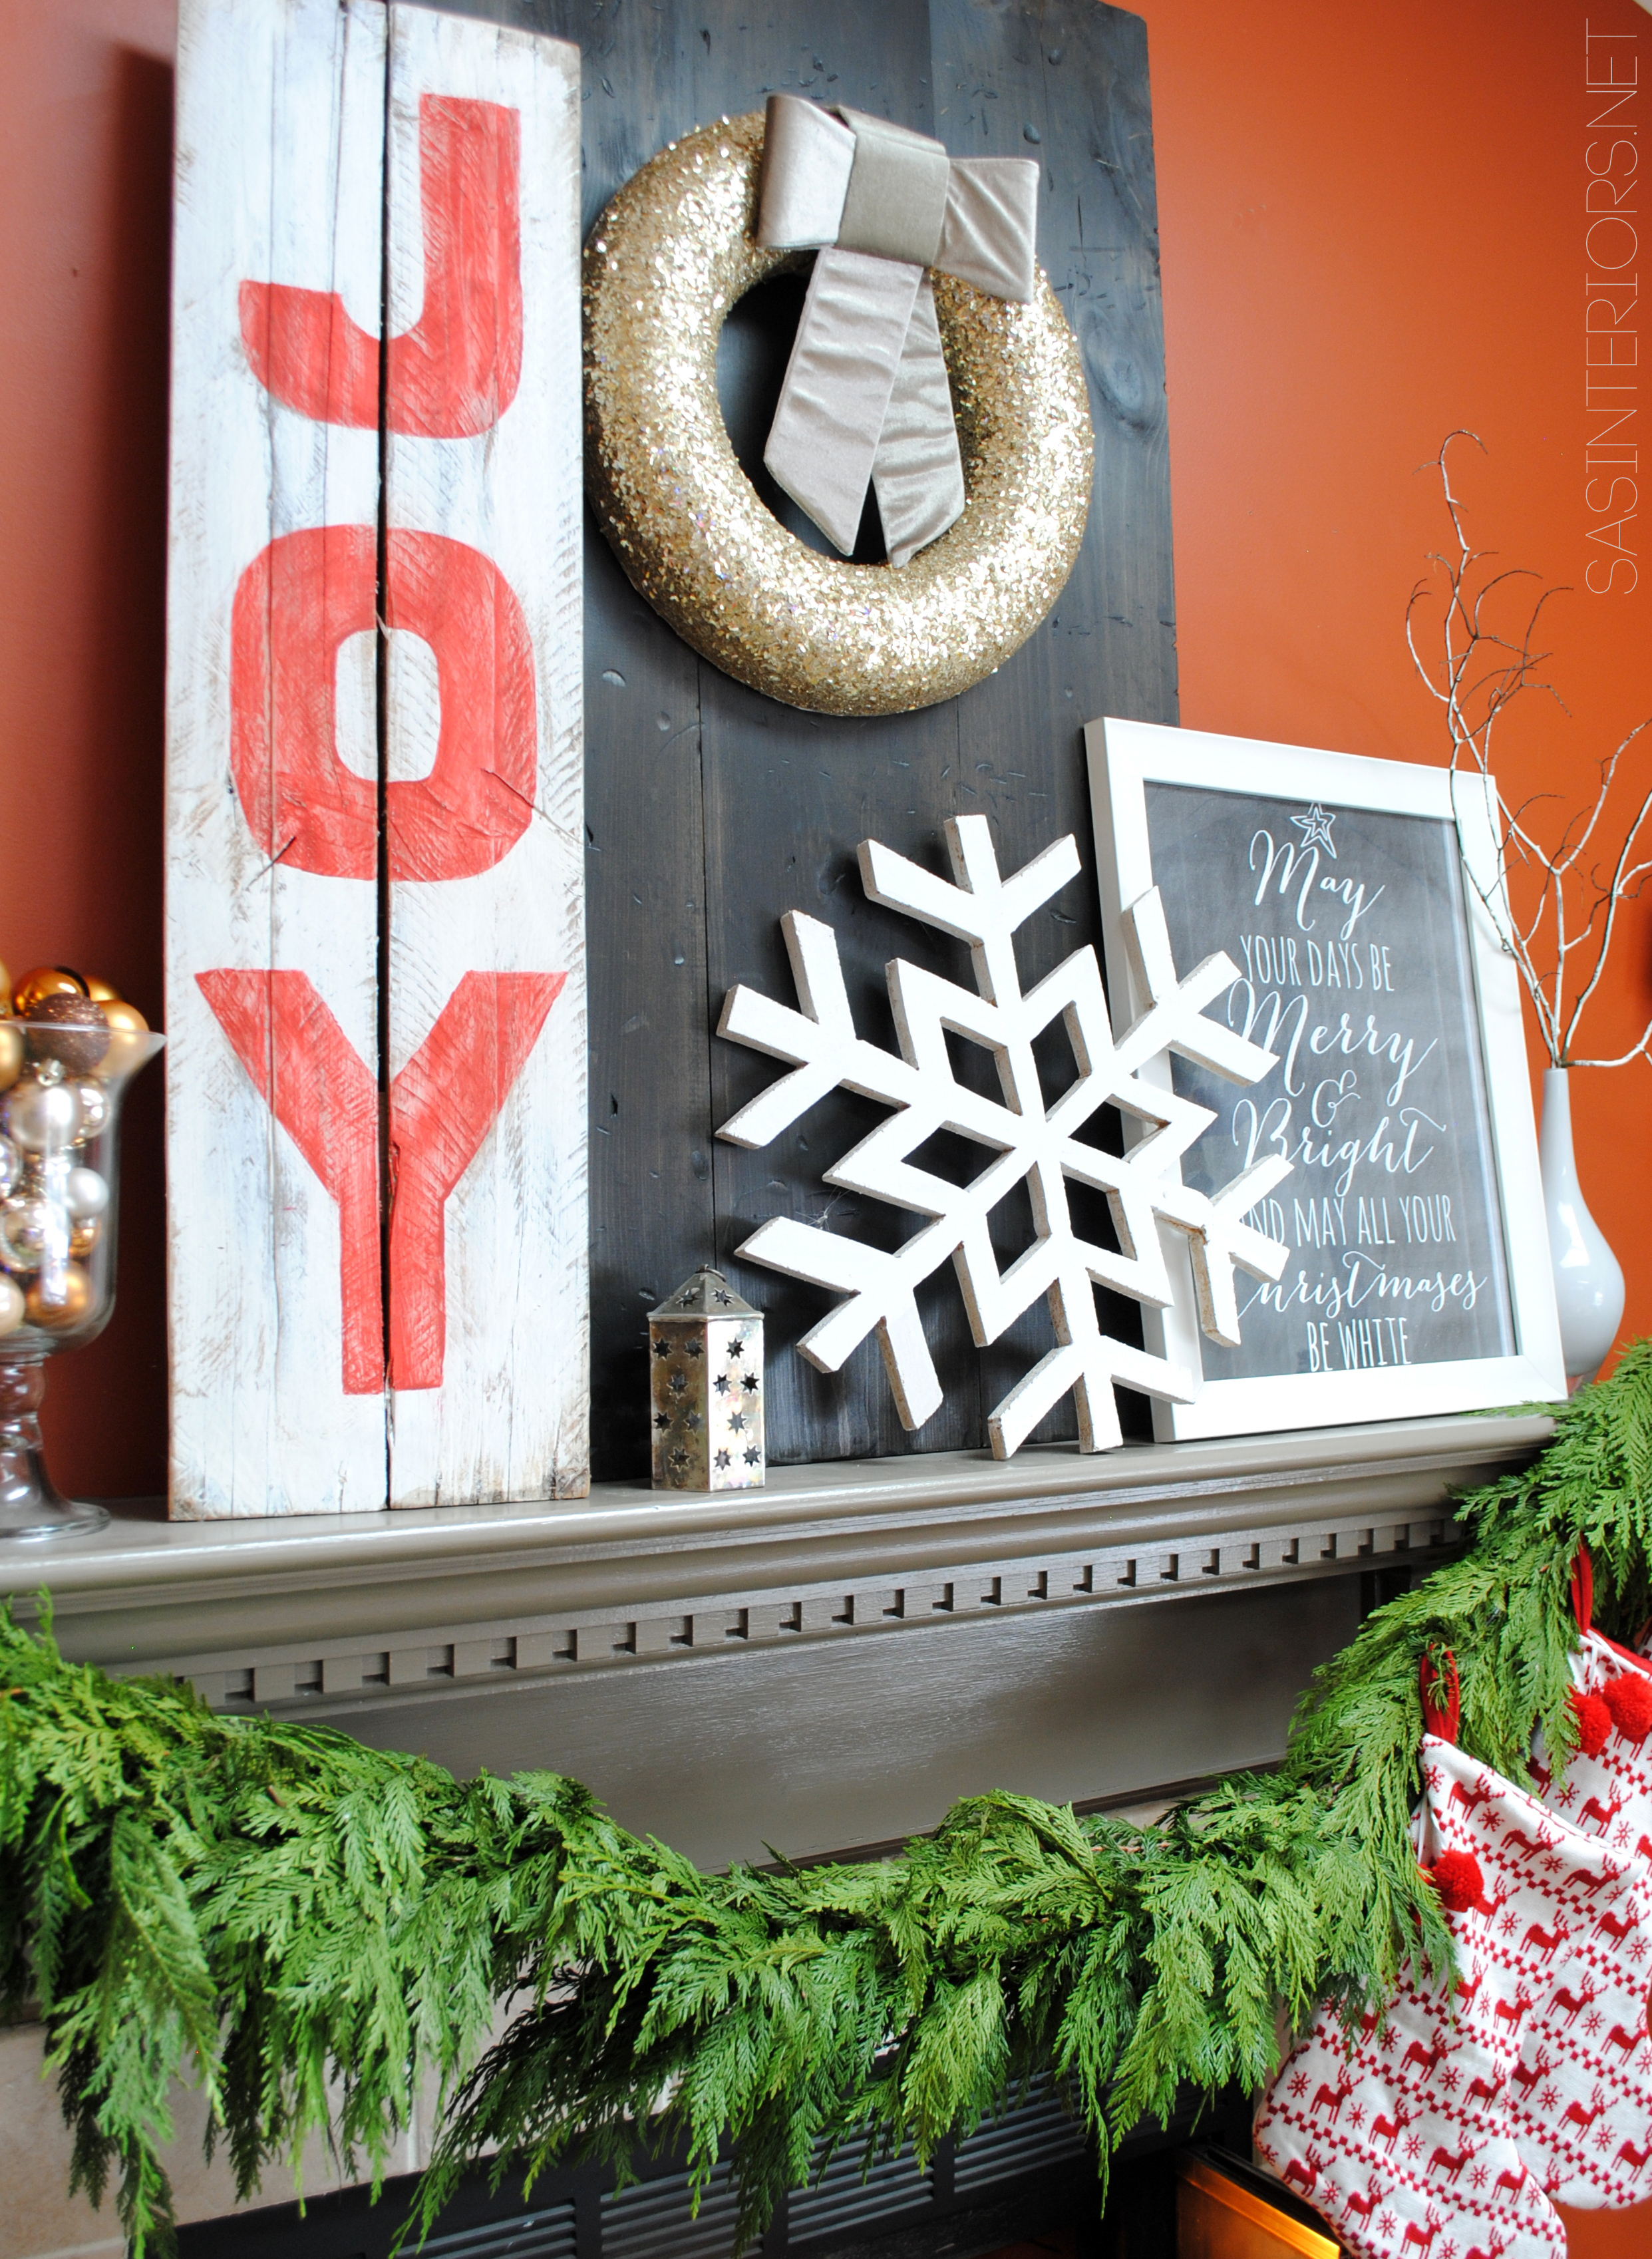
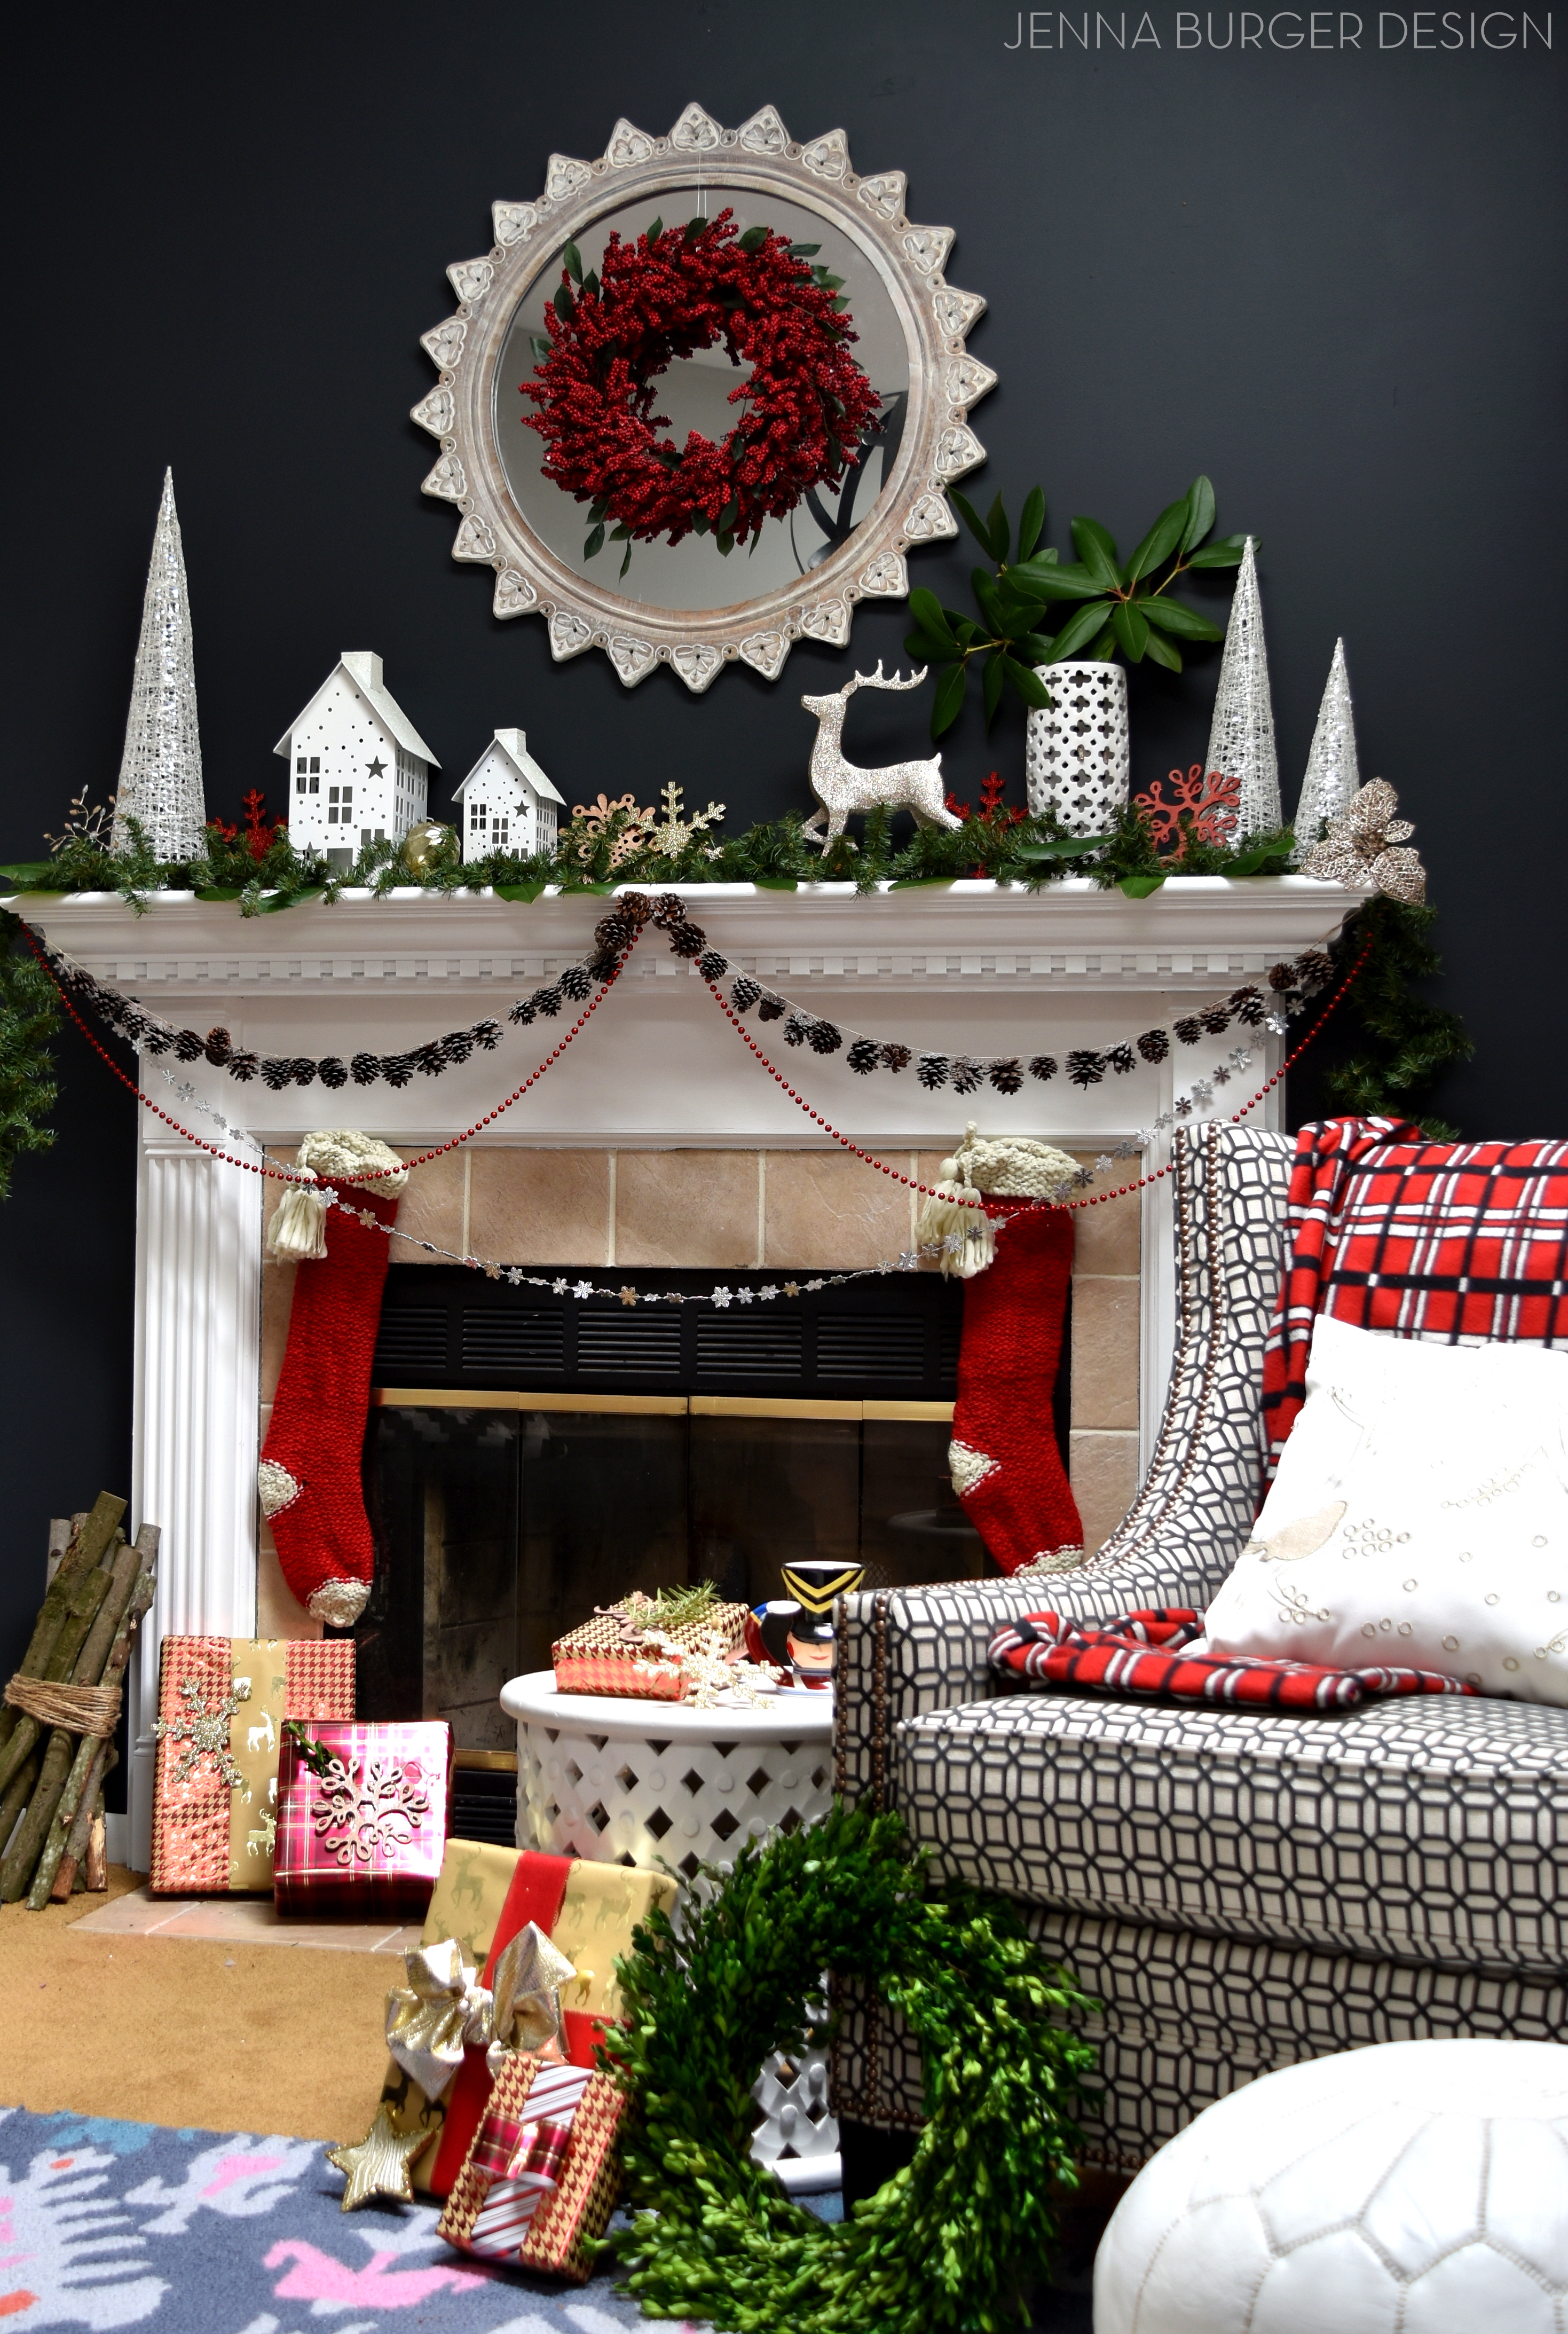
The new black wall – color: Valspar Black Heron – was the perfect backdrop to layering contrast white elements.

Christmas Mantel filled with old & new. Created by www.jennaburger.com

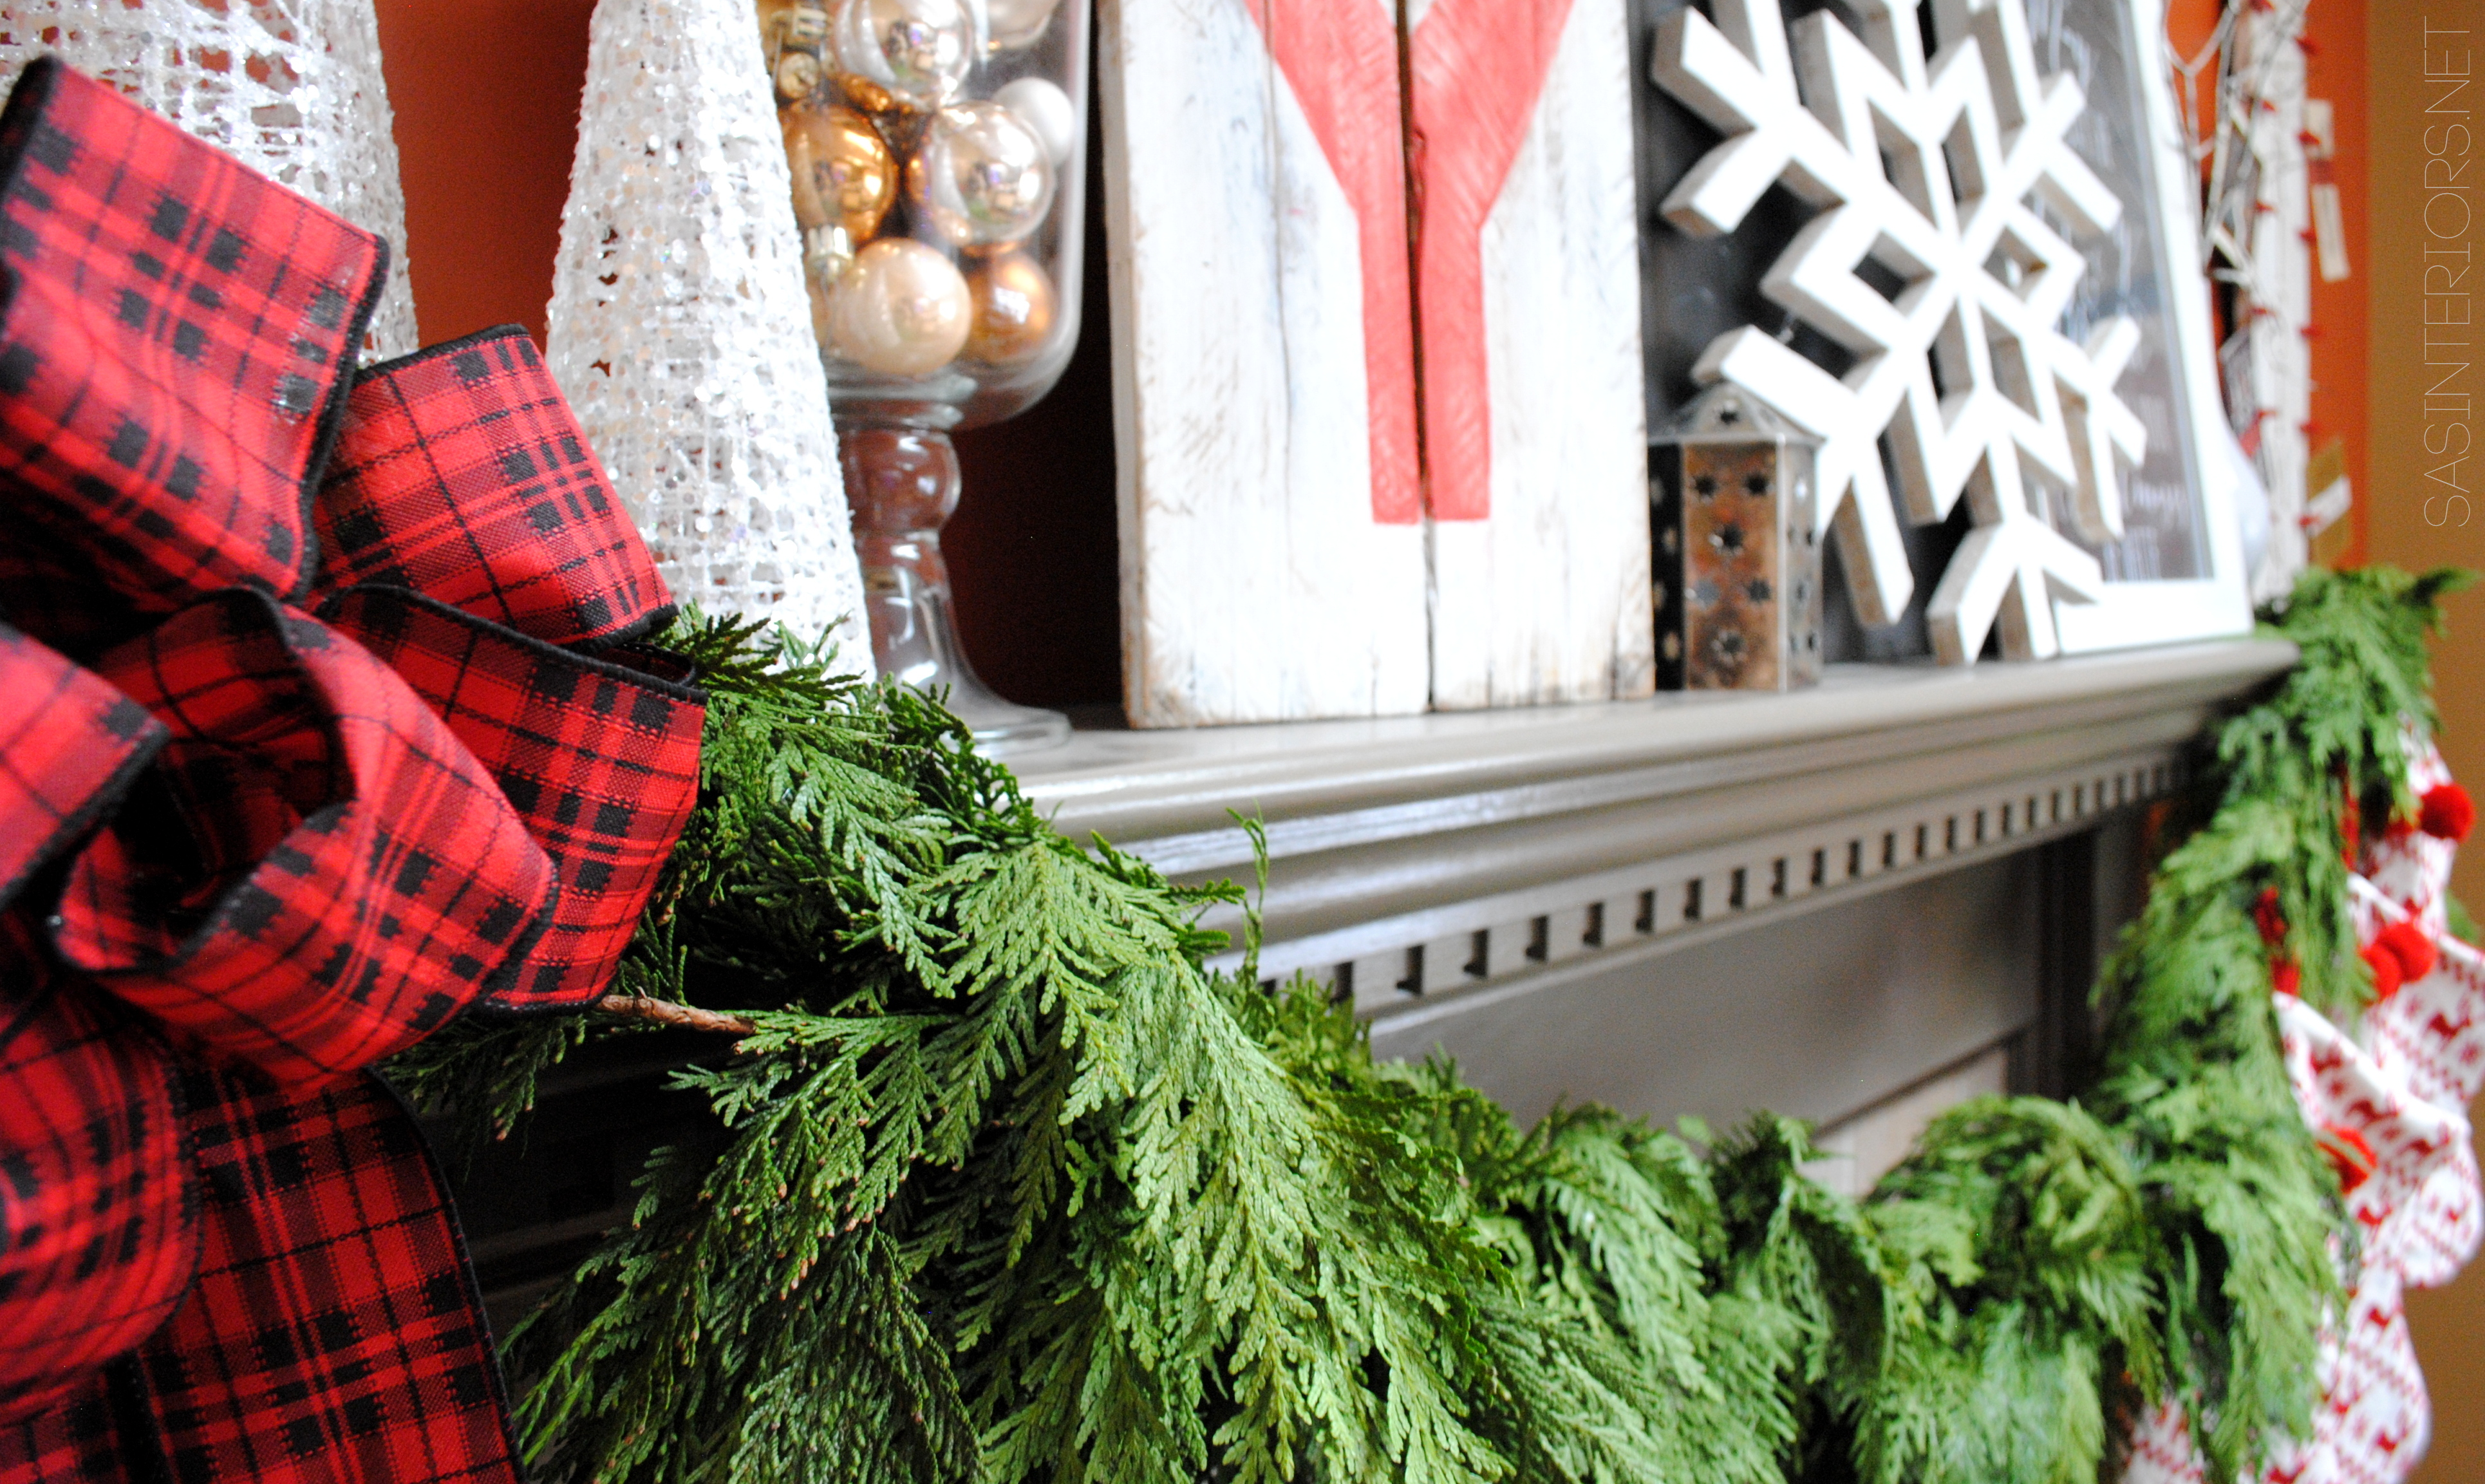
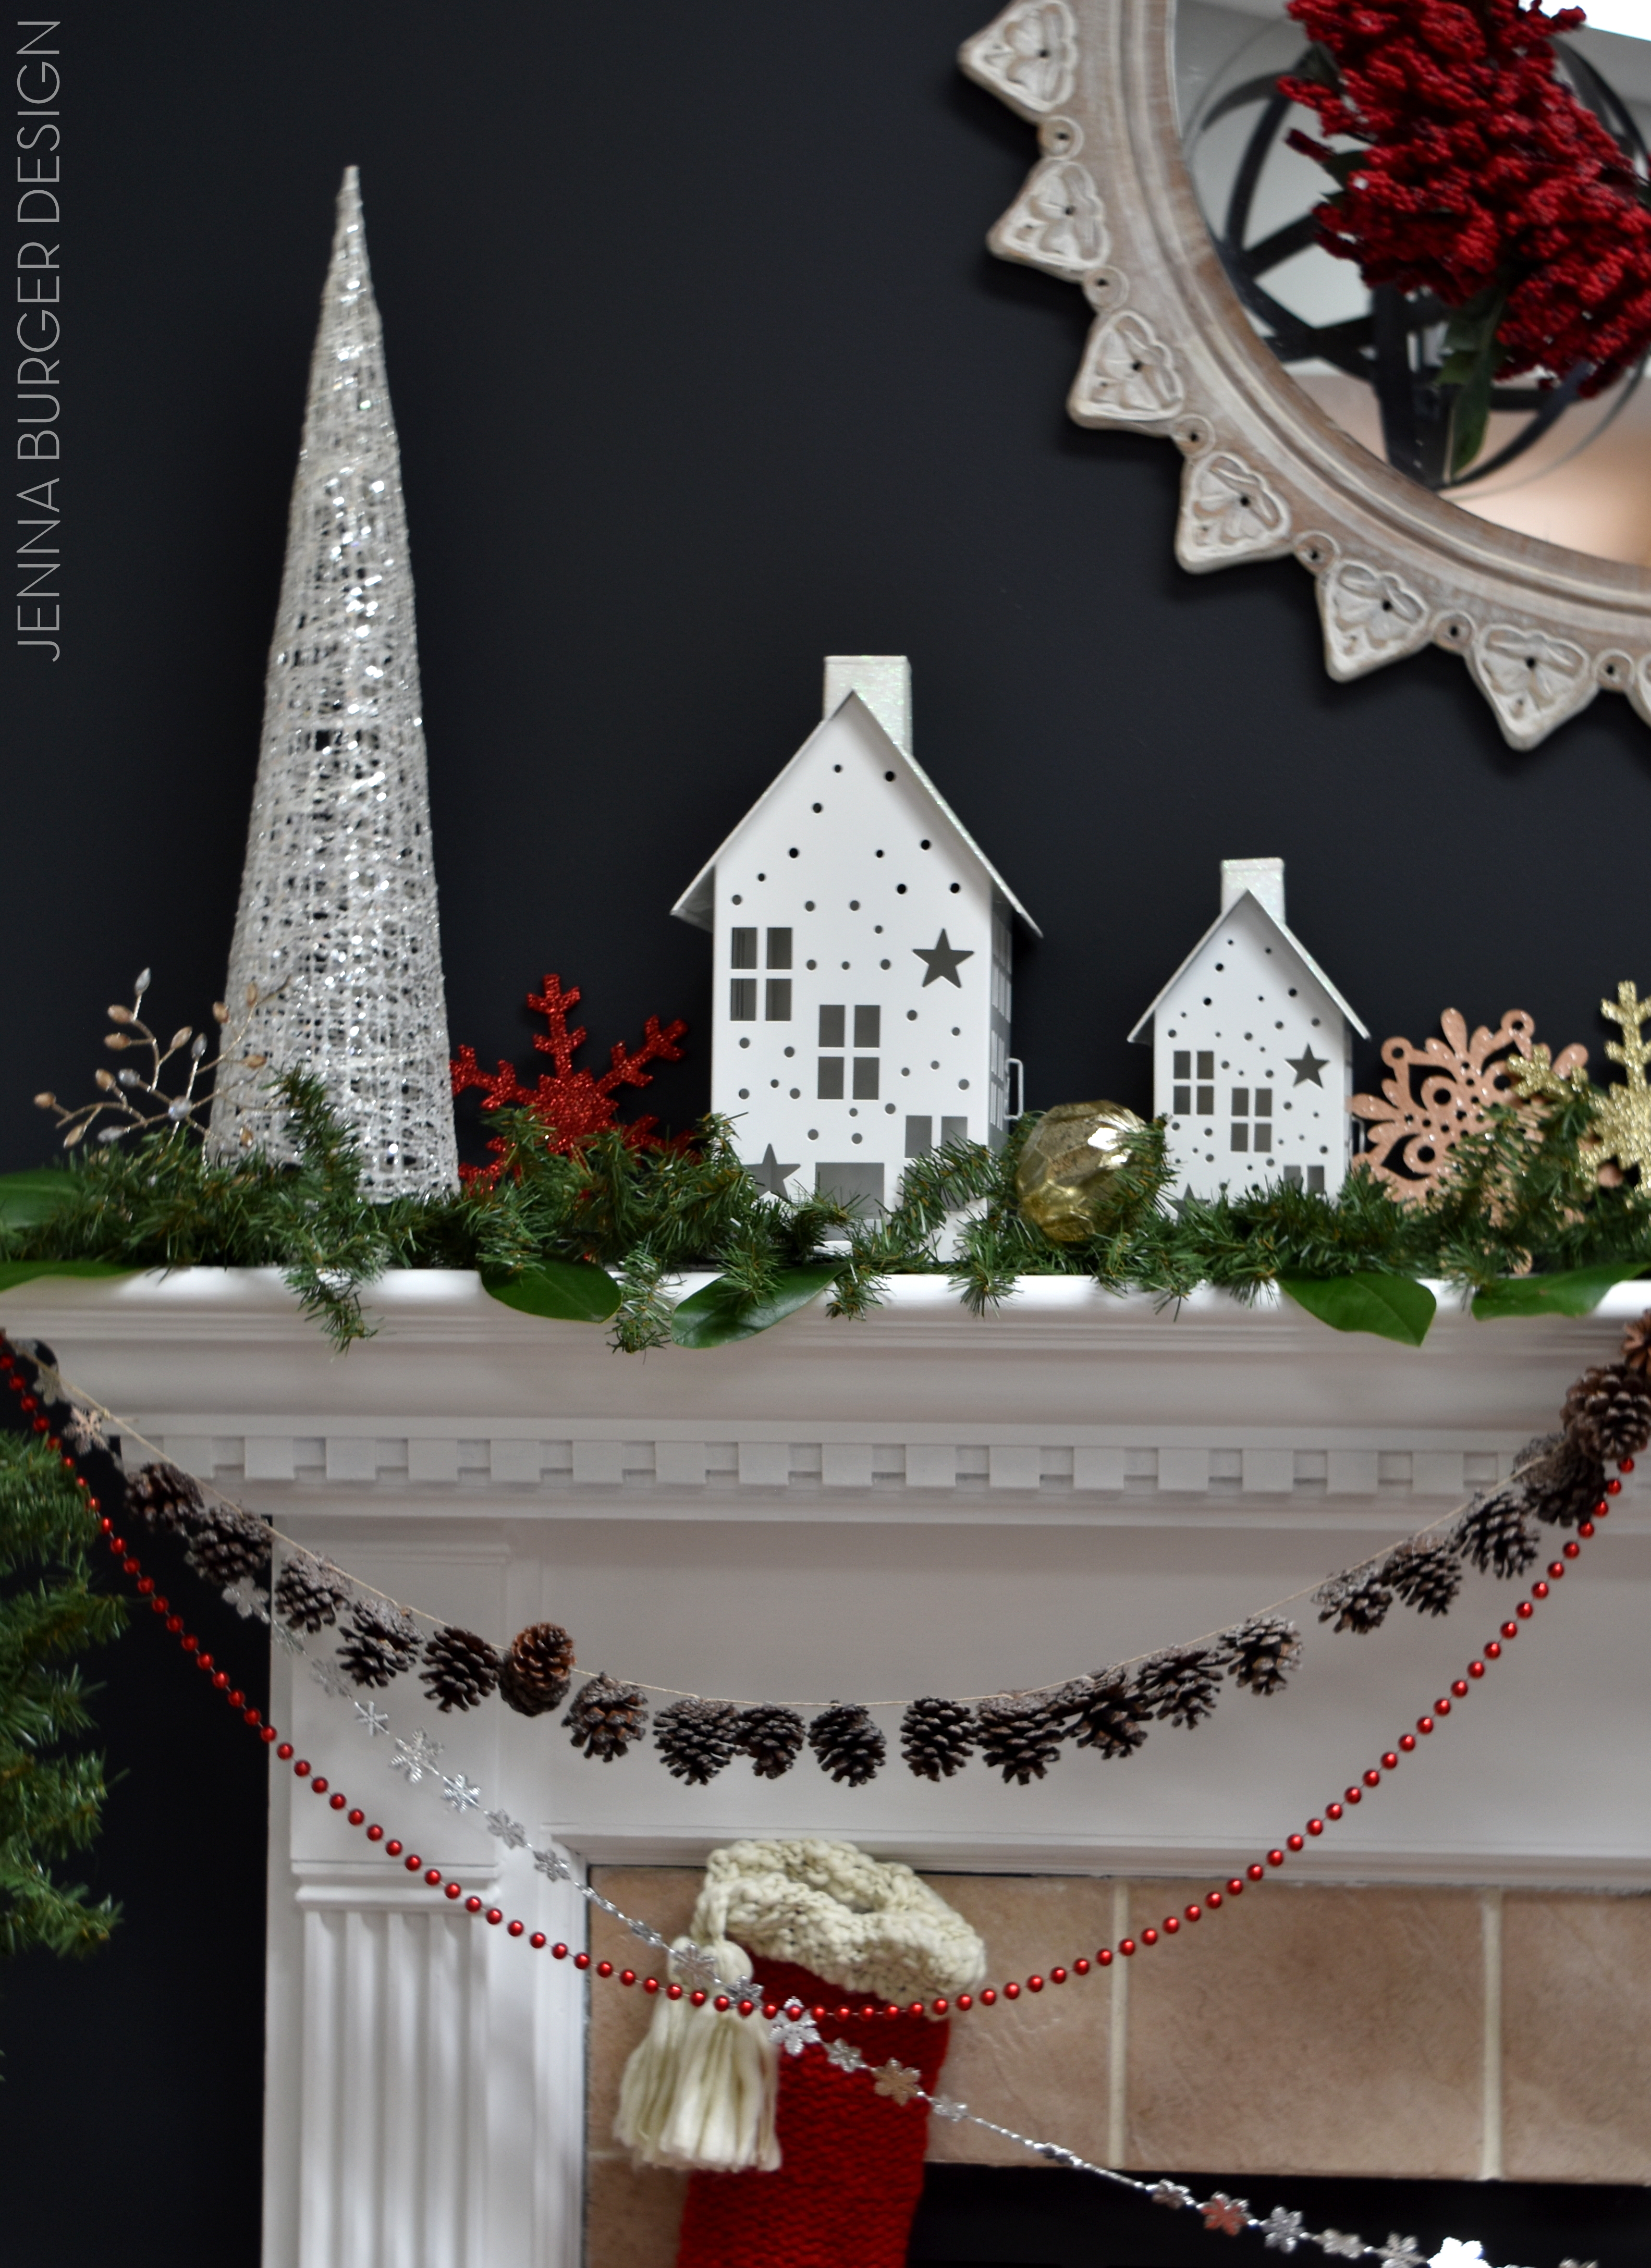
I stumbled upon these adorable white houses – in varying sizes – and couldn’t resist incorporating them in the mantel.  The same houses come in red as well, but I loved the crisp white with glitter roof.

Christmas Mantel filled with old & new. Created by www.jennaburger.com

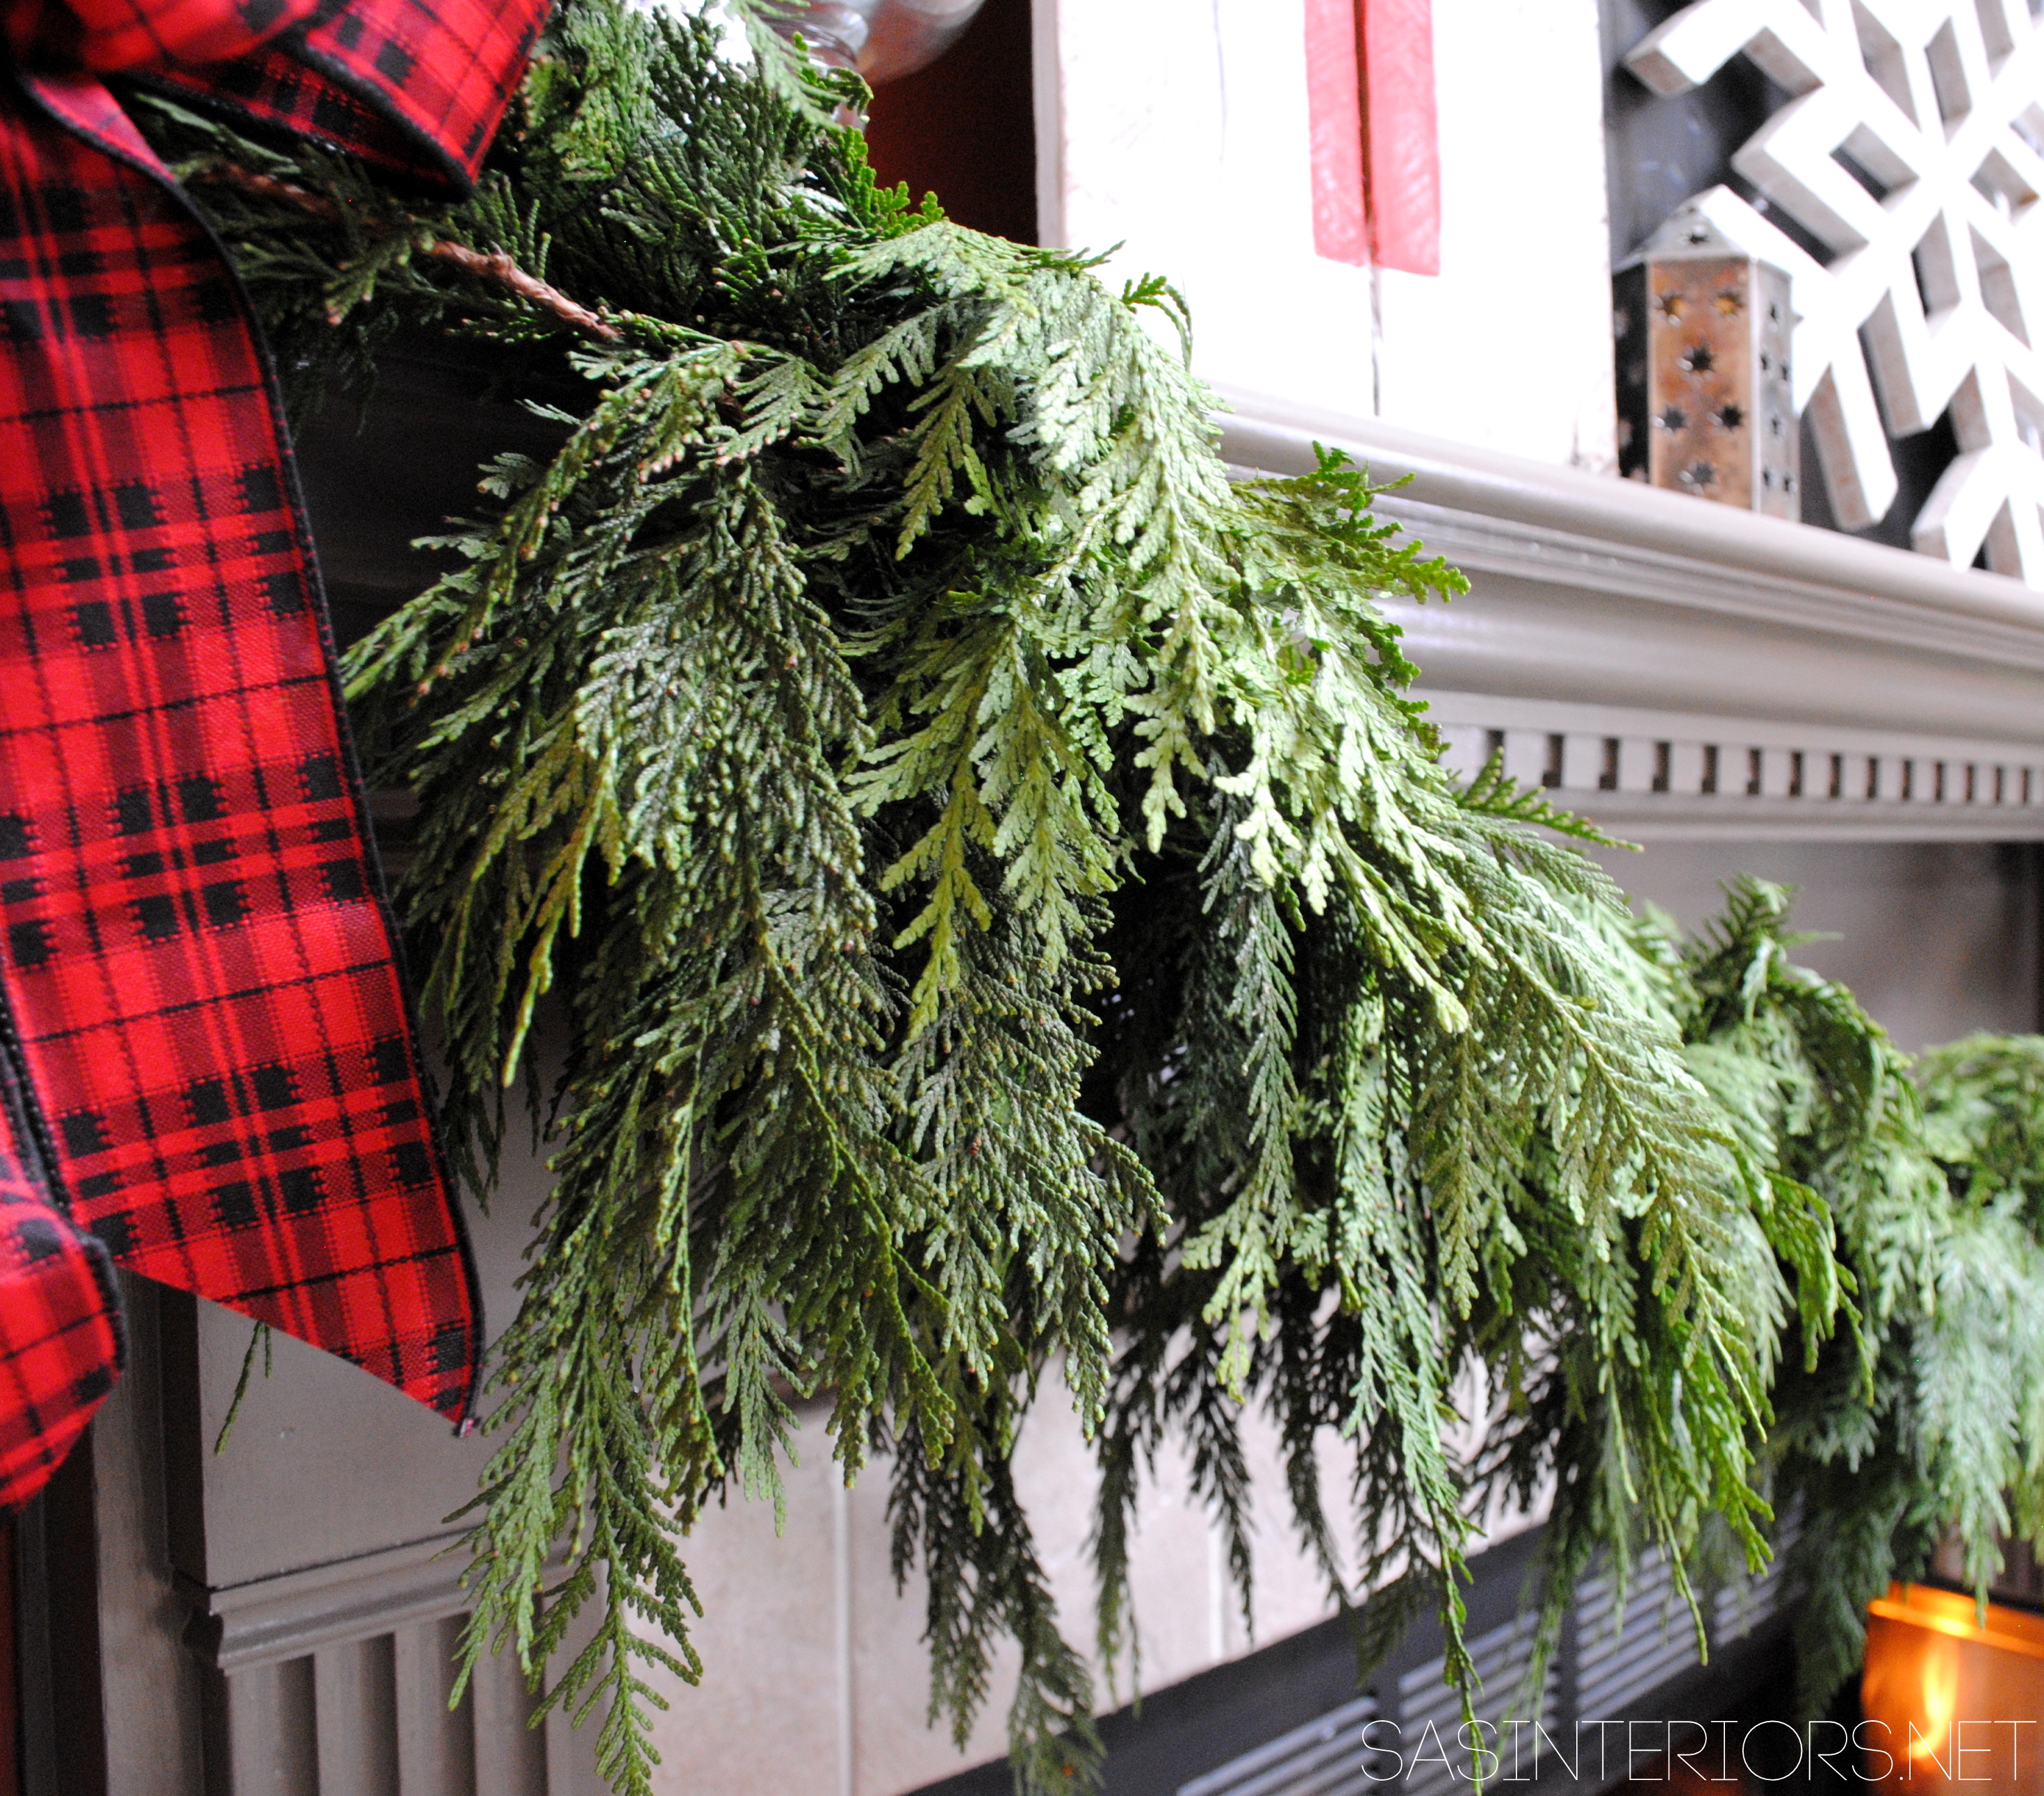
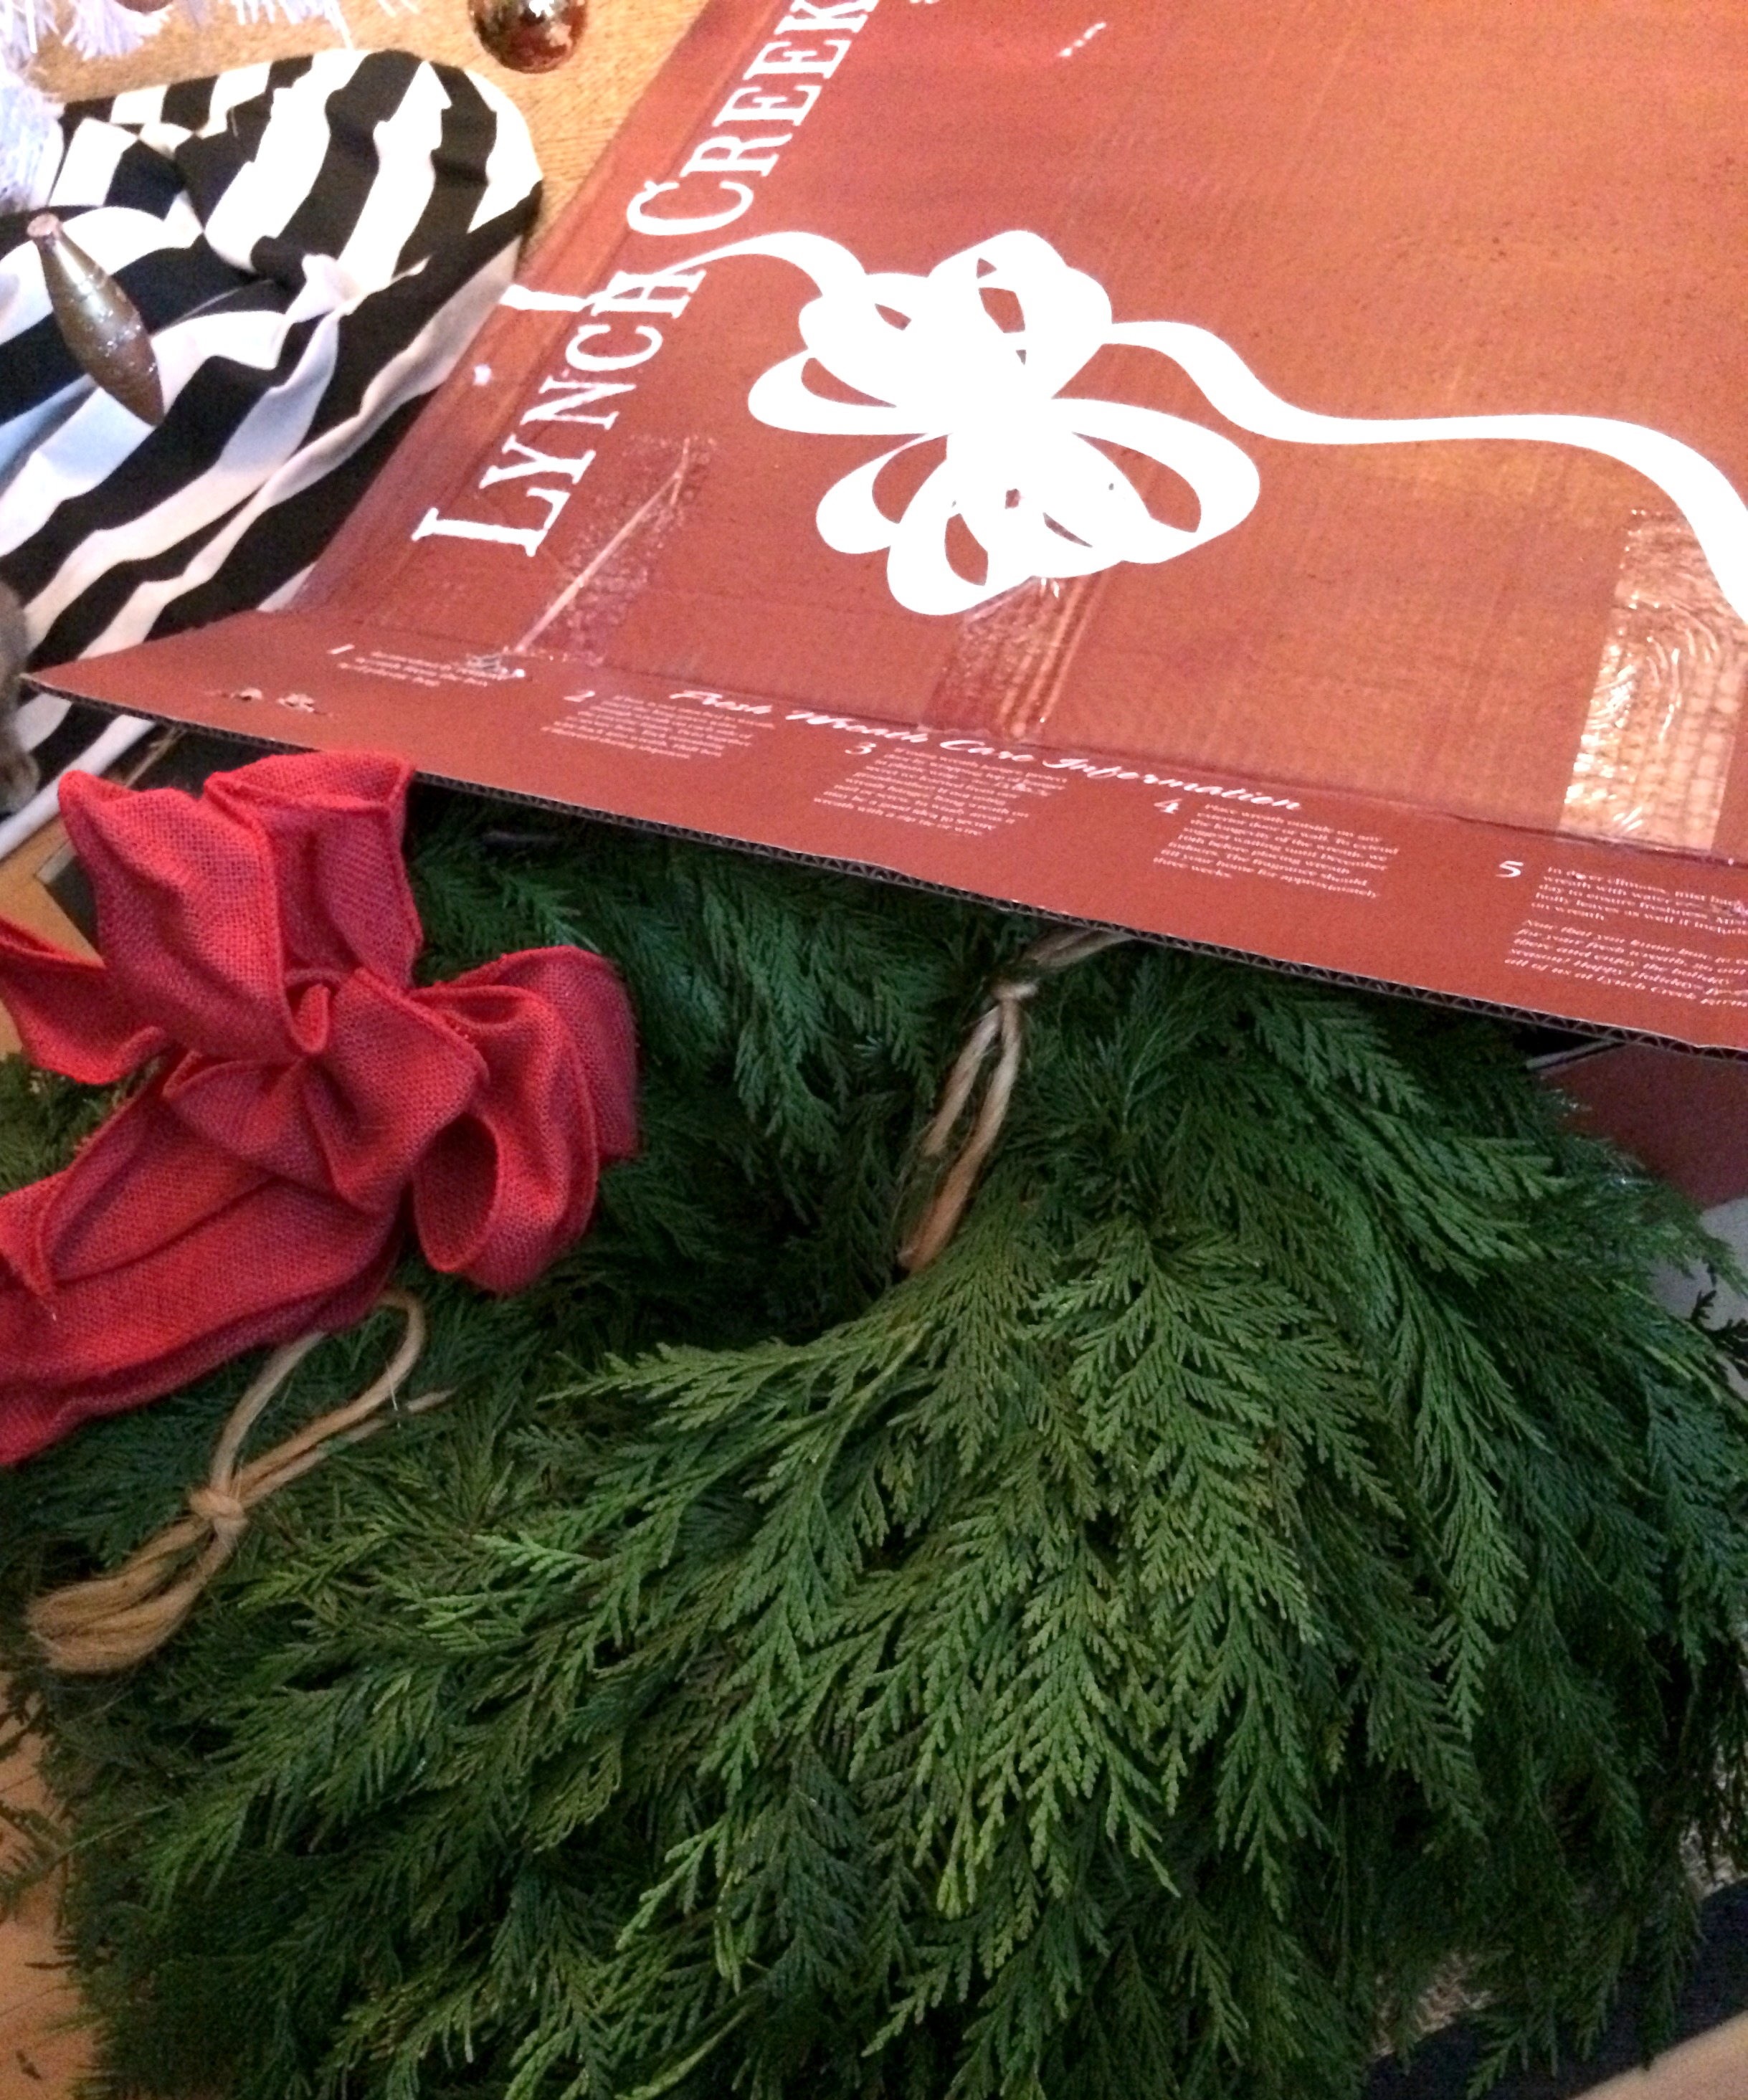
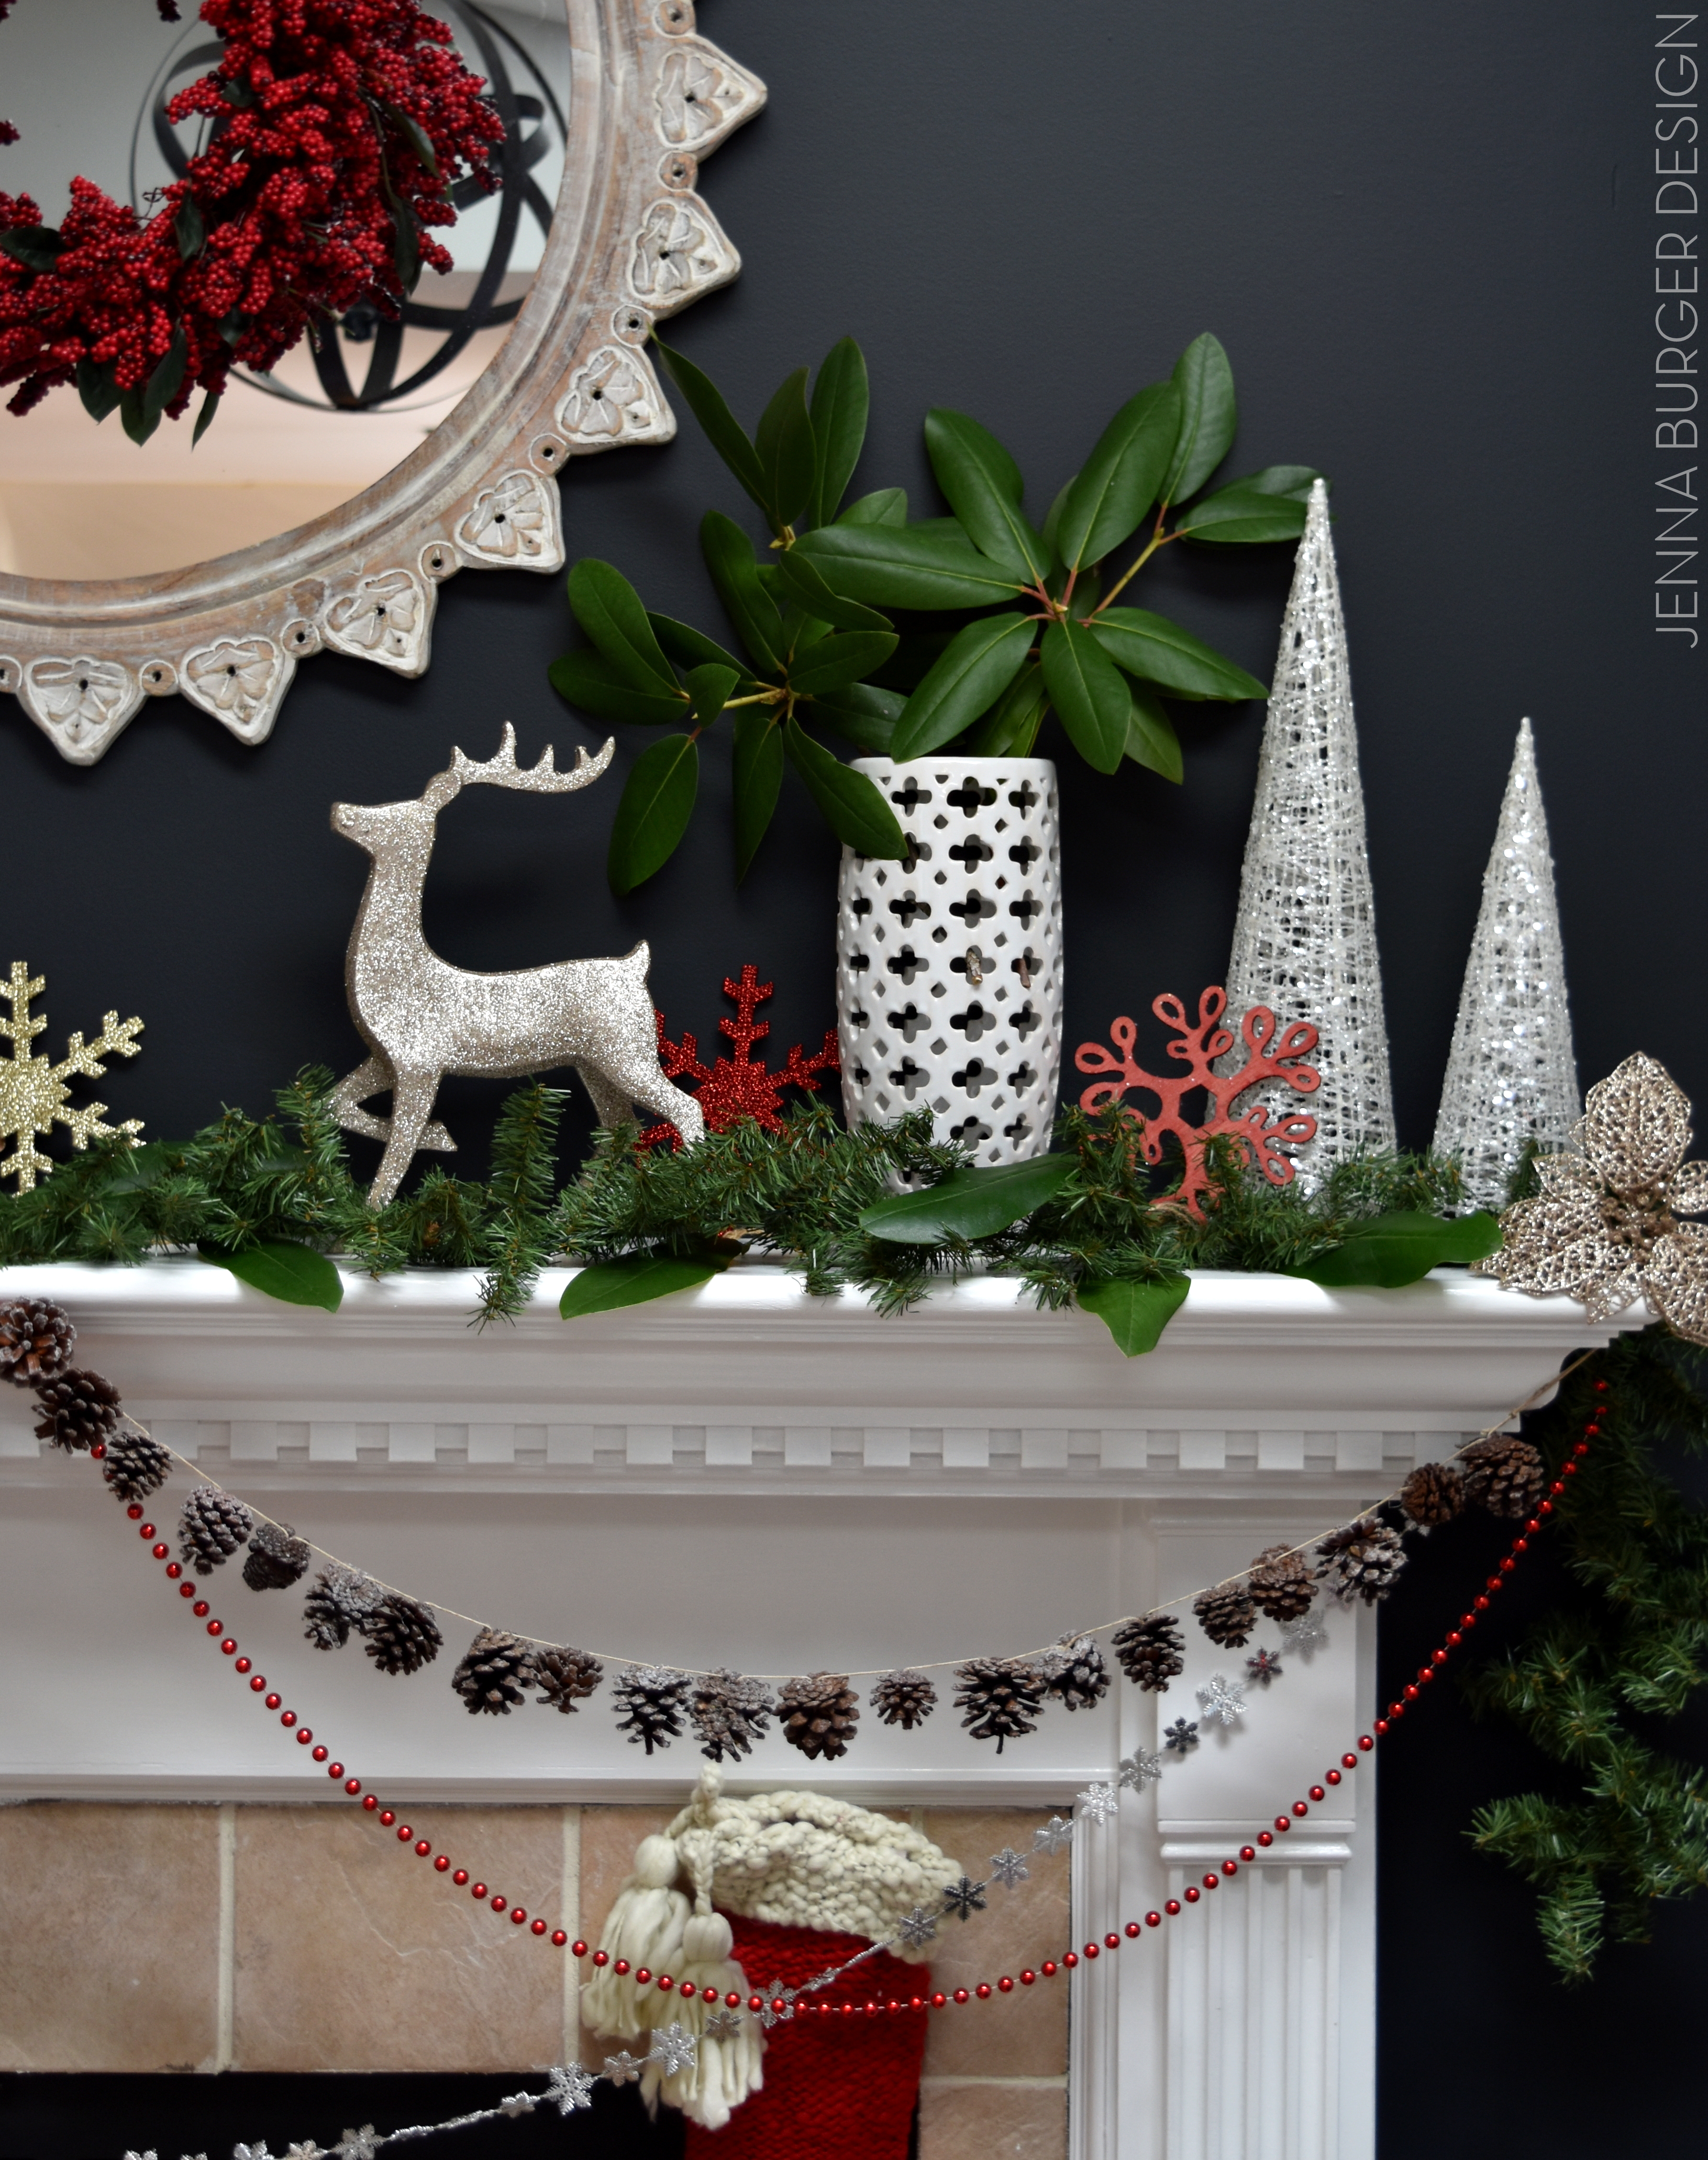
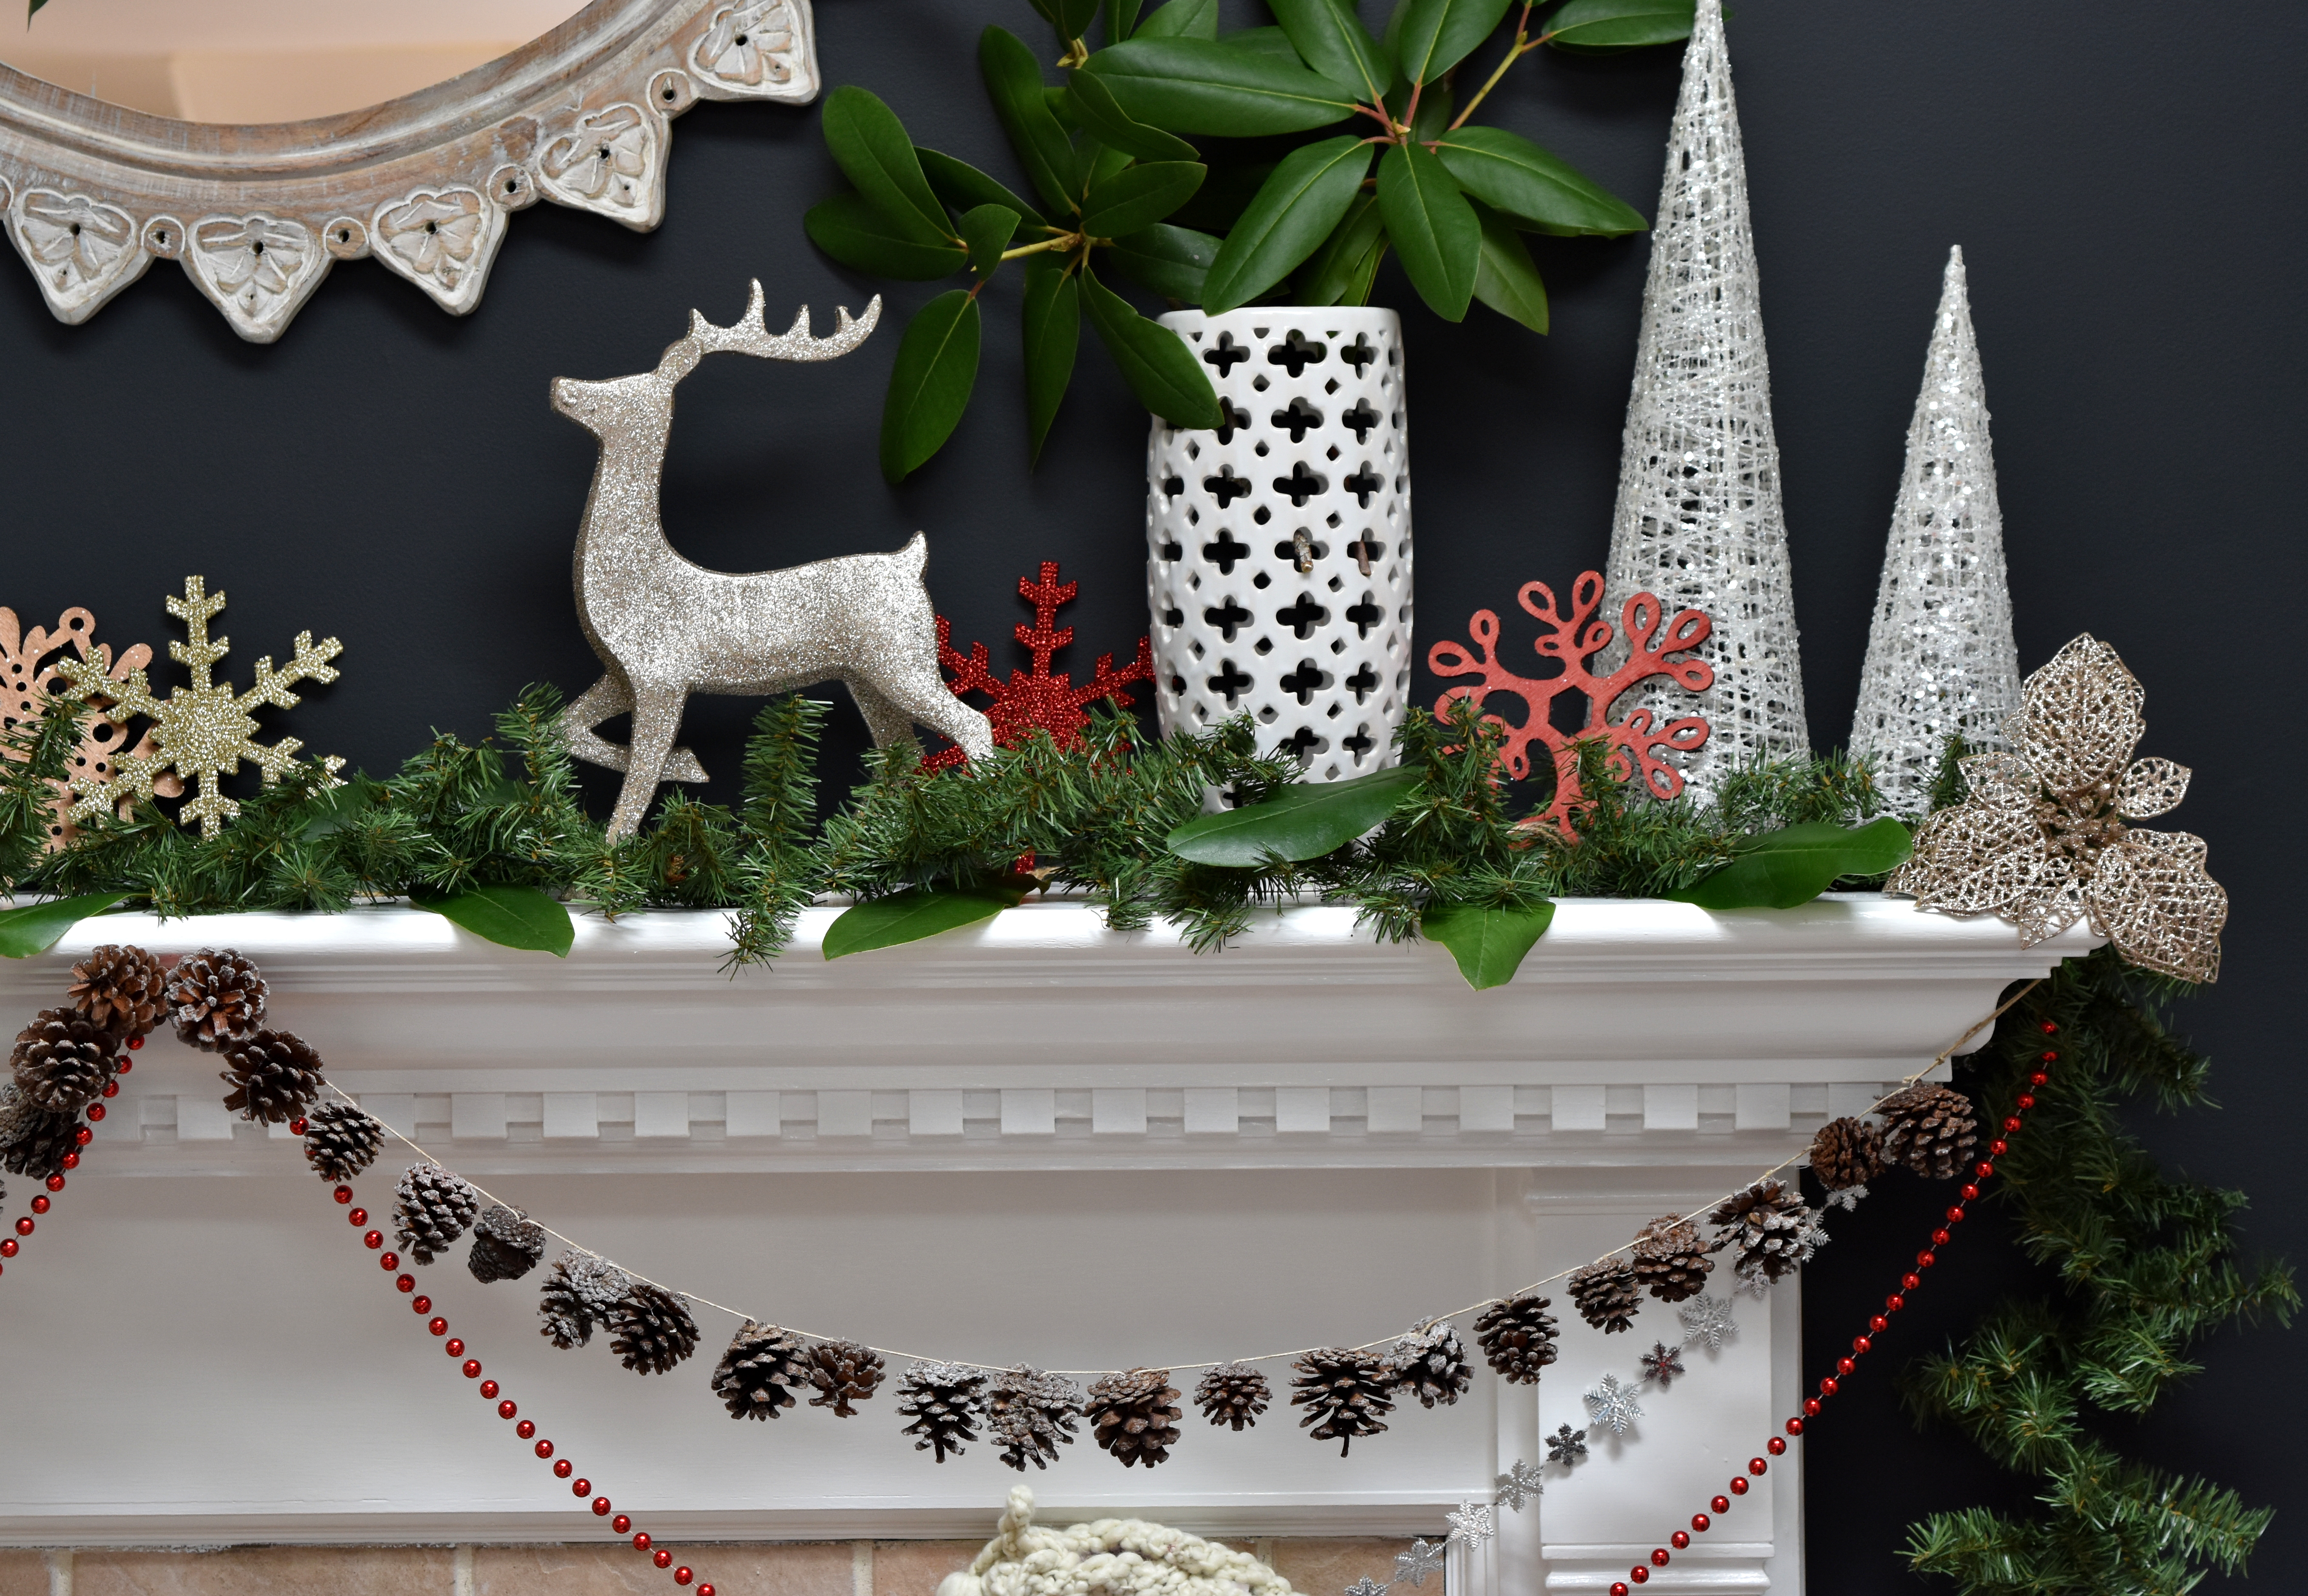
As the base of the mantel, I used a faux greenery garland and added in real cut magnolia leaves that I got from the tree in my yard.

Adding in real leaves amongst the faux, gives such a great look.  It is a nice idea to create a realistic-looking garland without the headache of drying branches + can be used year after year.

I also added a few magnolia branches to a tall white vase to introduce an organic element + height to the fireplace.

Christmas Mantel filled with old & new. Created by www.jennaburger.com

Christmas Mantel filled with old & new. Created by www.jennaburger.com

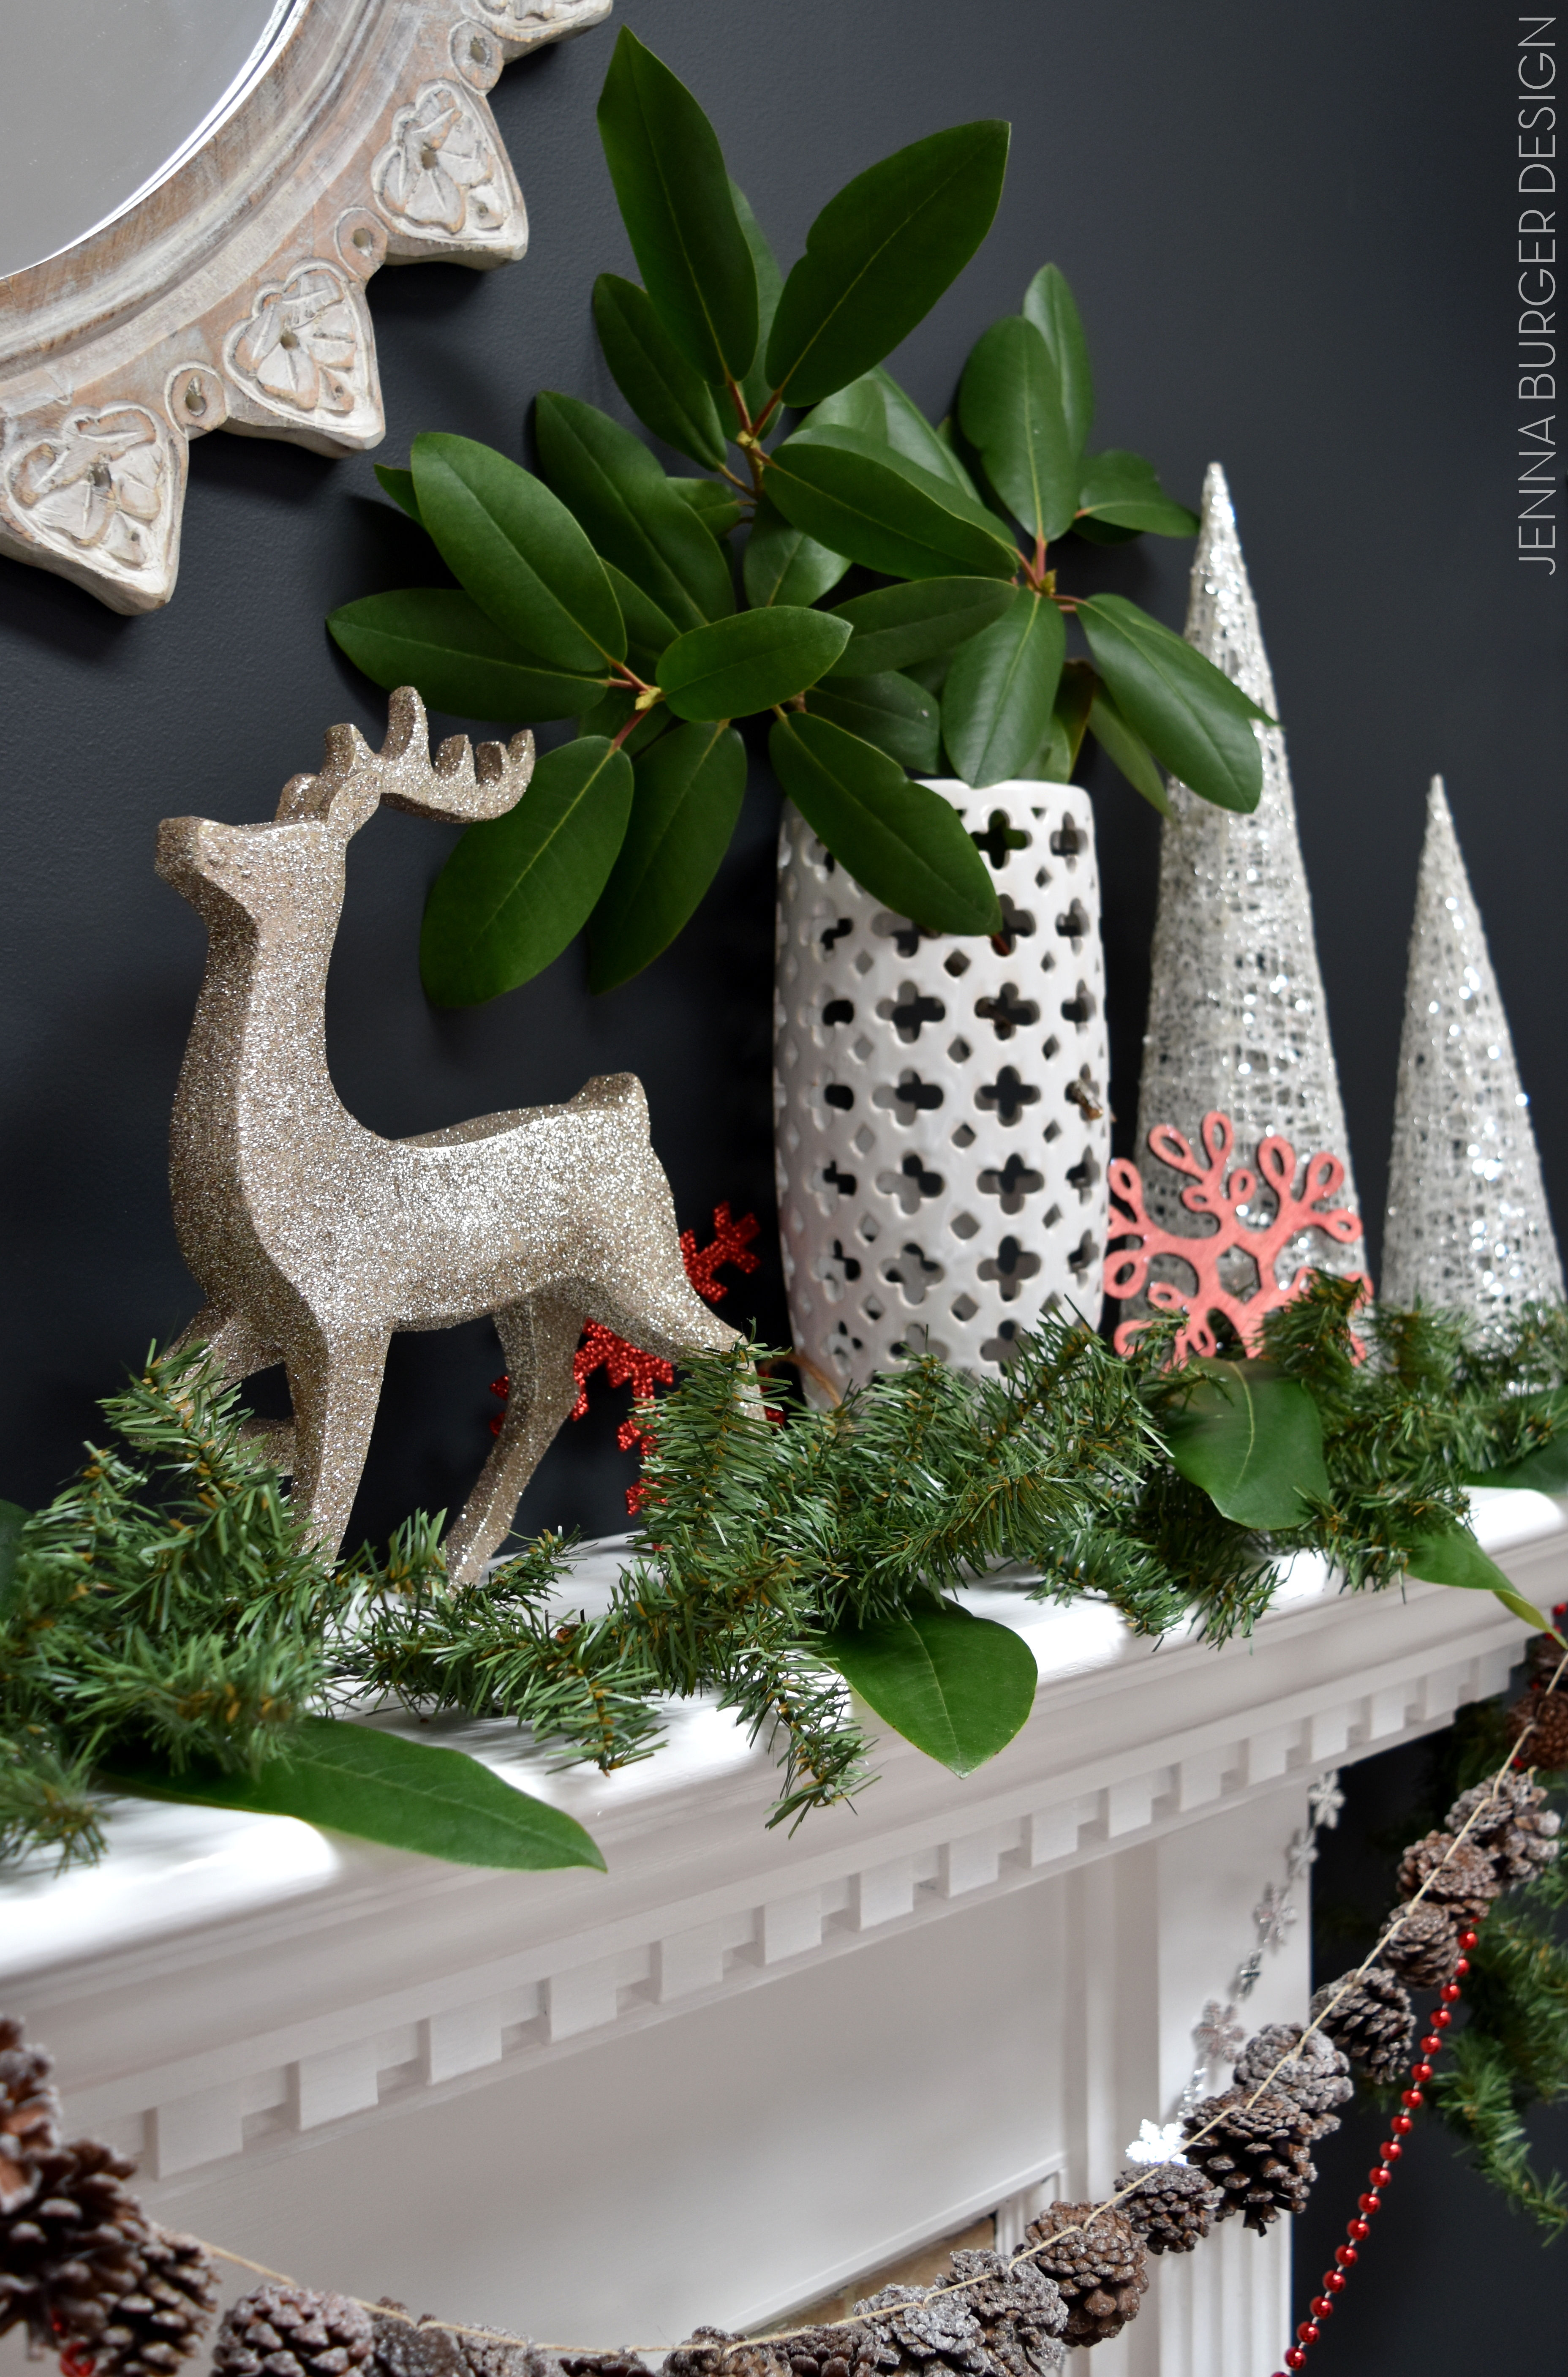
The sparkly reindeer is another new + fun find and if I could put my finger on a ‘theme’ for this years decor, it would be reindeer…

I snagged a few reindeer elements and I just love what they represent… a woodland, outdoorsy, winter feeling.

Christmas Mantel filled with old & new. Created by www.jennaburger.com

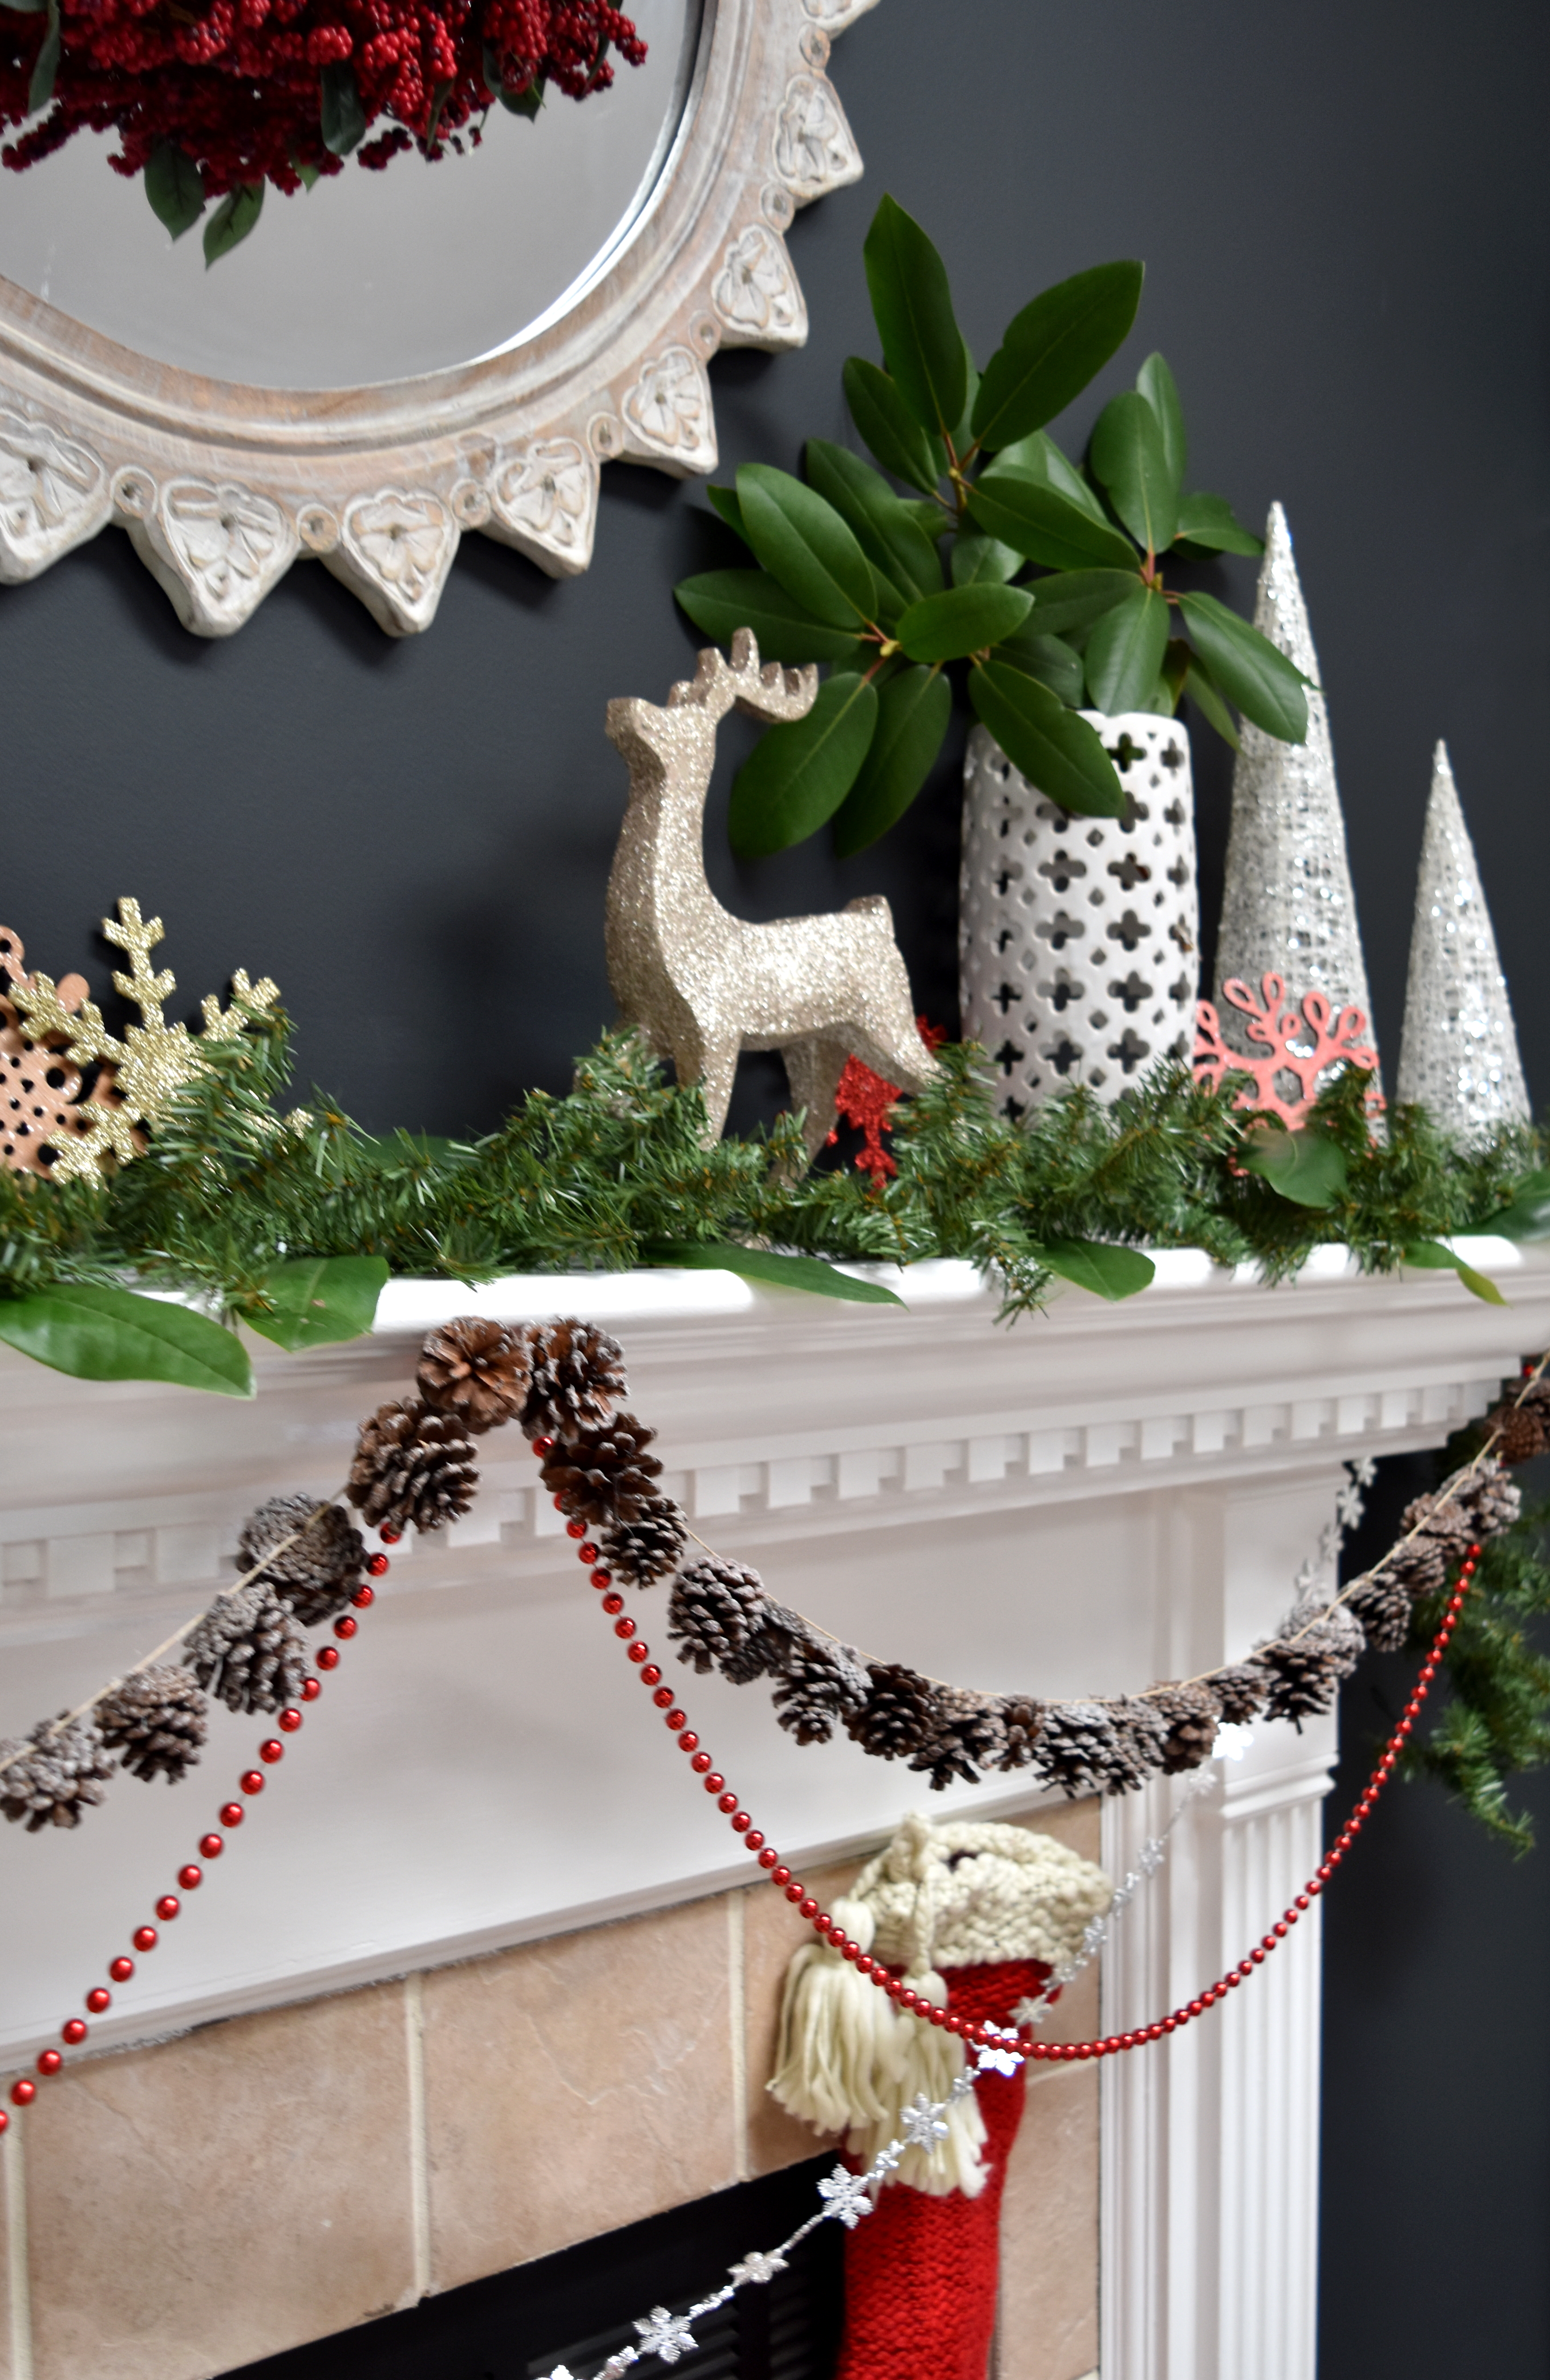
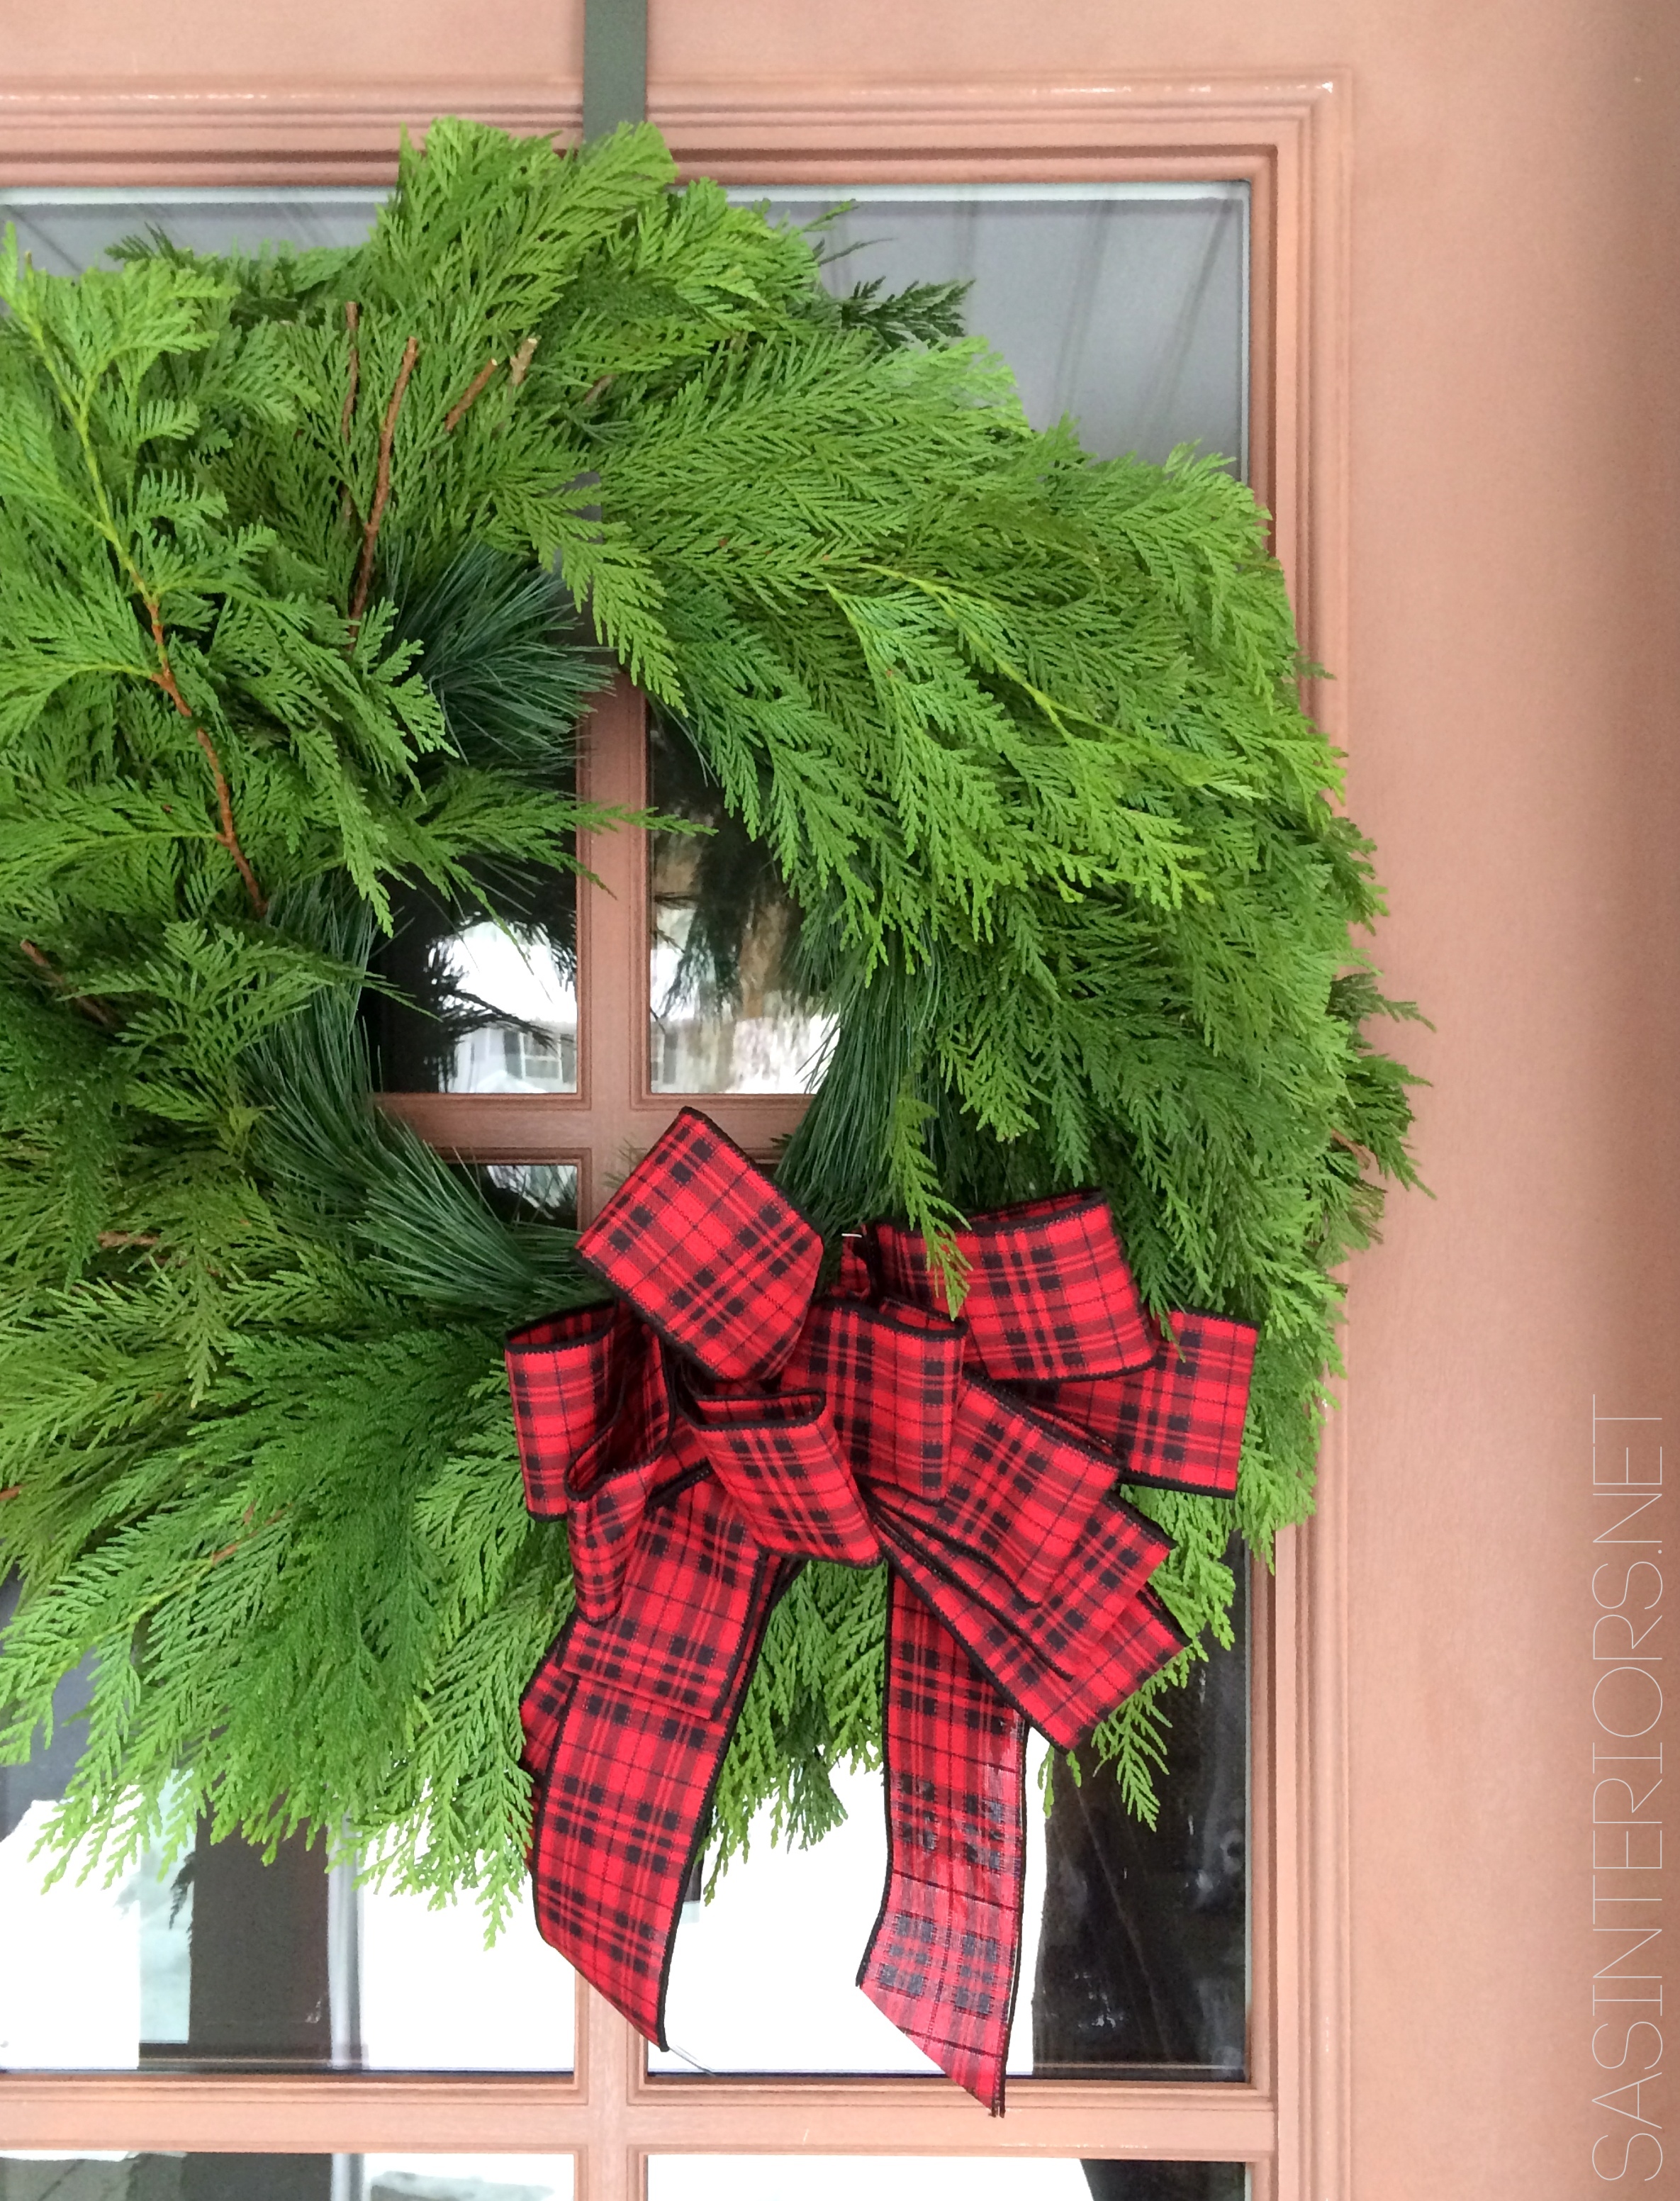
On the face of the fireplace, I draped several strands of differing garland.  I picked up a beautiful pinecone garland – which was a pleasant surprise because I thought they were individual pinecones which I was going to pile in a bowl – and hung it them from end to end on the mantel.

Then using red bead garland – that I got from Dollar General years ago – I hung a longer swag from edge to edge, and finished it with a silver snowflake garland across the front.

Hung by the fireplace with care are adorable knit red + white stockings.  I just love the oversized tassels!

Christmas Mantel filled with old & new. Created by www.jennaburger.com

Christmas Mantel filled with old & new. Created by www.jennaburger.com

Christmas Mantel filled with old & new. Created by www.jennaburger.com

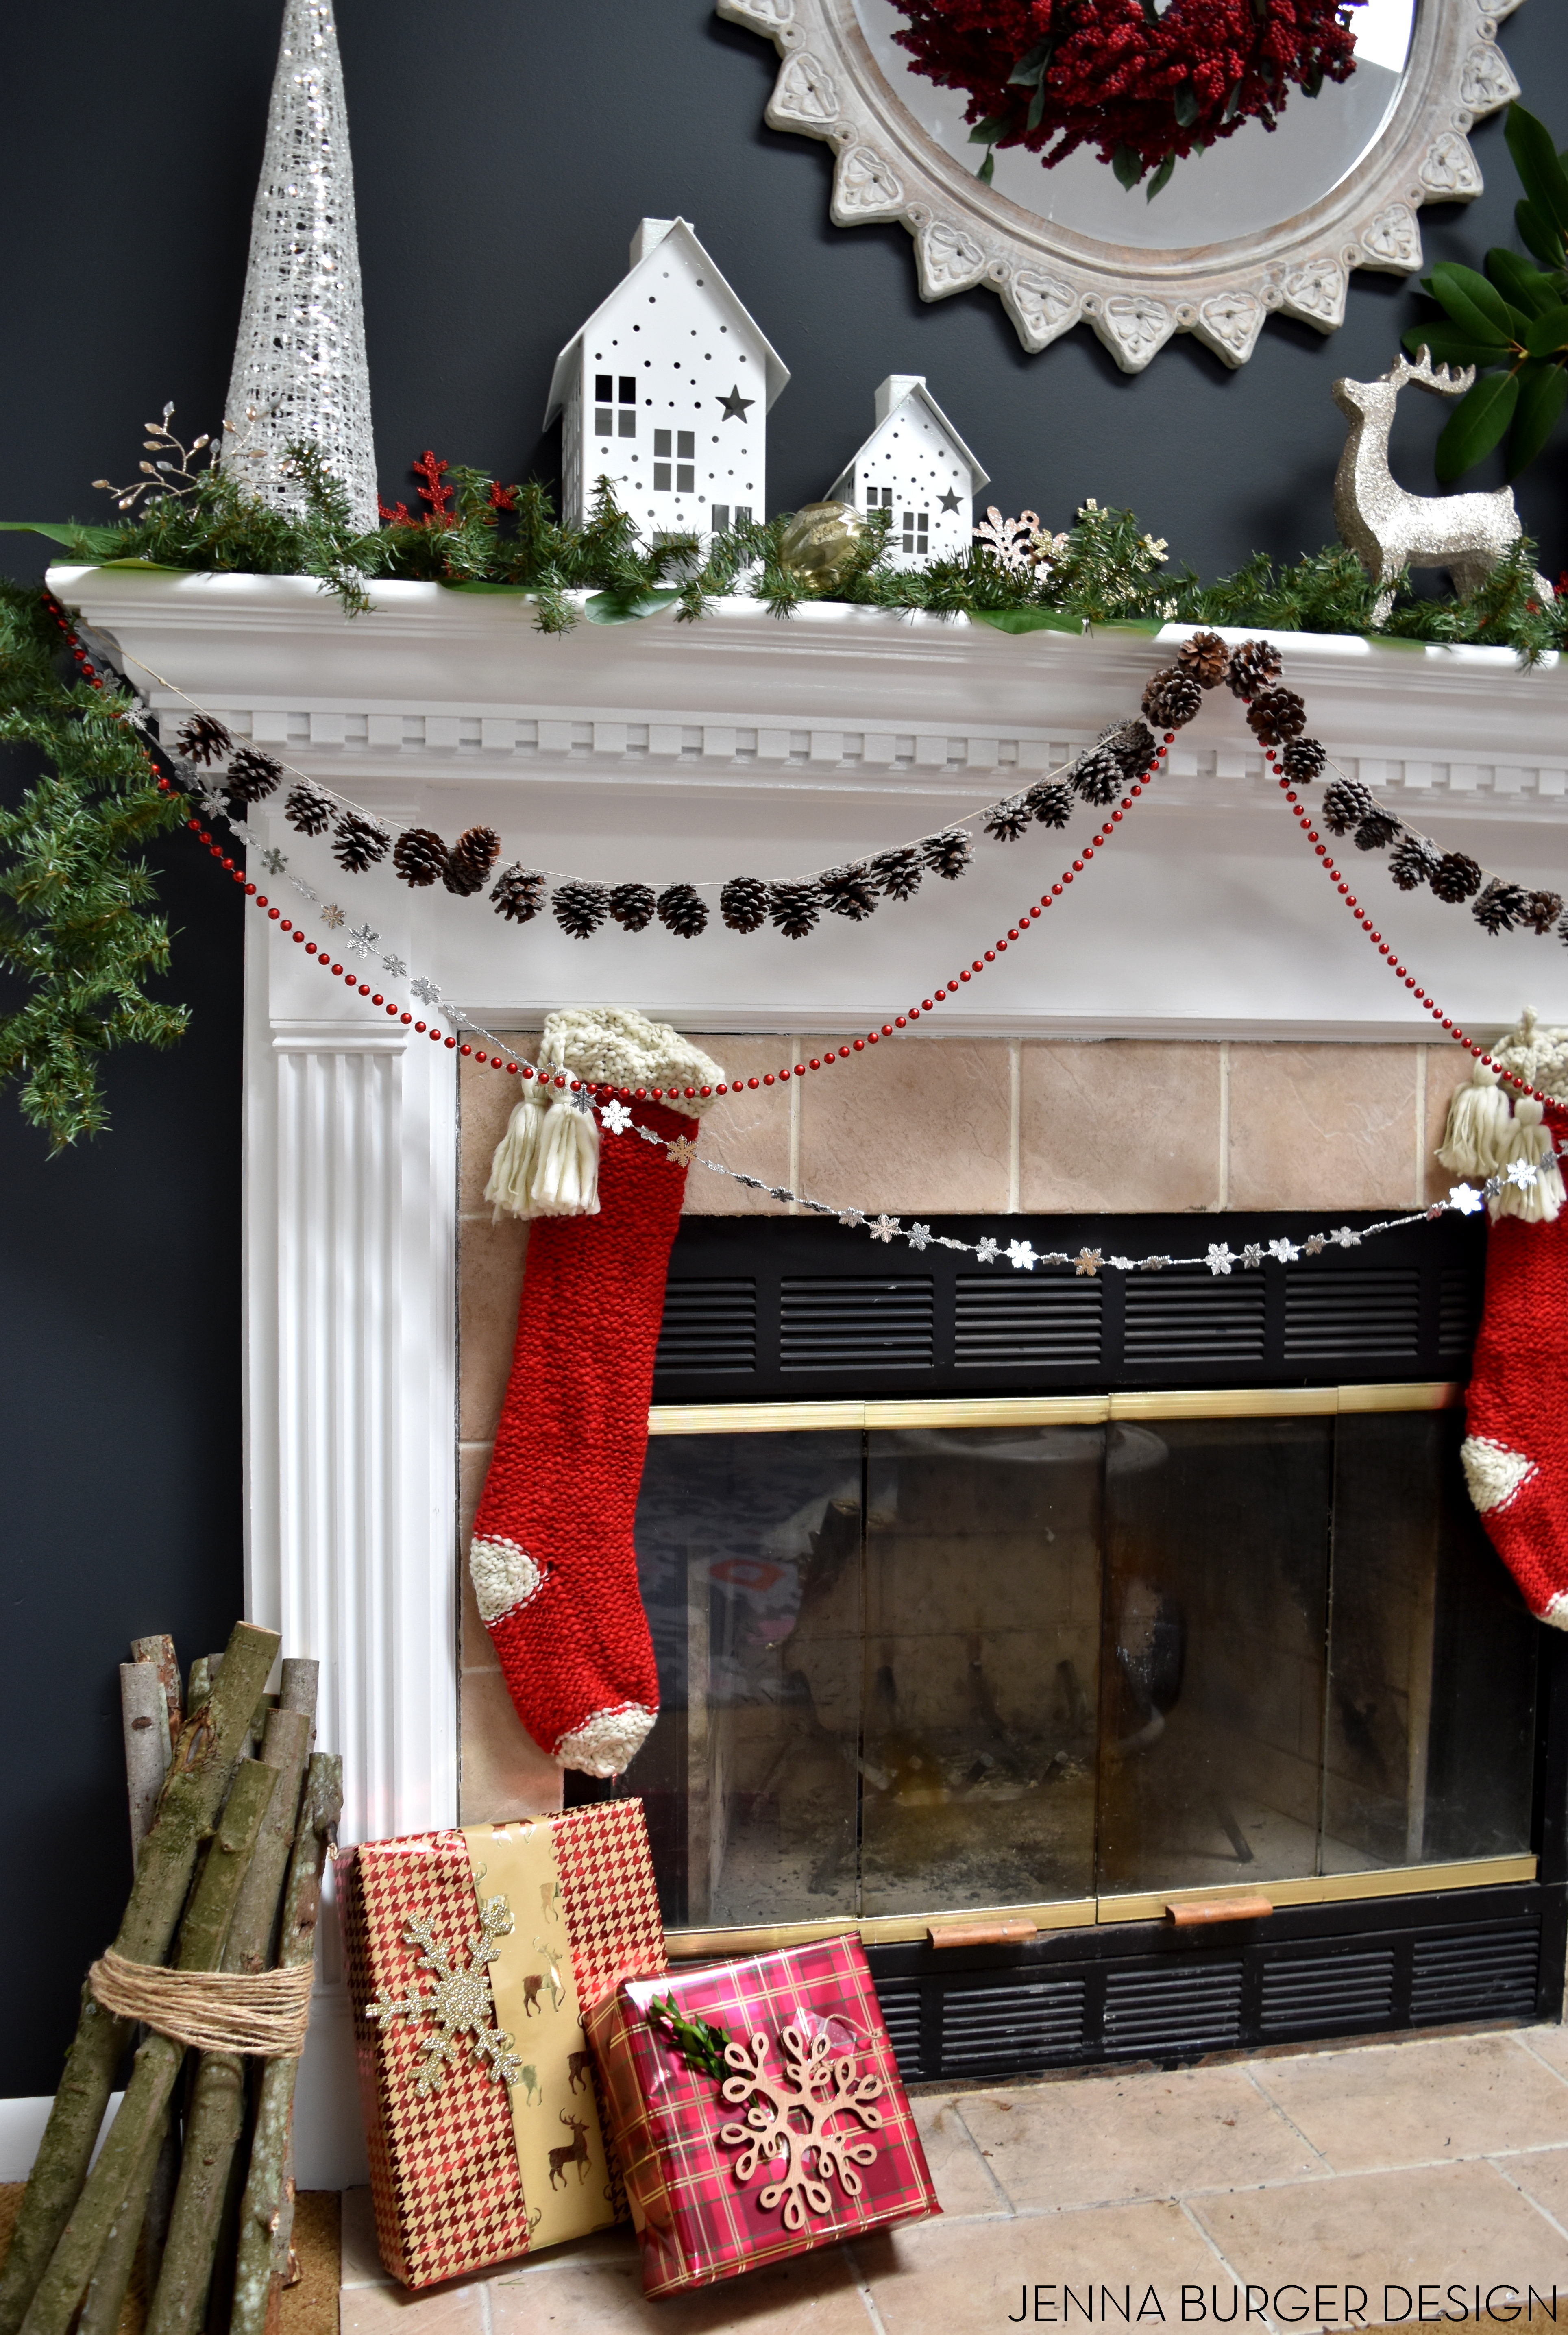
Recognize the mirror?  I used it for my Thanksgiving table, then decided to use it as the focal point above the fireplace and mounted a beautiful berry wreath on the face.

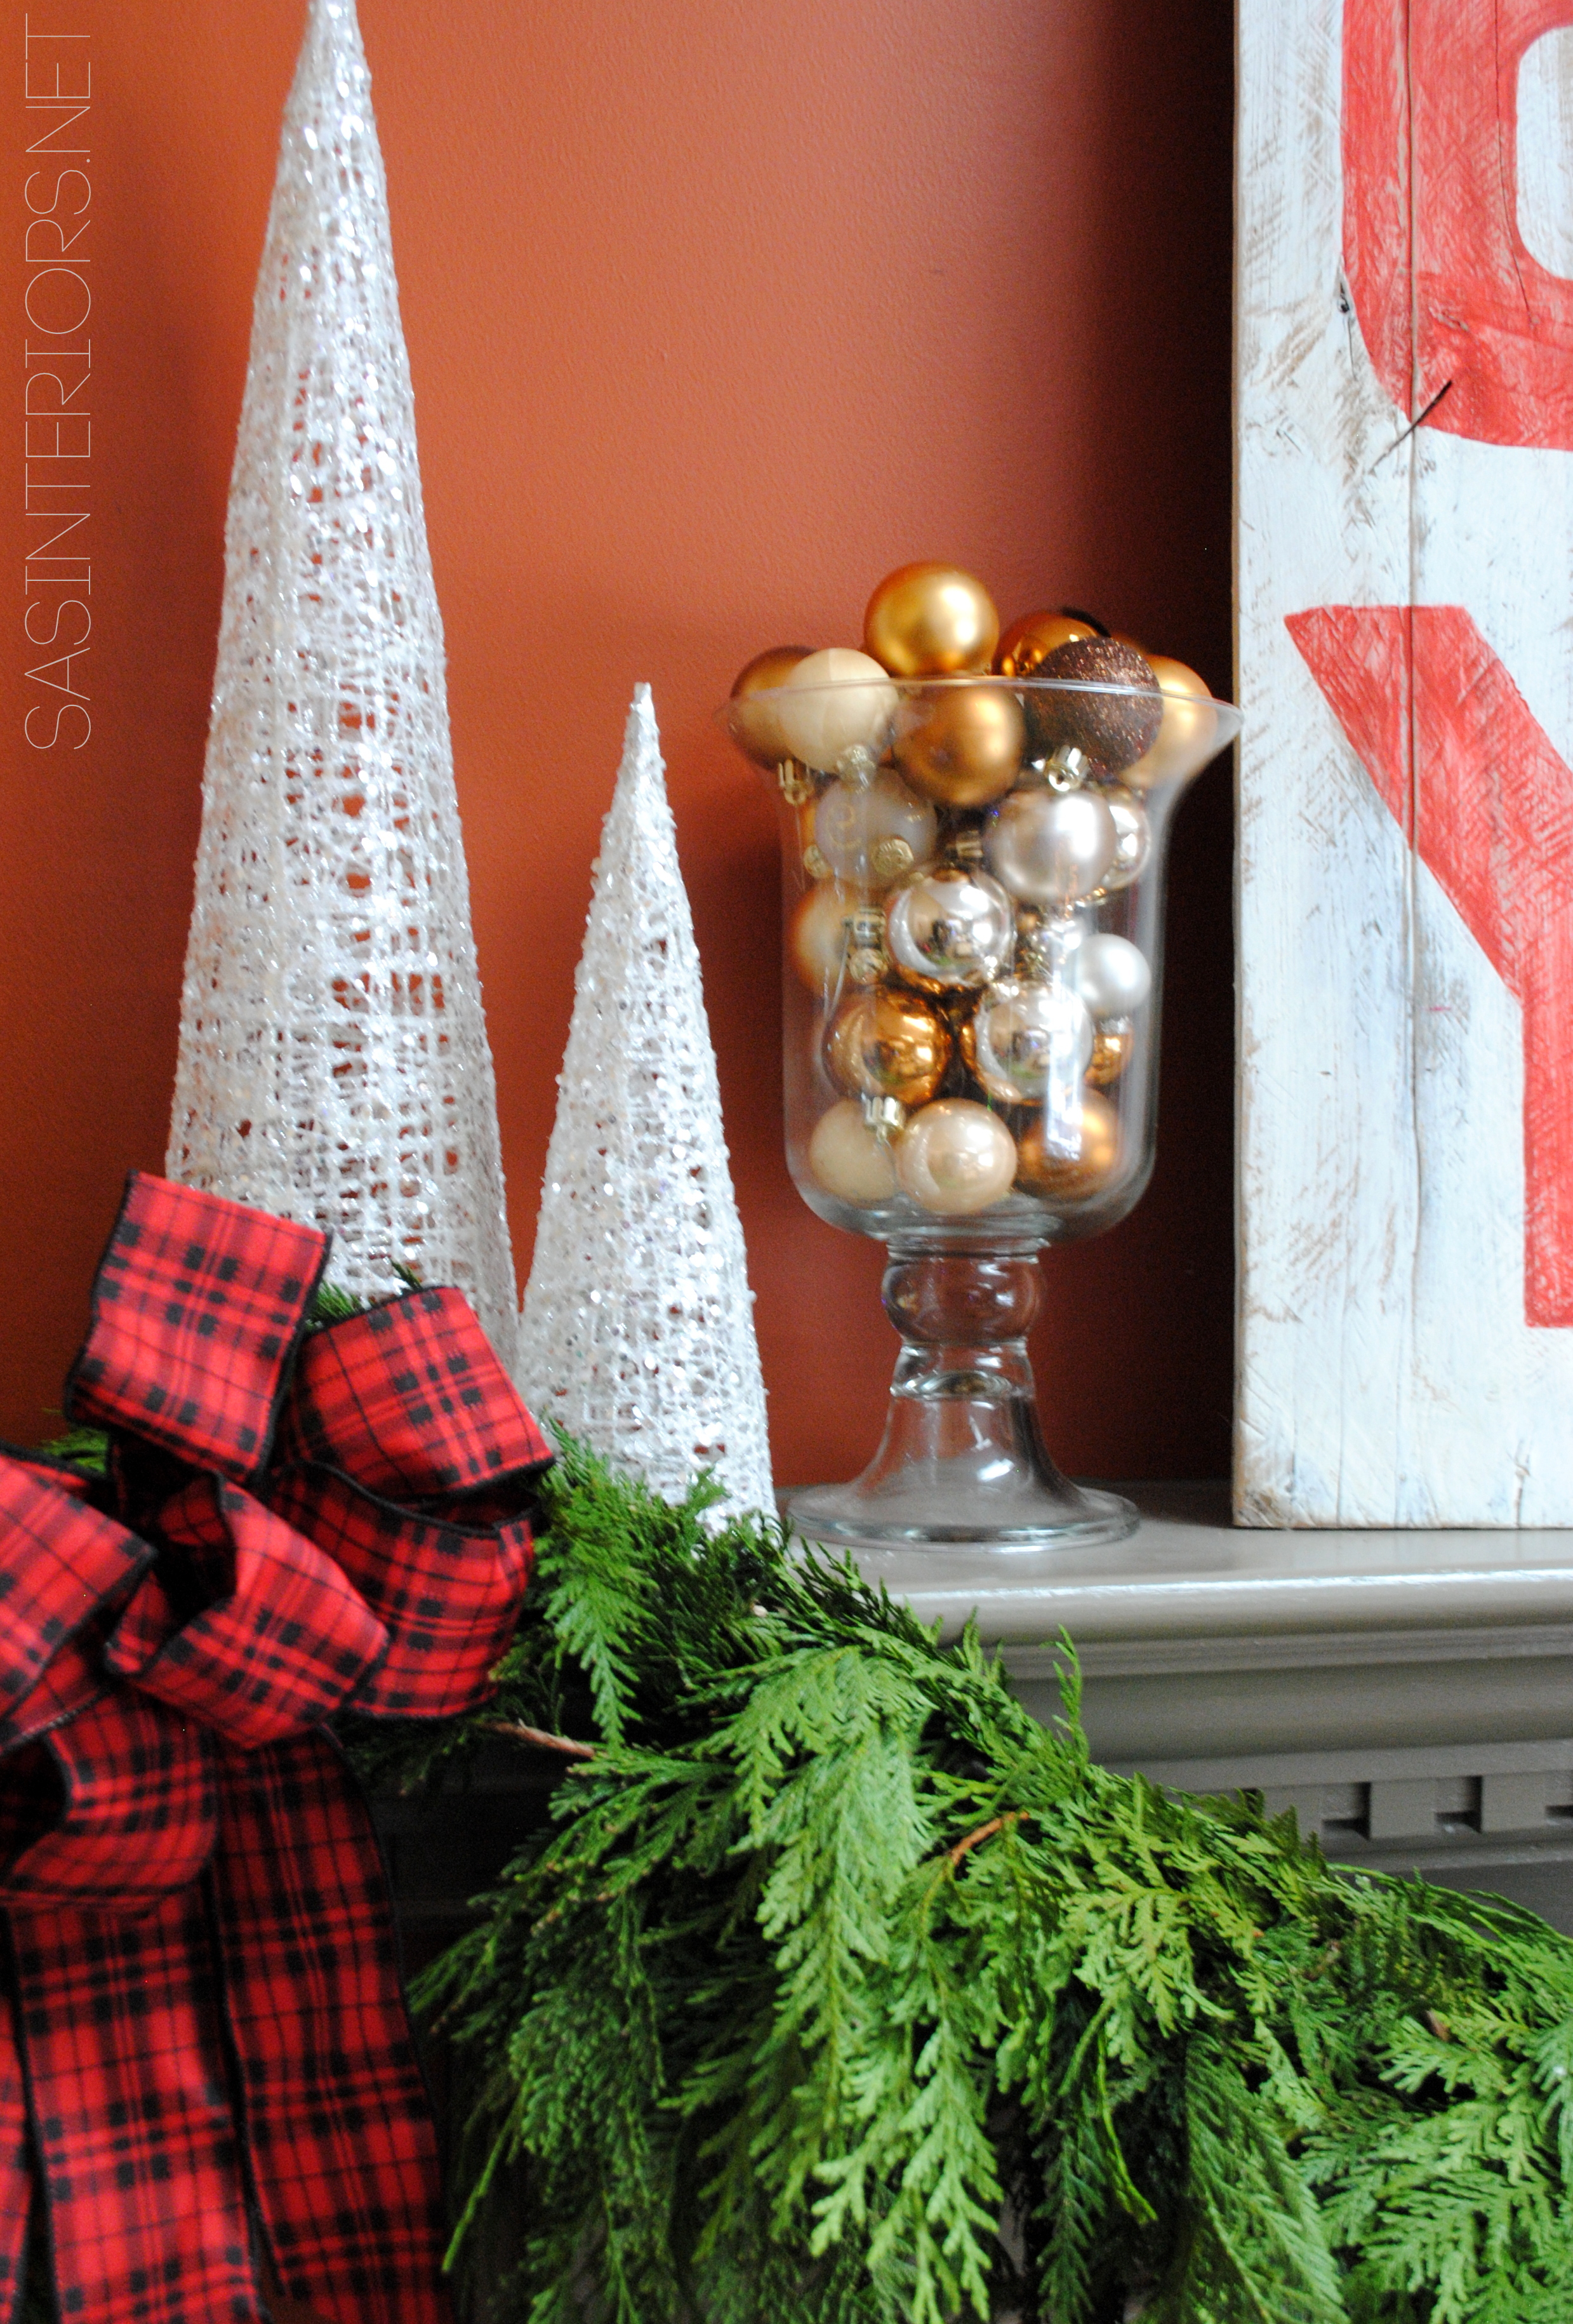
Giving height and grounding each end, I added in my one of my seasonal favorites, the glitter cone-shaped trees in silver + white (check out similar ones here).  I have gold too and they’ll be someplace else in the room.

Christmas Mantel filled with old & new. Created by www.jennaburger.com

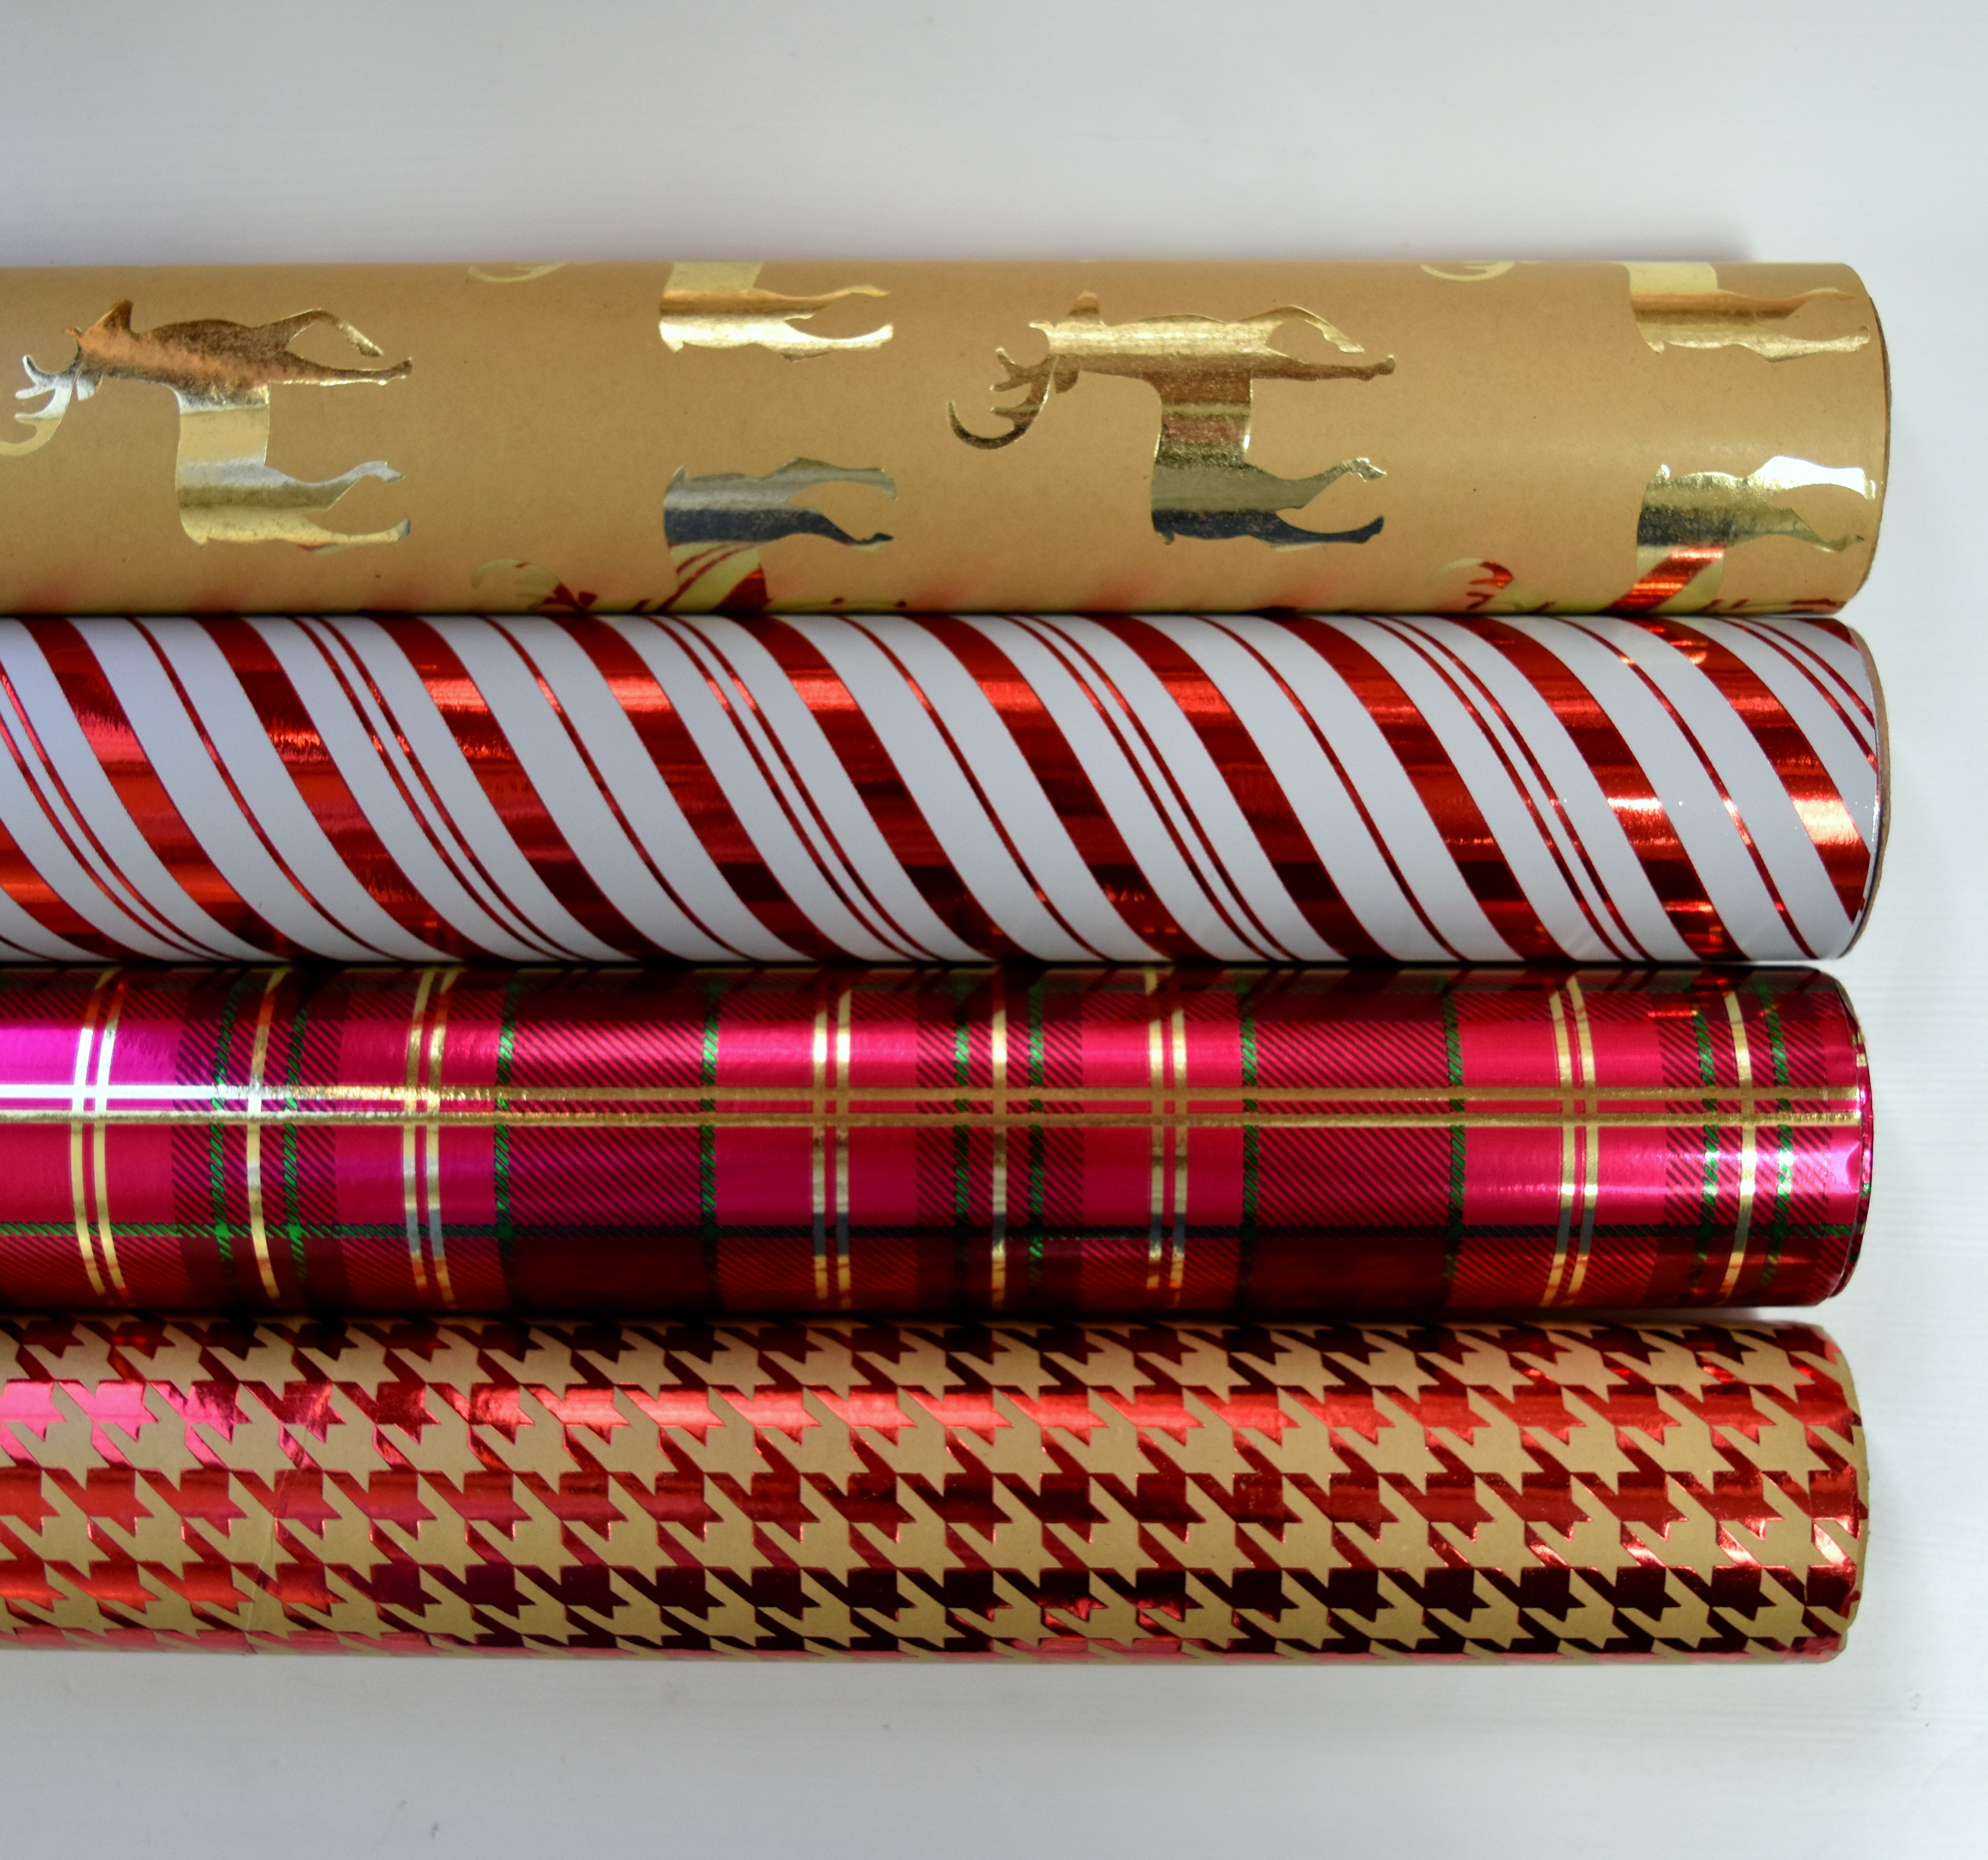
My reindeer ‘theme’ also continued with the wrapping paper I chose.  Check out this paper with the reindeer silhouette – I couldn’t resist.  I loved pairing it with the houndstooth + striped paper.

Christmas Mantel filled with old & new. Created by www.jennaburger.com

Christmas Mantel filled with old & new. Created by www.jennaburger.com

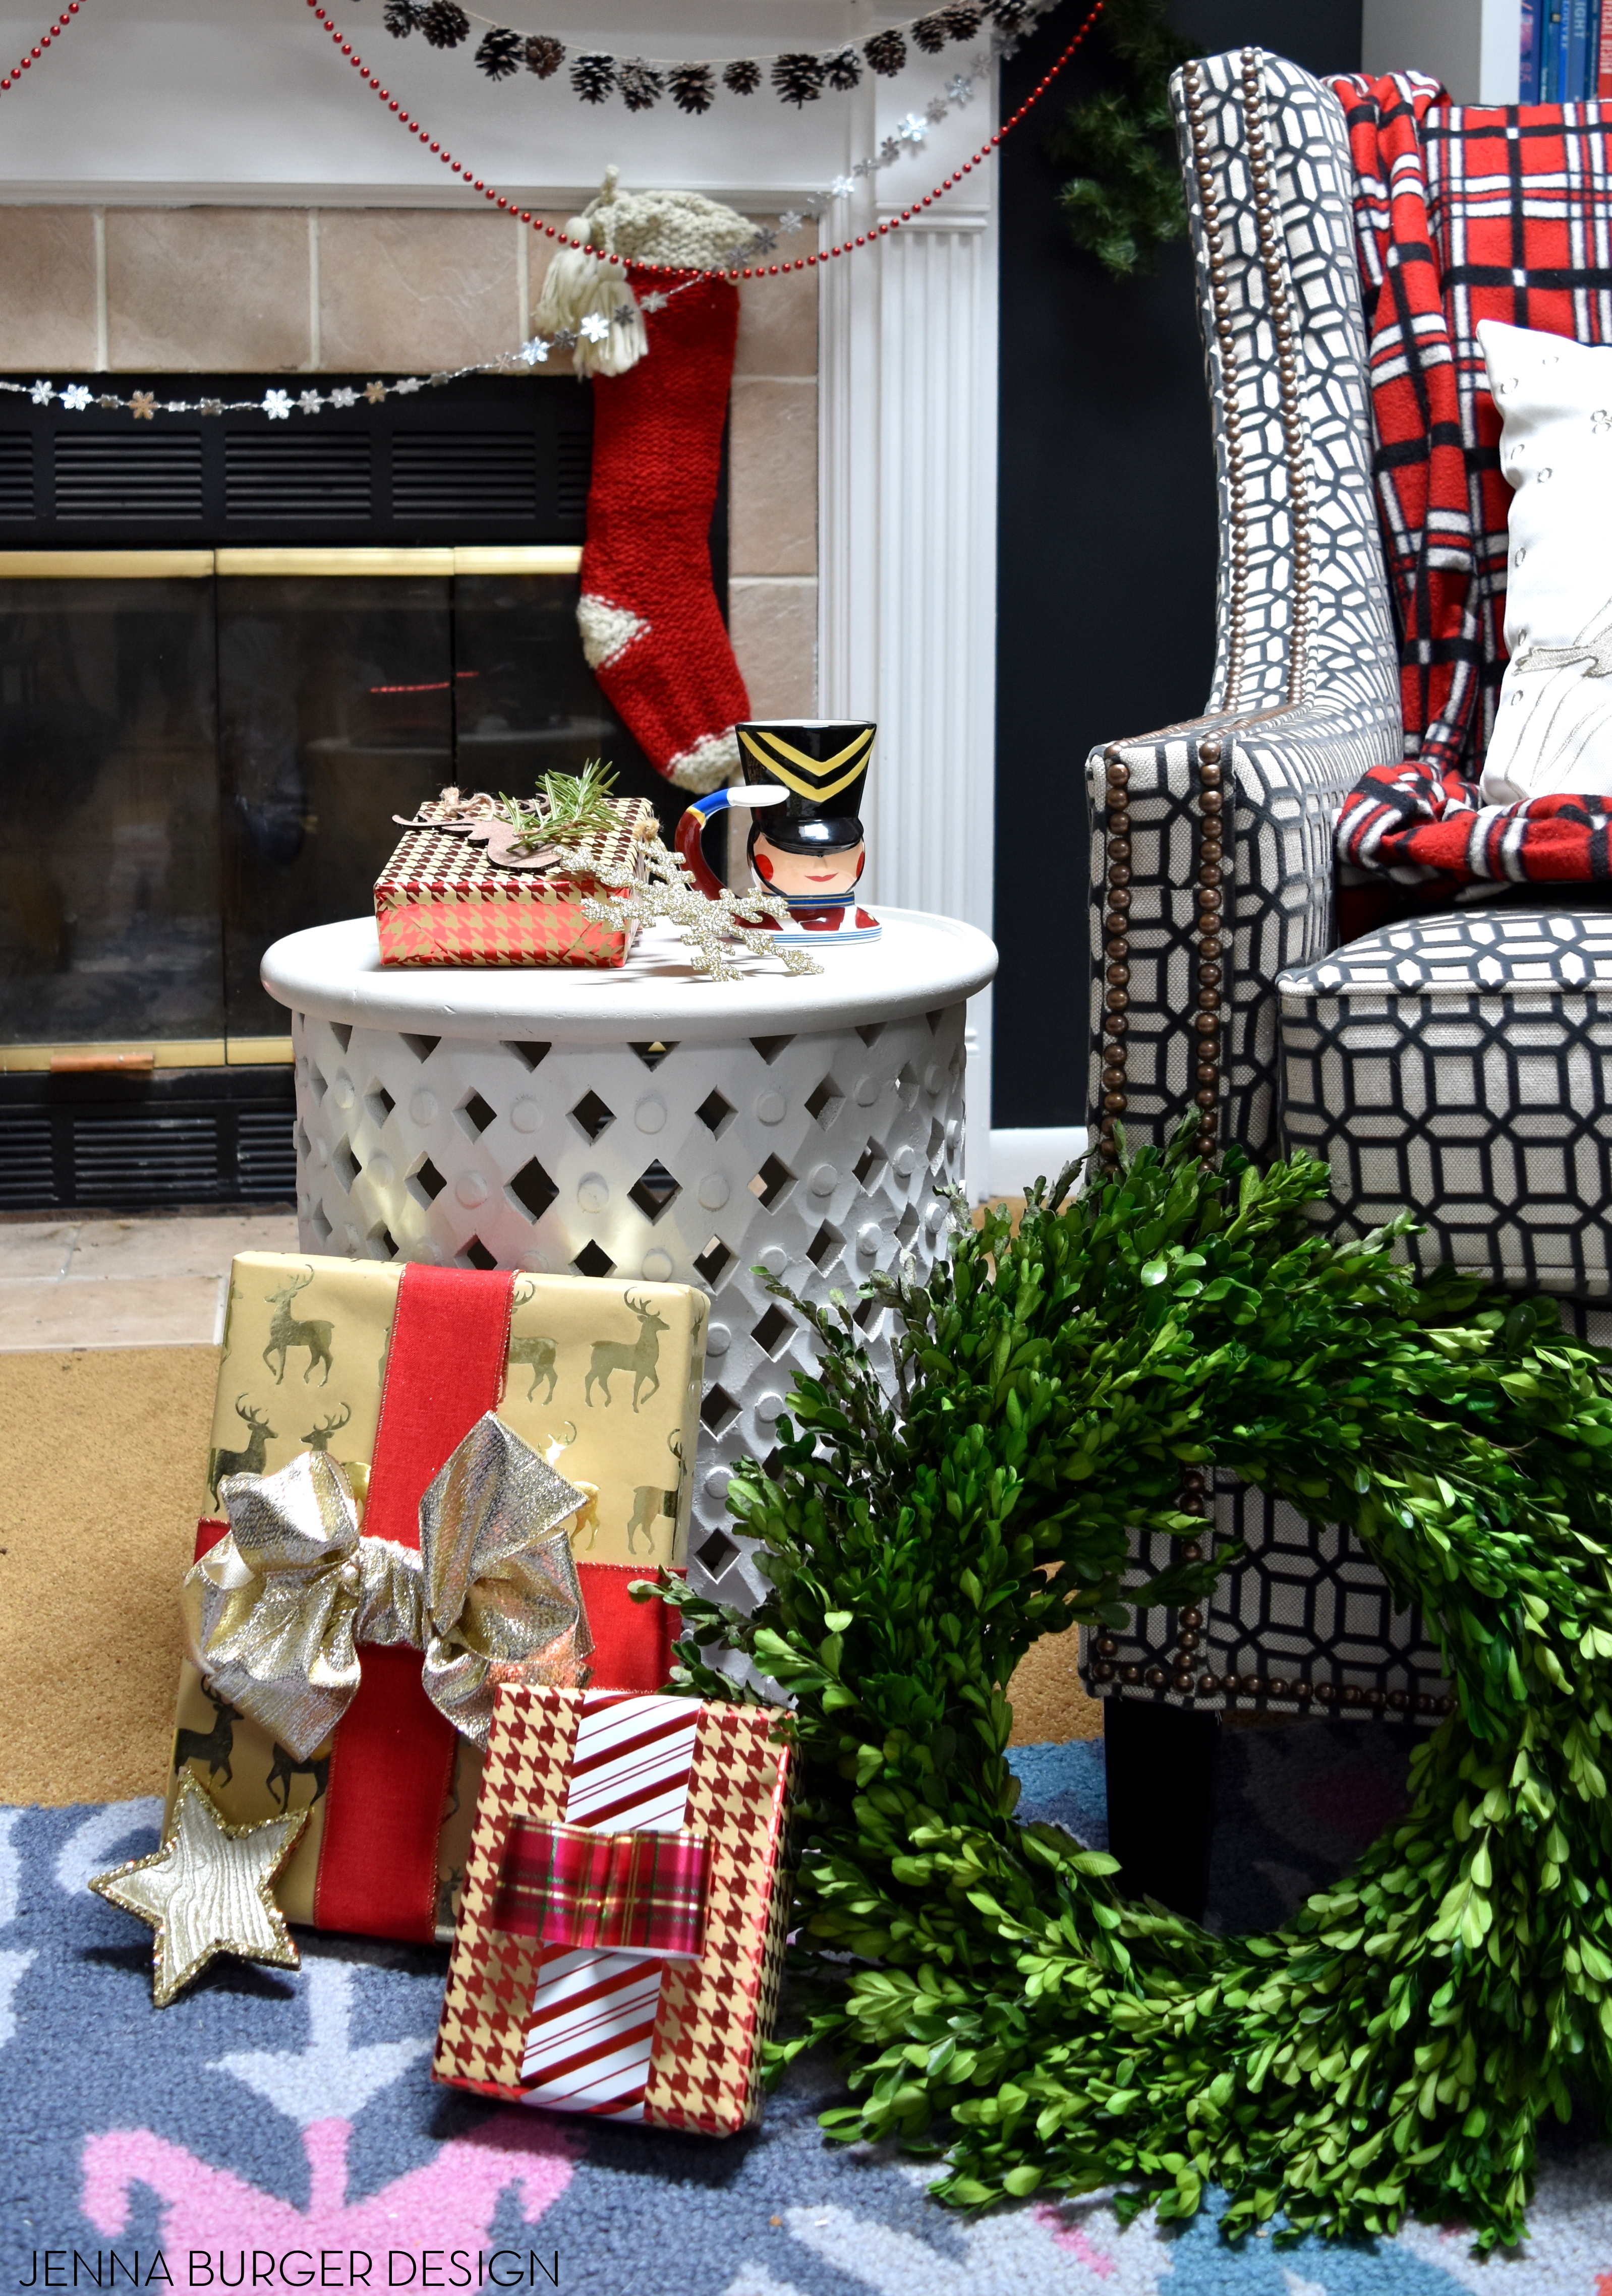
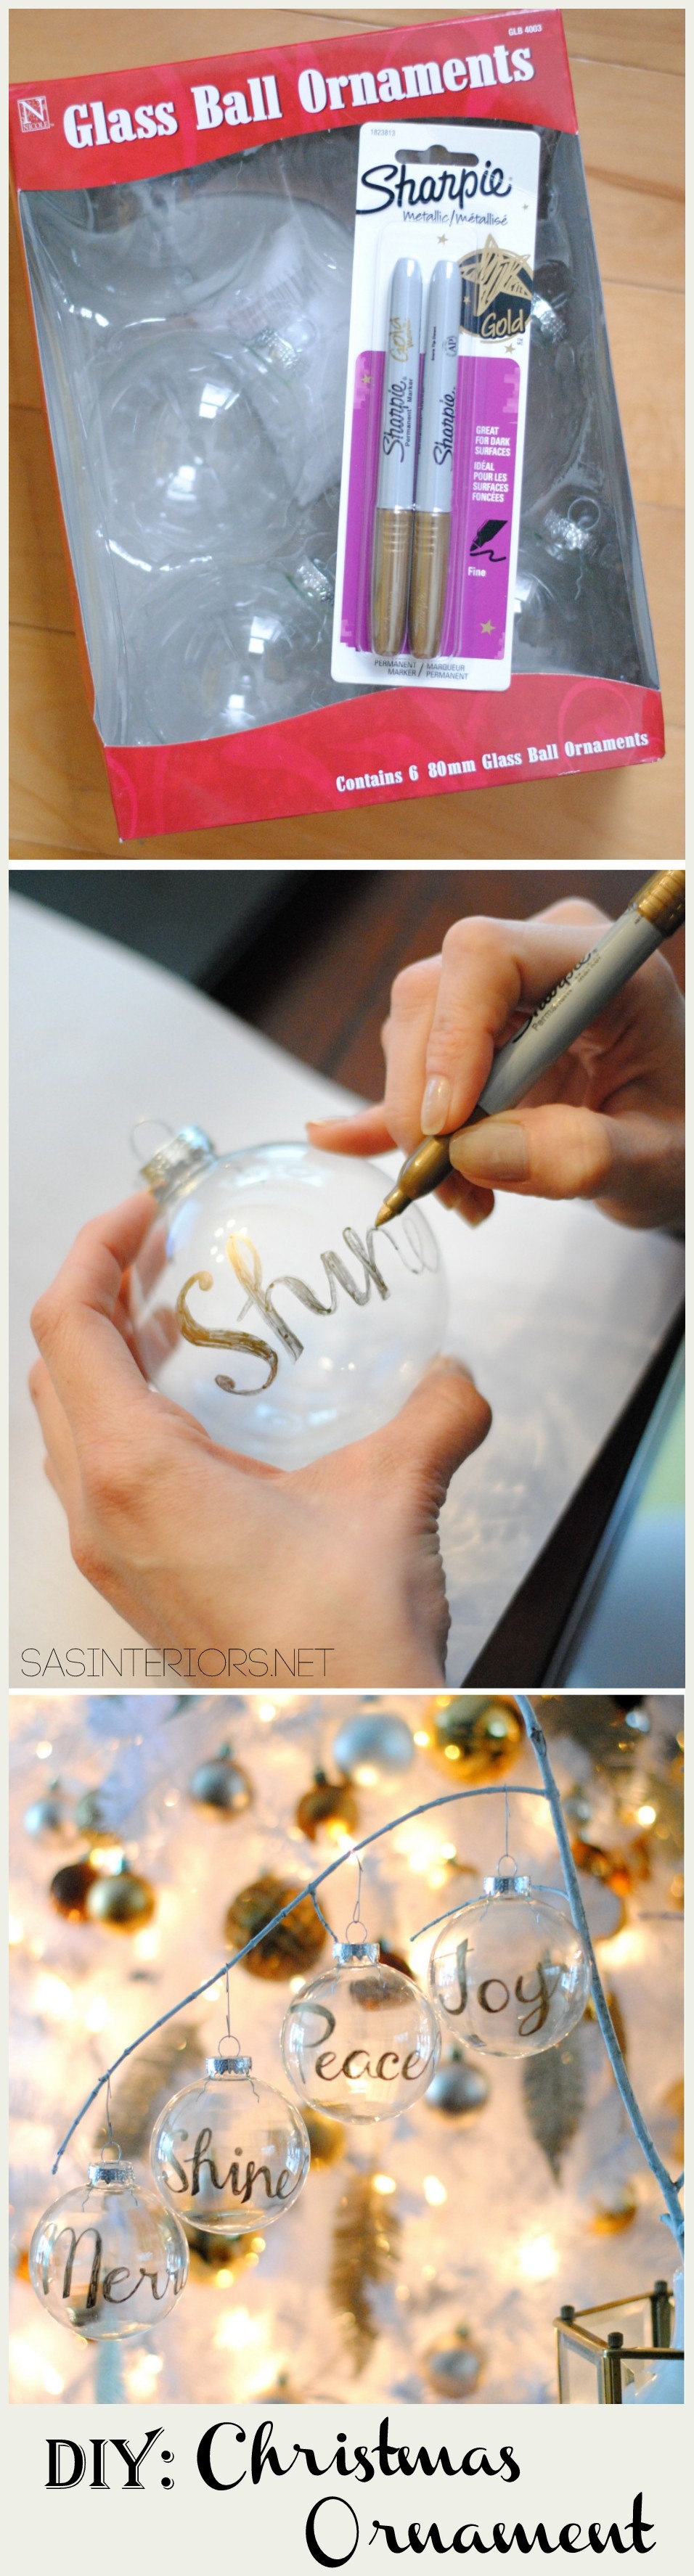
Throughout, I layered in new + old ornaments that added sparkle + shine.  These wood laser-cute ornaments were a surprising find this year and I grabbed a similar wood reindeer ornament version as well.

Christmas Mantel filled with old & new. Created by www.jennaburger.com

I am so happy with how this years Christmas mantel came out.  I had no real plan when I started decorating, but as usual when the everyday decor came down and I was left with a blank canvas, the ideas started to flow.

With some changes + tweaks, the result is pretty fantastically festive…

Christmas Mantel filled with old & new. Created by www.jennaburger.com

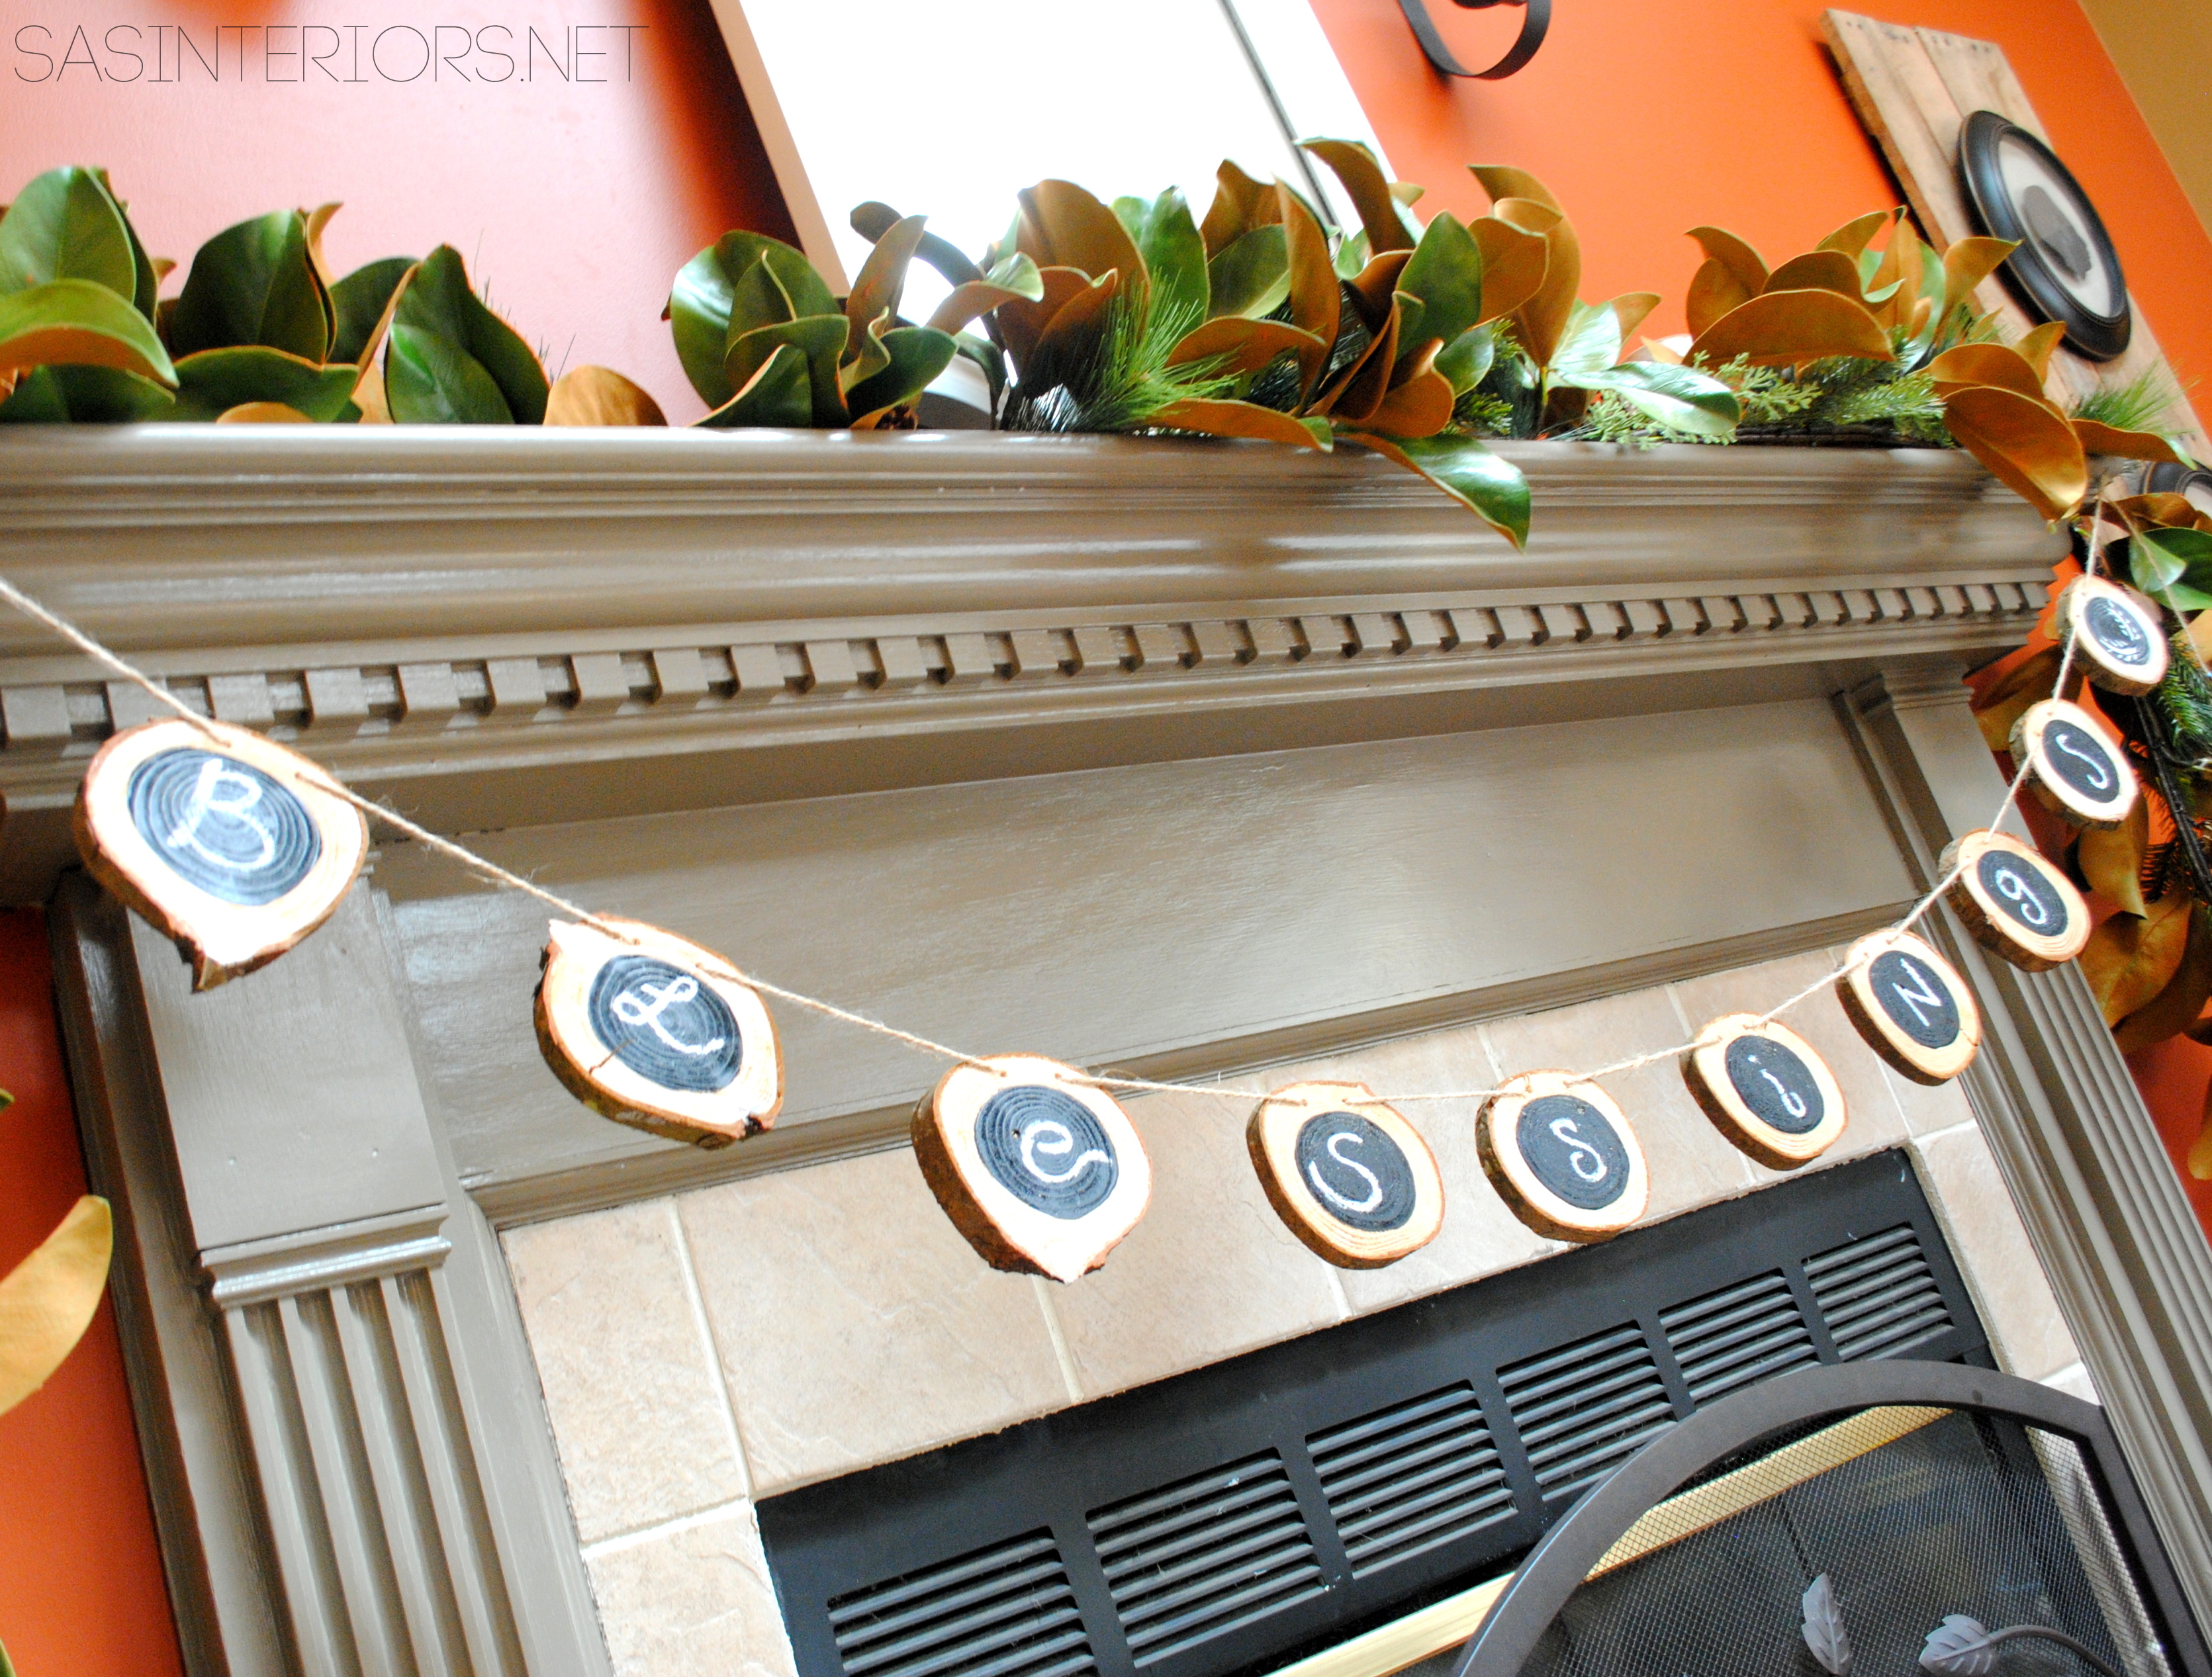
I can’t let you go without sharing that the annual Holiday Housewalk hosted by Jennifer Rizzo begins today!  This is the 3rd year that my home will be on the tour along with about 30 others.  You will NOT WANT TO MISS IT.  My home is coming up later in the week, so I hope you will stop back.

Holiday Housewalk hotsed by Jennifer Rizzo

Have a blessed Christmas season and thanks for checking out my mantel.

DISCLOSURE: THIS POST IS A COLLABORATION WITH LOWES, BUT ALL OPINIONS ARE 100% MY OWN.

Nature Inspired Holiday Decor

Good Morning Lovelies – Happy Monday!

I know, I know…

It’s only mid-November and I’m posting about Christmas, but believe me it’s for good reason.

A new article that I wrote is up on BHG.com and it’s about inspiring ideas for holiday decorating using nature.

As the holiday season approaches – Thanksgiving is less than 2 weeks away – it’s that time of year again when we transform our homes from the everyday and fill it with our festive favorites.

Whether you are ready to decorate now or plan on waiting a few weeks, be inspired by bringing the outdoors in this Christmas season…

Click to read the full article on  >>> Nature Inspired Holiday Decor

Nature Inspired Holiday Decor: Ideas to integrate the outdoors into your holiday setting by JennaBurger.comCheck out my bio page on Better Homes and Gardens

More content coming soon to be featured on BHG.com!

Christmas Mantel

Christmas mantel filled with old & new and lots of DIY creations!

Happy Friday!  Boy, am I glad it is FRIDAY.  It has been a heck of a week, how about for you?

I hope you enjoyed my Christmas Home Tour that I shared yesterday.  Thank you to all those that left the kindest, sweetest comments – I can not tell you how great they make me feel.  I am really loving how festive & warm our home feels right now and I hope I was able to convey that to you throughout the tour!

As I was putting the post of The Tour together, I was left with many more photos of the fireplace mantel.  Instead of making the post miles long, I thought I would create another post on just the mantel.  I am so smitten over how the mantel resulted this year, so let me show you around.

Come join me in the family room…

Christmas mantel filled with old & new and lots of DIY creations!

With our tree at one end of the room and the fireplace at the other, this is such a cozy, restful place.  The mantel this year is filled with a little old and a little new.

Christmas mantel filled with old & new and lots of DIY creations!

My approach for this years mantel was to lean and layerWhat do I mean?   From front to back, I added height with various items that I simply leaned on each other to give a layered (dimensional) look.

I started with the stained wood backdrop and added the pretty, glittery wreath I got from Lowe’s last year.  Leaning on it, I added the JOY pallet sign, which is really the focal point of the mantel.  Then I added a new chalkboard printable & the oversized wood snowflake (a roadside rescue).  It’s all about the layers!

Christmas mantel filled with old & new and lots of DIY creations!

The chalkboard printable is something new this year and it is a creation made by my friend KellieHow did I create it?  I saved the printable to a USB key, brought it to Staples and they printed it on blueprint paper for less than $4.  I then brought it home and framed it.  Easy-Peasy and it is a beautiful addition to the mantel.

https://www.jennaburger.com/2014/12/christmas-home-tour-2014/

For a bit of whimsy, the kids and I collected some branches from the backyard, which I used to fill a simple white vase.  It really grounds the fireplace.

Christmas mantel filled with old & new and lots of DIY creations!

When I initially placed the vase on the mantel, the brown branches got lost against the orange wall.  To make them stand out more, I took some white craft paint and painted them.  A few minutes later, they were finished and dry.

Christmas mantel filled with old & new and lots of DIY creations!

So pretty, right?

When decorating for this Christmas, I ended up changing the place of a few of our festive favorites.  One specific DIY creation that we all love & admire each year is the Christmas Card Holder.  This season, I chose to hang it to the right of the fireplace and it’s already starting to fill up.

Christmas mantel filled with old & new and lots of DIY creations!

On the other end of the mantel are a few more layered-in elements that give height & interest to the overall mantel.   For the last few years, my go-to favorites for Christmas are these modern cone-shaped Christmas trees from the Christmas Tree Shop a few years back.  We have them in a few different sizes in white and gold.  I just love how sparkly they are!  And how simple, yet glowing is a bowl filled with ornaments.  A 3-second creation that is beauty to the eye!

Christmas mantel filled with old & new and lots of DIY creations!

This years mantel would not be complete without a WOW.  The gorgeous cedar garland truly completed this years mantel montage.  I just adore how full and organic it feels.  My idea of being inspired by nature this holiday season really came to fruition with this garland.

Christmas mantel filled with old & new and lots of DIY creations!

I am so grateful to my friends at Lynch Creek Farm who sent me the garland, as well as the wreath for the front door.  And the smell…  I can’t even begin to explain how yummy our home smells.  I just wish you could dive through your screen to get a whiff.

Lynch Creek Farm

Here is a peek at the gorgeous wreath on the front door which you can see more of in my Christmas Home Tour.

Christmas Home Tour of Jenna Burger, one of the homes featured on the Jennifer Rizzo 2014 Holiday Housewalk

Back to the mantel…

I hung this beautiful cedar garland at each end of the mantel so it has a gentle swag in the center.  On the one side, I added a pretty red + black bow and on the other side, I hung 3 stockings that I just picked up from Lowe’s.

Christmas mantel filled with old & new and lots of DIY creations!

Christmas mantel filled with old & new and lots of DIY creations!

A few more views (I told you I couldn’t stop myself from photographing & sharing this mantel)…

Christmas mantel filled with old & new and lots of DIY creations!


Christmas mantel filled with old & new and lots of DIY creations!

Christmas mantel filled with old & new and lots of DIY creations!

From the kitchen to the dining room to the family room, you can see how the fireplace is a focal point in our home and we are truly admiring this years mantel creation…

Christmas mantel filled with old & new and lots of DIY creations!

Thanks for stopping by to enjoy my home decorated for Christmas!

Have you decorated your home for the holidays yet?

Chalkboard Wood Garland

Can you believe it’s November?  I’m breaking away from the bathroom for a bit (the remodel has taken over my life) to start thinking about this years seasonal decor.

Every year, we enjoy displaying our Christmas favorites, but at the same time we like to introduce new elements & of course, make some fun festive creations (like last years pallet Christmas Countdown).  Even though we typically start the process of unpacking the holiday boxes before Thanksgiving arrives, we certainly don’t overlook the beautiful Holiday of giving.  For that tricky time when we’re transitioning from one holiday to the next I have created this pretty & nature-inspired Chalkboard Wood Garland.

DIY: Wood Disc Garland with Chalkboard center - perfect to hang from the mantel, on the front door, or on any wall! Good for the holidays or any time of year.

As the Holiday prep begins, I wanted to make something that would give our family a little reminder to slow down (especially this time of year) & to truly enjoy the moment when everything around us is hustling & bustling.

For now, I thought the word blessings really sums up how we should be feeling and to be thankful for all we have – this time of year and always!   This is why the best part of the creation was the chalkboard layer – anything can be added and just as easily erased.

How To Make Wood Garland

To make this wood disc garland, I headed straight to my backyard to grab a big ole’ log.  I actually first sent the mister on the hunt and he returned with a fallen branch about 1″ round.  That wasn’t going to do, so I threw on my boots and headed for the woods.  I returned with a log about 3.5 – 4″ round.  He was skeptical we could cut it, but I put our circular saw to the test and it cut like butter.

We created 10 discs about 1″ thick.  More or less discs can be cut depending on the word(s) you want to spell out.  I thought 10 would be ideal and if one or more discs aren’t used for letters, a pretty picture can be added instead.

DIY: Wood Disc Garland with Chalkboard center - perfect to hang from the mantel, on the front door, or on any wall! Good for the holidays or any time of year.

Once all the discs were cut, I took my chalkboard paint from Lowe’s (left over from the chalkboard wall)  and freehand painted a circle on each disc.

DIY: Wood Disc Garland with Chalkboard center - perfect to hang from the mantel, on the front door, or on any wall! Good for the holidays or any time of year.

After they dried, which took about 2 hours, I drilled 2 holes about 1″ apart on the wood section of the disc.  These holes are for the twine to thread through in the next step.

DIY: Wood Disc Garland with Chalkboard center - perfect to hang from the mantel, on the front door, or on any wall! Good for the holidays or any time of year.

Then I threaded the twine through.  Twine seemed like the right material since it’s a natural feeling and looks rugged like the wood.  Though any type of string or ribbon could be used, it just depends on the look you want to achieve.

Since the drilled holes were kind of small, I attached an unfolded paperclip to the end of the twine and wrapped it with duct tape (superman duct tape to be exact, lol.  But any tape will do the trick).

DIY: Wood Disc Garland with Chalkboard center - perfect to hang from the mantel, on the front door, or on any wall! Good for the holidays or any time of year.

I added my letters for the word blessings.  I didn’t use any fancy fonts, just what came to mind…

DIY: Wood Disc Garland with Chalkboard center - perfect to hang from the mantel, on the front door, or on any wall! Good for the holidays or any time of year.

And voila… a beautiful festive garland was created.

DIY: Wood Disc Garland with Chalkboard center - perfect to hang from the mantel, on the front door, or on any wall! Good for the holidays or any time of year.

Perfect for the mantel, the door, or any wall in the home, this new wood garland can really be used all year round.

DIY: Wood Disc Garland with Chalkboard center - perfect to hang from the mantel, on the front door, or on any wall! Good for the holidays or any time of year.

DIY: Wood Disc Garland with Chalkboard center - perfect to hang from the mantel, on the front door, or on any wall! Good for the holidays or any time of year.

DIY: Wood Disc Garland with Chalkboard center - perfect to hang from the mantel, on the front door, or on any wall! Good for the holidays or any time of year.

DIY: Wood Disc Garland with Chalkboard center - perfect to hang from the mantel, on the front door, or on any wall! Good for the holidays or any time of year.

I also tried it on the front door along with a pretty red wreath…

DIY: Wood Disc Garland with Chalkboard center - perfect to hang from the mantel, on the front door, or on any wall! Good for the holidays or any time of year.

Something unique, right?!

DIY: Wood Disc Garland with Chalkboard center - perfect to hang from the mantel, on the front door, or on any wall! Good for the holidays or any time of year.

DIY: Wood Disc Garland with Chalkboard center - perfect to hang from the mantel, on the front door, or on any wall! Good for the holidays or any time of year.

This creation has been such a great break away from the bathroom renovation.  Even though I love diving into a big DIY project, sometimes simple + quick is much more gratifying.  Now I feel inspired & ready for the Holidays.

Have you started thinking about your seasonal & holiday decor?

When do you start decorating?

Lowes Creative Ideas Team Member

To gather even more unique, fun, and creative ideas for your indoor and outdoor Winter spaces, I would definitely suggest downloading the Lowe’s Creative Ideas app on your iphone and/or ipad.  I’m always checking out the FREE app for great seasonal + do-it-yourself inspiration.

 Also consider following Lowe’s on Facebook, Pinterest, and Instagram as well.

Disclosure: I am part of the Lowe’s Creative Team and was provided with a Lowe’s gift card to purchase items for my project.  I was also compensated for my time to use the products.  No one told me what to create, what to buy, how to use the product, or what to write.  All opinions are 100% mine!

DIY: Personalized Word Christmas Ornament

One week to go and Christmas will be here. Can you believe it?

As you know, my home has been decorated for quite a few weeks, but I have still been working on new holiday projects here and there to add to this years decor.   Once the house is ‘set’, I still enjoy adding new and unique touches for the season.

Since adding in a second tree this year, which is more of a pretty tree versus the sentimental traditional tree we decorate as a family, I’ve had fun with the gold + brown theme.  Along with the ball ornaments, I’ve added in some gold feathers (yes gold + feather in one combo: heaven) and just this past weekend, I jazzed it up even more with my latest DIY creations, word Christmas ornaments

DIY: Word Christmas Ornament using a Gold Sharpie by @Jenna_Burger, WWW.JENNABURGER.COM

Super fun, right?!  I got the idea from seeing a beautiful vignette in the Garnet Hill catalog.  I didn’t see the ornaments for sale (not like I would buy them anyway because they’d probably be $10+) and decided to create my own version.

I started off by grabbing a box (set of 6) of clear bulbs and a gold Sharpie marker at AC Moore.  With my 50% off coupon, I ended up getting both items for a few cents over $6.  Not bad for 6 ornaments, which = about $1/ornament…

DIY: Word Christmas Ornament using a Gold Sharpie by @Jenna_Burger, WWW.JENNABURGER.COM

Before putting pen to glass, I wanted to find the perfect font and words to write.  I decided on the words Joy, Peace, Shine, Merry.  All words that are meaningful around Christmas.  For the font, there was a toss up between Jenna Sue and Channel.

Jenna Sue and Channel font

In the end, I decided on the Channel font because I thought bigger and bolder would be better, plus it’s a little more forgiving – I’ll tell you why in a moment…

I started out by copying the script font from the computer screen to the ornament.

The result…  Not exact, but pretty close.

DIY: Word Christmas Ornament using a Gold Sharpie by @Jenna_Burger, WWW.JENNABURGER.COM

For each word, I started out with one line, then embellished each letter with thicker lines.  This type of font is more forgiving because you can layer and add onto each letter instead of it being a ‘one shot deal’.

DIY: Word Christmas Ornament using a Gold Sharpie by @Jenna_Burger, WWW.JENNABURGER.COM

Once the first layer of gold Sharpie was dry, I added another layer for a second coat.

DIY: Word Christmas Ornament using a Gold Sharpie by @Jenna_Burger, WWW.JENNABURGER.COM

Each ornament took about 8-10 minutes, so within about 40-60 minutes, I was done with the project.

DIY: Word Christmas Ornament using a Gold Sharpie by @Jenna_Burger, WWW.JENNABURGER.COM

All 4 unique and personalized ornaments would be perfect for a gift.  Any words could be used.  Maybe each ornament could say a member of the family or something silly about the holidays…

Once I was done, the ornaments were ready to immediately hang since Sharpie’s take no time to dry.

DIY: Word Christmas Ornament using a Gold Sharpie by @Jenna_Burger, WWW.JENNABURGER.COM

DIY: Word Christmas Ornament using a Gold Sharpie by @Jenna_Burger, WWW.JENNABURGER.COM

DIY: Word Christmas Ornament using a Gold Sharpie by @Jenna_Burger, WWW.JENNABURGER.COM

DIY: Word Christmas Ornament using a Gold Sharpie by @Jenna_Burger, WWW.JENNABURGER.COM

DIY: Word Christmas Ornament using a Gold Sharpie by @Jenna_Burger, WWW.JENNABURGER.COM

  So what do you think?  A project you’d consider tackling?  What type of project does it inspire you to make?

Cozy Adirondack Christmas Porch

Christmas is officially less than 2 weeks away.  It’s crazy how the season is passing us by so quickly.  Are you ready?

So I’ve got another surprise for you today…  Yes, another secret!

Since I shared a tour of the inside of my home last week, it’s time to take you outdoors… to my newly decorated Cozy Christmas Adirondack Porch.

Welcome…

I’m usually so focused on decorating the interior for the Holidays, that the porch often gets little thought and sadly neglected – are you like that?  Well not this year!

On a way-too-cold-to-be-outside day a few weeks ago, myself and the troops (a.k.a The Mister and the kids) ventured outdoors to decorate.  After a few hours, way too many decorating edits, broken bulbs (and they were brand spank-in new), and a couple of trips to Lowes, I was finally satisified with the result of this year’s cozy adirondack-style front porch. And I have to say, it’s our best yet.

Thankfully I can say that I live in the adirondacks, so having a front porch with a rustic, natural aesthetic is so apropos.  (my interior doesn’t really reflect the same look, but that’s okay).

I didn’t start off the porch with a specific idea in mind, but as the family and I started decorating, it all came together (over many cold hours) to create a cozy outdoor haven.  We began the transformation by removing some of the porch furniture that we have out for the summer.  We left the pretty lutyens bench though, draped a blanket over the back, and added a few pillows – it was the beginning of the adirondack porch.

In front of the bench, I positioned a round table (which is actually an electrical cable spool that I found on the side of the road) and added some festive elements including “dressed-up” mason jars, a lantern, and some pine and berry sprigs.

I said to the Mister that afternoon, “Let’s get some hot chocolate, cuddle under the blanket, and enjoy our newly decorated porch”.  Well we all ended up being too chilly and unfortunately ‘sitting and enjoying’ hasn’t happened yet, but it sure looks so inviting.

Would you stop over and have a cup of-something with me?

On the other side of the porch, I created a small festive vignette.  I stacked two large slices of cut logs and topped them with a poinsettia and a small pile of pinecones. As a larger and taller anchor, I brought in the potted boxwood (which sits throughout the year next to the garage), two lanterns filled with a large candle, and another poinsettia.  The varying heights and sizes of the elements, plus the differing textures, in the vignette, create an interesting composition.

Behind the poinsettia and pinecone vignette, I wanted even more height and added a leftover piece of pallet scrap, which I added a quick coat of white paint to and wrapped with twine.   A super simple 3 minute project!

Of course, we needed some greenery on the porch and I surely didn’t fail in that department.

On either side of the front door are two small (3′ high) faux trees decorated with petite ornaments and twine for garland.  Plus we added more greenery on the columns with a garland mix of pine and cedar.

The last element that we added to the front porch are the hanging ornaments.  This was the last addition and definitely my favorite!

The overall porch…

And alittle more ornament action…

And of course donned on my front door is my whimsical winter wreath that I made a few years ago.  Still a favorite.

Thanks so much for taking a tour of my newly decorated cozy adirondack front porch.  The porch and/or entryway of a home sets the tone for what’s to come inside.  Whether you have a simple wreath on your door or you go all out with lights, festive decorations always bring happy cheers and smiles.

Christmas in a Minute: Vintage-Inspired JOYful Sign

Happy Monday!  What a busy week upon us with Thanksgiving, Hanukkah, and the official start to the holiday season.  As the crazy Christmas sprint begins, I’m thinking simple, easy, and quick.  So this weekend, I created this fun + easy vintage-inspired JOYful sign.  Scraps of wood and a little bit of paint makes this a simple and very inexpensive creation.  It would be great for the mantel, outside patio, or as a gift.

Here’s the breakdown…

Christmas in a Minute: Vintage-Inspired JOYful Sign created by @Jenna_Burger, WWW.JENNABURGER.COM

Simple-to-follow tutorial on how to create a JOY sign

1. Cut the wood to your desired height and width. I used leftover pallet scraps to create this sign, but you could also use new wood instead.  I like the old pallets because they’re free, plus they have a distressed, worn look, which means no “beating up” the new wood.

2. Create the sign and sand.  If you have more than one piece of wood, you’ll need to attach them from the back.  Across the two pieces of pallet boards, I nailed two smaller pieces of pallet scraps on the back so the sign stayed together. Then I gave the wood a good sanding on the top and sides.

3. Paint the sign.  I painted the base of the sign with plain ole’ white paint leaving some of the raw wood to show through.

4. Outline letters.  I freehand sketched the letters J – O – Y on the sign.  You could use a stencil or silhouette if you wanted.

5. Paint the letters. Then I filled in the letters with red craft paint.  I used about 3-4 coats, but it dried quickly.  To give an even more distressed look, I gently went over the surface with a piece of sandpaper (by hand).

And that’s it.  Pretty simple, right?!

Pallet Christmas Countdown

Christmas is a comin’!

In less than 10 days, we’ll be counting down the 25 days till the arrival of Christmas.  To make the countdown a bit more fun and bearable, since for every child (and maybe a few adults) thinks the 25 days leading to the special day are SO LONG, I created a Countdown Calendar in the shape of a tree using my favorite material, pallets and a few other leftover scraps of wood.  Check it out…

Christmas Countdown Calendar using pallets and scraps of leftover wood.  Created by @Jenna_Burger, www.sasinteriors.net

Isn’t it so colorful?  The ornaments truly make it come alive.

When Lowe’s challenged the Creative Team to come up with something for the Holidays, I was so excited to create something unique and perfect to celebrate the coming holiday.  Last year, my December project was a creation for holding cards and this year, I wanted to create something just as dynamic.  When thinking about a project, I realized we didn’t have a countdown calendar, so that’s what this years project would be.

The project started out by taking 10 steps outside to the garage.  Yup, this creation was put together using only materials I already had on hand.  This is what I gathered…

  • Pallet and wood scraps – the more dented and imperfect, the better
  • Nails (3/4″ – 1″ deep)
  • Number stencil
  • Black Sharpie
  • Hammer
  • Circular Saw
  • (25) Colorful ornaments

1. I first started out by looking through my wood scrap pile and leftover pallet scraps.  I collected a bunch of pieces all in different colors and sizes.  The more imperfect the better.

Then I took some time and put a drawing together to figure out how many rows of wood would be needed and how the 25 ornaments would sit on the “tree”.  In the end, 7 tiers worked best and 2 of the rows have 4 nails, creating the 25 spots.

A little math is needed, but it wasn’t tough…

Christmas Countdown Calendar using pallets and scraps of leftover wood.  Created by @Jenna_Burger, WWW.JENNABURGER.COM

2. Now that the hardest part was over (a little mathematical equations), I laid out the pieces of wood to determine what looked nice next to each other and then the widths of each tier.

On the backs, I then labeled each row.

Christmas Countdown Calendar using pallets and scraps of leftover wood.  Created by @Jenna_Burger, www.sasinteriors.net

3. Then using a circular saw, I cut each piece to form the “tree” shape. Once that was complete, I added a scrap piece of wood to the backs of the pieces to attach them together.

Hammer, hammer, hammer using 3-4/” – 1″ nails.

Christmas Countdown Calendar using pallets and scraps of leftover wood.  Created by @Jenna_Burger, www.sasinteriors.net

I added a few more pieces of scraps (old paint sticks, to be specific) to the back.  This looks kinda messy, but hey, who’s lookin’ at the back???

Christmas Countdown Calendar using pallets and scraps of leftover wood.  Created by @Jenna_Burger, www.sasinteriors.net

No more looking at the back.  Let’s turn it over to the front where it’s prettier looking.

Now to the nails + the numbers.

4.  By eye (no more math needed), I marked the locations for the 25 ornaments.  Then I added a nail at each location leaving about 1/2″ exposed for the ornament to hang.

Christmas Countdown Calendar using pallets and scraps of leftover wood.  Created by @Jenna_Burger, www.sasinteriors.net

5. Once the nails were in, it was time for the numbers.  Using stencils I had from a previous Martha Stewart project, I outlined the numbers with a black sharpie.  Again, the more imperfect the better.

Christmas Countdown Calendar using pallets and scraps of leftover wood.  Created by @Jenna_Burger, www.sasinteriors.net

Once the numbers were done, the project was complete.  And here’s the result…

Plain + Decorated.

Christmas Countdown Calendar using pallets and scraps of leftover wood.  Created by @Jenna_Burger, WWW.JENNABURGER.COM

I love how it came out…

Christmas Countdown Calendar using pallets and scraps of leftover wood.  Created by @Jenna_Burger, WWW.JENNABURGER.COM

It’s so colorful and brings such whimsy to our holiday home decor.

Christmas Countdown Calendar using pallets and scraps of leftover wood.  Created by @Jenna_Burger, WWW.JENNABURGER.COM

Christmas Countdown Calendar using pallets and scraps of leftover wood.  Created by @Jenna_Burger, WWW.JENNABURGER.COM

The kids love it too and they can’t wait for the 1st of December to arrive to start adding an ornament each day.  While we wait, the ornaments that all came from this years Lowe’s collection, sit in the brass light turned container.

Christmas Countdown Calendar using pallets and scraps of leftover wood.  Created by @Jenna_Burger, WWW.JENNABURGER.COM

Christmas Countdown Calendar using pallets and scraps of leftover wood.  Created by @Jenna_Burger, WWW.JENNABURGER.COM

I hope you enjoyed my latest creation as much as I.  It was fairly easy to make, and I loved that I was able to create it using materials I already had.  How much better does it get?!  The anticipation and excitement leading to Christmas day can be a bit challenging, but hopefully my countdown calendar makes it a tiny bit more fun.

Christmas Countdown Calendar using pallets and scraps of leftover wood.  Created by @Jenna_Burger, WWW.JENNABURGER.COM

To gather even more unique, fun, and creative ideas for your indoor and outdoor Winter spaces, I would definitely suggest downloading the Lowe’s Creative Ideas app on your iphone and/or ipad.  I’m always checking out the FREE app for great seasonal + do-it-yourself inspiration. And even better, this Pallet Christmas Countdown creation will be featured in the upcoming Winter guide – how cool, right?!

Lowes Creative Team Member

Also consider following Lowe’s on Facebook, Pinterest, and Instagram as well.

 Disclosure: I am part of the Lowe’s Creative Team and was provided with a Lowe’s gift card to purchase items for my project.  I was also compensated for my time to use the products.  No one told me what to create, what to buy, how to use the product, or what to write.  All opinions are 100% mine!

Easiest + Fastest + Cheapest Tree Skirt EVER

Monday Morning Confession: I already started decorating for Christmas.  It might seem early for some, but I have a few surprises up my sleeve that I wanted to prep early for this year.  While many of my daily favorites get tucked away for the next 6 weeks, the holiday decor is once again making it’s debut for another year.  As some ‘old’ traditional elements remain, there are many new projects and vignettes that I’ll be sharing over the coming weeks.  One in particular is my new tree skirt.  Definitely the easiest + fastest + cheapest tree skirt you ever did see…

Easiest, Fastest, + Cheapest Christmas Tree Skirt.  Use 1.5 yd of fabric and wrap around tree.  Follow easy instructions by @Jenna_Burger of WWW.JENNABURGER.COM

For the last few years I’ve wanted a new tree skirt.  I had grand plans of making something beautiful and chic, but honestly it just never happened.  And anyway, is something pretty + most likely expensive, even worth it?  I’ve found over the years that the tree skirt ends up getting thrown around either from the kids or the cats, and then once the presents are added, you don’t even see it.  Well this is in my house anyway. maybe it’s different in your casa…

So after living with no tree skirt for a few days once the tree was up, I thought let me test out this pretty black and white striped fabric.  I threw it under the tree and loved it’s whimsical, non-perfect, simple look.  Plus it cost me nothing. So here we go… The black and white striped fabric I had on-hand was 1 yard, but I would recommend using 1.5 yards or even 2 yards for a fuller look. I placed the fabric in front of the tree.

Easiest, Fastest, + Cheapest Christmas Tree Skirt.  Use 1.5 yd of fabric and wrap around tree.  Follow easy instructions by @Jenna_Burger of WWW.JENNABURGER.COM

Then took the two top corners and wrapped them around the  bottom of the tree so they meet in the back.

Easiest, Fastest, + Cheapest Christmas Tree Skirt.  Use 1.5 yd of fabric and wrap around tree.  Follow easy instructions by @Jenna_Burger of WWW.JENNABURGER.COM

Easiest, Fastest, + Cheapest Christmas Tree Skirt.  Use 1.5 yd of fabric and wrap around tree.  Follow easy instructions by @Jenna_Burger of WWW.JENNABURGER.COM

Lastly, I tucked the bottom corners and all the loose edges underneath.

Easiest, Fastest, + Cheapest Christmas Tree Skirt.  Use 1.5 yd of fabric and wrap around tree.  Follow easy instructions by @Jenna_Burger of WWW.JENNABURGER.COM

Literally, this took all of 30 seconds and it was done.

Easiest, Fastest, + Cheapest Christmas Tree Skirt.  Use 1.5 yd of fabric and wrap around tree.  Follow easy instructions by @Jenna_Burger of WWW.JENNABURGER.COM

By the end of the day, the tree skirt is all dishuffled anyway, so within seconds it looks good again.  There really is no right or wrong to this tree skirt, which makes it perfect for me!

And the best part is, it cost nothing and the fabric can be used for something else after the Holidays.  Next year, I may want a totally different pattern and I won’t be married to something store-bought or a creation that took hours. I hope you enjoyed my 30 second tree skirt creation.  Sometimes the easiest things are the best!

Be sure to check back next Monday when I’ll be partnering with a few Blogging friends who will all be sharing super simple holiday projects for our Christmas in a Minute series.  Cheers to a festive season. xo