
Tag: Drop Cloth

DIY: Drop Cloth Curtain Panels with Leading Edge Detail

I’ll be honest, none of the window curtain panels in my home cost more than $50.  Yet all are custom made.  Not by an uber-expensive fabricator, but by me.

Store-bought and/or custom-made curtain panels can be very pricey, but the same look (or better) can be achieved by making your own.  And guess what, it’s not difficult…

DIY: Drop Cloth Window Panels with Leading Edge Detail. High-end look for less than $20 to make. via @Jenna_Burger, WWW.JENNABURGER.COM


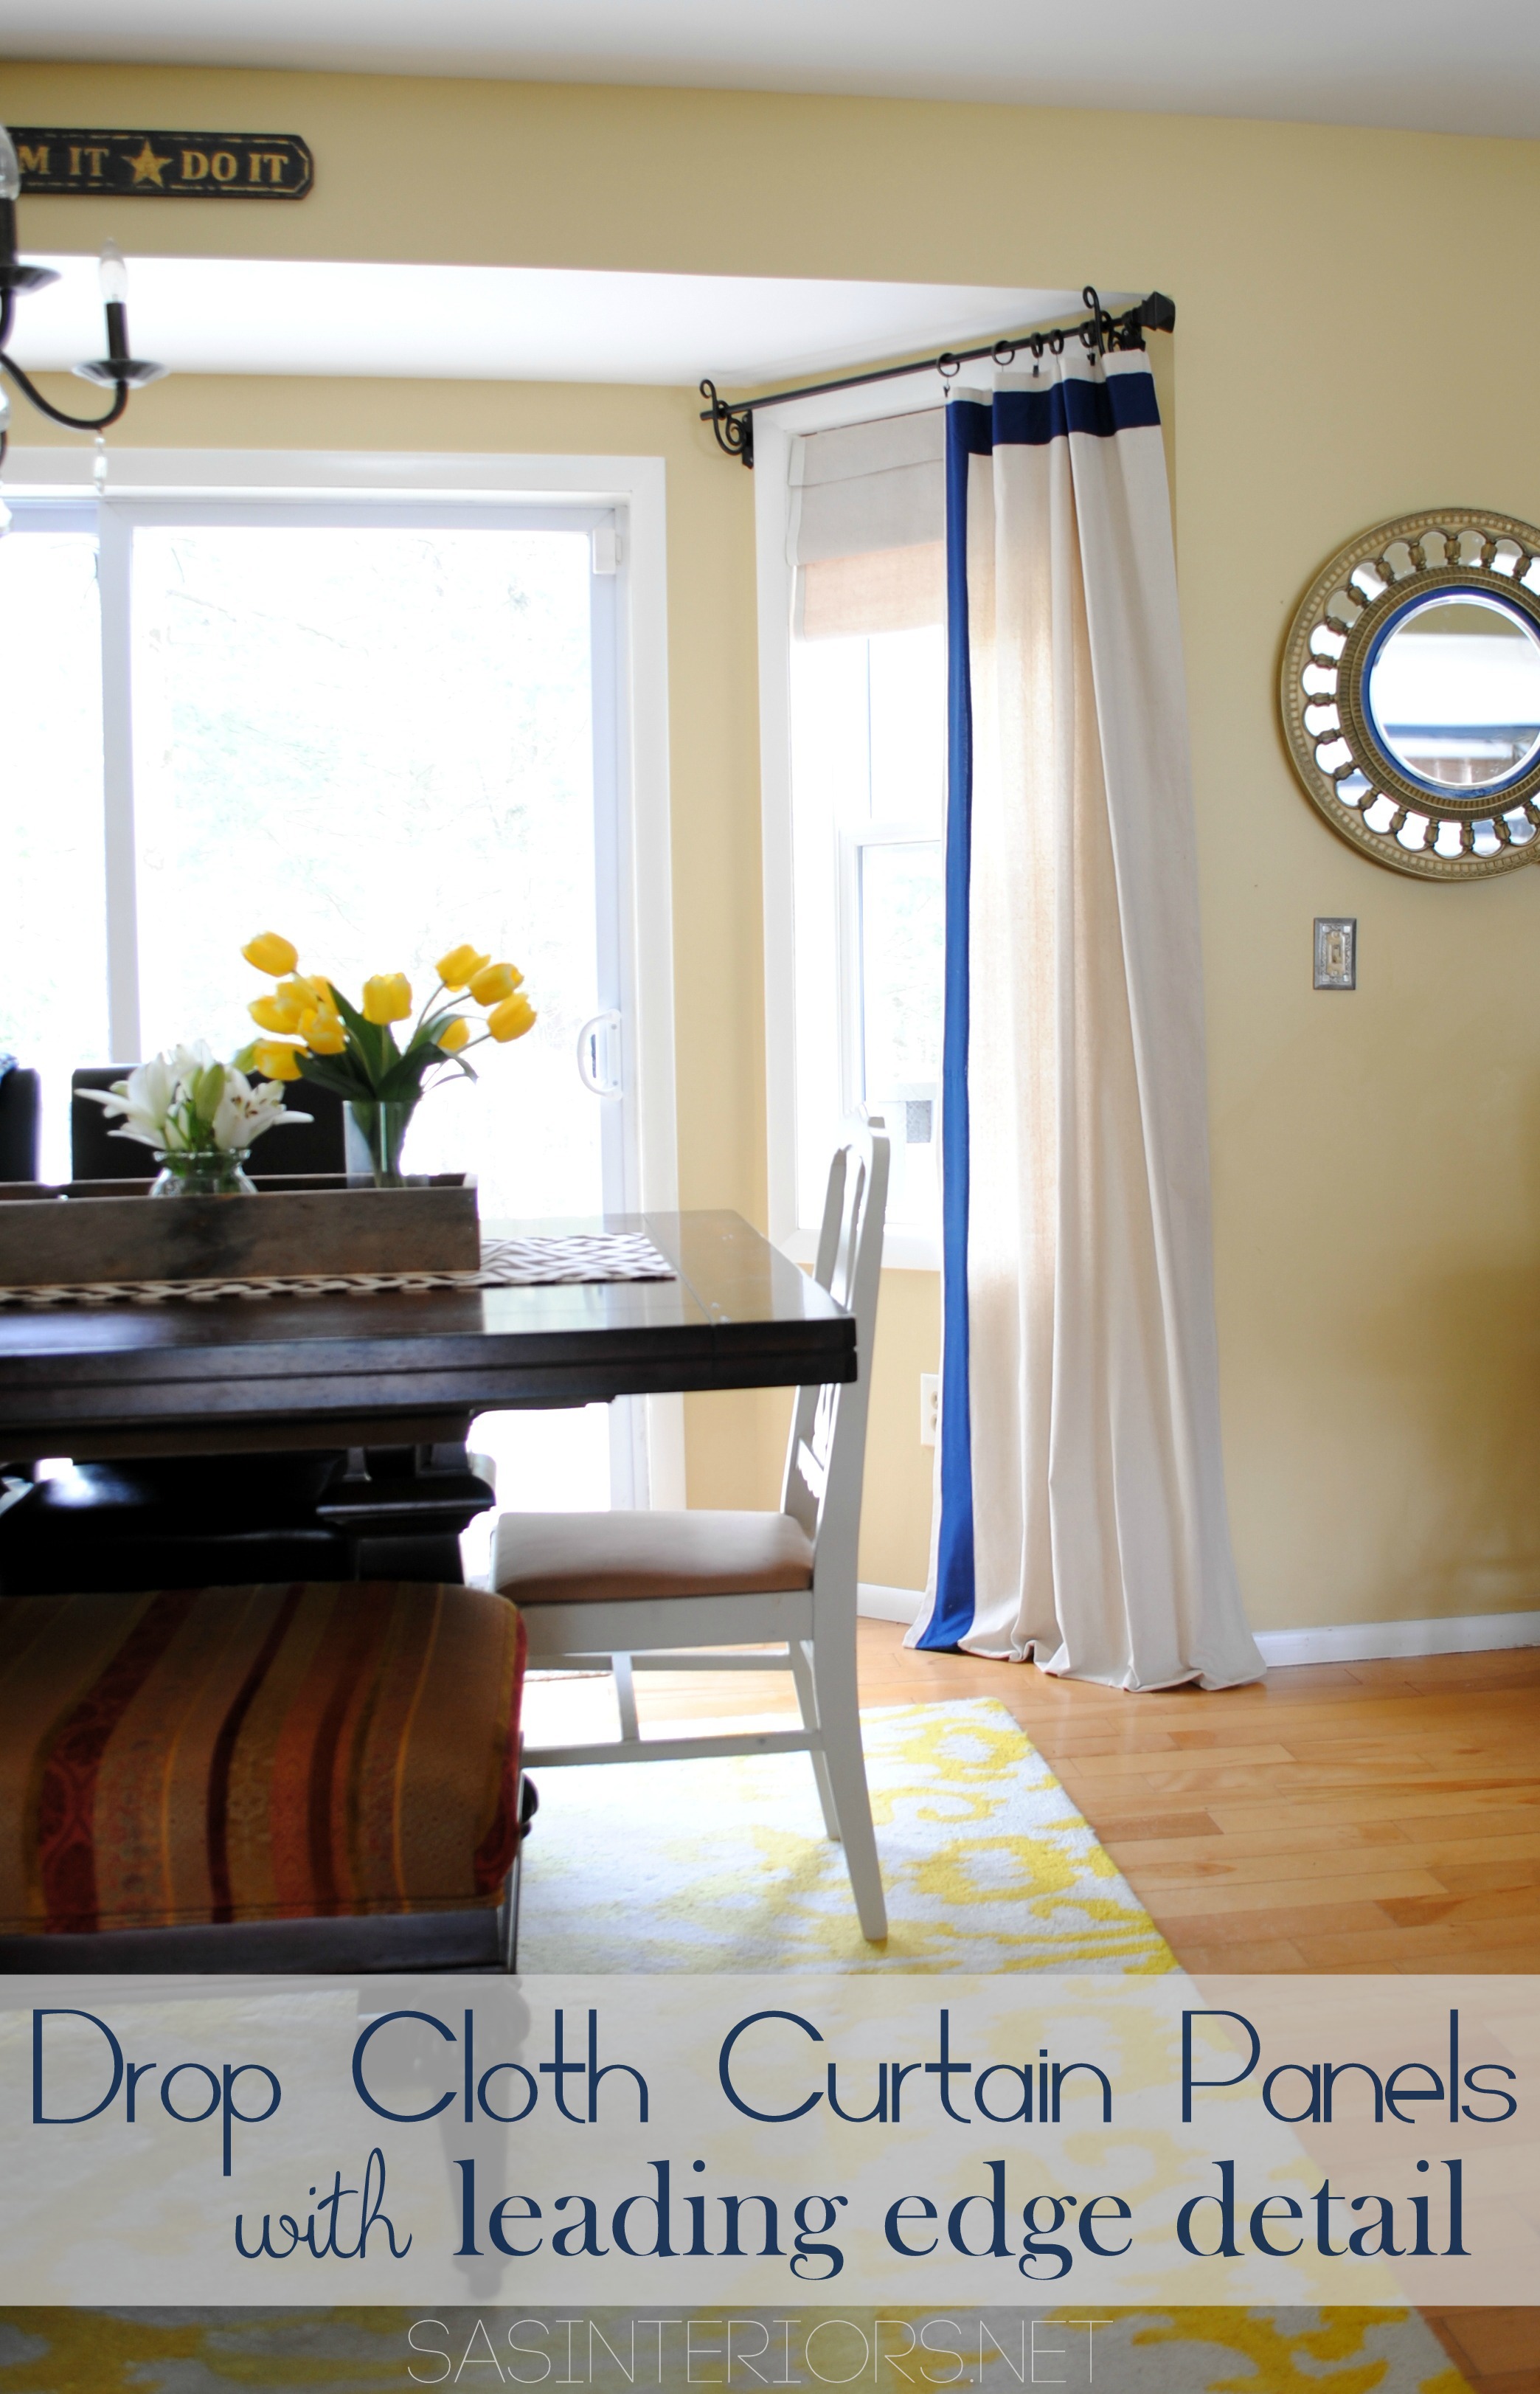
As the calendar turns and another Fall approaches, Lowe’s put The Team to the test this month to create a new window treatment for the home.  I was in need (well more like a want) of new window panels for the dining room, so I knew it was the perfect spot to get my craft on.

I desired something simple, so instead of stopping at the curtain aisle for a typical drape, I headed towards the paint aisle and landed in the drop cloth section.  confession: I can close my eyes and always find the drop cloth section… I’ve confessed my love for drop cloth before, but honestly it is The. Best. Material. hands down.  You can do so much with drop cloth material.  It’s not just for painters!!

Anyway, onto the new panels…

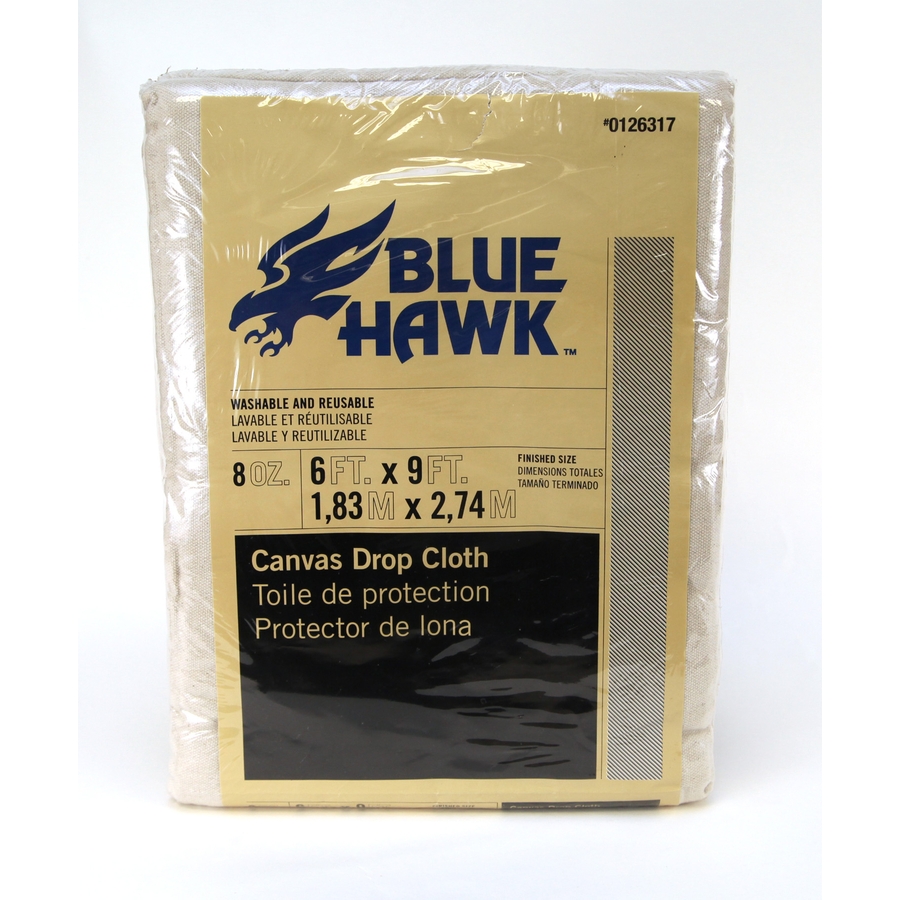
1. At Lowes, I chose a 6 ft. x 9 ft. size panel (about $10), then cut it in half to make (2) 3 ft. x 9 ft. pieces.

Drop Cloth

2. The panels are heavy enough, so I didn’t feel that a lining was needed, so I simply squared off the edges (drop cloth isn’t always perfectly straight), folded over the edges, and sewed all around.

DIY: Drop Cloth Curtain Panels

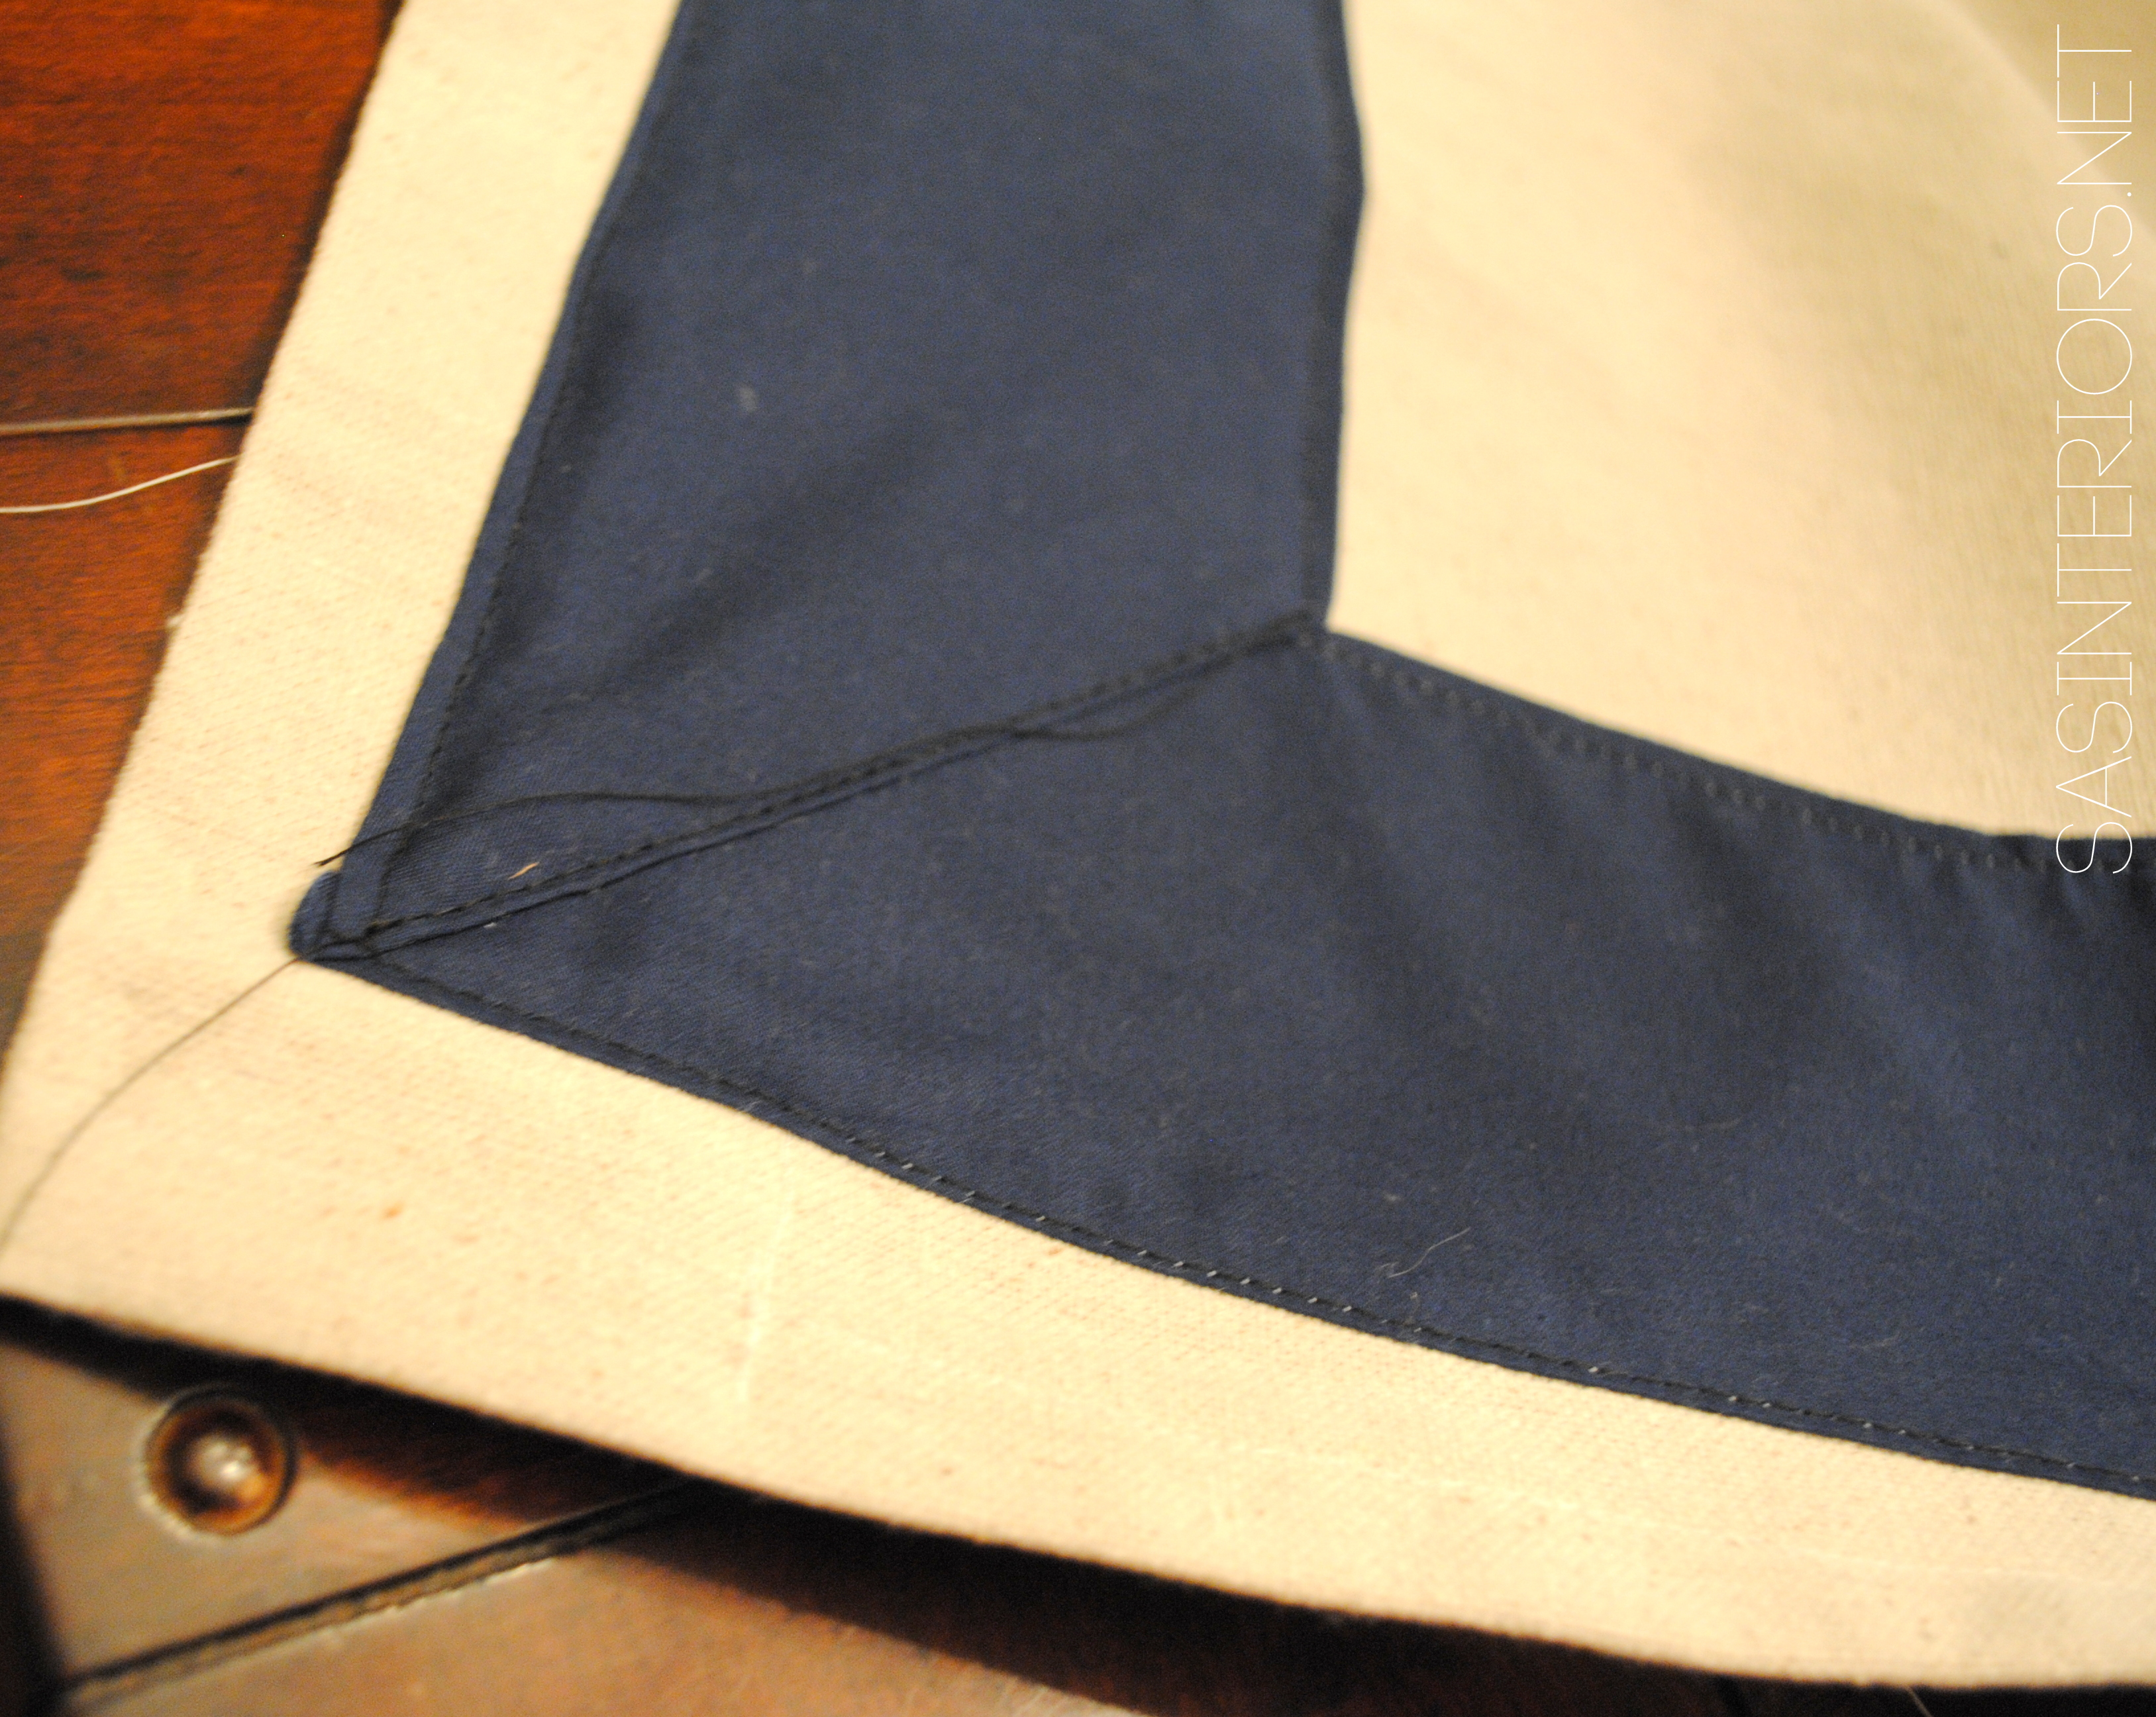
3. Once the panels were complete, it was time to add the decorative leading edge.  I chose a navy blue light cotton fabric which was the perfect contrasting complement to the lighter color of the drop cloth material.

And yes, that says $3 for the yard.  In all these panels cost about $13!

DIY: Drop Cloth Window Panels with Leading Edge Detail. High-end look for less than $20 to make. via @Jenna_Burger, WWW.JENNABURGER.COMThe color of the fabric is showing royal blue in this pic, but it is more navy in actuality.

4. I layed out the fabric length-wise and cut as many 4″ strips as I could.

DIY: Drop Cloth Window Panels with Leading Edge Detail. High-end look for less than $20 to make. via @Jenna_Burger, WWW.JENNABURGER.COMagain showing royal blue…  but it’s not.

5. Then I folded over the two side edges 1/2″ each and ironed the seam flat.

DIY: Drop Cloth Window Panels with Leading Edge Detail. High-end look for less than $20 to make. via @Jenna_Burger, WWW.JENNABURGER.COMThat’s the true color. I swear!

Sidenote: Because of the panel length (a typical panel can be from 84-96″ long), you may need to attach fabric strips to achieve one long strip. I did and before folding over and ironing the seam, I attached two strips and then I had enough length.  Once sewn, iron the seam flat.

DIY: Drop Cloth Window Panels with Leading Edge Detail. High-end look for less than $20 to make. via @Jenna_Burger, WWW.JENNABURGER.COM

6. Once the seams were ironed, it was time to attach the decorative edge to the drop cloth panel. I decided to have 1″ of drop cloth exposed, then add the navy blue accent.  I first pinned the navy fabric in place and sewed all along the edges using the same color thread.

DIY: Drop Cloth Window Panels with Leading Edge Detail. High-end look for less than $20 to make. via @Jenna_Burger, WWW.JENNABURGER.COM

DIY: Drop Cloth Window Panels with Leading Edge Detail. High-end look for less than $20 to make. via @Jenna_Burger, WWW.JENNABURGER.COM

And that’s it.  A high-end look for $13!

The result…

DIY: Drop Cloth Window Panels with Leading Edge Detail. High-end look for less than $20 to make. via @Jenna_Burger, WWW.JENNABURGER.COM

The panels are hung by clip rings and have slight puddle at the bottom.  They are the perfect addition for my dining space.

Other ideas + ways to achieve a high-end look for less…

  • You don’t have to use drop cloth to create a similar window curtain panel.  A similar detailed edge can be added to a store-bought curtain, similar to what I did in my daughter’s room.  In her space, I actually added the decorative fabric to the outside edge of the curtain panel instead of on top of the fabric.  The typical store-bought panel wasn’t long enough, but the added fabric made it the ideal length.

How-To Add Decorative Trim to Curtains {for cheap}

  • If you are using a thinner fabric to create a window panel and want to have a heavier panel that will allow less light to shine through, check out what I did in my bedroom.  Using drop cloth material (AGAIN), I took a regular weight cotton fabric and lined them.  Depending on the fabric pattern, a decorative edge could be added to these style panels as well.

DIY: How to Make Simple Lined Window Drapery Panels

Ideas are limitless for what you can create for your windows!

Thanks to Lowe’s, I was able to create my most recent creation for less than $15.  So next time your combing the paint aisle to grab some spray paint, don’t forget to check out the drop cloth section.  Your mind will go bonkers with all that can be created!

Excited for the Fall and ready to tackle some home improvement and DIY projects?  Lowe’s has it all.

Fall Badge Rectangle

Sign up for their free Lowe’s Creative Ideas Magazine, which is filled with ideas + inspiration!  Plus you can always follow them on Pinterest and Instagram for even more great ideas!

Disclosure: I am so grateful to be apart of the Lowe’s Creative Team and was provided with a Lowe’s gift card to purchase items for my project.  I was also compensated for my time to use the products.  No one told me what to create, what to buy, how to use the product, or what to write.  All opinions are 100% mine!

What have you made using drop cloth? Have you ever thought of jazzing up your window curtain panels to create a custom look?


DIY: Christmas Stockings

Did you check out my newly decorated Christmas mantel?  If not, that’s okay (but head over there now).  In that post you got a little sneak preview of the Christmas stockings that I recently made.  As a family of four, we’ve never had matching stockings.  The mister and I have the same (since we bought those together after getting married), but then came child #1 and he got a different style stocking, and after that child #2 came along and she has an even different style stocking.  Anyway, each year it’s been a mish-mosh of different color and style stockings hung on the mantel, until now.

You know my love for drop cloth, so what did I use?  Yes, you guessed it…the big DC!

I’ve always wanted to make stockings, but was intimidated thinking it would be too difficult – but IT WASN’T!

Using drop cloth material for the main stocking, creme colored felt for the cuff, and the basic sewing essentials, I created these stockings, that now sit at the mantel, in no time!  To start off, I used the old stocking as a template to create the “boot-like” shape.  I then cut an 8″ x 12″ piece of felt for the cuff, and sewed the “right” sides together (see pictorial).

I made 4 stockings (which have 2 sides each), so I had a total of 8 sides.

Once the cuff is attached to the “boot”, open the cuff and iron.  Then put the “right” sides of the boots together and pin all around.  Using a 1/2″ inseam, sew around the entire boot, EXCEPT at the top edge of the cuff.

Once you finished sewing all the way around, turn the stocking to the “right” side using the opening at the top edge.  Then iron the edges flat.

The stocking form is made – YAY!

At this point of the stocking-making-process, the tops of the cuffs will probably not match – that’s OKAY!  Taking a scissor or rotary cutter, trim the top edge of the cuff to get a straight line.

Then it’s time to make the cuff – turn over the felt fabric and adjust it to the amount that you want to see for the “cuff”.  I’ll admit, at this point, I was a wee bit mad at myself for not forethinking what I’m about to share.  There are many different ways to make stockings and honestly, I didn’t do any research beforehand, and just “went for it”.  Kind of a mistake.  When I went to turn the fabric over to make the cuff, I realized that you could see the stitching on what was before the “inside” of the cuff (see right pictorial).  At this point, I was about to ditch the project, but then I realized because the fabric is felt, it won’t fray and it actually gives the edge a decorative look.  I trimmed the edge about 1/4″ off the seam and I’m pretty happy with the result.  Another (slight) fail to success project!

Essentially it’s complete at this point, but of course you need something to hang the stocking.  Using another piece of felt, I simply made a loop that I sewed on to the inside edge of the stocking cuff.

Now they are ready to hang!  If you saw my Christmas mantel the other day, you may have noticed that the stockings were plain and unembellished.  Well that only lasted a day.  Using the ornaments from my Organic Centerpiece that I displayed on my dining table last Christmas, I looped them through clear fishing line and hung them around the felt loop of the stocking.  Also adding a chocolate glitter snowflake, the collection was a beautiful accent to the neutral-colored background fabric.

Also placed on two of the stockings are pins that were favorites of my husband’s late grandmother. A little way he remembers her around the Holidays.

I really love the simplicity of these stockings.  Each year as I change my colors and Christmas decor they will always be a beautiful accent to different embellishments that I can add.  Do you hang stockings at the fireplace?  Are they matching or a mish-mos of different styles like I had for the past years? (and just to set the record straight…  I don’t mind mish-mosh…  it’s eclectic!)

I link my projects to some of these parties: Skip to My Lou, Dittle Dattle, Between Naps on the Porch, Today’s Creative Blog, Stories of A to Z, All Things Heart & Home, Savvy Southern Style, House of Hepworths, Finding Fabulous, Creation Corner, The Shabby Nest, Tatertots and Jello, Thrifty Decor Chick, Under the Table & Dreaming

DIY: Drop Cloth Placements with Decorative Top Stitch

The Holidays are right around the corner and as I’ve been finalizing the table decor for Thanksgiving and getting ready for Christmas, I realized that I didn’t have any placemats that were festive or unstained (from past Holiday gatherings).  I was just about to head to the store, when I remembered I had purchased a new package of drop clothes the week before.  Why waste the time of spending money and venturing through the crowded stores, when I could just make what I was envisioning?!

If you’ve been a follower of mine for a while, YOU KNOW that I love drop cloth material!  Have you ever asked yourself, “Why does she always use drop cloth?”  I have.  My answer is because it’s cheap, durable, heavy, and looks very similar to linen (but without the wrinkles).  Have you ever made something using drop cloth material?  If not, you’re missing out – trust me!

To start off making these drop cloth placemats, determine the size you’re desiring.  I made the overall finished size 14″ x 19″, but cut my fabric to be 15″ x 19″ to allow for a 1/2″ seam all around. The beauty of making your own is that YOU can make any size you want / need – smaller, larger, square, triangle, oval…  And you can also use any fabric – It’s not a must to use drop cloth (even though I love it).

I made (4) placemats, so I cut (8) 15″ x 19″ pieces.  Iron.

Pin the right sides of the material together.  With drop cloth, there isn’t a “right” or “wrong” side, but again, this placemat tutorial can be used for ANY material.

Sew around the entire perimeter, leaving a 6″+/-  opening at one side, so you can pull the “right” side through.

Once the soon-to-be placemat is on the “right” side, iron the seams flat.

Looks pretty good and it’s almost done!

At this point, you have a lot of options which will depend on the fabric and/or the decorative embellishments you want to add (or not add).   For my drop cloth placements, I decided to add a decorative top stitch around the entire perimeter, which is inset about 3/4″ from the edge.

The stitch I used is #16 on my machine, which is a scalloped, zig-zag design, and in keeping with the Holiday theme, I decided on a burgundy colored thread.

This is a close-up of the stitch.  It’s very simple, yet more detailed and interesting instead of a typical straight stitch. 

Here’s a tip: When you are sewing around a corner, don’t pick up your needle, but instead pick up the “sewing foot”, turn your material around the corner, put down the “sewing foot”, and continue sewing.

1 down…  3 more to go! 

And they were all done!

Tomorrow, I have something even more exciting for you.  I’m going to embellish these placemats – still keeping them simple and stylish!

I link my projects to some of these parties: Skip to My Lou, Dittle Dattle, Between Naps on the Porch, Today’s Creative BlogHome Stories A to Z, All Things Heart & Home, Savvy Southern Style, House of Hepworths, Finding Fabulous, Creation Corner, The Shabby Nest, Tatertots and Jello, Funky Junk, Under the Table & Dreaming

DIY: Faux Roman Shade

You might think I’ve gone drop cloth crazy (which I have), but this material is truly simple, affordable, and stylish!  Plus it’s also durable, chic, and a great neutral palette for any accent color.   Lately I’ve been transforming my interiors to look a little more casual. With updated fabrics on the pillows and windows, and some stylish new accessories and repurposed pieces, my interior is changing into my desired style (of the moment…next week it could change again)..haha).  My latest drop cloth project was to make faux roman shades for my dining room windows.

Before, the window treatments were dupioni silk drapery panels with detailed sheers to match.  I was over the heaviness-look and wanted something to lighten and brighten the space.

I was on a mission to repurpose, so I took the window panels that were in my living room and moved them into the dining room.  But it still wasn’t “just” right ~ It needed something.  With a little experimentation of fabrics, I thought the drop cloth material would be a perfect neutral accent to the simple burnt orange/red drapes (the roman shades also coordinate quite nice with my table runner).

Supplies needed to create your own faux roman shade

  • Fabric of choice
  • Double Fold Bias Tape
  • Sewing Machine
  • Sewing supplies (pins, scissors, measuring tape, etc)
  • Velcro

Before I begin the tutorial, I wanted to mention there was an existing honeycomb-style shade where I wanted to install this new faux roman.  I removed the fabric shade using a straight edge, but left the bar on in place.  This is what I later used to attach the faux roman shade with the Velcro.  **If you are starting from scratch, you could put the Velcro directly on the window OR get a tension rod and Velcro the shade to it.

Let’s jump right in

1. Decide how many ‘drops’ you want for your roman shade. I decided on 2 drops, and then I added a Header Flap on the top.  Each drop is 5-1/2” and the top flap is 3-1/2”.

2. Measure the width of your window and cut your material.  With regards to the length, I cut mine to be about 36” long.  It’s important to leave a lot of extra material on the length, so you have enough to create the drops. (Read on and it’ll help you determine your length).

3. Take your Double Fold Bias Tape and edge the length of the roman shade.

4 and 5. Pin and Sew the bias tape onto your fabric.  If your top edge is not finished, fold over and sew, so you have a finished edge.

6. Fold over your fabric to create a 3-1/2” Header Flap; Iron the edge and sew along the top with a ½â€ inseam.

7. It’s time to start your first drop: Measure 9” from the top (3-1/2” for the Header Flap + 5-1/2” for the drop) and then fold the fabric under to create the drop of the roman shade. Bring the fabric all the way to the top of the back.

8a and 8b. Flip over the Header Flap.  Pin the drop and sew the fabric underneath the flap (along the pinned line as shown in the picture).

9. Onto the second drop: Measure another 5-1/2” for the next drop (which is now 14.5 from the top).  Repeat step 8.

You can make as many drops as you’d like to create a longer roman shade. 2 drops worked perfectly for my size window.

10. When you are complete with your roman shade, flip it over and attach the Velcro to the top edge of the shade.

11. As I mentioned above, I used the existing bar that was already in place.  If you are starting new, you can either attach the Velcro right to the window or use a tension rod and attach the Velcro to it.

And here it is …

Here is the overall space: Lighter and Brighter!

Adding a non-functioning roman shade can really jazz up a window.  I’ll be honest, this tutorial was a bit difficult to write and I hope I didn’t lose you.  It’s actually quite easy to make once you get started.  If you have ANY questions, please reach out to me and ask!

* Just a reminder, don’t forget the BIG Blogger Block Party event ~ link up your Summer Space projects to my link party next Thursday, the 23rd! *

DIY: Drop Cloth Table Runner

Lately I’ve been a wee-bit obsessed with drop cloths…not the ugly blue kind, but the pretty and fabulous heavy beige version.  I’ve basically gone drop cloth MAD – – everything in my house is being transformed with drop cloths.  (I may need drop cloth therapy in a few weeks, but for now, I’m okay…ha!)

After making a few pillows (which I’ll share soon), I ventured into making a runner for my dining room table using, non-other than, a drop cloth and a fun chevron accent fabric (you know I love chevron).  I’ve never quite found a table runner that is the ‘perfect’ size, until now because – – I made it myself!

Here’s a sneak peak of how it looks ~

This is where it all began…

My $16 drop cloth purchase! For that, I got a 6′ x 9′ piece AND a 4′ x 10′ piece…WOW!

Project Supplies:

Drop Cloth
Accent Fabric
Thread – white of clear
Thread – contrasting color
Iron

And here are the steps to create the table runner:

Measure the length of your table to determine your desired width and length that you’d like to make the runner.

My overall table length is 76” long.  I wanted to see 2” of the table on each side, so I determined the finished dimension to be 72” long.   For the width, I wanted the finished dimension to be 14”.

Ok, now onto cutting the fabric…

1. From my above dimensions, I cut (2) 73” x 15” pieces of drop cloth.  This allows for a ½â€ seam all around.

*Again, the above dimensions will be modified to fit your table *

2. Using a rotary cutter or scissor, cut (2) 7” x 15” pieces from your accent fabric.

3. Taking your accent fabric, turn under and iron ½â€ on the two long sides.

4. Position the accent fabric on the “right” side of your drop cloth panel and pin 2-1/2” from the edge.

5. Using your contrasting thread, top stitch the panel onto the drop cloth.

6. Repeat steps  3-5 on the opposite end of the same drop cloth panel.

7. Taking both drop cloth panels, pin the two “right” sides together.  Sew all the way around, except leave an opening of 10-12” on ONE of the shorter ends.

8. Trim the corners.

9. Using the hole you left, pull the right side through. Then iron it flat.

10. Iron the opening as well, so it lays flat.

11. Using your contrasting thread and ½â€ seam, top stitch around the entire edge (this will close the opening). Iron again.

And it’s COMPLETE!

You now have a beautiful table runner that is the PERFECT shape and size!

Like the vases and flowers on the table?  Here are the details!

Drop Cloth is very durable and REALLY affordable, but any fabric can be used for this stylish table runner project.  If you choose a fabric that is lighter weight, you will want to add an inner lining for more support.

Have you ever made anything using drop cloth?  It really is my new favorite material!

You’ll find this  tutorial at Stories of A to Z-Tutorials & Tips Tuesday