
Tag: girl nursery

DIY: Homemade Circle Crib Mobile

No baby yet.  Still waiting… In the meantime though, thank you all for the kind thoughts on the Nursery Nook that I created for our new soon-to-arrive (any minute) bundle!

For the new ‘nook’ I created this adorable easy-to-make and completely homemade crib mobile too…  As promised, I’m happy to show you all the steps.

DIY: Homemade / Handmade Circle Crib Mobile: a beautiful & inexpensive way to crib a focal point for your baby! Check out this easy-to-follow tutorial

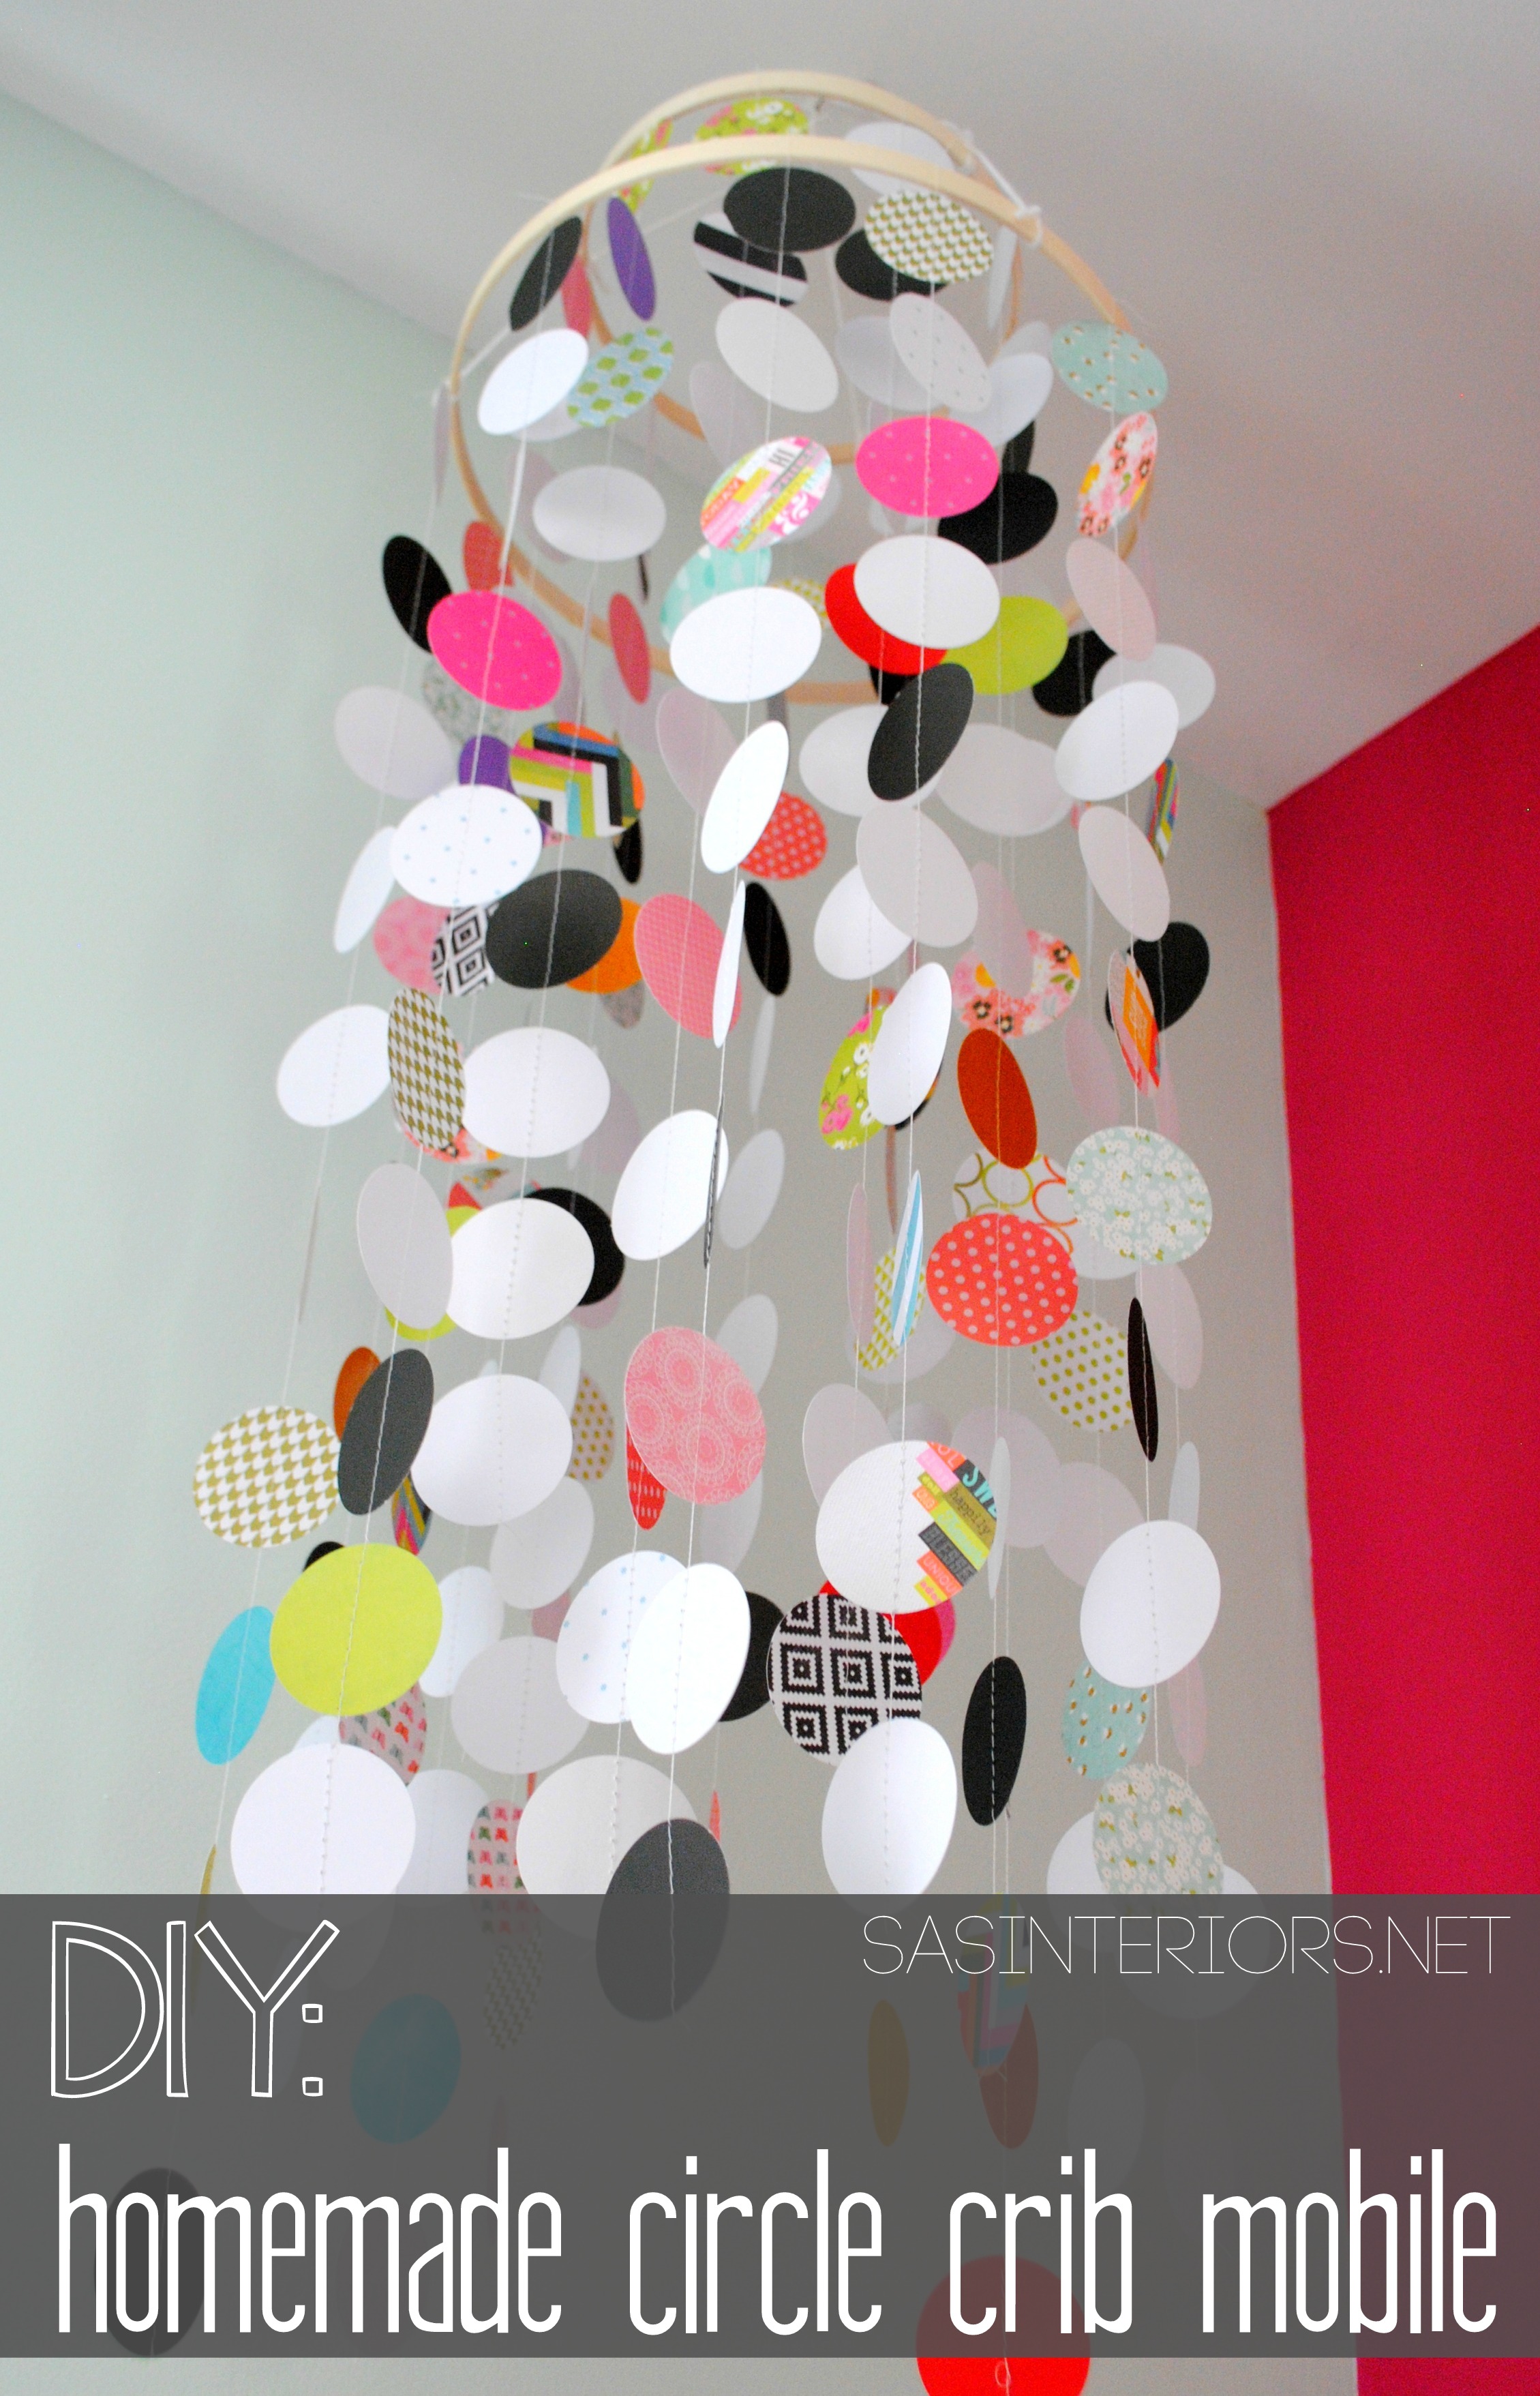
This type of circle crib mobile is nothing new.  I’m sure you’ve seen it before in stores and/or created by others (I’ve seen a few here & there and of course on pinterest), but I’ve always adored the look and how much color + height it brings to a room.  Plus most importantly of all, how much it can grab a baby’s attention!  Copy cat, who cares…  I love it, so I made it.

Looking back I often laugh, because for baby #1 (my son) I chose and purchased some of the most neutral pieces.  The crib mobile, specifically, was whites + creams and those are colors newborns don’t see.  Color is what they need.  For baby 3, making her way soon, this mobile will be very entertaining.

DIY: Homemade / Handmade Circle Crib Mobile: a beautiful & inexpensive way to crib a focal point for your baby! Check out this easy-to-follow tutorial

Crib mobiles can often be very costly as well.  Not this handmade creation!  It was super inexpensive and most of the materials I already had on hand.

The supplies I gathered were:
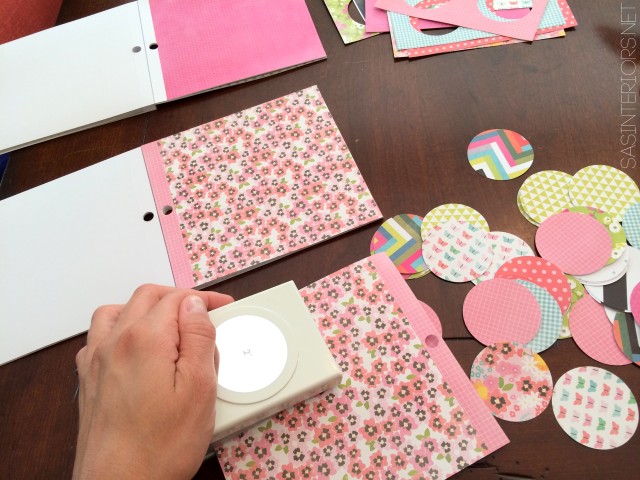
  • Scrapbooking paper
    • At AC Moore I found a 4″ x 4″ book of colorful modern patterned papers.  They were on sale for $5 a book and I snagged 2.
  • Circle Puncher
    • I used a 2″ round circle cutter
  • Wood quilt hoop in 2 sizes
    • I used an 8″ and 12″ diameter hoop
  • Yarn, ribbon, or string (to hang hops from ceiling)
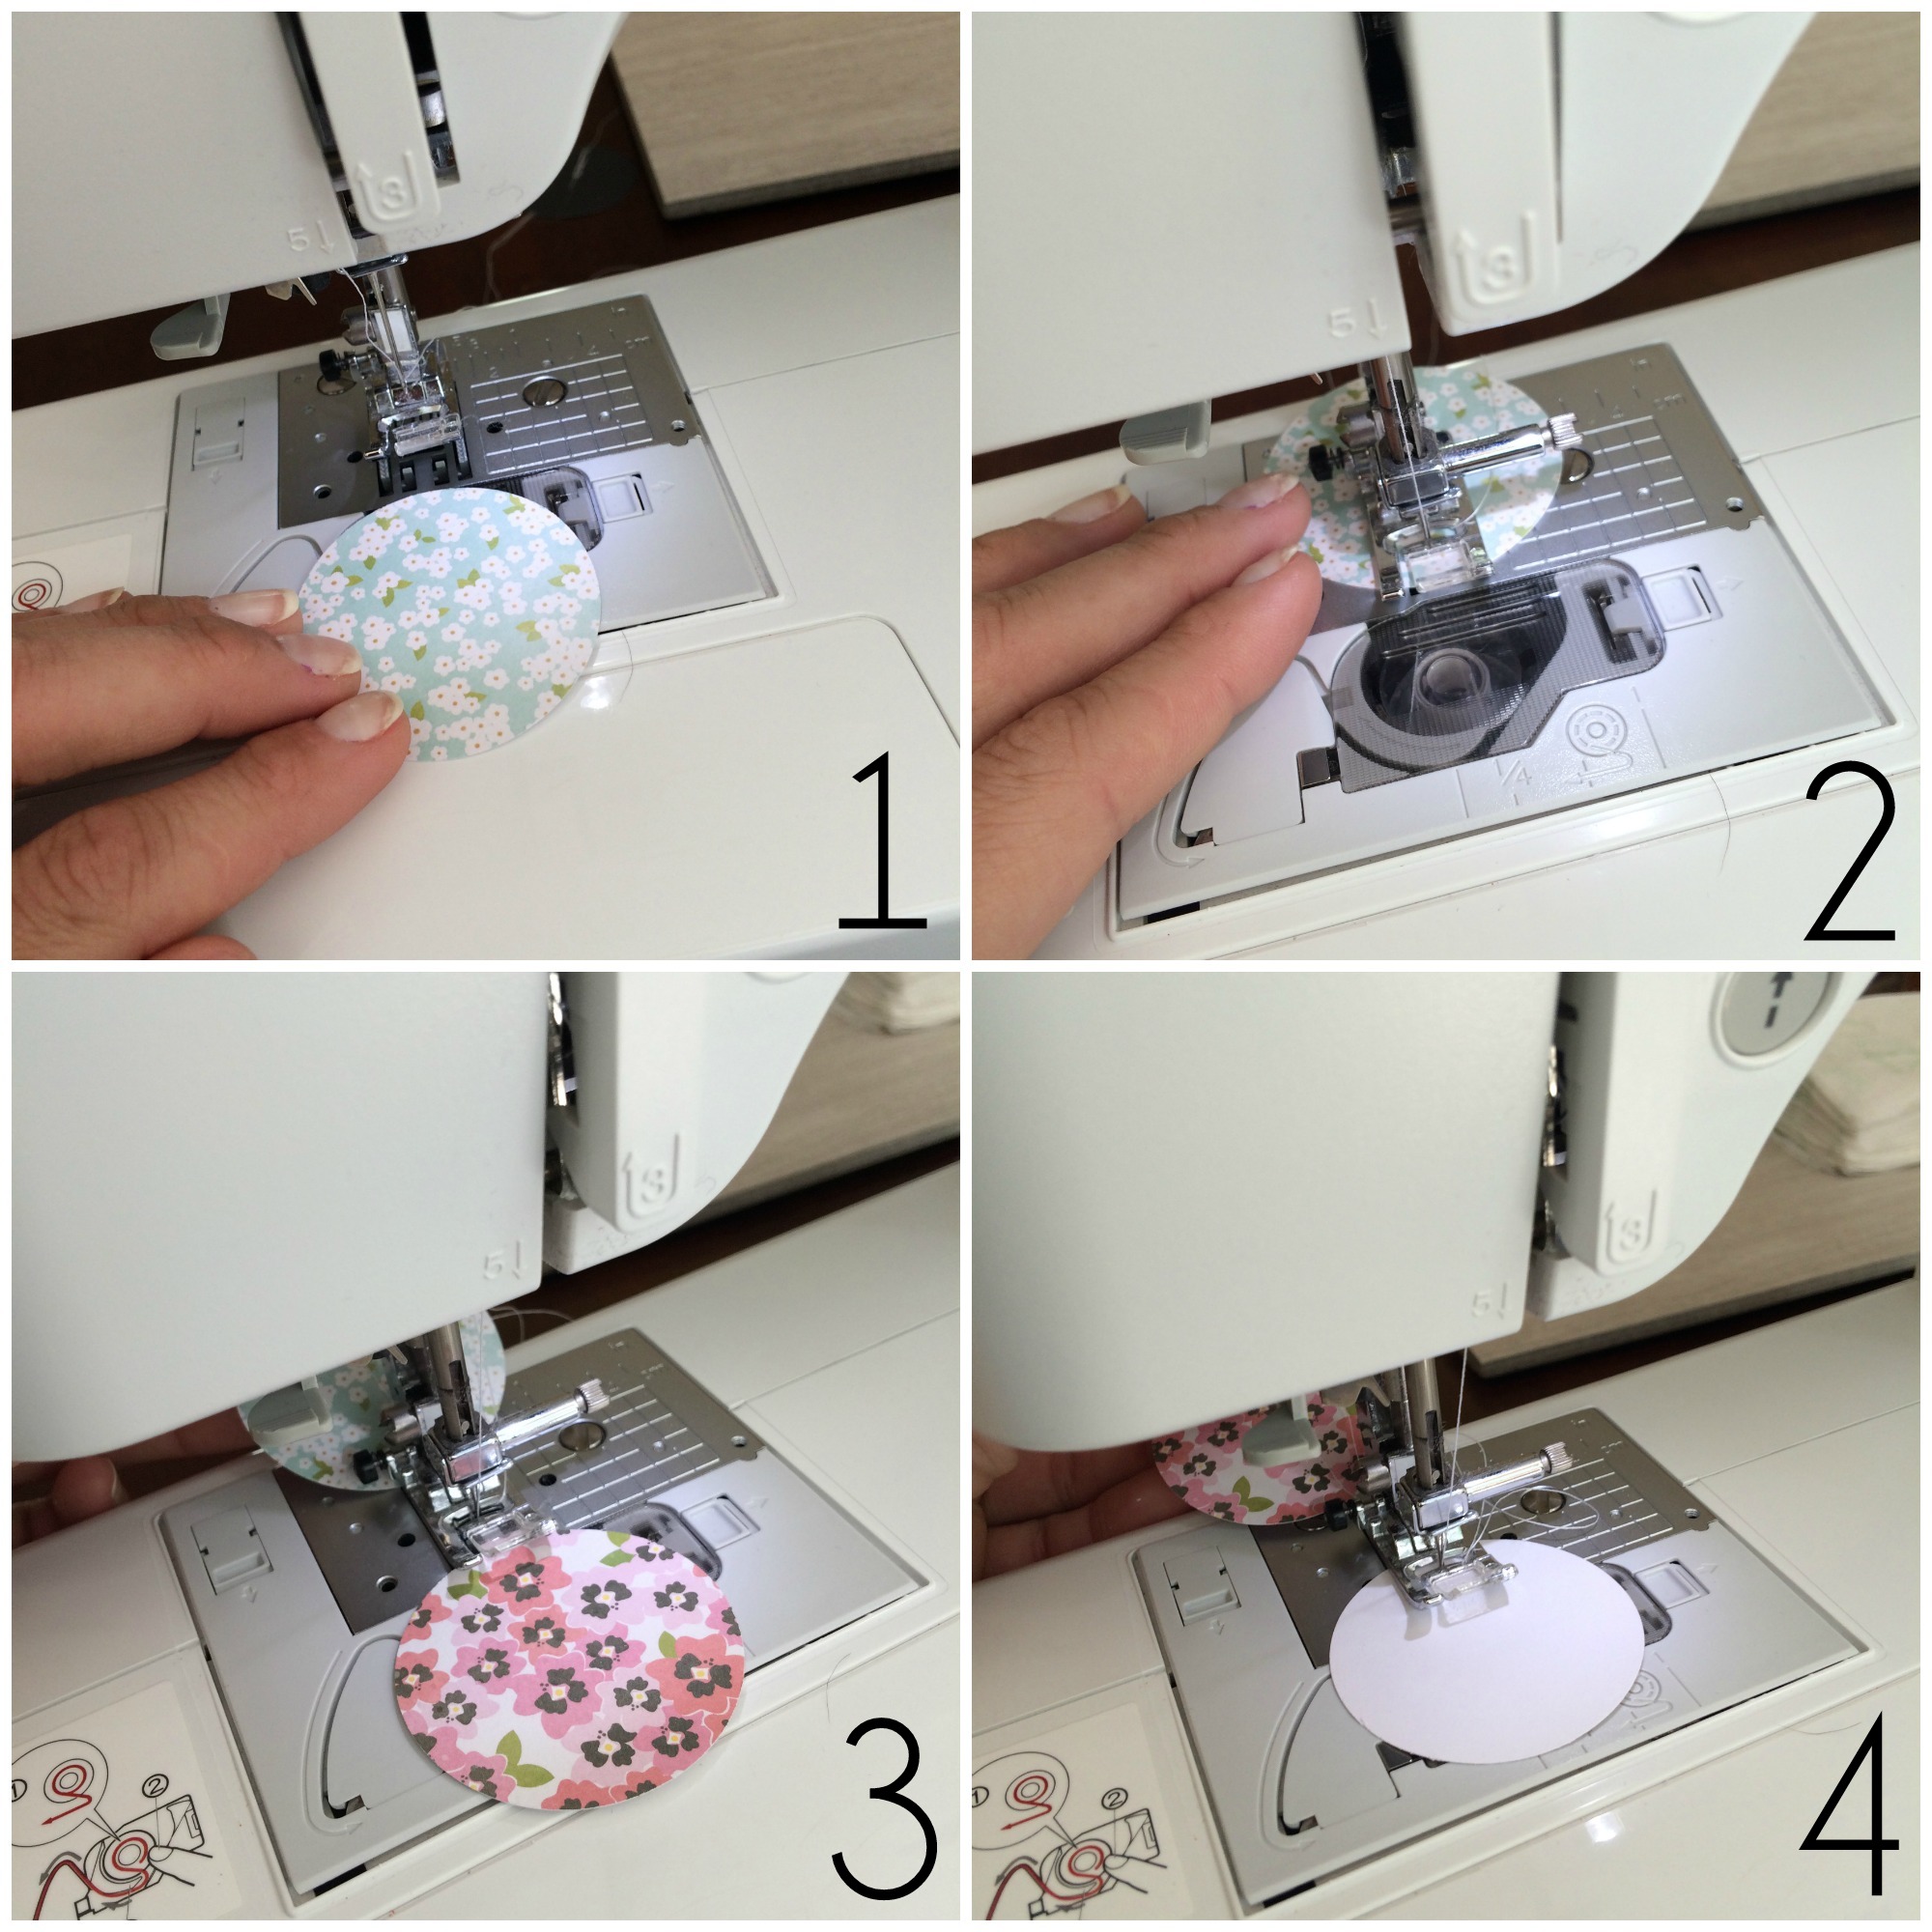
  • Sewing Machine + sewing essentials

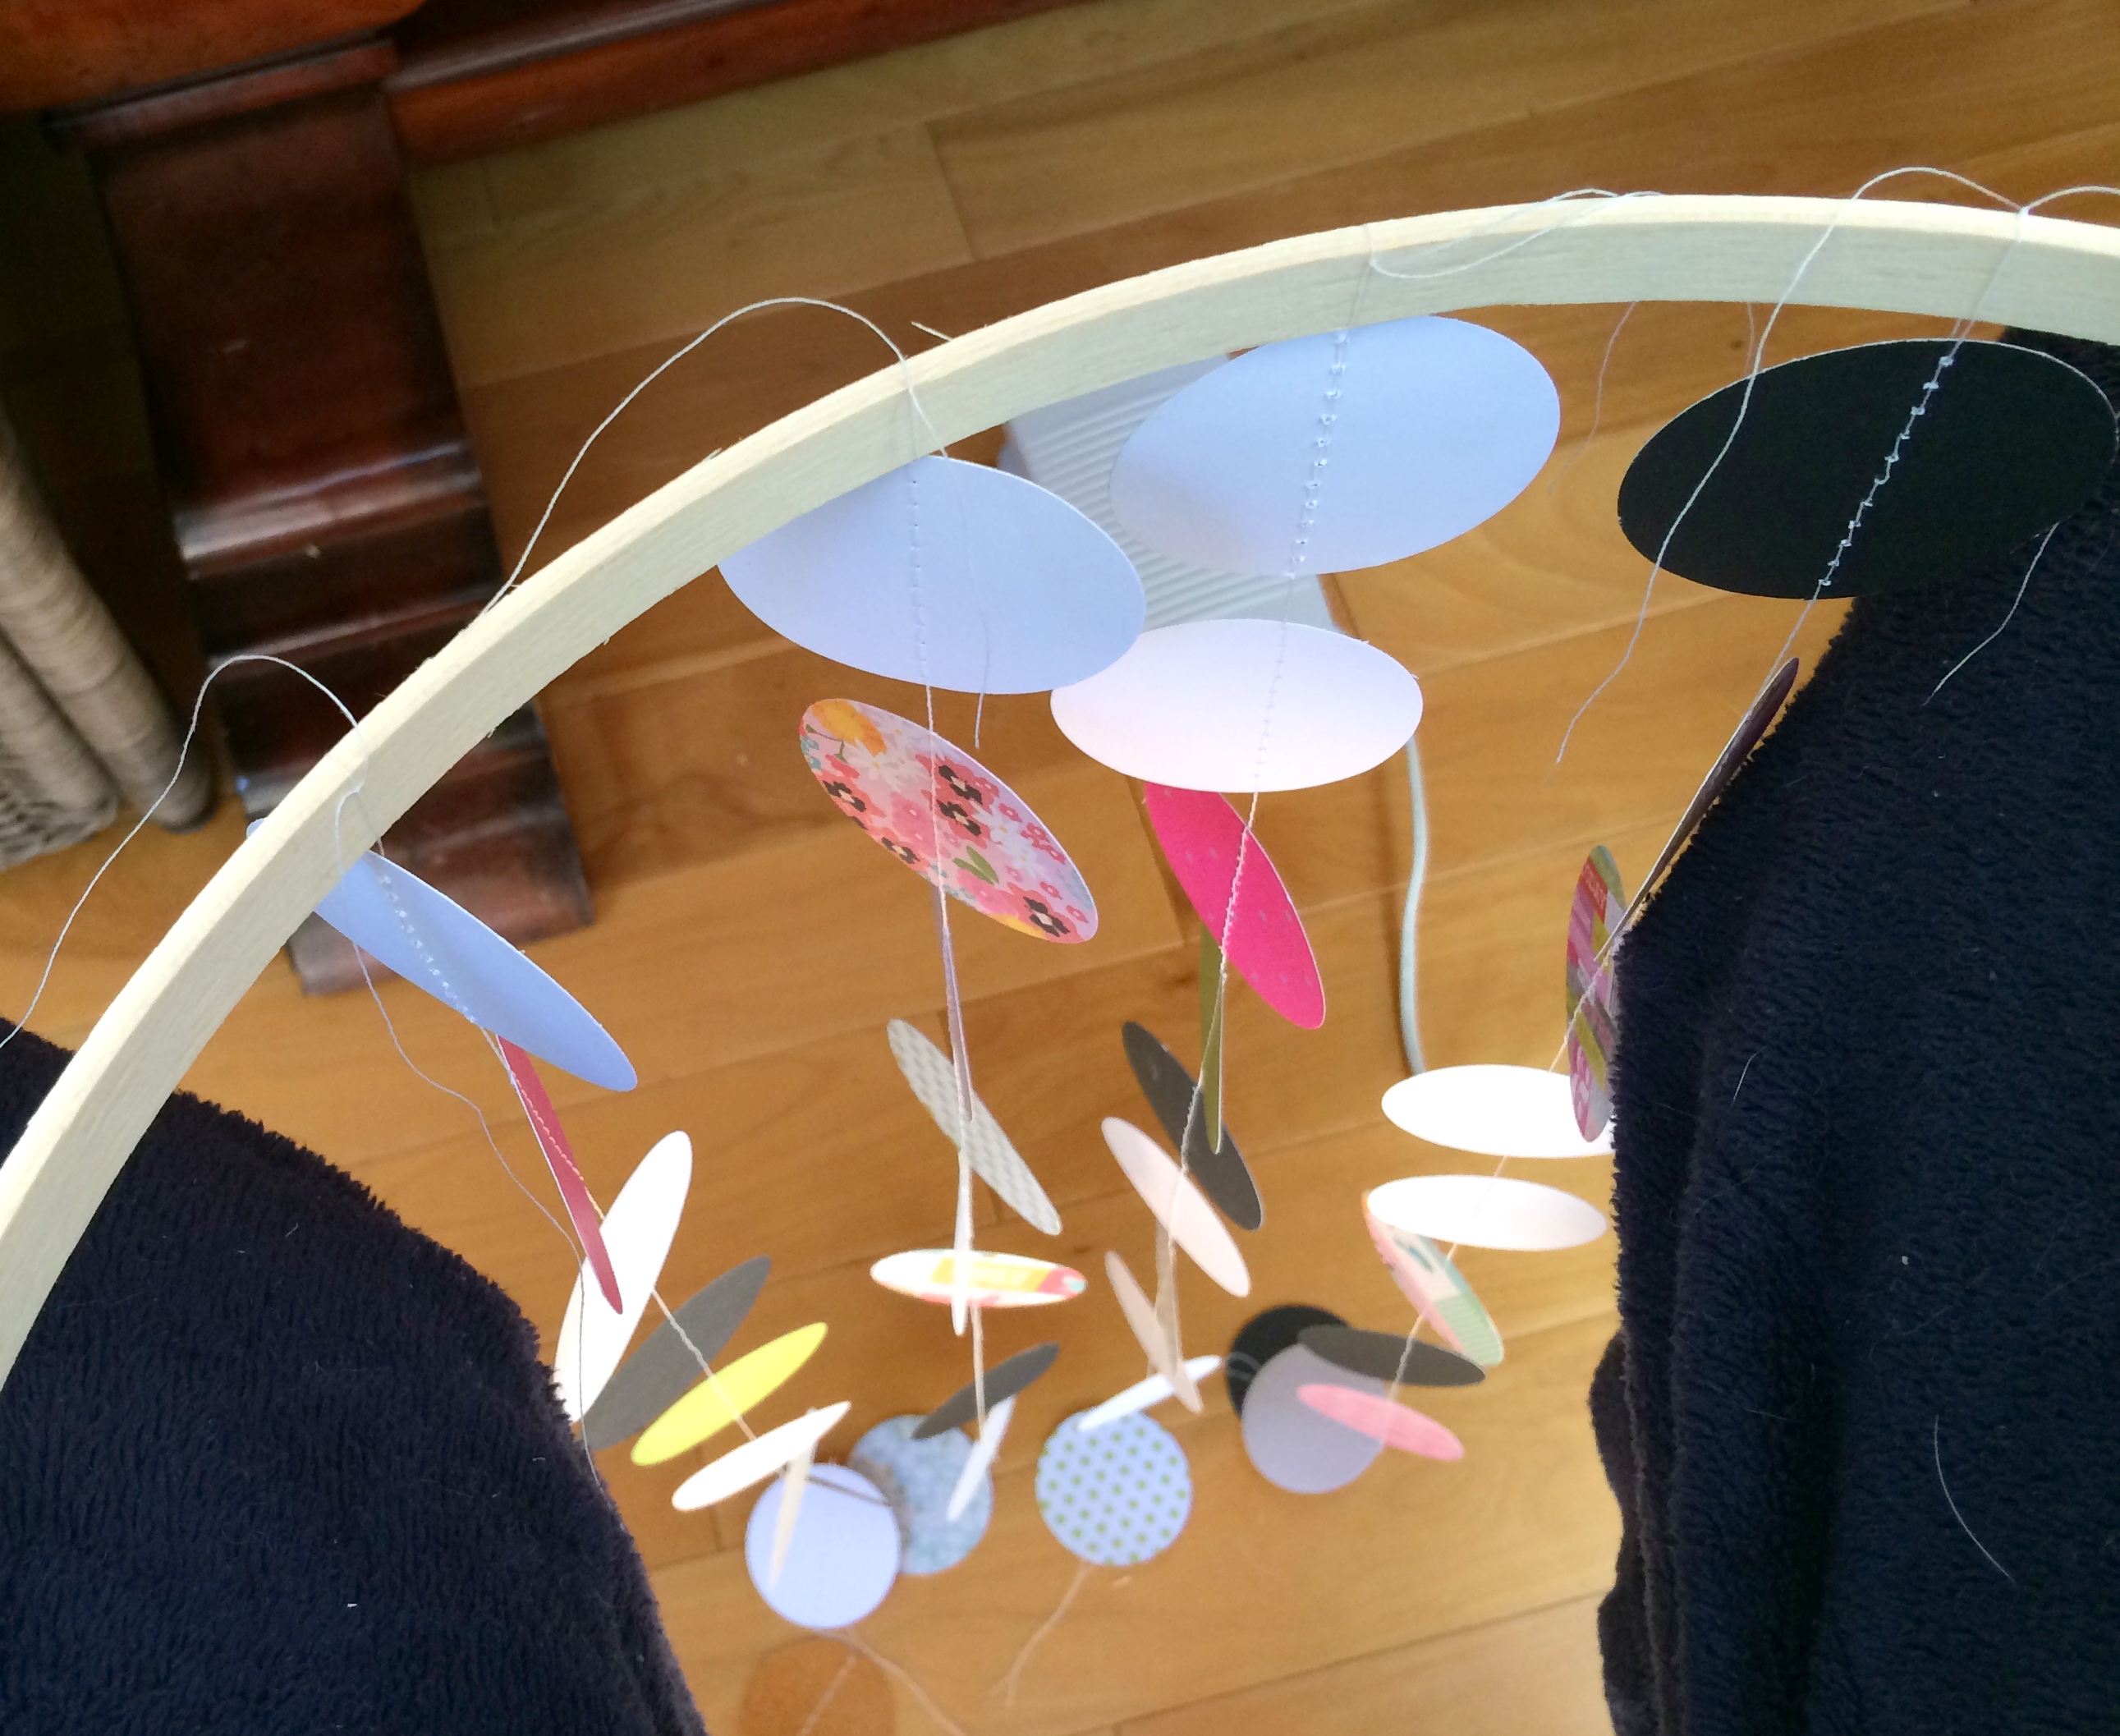
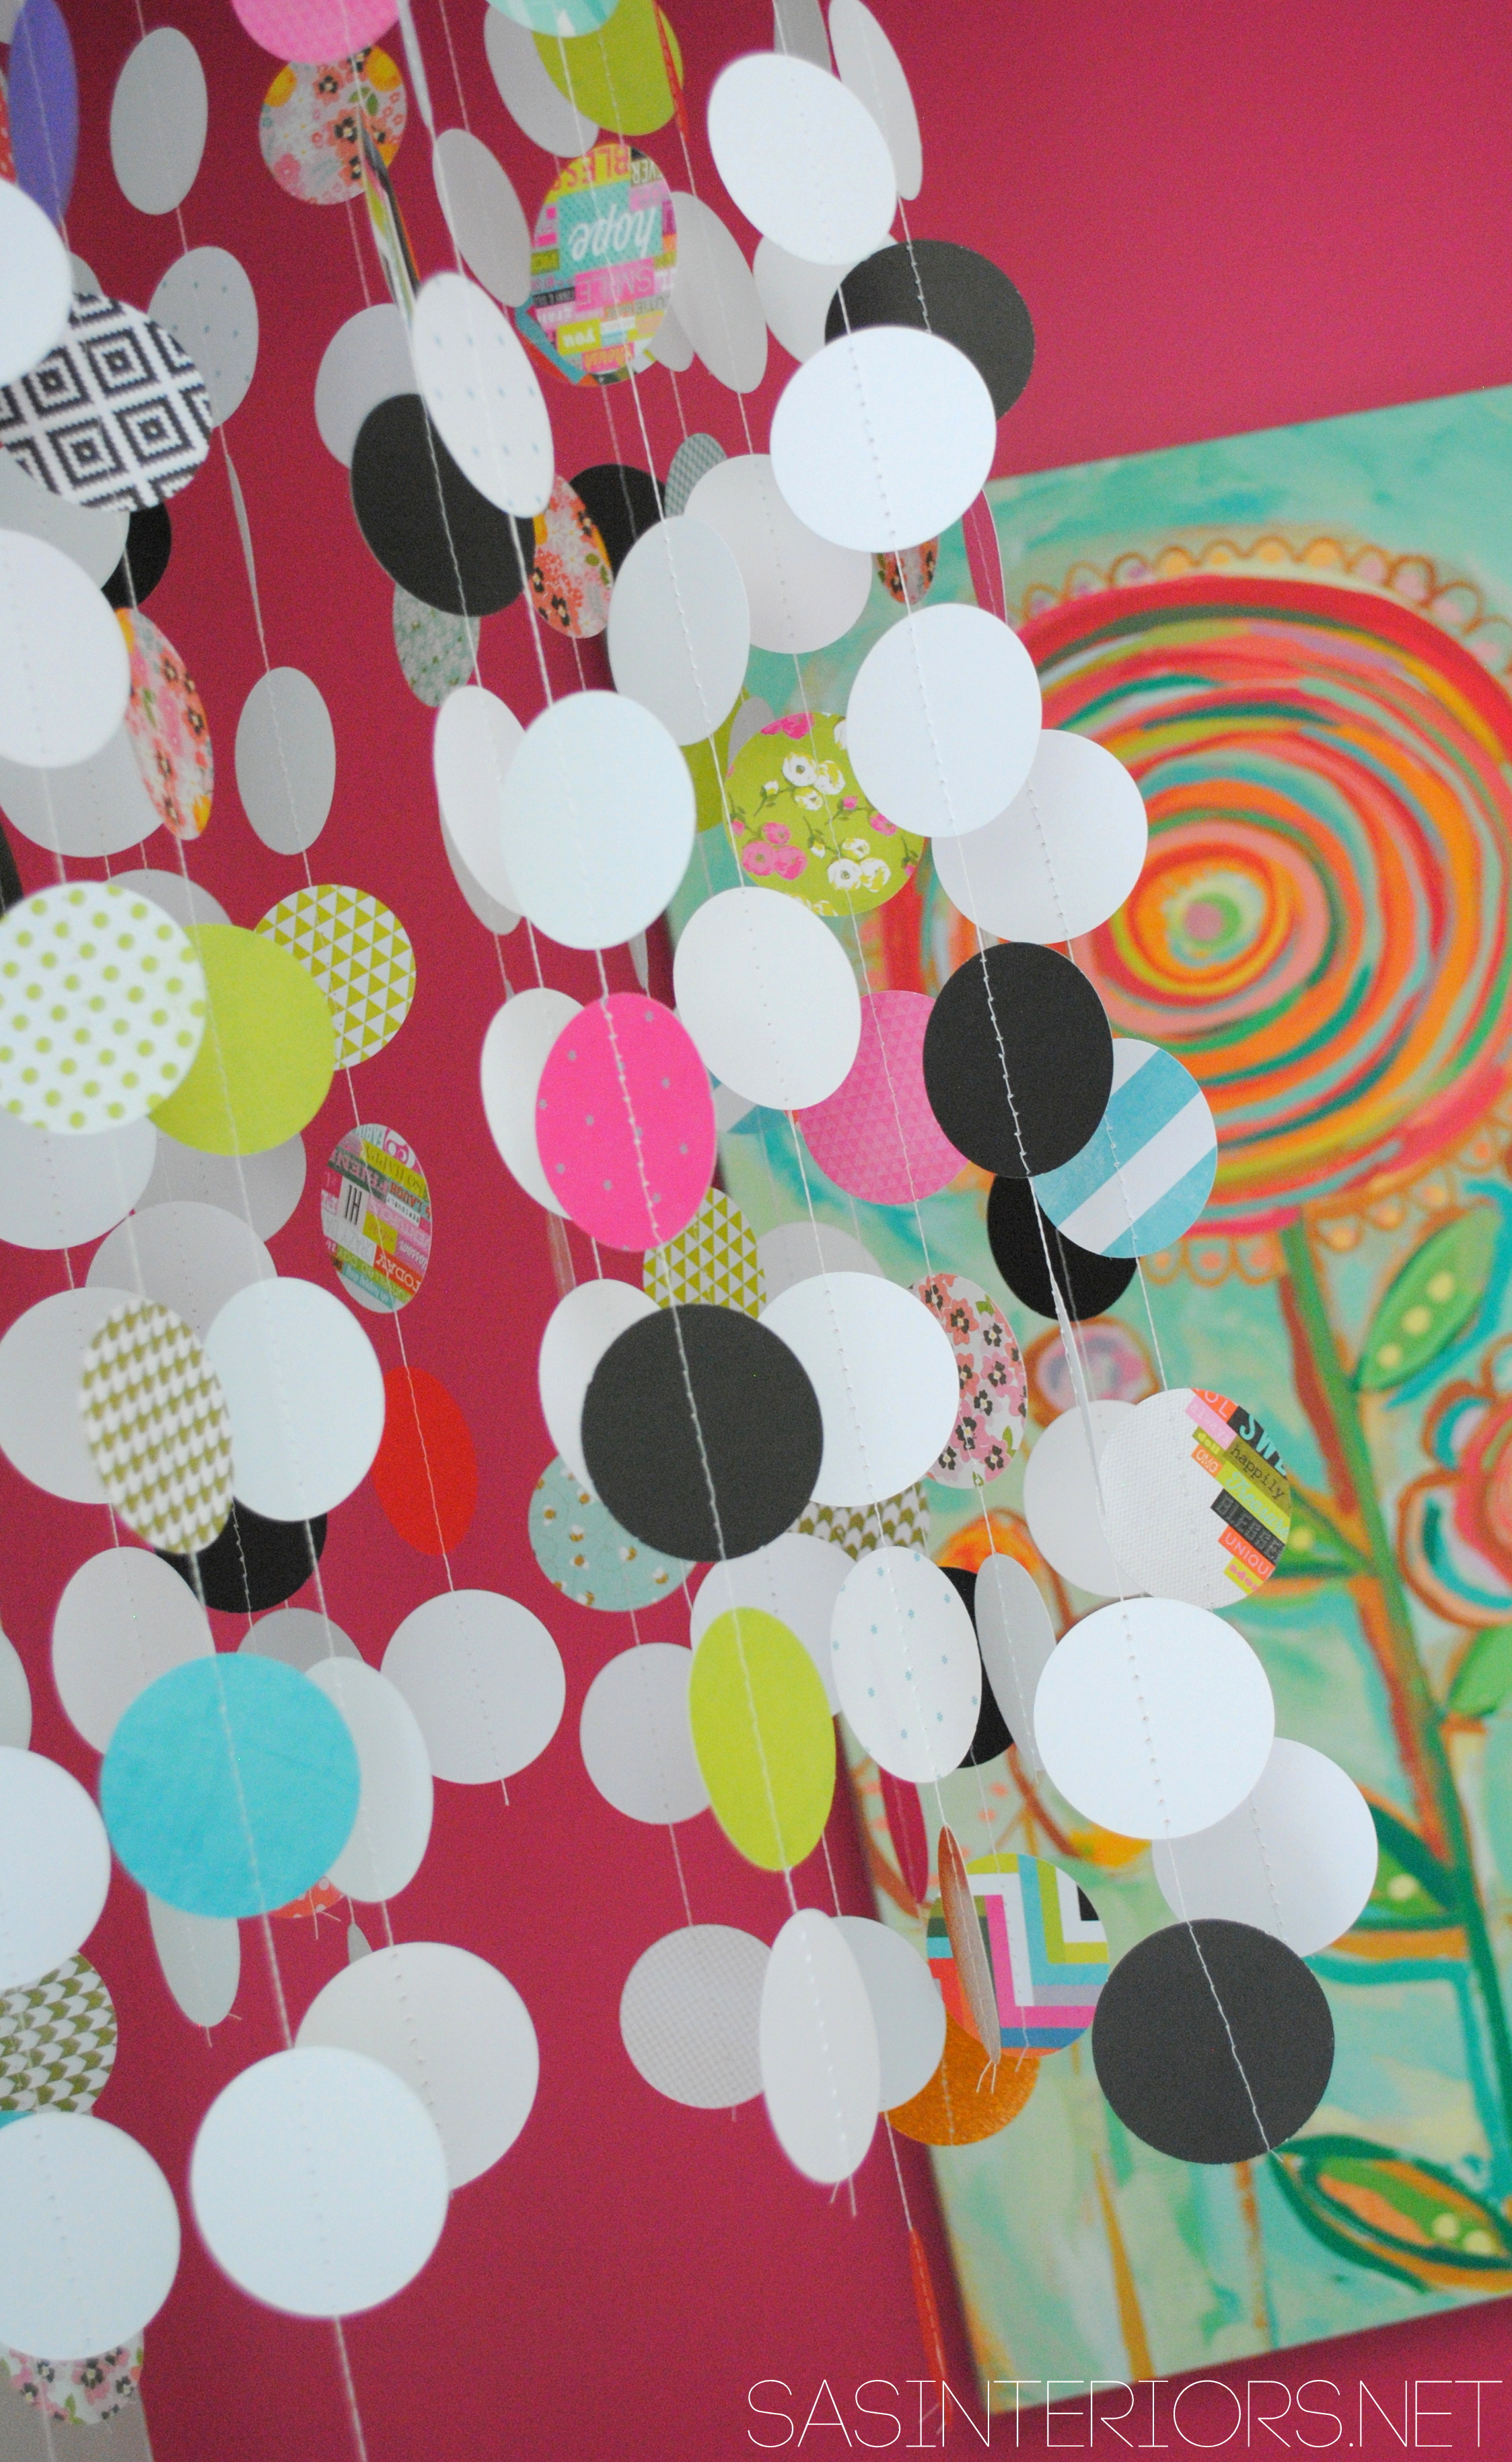
1. I started off by using the circle puncher and cut about 200 circles (it sounds like a lot, but it really doesn’t take long.  It’s a good time to catch up on your DVRed shows).

DIY: Homemade / Handmade Circle Crib Mobile: a beautiful & inexpensive way to crib a focal point for your baby! Check out this easy-to-follow tutorial

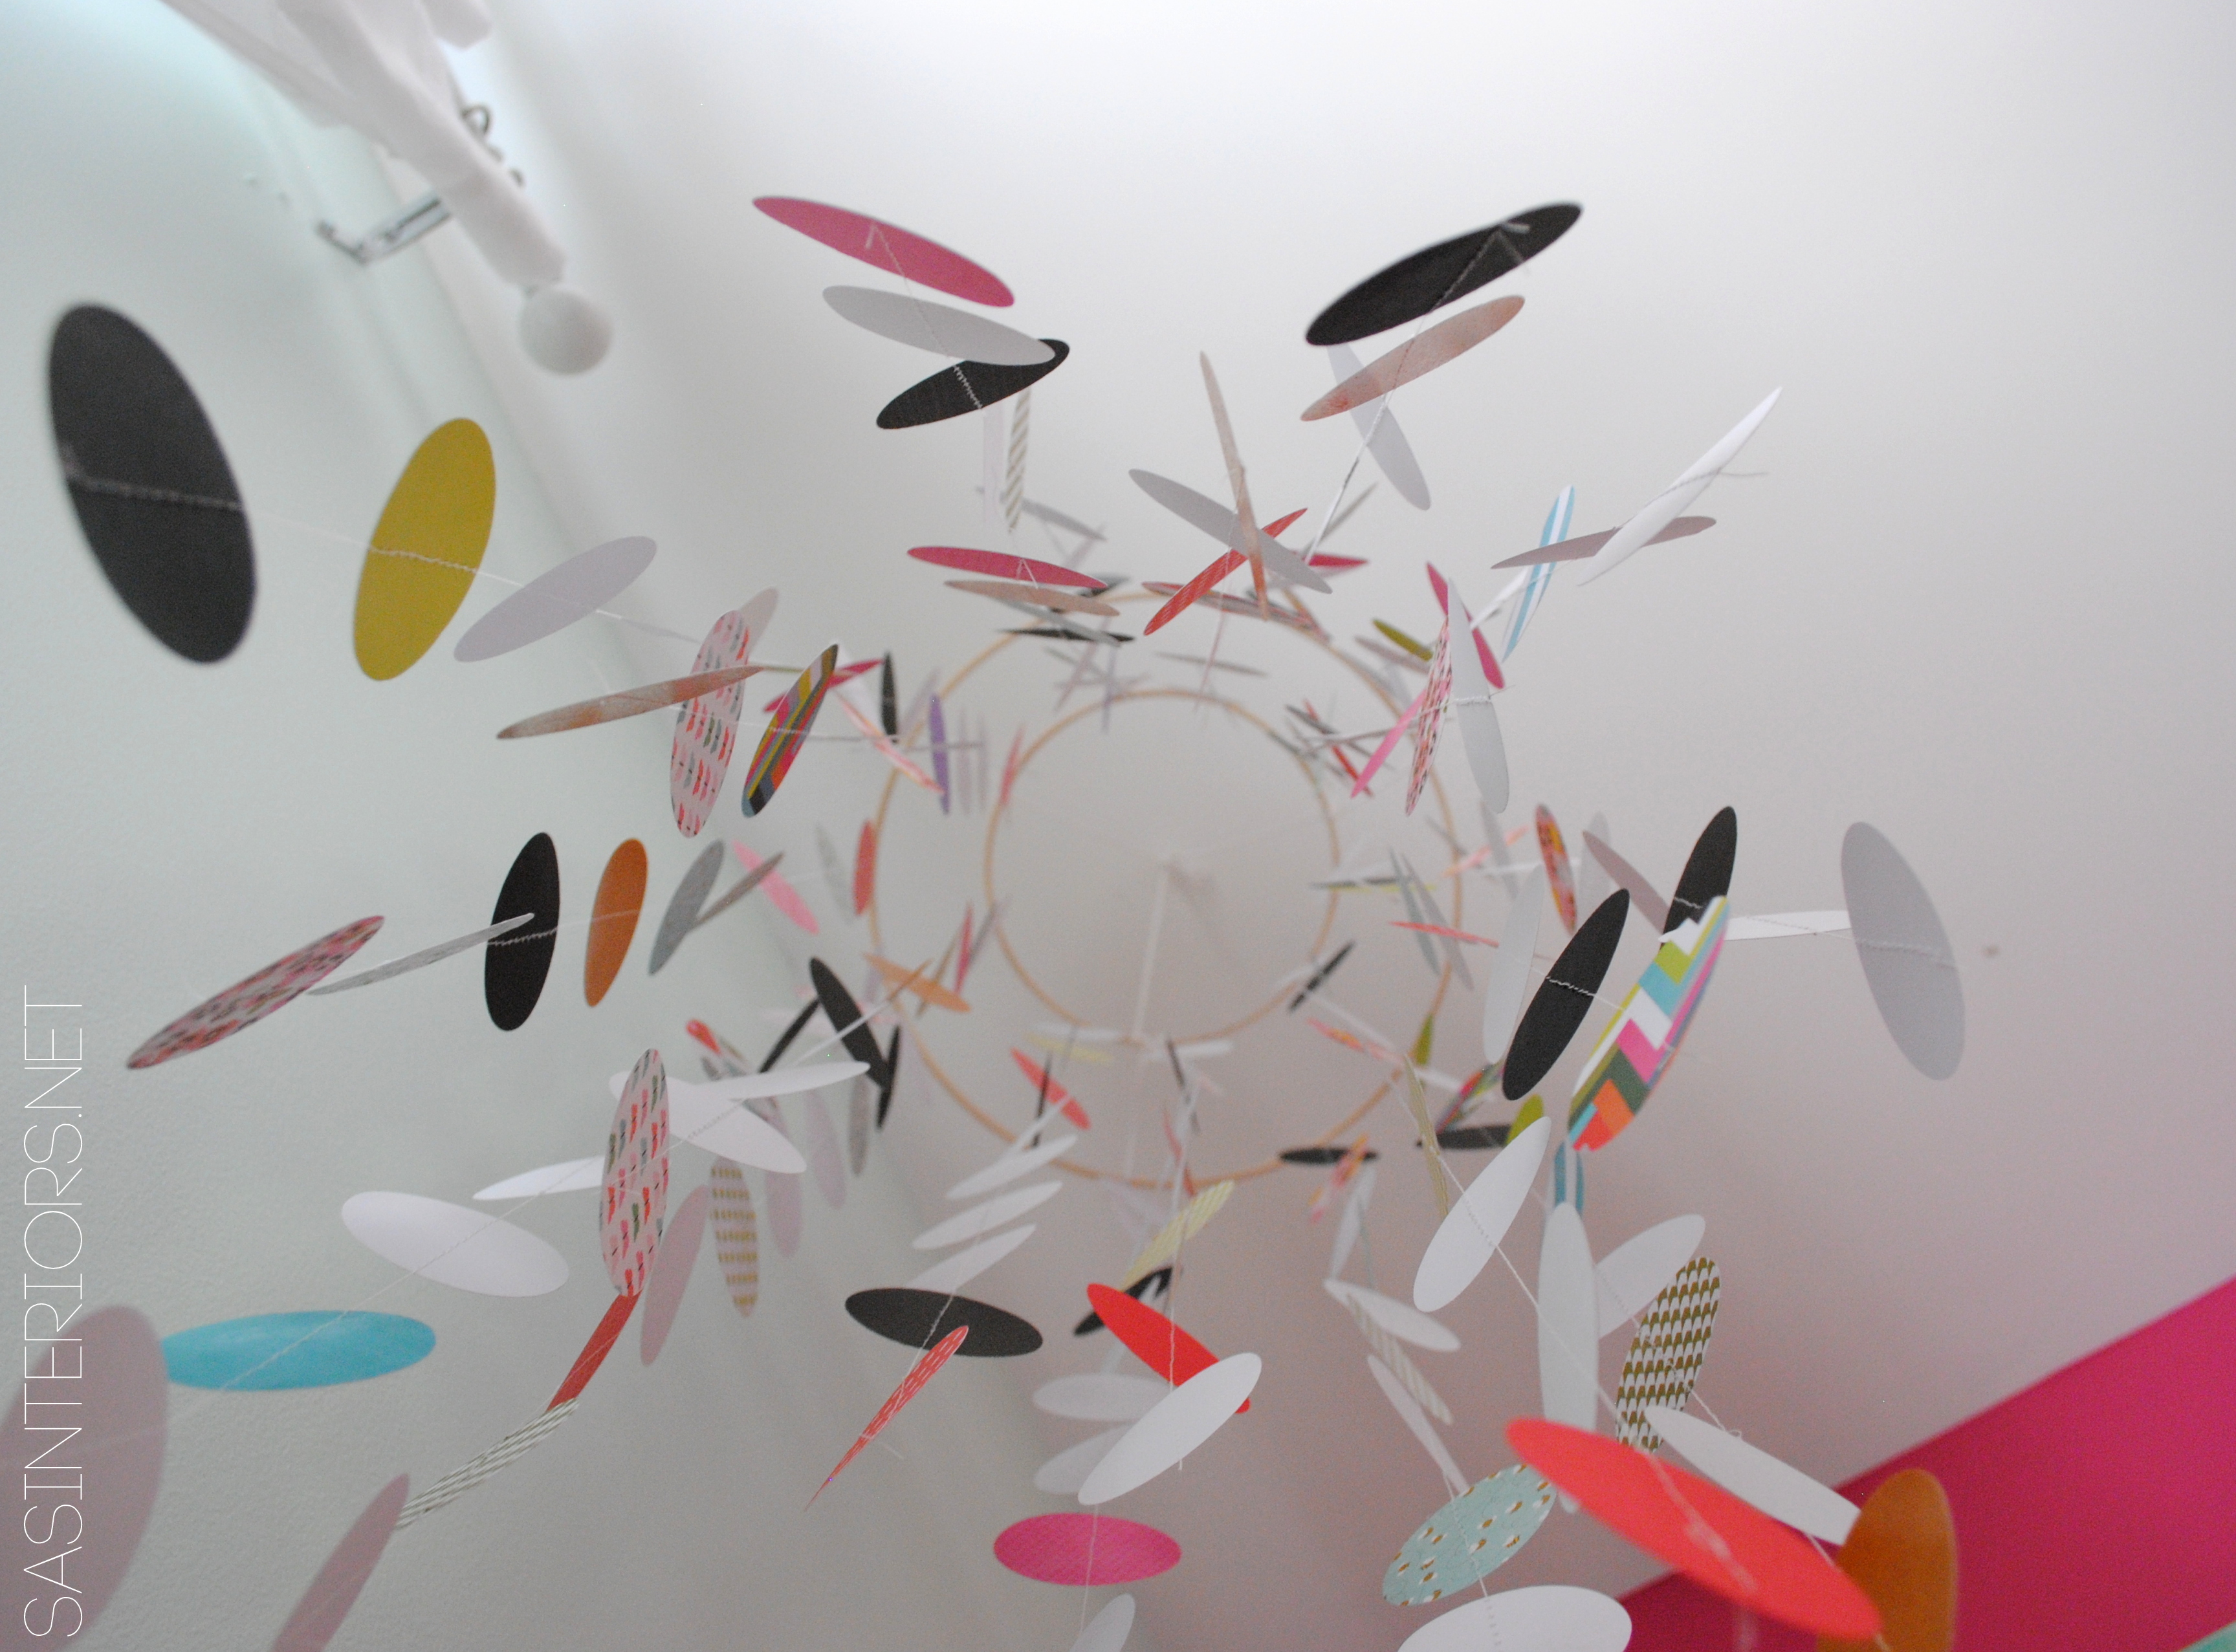
2. Once the punching out of the circles was done, it was time to attach the circles to each other…  I had never sewn paper before, so I thought it was going to be difficult.  I was wrong.  It was really easy.  Basically I sewed through one circle, continued with a few more stitches and then added another circle.  Because the design was only on one side (other side is white), I would alternate every 2 or 3 circles with the plain white side.  In the end, the circles are always moving (dancing as my daughter calls it), but I didn’t want it to be noticeable that one side had all pattern and the other side was all white.

DIY: Homemade / Handmade Circle Crib Mobile: a beautiful & inexpensive way to crib a focal point for your baby! Check out this easy-to-follow tutorial

For the small wood hoop, I made 10 strands of 11 connected circles and for the larger hoop (which is the lower tier), I made 12 strands of 9 connected circles to each other.  There really is no right or wrong way or specific height that is a must.  Each strand of circles resulted in slightly different lengths, but that’s what makes it interesting + homemade.  FYI:  The room has 8′ ceilings and the mobile resulted about 30″ high.

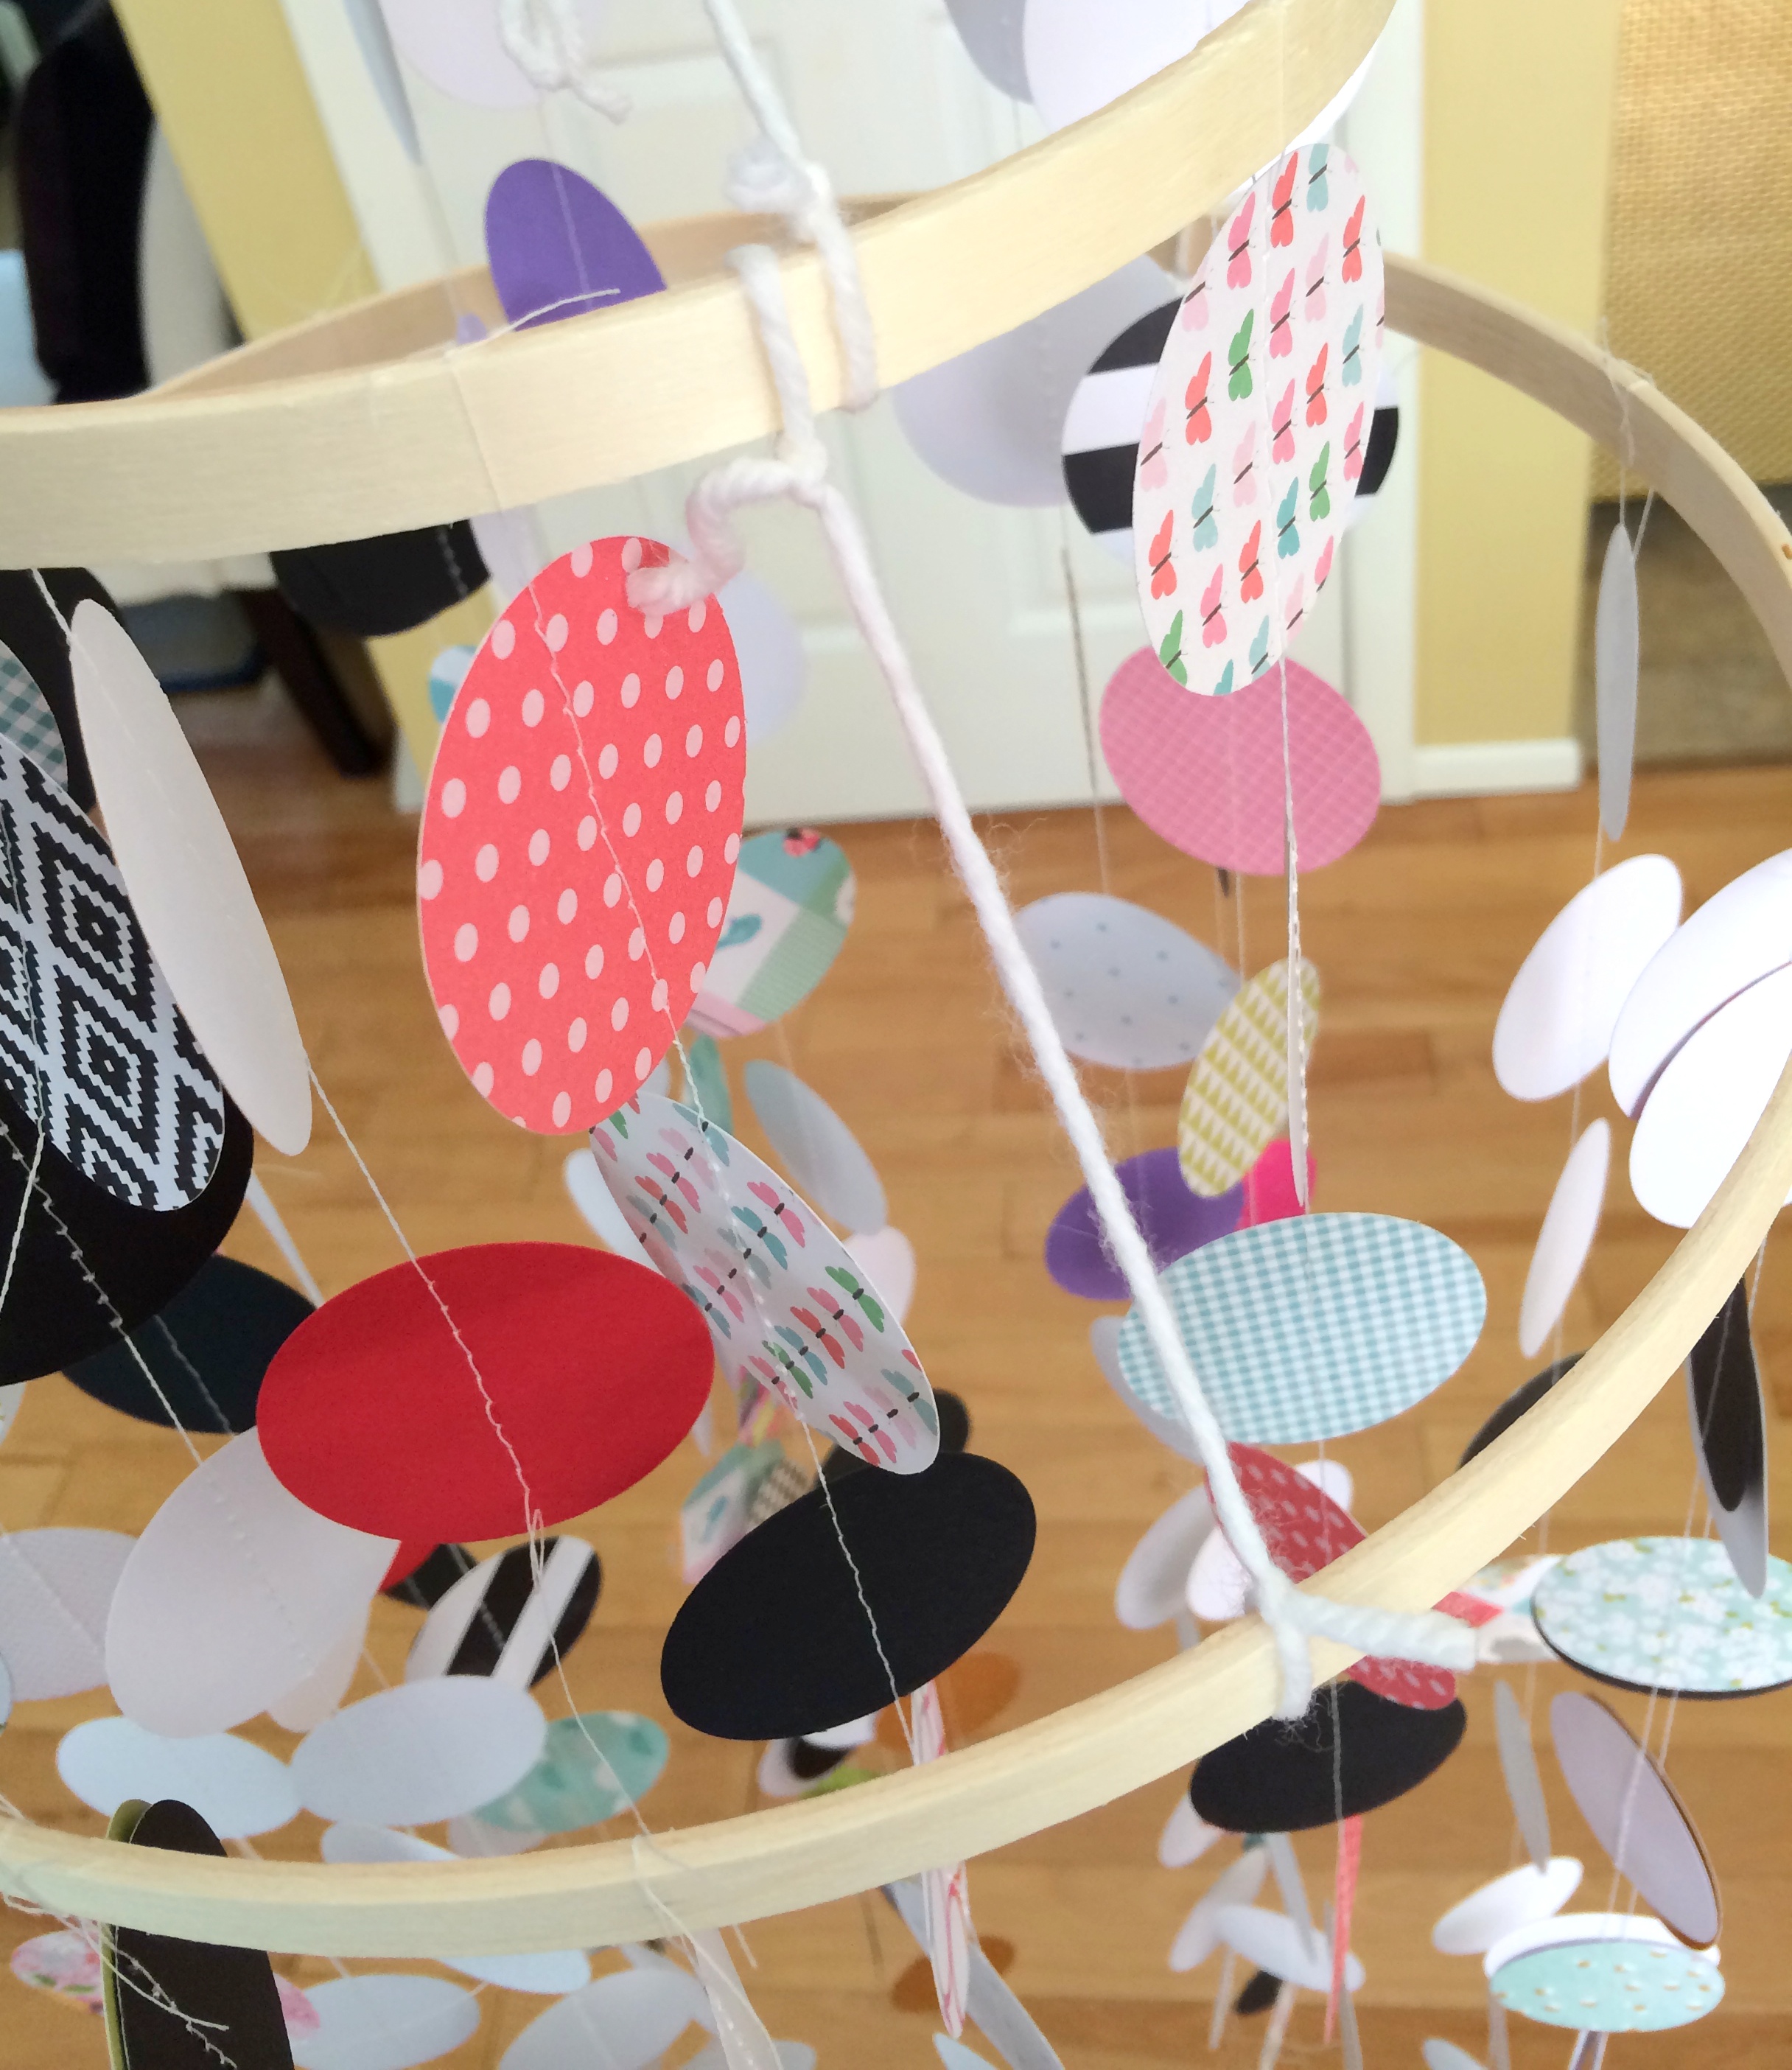
3. Once the circle strands were complete, I tied them on to the wood hoop.  It’s important to leave about 6″ of extra thread on one side so it can be attached to the hoop. Once tied, trim the thread.

DIY: Homemade / Handmade Circle Crib Mobile: a beautiful & inexpensive way to crib a focal point for your baby! Check out this easy-to-follow tutorial

4. Once the strands of connected circles are attached to the wood hoops, it was time to attached the wood hoops together.  An extra set of hands is best for this quick step, but it can be done on your own.  I used white yarn to connect the hoops and tried to keep the upper (small hoop) tier parallel to the bottom (larger hoop) tier.

DIY: Homemade / Handmade Circle Crib Mobile: a beautiful & inexpensive way to crib a focal point for your baby! Check out this easy-to-follow tutorial

The mobile is so light weight that I attached it to the ceiling with a small white hook.  Voila, it was complete…

DIY: Homemade / Handmade Circle Crib Mobile: a beautiful & inexpensive way to crib a focal point for your baby! Check out this easy-to-follow tutorial

I used white thread for the project and I love how you can see it on the darker colored circles.

DIY: Homemade / Handmade Circle Crib Mobile: a beautiful & inexpensive way to crib a focal point for your baby! Check out this easy-to-follow tutorial

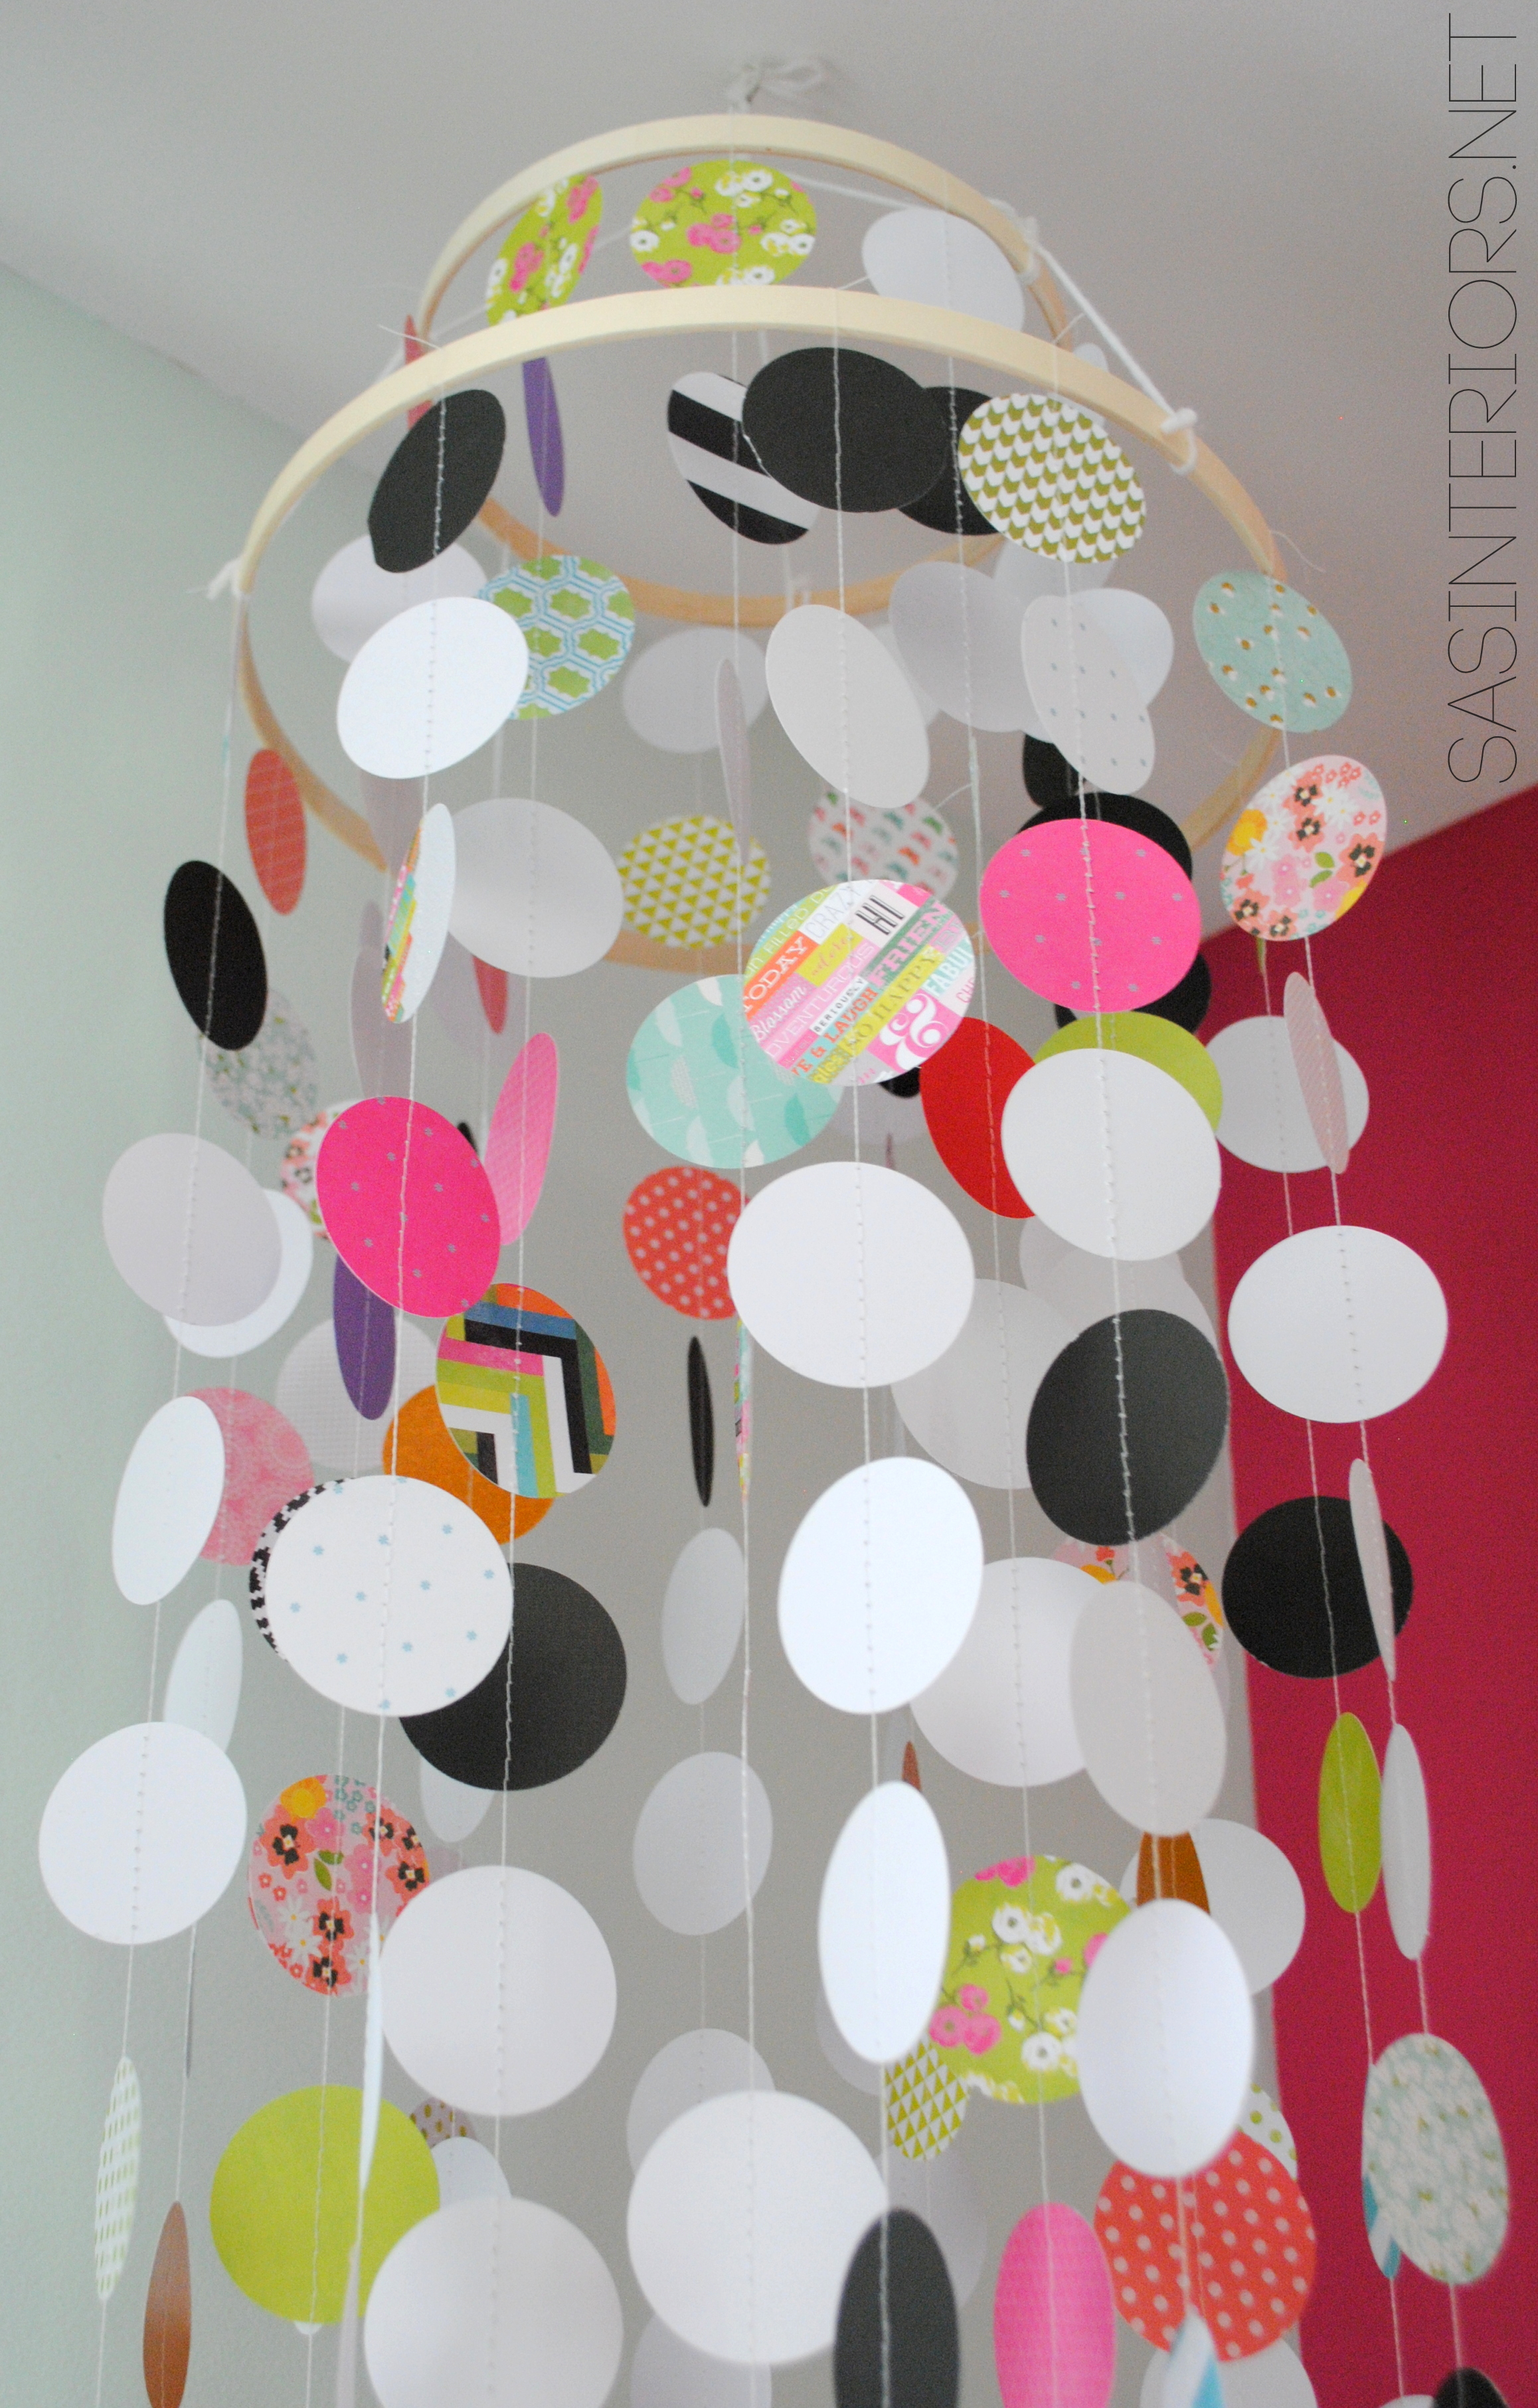
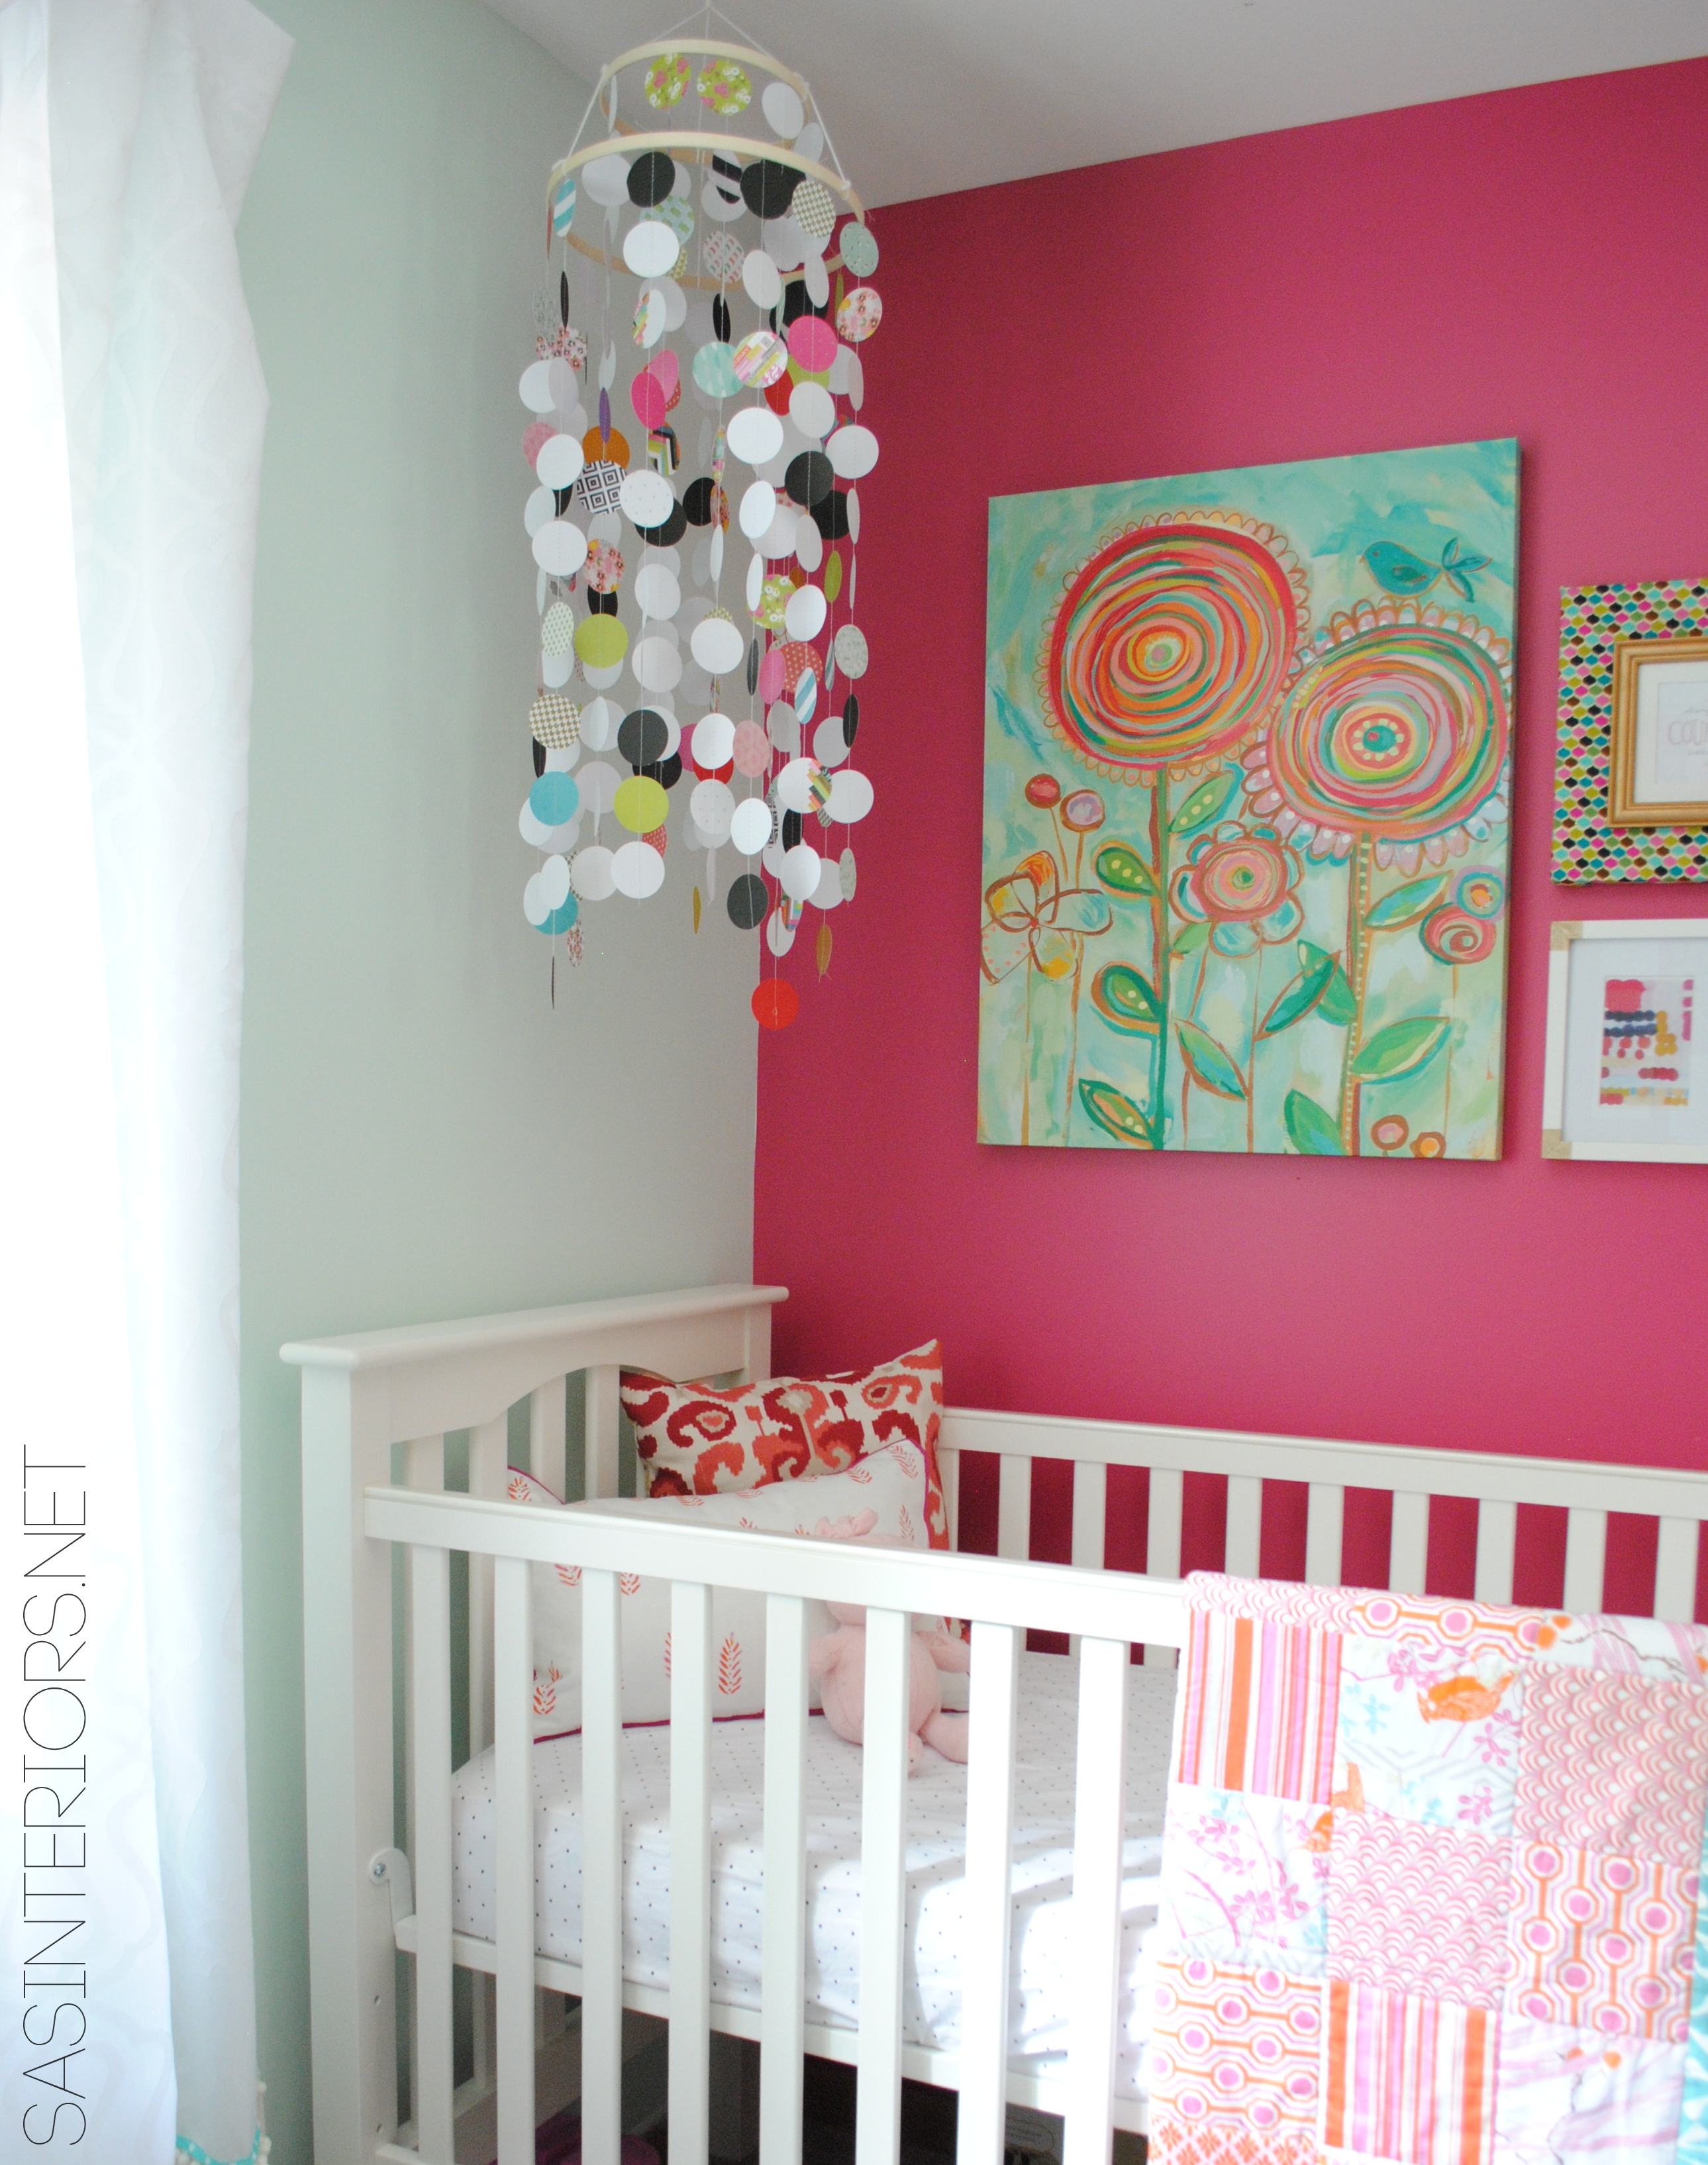
Here’s how the homemade circle crib mobile looks in the new Nursery Nook.

DIY: Homemade / Handmade Circle Crib Mobile: a beautiful & inexpensive way to crib a focal point for your baby! Check out this easy-to-follow tutorial

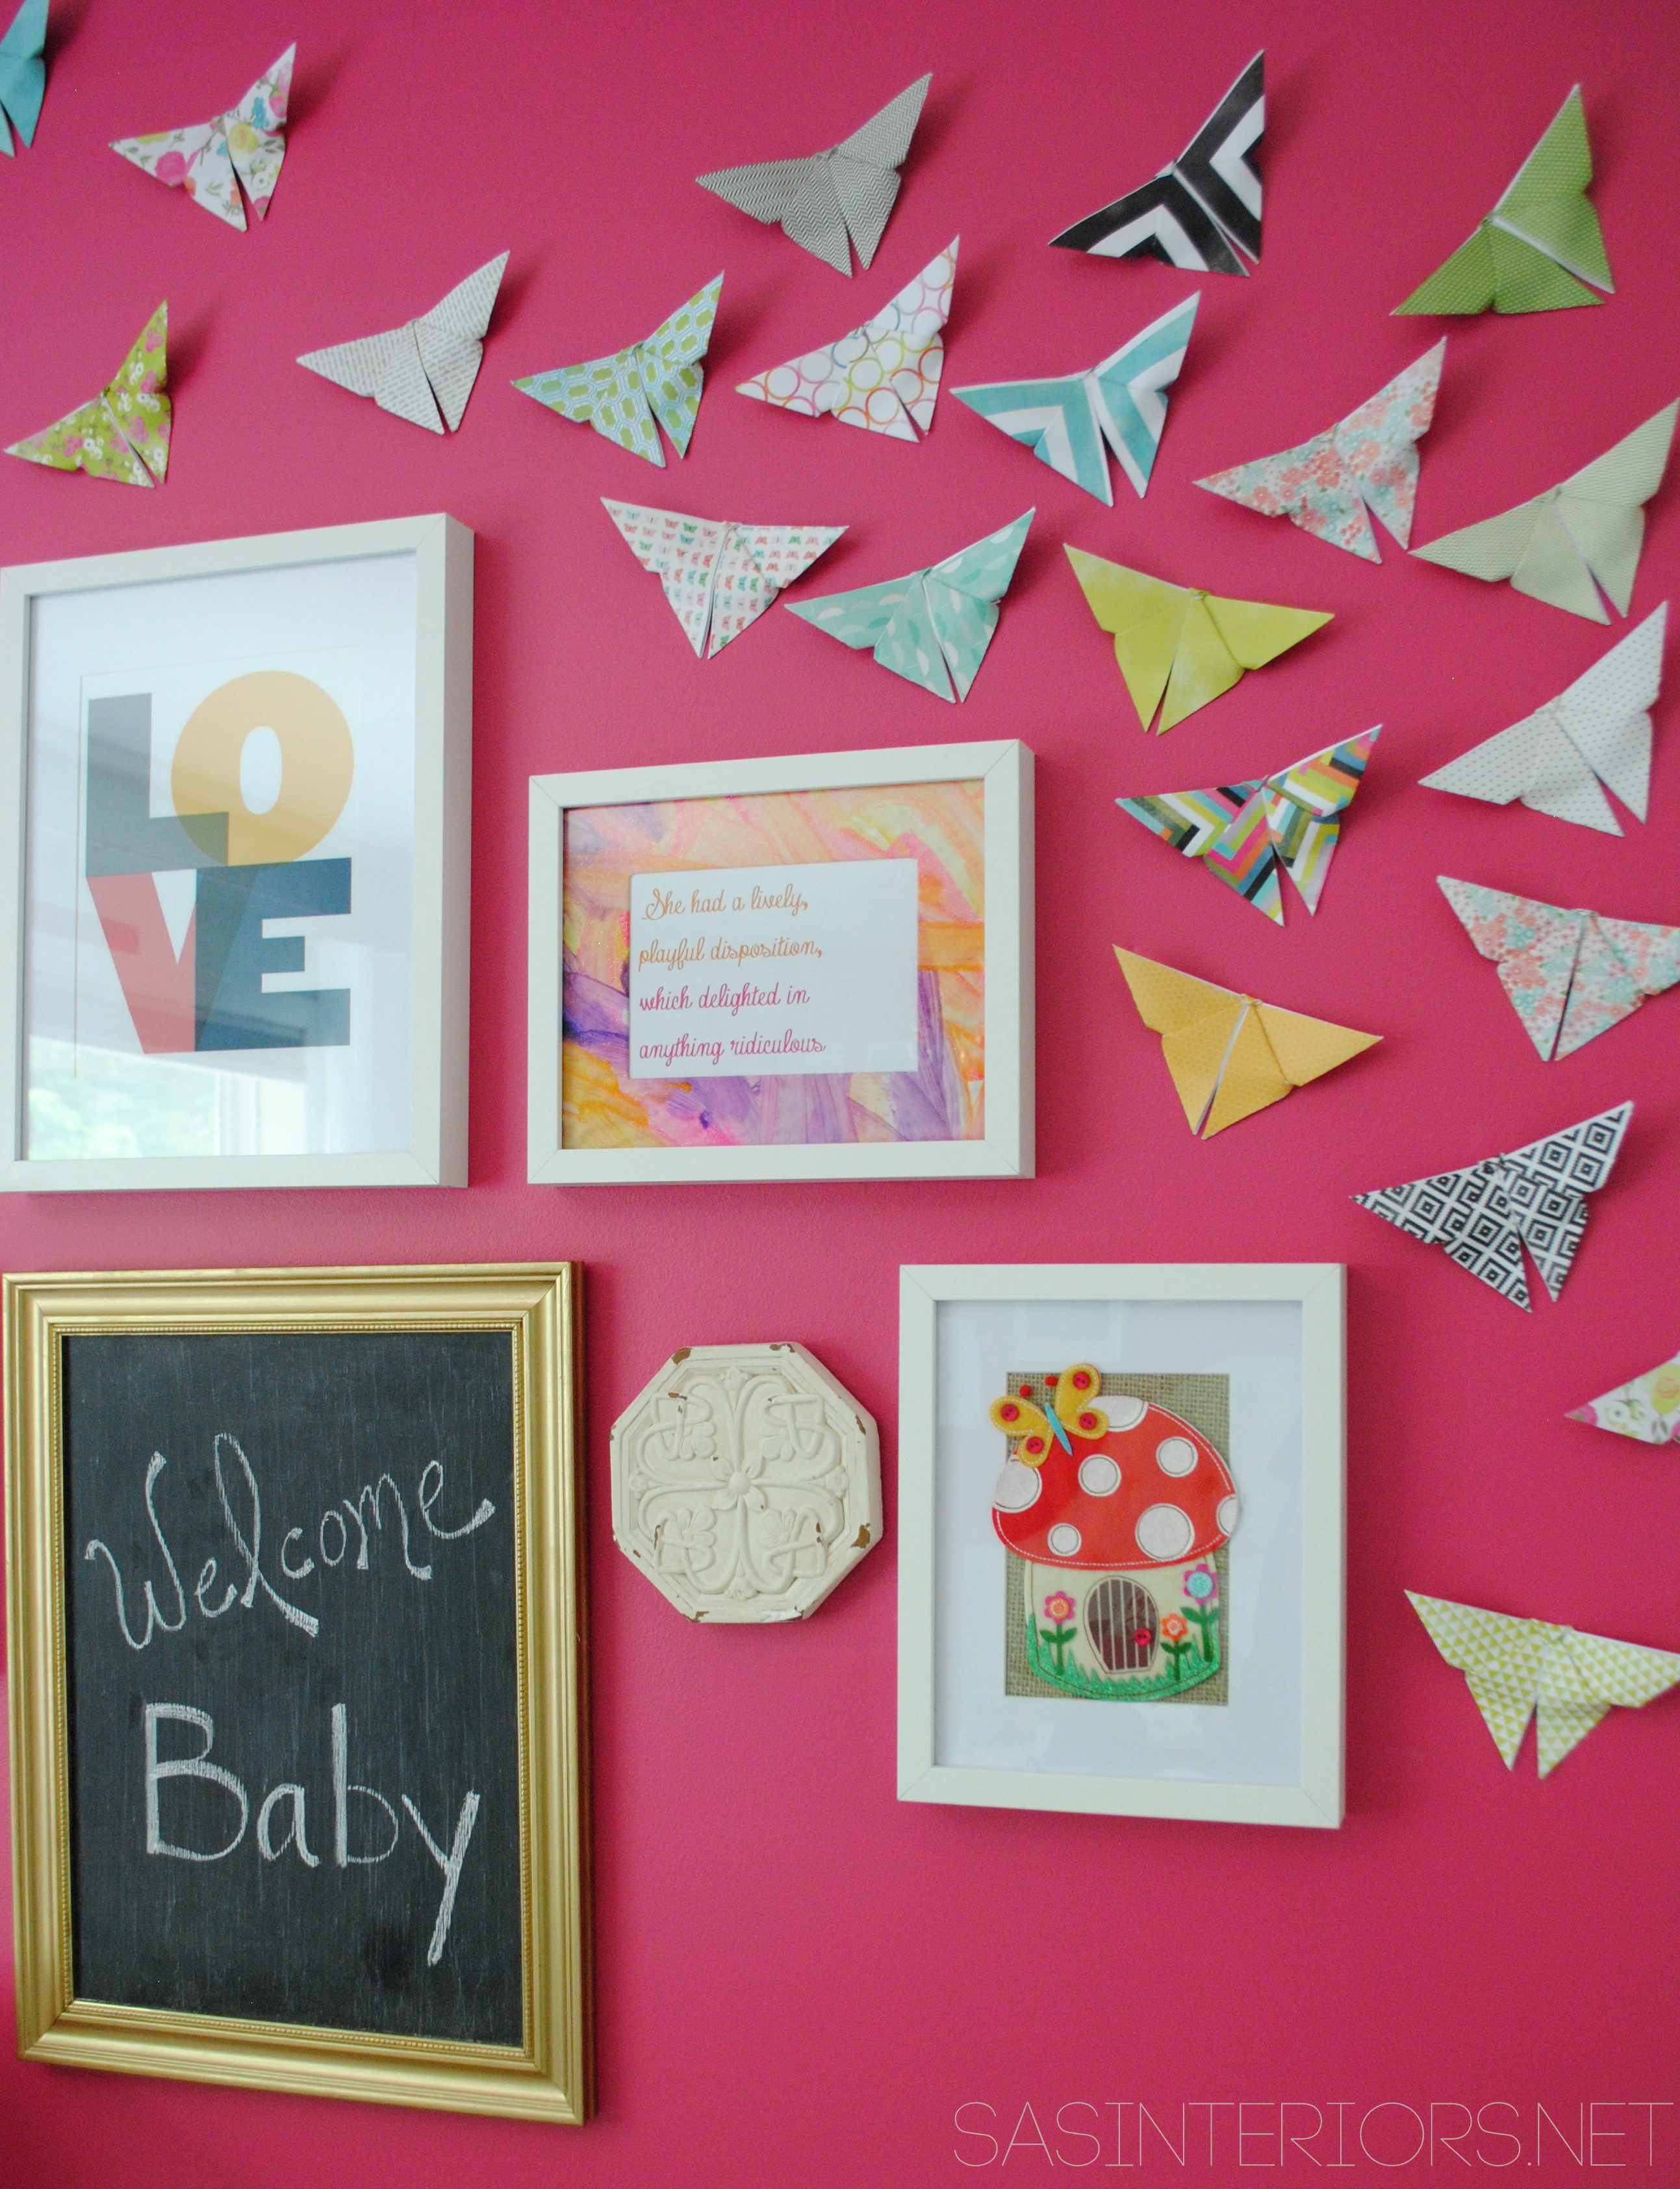
The paper I used for the mobile is scrapbooking paper which I found at AC Moore.  It came as a 4″ x 4″ book with many colorful designs & patterns – perfect for the space.  I also made these adorable origami butterflies using the same paper…

Nursery Nook: Gallery Wall - New creative wall with a combination of pictures, artwork, quotes, and special keepsakes. Come see the evolution of the 'nook'

I’m thrilled with how this “nook” came out and I’m extra thrilled with the creation of my simple mobile…

DIY: Homemade / Handmade Circle Crib Mobile: a beautiful & inexpensive way to crib a focal point for your baby! Check out this easy-to-follow tutorial

DIY: Homemade / Handmade Circle Crib Mobile: a beautiful & inexpensive way to crib a focal point for your baby! Check out this easy-to-follow tutorial

This crib mobile was what I had my heart set on and even though it’s something done before by many others, I’m happy that I went with what I loved & I know my baby will love just as much.

What attention grabbing mobile do you (or did you) have for your baby?

Big Girl Bedroom {Reveal}

There’s been a whole lotta room tours around here lately, and the latest space I’m {revealing} is my daughter’s newly revamped big girl bedroom.

Honestly, I’m not sure who’s more excited about this space – me or Big Girl “A”.

So here it is…

For a little reminder, this is what “A’s” room looked like before.

It was a beautiful space, but since turning 3, she was in need of a big girl room with a big girl bed.  Many of the elements in her room stayed, while others got “jazzed up” a bit.

Here was the room concept…

and, here’s the result…

My favorite element in the room is definitely the new tufted headboard – and I have to confess, I didn’t make it, but instead bought it.  It’s an off-white scalloped headboard and pops against the strong and vibrant fuschia focal wall. When I chose the color for the space, which was painted before honeysuckle was named Pantone’s Color of the Year in 2010, I was hoping it would “live” through my daughter’s growing ages and stages.  Thankfully I can stay it has.  It sure was nice to start the work in her room without having to repaint.

My other love in this room is the new kids play tent that I created in the corner of the room to the right as you walk in. It was the ideal little nook to add height, drama, and a little secret hideaway.

The corner cabinet was in the nursery space before, but I revamped it by adding fabric and ribbon within the 4 panels. By measuring and cutting pieces of drop cloth, I added ribbon trim surround and then secured it with a pretty thumbtack in each corner. Then to finish the look, I reused the bird wall appliques from the nursery and added them to the drop cloth panels.  It was a fairly easy update and softens the look of the cabinet.

The leaning book rack is part of “A’s” old crib.  I love this idea, but can’t take credit for it.  I saw it on Lindsay’s blog a few months ago and filed it away (in my head) for this new room.  I love for Miss A to see the actual book covers and similar to the pallet shelves I made for my son’s room, I love how the book covers bring so much color into the space.

And lastly above, I mounted “A’s” baptismal dress and hat into two different sized white framed shadow boxes.  (I gotta give the mister credit for this one – it was his idea)

I have a soft spot for quotes and inspirational words.

I often share special sayings on my FB page and my Great Quote board is a favorite on Pinterest.  For a while, I’ve been wanting to create an inspiration wall.

When the ideas started to flow for this room, I knew “A’s” room was the best opportunity to display all the wise words said by wise people.  There’s no symmetry to the wall (which allows the possibility for the wall to grow), and I mostly stuck with simple white frames while adding in a a few pictures and fabric wrapped canvases.

The “before” room was a combo of fuschia with soft greens, but for this new space I wanted it to be even more pow and decided a bright yellow would be the perfect addition.  And just a little goes a long way.

For the windows, they got a slight update as well.  First of all, I took the curtain rods and spray painted them a glossy white finish.  They were silver with clear ball finials purchased from Ikea about 5 years ago for my son’s first room.  Since I took them off the wall for the update, I also thought raising them higher was a must.  To reuse, but change the curtains / drapery panels, I added a 3″ decorative trim band to the top, side, and front of the curtain. This gave them a designer, custom look for pennies.  A tutorial on how to do this is coming soon!

Lastly, I painted all the mouldings – window trim and base trim – in the room to white and what a BIG difference that made.

I also needed another spot for more books.  I upcycled an old wood bookcase from the basement, sanded it down and painted it white.  Then to add a little pizazz to the top, I purchased this pretty decorative paper from a store in my home town.  I then added a few coats of mod podge to protect it, and it was completely revamped!

To sum up all the details, here’s a breakdown…

1. Thrift Store Nightstand – was previously used as a sidetable in the nursery and is now a nightstand
2. NON-DIYed headboard, but I love it – Wayfair tufted high arch headboard
3. Quilt and shams – Joss and Main (sale expired) – I added a large fabric band at the edge of each sham; Yellow pillow – Homegoods; Sheets – Target on sale for $12
4. Washi Tape Initial (click here for tutorial)
5. Birdhouses – hung from ceiling and added a fabric cover to the chain
6. Inspiration Wall – white frames from AC Moore; Square fabric covered canvases from nursery
7. Pillows on side chair – plum colored pillow from Crate and Barrel; Ikat pillow made by me with fabric from Duralee
8. Window Panels – fuschia panels purchased for nursery from Bed, Bath, and Beyond.  I added a 3″ decorative trim band at the top, side, and bottom (click here for tutorial) + used white spray painted on the old silver rod and raised it to be higher.
9. Bench with hinged top – found at a garage sale last year.  It was wood which I primed and painted white on the sides and yellow on the top

10. Corner Cabinet – Added fabric & decorative ribbon in panels
11. Reused crib mobile – DIY created crib mobile using a stick and fabric birds
12. Framed baptismal dress – Shadow box purchased from AC Moore to display baptismal dress and hat
13. Crib Railing Book Display
14. DIY: Kids Play Tent (click here for tutorial)

I have to say, I just love spending time in this new totally girly room with my big girl…  and she loves it too!  Thank you for checking out the reveal of this room makeover.  I’ve got a few DIY tutorials coming up for this space, plus my first Lowe’s Creative Team challenge project later this week.