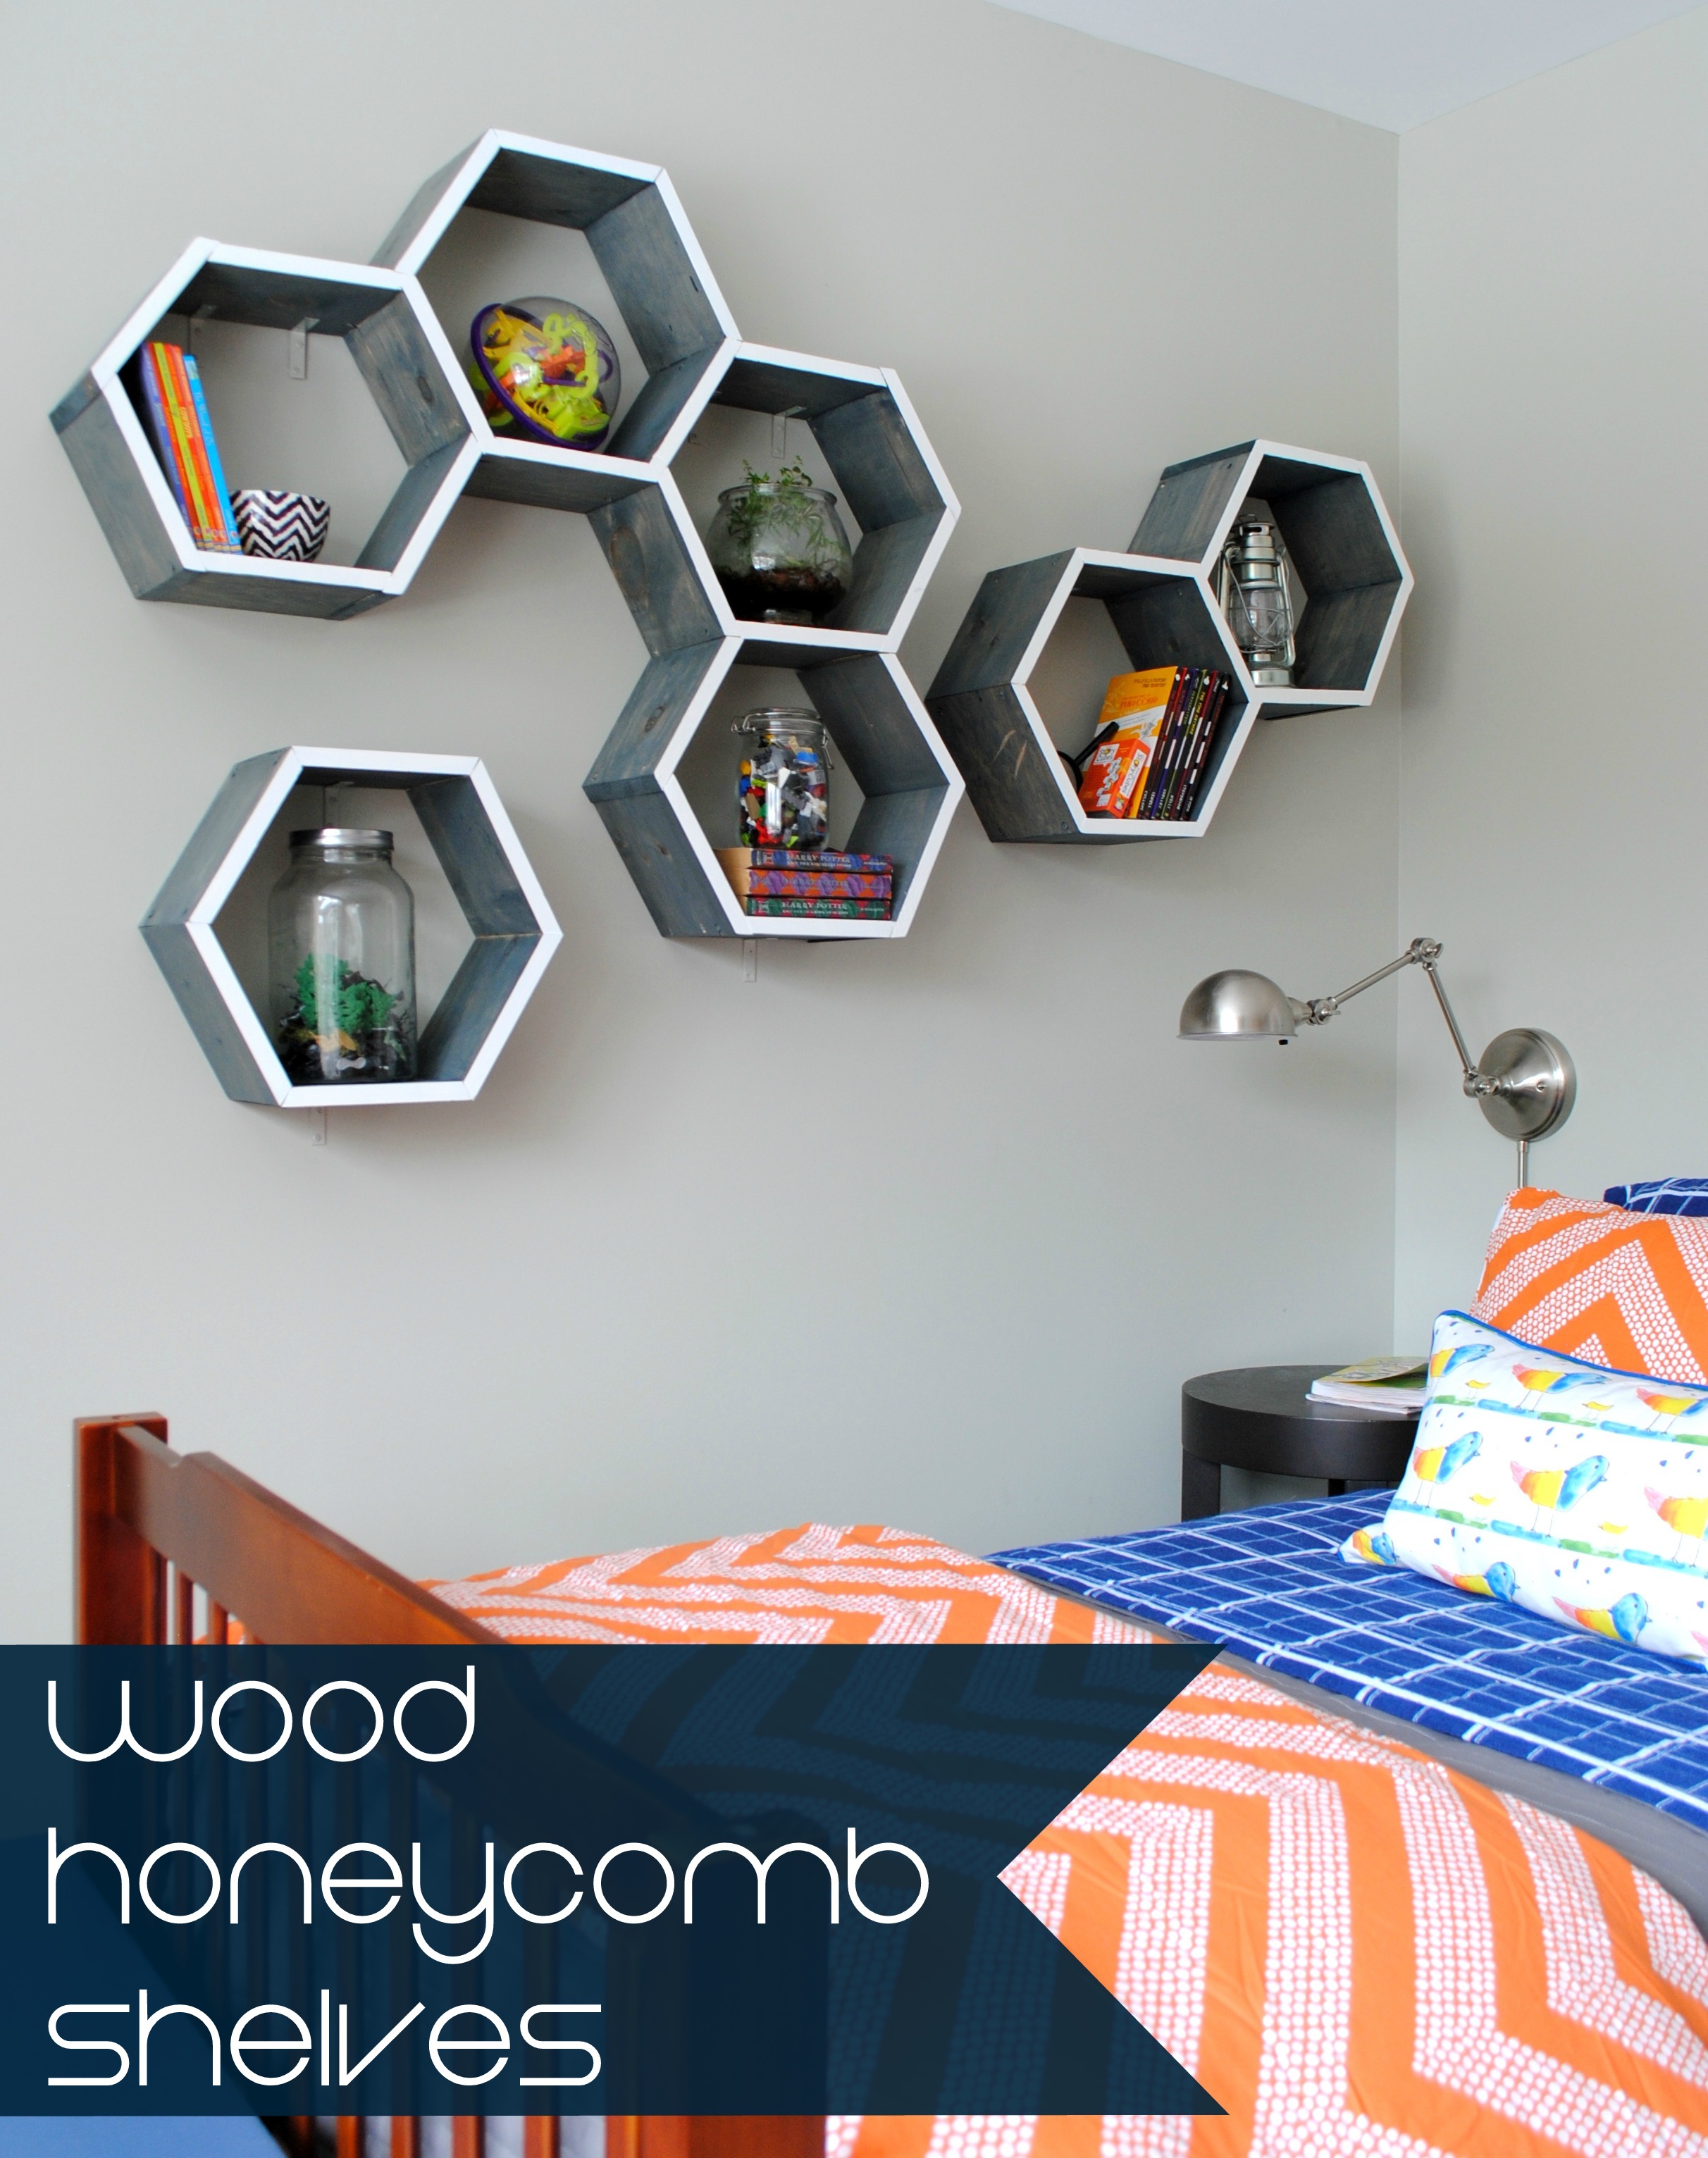
DIY: Honeycomb Wall Hooks
![DIY Tutorial: Honeycomb shaped wall hooks [inspiration for many other fun + functional wall storage ideas] Tutorial by Jenna Burger Design www.jennaburger.com](https://www.jennaburger.com/wp-content/uploads/2015/01/41.jpg)
I am quickly realizing that little girls need lots of storage. And no matter how much they have, it’s not enough…
As the end of 2014 closed out, I was determined to put the final touches on the shared girls room for my 2 daughters.
There really wasn’t a lot to do since creating the nursery nook, but it’s those little things that add up making it feel incomplete. Most of the walls were filled & looked fabulous, but the space around the closet needed something. After contemplating for quite a long time on what to do and knowing the requirements – fun + unique + functional + DIY – I was on the move. At the request of my daughter to also have something with a honeycomb design (similar, but different to my sons honeycomb shelves), I set out on creating these… Honeycomb Wall Hooks.
![DIY Tutorial: Honeycomb shaped wall hooks [inspiration for many other fun + functional wall storage ideas] Tutorial by Jenna Burger Design www.jennaburger.com](https://www.jennaburger.com/wp-content/uploads/2015/01/2B.jpg)
When Lowe’s gave the Creative Ideas Team the freedom this month to choice any style project – bloggers choice – I knew this was the spot for it! I had a blast making these wall hooks over the holiday break & my daughter is in love with “her” honeycomb creation.
If you’re thinking of creating something similar, this project is just an inspirational stepping stone to so many other great + unique possibilities. Different shapes could be used (think squares or triangles), different colors (green, blue, gray for a boys room), different arrangement (how about a larger area on a wall). These wall hooks are not only functional, but beautiful; they are the art of the space.
Here is what I used to create the honeycomb wall hooks
> (2) 1 x 8 x 6′ long – I created 12 hexagons, so the amount of wood needed will depend on the quantity you want to create
> Circular Saw – to cut hexagon shapes (see my recommendations for a circular saw here)
> Pencil, Ruler, and other general supplies
> Paint – colors of your choice
> Knobs – I found knobs at Lowe’s for .87, then painted them
> Drill
> Command Strips (or any wall adhesives)
1
To start out, I cut the wood into squares. The width of a 1 x 8 is actually 7-1/4″, so I measured and cut the length of the board using the circular saw in 7-1/4″ increments.
![DIY Tutorial: Honeycomb shaped wall hooks [inspiration for many other fun + functional wall storage ideas] Tutorial by Jenna Burger Design www.jennaburger.com](https://www.jennaburger.com/wp-content/uploads/2015/01/collage2.jpg)
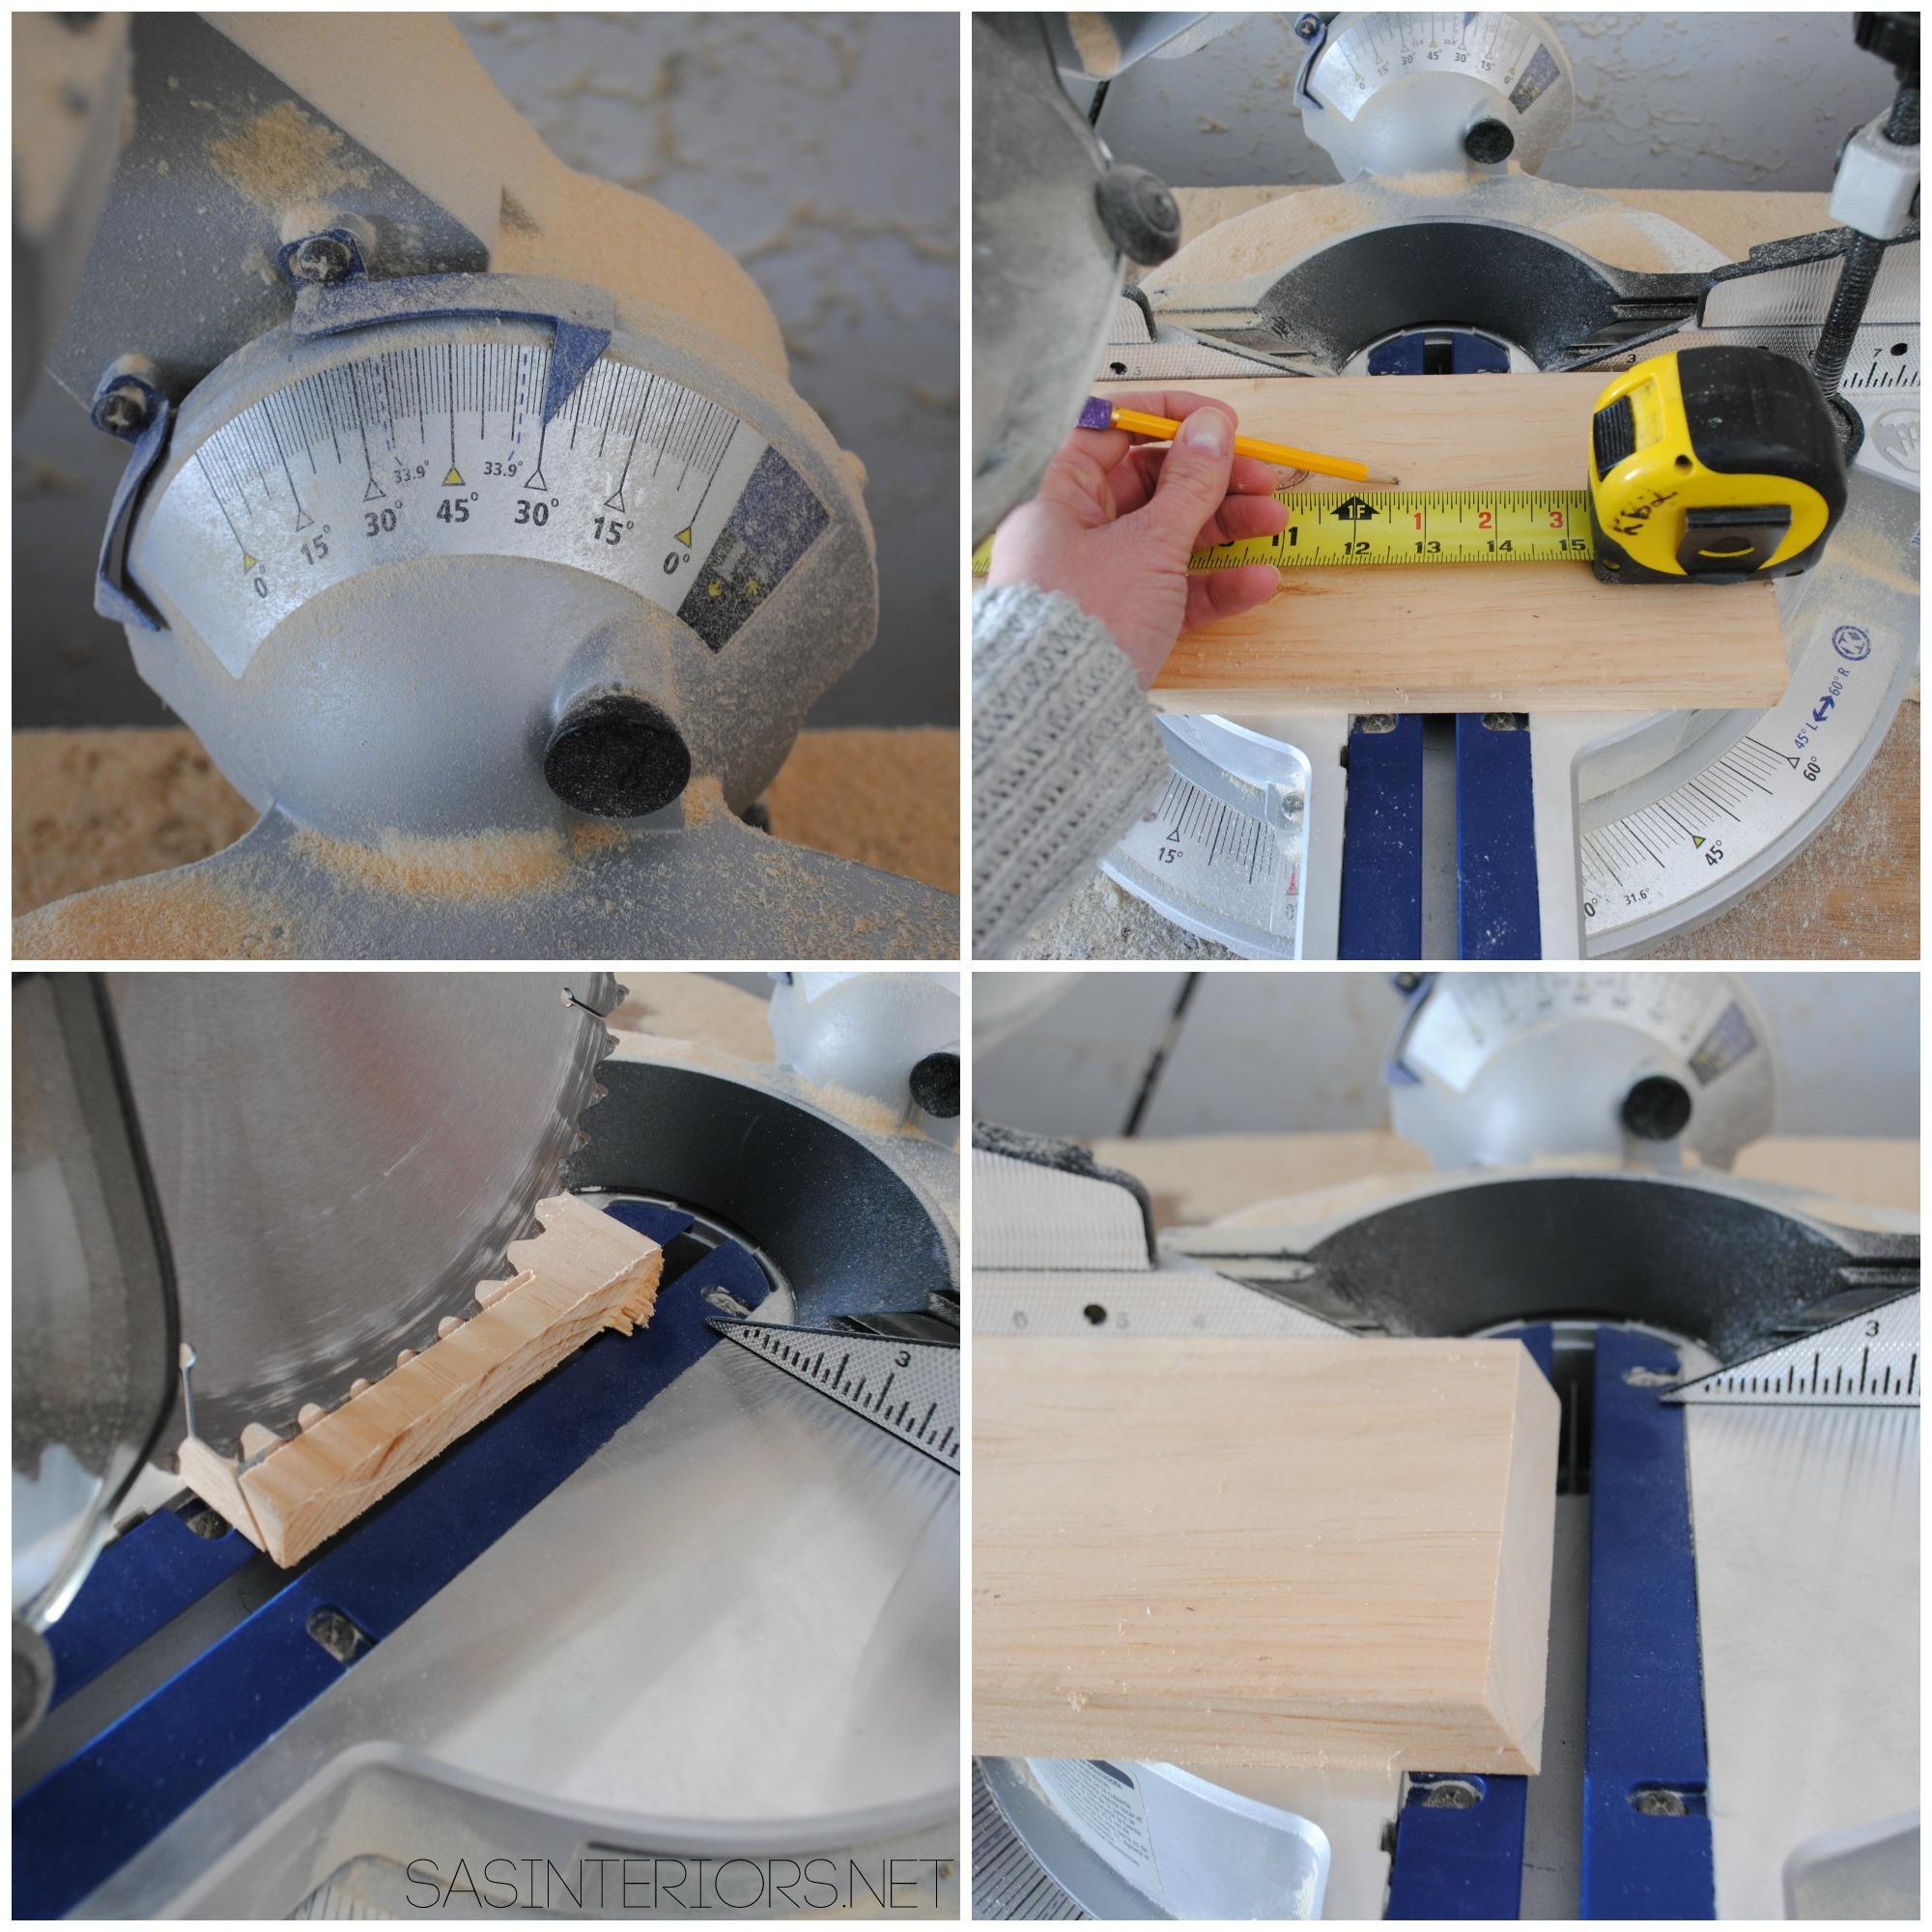
2
Once the squares were created, I made the hexagon shape. I started out with a strategy of how long each “leg” should be, but in the end, I just winged it by eye. It really doesn’t need to be perfect and there is not “right” way.
I lined up the wood with the saw and figured out that the angle of 22.5 was ideal to cut the angles for the hexagon shape.
![DIY Tutorial: Honeycomb shaped wall hooks [inspiration for many other fun + functional wall storage ideas] Tutorial by Jenna Burger Design www.jennaburger.com](https://www.jennaburger.com/wp-content/uploads/2015/01/DIY_HexagonCoatRack-001.jpg)
Then I cut the 2 opposite angles. Flipped over the wood and cut the other two angles which created the hex shape.
![DIY Tutorial: Honeycomb shaped wall hooks [inspiration for many other fun + functional wall storage ideas] Tutorial by Jenna Burger Design www.jennaburger.com](https://www.jennaburger.com/wp-content/uploads/2015/01/collage.jpg)
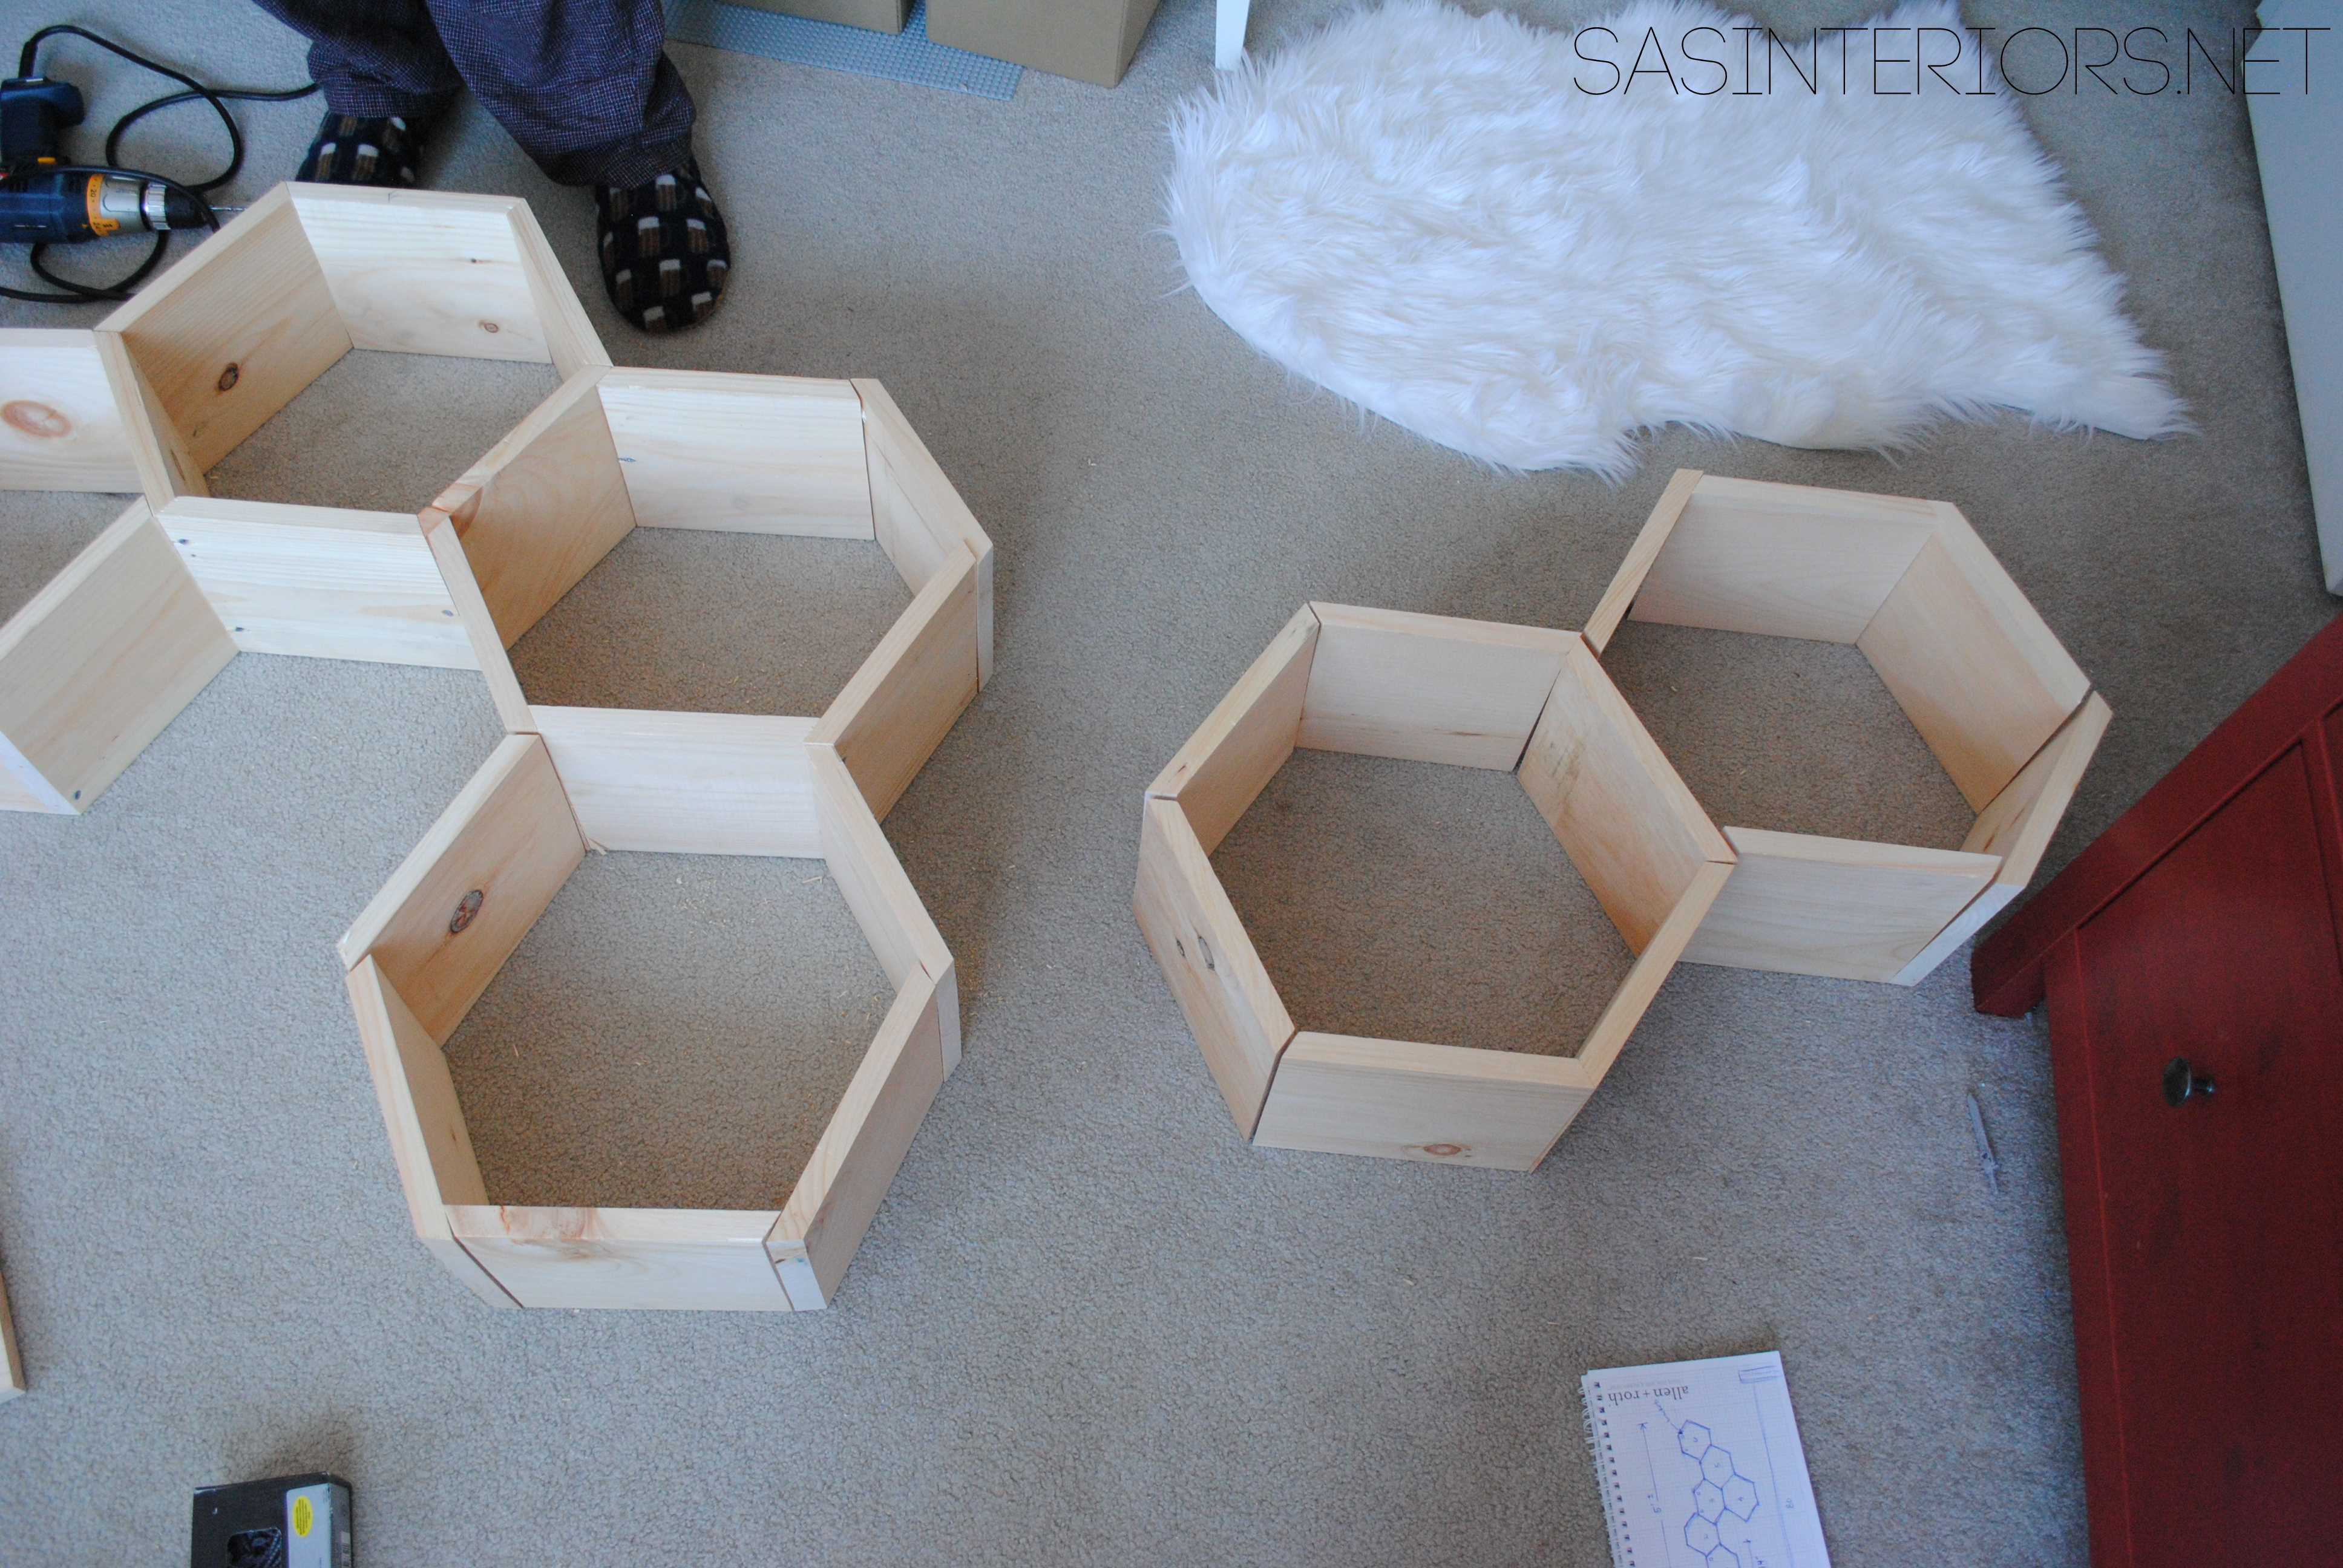
3
Taking the easy route (and thankfully it worked), I made one hexagon shape and used it as a template to trace the shape on the other 11 pieces.
![DIY Tutorial: Honeycomb shaped wall hooks [inspiration for many other fun + functional wall storage ideas] Tutorial by Jenna Burger Design www.jennaburger.com](https://www.jennaburger.com/wp-content/uploads/2015/01/DIY_HexagonCoatRack-002.jpg)
4
Before the painting process, I gave the edges a quick sanding with sand paper.
![DIY Tutorial: Honeycomb shaped wall hooks [inspiration for many other fun + functional wall storage ideas] Tutorial by Jenna Burger Design www.jennaburger.com](https://www.jennaburger.com/wp-content/uploads/2015/01/192.jpg)
And then they were complete…
![DIY Tutorial: Honeycomb shaped wall hooks [inspiration for many other fun + functional wall storage ideas] Tutorial by Jenna Burger Design www.jennaburger.com](https://www.jennaburger.com/wp-content/uploads/2015/01/181.jpg)
5
For the paint colors, I used what I had on hand. Either craft paint or wall paint works… I used both. I chose colors of pink, fuchsia, gold, white, turquoise, and coral (which resulted a bit darker, but it works). Using a foam brush (a regular paint brush would do just fine too), I painted all of the hex shapes the various colors.
![DIY Tutorial: Honeycomb shaped wall hooks [inspiration for many other fun + functional wall storage ideas] Tutorial by Jenna Burger Design www.jennaburger.com](https://www.jennaburger.com/wp-content/uploads/2015/01/171.jpg)
6
I snagged wood knobs at Lowe’s for .87 and painted them white for the colored hexagons and mint for the white hexagons. And for the gold hex shapes, I used the knobs that were previously in the kids bathroom and added super glue to attach them to the surface.
![DIY Tutorial: Honeycomb shaped wall hooks [inspiration for many other fun + functional wall storage ideas] Tutorial by Jenna Burger Design www.jennaburger.com](https://www.jennaburger.com/wp-content/uploads/2015/01/161.jpg)
7
For the wood knobs from Lowe’s, I drilled a hole into the wood block, then used the screw that it came with to secure them.
![DIY Tutorial: Honeycomb shaped wall hooks [inspiration for many other fun + functional wall storage ideas] Tutorial by Jenna Burger Design www.jennaburger.com](https://www.jennaburger.com/wp-content/uploads/2015/01/DIY_HexagonCoatRack.jpg)
Last step… to hang them!
8
I had a bit of fun creating the layout. It took a few tries to get it how I felt looked best. Once the layout was set, I used command strips to hang them to the wall. This most likely won’t be a forever creation (what is in my house?) so these wall adhesives are great + they leave no damage to the wall.
![DIY Tutorial: Honeycomb shaped wall hooks [inspiration for many other fun + functional wall storage ideas] Tutorial by Jenna Burger Design www.jennaburger.com](https://www.jennaburger.com/wp-content/uploads/2015/01/151.jpg)
I hung 10 of the hex shapes on the left side of the wall (since it was fairly bare) and 2 on the other side. Here’s the result of the honeycomb wall hooks.
![DIY Tutorial: Honeycomb shaped wall hooks [inspiration for many other fun + functional wall storage ideas] Tutorial by Jenna Burger Design www.jennaburger.com](https://www.jennaburger.com/wp-content/uploads/2015/01/102.jpg)
Functional Art!
![DIY Tutorial: Honeycomb shaped wall hooks [inspiration for many other fun + functional wall storage ideas] Tutorial by Jenna Burger Design www.jennaburger.com](https://www.jennaburger.com/wp-content/uploads/2015/01/121.jpg)
![DIY Tutorial: Honeycomb shaped wall hooks [inspiration for many other fun + functional wall storage ideas] Tutorial by Jenna Burger Design www.jennaburger.com](https://www.jennaburger.com/wp-content/uploads/2015/01/132.jpg)
Within minutes this wall was girl-ified with jewels… costume jewels, of course!
![DIY Tutorial: Honeycomb shaped wall hooks [inspiration for many other fun + functional wall storage ideas] Tutorial by Jenna Burger Design www.jennaburger.com](https://www.jennaburger.com/wp-content/uploads/2015/01/21a.jpg)
![DIY Tutorial: Honeycomb shaped wall hooks [inspiration for many other fun + functional wall storage ideas] Tutorial by Jenna Burger Design www.jennaburger.com](https://www.jennaburger.com/wp-content/uploads/2015/01/3a.jpg)
![DIY Tutorial: Honeycomb shaped wall hooks [inspiration for many other fun + functional wall storage ideas] Tutorial by Jenna Burger Design www.jennaburger.com](https://www.jennaburger.com/wp-content/uploads/2015/01/9a.jpg)
![DIY Tutorial: Honeycomb shaped wall hooks [inspiration for many other fun + functional wall storage ideas] Tutorial by Jenna Burger Design www.jennaburger.com](https://jb.spacityhosting.com/wp-content/uploads/2015/01/110.jpg)
Perfect for dress up too. Can you imagine a playroom filled with these wall hooks?!
![DIY Tutorial: Honeycomb shaped wall hooks [inspiration for many other fun + functional wall storage ideas] Tutorial by Jenna Burger Design www.jennaburger.com](https://www.jennaburger.com/wp-content/uploads/2015/01/7a.jpg)
![DIY Tutorial: Honeycomb shaped wall hooks [inspiration for many other fun + functional wall storage ideas] Tutorial by Jenna Burger Design www.jennaburger.com](https://www.jennaburger.com/wp-content/uploads/2015/01/6a1.jpg)
I almost forgot to share a pic of how this space looked before… Incredible update, right?!
![DIY Tutorial: Honeycomb shaped wall hooks [inspiration for many other fun + functional wall storage ideas] Tutorial by Jenna Burger Design www.jennaburger.com](https://www.jennaburger.com/wp-content/uploads/2015/01/before-after.jpg)
This room has had quite the transformation over the years starting as a nursery, then getting revamped to a big girl room with a 3-in-1 play tent. Once baby #3 (our littlest lady) came along, a new wall color was added and changes were made to accommodate a nursery nook. This gorgeous fun + functional wall creation was exactly what the room needed to be complete!
If you’re interested in the colors of the room, the deep fuchsia color is Benjamin Moore Royal Fuchsia and the mint color (which used to be beige) is Benjamin Moore Spring Mint.

If this project has inspired you, pin it to save for later!
![DIY Tutorial: Honeycomb shaped wall hooks [inspiration for many other fun + functional wall storage ideas] Tutorial by Jenna Burger Design www.jennaburger.com](https://www.jennaburger.com/wp-content/uploads/2015/01/overall-collage.jpg)
Thanks so much for following along and I really hope you enjoyed seeing the steps I took to make this creation!


To gather even more unique, fun, and creative ideas for your indoor and outdoor Winter spaces, I would definitely suggest downloading the Lowe’s Creative Ideas app on your iphone and/or ipad. I’m always checking out the FREE app for great seasonal + do-it-yourself inspiration.
Also consider following Lowe’s on Facebook, Pinterest, and Instagram as well.
Disclosure: I am part of the Lowe’s Creative Team and was provided with a Lowe’s gift card to purchase items for my project. I was also compensated for my time to use the products. No one told me what to create, what to buy, how to use the product, or what to write. All opinions are 100% mine!