How to Decorate a Mantel
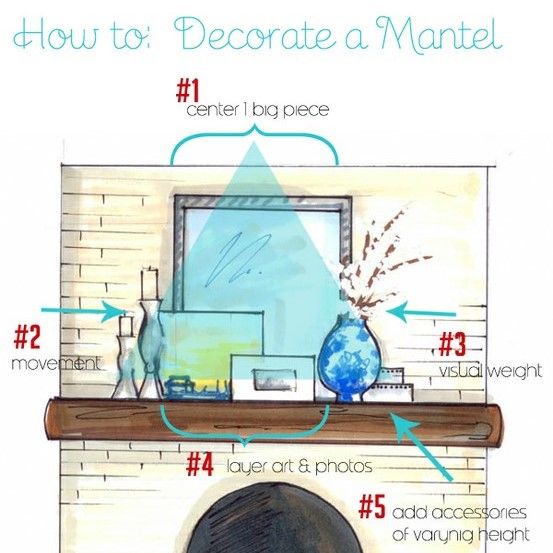
Many of you know that I’m a Pinterest junkie. From recipes to photography to gardening, anything and everything you could want to know about is on this amazing site. Of course, for me, my #1 search is usually home decor and DIY. The other day I stumbled upon this great pictorial on how to decorate a Mantel. I’m sure you know the expression, a picture means a thousand words, and this image certainly says it all. Through the words in my blog, I’m forever looking for ways to inspire you to create a haven of your own, well this is it!
When starting to decorate your mantel, it’s best to remove everything and begin with a fresh palette. It allows you to see it free and clear so your creative juices start to flow.
Simple tricks to start your mantel decor
1. Center 1 big piece: Begin in the center and choose something that is of a substantial size, maybe a mirror or artwork that you love. This will be the main focal point of the mantel and will “ground” the other accessories in front.
2. Movement: Choose items that “move” the eye. Whether it be candles which move from the flickering flame or items of varying heights which make the eye move up and down, include accessories that are intriguing and add vision interest.
3. Visual Weight: A secondary focal point that isn’t as big, but still gives a punch, is a great addition to a mantel ensemble. When pulling together a mantel, it’s best to layer one piece in front of another. Choosing a vase with flowers or branches that will sit in front of your “big piece” starts the layering effect.
4. Layering: Whether it be art, photos, candles, or accessories, layering and staggering different sized items in front of each other is a must to create a cohesive composition.
5. Vary Heights: Along with layering, adding accessories of varying heights is more visually engaging. It helps the eye move up and down and across. Between layering and varying heights, you want to create a wave effect with your mantel. It starts out low, then goes up, comes back down, then up again, and finishes low.
As Steven and Chris say, these 5 tricks create a Visual Triangle. Starting at the top most point, you have your 1 big center piece, and then each side angles down with the addition of interesting accessories, resulting in a finished triangle = a beautiful decorated mantel.
Looking at some real-life examples always help, so let’s take a peak at two of my recent mantels.
Fall Mantel – This is my most recent mantel decorated for Fall. Similarly to the pictoral above, I “marked up” the 5 tricks to create a cohesive mantel. Starting with the big piece in the center, a rectangular mirror, and layering different accessories at varying heights, the Visual Triangle was created. And do you see the “mantel wave”? There are lots of lows and highs, lows and highs.
Summer Mantel – This second mantel design was from the summer and even though it’s simpler and less accessorized, it still uses the 5 basic principles for decorating a mantel.
What do you like to showcase on your mantel?


