
Tag: painting horizontal stripes on walls

Foyer Reveal

You guys have been troopers holding out this long for the final reveal of the foyer.  I was waiting on a few pieces that I had ordered, and over the weekend they finally arrived.  I hurriedly styled and took pictures of the space, and this is the result…

Foyer Remodel with newly striped walls, fern art, and layers of colors + texture.  Spaced designed by @Jenna_Burger, WWW.JENNABURGER.COM

It is so fresh + updated.  I’m thrilled with the result and it wasn’t a lot of work.

A new greige paint color + wide horizontal stripes + a gold dresser + a few added accents = A revamped foyer that makes a statement

Past Posts you may be interested in
gorgeous gold dresser + new foyer paint colors —> Click here
10 top greige colors —> Click here
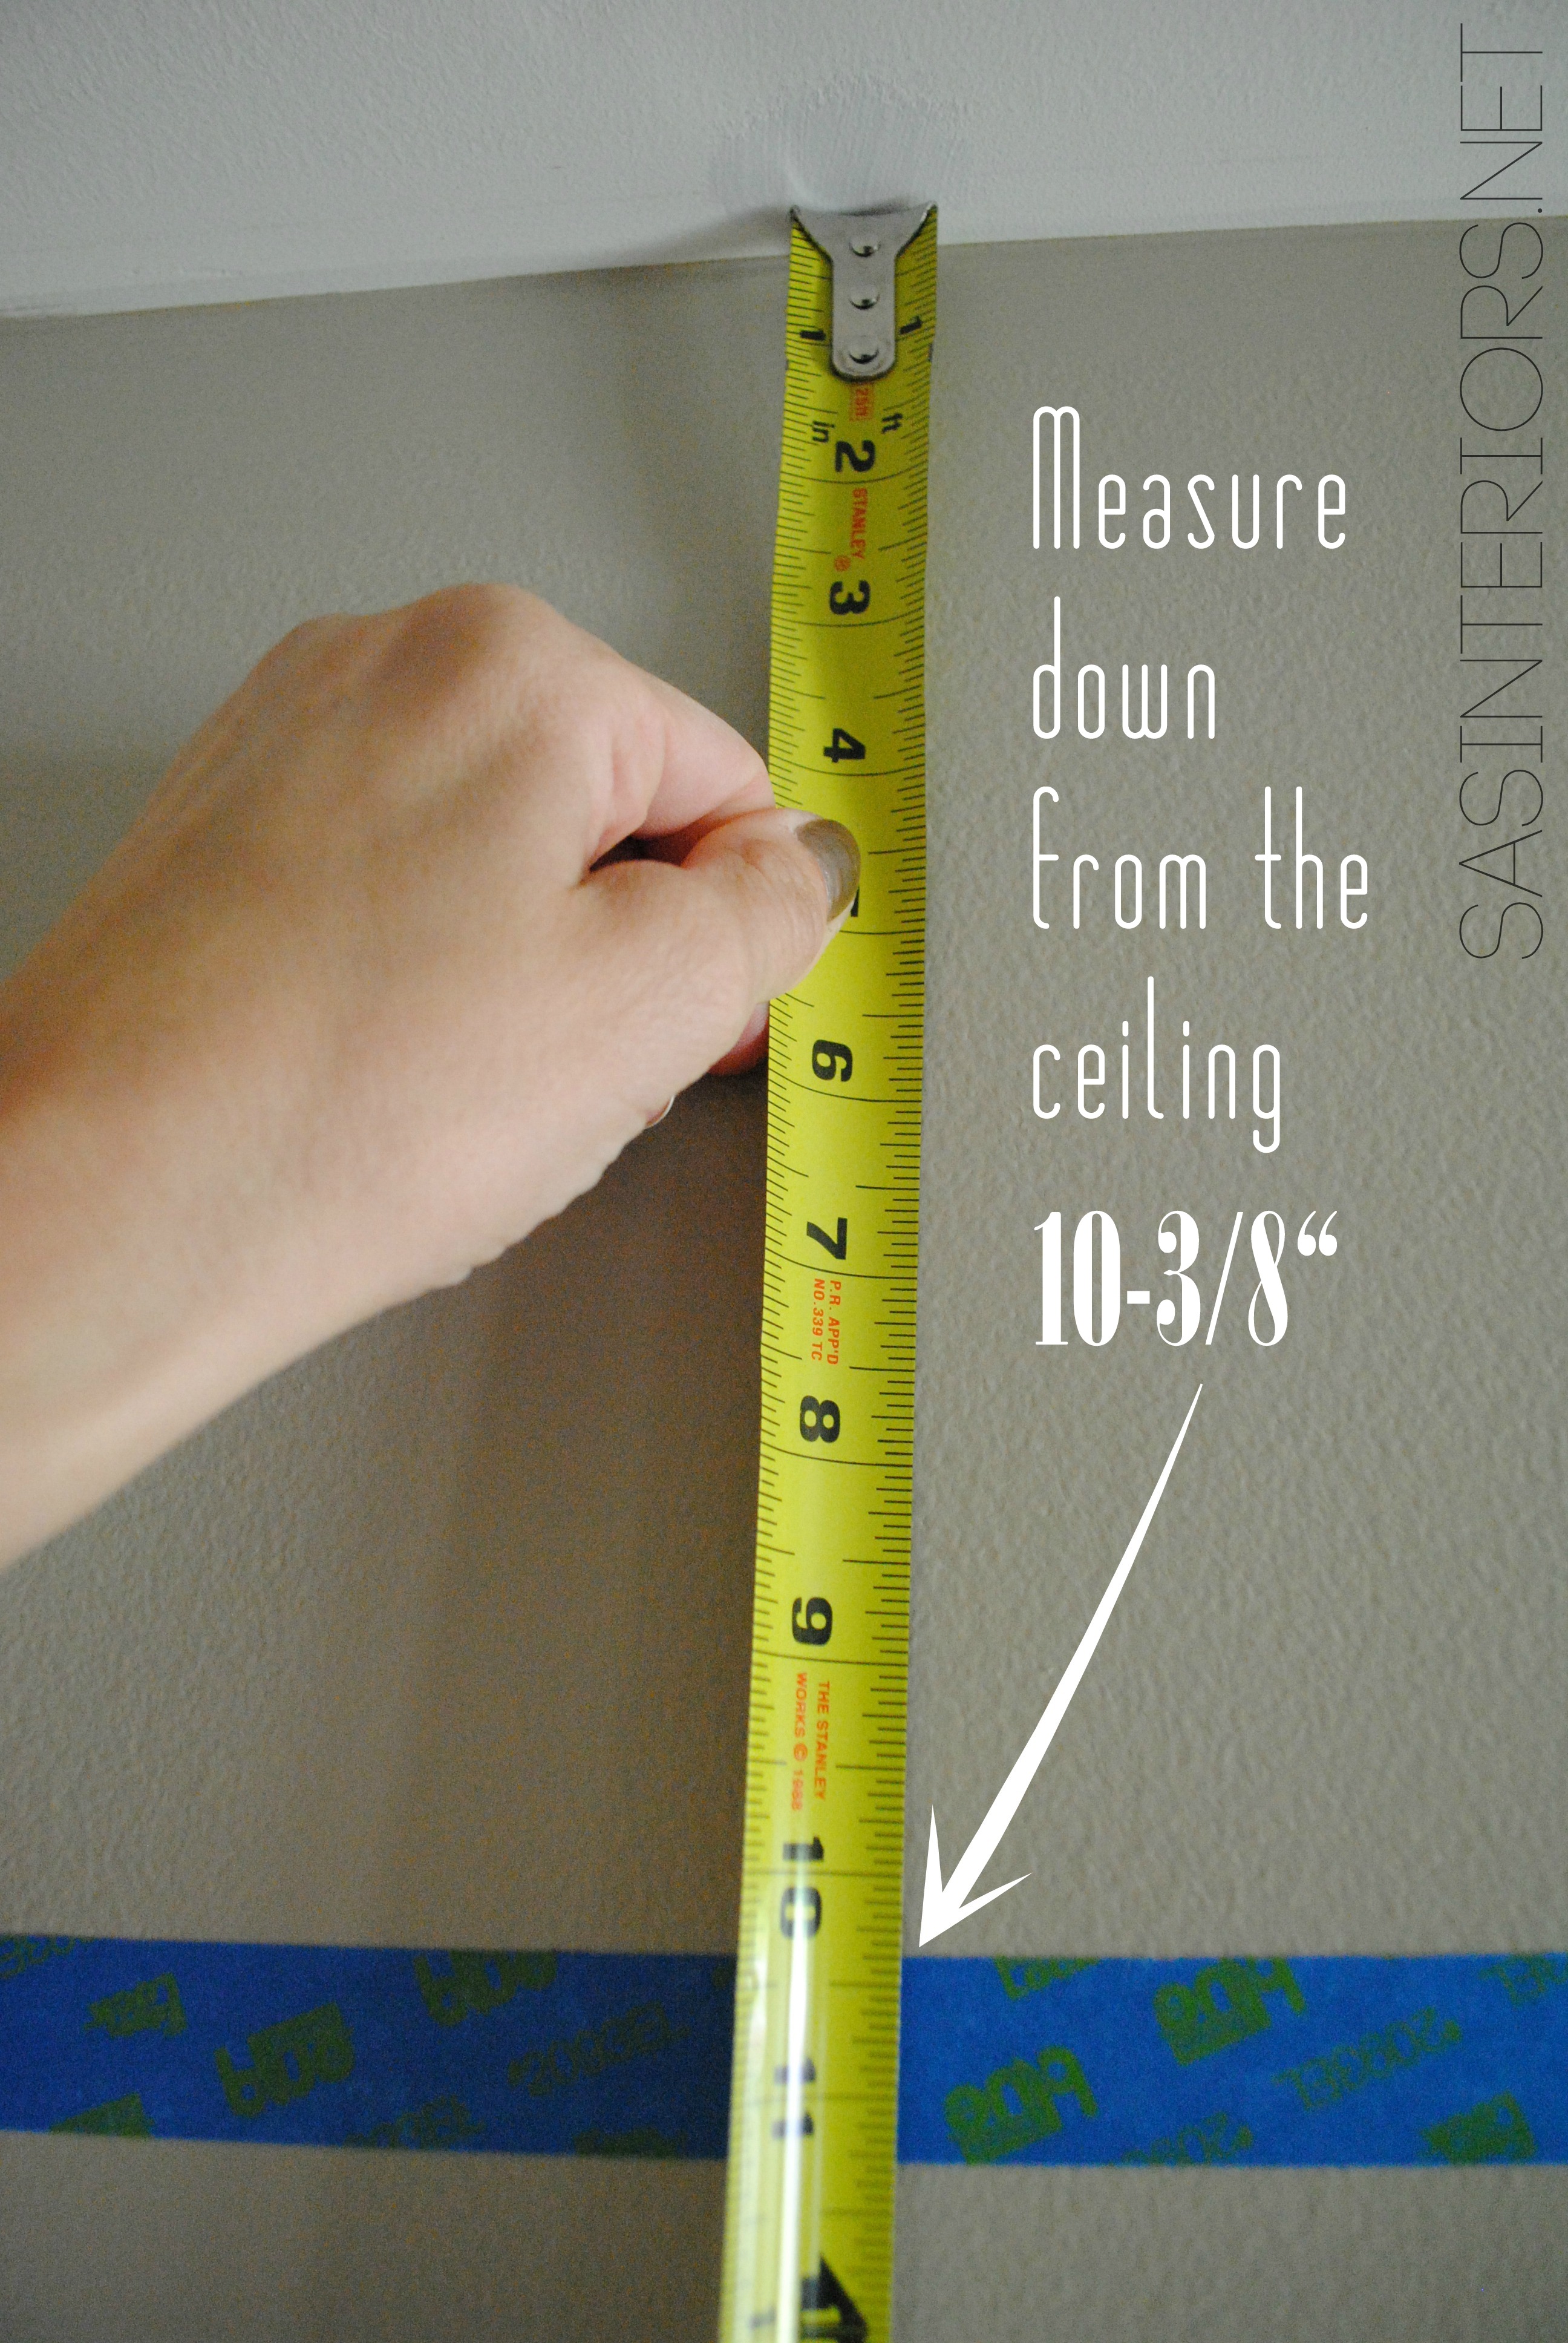
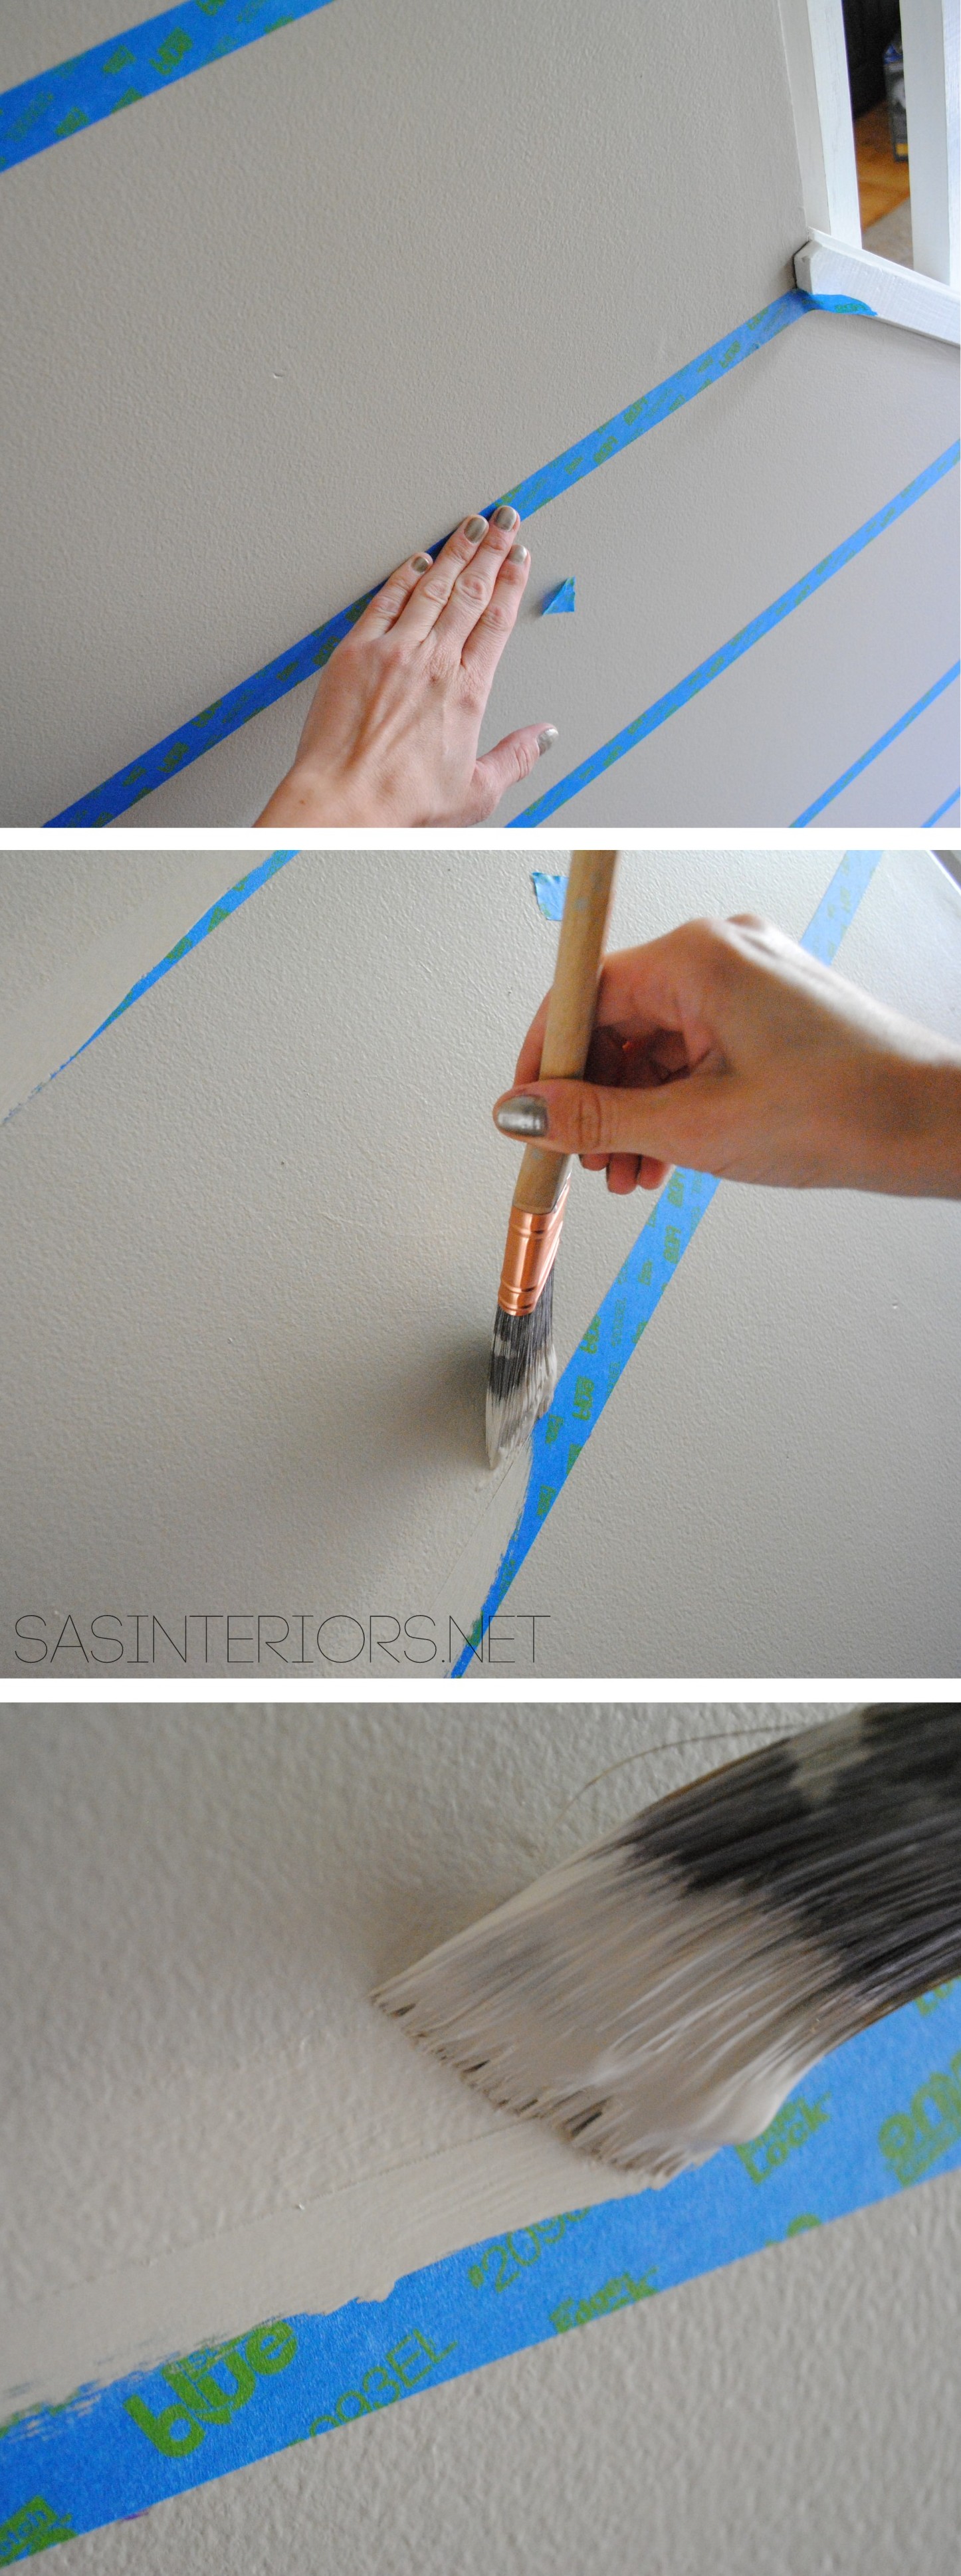
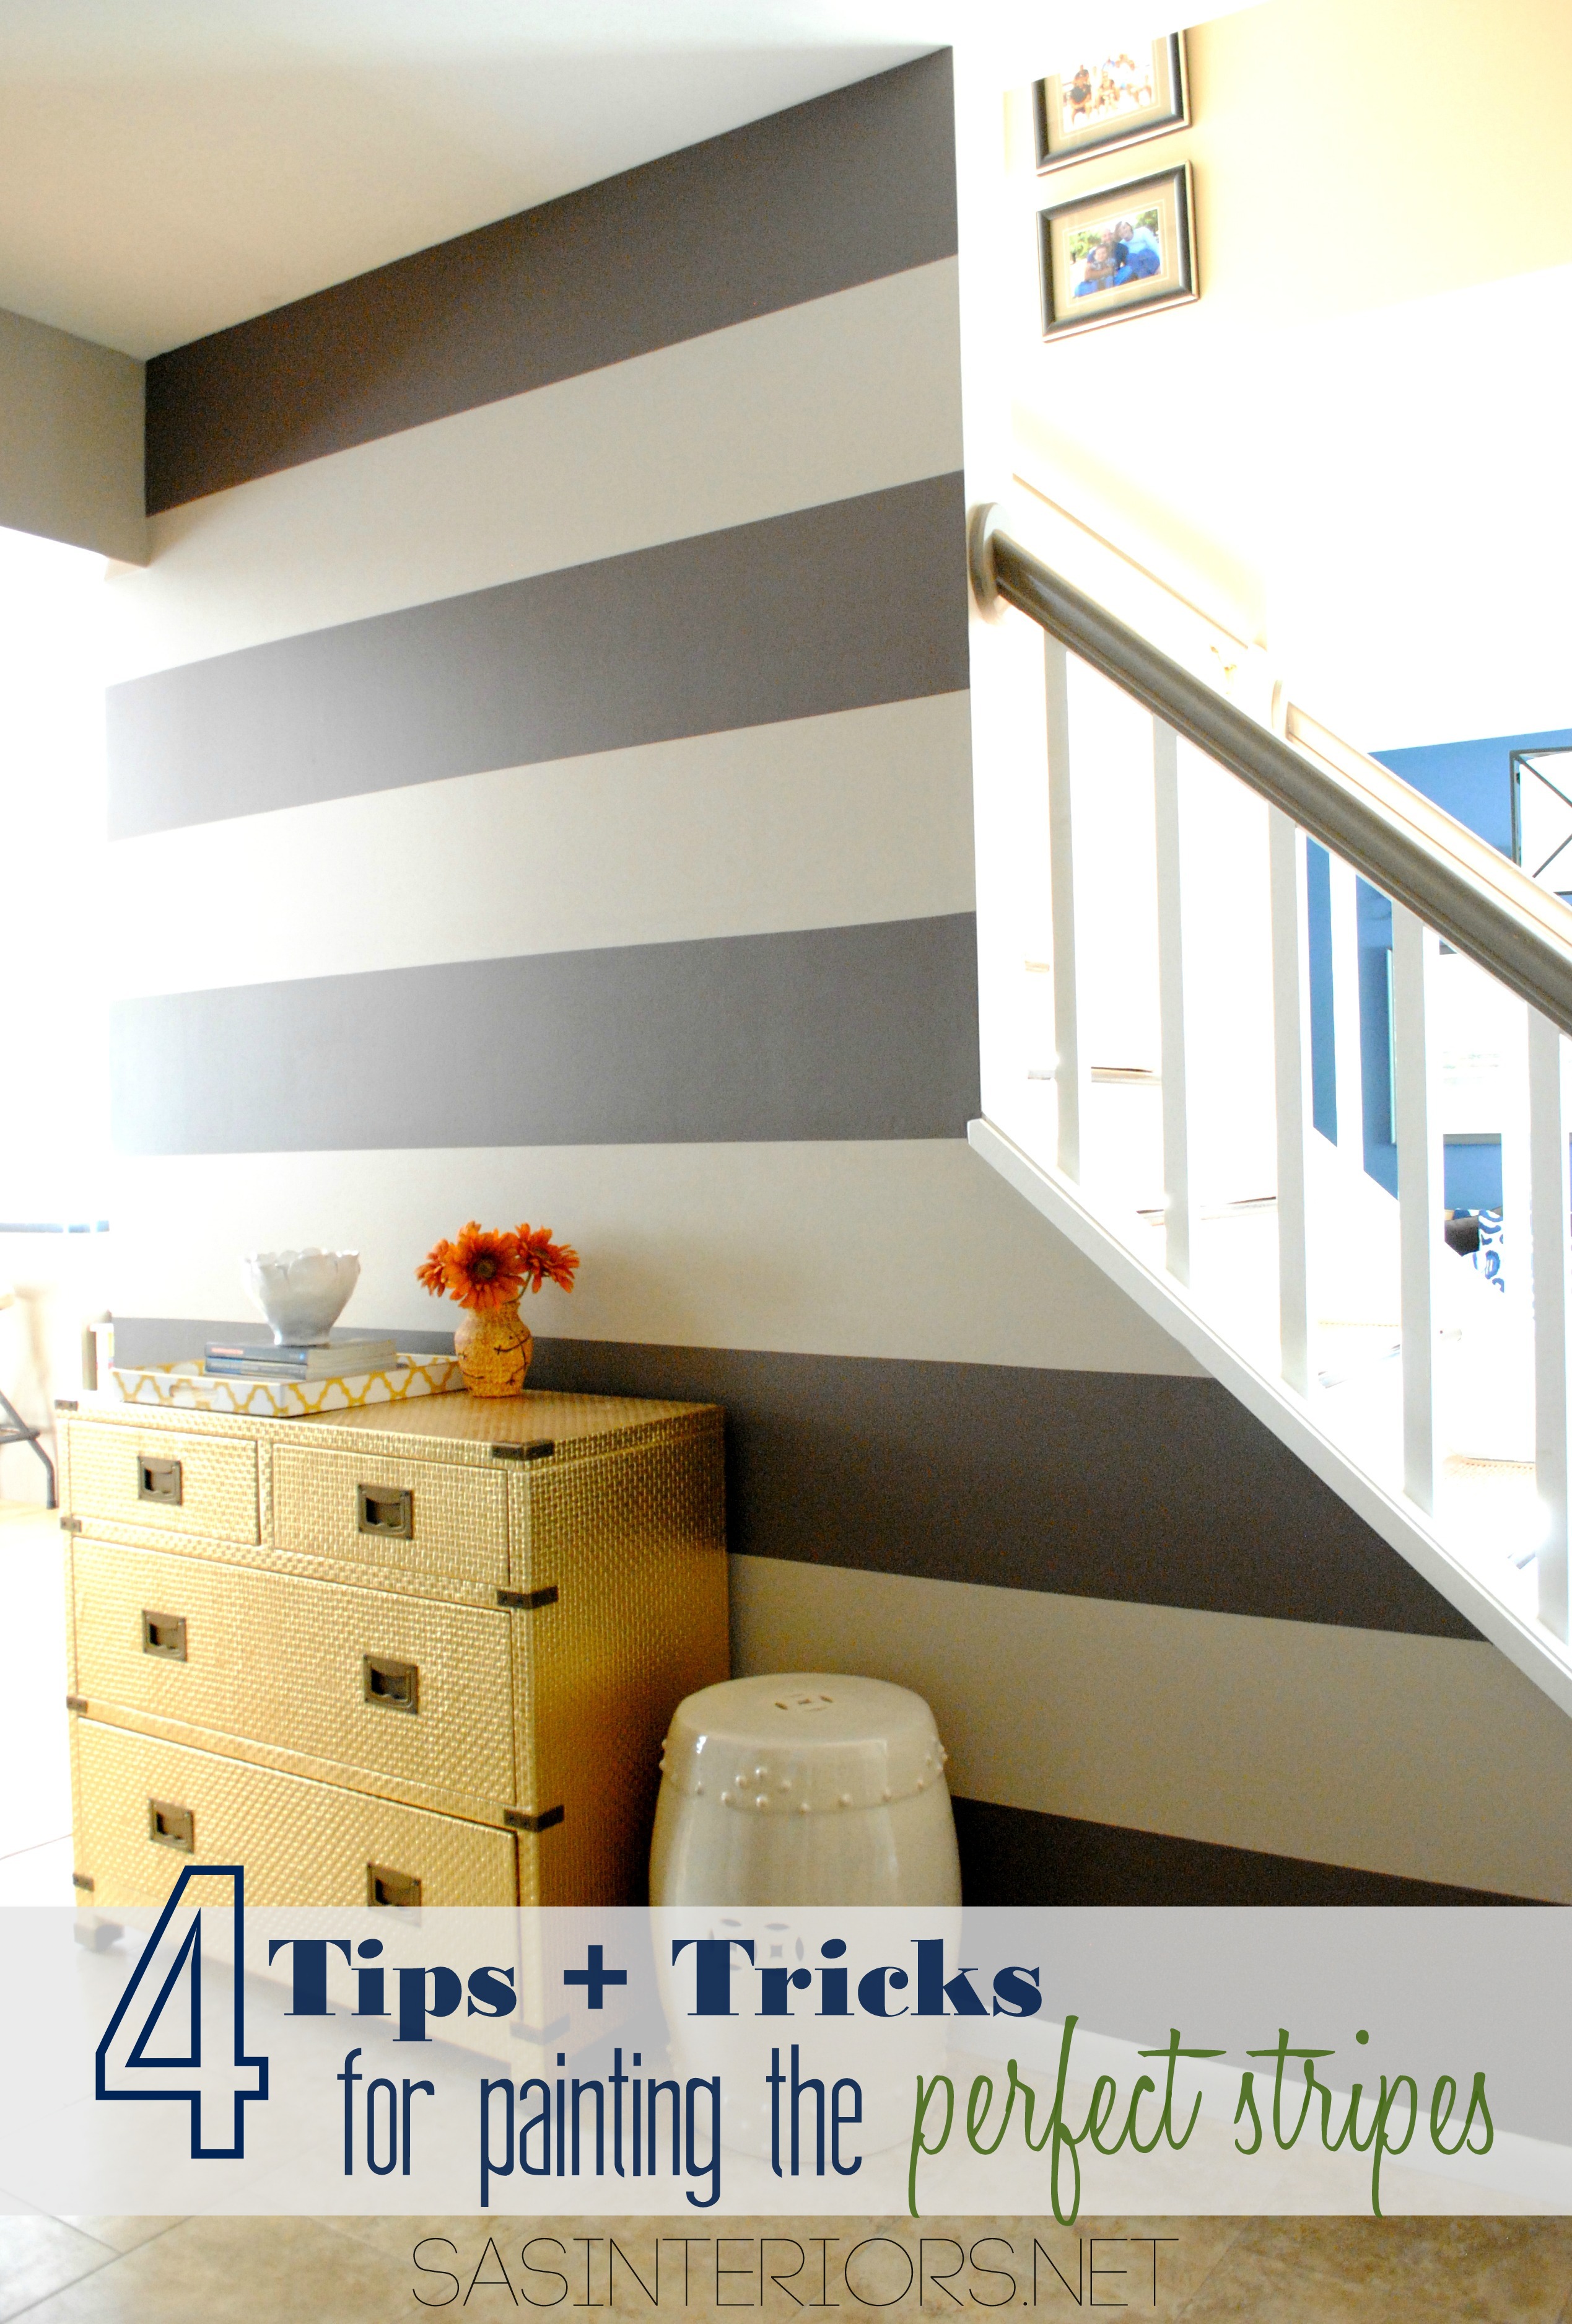
tips + tricks for painting stripes —> Click here

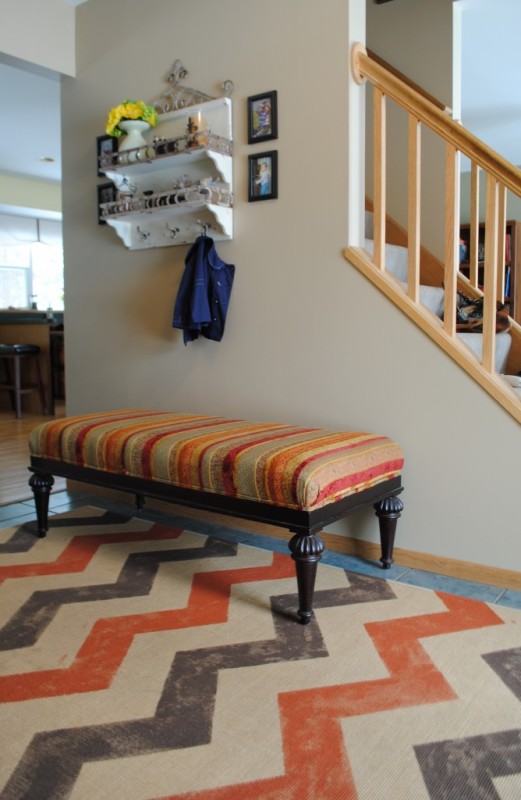
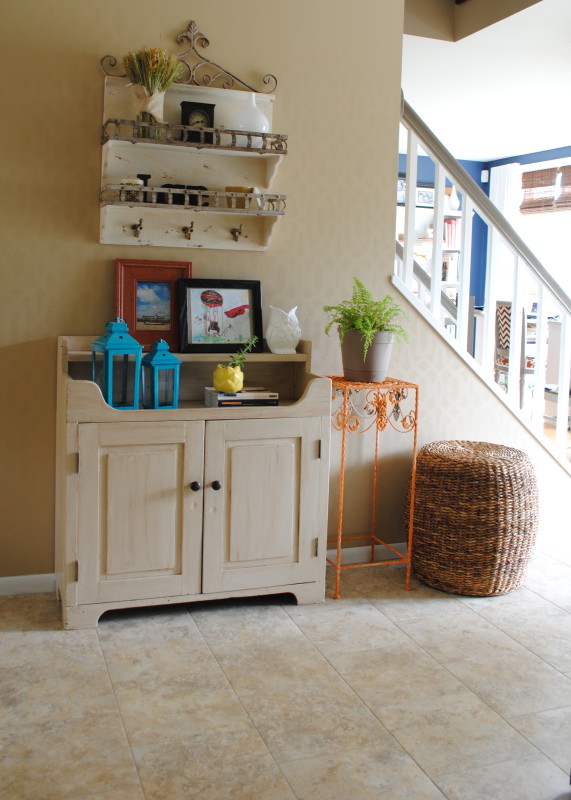
Let me take a step back and show the evolution of the space over that past few years.  When we moved in a little less than 4 years ago, the space was dark and the complete opposite of inviting.  The mouldings were wood, the floor was a dark teal ceramic, and the space looked dated.  Actually this picture (from 2011) shows it better than when we moved in with the walls painted and the chevron sisal rug.

'Before' Foyer Revamp

Within that year, I stenciled the wall, tackled the staircase (no more carpet), changed the wood mouldings to white, and installed a new luxury vinyl tile floor. The result (from 2012)…

'Before' Foyer Revamp

A lot of tone-on-tone cream hues.  Not really my style. Hence the 2013 revamp!

Let’s take a tour of the new space…

This is the main “feature” wall of the foyer.  It’s a fairly small space, with a lot going on.  The foyer, office, and dining room/kitchen are all off of the foyer space, as well as the entry to the garage, the coat closet / pantry, and the laundry.  A lot.  As much as the space needs to be pretty, it also had to be super functional and not cluttered.  It’s a high traffic area with our family coming and going throughout the day.

Foyer Remodel with newly striped walls, fern art, and layers of colors + texture.  Spaced designed by @Jenna_Burger, www.sasinteriors.net

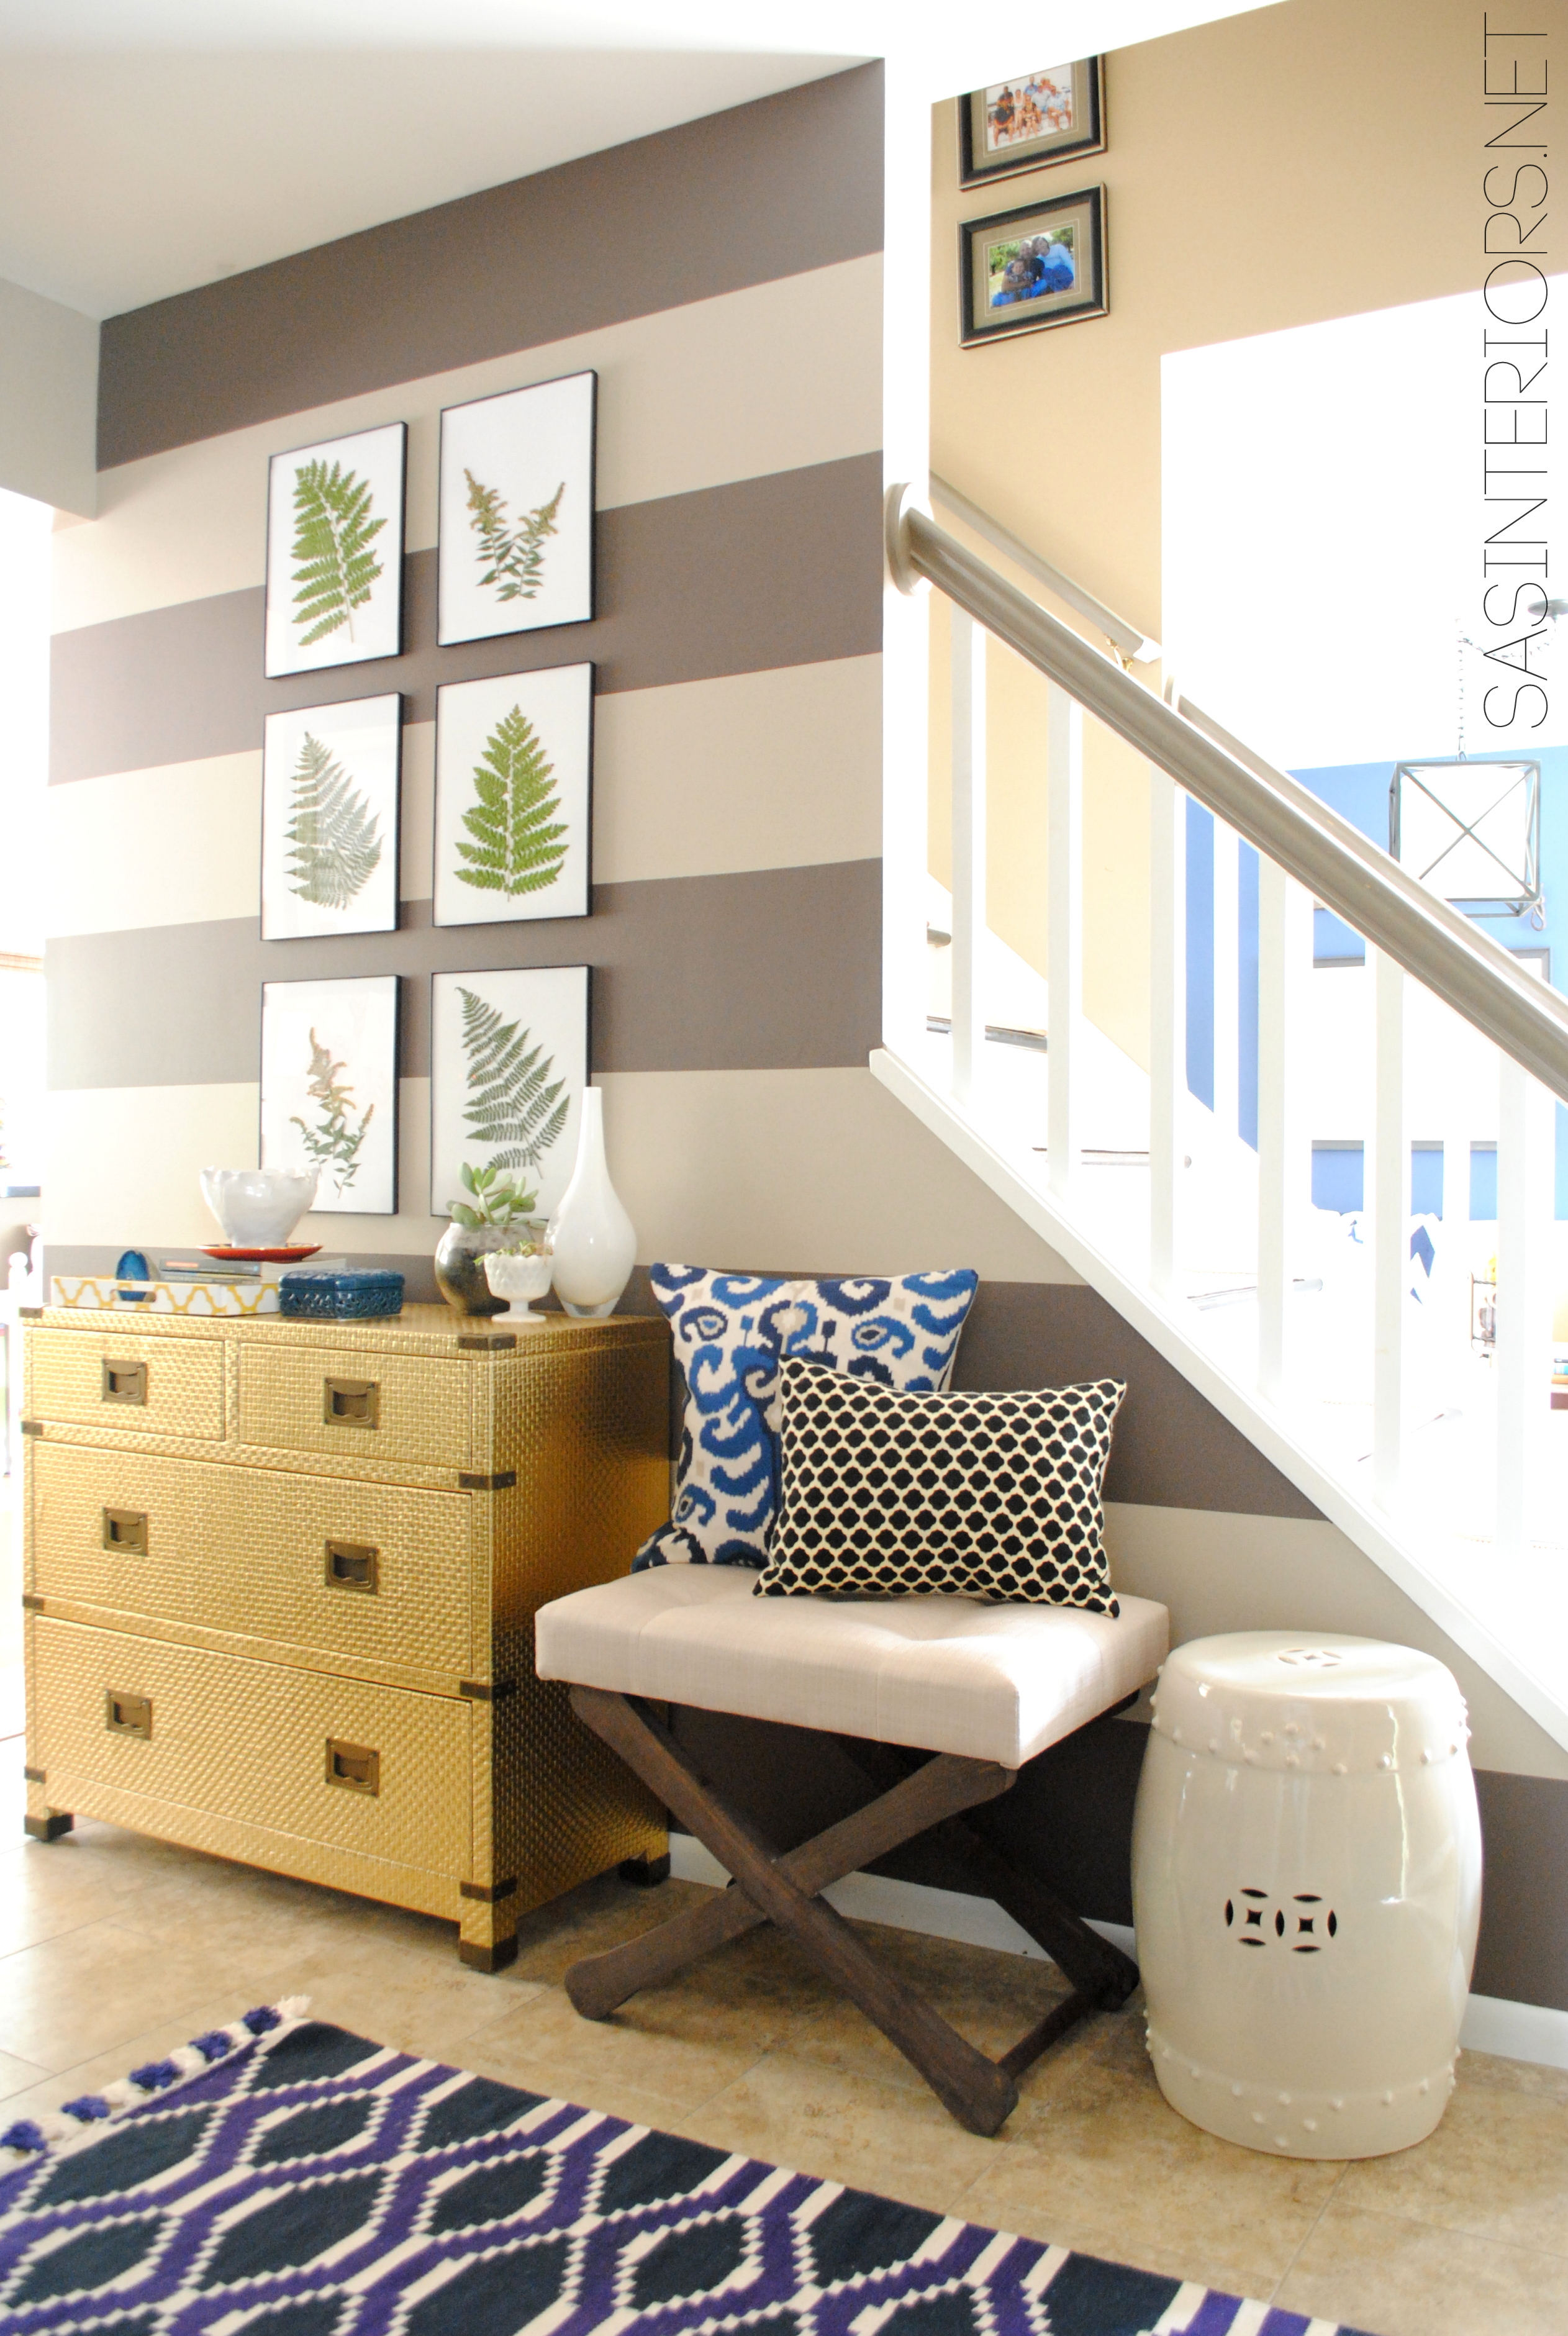
On the main wall is where I decided to add wide horizontal stripes in contrasting colors – a light greige with a dark charcoal (all the details can be found in this post).  The wide stripes visually create a taller space and fools the eye to think the space is long.  The stripes pull you in.

Foyer Remodel with newly striped walls, fern art, and layers of colors + texture.  Spaced designed by @Jenna_Burger, WWW.JENNABURGER.COM

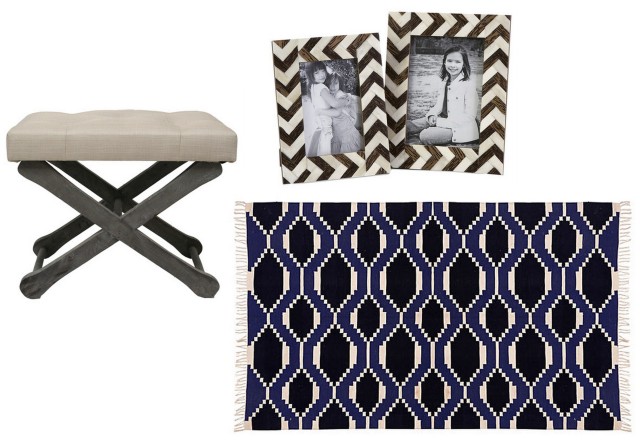
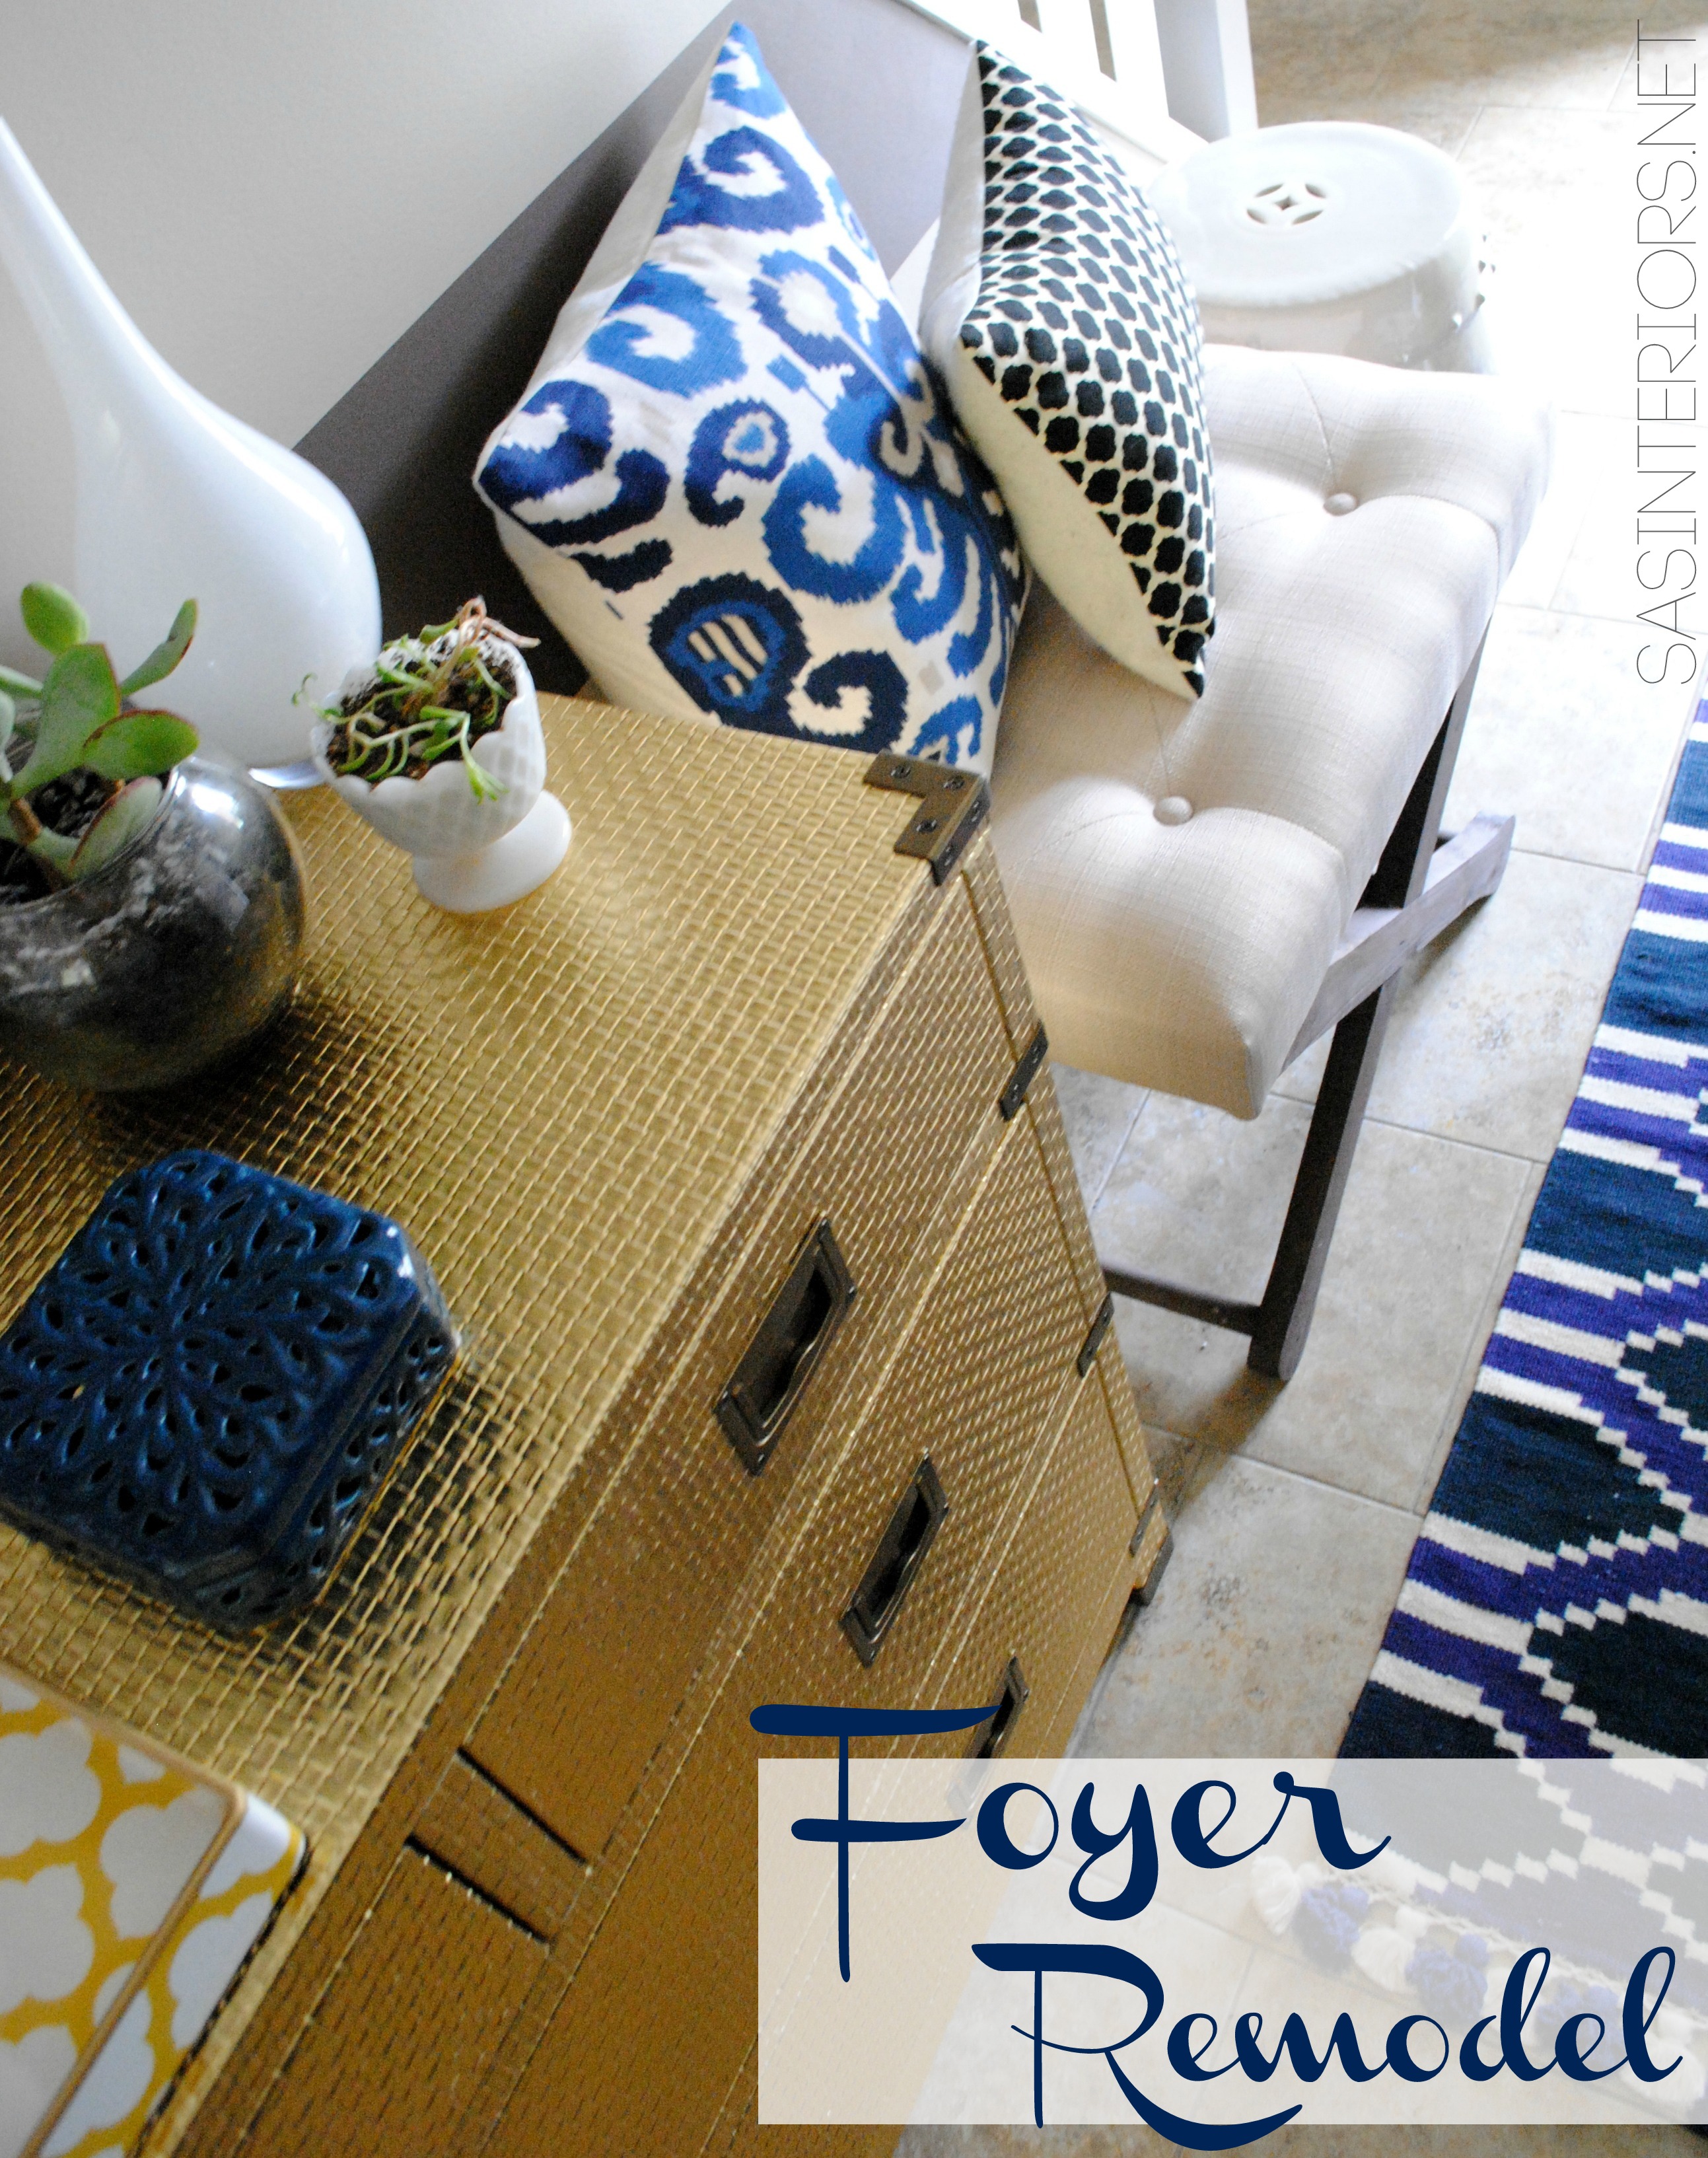
Even though the foyer is not a huge space, it does allow room for a piece of furniture.  I found this gold “gorgeousness” dresser that is super amazing.  It had me at first sight!  As much as it’s beautiful, it also is wonderfully functional.  The 4 drawers allow plenty of storage for the kids shoes and other misc items that never seem to have a home.

Next to the dresser, I added a beautiful upholstered ottoman – perfect for sitting and putting on shoes – as well as my favorite garden stool.  A few added pillows (from other rooms in the house) + some fun accessories for the dresser, complete the space!

Foyer Remodel with newly striped walls, fern art, and layers of colors + texture.  Spaced designed by @Jenna_Burger, WWW.JENNABURGER.COM

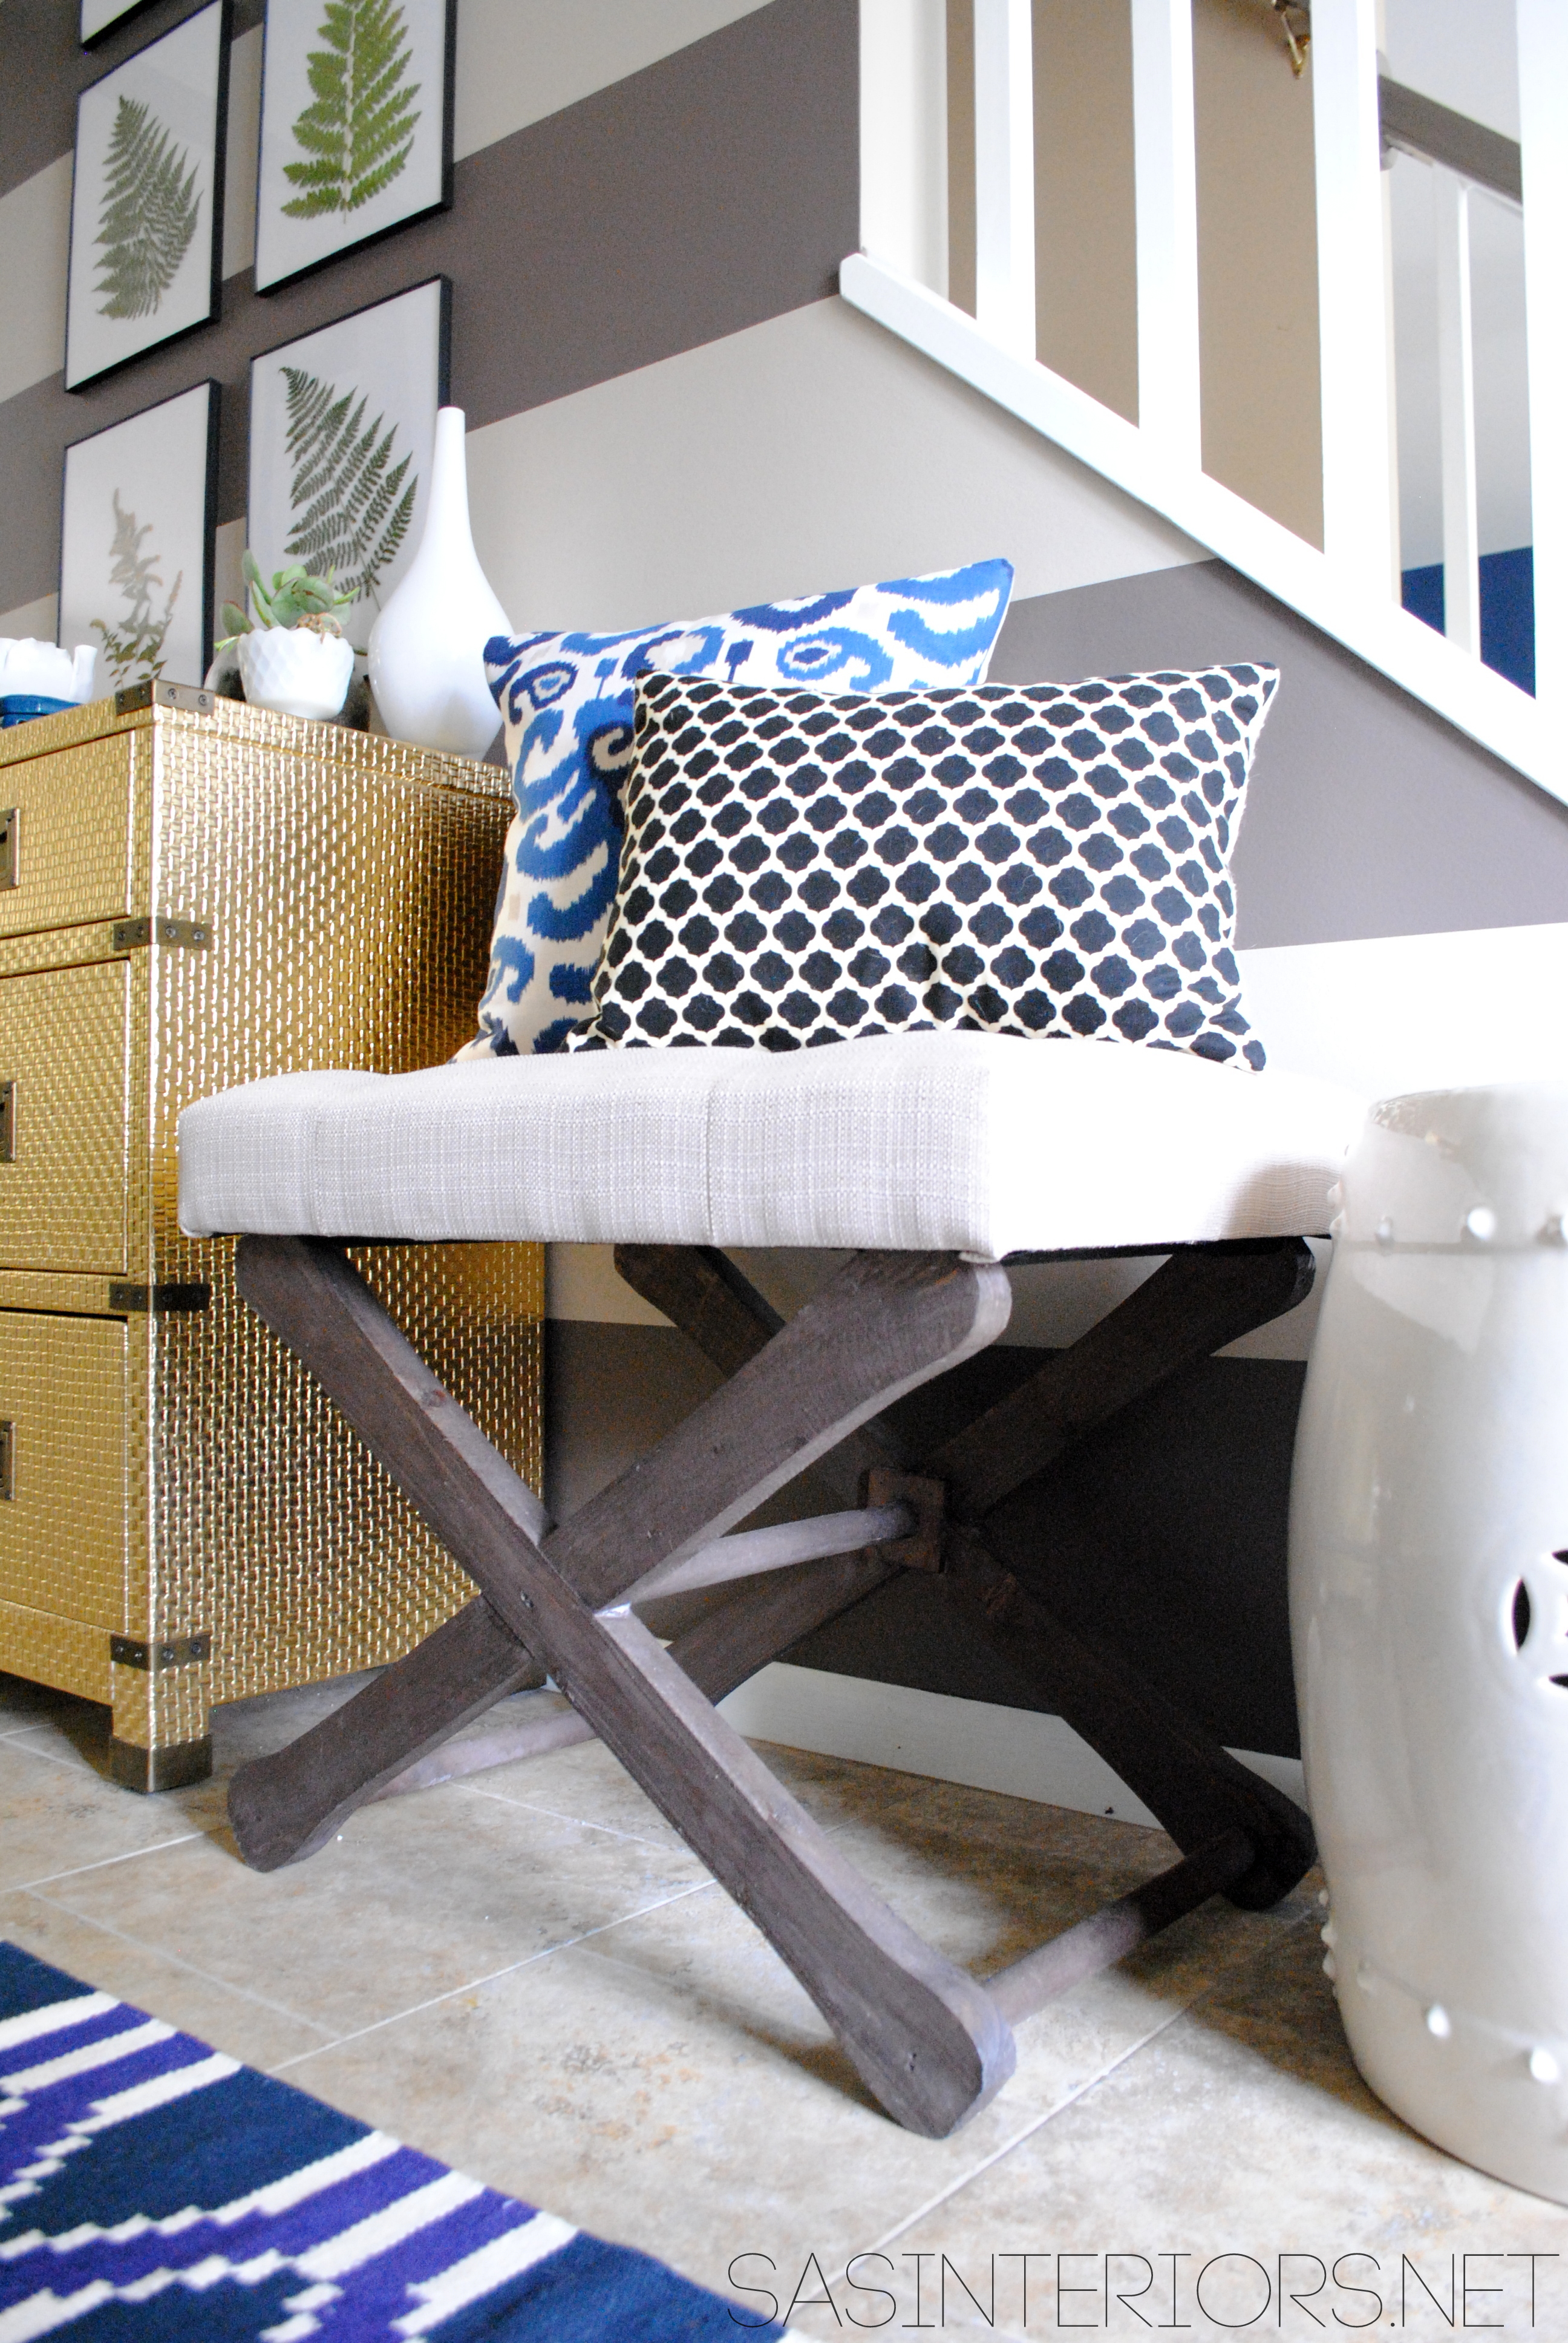
The rug is a recent purchase from One Kings Lane and was handmade in India.  I love the pattern, as well as the two blue hues.  Since I have multiple blue paint colors throughout my home, it really ties it all together.

Here’s a view coming down the stair…

Foyer Remodel with newly striped walls, fern art, and layers of colors + texture.  Spaced designed by @Jenna_Burger, WWW.JENNABURGER.COM

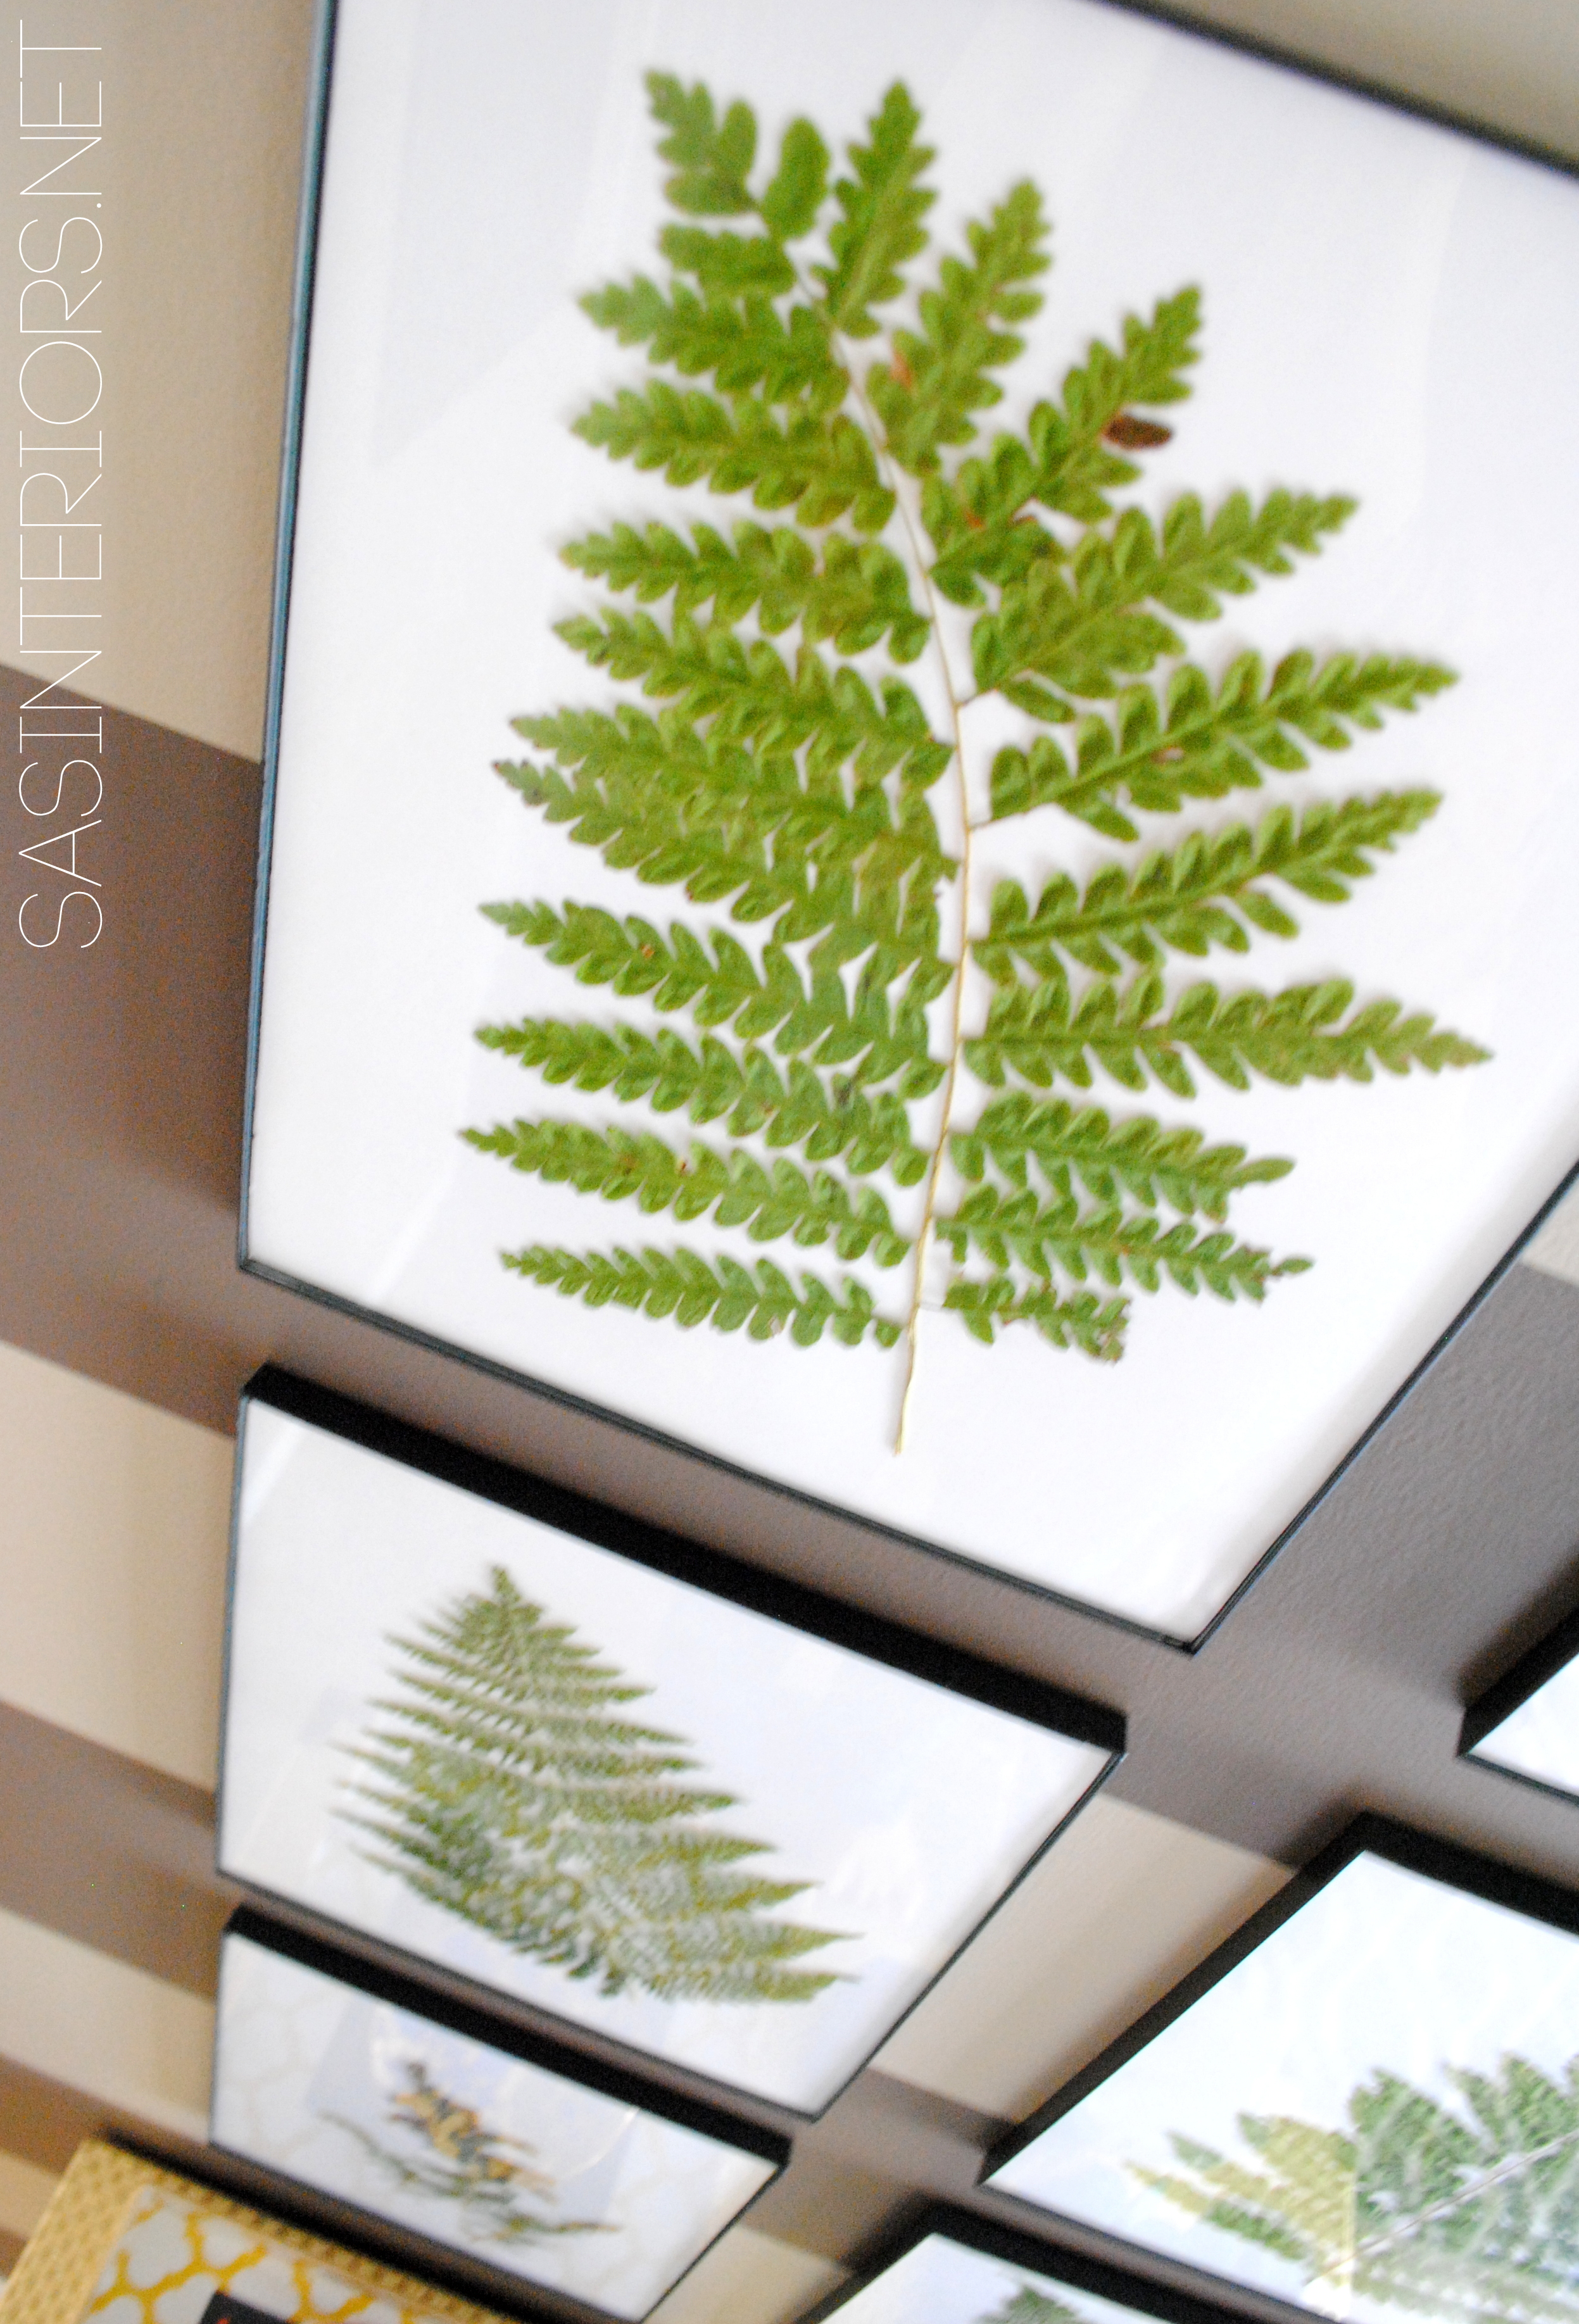
For the walls above the dresser, I decided to bring the outdoors in by framing nature.  The new “art” above my dresser are dried ferns and wild flowers —> for tutorial Click Here.  They were super easy to create and are so meaningful to our home since they came right from the backyard.

Foyer Remodel with newly striped walls, fern art, and layers of colors + texture.  Spaced designed by @Jenna_Burger, WWW.JENNABURGER.COM

Look who hopped in the photo session…  My little kitten Samson.  He’s never an arms length away.

Foyer Remodel with newly striped walls, fern art, and layers of colors + texture.  Spaced designed by @Jenna_Burger, WWW.JENNABURGER.COM

Welcome, as you come through the front door, this is the view.  The light greige color was continued around the room, but the darker charcoal stripe was only added to the main wall.

Foyer Remodel with newly striped walls, fern art, and layers of colors + texture.  Spaced designed by @Jenna_Burger, WWW.JENNABURGER.COM

To continue the deep charcoal color in the space, I also used it on the back of the front door.  Now the space completely flows since the color is used in multiple places.  And just to point out, the stair railing is also a taupe / gray color, so it’s all cohesive.

Foyer Remodel with newly striped walls, fern art, and layers of colors + texture.  Spaced designed by @Jenna_Burger, WWW.JENNABURGER.COM

Foyer Remodel with newly striped walls, fern art, and layers of colors + texture.  Spaced designed by @Jenna_Burger, WWW.JENNABURGER.COM

Foyer Remodel with newly striped walls, fern art, and layers of colors + texture.  Spaced designed by @Jenna_Burger, WWW.JENNABURGER.COM

It’s a great space to come home to now.  It’s absolutely an inviting, welcoming spot to enter.  Something that it wasn’t before…

Foyer Remodel with newly striped walls, fern art, and layers of colors + texture.  Spaced designed by @Jenna_Burger, WWW.JENNABURGER.COM

Thanks for taking a tour of my recently finished foyer revamp!  This space has had quite the transformation over the years.  I hope you enjoyed!  If you want to see more spaces in my home, click on over to my House Tour.

Tips + Tricks for Painting the Perfect Stripes

This time last week I was just about to jump into the foyer remodel.  I was picking up the paint + supplies, removing everything from the space, and getting the walls prepped.

A color was chosen.  The walls were spackled, sanded, and painted.  Then last the stripes were added.

Straight Stripes.
Crisp Stripes.
Perfect Stripes.

I am actually really impressed with myself on how straight the stripes turned out.

Here is the result…

Tips + Tricks for painting straight, crisp, perfect stripes

Now a week later, other than the styling + accessories, the space is complete. {big sigh of relief}…

But taking a step back, I learned alot about painting stripes.  There are many tutorials out there – I’m sure if you google it, you will find plenty –  and instead of giving you a step-by-step, I thought I’d simply give you the 411 on what worked and why.  Ready for it???

Trick 1.

The # of stripes.  Start out by determining how wide + how many stripes you want on the wall.   I wanted to go wide (somewhere between 10-12″ wide) + I wanted an odd number of dark stripes (for some reason odd numbered things appeal to the eye better), so I created a simple drawing of my wall.

The paintable wall (excluding the base moulding) measured =  93.5″.  I divided 93.5 by 9 (because I wanted 9 equal stripes) = 10.38. So each stripe resulted about 10-3/8″ wide.

Are you with me?  

Here’s a picture…

How To Determine Stripe Width + Tips  and Tricks for painting straight, crisp, perfect stripesI hope I didn’t lose you. Stick with me.

Trick 2.

So you got your stripe width figured out.

The next step is to make the stripes.  I went with the simplest technique for creating the stripes No nifty gadgets or gizmos were used, but instead just an ordinary, everyday tape measure.  Yup, I’ve got about a half dozen lying around.

Starting at the ceiling (that’s key – don’t start from the floor), I measured down about 10-3/8″ and made a mark with my pencil about every 20″ across the wall.

Then I connected the dots.  I lined up the tape with the first dot at the left wall edge, then continued across the wall meeting each dot.  It was fairly simple.  Once the tape was in place, I checked that the tape read 10-3/8″ all the way across.

When measuring stripes for the wall, always measure from the ceiling down.

Tips + Tricks for painting straight, crisp, perfect stripes

For this project, I used 3M painters tape.  I’ve used it before when painting the stripes in my son’s room & I have also tried FrogTape when creating the chalkboard wall for the CCC.  To be honest, I feel both are equal.  Both have a magical “formula” to keep the paint from supposedly seeping under the tape.  I don’t think that it works incredibly (but I have a another trick for that), so overall, I don’t prefer one more over the other.  Both do the job.  But, I will say, don’t cheap out (like I have in the past) and buy a generic painters tape.  IT. WON’T. STICK. TO. THE. WALL.  Go with the good stuff… 3M or Frogtape!

Trick 3.

So this is the best trick of ALL!!  The true way to achieving the most crisp, perfect striped lines with NO SEEPAGE under the tape is to “seal it”.  It sounds harder than it is.  After you’ve painted, use a brush to paint over the tape edge on the side you plan on painting the striped color (on my wall it was the dark color).   READ: ***Don’t paint the edge of the tape that is staying the background color because you will get a line after the tape is removed.

Then “burnish” (push hard) the tape into the wall so it makes a good seal.

Tips + Tricks for painting straight, crisp, perfect stripes

To help with remembering which side was which, I added a small piece of tape to the stripes that weren’t changing…  the background color.

Tips + Tricks for painting straight, crisp, perfect stripes

Then came the paint.  I’m sure you know how to do that.  No trick there…

Tips + Tricks for painting straight, crisp, perfect stripes

Last and final tip…

Trick 4.

After the second coat of paint remove the tape.  Yes, while the paint is still wet.

Tips + Tricks for painting straight, crisp, perfect stripessorry for the mucky picture, it was late at night when I took these pictures.

And you’re done.  Those are the 4 easy tricks + tips I have for painting stripes on walls.

Tips + Tricks for painting straight, crisp, perfect stripes

Fairly manageable, right?  So do you think you would try stripes now?

Have you ever seen the stripes I painted onto window curtain panels?  They are still my most favorite curtain panel to date…

How to add stripes to a curtain panel using paint

Anyway, let’s get back to my foyer.  Want to see more pictures of the crisp, straight, and incredibly perfect lines?

Tips + Tricks for painting straight, crisp, perfect stripes

Tips + Tricks for painting straight, crisp, perfect stripes

Tips + Tricks for painting straight, crisp, perfect stripes

Tips + Tricks for painting straight, crisp, perfect stripes

Tips + Tricks for painting straight, crisp, perfect stripes

And there you have it.  The crispest lines you’ve ever seen and it was so easy. Are you ready to paint stripes on your walls?  I’m thrilled with the result.

I have a few things I just ordered to finish up this space.  Here’s a peak…

With the new gold gorgeousness, a.k.a. the new gold dresser, these new elements are going to be just right to finish up the space.

Once they arrive, I will share the big reveal.  Until then, be sure to get your stripe on this weekend.

Where are you going to add stripes?  Do you have stripes in your home already?