Year: 2011

Your Favorite Top Posts of 2011

I hope you had a wonderful Holiday filled with many blessings.  I had a beautiful Christmas and was so thankful to spend it with family!  With the weeks of anticipation leading up to the big day, it’s kind of sad to see it end.  At the same time though, it is exciting to think about what the year ahead has to offer.

I can not believe 2011 is just about over.  Can you?  I’m always asking myself, where has the year gone!  It seems like it was January, just two days ago.  Do you feel that way?  As a wrap up of 2011, I decided to walk down memory lane to see what posts were favorites of my SAS readers.  Some of them, I was quite surprised about, and others I knew you really enjoyed.

Let’s take a look by counting down from 10 to 1

10. DIY: How to Make Simple Lined Window Drapery Panels

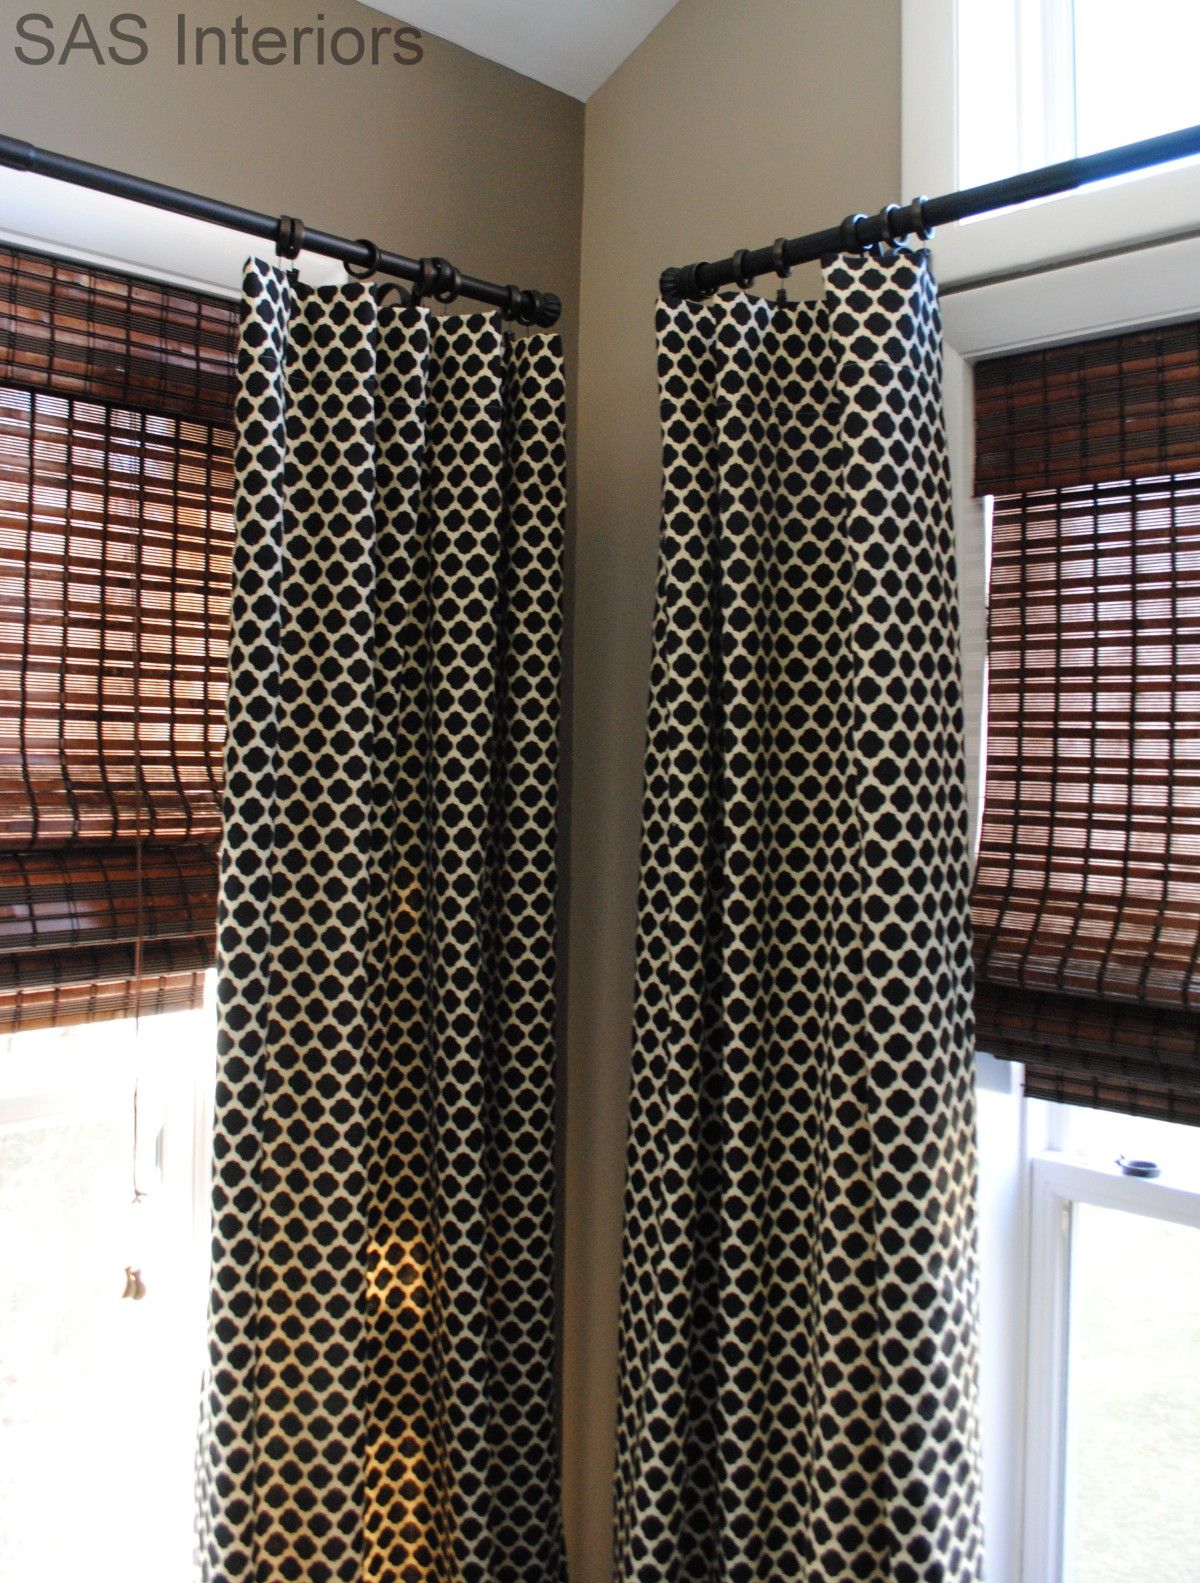
Funny that this post is in the top 10…  My lined window treatments for the master bedroom that I still have yet to complete – ha!  I was a bit nervous to make these window treatment panels since I had never made something like them before, but using drop cloth as the lining material and a fun geometric fabric, I was quite surprised how easy and luxe they turned out!  I hope to finish up this space soon…that’s on my 2012 list of To-Do’s.

9. DIY: Personalized Dry Erase Calendar

This is the post I’ve probably received the most comments / questions about!  It was definitely a favorite of mine to create and something that I use EVERYDAY…  my personalized dry-erase calendar that I made for my central command center .  Upon being inspired by Beth’s, I made one for my family to keep us on track so we know where to go and when!  Yes, you can use a dry-erase marker directly on glass and if you’re looking for the calendar printables, click {here}.

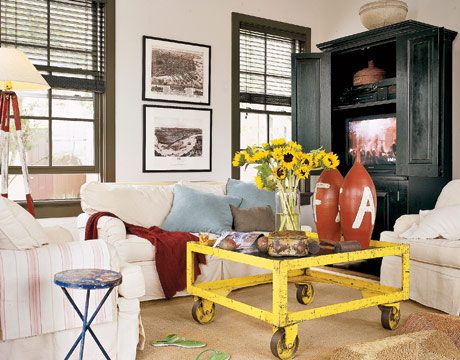
8. 5 Ideas to Accessorizing Your Coffee Table Decor

It’s the center of most living / family rooms, yet it’s often forgotten about or is cluttered with magazines, papers, and remotes. Even though in my home most of the coffee table decor is thrown on the ground and instead my 2 & 5 year old sit or jump on the coffee table (a.k.a. large leather ottoman), here are some 5 easy tips for accessorizing your coffee table.

7.  Faux Animal Heads For Your Interiors

I’ve realized for a while that this has been a popular post by y’all, but of the many that I’ve written, it surprises me.  I know faux animal heads /antlers were hot-hot-hot this year, but it’s interesting to me how many views this post received.  I have to admit, some of these interior spaces are gorgeous!

6. Decorating Above Kitchen Cabinets

Another decorating post that was really popular – How to decorate above the kitchen cabinets!  I felt alittle bad after publishing this post with what I said about ditching the faux vines…  Sorry if I hurt your feelings, it’s just my opinion.   Above the cabinets, is often a bare space of unchartered territory that you may have thought to add some decor, but just didn’t know what to display or how to pull it all together. Am I right?  By having a focal point, adding layers and varying heights, this “real estate” in the home can become Oh-So-Stylish!

5. DIY: Child’s Play Kitchen

The kids play kitchen was probably my favorite diy project of the year.  I’m not sure if it’s because it’s outside of the typical realm of my everyday “interiors” life or simply because my kids get so much enjoyment out of it, but this was a great project to imagine and then create.

4. 15 Creative Ways to Display Christmas Cards

I only write this post three weeks ago, but it has received an unbelieveable amount of interest and views.  I guess many of you needed ideas on how to display your Holiday cards (I did – that’s why I wrote the post and created this). I’m glad you enjoyed!

3. 15 Inspiring Autumn Wreaths

Some of the most enjoyment I receive when putting together posts are researching and being inspiring by others creations.  Autumn is my favorite time of year and I was so excited to create this post of Inspiring Autumn Wreaths.  There were SO many amazing wreaths to choose from and the ones I showcased were just a few of my favorites.

2. Creating a Photo Wall Display

Creating a montage of photos can be a bit tricky (and intimidating) to figure out where to start and then how to balance the sizes and layout. In this very popular post, I shared room examples and actual layout ideas to help make displaying those beautiful family photos alittle easier.

DRUMROLL…


1. 5 Minute Autumn Centerpiece


With over 20,000 views, my Autumn log centerpiece blew every other post away by a landslide.  This was the easiest and most beautiful DIY creation that I have ever made, and it literally took my 5 minutes!  The response from this post alone has been crazy.  My daily pageviews since this was published has gone up 3x – I truly never thought this simple project would get such great attention.

And this is how I transformed it for the Holidays.

I never know what will make a good post.  Some things that you love surprise me and other things that I thought would be very interesting to read, no one really cares about.  That’s what makes everyone different!  Thanks for taking a trip with me down memory lane to peak at your favorite projects and posts from the 2011.  Later this week, I’m going to share a month by month review of what I’ve accomplished and then in a few weeks after the New Year, I plan on sharing a post about my goals for 2012…  I’ve got to give some more thought to that.
DIY: Holiday Photo Cards

It’s that time of year when the post office is at it’s peak with the hustle and bustle of people sending out packages and waiting on line for stamps to mail their Holiday cards.  I usually design my cards in early November and mail them out right after Thanksgiving (this year though, I was a little late).

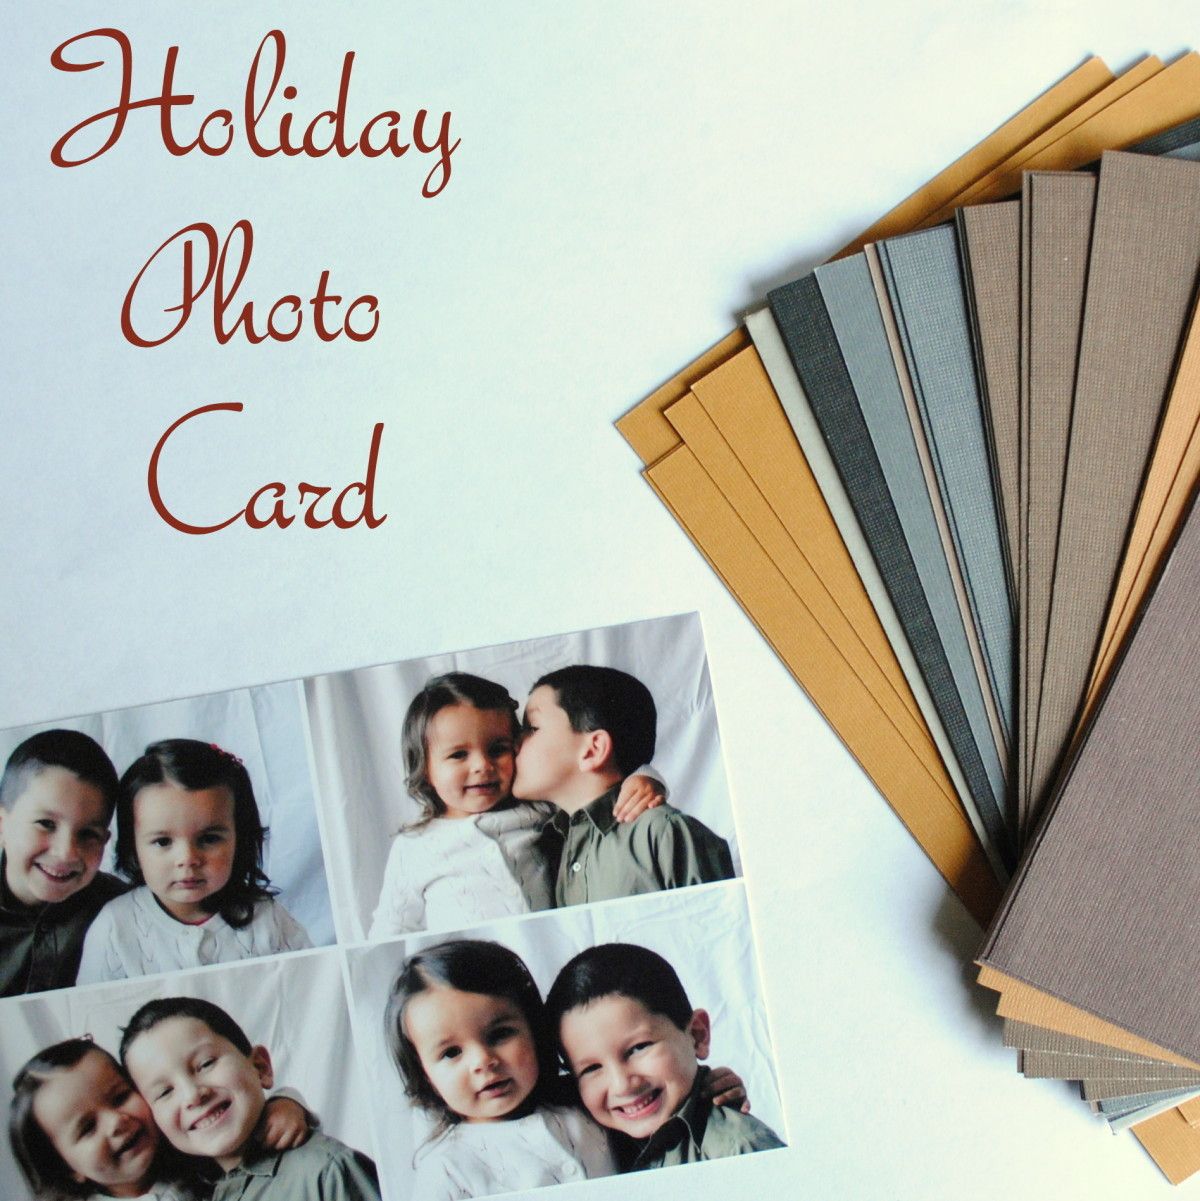
Because I have young kids and we have family near and far that we don’t often get to see throughout the year, I like to design and send a photocard, but they can often be expensive.   In being somewhat of a frugal person, I decided to make my own Holiday photocards this year (and honestly, I like the result better than the plug-your-picture-in-and-print style).

After a long photo session with the kids (which I was the photographer of), I used the free program, Picasa, to make a collage of pictures that would be perfect for the card.  I had them printed at Walmart for .09 cents each (x 40), which ended up costing me just over $3.00.

I was originally thinking of using white index cards to mount them on, but then I was able to find really heavy and pretty card stock that was slightly larger than the picture.  The card stock came in an assortment of earth tone colors, and was the perfect backdrop for the photo montage.

Using Aleene’s Tacky Tape Runner, I added three rows to the back of the picture to make a tacky surface so it would stick to the card stock.

This is the back of the photo, where you can see the three rows of Tacky Tape that I added.  I originally planned to use a gluestick to adhere the picture to the card stock, but this tape was SO MUCH BETTER!  It was easy to apply to the picture and then it adhered very well to the card stock surface.

I actually was lucky enough to receive this Tacky Tape from Aleene’s, along with some other “tacky” products that they offer. (and I mean “tacky” in a good way, not the overboard-ugly-too much way!)

Then flip the card onto the cardstock, and it’s complete!

Write something on the back, and they will be ready to mail!

We don’t really have an Aunt Betty…  I just wrote this out for the tutorial 🙂

If you’re interested in trying out products by Aleene’s to create your own creation, their products are available at Michael’s stores or online at www.Ilovetocreate.com.  I know you will be happy with the result of your project when you use their products – I sure was!

My Holiday cards are in the mail…  Are yours?

All the opinions in this post are 100% mine! Full post disclosure here

I link my projects to some of these parties: Skip to My Lou, Dittle Dattle, Between Naps on the Porch, Today’s Creative Blog, Stories of A to Z, All Things Heart & Home, Savvy Southern Style, House of Hepworths, Finding Fabulous, Creation Corner, The Shabby Nest, Tatertots and Jello, Funky Junk, Under the Table & Dreaming

If you’d like to see more projects by other bloggers using the Aleene’s products, click on the links below:


DIY: Christmas Stockings

Did you check out my newly decorated Christmas mantel?  If not, that’s okay (but head over there now).  In that post you got a little sneak preview of the Christmas stockings that I recently made.  As a family of four, we’ve never had matching stockings.  The mister and I have the same (since we bought those together after getting married), but then came child #1 and he got a different style stocking, and after that child #2 came along and she has an even different style stocking.  Anyway, each year it’s been a mish-mosh of different color and style stockings hung on the mantel, until now.

You know my love for drop cloth, so what did I use?  Yes, you guessed it…the big DC!

I’ve always wanted to make stockings, but was intimidated thinking it would be too difficult – but IT WASN’T!

Using drop cloth material for the main stocking, creme colored felt for the cuff, and the basic sewing essentials, I created these stockings, that now sit at the mantel, in no time!  To start off, I used the old stocking as a template to create the “boot-like” shape.  I then cut an 8″ x 12″ piece of felt for the cuff, and sewed the “right” sides together (see pictorial).

I made 4 stockings (which have 2 sides each), so I had a total of 8 sides.

Once the cuff is attached to the “boot”, open the cuff and iron.  Then put the “right” sides of the boots together and pin all around.  Using a 1/2″ inseam, sew around the entire boot, EXCEPT at the top edge of the cuff.

Once you finished sewing all the way around, turn the stocking to the “right” side using the opening at the top edge.  Then iron the edges flat.

The stocking form is made – YAY!

At this point of the stocking-making-process, the tops of the cuffs will probably not match – that’s OKAY!  Taking a scissor or rotary cutter, trim the top edge of the cuff to get a straight line.

Then it’s time to make the cuff – turn over the felt fabric and adjust it to the amount that you want to see for the “cuff”.  I’ll admit, at this point, I was a wee bit mad at myself for not forethinking what I’m about to share.  There are many different ways to make stockings and honestly, I didn’t do any research beforehand, and just “went for it”.  Kind of a mistake.  When I went to turn the fabric over to make the cuff, I realized that you could see the stitching on what was before the “inside” of the cuff (see right pictorial).  At this point, I was about to ditch the project, but then I realized because the fabric is felt, it won’t fray and it actually gives the edge a decorative look.  I trimmed the edge about 1/4″ off the seam and I’m pretty happy with the result.  Another (slight) fail to success project!

Essentially it’s complete at this point, but of course you need something to hang the stocking.  Using another piece of felt, I simply made a loop that I sewed on to the inside edge of the stocking cuff.

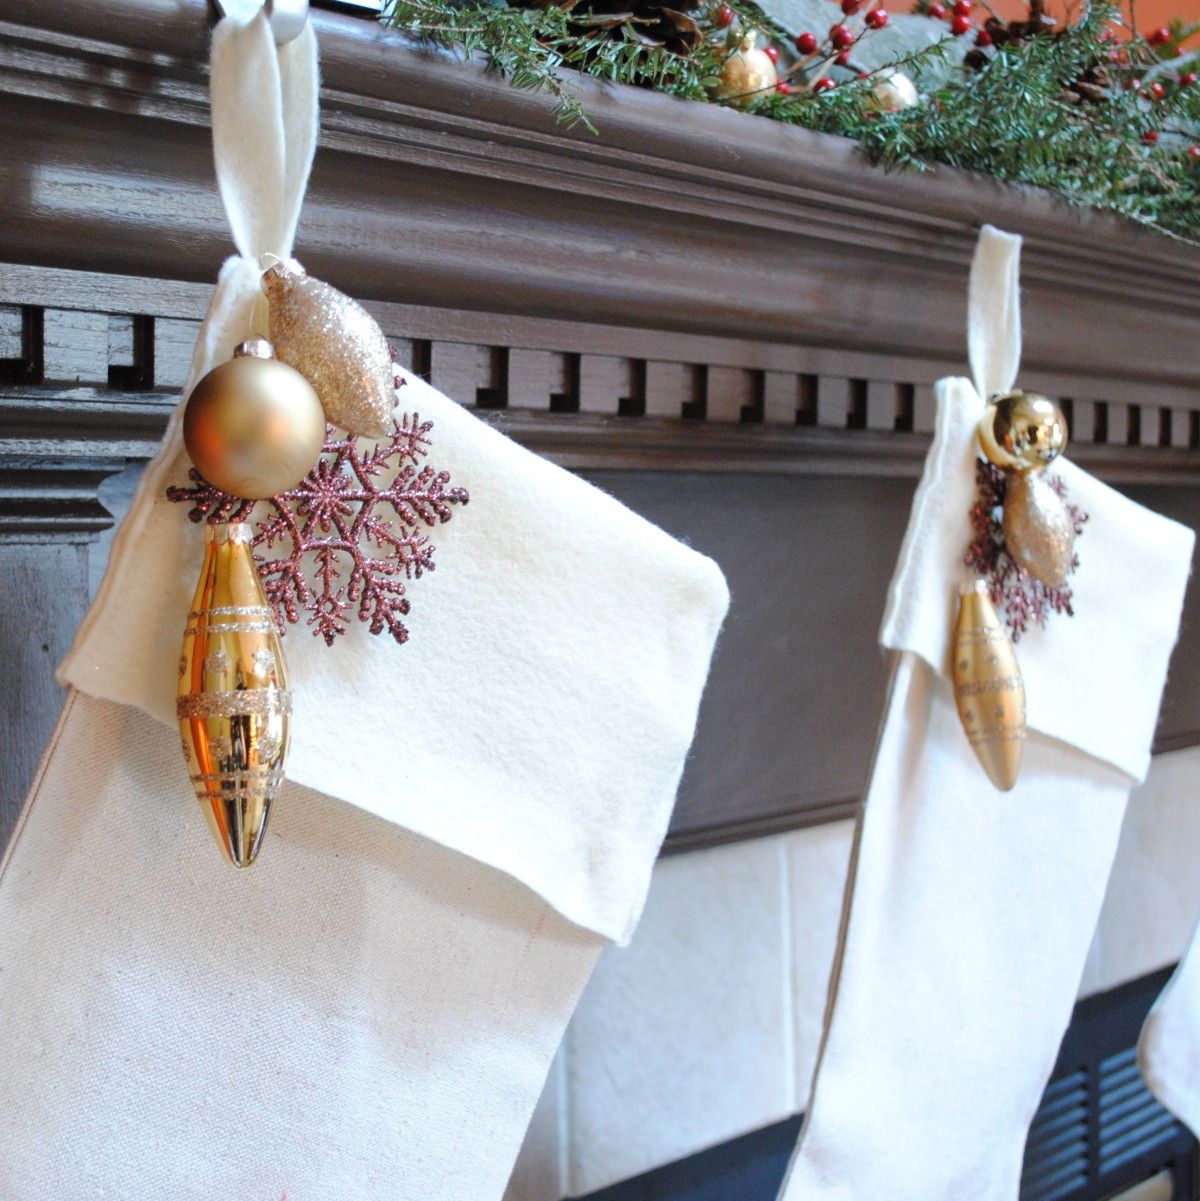
Now they are ready to hang!  If you saw my Christmas mantel the other day, you may have noticed that the stockings were plain and unembellished.  Well that only lasted a day.  Using the ornaments from my Organic Centerpiece that I displayed on my dining table last Christmas, I looped them through clear fishing line and hung them around the felt loop of the stocking.  Also adding a chocolate glitter snowflake, the collection was a beautiful accent to the neutral-colored background fabric.

Also placed on two of the stockings are pins that were favorites of my husband’s late grandmother. A little way he remembers her around the Holidays.

I really love the simplicity of these stockings.  Each year as I change my colors and Christmas decor they will always be a beautiful accent to different embellishments that I can add.  Do you hang stockings at the fireplace?  Are they matching or a mish-mos of different styles like I had for the past years? (and just to set the record straight…  I don’t mind mish-mosh…  it’s eclectic!)

I link my projects to some of these parties: Skip to My Lou, Dittle Dattle, Between Naps on the Porch, Today’s Creative Blog, Stories of A to Z, All Things Heart & Home, Savvy Southern Style, House of Hepworths, Finding Fabulous, Creation Corner, The Shabby Nest, Tatertots and Jello, Thrifty Decor Chick, Under the Table & Dreaming

Holiday Mantel and Table Centerpiece

I know I said a couple of weeks ago that I wasn’t in the Christmas Spirit, but now I finally am!   Last weekend, after our bellies were stuffed with Turkey, we started transforming the house from the Fall / Thanksgiving decor over to Christmas.  I’m not sure why I was so reluctant at first and unprepared for the changing season, but o well, it’s past me and I’m excited for some Holiday Cheer!

The center and focal point of our home is the fireplace (yes, the one on the burnt orange wall), and again it has been decked for the Holidays!  I was quite anxious to get started on the mantel because I knew exactly what I wanted to use and how I envisioned it to look.  I was thrilled with the result of my Fall centerpiece creation and wanted to use the log as the focal point for this year’s Christmas mantel.

Here is a simple run-down of how I created the log.

  1. Find a log of any length that you desire (My log is about 4′ long)
  2. Using a 1.5″ drill bit, drill holes into the log every 5-6″
  3. Insert tea lights or battery-operated candles into the holes.
  4. It’s ready to decorate for any season!

Back to the mantel…

Once I placed the log on the mantel, I simply started layering.  I used faux greenery for the base, then added some natural cut greenery from trees in my backyard throughout.

Then, I took faux berries (purchased at the craft store) and incorporated them throughout the greenery.  Because they are bendable, they are easy to work with.  After that came the final touches…  Ornaments, pinecones, and some other branches and twigs from the outdoors.

It was complete in no time!  This Holiday log decor on the fireplace mantel makes for a beautiful focal point.

Once it was complete, I had to add stockings, of course!  As a family of 4, we’ve never had matching stocks and they’ve always been on my to-do list to make.  I whipped out my sewing machine and a few hours later, added beautiful new stockings to the decor!  I’ll share a tutorial on that later in the week.

We really enjoy how the stockings are hung by the chimney with care

These stockings look kind of plain, but I jazzed them up yesterday…stay tuned and I’ll share more this week!

Part 2 of this post

I had to share this with you too…

Before deciding to decorate the mantel using the log, I was actually planning to display it on the dining room table similar to the fall centerpiece.  Since we use our dining table everyday, it was BEAUTIFUL, but not practical because the natural greenery sheds alot (forewarning).  On the fireplace it works because it’s not moved everyday.

Using the same technique as decorating the mantel, I layered greenery, branches, berries, and pinecones, then finished the centerpiece with decorative ornaments.  If you want to see more on this creation, I shared this project on my TV debut on Fox 23.

Complete with the handmade stenciled drop cloth placemats I made a few weeks ago, the table is set for Christmas!

The Holiday decorating continues…I’ve got many more projects and ideas to come during this countdown to Christmas!   If you’re looking for ideas on some do-it-yourself creations, head over to the Holiday section of Daily Do It Yourself.

I link my projects to some of these parties: Skip to My Lou, Dittle Dattle, Between Naps on the Porch, Today’s Creative Blog, Stories of A to Z, All Things Heart & Home, Savvy Southern Style, House of Hepworths, Finding Fabulous, Creation Corner, The Shabby Nest, Tatertots and Jello, Thrifty Decor Chick, Under the Table & Dreaming

Holiday Card Holder

Tis’ the season for cards!  Of course, you might get sent a random card here or there throughout the year for a birthday, anniversary, or special occasion, but there is no time like Christmas when you receive such a flurry of cards all at once.  And aren’t they such a delight to get?!  The anticipation of opening the mailbox each day around Christmas is so exciting!

Yesterday, I shared 15 creative ways to hang those plethora of cards, and today I am sharing my creation.  As I mentioned yesterday, I was in need of some inspiration this year as to how to display my newly received Christmas cards.  After doing a little hunting around the web, I was quickly inspired and created a unique card holder to call my own!

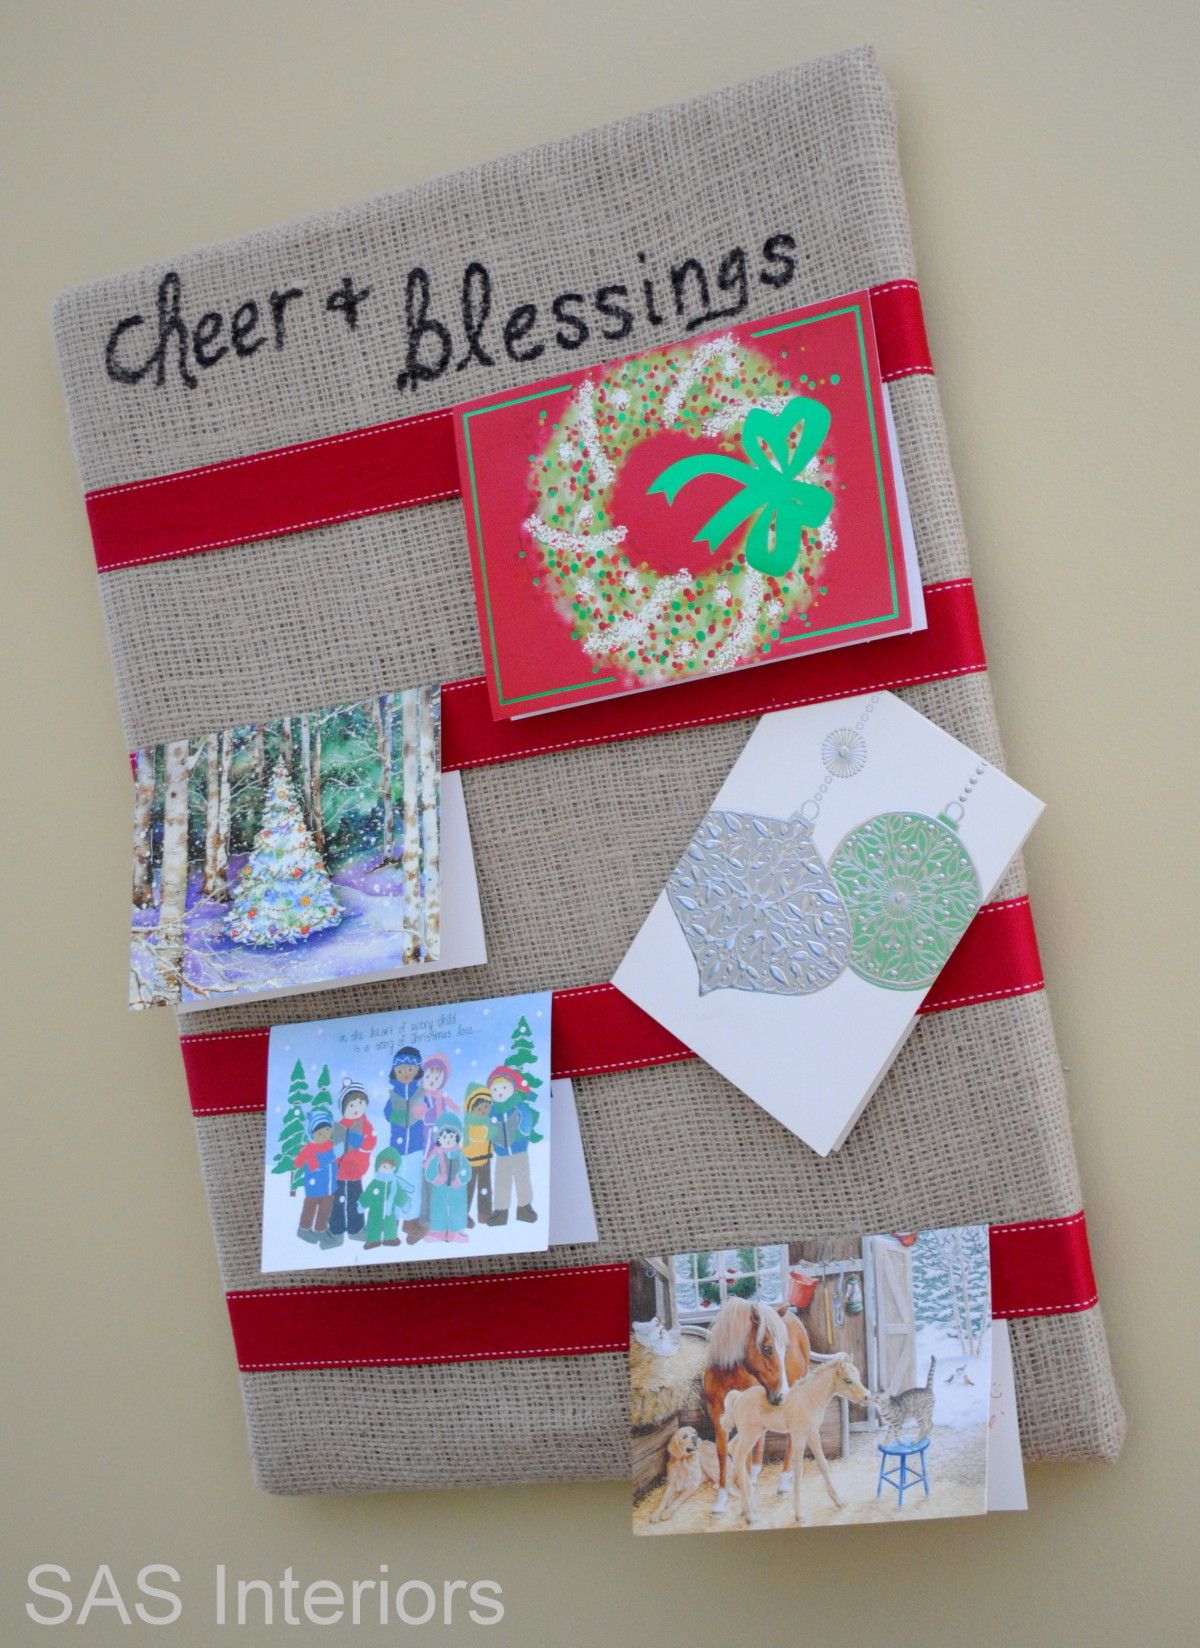
This Holiday card holder was actually very easy to make and only took a few minutes. If you’re interested in making something like this to hold your cards, I used:

  • 18 x 24 cork board (you could also use a picture frame or a flat piece of MDF or wood)
  • Burlap (or other neutral toned fabric)
  • Ribbon (one color ribbon or a few different styles)
  • Staple Gun

1. To start off, I ironed the burlap so it was free of any wrinkles and folded it over, so it was double thick.  (If using a tighter weave fabric, you may not need to make it double thick.  Because burlap has a loose weave, I didn’t want to see through it.)

2. I layed the corkboard on the fabric and secured it on the back with staples.

(I know it’s mess from the back, but you won’t see it)

3. Time to add the ribbon.  I used the same ribbon for the entire project because it’s what I had on hand.  You could also use different style and sized ribbon for a fun look! Before stapling, lay out the ribbon so the layout / design is exactly how you want it.  Then secure on the back with a staple.

4.  You can either hang it or lean it on a table.  I decided to hang the Holiday Card Holder, and made a loop on the back with some extra ribbon.  A few staples later…

…and it was complete!   Now I’ve got the perfect place to hang all the cards that will be delivered throughout the Holiday season!

I added the words: cheer & blessings to show how I truly feel to be sent these beautiful thoughts from people I love.  Using a black Sharpie marker, I added these two words that I am thankful to feel each day!

And don’t you just love that darling Winter Bucket List printable?  You can print it out for yourself to check off all the winter activities you do with your family!

Have you started decorating for Christmas yet?  I’ll have to be honest, I was not ready and excited this year as I usually am, but now that I’ve started transforming the house, I am getting psyched for some Christmas Cheer!

I link my projects to some of these parties: Skip to My Lou, Dittle Dattle, Between Naps on the Porch, Today’s Creative Blog, Stories of A to Z, All Things Heart & Home, Savvy Southern Style, House of Hepworths, Finding Fabulous, Creation Corner, The Shabby Nest, Tatertots and Jello, Thrifty Decor Chick, Under the Table & Dreaming


DIY: Drop Cloth Placements with Decorative Top Stitch

The Holidays are right around the corner and as I’ve been finalizing the table decor for Thanksgiving and getting ready for Christmas, I realized that I didn’t have any placemats that were festive or unstained (from past Holiday gatherings).  I was just about to head to the store, when I remembered I had purchased a new package of drop clothes the week before.  Why waste the time of spending money and venturing through the crowded stores, when I could just make what I was envisioning?!

If you’ve been a follower of mine for a while, YOU KNOW that I love drop cloth material!  Have you ever asked yourself, “Why does she always use drop cloth?”  I have.  My answer is because it’s cheap, durable, heavy, and looks very similar to linen (but without the wrinkles).  Have you ever made something using drop cloth material?  If not, you’re missing out – trust me!

To start off making these drop cloth placemats, determine the size you’re desiring.  I made the overall finished size 14″ x 19″, but cut my fabric to be 15″ x 19″ to allow for a 1/2″ seam all around. The beauty of making your own is that YOU can make any size you want / need – smaller, larger, square, triangle, oval…  And you can also use any fabric – It’s not a must to use drop cloth (even though I love it).

I made (4) placemats, so I cut (8) 15″ x 19″ pieces.  Iron.

Pin the right sides of the material together.  With drop cloth, there isn’t a “right” or “wrong” side, but again, this placemat tutorial can be used for ANY material.

Sew around the entire perimeter, leaving a 6″+/-  opening at one side, so you can pull the “right” side through.

Once the soon-to-be placemat is on the “right” side, iron the seams flat.

Looks pretty good and it’s almost done!

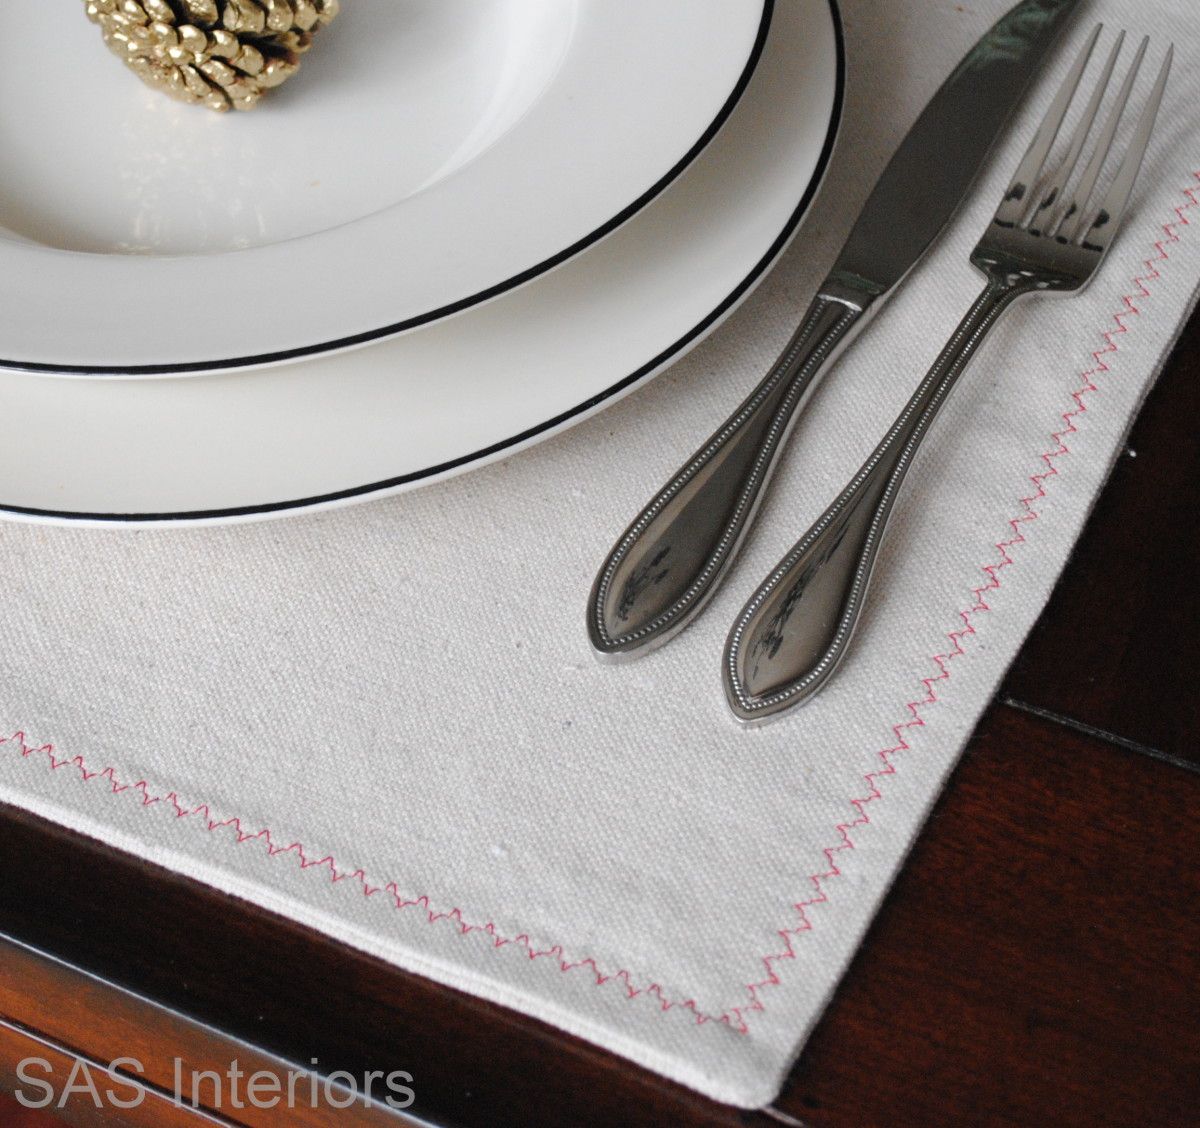
At this point, you have a lot of options which will depend on the fabric and/or the decorative embellishments you want to add (or not add).   For my drop cloth placements, I decided to add a decorative top stitch around the entire perimeter, which is inset about 3/4″ from the edge.

The stitch I used is #16 on my machine, which is a scalloped, zig-zag design, and in keeping with the Holiday theme, I decided on a burgundy colored thread.

This is a close-up of the stitch.  It’s very simple, yet more detailed and interesting instead of a typical straight stitch. 

Here’s a tip: When you are sewing around a corner, don’t pick up your needle, but instead pick up the “sewing foot”, turn your material around the corner, put down the “sewing foot”, and continue sewing.

1 down…  3 more to go! 

And they were all done!

Tomorrow, I have something even more exciting for you.  I’m going to embellish these placemats – still keeping them simple and stylish!

I link my projects to some of these parties: Skip to My Lou, Dittle Dattle, Between Naps on the Porch, Today’s Creative BlogHome Stories A to Z, All Things Heart & Home, Savvy Southern Style, House of Hepworths, Finding Fabulous, Creation Corner, The Shabby Nest, Tatertots and Jello, Funky Junk, Under the Table & Dreaming

The Right (and Wrong) Way to Hang Window Drapery Panels

I had planned on sharing another part of my bedroom makeover, but I got tied up in other directions, and didn’t have a chance to complete my next reveal.  But stayed tuned, I hope to wrap it up very soon (see how I said hope – it doesn’t mean it’ll actually happen, but it’s wishful thinking)!

Instead, I have a great post for you that will be informative and eye opening.

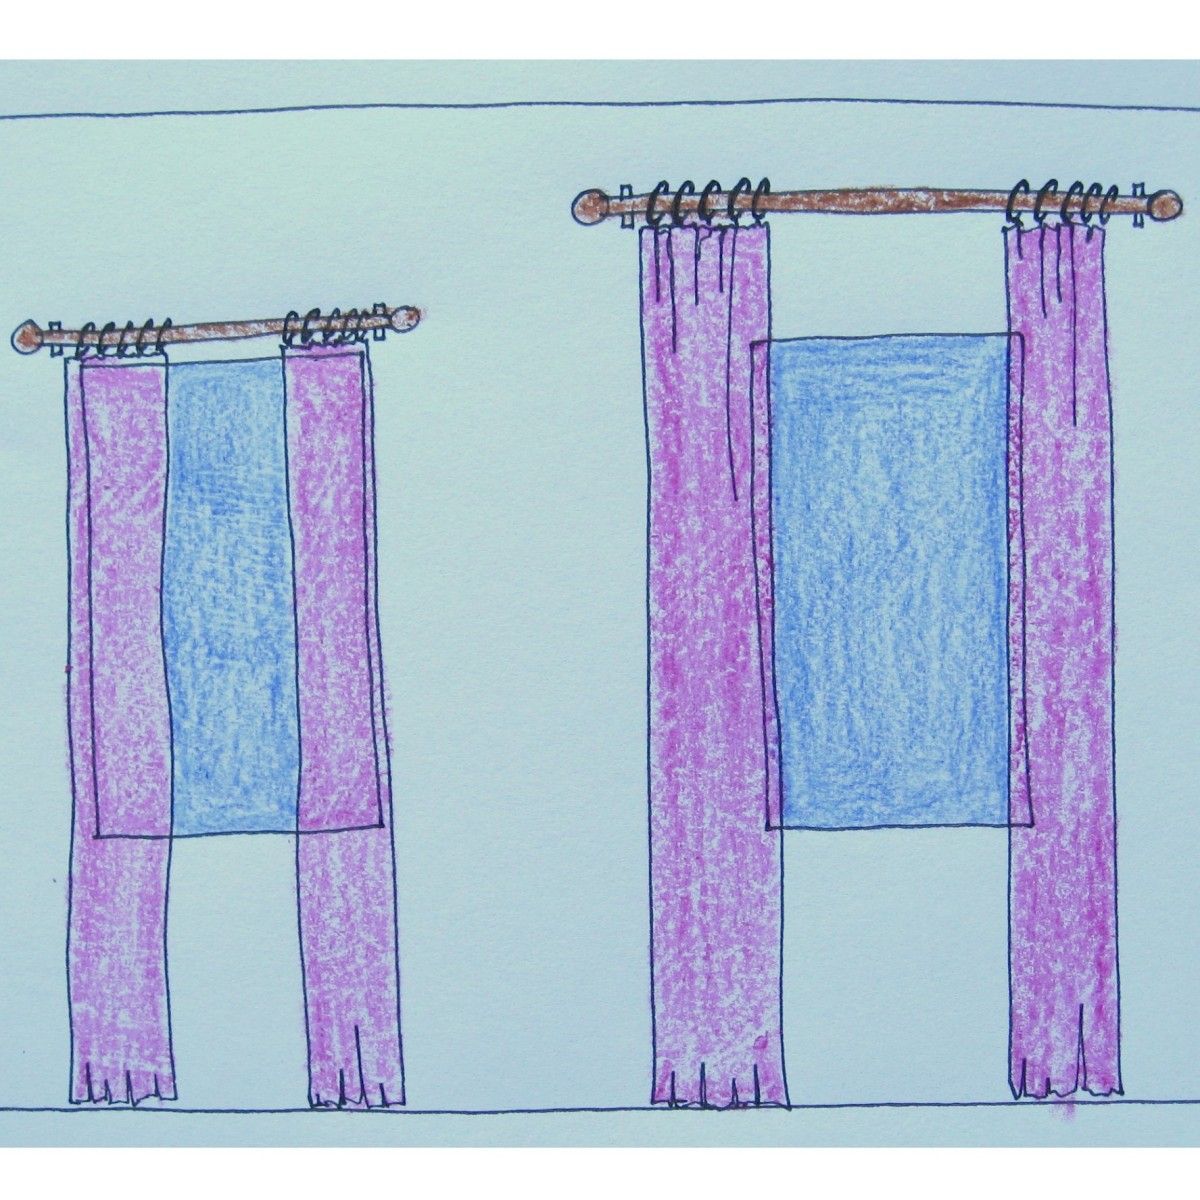
Earlier in the week when I shared my newly made lined window panels, I started to ponder how others think window treatments should be hung.  I sometimes take for granted that homeowners know the tricks that are innate in my brain.  I saw this picture via pinterest, but created my own illustration to visually show the best way to hang window treatments to allow as much natural light to shine through and visually enlarge the space.

Do you see a difference between these two window examples?
(I hope you do)

Which would you choose to be the best way to hang a window drapery panel?  And why is one better than the other?

Well let me share my answer and why!

My illustration starts with two of the same sized windows.

Then we’ll add some window treatments.

On the left side are window drapery panels that mostly cover the window and are hung on a rod that is placed directly above the window trim.

On the right side are window drapery panels that extend out to mostly cover the wall, leaving only about 1-2″ covering the window.  They are placed on a rod that is half way between the window trim and the ceiling

Well if you haven’t realized yet, the right side is the right way to hang window drapery panels.

And this is why~

There is a HUGE amount of additional light that shines through when window drapery panels extend out and are mostly placed on the wall surface.  Here’s an illustration showing the amount of light entering the space (seen in blue) for each window example.

This illustration shows how much of the window drapery fabric is covering the window (seen in red).  Only a sliver of fabric covers the window on the right side, but a huge amount of fabric is covering the left side.

And here is an overall illustration of how the draperies look side-by-side.

Positioning window treatments more on the wall than over the window, not only allows for more natural light, but it also heightens the room and visually widens the window.

Take a look at some real-life examples.

Let’s first start with the WRONG way of hanging window panels.

The window hardware is smartly placed to bring the eye up, but the window panels cover the window WAY TOO MUCH – unless you don’t want to see your neighbors this is NOT the way to hang drapes. (via Southern Living)

In this example the drapery hardware is placed on the window frame, so the panels appear to be hovering over the door allowing only a small amount of light to shine through. (via ChicColes)

Now let’s check out the RIGHT way to hang drapery panels.

* Allow in a HUGE amount of natural light
* The higher placed hardware heightens the room and allows the eye to be drawn up
* The window feels wider

How are the window treatments hung in your home?


DIY: How to Make Simple Lined Window Drapery Panels

For the past few months, I’ve been thinking about doing some updates to my bedroom.  There’s nothing “wrong” with it, but some of the elements – window treatments, pillows, pictures – have been around for a while and you know me, I always need something to change or update!

First thing on the list?  Window Treatments.

The ‘before’ window panels were from our previous home and the length has always been an issue since I repurposed them in this space.  They are beautifully lined panels from Pottery Barn (with matching pillow covers), but I was just ready for a change!

This is how they looked before~

Well actually the window treatments were the second on the list, first came the fabrics.

After having a concept in my head, I was on the search for new fabrics.  I was stuck on the color of dusty-gray-blue.  Because my interiors are mostly on the warm side, I wanted to bring in some cooler tones.   I combed the net, searched in fabric stores, and found nothing that appealed to me.  Then I made a random trip to Joanne Fabrics one day, and found this fabric which was very inspiring, but totally not the dusty-blue that I had desired.

O well, I loved it and a few fabrics later, I was out the door and ready to start my transformation.

Before I begin the step-by-step tutorial,  I wanted to mention that I decided to line the window treatments, but it isn’t a must for drapery panels.  Even though they were not going to be functional, meaning I wasn’t planning on moving them each day/night to block the light, I still wanted them to have a more substantial feel and heavier weight.  I decided to use drop cloth material because it was the least expensive and I knew from my other projects that drop cloth would really give the panels more substance and hang better.

Making Lined Drapery Panels

1. I started off by measuring the height from the floor to my existing drapery rod.  Once the height was determined, I added about 12″ of additional fabric which gave me some “play” for alterations in later steps.  I layed out the fabric and using my cutting board, clear ruler, and fabric cutter, to measure the length of fabric needed for three panels.

FYI: At this point, measuring does not need to be perfect, because it will be altered later.  That’s the beauty of these panels!

The measurement from my floor to the drapery rod was: 78″, but to allow for enough fabric I made each panel 90″

2. Once the main fabric is cut, lay the right side of your main fabric onto the right side of the lining fabric (in my case, I used drop cloth material because it was the least expensive.  For $16, I got one piece of drop cloth that was 9′ x 12′).

Before cutting, make sure ALL YOUR FABRICS ARE IRONED!  Once ironed, use your main fabric as a template and cut the lining fabric to the same size.

3. Once both fabrics are IRONED and CUT, pin around the edge of the entire panel.

4. Similar to making a pillow, sew around the 4 sides, except leave a 6-8″ opening at one of the shorter ends, so you can pull the right sided fabric through.

After sewing around, pull the fabric through to the right side.

5.  Once pulled through to the right side,  iron all the edges and seams so the panel is nice and crisp! Now that the main part of the lined drapery panel is complete, they are ready to be hung and altered.  There are numerous ways to hang window panels, but I decided to use a basic rod and hang the panels using clip rings.

6. To determine the height for the window panel, measure from the floor to the top of the clip (not to the top of the ring).  Take the unfinished side of your panel and clip the rings to it.  Then adjust the height of the panel up or down, so the panel either just hits / skims the floor OR leaves a slight puddle on the floor (I decided to have them just hit the floor).

The one side of the panel is still unfinished (that’s okay), and here’s how it will look from the back.

Now let’s finish this up…

7. It’s time to trim and finish the top.  Measure down about 4-5″ from the crease where the rings are clipped to.  Trim the rest.

8. (a) With the rings left on, remove the panel from your rod and head back to the ironing board. (b) First, iron in between the rings to get a crisp line.  Then remove the rings and iron the entire crease.  (c) Open the crease and fold over the top edge twice creating a finished edge. (d) Close the crease, iron and pin edge so it can be sewn.

8. Then sew along the bottom edge of the “flap”.

Reinstall the drapery rings and the lined window panels are complete and ready to hang.

The wall of windows and the entire view of the three lined window panels…

One more time…here is the before and after~

And if you didn’t notice, I got rid of the sheers and replaced them with functional wood roman shades – such a better look!

I’m still in the midst of this master bedroom makeover and I’ll be sharing more soon, so stay tuned!

I link my projects to some of these parties: Skip to My Lou, Dittle Dattle, Between Naps on the Porch, Today’s Creative Blog, Stories of A to Z, All Things Heart & Home, Savvy Southern Style, House of Hepworths, Finding Fabulous, Creation Corner, The Shabby Nest, Tatertots and Jello, Funky Junk, Under the Table & Dreaming

How to Decorate a Mantel

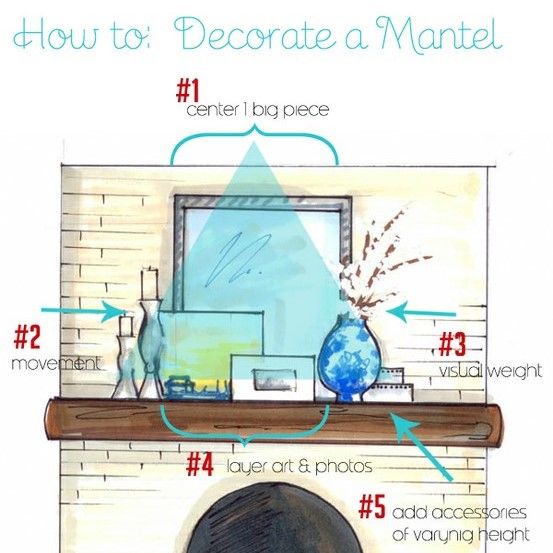
Many of you know that I’m a Pinterest junkie.  From recipes to photography to gardening, anything and everything you could want to know about is on this amazing site.  Of course, for me, my #1 search is usually home decor and DIY.  The other day I stumbled upon this great pictorial on how to decorate a Mantel.  I’m sure you know the expression, a picture means a thousand words, and this image certainly says it all.  Through the words in my blog, I’m forever looking for ways to inspire you to create a haven of your own, well this is it!

original image via and via

When starting to decorate your mantel, it’s best to remove everything and begin with a fresh palette.  It allows you to see it free and clear so your creative juices start to flow.

Simple tricks to start your mantel decor

1. Center 1 big piece: Begin in the center and choose something that is of a substantial size, maybe a mirror or artwork that you love.  This will be the main focal point of the mantel and will “ground” the other accessories in front.
2. Movement: Choose items that “move” the eye.  Whether it be candles which move from the flickering flame or items of varying heights which make the eye move up and down, include accessories that are intriguing and add vision interest.
3. Visual Weight: A secondary focal point that isn’t as big, but still gives a punch, is a great addition to a mantel ensemble.  When pulling together a mantel, it’s best to layer one piece in front of another.  Choosing a vase with flowers or branches that will sit in front of your “big piece” starts the layering effect.
4. Layering: Whether it be art, photos, candles, or accessories, layering and staggering different sized items in front of each other is a must to create a cohesive composition.
5. Vary Heights: Along with layering, adding accessories of varying heights is more visually engaging.  It helps the eye move up and down and across.  Between layering and varying heights, you want to create a wave effect with your mantel.  It starts out low, then goes up, comes back down, then up again, and finishes low.

As  Steven and Chris say, these 5 tricks create a Visual Triangle.  Starting at the top most point, you have your 1 big center piece, and then each side angles down with the addition of interesting accessories, resulting in a finished triangle = a beautiful decorated mantel.

Looking at some real-life examples always help, so let’s take a peak at two of my recent mantels.

Fall Mantel – This is my most recent mantel decorated for Fall.  Similarly to the pictoral above, I “marked up” the 5 tricks to create a cohesive mantel.  Starting with the big piece in the center, a rectangular mirror, and layering different accessories at varying heights, the Visual Triangle was created.  And do you see the “mantel wave”?  There are lots of lows and highs, lows and highs.

 Summer Mantel – This second mantel design was from the summer and even though it’s simpler and less accessorized, it still uses the 5 basic principles for decorating a mantel.

What do you like to showcase on your mantel?

Paint Tricks, Tips, and Techniques

I love PAINT!  Whether it be regular paint, spray paint, or craft paint, paint can dramatically change and transform any room or piece of furniture.  With my many painting endeavours, I have learned a few TIPS + TRICKS along the way, and now I want to share them with YOU!

 TIP 1

There is never a time when you’re painting that you’ll be done with the brush or roller after your first coat.  Either you need to take a break OR you are waiting for the paint to dry.

Before I discovered this all-time favorite paint trick, I washed my brush/roller with water EVERY TIME to avoid it from hardening.  Then the next time I went to use the brush/roller, it was often still water logged and would make the paint runny – NOT GOOD!  So here’s the trick (It’s SOOO easy) ~

1. Take a grocery store plastic bag
2. Put your brush or roller in the inside corner of the bag
3. Grab it from the outside and Twist
4. Secure it with a rubberband, clip, or simply twist it around and lay something on it.

Basically, you DO NOT want air getting to the brush, or  it will harden.

NO JOKE – – I use this trick EVERY TIME.  I’ve had brushes stay in bags for weeks when I haven’t gotten around to doing my final touch -ups (I know, crazy?!).

TIP 2

Another one of my favorite painting tricks is to use this formula to create a smooth and even painted finish.

This “magic potion”, Flood Floetrol, is a paint additive that will create a smooth, even finish, free of brush or roller strokes. I used it for the first time during my Kitchen Makeover and the results were amazing.  And better yet, it’s less than $10 a bottle (depending on the size).  I use this every  time I paint.

TIP 3

One pet peeve of mine is buying something, only to discard it within a short amount of time.  If it can be avoided, I’m all for it!  Buying paint liners is a huge waste of money, but it’s easier than cleaning or throwing away a paint tray, right?  Well here is a solution instead of wasting your hard earned money on paint liners – Use foil.  It’s that easy!  Line your paint tray with foil and throw it away when you’re done.  This trick comes in especially handy when using multiple colors and changing paints often.

TIP 4

After you’ve poured your paint into your foil-lined paint tray, it’s typical for leftover paint (in a can) to get stuck in the rim. Then when you try to seal the lid, it splatters all over you and you’re left with an unsealed can, resulting in possible hardening.  Here’s an easy trick!  Wrap a paper towel around a screwdriver and clean around the rim of the can.  The paper towel will soak up the leftover paint and you will be splatter free!

After Post Edit: Sandra of Sawdusts and Paperscraps just added a great painting tip that goes right along with cleaning the rim.  She punches holes in the rim with a nail to allow the paint to drip back into the can.  With that tip and the one above, there definitely shouldn’t be any leftover paint in the rim to achieve a perfectly sealed can!


TIP 5

Applying paint can sometimes be tricky, especially if your a first-timer. Using the “W” or “M” technique, along with a good quality roller, will result in an even, smooth finish.

  1. Cover your roller with a good amount of paint and starting from the bottom, make a long stroke up.
  2. Then come down with your roller.
  3. Continue your “M” pattern along the wall and fill in the area in between rolling from left to right until the area is completely covered.

> Use a quality brush and roller: DON’T bother buying the “all-inclusive” paint packages. Use a roller that is best suited for your project (see above for options)!  A cheap inexpensive roller won’t hold as much paint and it’ll take you double the time to complete the job.

 TIP 6

And last but not least, winter is right around the corner and within a few weeks the freezing temps will be setting in.  Avoid the mistake I made last year and be sure to bring all your paints indoors, otherwise they will freeze.  Paint should always be kept at room temperature!

 I hope you’ve found these tips enjoyable + helpful to make your next painting experience a little easier!