Month: July 2011

Kitchen Makeover Phase Three: Tiling Over Laminate & Adding Cabinet Brackets

Countertops done – check!

Cabinets complete – check!

Now I’m on to the details…

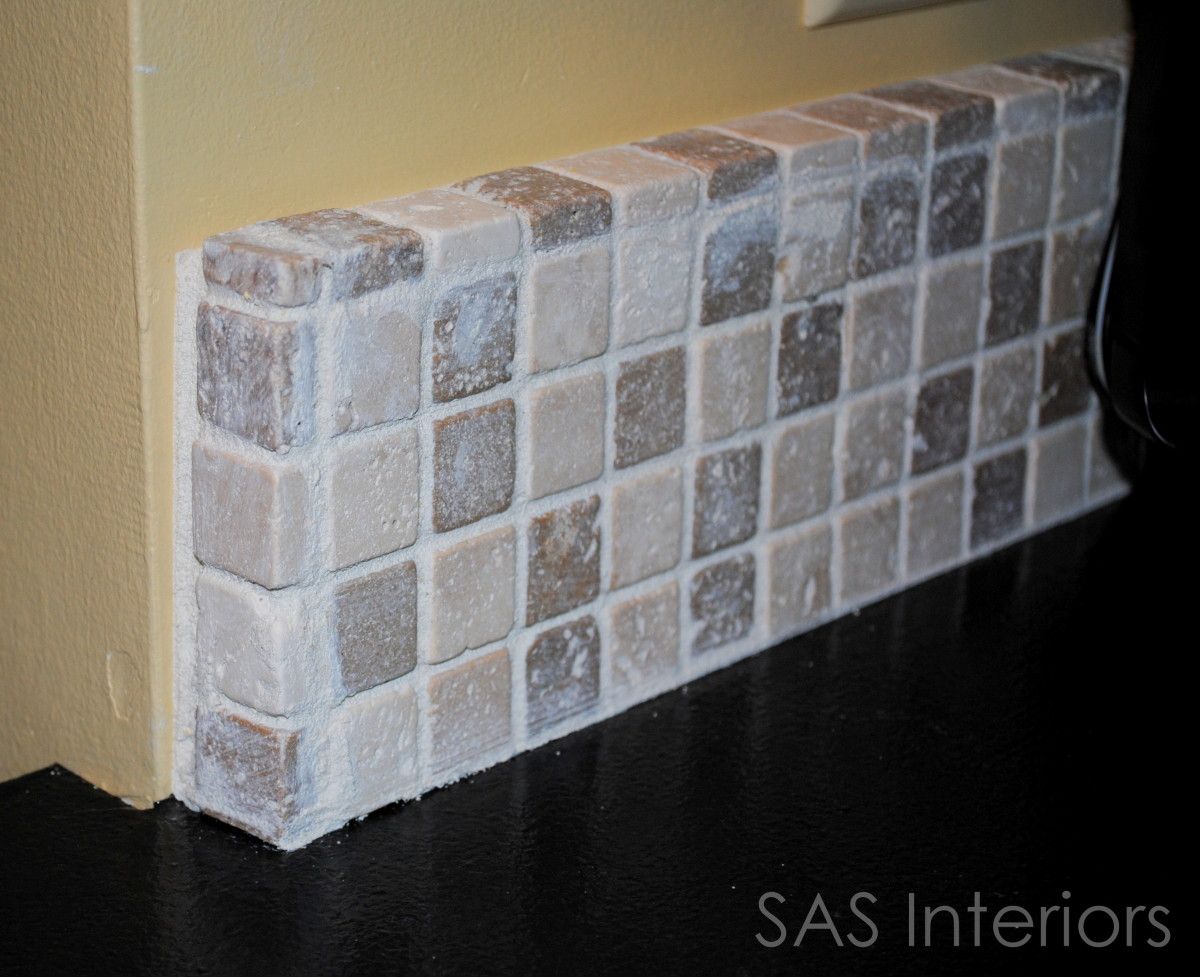
I’m always attracted to a custom tiled backsplash versus the typical plain 4″ high backsplash that matches the countertop surface.  Before embarking on the countertop transformation, my husband and I tried to remove the existing solid backsplash, but were unsuccessful.  We moved forward with our makeover, but I still had it in my head to do something. hmmm…

Once the countertop was complete, I thought, ‘how about tiling right over the laminate to create a custom look on the backsplash?’…why not?

From my many tiling projects – powder room backsplash, fireplace surround, and kids bathroom – you know how I love to tile.  Like paint, it truly changes and updates the overall look.  The process of tiling this kitchen backsplash was the same as {THIS TUTORIAL}, but I’ll give a quick run-down anyway….

1. After measuring the backsplash height, I cut the tile to the appropriate size. I love using small tile because it usually has a mesh back and it’s easy to work with.

2.  Apply the tile adhesive to the back surface.

3. Spread the grout on the back surface and using a grooved trowl, spread it out so the adhesive covers the entire tiled area.  You don’t want the surface to be overly covered with adhesive, but just enough so the tile can “grab” to the surface you want to cover.

4. Adhere the tile to the surface.  Continue with the remainder of the area.  Again, to see a more in depth tutorial, check out these two previous posts {here and here}.

5. Grout.  My trick to grouting small areas, is to use a Ziploc bag.  Cut off the tip and grout,  just as you would if icing a cake.

This is a picture of me tiling my fireplace surround using my ‘trick of the trade’.

TIP: Another important bit of advice that I’ve found SO HELPFUL is to use painter’s tape to cover the areas you don’t want grout to touch.  Grout is very gritty, and is sometimes difficult to get off a surface, especially when it hardens.  It also gives you a nice, clean line once it’s removed.

Tiling is fairly easy!  And fun (seriously)!  I’ve said it once, and I’ll say it again…it truly is an inexpensive way to update a space.  To tile this backsplash was less than $50 for materials.

I wrapped the tile around the existing laminate surface to create a custom tile look.

Doesn’t the tile change the entire look of the kitchen?

Adding Cabinet Brackets

Another detail that I added to the kitchen, are faux brackets underneath the upper cabinets.  I’ve always loved the look of brackets and chose a profile that was fairly simple and in keeping with the modern sophistication I was trying to achieve for the kitchen.

The inspiration of the brackets came from Layla’s kitchen and it shows how adding details to a space, give it the true character and intrigue.

After painting them to match the cabinet color, they were ready to be hung.

These brackets are actually shelf brackets, and the hardware that they came with wasn’t going to work.  After giving some thought on how to install them, I decided to use an instant glue.  On second thought, I used this Epoxy Instant Mix that dries in 1 minute, giving me a few more seconds to make sure they were placed just right.

Apply a small amount to the back.

Then adhere to the wall.  Use a level to make sure that it is plumb. It dries fast, so don’t move.

It worked perfectly and they are never coming down (even if I wanted them to)!

Here is a before….

And here is how it looks now….

What do you think…what a change, right?  Small details make the world of difference!

And if you don’t remember what the kitchen looked like before…here’s a peak ~

And here is how it’s looking now ~

I am sure you are tired of me saying this, but I’m still not ready to share the entire reveal. I have a few more projects to complete, then I’ll show you the results of the whole space!  (I forgot to mention, we splurged on new appliances ~ SOOO excited).

I want to hear from you – What projects have you been working on this summer?

Kitchen Makeover Phase Two: Painting the Cabinets

The Kitchen Makeover is moving along….

It’s been quite the undertaking, especially since the space has had to remain in working order throughout the entire process.  To be honest though, it really hasn’t been too bad, but I am very thankful that it’s almost done.  After the completion of the countertops last week, this week’s task was to paint the cabinets.

What do you think??

After much thought (and a few sleepless nights), I decided on a color that is primarily taupe, but has undertones of blue, green, and gray.  The actual color is Benjamin Moore – Berkshire Beige.  I have used this color before and it is truly one of my favorites!

Thanks to my gracious friends at Benjamin Moore who kindly supplied the paint for this project, I was on my way to transform these beauties. 

Bye-Bye to oak and Hello to taupe!

For this project, I used the Benjamin Moore Aura paint in a semi-gloss finish – It’s an amazing product and gives complete coverage!

As you’ve seen a few times from other posts, the before cabinets were a stained oak finish.  I had updated the hardware last year (which I love), so that was the only element that was remaining.  After the countertops were transformed with the Rust-oleum Transformations Kit, I was ready to get painting.

If you haven’t seen the kitchen before, here it is…

I started off with the peninsula section of the kitchen. Using a latex based primer, I applied the paint with the ‘W’ technique. Note: Many DIYers like to use Oil based primers and paints for cabinets because it’s more durable and is easier to clean, but I felt comfortable enough that in this application, the latex paint would be fine and hold up over time.

After this part was done, I worked on the remainder of the kitchen in sections.  I first removed the upper cabinets, painted them and the face frame, then moved on to the base cabinets.  Because my kitchen had to be functioning at all times, it was best to break it up and work in “small doses” instead of removing every door at once.

Design Tip

The key to creating smooth brush and roller strokes is to use a paint additive, like Flood Floetrol.  This was the first time that I’ve ever used an additive when painting and it gave amazing factory finish results.  And the cost?  Less than $10 a bottle (depending on the size).

Once the doors were off, I was ready to paint.  I used a brush-and-roller-combination technique (fancy, huh?!).  I first used the brush to get into the recessed crevices of the door, then worked my way to the outside panel and sides, and finished the center area with the roller.  Once the cabinet face is covered with paint, it’s important to go back with the roller to smooth out any ridges or roller marks (very important to create a smooth finish).

Tip: Roll the roller in the same direction as the wood grain.

Moving on to the cabinet face.  Using the same brush-and-roller-combination technique, I painted the cabinet fronts. ( I can’t believe I’m letting you peak into my cabinets…they’re a mess!)

All the cabinets are complete…they’re done and you’re so excited.  BUT wait right there…it’s time to remove the painter’s tape.  For me, this is always the tricky part because I find the tape often pulls off the paint.  The solution to this is to use a sharp blade to score the line where the tape meets the painted surface.

If some paint does peel off, lightly sand the area, then use a small brush for touch-ups.  Take a look at my areas of oops, the paint peeled

After a few touch-ups, I really was finally done with the cabinets.  And here are the results~

I still am resisting to show you the entire space because there is still some more to do before this makeover is complete.  Did you happen to notice anything else in the kitchen that is new???

Check back next week for Phase Three of this kitchen makeover!

The product mentioned in this post was provided by Benjamin Moore, but the review and opinions provided are 100% my own.

Kitchen Countertop Reveal Using the Rust-Oluem Countertop Transformations Kit

I have been quite excited all week to share this….  As you know from my recent posts, my kitchen is in the midst of a minor makeover.

No new cabinets.  No new countertops.  But the existing is all being TRANSFORMED.

When the friendly folks at Rust-Oleum heard about my kitchen revamp, they kindly sent me their Countertop Transformations Kit in the Oynx finish to try out on my existing hunter green laminate surface.  From the many posts I’ve written on my kitchen, I have been quite indecisive on what to do with the countertops, and I thought the Rust-Oleum kit would be a great solution!  This do-it-yourself “coating system” gives existing countertops a whole new look that is durable, long-lasting, and the look of a natural material.

I was very happy to finally say bye-bye to the old countertops which were quite dated!  Here’s the before…

Last Friday night (once the kids were in bed), my husband and I set forth on starting the transformation process.  The Rust-Oleum Countertop Transformations Kit comes with most of the supplies needed for the project.

But there are a few other things that you will need to purchase separately like rollers, painters tape, trays, gloves, and brushes.

The Instructions in the kit will explain EVERYTHING in detail, plus there is a very informative DVD (that you can view here) that will take you through each step of the process.  I can absolutely say that at no pint was I confused on what to do – the instructions are very clear and explanatory.

Bravo Rust-Oleum, for supplying great instructions! 

Here is a basic overview of the 5 steps to transform your countertops (image provided by Rust-Oleum)

Day 1

One of the most important parts to this project is to protect the areas around the countertop (ie: cabinet, floor, and backsplash).   You don’t want the product to get on any surface other than the laminate countertop area.  Unlike regular paint, this product creates a thick, hard surface and is difficult to get off other surfaces once dry.

Tape and use plastic or drop clothes

Once your surface is prepped and ready-to-go, you can start the sanding process.

As they say in the video, for the next step, you have to “work fast and work together”.  This could be difficult for some couples, but my husband and I worked in sections and abided by the rules – work fast and work together to cover the entire surface. After applying the adhesive (see manual for actual step-by-step instructions), it’s time to spread the Decorative Color Chips.  This was one of the most interesting parts of the entire project.  Be forewarned – they fly everywhere – I’m still finding chips in odd places and it’s been over 5 days.

At this point, the adhesive with the adhered chips has to dry overnight, so we embarked on the remainder of the transformation the next morning (12+ hours later).  The surface is VERY rough, but no worries…it’s far from being complete!

Day 2

The next step is to sand, sand, sand!  And then…sand some more.  At this point of the project, I was LOVING how the counters looked.  They had a concrete, dull appearance and I was so excited!

It was finally time for the last step….to adhere the protective top coat.  And it was done!  The top coat (which I hadn’t realized) leaves a glossy finish.  At first, I was a bit disappointed that the surface didn’t have a dull, flat or satin finish, but over the days it’s grown on me.  It would be nice if Rust-Oleum had a choice of a glossy or matte top coat (maybe in the future?).

Important Note: When the surface is dry about 48+ hours after applying the protective top coat, the painters tape can be removed.  It is VERY important to use a sharp blade to score the tape edge.

DO NOT just remove the tape because it will remove the countertop material as well.  Some of the wall paint was removed when I took off the painters tape, so I’ll have to go back and fix it.  Around the sink is a tricky spot, so score and remove the tape VERY carefully.

The Countertop Transformation Kit which is available at Lowe’s, covers up to 50 sq. feet or 20 linear feet.  My countertop surface is 18 linear feet and I had just enough product, so I would say that the product included is accurate to the area it covers.  If you are unsure of how to measure your countertop to get an accurate calculation, follow these steps.

The cost of the kit is $249, and the additional supplies will be about $30.  For about $300, you can achieve an entirely new and beautiful countertop surface, whereas a new laminate countertop (of this size) would be about $1500 and granite countertops would be about $3000.  That being said, there are other countertop paints available that are less expensive.  Rust-oleum makes another one-step laiminate countertop “coating” that is $20 +/-, but I have no experience with the product, it’s process, or how it wears over time.  Since it’s a one-step process, I would be reluctant about it’s durability.  Have you tried it?  Have you transformed your countertops using another product?  I’d love to hear!

As I mentioned in the beginning of this post, I chose to use the Oynx color, which is all black, but there are a total of 5 colors to choose from ~ Take a look at them {here}

Want to see the countertop colors in action?  Use the Kitchen Makeover Virtual Tool to see a preview.

Still wondering about the product, here is some additional information~

Overall, the Rust-Oleum Countertop Transformations Kit was really easy to use.  On a scale from 1 to 10, the level of difficulty would be a 2.  A beginner with no handy skills can absolutely use this system and achieve beautiful results.

My kitchen is still in the midst of being transformed, so I’m only making a minor reveal of the countertops.  I hope to have it complete and ready to share by next week!

Stay Tuned till next time!!

The product mentioned in this post was provided by Rust-Oleum, but the review and opinions provided are 100% my own.

Kitchen Revamp is Underway

It’s been a long time waiting, but I’ve FINALLY made my decisions on what to do with my kitchen.  A few months ago…7 months to be exact (back in late December), I mentioned that on my to-do list for 2011 was to makeover my kitchen.  I’d love to do a complete overhaul with new cabinets and beautiful new countertops, but it’s not in the cards right now.  If you remember, I had decided to use stain on the cabinets to achieve a darker look, but was stuck on what to do with the countertops.   Well I changed my mind entirely…a girl can do that, right?!  No more stain, but instead ~ PAINT!

My other major dilemma at the moment was that it was wintertime and I was afraid of the possible smells and vapors from the paint or stain.   Not being able to open the windows is a big no-no with kids in the house.  So I waited and waited and thought and thought……

And now, it’s summer.  I made a decision, the windows are open, and I’m transforming!

Here is a before picture of the kitchen

After lots of thought, I decided to use the Rust-Oleum Countertop Transformation Kit (which I pictured in this post), and a taupe colored paint for the cabinets (I’ll share the specifics in a future post soon)!

Here’s a sneak peak of what we’ve been up to, which I also shared in Sunday’s post.

Tomorrow will be the big reveal…stay tuned!