Month: October 2011

How to Decorate a Mantel

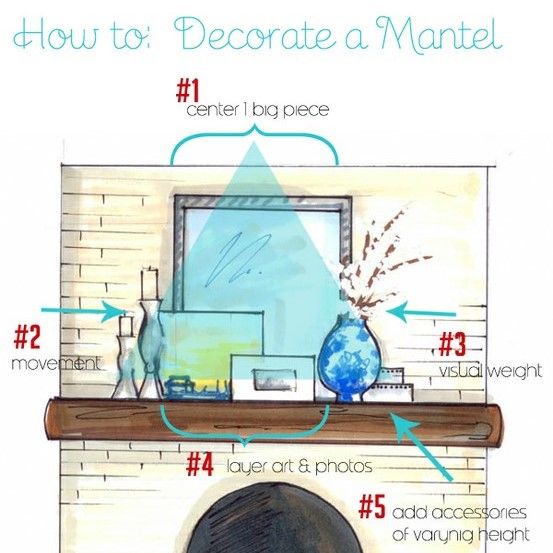
Many of you know that I’m a Pinterest junkie.  From recipes to photography to gardening, anything and everything you could want to know about is on this amazing site.  Of course, for me, my #1 search is usually home decor and DIY.  The other day I stumbled upon this great pictorial on how to decorate a Mantel.  I’m sure you know the expression, a picture means a thousand words, and this image certainly says it all.  Through the words in my blog, I’m forever looking for ways to inspire you to create a haven of your own, well this is it!

original image via and via

When starting to decorate your mantel, it’s best to remove everything and begin with a fresh palette.  It allows you to see it free and clear so your creative juices start to flow.

Simple tricks to start your mantel decor

1. Center 1 big piece: Begin in the center and choose something that is of a substantial size, maybe a mirror or artwork that you love.  This will be the main focal point of the mantel and will “ground” the other accessories in front.
2. Movement: Choose items that “move” the eye.  Whether it be candles which move from the flickering flame or items of varying heights which make the eye move up and down, include accessories that are intriguing and add vision interest.
3. Visual Weight: A secondary focal point that isn’t as big, but still gives a punch, is a great addition to a mantel ensemble.  When pulling together a mantel, it’s best to layer one piece in front of another.  Choosing a vase with flowers or branches that will sit in front of your “big piece” starts the layering effect.
4. Layering: Whether it be art, photos, candles, or accessories, layering and staggering different sized items in front of each other is a must to create a cohesive composition.
5. Vary Heights: Along with layering, adding accessories of varying heights is more visually engaging.  It helps the eye move up and down and across.  Between layering and varying heights, you want to create a wave effect with your mantel.  It starts out low, then goes up, comes back down, then up again, and finishes low.

As  Steven and Chris say, these 5 tricks create a Visual Triangle.  Starting at the top most point, you have your 1 big center piece, and then each side angles down with the addition of interesting accessories, resulting in a finished triangle = a beautiful decorated mantel.

Looking at some real-life examples always help, so let’s take a peak at two of my recent mantels.

Fall Mantel – This is my most recent mantel decorated for Fall.  Similarly to the pictoral above, I “marked up” the 5 tricks to create a cohesive mantel.  Starting with the big piece in the center, a rectangular mirror, and layering different accessories at varying heights, the Visual Triangle was created.  And do you see the “mantel wave”?  There are lots of lows and highs, lows and highs.

 Summer Mantel – This second mantel design was from the summer and even though it’s simpler and less accessorized, it still uses the 5 basic principles for decorating a mantel.

What do you like to showcase on your mantel?
Paint Tricks, Tips, and Techniques

I love PAINT!  Whether it be regular paint, spray paint, or craft paint, paint can dramatically change and transform any room or piece of furniture.  With my many painting endeavours, I have learned a few TIPS + TRICKS along the way, and now I want to share them with YOU!

 TIP 1

There is never a time when you’re painting that you’ll be done with the brush or roller after your first coat.  Either you need to take a break OR you are waiting for the paint to dry.

Before I discovered this all-time favorite paint trick, I washed my brush/roller with water EVERY TIME to avoid it from hardening.  Then the next time I went to use the brush/roller, it was often still water logged and would make the paint runny – NOT GOOD!  So here’s the trick (It’s SOOO easy) ~

1. Take a grocery store plastic bag
2. Put your brush or roller in the inside corner of the bag
3. Grab it from the outside and Twist
4. Secure it with a rubberband, clip, or simply twist it around and lay something on it.

Basically, you DO NOT want air getting to the brush, or  it will harden.

NO JOKE – – I use this trick EVERY TIME.  I’ve had brushes stay in bags for weeks when I haven’t gotten around to doing my final touch -ups (I know, crazy?!).

TIP 2

Another one of my favorite painting tricks is to use this formula to create a smooth and even painted finish.

This “magic potion”, Flood Floetrol, is a paint additive that will create a smooth, even finish, free of brush or roller strokes. I used it for the first time during my Kitchen Makeover and the results were amazing.  And better yet, it’s less than $10 a bottle (depending on the size).  I use this every  time I paint.

TIP 3

One pet peeve of mine is buying something, only to discard it within a short amount of time.  If it can be avoided, I’m all for it!  Buying paint liners is a huge waste of money, but it’s easier than cleaning or throwing away a paint tray, right?  Well here is a solution instead of wasting your hard earned money on paint liners – Use foil.  It’s that easy!  Line your paint tray with foil and throw it away when you’re done.  This trick comes in especially handy when using multiple colors and changing paints often.

TIP 4

After you’ve poured your paint into your foil-lined paint tray, it’s typical for leftover paint (in a can) to get stuck in the rim. Then when you try to seal the lid, it splatters all over you and you’re left with an unsealed can, resulting in possible hardening.  Here’s an easy trick!  Wrap a paper towel around a screwdriver and clean around the rim of the can.  The paper towel will soak up the leftover paint and you will be splatter free!

After Post Edit: Sandra of Sawdusts and Paperscraps just added a great painting tip that goes right along with cleaning the rim.  She punches holes in the rim with a nail to allow the paint to drip back into the can.  With that tip and the one above, there definitely shouldn’t be any leftover paint in the rim to achieve a perfectly sealed can!


TIP 5

Applying paint can sometimes be tricky, especially if your a first-timer. Using the “W” or “M” technique, along with a good quality roller, will result in an even, smooth finish.

  1. Cover your roller with a good amount of paint and starting from the bottom, make a long stroke up.
  2. Then come down with your roller.
  3. Continue your “M” pattern along the wall and fill in the area in between rolling from left to right until the area is completely covered.

> Use a quality brush and roller: DON’T bother buying the “all-inclusive” paint packages. Use a roller that is best suited for your project (see above for options)!  A cheap inexpensive roller won’t hold as much paint and it’ll take you double the time to complete the job.

 TIP 6

And last but not least, winter is right around the corner and within a few weeks the freezing temps will be setting in.  Avoid the mistake I made last year and be sure to bring all your paints indoors, otherwise they will freeze.  Paint should always be kept at room temperature!

 I hope you’ve found these tips enjoyable + helpful to make your next painting experience a little easier!

DIY: Child’s Play Kitchen

Aside from blogging, working, and being a mom and wife, I have spent every waking moment of my spare time over the last two weeks, making this…

I didn’t buy it this way.  I made it! I actually can’t believe it myself.  This is what I started with – a wood nightstand with two drawers.

My daughter turned two last month and she really loves to play with pretend food, so I searched and hunted for a play kitchen for her birthday.  I  found a few I liked, but they were either too expensive or too big, so after some thought, I decided to make one on my own.  I DIY everything else, so I was up for the challenge.  In searching for real kitchens on Pinterest, I came across a few pretend kitchens.  Using some ideas that I had seen, and knowing the desired size I was looking for, I’ve been on the hunt for a nightstand for quite some time.  Thankfully my mom came to the rescue a few weekends ago and brought me this beauty.  It was actually difficult for me to transform this nightstand because it was in great shape and looked really nice.  But that thought went out of my head in 5 seconds!  In no time, I was off and working…

What’s great about DIYing, is that you can search for inspiration, and then add your own unique creativity, to make a one-of-a-kind piece.  To make a play kitchen there are a gazillion things you can do and include, but hopefully with my creation, I’ll inspire you to make your own.

That being said, I will spare you the {play by play} details, and instead show some highlights throughout the process.

Thankfully for my anniversary, the mister got me some new tools, and ALL of them came in handy for this project!  I started off sanding the nightstand with an orbital sander.  Once it was nice and smooth, I applied one coat of primer, followed by using my new jigsaw to cut our the hole for the sink.  {MISTAKE} I should have made ALL the cuts and holes before I painted, because what happened?  The dust got into the paint (but, of course).  No problem though, I just sanded the surface one more time.   Mishaps can be rectified!  And there’s a sneak peak of the paint.

Moving on… 

I made a tall back piece out of MDF board and used “L” brackets to secure it to the nightstand top.

Then came the paint.  I chose to use a mustard-yellow hue with a touch of green undertone – Valspar Wasabi. Then the accents of burnt orange and deep purple (sounds kind of like the rest of my house, doesn’t it?).  To make the paint dry as smooth as possible, I added Flood Floetrol (also used in my kitchen makeover) which is a must when trying to achieve a smooth, even finish.

At this point, I was spending many hours in the garage and I’m sure my neighbors thought I was crazy!

I completed the painting phase of the kitchen, by adding two coats of satin Polyurethane.  Once the paint was finally dry, which took longer than I thought because we had some ultra humid days, I was ready to add the details.  To create the backsplash, I used leftover scraps from the personalized calendar and added a few coats of Mod Podge to harden the surface.  Then I finished it off by adding a decorative scalloped edge wood piece at the top.

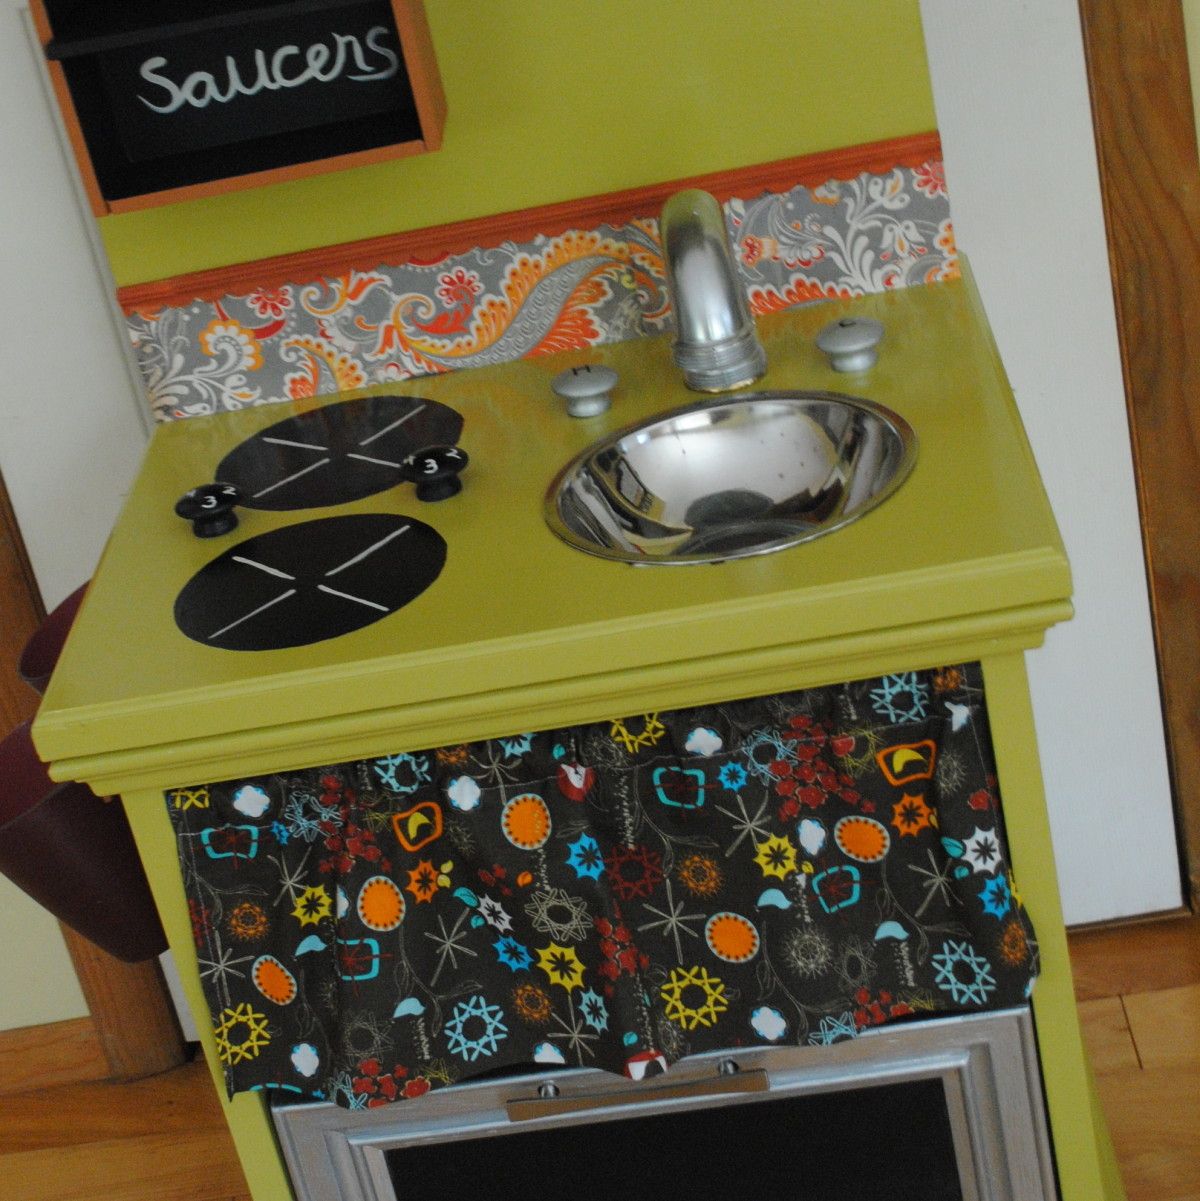
Then came time to create the burners.  Using a round kitchen bowl, I outlined two circles and filled them with black chalkboard paint.  Right before that, I drilled the holes for the sink faucet handles and the burner handles (learned my lesson from last time… drill, THEN paint).

Once everything was dry, I attached the faucet handles and burner handles to the top of the kitchen by using screws from underneath.  By not tightening the screws too much, the handles can actually turn.  Then with white paint, I free-handed the burner coils and numbers on the burner handles, and added the H & C with a black Sharpie.

This is the work surface area of the kitchen all complete.

And the last part to this kitchen was the faucet.  That was a little tricky, because the mister and I were perplexed on how to fasten it onto the kitchen top.  If you remember back a week ago, I showed you this picture~

Yes, that is a P-Trap for the bathroom and using a little metallic silver spray paint, it transformed into a sink faucet.

For the “oven drawer” I also used this same spray paint and the black chalkboard paint in the center.  Looks pretty real to me.  Wouldn’t you say?  And then completed the look with a quick hand-sewn valance that sits in place of the top drawer.

What’s really nice about this kitchen is that it has ALOT of storage.  All their play “things” can be hidden away.

This is the result of the kitchen.  After many long days and endless hours, it really was a joy to create!

And one last time just to show you again where this cute little kitchen started…

This is different than the typical Interior Design and Decorating ideas and inspiration that I like to share on my blog, but it was fun creating something that is a little more “out of the box” for me.  I hope you enjoyed!

5 Minute Autumn Centerpiece

This past weekend when I got my DIY groove back, I made a centerpiece for my dining table that literally took less than 5 minutes and cost nothing!  The pictures, staging, and post took longer than the actual project.  Thankfully I am SO pleased with the results and now my dining table is complete for the Fall season.  Here’s a sneak peak of the final outcome, but let me take you through the steps so you can make one for your table!

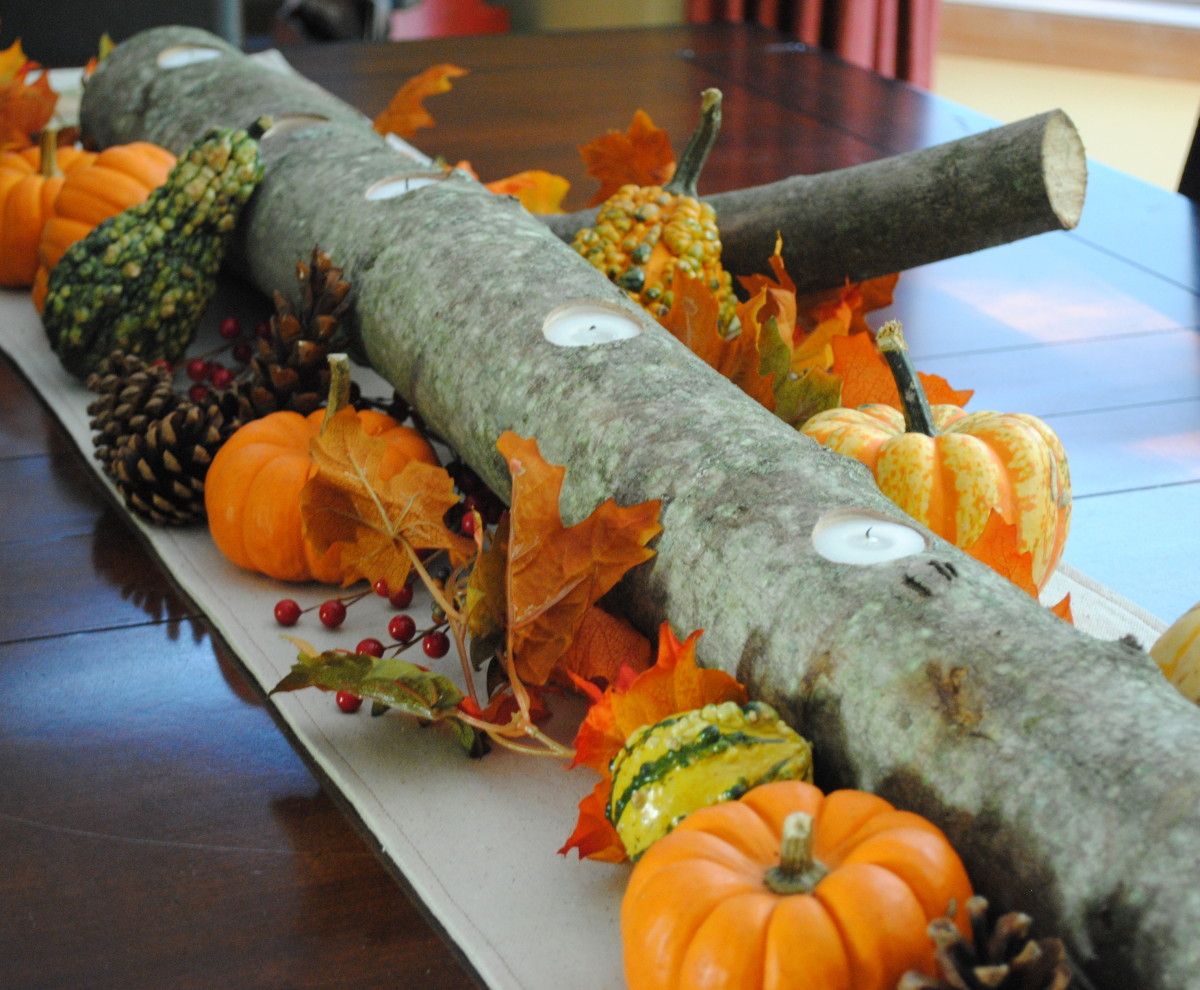
Log Centerpiece that takes minutes to create and can be used for so many holidays & occasions!  Designed by @Jenna_Burger of www.sasinteriors.net

A few weeks ago, while going for an evening walk around the neighborhood, there were a pile of cut down trees on the side of the road ready for the next day’s garbage pickup.  I couldn’t stop myself, and ended up grabbing this 4′ beauty and piled it into the Radio Flyer wagon along with the two kids (the remainder of the trip home sure was tight for the kiddos).

As soon as I set my eyes on this log, I knew exactly what I wanted to do – make a centerpiece with tea lights.  I envisioned a simple, yet sophisticated backdrop that can be updated and changed throughout the seasons and holidays!

Unfortunately, it sat and sat in my garage for too long.  Then this weekend, my husband FINALLY got a drill bit that was large enough (1.5″ diameter) to drill into the log to create what I was desiring – My centerpiece creation was finally coming to fruition.

The mister and I drilled 6 holes about 10″ apart, and it was done!  Finito!!  It was that easy and it took less than 5 minutes to create this beautiful centerpiece.

And here it is.  Complete and shining bright!

So simple, yet so beautiful!

I had planned on putting it on my dining table and leaving it alone.  I thought it would “speak” for itself and it’s organic appeal would shine.  I still plan on doing that since we eat at this table everyday, but I also wanted to see how it would look all “dressed up”.  Soooo I took some of the Fall decor from the other vignettes I created and embellished this new log centerpiece.

I surrounded the log centerpiece with varying sizes of sugar pumpkins, pinecones, berries, and artificial leaves – perfect for a Thanksgiving table!

I was so happy to finally get this project complete and I love how it turned out.  How do you decorate your table for Fall?

I link to these parties: Cottage Instincts, Skip to My Lou, Dittle Dattle, Between Naps on the Porch, Today’s Creative Blog, Stories of A to Z, The Lettered CottageAll Things Heart & Home, Savvy Southern Style, House of Hepworths, Shabby Chic Cottage, Finding Fabulous, Creation Corner The Shabby Nest, Tatertots and Jello, Funky Junk, Under the Table & Dreaming

Trash to Treasure: Nursery Lamp Makeover

It’s always fun to make treasure out of trash!

A few weeks ago I was visiting a friend and sharing with her my experience on revamping a recent lamp project.  In turn she said she had acquired a lamp that was from her husband’s childhood, but had no idea what to do with it.  After a trip to the basement to scrounge through a few boxes, she came back with quite the “trash”.  It really wasn’t trash, it was just in desperate need of a makeover to give it new life.

To keep it in the family, her desire was to put it in her son’s room and I had the perfect idea!

Once I got the lamp home, I took it apart from head to toe and snapped a picture, just in case I forgot how to reassemble it later.  The lamp needed to be rewired and since I had just finished my How-To Rewire a Lamp tutorial, I was experienced enough to make the proper updates.  As you can see from the before pictures, the brass had tarnished from age and the colors were drear and in need of a revamp.

I started off by hand sanding each part of the lamp to give it a fresh start before painting.  The horse was a little tricky to sand, but I was able to get into some of the grooves…

Armed with “my staples” (not real staples, I mean spray paints), I was ready and off to transform this little horsey!

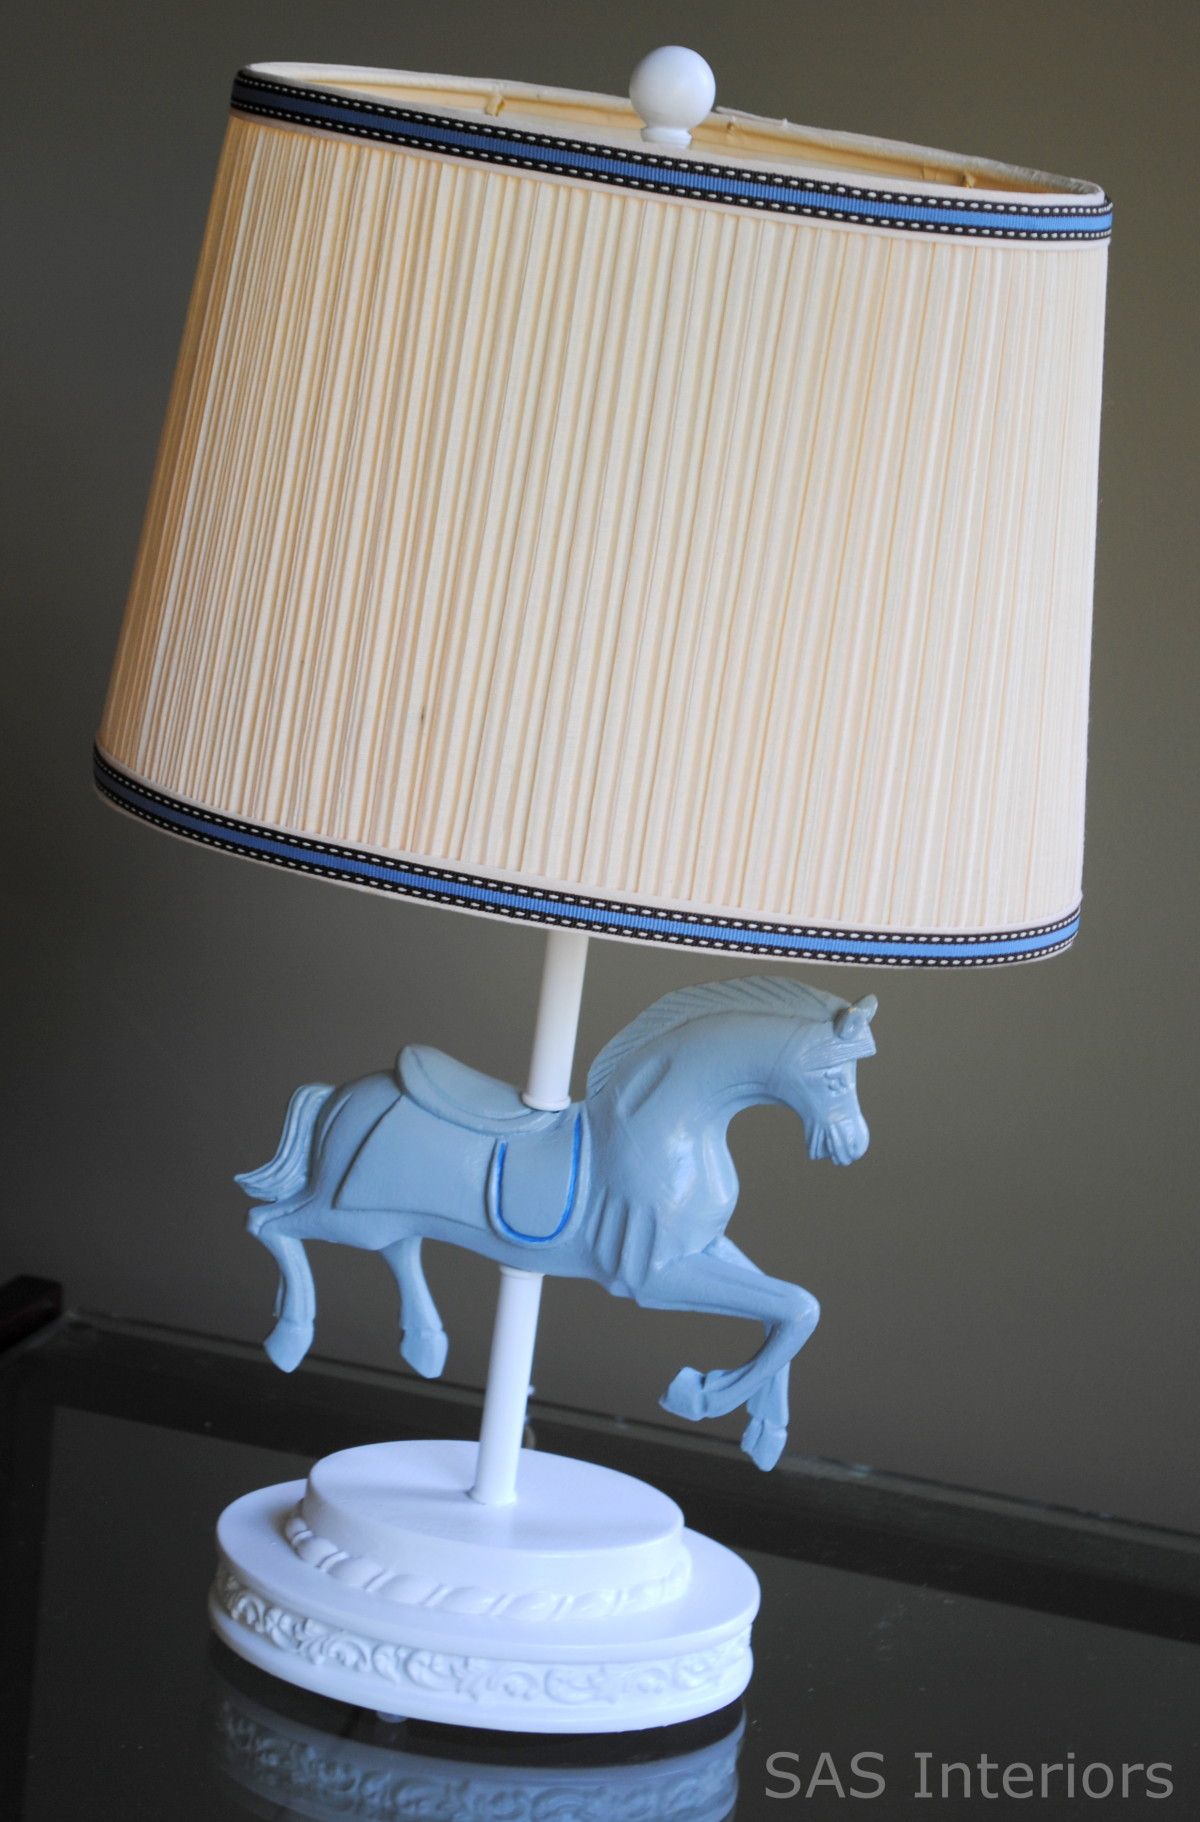
Ba-bye colored horse – Now you’re going to be a horse of a different color.  I spray painted the horse with 3 coats of Rust-oluem Winter Gray (same color as my lamp revamp), the other parts of the lamp (base and tubing) white, and finished it with a top coat of crystal clear enamel.

I had mixed feelings about the lampshade.  I actually had planned on replacing the old shade with a new crisp, white style.  I even bought a new one but it didn’t seem to be the perfect fit.  The existing shade was oval shaped to match the lamp base.  So I said, O heck with it, let’s reuse the shade and simply dress it up by giving it new life with a stylish ribbon.

Before being completely done with this Lamp reVamp, the horse was missing something… he needed a bit of color, so with a small brush and cobalt blue paint, I outlined the edge of it’s saddle to add the perfect finishing touch.  And then…

… it was done!

Again, here is the before…

And here is how the trash was turned into treasure…

Thankfully my friend LOVED the lamp and was so happy to add this new treasure to her son’s bedroom!  What treasures have you made from trash?