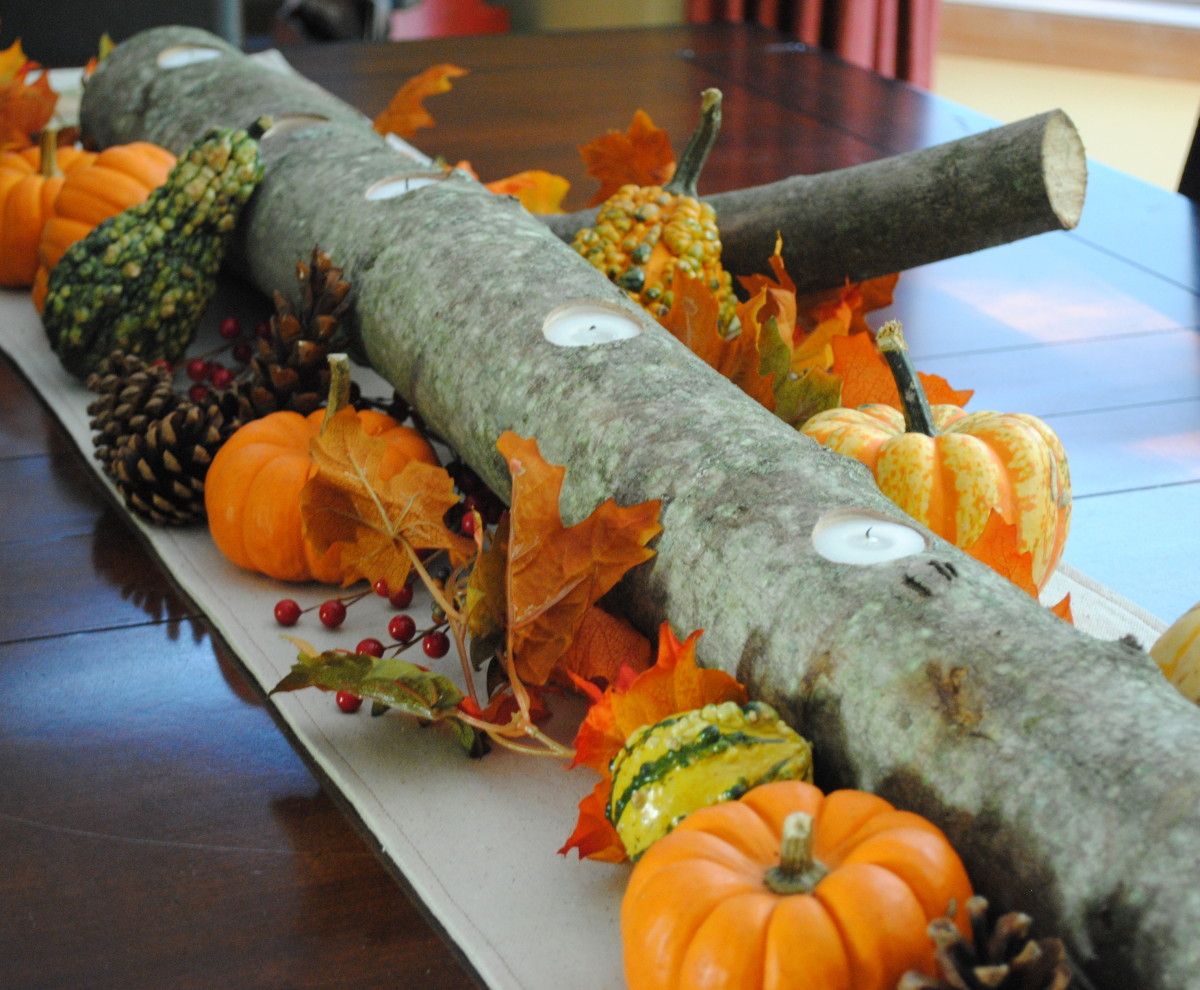
This past weekend when I got my DIY groove back, I made a centerpiece for my dining table that literally took less than 5 minutes and cost nothing! The pictures, staging, and post took longer than the actual project. Thankfully I am SO pleased with the results and now my dining table is complete for the Fall season. Here’s a sneak peak of the final outcome, but let me take you through the steps so you can make one for your table!
A few weeks ago, while going for an evening walk around the neighborhood, there were a pile of cut down trees on the side of the road ready for the next day’s garbage pickup. I couldn’t stop myself, and ended up grabbing this 4′ beauty and piled it into the Radio Flyer wagon along with the two kids (the remainder of the trip home sure was tight for the kiddos).
As soon as I set my eyes on this log, I knew exactly what I wanted to do – make a centerpiece with tea lights. I envisioned a simple, yet sophisticated backdrop that can be updated and changed throughout the seasons and holidays!
Unfortunately, it sat and sat in my garage for too long. Then this weekend, my husband FINALLY got a drill bit that was large enough (1.5″ diameter) to drill into the log to create what I was desiring – My centerpiece creation was finally coming to fruition.
The mister and I drilled 6 holes about 10″ apart, and it was done! Finito!! It was that easy and it took less than 5 minutes to create this beautiful centerpiece.
And here it is. Complete and shining bright!
So simple, yet so beautiful!
I had planned on putting it on my dining table and leaving it alone. I thought it would “speak” for itself and it’s organic appeal would shine. I still plan on doing that since we eat at this table everyday, but I also wanted to see how it would look all “dressed up”. Soooo I took some of the Fall decor from the other vignettes I created and embellished this new log centerpiece.
I surrounded the log centerpiece with varying sizes of sugar pumpkins, pinecones, berries, and artificial leaves – perfect for a Thanksgiving table!
I was so happy to finally get this project complete and I love how it turned out. How do you decorate your table for Fall?
I link to these parties: Cottage Instincts, Skip to My Lou, Dittle Dattle, Between Naps on the Porch, Today’s Creative Blog, Stories of A to Z, The Lettered Cottage, All Things Heart & Home, Savvy Southern Style, House of Hepworths, Shabby Chic Cottage, Finding Fabulous, Creation Corner The Shabby Nest, Tatertots and Jello, Funky Junk, Under the Table & Dreaming

What a great idea! It’s perfect for Fall the way you have embellished it but you are right about it being great for other seasons too. I can see that being great in that ‘in between time’ after Christmas but before Spring. I think that was a wonderful idea to keep the side branch in order to keep the log stable.
Thank you so much for the kind thoughts – it was such a fun project to create!
Totally LOVE this! It could be in a magazine:)!
Very creative.
Amanda
Thank you so much Amanda for the kind comment! I love that you think it could be in a magazine. Sometimes the simplest things are the most beautiful.
xo Jenna
That is beautiful! I can’t believe it was so easy!
Shannon @ Imperfectly-Inspired
I know – It was so easy to make! Thanks for the kind compliments!! xo Jenna
Love your centerpiece especially the candles in the log. I don’t have the tool to make the holes, but could probably improvise.
Thanks so much Lisa for the kind comment! I used a regular drill for the holes and had to purchase a 1.5″ bit (which is only a few dollars). We use our drill for SO many things, so I highly recommend getting one.
Jenna, I LOVE it! It is as good as anything you’d see in a magazine. Great job.
Thanks so much Kristin!
I love this! It looks great and I love how easy it is to make. Thanks for sharing. You’ve been pinned!
Carissa
PS I’m also your newest follower.
Thanks Carissa – so glad to hear that you like my Autumn centerpiece! xo Jenna
So pretty!! What a great idea! I sure hope you are hosting Thanksgiving at your house this year so everyone can admire it!!!
Thanks Niki and yes, I am hosting Thanksgiving. I will have to move a few things around though because if I leave the centerpiece, there won’t be much room for food, lol. Thanks for the kind comment! xo Jenna
so beautiful! makes me want a power tool!
Thanks Breanna! Power tools are awesome – I just got a bunch for my anniversary instead of jewelry, lol. Thanks for stopping by. xo Jenna
Hi Jenna! I just came across your blog today. Can I just say…LOVE IT!!! This quick and easy project is great. Two of my favorite things…quick and easy! I am now your newest follower; and I hope you will follow me, too! Many blessings to you!!!
Hi Shenita! Welcome to SAS Interiors – so glad you found me – I love having new followers! I’ll head over and check out your blog too. xo Jenna
This is absolutely fabulous. Very creative and professional looking. You could never find something as good as this in a store!
Thanks Jodie – what a sweet comment! xo Jenna
I love the candle spots in the log! What a great idea! Looks fantastic :)
Your comments are so sweet – thank you!! xo Jenna
I love this Jenna!! So natural and wonderfully fallish the way you have it decorated. Thanks for sharing the idea. I just featured this project over on my blog Vignettes today :-)
Thank you so much Kristin for your kind words and for featuring my project. I’m header over there now to check it out! Jenna
Wow! This is stunning! I have a ton of branches in a burn pile in my back yard. I may have to go rescue one for my house and one for my mom’s!
Thank you so much Alison! Today is a perfect day to head out to the wood pile and rescue some branches to make this centerpiece – it’s easy, fun, and takes NO TIME!! Enjoy
That has got to be the coolest centerpiece I have ever seen. I love it.
Awe, thanks Tanya – so sweet!!! xo Jenna
love this! going to have my husband help me make one now ;) love how inexpensive this is considering it is something i would imagine PB or C&Barrel has for sale for a lot of $$!!
Thank you Jamie! It definitely is easier to have a helper, but this is something that can be a one-person project. It is super inexpensive and you’re right, would probably cost big bucks at those “named” stores!
Love it and so easy. The tiny pumkins are just darling!
Thank you Veronica!
HI! I love your centrepiece! I admit it,i amgoing to totally copy this! Thanks for the inspiration!
Thanks so much Elisa. Copy away and send me a photo or upload it to my Facebook page!!! Glad you were inspired. xo Jenna
I love it because it’s rustic and so pretty – and I love the story of how you found it.
Thanks so much Angi for your kind thoughts! Jenna
This is a fabulous idea. With the drought this year we have tons of dead limbs laying around. This would be a great way to use one of them. Thanks for this idea ;)
Thanks Tammy for the kind thoughts and I’m so glad I inspired you with my centerpiece log! xo Jenna
adding to fav’s
So beautiful!! I would also look great on a mantle or entertainment armoire. I wonder if my hubby has the right size drill bit. :) I’m off to share your link with my Facebook peeps. This is too pretty to keep to myself.
Thanks so much Stephanie! If you don’t have the right drill bit, it costs less than $5.
This is really decorative, but lighting a candle in dry wood, sorry, an accident waiting to happen.
Very true, and an alternative could be to use faux candles and still get the same effect!
Have I mentioned how much I love this centerpiece? I’m sure I have. I decided to let the whole world know on my Favorite Things for Thanksgiving blog post, though!
Come check it out here: http://www.creativecarissa.com/2011/11/few-of-my-favorite-things-thanksgiving.html and grab a featured button if you’d like.
Cheers!
You are so sweet, Carissa! Thank you so much for the kind words and for featuring it on your blog. xo Jenna
Loved this tutorial so much I featured you here:
http://raisingyourrainbows.blogspot.com/2012/09/creative-fall-flare.html
Thanks for sharing
Erica
Thanks Erica!
i am gonna make this as my center piece but was wanting to know can it be used year after year. i love this.
an u use these every year all year. how cab u keep the wood looking still fresh i guess is the word. i love thos here by the way
Thankfully the wood is still goo after a year – it never rotted. I think if the tree branch is hearty enough it should be okay. So happy to have inspired you! xo Jenna
I LOVE this!
Thanks Karah!
It’s beautiful Jenna! Now I need that drill bit so I can make one for myself!!
If you don’t mind I’d like to use one of your images in a round up I’m doing.
I absolutely love it what a great idea. I wouldn’t be much good with a drill though!
Thanks for the inspiration, Jenna! I finally just tried this project and it turned out great! Fun and easy too. I documented my results on my little fledgling blog. Fair credit given for the inspiration, of course!
It’s fantastic Brittany! You did a great job. I shared it on my FB page: https://www.facebook.com/photo.php?fbid=617487284931829&set=a.404121089601784.111365.170419196305309&type=1&theater. So happy to have inspired you!
xo
Jenna
This is absolutely beautiful. Thanks for sharing.
What a cool idea! It looks beautiful.
I made this after looking at your post! You are right…it took all of 10 min to make….of course my husband found the log and had the drill bit to cut the candle holes…but it makes a great looking impact! Thanks for the idea! Judi
Did you clean the wood at all before bringing it in your house? I’ve been wanting to do this but am afraid there would be bugs in the wood!
I didn’t clean the wood. Honestly, the tree was in very good condition with no holes or anything, so I felt completely confident to bring it in the house. Make sure to choose a branch that is solid and not sitting on the ground and rotting.