Aside from blogging, working, and being a mom and wife, I have spent every waking moment of my spare time over the last two weeks, making this…
I didn’t buy it this way. I made it! I actually can’t believe it myself. This is what I started with – a wood nightstand with two drawers.
My daughter turned two last month and she really loves to play with pretend food, so I searched and hunted for a play kitchen for her birthday. I found a few I liked, but they were either too expensive or too big, so after some thought, I decided to make one on my own. I DIY everything else, so I was up for the challenge. In searching for real kitchens on Pinterest, I came across a few pretend kitchens. Using some ideas that I had seen, and knowing the desired size I was looking for, I’ve been on the hunt for a nightstand for quite some time. Thankfully my mom came to the rescue a few weekends ago and brought me this beauty. It was actually difficult for me to transform this nightstand because it was in great shape and looked really nice. But that thought went out of my head in 5 seconds! In no time, I was off and working…
What’s great about DIYing, is that you can search for inspiration, and then add your own unique creativity, to make a one-of-a-kind piece. To make a play kitchen there are a gazillion things you can do and include, but hopefully with my creation, I’ll inspire you to make your own.
That being said, I will spare you the {play by play} details, and instead show some highlights throughout the process.
Thankfully for my anniversary, the mister got me some new tools, and ALL of them came in handy for this project! I started off sanding the nightstand with an orbital sander. Once it was nice and smooth, I applied one coat of primer, followed by using my new jigsaw to cut our the hole for the sink. {MISTAKE} I should have made ALL the cuts and holes before I painted, because what happened? The dust got into the paint (but, of course). No problem though, I just sanded the surface one more time. Mishaps can be rectified! And there’s a sneak peak of the paint.
Moving on…
I made a tall back piece out of MDF board and used “L” brackets to secure it to the nightstand top.
Then came the paint. I chose to use a mustard-yellow hue with a touch of green undertone – Valspar Wasabi. Then the accents of burnt orange and deep purple (sounds kind of like the rest of my house, doesn’t it?). To make the paint dry as smooth as possible, I added Flood Floetrol (also used in my kitchen makeover) which is a must when trying to achieve a smooth, even finish.
At this point, I was spending many hours in the garage and I’m sure my neighbors thought I was crazy!
I completed the painting phase of the kitchen, by adding two coats of satin Polyurethane. Once the paint was finally dry, which took longer than I thought because we had some ultra humid days, I was ready to add the details. To create the backsplash, I used leftover scraps from the personalized calendar and added a few coats of Mod Podge to harden the surface. Then I finished it off by adding a decorative scalloped edge wood piece at the top.
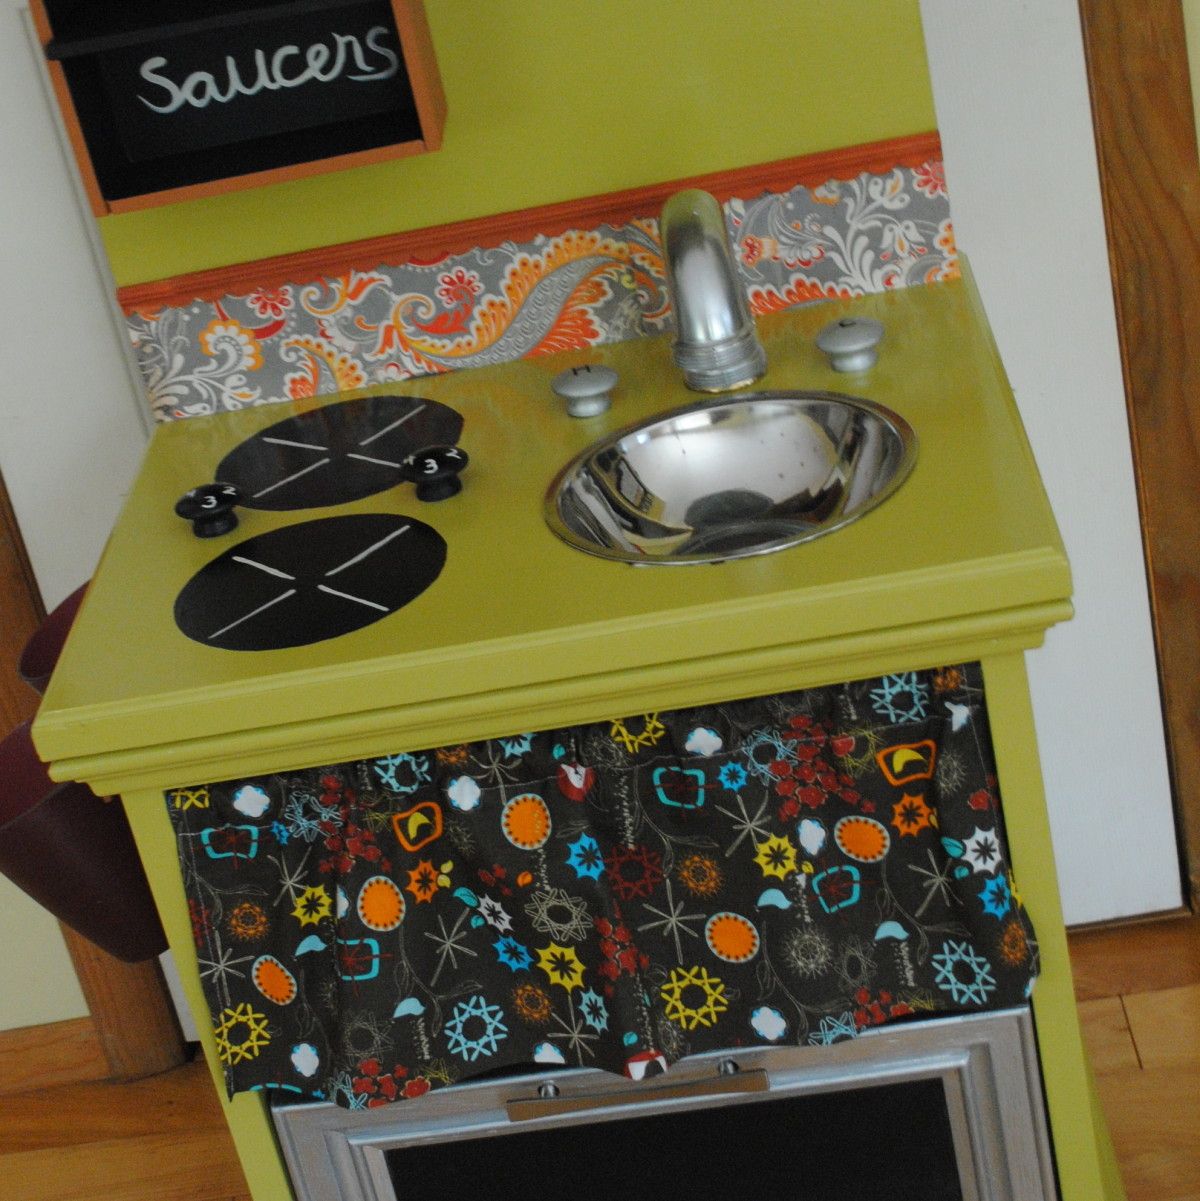
Then came time to create the burners. Using a round kitchen bowl, I outlined two circles and filled them with black chalkboard paint. Right before that, I drilled the holes for the sink faucet handles and the burner handles (learned my lesson from last time… drill, THEN paint).
Once everything was dry, I attached the faucet handles and burner handles to the top of the kitchen by using screws from underneath. By not tightening the screws too much, the handles can actually turn. Then with white paint, I free-handed the burner coils and numbers on the burner handles, and added the H & C with a black Sharpie.
This is the work surface area of the kitchen all complete.
And the last part to this kitchen was the faucet. That was a little tricky, because the mister and I were perplexed on how to fasten it onto the kitchen top. If you remember back a week ago, I showed you this picture~
Yes, that is a P-Trap for the bathroom and using a little metallic silver spray paint, it transformed into a sink faucet.
For the “oven drawer” I also used this same spray paint and the black chalkboard paint in the center. Looks pretty real to me. Wouldn’t you say? And then completed the look with a quick hand-sewn valance that sits in place of the top drawer.
What’s really nice about this kitchen is that it has ALOT of storage. All their play “things” can be hidden away.
This is the result of the kitchen. After many long days and endless hours, it really was a joy to create!
And one last time just to show you again where this cute little kitchen started…
This is different than the typical Interior Design and Decorating ideas and inspiration that I like to share on my blog, but it was fun creating something that is a little more “out of the box” for me. I hope you enjoyed!

This is awesome! That PVC “faucet” is so smart as was painting the bottom drawer in chrome and black to make it look like an oven door! I had to really think hard to figure out what you had done! I originally thought you had replaced the drawer with something else… That’s me, always making things harder than they need to be. LOL Love, love, love this!
Thanks so much Sandra for the kind words – alittle creativity goes a long way!! xo Jenna
Are you serious??!! That is amazing! The best thing I’ve seen in quite a while. Your kids are so lucky, not just to have that cute kitchen, but to have such a creative and energized mom! I can’t wait to share this…
OMG, Heidi, you are SO SWEET! What kind words – thank you!! And for you to say this is one of the best things you’ve seen in a while, is so nice. There are SO MANY amazing projects out there, so that is much appreciated. xo Jenna
Are you for real? Jenna, this is awesome!!!! My mouth dropped! LOL!!
Love it!
xoxo,
Carrie@2friends2cities
Awe, thanks Carrie – you are so sweet! xo Jenna
This is ADORABLE!!! It is perfect! Did your daughter LOVE LOVE LOVE it? This can be a family heirloom!
Yes, Laura, both my kids LOVE playing with this kitchen and I hope it stays in the family for a LONG time!! xo Jenna
This is the cutest, most clever thing I have ever seen created!!!! I would bet your daughter will pass this down to her own daughter!!!
Thank you so much for your kind words and yes, I hope it will be used and passed down to the next generations!
OMG!! Jenna, this is too cute! Awesome job. I’ve seen a picture on Pinterest showing this exact project countless times and thought that if my daughter had the room in her bedroom I’d make one. Yours turned out great. How do the kids like it?
~ Catie
Thanks Catie for the kind comment! My kids LOVE the kitchen. I’m sure you can make one for your daughter too. That’s why I liked creating my own because it could be to my desired size. This kitchen it only about 20″ wide, so it’s definitely small enough to move around, but big enough for them to play.
This is ridiculously AWESOME!!!! I LOVE IT!!!
Thanks Jessica! It was alot of fun to make and my kids LOVE IT.
wow, how awesome! I bet you are feeling very proud and happy with yourself! Congrats!!!!
Thanks Michele. I am very proud of myself for creating this and what makes it most joyous is that my kids completely LOVE IT!
This is darling!
Thank you Kimberly – very appreciated!!
You did a bloody fantastic job! I have been collecting play foods for my little niece for a while and wanted to make her a little kitchen, had the idea to use a little bookshelf to make it but your idea is much better. Will be on the lookout for a little set of drawers now, thanks heaps for the inspiration :D
Thanks Jaxx – so glad to have inspired you!! xo Jenna
I LOVE this and can’t wait to make one myself for my Grand-daughter!! Squeal!! Seriously cute…hoping her mom doesn’t follow me too closely on facebook or she will know what her daughter is getting for Christmas. I pinned this on Pinterest…and I hope I am doing that correctly…put your name on the project…don’t want to lose where I saw the tutorial! Thanks for sharing this!
I LOVE this…so creative!
Thank you so much Sally!
So cute! Love that you have a drawer that pulls out….cute way to help keep things organized.
Thanks Mandy! Yes, the drawer definitely keeps things organized!!
Amazing transformation from the “before” to the “after” photo! All of your hardwork paid off. This is a fabulous play kitchen!!
Thanks so much Nicole!
This looks fab. I’m trying to finish my daughters play kitchen and have still got to do the sink and tap. Great idea for the tap.
Thank Louise! With some creative thinking, there is SO much to do in making a kitchen like this – glad you were inspired! Jenna
Would LOVE it if you could share this on my link party at http://www.serenityyou.blogspot.com
Natasha xxx
Thank you for the kind comment Natasha! I’ll head over to the link party and link up :) Jenna
I LOVE this idea! Now I’m hoping I can get my hands on an old nightstand before Christmas. Beautiful work!
I featured your project in a recent blog post…
http://radcrafter.com/2011/11/12-diy-christmas-gift-ideas/
Alida
Thank you so much Alida! I’ll take a look at the post. Jenna
Absolutely beautiful! So clever and well-done! I want to make one for my daughter — oh, wait, she’s 20 now. (Sigh)
Again, terrific job, and kudos to your mom for finding such a great nightstand.
Thanks Patti, you are so sweet! And one day (in the future) you may have the chance to make one for your grandkids!! ~Jenna
Hi,
Your play kitchen is awesome! I found you… because I was searching for children’s kitchens (I have a child’s desk/hutch that needs to be repurposed into a kitchen)!! Thank you for the great tutorial. I will begin on my hutch soon!
Question: how did you attach the P-trap? I love the p-trap idea… brilliant!
Thank you again!!
Thanks so much Melissa and I’m glad you found my blog through the search for Children’s kitchens. The P-trap (lol), that was tricky. I actually found a flat piece (of something) that the end of the P-trap fit perfectly into and then I glued it on to the curface with liquid nails. Just look around your garage and see what you have – that’ what I did. PLEASE share pictures when you’re done and I’d love to feature the result on my other blog, Daily Do It Yourself (www.dailydoityourself.com). -Jenna
Thank you for the p-trap help. Give me a couple of weeks to complete the kitchen and I will definitely send photos! ~ melissa (Now I must go and check out your other blog!)
Good Luck – Can’t wait to see the outcome!
How did you get the faucet to stay on?
Kriste, I had a circular disk that I found that fit the same diameter as the faucet. I super glued the disk to the nightstand top and then the faucet bottom sits in that. Are you making a kitchen?
Wow that’s pretty amazing. I never would’ve guessed it was made out of a nightstand until I saw the photos. I’d love to be able to make something like this for my daughter when she’s older but I wouldn’t have the patience. Great job!
Thank you Venassa! It really wasn’t that difficult to make and I’m sure you’d enjoy it because you’re daughter will love it. Just give it a try!
I love your play kitchen. It was definitely one of my faves as I was cruising pinterest researching what I wanted to do when we started on making one for our son this Christmas.
I also featured your project on my blog today among a short list of inspirational play kitchens. Come check out the post and grab a featured button if you’d like: http://www.creativecarissa.com/2011/12/im-dreaming-of-diy-play-kitchen.html
My grandfather made me my very own stove when I was a little girl. My memories of playing with it are all the fonder, because I know it was made specially for me! I bet your little girl will feel the same one day, looking back.
Amazing job :)
What a great story – thanks for sharing Mandi! I hope you had a great Holiday and Happy New Year!! xo Jenna
Hello! I just wanted to let you know that you inspired me to make one of these cute kitchens for my daughter for Christmas! Thanks for the inspiration!! I am going to blog about it and link back here if you don’t mind!
That’s awesome Mariah – I can’t wait to see it. Please share the link or post it on my facebook wall!! Happy New Year – xo Jenna
Here is the link to my blog post about our little play kitchen!
http://mariahscreations.blogspot.com/2012/01/my-daughters-new-kitchen.html
It looks great Mariah! Thanks for sharing! xo Jenna
I’m in the process of making one right now and I read through your comments to make sure my questions had not been asked yet. But where did you get the circular disk for the faucet and how did you hand the curtain? It looks like it’s on a rod, but for the life of me I can not figure out how hang it. I’m new to this whole craft world. : )
Thanks
Meredith
YAYA, Meredith, glad you are making one of your own play kitchens. The faucet – Honestly, I just found something in my garage that would work to attach the faucet. I don’t even remember where I got the circular disk. Try a piece of round wood or something to fit into the PVC pipe that will help anchor it to the surface. And for the curtain, it is hung on a $2 tension rod that I purchased at Walmart. Once the drawer came out, I was able to hang it from the inside. Let me know if you have any more questions! xo Jenna
Thank you! Tension rod! Duh! : )
I am a carpenter and most of this type of re-purposed projects I see are goofy, flimsy and really don’t look good. This one works. Good job. For other doing this I have a suggestion that will shave some cost. No need to purchase an oven handle, cut a broom handle and screw it on from behind with long screws. Cut it long, close to the width of the drawer and it will look like a typical oven handle (you will need to add a spacer between the handle and the drawer front, use short lengths of small diameter pipe, two old thread spools or even the plastic body of a ink pen hollowed out and cut to length would work). If you can find a computer fan grille big enough it would make a great burner grille.
Thanks David for chiming in and those are some great solutions and ideas! -Jenna
Did you make those doughnuts or did you buy them? If so where did you buy them? If you made them please make/show me the tutorial! :D
Hi Ashley! I’m crafty, but not that crafty. I bought the donuts. They are made by Melissa and Doug and I purchased them at AC Moore, but they’re available at many retailers.
This is amazing. My husband and I are working on a similar one, and can’t figure out how to attach the faucet. Any suggestions?
Superglue. The faucet is a difficult part of the play kitchen and honestly, has fallen off (well, actually pulled off) many of times. My solution is superglue – the gel one seems to work better! Good Luck. xo Jenna
Wow! This is an amazing transformation. Great job :)
Thanks so much Mandy!
Love this Jenna! Pinned it! I have a piece I’ve been wanting to do this to. Thanks for a great tutorial!
gail
Thanks so much Gail! xo Jenna
This is so adorable! My daughter is 20 months old and also obsessed with play kitchens – this is so clever I’m excited to find the inspiration. Thank you so much for such a detailed tutorial!!
Thanks so much Jennifer. So happy to have inspired you! xo Jenna
Love the kitchen. I’m making one for my grandchildren. Where did you find your “sink”? I’m having a hard time finding a bowl that has a flat rim.
Thanks!
The sink is a metal mixing bowl. It came in a set I had and thankfully didn’t use to much. So happy you love my creation! xo Jenna
I really love this idea. I came across your blog about a month ago and kept referring back to this DIY project. I found a night stand yesterday and am very excited to start on it. It will be a Christmas gift for my soon-to-be 18 mth old.
Connecting the p trap could be done with the cap of a milk jug. The cap fits right inside the p trap. Just glue and screw it to the top of the counter top and put the p trap on and put a little screw in it to hold it.
Great idea Dianne!
I plan to make a small sink in my garden. Then the kids can wash their hands before get into the house.
Got a new idea from here. Thanks.
Hurrah! I have been looking for something like this – I’m im the process of finishing off a play kitchen for my daughter and could not think of what to use for cooker dials and a tap! Thank you! Your kitchen looks gorgeous, in sure your little one loves it!!
I am begining a DIY play kitchen, tonight, love the faucet idea, how did you attach it to the top?
Wow!
Great Idea using a P-trap for the faucet!!! I’m in the process of making a play kitchen and was so stuck and not wanting to pay crazy money for a real faucet. You’re a genius! Thanks!
Thank you for this post! I’ve had a toy kitchen in my kids’ playroom that I bought for a few dollars at a thrift store last year. It was missing the faucet and I couldn’t figure out what to put in its place. I found your post on pinterest and the pipe fitting is genius! You made an adorable kitchen. Bravo!
This is adorable! Thank you for sharing. I didn’t see what you used for the faucet handles — do you mind sharing?
The faucet handles are wood cabinet knobs that I painted silver, then added “H” and “C” to… Super easy!
Thanks!
How did you attach the faux faucet?
I attached the faux faucet with a strong adhesive. Try an epoxy or liquid nails to make sure its secure.
Trying to figure out how to attach
P trap for faucet
I used a strong adhesive to attach the P-Trap to create the faucet. Good Luck!