
Month: December 2012

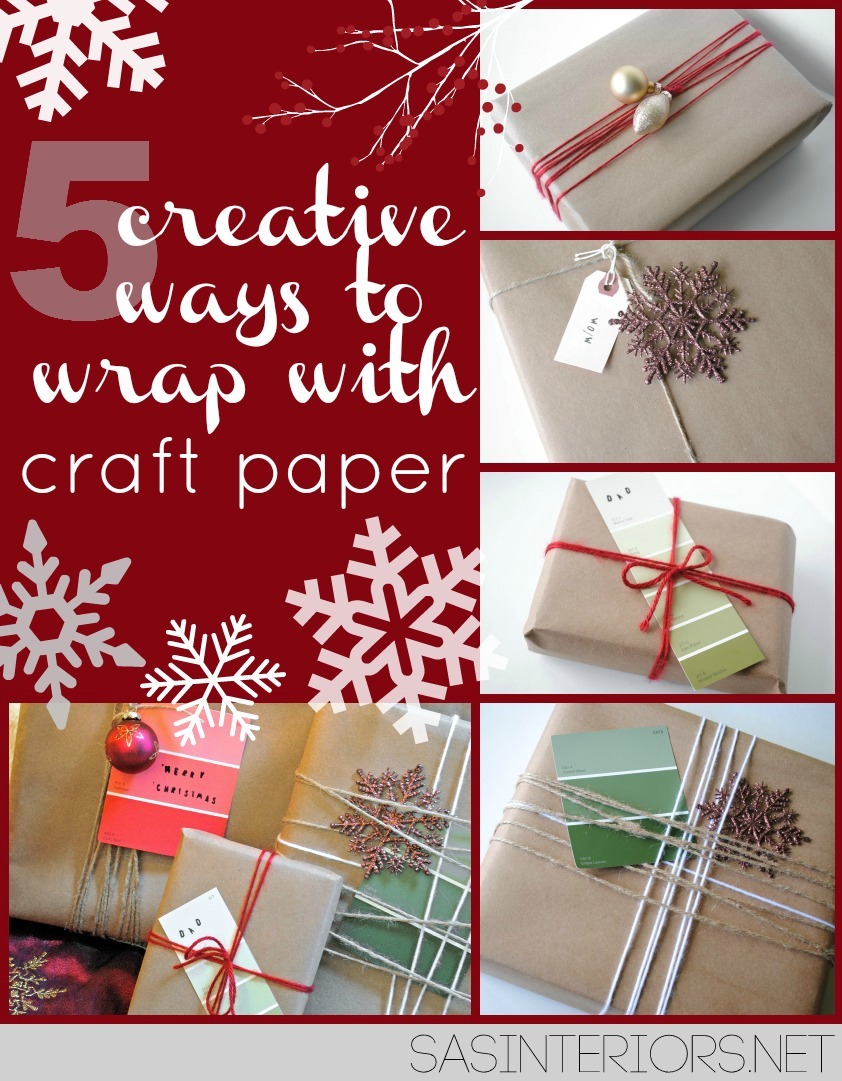
New Years Sparkly Tablescape + Lowes Giveaway #LowesCreator

Lowes CreatorI hope you had a wonderful and joyous Christmas!  Ours was filled with plenty of smiles, laughs, and hugs.  The kids were thrilled with their gifts from Santa and they have been quite occupied (which makes mama happy treasuring the quiet moments).  We’re off to see more family this coming weekend, but in the meantime, I have something fun to share…

In the midst of all the Holiday Hoopla, Lowe’s sent me on another challenge this month to scour their aisles and create SOMETHING SPARKLY for New Years. This one surely threw me for a loop (especially since I don’t usually decorate for New Years), but I arose to the challenge and feel that I hit this one out of the ballpark!

Thus the creation of my New Years 2013 Sparkly Tablescape

New Years Sparkly Tablescape Centerpiece by @Jenna_Burger, sasinteriors.net #LowesCreator #LowesCreativeIdeas #NewYears #Decorating #Tablescape

An idea struck when I was in the plumbing aisle looking at PVC pipe.  Isn’t that where all your ideas start too??

Scouring the aisles of Lowes

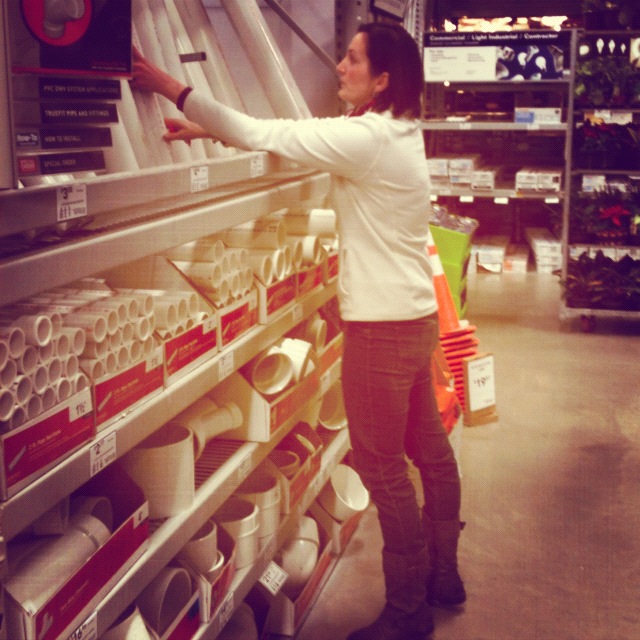
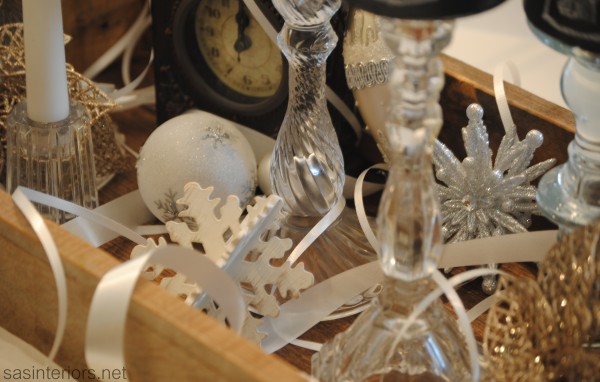
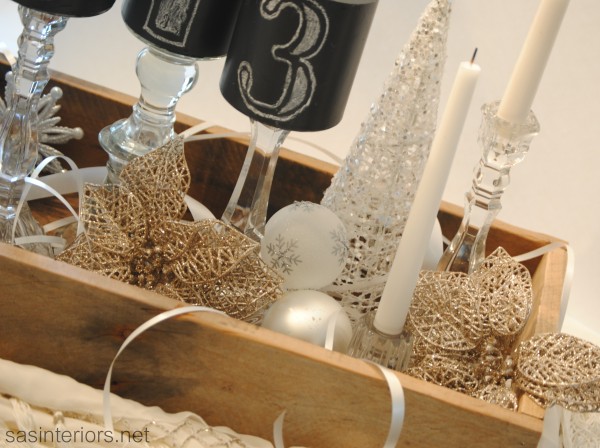
In knowing that I had a bunch of crystal candlesticks (which are missing mates and are all random sizes and heights) in the china cabinet, I thought that would be a good place to start to bring in the glitz, glitter, and sparkly!  And then I would add PVC pipe into the mix.

Ok, but seriously…  I had the thought to cut the PVC pipe, paint them with chalkboard paint, and add the numbers 2-0-1-3. So I was off and shopping for my materials.

I ended up buying:

  • (1) 2′ long PVC pipe
  • (4) PVC caps (which I think were around 25 cents each)
  • chalkboard paint
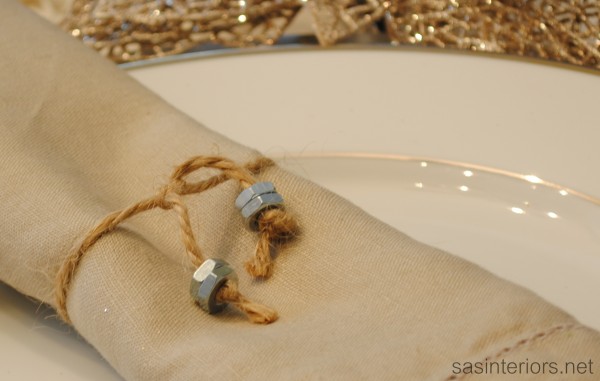
  • nuts (for napkin rings – keep on reading)

Once home, I started off by cutting the PVC pipe with a miter box so I had 4 pieces that were 4″ high each.

15New Years Sparkly Tablescape Centerpiece by @Jenna_Burger, sasinteriors.net #LowesCreator #LowesCreativeIdeas #NewYears #Decorating #Tablescape

New Years Sparkly Tablescape Centerpiece by @Jenna_Burger, sasinteriors.net #LowesCreator #LowesCreativeIdeas #NewYears #Decorating #Tablescape

It was bitter in the garage, so the Mister and I cut them indoors. I’ll tell you, it was a mess – beware! After cutting the PVC to the needed size, I handsanded the edges to get rid of the plastic shavings and to make them somewhat smooth.

New Years Sparkly Tablescape Centerpiece by @Jenna_Burger, sasinteriors.net #LowesCreator #LowesCreativeIdeas #NewYears #Decorating #Tablescape

I added the PVC cap on one end which would be the part that sits on top of the candlestick.

New Years Sparkly Tablescape Centerpiece by @Jenna_Burger, sasinteriors.net #LowesCreator #LowesCreativeIdeas #NewYears #Decorating #Tablescape

Then using Rustoleum chalkboard paint, I painted the exterior, interior, and the edges.

Then using Rustoleum chalkboard paint, painted the exterior, interior, and the edges.

Lastly, with white chalk, I freehanded the number 2-0-1-3 on each PVC cylinder.

New Years Sparkly Tablescape Centerpiece by @Jenna_Burger, sasinteriors.net #LowesCreator #LowesCreativeIdeas #NewYears #Decorating #Tablescape

Believe me, up close it isn’t perfect, but it’s unique and cute!

Once the Chalkboard PVC holders were done, I was ready to decorate my tablescape. To start, I shopped my home. I gathered anything silver and sparkly.  I grabbed ornaments from the Christmas tree, the new sparkly Christmas cones from the mantel, a clock (so apropos for New Years), along with white ribbon in different sizes and many of my crystal candles.

After that it was ready to start playing.  After a few moves and some edits, the centerpiece was complete.

New Years Sparkly Tablescape Centerpiece by @Jenna_Burger, sasinteriors.net #LowesCreator #LowesCreativeIdeas #NewYears #Decorating #Tablescape

New Years Sparkly Tablescape Centerpiece by @Jenna_Burger, sasinteriors.net #LowesCreator #LowesCreativeIdeas #NewYears #Decorating #Tablescape

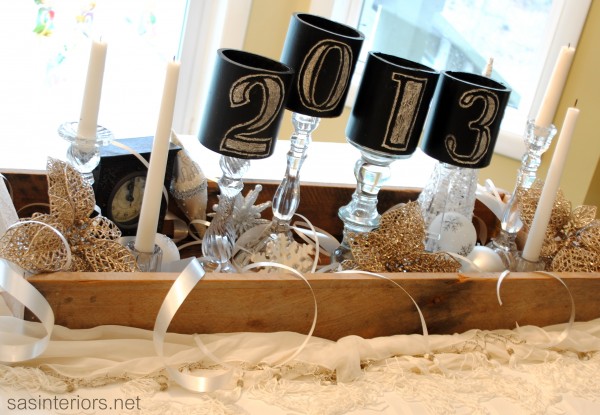
As the moveable base for the centerpiece, I used the pallet wooden box that I recently created for my Christmas setting.  It’s nice because it holds everything in place and can easily move so the table can actually be used for meals. Beauty + Function!

New Years Sparkly Tablescape Centerpiece by @Jenna_Burger, sasinteriors.net #LowesCreator #LowesCreativeIdeas #NewYears #Decorating #Tablescape

Under the wood box is a pretty white scarf that I’ve had for years (and don’t ever wear).  When I was hunting around my home, I thought it would be the perfect addition to bring in some sparkle.

New Years Sparkly Tablescape Centerpiece by @Jenna_Burger, sasinteriors.net #LowesCreator #LowesCreativeIdeas #NewYears #Decorating #Tablescape

New Years Sparkly Tablescape Centerpiece by @Jenna_Burger, sasinteriors.net #LowesCreator #LowesCreativeIdeas #NewYears #Decorating #Tablescape

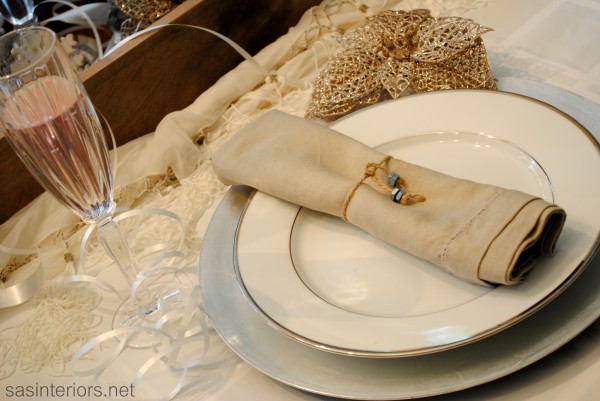
And of course we couldn’t have a New Years table without some bubbly…

New Years Sparkly Tablescape Centerpiece by @Jenna_Burger, sasinteriors.net #LowesCreator #LowesCreativeIdeas #NewYears #Decorating #Tablescape

For each seat setting, I added a silver charger with our china plates on top (a simple white plate with silver edging). For the napkin, I added a linen cloth and tied it with a piece of jute and added a few nuts for fun. I was going to create an entire napkin ring with nuts, but didn’t have time, but it could be an idea for a future project.

New Years Sparkly Tablescape Centerpiece by @Jenna_Burger, sasinteriors.net #LowesCreator #LowesCreativeIdeas #NewYears #Decorating #Tablescape

New Years Sparkly Tablescape Centerpiece by @Jenna_Burger, sasinteriors.net #LowesCreator #LowesCreativeIdeas #NewYears #Decorating #Tablescape

And one last look at my fun, whimsical, and sparkly New Years Tablescape.

New Years Sparkly Tablescape Centerpiece by @Jenna_Burger, sasinteriors.net #LowesCreator #LowesCreativeIdeas #NewYears #Decorating #TablescapeIs it pin-worthy?

After wracking my brain for a bit on the ideal project for New Years, I’m thrilled with the outcome of my sparkly creation.  It wasn’t easy, but I feel when I’m put to the challenge, something great always results!

Cheers to a happy, healthy, joyous, prosperous, and amazing 2013!

Onto the giveaway, which is HUGE!

Now’s your chance to tackle a new project in your home in 2013.  Lowe’s is generously giving one winner a $75 Gift Card to their store – how cool?!

a Rafflecopter giveaway

Disclosure: I am part of the Lowe’s Creative Team and was provided with a Lowe’s gift card to purchase items for my project.  I was also compensated for my time to use the products.  No one told me what to create, what to buy, how to use the product, or what to write.  All opinions are 100% mine!

I link my projects to some of these parties: Skip to My Lou, Dittle Dattle, Between Naps on the Porch, Today’s Creative Blog, Stories of A to Z, All Things Heart & Home, House of Hepworths, Finding Fabulous, The Shabby Nest, Serenity Now, Tatertots and Jello, Thrifty Decor Chick, Tip Junkie

5 Creative Ways to Wrap with Craft Paper

Wrapping gifts makes me happy!

With a yummy glass of wine in hand, I wrapped quite a few last evening. It brings me joy to give to others.

Until this year, I used the typical fun and festive paper that you see in the holiday aisles at most big-box stores.  Papers come in a variety of colors, lengths, and themes,  but there is something impersonal about it.  Just like a front door to a home, the packaging on a present sets the tone for what’s the come.  Wrapping doesn’t have to be expensive, but creative is key.  Earlier this week, I shared 15 unique ways to wrap holiday gifts and today I’m sharing how the gifts I will be giving this year will be wrapped.

5 Creative ways to wrap holiday gifts using craft paper by @Jenna_Burger via sasinteriors.net

From the graphic and title of this post you can pretty much figure out what I used for wrapping gifts this year, but if not, it’s… Craft Paper.

I love it!  Why? It’s inexpensive, you’ll never run out, it can be used and customized for any occasion, it’s multi-functional, and is super thick/heavy (like high-end pricey papers at $6/$8 a roll).

And let me say it again… you’ll never run out (well eventually you will but not for at least 5 or 10 years)! I purchased a 500′ roll of brown craft paper for $8 at Lowes.  Pretty awesome, right?!

Let’s dig right in to see how my presents will be wrapped for Christmas 2012…

After wrapping my presents in the brown craft paper, I got started with the embellishments a.k.a. the fun part!

Craft Paper Idea #1

Materials

  • Yarn
  • Paint Chip samples or other gift tags

As a DIYer and crafter, paint chip samples seemed unique and so appropriate to add to a gift that came from me. I picked a few up that seemed Christmas-like in a range of red and green hues.

5 Creative ways to wrap holiday gifts using craft paper by @Jenna_Burger via sasinteriors.net

You really can do so much with paint chip samples!  After I wrapped my present in brown craft paper, I then wrapped two layers of red yarn around and finished it off with a long green paint chip sample.  I added the words DAD on it with individual letter stamps that I got at AC Moore for $1.  Super cheap and so pretty!

5 Creative ways to wrap holiday gifts using craft paper by @Jenna_Burger via sasinteriors.net

And the result…

5 Creative ways to wrap holiday gifts using craft paper by @Jenna_Burger via sasinteriors.net

Craft Paper Idea #2

Materials

  • Jute
  • Leftover (non-used) small ornaments
  • Paint Chip samples
  • Letter Stamps

5 Creative ways to wrap holiday gifts using craft paper by @Jenna_Burger via sasinteriors.net

Again super easy to make and some of the supplies are a repeat from the last gift idea.  Instead of using the yarn this time, I decided on jute, which again is very inexpensive. I got this roll at Walmart for $3 and have used it for many things around the house.

After wrapping and adding the embellishments, here’s the result…

5 Creative ways to wrap holiday gifts using craft paper by @Jenna_Burger via sasinteriors.net

It was so simple to make!  I wrapped  a loooong strand of jute towards the end of the box (not centered) with an ornament and paint chip sample, and it was complete.  With the individual letter stamps, you can say anything and add as many words as you’d like.  The options are endless.  For this present I wrote Merry Christmas.

Craft Paper Idea #3

Materials

  • Jute
  • A simple tag
  • Any ornament

5 Creative ways to wrap holiday gifts using craft paper by @Jenna_Burger via sasinteriors.net

Using any ornament – I loved how these chocolate snowflakes sparkled – add it to a present for a creative embellishment.  I wrapped one layer of jute around the box, added a tag, and the simple snowflake ornament, and my present was complete.

This special one is for my mom…

5 Creative ways to wrap holiday gifts using craft paper by @Jenna_Burger via sasinteriors.net

Craft Paper Idea #4

Materials

  • Yarn – I chose red
  • Small Ornaments

5 Creative ways to wrap holiday gifts using craft paper by @Jenna_Burger via sasinteriors.net

A minute later, the result…

5 Creative ways to wrap holiday gifts using craft paper by @Jenna_Burger via sasinteriors.net

For this present in particular, I simply wrapped a looong strand of red yarn around the box and finished it with two small ornaments.  So easy.

Craft Paper Idea #5

Materials

  • All of the above!

To create this last idea, I used it all…  Jute, yarn, an ornament, and a paint chip sample.

5 Creative ways to wrap holiday gifts using craft paper by @Jenna_Burger via sasinteriors.net

As you see, each present has similar materials, but is put together differently each time to truly make a one-of-a-kind gift.  How special?  And what recipient wouldn’t appreciate the time you took to think outside of the box?!

5 Creative ways to wrap holiday gifts using craft paper by @Jenna_Burger via sasinteriors.net

5 Creative ways to wrap holiday gifts using craft paper by @Jenna_Burger via sasinteriors.net

Pretty, simple, and O so fun and unique to create!

If you’re looking for even more ideas on how to wrap, then you’ll have to check out my Wrapping Round-Up of 15 Unique Ideas to Wrap Holiday Gifts.Creative ways to wrap holiday gifts using craft paper by @Jenna_Burger via sasinteriors.net

How do you usually wrap your Holiday gifts?

JOYful Christmas Mantel

The hustle and bustle of the Holidays are in full swing, but I was able to step back from the craziness of it all this past weekend to revamp my mantel and deck it out for Christmas.

As a Blogger, I feel so lucky to have a platform to share my new creations.  When the time comes to create a new mantel composition, I push myself to always try something new and different, and raise the bar from the previous year.  Thus the result of my new JOYful Christmas Mantel…

Like with every mantel, I cleared off all the decor from my Fall mantel so I could see the space free and clear!  This always helps start the ball-rolling for my latest montage.  I’ll tell you, I don’t usually go into decorating my mantels (or many areas of my home) with a plan.  Once I see a blank slate, somehow it all starts coming together.

I will say though, I’ve had the idea to create this JOY sign for a while.  I thought it would look beautiful leaning against the new ebony stained wood board backdrop. Thankfully all came together and I’m so pleased with the result – I’ll be sharing a quick and easy tutorial on how I created the sign very soon.

Going for an asymmetrical look,  I added a gorgeous boxwood wreath next to the JOYful sign.  I scored this totally faux, but looks totally real, wreath at Lowe’s – I’m in love, I’m in love, I’m in love.  I love decorating with boxwood and cedar branches, and when I saw this, I grabbed it.  Well actually I thought about making it at first, but after figuring out the cost, this was a better deal.

In creating the mantel, I mixed in a few Christmas elements with a few non-Holiday pieces.  I couldn’t dare put away my fabulous white ginger jar that I enjoy looking at everyday, so of course there it is… (along with my easy-peasy presto-chango-with-spray-paint candle stick).  And I think they look great amongst everything else.

Some of the fun, festive decor that I added around it are the:  three sparkly mod Christmas trees, two brushed nickel Christmas stocking holders (which I got forever ago from Target), and one piece of birch log.

My burnt orange wall is a show-stopper in itself, but I always like to add a burst of color in another way.  With this mantel, I brought in a pop of yellow with a few sprigs of forsythia (totally wrong flower for the season, but I love the yellow with the red in the JOY sign).  In the same vase, I added some faux red berries.  Yellow + Red = Perfect Compliment!

The mantel is simple, elegant, and festive.  O, I truly wish you could see it in person!

The drop cloth and felt stockings are still a favorite of mine.  I made them last year and added metallic gold ornaments to give a little accent.

And here’s the overall space…

O, how I love thee!

Thanks for taking a tour of my Christmas Mantel 2012.  Similar to my recent tablescape creation, I mixed in items from around my home with dollar store deals and DIY projects.

Have you decorated your mantel for Christmas yet?  If so, please share the link below so I can visit. 

Looking for tips on how to decorate a mantel? {click here}

I link my projects to some of these parties: Skip to My Lou, Dittle Dattle, Between Naps on the Porch, Today’s Creative Blog, Stories of A to Z, All Things Heart & Home, House of Hepworths, Finding Fabulous, The Shabby Nest, Serenity Now, Tatertots and Jello, Thrifty Decor Chick, Tip Junkie

Christmas Tablescape

We’re only a few days into December, but my table is set and ready for Christmas.

Of course I’ll be using the table between now and then, but I had a little downtime last weekend and was excited to do a trial run for our Christmas dinner and other gatherings throughout the holiday season.  I adore creating new tablescape vignettes and wanted to experiment using a few new accessories that I recently picked up from the Dollar General Holiday décor aisle. I mixed them with a few thrift store finds and DIY projects to create this…

I had alot of fun creating this vignette and we actually enjoyed a scrumptious dinner Saturday night on this beautifully decorated table.  It was a little pre-Christmas meal to start off the countdown to the special Holiday.  As you can see, we also lit the first candle on our Advent wreath.

The base of the table started with my DIY chevron table runner that I created.  I actually never shared a tutorial on this specific runner, but it’s similar to the drop cloth runner that I made.

Since this is the table where we have dinner most every night, I needed a centerpiece that could easily move.  A few weekends ago, the Mister and I created this box (using the same technique from the monogrammed chevron tray) using leftover pallet scraps.  The size is 16″ wide X 26″ long and it’s the perfect size for a large scale (yet easily moveble) center focal point.

Inside the box I added advent candles, gold sparkly Christmas trees from Dollar General, and a ceramic bowl filled with cinnamon sticks, all surrounded by natural greenery that I trimmed from trees in our backyard. The cinnamon sticks smell so good – they give such a yummy fragrant scent when you pass by.

Dollar stores (like Dollar General) are a great place to find inexpensive items to decorate with.  By ‘shopping your home’ and mixing dollar-store-deals with thrift-store-finds, you can truly create a gorgeous and elegant tablescape or vignette for very little money.

For each table setting, I added a round bamboo charger on top of the drop cloth placemats that I created last year.  The bamboo weave gives nice texture and contrast to the neutral colored plates and placemats.  I then added my everyday cream with black line rimmed dinner plates (a wedding gift from Crate and Barrel) and a buttercup-colored napkin (from Target) threaded through a festive bell ring.  The seasonal bell ring was a great find from Dollar General.  I don’t think they are actually napkin rings, but who cares – they work perfectly!

To add alittle more pizazz to the table, I draped a long strand of red Christmas bead garland around the perimeter of the pallet box.  The bright hue was a perfect accent to the red bells on the napkins and the berries in the centerpiece.

A few loose Christmas ornaments completed the festive look.

Inviting and fun!

I’m really happy with the result of this tablescape.  And the best part is that it’s practical because the main decor is in a box, which can easily move.  I plan on using this newly created tray centerpiece for many upcoming Holidays and occasions – I’m thinking Easter baskets, Spring decor, and Fall foilage.

Were you wondering where I put my log centerpiece this year?  Well it’s not here on the table (like last year) and it’s not on the mantel either, but instead I decided to use it as the backdrop for our village.  The log centerpiece made for an AMAZING focal point, but wasn’t so easy to move = not practical.  Since the buffet gets left alone, it was the perfect spot to admire it.  That log centerpiece has been around the block and back, so it couldn’t be stuck away.

This is how it looked last year

And this is how it’s being used now…

I love our little miniature village…  and so do my kids.  Each night, they drag over the stool and love to peak inside.  It’s magical.

It would be nice to have each of you enjoy a delicious meal with me here at my table, but at least we can dream, right?!

I hope you’ve liked taking a glimpse at my tablescape for this Christmas – especially since it cost so little to create.  Dollar General really had some great deals and you connect with them even more to see what they have to offer on the Dollar General Facebook Page.  I sure have enjoyed sharing my tablescape with you!

Happy Holidays!

Visit Sponsor's Site