
Month: August 2013

I’m a CoverGirl

I was thrilled when the Fall issue of Saratoga Mama (affiliated with SaratogaMama.com & Saratoga Today) hit the stands last week because not only do I love finding out what’s happening in my neck of the woods, but I got to finally see the space I designed featured on the front cover.

My first cover! I’m officially a CoverGirl.  Well kinda…

One of the fun & challenging projects I took on this Summer was to partner with Colleen of Saratoga Mama to makeover 3 rooms for a feature in the back-to-school issue.  In 2 days (not consecutively, thankfully) we scouted, shopped, staged, and shot the spaces.  It was a whirlwind, but it was a blast.

Here is the result.

Fall Issue of Saratoga Mama Magazine

All 3 spaces were okay.  Just okay.  But they needed a little TLC to ultimately be more stylish & functional.  Once a plan of action was set, we were on our way!  Check out more of the process + what worked/didn’t work {here}

Now to the details of each space…

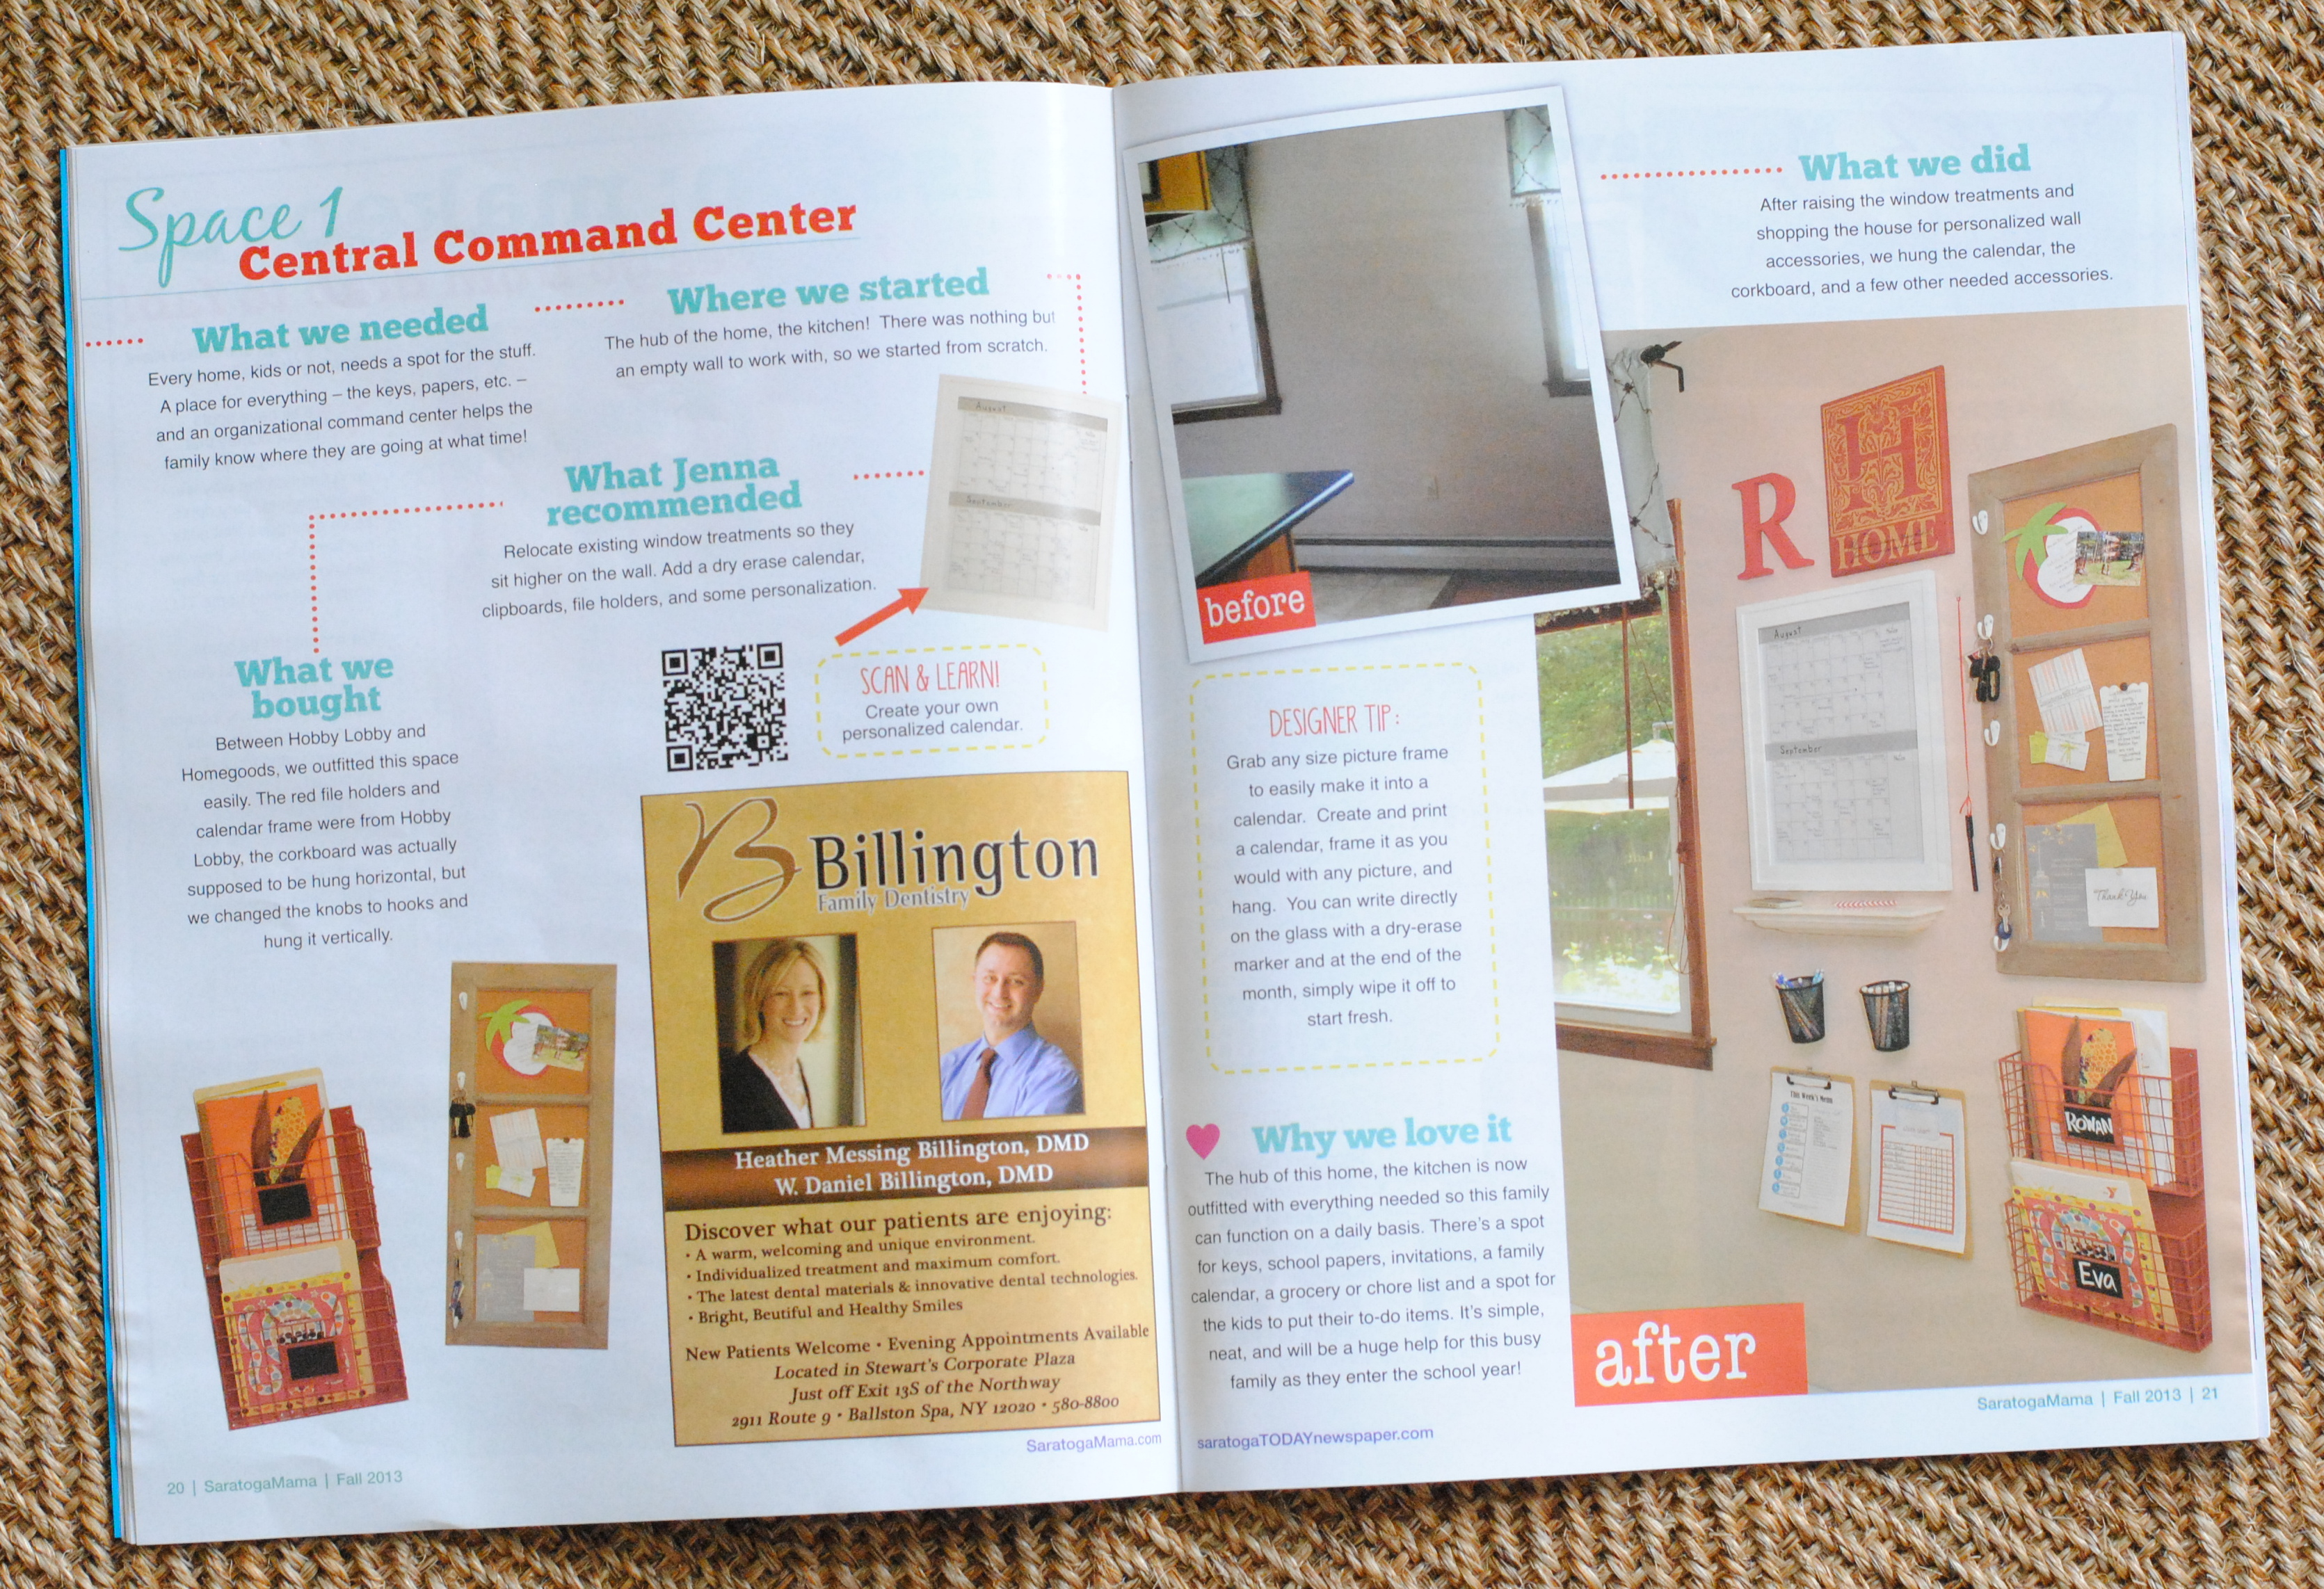
Space 1: Central Command Center

Creating a Central Command Center

The homeowner of this space was in major need of an organized drop space for everything to keep her family running. They needed a spot for all the everyday ‘stuff’ like keys, kids school papers, announcements, invitations, etc.  We decked out the open wall space between her kitchen and dining room with a new central command center to get her family on track.  The space includes:

  • A personalized 2-month calendar (similar to the one I created for my family)
  • Clipboards to easily rotate and change the weekly chore chart and homework chart
  • Metal bins for each child
  • A corkboard for important things
  • and a little Personalization!

After we shopped, I layed out the items on the floor to create the perfect montage.  I created a faux wall on the floor using painters tape so the measurements would be exact once translated to the wall.

We moved, rotated, tweaked, and adjusted until it was just right.  Here is the result of the layout…

Creating a Central Command Center

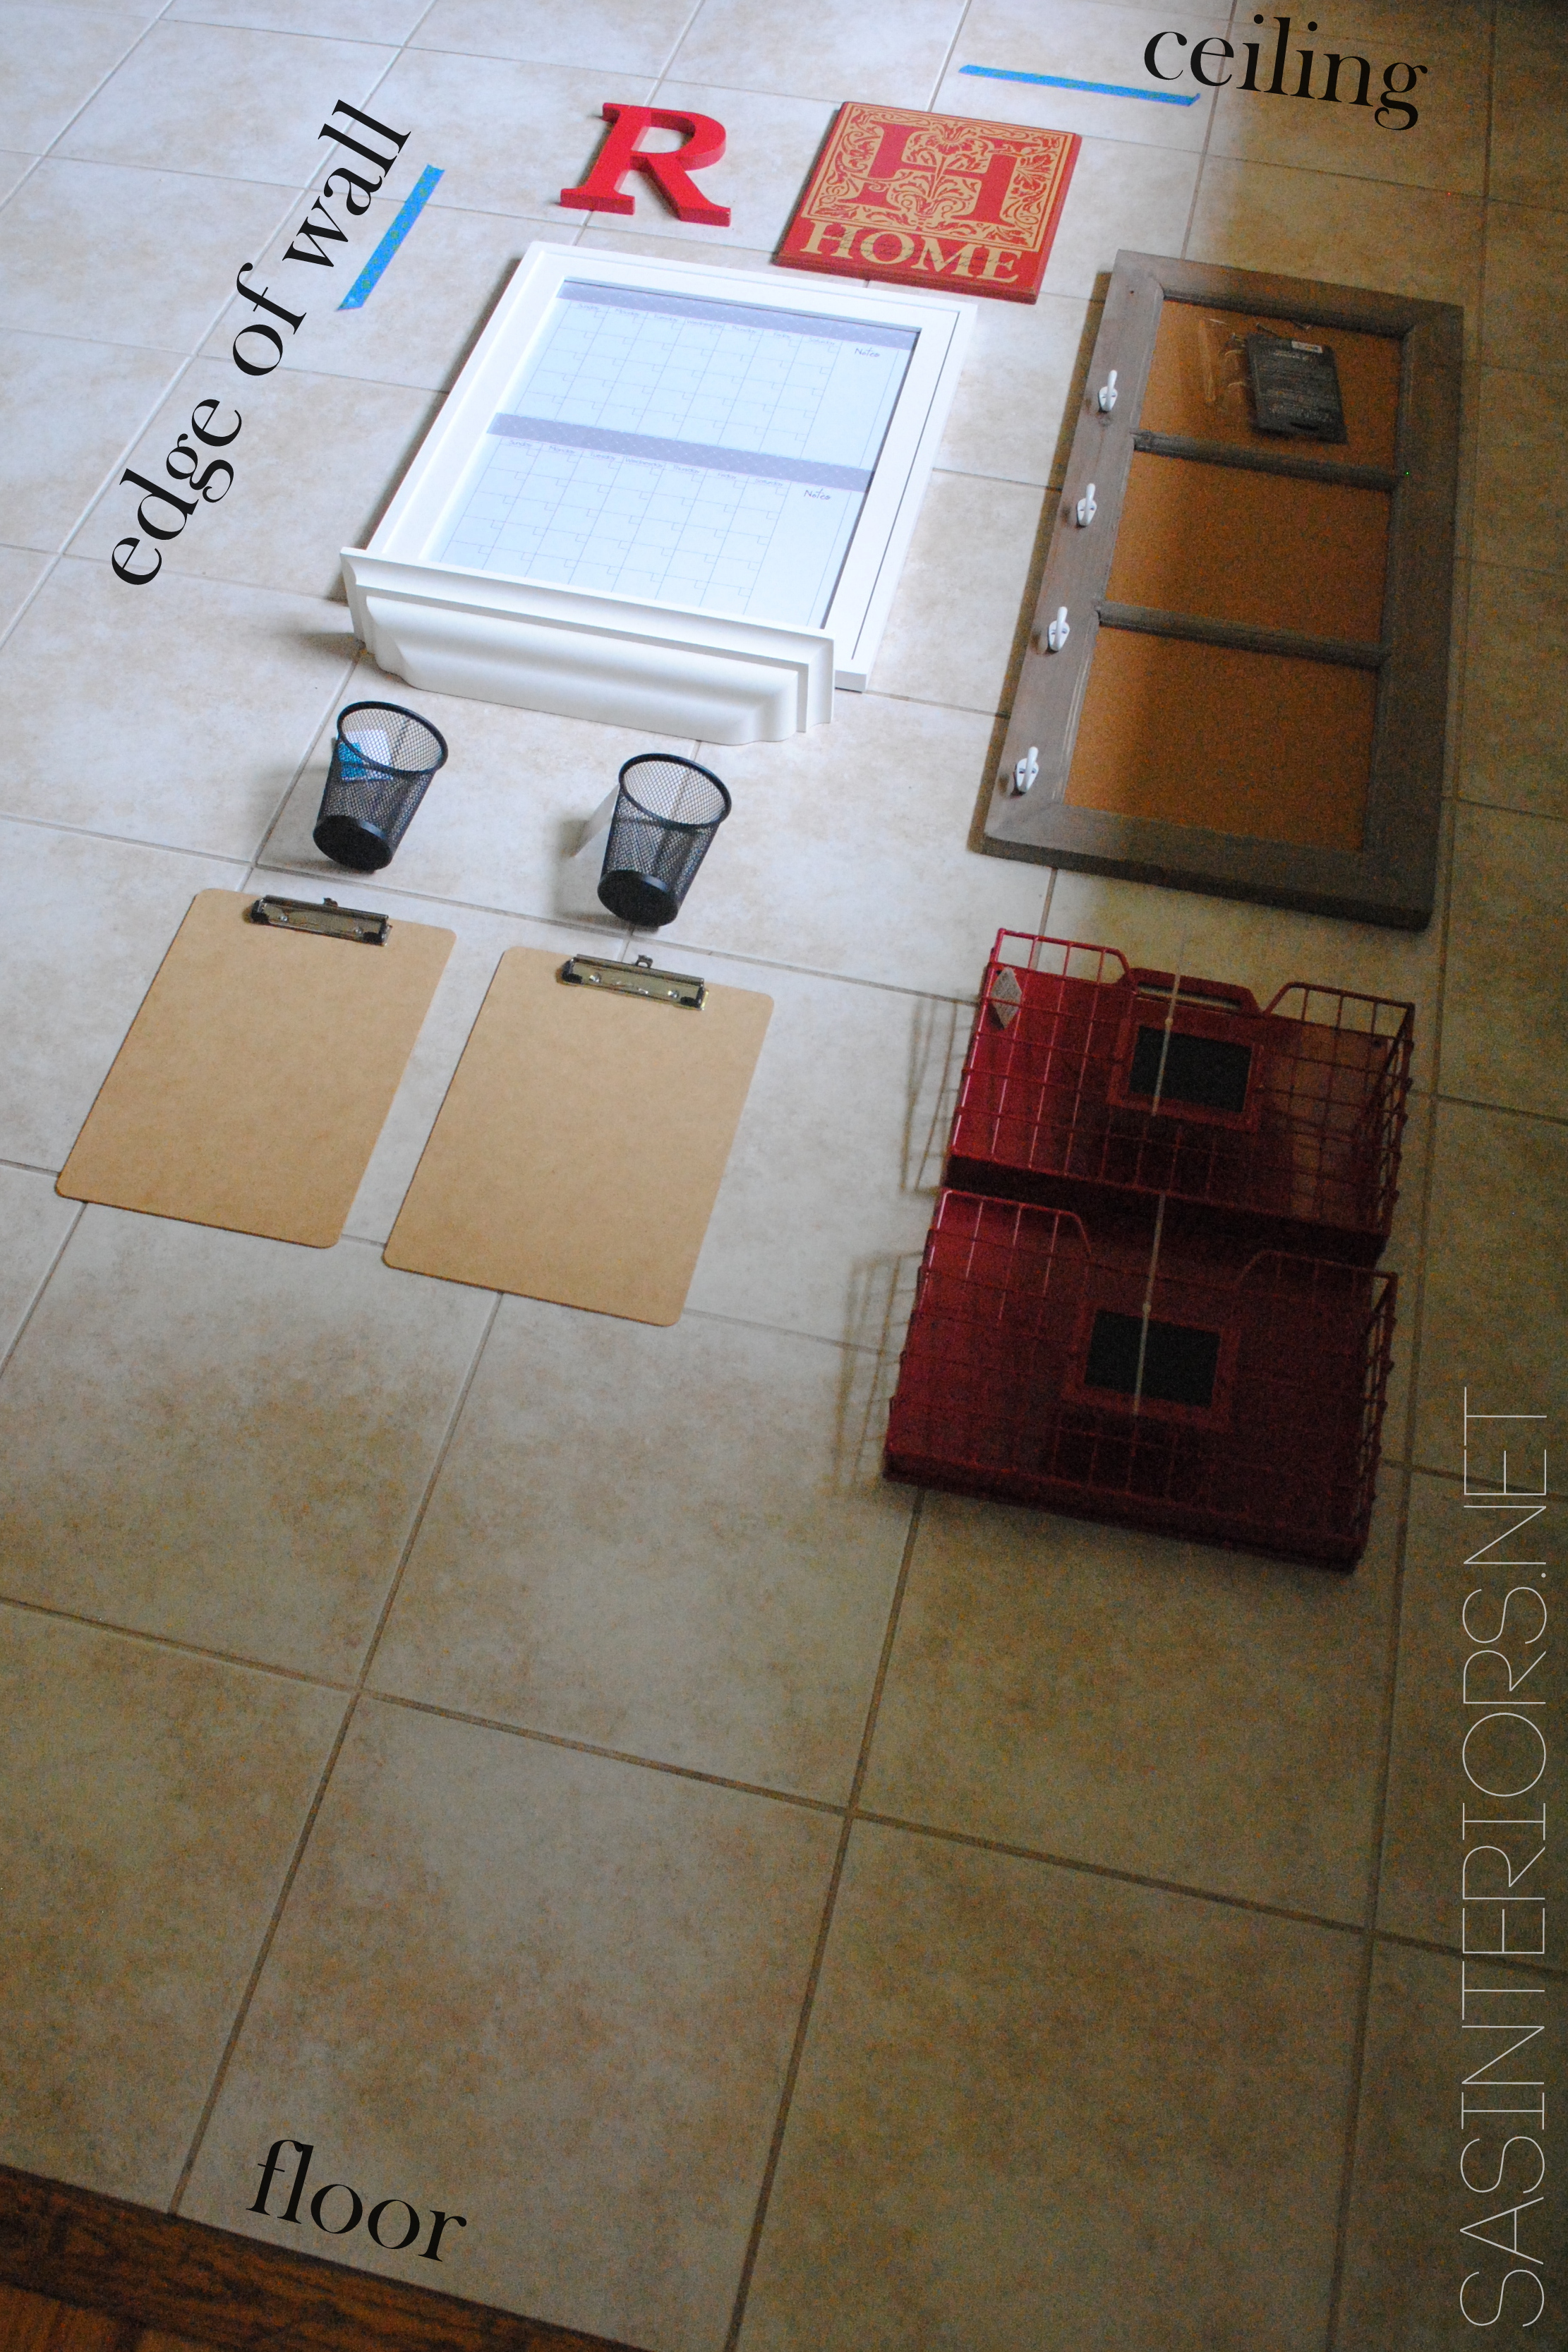
And the final Central Command Center on the wall…

Creating a Central Command Center

Creating a Central Command Center

And finally, the layout in the magazine.

Creating a Central Command Center

The homeowners kids were super cute.  And even though the little girl didn’t want to be photographed, it all ended well and the photographer captured an adorable photo.

Creating a Central Command Center

In the end, the homeowner was thrilled and expressed how useful + functional this space is for her and her family. It’s a real space she uses everyday!  It’s incredible what can be created with a little thought and focus.  In all, this space cost less than $100 to create.

Here is a breakdown:

  • Clipboards: $5
  • Personalized Calendar: $15 (for the frame; calendar is a DIY creation)
  • Red metal files: $30 (homegoods)
  • Corkboard: $30 (homegoods – it’s supposed to be hung horizontal, but I removed the original hooks and added new white hooks placed vertically for keys)
  • Pen holders: $8 (even though meant for the desk, I hung them using a nail)
  • Shelf & wall decor:$0 (repurposed from another space)

Space 2: Mom Cave

Office Makeover in one day + on a budget

This was an awesome space to transform.  Most of the elements were already there and actually remained in the space, but with some minor tweaking, this office looks completely different!  The desk area is located at the landing of a second floor cape-style home.  The ceilings slope to about 4′, but the area was too large to be wasted.  Just recently, the homeowner moved her desk to this area and it’s been a great, quiet haven to work.  YET, it wasn’t pretty and inviting.  It needed something!  With a few quick changes, this space went from drab to fab.

The first thing I noticed when I walked up the stairs to this space was the lack of color.  It needed something for the eye to draw in.  The ideal wall was the low wall behind the desk.  It was begging for something intense.  I chose Benjamin Moore Rhubarb for a splash of color against the white distressed desk. It was the perfect solution for this office makeover. A few other elements included:

  • A new desk lamp. (Target)  The old style was too harsh, so I brought in a non-typical task lamp that gives a soft glow to the space instead of an intense, direct light.
  • New knobs. (Hobby Lobby) Changing the top knobs added definition to the desk + they pick up the new rhubarb wall color & gold tones in the lamp
  • Storage for desk organization. (Homegoods and Staples)
  • A corkboard. (Homegoods)
  • A desk chair. (TJ Maxx)  A comfy and non-traditional desk chair.

The space was so fun to put together and in the end I saw how happy the little changes meant to the homeowner.  Little things do make a difference.

Office Makeover in one day + on a budget

I’m in love with this lamp.  The faux snakeskin lamp base gives the space texture and depth, and an unexpected elegance.  The brass tones at the bottom of the lamp base were also picked up in other areas of the room (small doses, of course) like the labels on the corkboard organizer and the new knobs.

Office Makeover in one day + on a budget

What was supposed to be a picture frame got changed into a daily corkboard organizer using a roll of cork + stick on labels.  Now the homeowner can add reminders for the week and break it up per day.

Office Makeover in one day + on a budget

The side wall used to hold 2 floating shelves that protruded too far into the room.  Now a photo montage wall filled with black & white family photos + meaningful elements makes this wall a happy place.  Adding in a repurposed chair + a standing lamp with a new shade was the final touch.  This space is now inviting, comfortable, and ideal for a work-from-home mom.

shoot26

Office Makeover in one day + on a budget

The final result in the magazine…

Office Makeover in one day + on a budget

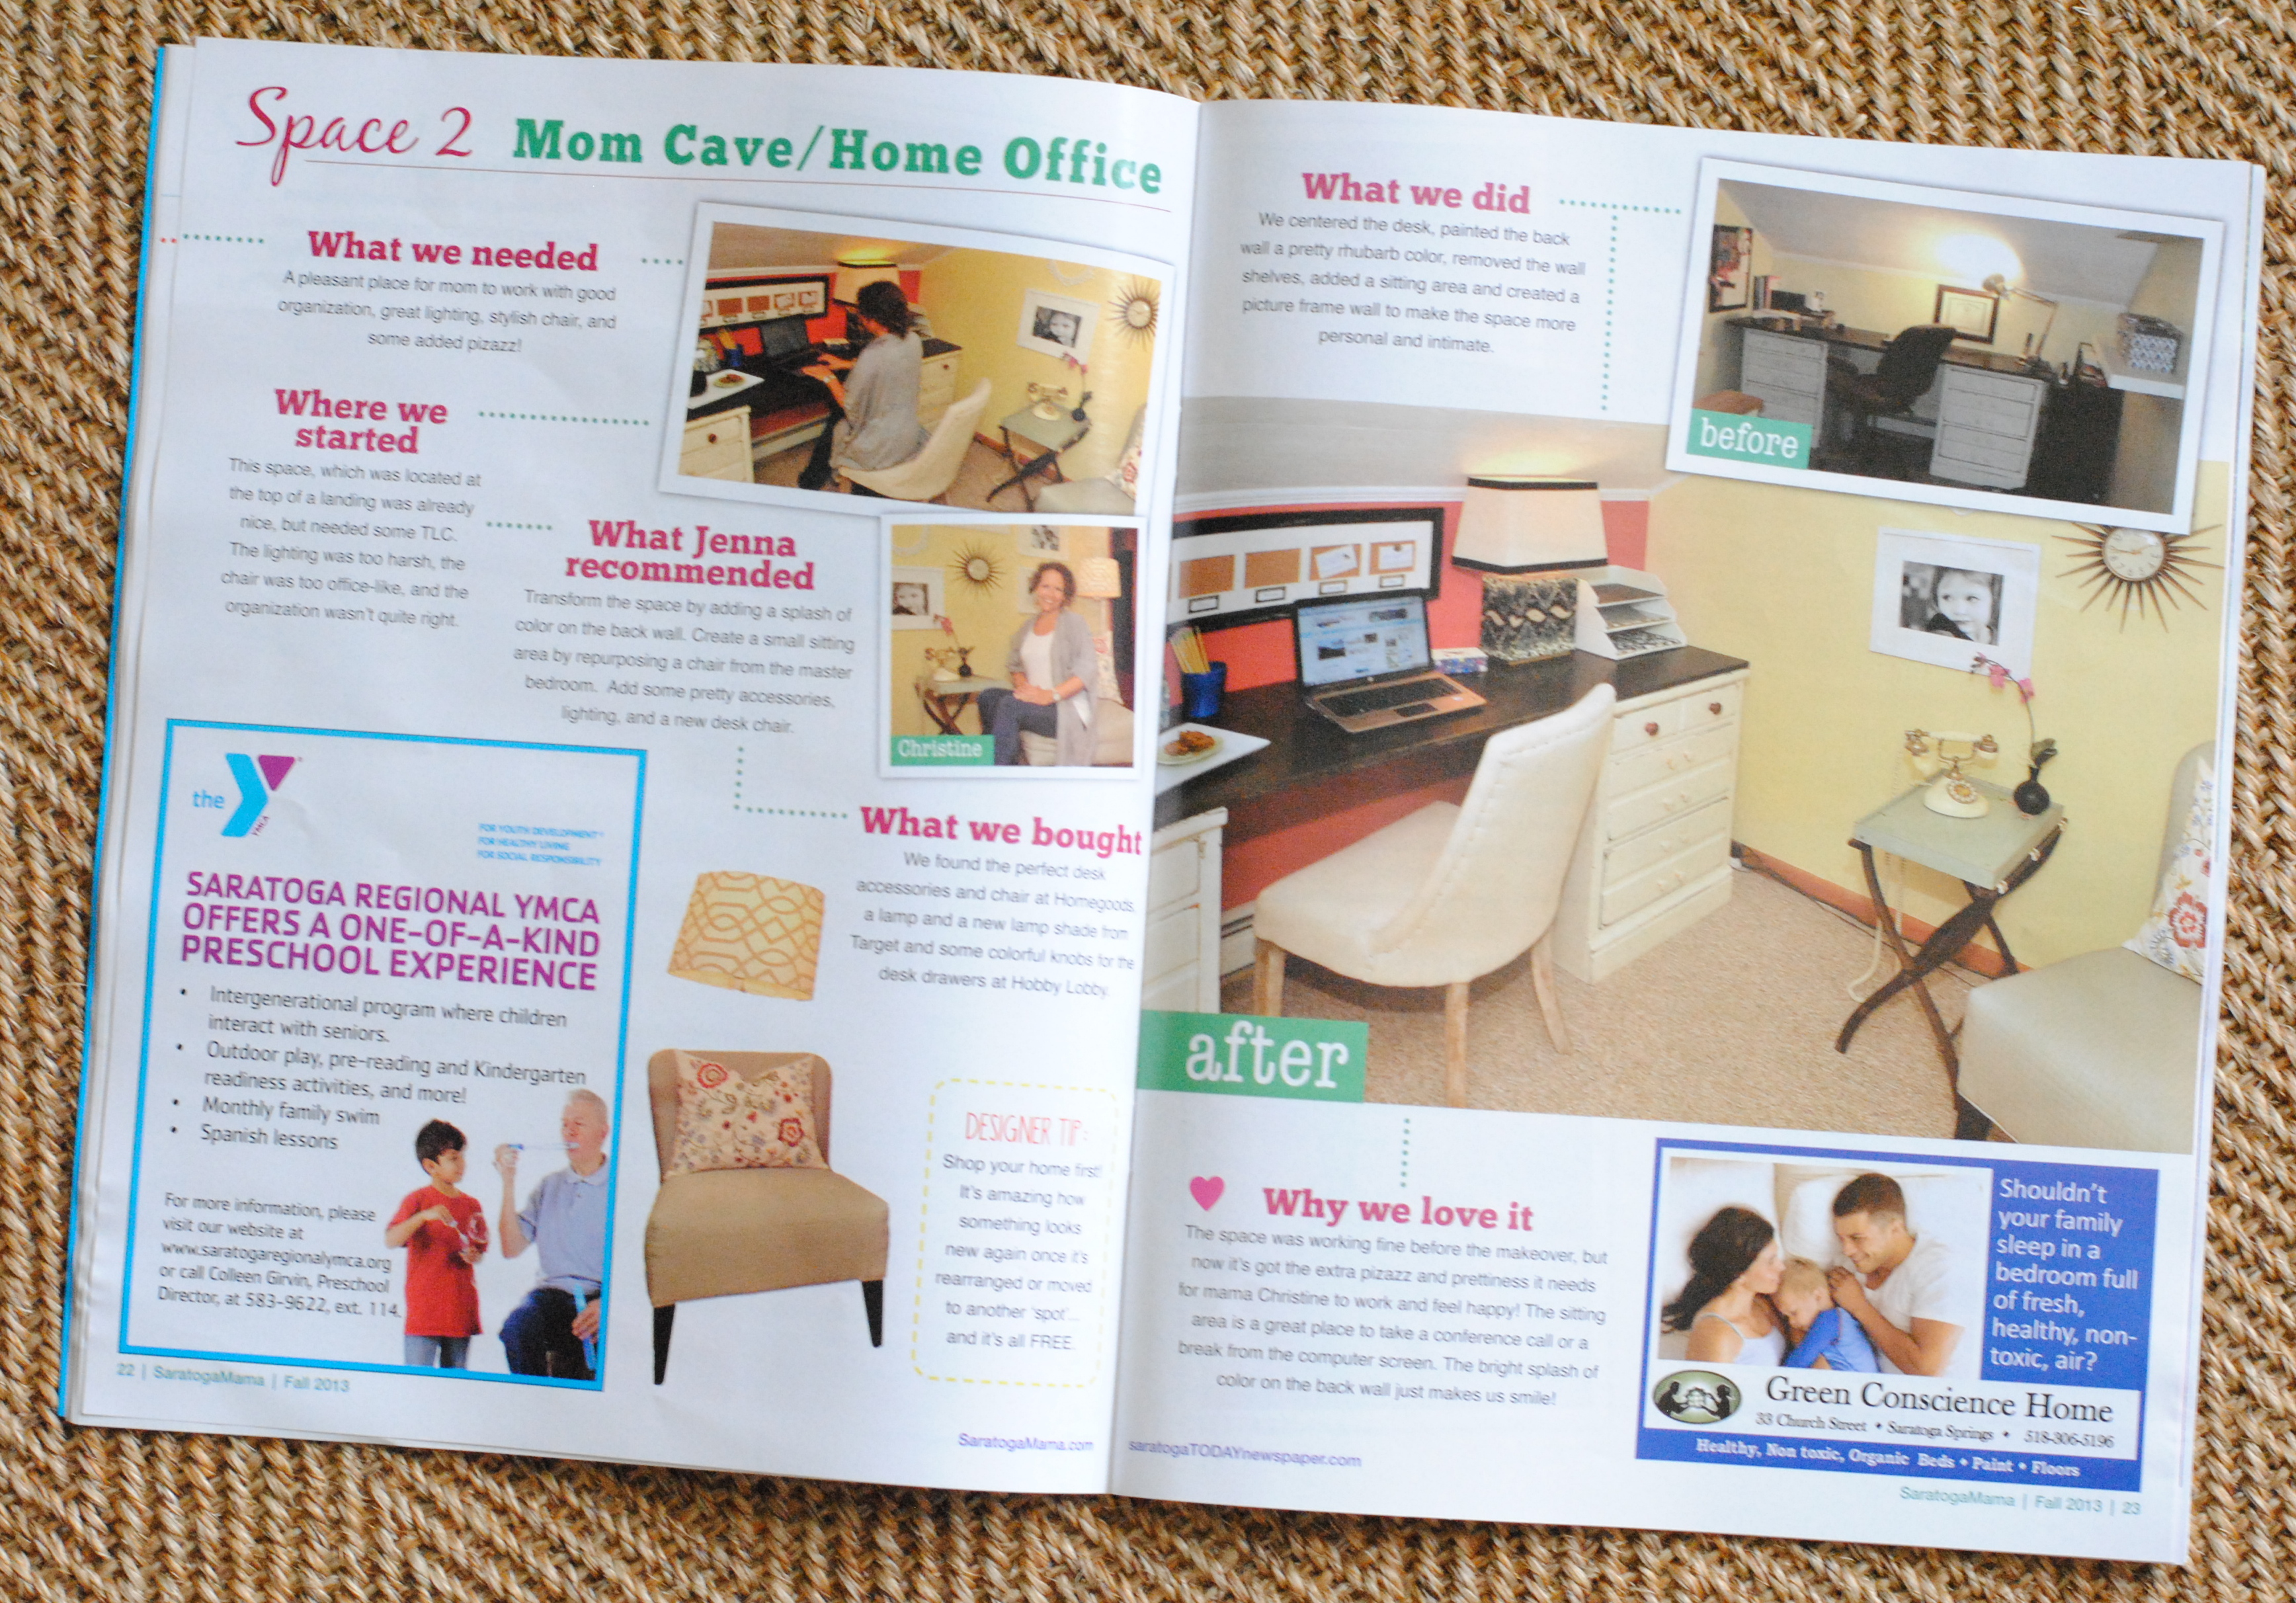
A few of the elements in this space are new, but most were repurposed from other rooms throughout the home.  It’s a space that is warm + welcoming, & ideal to work in.

Space 3: Kids Corner

Kids Corner Makeover

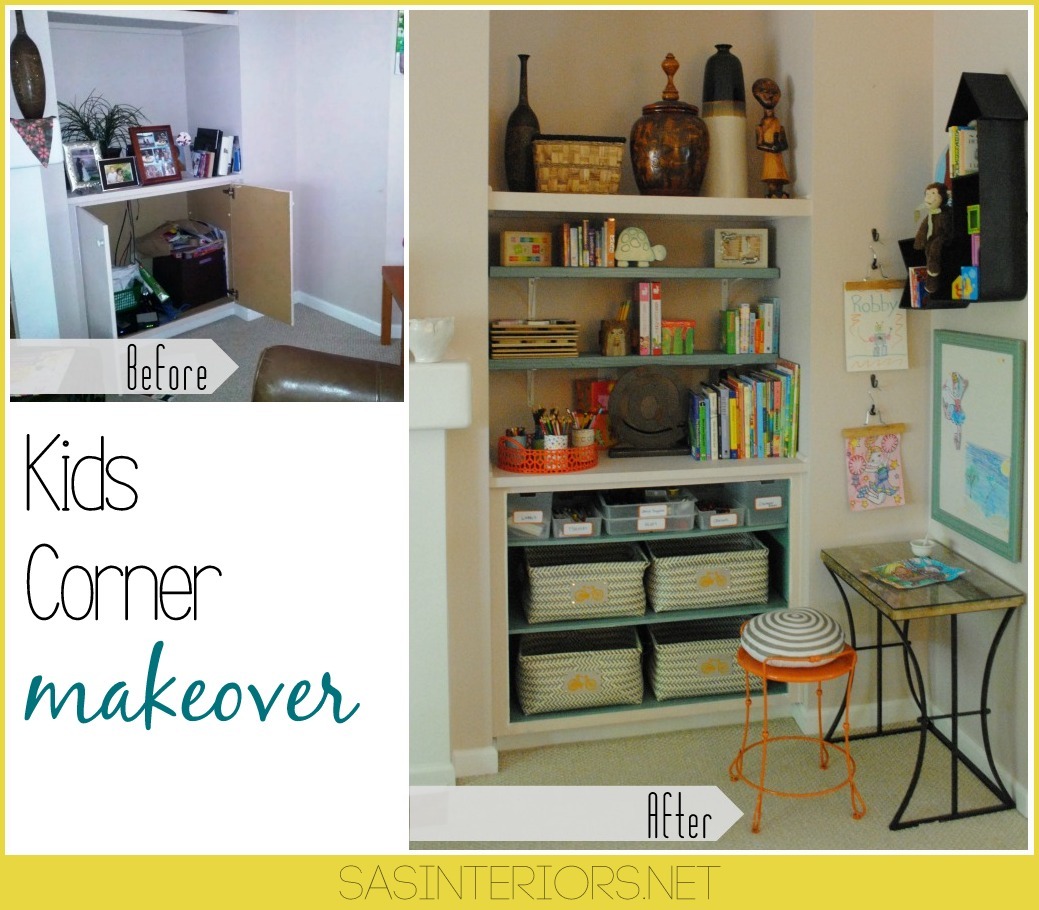
If you’ve got kids, most likely they love to color and create.  A place in the home just for them to call their own is so important.  A place that holds all their stuff so that at any time they can grab a puzzle, a book, or a paint brush will make them happy and independent.  The newly created kids corner in this home was once a dark space with a chair that covered most of the corner.  The outcave that was meant for a TV was unoccupied leaving a large span of open space, and the doors below were serving no purpose for what was behind them.  A new functional space was needed!

The first step to transforming this space was to remove the cabinet doors.  With my suggestion of a soft blue hue, the homeowner painted the interior of the cabinet, as well as the shelves + the new shelves above.  Then on our scouting adventure, we found fun baskets to hold paper, books, and all the necessary crafting supplies to fill the shelves. Books, puzzles, and pictures from around the home quickly filled the rest.

The new spot was coming together…

Kids Corner Makeover

Sometimes the most unexpected items end up being the best.  My most favorite element in the new kids corner is definitely the industrial-style arrow.  The homeowner thought I was a little crazy about purchasing this for the space, but I felt it was right.  It was fun, unique, and totally not expected.  It also makes the ideal space for holding books, stuffed animals, and other cute accessories.  Lastly, I love this arrow because it heightens that space.   Even though the wall is narrow it needs to be filled.  Filling it draws the eye up, which makes the room feel larger and taller.

Kids Corner Makeover

Kids Corner Makeover

Finding this ‘desk’ that was actually part of a nesting table set makes for the perfect work space.  Even though this wall is only about 30″ wide, it’s the perfect spot for a little creator.  The top of the desk wasn’t flat (not ideal for working), so I suggested the homeowner have a piece of glass cut to size.  It cost about $15 and make the best flat surface.

3 adorable coat hangers are hung on the side wall to easily change out artwork & beautiful one-of-a-kind creations.

Kids Corner Makeover

The result in the magazine…

Kids Corner Makeover

And that’s a wrap.

It was awesome to be apart of such 3 great transformations.  In just 2 days, Colleen and I accomplished a whole heck of a lot.  It’s amazing how much can be transformed with a plan and a small budget.  If you live in the Saratoga area, be sure to pick up the latest issue of Saratoga Mama Magazine.  If you’re not in the area, no worries, click here to read it online.

Have a space in mind that you’ve been wanting to give a makeover?  Start by shopping your home.  Repurposed items that you already own are the best way to give your home a new look without spending a dime.  As an example, you should check out how I spiced up my bookcase with $5. Yes it only cost $5!

DIY: Pallet Gardening Table

Why yes, another pallet project coming your way.

I’ve only created 328 pallet projects thus far.  well maybe that’s a bit of an exaggeration…

Anyway, I’ve been busy with creating something new and different using pallets.

What did I make? A Pallet Gardening Table…

#DIY: Vertical Pallet Gardening Table - No more gardening on the ground with a hurt back. Create a garden table for less than $10. Created by @Jenna_Burger of WWW.JENNABURGER.COM

I’ve never seen something like this before (maybe it’s on pinterest, but lately it’s been crushing my creative juices so I try to stay clear)

Why did I create it? Because I needed a spot of my own to do my gardening and potting.  As I’ve said before, gardening isn’t my strong-suit, but when I do enjoy it and with time, I hope to get better.  Spending hours on the driveaway hunched over, is just not cutting it anymore.

And why did I use pallets? BECAUSE THEY’RE FREE.  how much better does FREE get…  Plus I really like the size & look of pallets.  Don’t you?

In all, this project cost less than $10 to make and basically the money was spent on hardware.

So here is what I gathered to create this Pallet Gardening Table:

  • (6) C-Shaped Screws (they need to be heavy-duty)
  • (4) 4″ Strap Hinges
  • Wood Screws (for outdoor use) to install hinges
  • Small C-Hooks
  • Chain (about 6′ – 7′ in length) – I got a cute yellow chain from Lowe’s
  • (2) Pallets that are the same size

Supplies for the Vertical Pallet Garden Bench

Lowe’s put me to the test this month to create something interesting + for the outdoors, so let me show you the process…

1. I started by adding the C-Screws to the pallet that would sit on the house (if you create something similar, it could also be attached to your deck or in your garage.  It’s not a must for just the side of a house).

#DIY: Vertical Pallet Gardening Table - No more gardening on the ground with a hurt back. Create a garden table for less than $10. Created by @Jenna_Burger of WWW.JENNABURGER.COM

(1) C-Screw on each side was added to the top of the pallet about 2-3″ in from the end.

(1) C-Screws on each side was added to the face of the pallet about 6″ from the top & in the center of the end planks.

Once complete, that pallet was set aside.

#DIY: Vertical Pallet Gardening Table - No more gardening on the ground with a hurt back. Create a garden table for less than $10. Created by @Jenna_Burger of WWW.JENNABURGER.COM

On the other pallet, add (1) C-Shaped Screw on each side to the face of the pallet (which will be your work surface) about 12″ from the edge & in the center of the end planks.

#DIY: Vertical Pallet Gardening Table - No more gardening on the ground with a hurt back. Create a garden table for less than $10. Created by @Jenna_Burger of WWW.JENNABURGER.COM

2. Once the (6) C-Shaped Screws are in place, then it’s time to connect the (2) pallets.  Using heavy-duty 4″ strap hinges, place (2) at the end planks and the other (2) somewhat evenly spaced in the center.

#DIY: Vertical Pallet Gardening Table - No more gardening on the ground with a hurt back. Create a garden table for less than $10. Created by @Jenna_Burger of WWW.JENNABURGER.COM

3. Link the chain onto the C-Screws, so it fits just right for the bench to be open at 90 degrees.  The Strap Hinges won’t let the pallet open more than 90 degrees, so essentially the chain isn’t needed, but I liked the extra security + the yellow adds a cute pop of color.

#DIY: Vertical Pallet Gardening Table - No more gardening on the ground with a hurt back. Create a garden table for less than $10. Created by @Jenna_Burger of WWW.JENNABURGER.COM

So this bad boy is mega heavy.  You will absolutely need 2-3 people to move this…  unless your The Hulk.

4. Once the bench was done (on the ground), it was time to put it in place on the vertical surface.  The work bench should be around 36″ high (typical height of a kitchen countertop), but you can determine if you want it higher or lower.  I chose 36″ above the ground.  We held it in place and determined where the C-Screws in the house should be placed.

* This is the process I took, but you will have to evaluate your space for the best way to hang the pallets.  Don’t hold me accountable for your situation because every vertical surface is different.

Using (2) C-Shaped Screws, we installed them into a stud on the side of the house.

#DIY: Vertical Pallet Gardening Table - No more gardening on the ground with a hurt back. Create a garden table for less than $10. Created by @Jenna_Burger of WWW.JENNABURGER.COM

5. Once the C-hooks were in place, we added about 6″ of chain to each side which hooked from the C-Shaped Screws on the house to the C-Shaped Screw on the top of the pallet.

#DIY: Vertical Pallet Gardening Table - No more gardening on the ground with a hurt back. Create a garden table for less than $10. Created by @Jenna_Burger of SASinteriors.net

6. At this point, it’s done.  The overall project didn’t take long at all – maybe about 30 minutes.  The last added detail were hooks along the sides and back of the vertical pallet to hold shovels, a small rake, etc.

#DIY: Vertical Pallet Gardening Table - No more gardening on the ground with a hurt back. Create a garden table for less than $10. Created by @Jenna_Burger of WWW.JENNABURGER.COM

And then it was complete!

#DIY: Vertical Pallet Gardening Table - No more gardening on the ground with a hurt back. Create a garden table for less than $10. Created by @Jenna_Burger of WWW.JENNABURGER.COM

#DIY: Vertical Pallet Gardening Table - No more gardening on the ground with a hurt back. Create a garden table for less than $10. Created by @Jenna_Burger of WWW.JENNABURGER.COM

#DIY: Vertical Pallet Gardening Table - No more gardening on the ground with a hurt back. Create a garden table for less than $10. Created by @Jenna_Burger of WWW.JENNABURGER.COM

#DIY: Vertical Pallet Gardening Table - No more gardening on the ground with a hurt back. Create a garden table for less than $10. Created by @Jenna_Burger of WWW.JENNABURGER.COM

#DIY: Vertical Pallet Gardening Table - No more gardening on the ground with a hurt back. Create a garden table for less than $10. Created by @Jenna_Burger of WWW.JENNABURGER.COM

When it’s not in use, simply push up the horizontal pallet and hook it into place.

#DIY: Vertical Pallet Gardening Table - No more gardening on the ground with a hurt back. Create a garden table for less than $10. Created by @Jenna_Burger of WWW.JENNABURGER.COM

#DIY: Vertical Pallet Gardening Table - No more gardening on the ground with a hurt back. Create a garden table for less than $10. Created by @Jenna_Burger of WWW.JENNABURGER.COM

#DIY: Vertical Pallet Gardening Table - No more gardening on the ground with a hurt back. Create a garden table for less than $10. Created by @Jenna_Burger of WWW.JENNABURGER.COM

#DIY: Vertical Pallet Gardening Table - No more gardening on the ground with a hurt back. Create a garden table for less than $10. Created by @Jenna_Burger of WWW.JENNABURGER.COM

So what do you think…  Would you be up to creating something like this?  I was always in need of a better place to do potting + gardening.  Thankfully this gardening table has been a great solution (and has saved many of sore backs…)!

If you’re interested in more of my pallet creations, check these out:

DIY_Monogrammed Chevron Pallet TrayMonogrammed Chevron Pallet Tray

#DIY - Vertical Pallet GardenVertical Pallet Garden

#DIY: Outdoor Pallet Sofa Outdoor Pallet Sofa

#DIY: Pallet BookcasePallet Bookshelf

Told ya’ I’ve built alot of creations using pallets!

What DIY creations have you made using pallets?  What do you love using pallets for?  Do you keep them as one or do you like to dismantle them to create something new + different?

Disclosure: I am so grateful to be apart of the Lowe’s Creative Team and was provided with a Lowe’s gift card to purchase items for my project.  I was also compensated for my time to use the products.  No one told me what to create, what to buy, how to use the product, or what to write.  All opinions are 100% mine!