
Month: February 2015

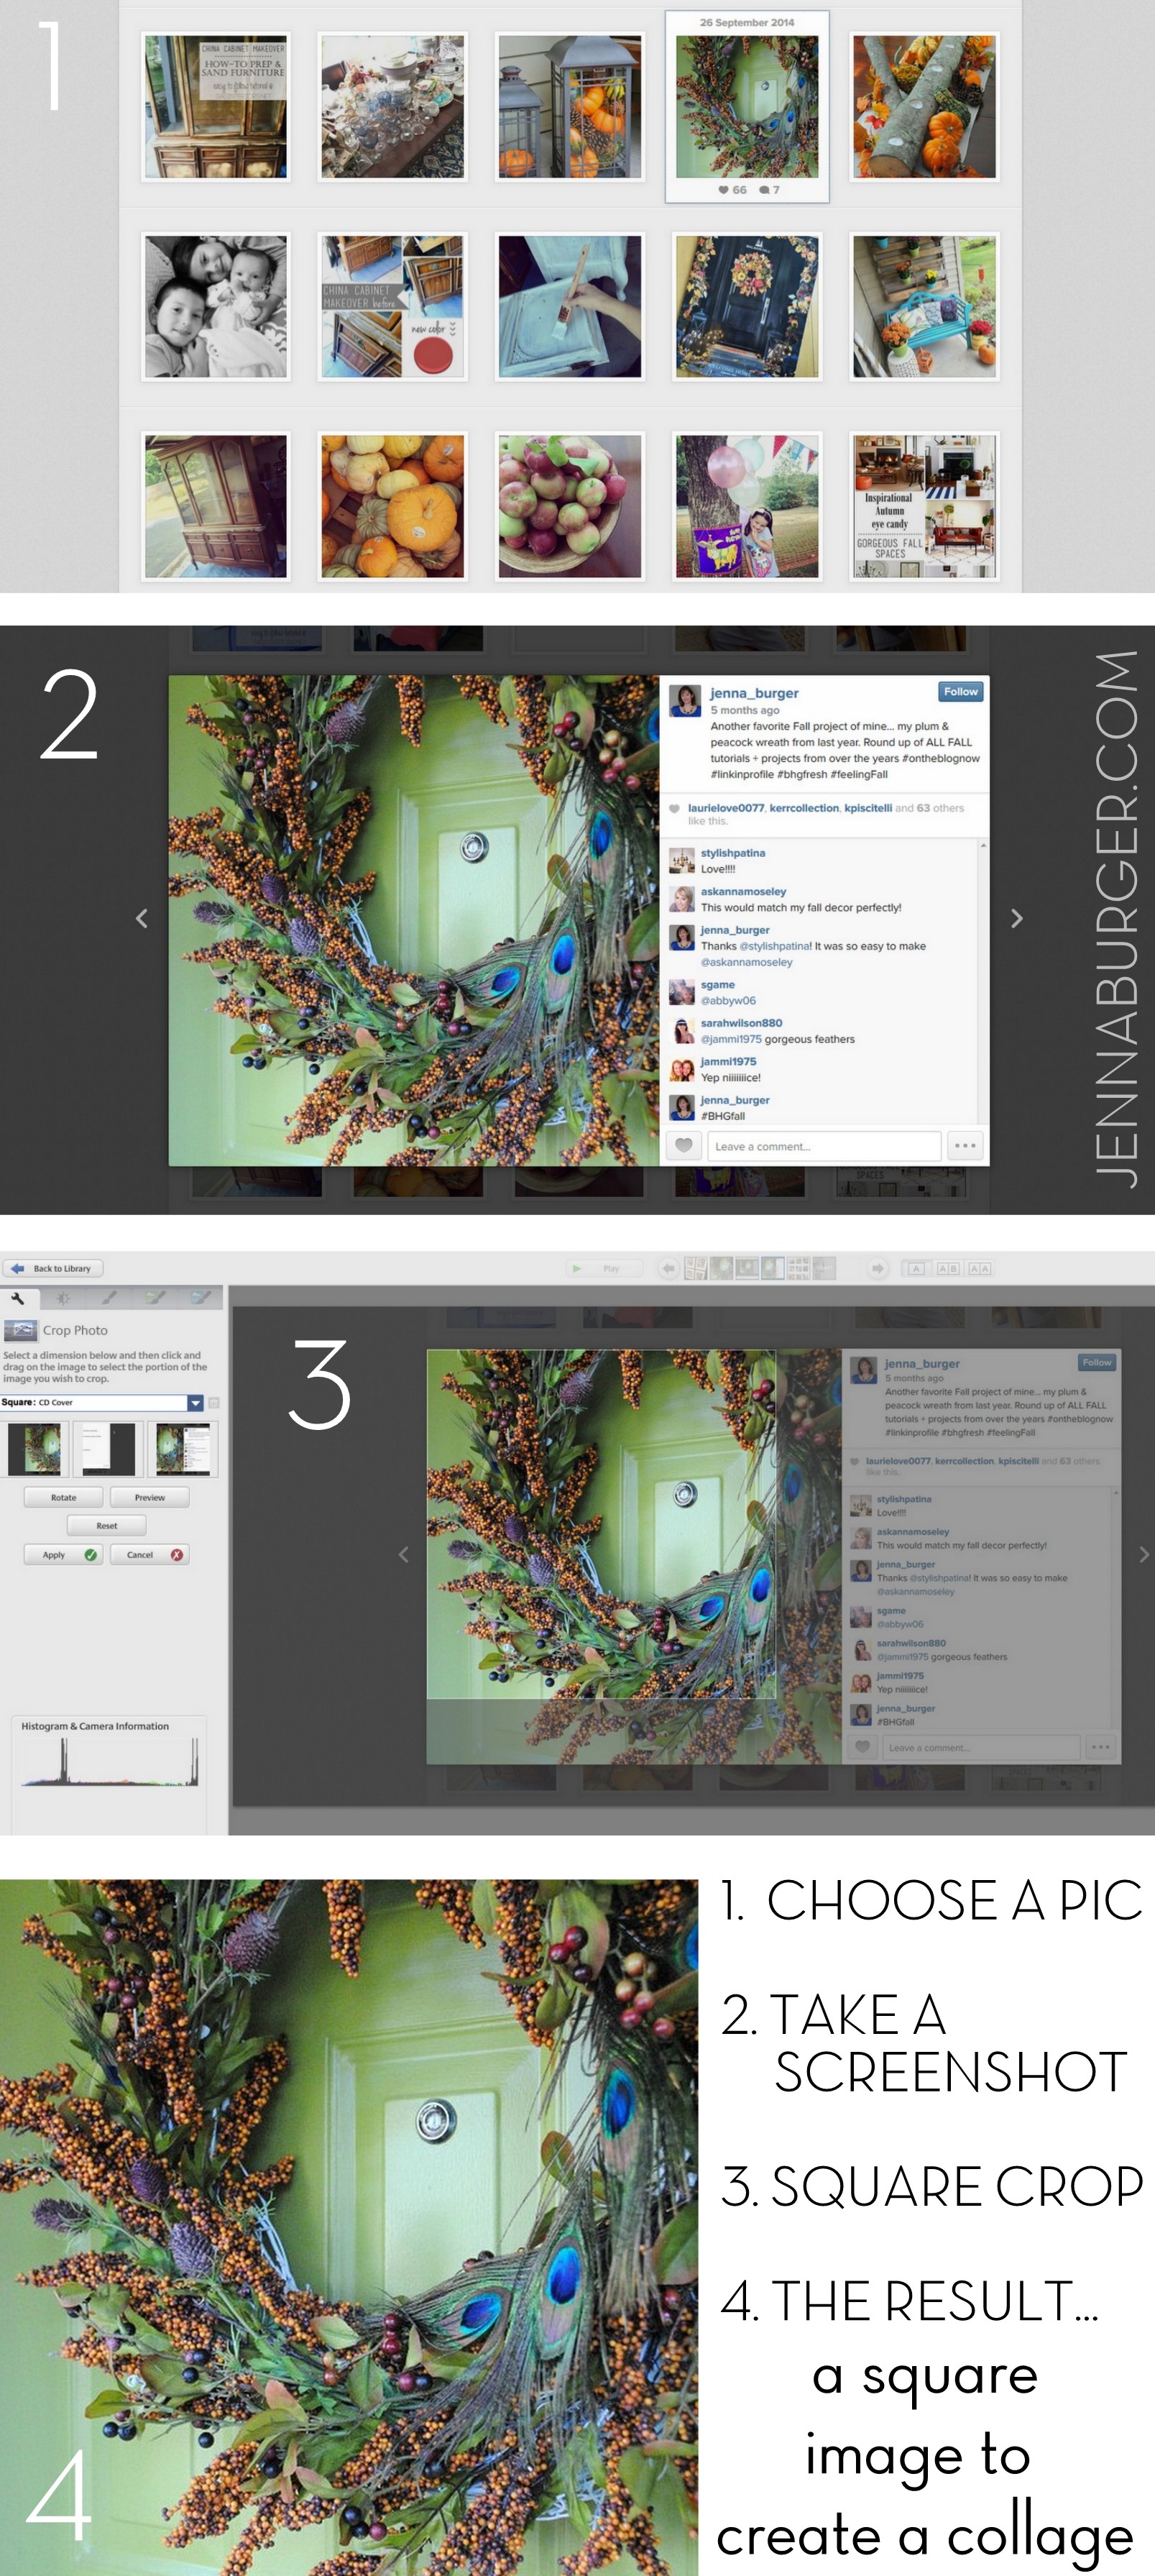
Digital Home Organizational Platform: HomeZada

HomezadaA few years back, I shared details on an online program called HomeZada, a digital home information platform that helps homeowners organize + protect +maintain their biggest financial investment + asset, the home.

Recently HomeZada revamped their site & platform to support and manage all the details for the entire homeowner cycle of owning, selling, and buying a home, which in turn will improve the value of the home + save money!

HomeZada

Big and small, we tackle a lot of projects in our home each year, but I have to admit I am the worst record keeper of receipts and home maintenance information.  Who knows the last time we cleaned our air ducts or had the furnace serviced.  This is how I believe HomeZada is truly a lifesaver!  As a homeowner, having all of this information about my home in one place makes life a lot easier.  Plus the updated platform on HomeZada is very user-friendly + easy-to-navigate + very helpful!

When you first sign up for an account, this is the dashboard you will see to add all of your information…HomeZada now empowers users to digitally manage all data throughout the cycle of buying, owning and selling a home.
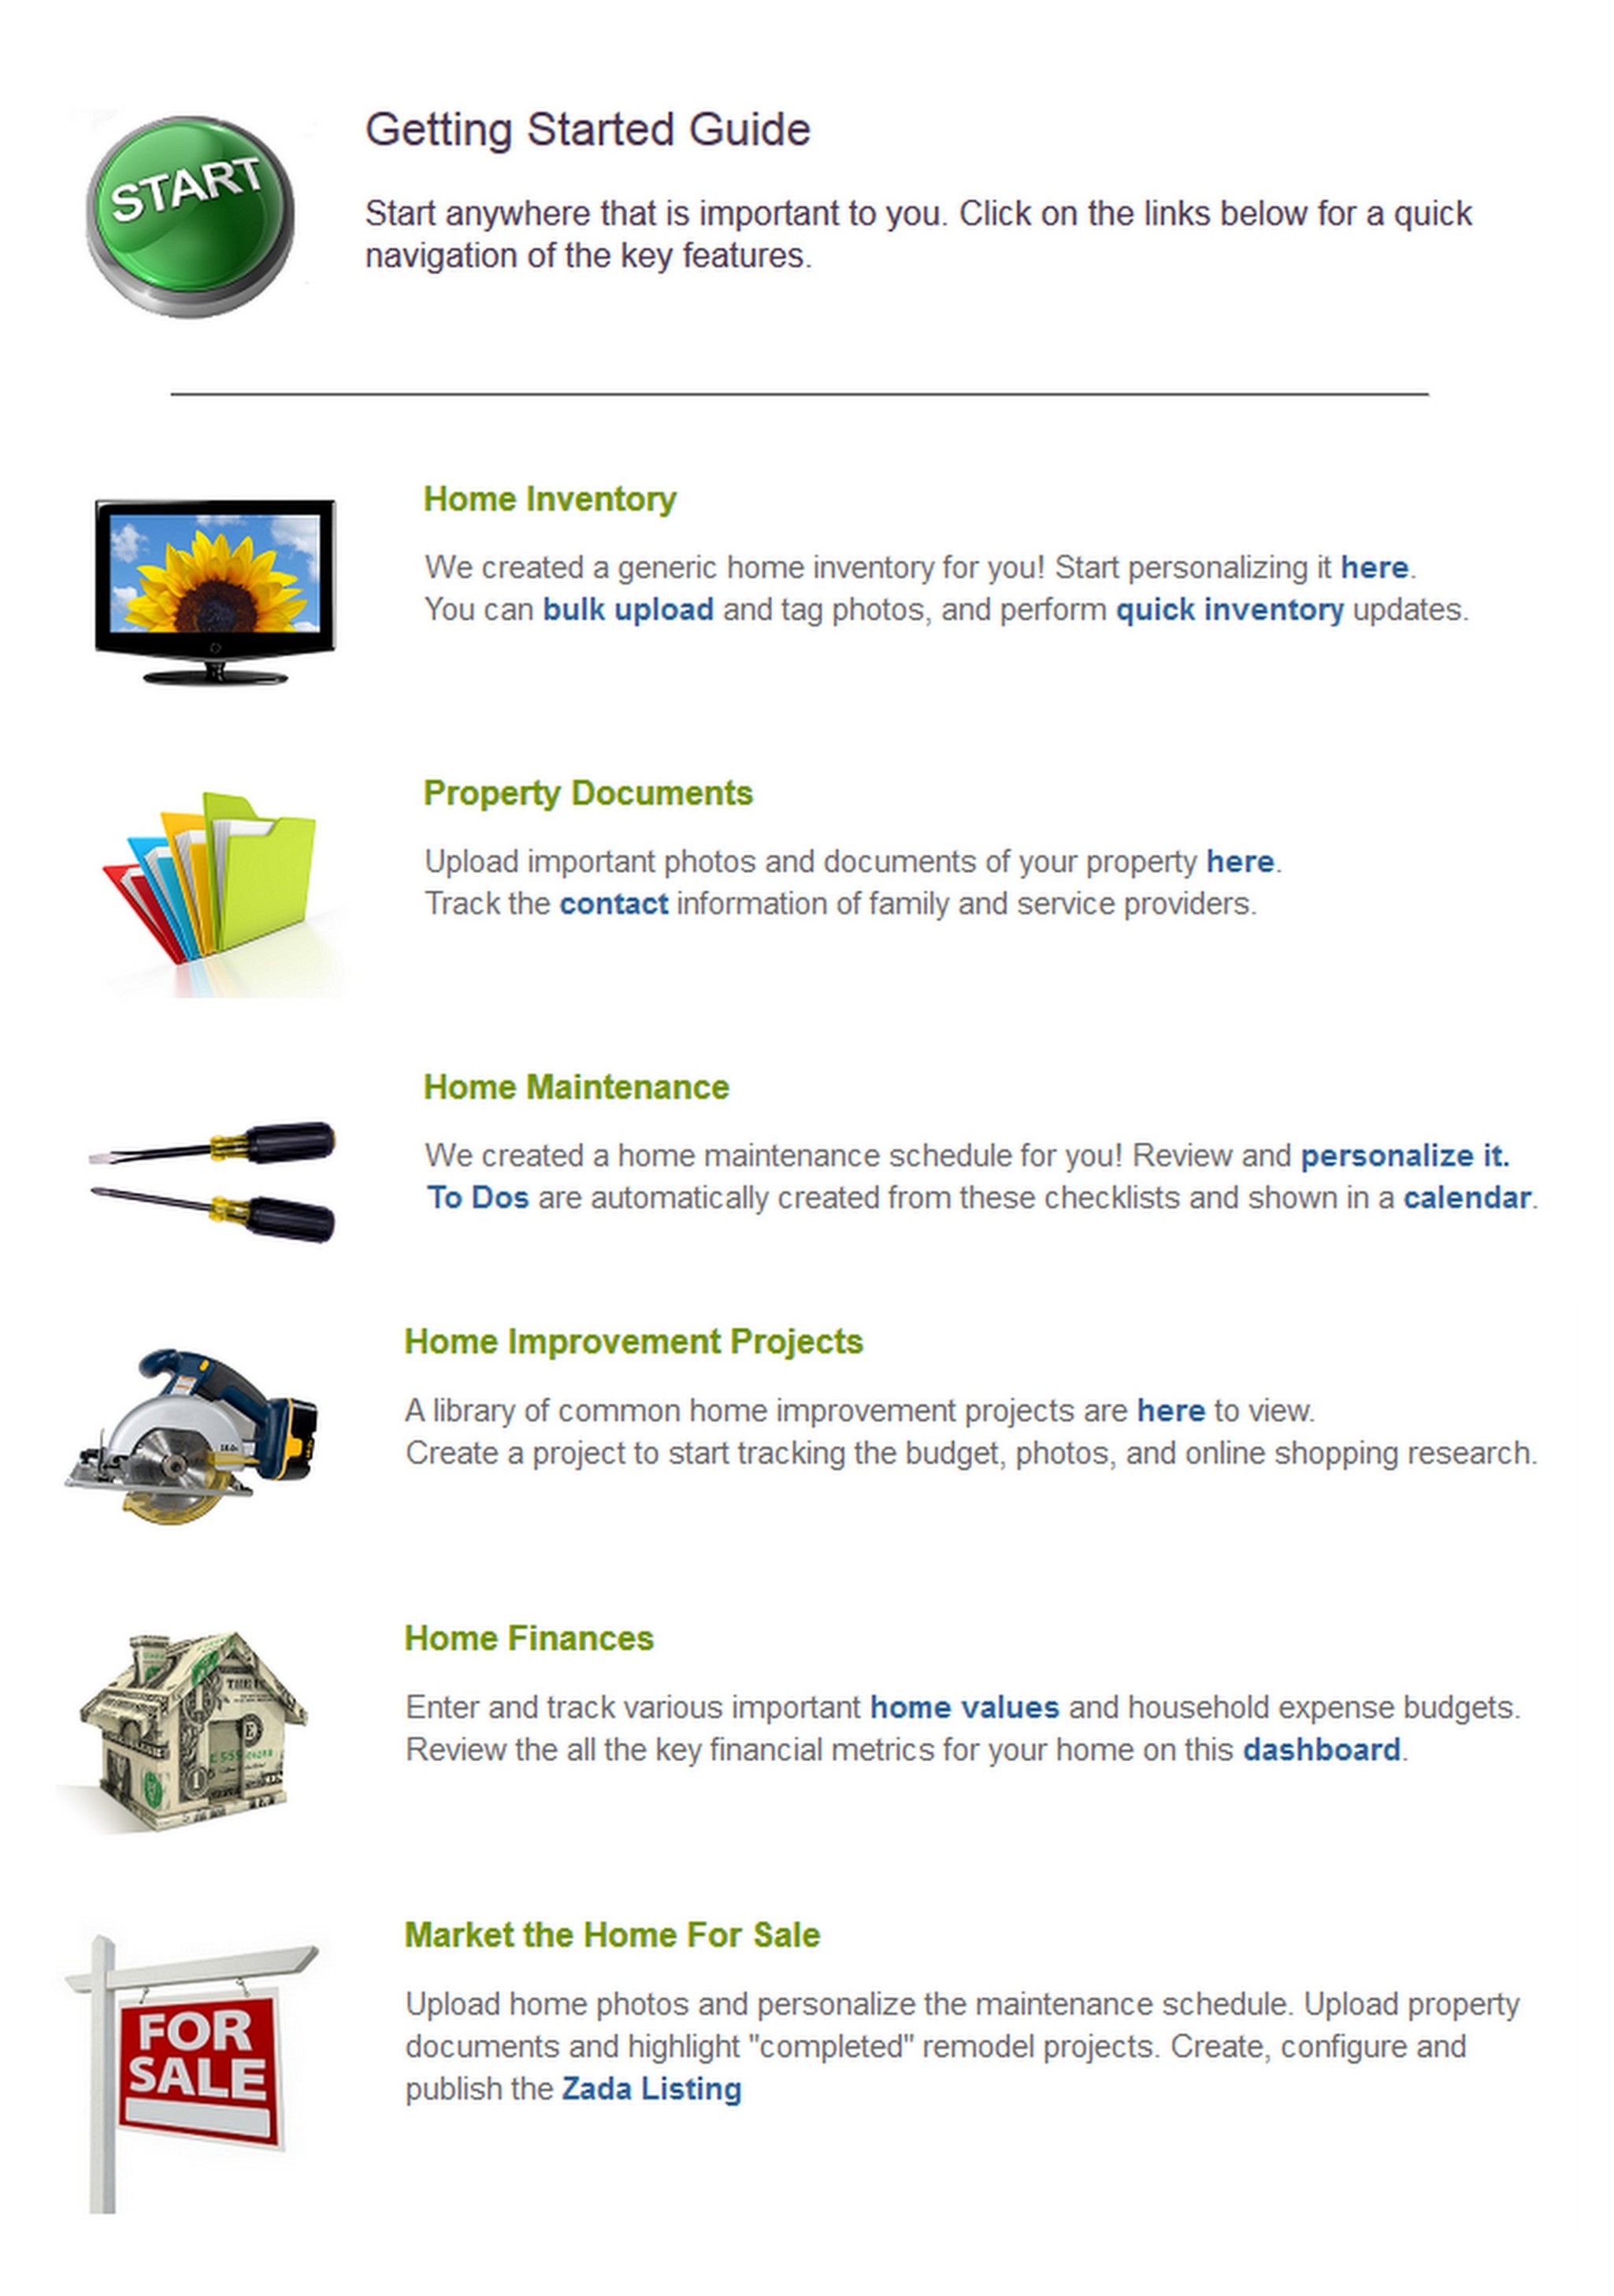
From this page, you will be able to manage your home inventory (furniture and decor), create a home improvement schedule (on a handy to-do calendar), plan future projects, track household expenses + budgets, and also sell your home!

Yes, you can even sell your home with the latest & greatest feature on HomeZada, called Zada Listing.

As you track your digital data about your home including photos, documents, etc. about your fixed assets + home improvements + home maintenance, you can now “publish” that info in the future when/if you decide to sell your home as a Zada Listing.  This can help market your home online with unlimited photos + documents, improve the value of your home, and build confidence with buyers. Check out this sample listing

HomeZada now empowers users to digitally manage all data throughout the cycle of buying, owning and selling a home.
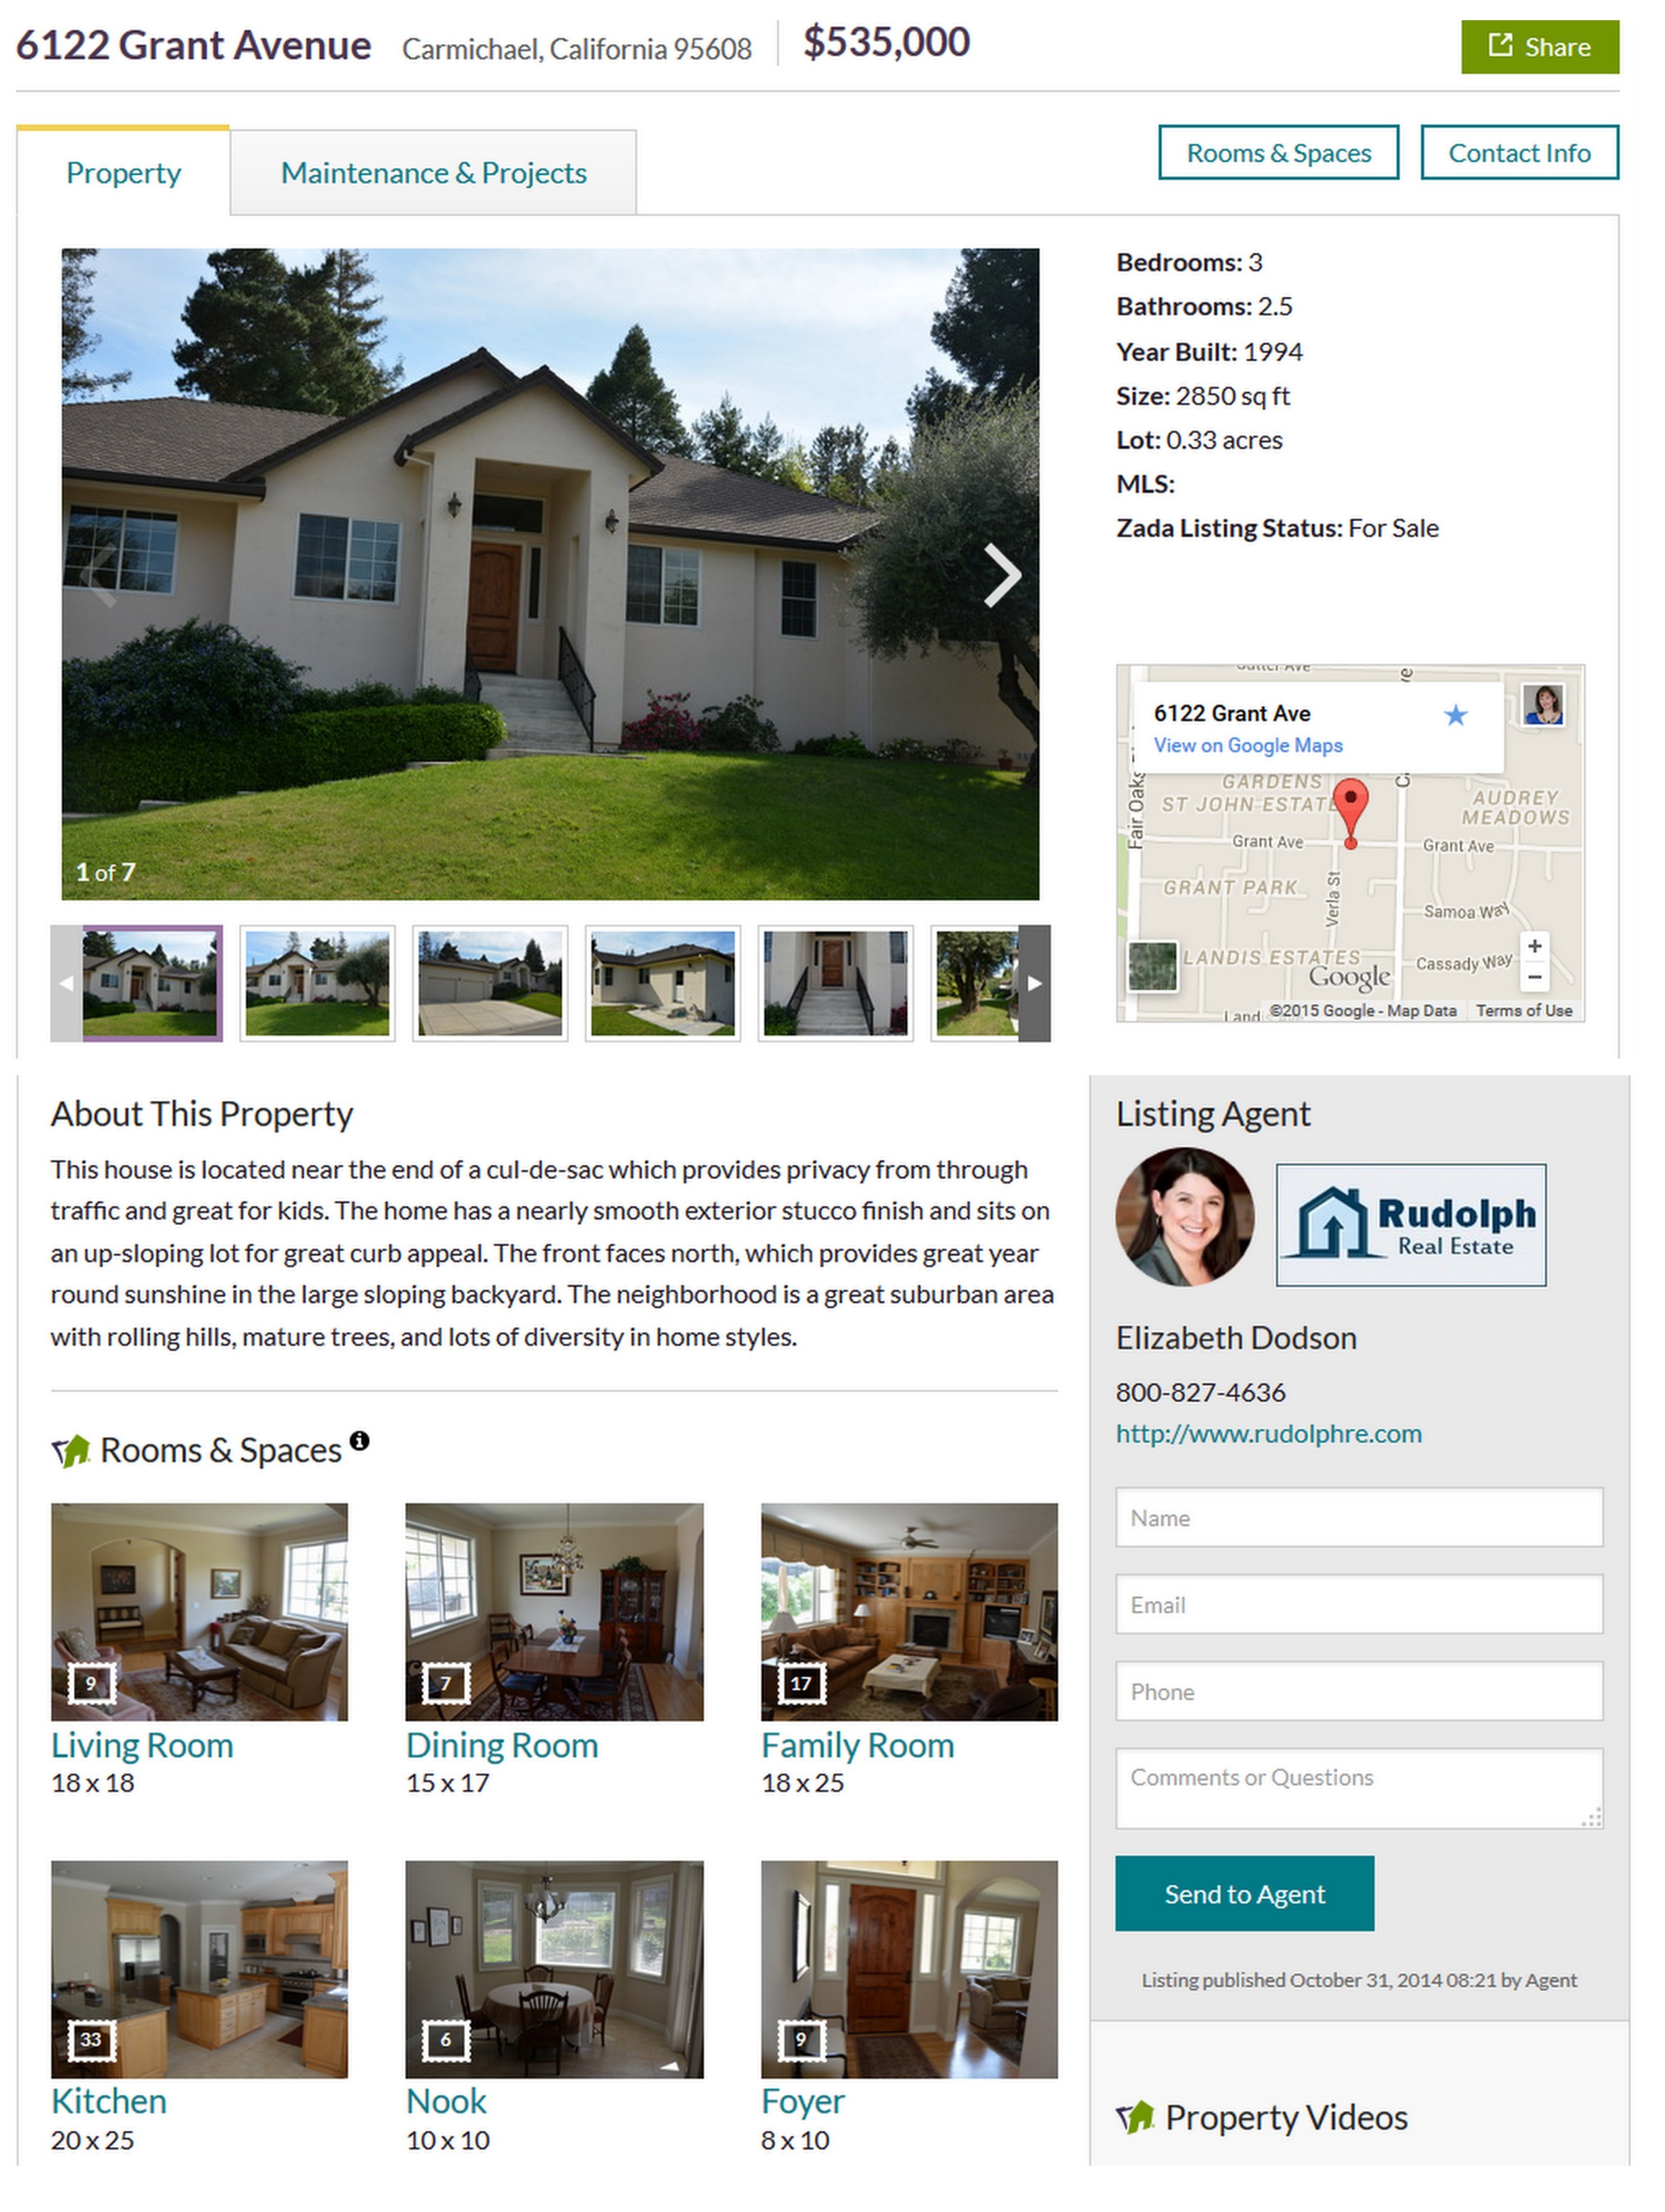
This new feature can also be used by Real Estate Agents as part of their online marketing strategy to differentiate your home.

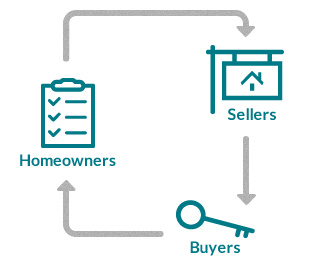
No longer is Homezada only for managing your home today, but it really can be used throughout the entire homeowner lifecycle. Here is a breakdown of how this platform will work for the homeowner, the seller, and the buyer…

HomeZada now empowers users to digitally manage all data throughout the cycle of buying, owning and selling a home.

Owners

> Protect your home’s inventory in case of natural disasters or other unpredictable events with a portfolio of photos and documents
> Keep your home safe to live in with expert and timely seasonal reminders of home maintenance tasks
> Preserve your home and its efficiency by tracking and managing all of your home improvement projects

Sellers

> Make your home stand out from the rest and dazzle buyers with a Zada Listing
> Share photos and documents of all the details of your home
> Show completed projects and maintenance schedules

Buyers

> Have access to a comprehensive overview of the home through pictures, videos and documents easily accessible online
> Save time and energy by finding a home that matches your goals and needs by really understanding the details of the home
> Feel confident in your purchase when obtaining the complete digital copy of the Zada Listing

Pricing and Availability

> For homeowners, HomeZada offers both a free & premium account ($59) option.

> For sellers, HomeZada provides a six-month period to publish a Zada Listing for $75 as a one-time fee.

> For buyers, you’ll need to become a premium member + there is a $90 one-time fee for the Zada Listing Data.

If you are on a mission to get organized (aren’t we all?) & would love to have all the details of your home in one place, then this platform is for you!  This is a sponsored post for HomeZada, but all thoughts + opinions are 100% my own.  I only feature & give a thumbs up to companies I truly value!

Top Paint Colors for Black Walls + Painting a Black Wall in the Living Room

Black has been on the brain and here are my TOP PAINT COLORS FOR BLACK WALLS

TOP BLACK PAINT COLORS for any room in the home! Paint Color roundup by Jenna Burger Design, www.jennaburger.com

From bronchitis to a broken furnace to dealing with bitter below-zero temps, it has been a bustling few weeks.  But the biggest focus of my spare time around work & kids activities has been going BLACK in the living room.

Black is bold.  Black is neutral.  HOW TO MAKE BLACK WALLS WORK in every space of the home. I chose Valspar Black Heron for the living room fireplace wall and the color is a soft charcoal black! More @ www.jennaburger.com

A few weeks back, I mentioned my plan of action to completely change the living room upon selling almost all my furniture to a friend.  Even though they were material things and didn’t work for the space, I held on to them way too long.  Once the room was cleared out, I felt freed.  It was an interesting feeling to feel liberated by furniture.  Typically I give the advice to others to just let it go, but it ‘s easier said than done.  Anyway, part of the plan for changing the space was to paint the walls + the mantel.  Over the years as the paint hues around our home have evolved to more cooler tones, the living room space was one of the last to be updated.

Ever since choosing navy for my office (check out my favorite navy paint colors), I have had a passion for deep + dark hues with whites + lights layered in.  I’ve also been dying to paint a wall black.  Crazy sounding to some, yes, but it’s such a dramatic, fierce, and strong color (here are 23 inspirational spaces that black on the wall is awesome).  I knew black was finally going to get it’s moment in the new living room space of our humble abode.

By-Bye orange…

Black is bold.  Black is neutral.  HOW TO MAKE BLACK WALLS WORK in every space of the home. I chose Valspar Black Heron for the living room fireplace wall and the color is a soft charcoal black! More @ www.jennaburger.com

Hello Black! I know it looks blue in the pictures, but it’s black.

Black is bold.  Black is neutral.  HOW TO MAKE BLACK WALLS WORK in every space of the home. I chose Valspar Black Heron for the living room fireplace wall and the color is a soft charcoal black! More @ www.jennaburger.com

A before and after of the overall wall will give a better sense of the change in color…

Black is bold.  Black is neutral.  HOW TO MAKE BLACK WALLS WORK in every space of the home. I chose Valspar Black Heron for the living room fireplace wall and the color is a soft charcoal black! More @ www.jennaburger.comThe color I chose for the fireplace wall is Valspar Black Heron and it’s a soft, charcoal black that in my opinion resembles the coloring of a chalkboard.  It has a slightly blue undertone and looks awesome with the other lighter hues I used in the room – Valspar Silver Thistle Down on the other walls and Valspar New Ream for the fireplace.

Even though the wall is darker now with the black paint color, the overall room feels so much larger.

With the in-progress picture above, you are seeing a sneak peek of what is to come.  Here are more details on what will be going on with this wall…

Black is bold.  Black is neutral.  HOW TO MAKE BLACK WALLS WORK in every space of the home. I chose Valspar Black Heron for the living room fireplace wall and the color is a soft charcoal black! More @ www.jennaburger.com

Moulding.  Accessories.  Layers.  A lot more is to come before this room is complete, but progress is being made starting with the fabulous, new black wall!

Choosing the Best Black

Black paint for walls is a great neutral choice other than the typical gray, taupe, or beige.  Black is bold, unexpected, and a beautiful hue to add white + lighter layers.

Like the array of white paint colors to choose from, there are just as many blacks and there are a few things to consider to deciding on the best black for you…

Tips for choosing the BEST BLACK paint color for your room!

3 factors to choosing how a black wall color will read in a space depends on:

1. the natural light filtering in during the day

2. the artificial light in the evening

3. the undertones of the paint color

After looking at too-many-to-remember black paint colors, here are my favorites:

TOP BLACK PAINT COLORS for any room in the home! Paint Color roundup by Jenna Burger Design, www.jennaburger.com> 1 – Valspar Black Raven (a soft black with a slight blue undertone)
> 2 – Benjamin Moore Black Satin
> 3 – Valspar Kettle Black
> 4 – Behr Totally Black (a true black hue as seen in the boy room makeover by the Hunted Interior)
> 5 – Farrow & Ball Off-Black
> 6 – Valspar Black Heron (the color I chose)
> 7 – Benjamin Moore Black Suede
> 8 – Benjamin Moore Oynx
> 9 – Benjamin Moore Black Beauty (a warm black that works beautifully with stained wood as seen in the home of Making it Lovely)
> 10 – Valspar Dark Kettle Black (a deep black as seen in the bedroom makeover of Oh Happy Day)
> 11 – Sherwin Williams Caviar
> 12 – Benjamin Moore Black Berry
> 13 – Behr Cracked Pepper

You know you want to paint something black now…   So what black will you choose for your next painting project?! 

Easy-To-Make Instagram Photo Collage

With the 2000+ pictures I took & shared on Instagram (follow me if you’d like) last year, somehow + someway I wanted to enjoy them more than viewing them on the 2.5″ x 2.5″ screen of my phone.

As the new year rolled around and I was reflecting on 2014 and looking towards 2015, I got to reminiscing on all the personal + professional pictures I’ve showcased on my Instagram account and thought creating a photo collage would be the best way to enjoy those precious moments of my life from the years past.  There are plenty of sites out there where you can create posters and/or other fun creations using Instagram pics (or digital pictures too), but they’re pricey and spending bucks just doesn’t jive with me when I know I could make something comparable (or better) for mere dollars.

I got to thinking & creating and with a bit time, I created a 4 photo collages that captured some truly great moments from 2014…

Easy-to-Make Photo Collage using Instagram or digital photos for $5.  Tutorial by Jenna Burger, www.jennaburger.com

Easy-to-Make Photo Collage using Instagram or digital photos for less than $5.  Tutorial by Jenna Burger, www.jennaburger.com

The best part about this 80 picture photo collage is that it cost about $5. How much better does it get?!  more details on the $$$ below…

So obviously this photo collage doesn’t have to be created using only photos from Instagram.  Images from your phone or digital pictures from a snap & go camera can also be used to create a similar photo collage.  Since there are multiple ways to make this collage, I am sharing tutorials for all…

Creating a Photo Collage using Instagram Images

1. Go to your Instagram page.

2.  Choose a picture and take a screenshot of the image. If you are unfamiliar with what a screenshot is (as I was only a few years ago), you can capture a “shot” of your screen with a click of a button.  On my computer the button is towards the top right corner and it says PrintScreen (your computer might be different, but with all computers it’s possible).

3. Using a photo editing program – I use the free program, Picasa – crop your screenshot image so it is square.
Easy-to-Make Photo Collage using Instagram photos

if you don’t have an instagram account and want to create a similar photo collage using images from your phone or camera, follow this tutorial…

Creating a Photo Collage using a picture from your phone or Digital Image from your computer

Phone: Download the picture to your computer and crop it to a square size. Then save a copy.

Computer: Crop your picture of choice to a square size and save a copy.

Easy-to-Make Photo Collage using Instagram photos

The reason for cropping?  An image downloaded from your phone or a digital image on your computer doesn’t have to be cropped as showed above, but be sure that the image is fairly close up or “cropped” close so it shows detail.  Because the pictures on the final collage are small, a close-up/detailed image is best.

Next up… Creating the photo collage. 

For the collage, I used the free program of PicMonkey.  They offer different collage layouts, one specifically being a square template. When you go to PicMonkey, click collage.

Easy-to-Make Photo Collage using Instagram or digital photos for less than $5.  Tutorial by Jenna Burger, www.jennaburger.com

After clicking collage, you’ll be able to open & choose the 20 images (I think 20 images per 8 x 10 looks best) you want to use to create the photo collage. After choosing the images, click layouts (2nd button down on the left) and choose the template with 5 across & 5 down.  Then remove (by clicking “X” on the box) the boxes on the end row so you are left with 4 boxes across and 5 boxes down.

Easy-to-Make Photo Collage using Instagram or digital photos for less than $5.  Tutorial by Jenna Burger, www.jennaburger.com

First go to the bottom and set the size of your image to 2700 x 3379, which creates an 8 x 10 image.  Then click Autofill at the top and the 20 images will be inserted into the boxes.  If you want to move the images around to different locations, you can.

Easy-to-Make Photo Collage using Instagram or digital photos for less than $5.  Tutorial by Jenna Burger, www.jennaburger.com

Save the collage to your computer.  Depending on the amount of collages you want to create, follow the steps over and over again.

I chose 80 of my favorite images (out of 2k instagram images, it was very difficult to pair down and choose, but I did it) and then created (4) 8 x 10 collages – each collage has 20 pictures with 4 across and 5 down.  It was trial and error figuring out how many pictures would be best on each page so each image wouldn’t look too big or too small.  In the end, I am happy that I chose 20 images per page and the size of each image is about 2″ high x 2″ wide.  The images are not exactly square, but almost.

The result of my 4 photo collages which cost about $5…

Easy-to-Make Photo Collage using Instagram or digital photos for less than $5.  Tutorial by Jenna Burger, www.jennaburger.com

Once the 8 x 10 photos were created, I uploaded them to Snapfish to have them printed.  Typically an 8 x 10 image is $2.99 but they’re often on sale (right now there is a 50% coupon).  Other online retailers or local stores where you can print pictures works too.

Easy-to-Make Photo Collage using Instagram or digital photos for less than $5.  Tutorial by Jenna Burger, www.jennaburger.com

A photo collage like this is also a great way for capturing and enjoying kids artwork.  Kiddos come home with SO MANY beautiful creations, but it’s impossible to keep everything.  Instead of tossing them putting them in a box, snap a picture and then create a collage like this using the same steps.  Your child(ren) will feel so proud that their work can be displayed on the walls of your home!

The new photo collages that I created now deck the walls of my office / living room and replaced the travel subway art, which I moved to another spot.

Easy-to-Make Photo Collage using Instagram or digital photos for less than $5.  Tutorial by Jenna Burger, www.jennaburger.com

The frames that I used for the collages are a simple white style that I picked up at AC Moore for $6/per frame.  Inexpensive frames from Ikea would also make this project creation super inexpensive.

Easy-to-Make Photo Collage using Instagram or digital photos for less than $5.  Tutorial by Jenna Burger, www.jennaburger.com

Easy-to-Make Photo Collage using Instagram or digital photos for less than $5.  Tutorial by Jenna Burger, www.jennaburger.com

The walls of our home are adorned with pictures & meaningful art.  These new photo gallery creations just add another layer to our family’s story…

Embracing the Beautifully Imperfect Home

Live with intention by embracing your beautifully imperfect home NOW!

As the snow is piling up in my neck of the woods (it’s about 3′ + high) , as of late I’ve been spending a lot of time indoors.  As much as it feels suffocating at times, it’s also been enjoyable to take in the beauty of our home that is coveted by the surrounding walls & roof above.

I started out the year with a focus – not a goal because that is just too overwhelming for me – to live more with intention.  Living with purpose and meaning isn’t easy but with mindful thoughts, I’ve taken on less with more intentional focus.  Believe me, it hasn’t been easy and it’s not every day that I ‘live in the moment’, but I have gotten a wee-bit better and as long as I work on it, I feel like I am going in the right direction.

Embracing the Beautifully Imperfect Home

As I continue to strive towards living with intention, I am also working on accepting + embracing the beautiful of today. The beauty that lies within our 4 walls NOW.  I wrote an article recently for a local magazine and I was asked by a few friends to share it as it’s something many feel, but sometimes have difficulty expressing (as do I and admittedly it took me 2x longer than anything I’ve ever written before.  Tapping into my deeper, more meaningful side doesn’t come easy).

Living with Intention quote

When decorating a home, it can often be difficult to accept the now because of the constant striving for better or more so, the striving for perfection. There is no such thing as the perfect home, the perfect furniture, or the perfectly decorated walls. A home is more than the roof above and the 4 walls that surround us, it’s a place memories are made with unpredictable messy moments and a place we should embrace today.

In our Pinterest-perfect world, it can often be debilitating to do your own thing because the bar has been set so high with the best holiday crafts, the gorgeous room makeovers, and the looks-to-go-to-eat desserts. The reality is though on any given day in my home, no room is magazine-ready or perfect for Pinterest. There are dishes in the sink, crumbs on the floor, and those pictures I’ve been wanting to hang are still sitting in the corner. A home shouldn’t be about striving for the ideal or the perfect, but instead should truly be filled with what is most meaningful and decorated how YOU want, which in turn will bring the most acceptance, happiness, and joy.

Embracing the Beautifully Imperfect Home

Admittedly as a Designer, I often feel it’s expected that my home look perfect, showroom ready when someone comes through the door, but the reality is like most, I live in a chaotic, busy home of 5, and perfect is impossible. As I’ve gotten older (and a little wiser), I have learned (and am still learning) to let go of every room looking photo-ready at all times. As much as I want my home to look perfect, it already IS perfect and that is beauty. The imperfections and the lived-in feel are what make a home beautiful and meaningful. Even though I have a list of changes and updates, I accept and embrace the NOW which means slowing down and enjoying what we have today. This is our life; the home we’ve created. For others, it means accepting the imperfect, unfinished space instead of putting off doing things because perfect is too hard or too much work. Letting go of the Pinterest-perfect ideal will open up the opportunity to take risks to create a home that’s always been desired. Like the old saying, “Beauty is in the eye of the beholder”.

I recently received the book, It Doesn’t Have to be Perfect to be Beautiful by MyQuillyn Smith, a.k.a. The Nester, and cover to cover, it was eye opening and freeing. Even though I live and breathe design every day, it allowed me to accept our now home and confirmed that embracing what I already have created, is beautiful. Photo-ready with everything picture-perfect isn’t welcoming and it isn’t relatable. What is inviting about not being able to put a coffee cup on a table or move a pillow to sit on the sofa?

Embracing the Beautifully Imperfect Home

We all have different styles and there is no one size fits all. Decorating a home is a process that is ever-evolving and what’s most meaningful is the intangible beauty that resonates with love and laughter. A perfect home is what you make of it and its beauty is already there. A home is most meaningful when it is unique, personal, and authentic. And that is beautiful…

Embracing the Beautifully Imperfect Home

– Live with Intention –

DIY: Kids Fingerprint ART

DIY: KIDS fingerpaint art - inspired by the book Mix It Up, fingerpaint wall art can easily be created by kids

Many of the walls in our home are filled with beautiful creations made by our kids.  I just love their creative minds & the beautiful colors they use in their artwork.  Plus everything they create is so meaningful & it’s incredible how prideful they are to have their beautiful work displayed so prominently.

When it came time to add artwork to the walls of the remodeled bathroom, it took me a few weeks to find just the right art.  I wanted something that wouldn’t take away from the beauty of the wallpaper + it had to be meaningful.

As I was shopping in the local bookstore with my kids, I saw a book called Mix It Up by Herve Tullet (here is the book on amazon) and as soon as I opened it up, an idea came to me… fingerpaint art!  You see, this book is captivating from the first to the last page.  “Follow the artist’s simple instructions, and suddenly colors appear, mix, splatter, and vanish in a world powered only by the reader’s imagination.”

My inspiration…

DIY: KIDS fingerpaint art - inspired by the book Mix It Up, fingerpaint wall art can easily be created by kids

My interpretation…

DIY: KIDS fingerpaint art - inspired by the book Mix It Up, fingerpaint wall art can easily be created by kids

Not only does this fingerprint art look so beautiful, but it only took minutes to create!  How much better does it get when it comes to kids?!

I purchased 2 frames with an 8 x 10 opening and used 8 x 11.5 white paper from a drawing/art pad to create the artwork.

Using a ruler + pencil, I made a small mark about every 1.5″ – 2″ across & down creating a grid.

DIY: KIDS fingerpaint art - inspired by the book Mix It Up, fingerpaint wall art can easily be created by kids

The pencil marks are helpful to keep the fingerprints in a straight line…

Once the marks were made, it was time to get the kids involved.  If they’re old enough, you can let them do their thing or you can assist to get their thumb prints on the mark.

DIY: KIDS fingerpaint art - inspired by the book Mix It Up, fingerpaint wall art can easily be created by kids

We used craft paint in a mixture of colors and randomly added the colors…

DIY: KIDS fingerpaint art - inspired by the book Mix It Up, fingerpaint wall art can easily be created by kids

Minutes later, the result…

DIY: KIDS fingerpaint art - inspired by the book Mix It Up, fingerpaint wall art can easily be created by kids

Once they were dry by the next morning, each of the beautiful fingerprint creations were ready to hang…

DIY: KIDS fingerpaint art - inspired by the book Mix It Up, fingerpaint wall art can easily be created by kids

DIY: KIDS fingerpaint art - inspired by the book Mix It Up, fingerpaint wall art can easily be created by kids

DIY: KIDS fingerpaint art - inspired by the book Mix It Up, fingerpaint wall art can easily be created by kids

DIY: KIDS fingerpaint art - inspired by the book Mix It Up, fingerpaint wall art can easily be created by kids

DIY: KIDS fingerpaint art - inspired by the book Mix It Up, fingerpaint wall art can easily be created by kids

So fun, right? Fast + Meaningful + Inexpensive = Major Score!

Thanks for following along on every tid bit of this bathroom makeover!

 From start to finish, these are all the posts pertaining to this bathroom remodel
Plan of Action
Demo: Removal + Installation of the Tub & Walls
How-To Tile + Grout the Bathroom Walls
Installing Wallpaper
Adding a Tile Accent Border
Creating a Tiled Niche
DIY: Simple Painted Wood Shelf with Decorative Brackets
DIY: Kids Fingerprint Art
Bathroom Makeover Reveal
Resources

DIY: Simple Wood Shelf with Decorative Brackets

As I am crazy busy painting and ordering furniture for the living room makeover, I want to rewind a bit and share a few details on the bathroom remodel that I revealed on the blog a few weeks back.  Sometimes, I move from project to project so quickly and forgot to share the little details that truly make a space extraordinary!

One of the many projects that I created + adore in the new bathroom space is the simple wood shelf with decorative brackets that I created for above the toilet.

Here’s a peek…

DIY: Creating a simple WOOD SHELF with decorative brackets.  Perfect for displaying + styling accessories and/or pictures!  Also great for picture gallery walls.  DIY by Jenna Burger Design, www.jennaburger.com

My original plan for the wall space above the toilet was to create a multi-tier shelf using metal piping which would have given the space a more industrial aesthetic.  (Here is the original plan of action + mood board)

As the new space evolved and the wallpaper went up, I wasn’t feeling the look of the shelving unit that I had planned on.  Instead I opted to create a simple painted shelf which allowed for the addition of a few accessories, but truly allowed for the statement of the space – the wallpaper – to shine through.  Where the tiered shelf would have covered much of the wall, the one wood shelf enhances the overall bathroom + it makes the space feel larger especially since there is no window (only a skylight above)

Here’s how I made the simple wood shelf >>>

The area above the toilet looked like this before I did anything…

DIY: Creating a simple WOOD SHELF with decorative brackets.  Perfect for displaying + styling accessories and/or pictures!  Also great for picture gallery walls.  DIY by Jenna Burger Design, www.jennaburger.com

Supplies

> Decorative wood brackets ($3-5 at Lowe’s)

> 1″ x 8″ piece of wood cut to desired length

> screws + anchors

> primer + paint

> general tools

1. Starting off, I measured & determined the middle point of the toilet to center the shelf.

Then using a pencil, I marked on the wall the height placement for the shelf and where I wanted to place the wood brackets.  I first hammered my screw into the wall to make the hole, then input the anchor. Once it was popped through, I installed the screw…

DIY: Creating a simple WOOD SHELF with decorative brackets.  Perfect for displaying + styling accessories and/or pictures!  Also great for picture gallery walls.  DIY by Jenna Burger Design, www.jennaburger.com

Then I repeated the same steps for bracket #2.

2. Once the screws were in place, I attached both brackets, and laid the 1″ x 8″ (which is actually 7-1/4″ wide) across the top.

DIY: Creating a simple WOOD SHELF with decorative brackets.  Perfect for displaying + styling accessories and/or pictures!  Also great for picture gallery walls.  DIY by Jenna Burger Design, www.jennaburger.comThankfully it was level  – phew

3. Next up was to cut the board to the right length.

By eye, no measuring tape, I made a mark and cut the board with the miter saw (my recommendation for one here). If you don’t have a miter saw, you can have your local Lowe’s make the cut in their lumber department.

DIY: Creating a simple WOOD SHELF with decorative brackets.  Perfect for displaying + styling accessories and/or pictures!  Also great for picture gallery walls.  DIY by Jenna Burger Design, www.jennaburger.com

4. Once the shelf was cut, hung, & done, it was time to paint it.

I first primed all the wood pieces with Zinsser Primer, then gave all the surfaces 2 coats of plain ole’ white.

DIY: Creating a simple WOOD SHELF with decorative brackets.  Perfect for displaying + styling accessories and/or pictures!  Also great for picture gallery walls.  DIY by Jenna Burger Design, www.jennaburger.com

After a day of drying, it was complete and ready to hang.  Typically the longer the paint dries the better, but I was excited to get it in place.  Paint often takes 2-3 weeks to fully cure.

And this is what the new simple-to-make + inexpensive wood shelf looks like in place…

DIY: Creating a simple WOOD SHELF with decorative brackets.  Perfect for displaying + styling accessories and/or pictures!  Also great for picture gallery walls.  DIY by Jenna Burger Design, www.jennaburger.com

DIY: Creating a simple WOOD SHELF with decorative brackets.  Perfect for displaying + styling accessories and/or pictures!  Also great for picture gallery walls.  DIY by Jenna Burger Design, www.jennaburger.com

And the overall space…

DIY: Creating a simple WOOD SHELF with decorative brackets.  Perfect for displaying + styling accessories and/or pictures!  Also great for picture gallery walls.  DIY by Jenna Burger Design, www.jennaburger.com

I am very happy with the change of plan from a more detailed shelving system to a simpler white style.

Sometimes… the simpler, the better.  At least when it comes to design.  A simple wood shelf like this is an inexpensive and fairly easy project for anyone to tackle.  And it’s not just for the bathroom either.  Any space in the home can use an extra shelf here or there, right?!  Think the kitchen perfect for those cute teacups or for the living room ideal for accessory styling + books.  Or how about in the hallway to display photos.  Yes, a shelf like this would be perfect for a photo gallery wall!  The ideas + uses are endless.

I have another fun + easy project that I created for the bathroom which I will be sharing later this week.  Stay tuned…

 From start to finish, these are all the posts pertaining to this bathroom remodel
Plan of Action
Demo: Removal + Installation of the Tub & Walls
How-To Tile + Grout the Bathroom Walls
Installing Wallpaper
Adding a Tile Accent Border
Creating a Tiled Niche
DIY: Simple Painted Wood Shelf with Decorative Brackets
Bathroom Makeover Reveal
Resources