
Kitchen: Prepping for Paint

It’s kinda crazy, but it’s been 10 weeks since we closed on our new-to-us home and just over a month since we moved in.  Due to budget and timing, we had no plans to remodel the kitchen.  The space is very large and duals as our kitchen + dining room.  From the day we stepped foot into the house, the kitchen space really through me for a loop and I was unsure of how it would function and how we would use it best.  I want to live in the space for a while to know what works and what doesn’t.  That being said, I couldn’t leave it as is.  A makeover was a must.

In our last house, it was a year before we took the plunge to tackle a DIY kitchen remodel with paint on the cabinets, new hardware, appliances, etc.  The result was pretty awesome and within a few years, it ended up being featured in Better Homes and Gardens Kitchen + Bath Makeovers magazine – how cool?!?

For our new home, I didn’t want to wait.  While we had a month of construction, I took on the task of making over the kitchen on my own.  It was quite the endeavour (since we weren’t living in the house AND there were boxes everywhere), but it was SO worth the crazy, hectic moments to get the beautiful, updated result for little cost.

Let’s take a step back and look at what the kitchen looked like before we moved in…
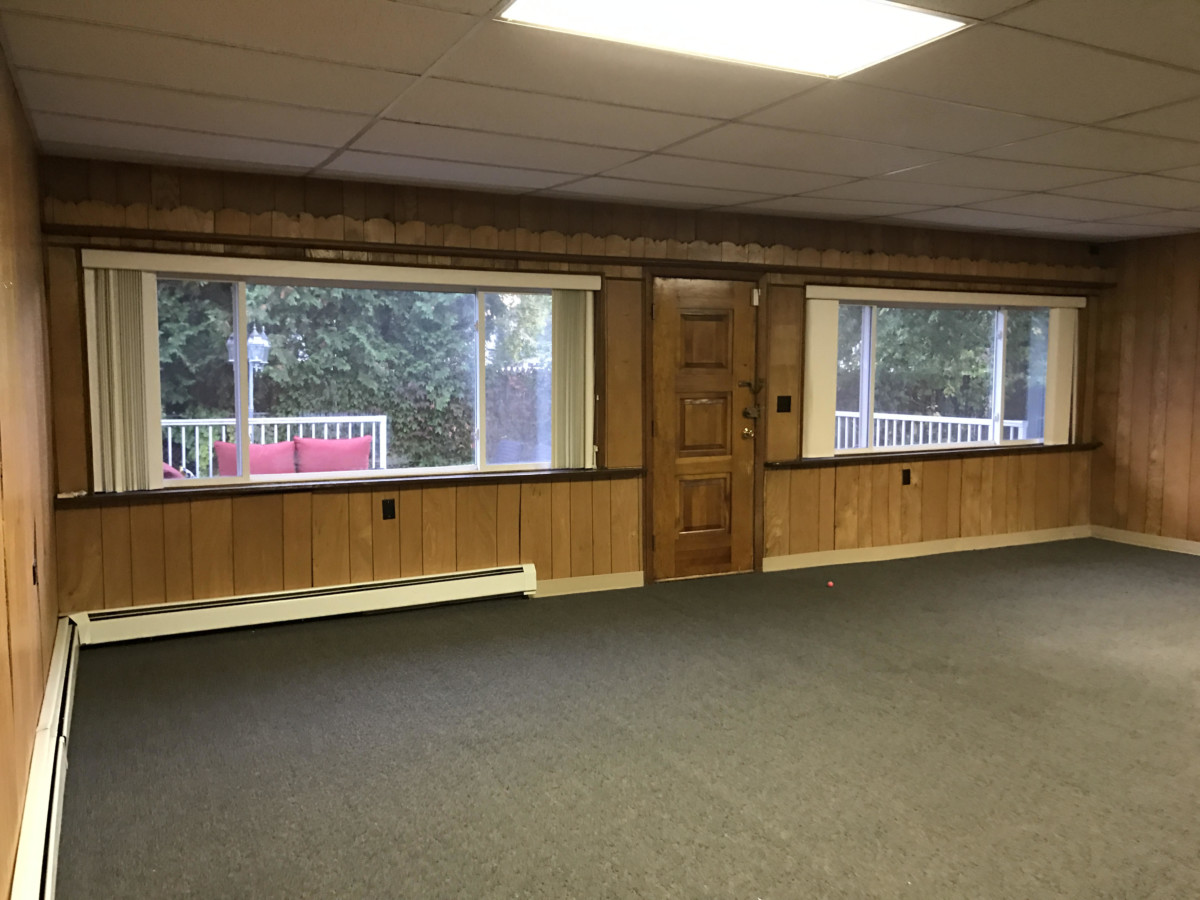
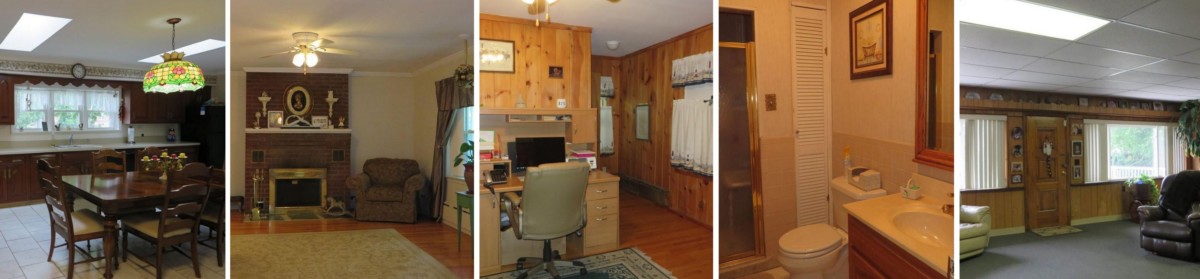
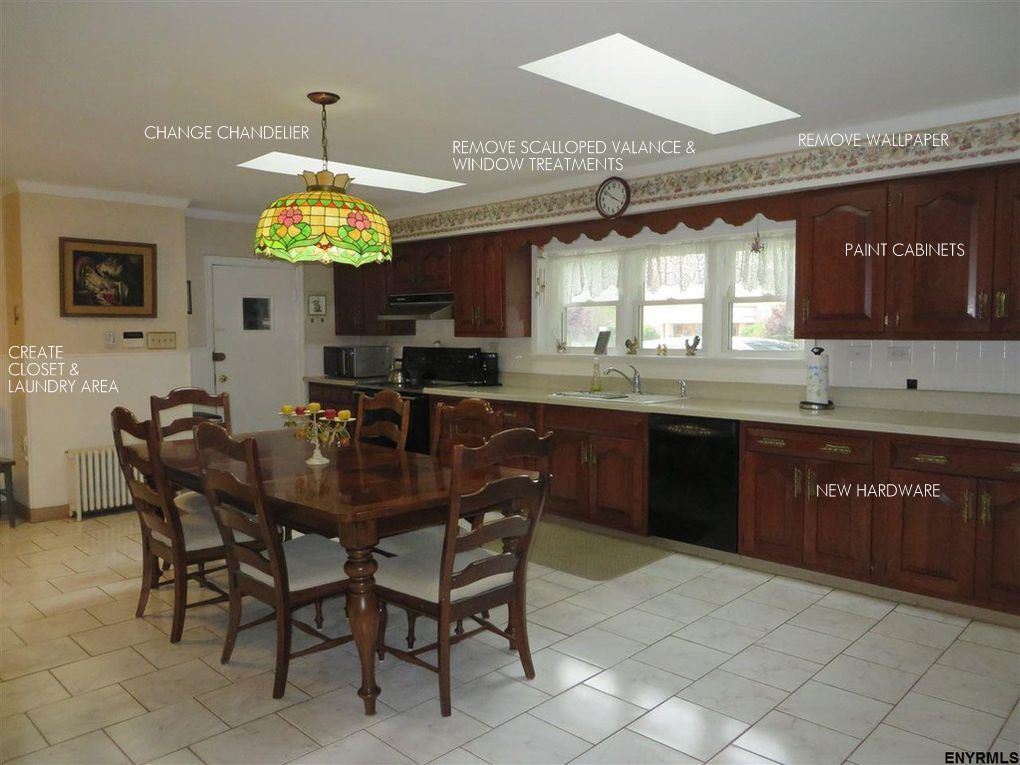
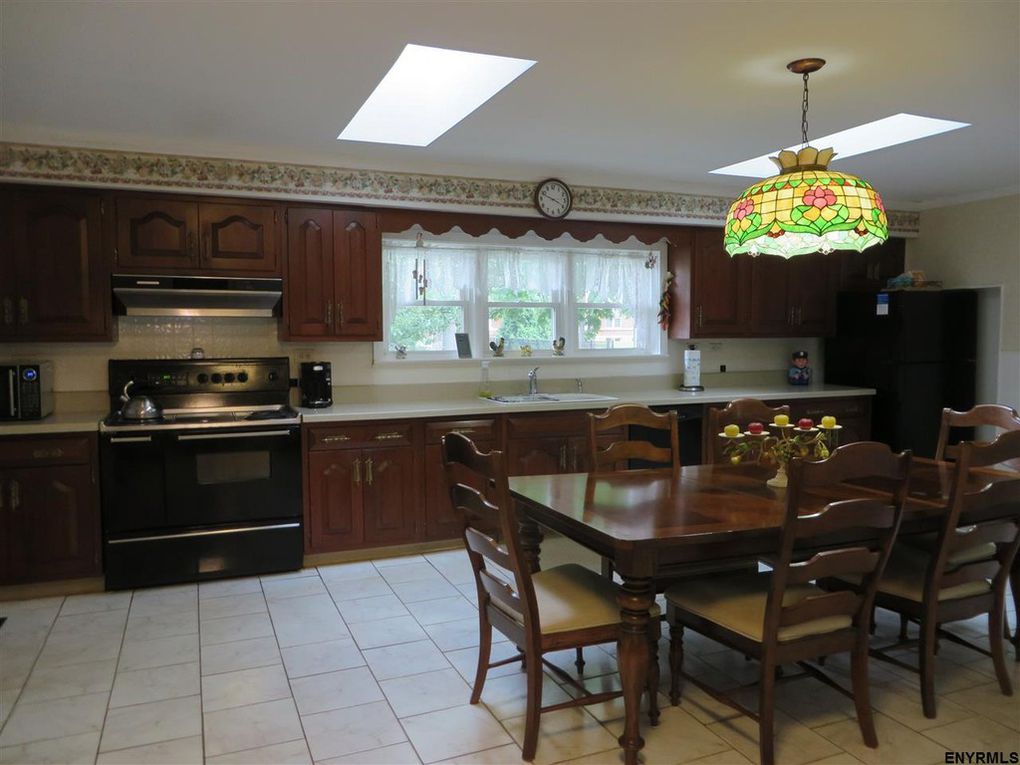
BEFORE

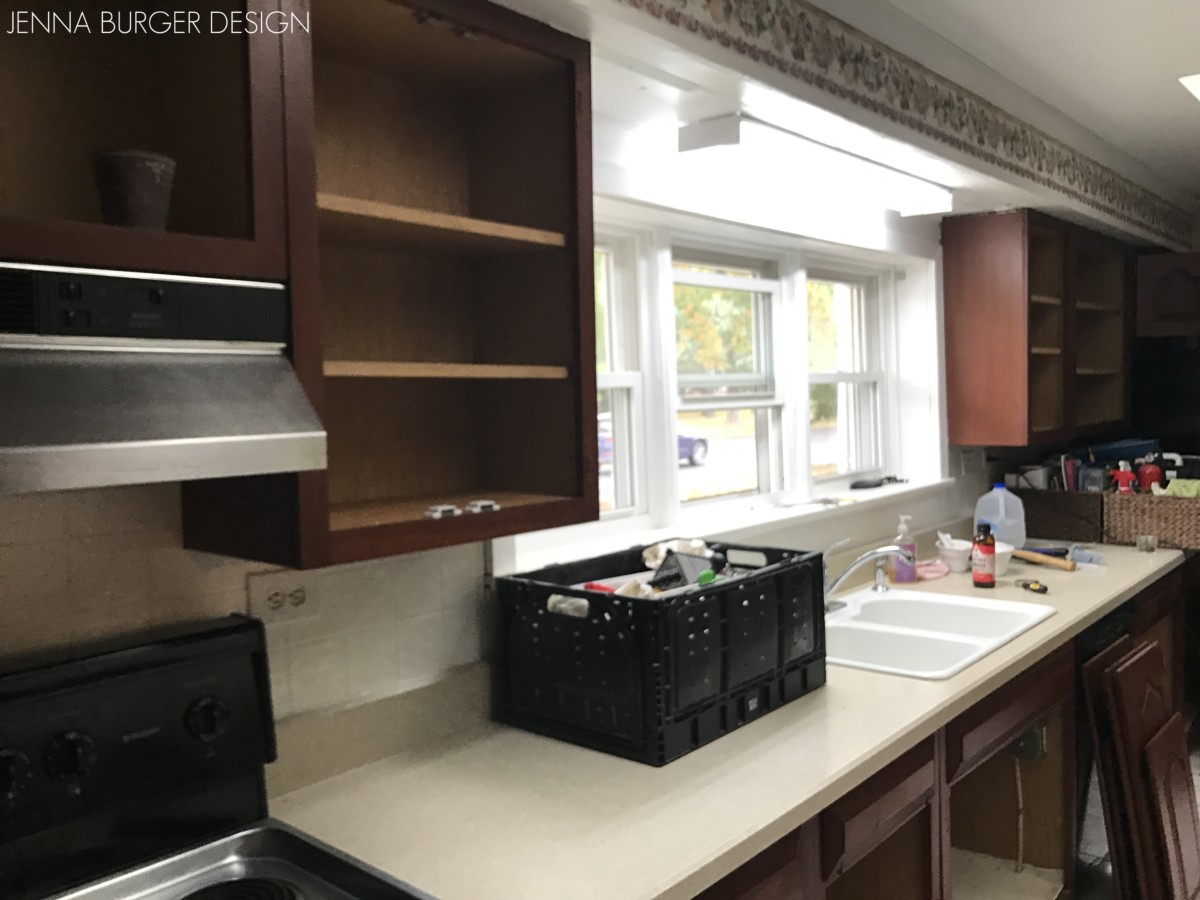
When we closed on the house, most of our boxes were stored in the garage and in the kitchen since it was the only space not being renovated.  From our mattresses, to sofas, to chairs, to our dining room set, the kitchen was packed from floor-to-ceiling, wall-to-wall.  Thankfully there was a 3-foot path in front of the cabinets for me to work and makeover our kitchen…

I started out by removing all the dated, ornate brass hardware from the stained cabinets. I ditched the pulls, but kept the hinges to possibly reuse (after spray paint).

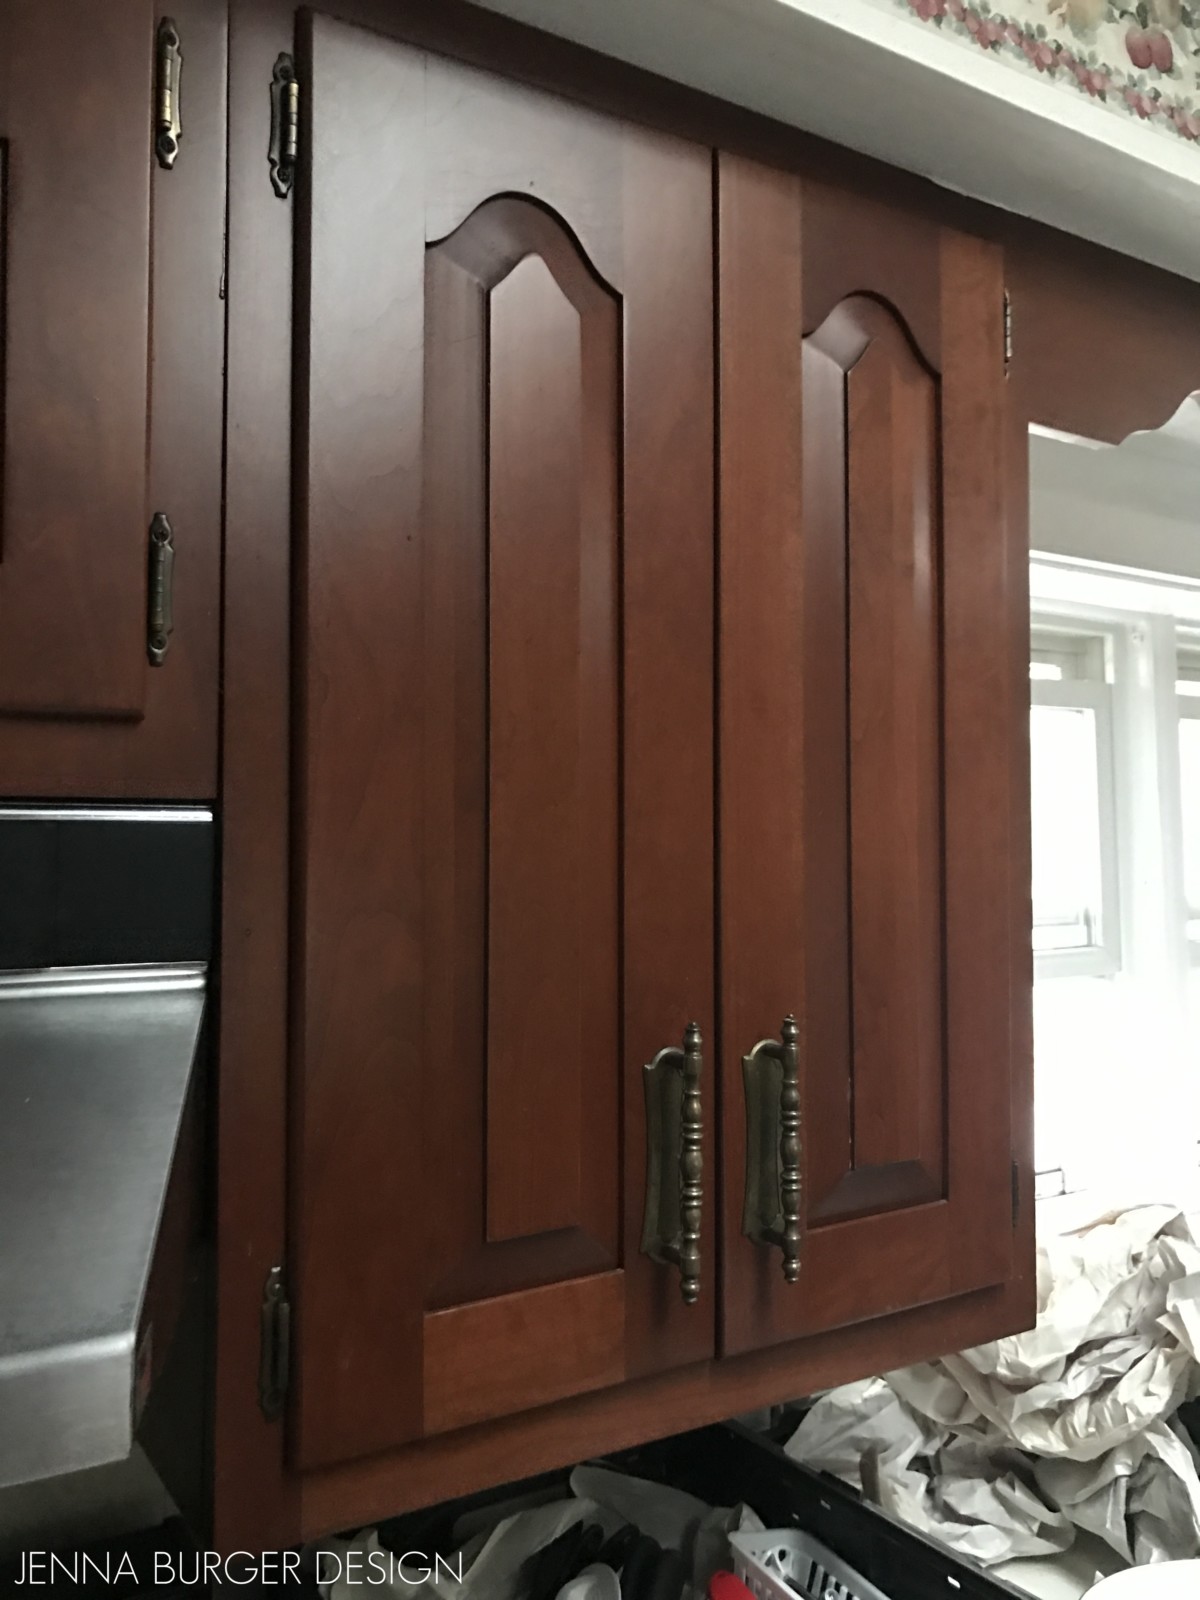
Removing the hardware made a huge difference on how the cabinets looked.

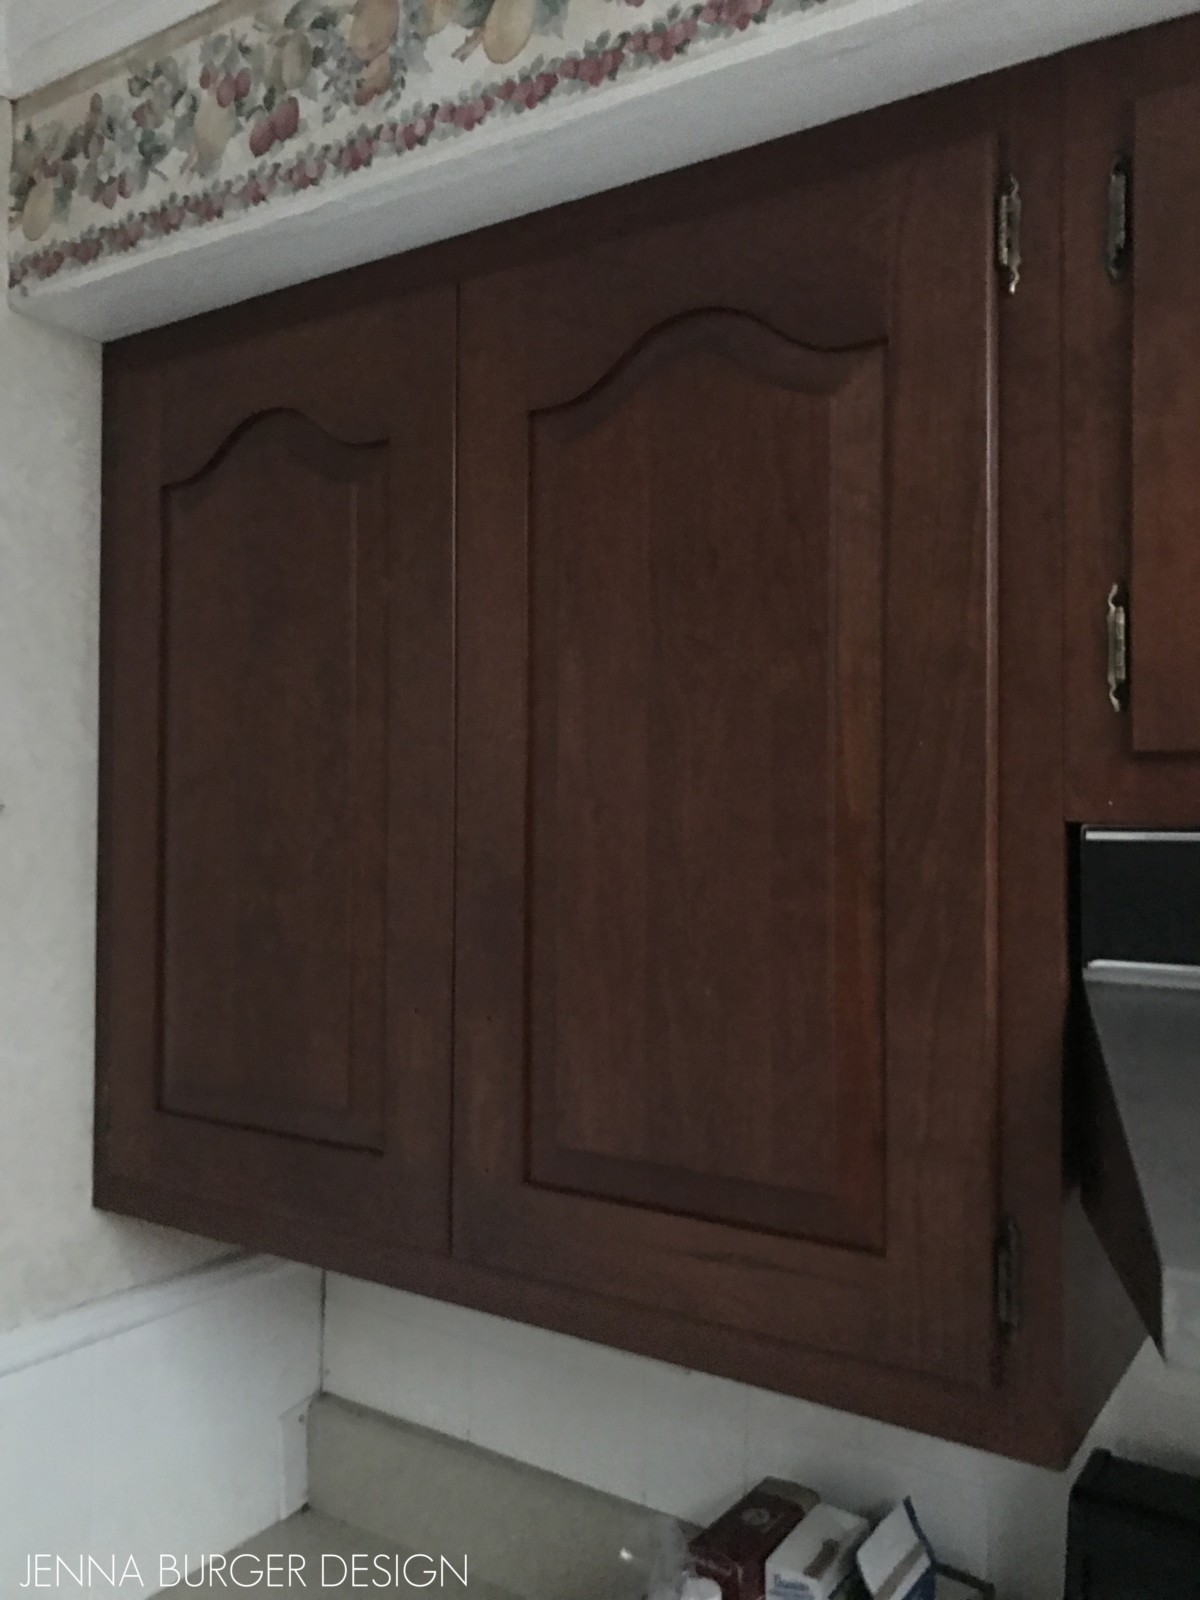
The cabinets are made by Woodmode, which is a good cabinetry company and I have used before for Client projects.  They were stained a deep cherry hue, which I didn’t love, but they are made well and are actual wood cabinets (versus a cheap composite).

Once the hardware was removed, I labeled each cabinet using a sticker on the inside of the door, then detached the cabinet doors from the face frames.

I was blessed with a work space to use to paint the cabinets.  This was key to successfully painting 20+ cabinet doors and 6 large drawers.  I was able to spread out and work at my leisure to transform each piece.

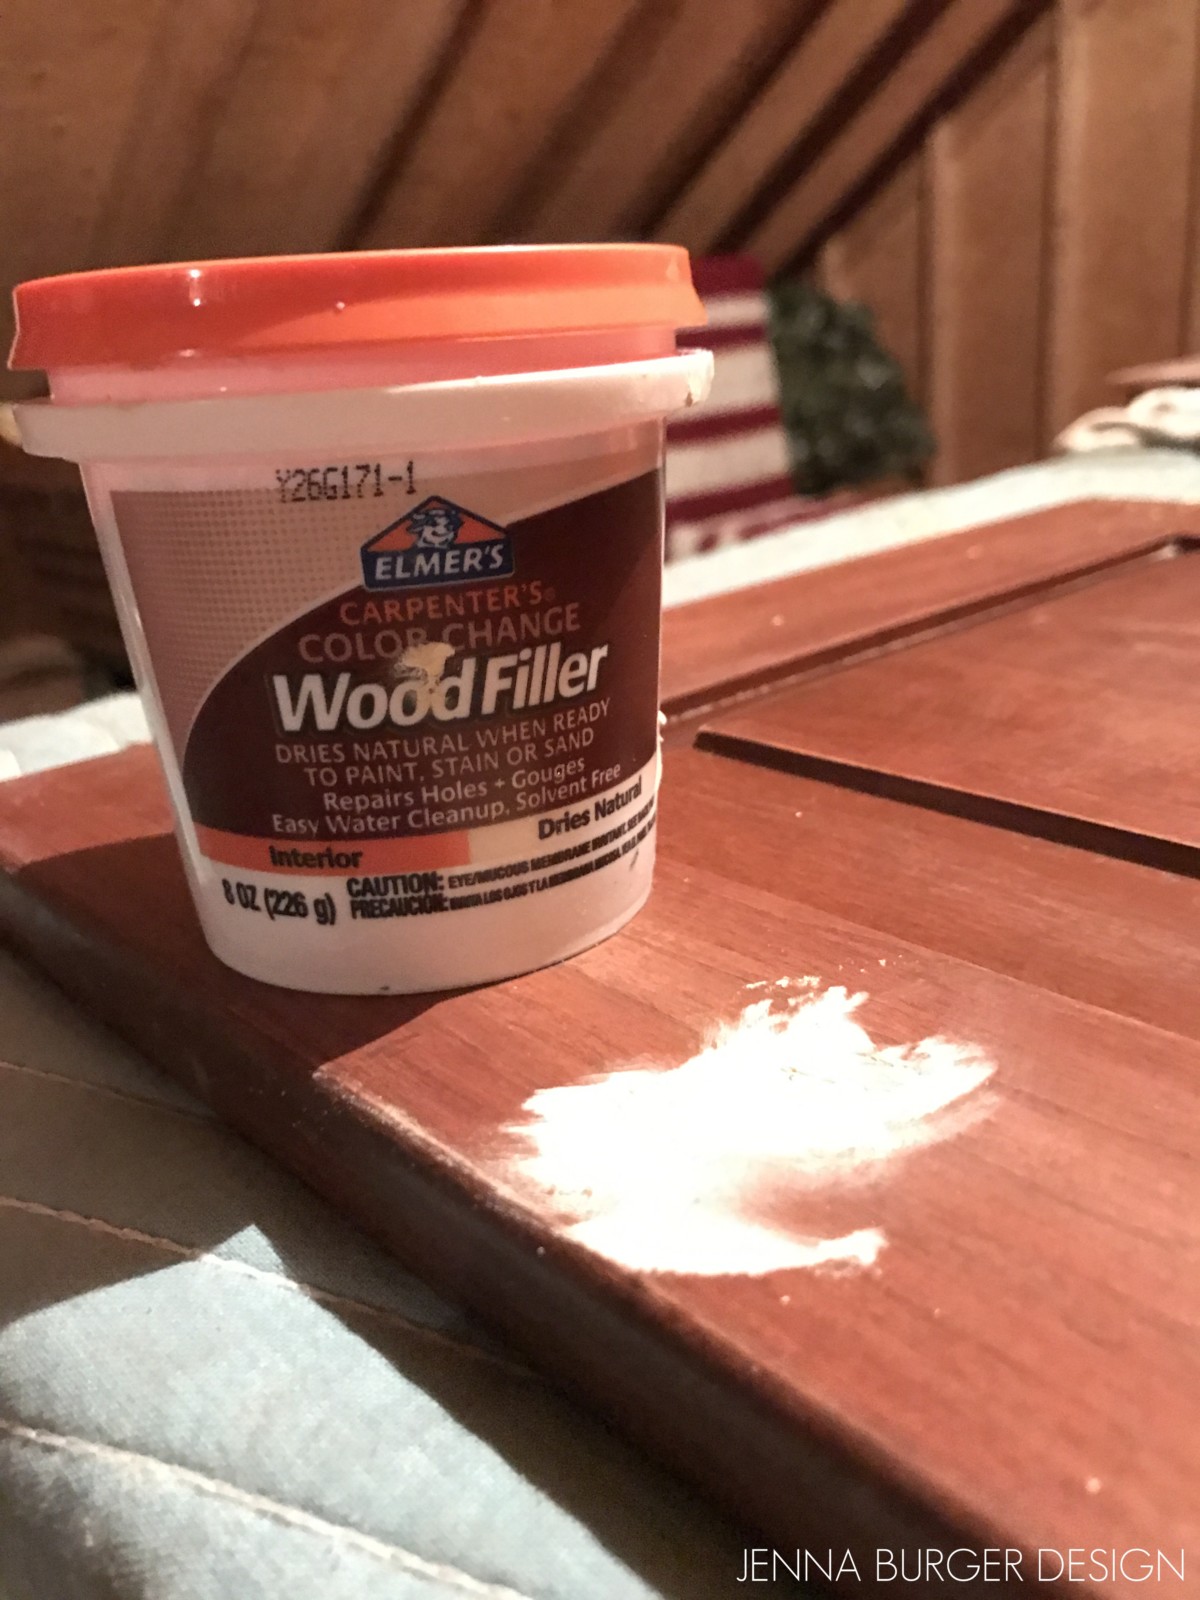
Once the cabinets were in the shop, I started off by filling the holes from the hardware.  The hole separation from the previous hardware was an odd measurement and I couldn’t find any new hardware with the same center-to-center measurement.  I also wanted the updated, remodeled kitchen to be more modern and reflective of my style.  That being said, a simpler knob would be best.

I used this wood filler to fill the holes.

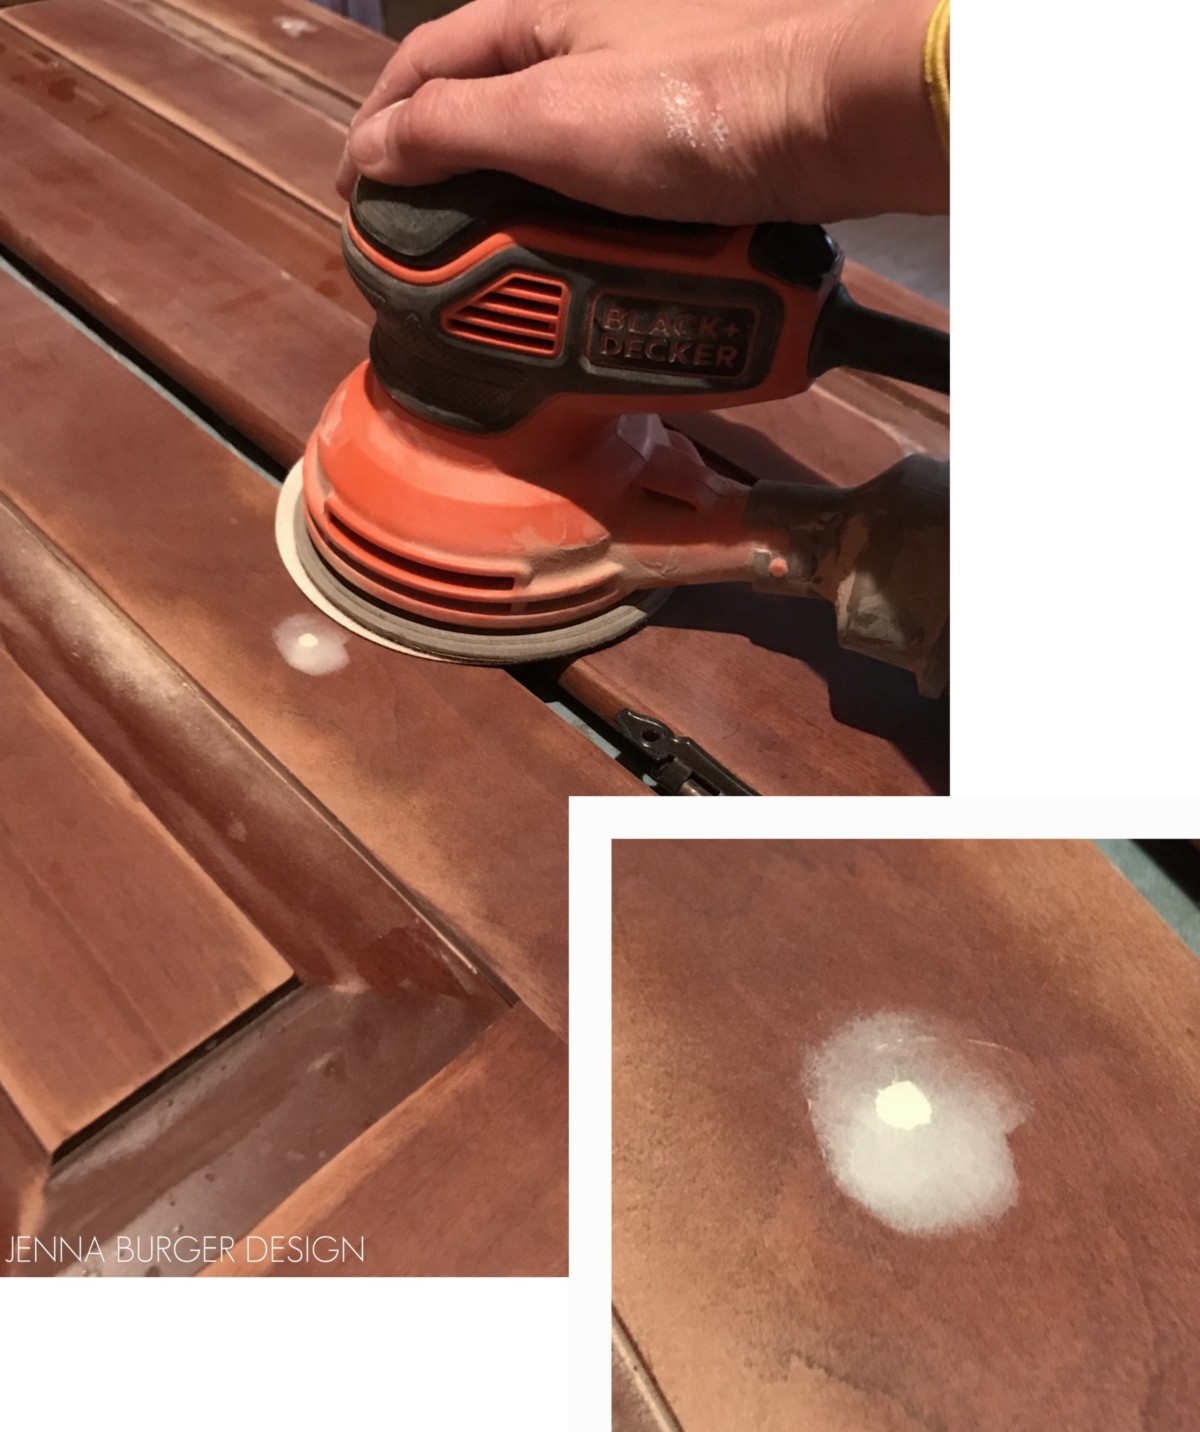
The doors were really dirty with layers of grease, grime, and gunk.  Once the wood filler dried, I sanded the overall face of the cabinets with my favorite orbital sander.  An orbital sander like this will save your countless hours and really sore arms – its a life changer and hands down, my most used tool!

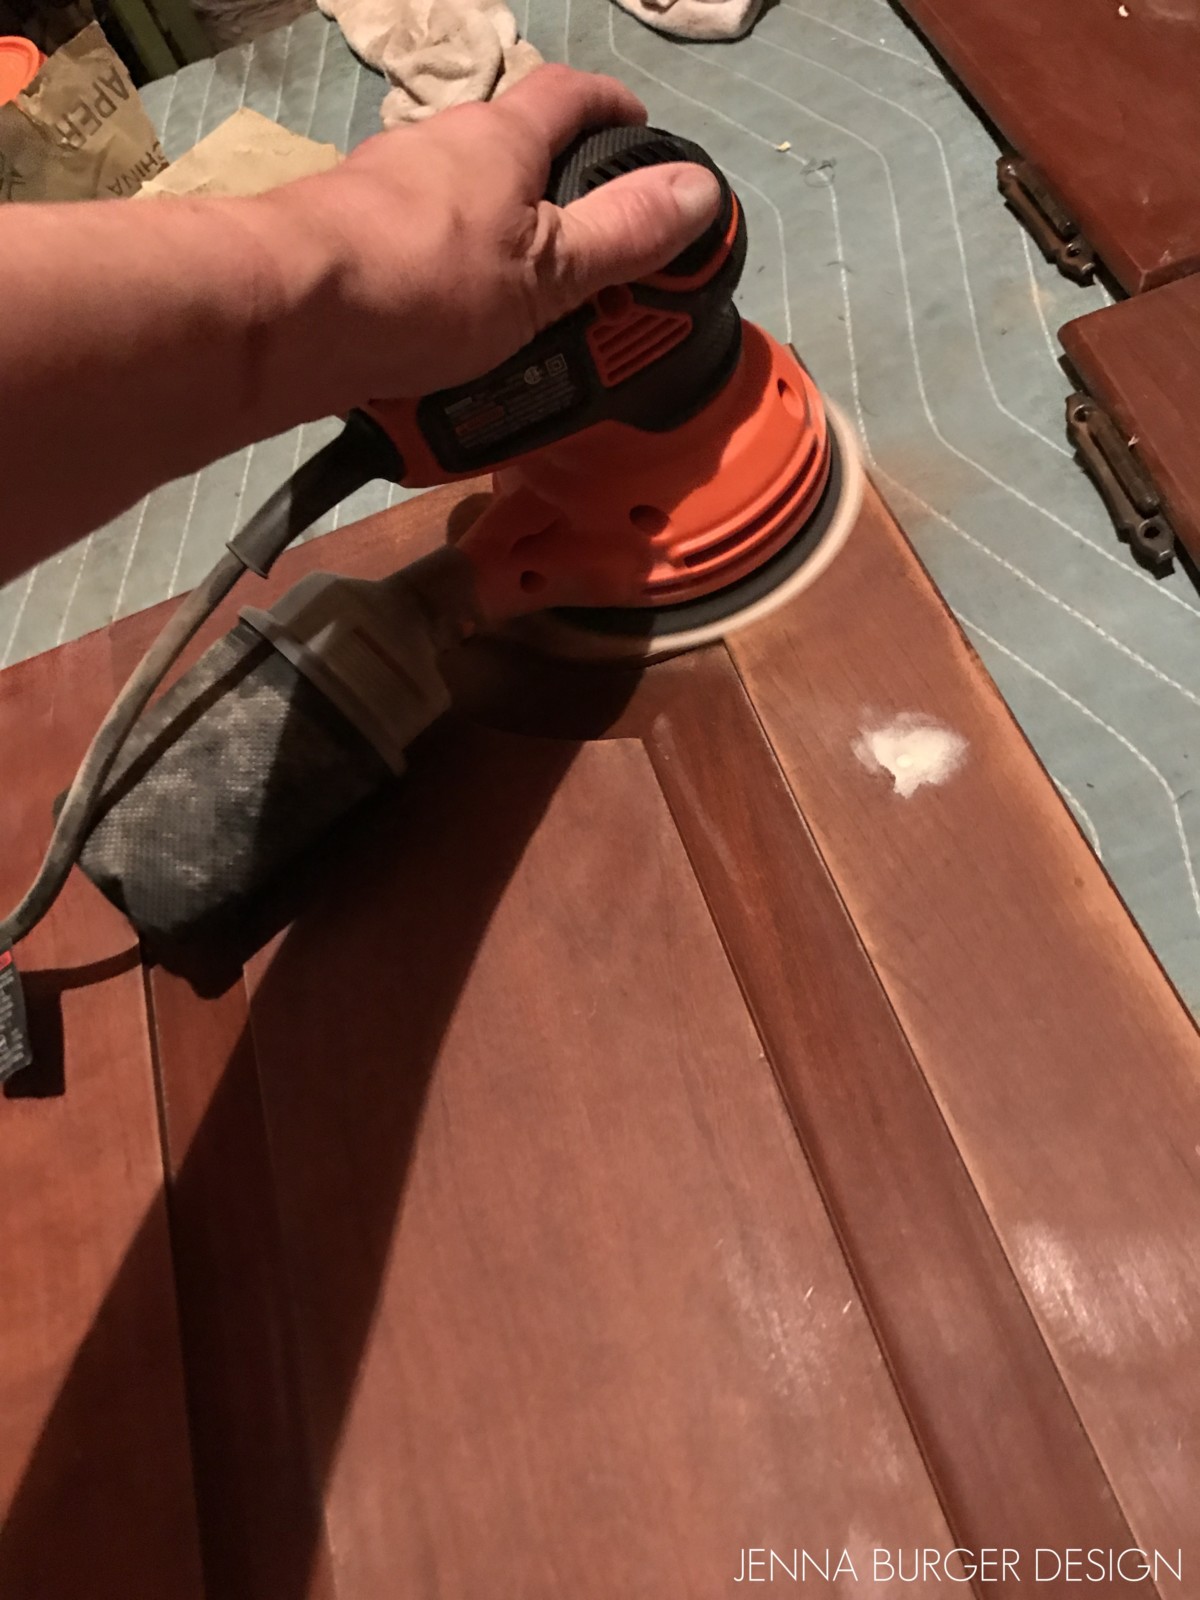
Sanding the wood eliminated the top layer of finish (the sheen) and in some areas around the cabinet edges, the raw wood was exposed.  Once the holes were filled and smooth and the face of the cabinet doors + drawers felt clean, they were complete.

All ready for paint!

Before painting could begin, I had a lot of particle / dust build-up in the corners.  I first thought about using a wet rag, but I didn’t think it would get all the dust out.  The mister suggested using Flarp. Flarp? What the heck is that?!? I put him on the mission to find it and he did.  I think he got it at Walgreens.  Anyway, it was the answer to my prayers.


Flarp... the best trick to remove dust from cabinet corners

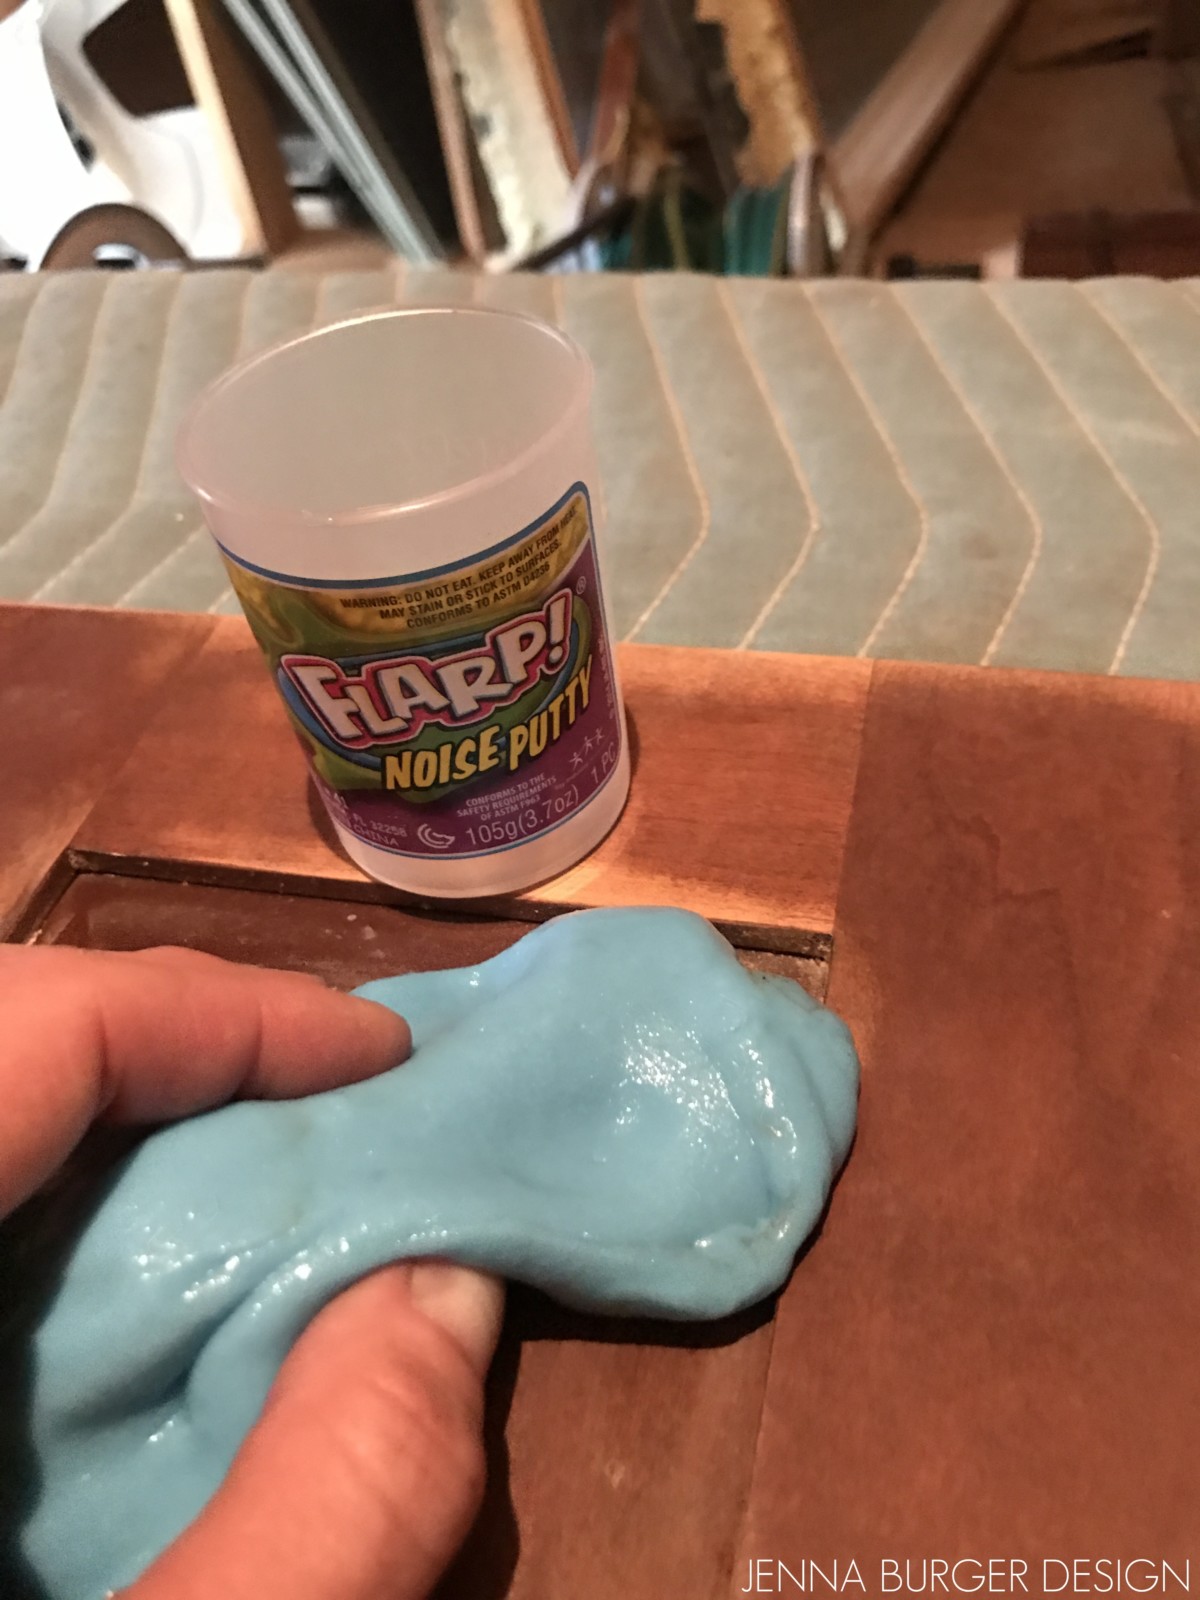
It’s sticky, but not messy.  It was perfect.  I clumped the Flarp into a ball, stuck it into the corner of the cabinets, then removed it.  Voila, the corner was dust-free.  Magic!
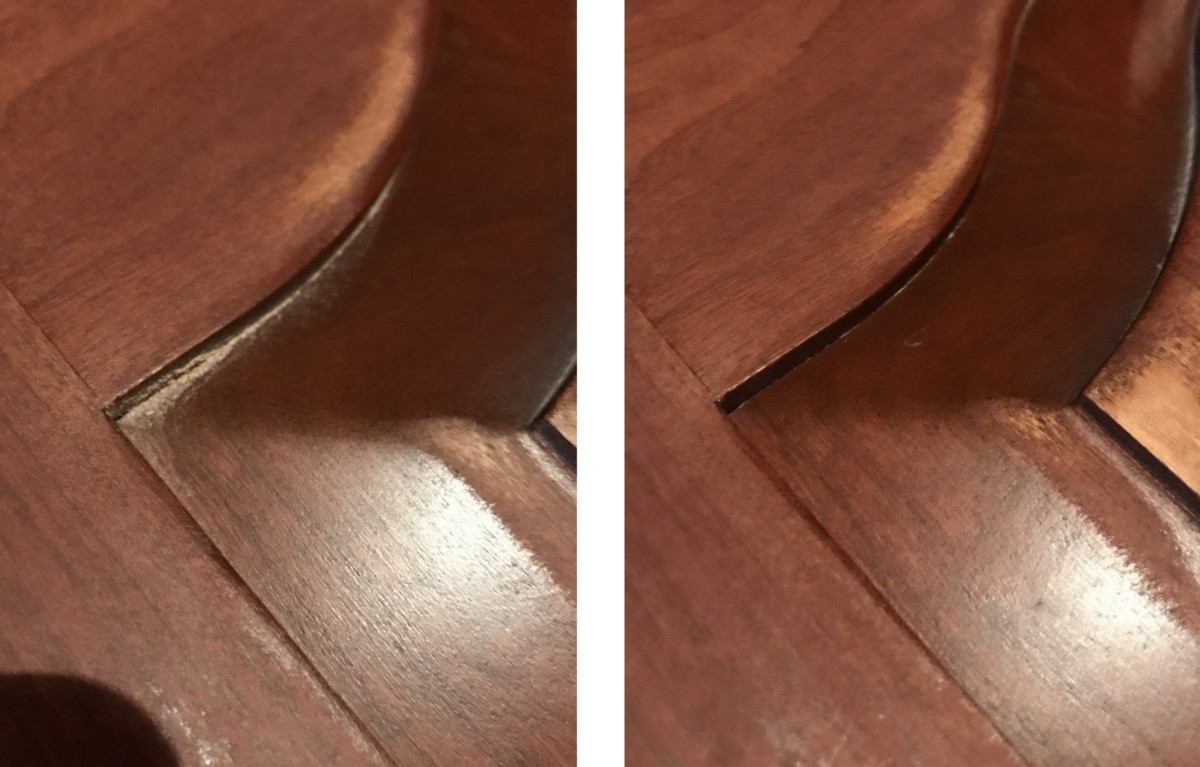
Check it out…

Prep is complete.  Next steps… Prime & Paint.

DISCLAIMER: THIS KITCHEN REMODEL IS A COLLABORATION WITH LOWE’S.  ALL OPINIONS + SELECTIONS ARE MY OWN.

Living Room Progress

It’s been several weeks since I shared an update on our brick ranch fixer upper which started with a preview of the progress on the large living room.  Since then, we officially moved into our new home after 6 weeks of renovations, which included a lot of sheetrock work, a new bathroom, and a new laundry space.

The second room reveal, well I should say more progress reveal, is another living / family space. This room has much of the furniture from the blue room in our previous home + a few exciting additions.

Let’s dive in…

THE BEFORE

This is a sizable room about 15′ x 18′ with a brick fireplace, hardwood floors, a large window, and interesting architectural details like the rounded doorways.

The room still isn’t painted (despite my hanging pictures) and there is still work to be done like the fireplace (more on that in a bit), but here is what the space looks like now…

THE AFTER [PROGRESS]

The bones of the space are still here, but it’s been updated to reflect our style and personality.

I chose to position the sofa (the Cameron sofa from Crate and Barrel that we purchased 15 years ago + still love) in front of the window, which has a straight on view of the TV and an equal easy view of the fireplace.  I paired it with a metal coffee table that I actually changed a few years back with wood planks, but decided to change back with the original glass.  It feels so fresh and new in this setting.

The velvet navy chair + graphic diamond rug are new purchases – both of which I am obsessed with.  I adored the navy colored room in our last house and it worked well because so much light filtered into the space.  This current home is different and I know the walls will have to be a lighter hue (color still to be determined), so I decided to bring in the deep navy color in a different way through layers and accessories.

This chair is a dream.  It is SO luxurious.  I found it on Wayfair, but it was out of stock – bummer.  Then with some sourcing, I found it at bed, bath, and beyond, which I used a 20% coupon to purchase it with – score!

On the other side of the room is a large open wall so to add height + drama, I chose these new bookcases in white metal + light wood and paired it with a contrasting media cabinet in a black lacquer finish with hints of brown stained wood on the base.

In this new home, we were desperate for shelving as we left behind two built-ins that flanked the fireplace + the two large bookcases in another room. We have many books + accessories, a.k.a “stuff”, and need space for them ALL!

TWEAKS TO THE ROOM

> Just a couple of days ago the TV stand arrived, yet I had already hung the picture above (a line drawing of the Guggenheim Museum by Frank Lloyd Wright), which now needs to be moved up slightly so it’s not overlapping.

> Pictures need to be added to either side of the bookcases.

> I feel the rug needs to be pulled out more from the sofa so there isn’t as much wood floor exposure in front of the media cabinet.

> Paint the walls of the room a light color

> Paint / stain the brick fireplace a black / deep charcoal hue.  With the light paint on the walls (soon to be), a deep contrasting color like the black wall in our previous home will really bring beautiful depth to this room.  >>> Check our my favorite black paint colors

INSPIRATION

Photo Credit: Allison Bloom of Dehn Bloom

Wouldn’t the fireplace come alive in a dark hue?

Before I wrap up this progress tour, we have to talk about the new lucite light fixture.

It’s another new addition to the room and it’s amazing.  This lovely lucite light was love at first sight, but it took me a while to make the plunge and buy it.  I absolutely was stopped in my tracks when I initially saw it, but I thought it would be too ‘glam’ or over the top for the room.  After some thought and then seeing a similar fixture for 4x the cost, I had to get it.  Once it was installed, I just about died!

RECAP

Another room almost complete.

From this…

To this…

From this…

To this…

More room updates on our brick ranch fixer upper coming soon.


Brick Ranch Fixer Upper: Living Room Transformation

It’s hard to fathom that a month & a day ago we bought a new home and moved.  The month has been the longest, yet shortest ever.  It’s been filled with joy, excitement, and moments of sheer nervousness.  I’ve never slept so little or asked myself so many times, ‘did we make the right decision’?!?  In the next beat, I just carry forward because there’s no looking back now… Right???

As I mentioned in the last posts when I shared the background story of the house + before pictures, extensive renovation was needed before we officially moved in.  There was no major demo planned, but almost every room in the house needed something, and I don’t mean just spackling walls and paint.  Most of the rooms needed sheetrock and wall repair, some more than others.

The room that needed the most attention was the living room.  It wasn’t original to the house as we were told it was once an outdoor patio.  At some point, the 20′ x 25′ space was enclosed, but whether it was an inexperienced contractor or to save money, the construction of it was poor.  When we first saw the house, we knew this room was going to need the most attention and the most love, and we wanted to do it once AND right!

Let’s dive in to the transformation process…

THE BEFORE.

THE PLAN.

THE TRANSFORMATION.

Through pictures, this is how the room has evolved in 4 weeks. Later in the post, I’ll share more details on the process…

So there it is… The transformation in one month from dark + drear to light + bright.

THE DETAILS.

The first days of construction started with removing the paneling.  The thin vertical paneling was adhered only with glue to the existing brick facade (remember this space was originally a patio, so the exterior walls were brick with windows that were closed in).

The yellow in the picture below is painted brick, the square holes were original windows, and the random black markings was the glue.

Along with the vertical paneling, the acoustic ceiling tiles and the track were also removed.


Once the demo was complete, the space was ready to be created into a room.  We didn’t know the paneling was directly adhered to the brick.  We assumed there was a stud wall, which the new sheetrock could then be attached to.  Unfortunately that wasn’t the case, so walls had to be constructed around the room, along with new ceiling rafters.

Once the framing was complete on the walls and the ceiling, it was time to enclose the space with sheetrock.

Because of the new wall build out, the windows and exterior door now have deeper jambs, which is quite nice and unexpected.  I like that the window sills are so deep!

Between week 2-3 of construction, the sheetrock + taping + sanding was complete, and the wood floor could be installed.  When the carpet was removed, we found the floor was a laminate material, which was left in place.  A plywood backer was first installed on the floor, then the prefinished hardwood (which is a clear pine) was installed.

There were multiple floor materials throughout the original home, which we wanted to eliminate so it feels more cohesive.  We chose to run the new hardwood into the small hallway which leads to a bedroom, bathroom, and the kitchen (which is tiled).

The hardwoods cast an orange hue in the pictures above because the artificial lights are typically on for the workers.  But the floors actually aren’t as orange.  This picture is truer to their actual coloring and depth.  Aren’t they pretty? I adore the wood grain and multi-colors of lights and darks.

WHY WE CHOSE HARDWOOD.

Many hours of thinking + analyzation went in to the flooring choice.  From carpet to tile to white washed floors, we considered many different materials.  We first negated carpet because this will be a high traffic area that leads to the back yard, which is the pathway from the kitchen.  Carpet would get damaged.  We knew it had to be a hard material that can easily be cleaned.  We considered tile and different toned hardwoods, but with the kitchen being tiled, there would then be three flooring materials throughout.  In the end to make the new space feel cohesive with the rest of the house, we chose a clear pine hardwood. It was a good decision!

The space now is ready for paint + the finishing touches.  And check out one of two light fixtures that will be beautifully hanging from the ceiling…

EEK, I’m getting excited!

I can not wait to add the finishing layers to this room.

The space will be getting most of the furniture from our previous living room.

One room almost complete!

From this…

To this…

More room updates on our brick ranch fixer upper coming soon.

Our Brick Ranch Fixer Upper

A few days ago I shared that a little less than a month ago we sold and bought a new home. The move was local, within 10 minutes of our previous home, but it has still be a challenging transition.

The new house is a fixer upper, as I’m calling it the Brick Ranch Fixer Upper, and the areas of focus need to be tackled before we moved in. The scope started out as mostly Sheetrock work – ceilings and some walls – but in the recent days it’s expanded a bit. Before getting ahead of myself too much, let me give you a tour.

Brace yourself and use your imagination for it’s potential, because it ain’t too pretty (YET)…

Welcome to our Brick Ranch Fixer Upper…

FOYER

I adore a home with a true foyer / entry space versus walking right into the living space.  I like to have a distinct area to enter into the home before proceeding into the adjacent rooms.  Having an actual foyer really appealed to me about this home and I’m excited to use some of the furniture from the foyer in our previous home, along with new lighting and wallpaper or paint.

And the floors – hardwood – yes!!!

LIVING ROOM

Off the foyer is a living room space which we plan to update by removing the wallpaper and ceiling fan, sheetrocking the ceiling, and incorporate our style with new furniture, a gorgeous new light fixture, painting the brick, and window treatments.

KITCHEN + DINING ROOM

The kitchen has SO MUCH POTENTIAL.  It’s huge and will dual as a kitchen and dining room.  I have big plans for the future with a new layout, new cabinets, and new floors, but in the immediate I’m going to work with what I have.  My plan is to paint the existing cabinets, change the cabinet hardware, remove the scalloped valance above the sink, remove the wallpaper, and change out the tiffany-style chandelier.

Most of the furniture for this space will be similar to our dining room from our previous home, including my beloved coral china cabinet.

Can you see the potential?  No?  Stand by…

FAMILY ROOM

Now is the moment when you may ask, ‘why did they buy this house???’…

This room will get the most attention and love.  It’s not original to the house and used to be an outdoor courtyard.  At some point, the room was enclosed but not properly insulated and was poorly executed with vertical siding and an acoustic ceiling.

It’s a little shocking so just focus on the windows and the size of the room.  This room gets flooded with natural light all day long and I can’t wait to soak up the sun in this space.

Cleared from furniture, this is the space…  It’s DATED with a capital D right now, but this 20′ x 25′ room is incredible and going to be our main hang-out-area!   Most of the furniture for this room will be similar to the family room in our previous home.

BEDROOMS

The other big difference between this house and our last, is that it has 4 bedrooms instead of 3. This is going to be a huge change for us because my daughters previously shared a room, but will now have their own space.

I always dreamt they’d happily, willingly, and excitedly share a room until they moved out for college, but their sharing a space is very difficult. Maybe it’s the age, but their schedules are so different (i.e.: sleeping, waking, school) and many frustrating moments (i.e.: tantrums) occur because of it. So now everyone will have their own space and they’re very excited.

All the bedrooms are of a decent size and need similar work: new sheetrock ceilings, wallpaper removed, paint, new decor & window treatments.

Wood walls, wood floor, wood mouldings…  Just too much wood.  This will be my sons room and he wasn’t happy about all the dated wood (as he says, ‘it looks old’) + the fact that it’s smaller than his previous room.  The plan was to paint the paneling, but instead we’ll be sheetrocking the room.

BATHROOMS

The original plan was to leave the dated bathrooms as is (due to budget) and simply remove the wallpaper and paint. Welllll, for the main bathroom, one issue led to another and it ended up being a full gut.  Every material was removed down to the studs.  Much more on this bathroom transformation will be coming soon.

This is another bathroom which for the immediate will be getting a DIY makeover – paint the existing cabinet (as I painted the cabinets in our previous home), add luxury vinyl tile (like this installation of LVT), remove the wallpaper, paint, and new mirror.  I feel confident that we can transform this space for little cost (I hope).

EXTERIOR

The exterior is getting a lot of attention… again more than we originally intended, but for good reason.

This is the back of the house.  The yard has a lot of overgrowth… trees and shrubs will be cut back and trimmed.

So that wraps up the tour.

The house needs a new kitchen and new bathrooms, but that will come in time.

THE SCOPE OF WORK FOR THE IMMEDIATE IS:
> Sheetrock most ceilings to cover the existing tiles that are ugly and not properly installed.
> Sheetrock walls and ceiling, plus add insulation, in the large paneled room (it used to be an outdoor courtyard so this space isn’t original to the house)
> Move the washer and dryer to the first floor and create a laundry closet. It’s currently in the basement.
> Move some ceiling light locations; Install all new light fixtures (24 to be exact)
> Remove wallpaper in the bedrooms

Due to some unforeseen issues and / or changing-one-thing-which-leads-to-the-next,
THE SCOPE HAS EXPANDED TO INCLUDE:
> Renovating one of thean entire bathroom
> Sheetrocking the 4th bedroom which has vertical wood paneling
> Exterior work including a new concrete slab at the front porch, new vented ceiling, new column configuration, adding vinyl board and batten to cover part of the existing brick
> And a slew of other little, costly, unforeseen issues.

It’s been an extremely exciting, nervewracking, and fun process. Walls are torn apart, ceilings have been removed, and it’s definitely at the point of being worse before it gets better. Each day though, I see the light in which this house is becoming a home.

Next post coming soon will be more insight and progress pictures of the transformation.

  • 1
  • 2