
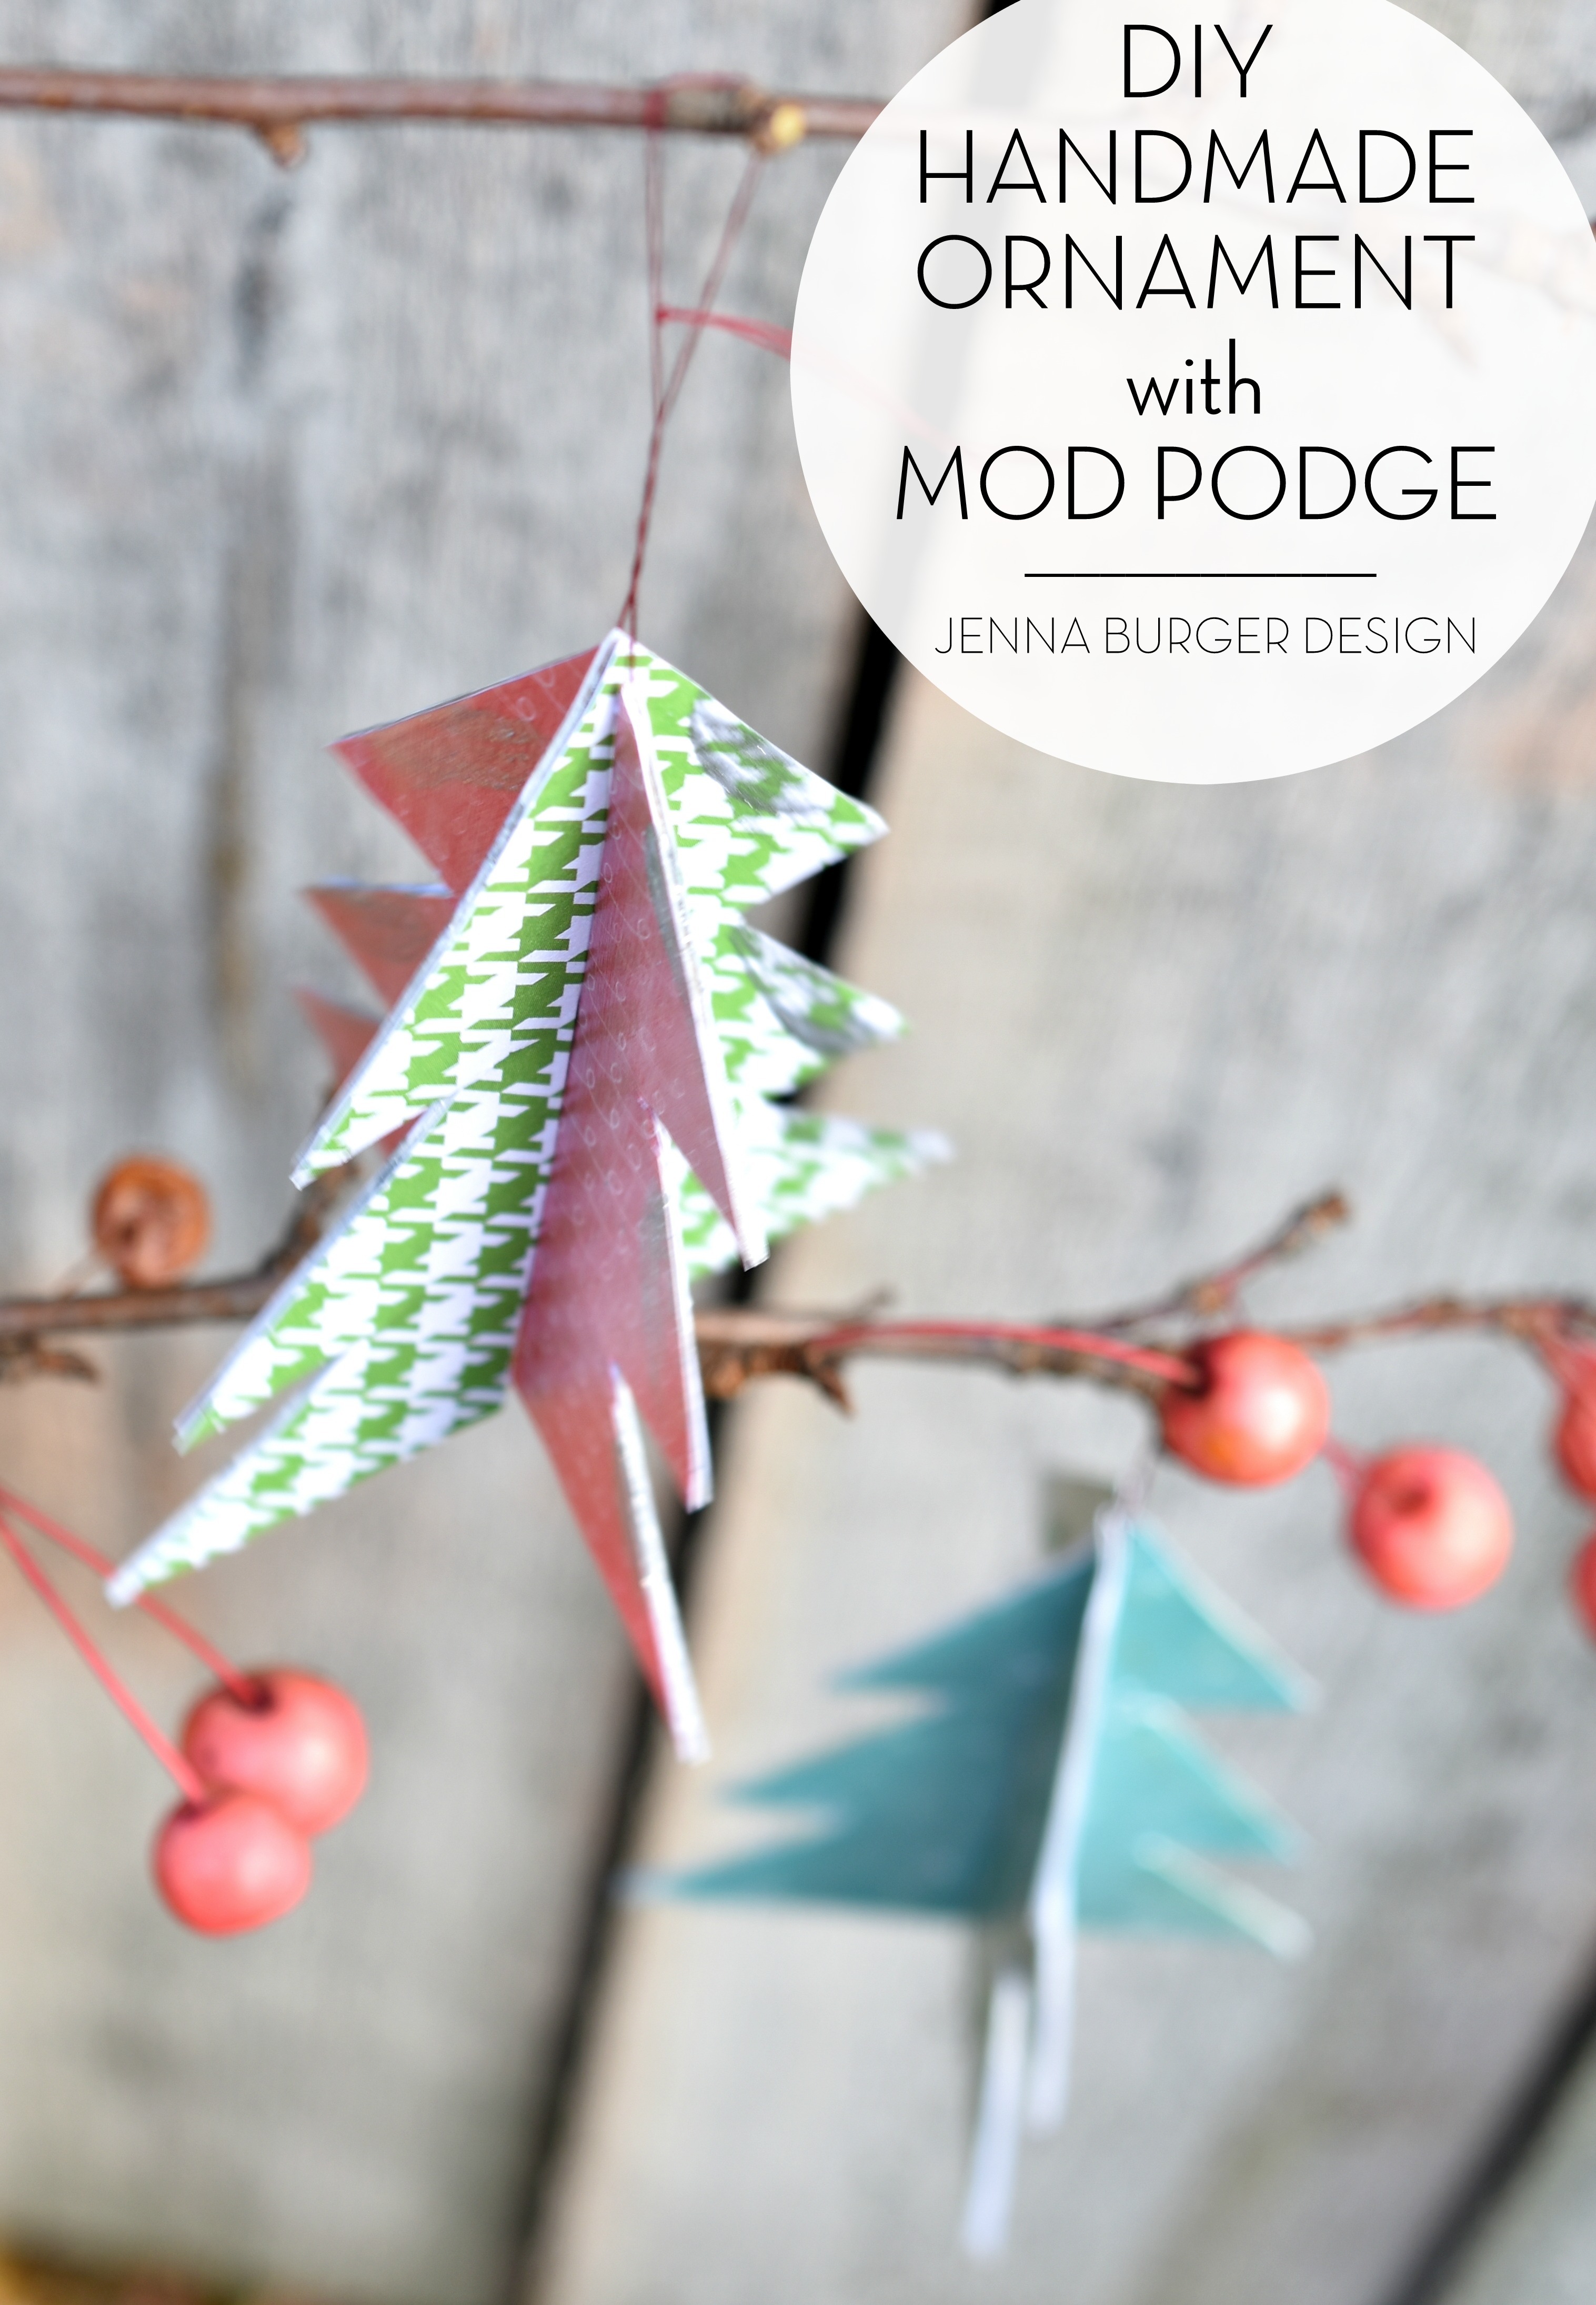
Mod Podge DIY Christmas Ornament

This post is brought to you by Plaid and Blueprint Social. The creation + words shared are 100% my own!

Another Christmas season is upon us…

As the seasonal boxes start to make their way up from the basement, I always like to integrate our festive favorites with new finds + homemade creations.

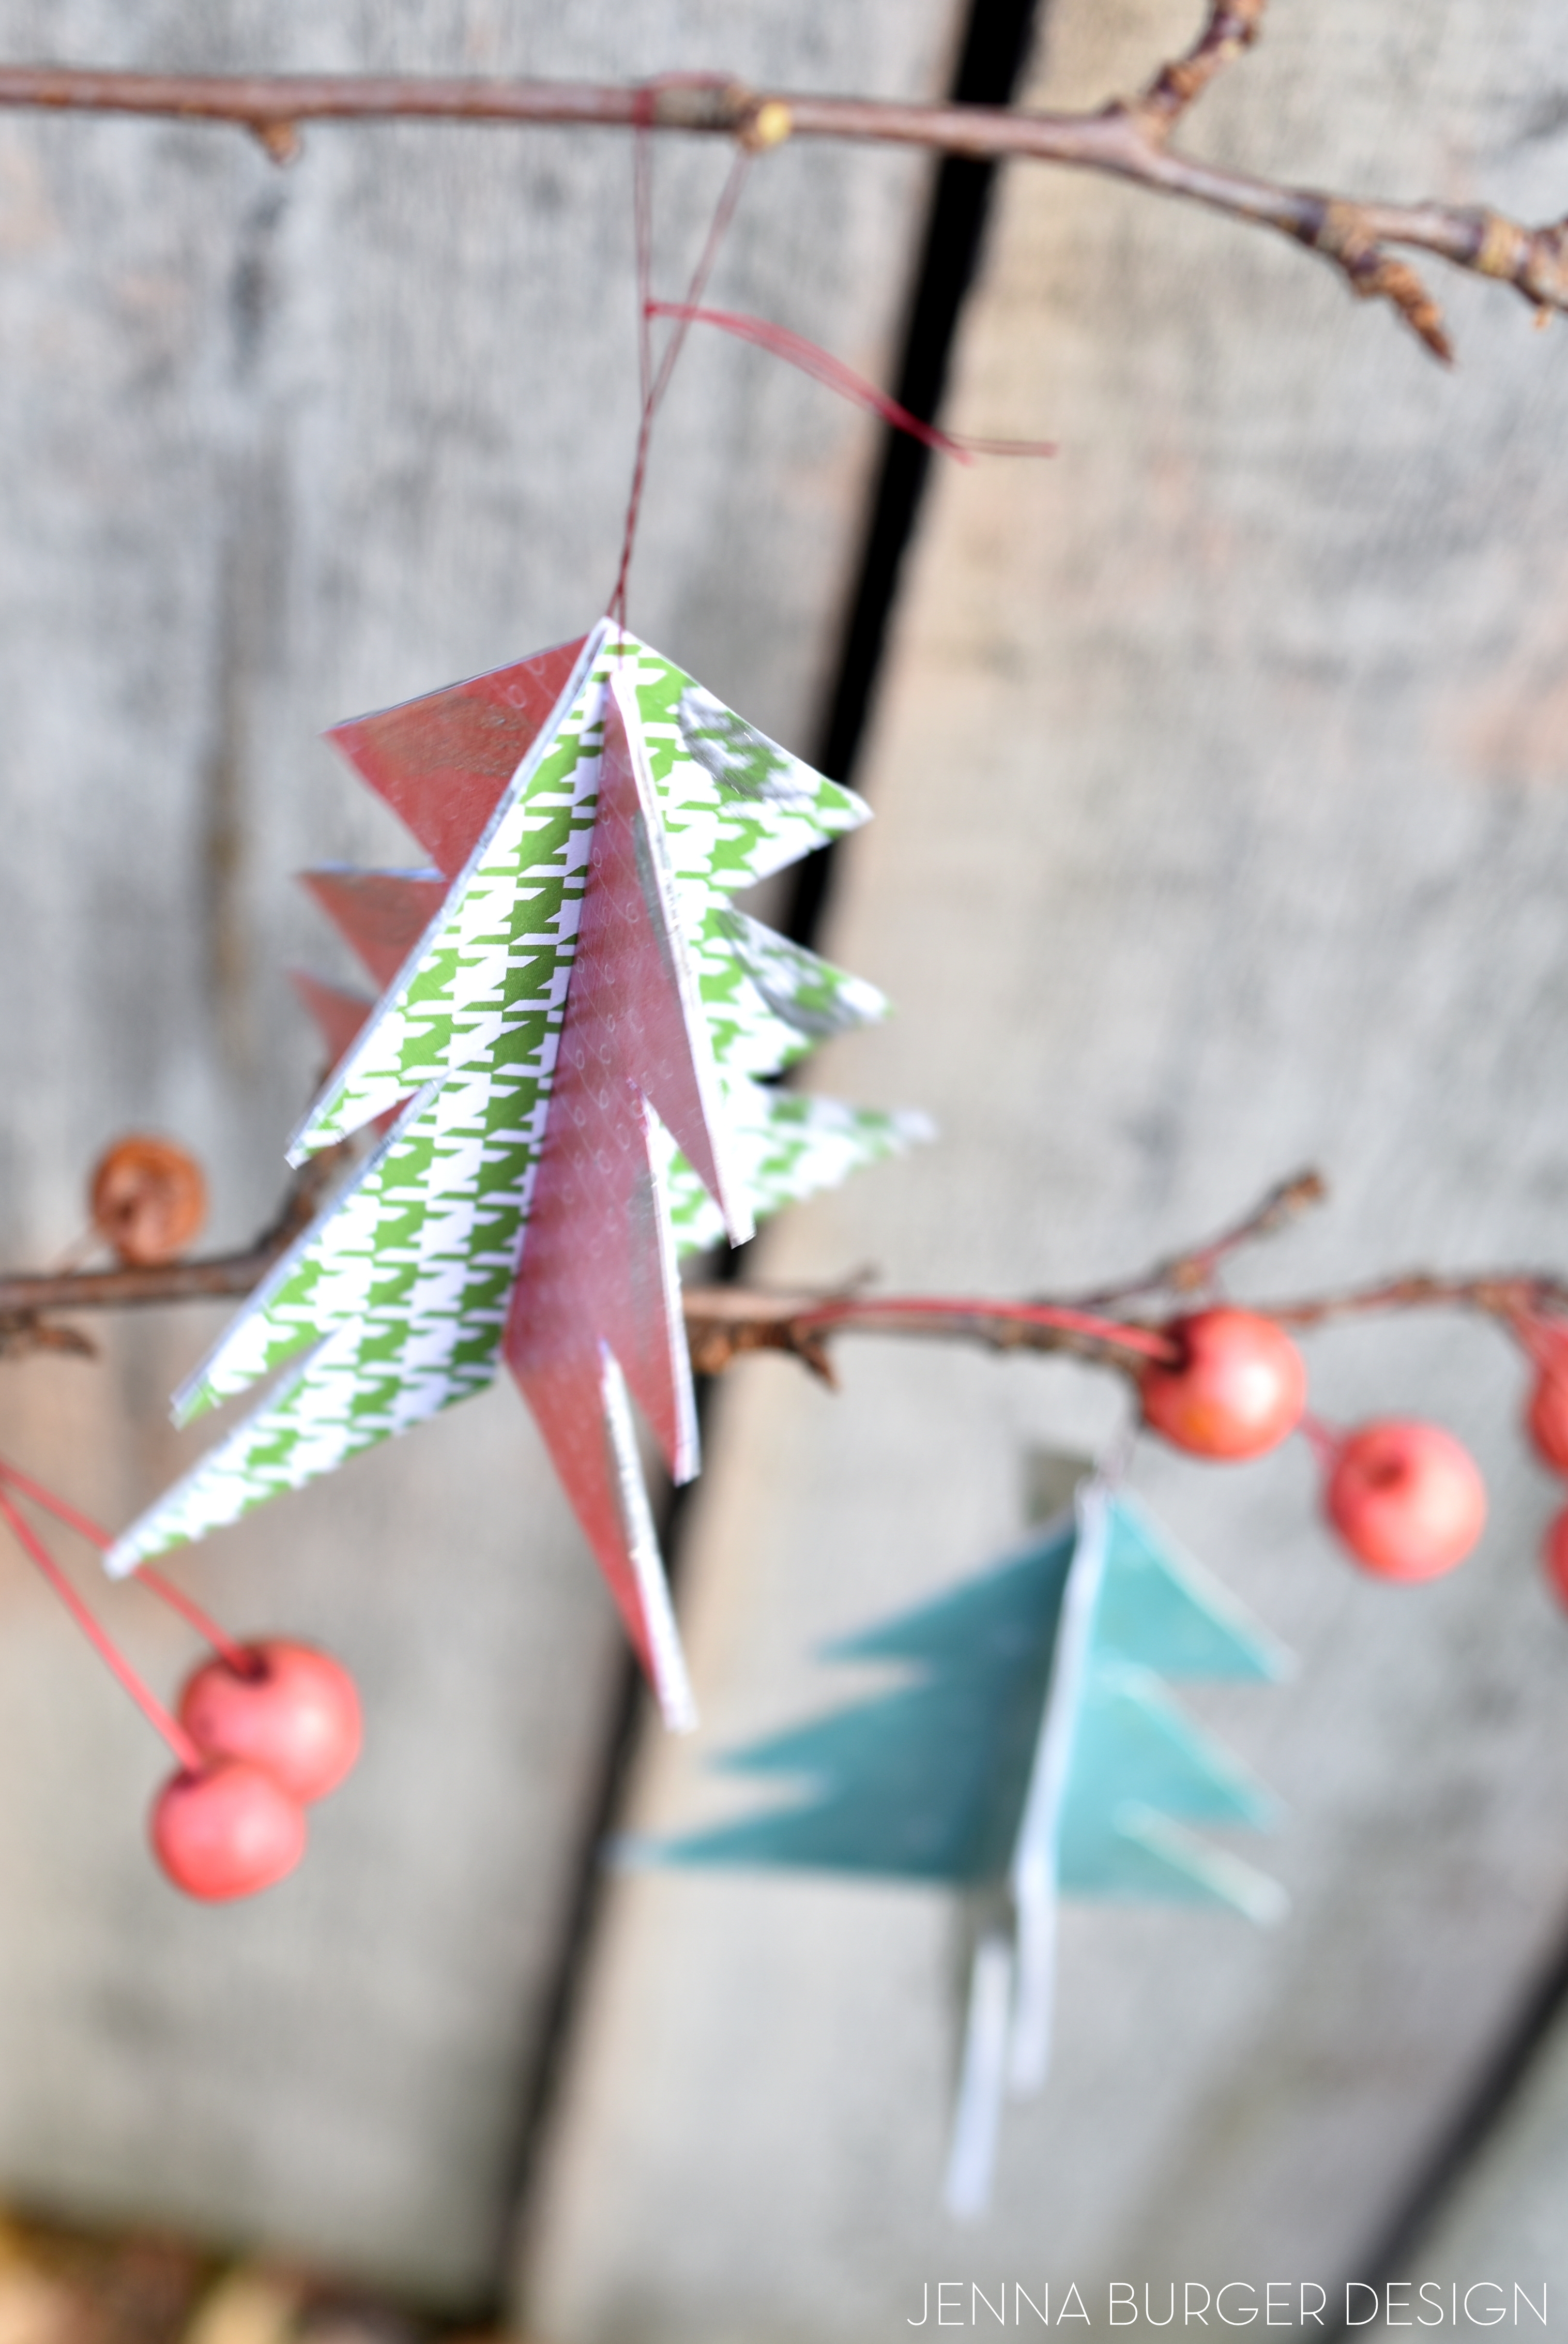
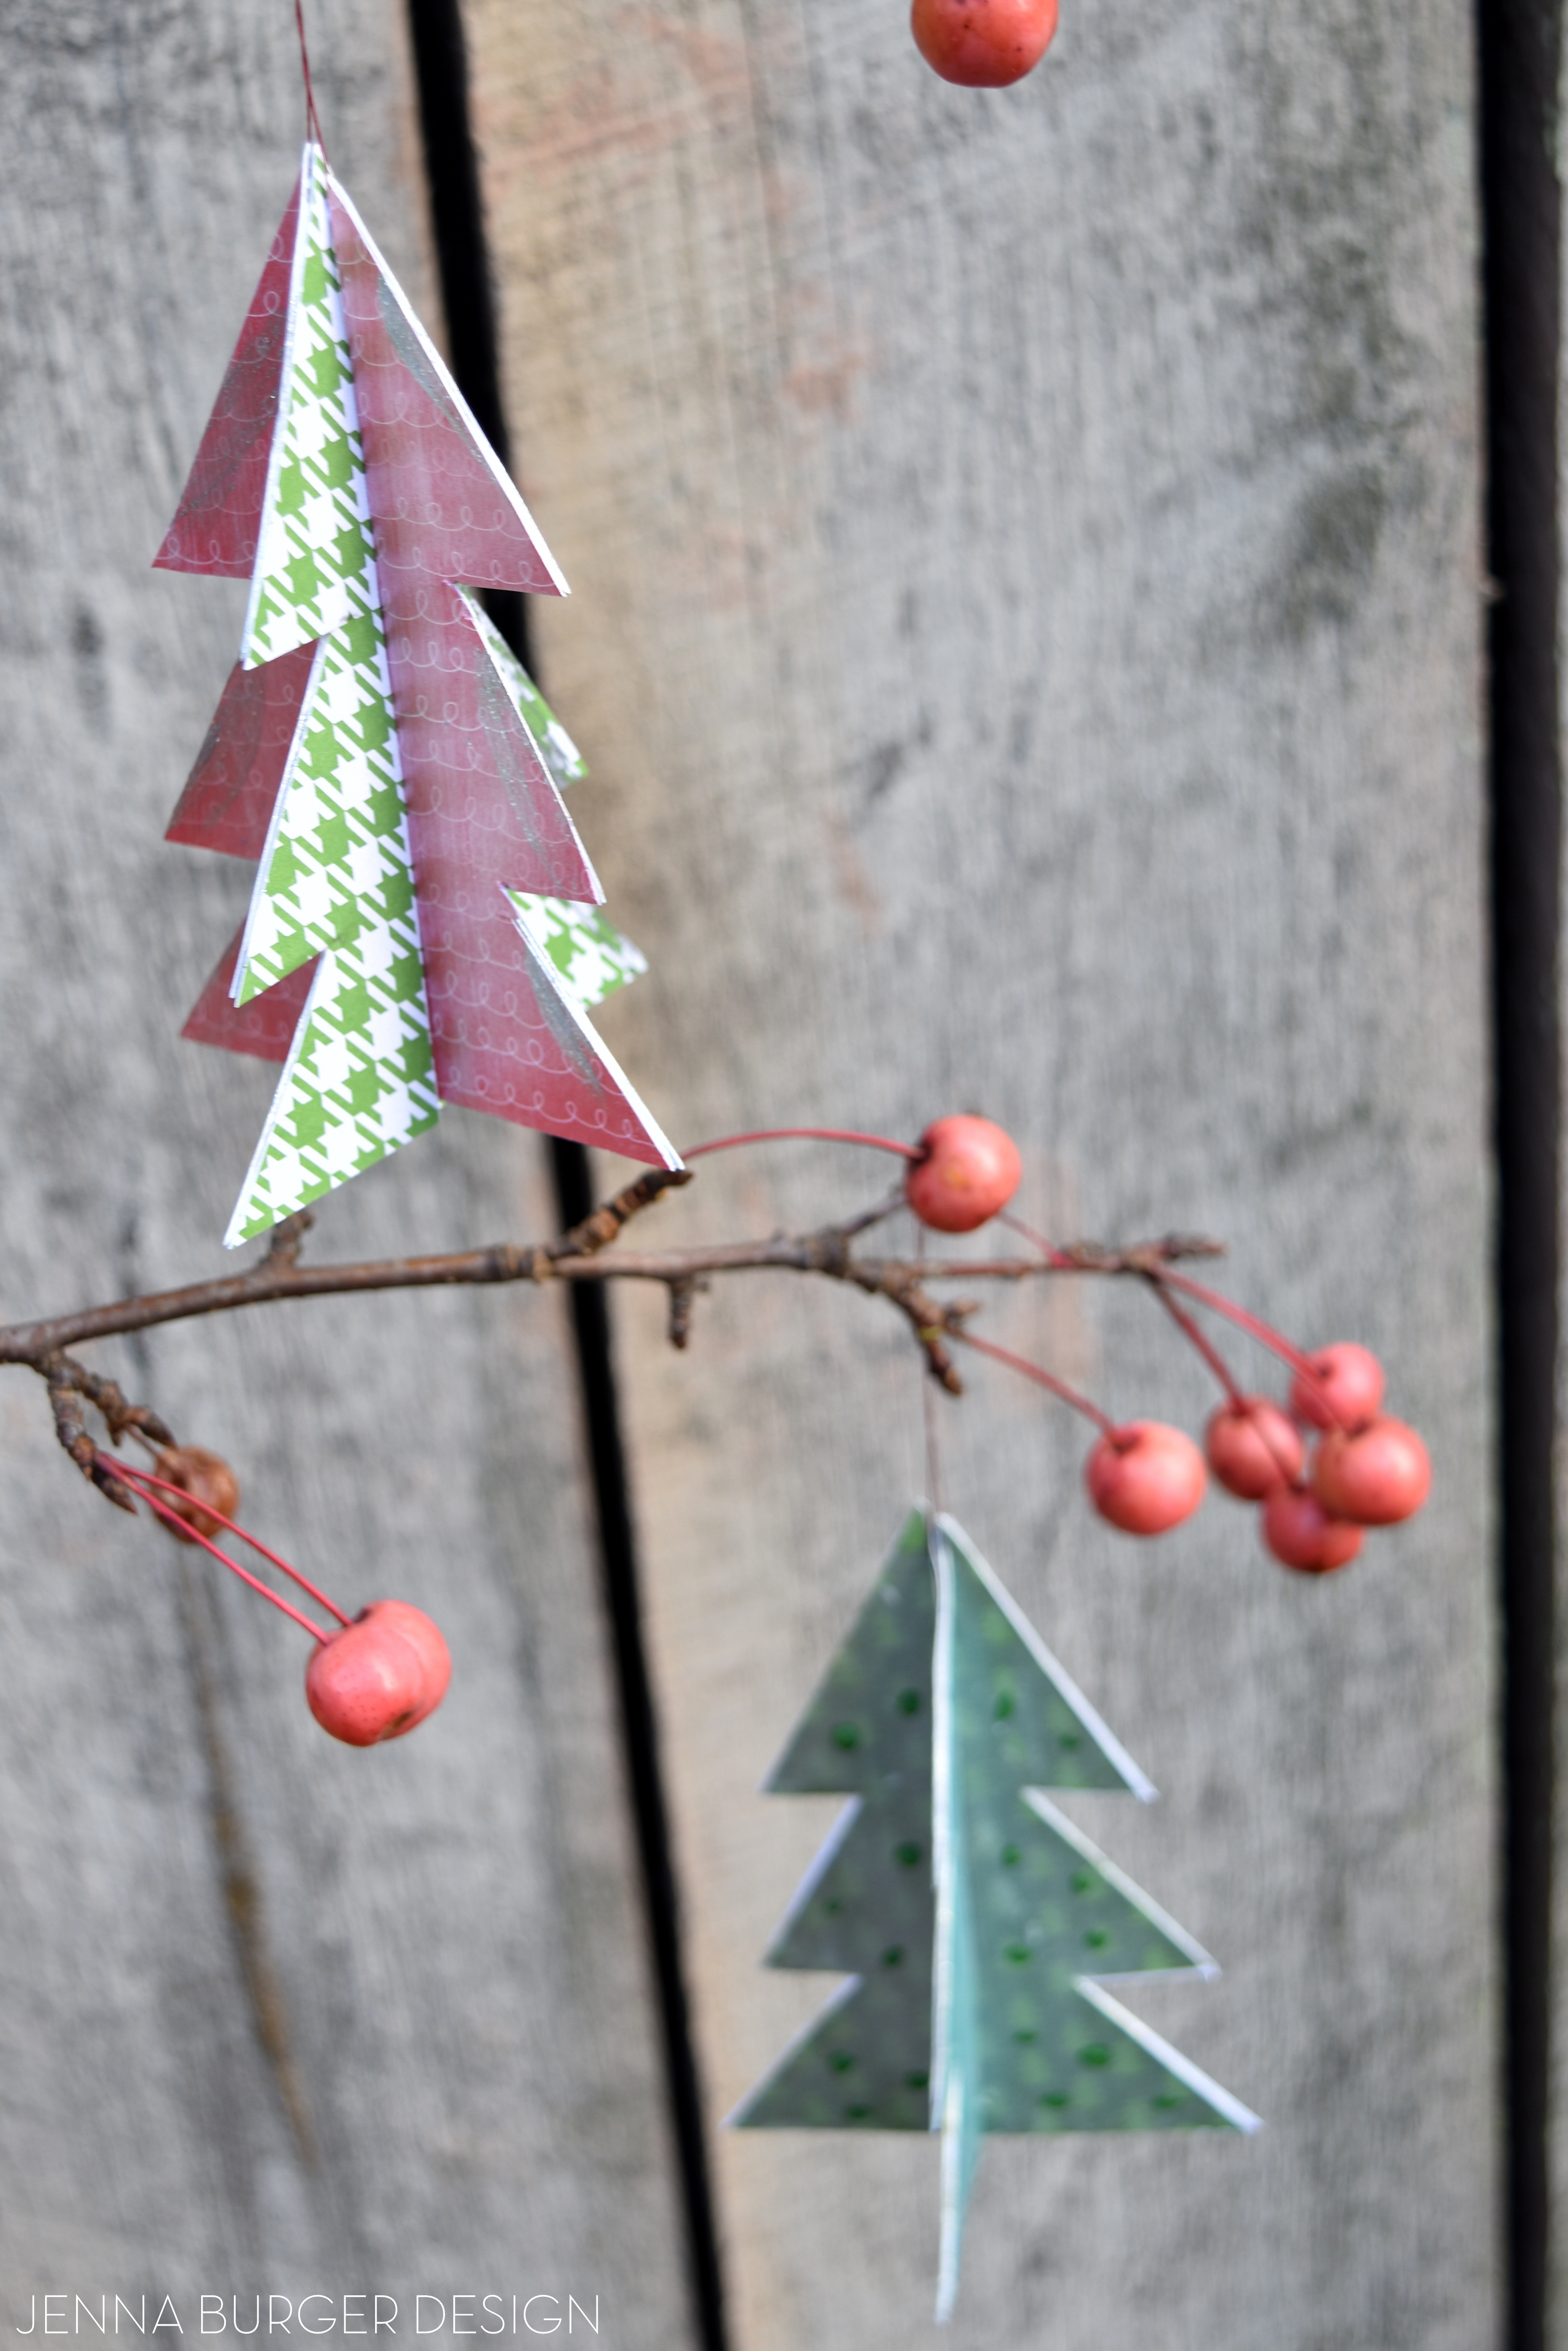
Last week while the kids had a half day of school, we got our craft-on and made these adorable Christmas Tree Ornaments with Mod Podge

DIY: Handmade Tree Ornament using Mod Podge by www.JennaBurger.com

Mod Podge by Plaid has a slew of products for decoupaging, but they just launched a new pearl formula that has an pearlescent sheen and it’s so pretty for creating a ‘mother of pearl’ effect.  When creating my handmade paper trees, the pearl Mod Podge gave the prettiest top coat overlay along with adding some some gold + glitter using FolkArt Multi-Surface paint.
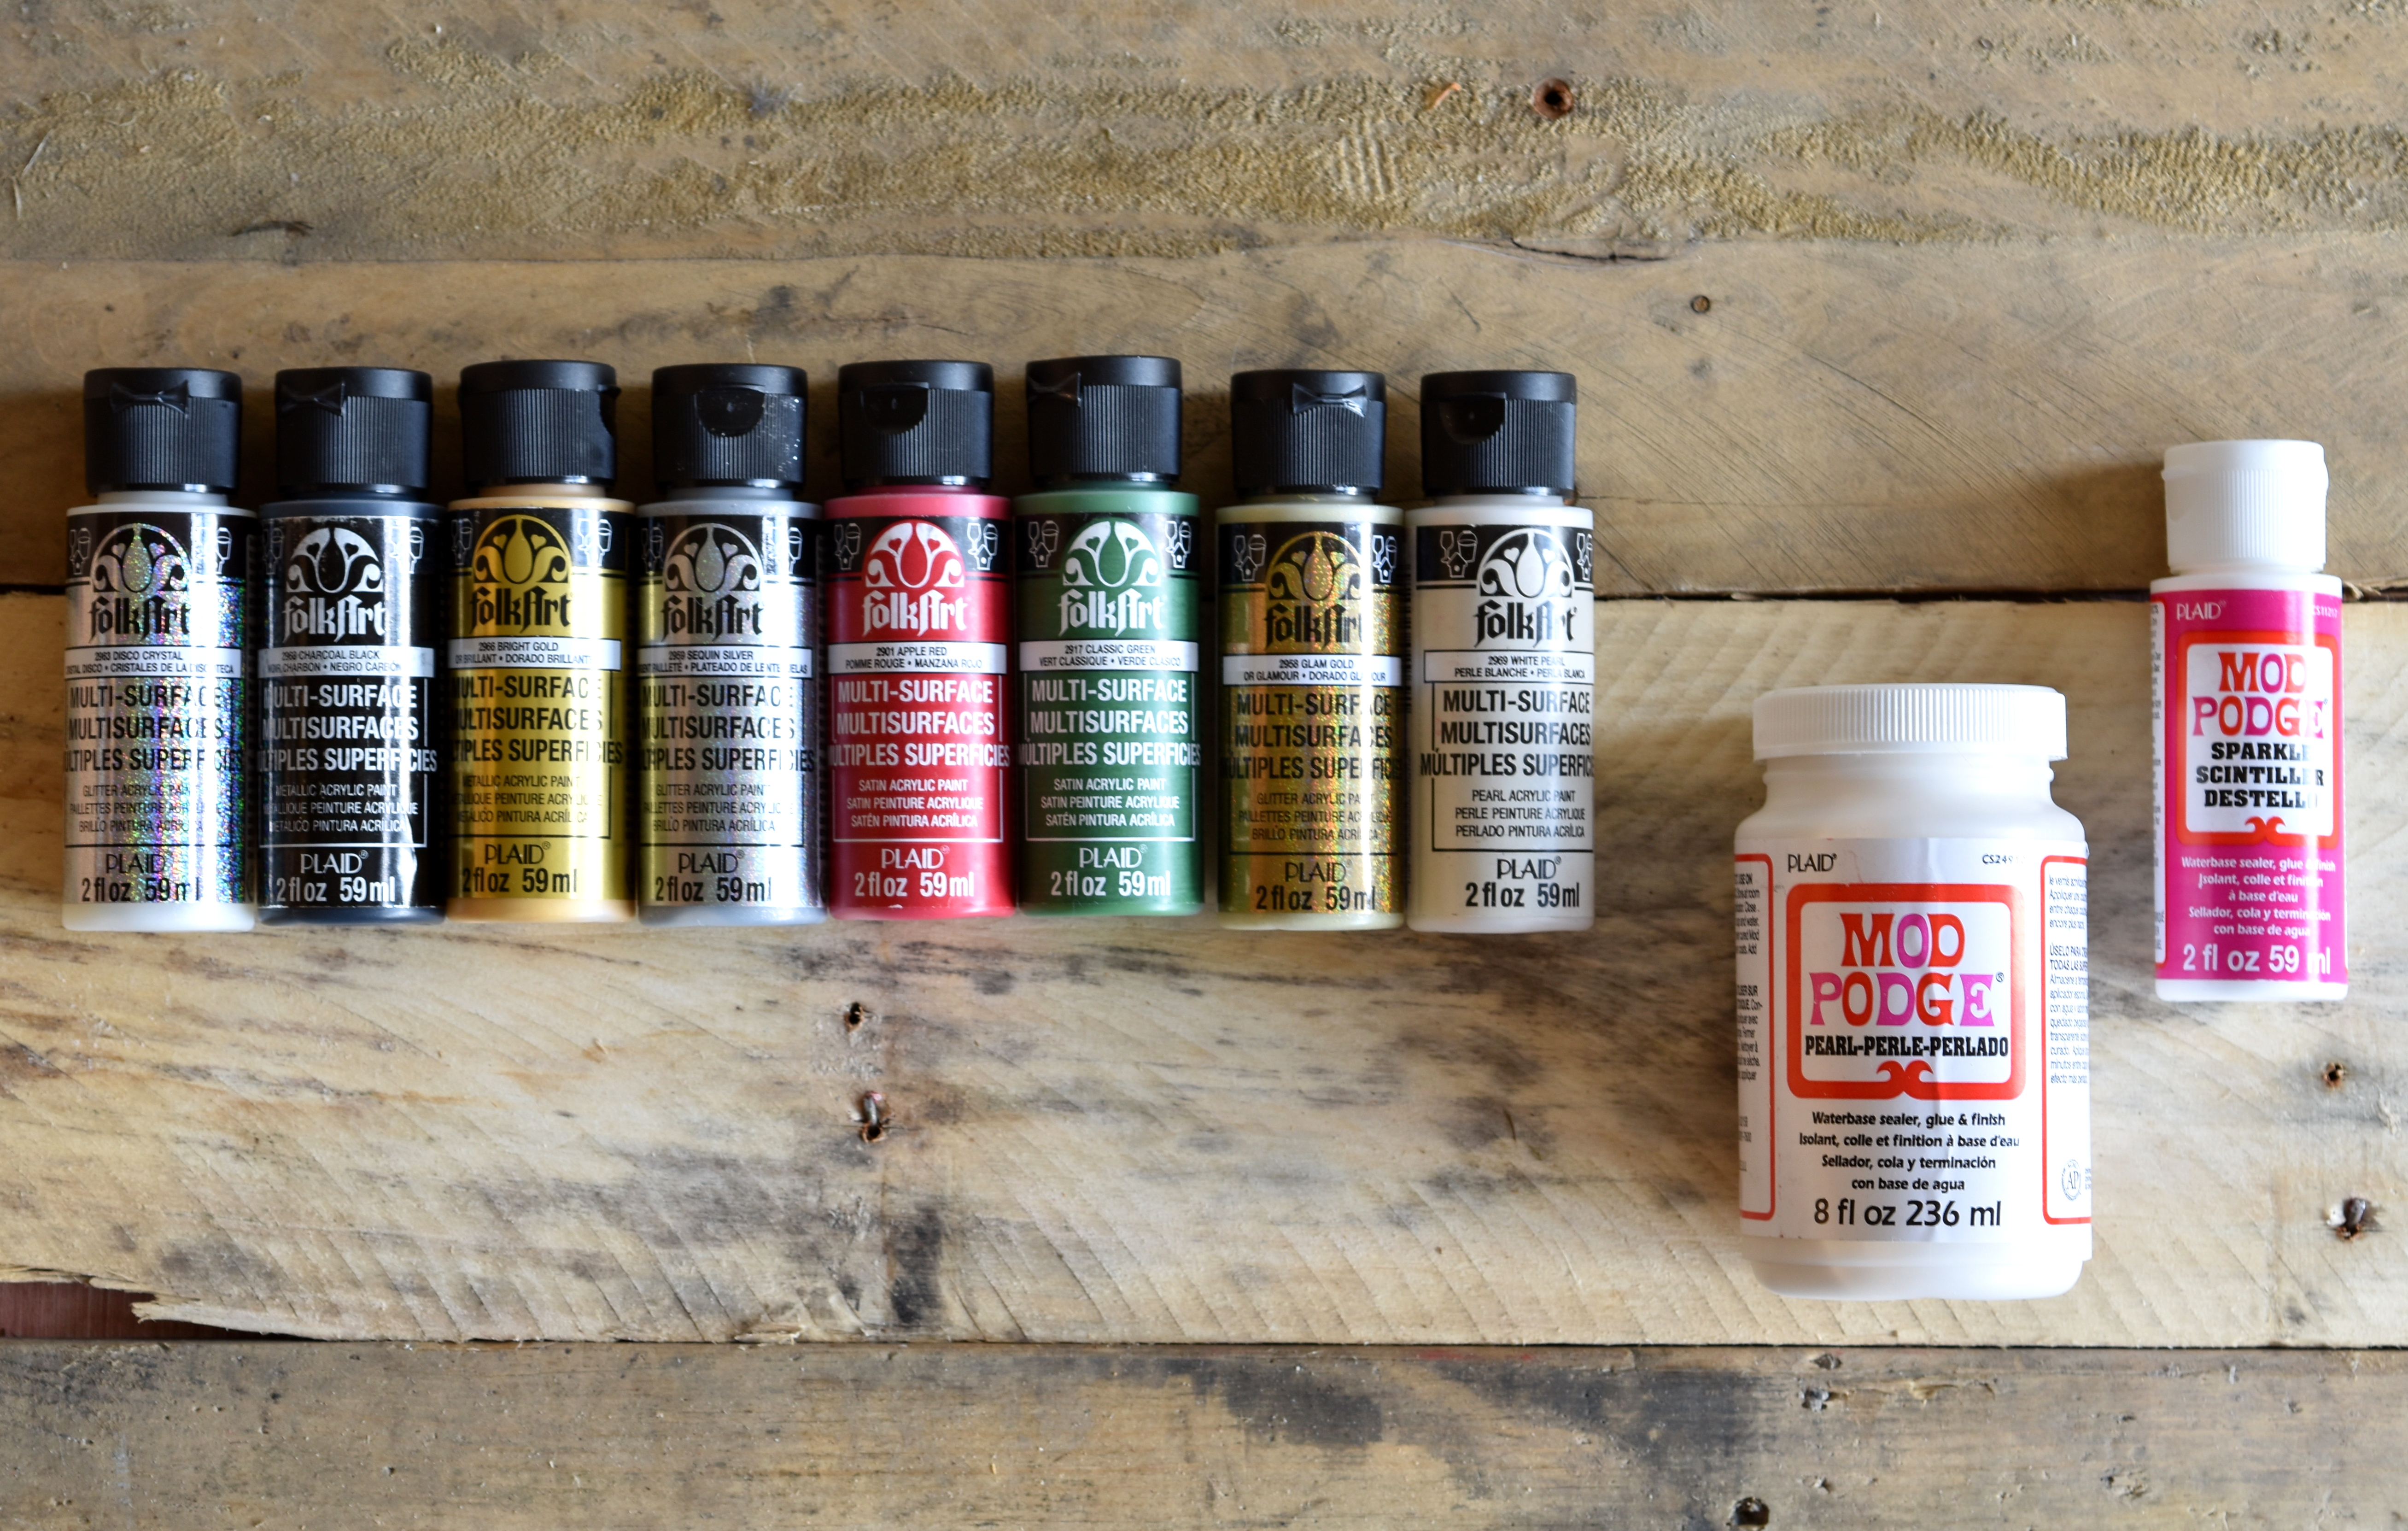
DIY: Handmade Tree Ornament using Mod Podge by www.JennaBurger.com

MATERIALS

> Mod Podge (pearl)
> FolkArt paints
> Cereal box (or thin cardboard)
> Scrap paper – holiday theme
> Scissors
> Needle + Thread

HANDMADE ORNAMENT

This project was real easy + enjoyable to make.  It took about a half hour and I was able to get the kids involved too.
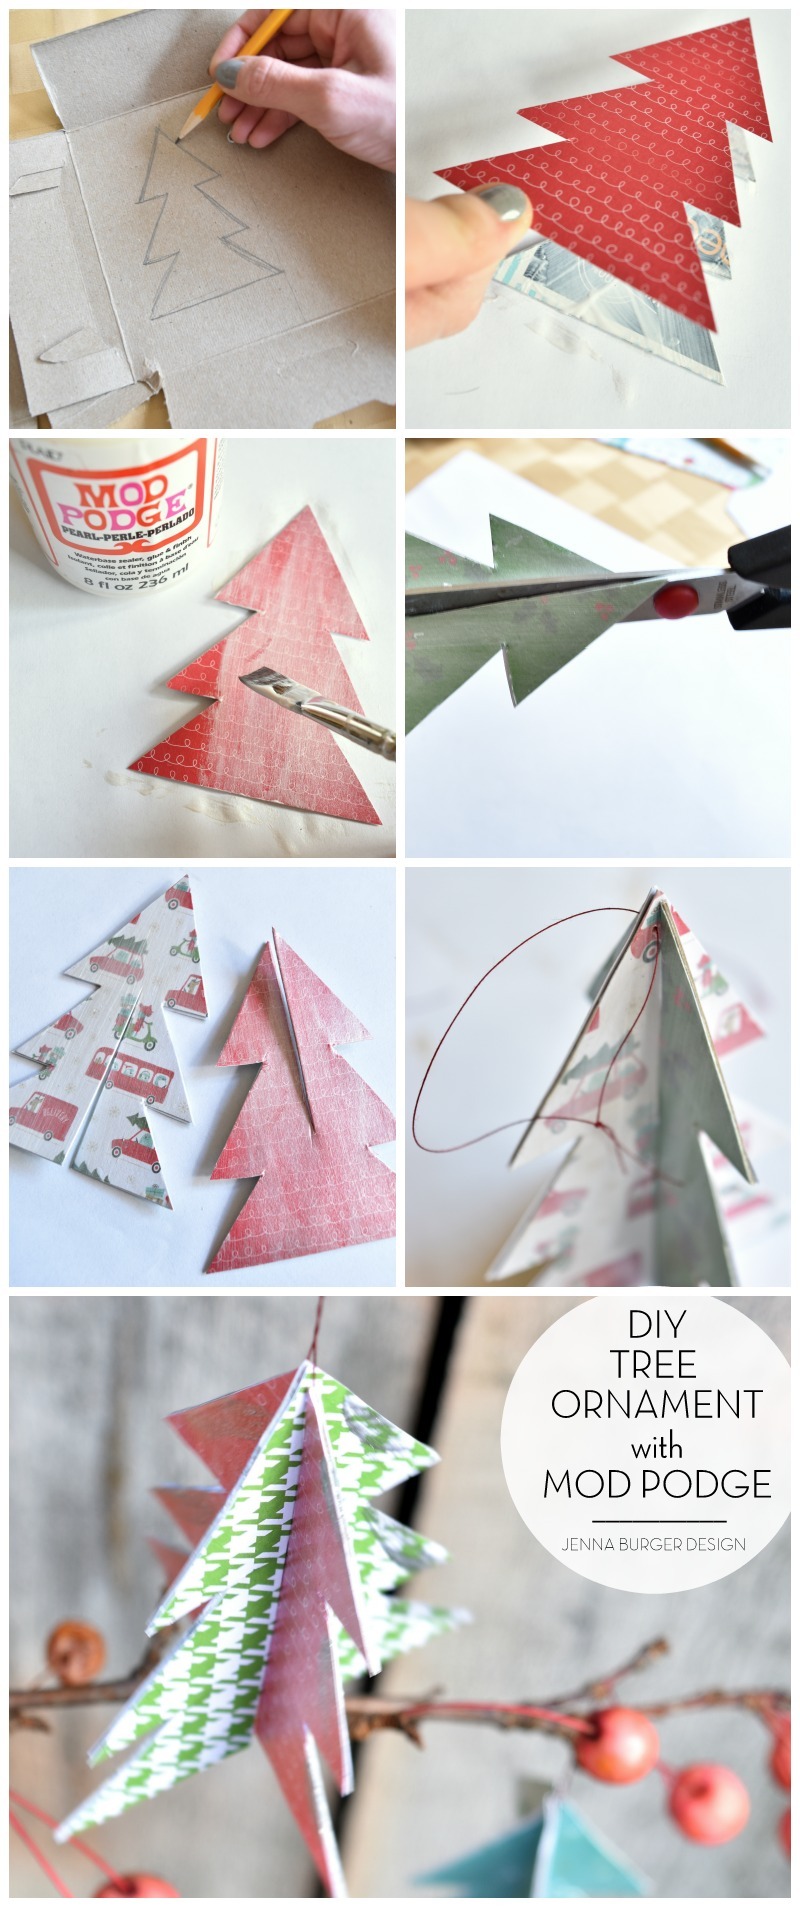
1

Using the inside of a cereal bar box, I started off this project by free-hand sketching a christmas tree about 3″ tall.

I cut it out and used it as a template for the other trees.
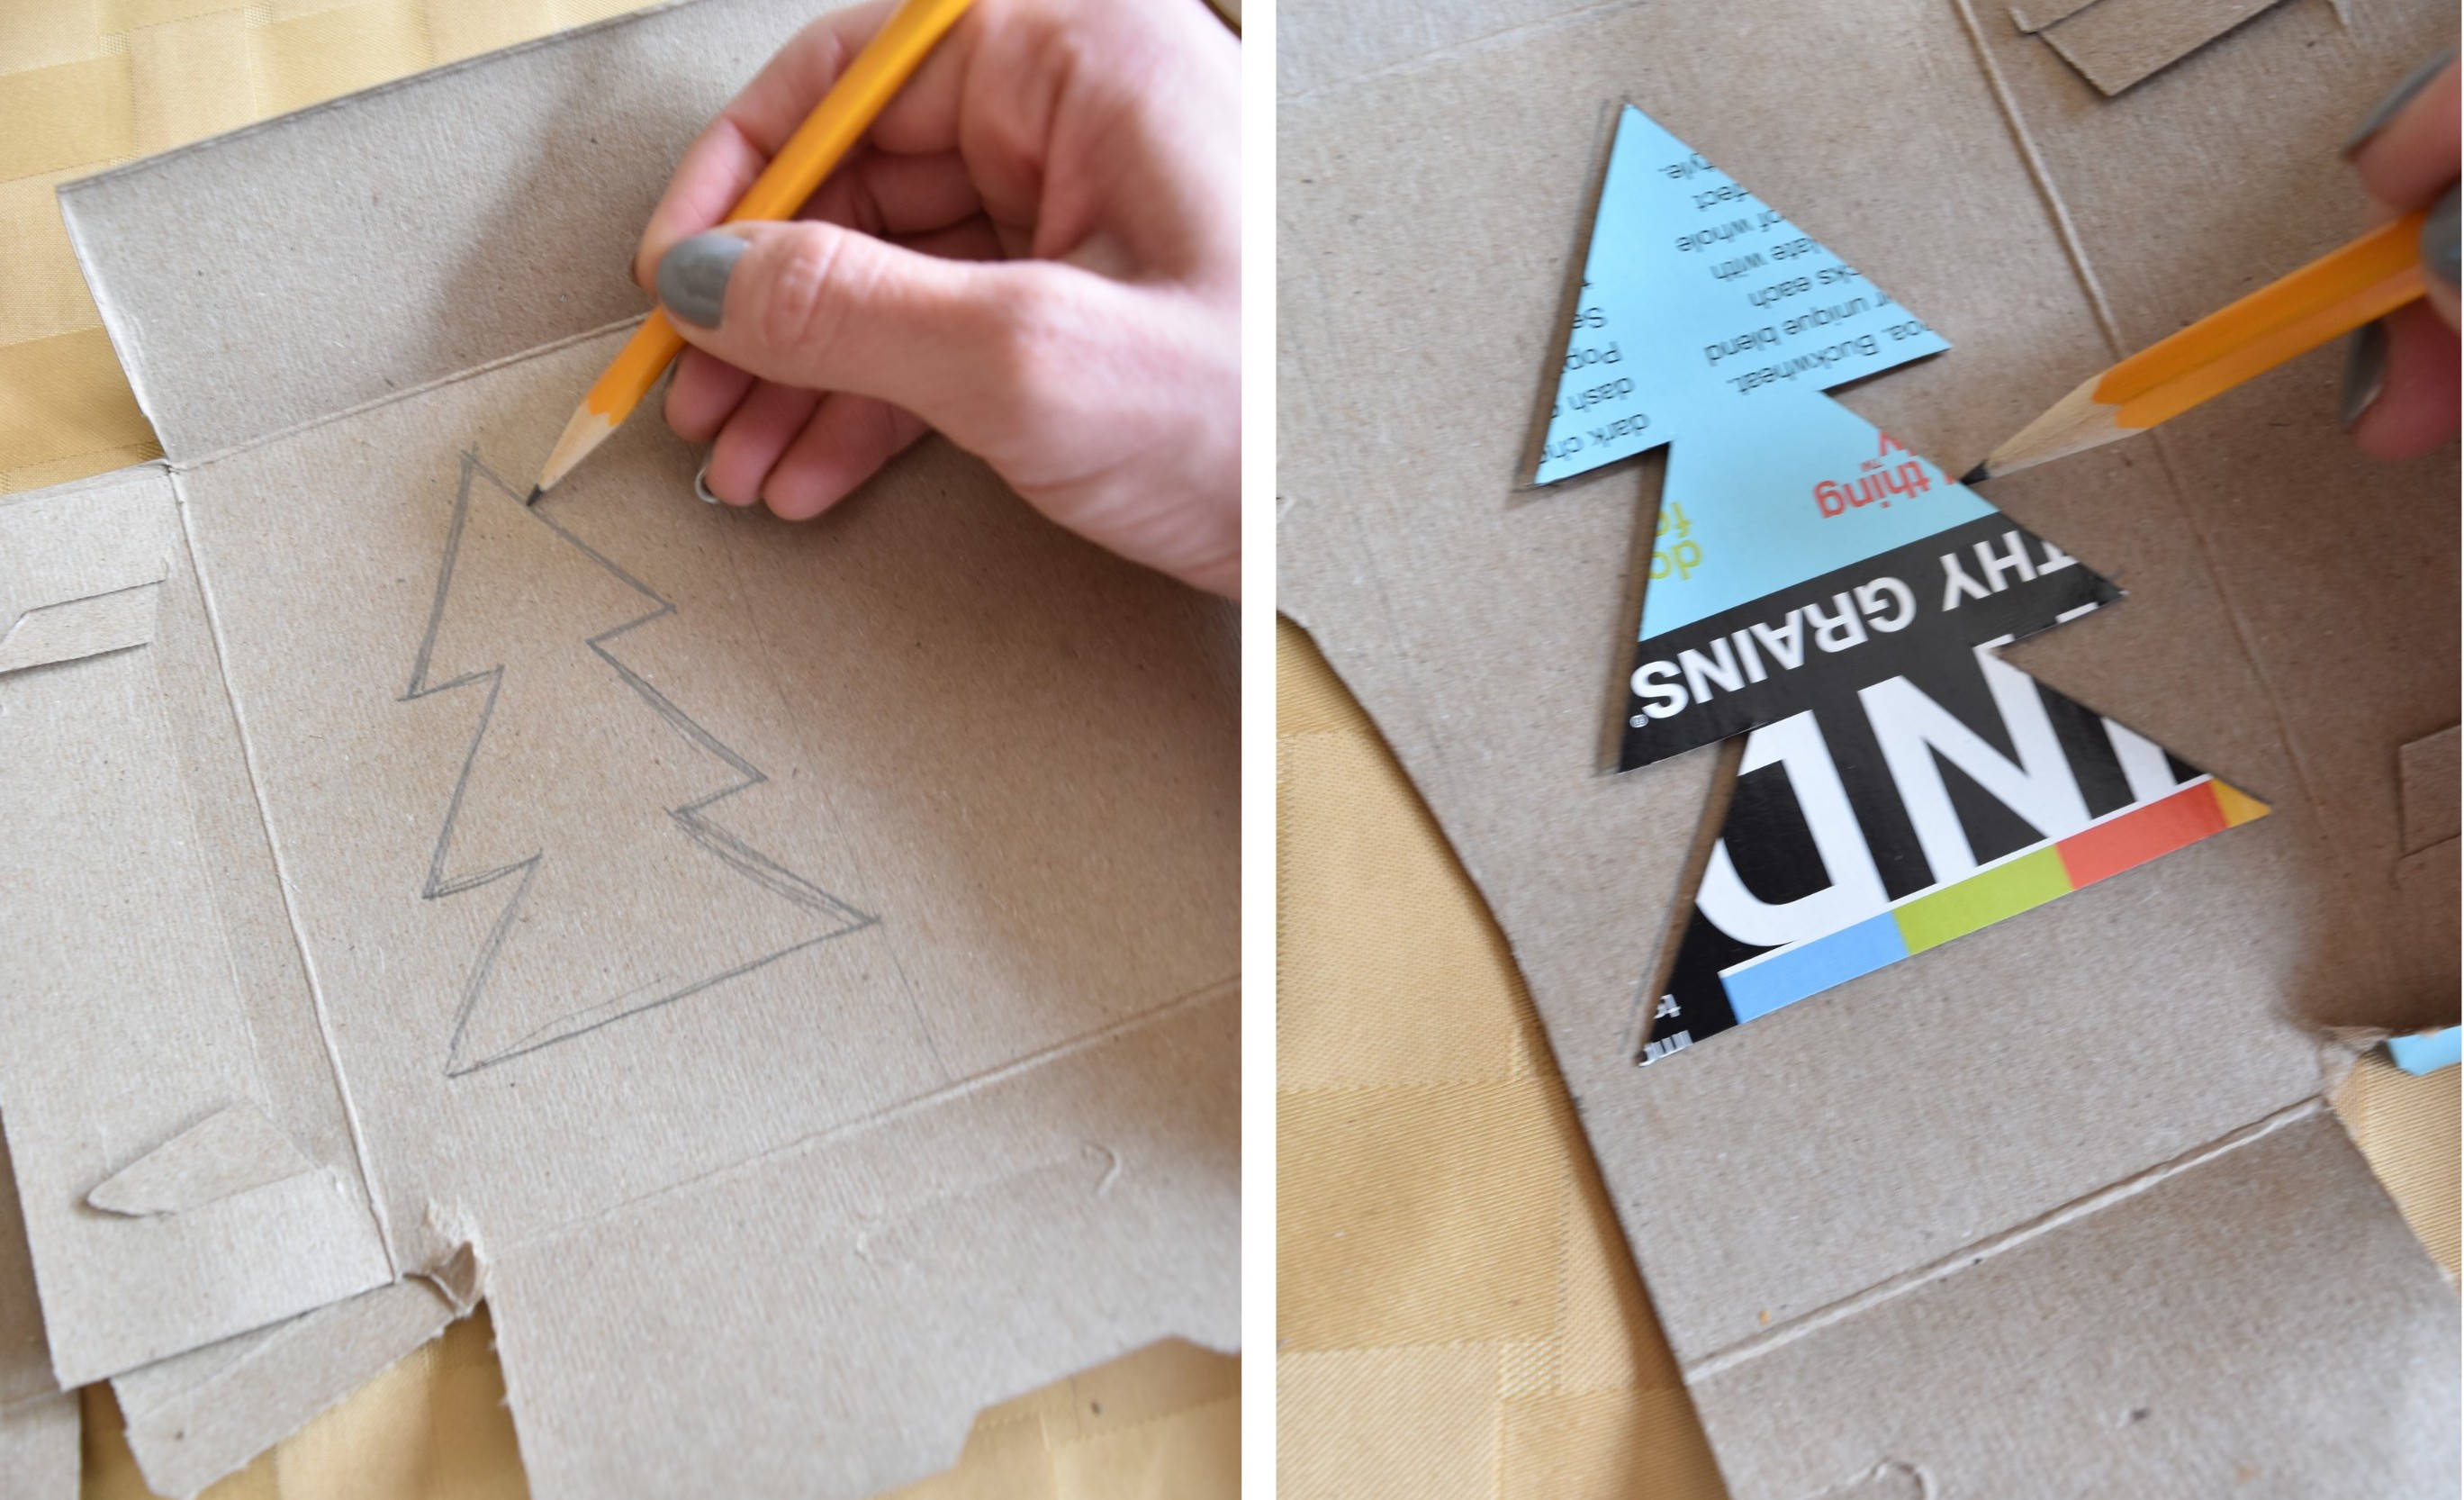
DIY: Handmade Tree Ornament using Mod Podge by www.JennaBurger.com

2

Once all the trees were cut,I I used the template and traced the tree outline of the holiday themes scrapbook paper.

Then it was time to have fun with the Mod Podge…

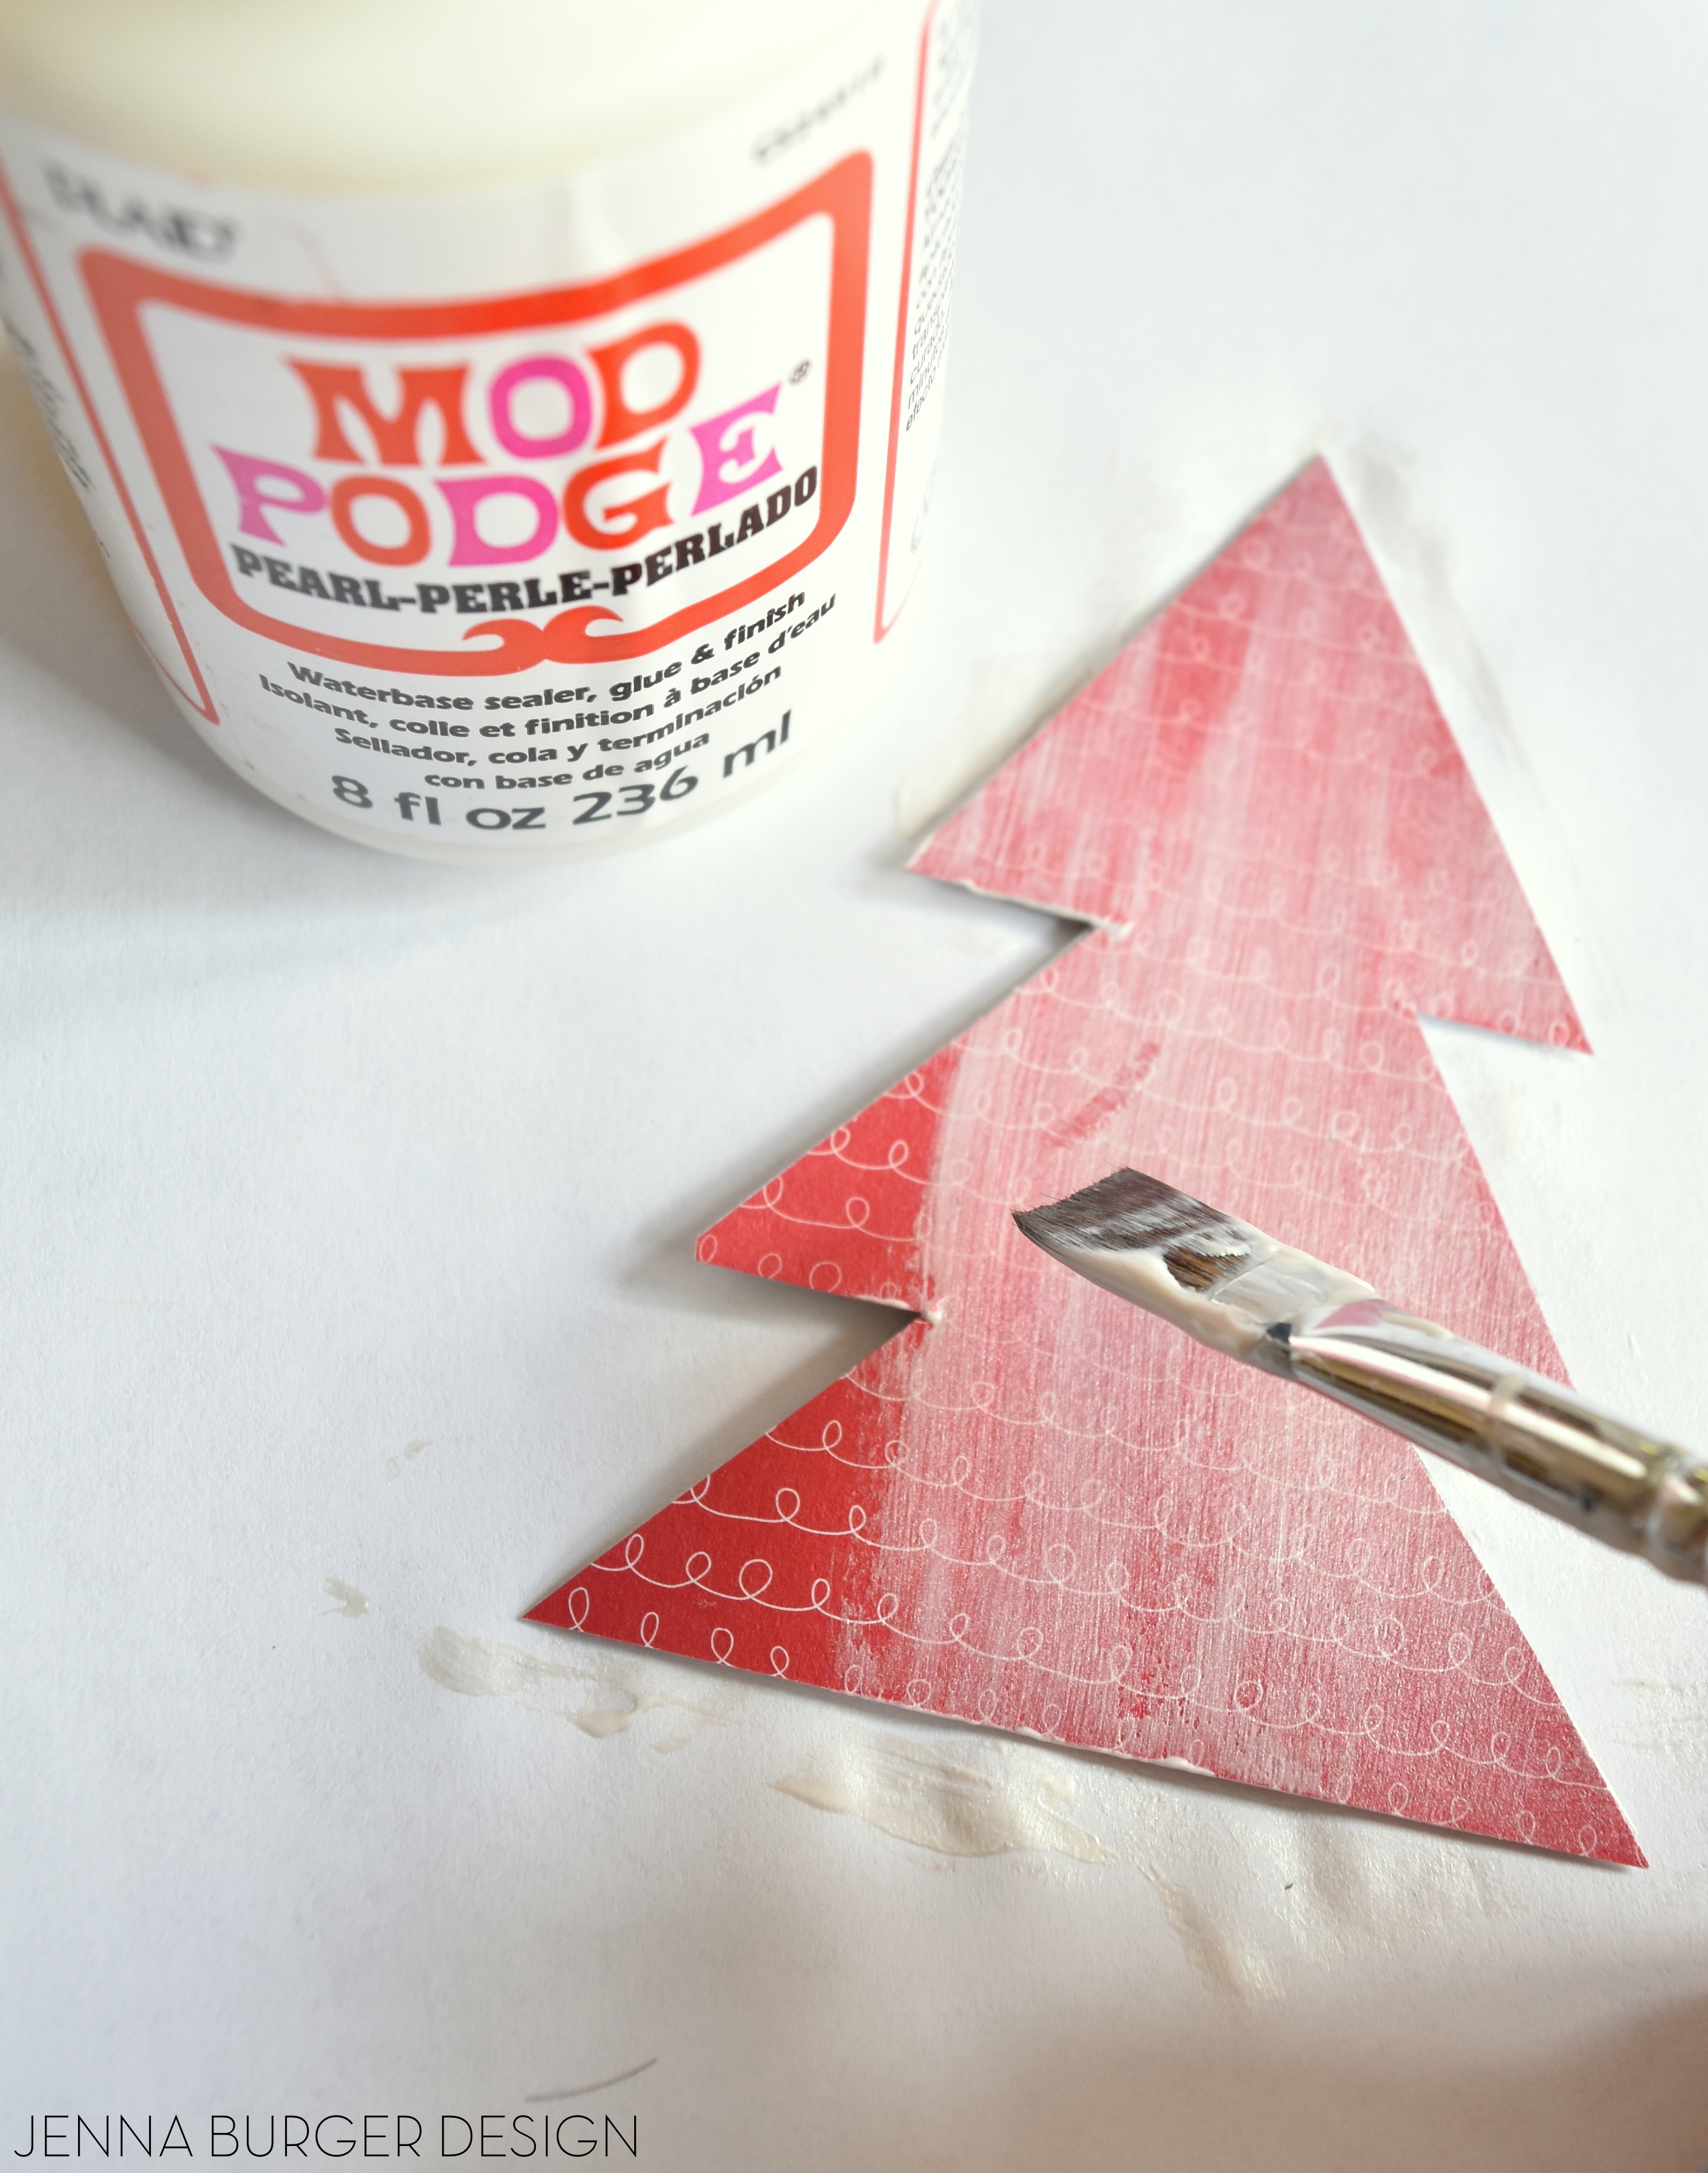
I applied a thin layer of Mod Podge to the cardboard layer and layed the cut scrapbook paper in place.

DIY: Handmade Tree Ornament using Mod Podge by www.JennaBurger.com

3

Then I applied another thin layer of Mod Podge over the pretty paper.

DIY: Handmade Tree Ornament using Mod Podge by www.JennaBurger.com

4

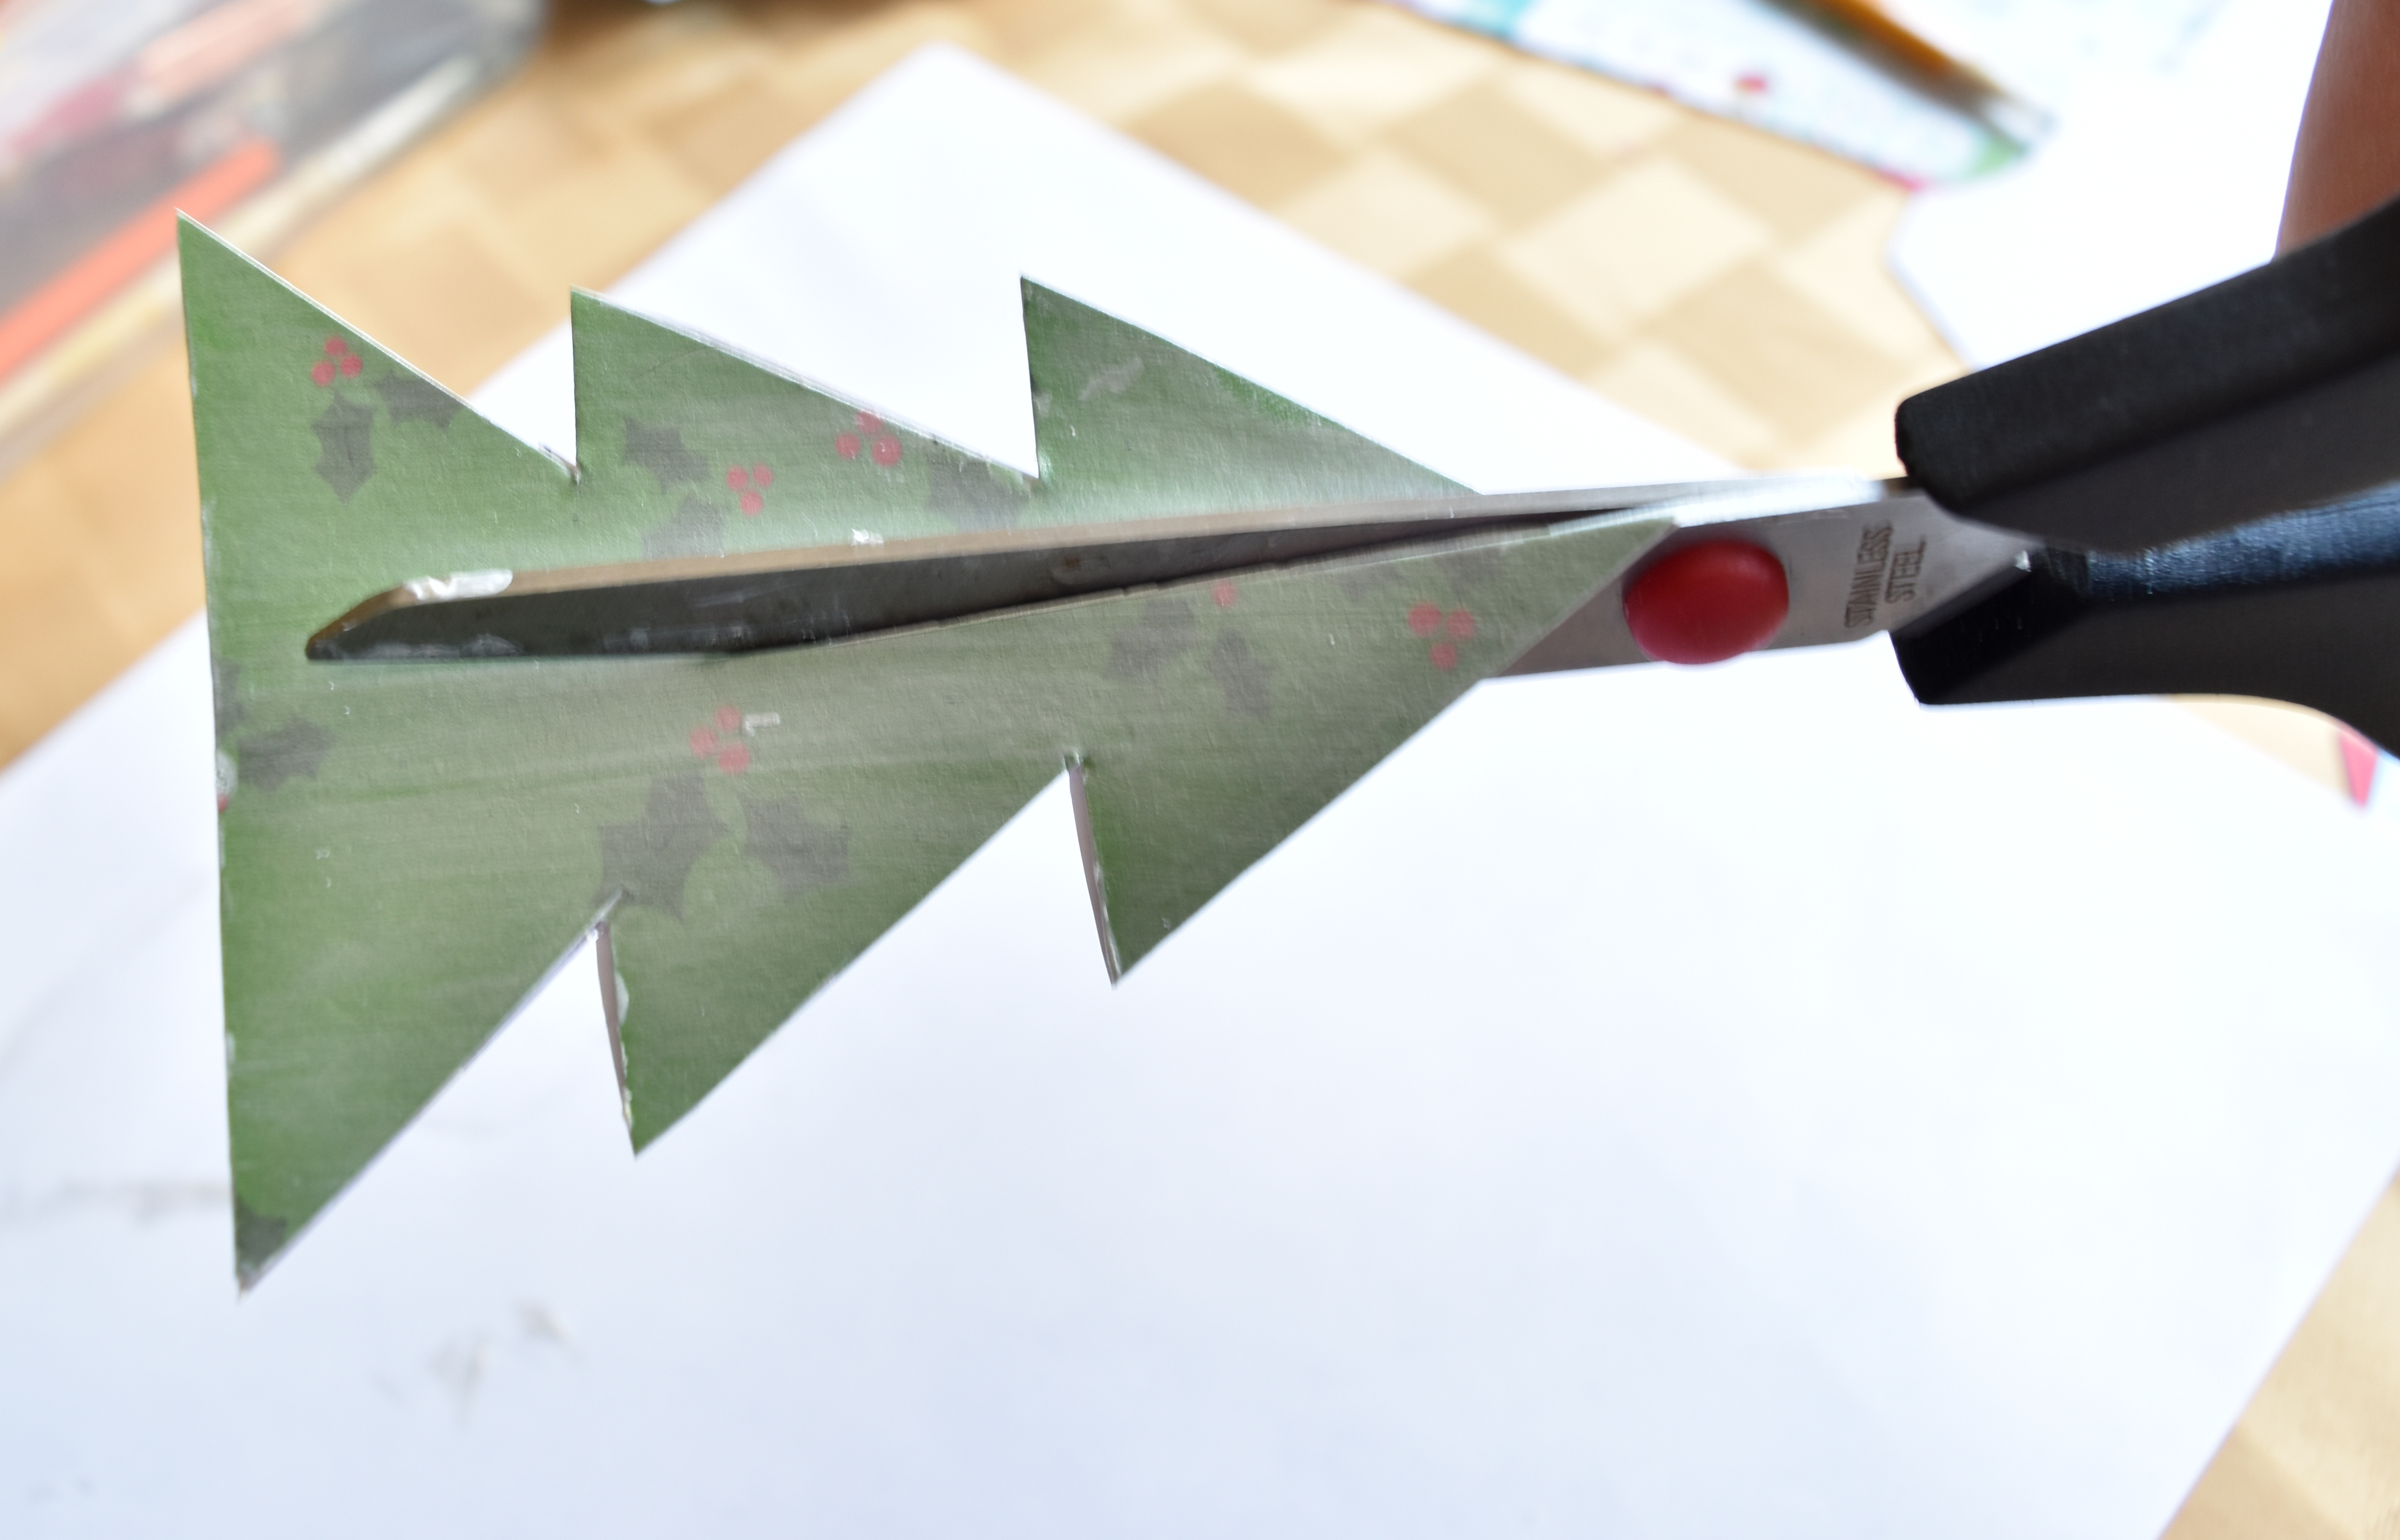
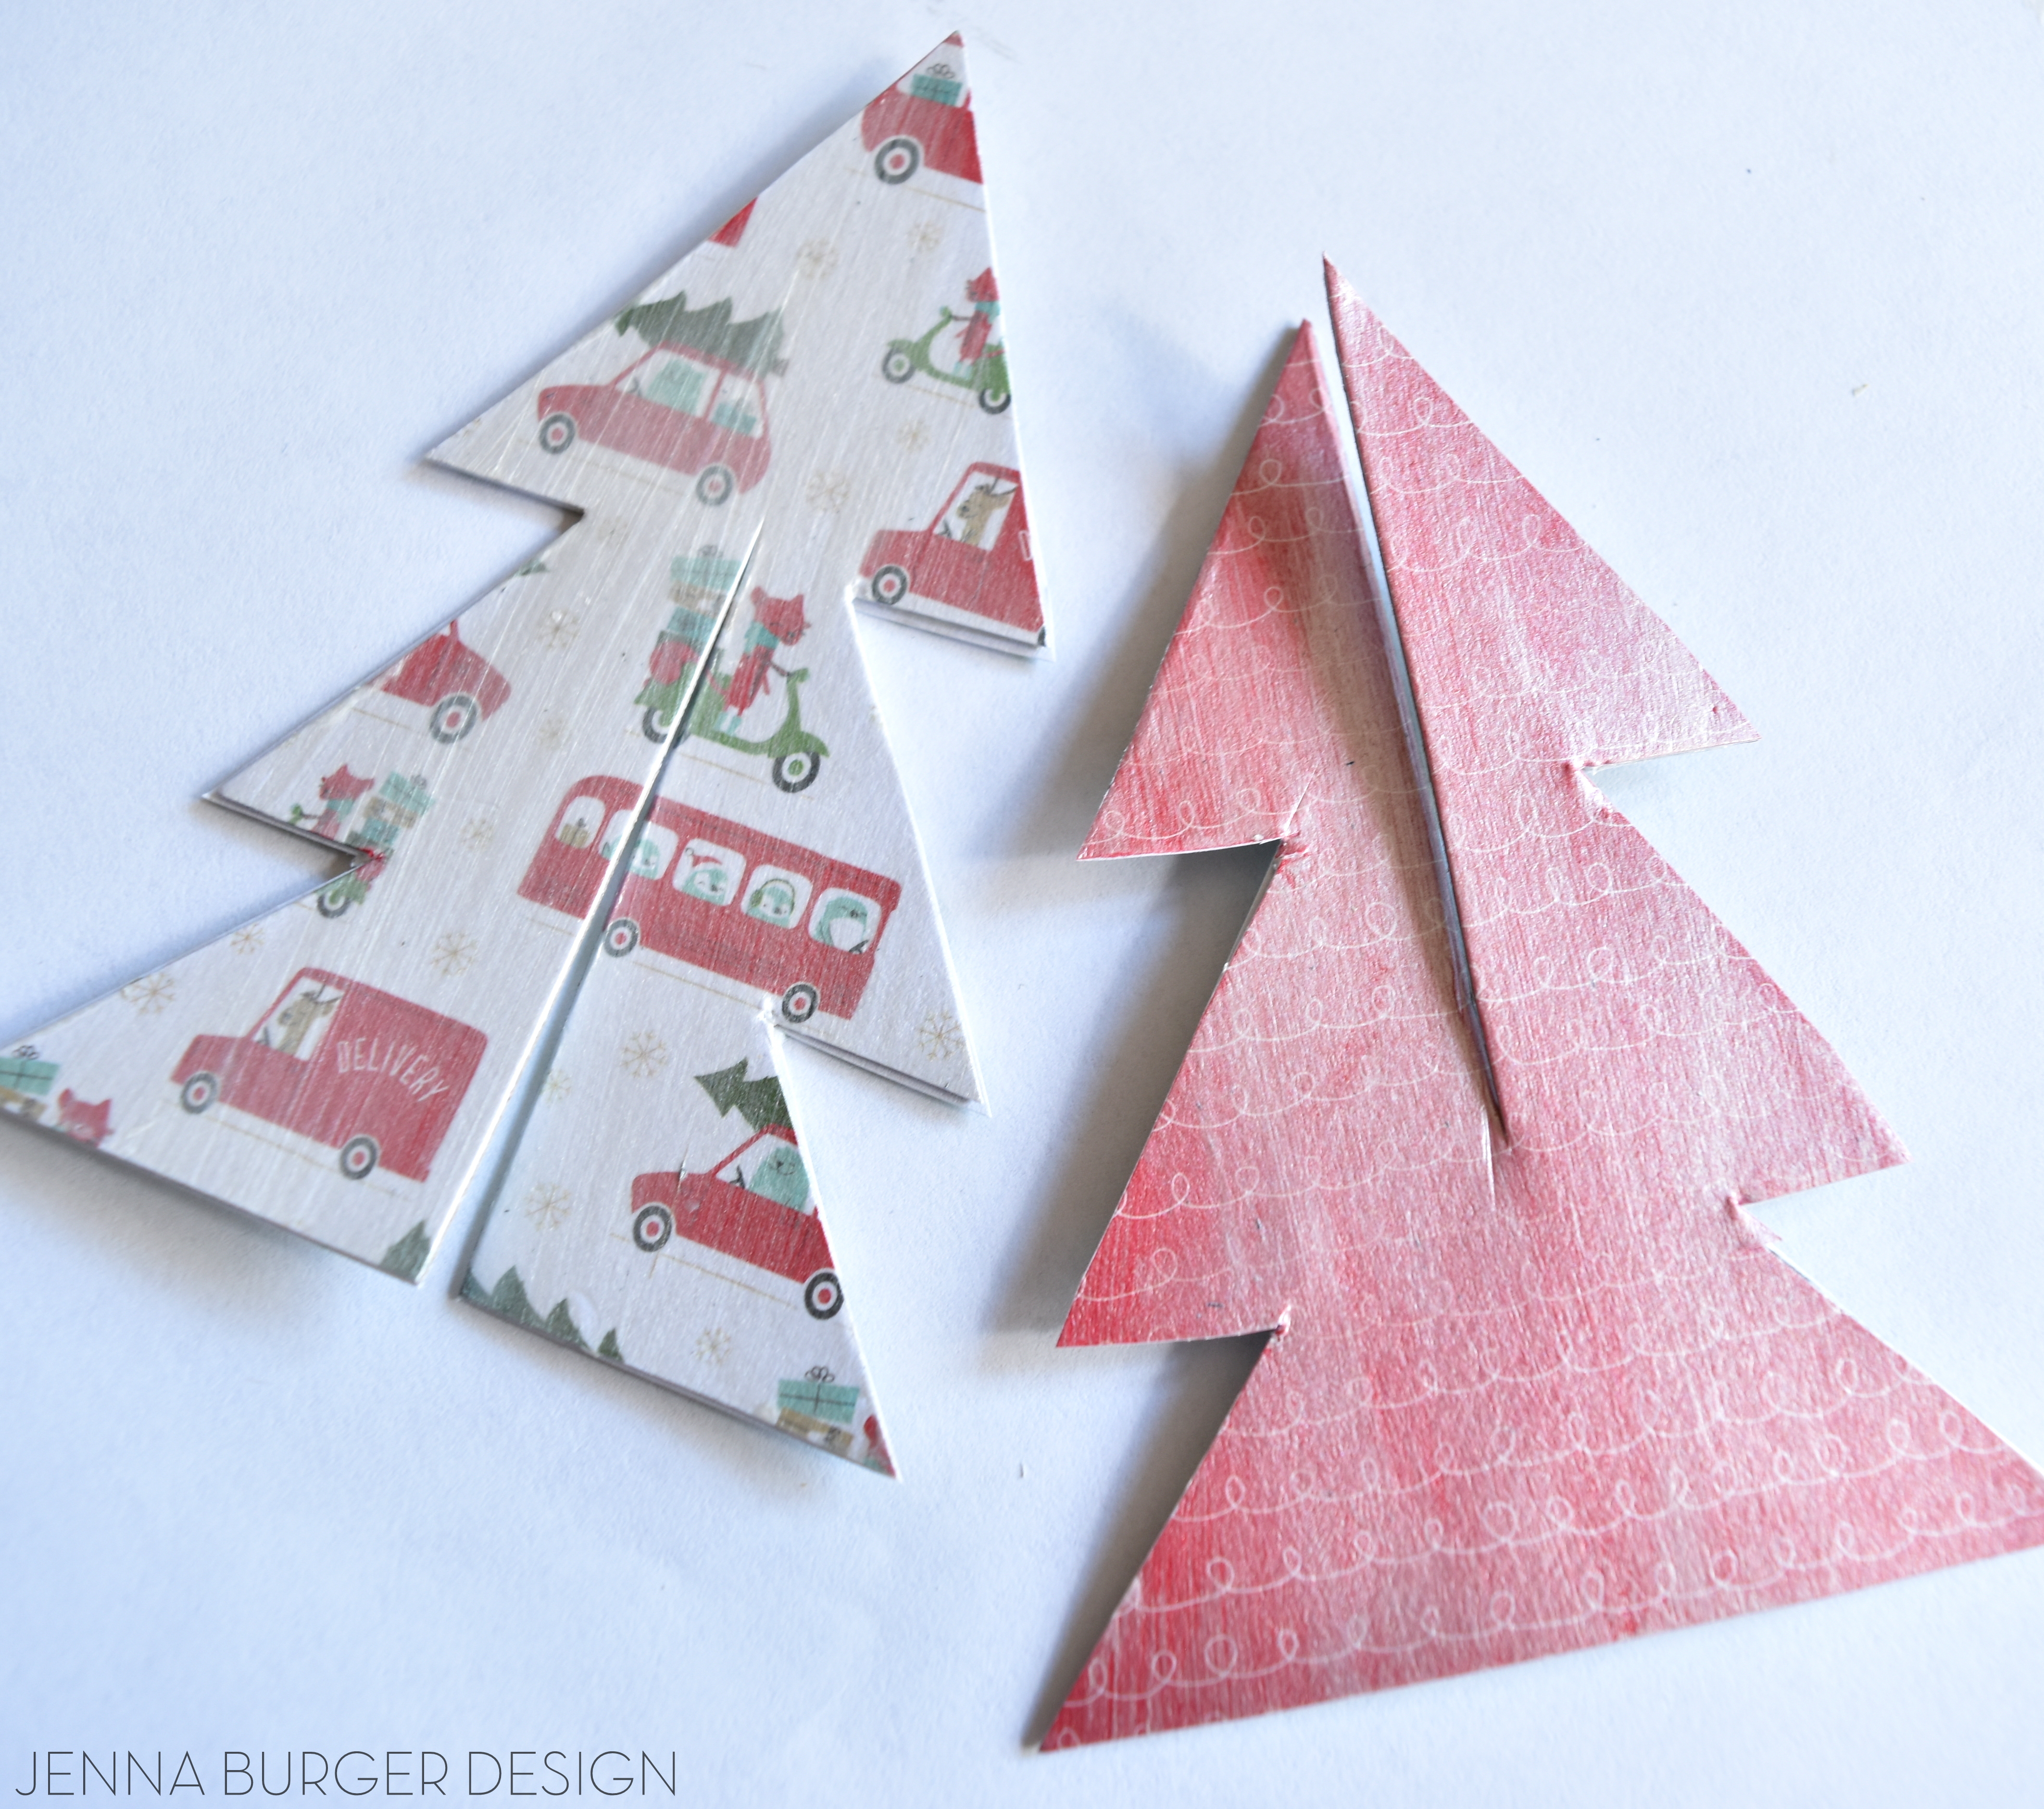
Once all the trees were dry, it was time to assemble them.  To do that, they would need to fit in to each other.

Using scissors, I cut a slit half way down the center of 2 trees – one top down, the other trunk up…

DIY: Handmade Tree Ornament using Mod Podge by www.JennaBurger.com

DIY: Handmade Tree Ornament using Mod Podge by www.JennaBurger.com

5

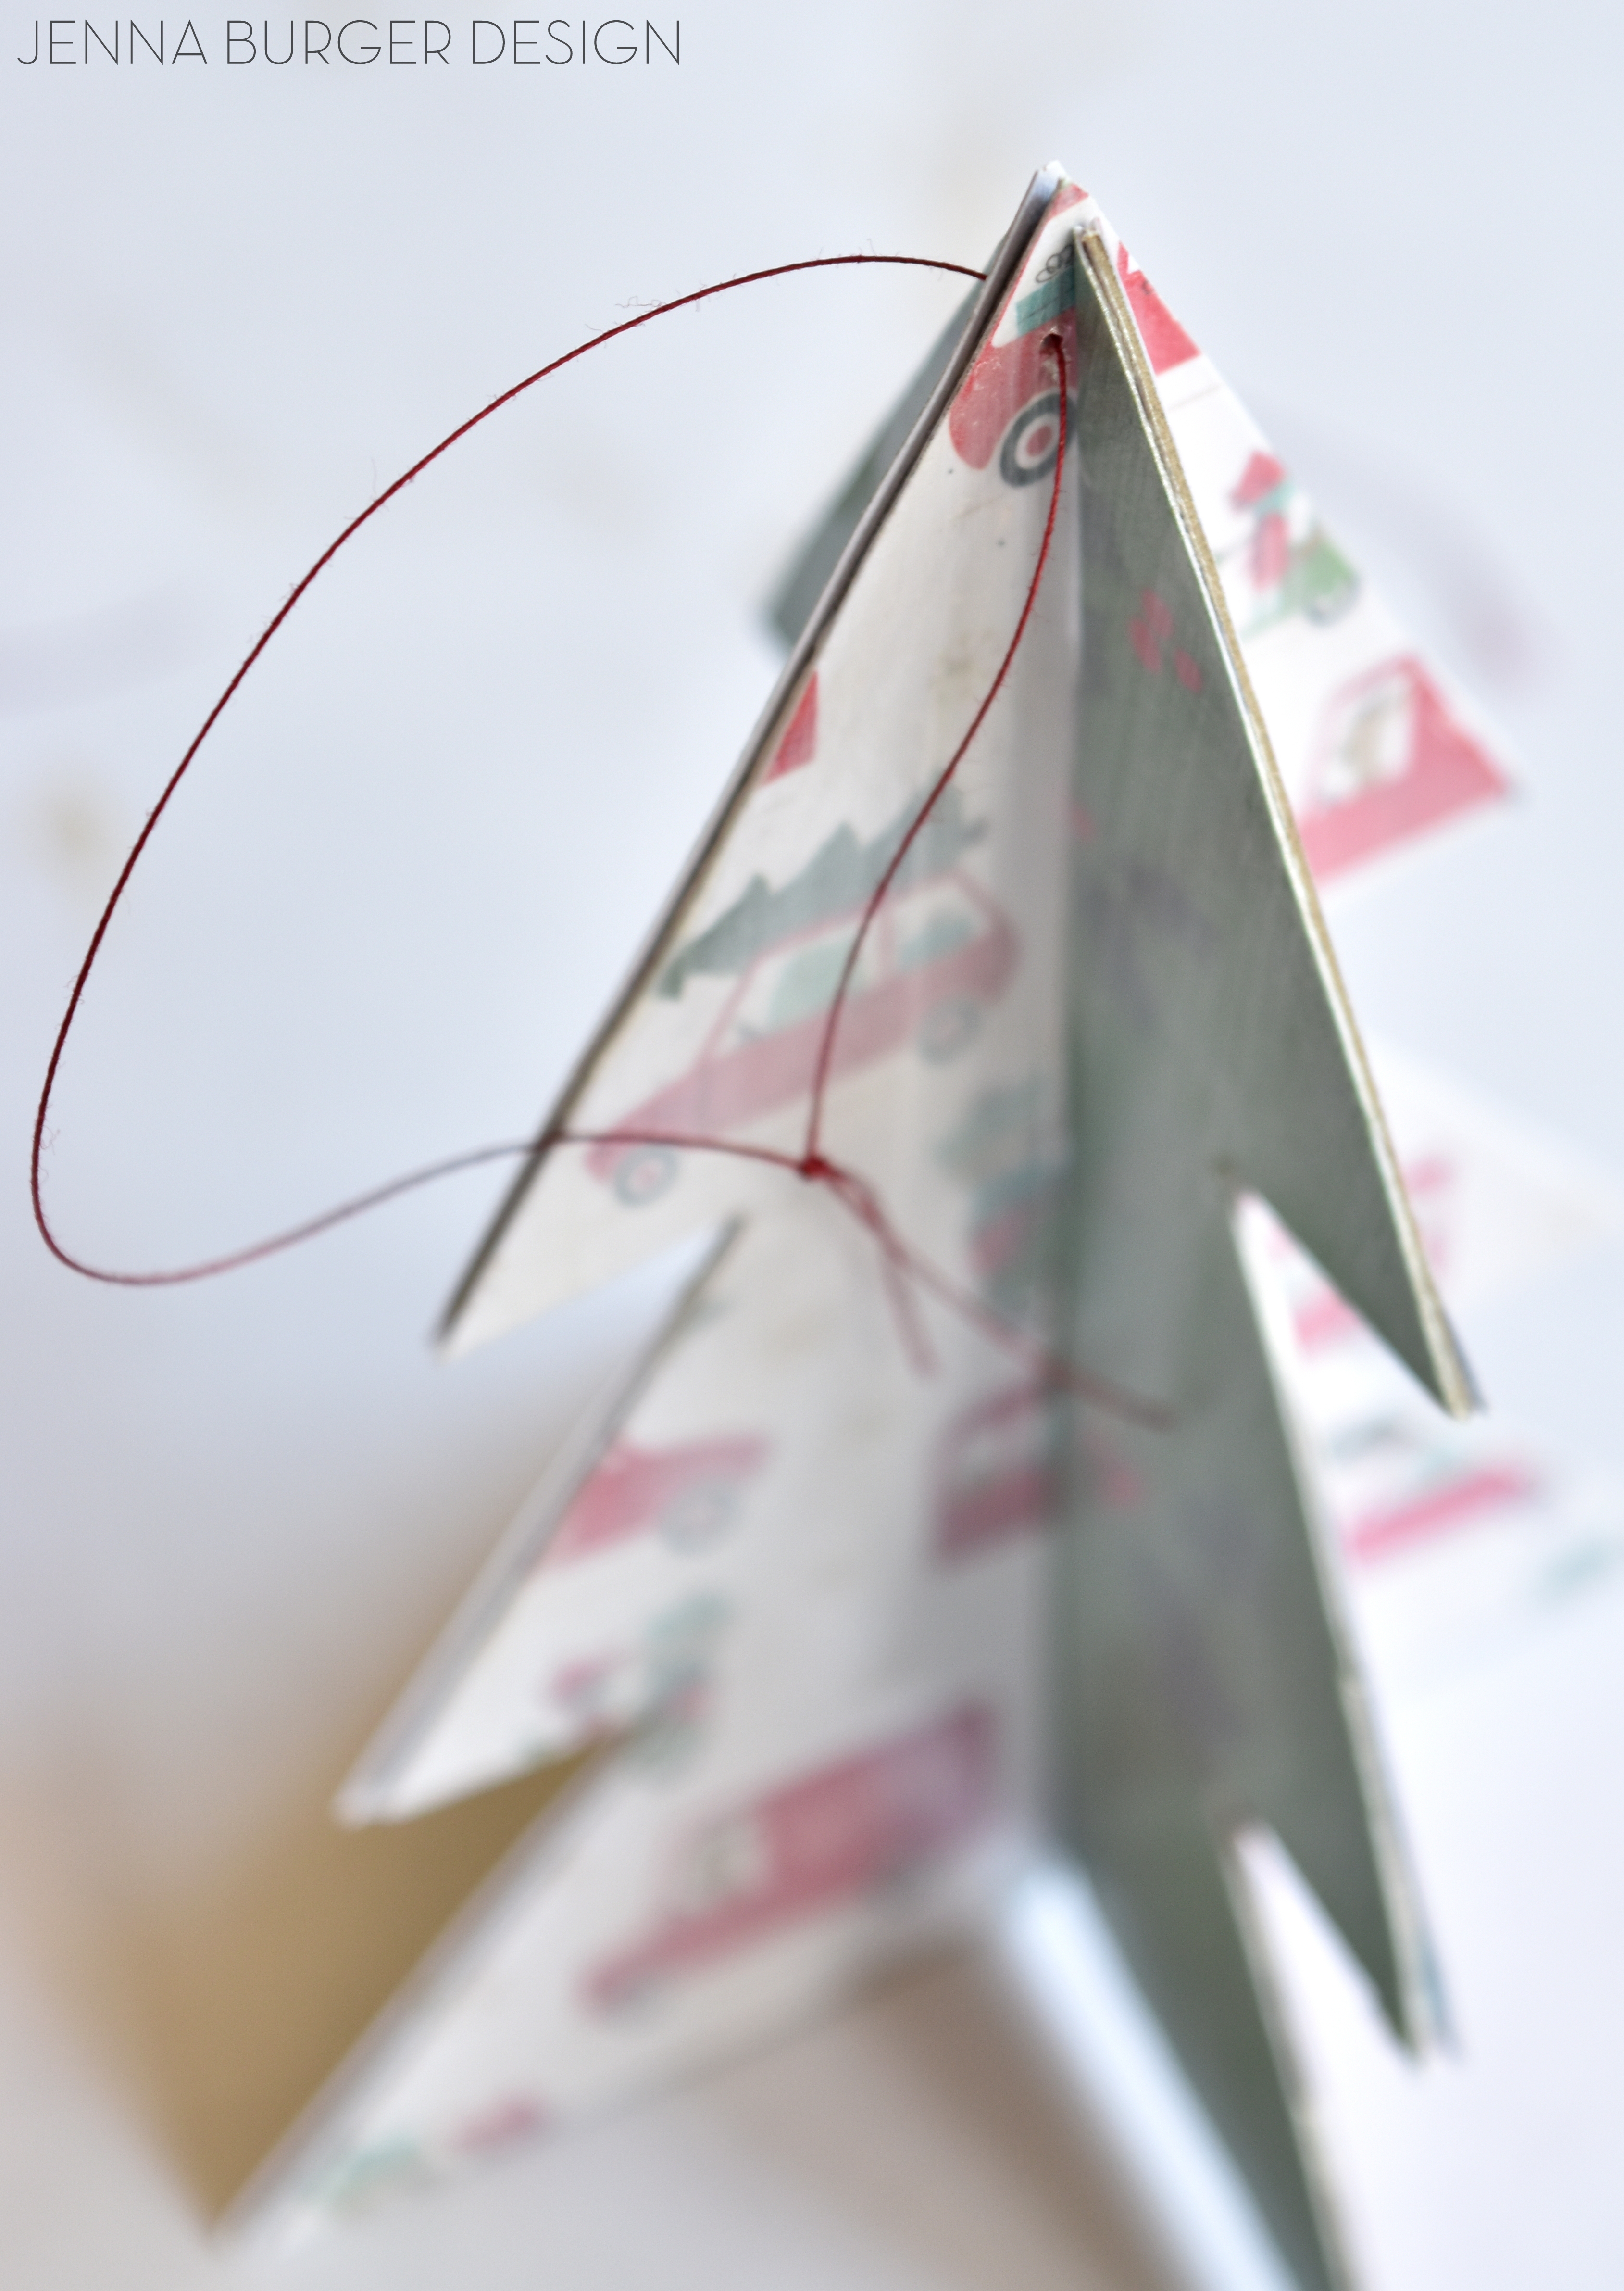
Assembly time… fit them together to make a three-dimensional tree.

This is when I jazzed them up using the FolkArt paints.  I added a little gold + glitter…

DIY: Handmade Tree Ornament using Mod Podge by www.JennaBurger.com

To hang, I used a needle to thread a thin string through the top of the tree.

DIY: Handmade Tree Ornament using Mod Podge by www.JennaBurger.com

The simplest + prettiest handmade ornament for the tree…

DIY: Handmade Tree Ornament using Mod Podge by www.JennaBurger.com

DIY: Handmade Tree Ornament using Mod Podge by www.JennaBurger.comRECAP

or to pin for later…

DIY: Handmade Tree Ornament using Mod Podge by www.JennaBurger.comCheck out more products + DIY creations by Plaid on Pinterest, Facebook, and Instagram!

I wish you a wonderful season of decorating + Happy Holidays!

Burlap Candy Corn Pennant

DIY Craft: Burlap Candy Corn Pennant. Simple, Inexpensive, and Fun! Perfect for Halloween! Tutorial @ www.jennaburger.com

One day I’m writing about upcoming trends for the coming year, the next day I’m sharing a cutesy Halloween craft.  You truly never know what you’re going to read next or what I’ll be in the mood to inspire you with… always new + interesting!

Halloween is just a couple weeks away and upon being inspired by the fun festive decor in the Target Dollar Bin, I spruced up my Fall porch with a simple, inexpensive, and fun burlap pennant to look like candy corn… so yummy, don’t you just want to eat it?!

DIY Craft: Burlap Candy Corn Pennant. Simple, Inexpensive, and Fun! Perfect for Halloween! Tutorial @ www.jennaburger.com

I really am not a crafty gal but I just couldn’t resist making this pennant.  I could have spent the few dollars to buy it, but since I had all the materials on hand from past projects, I decided to DIY it!

MATERIALS

>1/4 yard burlap
>cardstock / heavy paper – I used a manila folder (for pennant template)
>craft paint in the colors of white, orange, and yellow
>sponge brush
>twine
>scissors
>toothpick + tape

1

Using cardstock or heavy paper (I used a manila folder), cut out a template for the pennant ‘flag’.  Size is up to you.  My template is about 5.5″  x 8″.  In all, I created (8) pennants, then cut them out with sharp scissors, and ironed them flat.

DIY Craft: Burlap Candy Corn Pennant. Simple, Inexpensive, and Fun! Perfect for Halloween! Tutorial @ www.jennaburger.com

2

Dividing each pennant in 3 sections, I used a sponge brush to paint on the orange in the middle section first, then followed it with the white and yellow paint at the top and bottom.

To create a straight line, I cut out a piece of cardstock (I used a manila folder again) and painted up to the line.

DIY Craft: Burlap Candy Corn Pennant. Simple, Inexpensive, and Fun! Perfect for Halloween! Tutorial @ www.jennaburger.com

DIY Craft: Burlap Candy Corn Pennant. Simple, Inexpensive, and Fun! Perfect for Halloween! Tutorial @ www.jennaburger.com

When they were complete & dry (the next day), I was ready to create the pennant.

They look so good, I could eat them… #yum

DIY Craft: Burlap Candy Corn Pennant. Simple, Inexpensive, and Fun! Perfect for Halloween! Tutorial @ www.jennaburger.com

For this part of the project, I used the twine, scissors, tape, and a toothpick.

DIY Craft: Burlap Candy Corn Pennant. Simple, Inexpensive, and Fun! Perfect for Halloween! Tutorial @ www.jennaburger.com

3

I lined up the end of the twine with the end of the toothpick and wrapped it tight with tape.  Then starting at one end of the pennant ‘flag’ top, I poked through the burlap with the toothpick and pulled through the twine.

At the other end of the ‘flag’ top, I poked through the burlap again and pulled the twine through to the backside.

I continued this step for all the ‘flags’.

DIY Craft: Burlap Candy Corn Pennant. Simple, Inexpensive, and Fun! Perfect for Halloween! Tutorial @ www.jennaburger.com

The spacing between each ‘flag’ is subjective but I chose about 3″ and left about 2′ of extra twine at each end to hang and adjust.

DIY Craft: Burlap Candy Corn Pennant. Simple, Inexpensive, and Fun! Perfect for Halloween! Tutorial @ www.jennaburger.com

And this is the result.

DIY Craft: Burlap Candy Corn Pennant. Simple, Inexpensive, and Fun! Perfect for Halloween! Tutorial @ www.jennaburger.com

It really was so easy to make and it dresses up the front porch so pretty!

DIY Craft: Burlap Candy Corn Pennant. Simple, Inexpensive, and Fun! Perfect for Halloween! Tutorial @ www.jennaburger.com

Inside the house or out, this simple + inexpensive burlap candy corn pennant was so fun + fast to make – 20 minutes total!

DIY Craft: Burlap Candy Corn Pennant. Simple, Inexpensive, and Fun! Perfect for Halloween! Tutorial @ www.jennaburger.com

Can you believe I got crafty?!  Kinda Crazy, but it really was enjoyable to step back from the big projects + big decisions and just have fun.  This crafty-business has me thinking…

HAPPY HALLOWEEN.

If you like this festive project, you might like this Halloween pillow I made a few years back which is also on my porch.

Halloween pillow using ombre effect & stencils. Festive + Fun! tutorial by www.jennaburger.com


Creating Colorful Easter Eggs with Melted Crayons

Create colorful EASTER EGGS using Melted Crayons. It's easy to do + KIDS will LOVE it. Read the tutorial now or Pin for Later!

In just about a month, another Easter will be upon us.  Along with focusing on the importance of Easter, creating colorful eggs is often a tradition that many kids enjoy as the holiday approaches, mine included!  A basket filled with eggs of varying hues can make a gorgeous centerpiece and is the ideal reminder that Spring is on it’s way – I hope.

A new and unique alternative idea that you may want to try this year is to use crayons instead of the traditional food coloring or store-bought dye kits.  I have to tell you, the result will be unexpectedly awesome!  Have you ever felt that the traditional food coloring or dyes don’t create an intense enough color?  Yes, you can leave the eggs in the dye filled cup for hours, but what child wants to wait that long? Mine certainly don’t…  With the technique of using melted crayons, the color can be as bright (or subtle) as you’d like and the result is instant…

Here are the steps I took with my kids to create Colorful Easter Eggs Using Melted Crayons…

Supplies Needed:

  • Eggs (steps to hard boil the eggs are below)
  • A colorful collection of crayons

Create colorful EASTER EGGS using Melted Crayons. It's easy to do + KIDS will LOVE it. Read the tutorial now or Pin for Later!To start off…

1.Put the eggs in a pot and fill the pot with cold water so it covers the eggs about 1-2″.

2.Once the eggs come to a full boil, remove the pot from the stove and cover for 12 minutes (so they create a hard-boiled egg).

3.Carefully remove the eggs from the pot and let them stand for about 1-2 minutes (the eggs will be very hot, so be sure to use tongs when removing them from the pot).

Create colorful EASTER EGGS using Melted Crayons. It's easy to do + KIDS will LOVE it. Read the tutorial now or Pin for Later!

Here comes the fun part…

4. Using crayons, start drawing on your egg.  Be creative. Get the kids involved.  It’s a lot of fun to try different patterns and to mix the colors. For our eggs, I used one color as the base, then added another color on top.  I smudged in the background hue which gave a fun, swirly look.

Create colorful EASTER EGGS using Melted Crayons. It's easy to do + KIDS will LOVE it. Read the tutorial now or Pin for Later!

Because of the hot exterior of the egg, the crayon will melt on the egg’s surface.  Once your masterpiece is finished, gently place the egg into the original egg holder and place it into the refrigerator.  After a few minutes they will be cool and the decorated eggs can be handled and displayed as you’d like.

Create colorful EASTER EGGS using Melted Crayons. It's easy to do + KIDS will LOVE it. Read the tutorial now or Pin for Later!

They’ll make a beautiful addition to any centerpiece – paired with other Easter decorations or simply on their own.

Create colorful EASTER EGGS using Melted Crayons. It's easy to do + KIDS will LOVE it. Read the tutorial now or Pin for Later!

Create colorful EASTER EGGS using Melted Crayons. It's easy to do + KIDS will LOVE it. Read the tutorial now or Pin for Later!

Want to save it and/or pin it for later use?  Here’s a quick graphic to remember the steps…

Create colorful EASTER EGGS using Melted Crayons. It's easy to do + KIDS will LOVE it. Read the tutorial now or Pin for Later!

Enjoy and Happy Easter Egg Decorating!

DIY: Holiday Photo Cards

It’s that time of year when the post office is at it’s peak with the hustle and bustle of people sending out packages and waiting on line for stamps to mail their Holiday cards.  I usually design my cards in early November and mail them out right after Thanksgiving (this year though, I was a little late).

Because I have young kids and we have family near and far that we don’t often get to see throughout the year, I like to design and send a photocard, but they can often be expensive.   In being somewhat of a frugal person, I decided to make my own Holiday photocards this year (and honestly, I like the result better than the plug-your-picture-in-and-print style).

After a long photo session with the kids (which I was the photographer of), I used the free program, Picasa, to make a collage of pictures that would be perfect for the card.  I had them printed at Walmart for .09 cents each (x 40), which ended up costing me just over $3.00.

I was originally thinking of using white index cards to mount them on, but then I was able to find really heavy and pretty card stock that was slightly larger than the picture.  The card stock came in an assortment of earth tone colors, and was the perfect backdrop for the photo montage.

Using Aleene’s Tacky Tape Runner, I added three rows to the back of the picture to make a tacky surface so it would stick to the card stock.

This is the back of the photo, where you can see the three rows of Tacky Tape that I added.  I originally planned to use a gluestick to adhere the picture to the card stock, but this tape was SO MUCH BETTER!  It was easy to apply to the picture and then it adhered very well to the card stock surface.

I actually was lucky enough to receive this Tacky Tape from Aleene’s, along with some other “tacky” products that they offer. (and I mean “tacky” in a good way, not the overboard-ugly-too much way!)

Then flip the card onto the cardstock, and it’s complete!

Write something on the back, and they will be ready to mail!

We don’t really have an Aunt Betty…  I just wrote this out for the tutorial 🙂

If you’re interested in trying out products by Aleene’s to create your own creation, their products are available at Michael’s stores or online at www.Ilovetocreate.com.  I know you will be happy with the result of your project when you use their products – I sure was!

My Holiday cards are in the mail…  Are yours?

All the opinions in this post are 100% mine! Full post disclosure here

I link my projects to some of these parties: Skip to My Lou, Dittle Dattle, Between Naps on the Porch, Today’s Creative Blog, Stories of A to Z, All Things Heart & Home, Savvy Southern Style, House of Hepworths, Finding Fabulous, Creation Corner, The Shabby Nest, Tatertots and Jello, Funky Junk, Under the Table & Dreaming

If you’d like to see more projects by other bloggers using the Aleene’s products, click on the links below:


DIY: Bow Holder

Last week, I shared my son’s DIY Skateboard Shelves, and this week I’m sharing a DIY project that I recently created for my daughter’s room.  She has quite the collection of {pretty bows} and the box that was holding them, just wasn’t cutting it anymore. With little time in the morning, I was tired of looking for the perfect bow to complement her pretty little outfit….until I created this solution~

It was super easy to make…and here’s how:

Supplies

  • Frame: Any picture frame of any size will do ~ whatever works for your space
  • Fabric: Any fabric will do ~ whatever complements your decor
  • Ribbon
  • Staple gun

1. Start off with your frame ~
I used a picture frame that wasn’t being used to create my PER-TAY Bow Display (no need to buy anything)

2. Wrap your fabric of choice around the cardboard and staple it with a staple gun ~ I used the cardboard that came with the frame since it was already the exact size.  It’s important that the cardboard is thick enough for a staple to go through.  If it isn’t, add an additional piece of cardboard.

3. Time to add the ribbon.  Once you determine your ribbon layout, staple it to the back ~There are LOTS of variations on adding the ribbon.  (I also used hot glue to keep my ribbon in place, then stapled) See more ideas below….

Ribbon Ideas

  • Create a diagonal pattern with your ribbon
  • Use different sized ribbon, but all the same color
  • Use the same size ribbon in different colors

4. You’re DONE…admire your masterpiece!

Wait….it’s NOT quite finished yet…It needs {BOWS}

NOW it’s COMPLETE!

Another view…

This was a fun and easy project to create.  Because I used materials that were just layin’ around, the project cost nothing….$0…my FAVORITE kind of project!  AND it makes my life in the mornings a whole lot EASIER!