
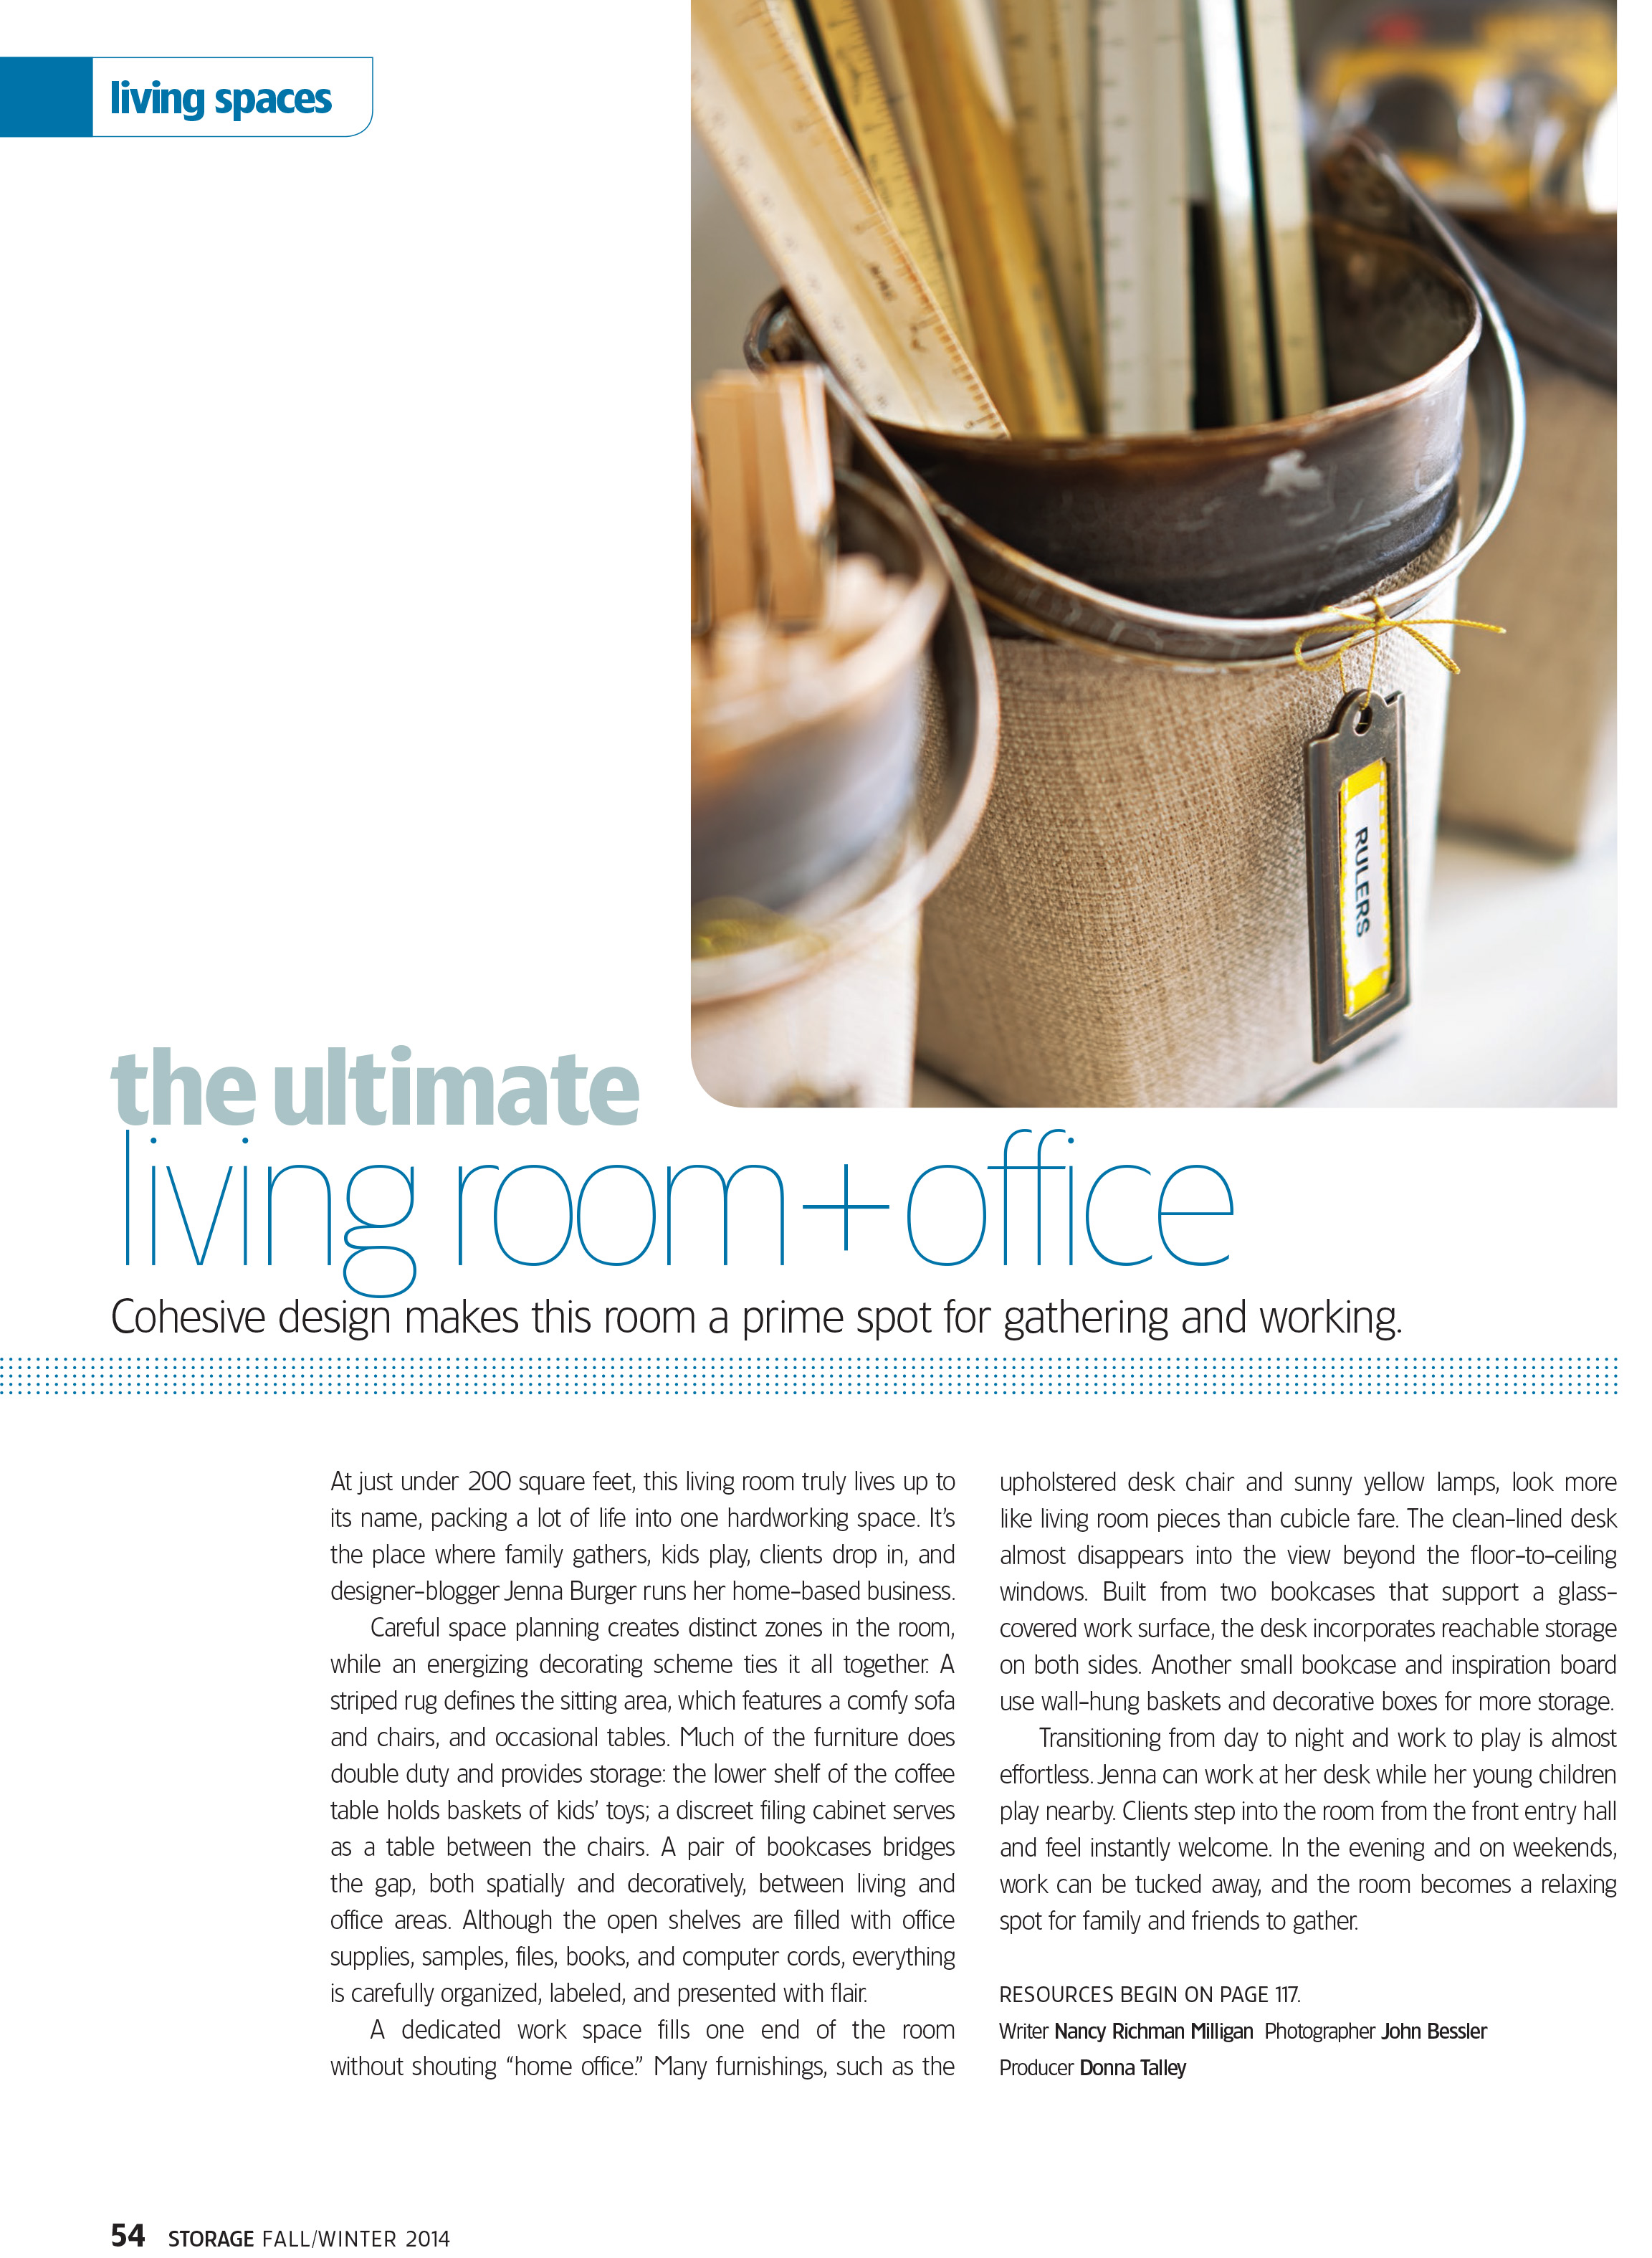
Cover Feature: Storage Magazine + Behind the Scenes Details

Hi All! If you’ve been out and about lately shopping at stores like Target, Barnes and Noble, or your local grocery store, you may have come across a magazine featuring a vibrant blue room on the cover…  Storage Magazine to be exact.  And guess what, that’s my home!  Yes, can you believe it?! Because I can’t.  Another cover?  How is it possible?
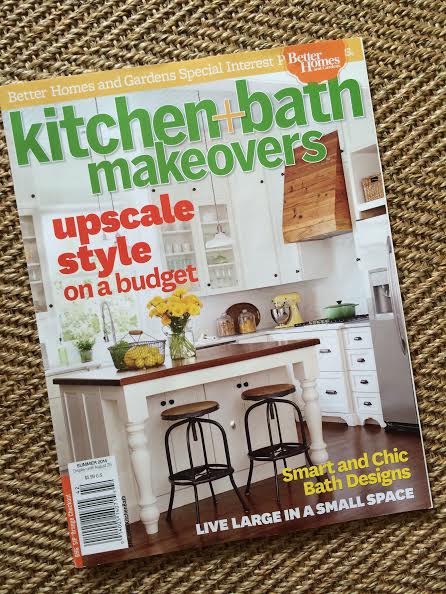
Here’s the cover…

Storage Magazine Fall/Winter 2014: cover feature with my living room / office. Great story on organization and how I've created a multi-purpose space.

Here’s the story behind the cover…

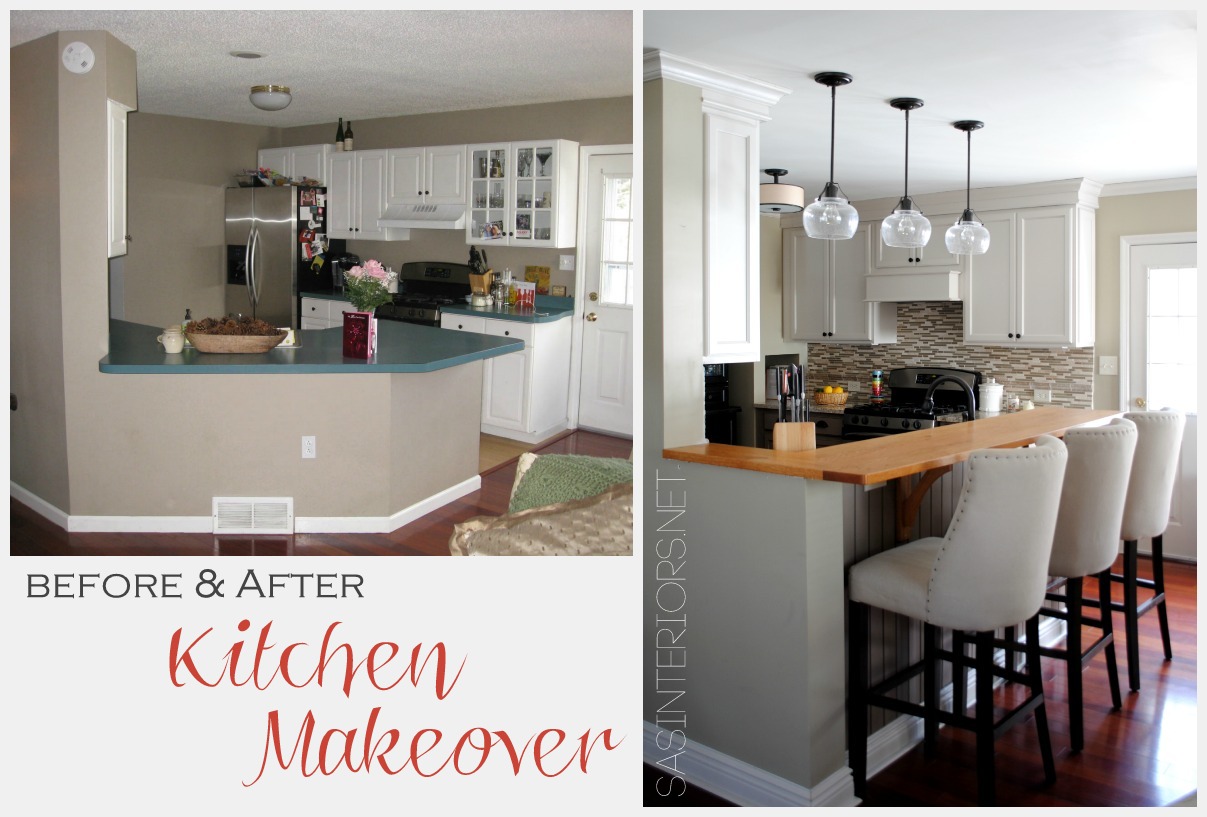
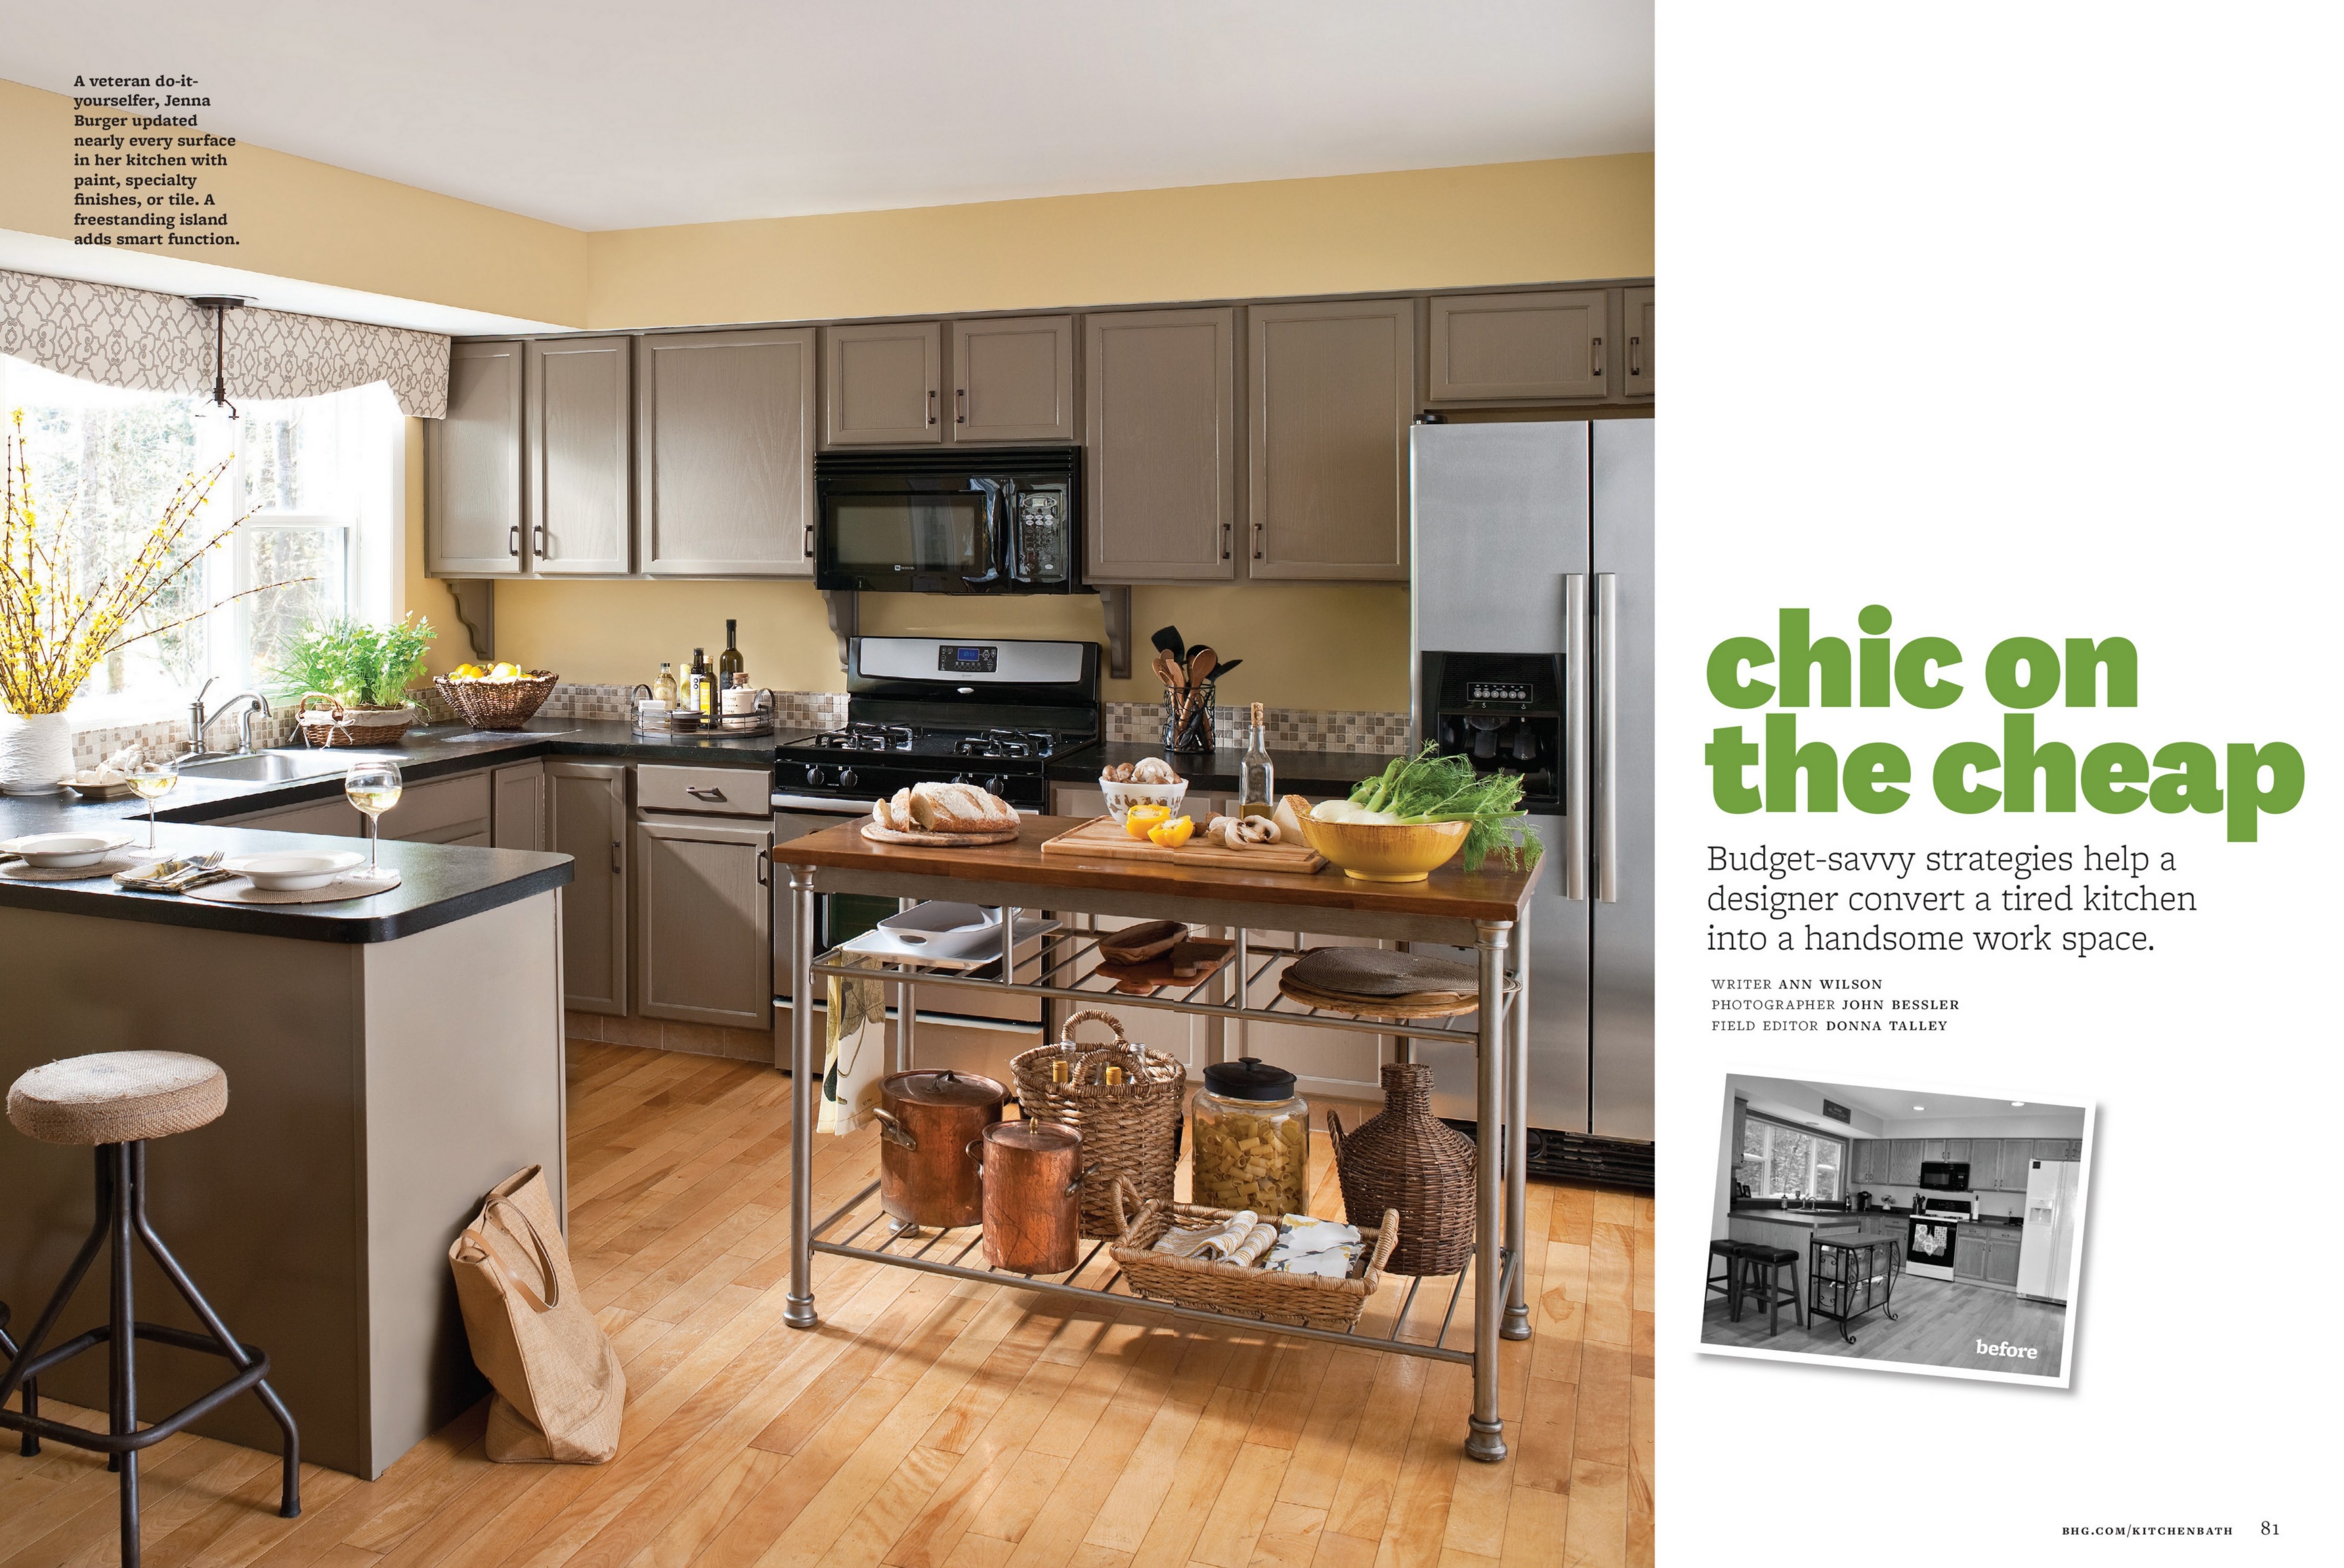
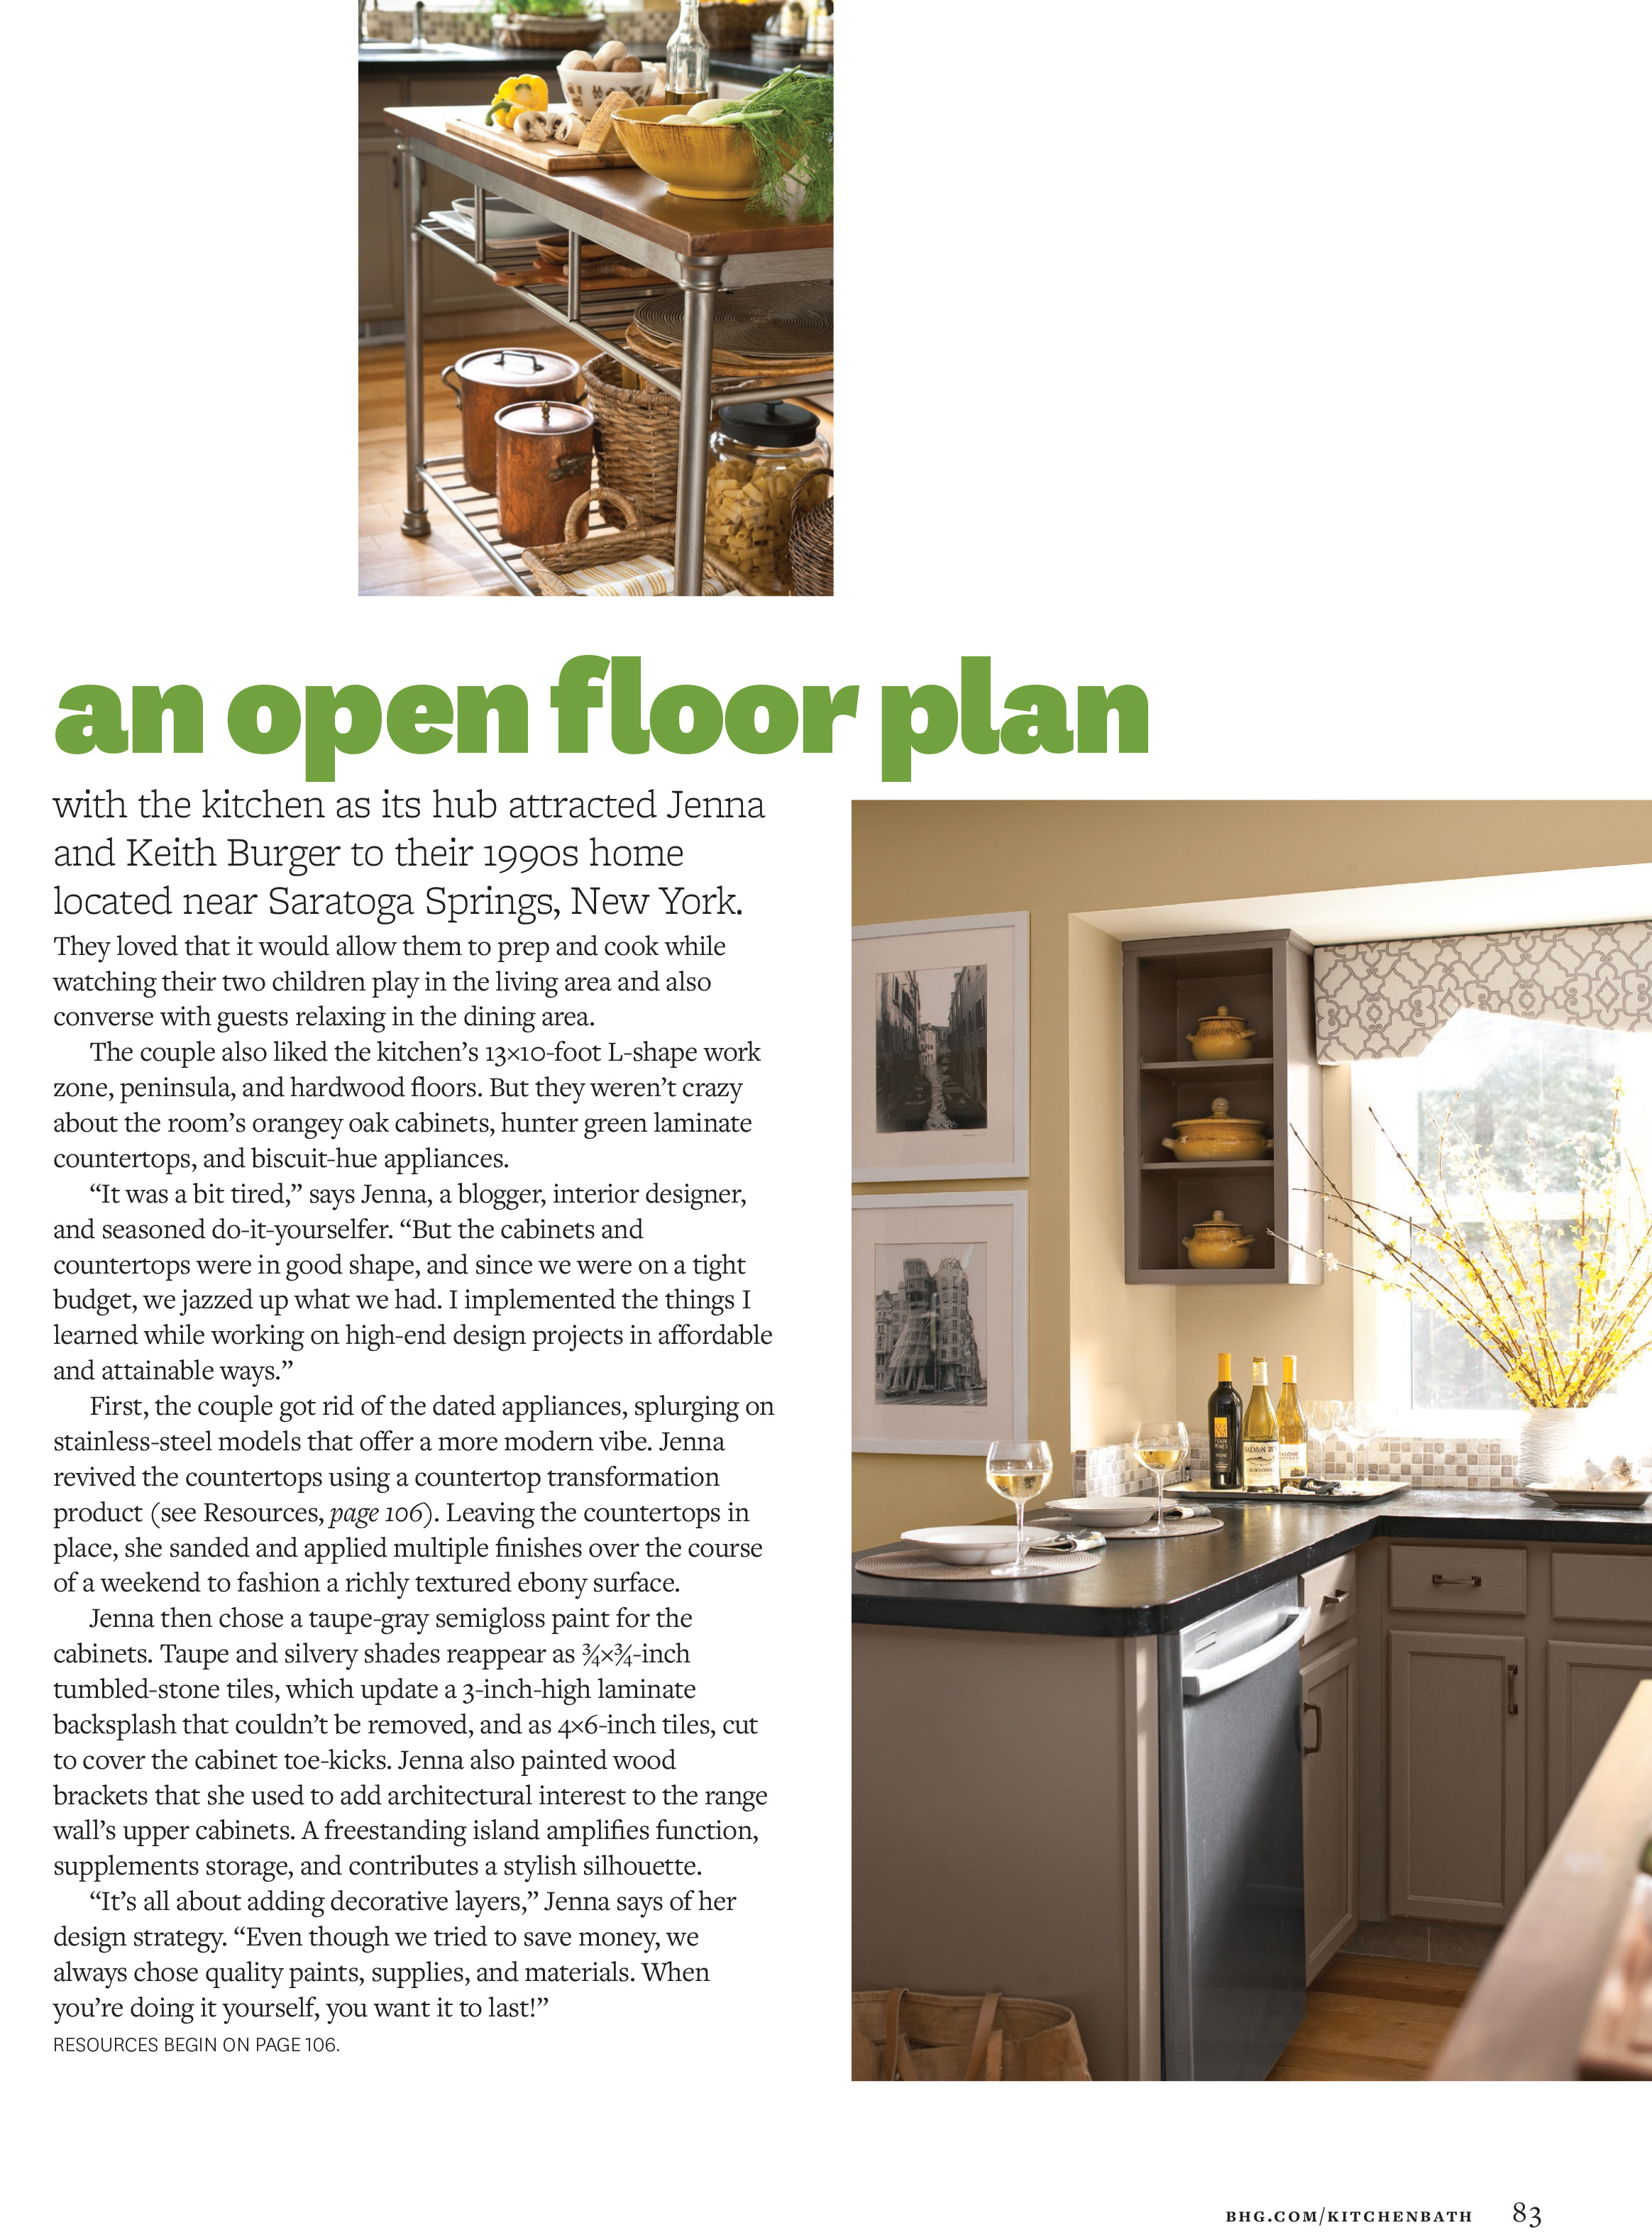
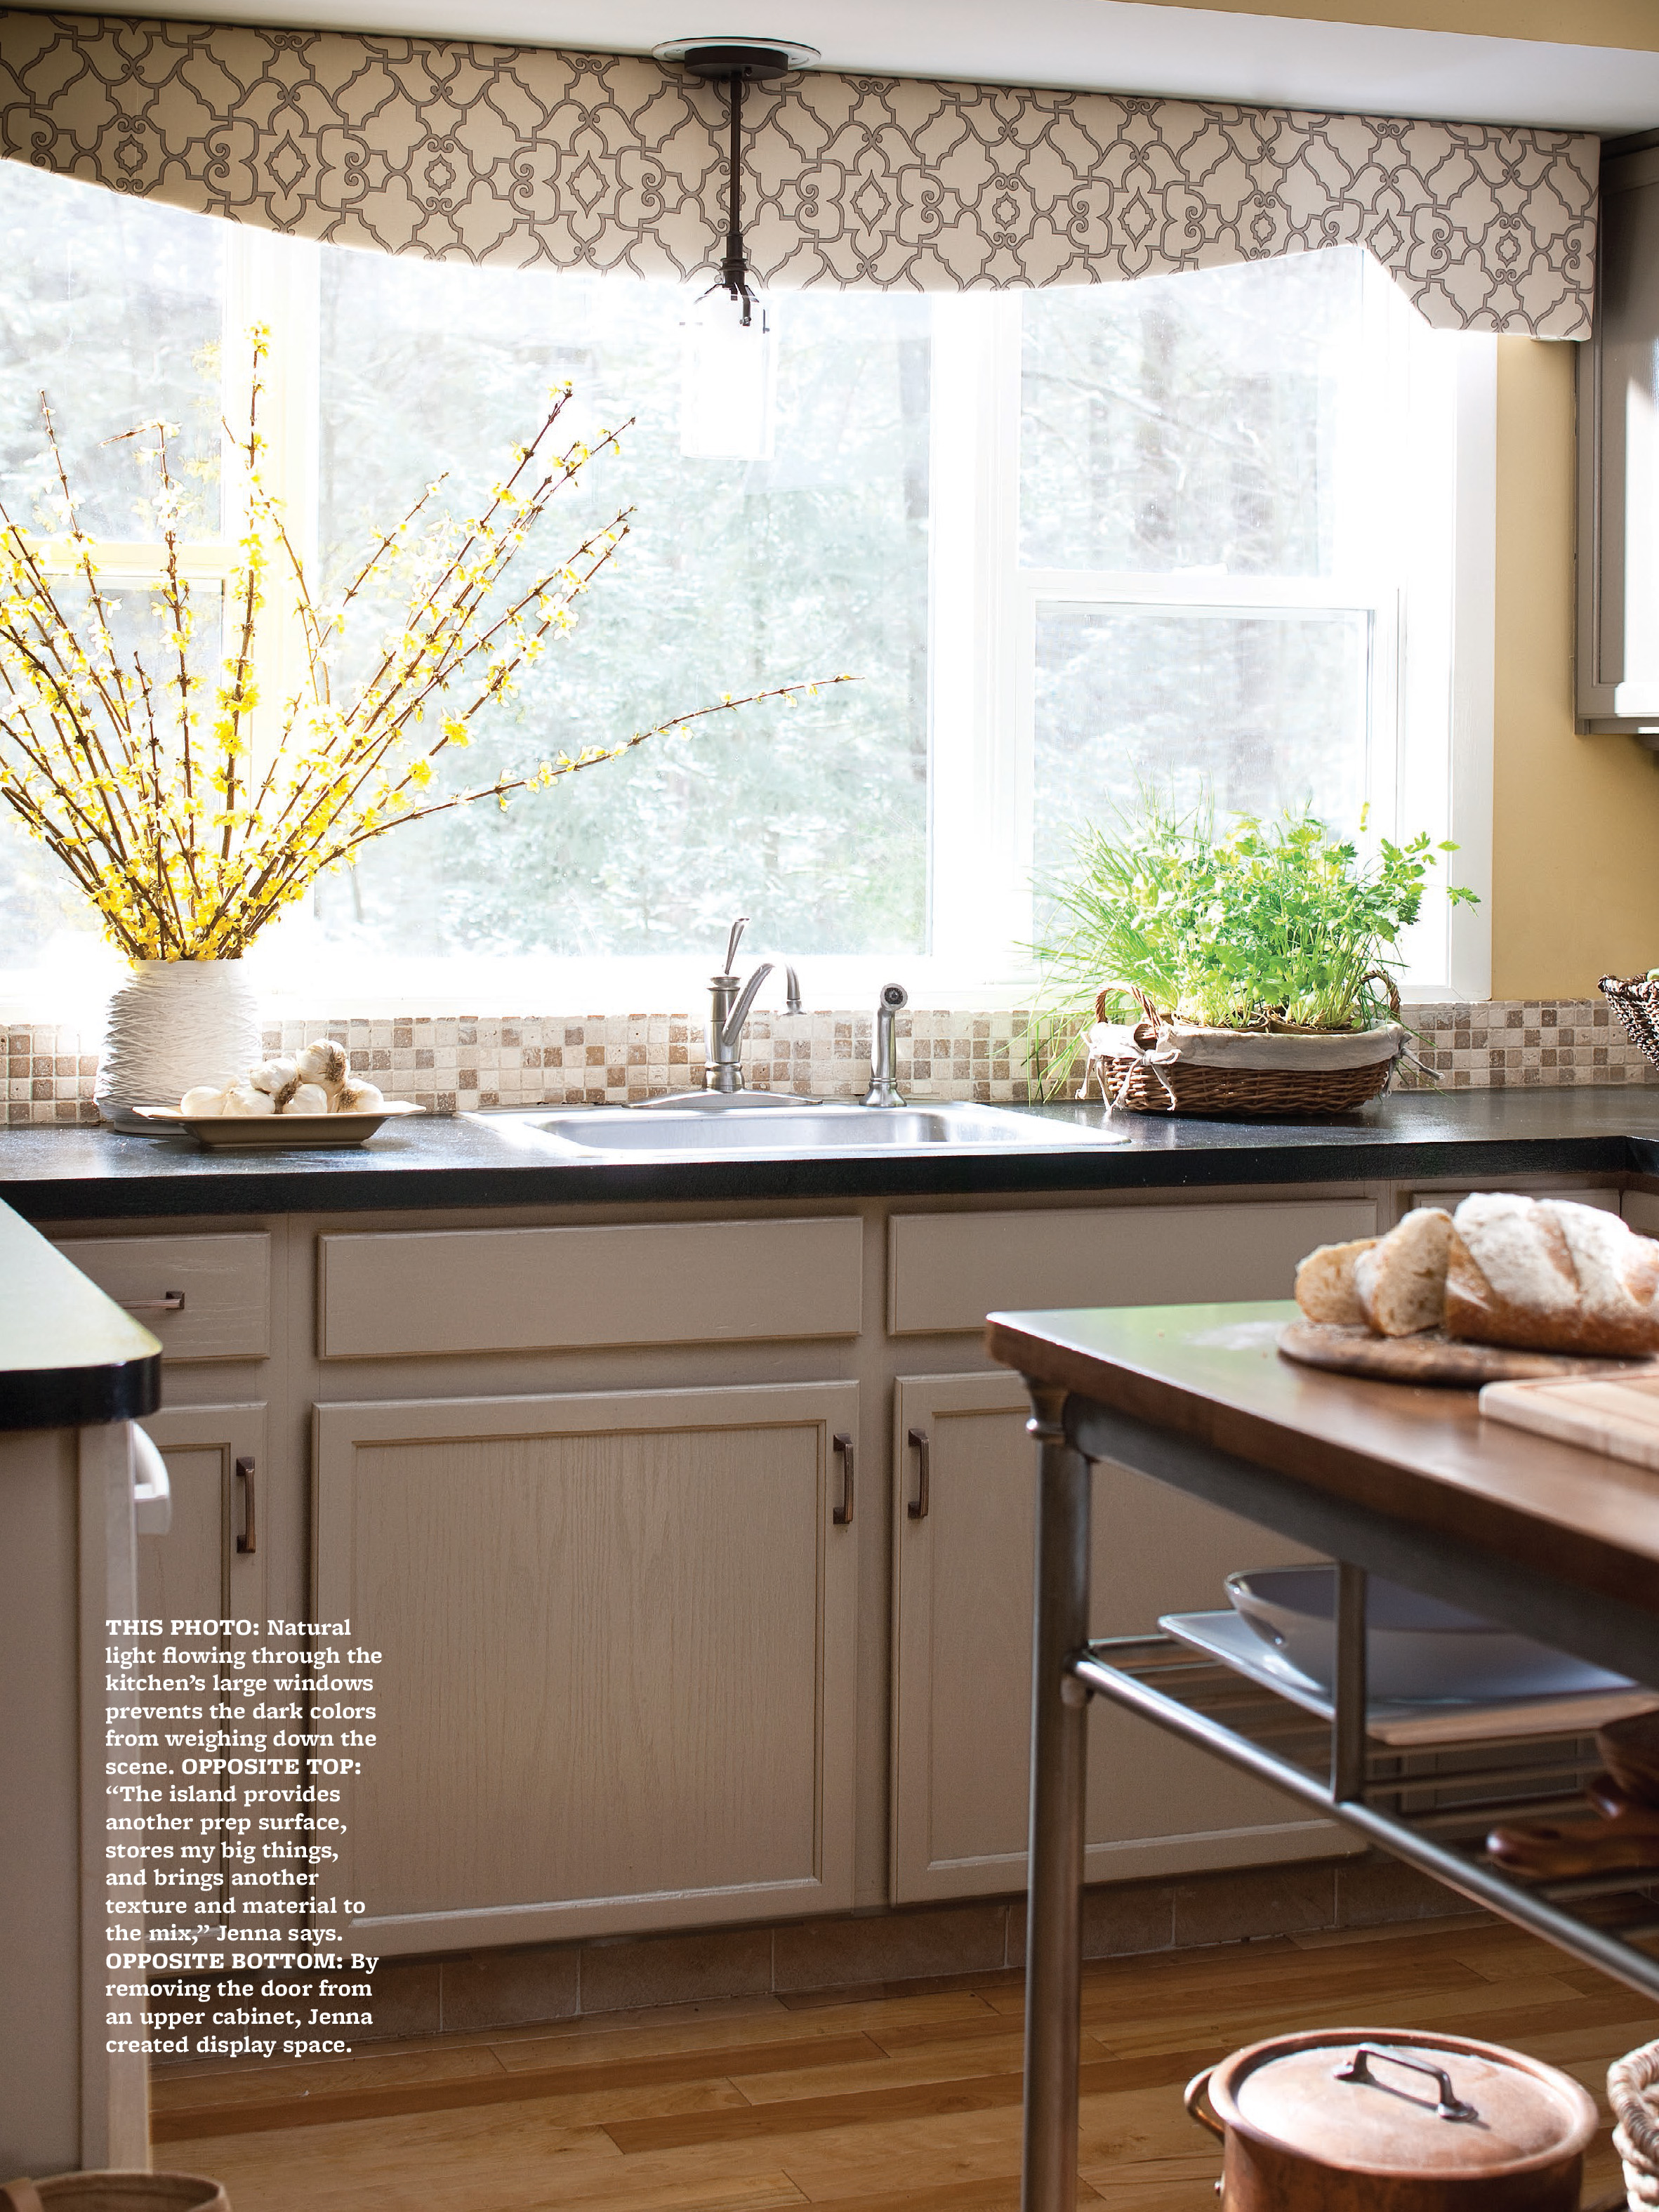
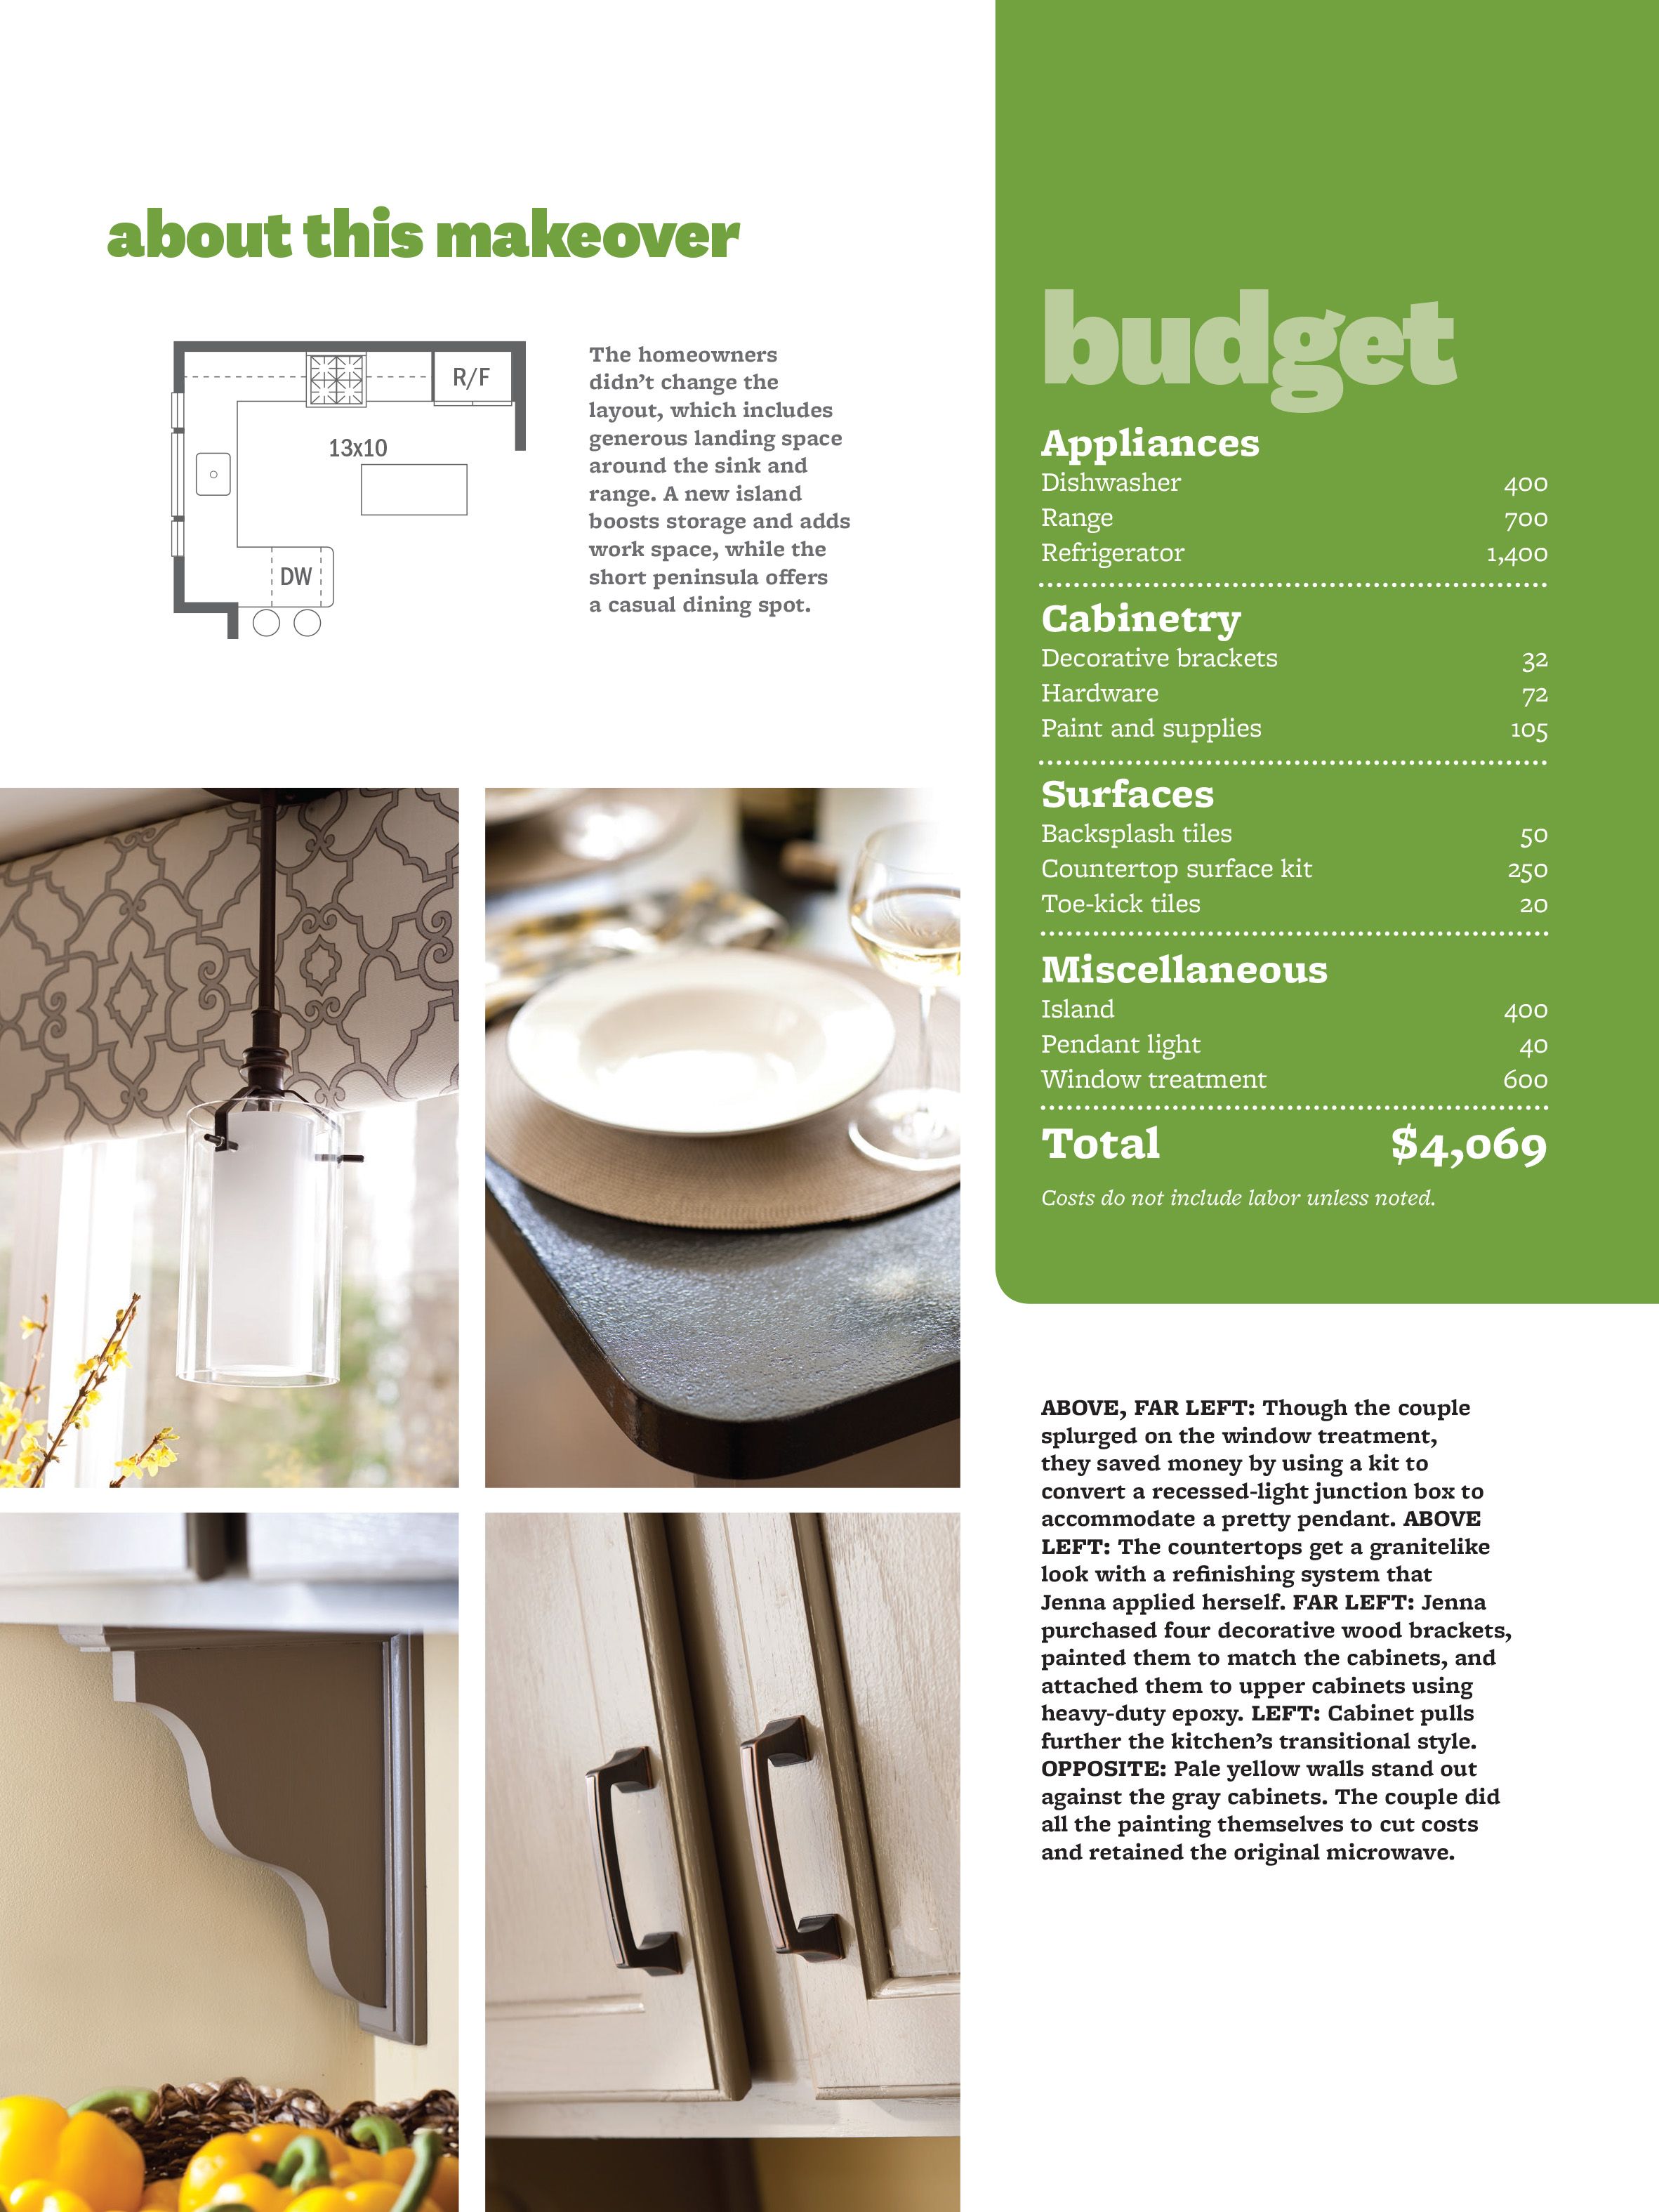
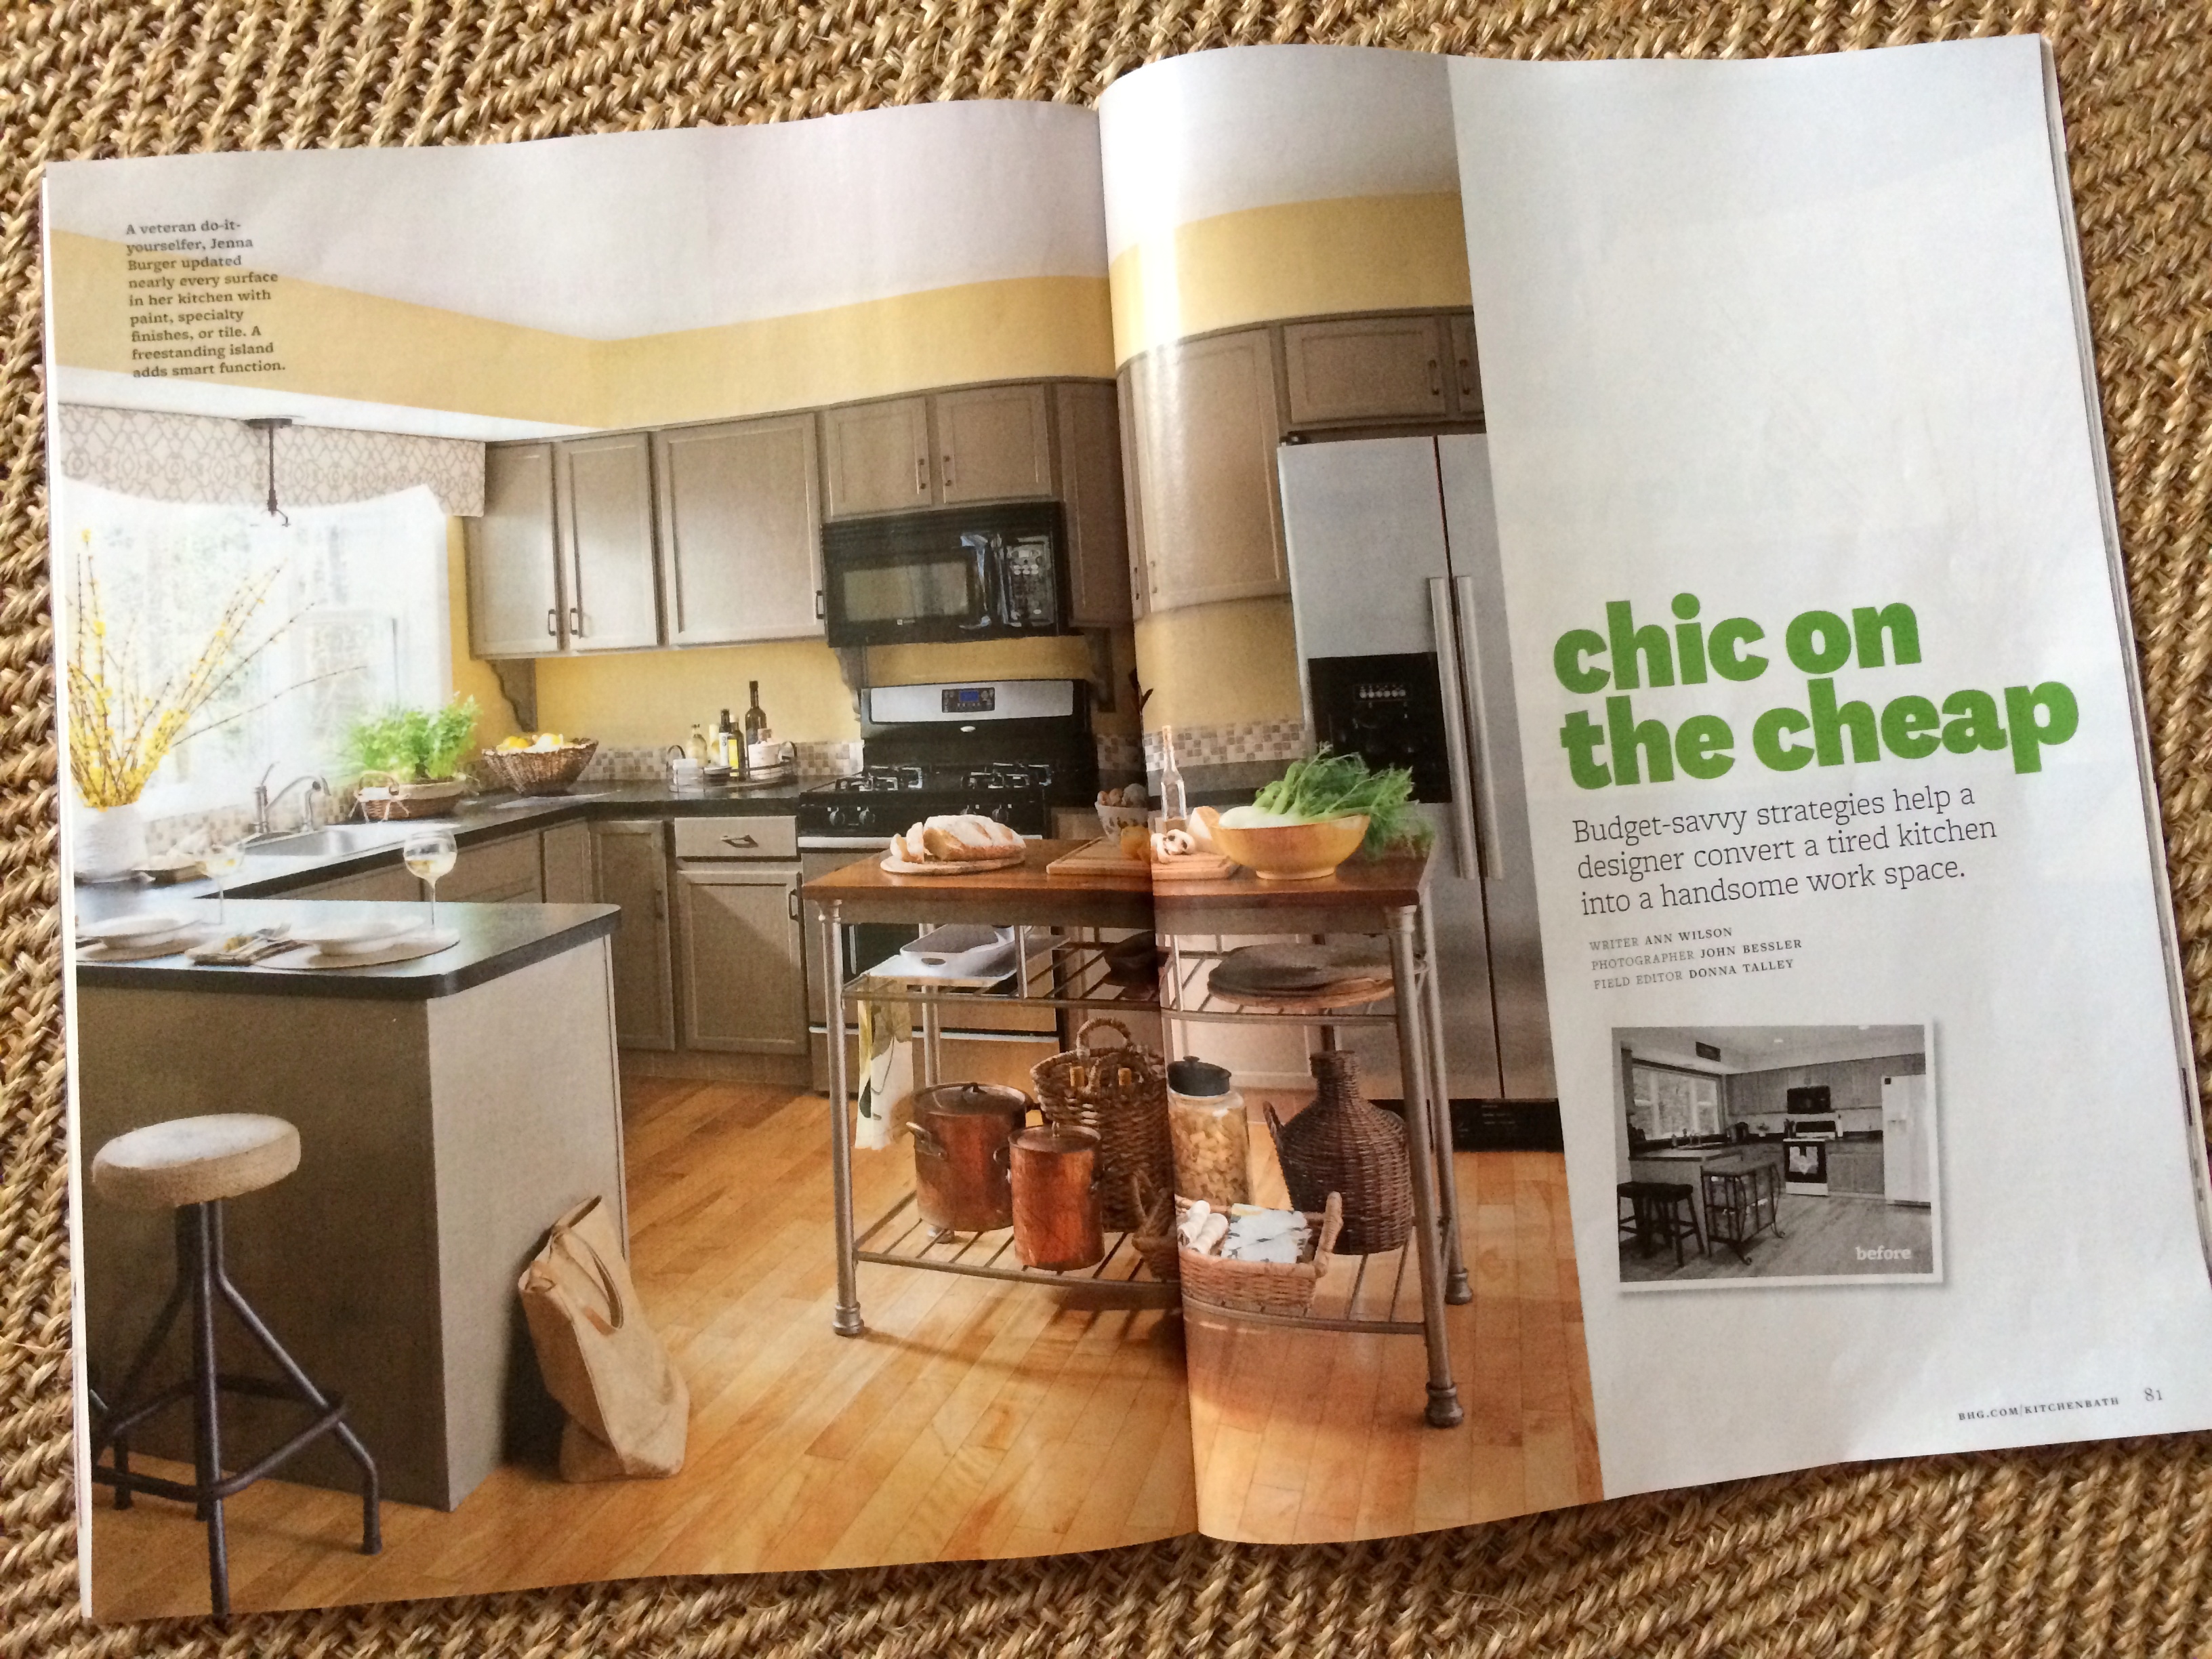
If you’re a regular reader and have been following along with my blog, you may know that my kitchen and master bathroom were also recently featured in a magazineKitchen + Bath Makeovers.

All within a few days, well over a year ago, a team – photographer & stylist – came to my home to do a big photoshoot which included the kitchen, master bath, and my living room/office.  It was so exciting and a true pinch-me-moment.  It seems like a lifetime ago looking back, but it really was an incredible, eye-opening experience and one I will never forget.

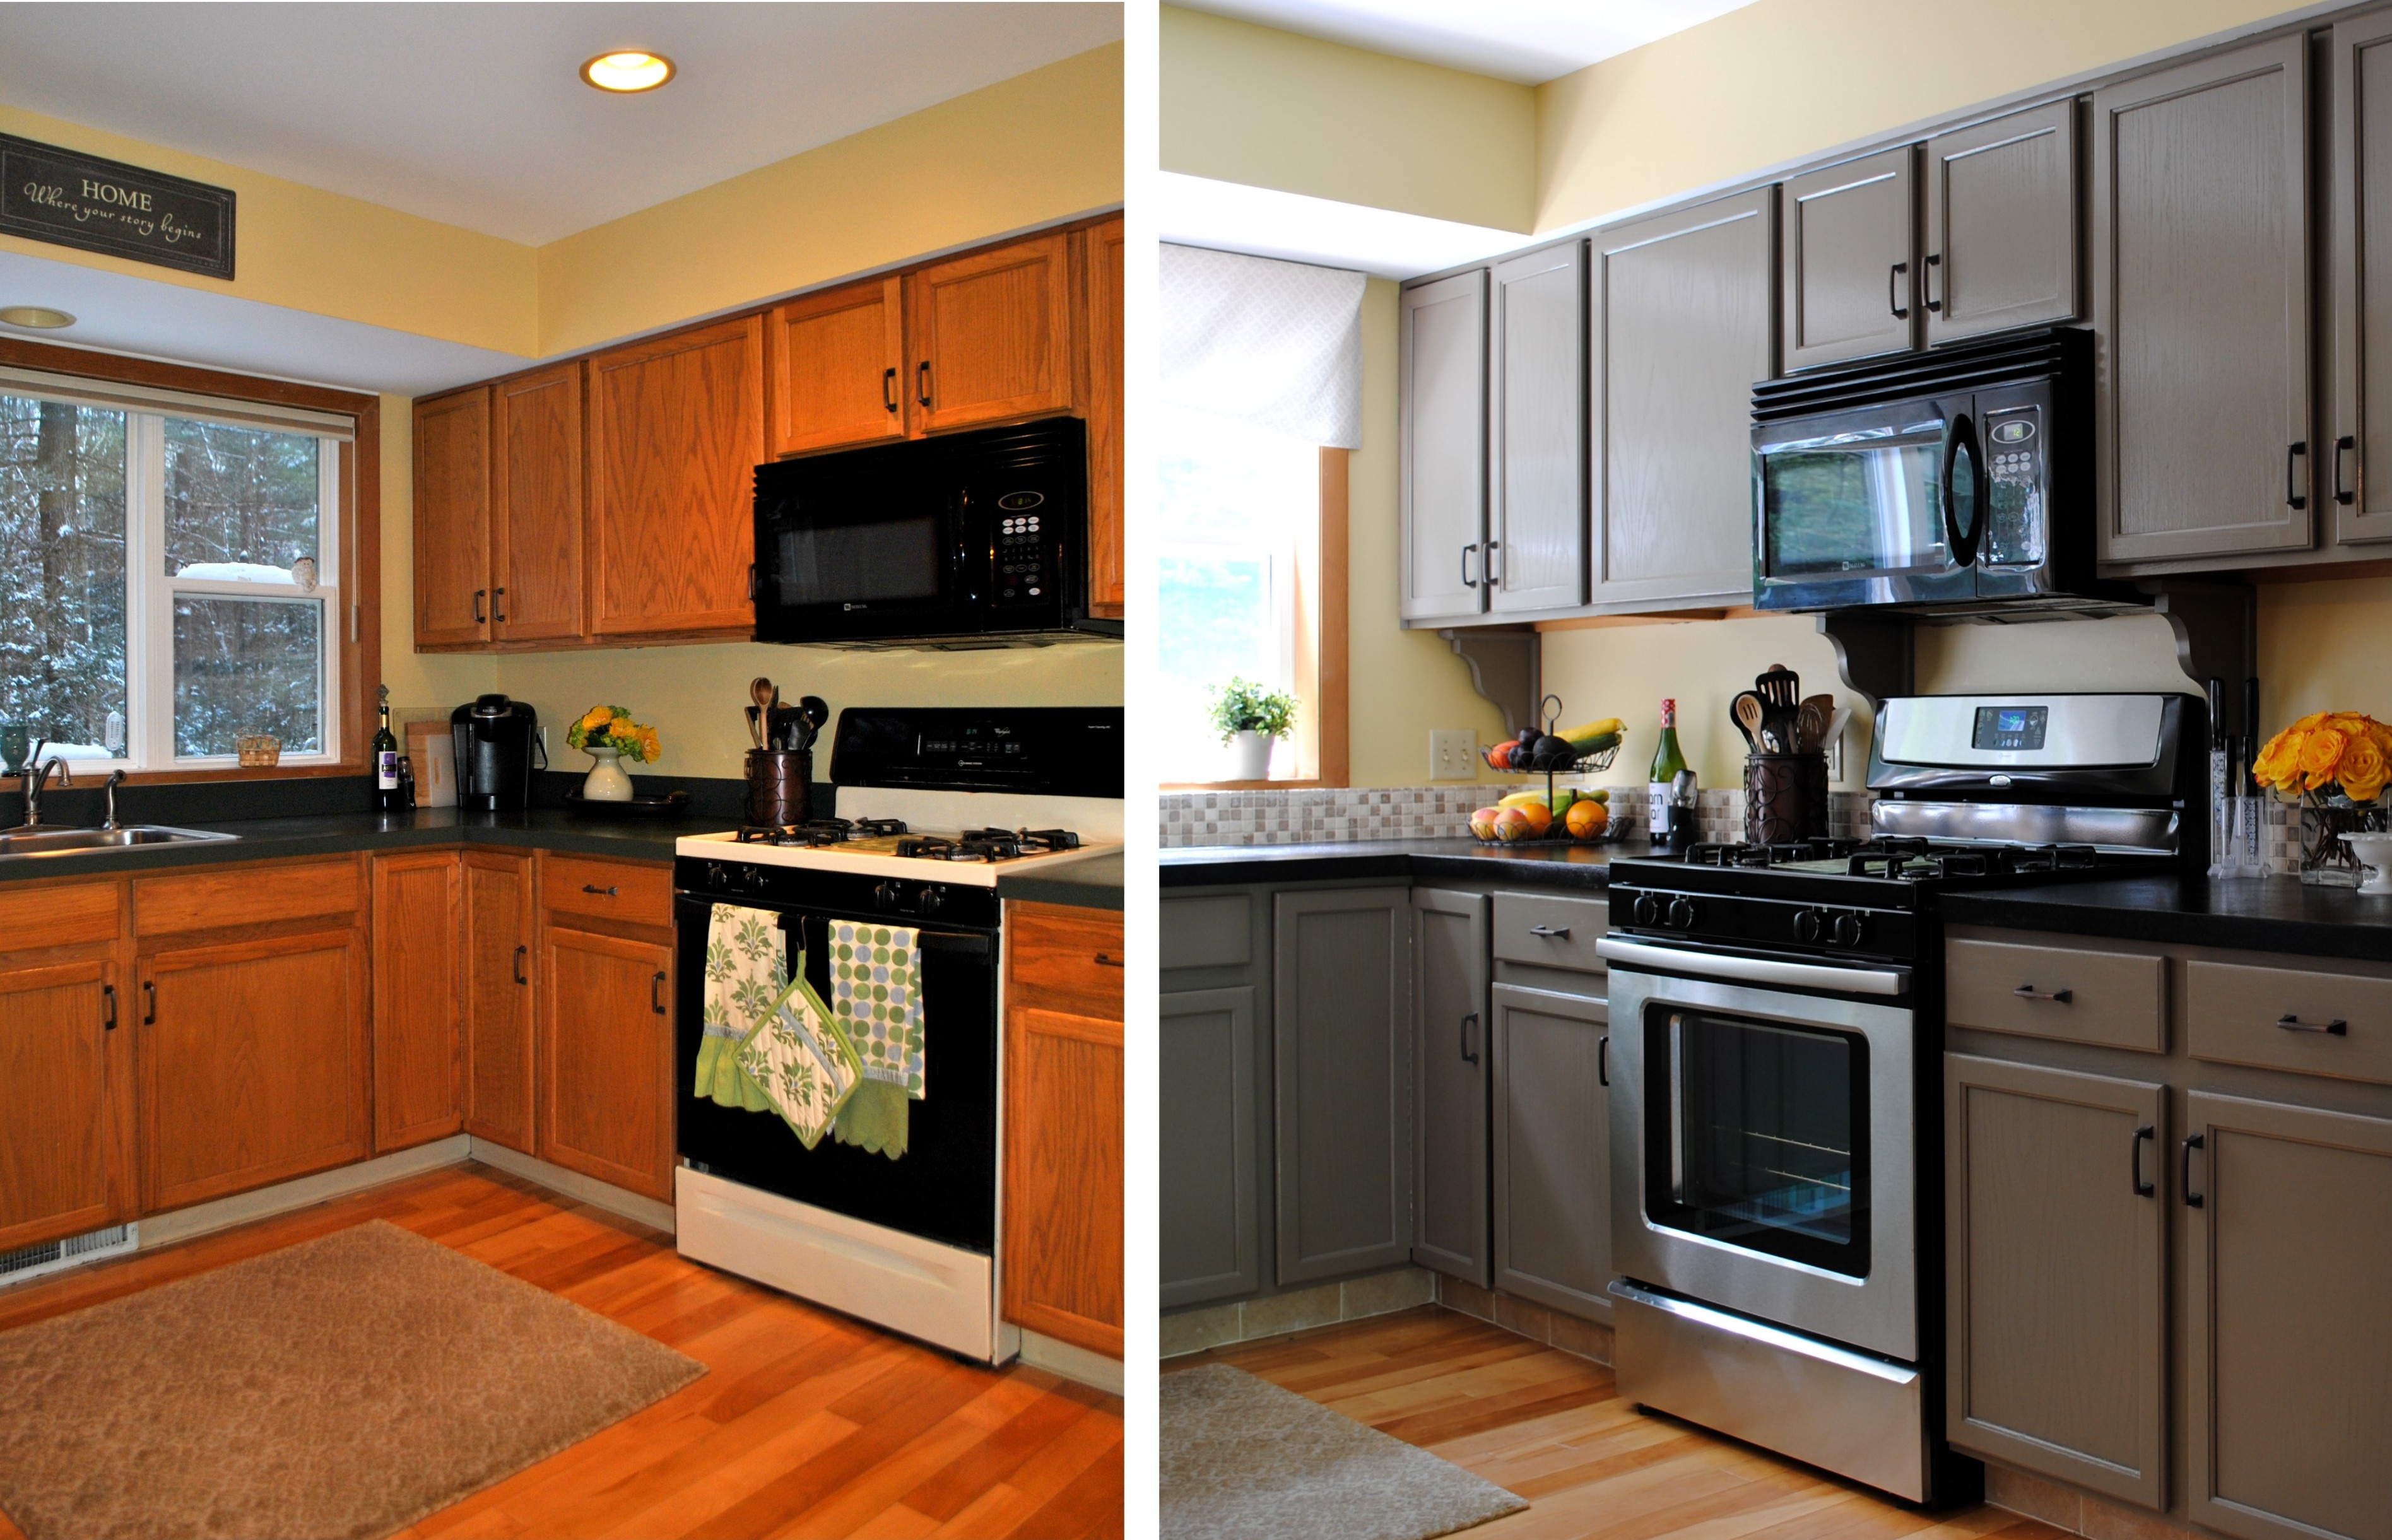
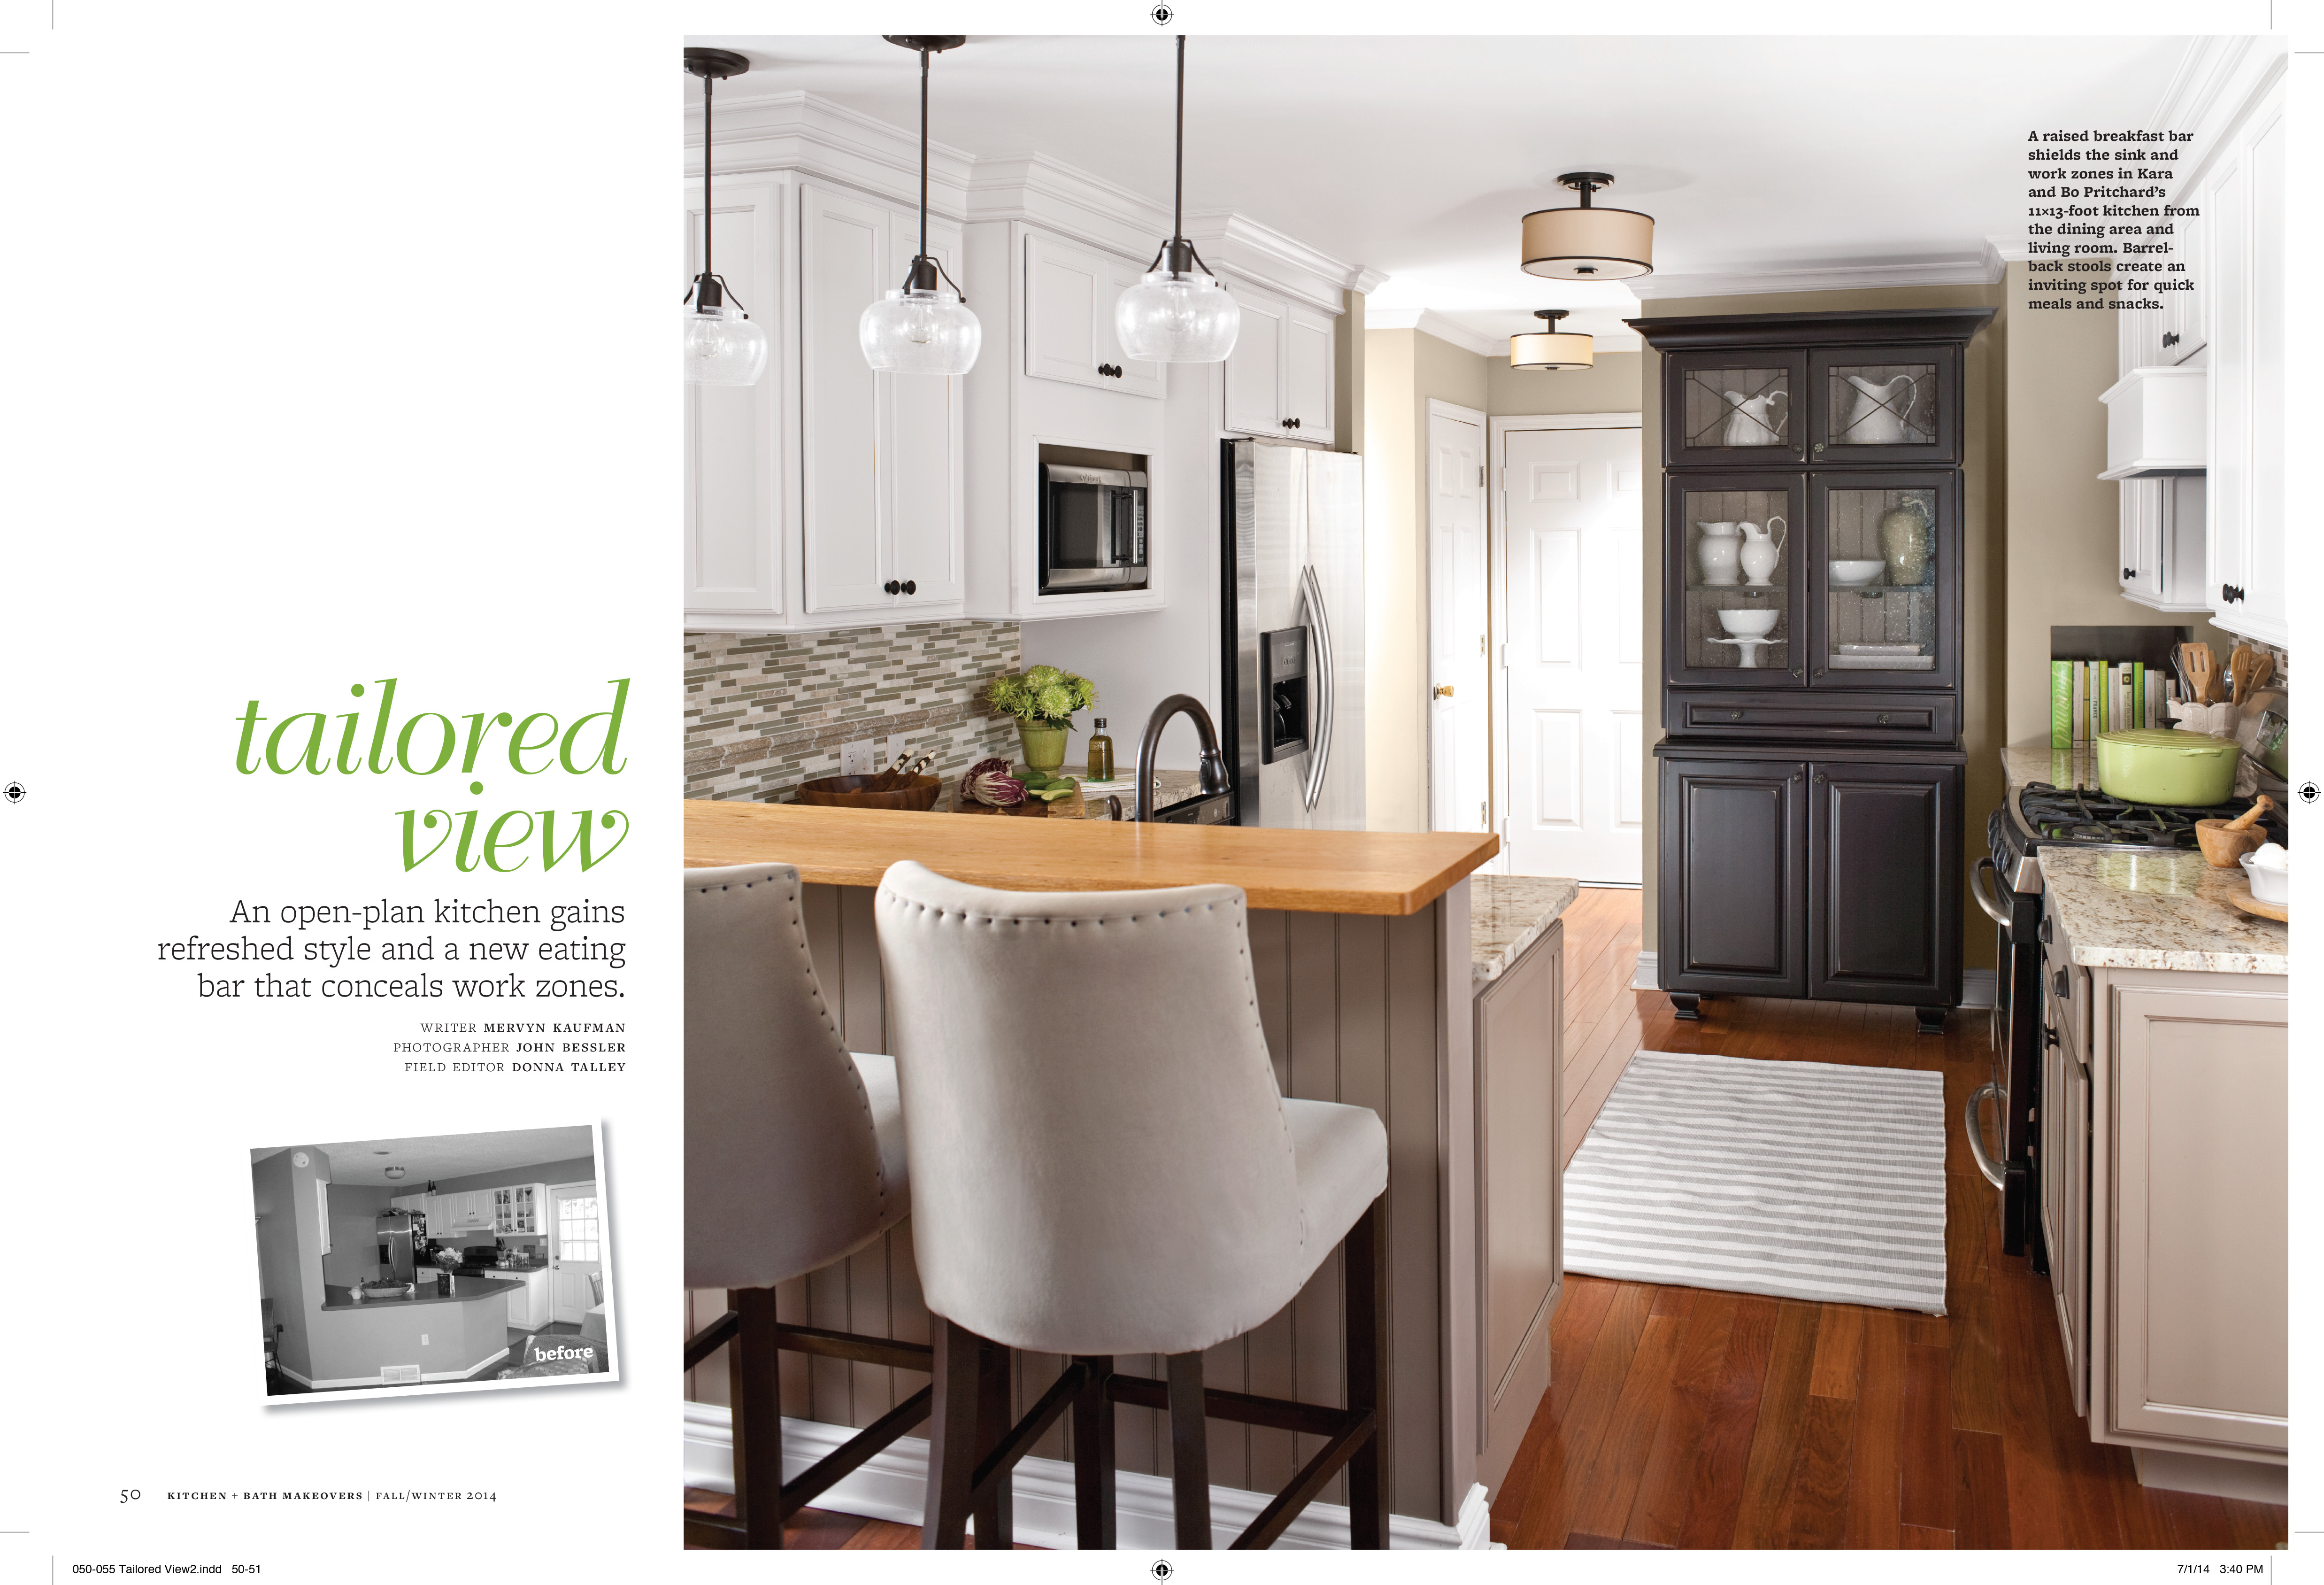
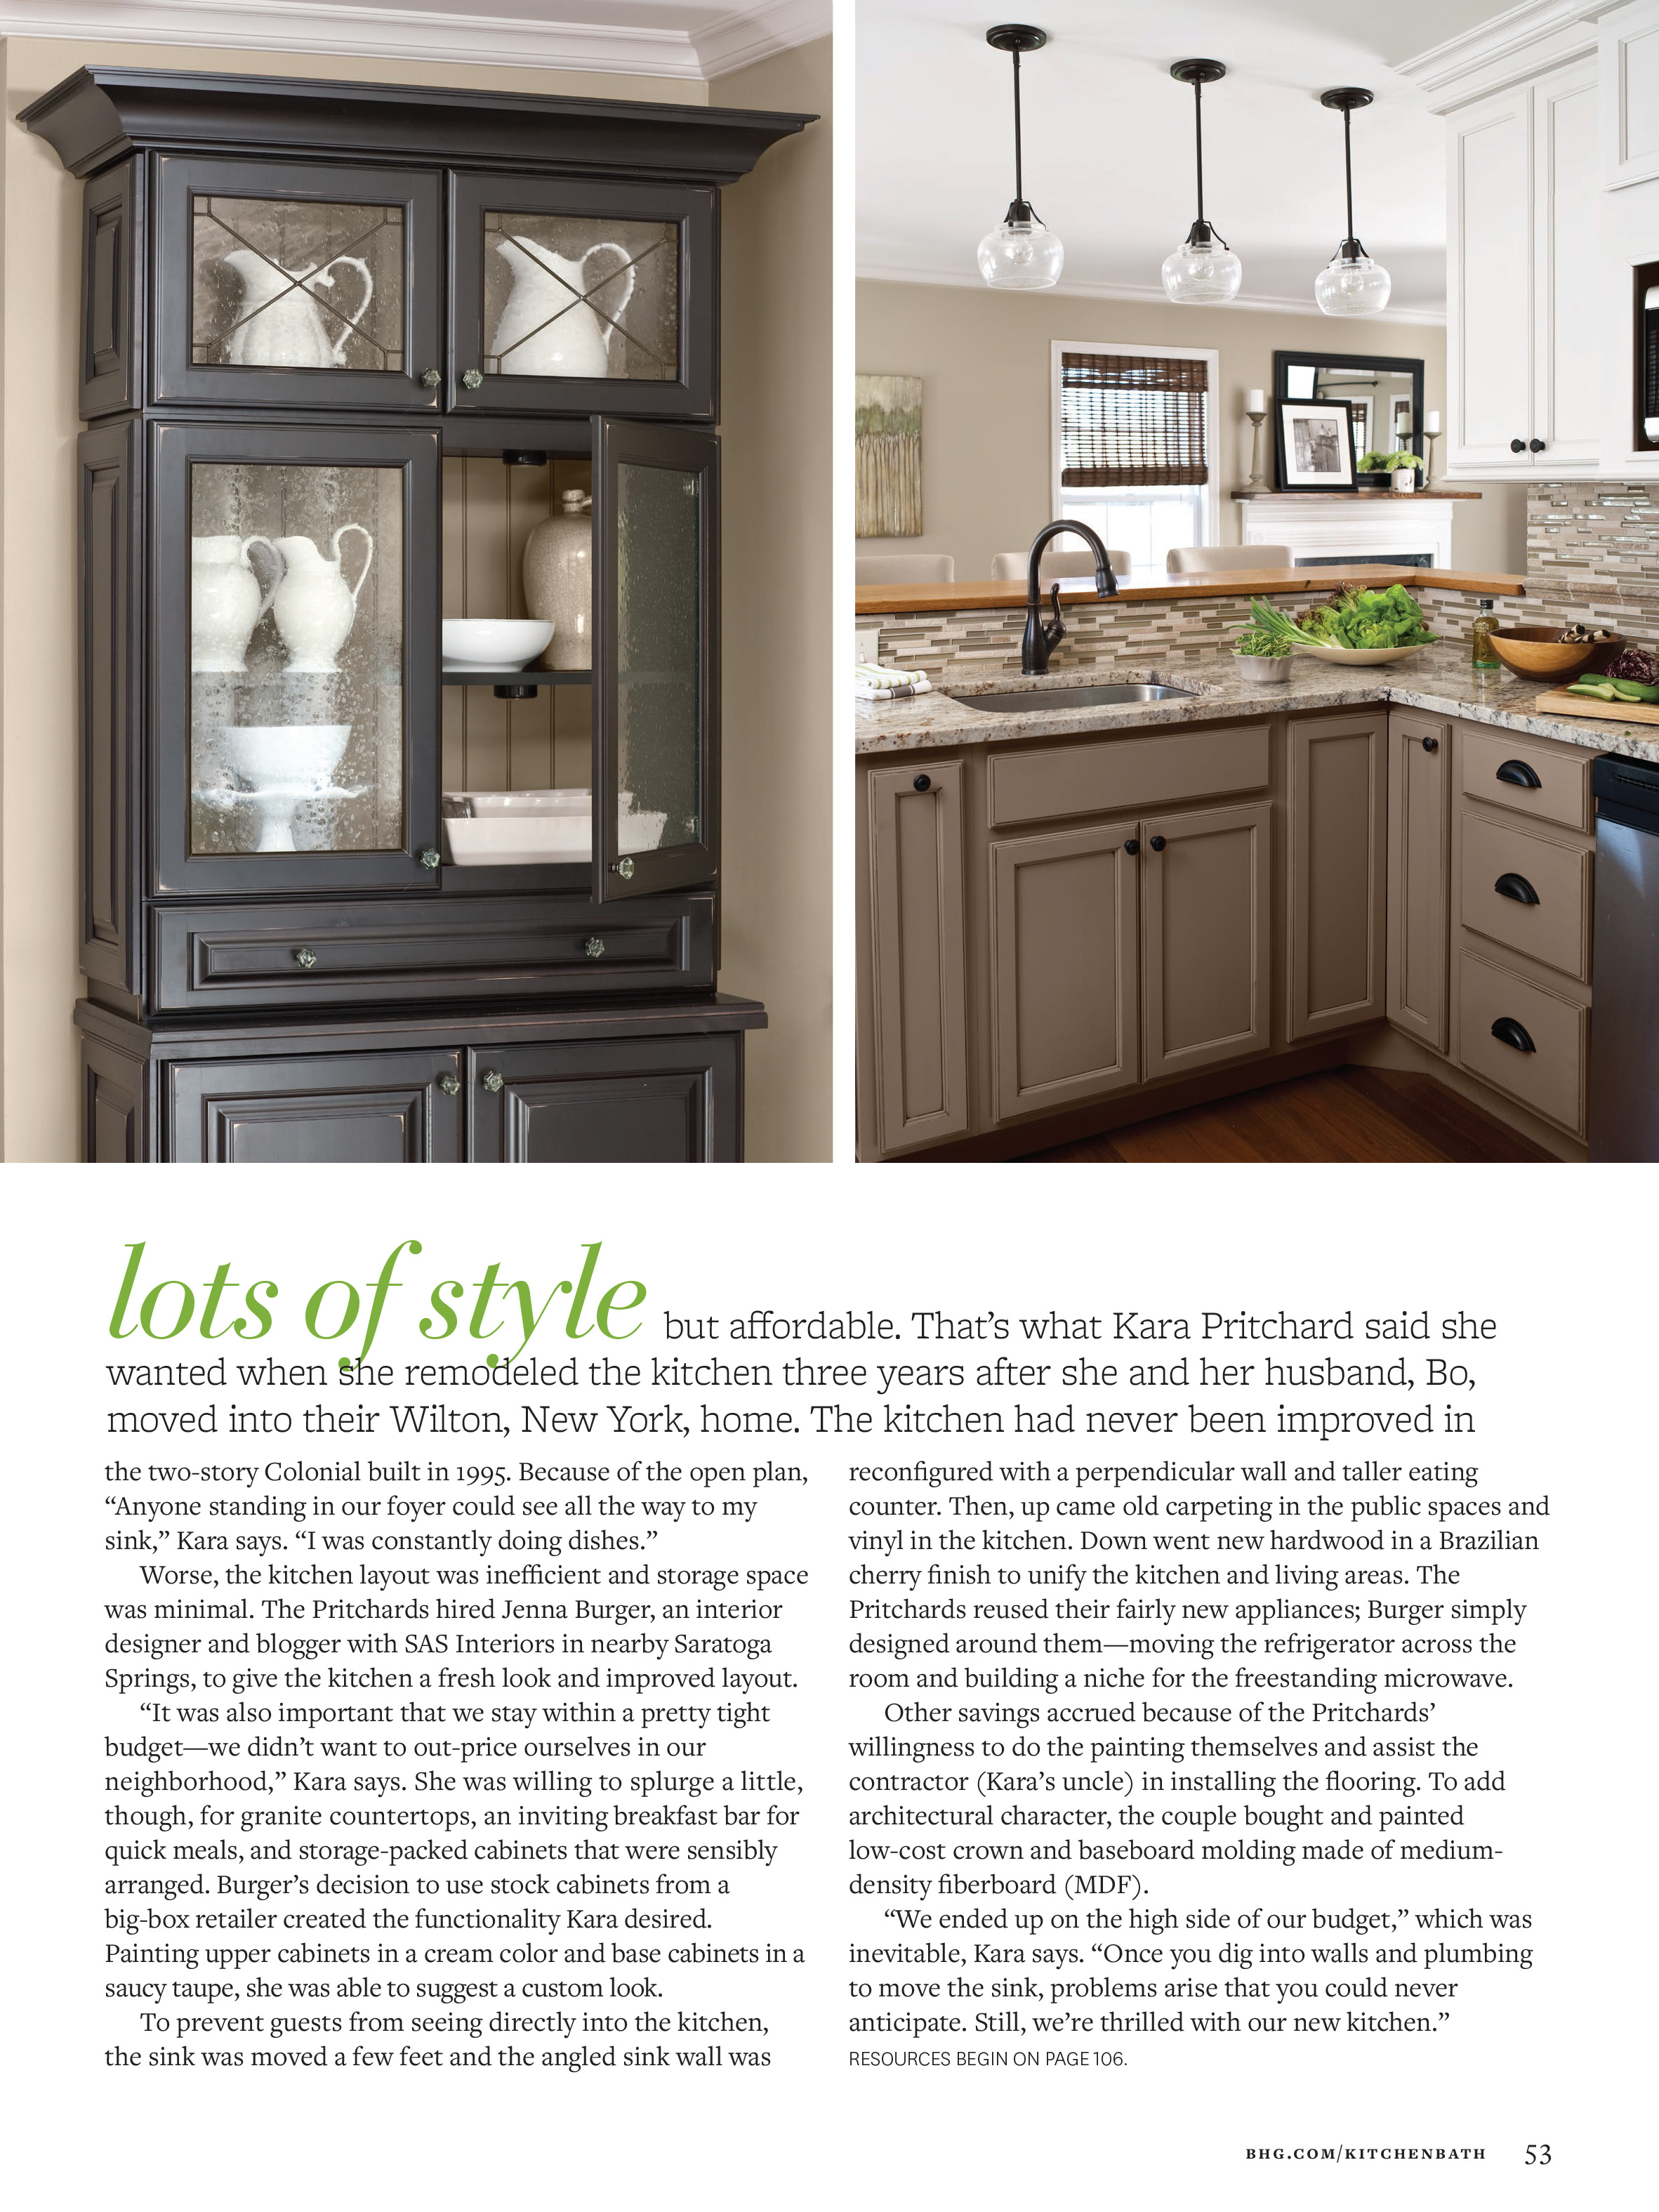
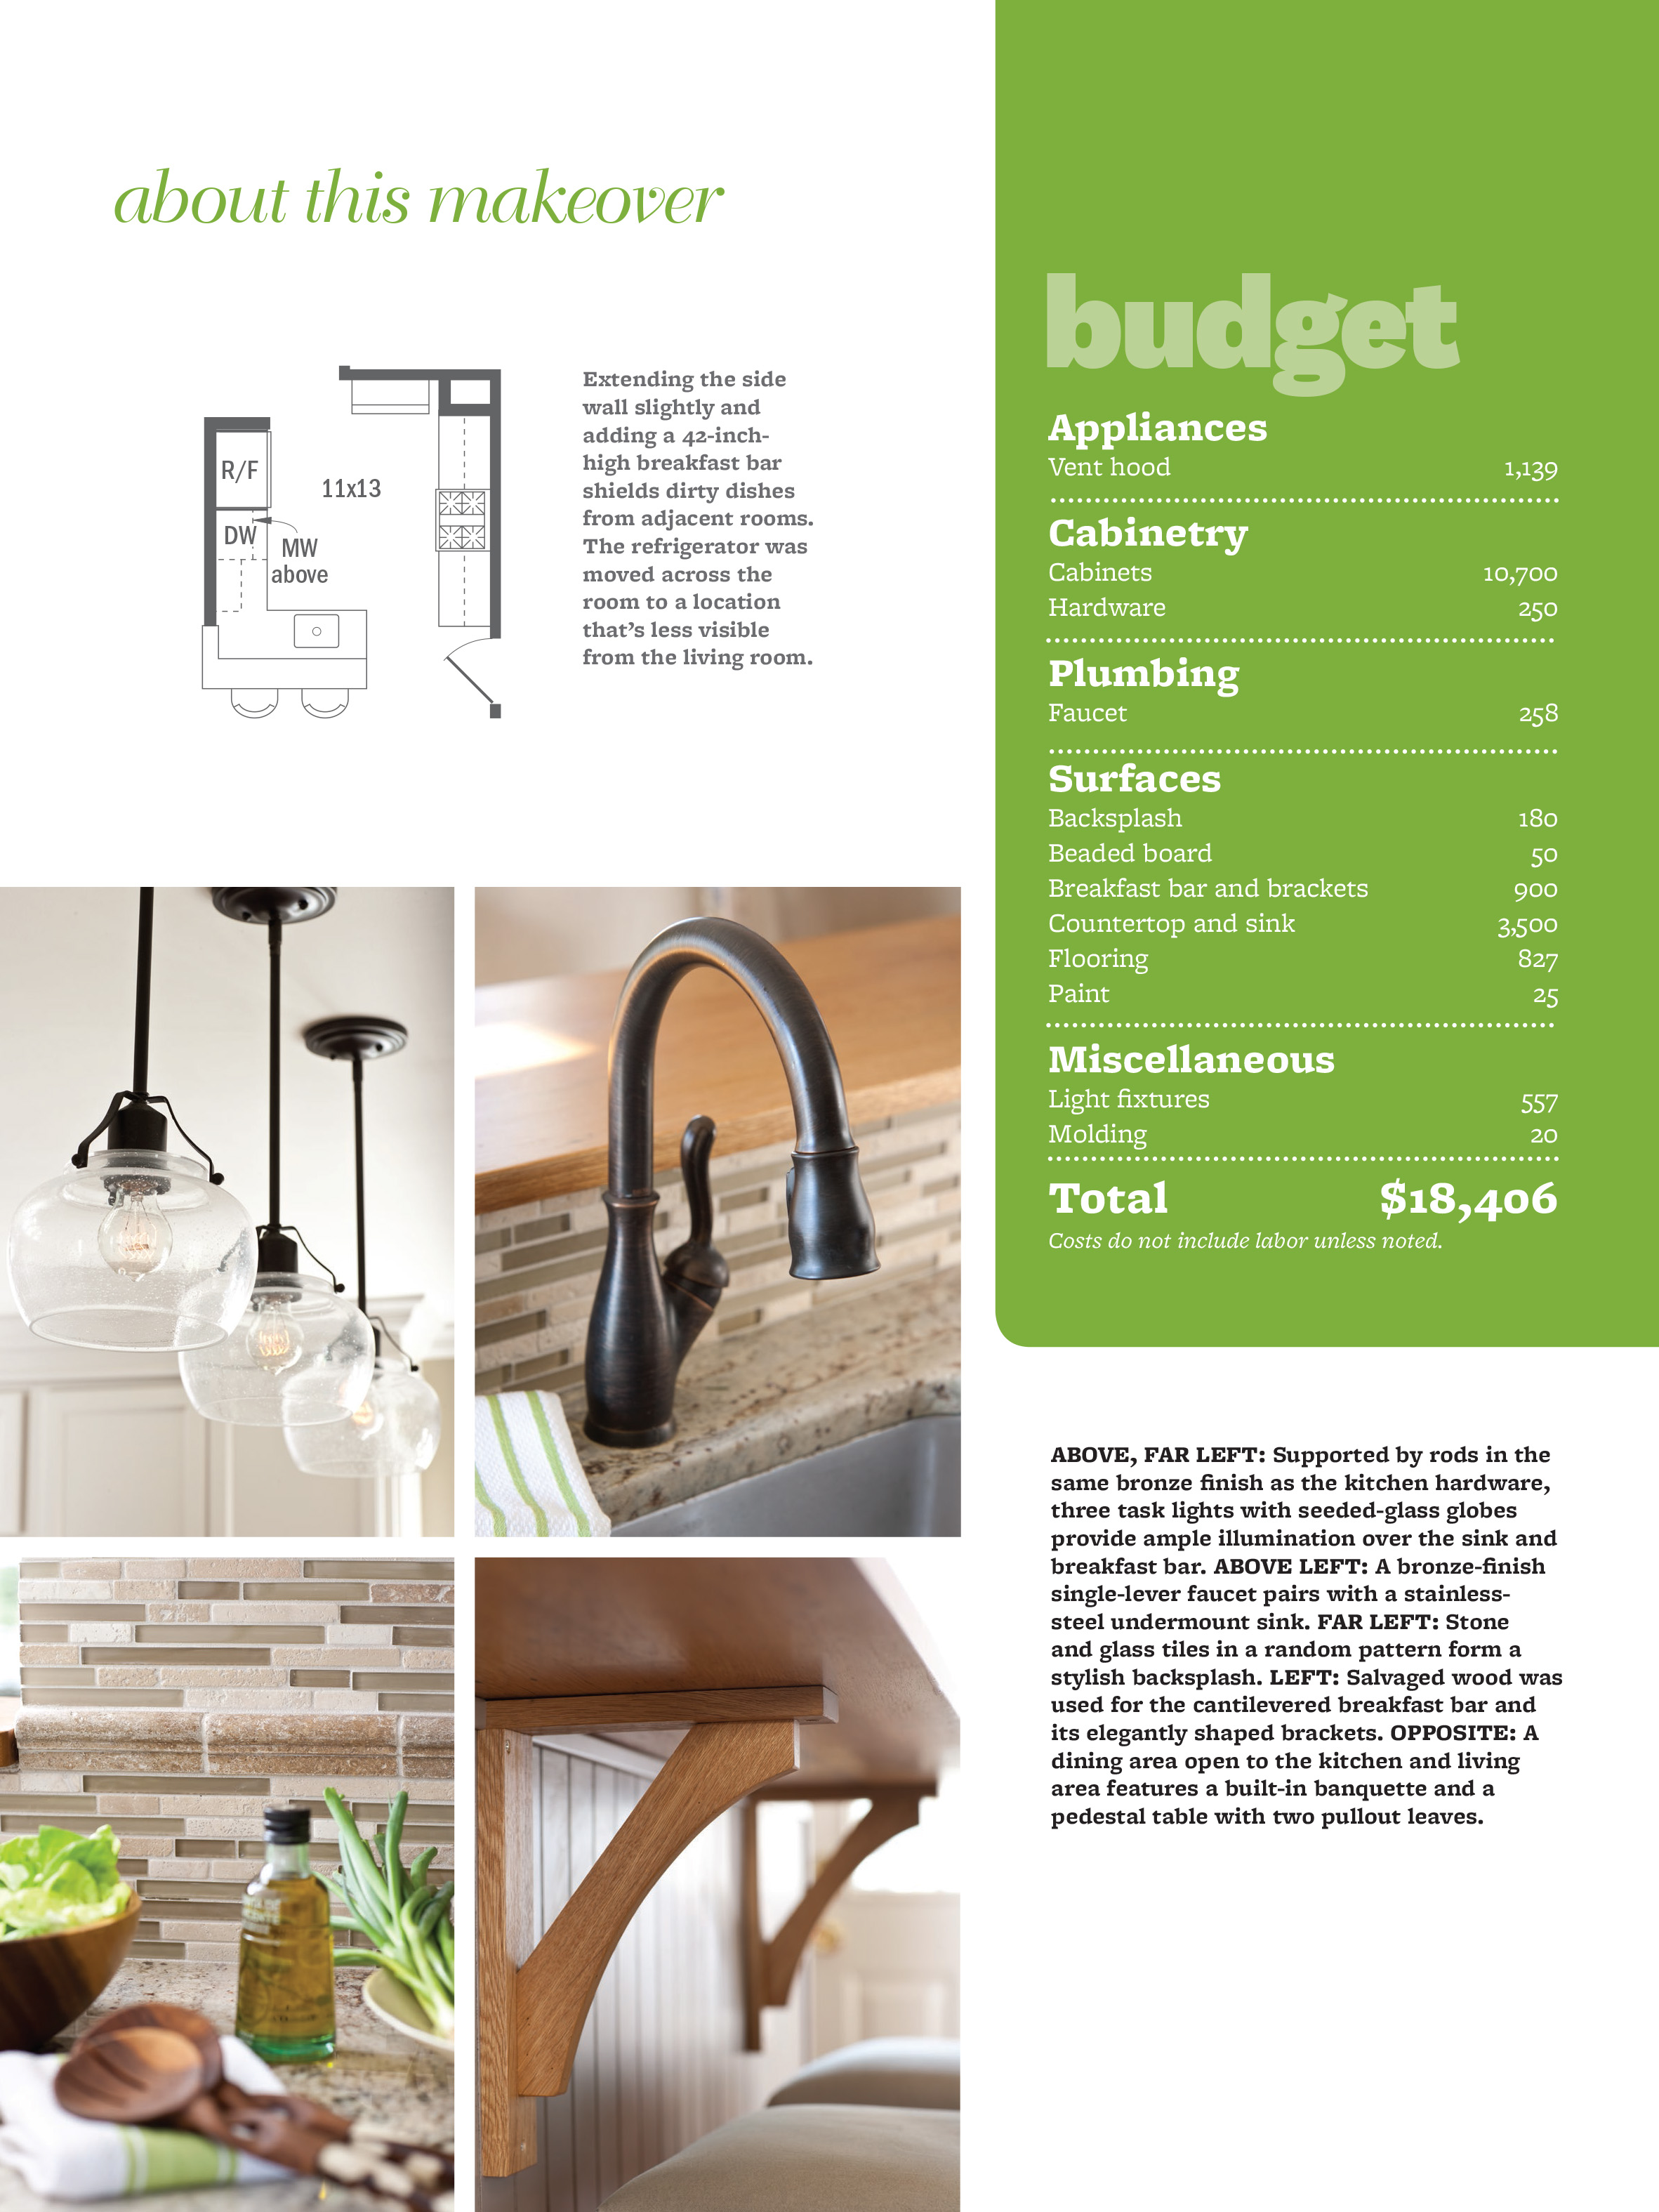
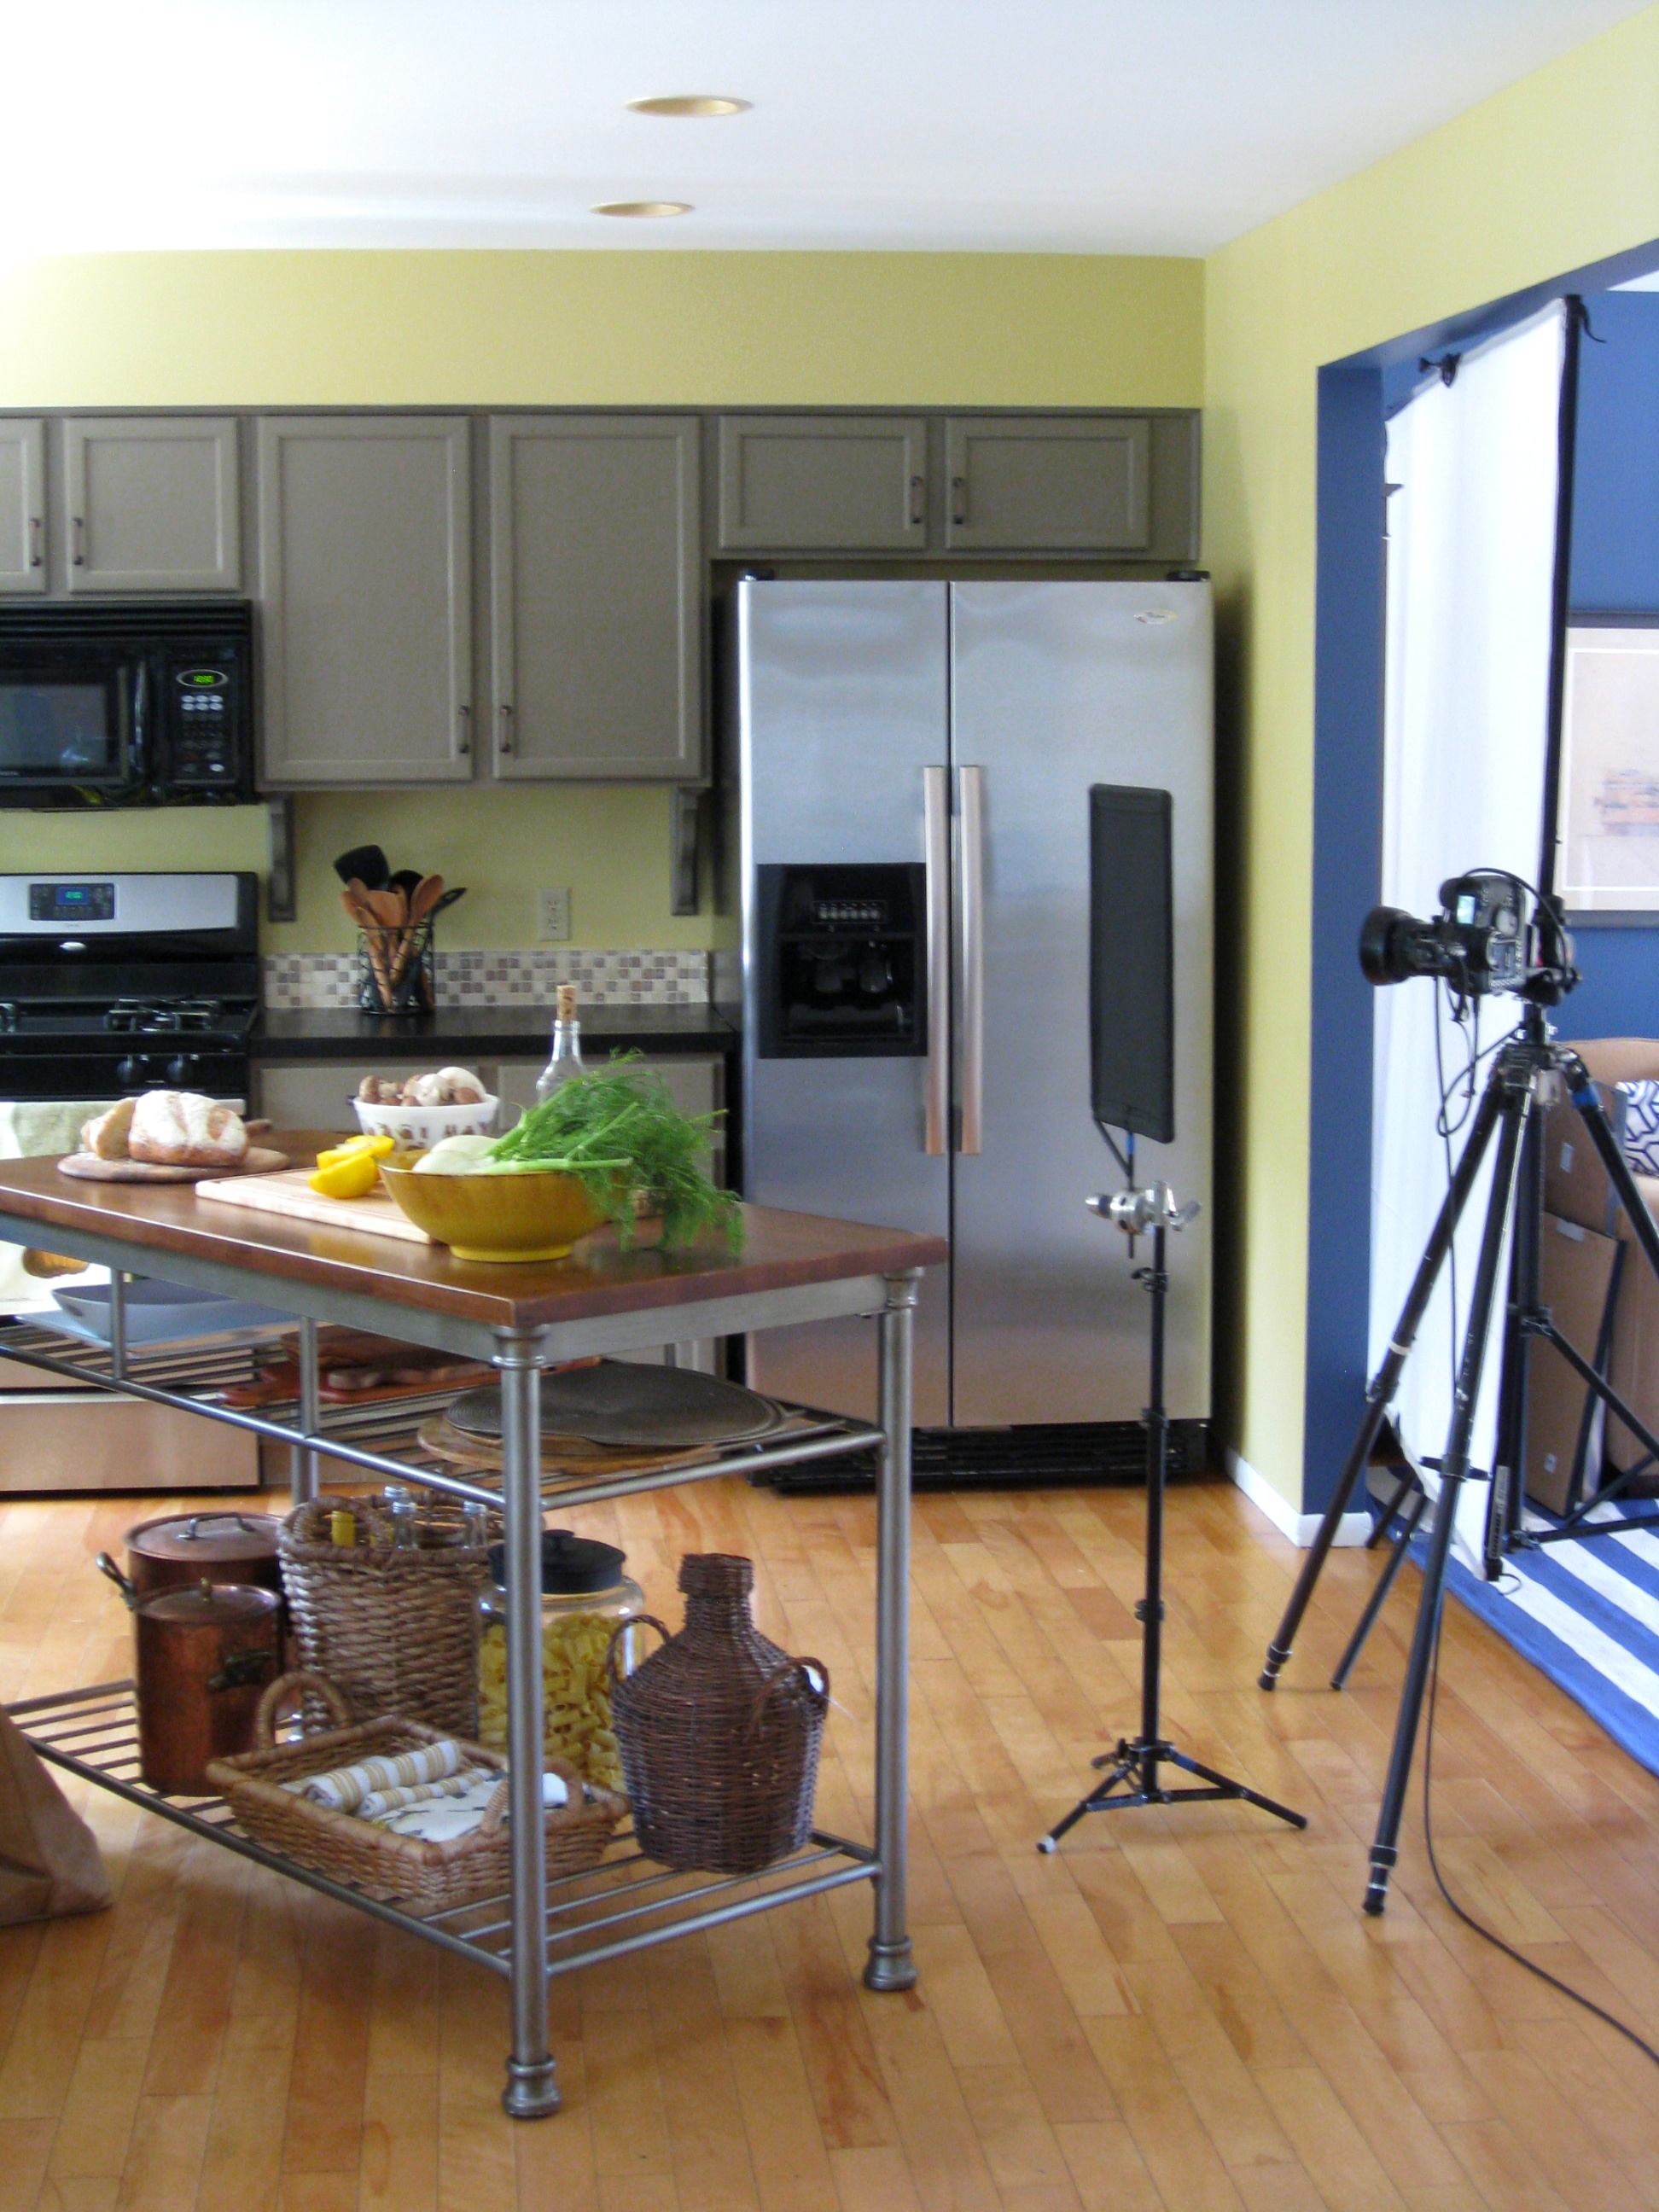
Day 1 was the kitchen and that was completely transformed to look like this…

My Kitchen featured in KBMO

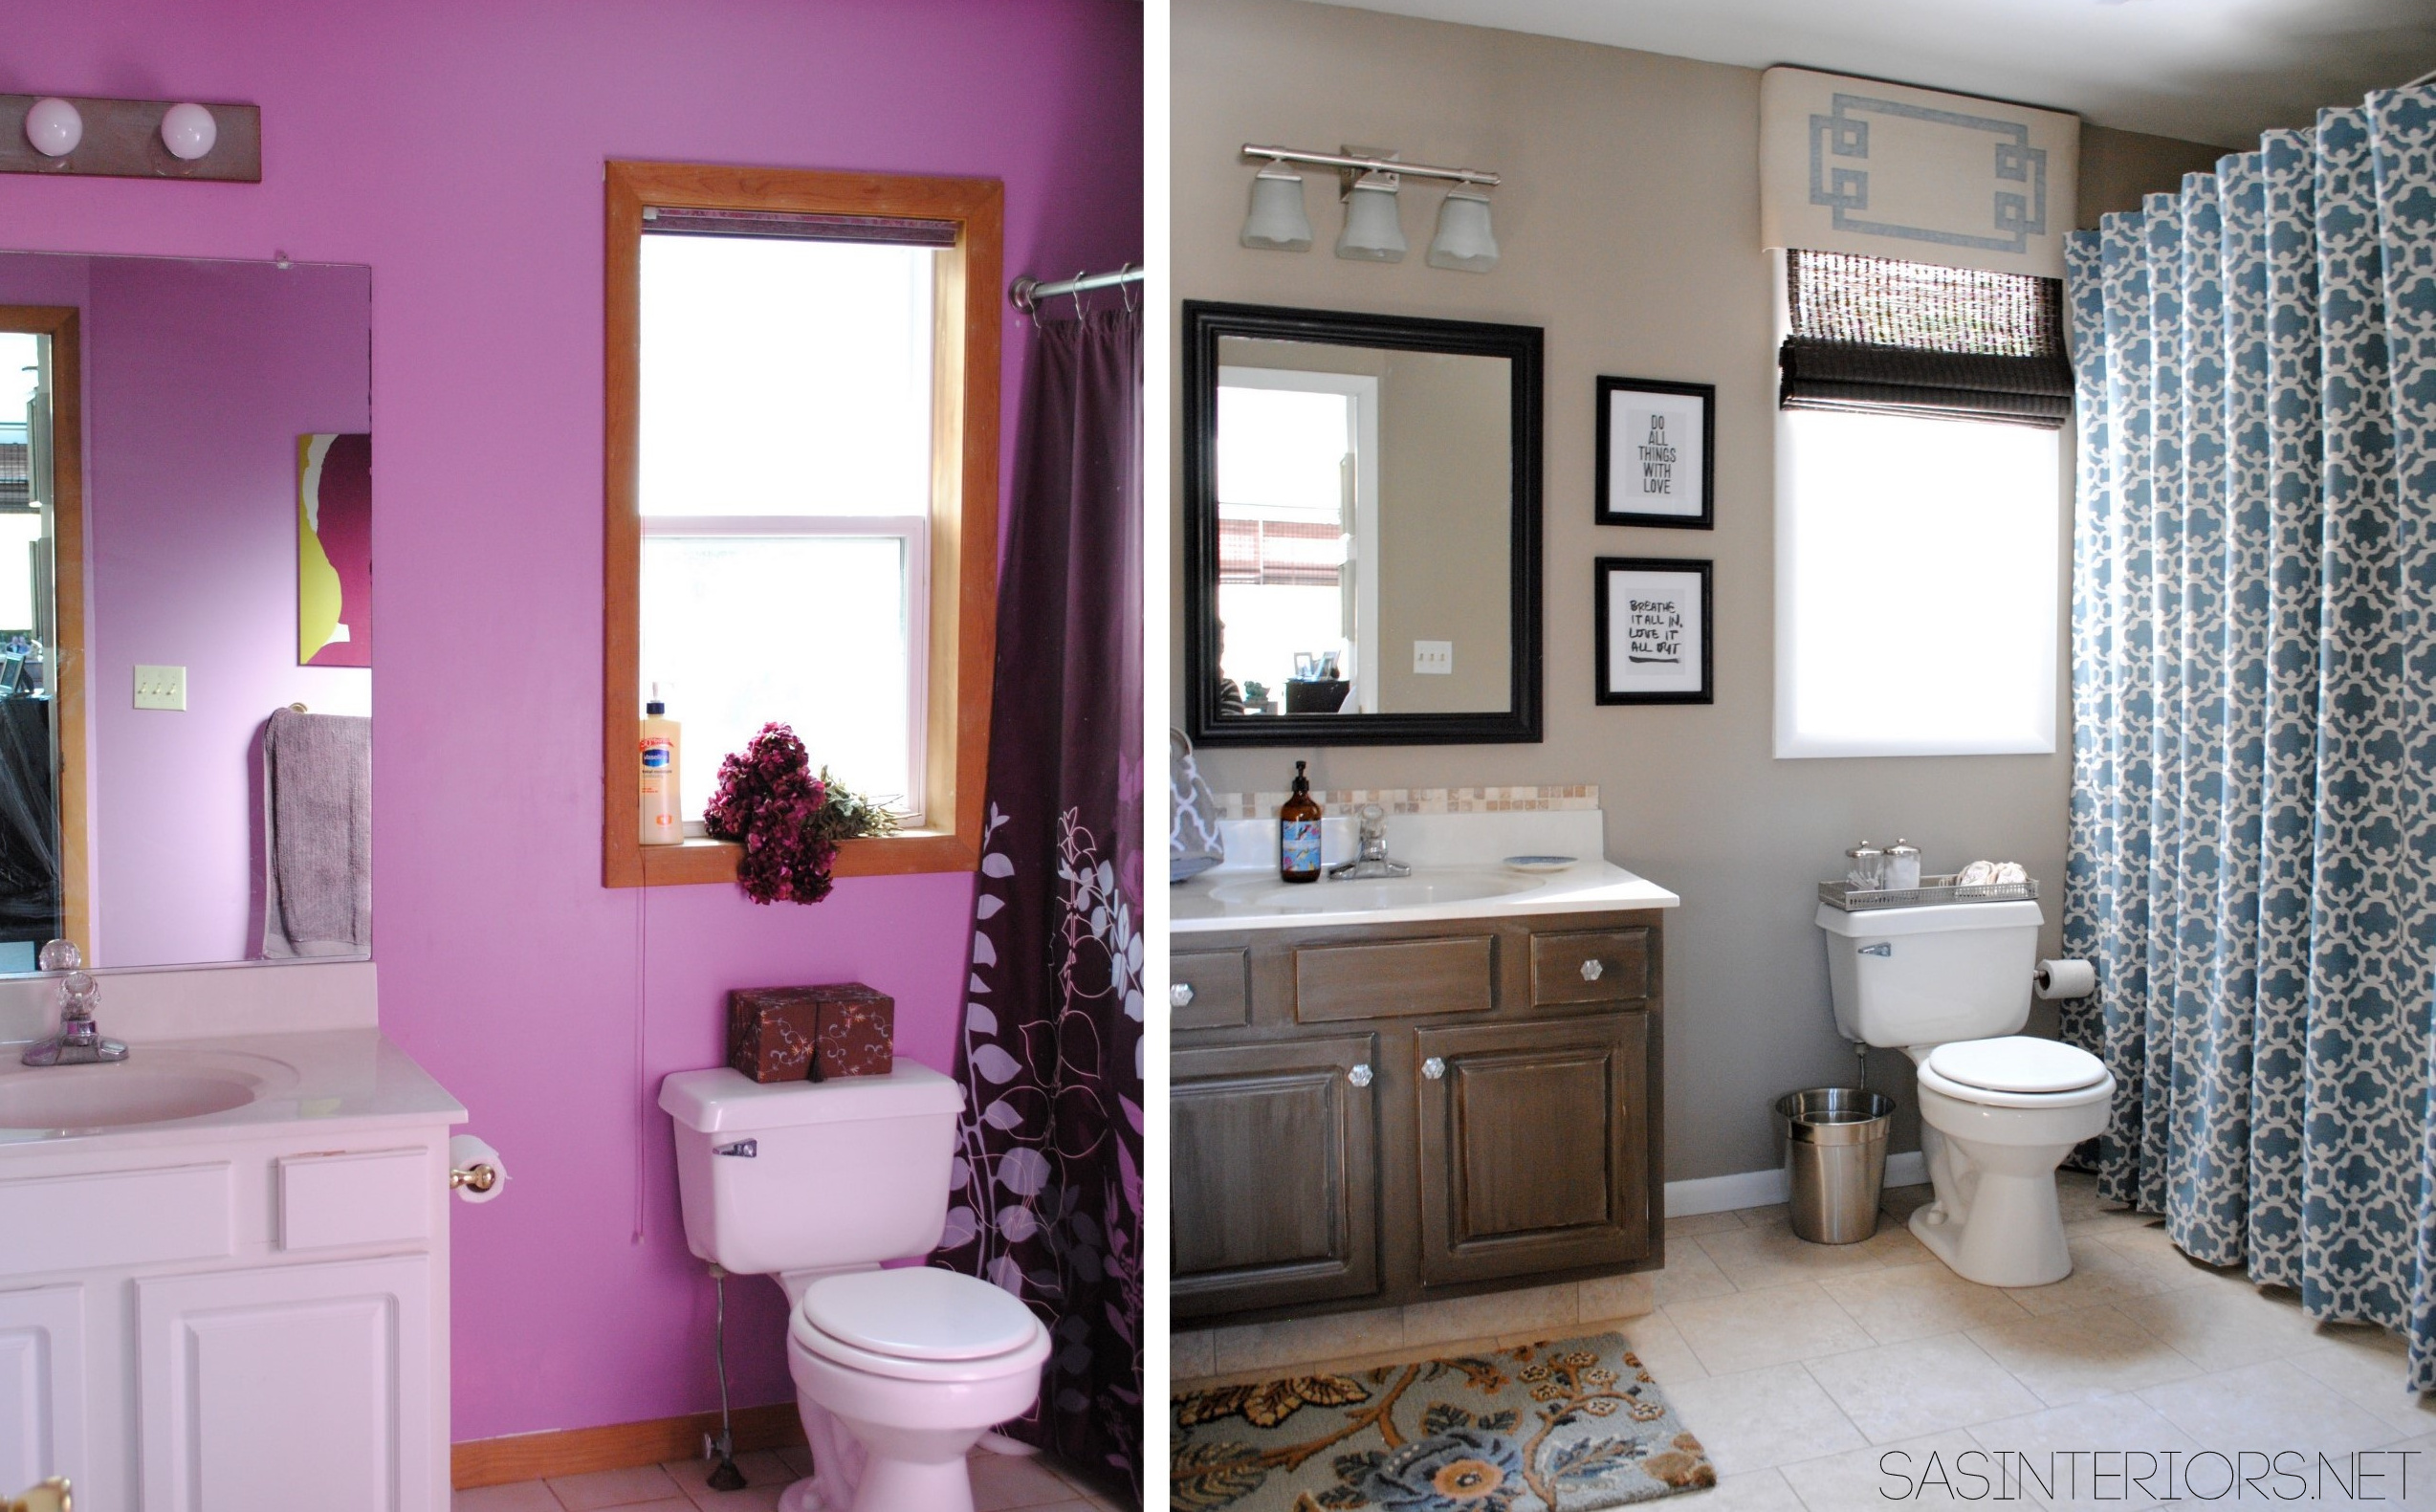
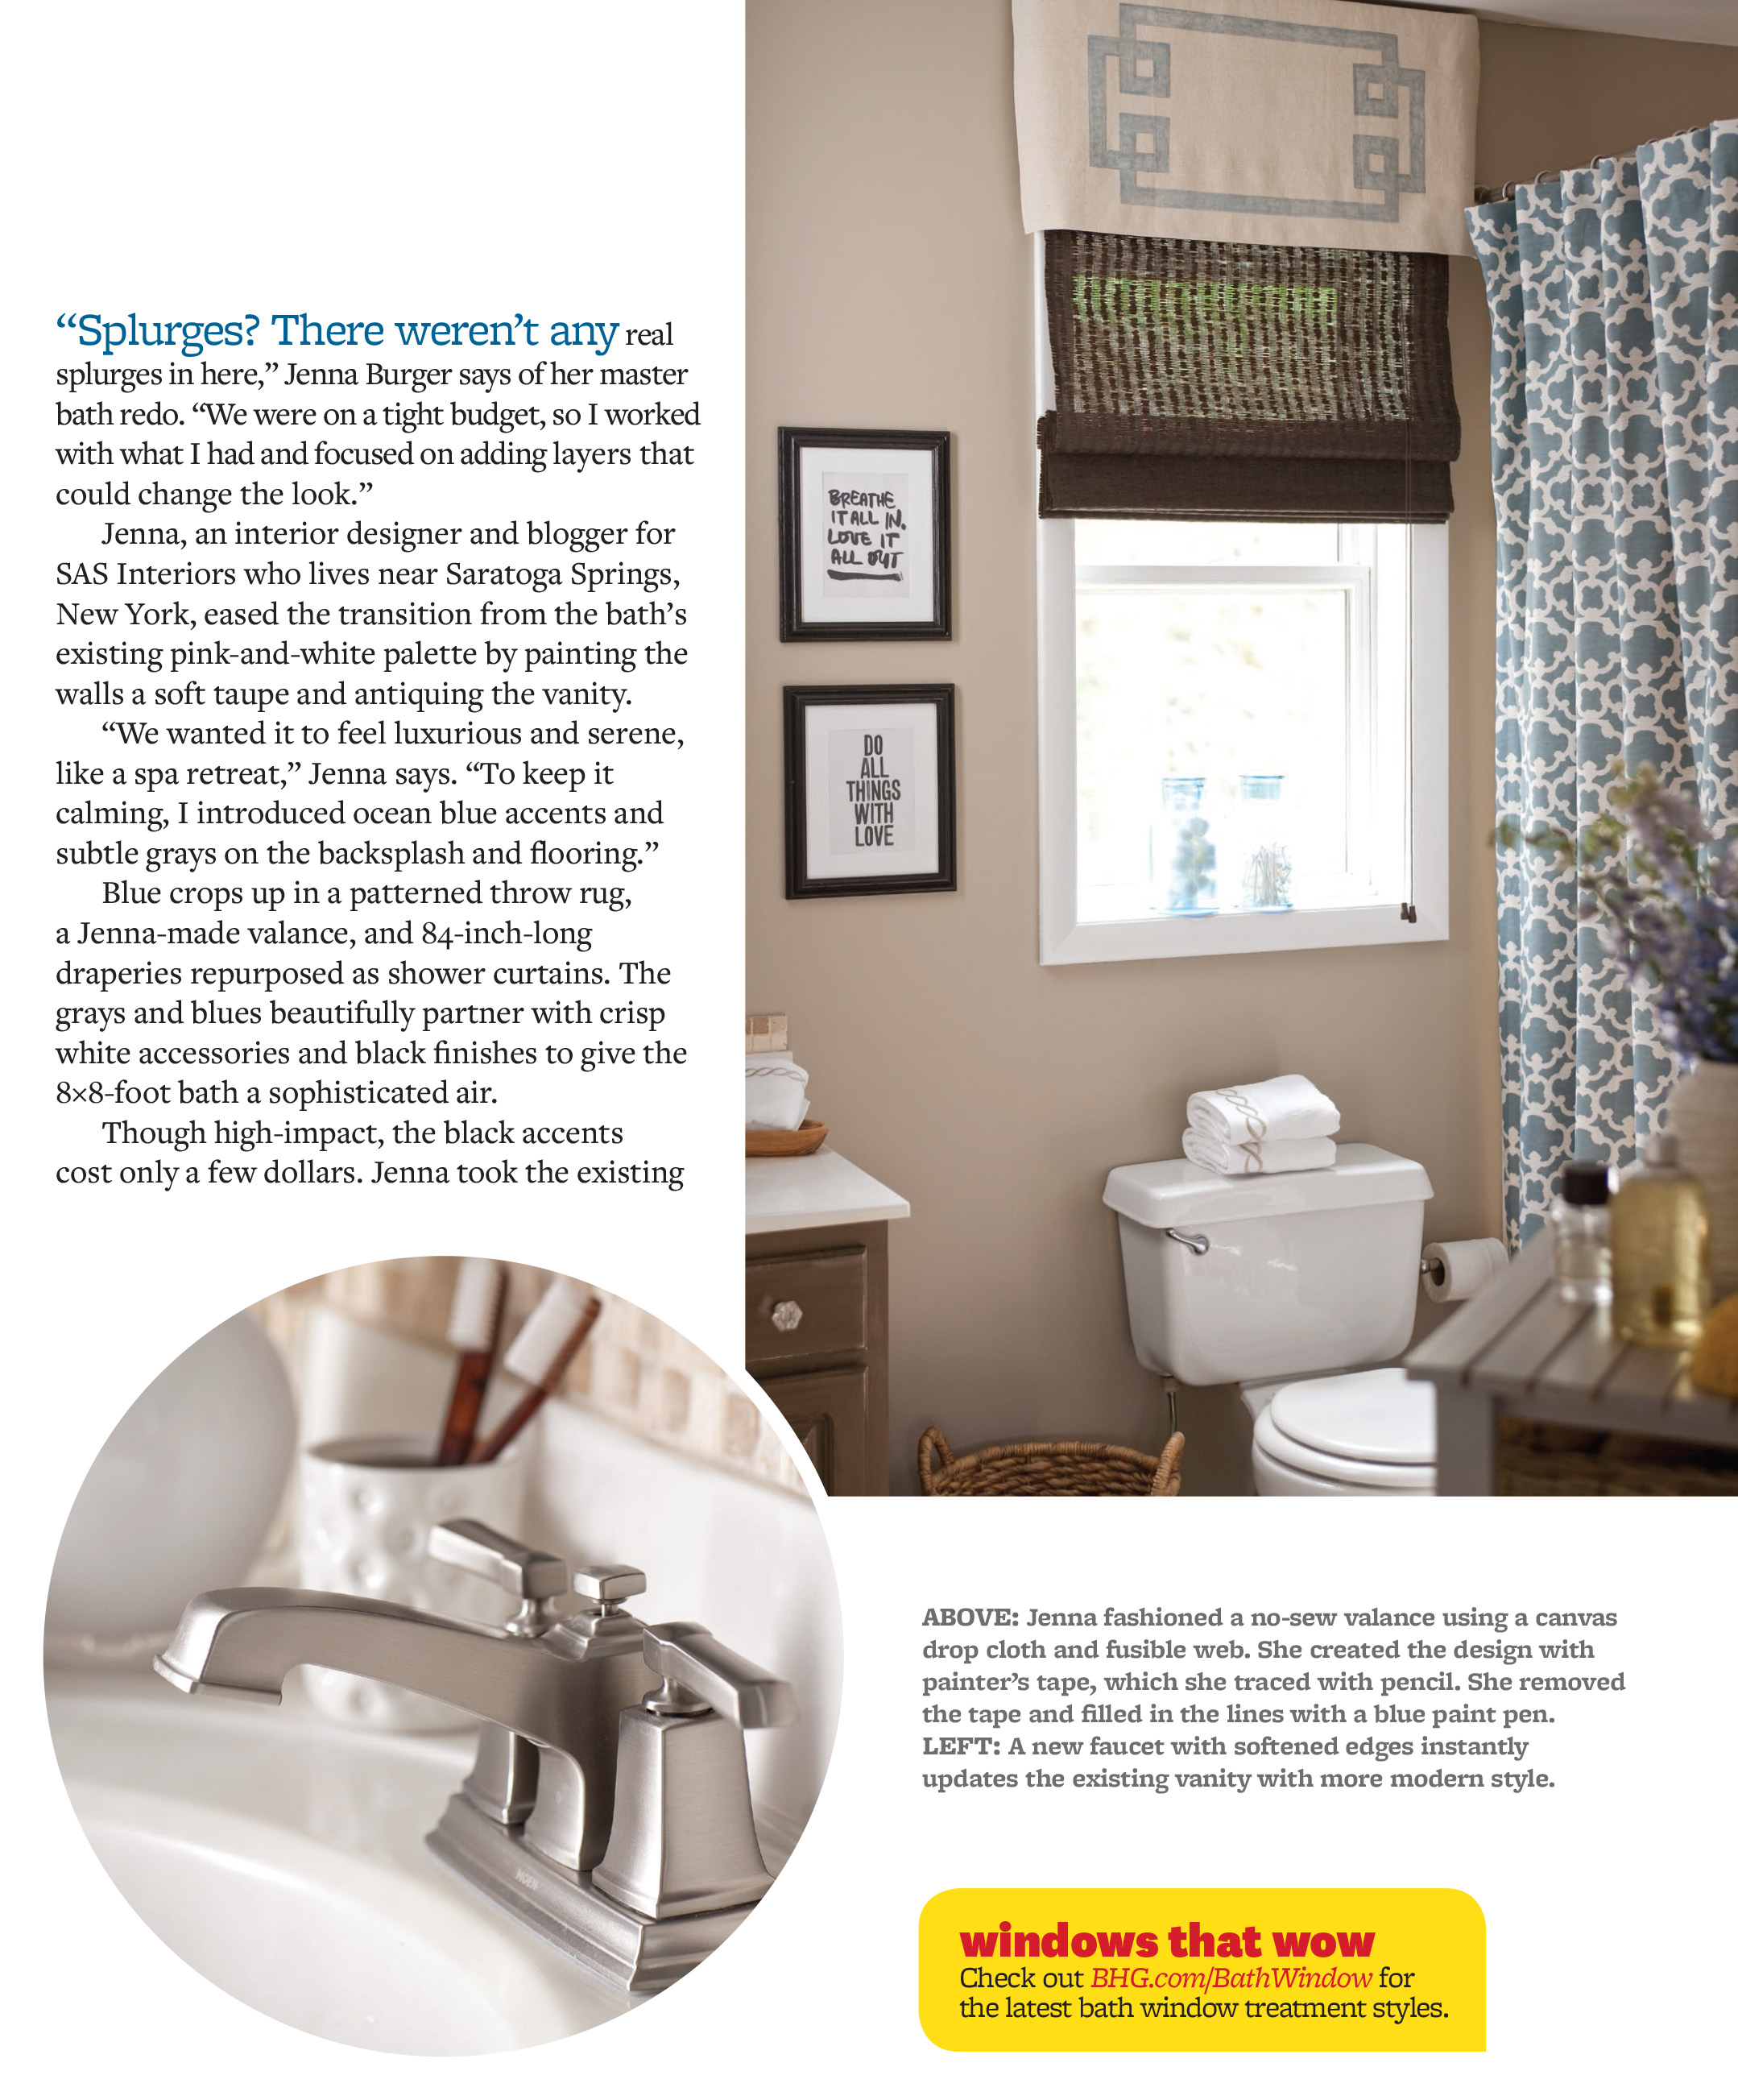
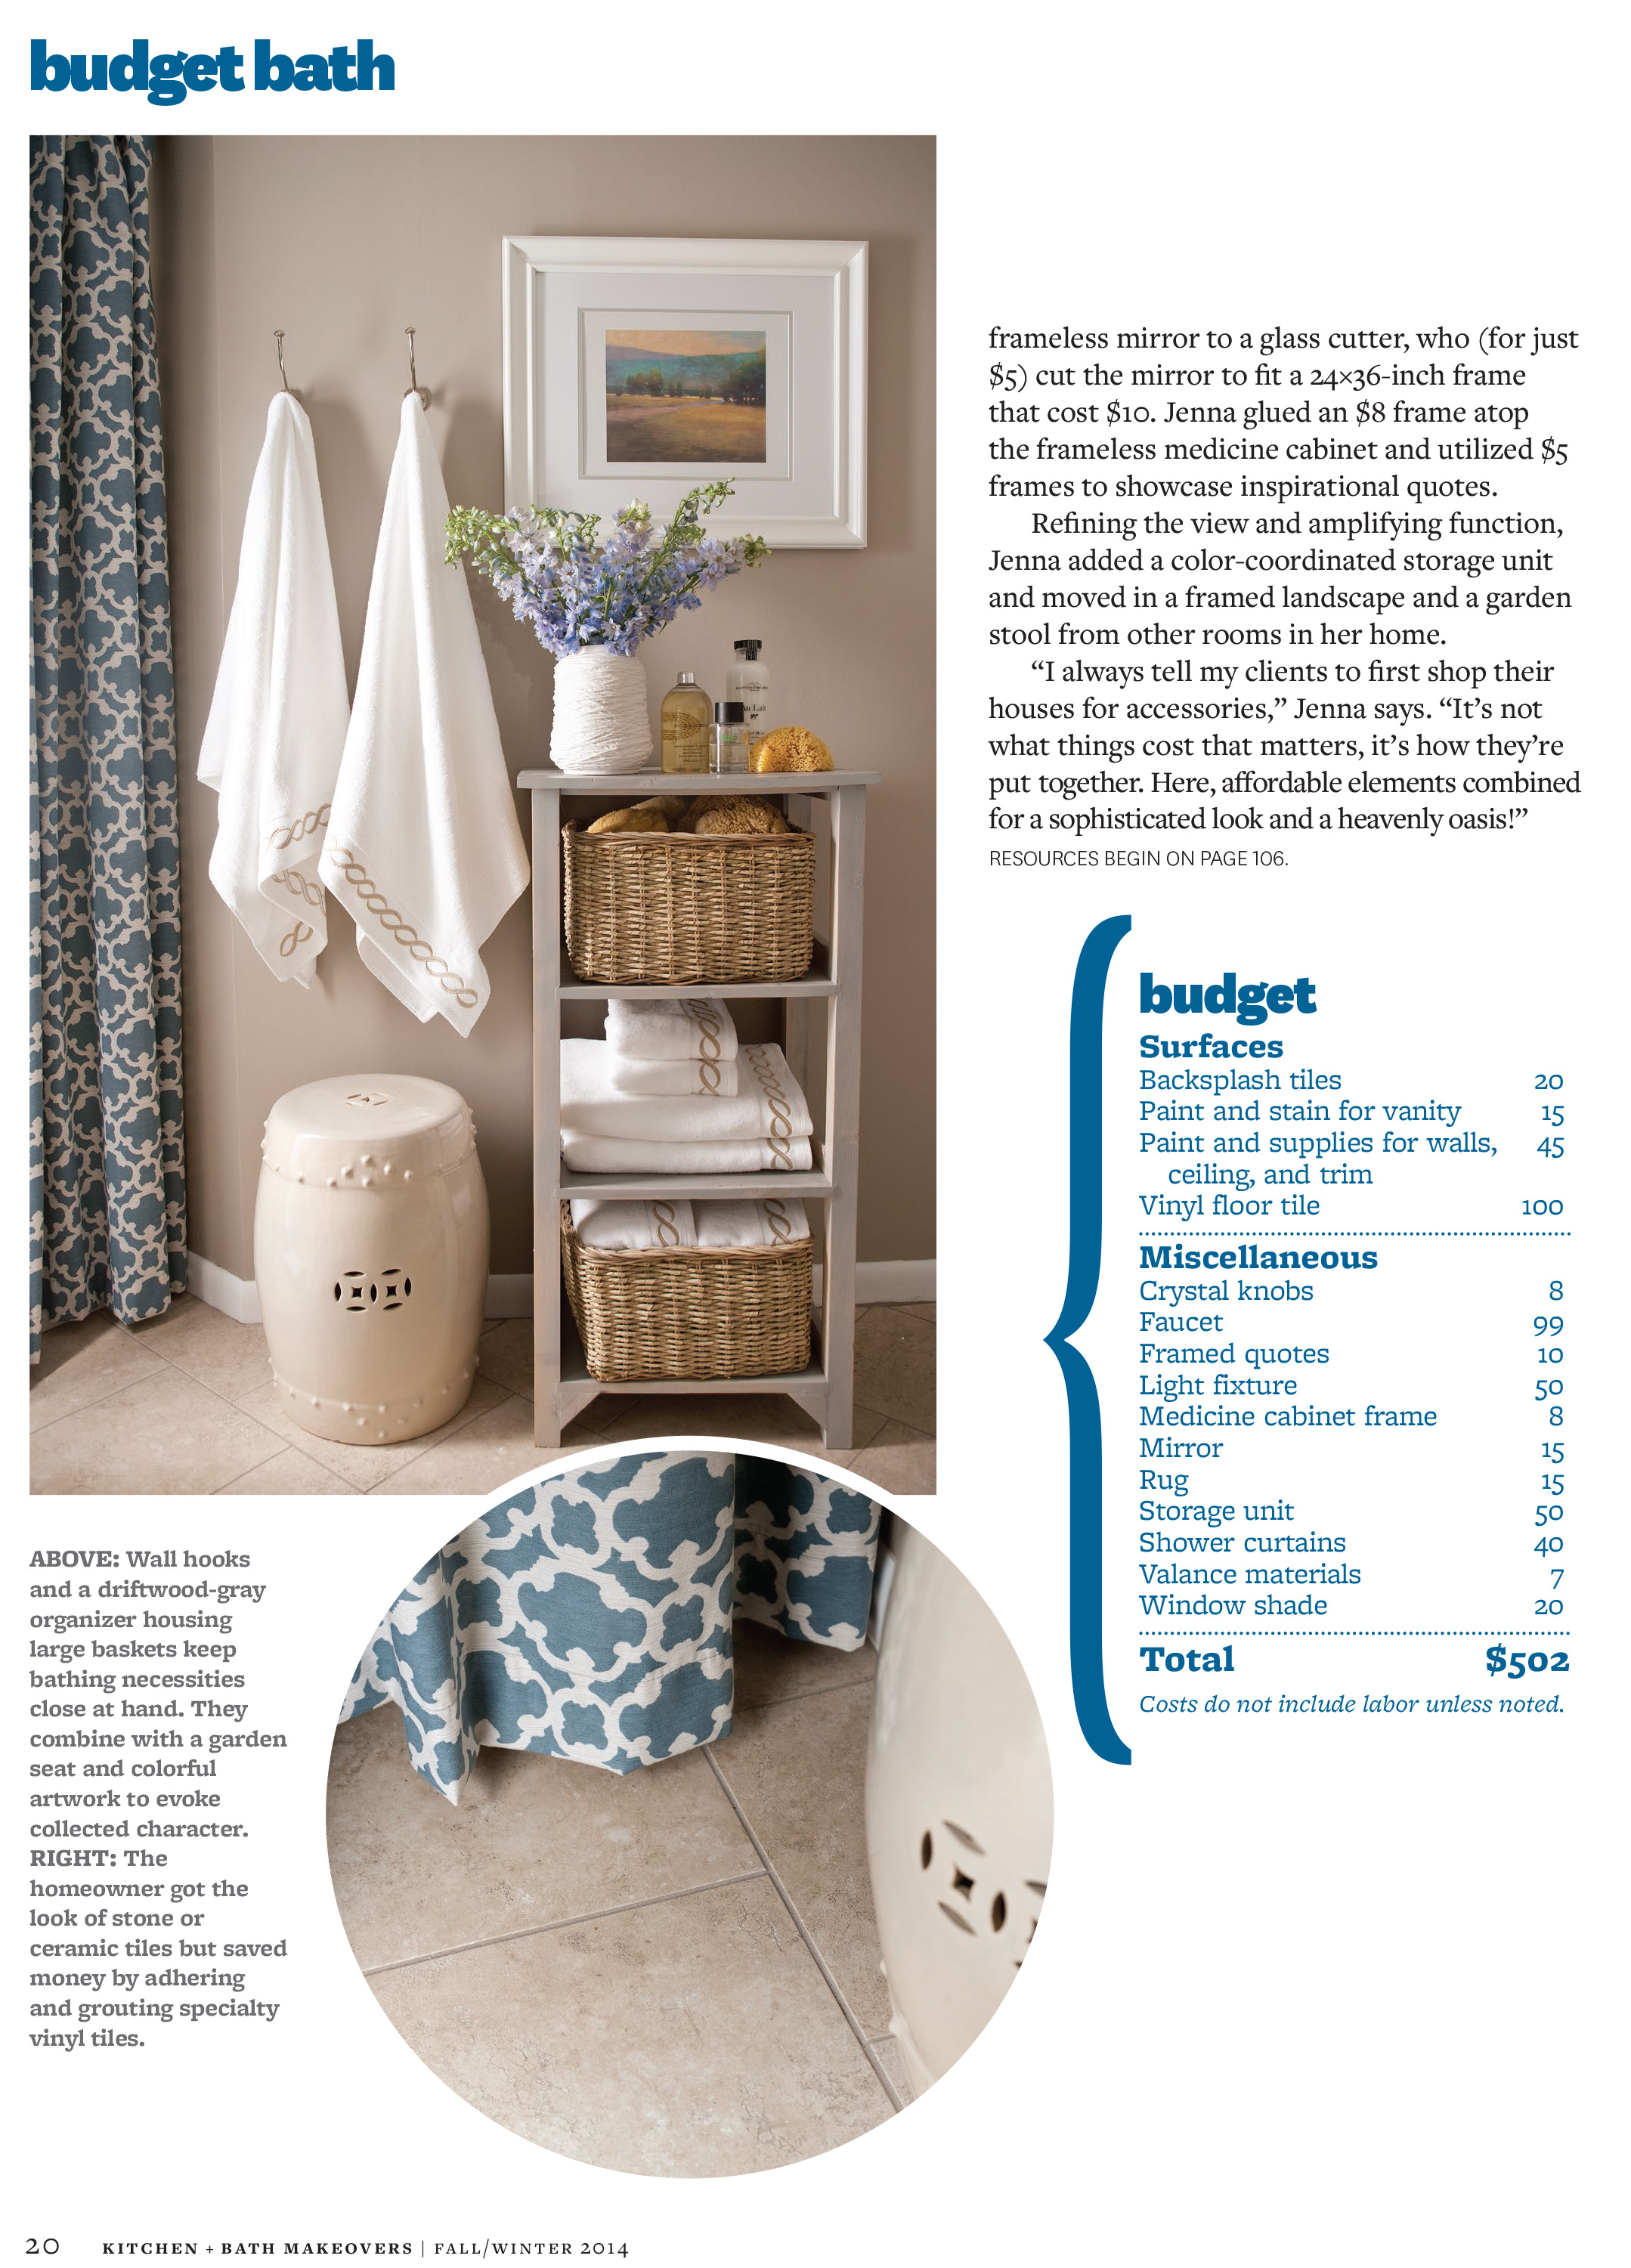
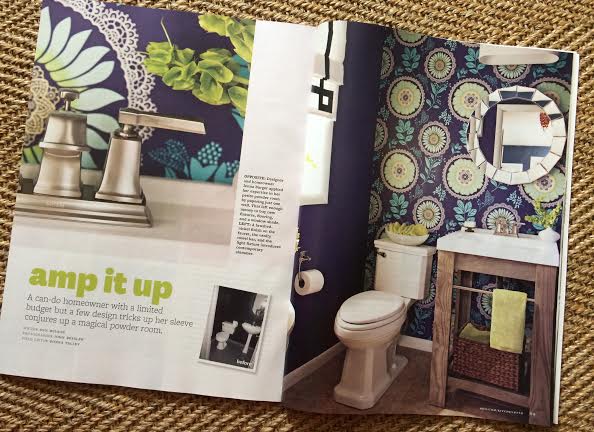
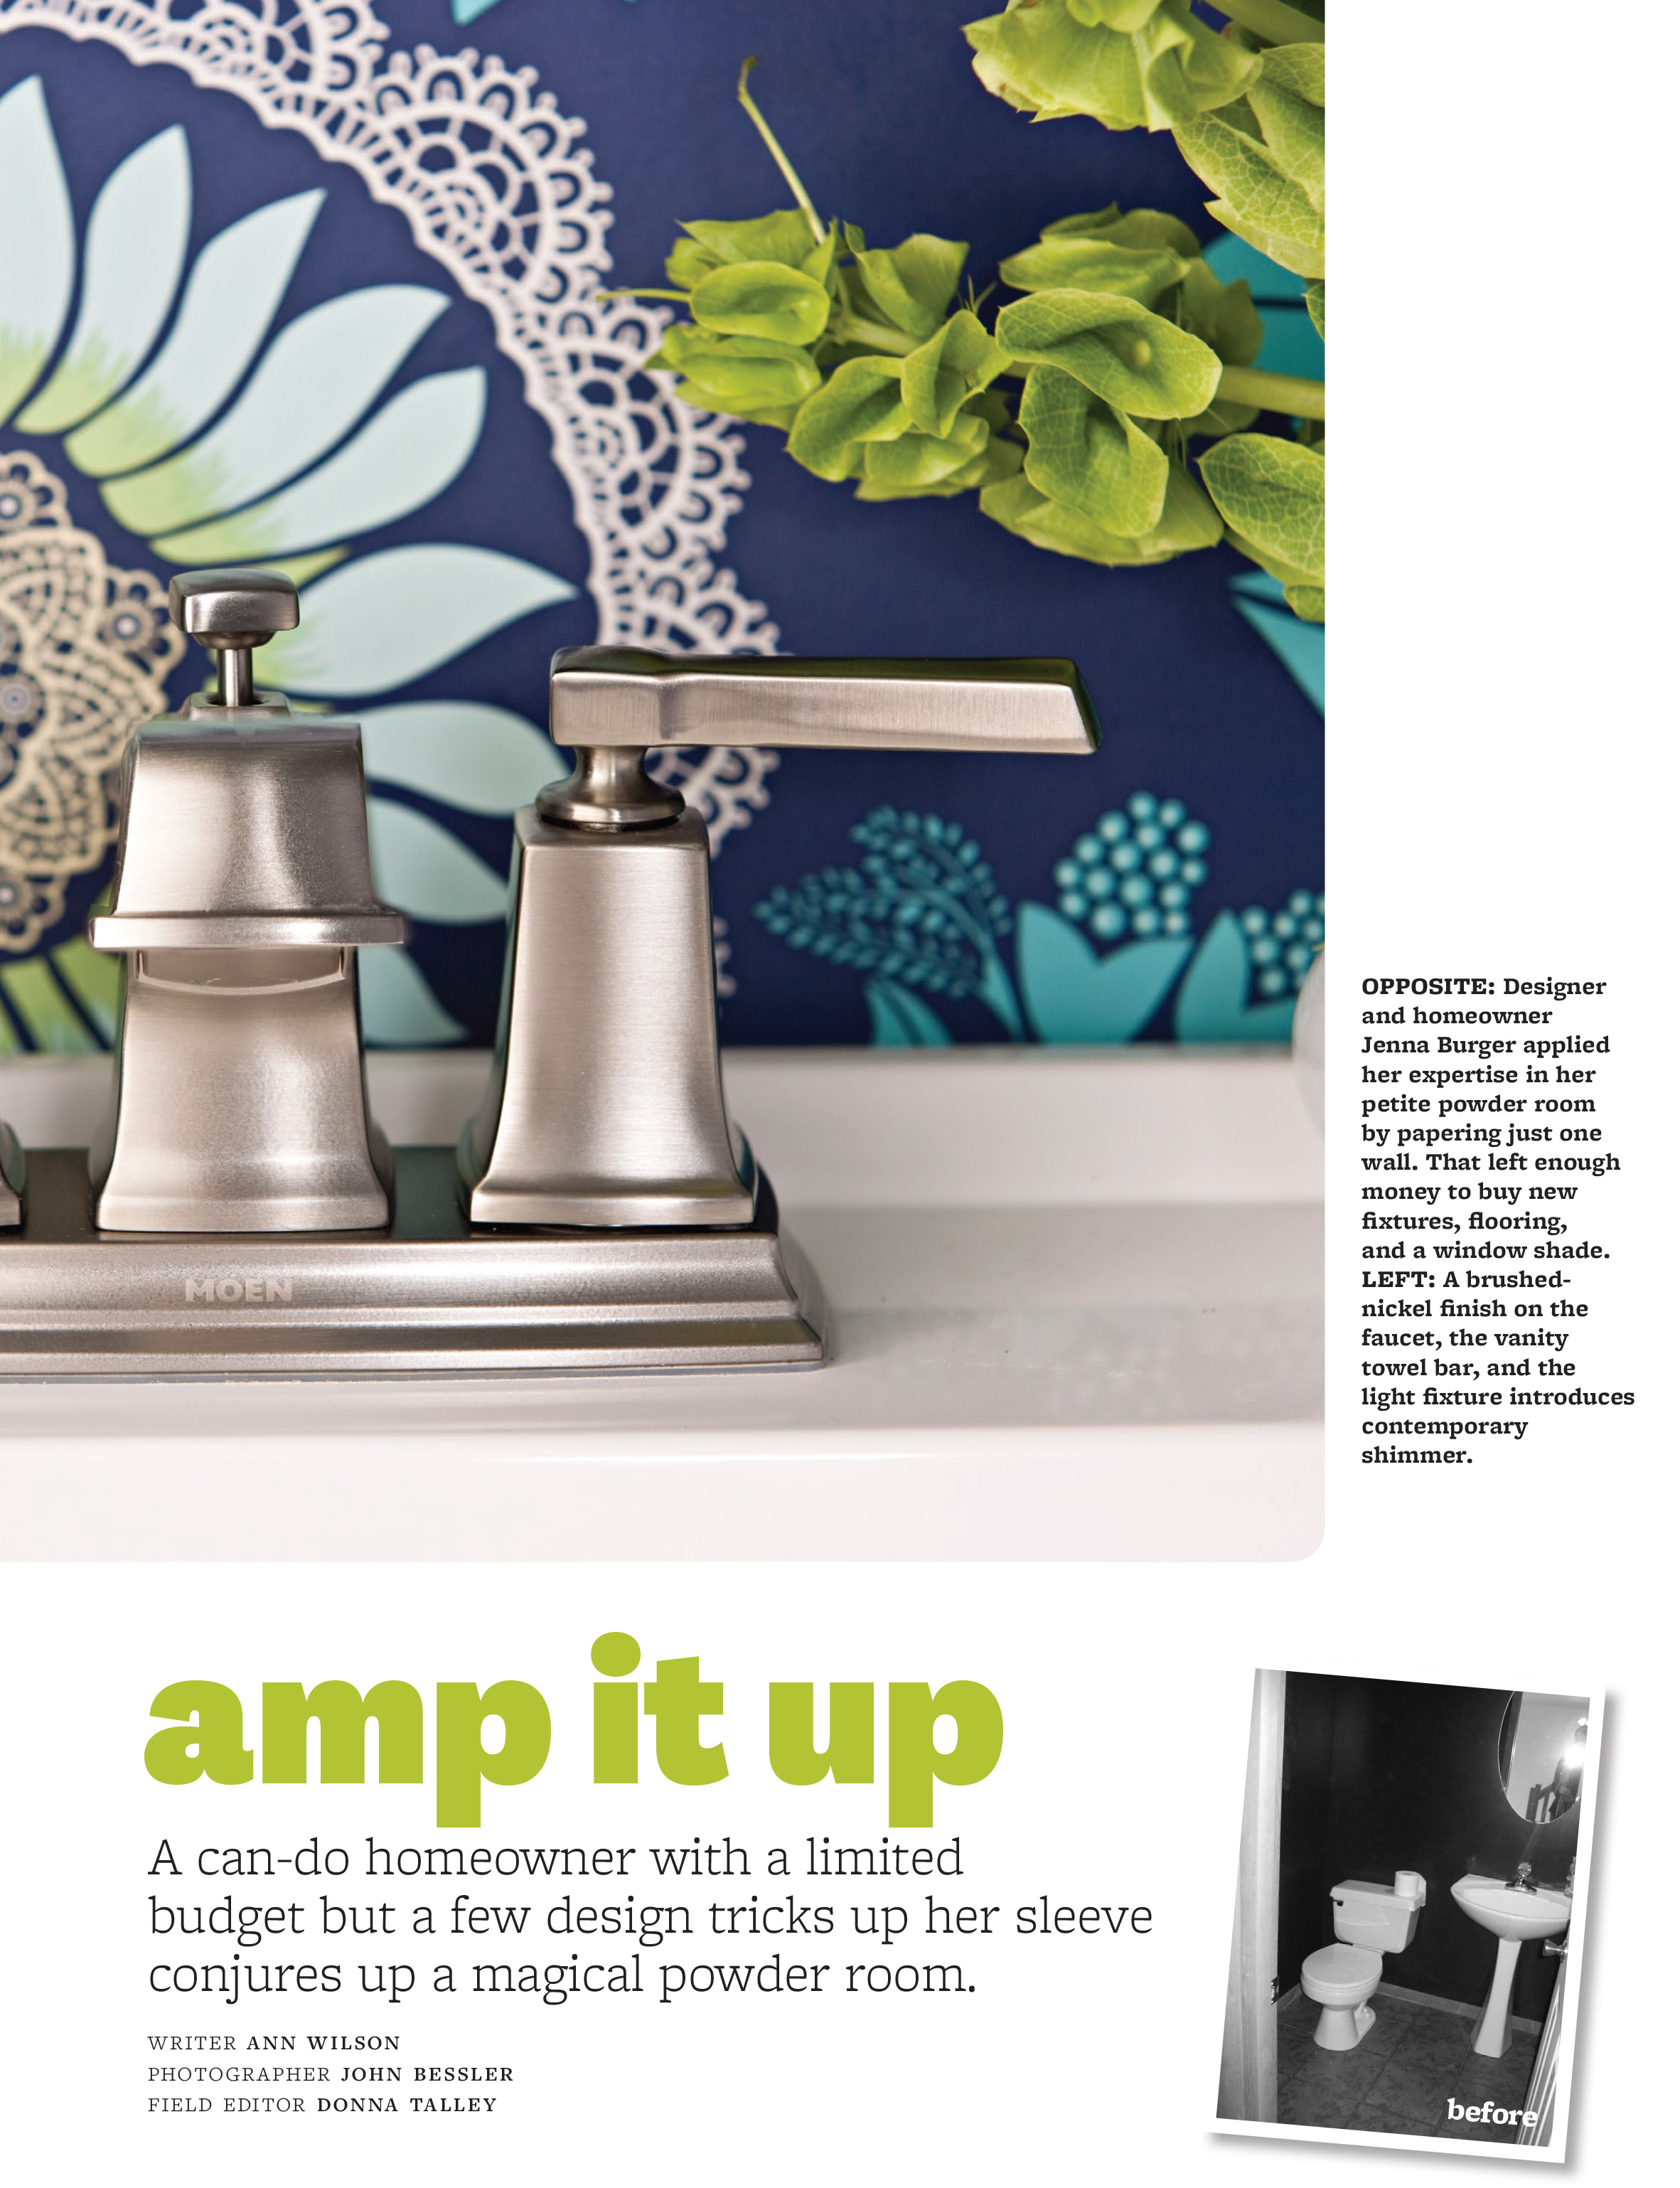
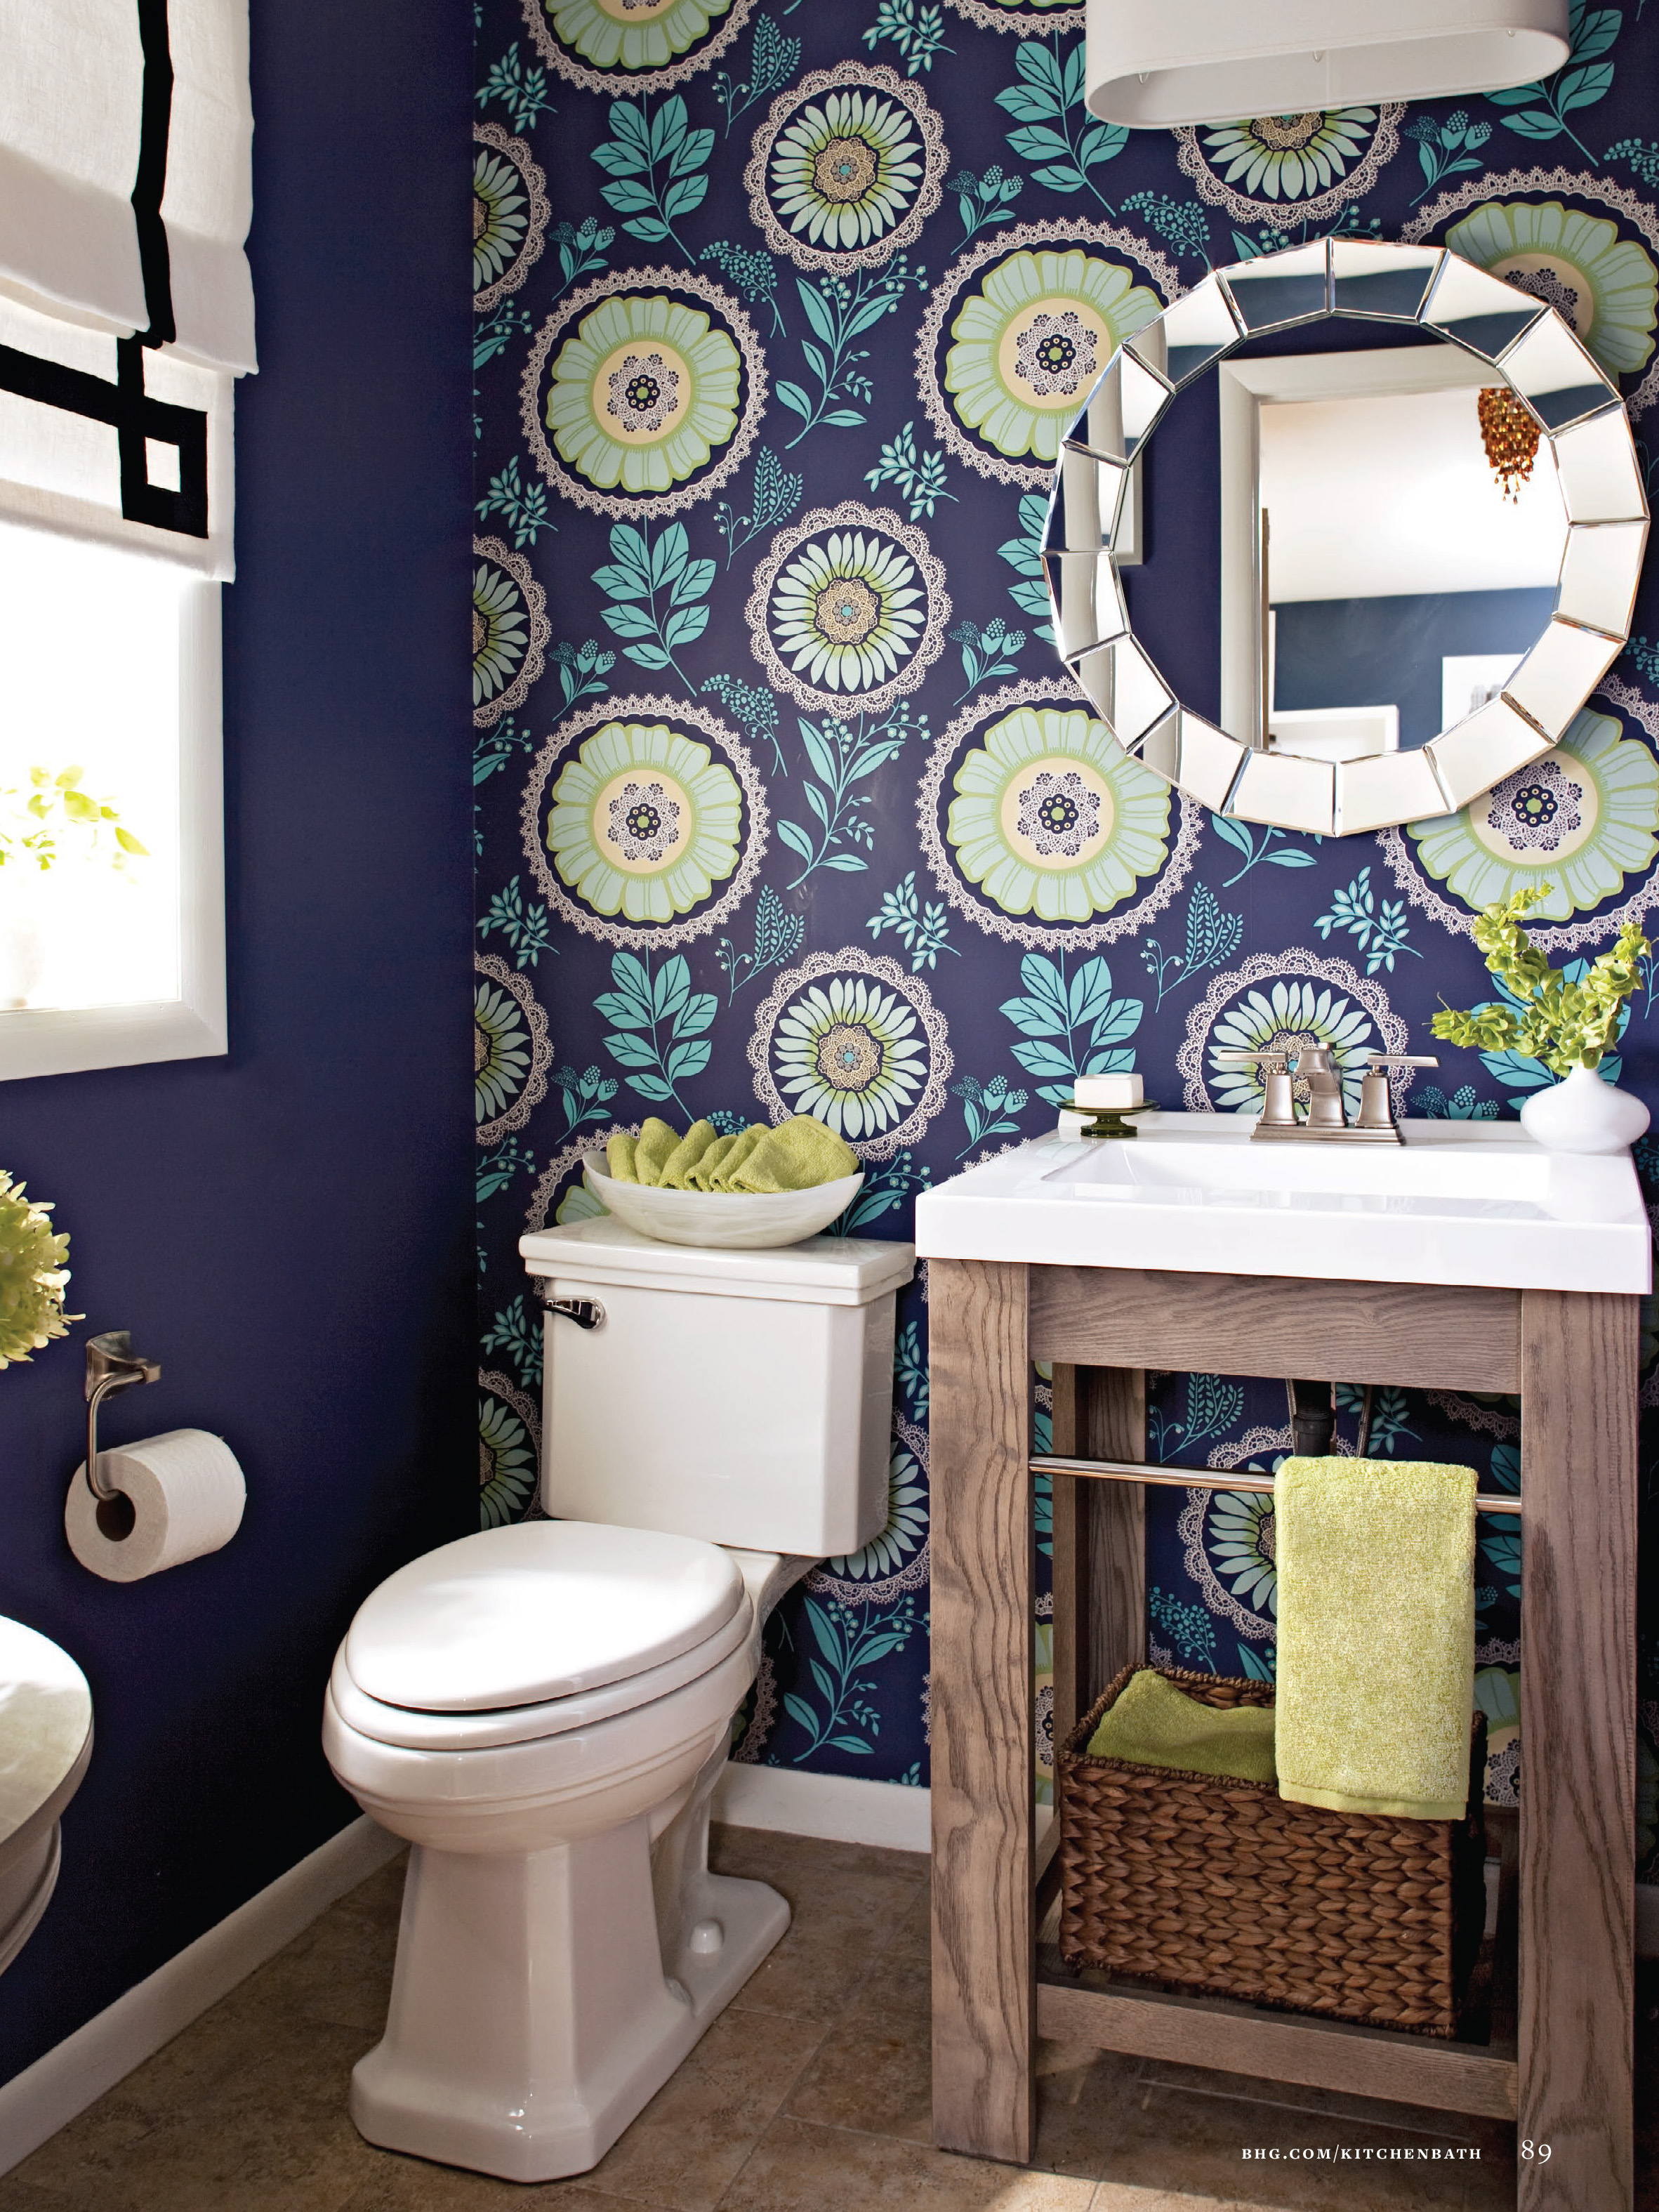
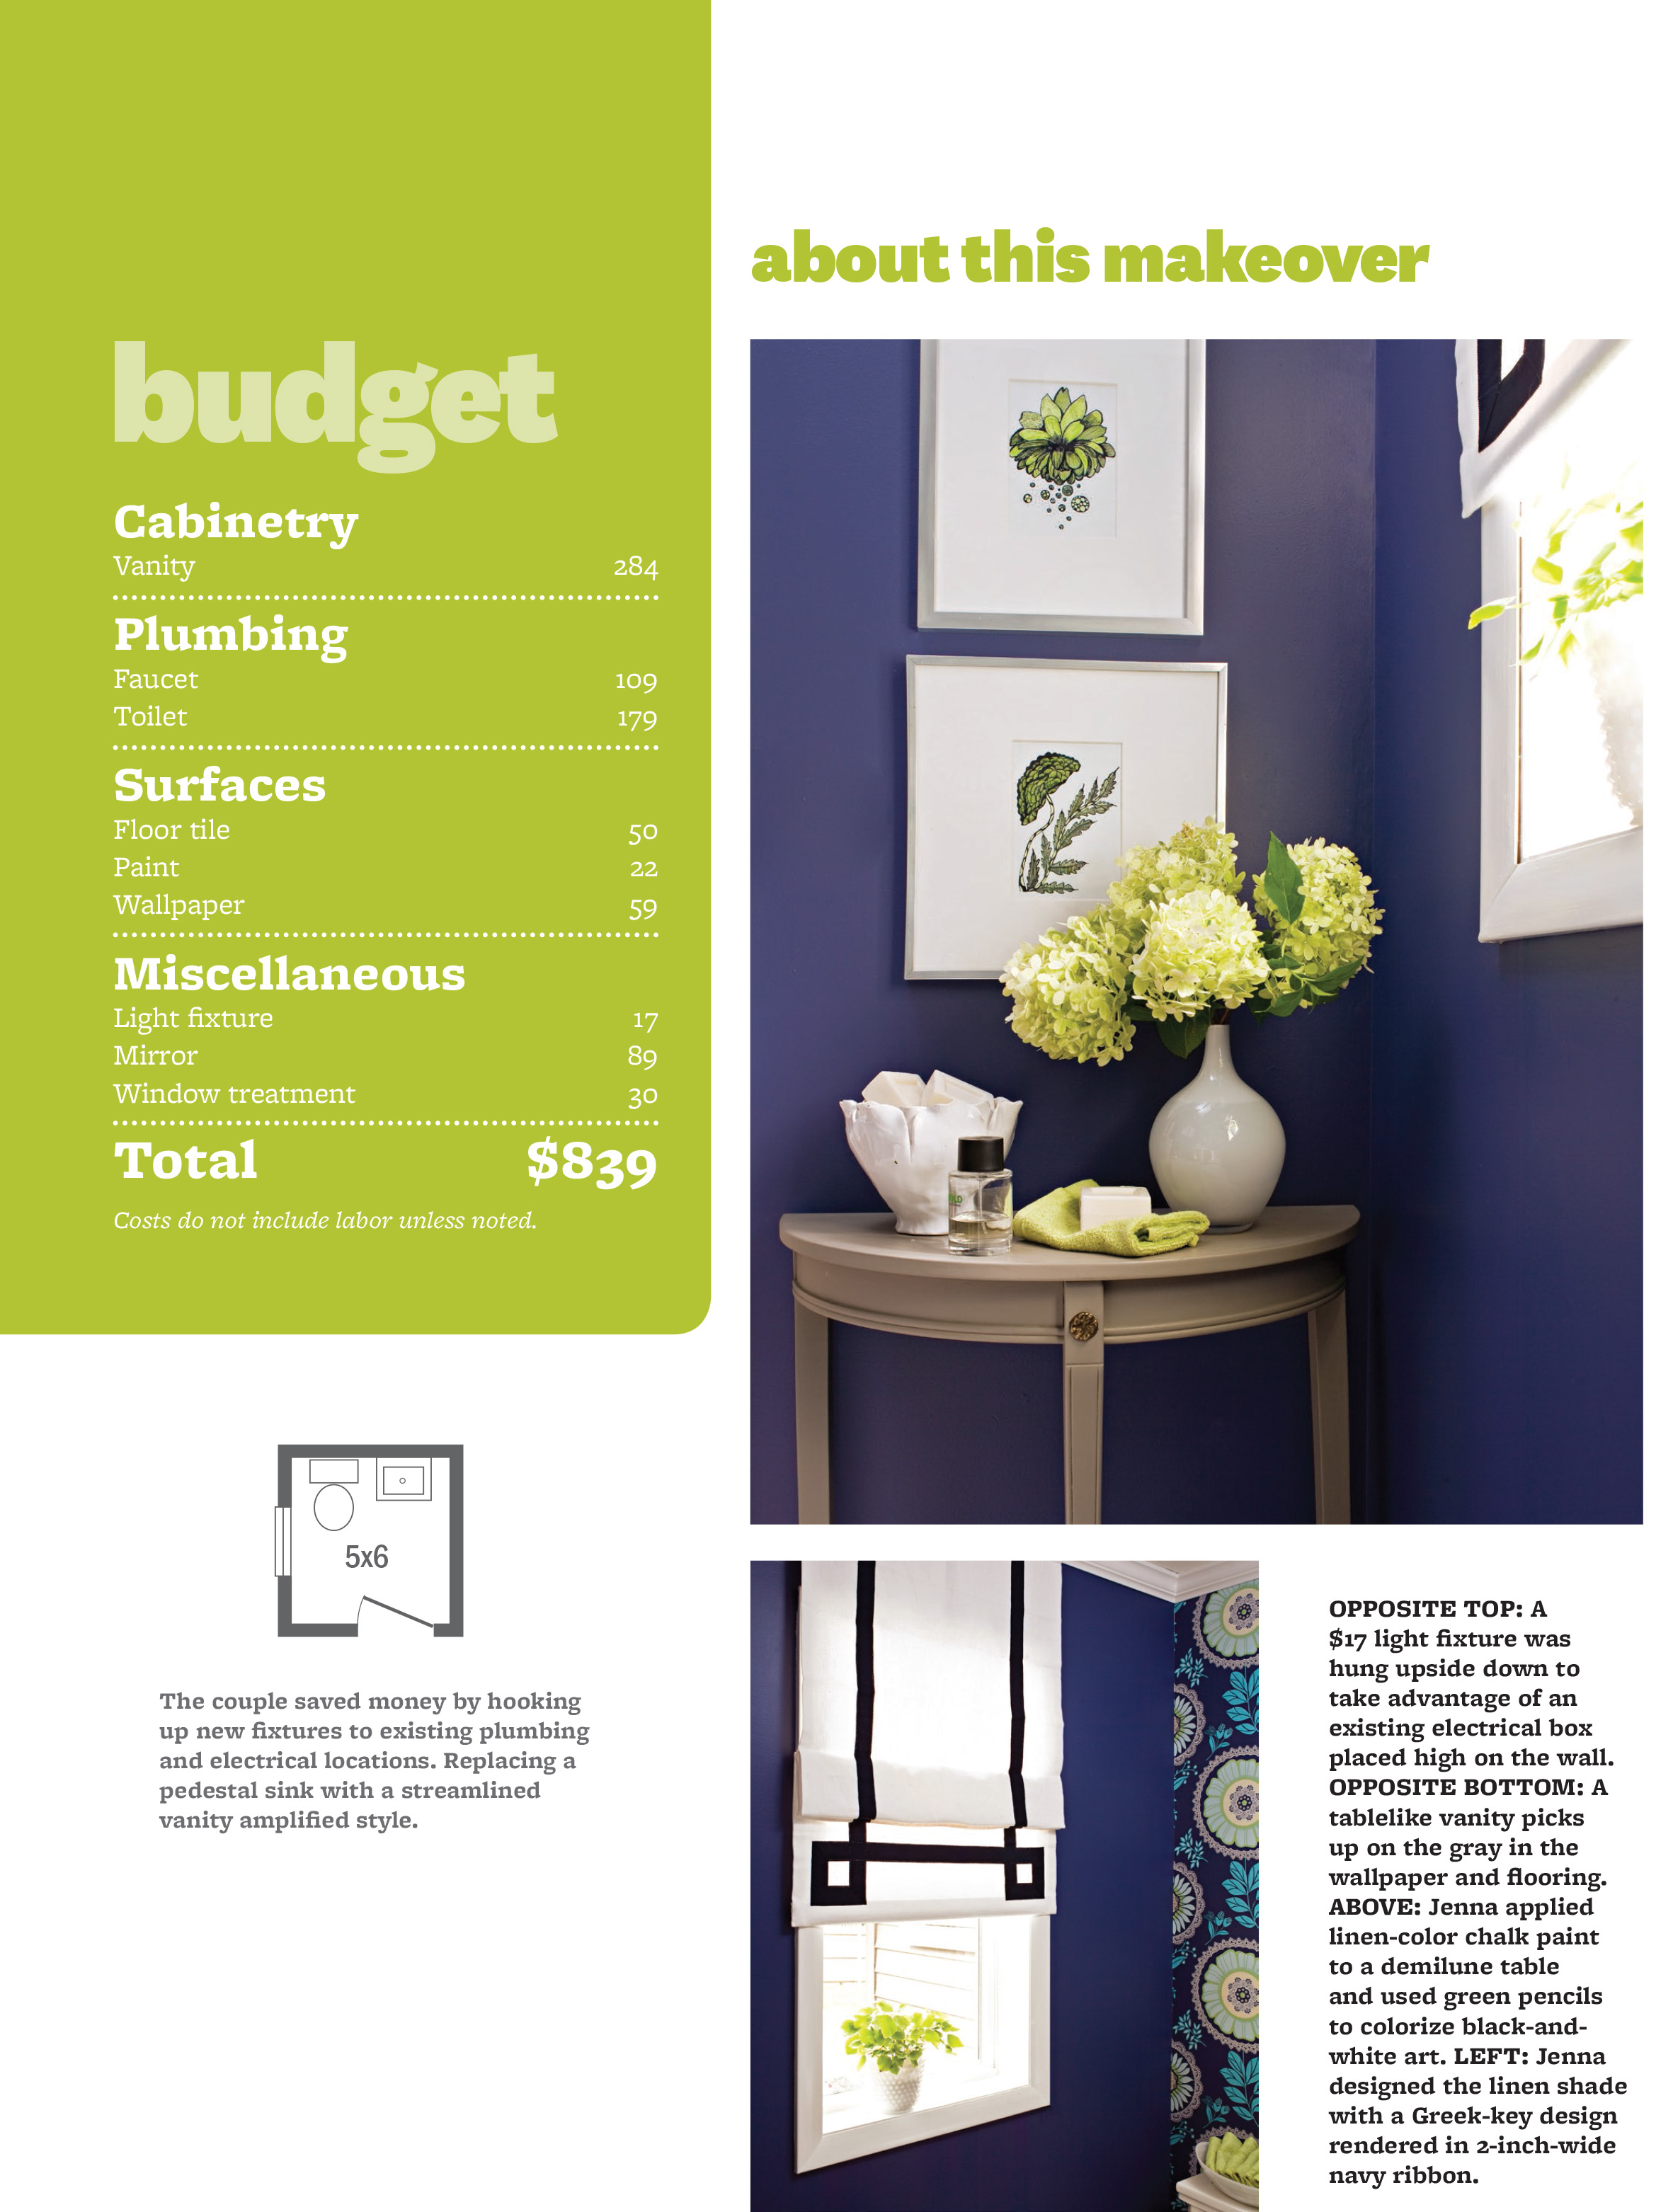
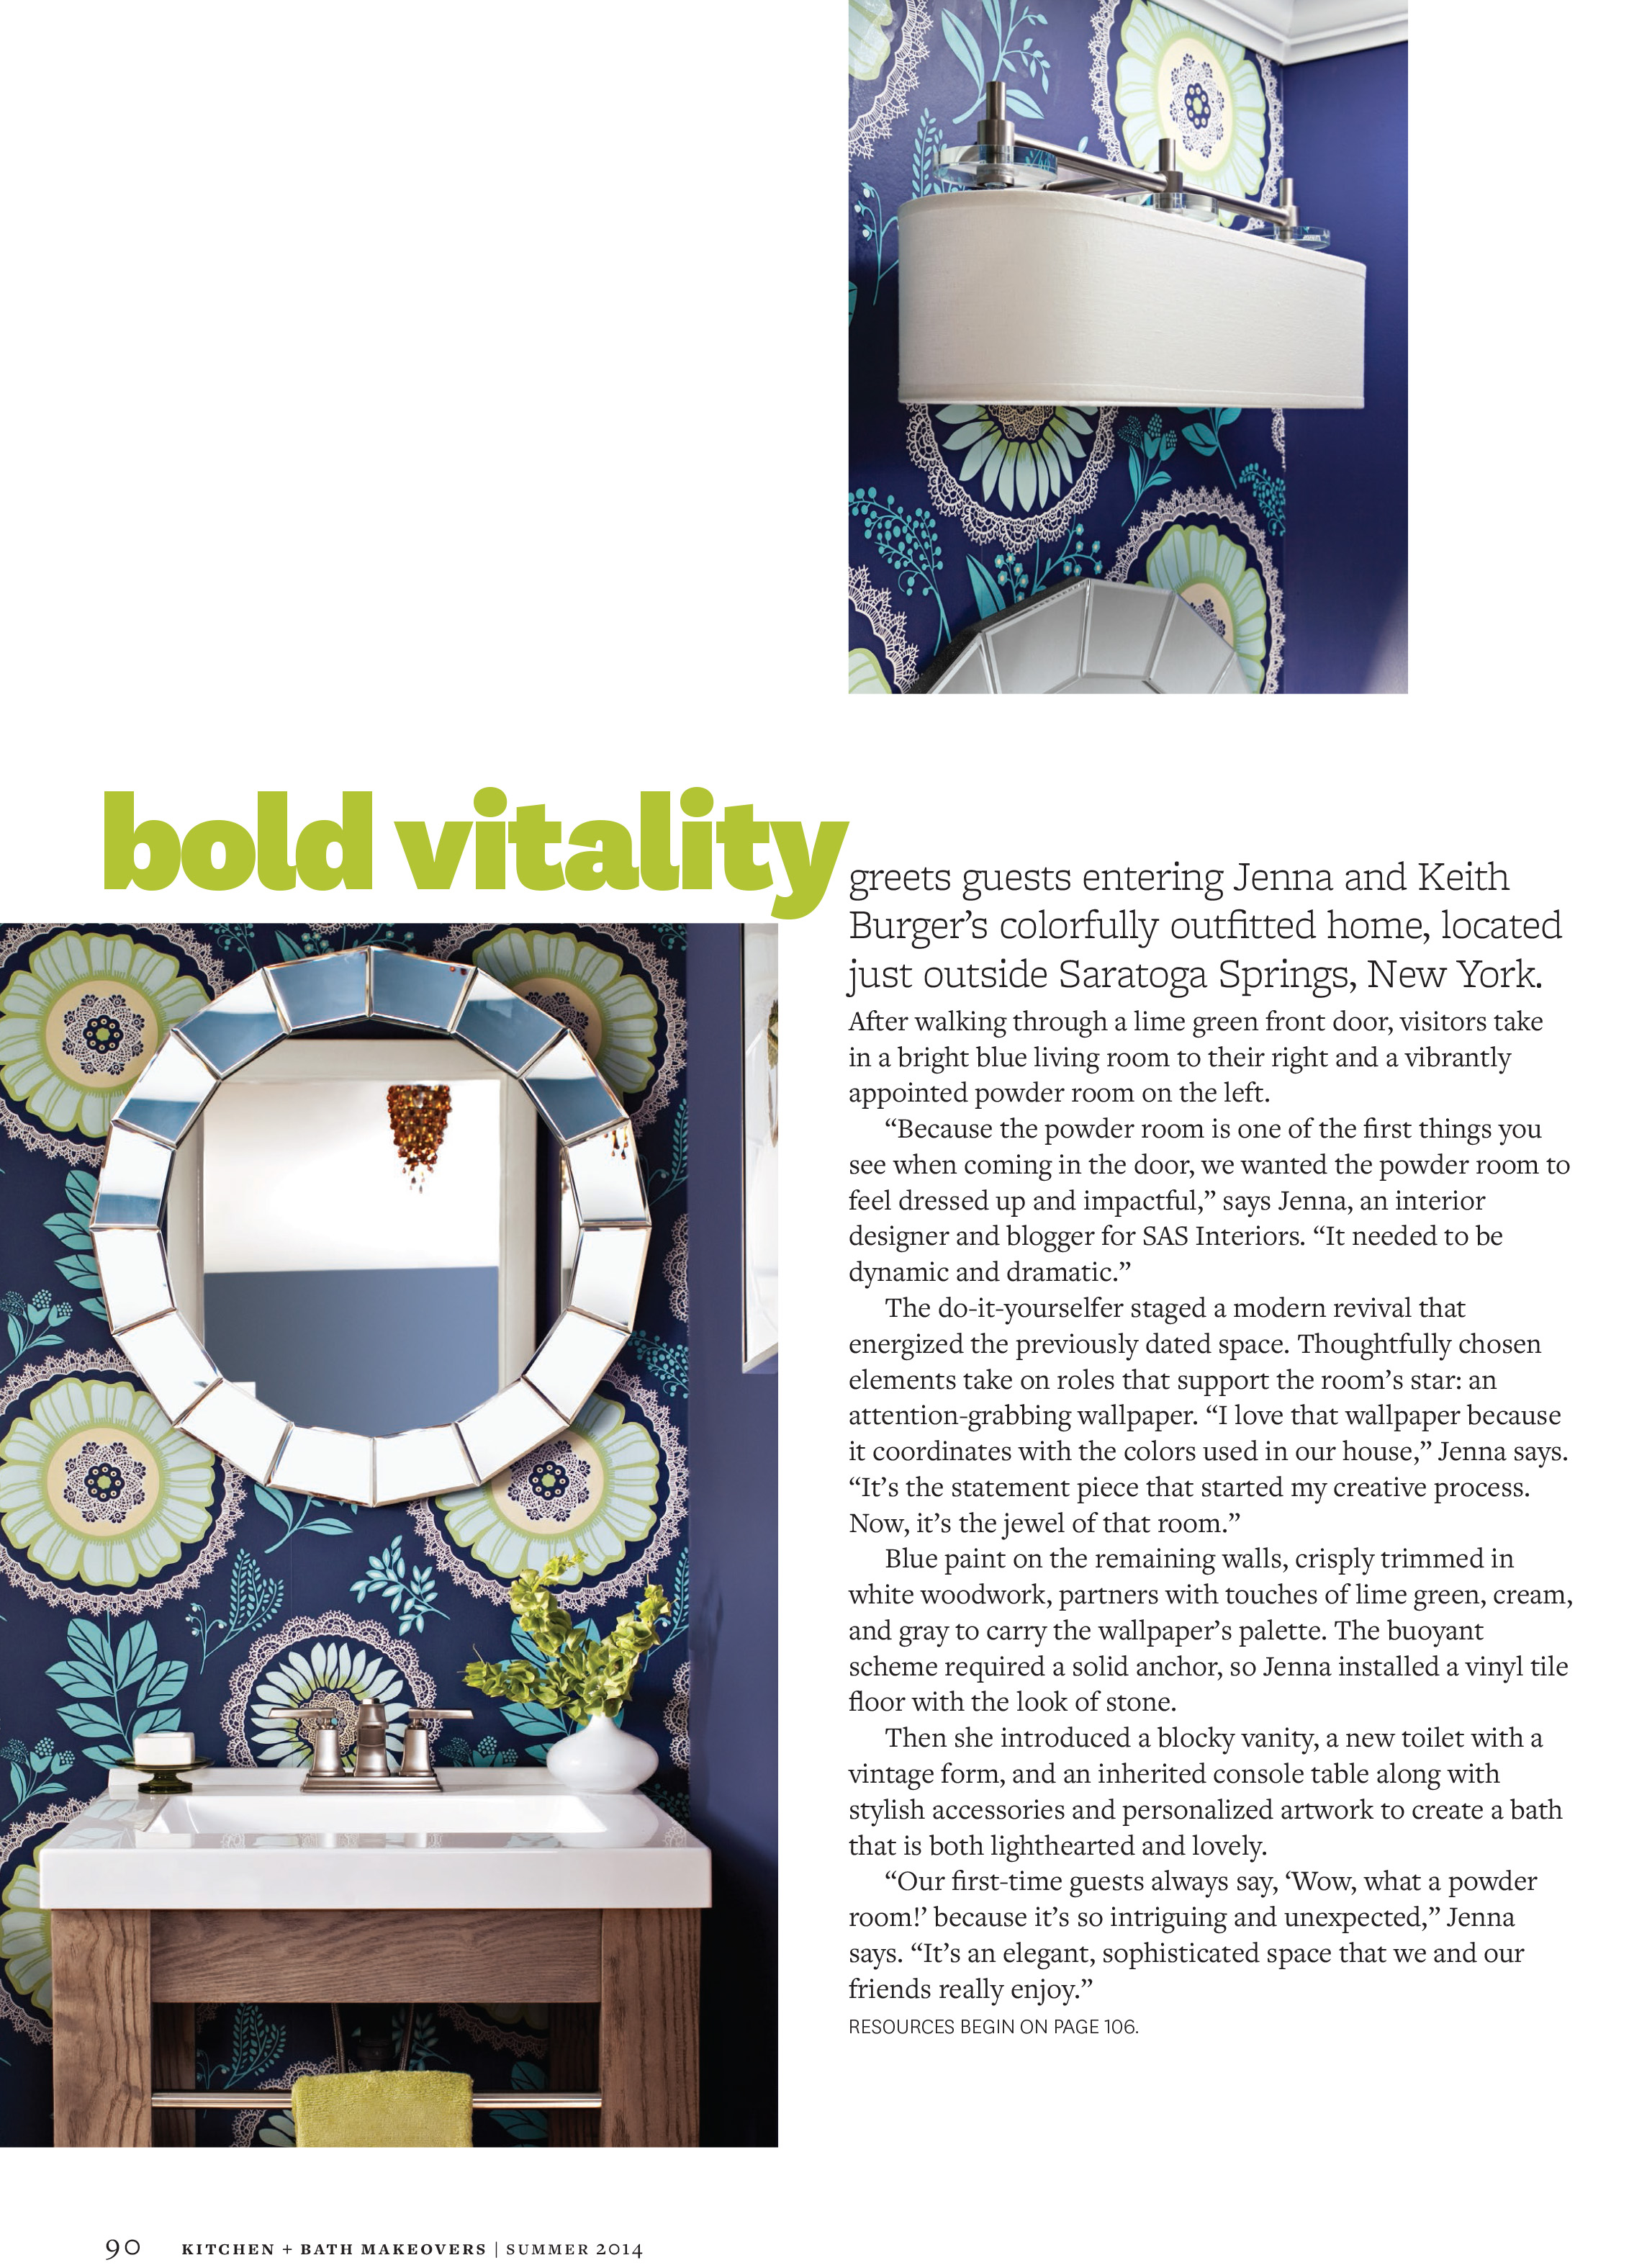
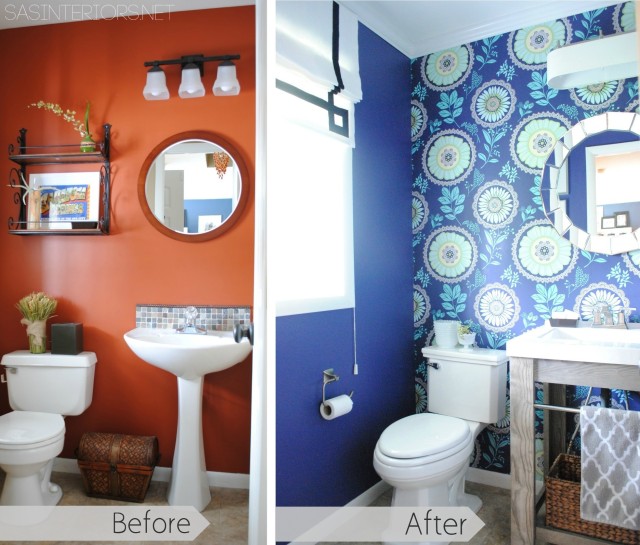
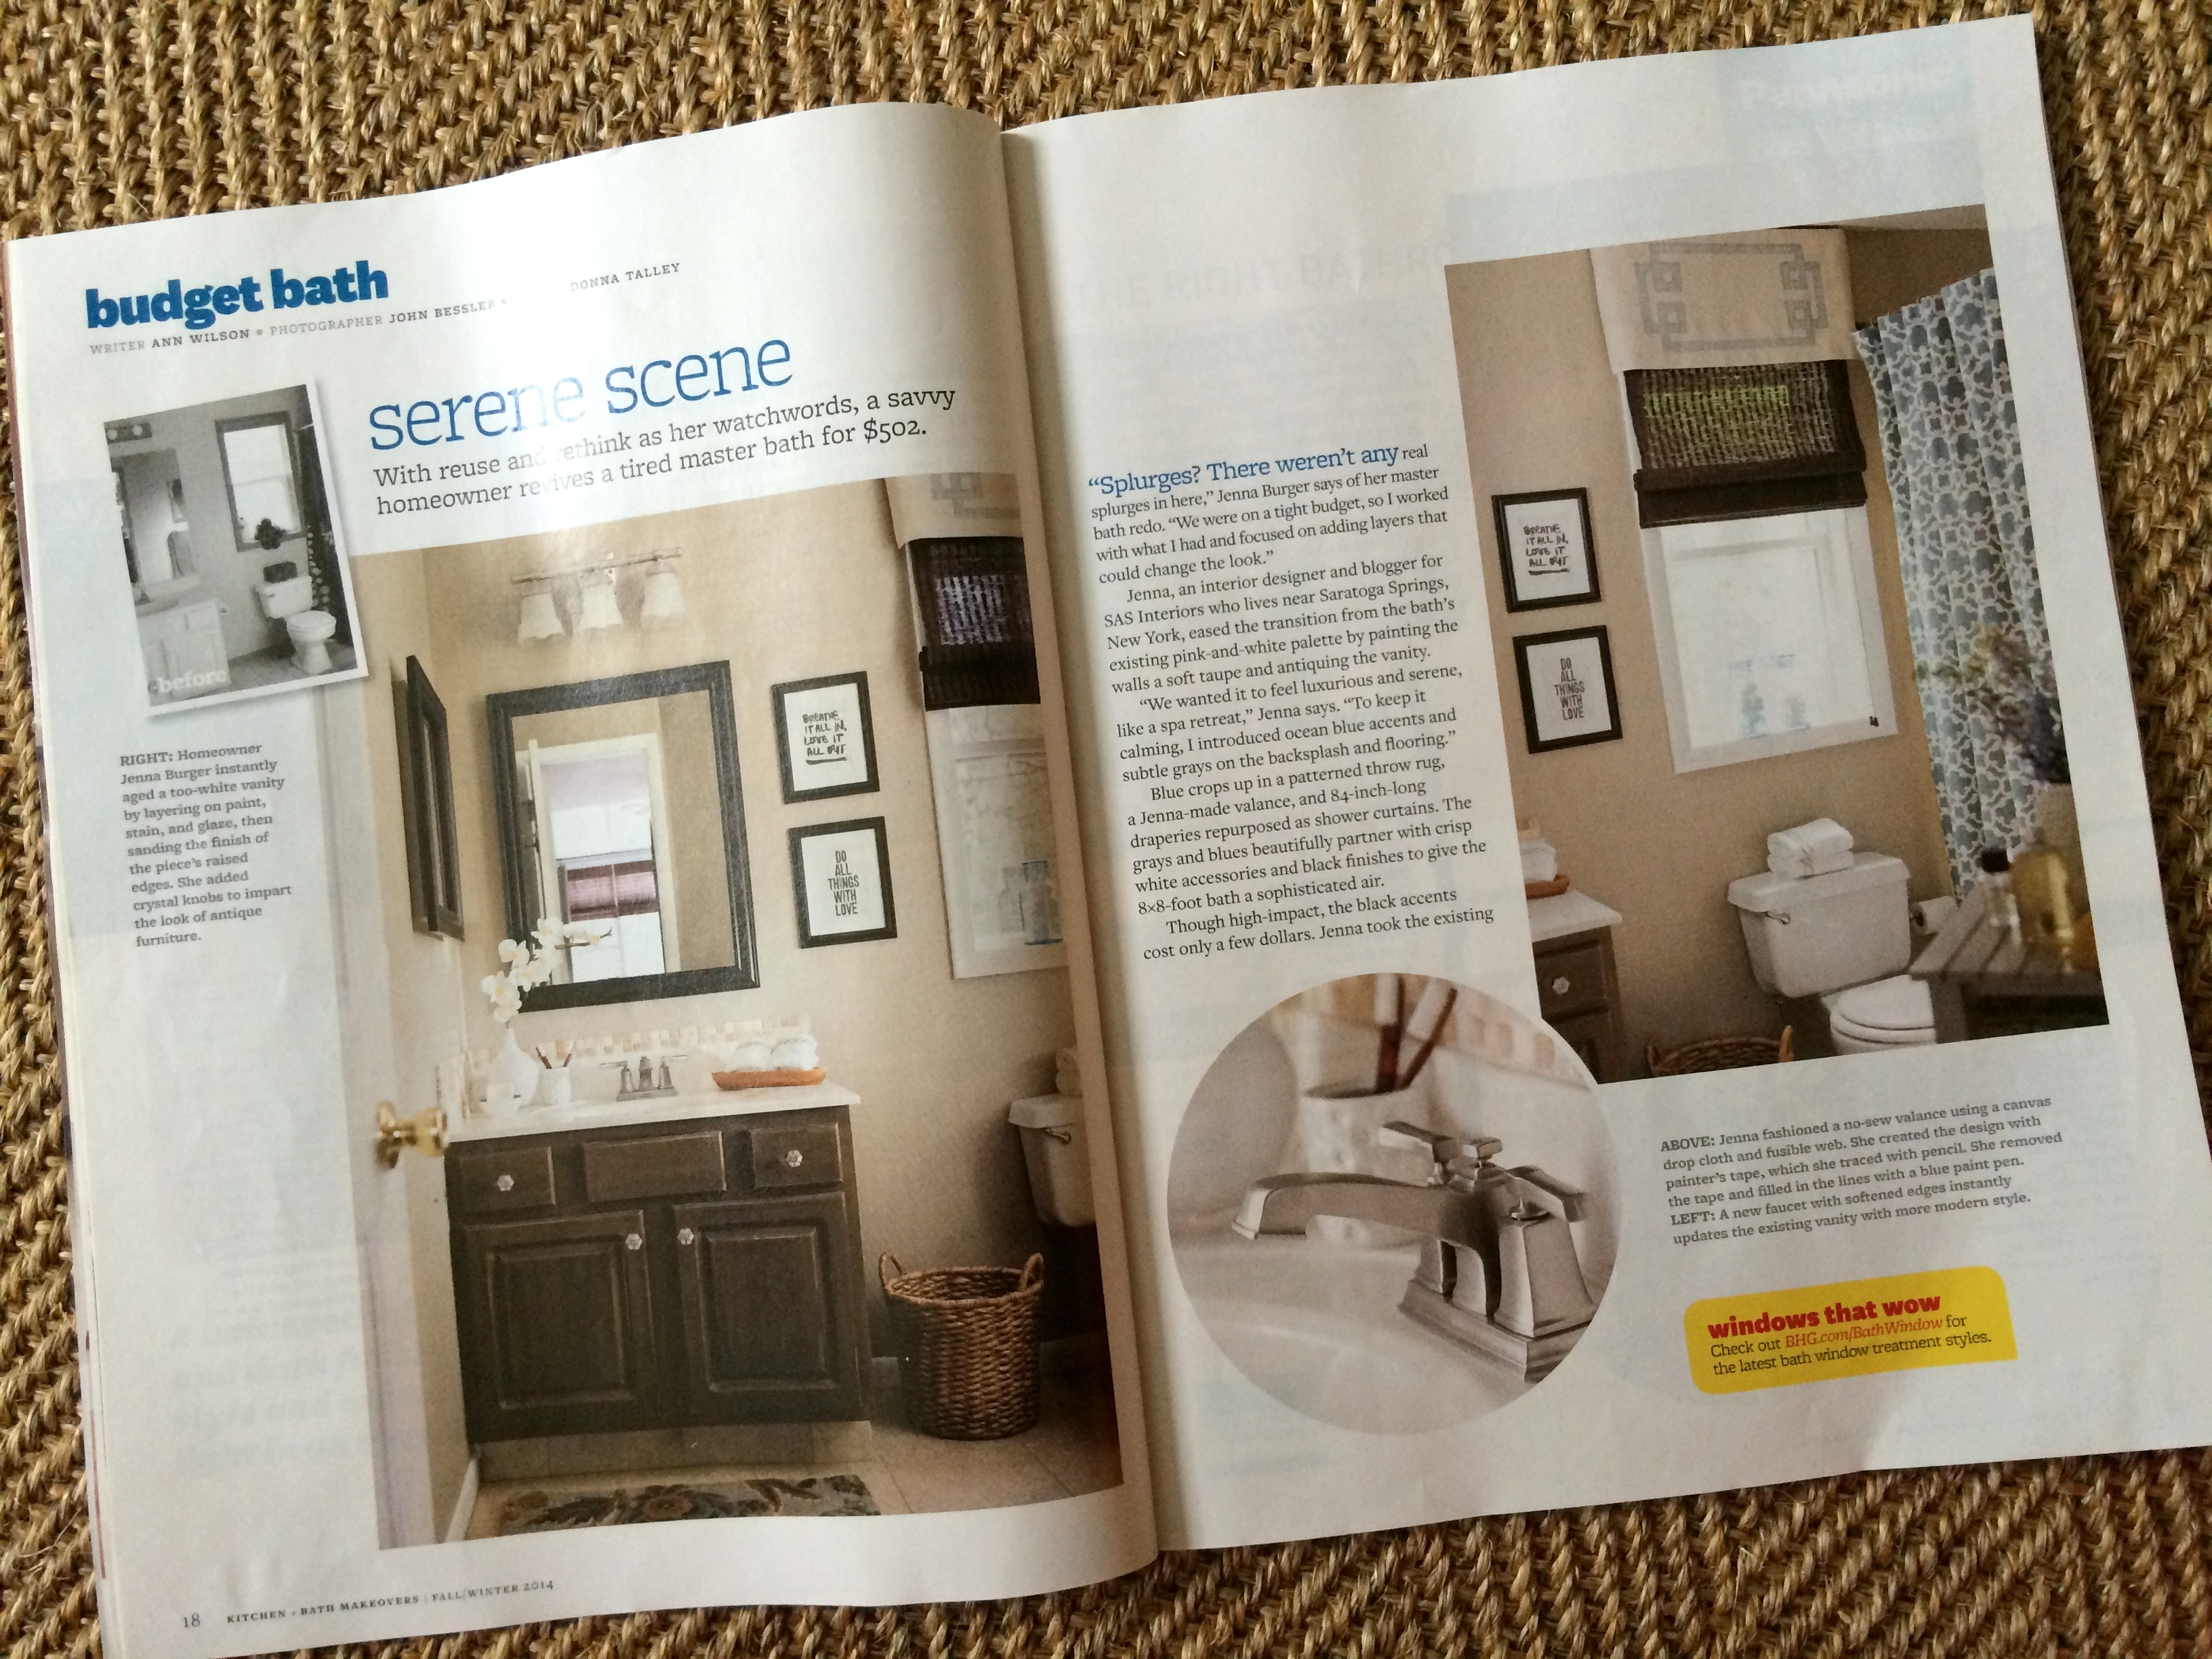
Day 2 was the master bathroom and that never looked better…

My master bathroom featured in KBMO

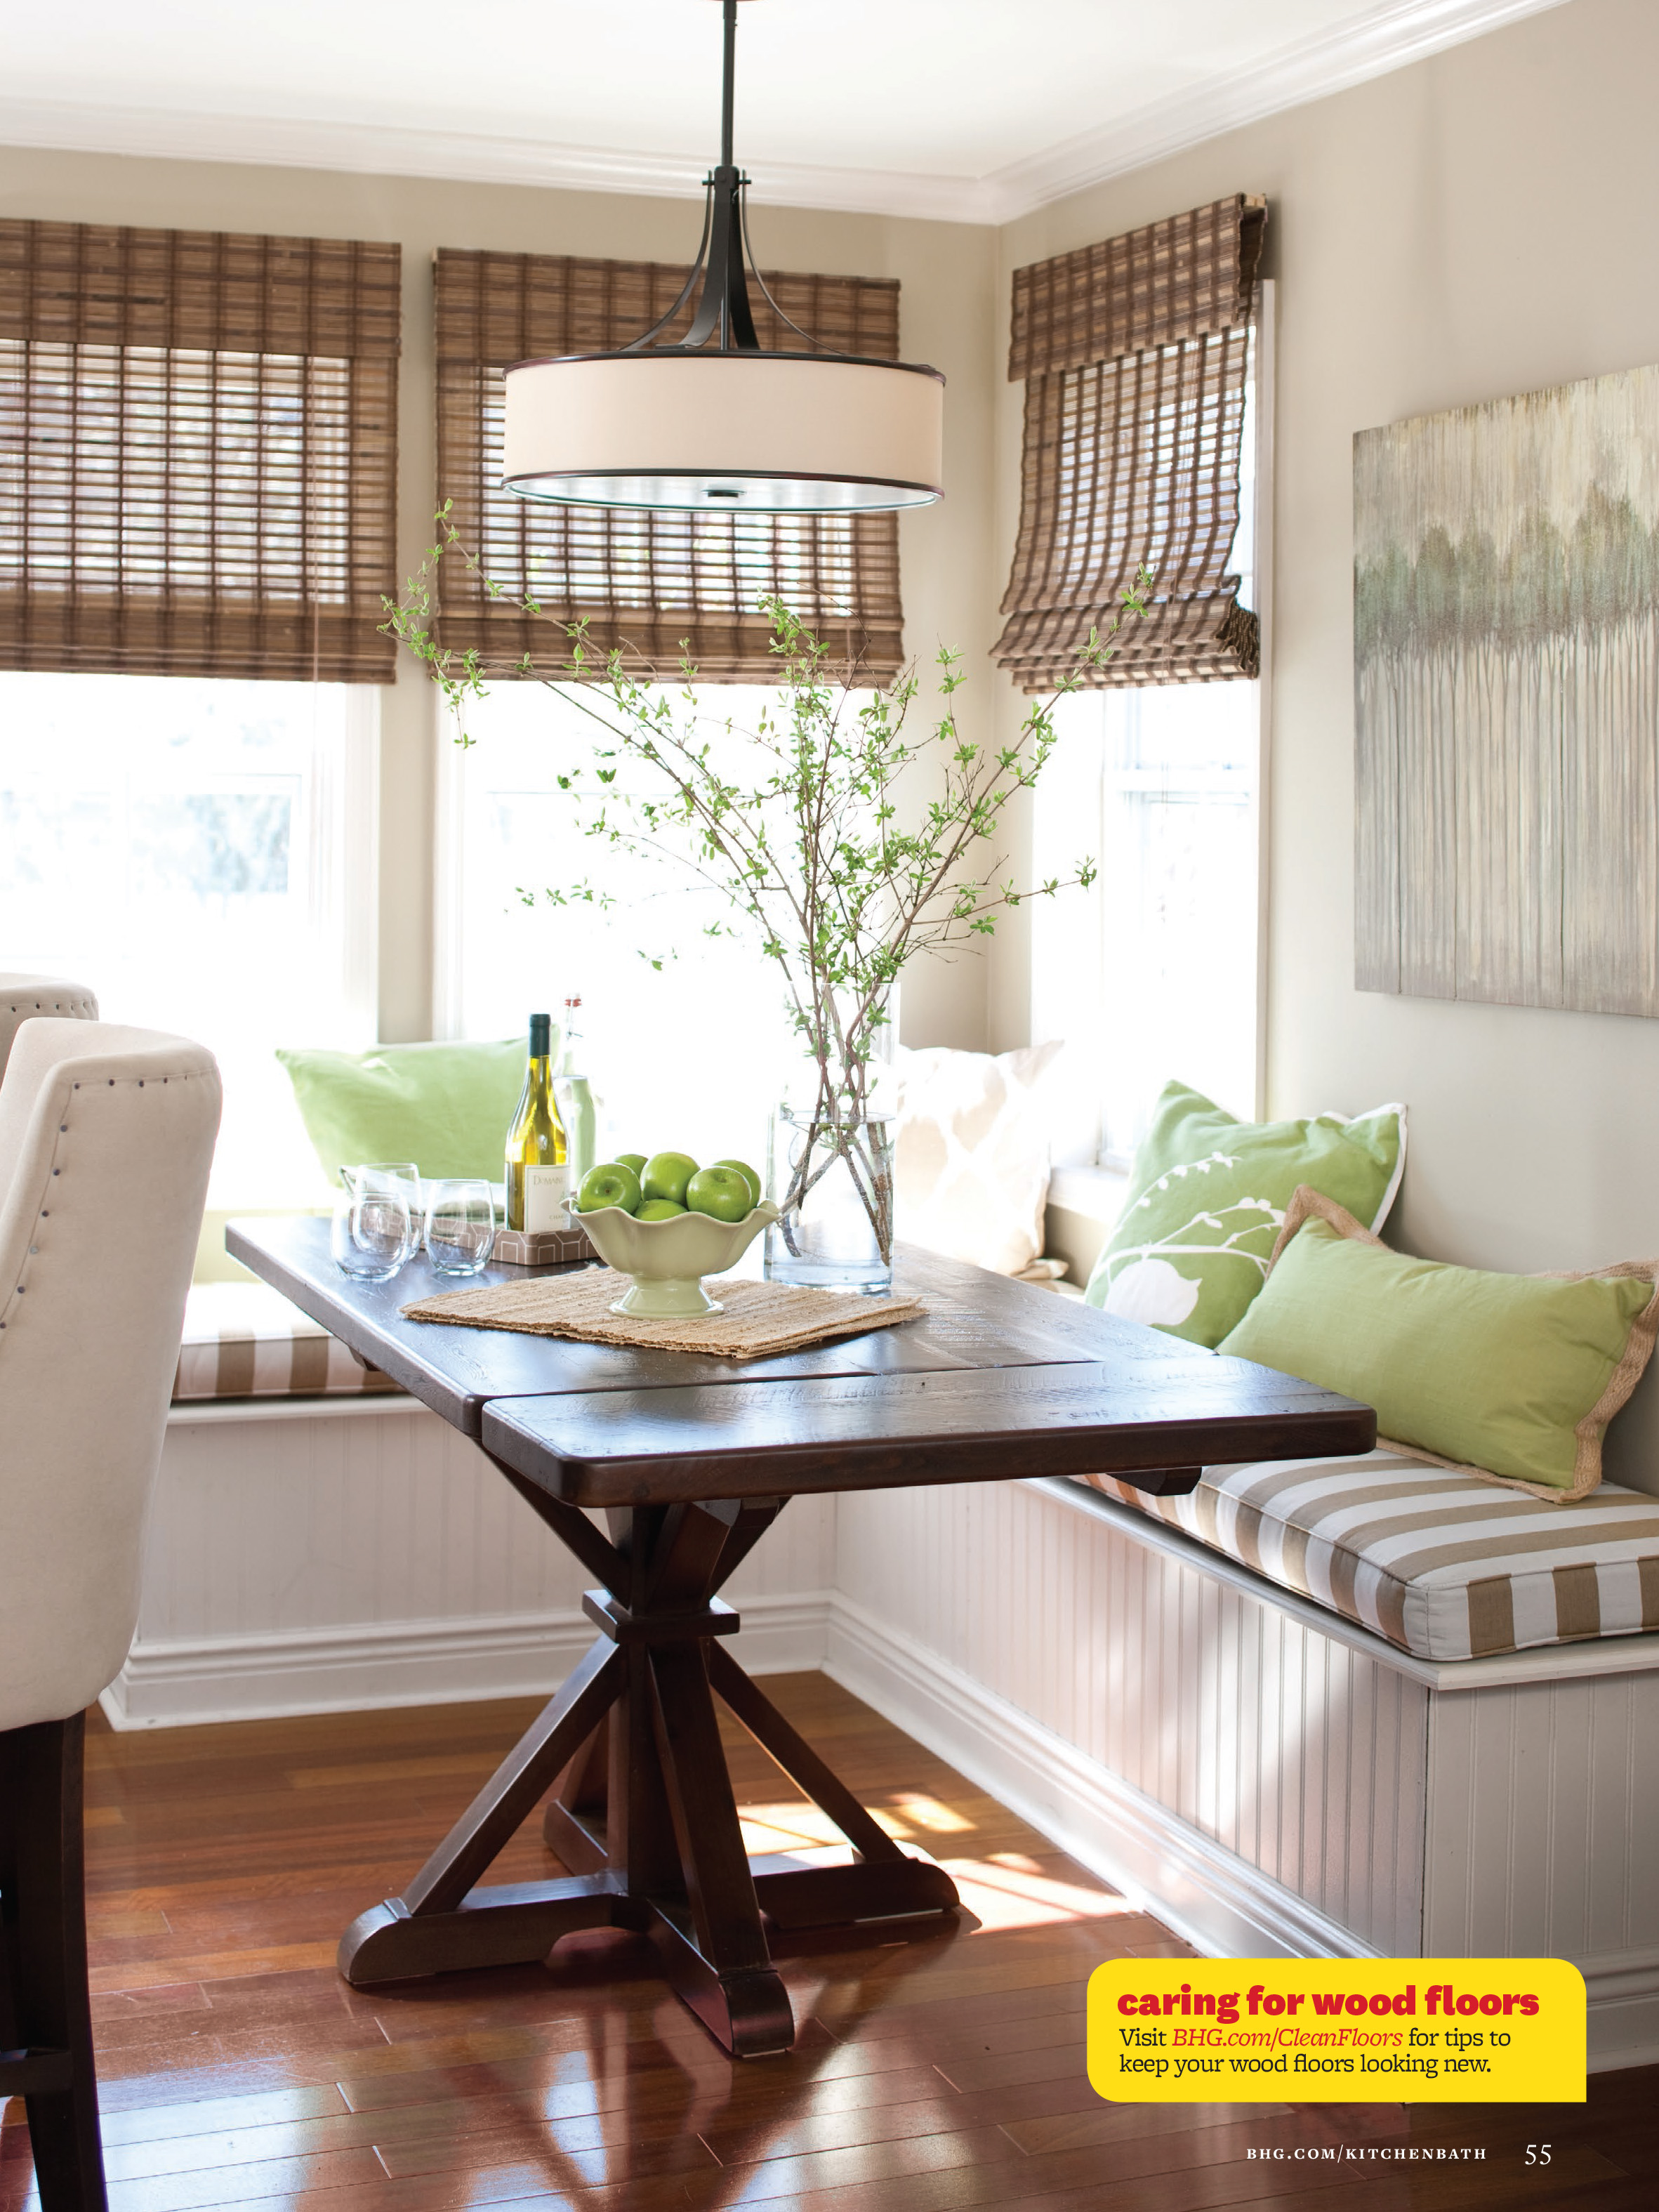
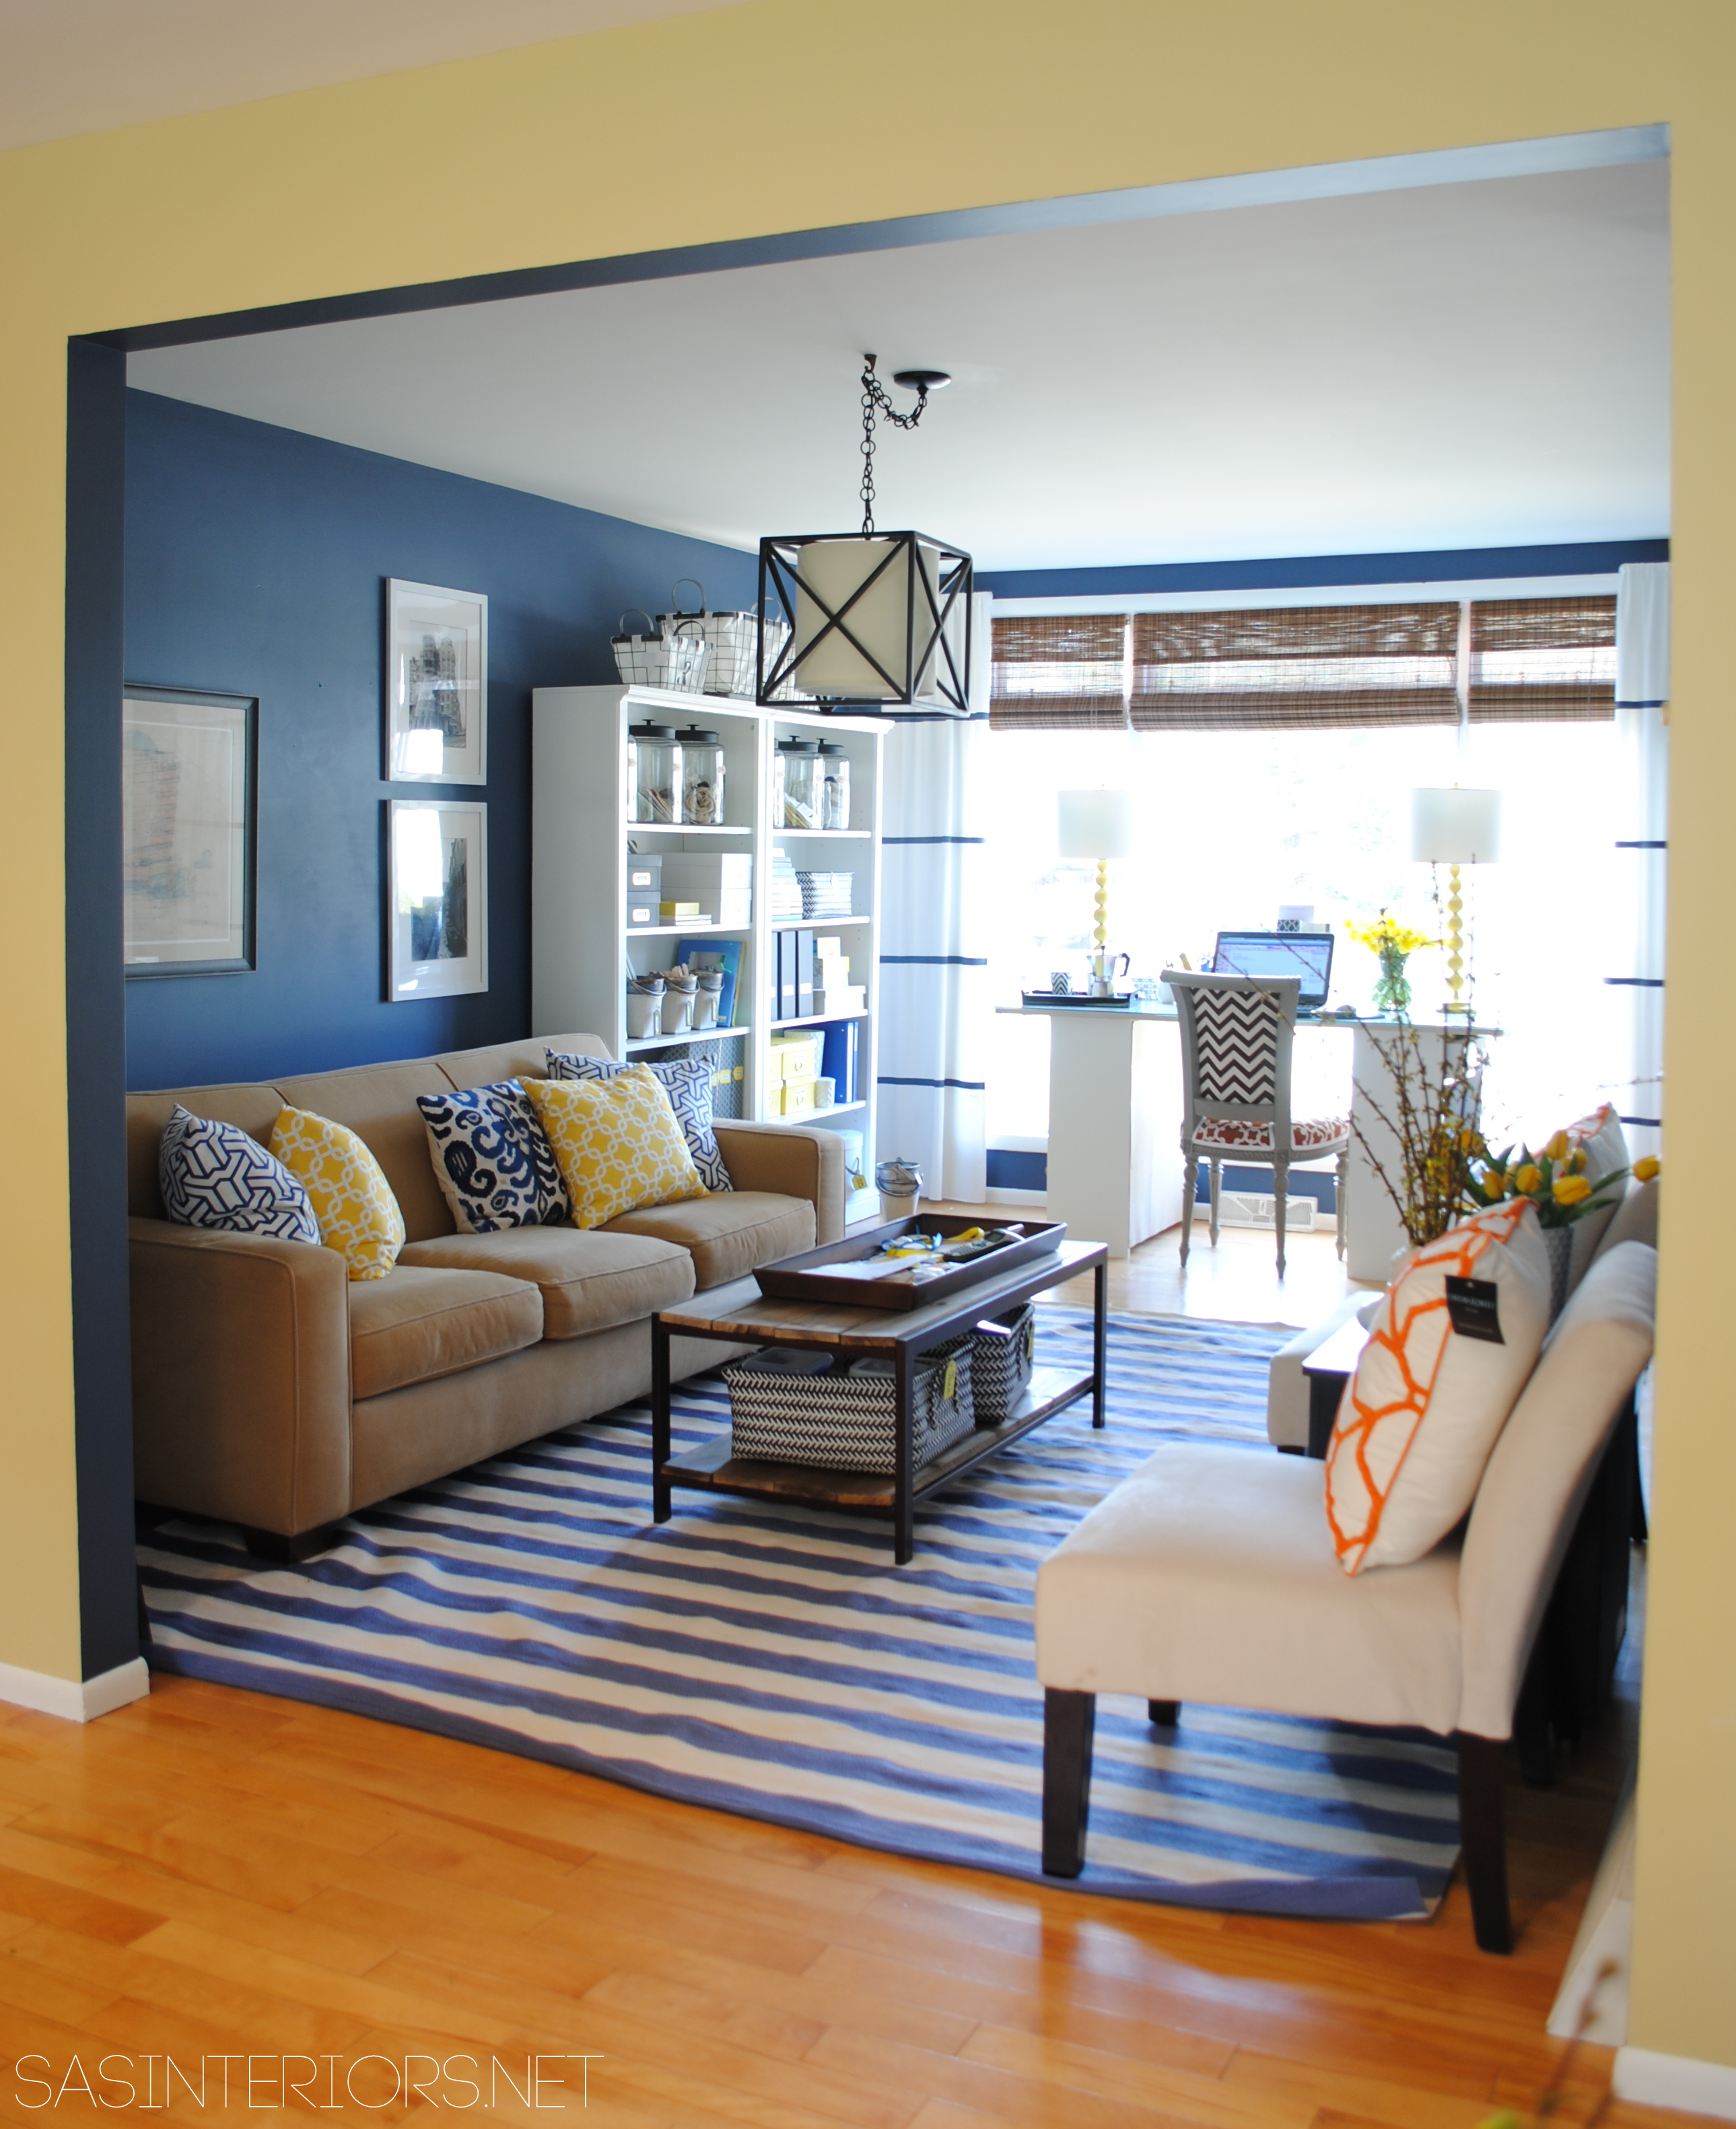
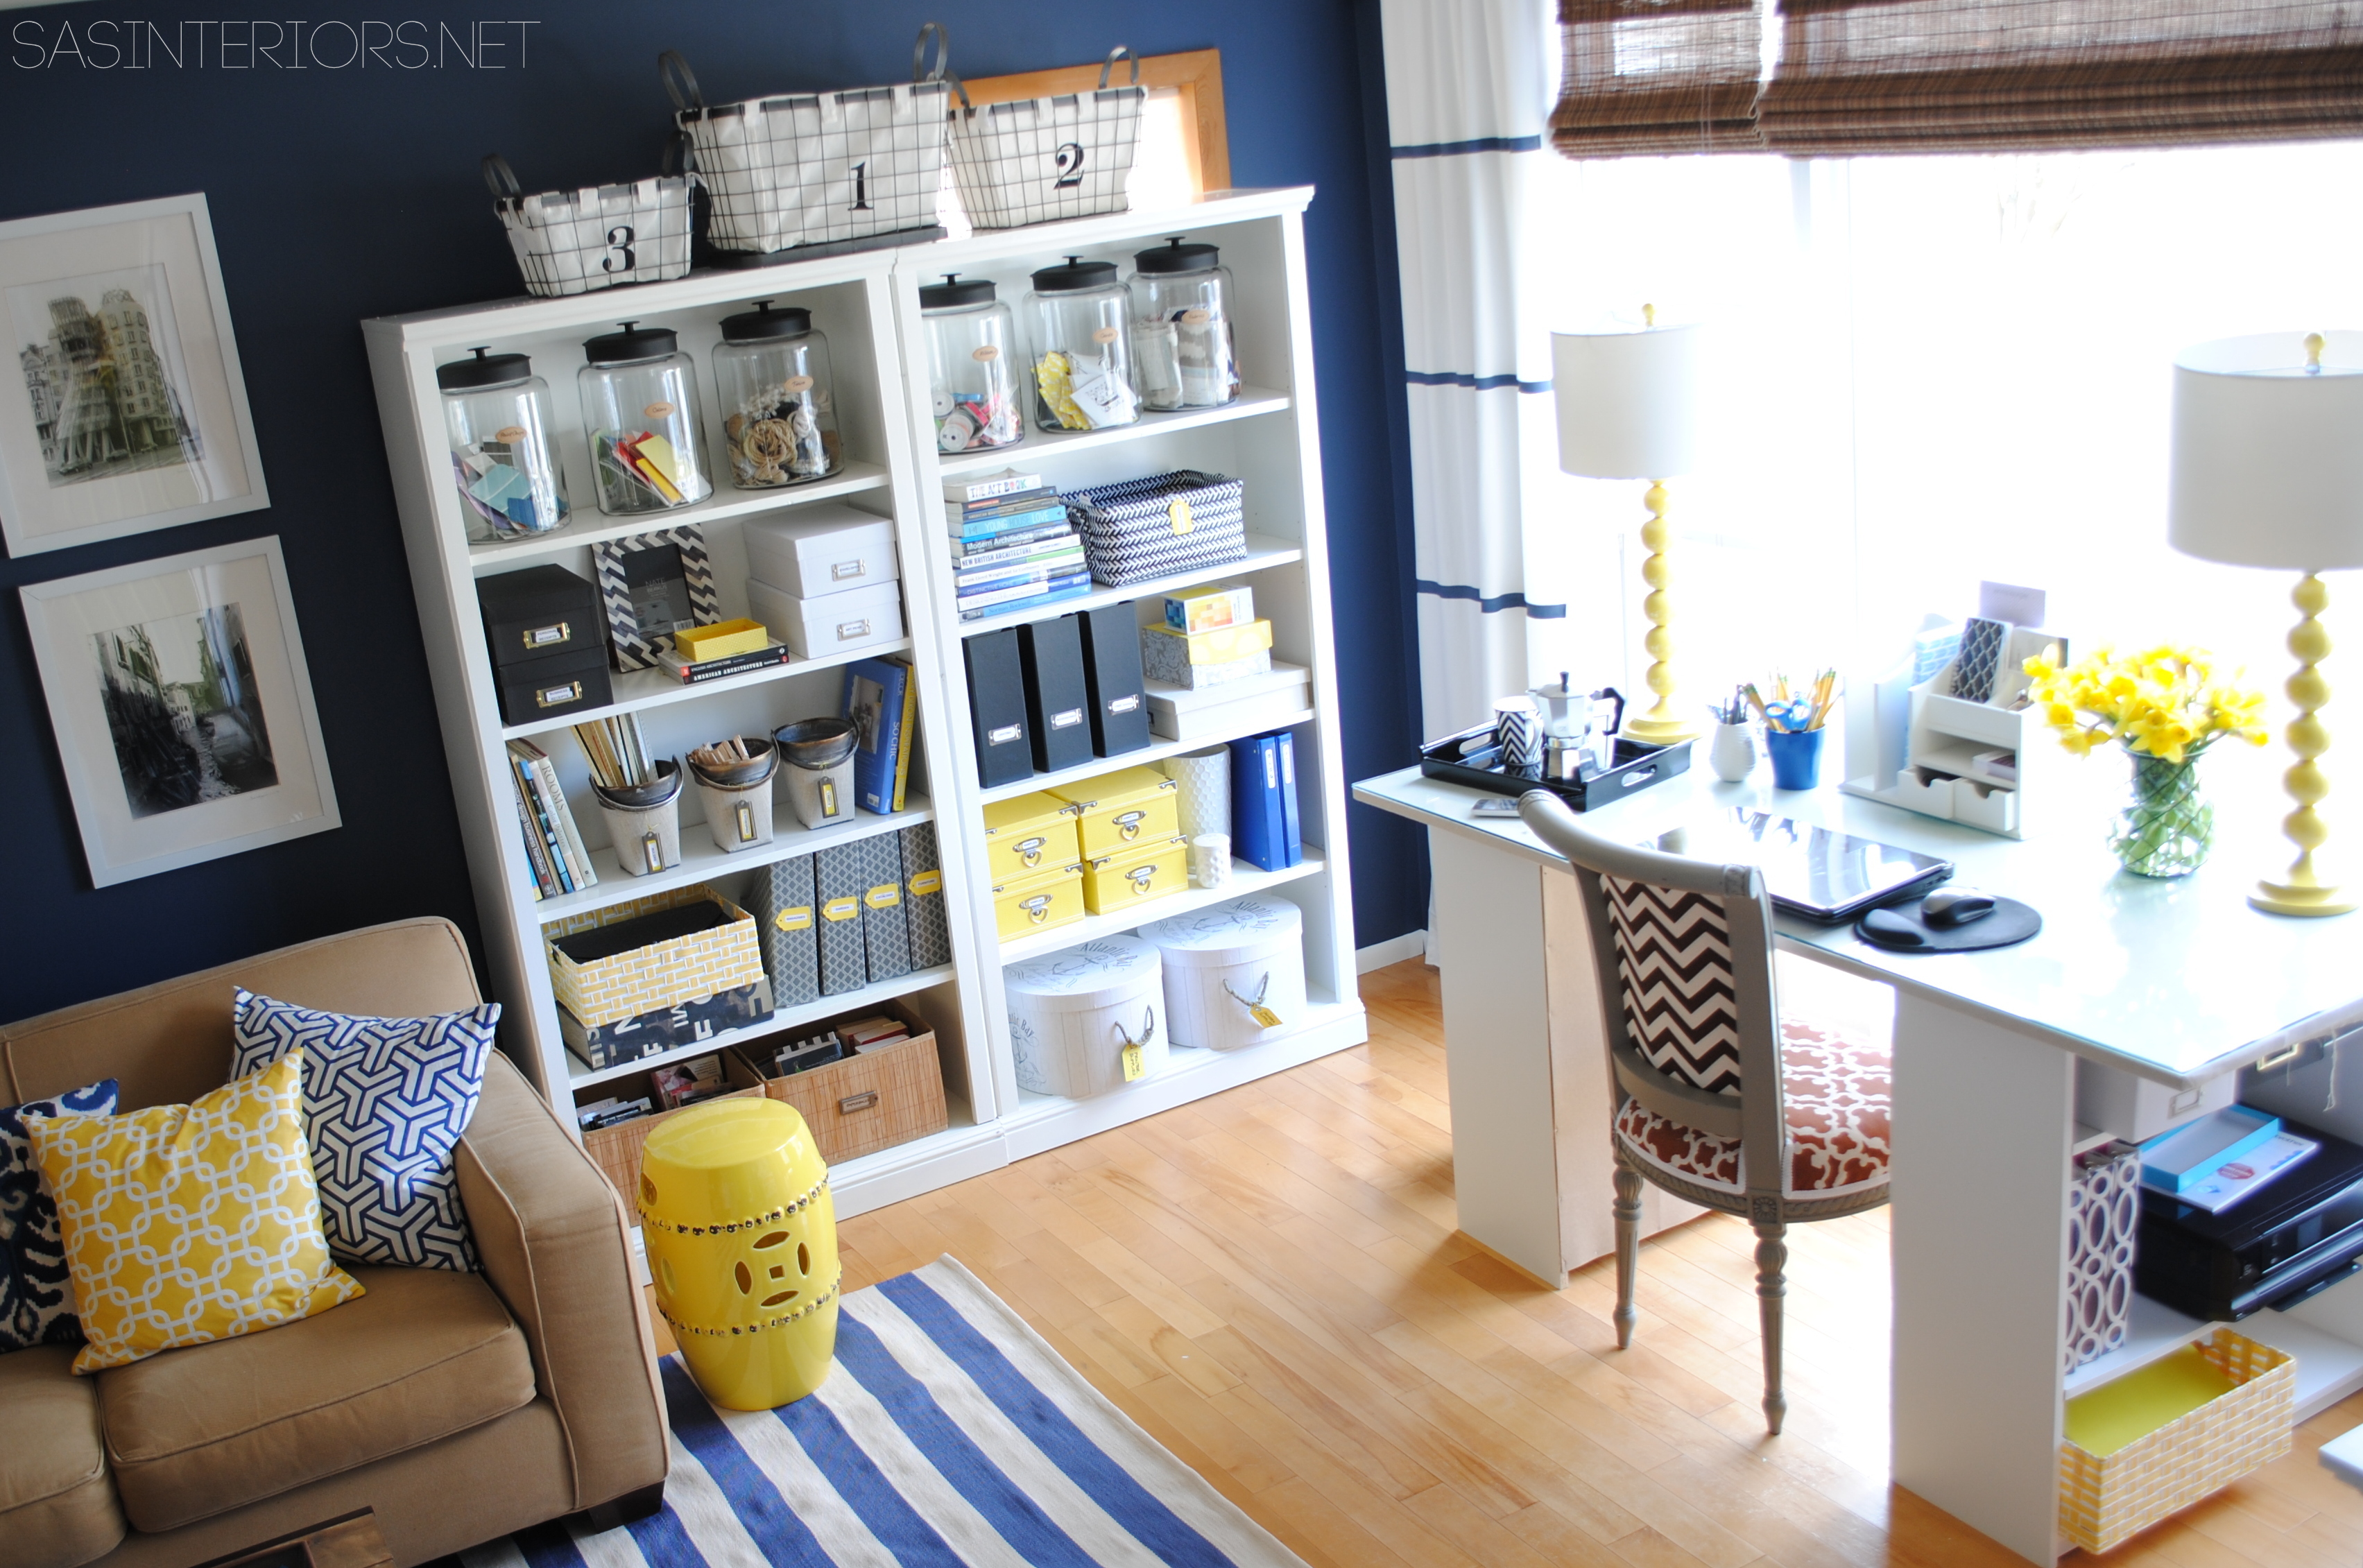
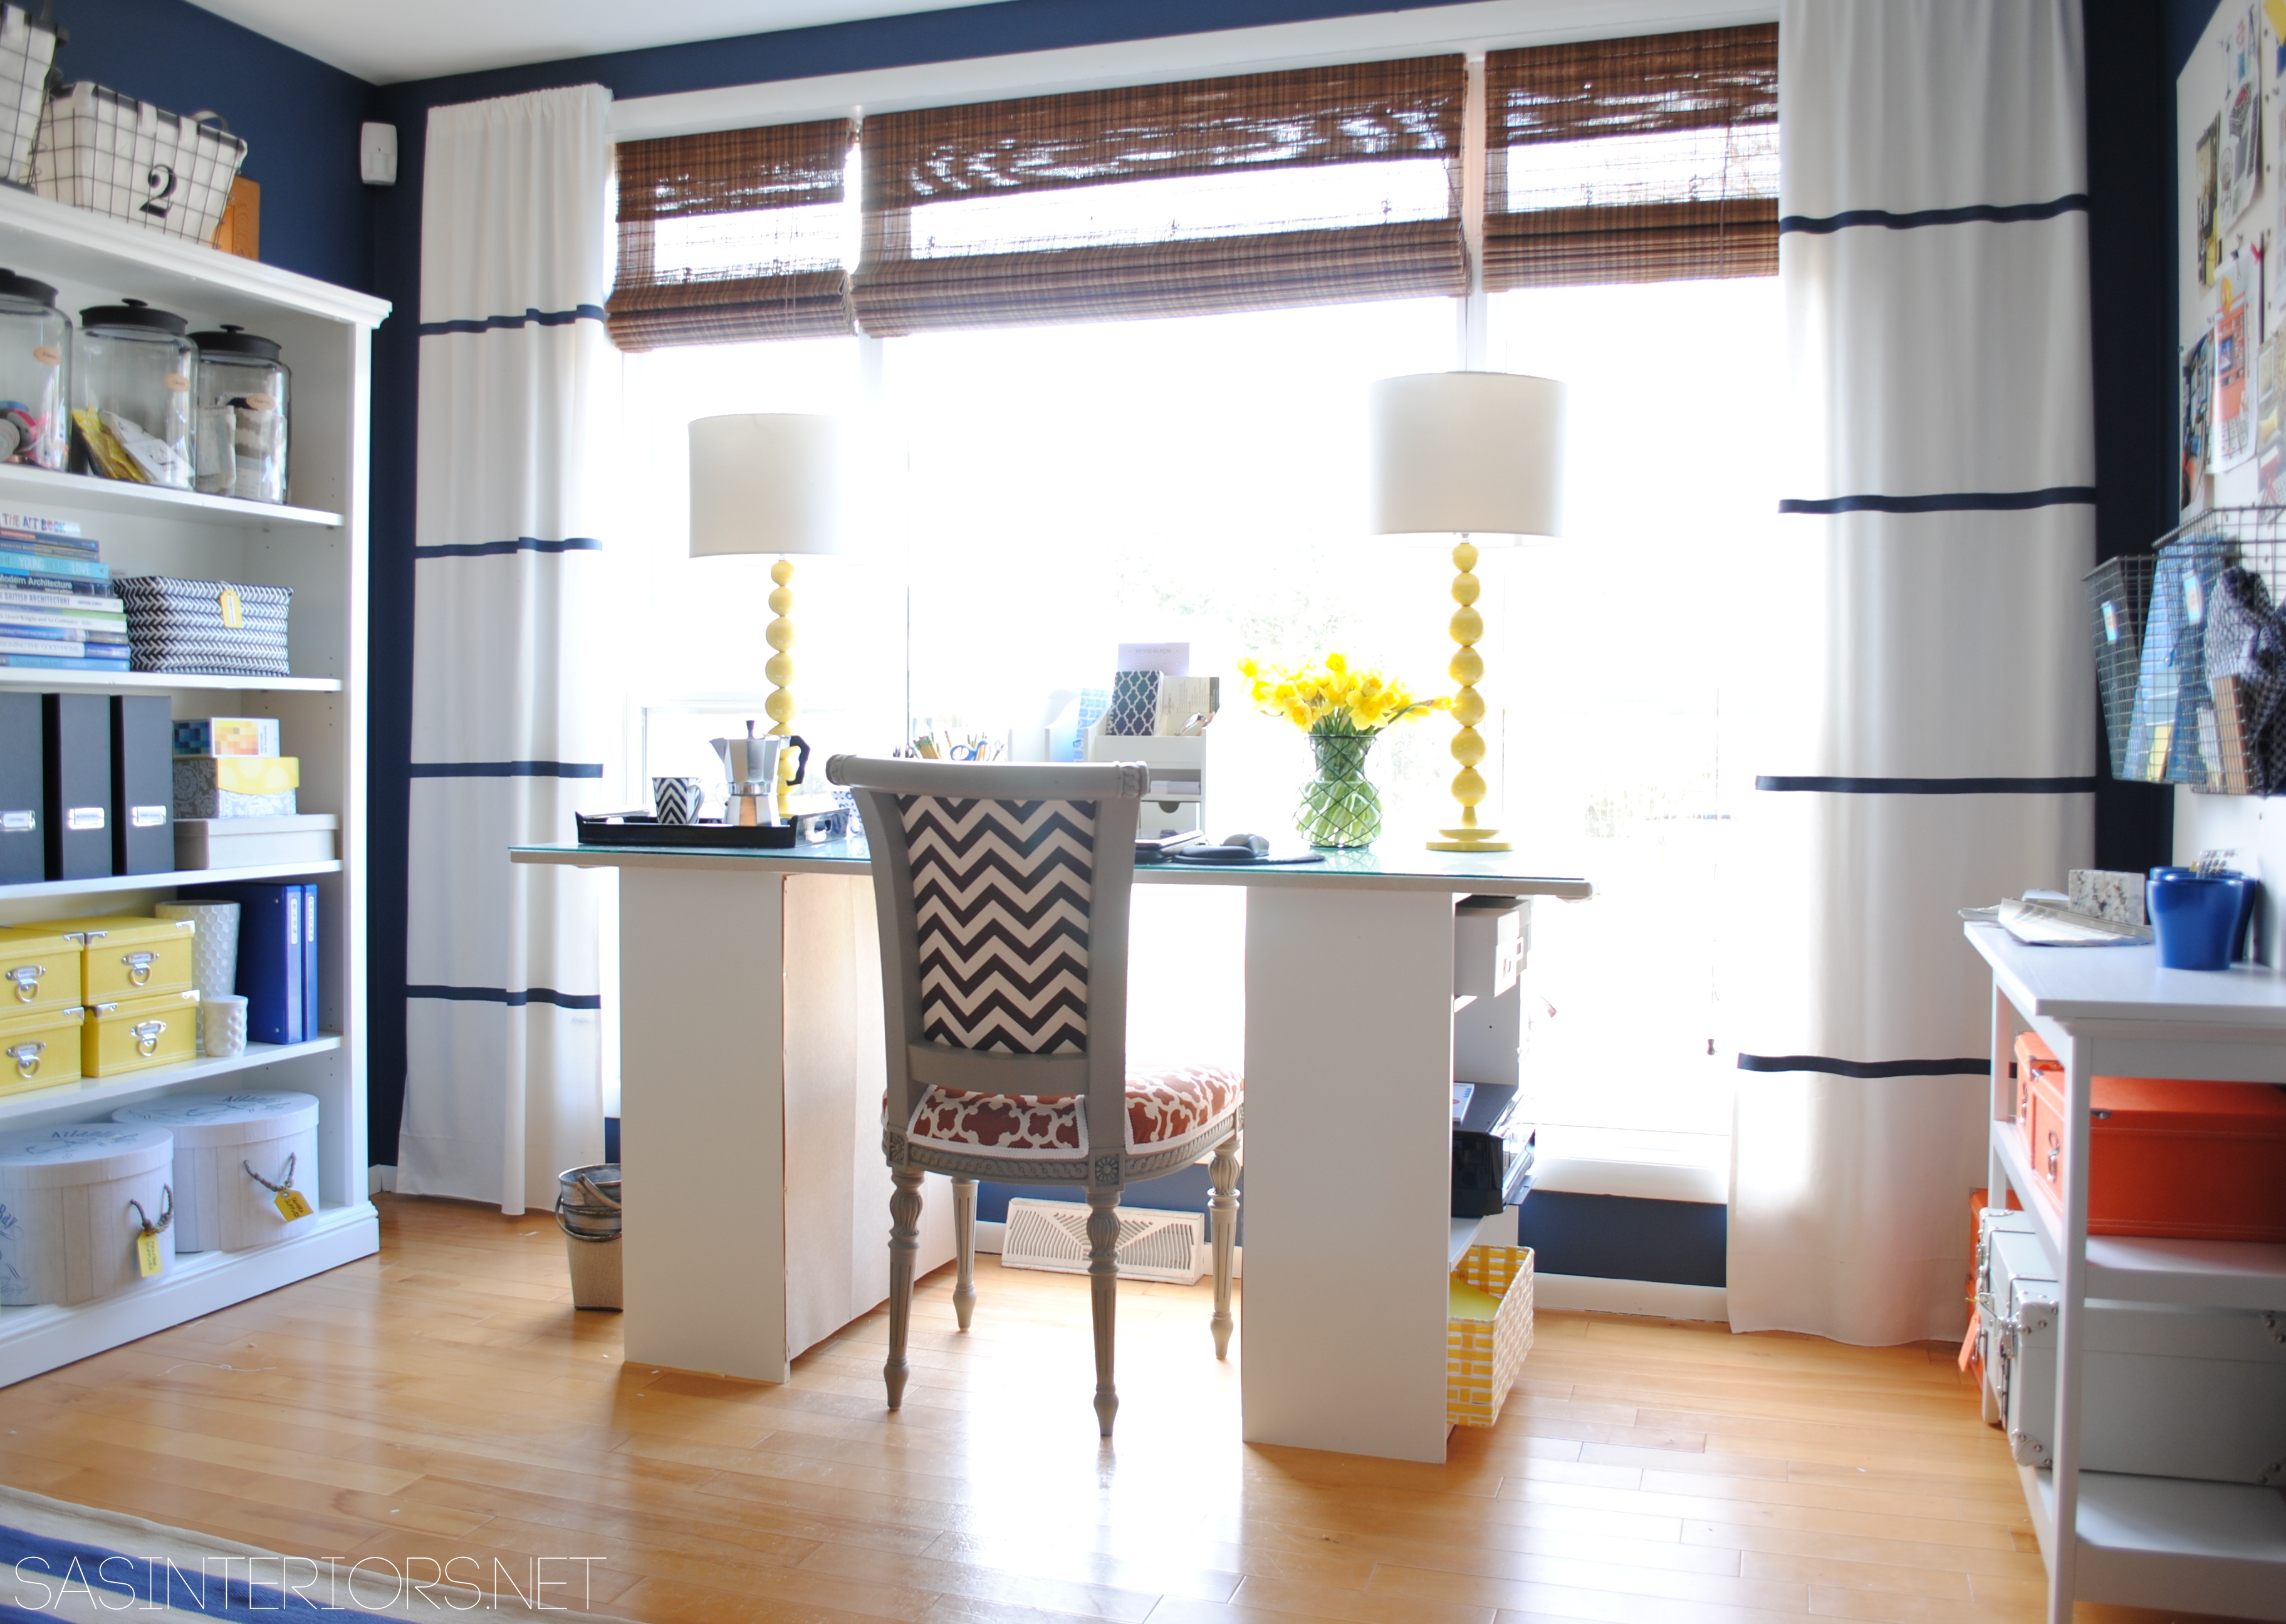
Then Day 3 was the office / living room…

This space, by far, got the biggest transformation of all.  Basically the main elements of the room, a.k.a. ‘the bones’, stayed and then Donna Talley, the stylist/producer of the shoot, did her magic to tell the story of how I use, live, and work in this room which serves the purpose for family + work.

Living Room / Office featured in Storage Magazine

What’s crazy about this room is that it was the biggest pain to arrange furniture and it took quite a few attempts before it I got it just right.  This is what it looked like years ago…

Original living room

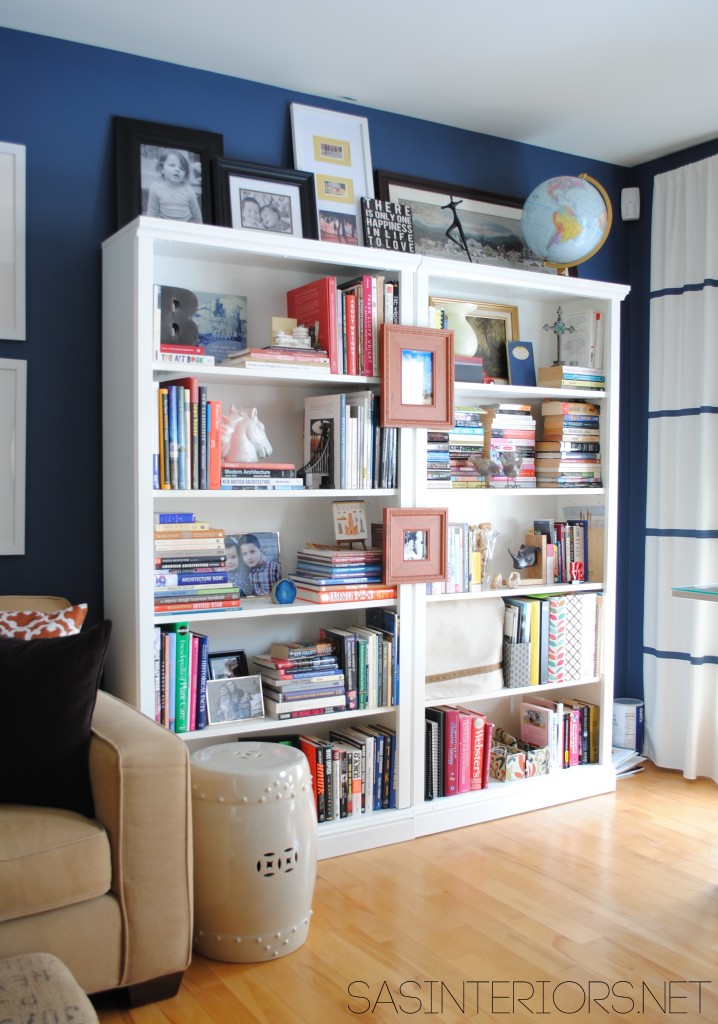
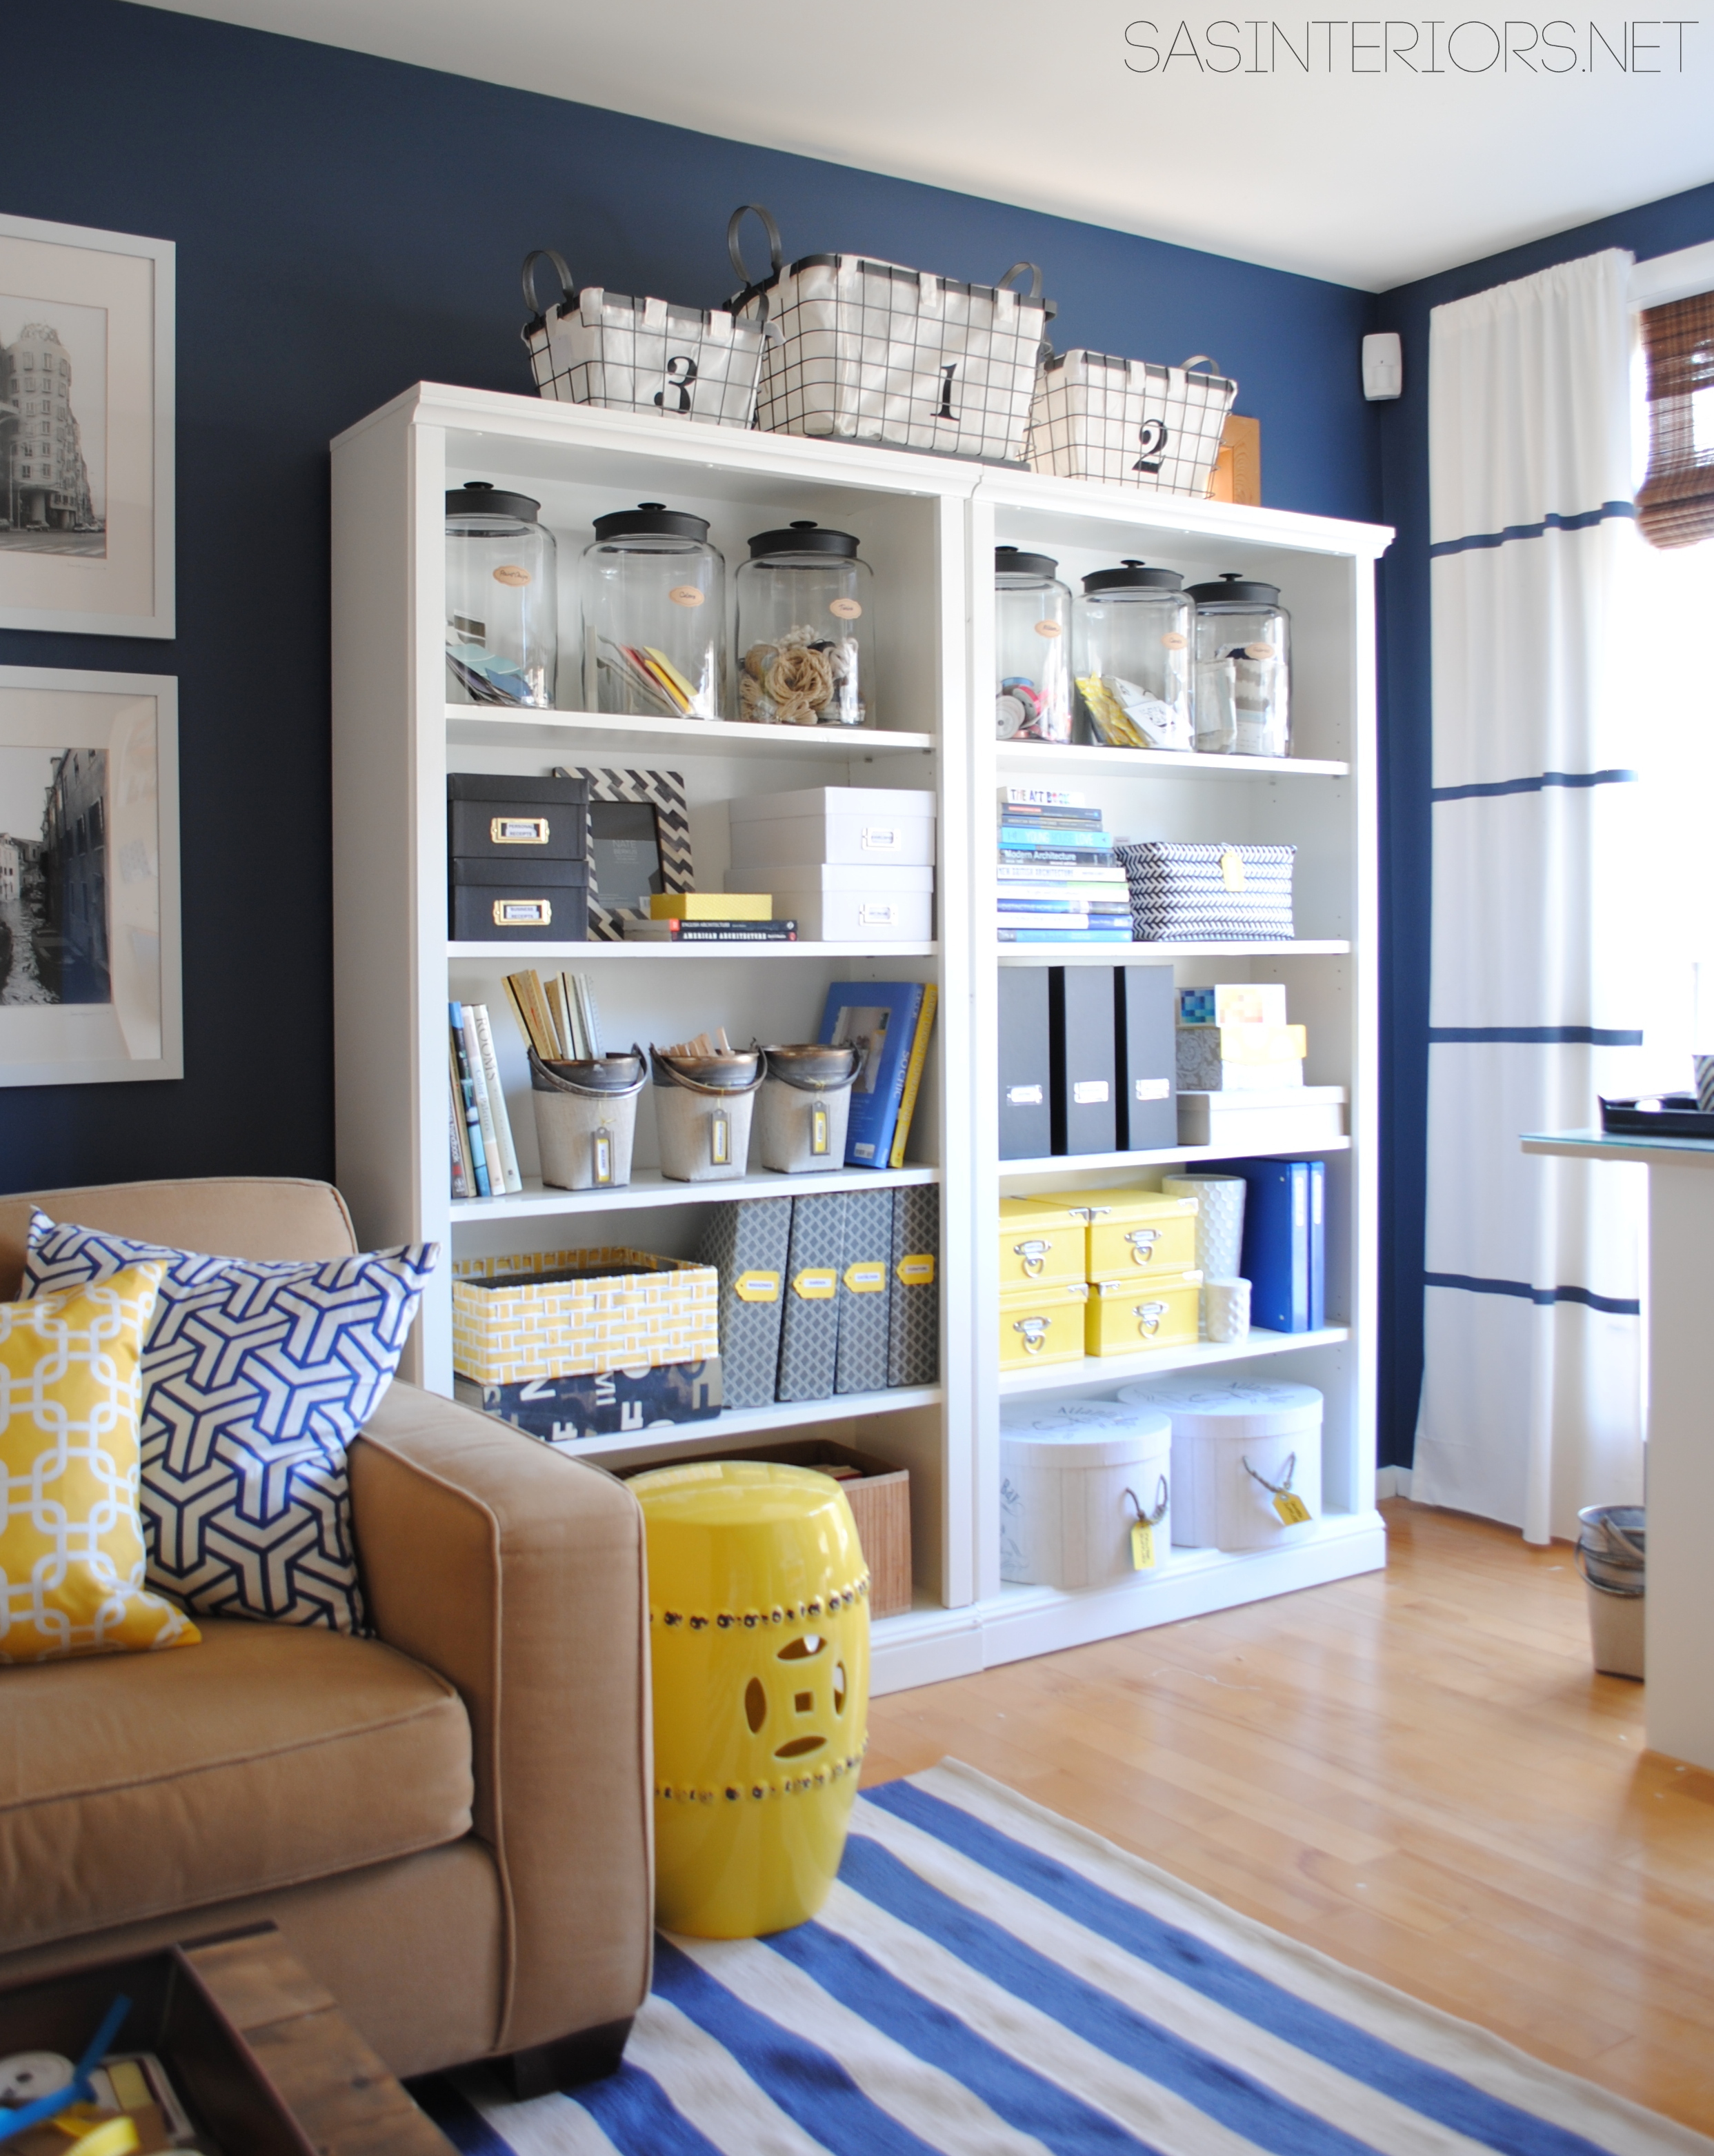
The difficult part about this space is the windows.  There is one large window at the far end and then a smaller side window.  That stinkin’ side window made things quite difficult.  After moving furniture around for many months, I made a daring design decision and put a bookcase in front of that side window – yes you heard me right!  I covered it up. Read more about it here.

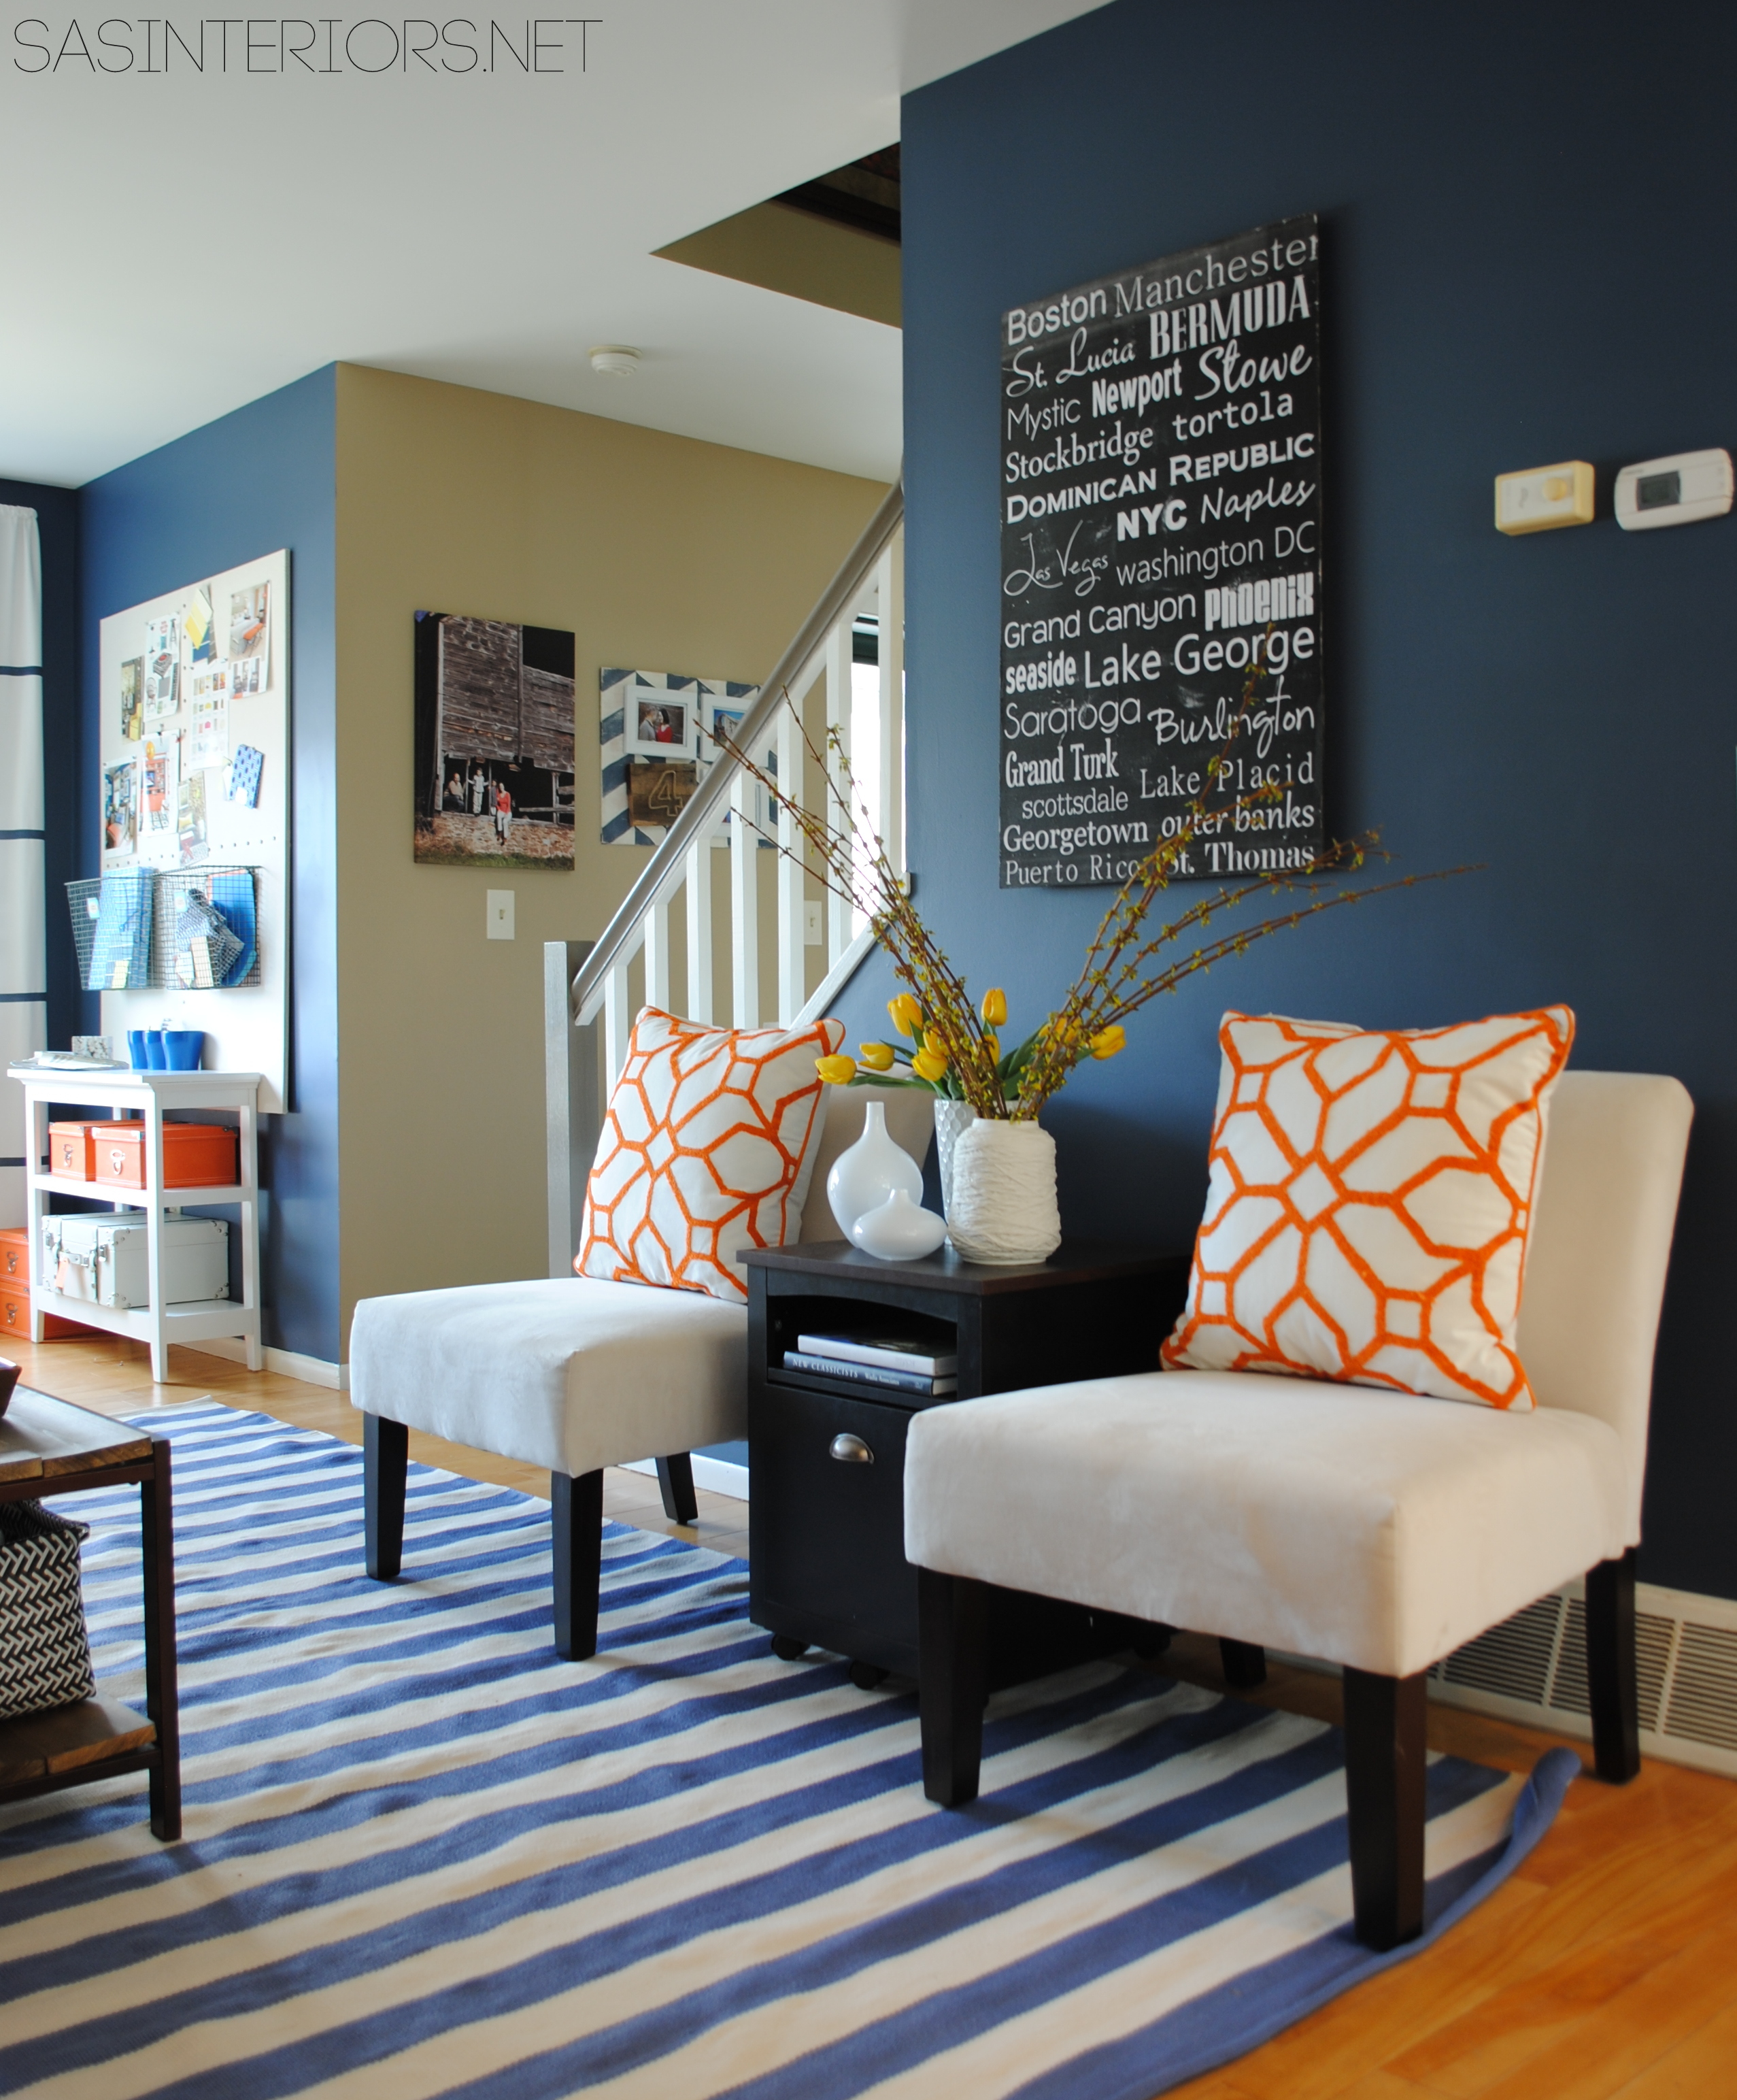
Then I painted the room navy blue, and ever since it’s been my favorite space in the house!  The completed room reveal can be seen here and this is pretty similar to how it looks today (versus the magazine which portrays the room differently).

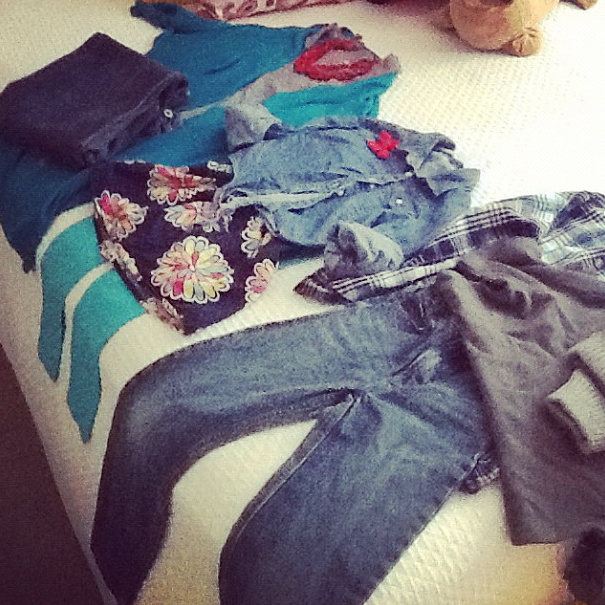
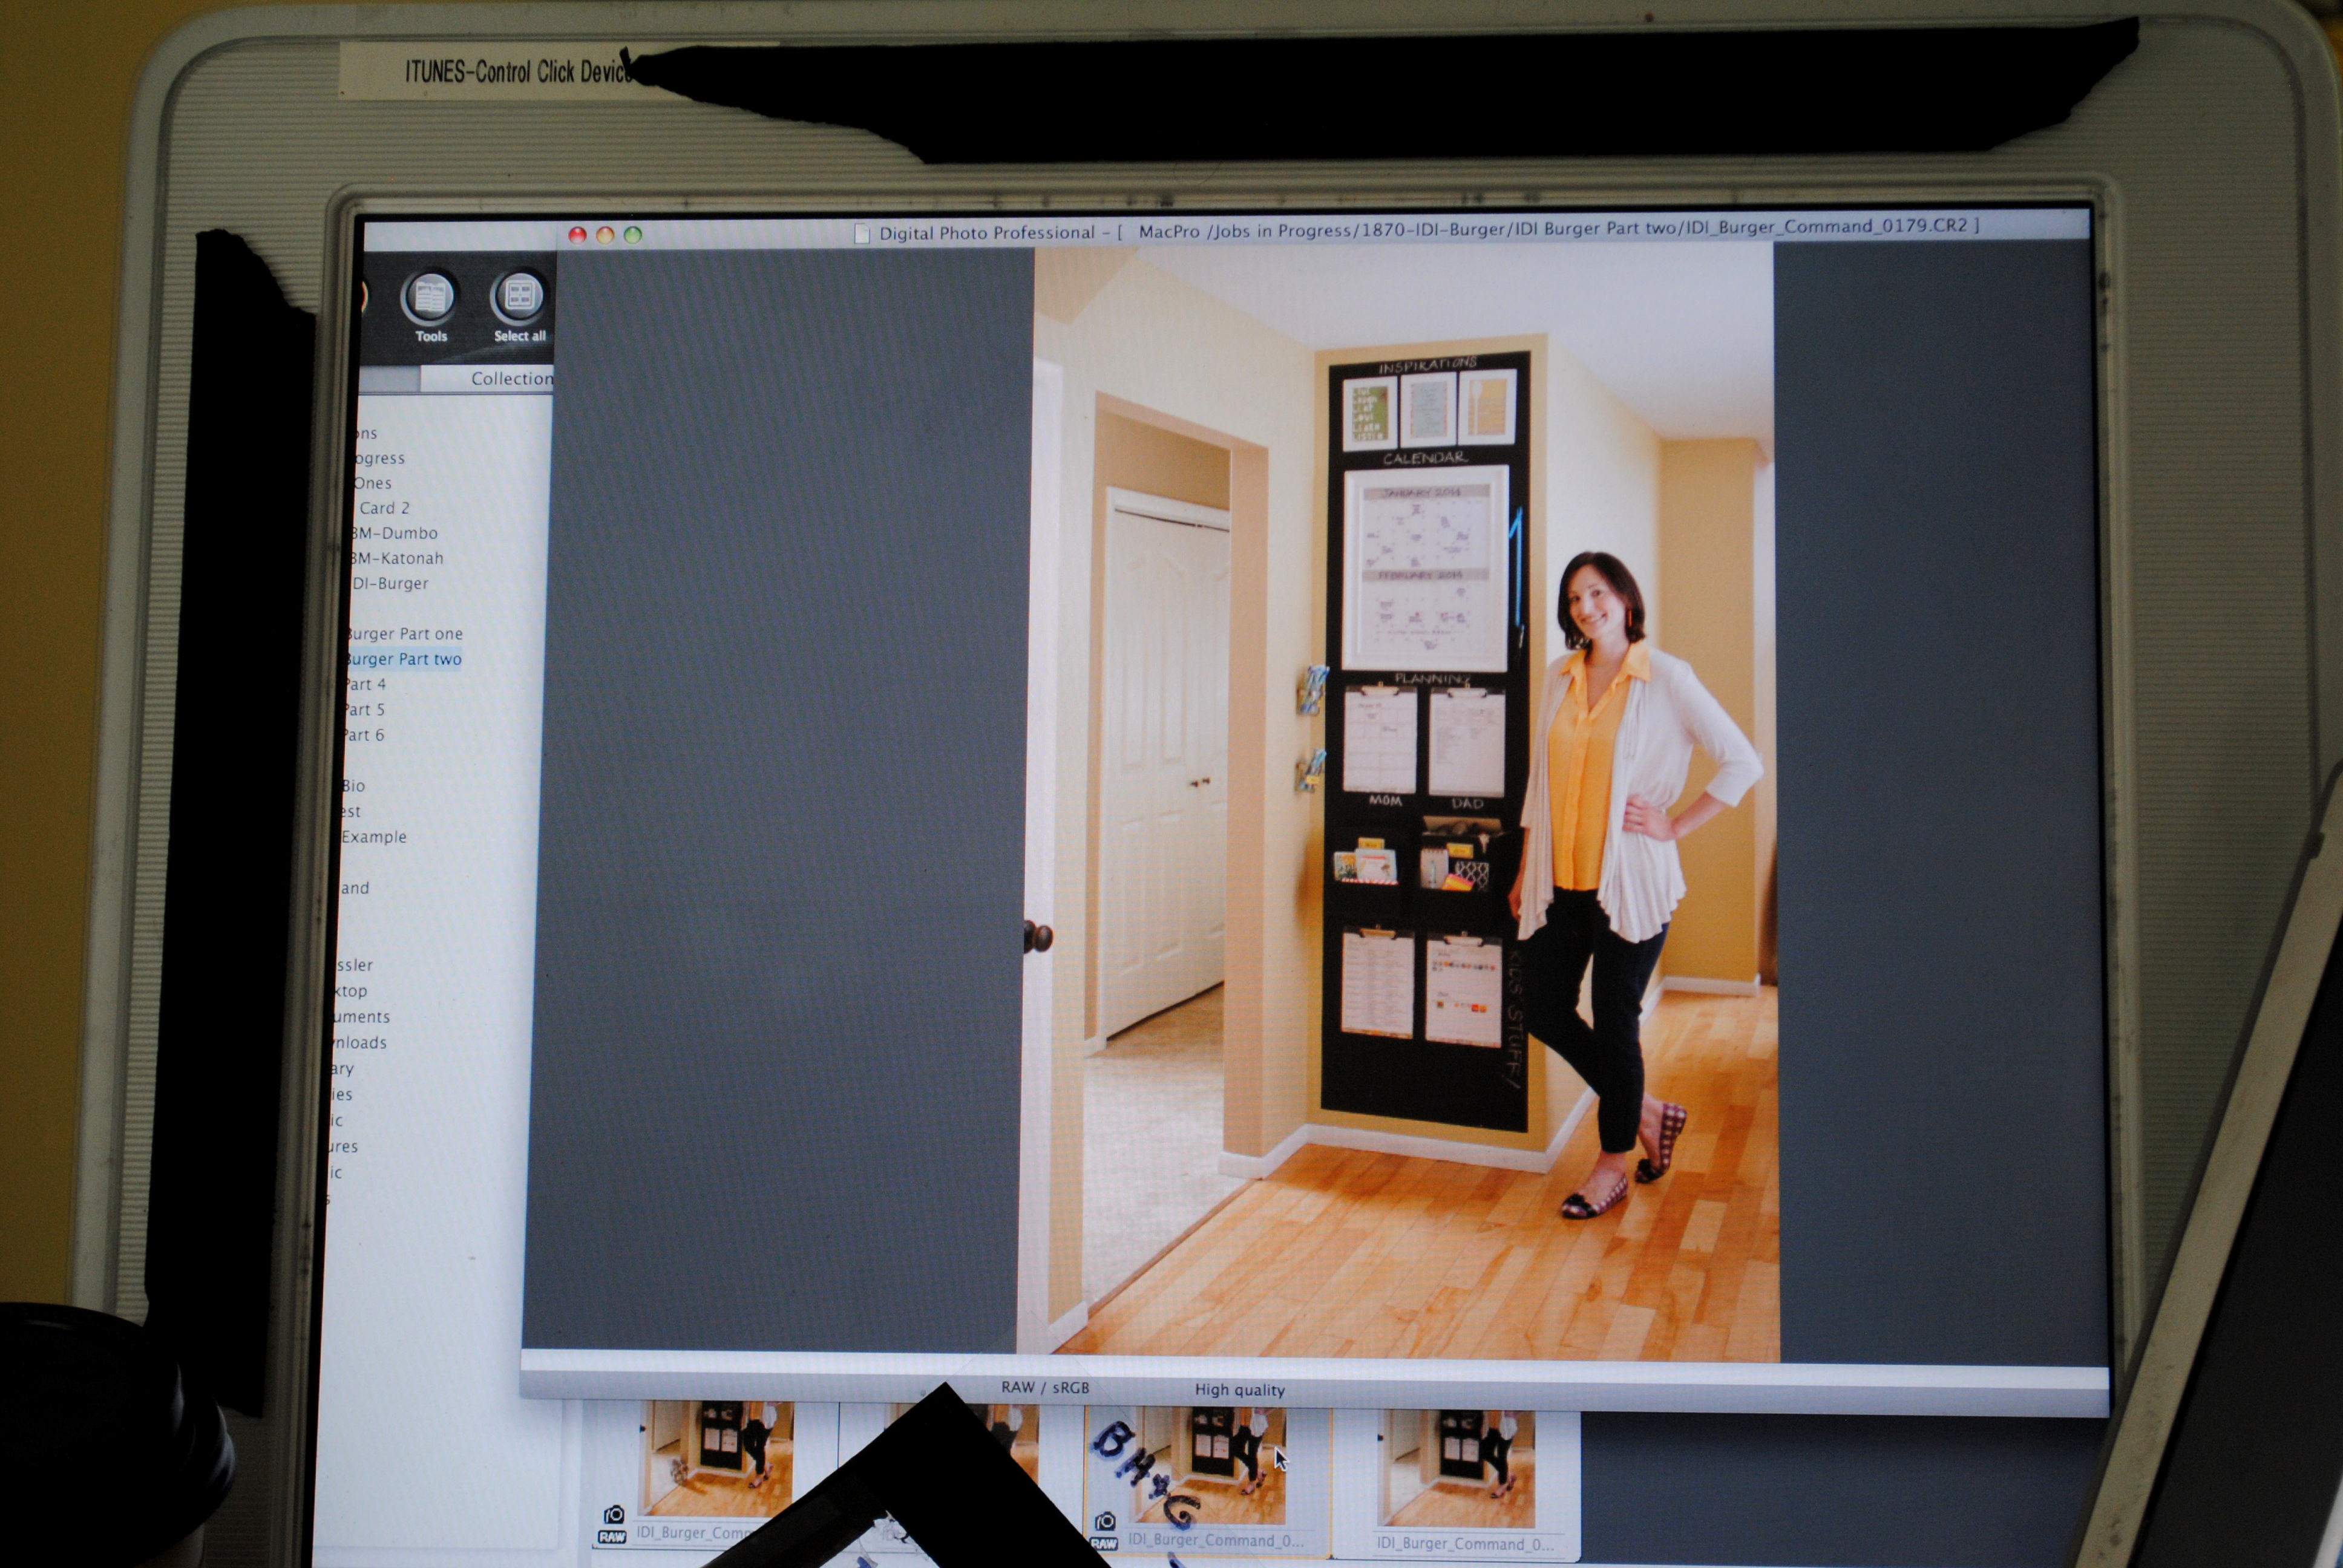
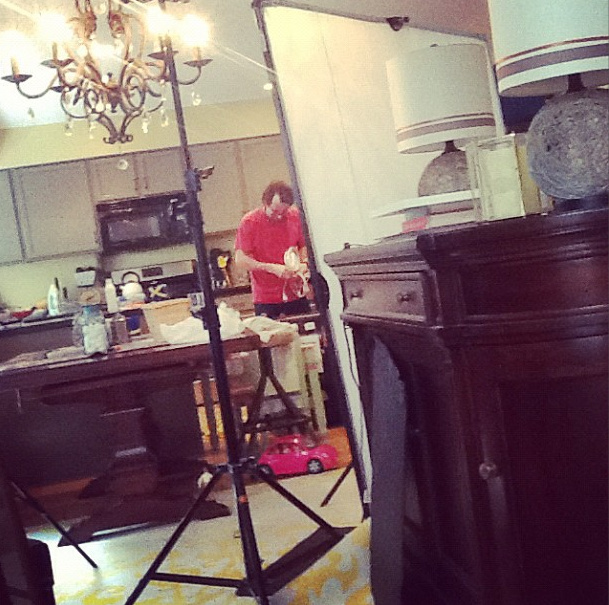
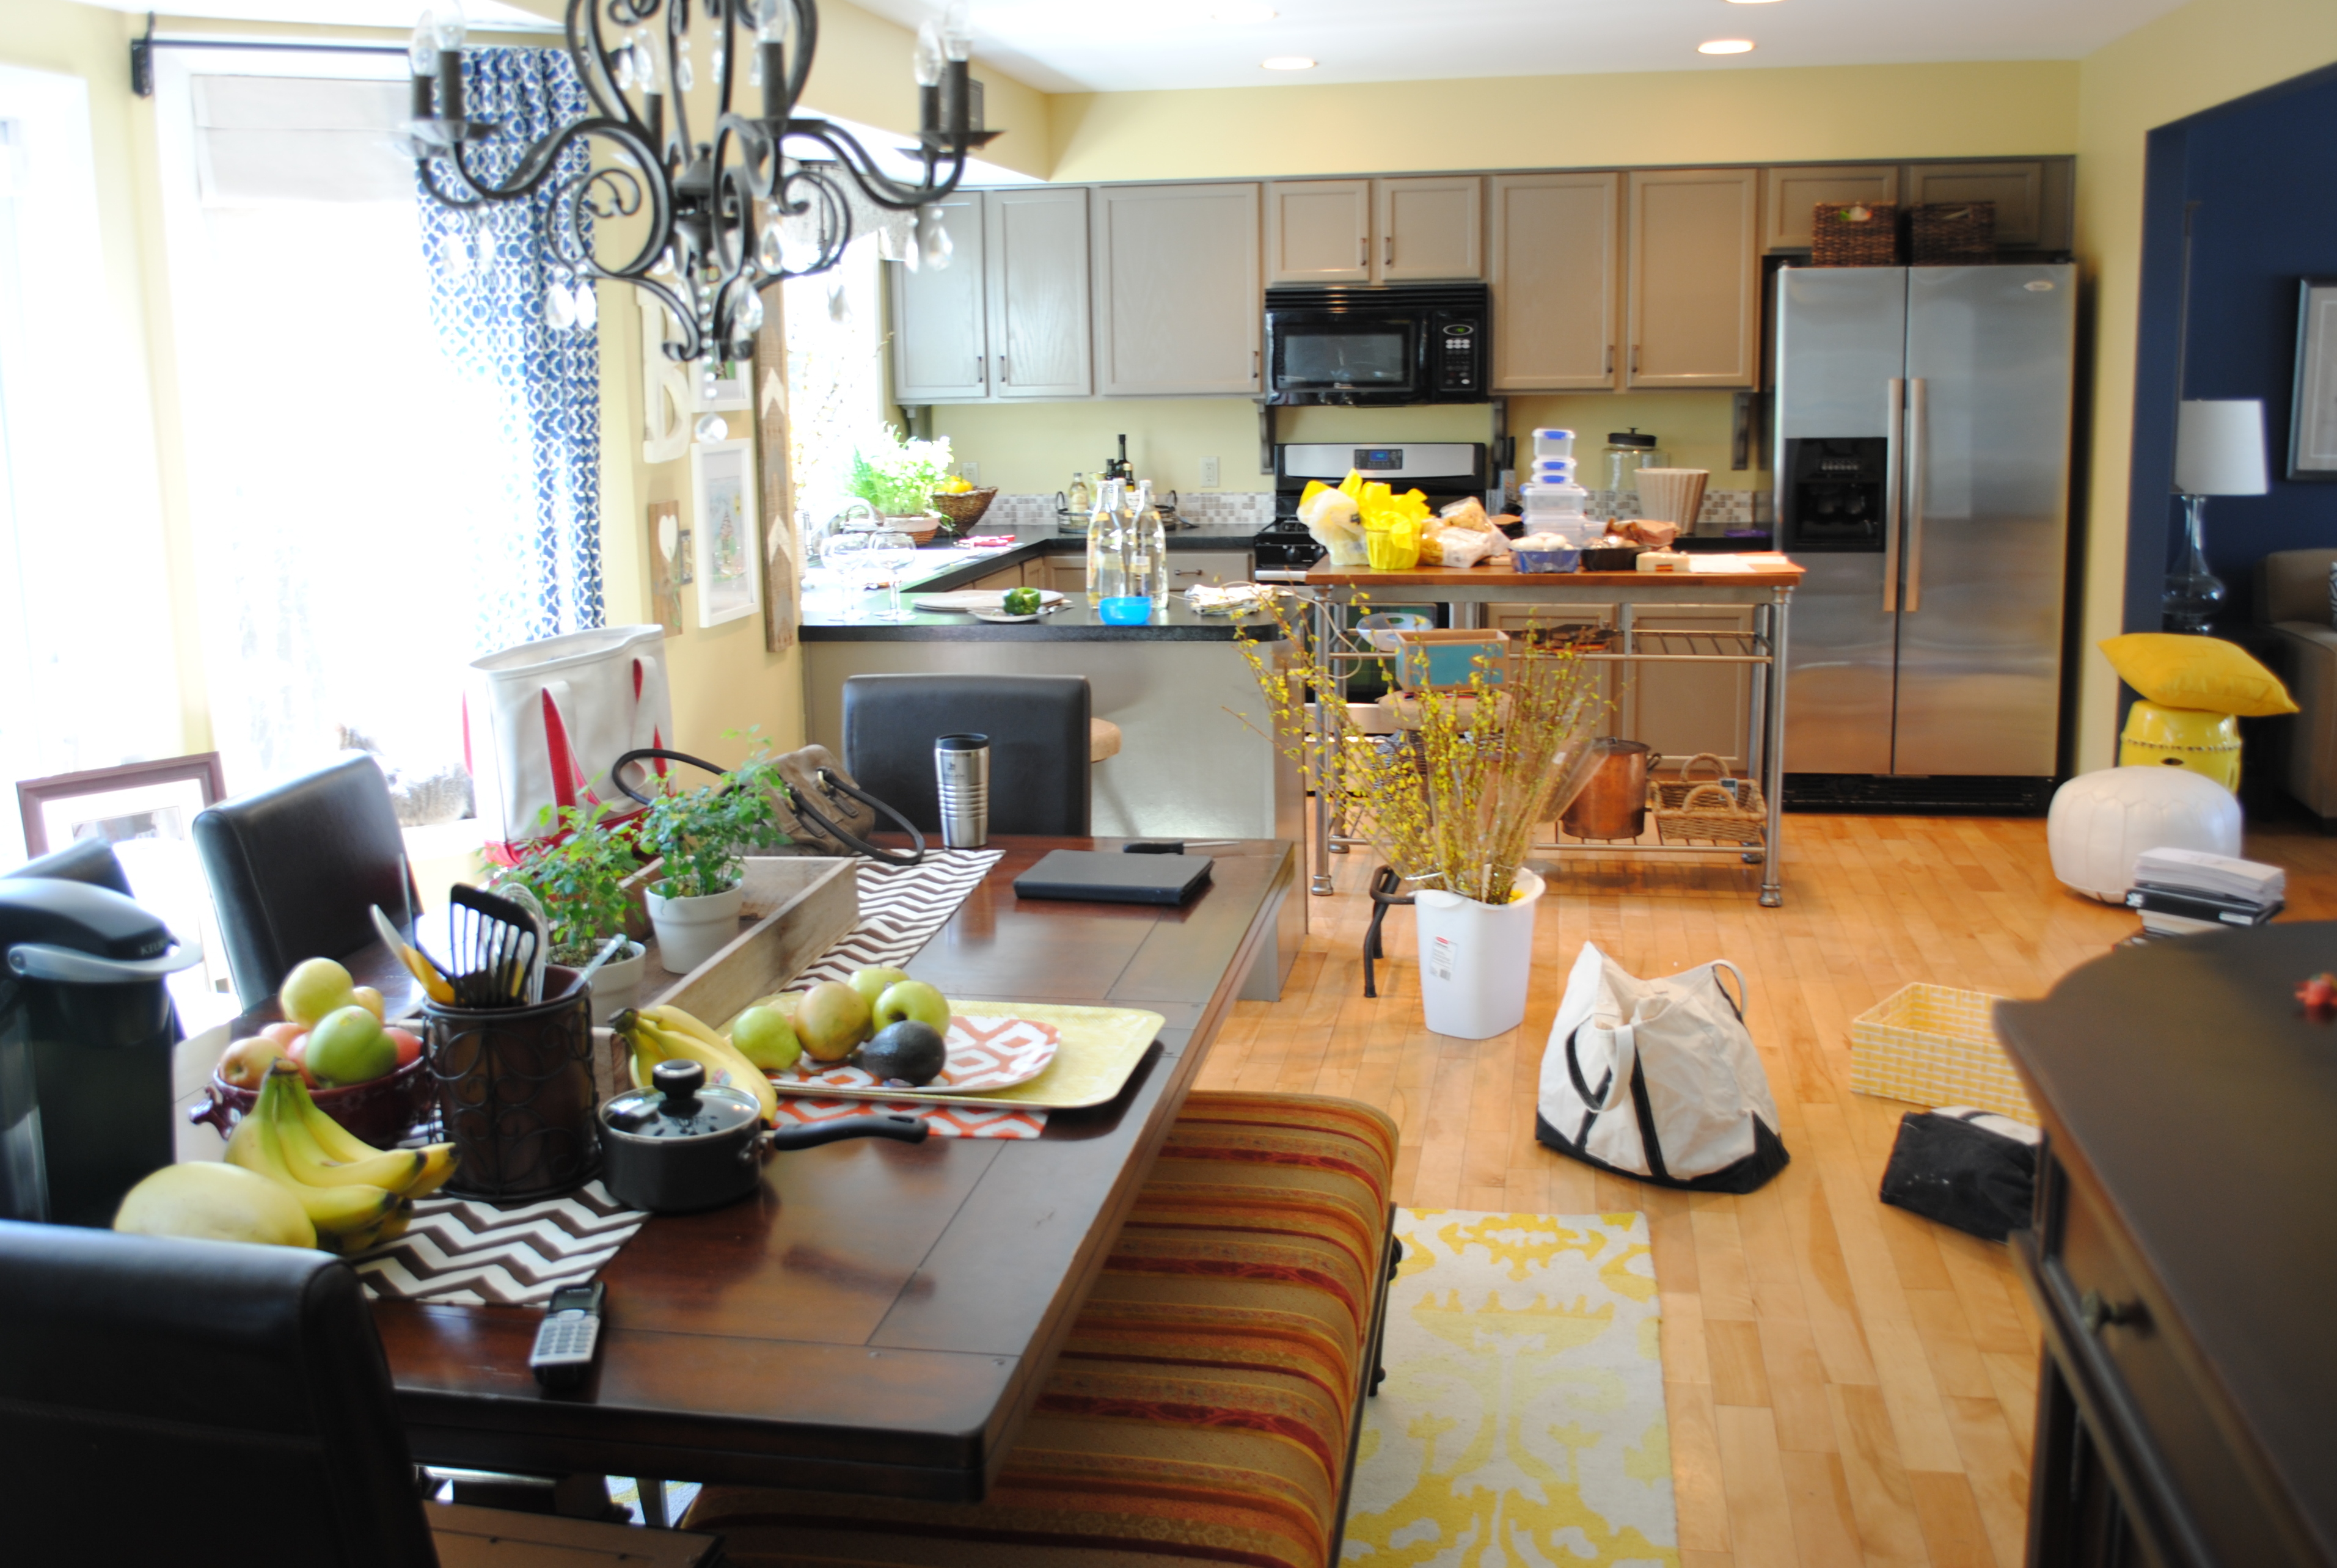
I always love behind-the-scenes pictures to see/find out what really goes into the making of something, so I snapped a few pics for you…

Believe me, there is so much more happening than what is in the ‘scene of the shot’!

Living Room / Office featured in Storage Magazine

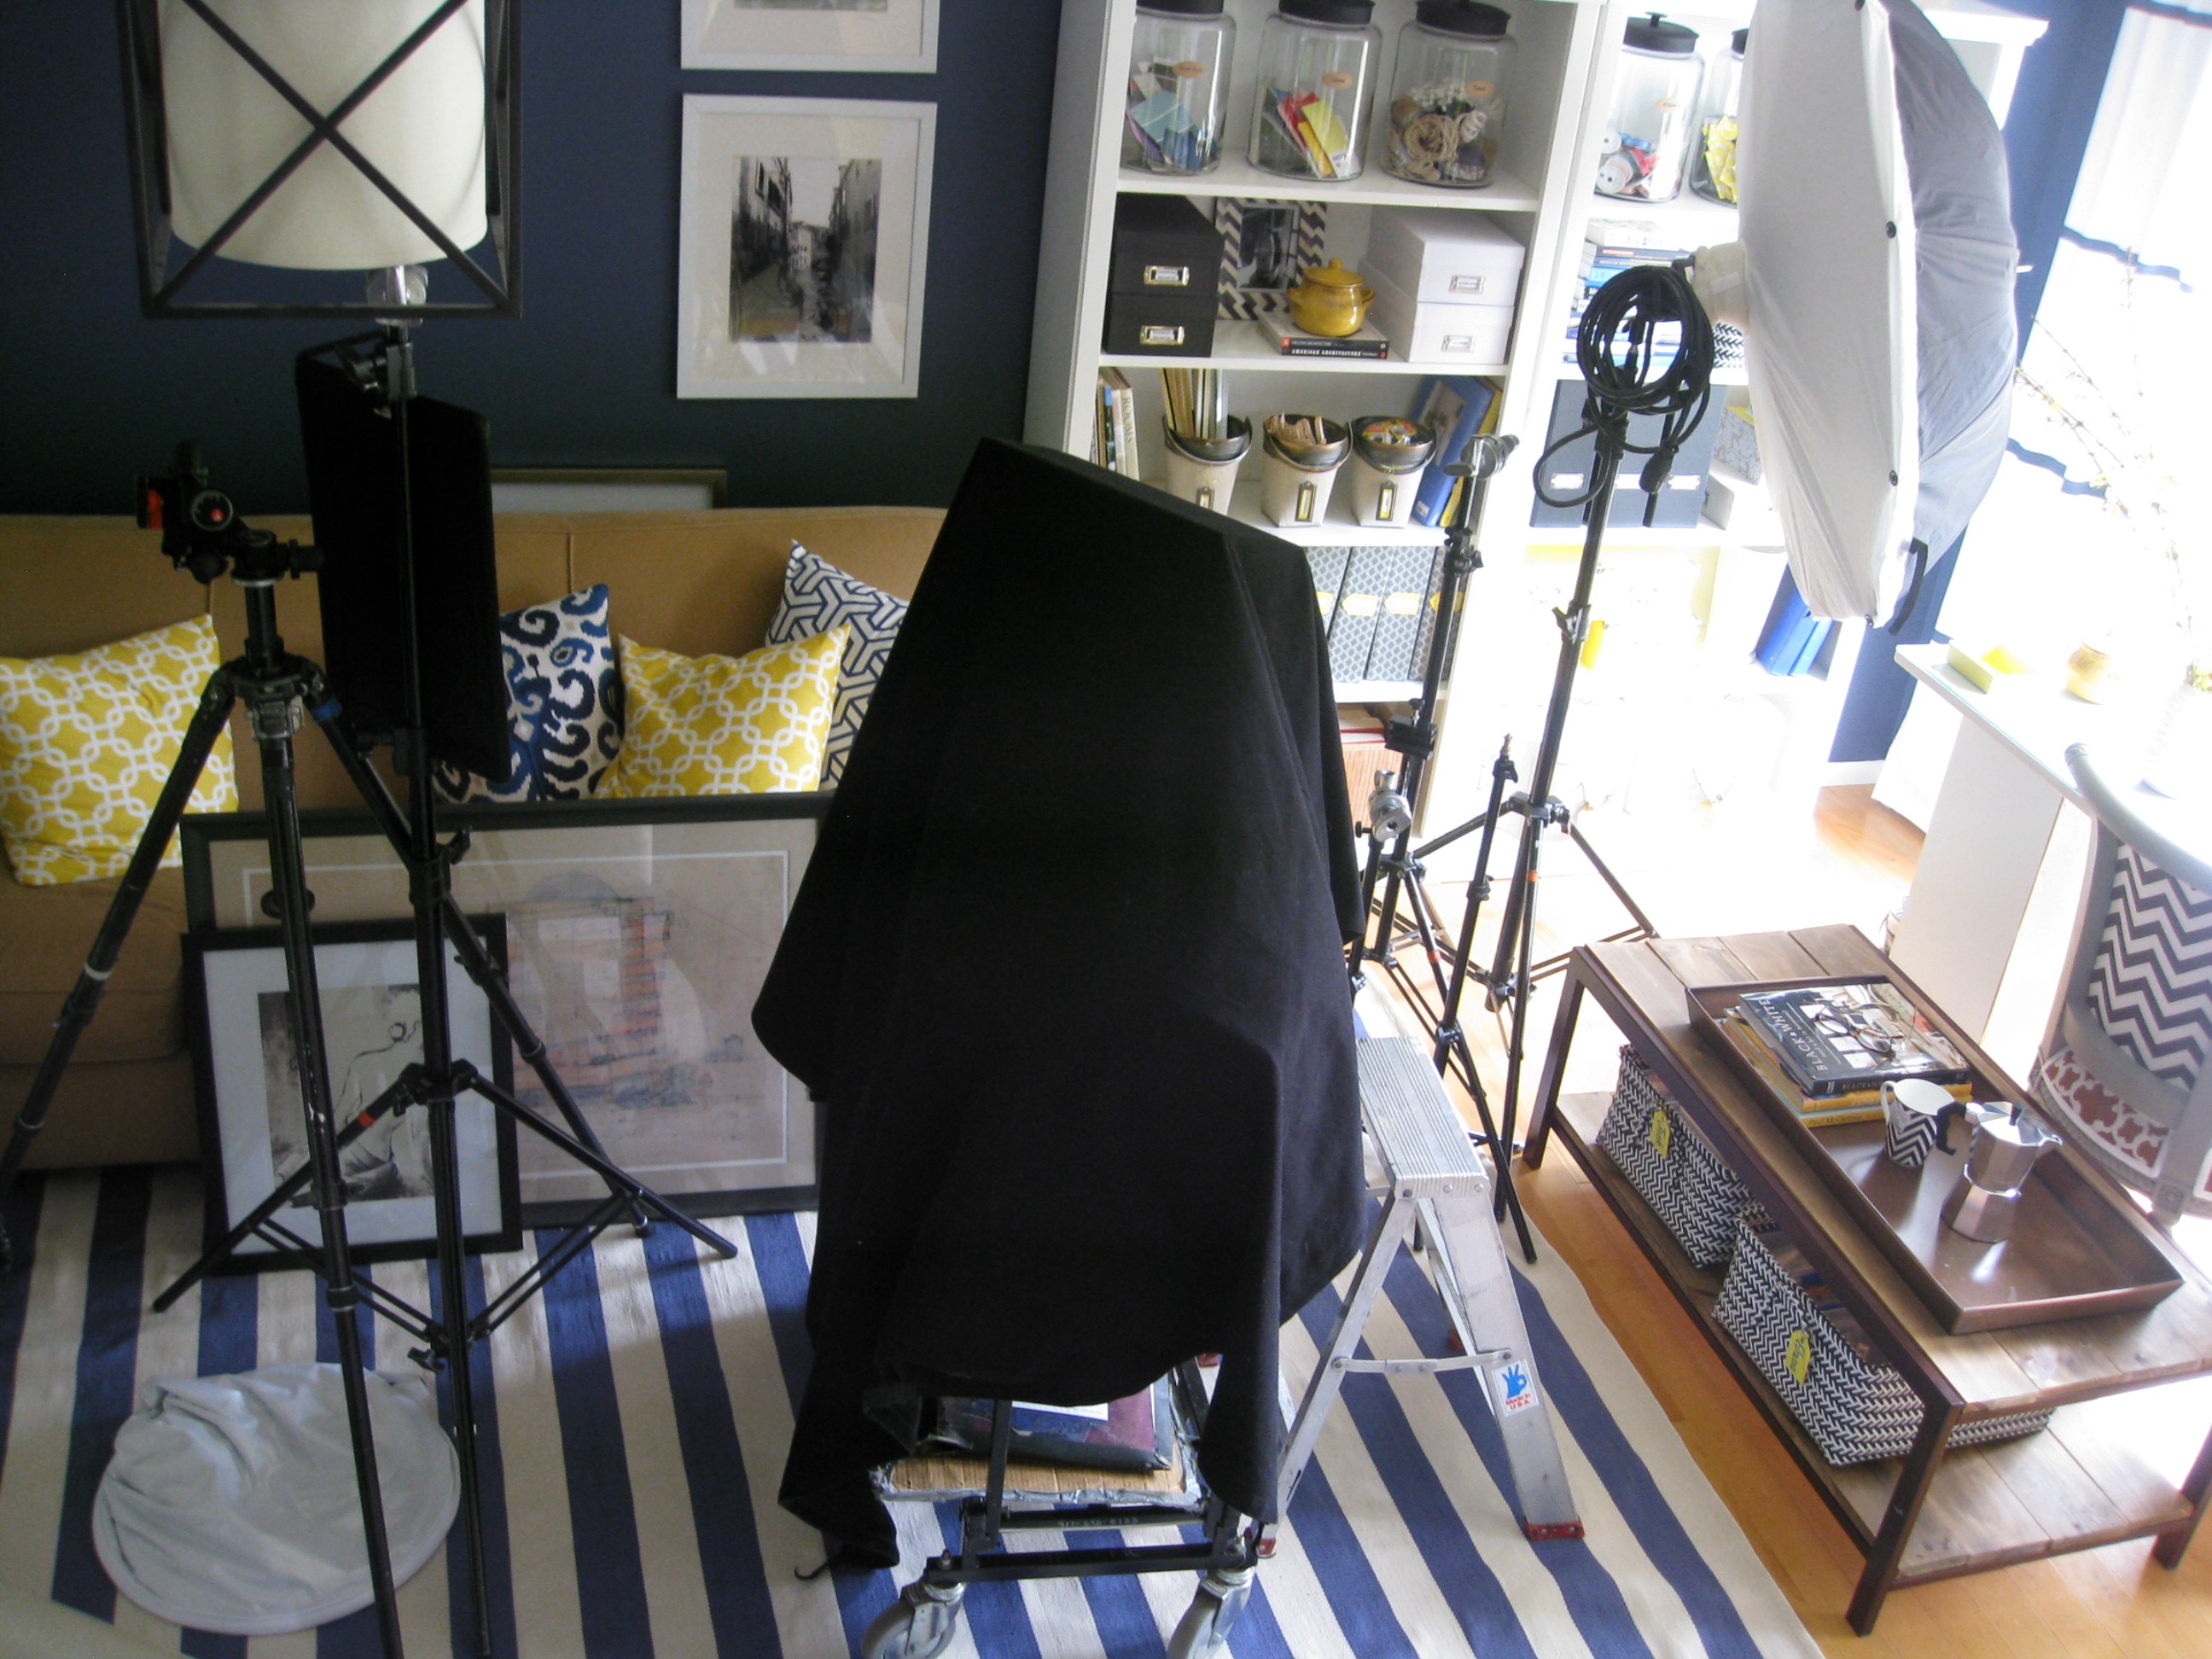
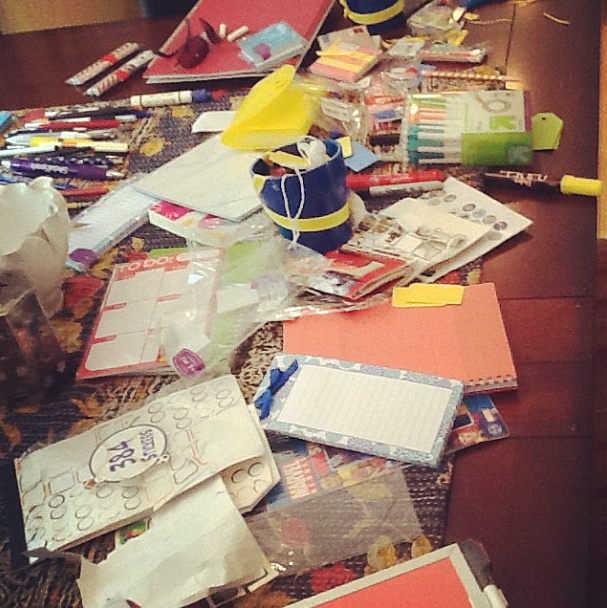
My house was torn apart.  All for good reason!

Living Room / Office featured in Storage Magazine

Living Room / Office featured in Storage Magazine

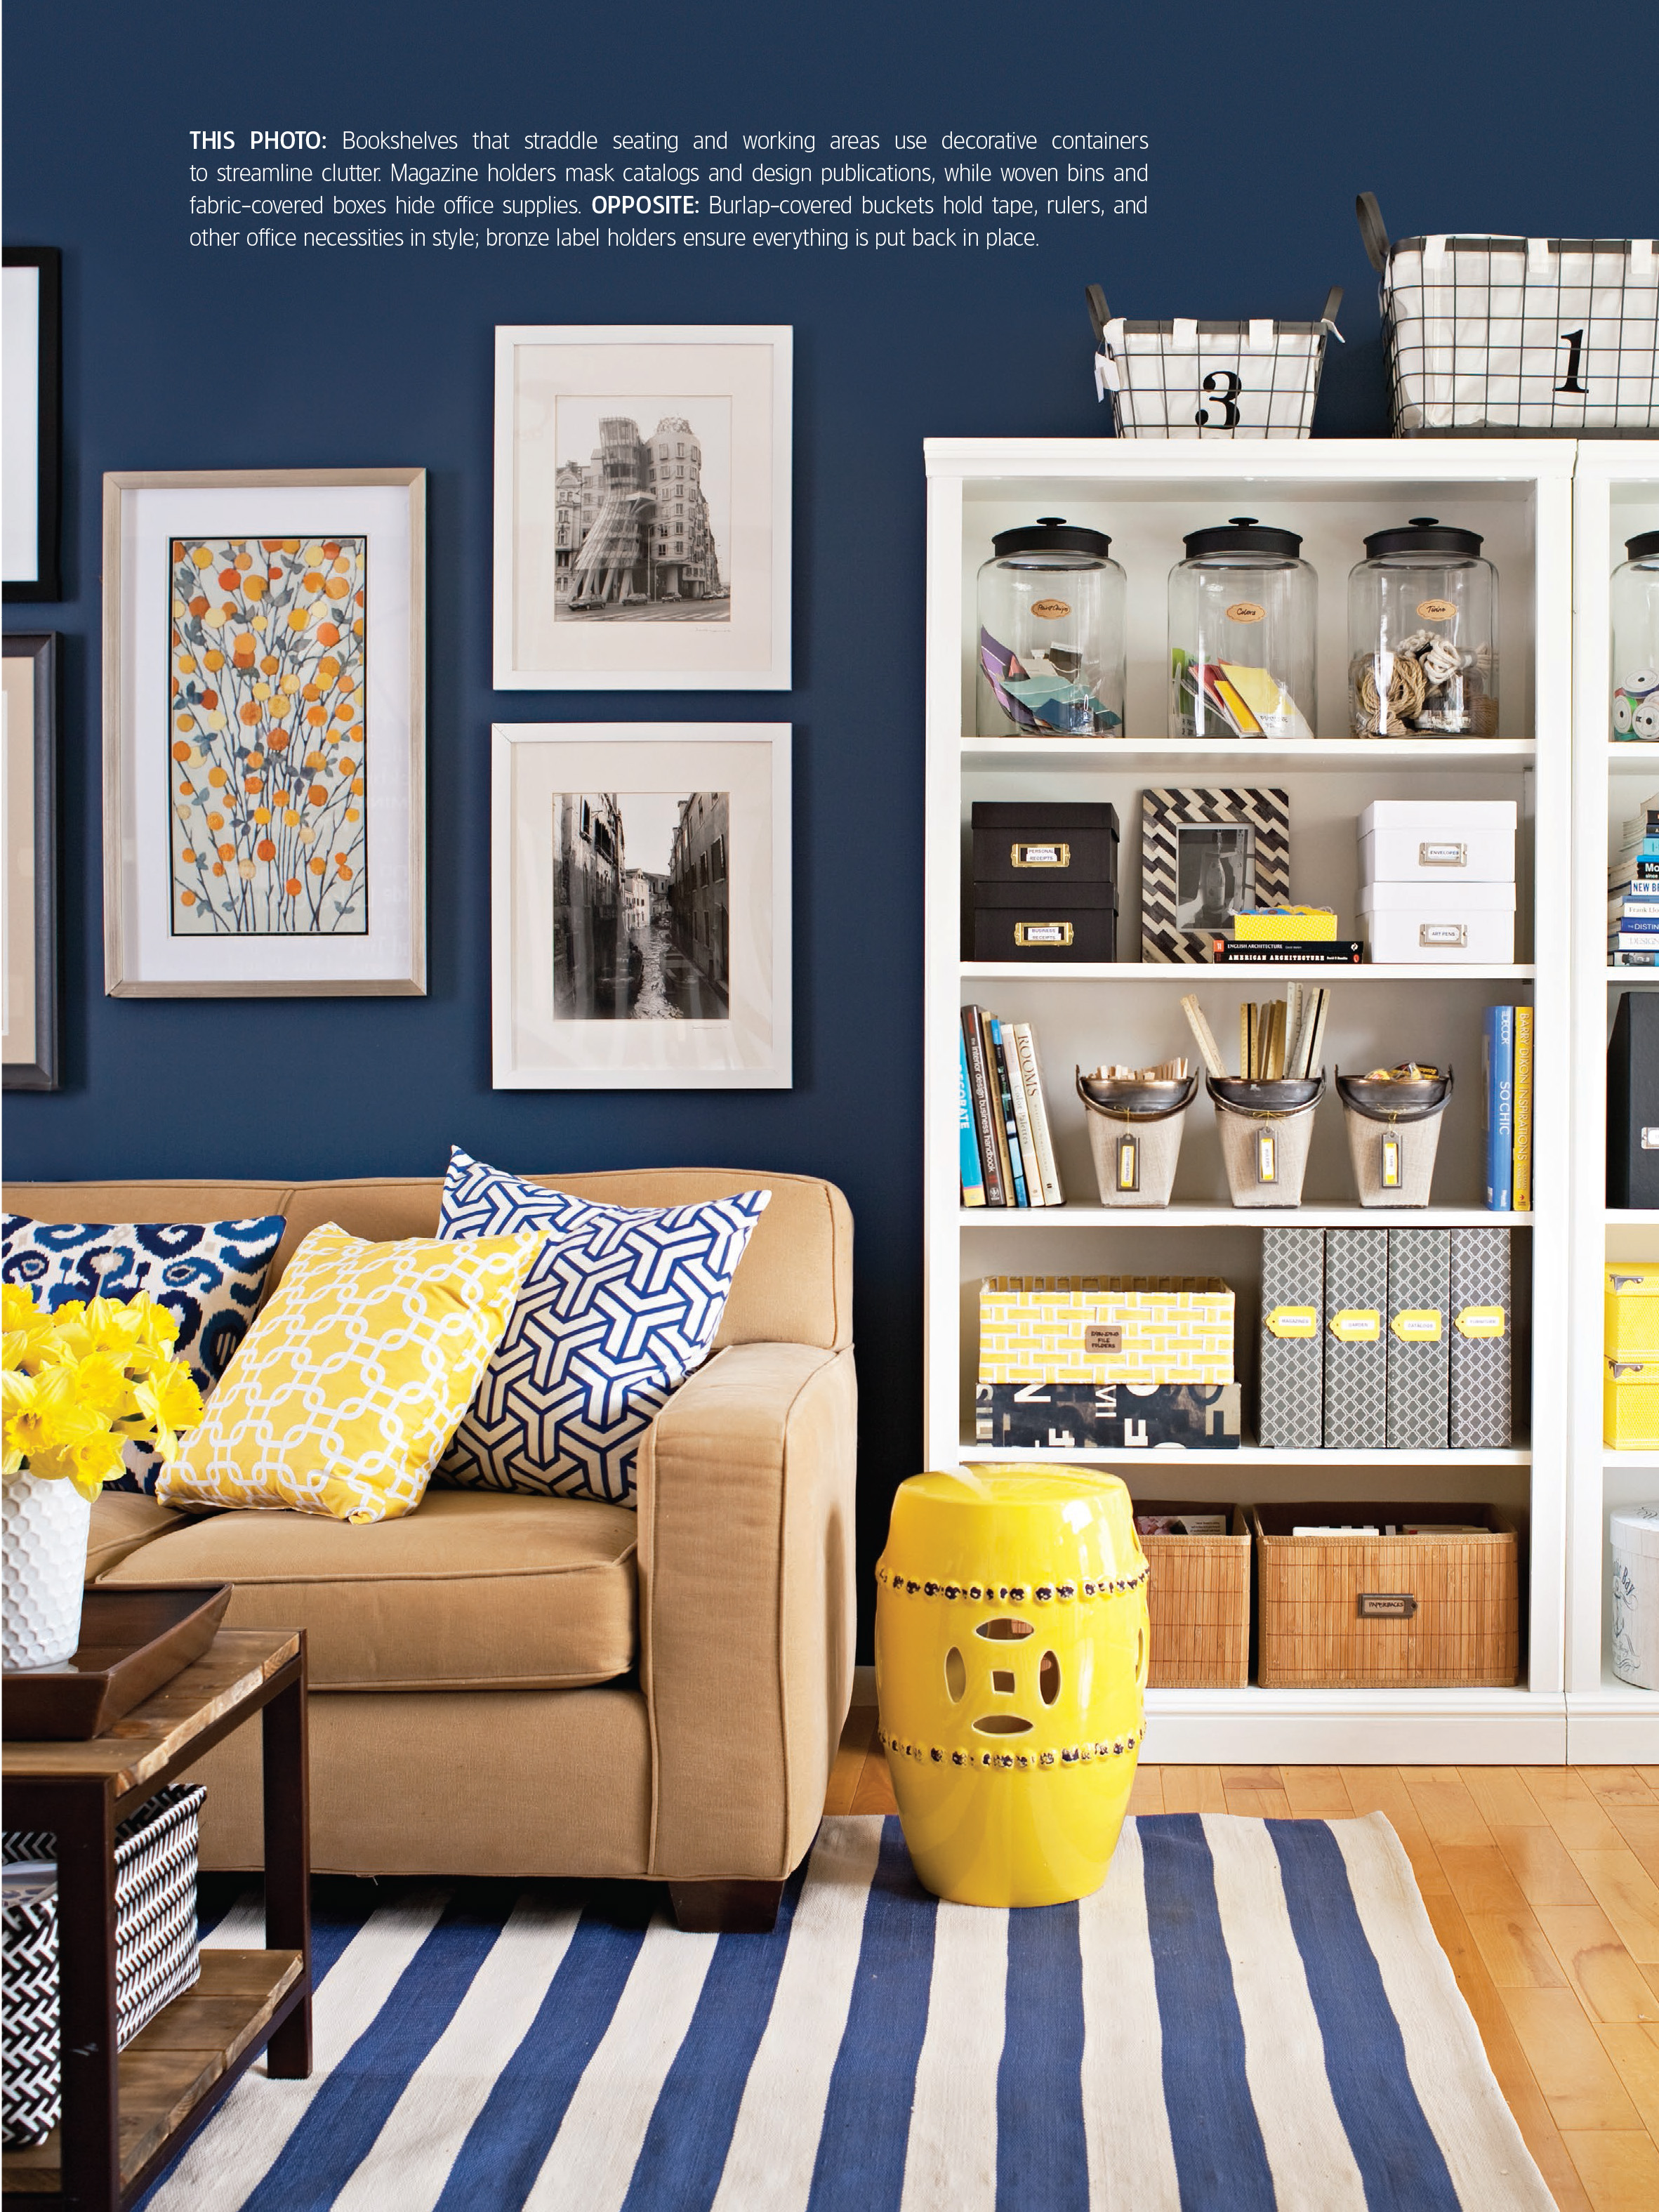
The styling of the space was beautiful.  It felt like such a different room…

Living Room / Office featured in Storage Magazine

Living Room / Office featured in Storage Magazine

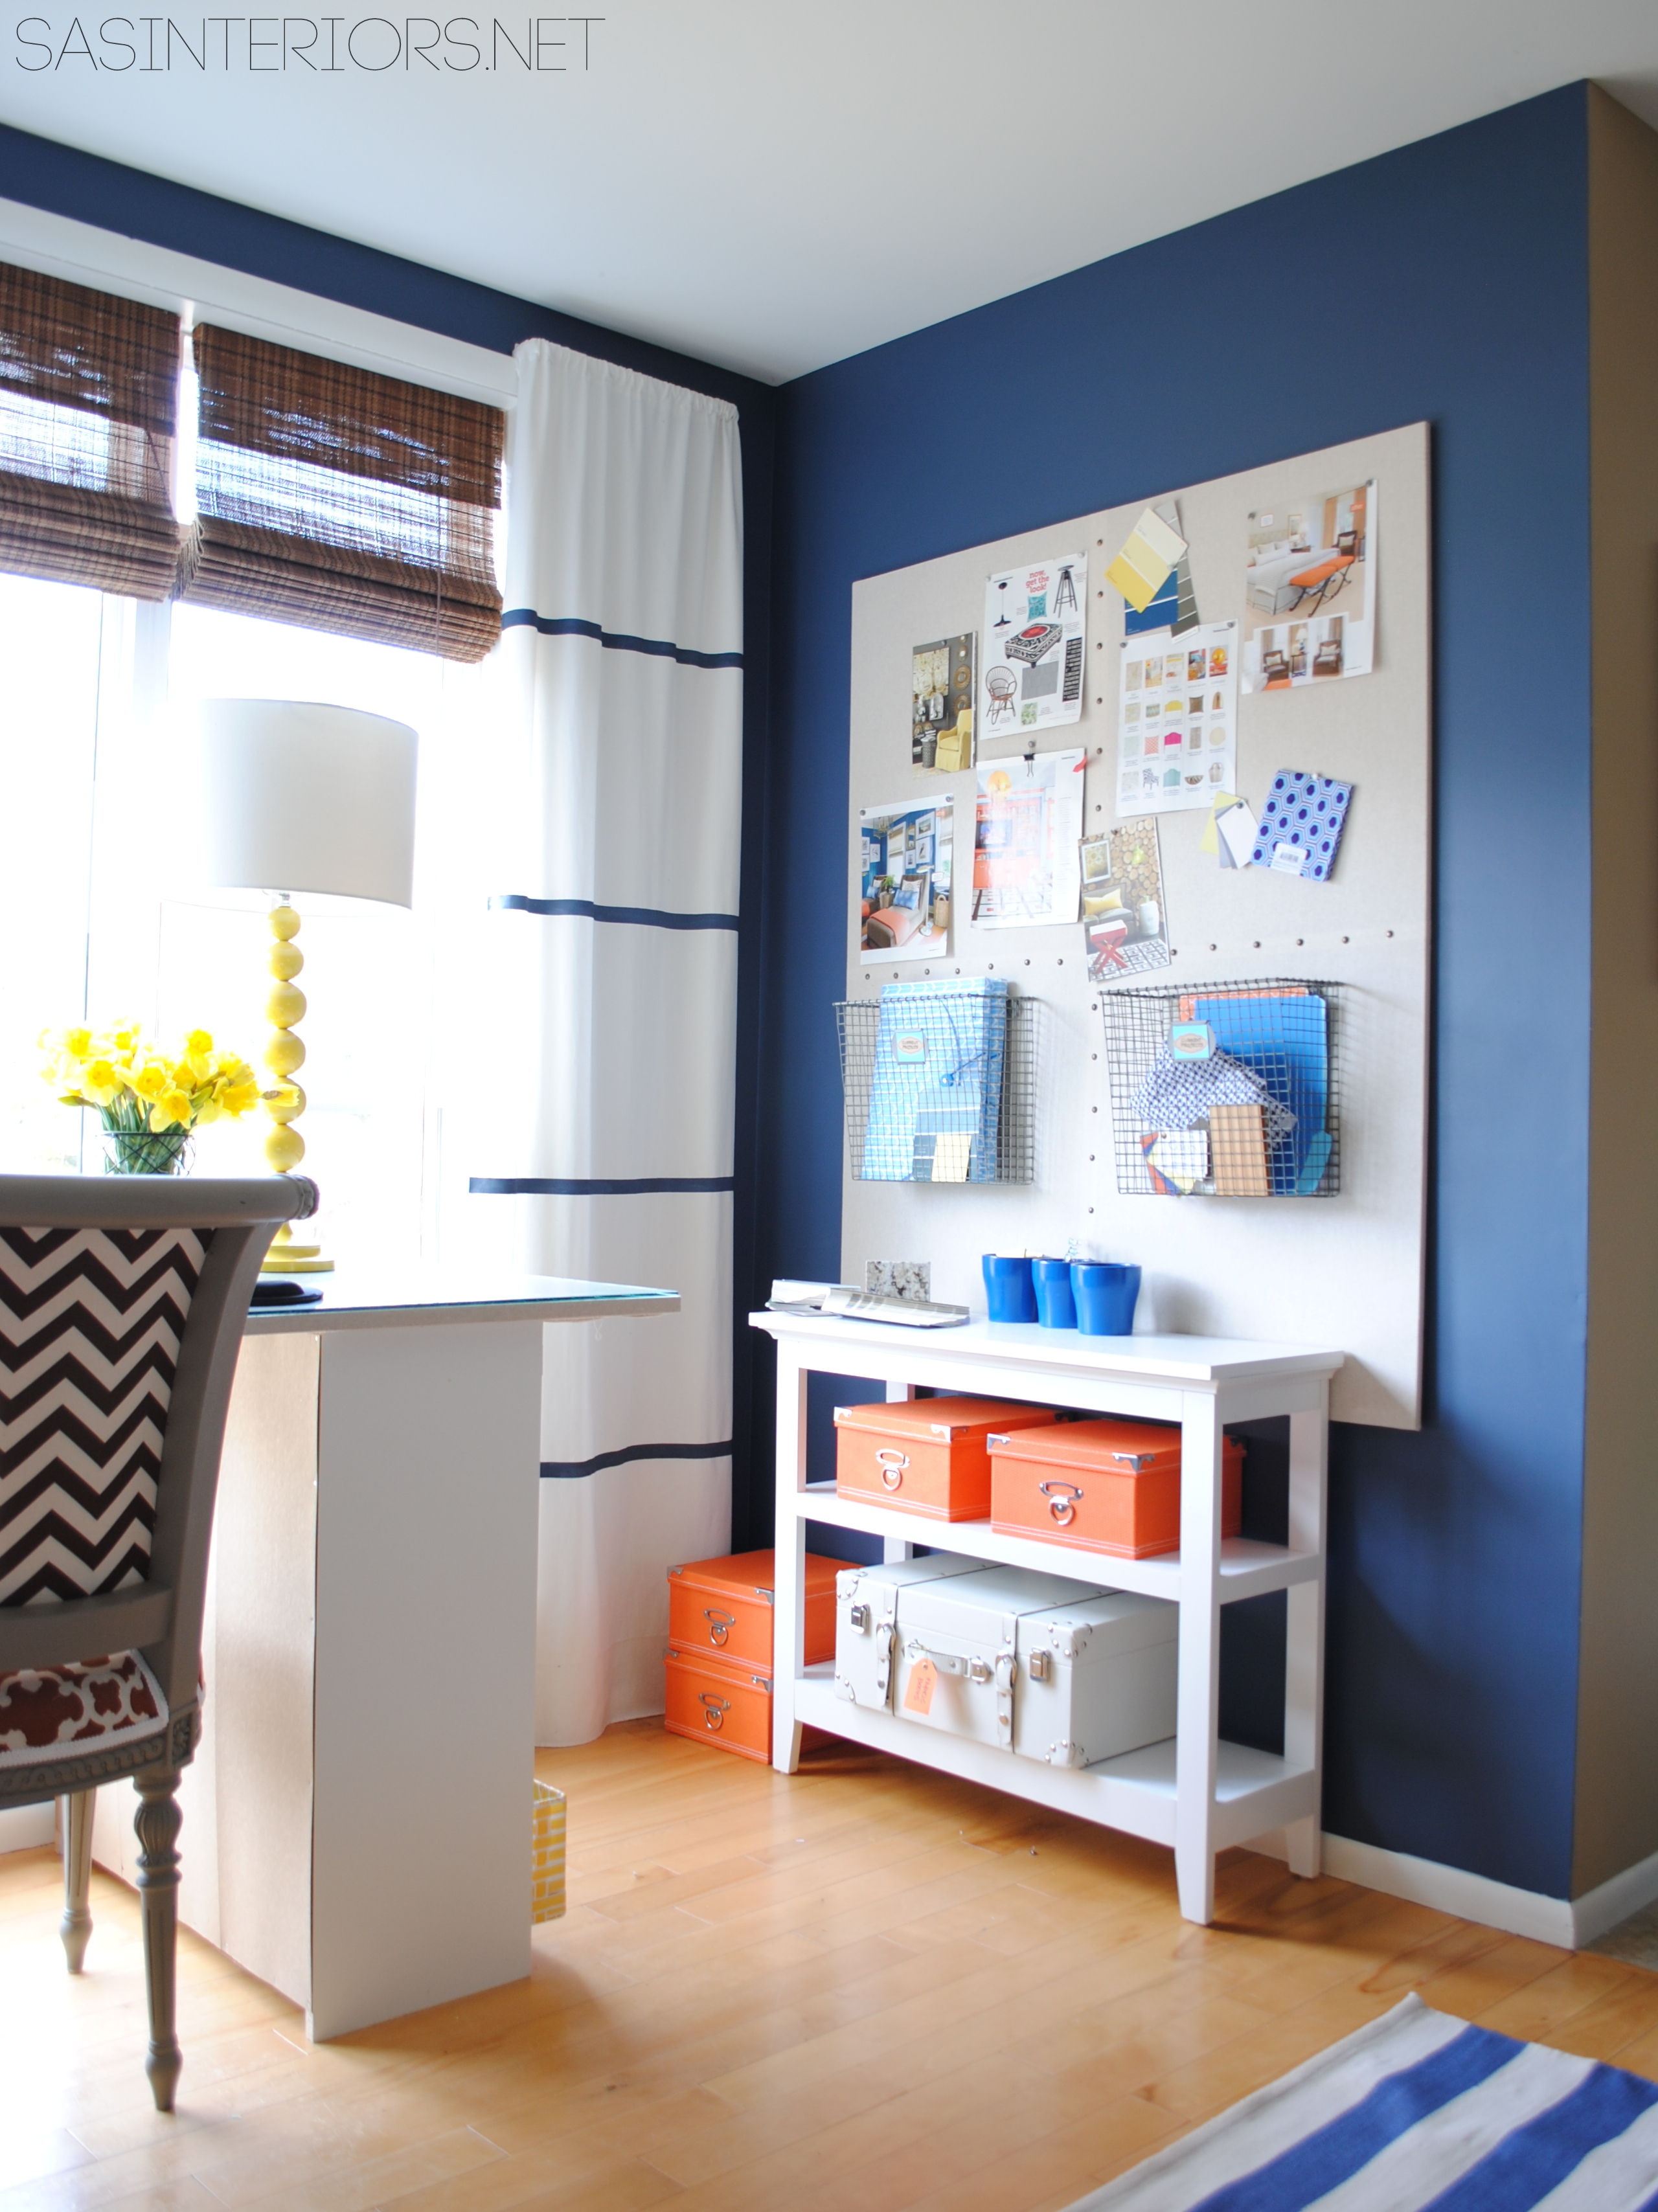
So much thought went into every detail.

Living Room / Office featured in Storage Magazine

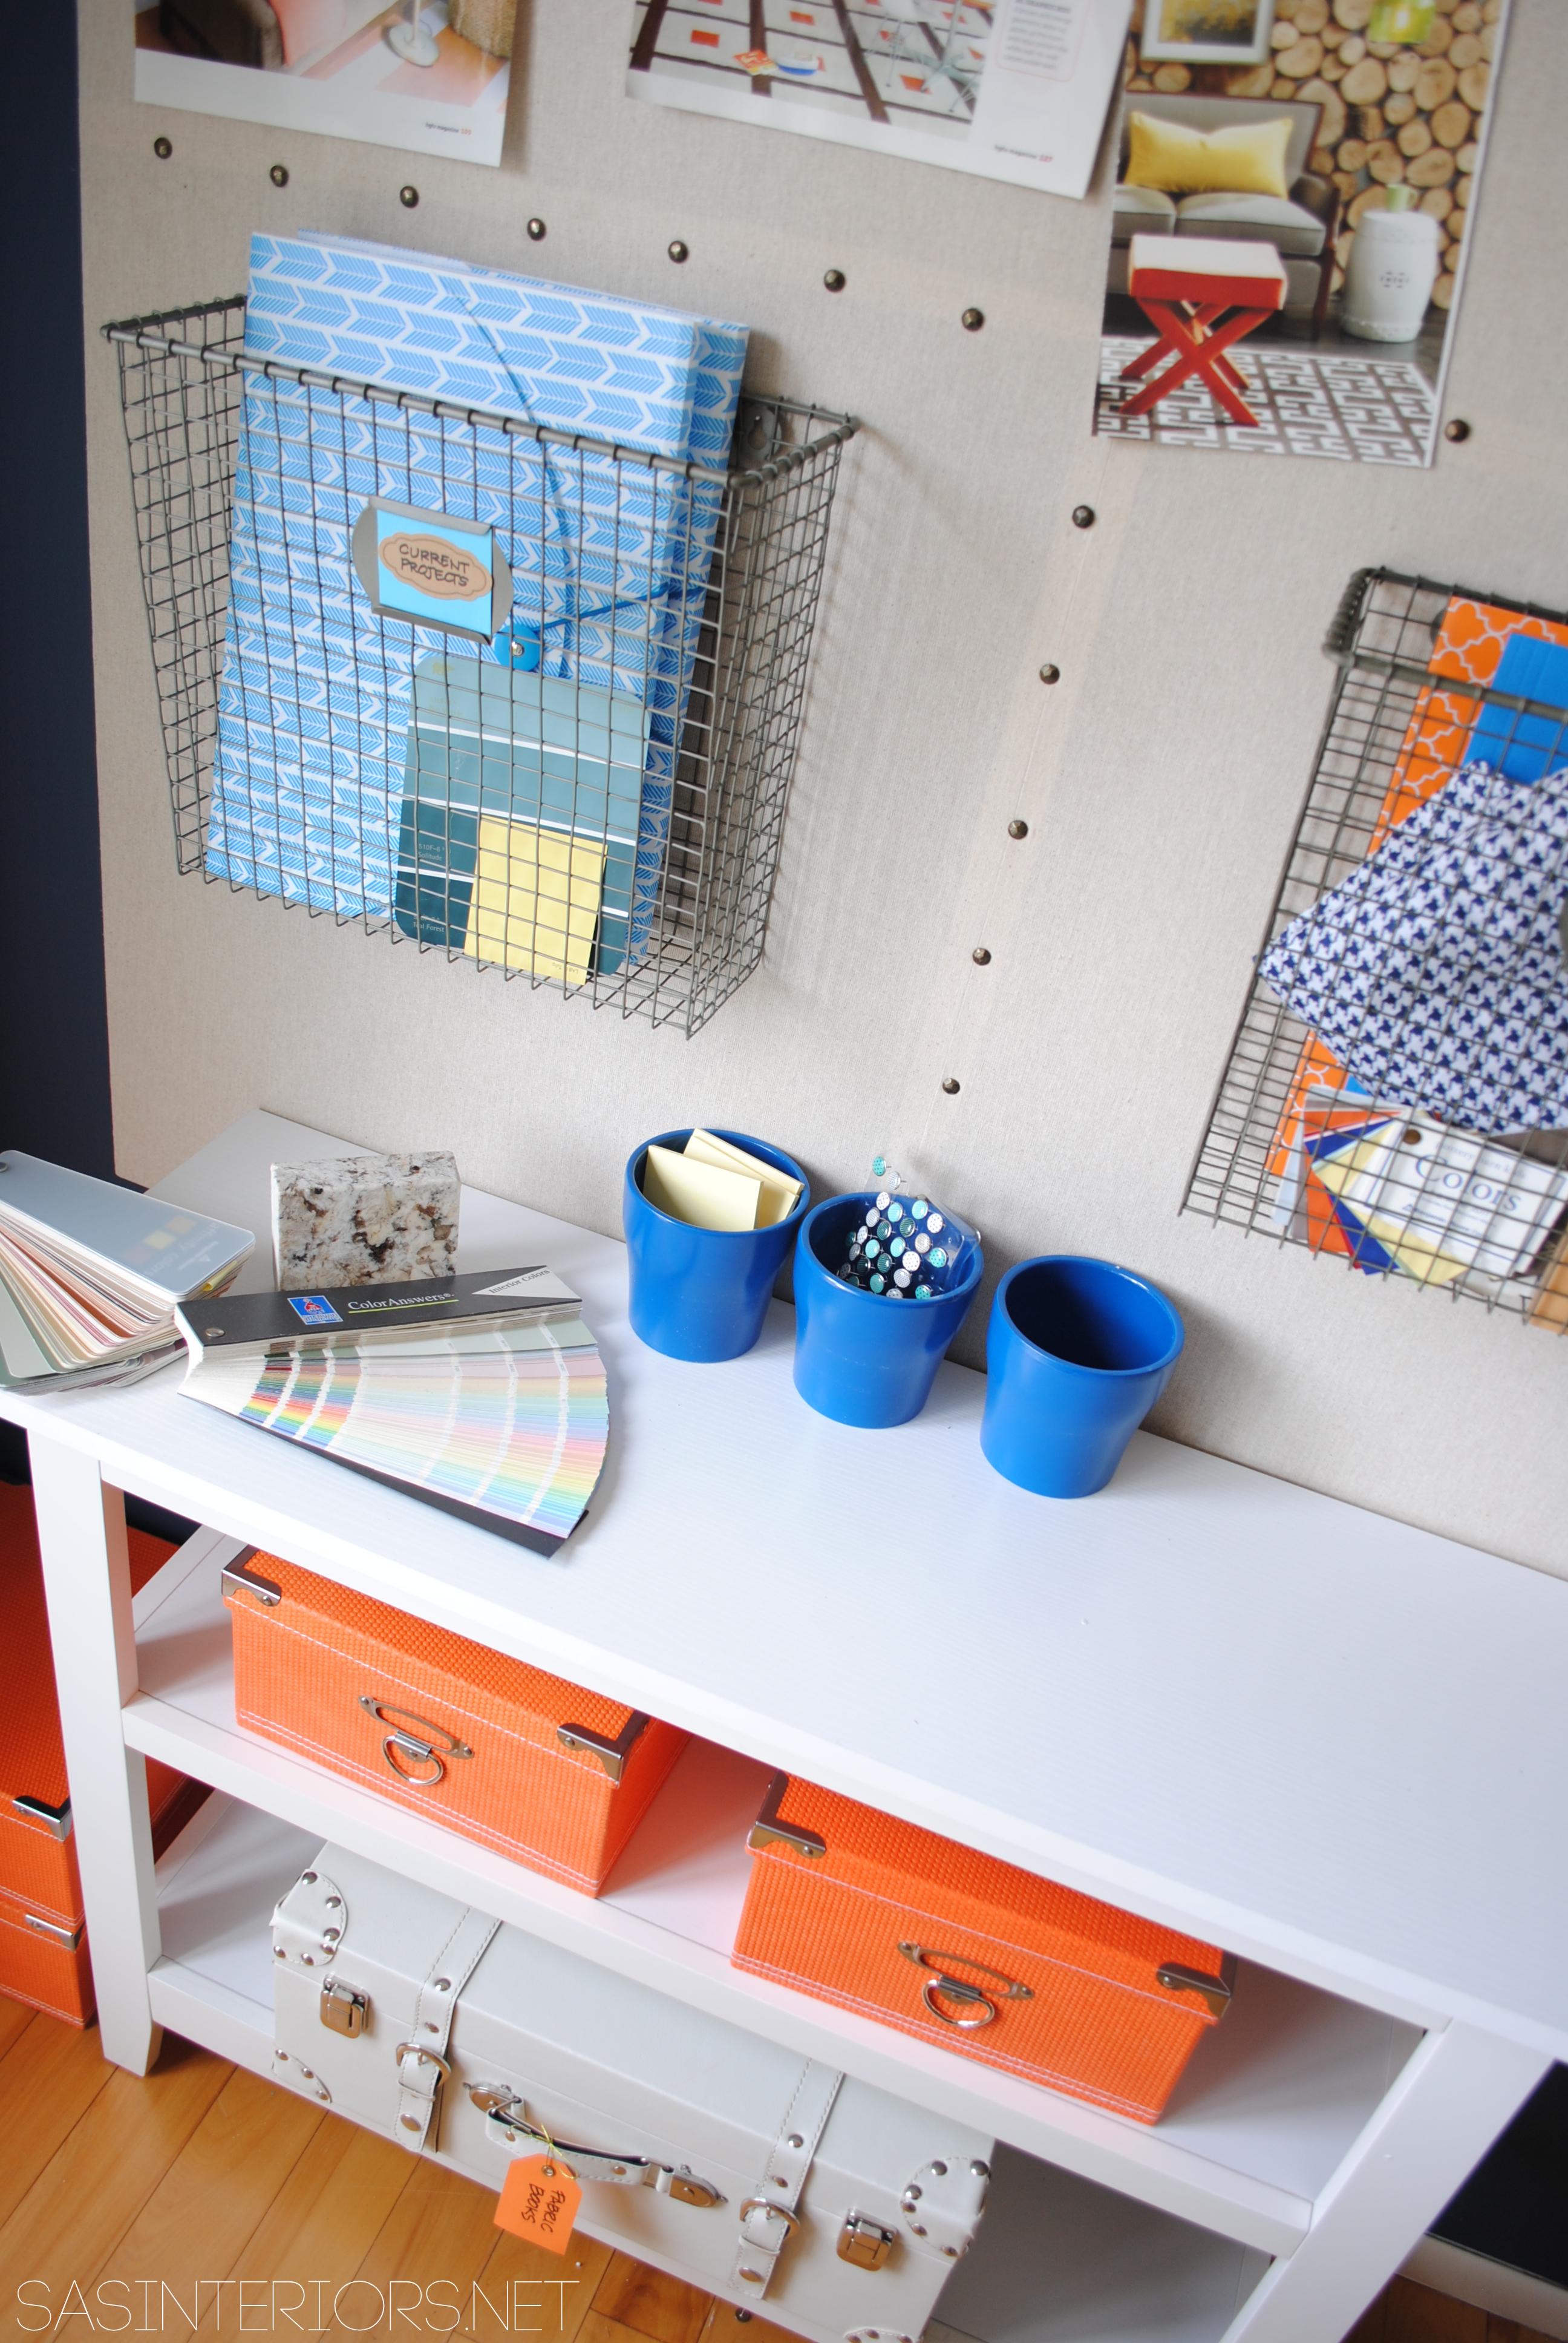
The placement of every pencil, every box, every flower was thought out.

Living Room / Office featured in Storage Magazine

Living Room / Office featured in Storage Magazine

Living Room / Office featured in Storage Magazine

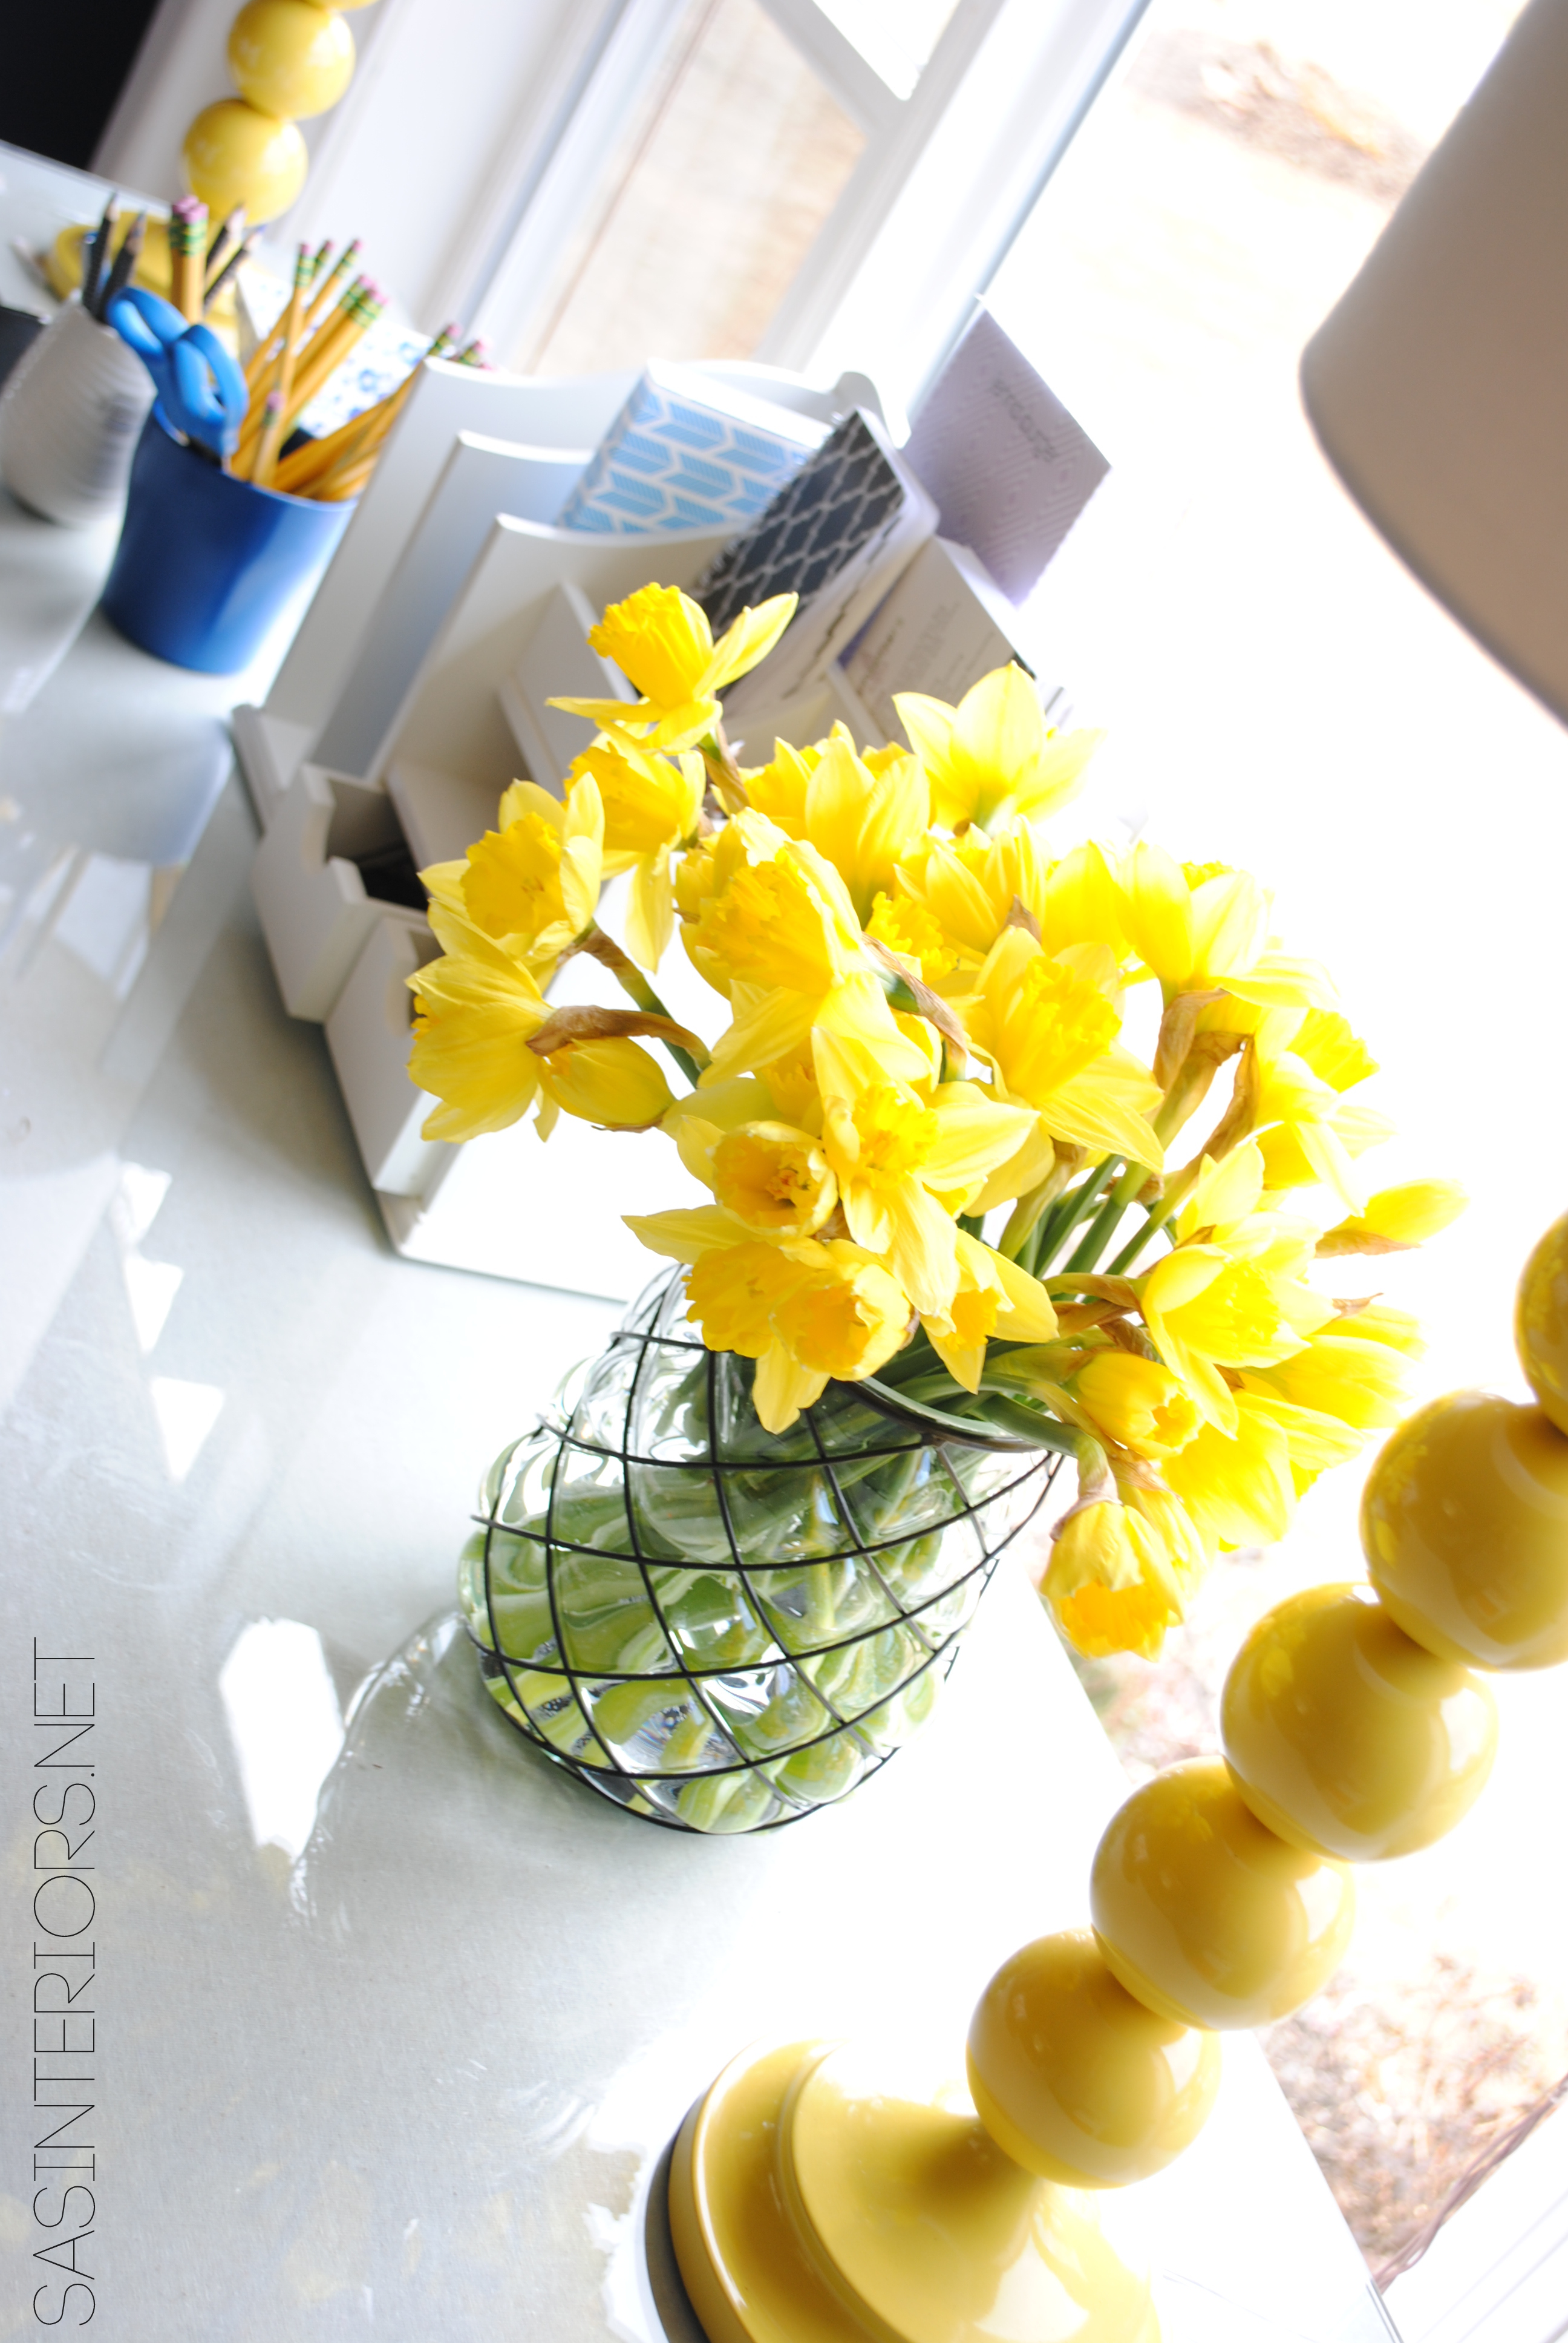
Interested in some of the elements in my living room/office?

Here are some details:

> Sofa – Cameron sofa by Crate and Barrel

> Pillows – some are mine that I made or bought, others are from Homegoods

> Bookcases – DIY project: wood to white bookcases

> Roman Shades – Payless Decor

> Desk – The desk itself was created using (2) 3′ wide X 12″ deep laminate bookcases.  For the work surface, I purchased a 3/4″ piece of plywood, covered it with fabric (stapled underneath), then had a 70″ long x 30″ wide piece of 1/4″ glass cut to size, which sits on top.  The shelves of the bookcases underneath allow for plenty of storage, yet I don’t actually see the “stuff” because they face each other and are hidden (definitely a plus since it hides my clutter).

> Desk Chair – DIY project: side chair makeover

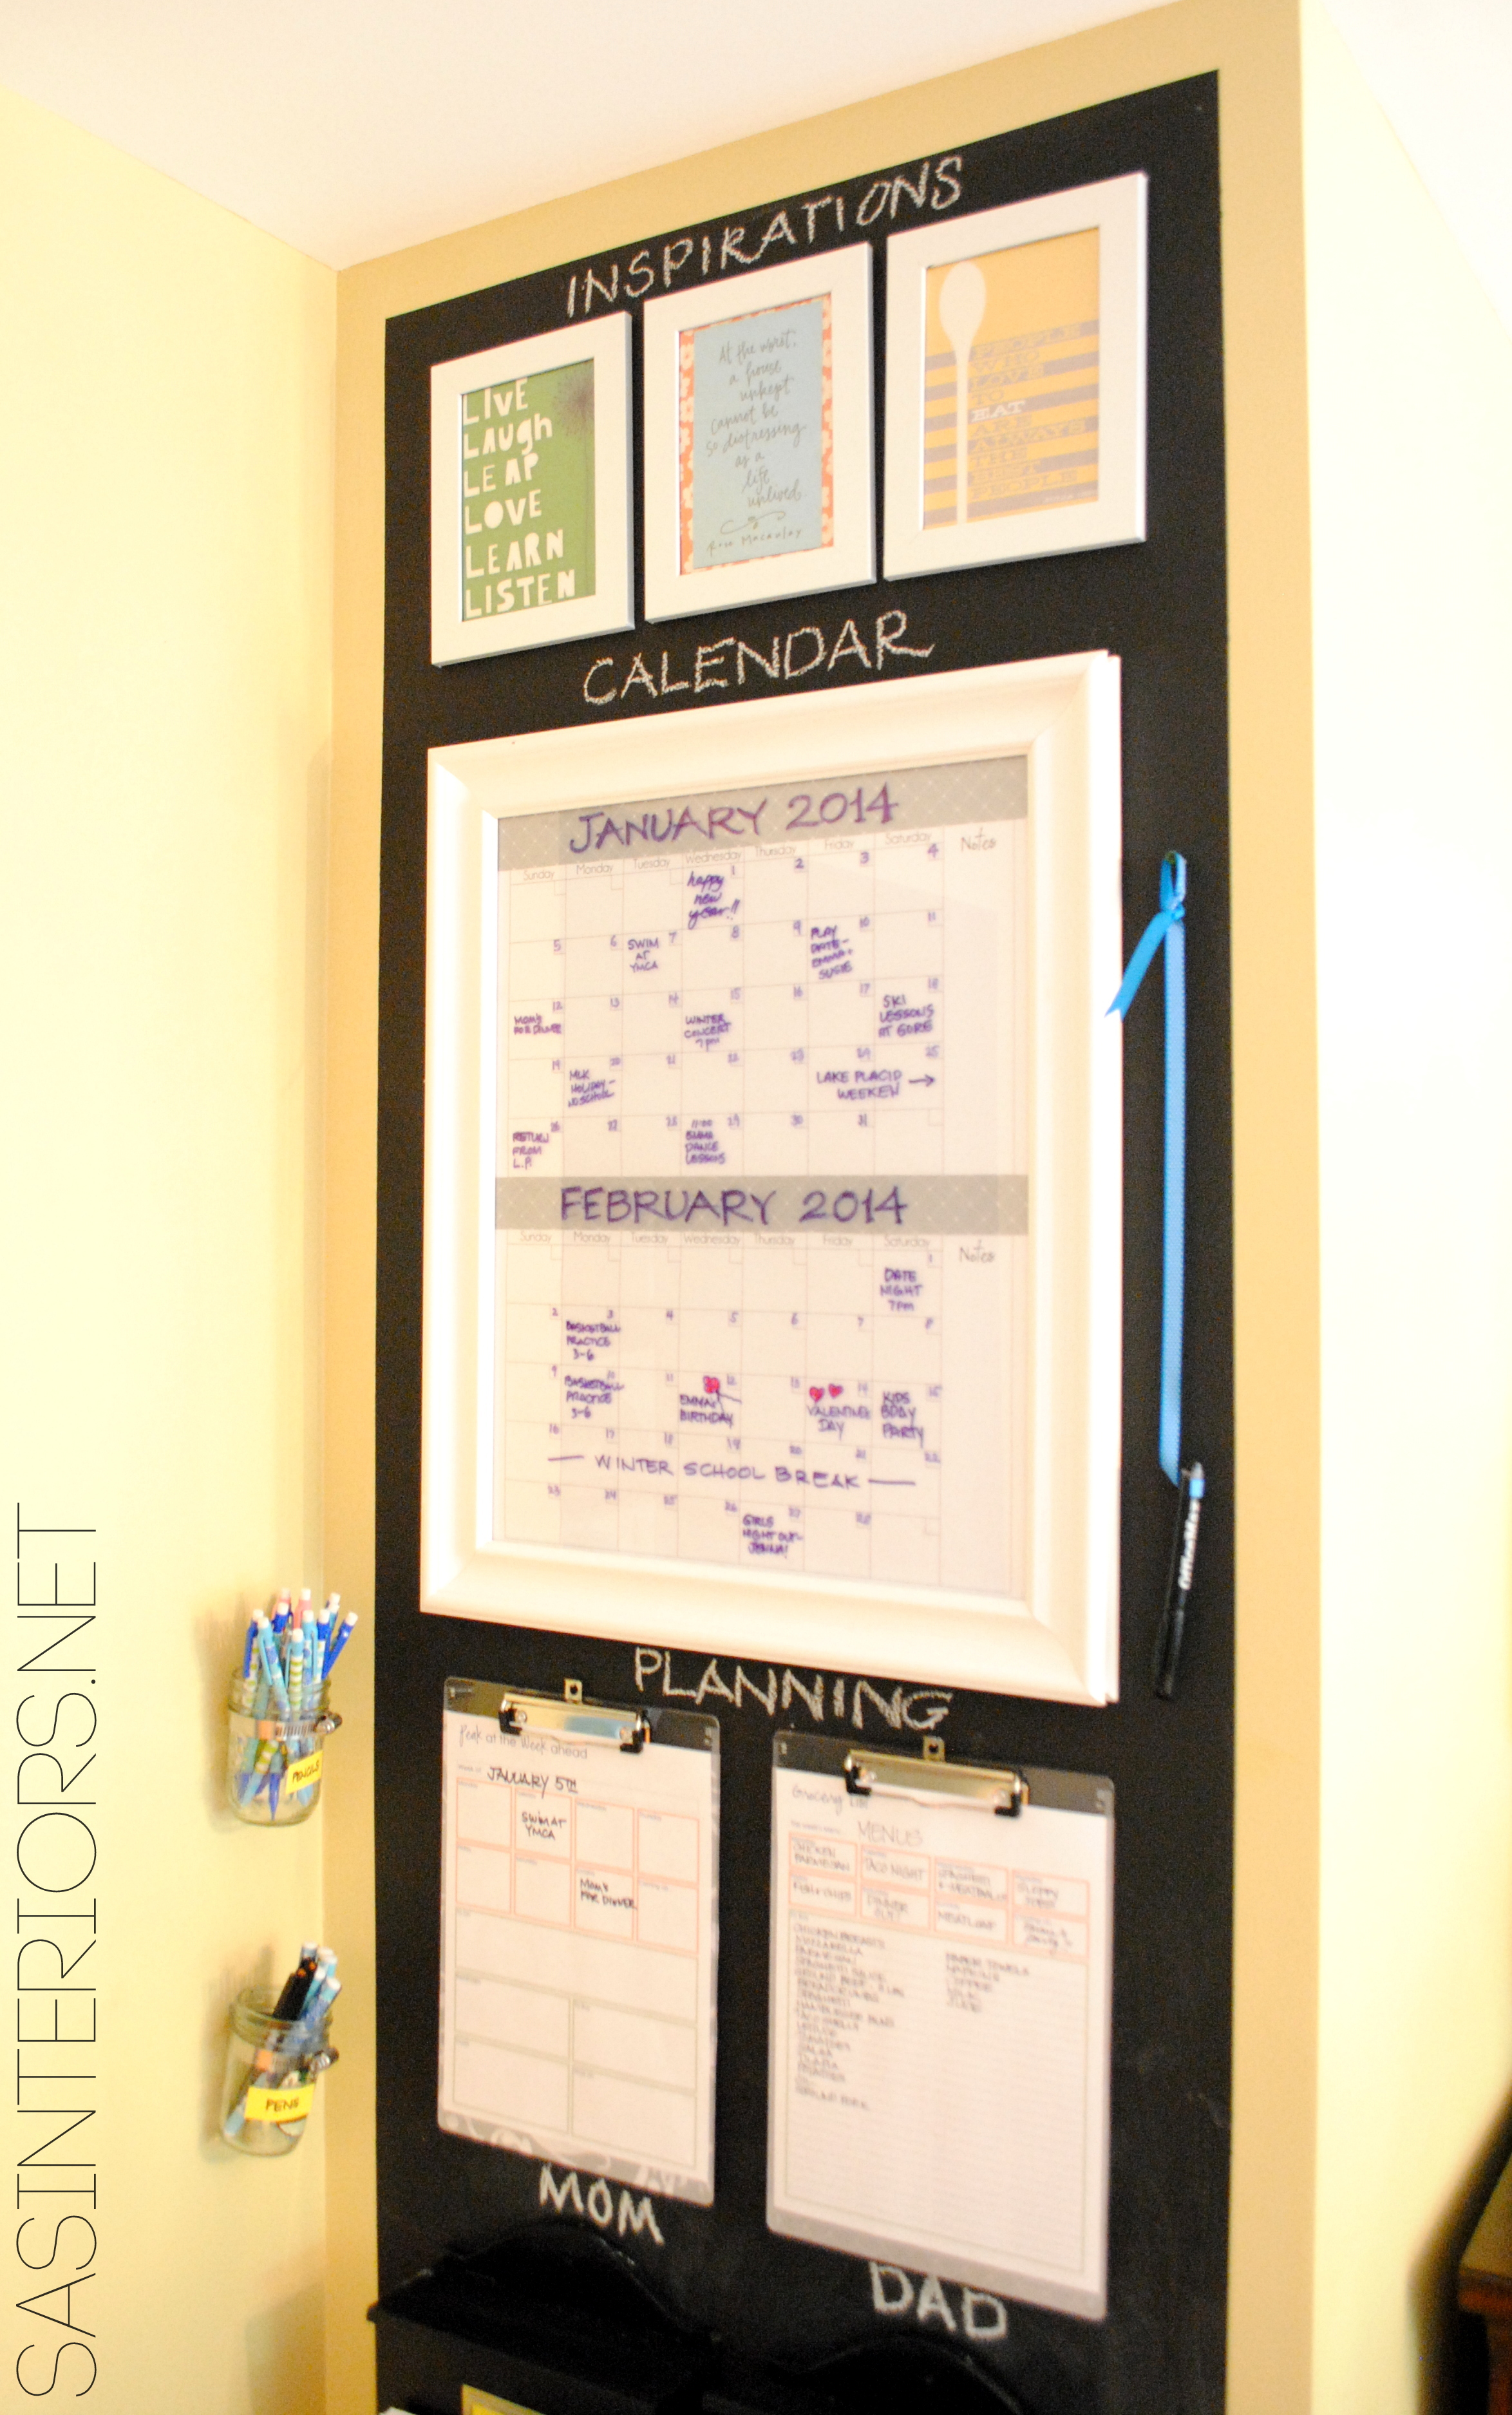
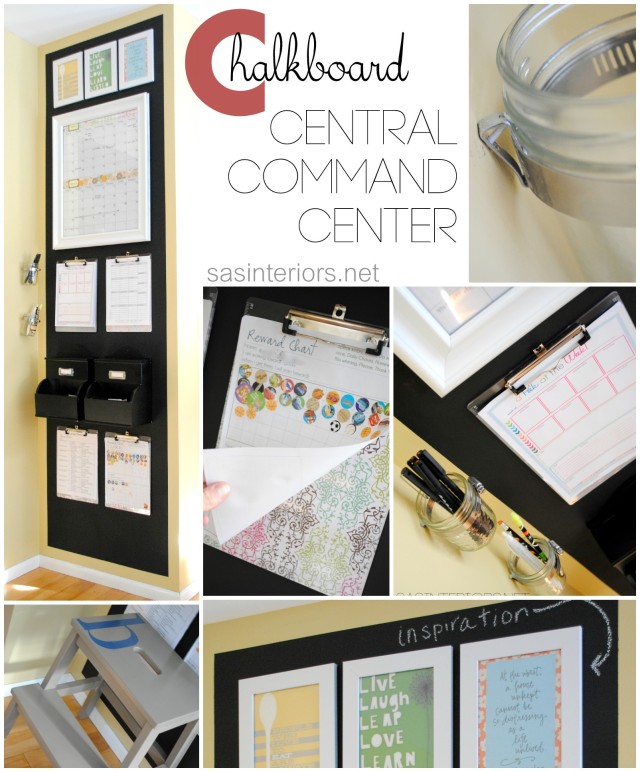
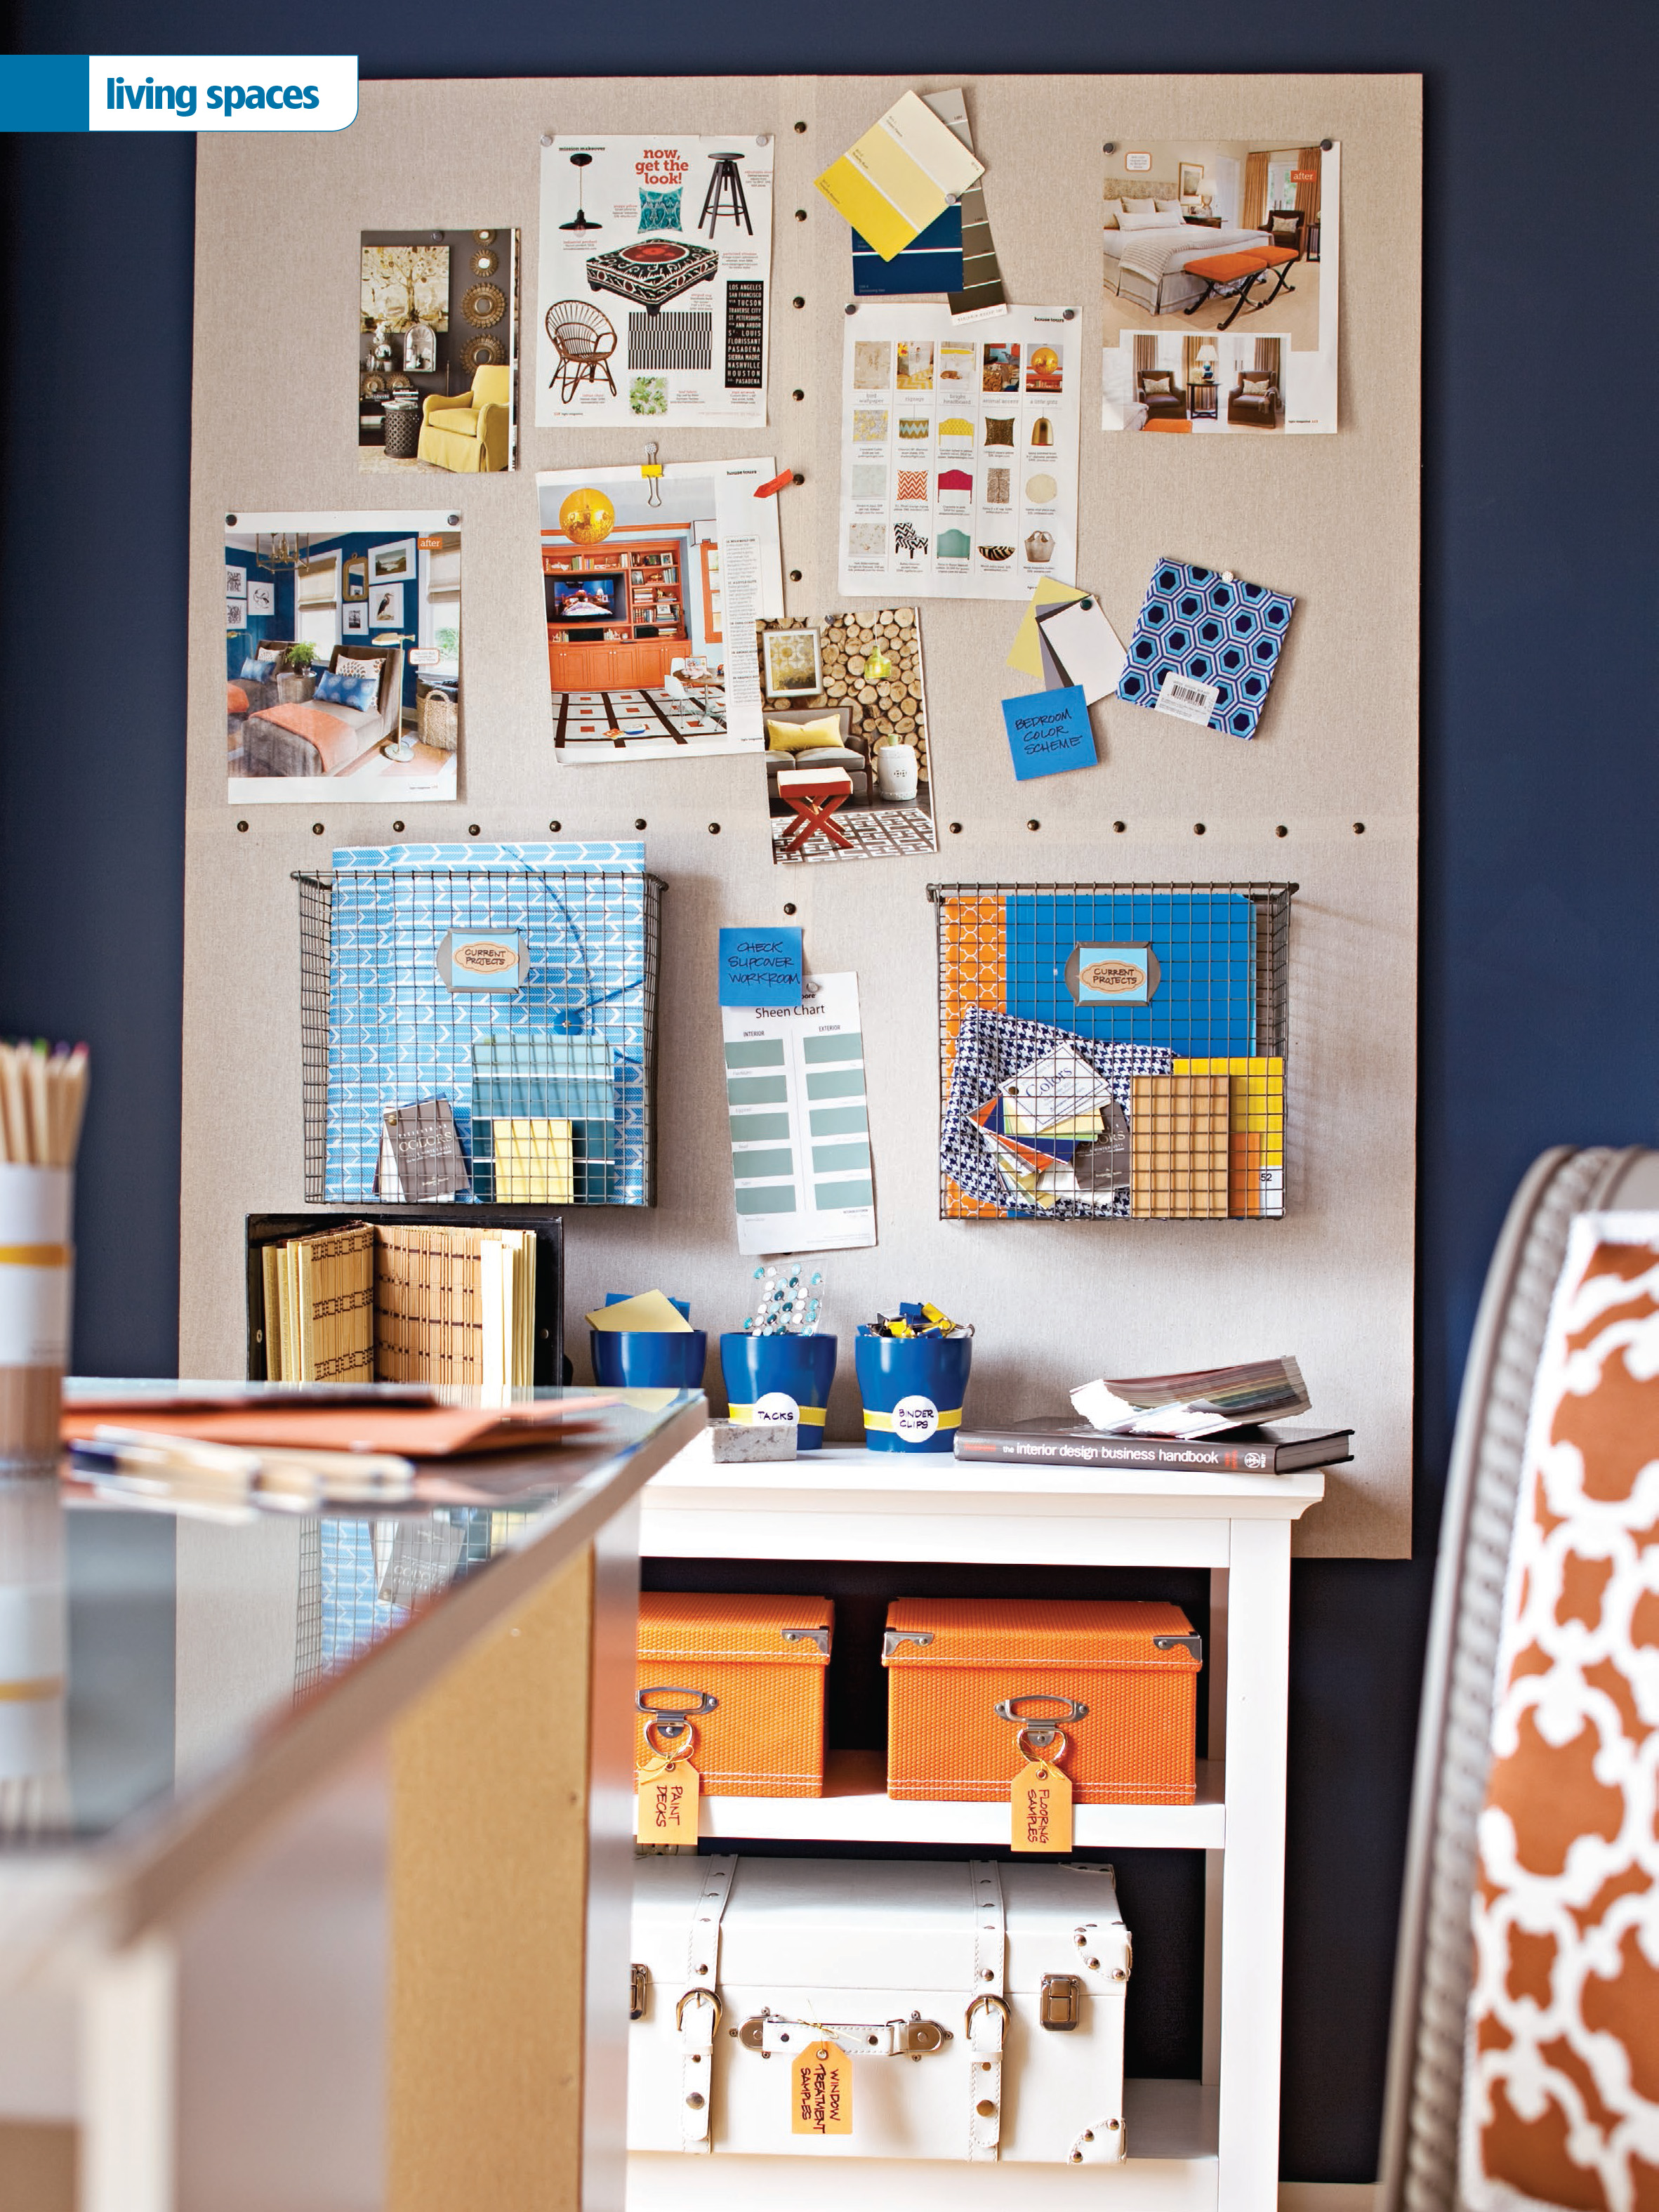
> Large Inspiration board – DIY project: inspiration board tutorial

> White side table – Target

> White Side Chairs – Homegoods

> Pillows – Homegoods

> Side Table / File Cabinet – Target

> Artwork above Side Chairs – DIY project: travel inspired art sign

> Rug – Dash & Albert

> Coffee Table – DIY project: industrial style coffee table

More of the nitty-gritty details can be found in this post.

Living Room / Office featured in Storage Magazine

My images don’t do a justice for what is shown in the magazine.  The feature is incredible and I’m still in disbelief that it is my home.  Here’s a look at the pages from the article…

Living Room / Office featured in Storage Magazine Fall/Winter 2014 issue, Designed by Jenna Burger - Produced by Donna Talley - Photographed by John Bessler

Living Room / Office featured in Storage Magazine Fall 2014 issue, Designed by Jenna Burger - Produced by Donna Talley - Photographed by John Bessler

Living Room / Office featured in Storage Magazine Fall 2014 issue, Designed by Jenna Burger - Produced by Donna Talley - Photographed by John Bessler

Living Room / Office featured in Storage Magazine Fall 2014 issue, Designed by Jenna Burger - Produced by Donna Talley - Photographed by John Bessler

Living Room / Office featured in Storage Magazine Fall 2014 issue, Designed by Jenna Burger - Produced by Donna Talley - Photographed by John Bessler

Living Room / Office featured in Storage Magazine Fall 2014 issue, Designed by Jenna Burger - Produced by Donna Talley - Photographed by John Bessler

I hope you enjoyed the behind-the-scenes footage + the feature.   The shoot was so long ago and at the time, I wanted to scream from the mountaintops with excitement.  Unfortunately I couldn’t reveal many details, so it feels good to finally be able to share this with you.  Thanks for joining in the excitement!

Triple Feature in Kitchen + Bath Makeovers Magazine

Post updated 1/2015 with images from magazines…

It seems like a lifetime ago, but early last year (in 2013) a crew from Better Homes & Gardens came to my home to photograph a bunch of spaces.  It was an incredible, eye-opening experience and one I will never forget. Truly a dream come true that I never even knew I had…

Long before one of my client’s kitchens were photographed for this past Spring’s KBMO cover and even longer before my kids & I were photographed at our Central Command Center, our kitchen and master bath (plus the family room) were photographed and are finally being featured in the fall/winter issue of kitchen + bath makeovers magazine, which is on newsstands now (or you can download it here – fyi, I get no kickback from the sales)

Better Homes & Garden Kitchen + Bath Makeover magazine - SAS Interiors Kitchen and Master Bath feature

Both spaces were total DIY makeovers that the Mister and I tackled on our own from start to finish.

the kitchen before & after

Kitchen before & after

DIY projects included in the kitchen makeover:
Kitchen Makeover {Reveal}
Kitchen Update {One Year Later}
painted cabinets
painted countertops
tile backsplash
decorative brackets

the master bathroom before & after

Master Bathroom before & after

DIY projects included in the master bathroom makeover:
Master Bathroom Makeover {Reveal}
faux ‘stained’ (using paint) cabinet
shower curtain using a curtain
luxury vinyl groutable floor tile (similar project tutorial)
tile backsplash (similar project tutorial)

Over the past year, I’ve had quite a few local & national magazine features, but every. single. time. I am overwhelmed, exhilarated, and plain ole’ happy!  And of course, I feel completely blessed.

What I love so much about the Kitchen + Bath Makeovers magazine is that the articles are of real spaces (kitchens or bathrooms) typically on a tight budget.  The rooms are DIY updates (like my kitchen) or budget-conscious makeovers (like my clients kitchen).  O, I forgot to mention, in the same issue as my kitchen and bathroom makeover, is a clients kitchen than I also transformed.  Their kitchen was more involved than mine and a true renovation.   The before and after is incredible (see more of my clients kitchen makeover in this post).

Kitchen before and after

To give a glimpse of the features, here are a few snippets from within the magazine…

the kitchen…

Kitchen Makeover featured in KBMO Fall/Winter 2014, produced by Donna Talley & photographed by John Bessler

Kitchen Makeover featured in KBMO Fall/Winter 2014, produced by Donna Talley & photographed by John Bessler

Kitchen Makeover featured in KBMO Fall/Winter 2014, produced by Donna Talley & photographed by John Bessler

That fabulous metal island from the shoot can be found here (<- affiliate link)

Kitchen Makeover featured in KBMO Fall/Winter 2014, produced by Donna Talley & photographed by John Bessler

Kitchen Makeover featured in KBMO Fall/Winter 2014, produced by Donna Talley & photographed by John Bessler

the master bathroom…

Bathroom Makeover featured in KBMO Fall/Winter 2014, produced by Donna Talley & photographed by John Bessler

Bathroom Makeover featured in KBMO Fall/Winter 2014, produced by Donna Talley & photographed by John Bessler

Bathroom Makeover featured in KBMO Fall/Winter 2014, produced by Donna Talley & photographed by John Bessler

It’s kinda crazy to see spaces of my own home in print, especially since it’s never been so clean and perfect as the day it was photographed.  Just keepin’ it real! It is nice to know that it could look like that again (but it probably won’t, lol).

and my clients kitchen…

Kitchen Makeover featured in KBMO Fall/Winter 2014, produced by Donna Talley & photographed by John Bessler

photo 3

Kitchen Makeover featured in KBMO Fall/Winter 2014, produced by Donna Talley & photographed by John Bessler

Kitchen Makeover featured in KBMO Fall/Winter 2014, produced by Donna Talley & photographed by John Bessler

Kitchen Makeover featured in KBMO Fall/Winter 2014, produced by Donna Talley & photographed by John Bessler

Kitchen Makeover featured in KBMO Fall/Winter 2014, produced by Donna Talley & photographed by John Bessler

To see more of the featured stories + many other amazing kitchens & bathrooms, you really should pick up a copy of KBMO (I spotted & snagged my copy at Lowe’s).  There are so many great ideas & tips throughout the magazine.  You will totally be inspired!

I wanted to mention that I had another project featured in the last Kitchen + Bath Makeovers issue (Summer 2014 issue).  The feature was of our beautiful powder room, which was photographed last Summer.

1

The bathroom update was dramatic with a new deep blue hue + Amy Butler wallpaper on the main wall.  I just love every bit of it!  Even today when I pass by, I smile.

3

Bathroom Makeover featured in KBMO Fall/Winter 2014, produced by Donna Talley & photographed by John Bessler

Bathroom Makeover featured in KBMO Fall/Winter 2014, produced by Donna Talley & photographed by John Bessler

Bathroom Makeover featured in KBMO Fall/Winter 2014, produced by Donna Talley & photographed by John Bessler

Bathroom Makeover featured in KBMO Fall/Winter 2014, produced by Donna Talley & photographed by John Bessler

the powder room before & after

Powder Room before & afterDIY projects included in the powder bath makeover:
Powder Room {Reveal}
removing the toilet and sink
how-to hang wallpaper
luxury vinyl groutable floor tile (similar project tutorial)

Thanks for sharing in my excitement.  You always are huge supporters and I’m so blessed.  I have another magazine feature coming out in a few weeks and it’s a room of mine on the cover {squeal}.  I’ll be sure to keep you posted.

I Did It: Better Homes and Gardens Feature

I’m over the moon to share some exciting news with you.  First though, it can’t go without saying that I find it truly incredible how one’s life and journey evolves over time.  For me, I have put so much time and effort into my passion for design and inspiration, and I have been incredibly blessed with unimaginable opportunities – opportunities that have exceeded hopes and dreams.  By being open minded (somewhat) and following my destined path, I have been given, rewarded, and I am ever so grateful.

On to my exciting news…  I don’t even know where to begin or how to start, so here I go…  My kids and I are featured in the I Did It section of the Better Homes and Gardens January 2014 issue.  This feature is beyond amazing.   It’s the last page of the magazine, so it’s really just as important as the front page (if you’re a back to front reader like me, ha).

Here it is…

I Did It feature in January 2014 issue of Better Homes and Gardens - @Jenna_Burger of SAS Interiors, WWW.JENNABURGER.COM

Crazy, right?!

How did this happen?

I’m still pinching myself.

About a year ago through a friend/client, I was lucky to meet the incredibly talented Donna Talley, Stylist and Producer for Meredith Corporation (publisher of BHG and many other magazines).  We worked together on a few project submissions and photoshoots (more of which will be coming out in other BHG magazines in 2014), which then led to the submission of my central command center.  After review, the BHG team loved it’s incredible function and ease for any family to implement.  They thought it was perfect for their get organized-theme January issue.

From that point, a date for shooting took place, which was in mid-June, and the rest was history.  O wait…  I failed to mention one important detail.  My kids were also asked to be in the feature with me.  Yikes.  That news alone made the pressure (pressure I put on to myself) for perfection that much more.  Not only did I have to look good, but I had to worry about how my kids would look (not too big of a deal) and how they would act (sometimes a challenge).

And the biggest challenge of all…  WHAT TO WEAR!

In the end, nothing went as planned, yet ALL went incredibly well.  And it was ALL incredibly fun!

So here’s a little insight into the day…

Initial ideas for clothes.  In the end, totally different choices were made.

I Did It feature in January 2014 issue of Better Homes and Gardens - @Jenna_Burger of SAS Interiors, WWW.JENNABURGER.COM

A central command center, of course, needs organization!

I Did It feature in January 2014 issue of Better Homes and Gardens - @Jenna_Burger of SAS Interiors, WWW.JENNABURGER.COM

And there were many options.  Working with Donna, options are everything.  The motto Less is More, is not allowed.

I Did It feature in January 2014 issue of Better Homes and Gardens - @Jenna_Burger of SAS Interiors, WWW.JENNABURGER.COM

It’s all in the details, so my nails were done…

I Did It feature in January 2014 issue of Better Homes and Gardens - @Jenna_Burger of SAS Interiors, www.sasinterior.net

And a few curlers helped my blah hair…

my sweet friends on IG left me some nice comments. xoI Did It feature in January 2014 issue of Better Homes and Gardens - @Jenna_Burger of SAS Interiors, www.sasinterior.net

And then I was ready and in front of the camera.

I Did It feature in January 2014 issue of Better Homes and Gardens - @Jenna_Burger of SAS Interiors, WWW.JENNABURGER.COM

Photos were taken.  Outfits were changed. More photos were snapped.  And then the result.  On the back page of BHG magazine.

I Did It feature in January 2014 issue of Better Homes and Gardens - @Jenna_Burger of SAS Interiors, WWW.JENNABURGER.COM
It surely was a wonderful and eye-opening day.  The amazing Donna Talley vamped up my central command center like no other. It was perfect-i-o-n.  And the talented, John Bessler, photographer extraordinaire, made my kids at ease and as always took beautiful, engaging photos.

I Did It feature in January 2014 issue of Better Homes and Gardens - @Jenna_Burger of SAS Interiors, WWW.JENNABURGER.COM

Since being involved in about 10 other photoshoots with Donna, it still amazes me how much goes into the set up and lighting.  Pictures in magazines look effortless, but there is so much that goes into making them camera-ready.  For my little 30″ command center wall, look at how the room needed to be transformed.

I Did It feature in January 2014 issue of Better Homes and Gardens - @Jenna_Burger of SAS Interiors, WWW.JENNABURGER.COM

I Did It feature in January 2014 issue of Better Homes and Gardens - @Jenna_Burger of SAS Interiors, WWW.JENNABURGER.COM

To get the light ideally balanced takes an incredible amount of work.  Something that I surely took away from the shoot and try to implement in my own blog photoshoots.

I Did It feature in January 2014 issue of Better Homes and Gardens - @Jenna_Burger of SAS Interiors, WWW.JENNABURGER.COM

And lastly, a few pictures that I took of the central command center once the day was over and everyone was long gone.

I Did It feature in January 2014 issue of Better Homes and Gardens - @Jenna_Burger of SAS Interiors,WWW.JENNABURGER.COM

I Did It feature in January 2014 issue of Better Homes and Gardens - @Jenna_Burger of SAS Interiors, WWW.JENNABURGER.COM

These pictures are certainly not like the professional ones.  But they are good enough for me 😉

I Did It feature in January 2014 issue of Better Homes and Gardens - @Jenna_Burger of SAS Interiors, WWW.JENNABURGER.COM

I Did It feature in January 2014 issue of Better Homes and Gardens - @Jenna_Burger of SAS Interiors, WWW.JENNABURGER.COM

I Did It feature in January 2014 issue of Better Homes and Gardens - @Jenna_Burger of SAS Interiors, WWW.JENNABURGER.COM

And that’s a wrap.  Phew, I am so glad I could finally share this exciting news with you.  It’s been a long 7 months holding it in!

My take away from this whole experience…  Amazing opportunities and experiences can happen to anyone.  Simply do what you love.  Put in the effort and your reward will come.

I Did It feature in January 2014 issue of Better Homes and Gardens - @Jenna_Burger of SAS Interiors, WWW.JENNABURGER.COM

If you’d like to get your hands on the January issue, it’s on the newsstands now. Not only is my feature fun, but the entire issue is jam-packed with great organization tips.

If you want to see more of the central command center, visit the original post.

Central Command Center_1

I will confess that the command center has been updated since the photoshoot and I’ll be sharing more of that in 2014!

I’m a CoverGirl

I was thrilled when the Fall issue of Saratoga Mama (affiliated with SaratogaMama.com & Saratoga Today) hit the stands last week because not only do I love finding out what’s happening in my neck of the woods, but I got to finally see the space I designed featured on the front cover.

My first cover! I’m officially a CoverGirl.  Well kinda…

One of the fun & challenging projects I took on this Summer was to partner with Colleen of Saratoga Mama to makeover 3 rooms for a feature in the back-to-school issue.  In 2 days (not consecutively, thankfully) we scouted, shopped, staged, and shot the spaces.  It was a whirlwind, but it was a blast.

Here is the result.

Fall Issue of Saratoga Mama Magazine

All 3 spaces were okay.  Just okay.  But they needed a little TLC to ultimately be more stylish & functional.  Once a plan of action was set, we were on our way!  Check out more of the process + what worked/didn’t work {here}

Now to the details of each space…

Space 1: Central Command Center

Creating a Central Command Center

The homeowner of this space was in major need of an organized drop space for everything to keep her family running. They needed a spot for all the everyday ‘stuff’ like keys, kids school papers, announcements, invitations, etc.  We decked out the open wall space between her kitchen and dining room with a new central command center to get her family on track.  The space includes:

  • A personalized 2-month calendar (similar to the one I created for my family)
  • Clipboards to easily rotate and change the weekly chore chart and homework chart
  • Metal bins for each child
  • A corkboard for important things
  • and a little Personalization!

After we shopped, I layed out the items on the floor to create the perfect montage.  I created a faux wall on the floor using painters tape so the measurements would be exact once translated to the wall.

We moved, rotated, tweaked, and adjusted until it was just right.  Here is the result of the layout…

Creating a Central Command Center

And the final Central Command Center on the wall…

Creating a Central Command Center

Creating a Central Command Center

And finally, the layout in the magazine.

Creating a Central Command Center

The homeowners kids were super cute.  And even though the little girl didn’t want to be photographed, it all ended well and the photographer captured an adorable photo.

Creating a Central Command Center

In the end, the homeowner was thrilled and expressed how useful + functional this space is for her and her family. It’s a real space she uses everyday!  It’s incredible what can be created with a little thought and focus.  In all, this space cost less than $100 to create.

Here is a breakdown:

  • Clipboards: $5
  • Personalized Calendar: $15 (for the frame; calendar is a DIY creation)
  • Red metal files: $30 (homegoods)
  • Corkboard: $30 (homegoods – it’s supposed to be hung horizontal, but I removed the original hooks and added new white hooks placed vertically for keys)
  • Pen holders: $8 (even though meant for the desk, I hung them using a nail)
  • Shelf & wall decor:$0 (repurposed from another space)

Space 2: Mom Cave

Office Makeover in one day + on a budget

This was an awesome space to transform.  Most of the elements were already there and actually remained in the space, but with some minor tweaking, this office looks completely different!  The desk area is located at the landing of a second floor cape-style home.  The ceilings slope to about 4′, but the area was too large to be wasted.  Just recently, the homeowner moved her desk to this area and it’s been a great, quiet haven to work.  YET, it wasn’t pretty and inviting.  It needed something!  With a few quick changes, this space went from drab to fab.

The first thing I noticed when I walked up the stairs to this space was the lack of color.  It needed something for the eye to draw in.  The ideal wall was the low wall behind the desk.  It was begging for something intense.  I chose Benjamin Moore Rhubarb for a splash of color against the white distressed desk. It was the perfect solution for this office makeover. A few other elements included:

  • A new desk lamp. (Target)  The old style was too harsh, so I brought in a non-typical task lamp that gives a soft glow to the space instead of an intense, direct light.
  • New knobs. (Hobby Lobby) Changing the top knobs added definition to the desk + they pick up the new rhubarb wall color & gold tones in the lamp
  • Storage for desk organization. (Homegoods and Staples)
  • A corkboard. (Homegoods)
  • A desk chair. (TJ Maxx)  A comfy and non-traditional desk chair.

The space was so fun to put together and in the end I saw how happy the little changes meant to the homeowner.  Little things do make a difference.

Office Makeover in one day + on a budget

I’m in love with this lamp.  The faux snakeskin lamp base gives the space texture and depth, and an unexpected elegance.  The brass tones at the bottom of the lamp base were also picked up in other areas of the room (small doses, of course) like the labels on the corkboard organizer and the new knobs.

Office Makeover in one day + on a budget

What was supposed to be a picture frame got changed into a daily corkboard organizer using a roll of cork + stick on labels.  Now the homeowner can add reminders for the week and break it up per day.

Office Makeover in one day + on a budget

The side wall used to hold 2 floating shelves that protruded too far into the room.  Now a photo montage wall filled with black & white family photos + meaningful elements makes this wall a happy place.  Adding in a repurposed chair + a standing lamp with a new shade was the final touch.  This space is now inviting, comfortable, and ideal for a work-from-home mom.

shoot26

Office Makeover in one day + on a budget

The final result in the magazine…

Office Makeover in one day + on a budget

A few of the elements in this space are new, but most were repurposed from other rooms throughout the home.  It’s a space that is warm + welcoming, & ideal to work in.

Space 3: Kids Corner

Kids Corner Makeover

If you’ve got kids, most likely they love to color and create.  A place in the home just for them to call their own is so important.  A place that holds all their stuff so that at any time they can grab a puzzle, a book, or a paint brush will make them happy and independent.  The newly created kids corner in this home was once a dark space with a chair that covered most of the corner.  The outcave that was meant for a TV was unoccupied leaving a large span of open space, and the doors below were serving no purpose for what was behind them.  A new functional space was needed!

The first step to transforming this space was to remove the cabinet doors.  With my suggestion of a soft blue hue, the homeowner painted the interior of the cabinet, as well as the shelves + the new shelves above.  Then on our scouting adventure, we found fun baskets to hold paper, books, and all the necessary crafting supplies to fill the shelves. Books, puzzles, and pictures from around the home quickly filled the rest.

The new spot was coming together…

Kids Corner Makeover

Sometimes the most unexpected items end up being the best.  My most favorite element in the new kids corner is definitely the industrial-style arrow.  The homeowner thought I was a little crazy about purchasing this for the space, but I felt it was right.  It was fun, unique, and totally not expected.  It also makes the ideal space for holding books, stuffed animals, and other cute accessories.  Lastly, I love this arrow because it heightens that space.   Even though the wall is narrow it needs to be filled.  Filling it draws the eye up, which makes the room feel larger and taller.

Kids Corner Makeover

Kids Corner Makeover

Finding this ‘desk’ that was actually part of a nesting table set makes for the perfect work space.  Even though this wall is only about 30″ wide, it’s the perfect spot for a little creator.  The top of the desk wasn’t flat (not ideal for working), so I suggested the homeowner have a piece of glass cut to size.  It cost about $15 and make the best flat surface.

3 adorable coat hangers are hung on the side wall to easily change out artwork & beautiful one-of-a-kind creations.

Kids Corner Makeover

The result in the magazine…

Kids Corner Makeover

And that’s a wrap.

It was awesome to be apart of such 3 great transformations.  In just 2 days, Colleen and I accomplished a whole heck of a lot.  It’s amazing how much can be transformed with a plan and a small budget.  If you live in the Saratoga area, be sure to pick up the latest issue of Saratoga Mama Magazine.  If you’re not in the area, no worries, click here to read it online.

Have a space in mind that you’ve been wanting to give a makeover?  Start by shopping your home.  Repurposed items that you already own are the best way to give your home a new look without spending a dime.  As an example, you should check out how I spiced up my bookcase with $5. Yes it only cost $5!

Publication Feature: SAS Interiors Featured in FIRST for Women Magazine

I was thrilled to announce last week that I had a 3-page article published in a local magazine, and I’m just as thrilled to announce that this month I have been published again in a national magazine, FIRST for Women.

My feature in FIRST is new news to you, but not to me.  It was been in the works for quite a while…

It proves to me and hopefully for you, that any article you read or any TV remodel home show you watch, hasn’t been put together over night or even in just one week.  I’m sure all of those amazing makeover shows that we watch where the house has been transformed in 30 minutes, has actually taken months – probably 6+ months – to put together.

Sorry, I digressed…

Anyway, I was contacted by the Decor Director of FIRST back in early November 2012.  I was shocked one afternoon to receive this email:

FIRST for Women Magazine feature

They think “my ideas are just genius” and they wanted to feature my styled bookcases.  Yes, the laminate bookcases that I styled with books, accessories, pictures, and more after I painted them last Summer.

After an ‘Absolutely, thank you so much’ email back, the story was approved for the March issue.  I was elated to say the least.  I just couldn’t believe, my work was that much of interest to actually be featured.  Honestly, I have all of YOU to thank for your continued following and support of my blog.  Without the love of pinning and sharing my work, this never would be possible.

FIRST for Women Magazine feature

After a few rounds of phone interviews and confirmation of my blog and name in mid-December, it was complete and the waiting game began.

All that waiting brings us to this weekend.  The coveted March issue that I’d been waiting to get my hands on was finally on the newsstands.

FIRST for Women Magazine feature

I can be such a dork at times and took a few snapshots (that I shared on instagram and facebook) of when I first saw the magazine at Barnes & Noble.

I was totally pinching myself…

FIRST for Women Magazine feature

And here’s the feature on my styled bookshelves

FIRST for Women Magazine feature

What’s funny is that this bookcase and it’s matching partner (which were separate in this picture), are now side by side in my newly created home office / family room.  I just featured the space last week.

Home Office / Family Room Space

Home Office / Family Room Space

But I will say, the bookcases are still styled the same as they appear in the article.

I know, feel, and believe that this is just the beginning of many more amazing opportunities to come.  Again, thank you so much for your continued support – I can not tell you how much it’s appreciated!