


Bathroom Makeover: Plan of Action {Day 1}
I’m at it again… another project! And this is a biggie. I know, I know…. I haven’t even waited 0.05 seconds before starting something new, but this project has been in the works for over a year and I’m thrilled that my thoughts + ideas are actually coming to fruition! So the next big remodel… the hall/kids bathroom.
This bathroom got a mini DIY revamp about 3 years ago, but it’s been used & abused by two kiddos, so it was time to put my design expertise to work and create a space that would handle the everyday splashes & wear of two busy bees.
Of course, I can’t start the remodel without a plan of action. So here it is. My creative vision board for the new bathroom space…

I’m thrilled to be partnering with Lowe’s on this bathroom renovation and they’ve put me to the test to create a dynamic, on-trend space using their in-stock products (items that can be found in store versus online). My vision for this revamp is to mix my design style of classic eclectic – classic for the background with bold elements layered in! Since the tile is the dominate feature (shower + 3′ up all the walls) in this bathroom, that’s where I started…
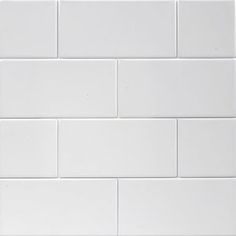
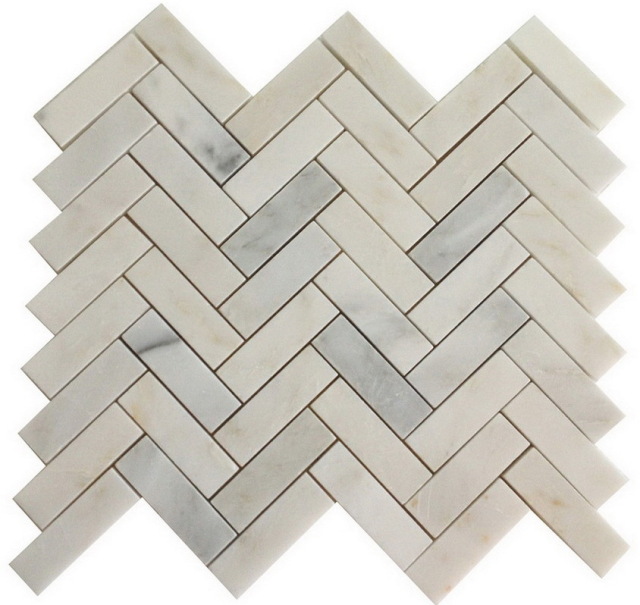
My design philosophy when creating any space is to go classic for the elements that are expensive and/or difficult to change. Similar to buying a sofa (which I typically go neutral in color and pattern), I wanted a tile that could “live” a long time… I DO NOT plan on changing the tile in a year or two (or even 5), so it had to be something that I would like now & in the future. There is nothing more classic and beautiful than 3 x 6 subway tile. The bonus, it’s only .22 cents a tile – one of the least expensive Lowe’s has. But (there’s always a but), I wanted something more. I needed to create a wow-factor. So along with the classic subway tile, I am also going to incorporate a gorgeous herringbone carrara marble. Crossing my fingers that it looks as good on the wall as I envision it in my head {squeal}.
But you all know me, I need color somehow, someway. That’s where the layers in the space come in. I’ve selected a dynamic wallpaper that is really give an incredible contract against the classic white subway. It’s bold. It’s unexpected. It’s me.

The classic and the bold are covered! The other elements in this new proposed bathroom are all going to enhance the beautiful classic and bold selections. The old builder-grade vanity will be headed curbside and a new, more modern vanity in an espresso finish will be installed in it’s place. For the lighting, I wanted to introduce another unexpected element and chose an oversized single exterior industrial-style light fixture.
Here’s the catch… I’m doing 95% of this bathroom renovation on my own. I’m crazy, right?! Nutso, but I’m determined. The part that I will not be tackling is the install of the new tub and shower components. The mister nor I have ever installed a tub or shower fittings and are too nervous to tackle it on our own and want to avoid any possible leaks. We know when to call in the pros and the tub install is not within our skill-set. I am sure we could do it, but who wants to take the chance? Not Us! Beyond that though, it’s all on me. Tile, toilet, vanity, lighting… All DIY baby!
Since this bathroom makeover is almost an entirely DIY job, it’s going to take longer than typical, so our goal is to tackle it in 30 days. 30 days start to finish, complete! Can we do it? Let’s see. I hope you’ll follow along on another crazy DIY adventure…
{Day 1} Plan on Action – Complete! 29 more days to go…
From start to finish, these are all the posts pertaining to this bathroom remodel
Plan of Action
Demo: Removal + Installation of the Tub & Walls
How-To Tile + Grout the Bathroom Walls
Installing Wallpaper
Adding a Tile Accent Border
Creating a Tiled Niche
Bathroom Makeover Reveal
Resources
This post is sponsored by Lowe’s, but all thoughts and opinions are 100% my own. I am thrilled (and a bit nervous) about tackling this project, but very excited to be partnering with Lowe’s on creating an entirely new bathroom space. I’d love for you to follow along on this new project!