
Tag: creative vision board

Creating an Interior Design Plan + Mood Board

A few weeks ago, I shared a few favorite tools that I use to run my design business + blog.

All are must-haves to run my office efficiently (as possible, it’s never perfectly smooth), but my main go-to day in and day out is my Intel 2 in 1 laptop + computer!

From morning till night, this is my #1 for creating design plans to writing blog posts to browsing the web for inspiration.

I’m often asked what programs I use for the floor plans + mood boards I create for my blog and for client presentations. And today, you lucky dogs are going to get the inside scoop…

Creating a Design Plan + Mood Board

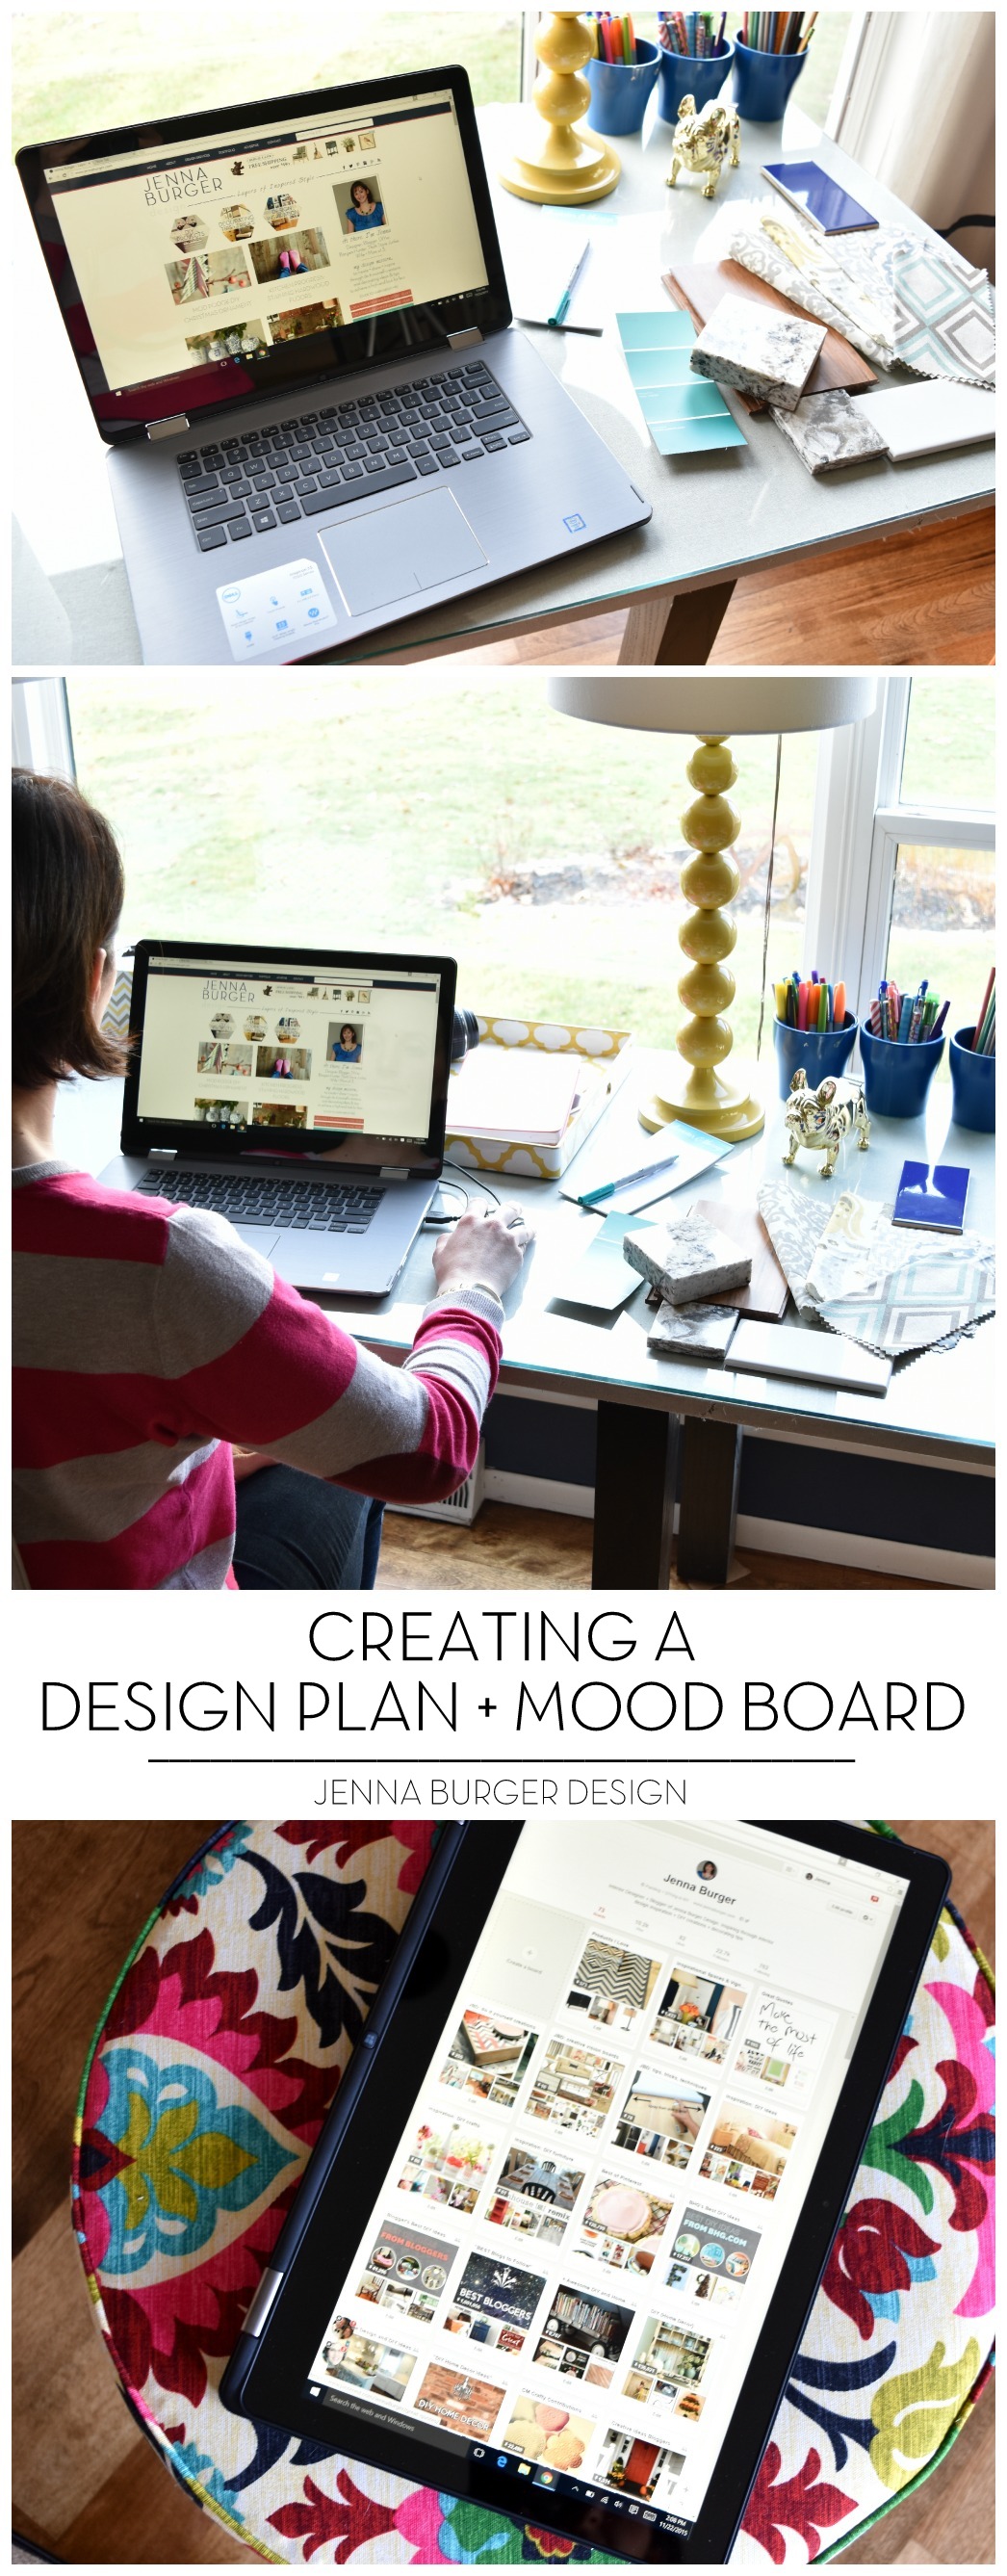
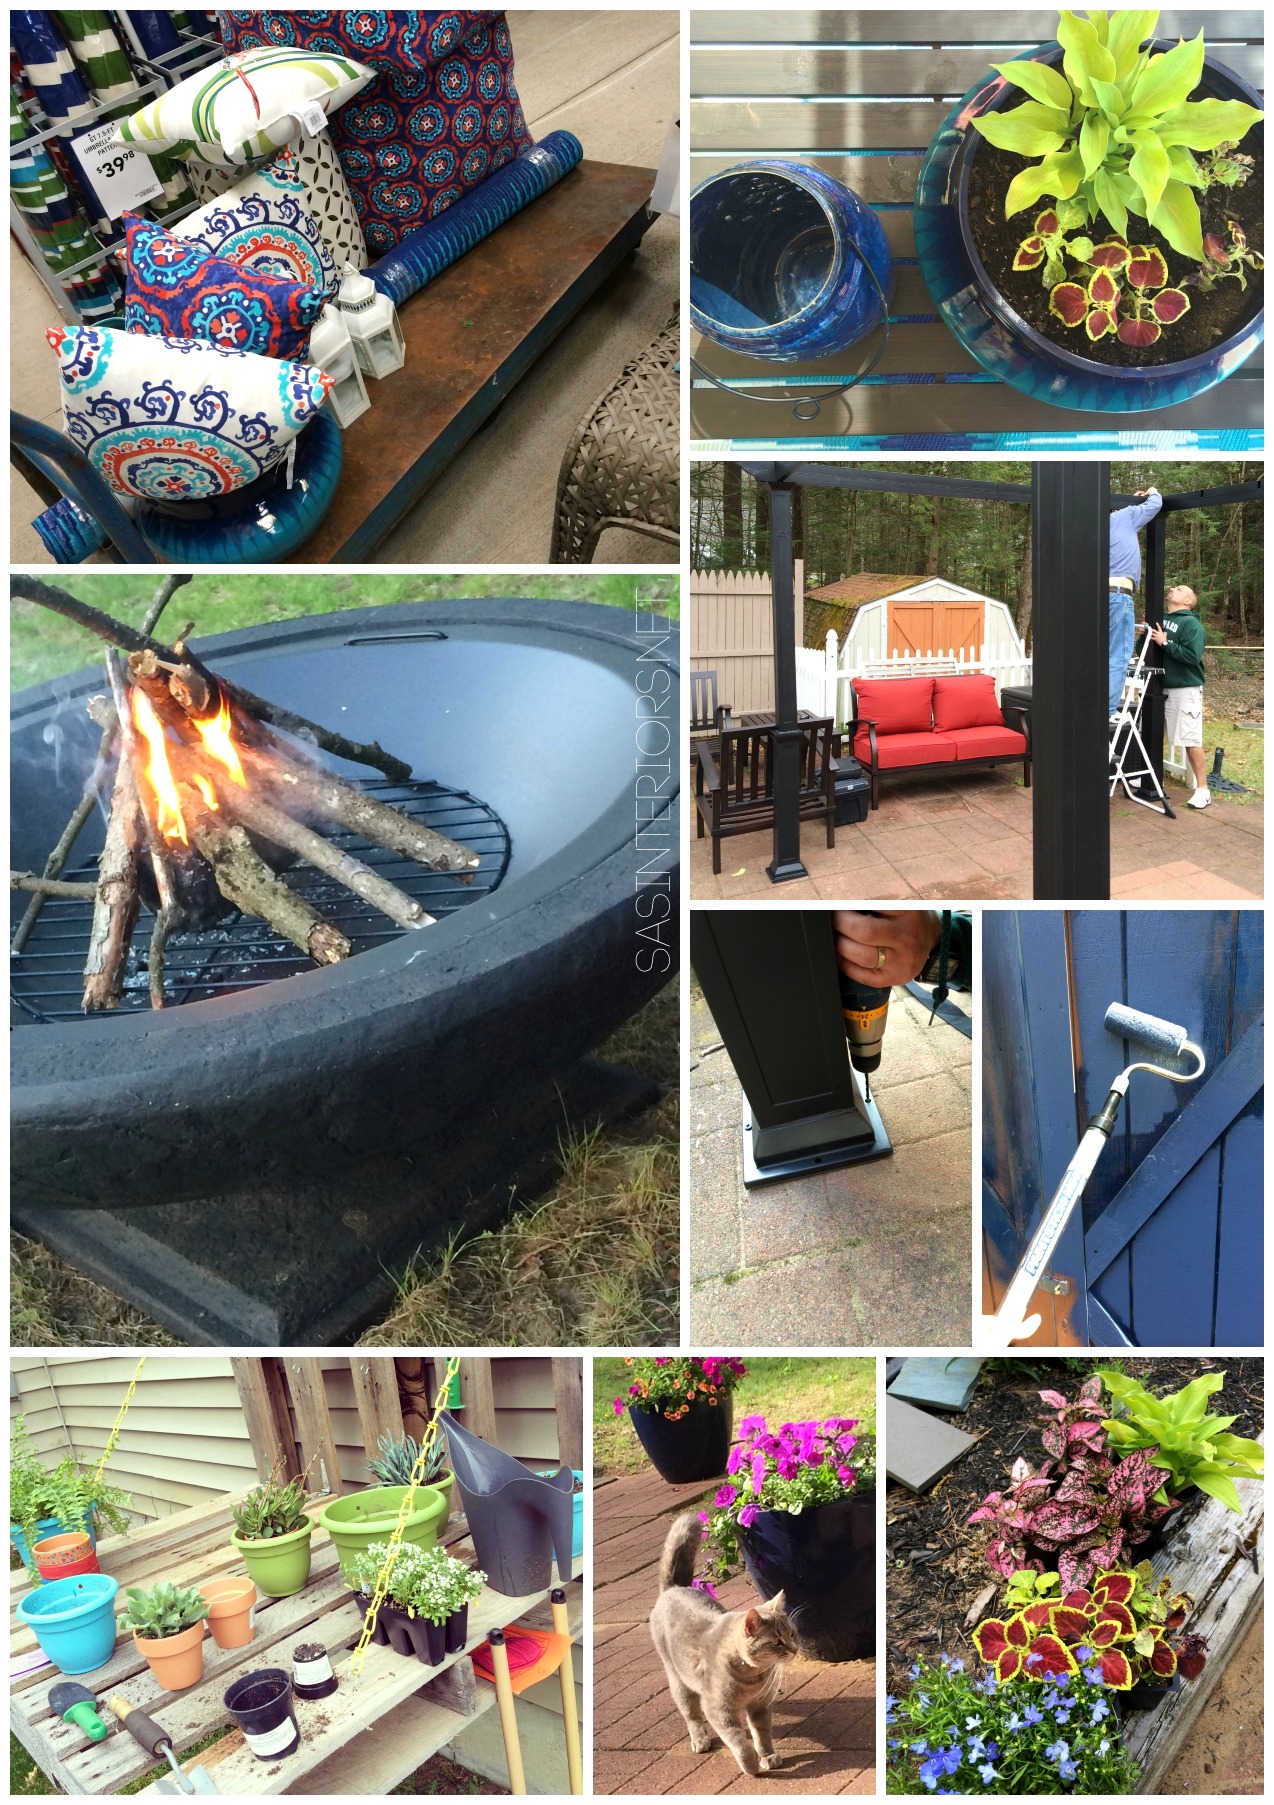
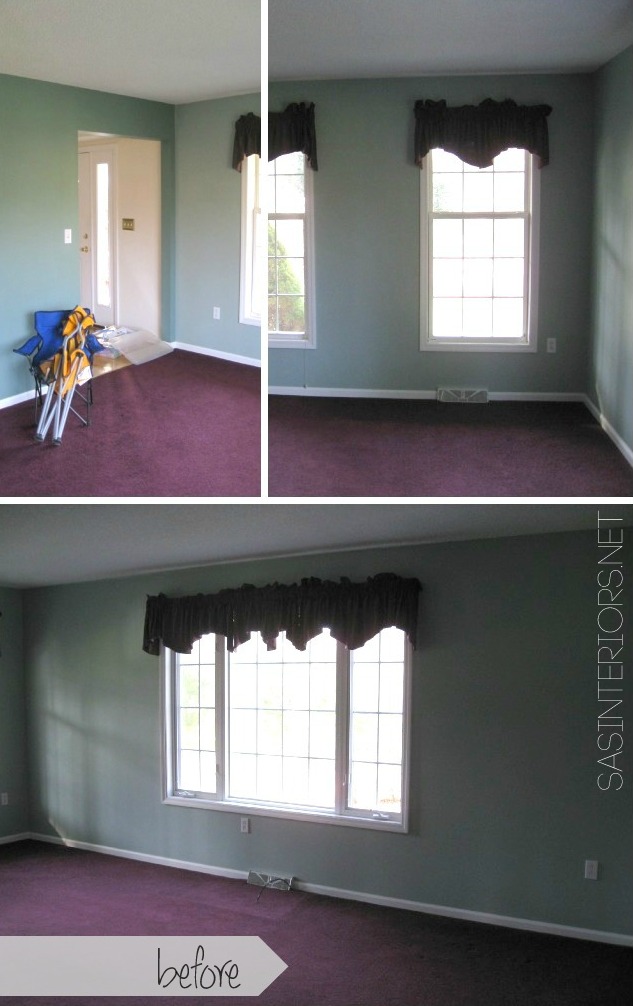
Whether designing a space for myself or for a client, the process typically starts by gathering inspiration + making notes about the proposed space.

Before an initial meeting with a client, I ask them to look through magazines + search online for spaces & elements that they are drawn to.  There’s no need for a common thread or a specific style.  That doesn’t matter.  Basically, if you love it – for whatever reason – tag it. Later, we can dig through the why do you love it…

The next part of the initial design process is to write down wants, needs, and use of the space + what the objective of the room will be.  How do you want the room to feel?  If the room could talk, how would the room describe itself?

These first steps gets the ball rolling for me to pull together how the room(s) will look, feel, and function!
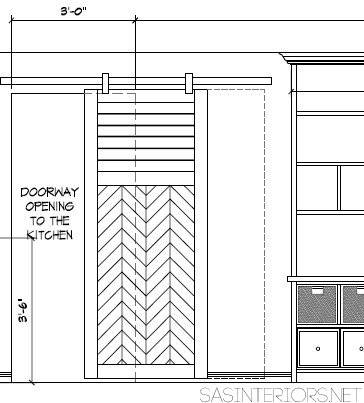
FURNITURE PLAN

Next up, I create a furniture plan for the space(s).

For this, I use AutoCAD. Unlike inexpensive drag & drop architectural programs, AutoCAD is 100% manual to create the plan with exact measurements needed.  This program is most used by professionals in the Architectural field and has been around for many years.  I use an older version of Architectural Desktop 3.3.  Here’s a look…

Creating a Design Plan + Mood Board

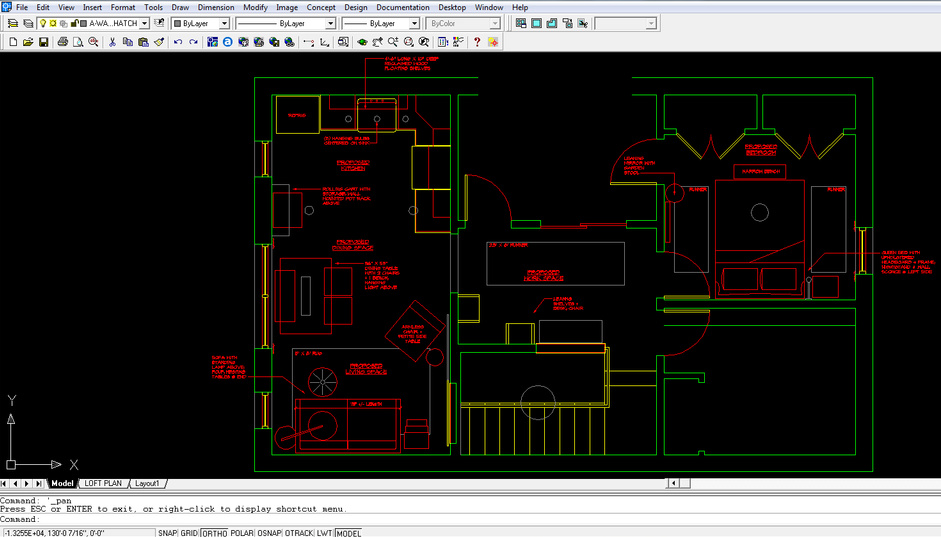
For those of you who want to create your own furniture plan, there are many drag + drop programs to give a try.  Or you can try SketchUp, which is a 3D modeling program.

GATHER IDEAS

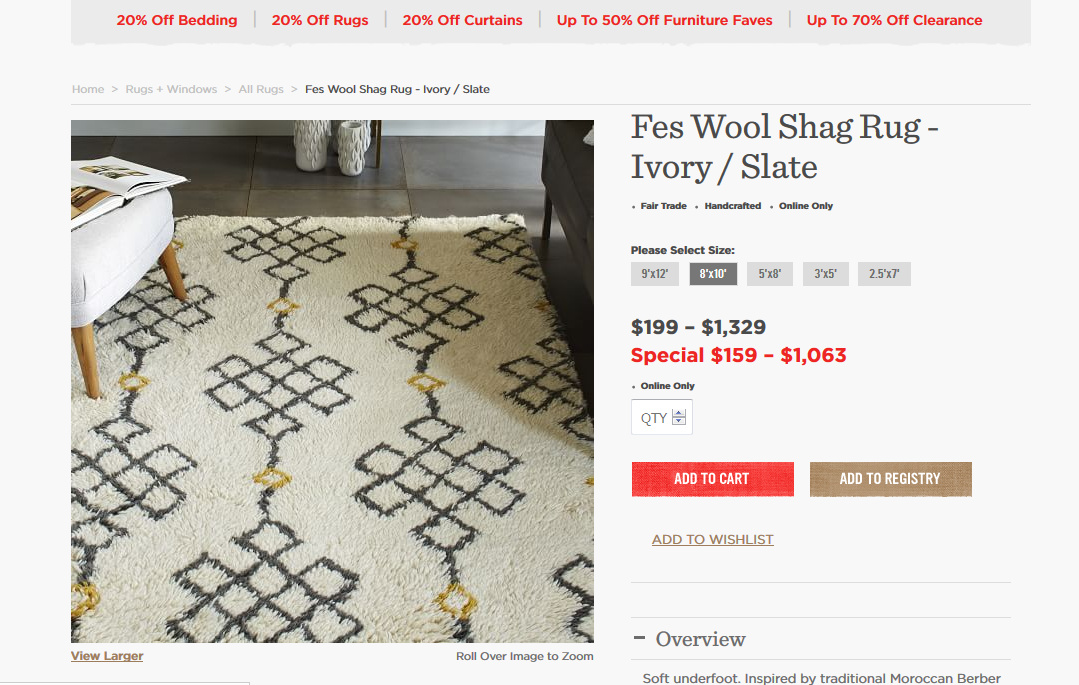
Simultaneously to creating the furniture plan (I make changes as I find items and can input the exact measurements), I am also scouring the web + my design resource library for furniture and decor elements to create the room that fits the look + feel + function I am designing.

I pull images from the web by saving them to my desktop or taking a screenshot.

Ever take a screenshot – a snapshot of your computer screen – on the web?  If not, it’s easy!  On your computer keyboard there is a button, PRNTSCR, typically on the top right.  Click it and you’ll take a shot of your computer screen at that moment.

This is a screenshot of a rug that was perfect for a loft space I am designing…
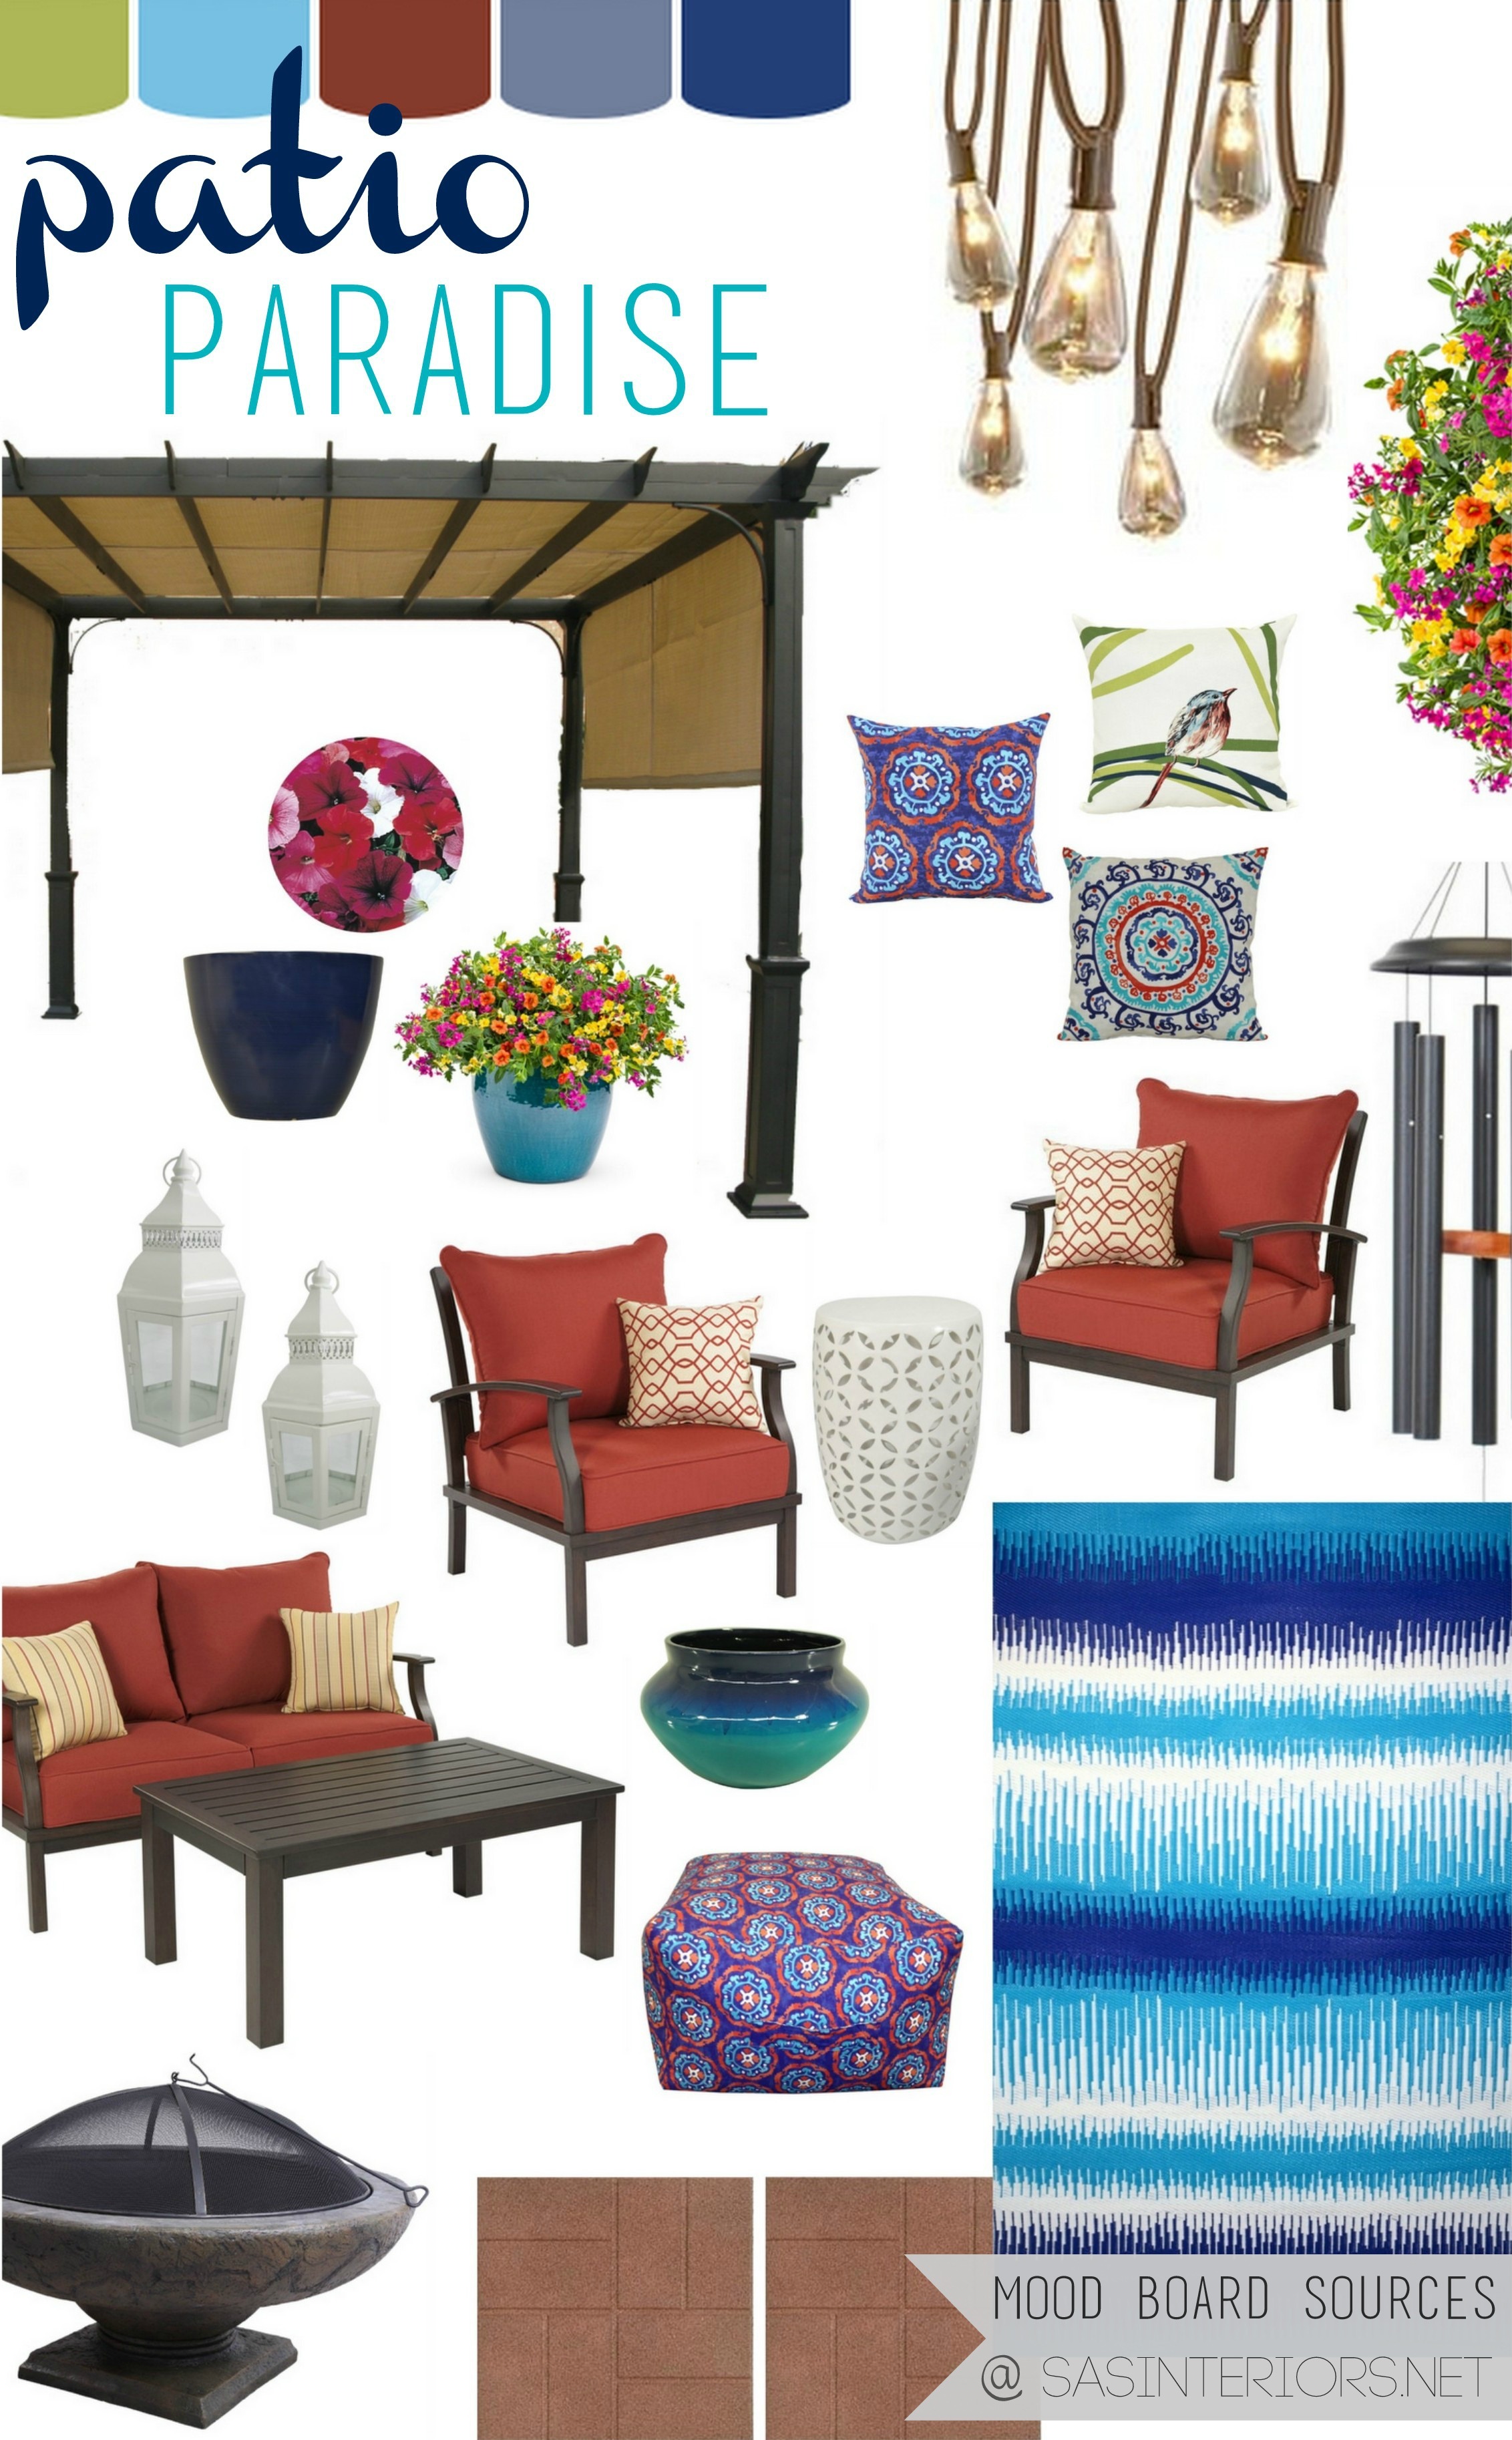
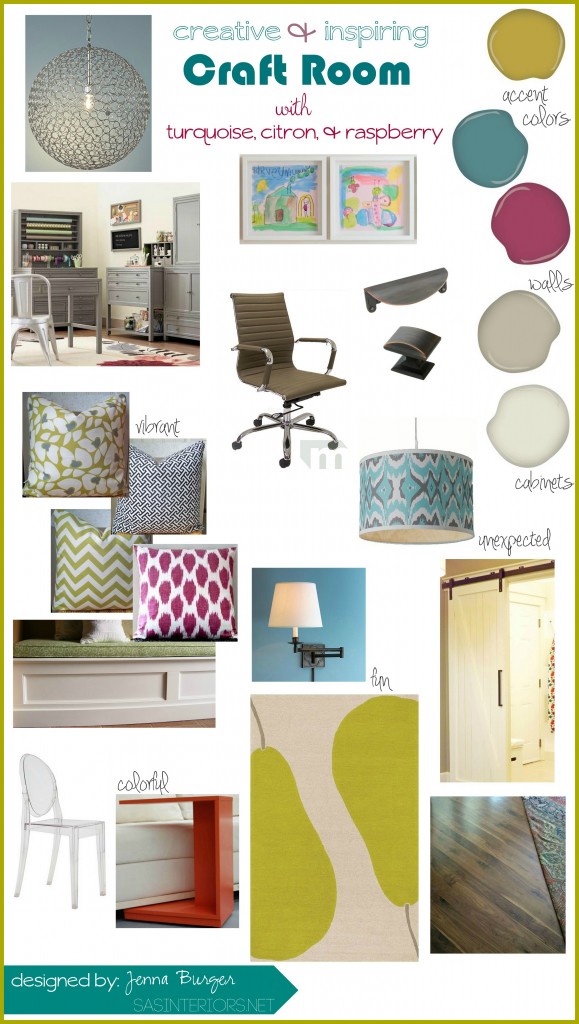
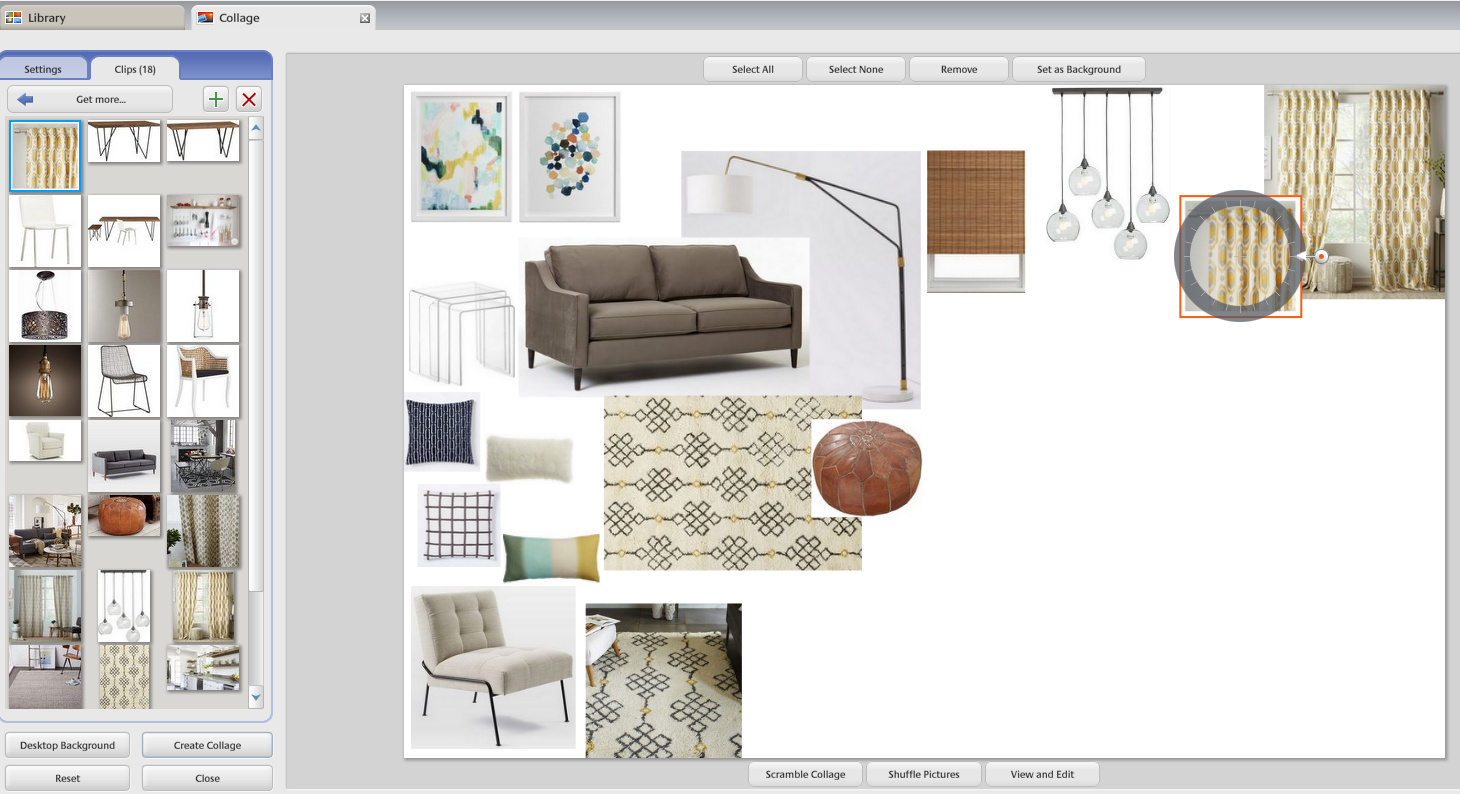
Creating a Design Plan + Mood Board

MOOD BOARD

Once I have a good handle on about 90% of the items that I want for the space, I start the creation of the mood board.  For this part of the design process, I use Picasa, a free picture program to organize + edit.  It has a collage-making section and is very user-friendly.

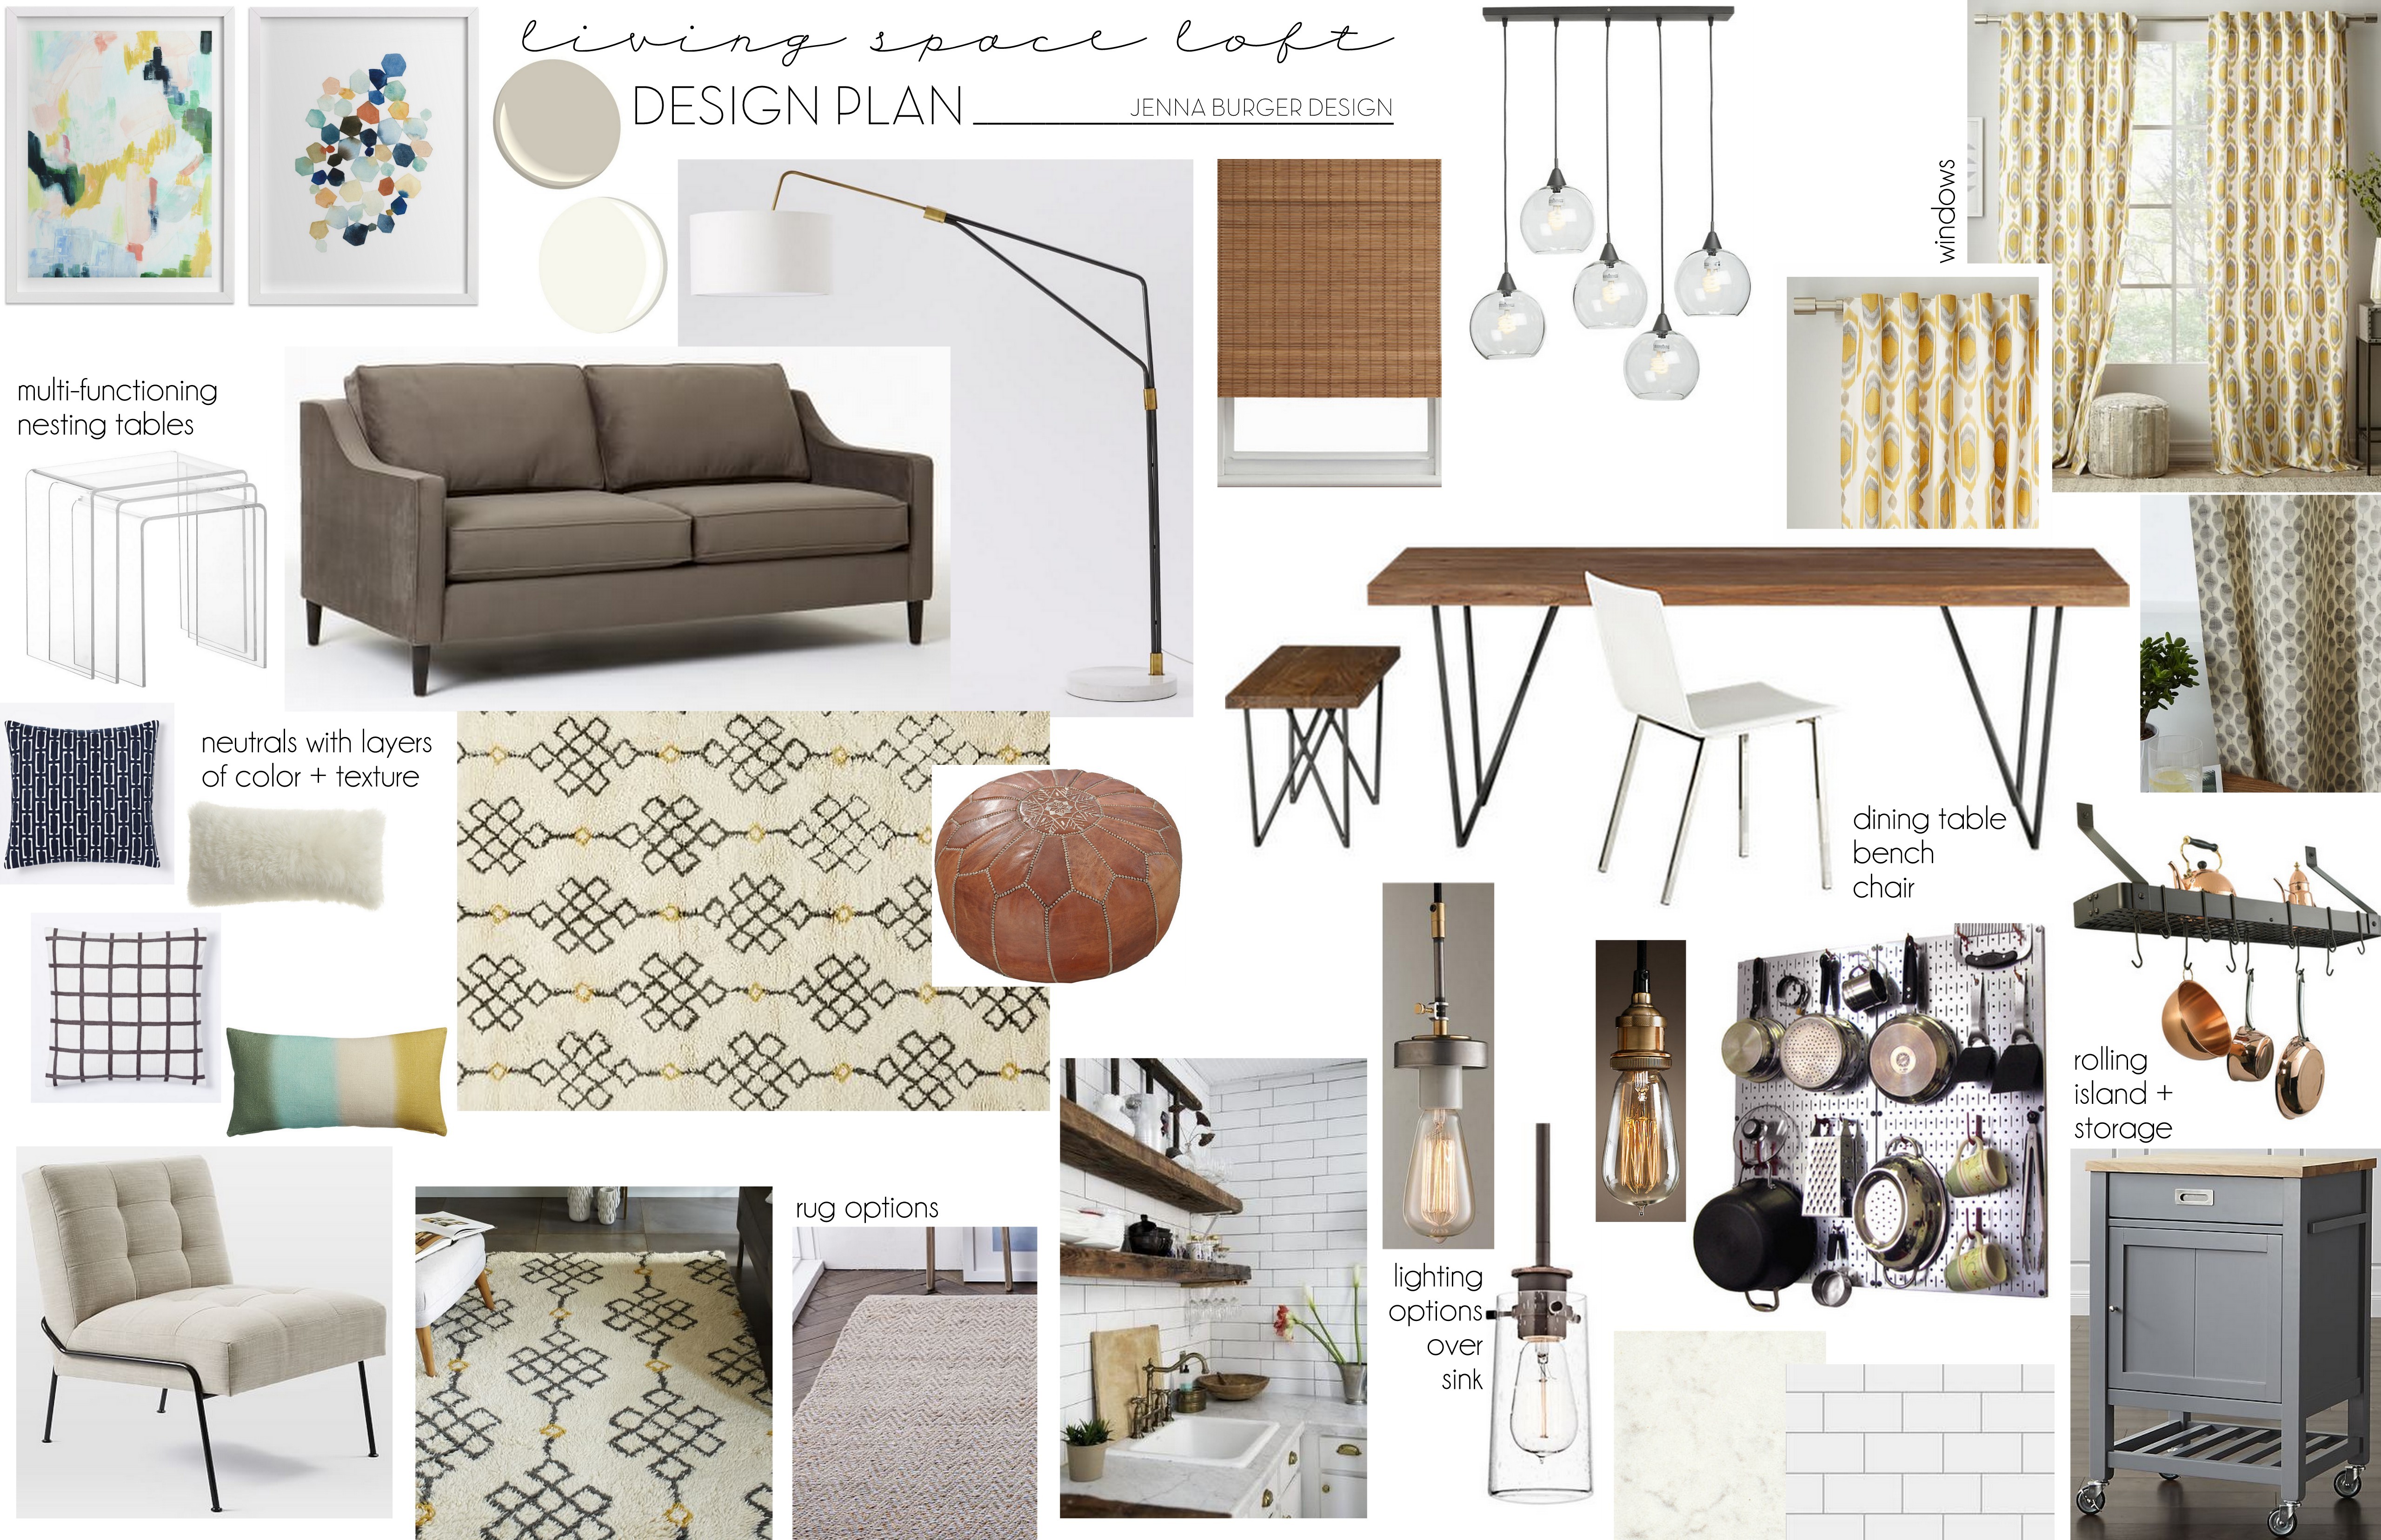
Here is a snippet when I was creating the mood board for the loft…

Creating a Design Plan + Mood Board

Once the Furniture Plan + Mood Board was complete, I was ready to print.

Here is the result…

Creating a Design Plan + Mood Board

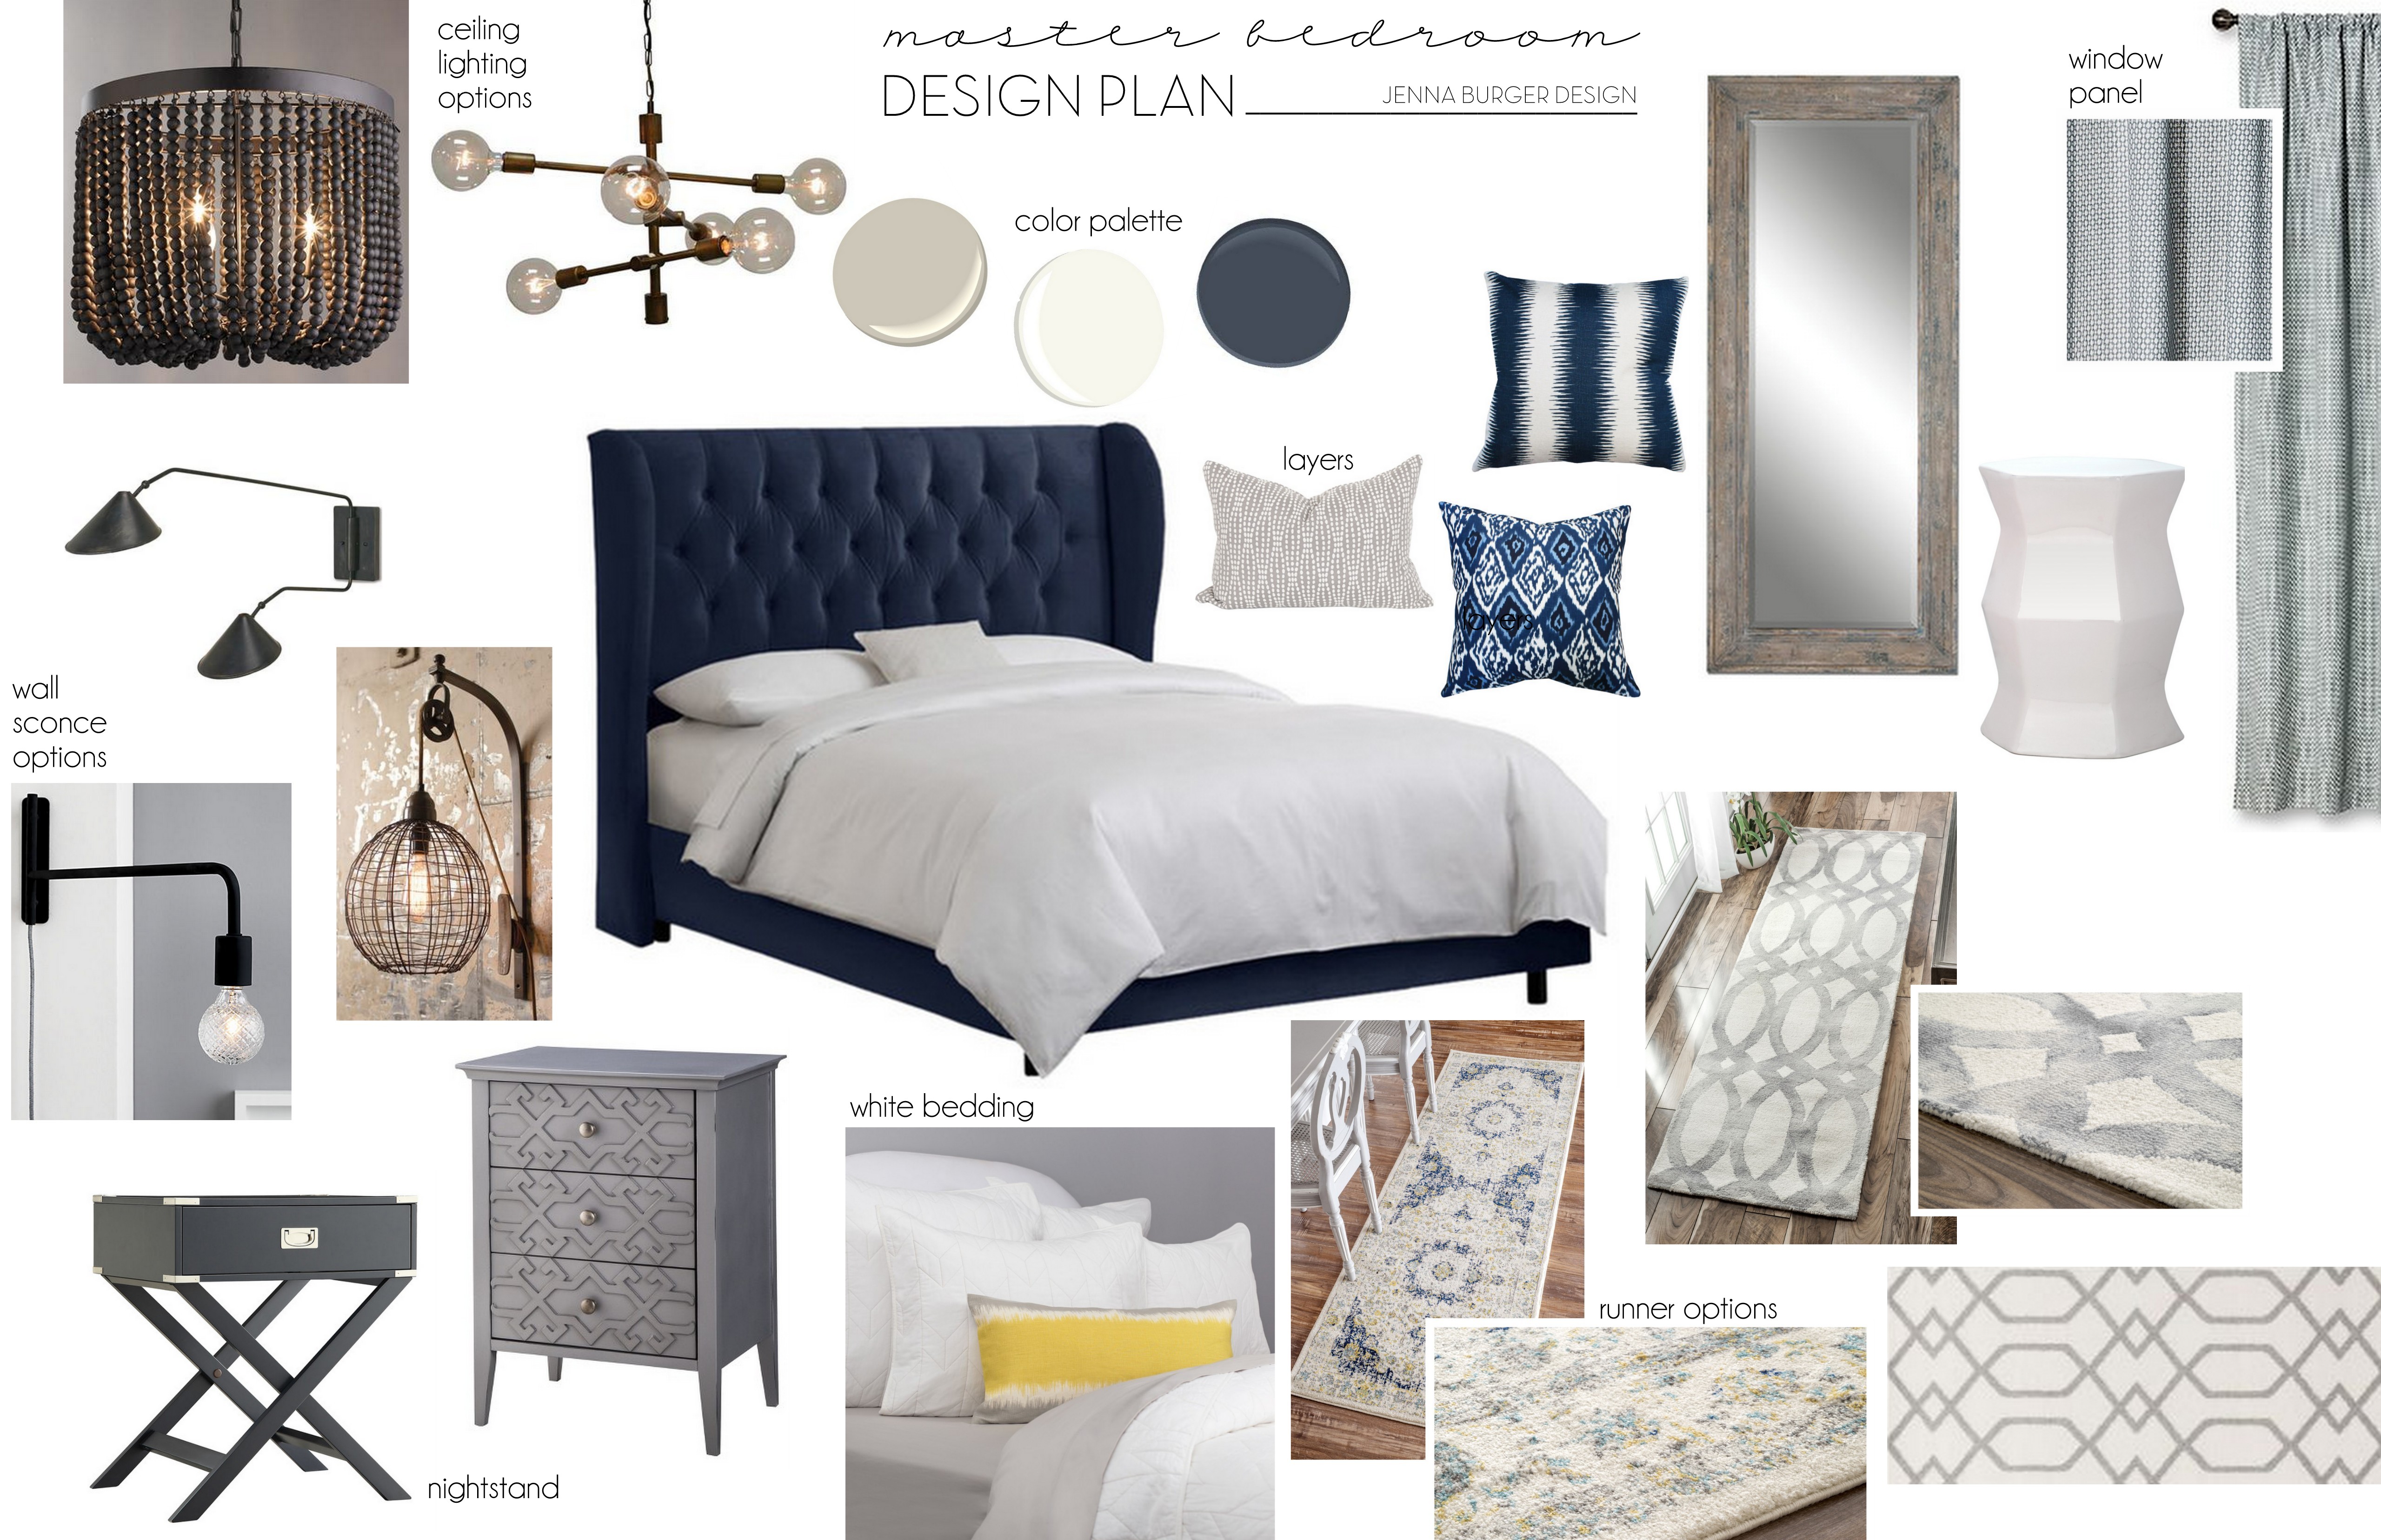
This is the bedroom space mood board…

Creating a Design Plan + Mood Board

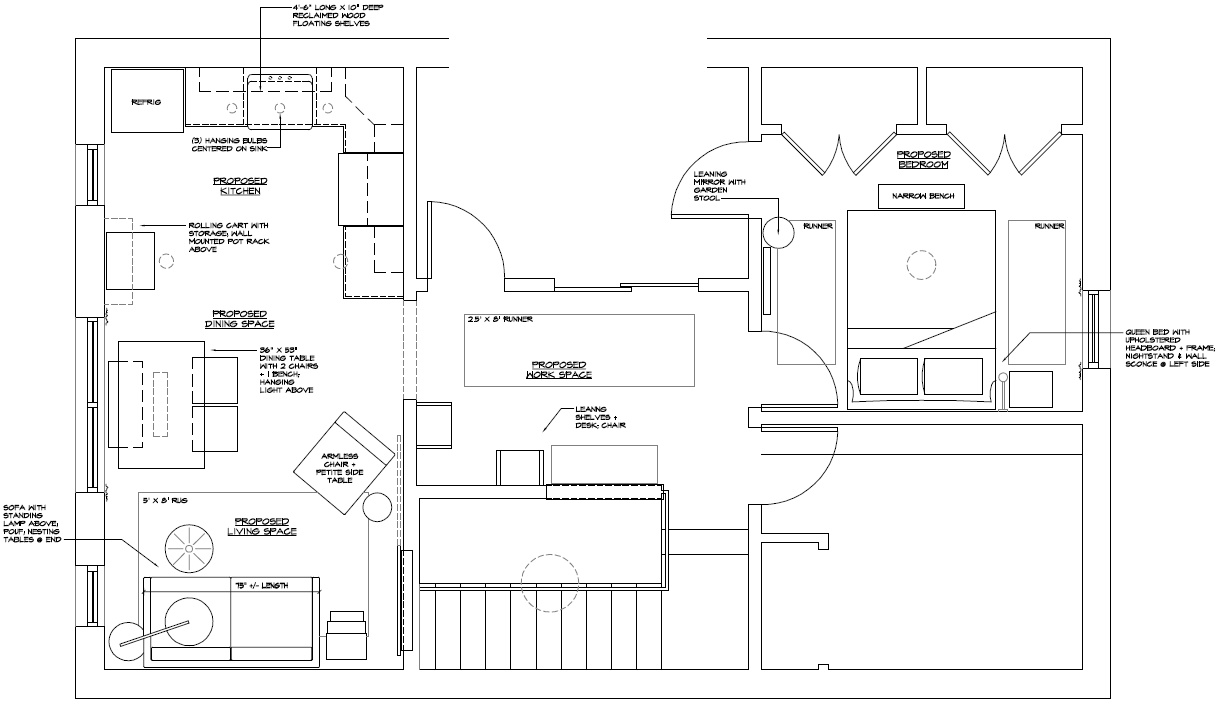
And lastly, the overall floor plan for the loft…

Creating a Design Plan + Mood Board

From the initial thoughts + ideas all the way through to creating a real living space, this is the process of developing the design + making the mood board!

ALL with my Intel computer.  I told you it’s my main go-to for running my business.

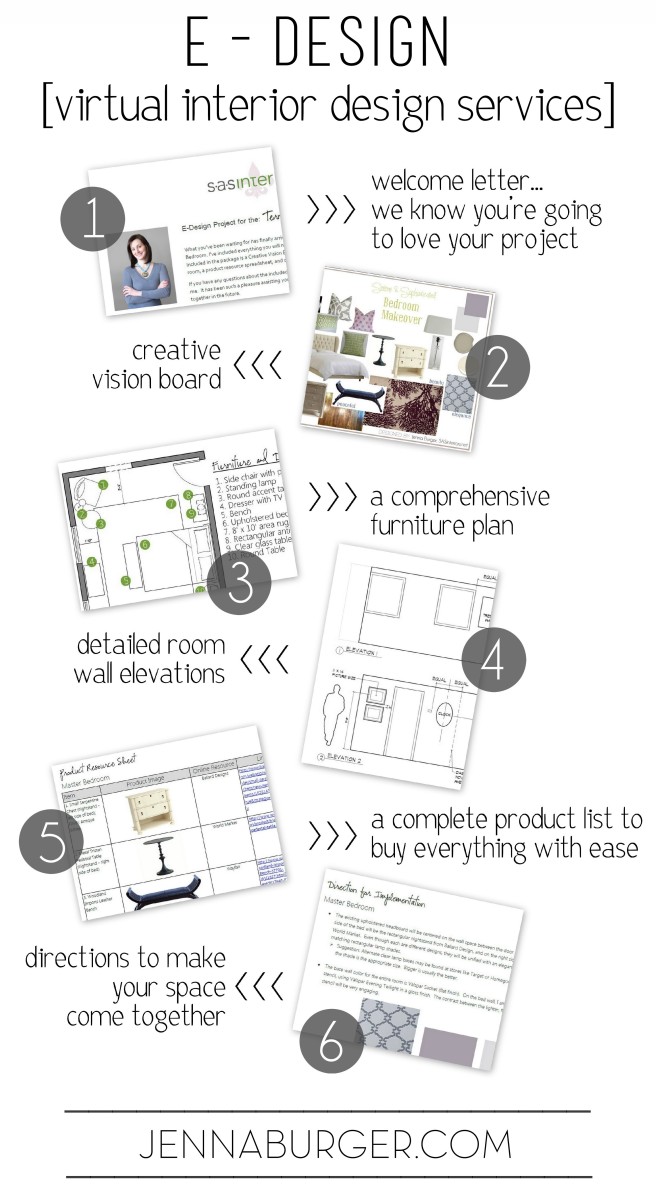
Along with working on local client projects, I also offer E-Design services to those living anywhere in the US.  For those projects, all communication is online. Along with my business + my blog, as I said before, my computer is like my 4th child… a little sad to say, but true.

Interested in learning more about my E-Design program?  I offer a slew of services.

Here’s an example of what I can do for you…

E-Design Services by www.JennaBurger.com

There you have it… a peek into how I create a design plan + mood board for clients.

I’m off to meet with a possible new client about another project…

More questions about running a design business?  Ask me!  I’d also love to hear about your ideas + experiences.

DISCLOSURE: THIS POST IS A PARTNERSHIP WITH INTEL TO SHARE MY THOUGHTS + HOW I USE THE INTEL 2 IN 1 LAPTOP FOR MY DESIGN BUSINESS. #spon

A Not-So-Lavish Laundry Room

This past weekend was a busy one at the ole’ homestead!  From exterior work on the garden to shuffling kids to various sports activities, it was non-stop.  And when we did have a few minutes of “down time”, we started a new project inside…

It’s a horrid-looking space that has been a catch-all for stuff for way too long.  Well I should say, was a catch-all because in just a few hours this space I am referring to got a complete new revamp and I am over-the-hill happy!  What space am I referring to?

THE LAUNDRY!

Honestly, I use the word ‘space’ because it’s not at all a room… I wish!  Our laundry area is essentially a closet. A small closet.  A small closet that holds a lot and until now was completely disorganized + a complete MESS.

I dread sharing this, but here WAS (that’s an important word, WAS) the before…

A not-so-lavish laundry room: The Before

Gutsy, huh?!  Yup, no holding back here. My goodness, I can’t believe I just shared that picture.  And you thought all the spaces in my home were beautiful at all times… NOT!

This laundry closet (it’s literally a closet that is 4′-6″ wide) is just off the foyer.  Across from it is the coat closet / pantry and the hallway leads to the garage.  It’s a tight space that is used a lot, and needed a revamp to be as efficient as possible.  It’s something that has been on my radar for a while and I knew with some TLC, it would shine up like a pretty penny (and it sure did – more on that in a moment).

WHAT THIS LAUNDRY SPACE NEEDED.

> More Storage (big & small) for dishtowels, cleaning supplies, rags, napkins + paper towels, tablecloths, paper goods (paper plates, cups, plastic ware)

> Wall Storage for holding the iron, ironing board, broom, mop

> New Shelving

> New Paint on the walls + trim

> Layers: Pops of color + pictures (to make it pretty)

THE PLAN OF ACTION.

Before tackling this space, I made some quick notes on what was working (not much) + what wasn’t (a lot) + what I needed to store on the new shelves that I planned on installing.

After that, I created a quick creative vision board to help me stay on track for how to best tackle the aesthetics for this laundry revamp…

REVAMPED LAUNDRY ROOM: plan of action for this not-so-lavish laundry room

More specifically, this is what each element in the new space will be used for…

REVAMPED LAUNDRY ROOM: plan of action for this not-so-lavish laundry room

And here’s how it played out in a brief timeline…

FRIDAY AFTERNOON: Removed the existing shelving that was falling apart / Cleaned walls of dust build-up / Patched the 92 holes in the wall

EARLY SATURDAY MORNING: Sanded the walls (the orbital sander took a lot less time than hand sanding – there were a lot of holes!) / Applied the first coat of new paint (love the color!)

SATURDAY AFTERNOON: Applied coat #2 of the paint (and done – YAY)

EARLY SUNDAY MORNING: Installed the top rail for the shelving unit / Installed the shelves (one shelf was wrong so the Mister headed back to Lowe’s for trip #2) / Started organizing

SUNDAY NIGHT: Finished organizing the shelves with some old + some new baskets & bins

* this makeover certainly could have been tackled in one day, but with our hectic lives, nothing ever gets accomplished that quickly.

A few sneak peek progress pictures…

REVAMPED LAUNDRY ROOM: progress images for this not-so-lavish laundry room

For a gal that dreads laundry day (which seems like every day of the week with my clan of 5), I have to admit that for the last 2 days, it hasn’t been so bad.  I am LOVING my newly revamped laundry ‘closet’ and even though it still isn’t so lavish it certainly is 1,000,000 times better than it was.

The AFTER coming tomorrow.  Brace Yourself!


Patio Paradise: The Plan + Mood Board

Patio Paradise Mood Board: Creating an inviting, relaxing patio oasis

I hope you had a fabulous Memorial Day weekend!   Not only did we spend time thanking those who served our country, but we enjoyed much of the long weekend soaking up the sun + enjoying the beautiful outdoors.  BUT like always, with playtime comes worktime.  Before setting our sights on BBQing & the beach, we worked all day Saturday on the outdoors.

Over the past month, we have been spilling hours into transforming our sideyard into a Patio Paradise!  I’m thrilled to be partnering with Lowe’s on this project to create a space that is inviting, relaxing, and truly a magical oasis.  With the new baby coming in just a few short weeks, I am banking on this new area being our stay-cation spot for the Summer.

Here’s a peek at the shopping and prepping that has gone into to making this Patio Paradise come to fruition…

Progress on creating a Patio Paradise

When you have a blah blank slate, there is alot that can be done. Only a few years ago, the area where our new oasis now sits was filled with a dilapidated above-ground pool + 15 overgrown trees.  It surely has taken a turn (for the better) since then!

Before

Before

I’m super excited for this outdoor space to be done & to share it with you.  As I’ve mentioned once and again (and maybe 48 other times), I don’t have a green thumb + many perennials are difficult to grow in my neck of the woods because of the long winters.  But, I can say that new buds are popping each day.  In no time, this space will be done and I’ll be able to share with you my new Patio Paradise!  In the meantime, if you’ve got your eye on any of the elements in my mood board, here are direct links to the sources…

Patio Paradise Mood Board: Creating an inviting, relaxing patio oasis

1. Outdoor Lights
2. Pergola
3. Garden Pot (navy)
4. Lanterns – Large & Small
5. Pillows – Blue Multi / White Medallion / Bird
6. (2) Side Chairs + Pillows
7. Loveseat + Coffee Table
8. White Garden Stool
9. Planter
10. Outdoor Rug
11. Pouf
12. Outdoor Fireplace

Once our Patio Paradise is complete, we’ll be ready for a big ole’ bash!  I wish you could all come.  The reveal + party pics coming soon.  In the meantime, later this week (or possible next week) I’ll be sharing the other outdoor spaces around our home.  Along with the patio, we’ve been busy updating the back deck + the front porch.  I better get back to work…

What updates have you made to your outdoor spaces this Spring?

Disclosure: I am super excited to be partnering with Lowe’s on this outdoor project.  I love working with Lowe’s because they offer a range of items with great design qualities.  As always, they did not tell me what to write, what to choose, and all thoughts are 100% my own.  They gave me free-reign on everything so my design ideas + thoughts are 100% genuine.

Creative Vision Board: Inspiring & Vibrant Craft Room

I’ve been working on some really fun client projects lately, and one in particular is a mega craft room / office space.

The client recently moved into the home and instead of using the formal dining room for it’s true purpose, they decided to transform the space into a totally functional craft room and office.  The space will be used for work purposes, as well as some major crafty creating!

Construction is about to begin in a few weeks, but here’s the ‘before’ of how the space currently looks…

Creative and Inspiring Craft Room Mood Board by @Jenna_Burger, sasinteriors.net

Thankfully it won’t be like this for much longer because we have some major goodness coming.

I shared a sneak peak of colors last week on my FB page, but here is what we envision for the space…

Creative and Inspiring Craft Room Mood Board by @Jenna_Burger, sasinteriors.net

Fanta-bulous, right?!

Color. Color. Color. is going to fill this room in no time.  I have been loving the color combo of turquoise, citron, and raspberry, and I knew this was the perfect space to try and test my rich & vibrant color vision.

The following steps to come are:

  • removing the carpet
  • removing the popcorn ceiling
  • removing the dated window treatments

then…

  • painting the walls a neutral gray
  • adding layers of color through accessories
  • doing a few light construction modifications
  • installing new recessed lighting and decorative lighting
  • adding a whole bunch of gorgeous built-ins!

The built-ins are going to totally make this space.  Here is a small peak at the drawings I created for this project:

Creative and Inspiring Craft Room Mood Board by @Jenna_Burger, sasinteriors.net

The door design, which has changed slightly from the drawing above, is going to be mega!  We’re having two custom rolling doors built and the design will be similar to this inspirational image…

Creative and Inspiring Craft Room Mood Board by @Jenna_Burger, sasinteriors.net

I can’t wait to share more details as the project develops.  Stay Tuned!


Creative Vision Board: Bold Modern Office

Happy Wednesday!  Thanks for stopping by to check out my latest Creative Vision Board.  This new series that I started 3 weeks ago, has been a lot of fun to get my creative juices flowing and keeps me “in-the know” & “up-to-date” on new furniture, accessories, and decor that’s available across the web. Did you know that all the furniture and accessories that I showcase on my Creative Vision Boards are available for anyone to purchase (meaning they’re not to-the-trade only)?  These CVB’s are also a teeny glimpse at what I create for my E-Design clients.

Enough of the chatter, let’s take a look at my latest creation of a Bold & Modern Office

For this week’s Creative Vision Board, I started with the Club Chair in a turquoise colored leather – scrumptious, right?!  In the office, I envision two of these divinely comfortable club chairs off to the side with a black marble-top and silver legged, scalloped side table in between.  What a great place to read a book or review paperwork (or blog, hehe).

Now that you know the starting point for this space, let’s break it down like usual, with my three key factors to create a room – color, texture, and style.

Color

Last week’s CVB was quiet and serene, but since this is a modern office space, it was a must to introduce COLOR!  Starting with the walls, I would use a modern and bold geometric wallpaper on the focal wall behind the white, mirrored credenza. The remaining walls would be covered with wide horizontal stripes in quieter hues of cream and taupe/gray.

The crisp white desk would pop off of the faux cow hide rug which is layered over a dark wood floor and a classic herringbone natural-colored rug. Layers, Layers, Layers!

Other exciting colors in this office would be burnt orange and pistachio, as seen in the ottoman, fabrics, and accessories.

Texture

If you work from home or spend a significant amount of time in your office, it’s important to introduce engaging elements.  One way to do this is through texture.  This office has alot of textural qualities.  From the smooth subtle leather club chair to the faux cow hide rug to the chevron patterned cashmere rug, this office space is filled with texture and pieces you would want to touch all day!

Style

So much style in one space, I wish I could snap my fingers and instantly work in this office!  Don’t you? From classic to modern, this office has a good balance of old and new elements.  One of my favorite pieces in the room is the large, crisp white desk.  The purpose of a traditional desk is there, yet with a modern twist.  It is more open and airy than typical and has a beautiful X-leg.

My Advice to Design a Room Like This

Have fun and be daring when designing an office space. Create a space that is inspiring, engaging, and gets the creative process moving.  This is a room in the house that doesn’t need to be 100% cohesive with the rest.  Yes, bringing in elements from the rest of the house is nice, but you can truly make it a statement on it’s own.

Thanks for stopping by to check out my latest Creative Vision Board.  Has it inspired you to revamp your office?  Have you created an office space that you love being in?

* Creative Vision Board Disclaimer: Some CVBs are created for specific clients and others are created by me to inspire you.  Either way, specific resources are not provided because these are the types of creations that clients pay me for and if I gave the information away for free, no one would hire me.  BUT if you’re interested in specific pieces seen on my Creative Vision Boards or want to create the exact look in your space, you can gladly pay a nominal fee for the resources.  Nothing on my Creative Vision Boards are to-the-trade only and everything can be found on the internet. Also, if you have a question about a specific resource then my One-Question Consult would be perfect for you and/or if you’re looking for a new, custom created CVB, then you might want to take a look at my Jump Start Design option.  If you have a question about anything, email me!

Creative Vision Board: Serene and Sophisticated Bedroom

I’ve been super psyched for Wednesday to arrive so I could share my newest, latest, and greatest Creative Vision Board.  After last week’s Red Hot Eclectic Living Room board started off the series, I was hard at work conceptualizing and creating my latest “room”.

If you’re new to this Wednesday ritual, every hump day (a.k.a. Wednesday) I will create and share a new Creative Vision Board for a room in the home, then I’ll break-it-down explaining how I created the board and how you can create something similar for your space.

Drumroll please for this week’s, Serene & Sophisticated Bedroom Creative Vision Board

For this week’s CVB, I started with the chevron side table lamps (which in reality would be placed in front of the lamps on the nightstand).  Lighting often ‘makes’ a room, and just like last week, it was where I started when pulling this space together.  Because of the mere WOW-factor that these chevron beauties make, the other larger selections in the room took a backseat to compliment this dominant fixture.

Let’s jump in and break down the room even further using my three key factors to make a room: color, texture, and style.

Color

For me, a bedroom should be calming and serene, creating a heavenly oasis to retreat to after a long, exhausting day.  Believe me, I love color, but keep the vibrant hues for the other spaces in the home. With the deep navy and white on the lamp, I decided to introduce other blue tones into the space which can be seen in the rug and pillows.

Additionally to add a pop of color, I introduced the accent color of lime green – just a little goes a long way – that can be seen in the pillows and the garden stool, which would be perfect as a side table next to the chair.

Soft tones for the bedding, window treatments, wallpaper, and wall color are a perfect backdrop for this bedroom.

Texture

Tactile surfaces are a must for me when designing a space.  Whether a soft rug, grasscloth wall, or a high-polished lamp, texture in a room gives great depth and dimension!  A room could be all one color (bo-ring), but when different textures are introduced, it becomes completely engaging.  In this ‘room’, texture can be seen in the bamboo shades, the linen draperies, and the soft leather stool.  Even the chandelier has a textural quality.  Ooo, so much to touch!

Style

From classic to modern, this room is filled with elements of various styles, yet still reads as one cohesive space. One of my favorite elements in the room is the minimal, slightly-retro style chair with the orange and white floral fabric. What a divine chair for reading!

My Advice to Design a Room Like This

Start with the larger pieces in the room – the bed, chair, chandelier – and then introduce soft finishes and accessories that enhance the overall look and compliment the larger elements.  Think about the feelings that you want your bedroom to evoke and introduce colors that will project that aesthetic.

Thanks for checking out my latest Creative Vision Board – what do you think?  Would you love a bedroom like this?  If you have questions regarding any of the specific pieces shown in my Creative Vision Board, you can gladly contact me and we can work together through my E-Design service. Until next week… Happy Decorating!

* Creative Vision Board Disclaimer: Some CVBs are created for specific clients and others are created by me to inspire you.  Either way, specific resources are not provided because these are the types of creations that clients pay me for and if I gave the information away for free, no one would hire me.  BUT if you’re interested in specific pieces seen on my Creative Vision Boards or want to create the exact look in your space, you can gladly pay a nominal fee for the resources.  Nothing on my Creative Vision Boards are to-the-trade only and everything can be found on the internet. Also, if you have a question about a specific resource then my One-Question Consult would be perfect for you and/or if you’re looking for a new, custom created CVB, then you might want to take a look at my Jump Start Design option.  If you have a question about anything, email me!