
Tag: diy bathroom

Master Bathroom Renovation: Plan + Mood Board

It’s been quite some time – about a year – since we tackled a full-on big room renovation.  To put it plain + simple, the kitchen remodel last Fall just wiped me out… and we didn’t even do too much on our own. When it was done, I was desperate for a break.  Then life got busy. Sports. Work. School. Appointments. You know the drill…  But when this past Summer turned into Fall and the kids were back to school and a everyday routine was once again established, I was finally feeling the itch to get my hands dirty… again.

If you remember back about 4-1/2 years ago, one of the last spaces in our home to get attention after moving in was the master bathroom.  The walls were a horrendous purple/pink hue with dated + dusty brass accents.  It all had to go…

Master Bathroom 'before' renovation - JENNA BURGER DESIGN

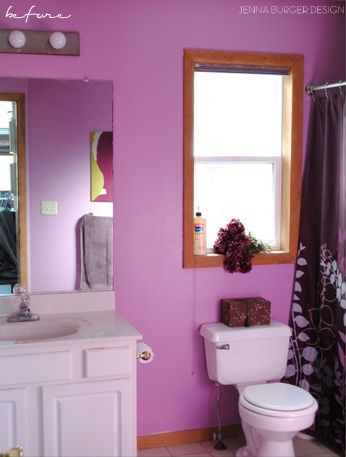
…but it didn’t all go.

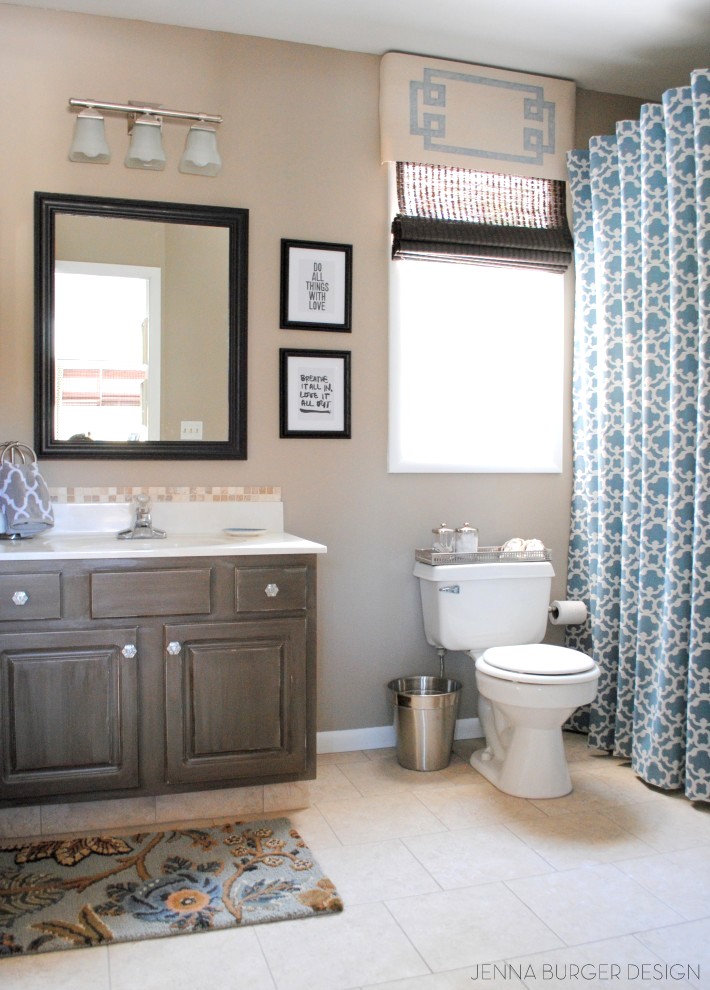
With a few cans of paint, I transformed the walls, the trim, and the cabinet with a whole new color palette. Then to finish it, I laid a new floor using luxury vinyl tile, hung a new mirror, and changed the light. A few hundred dollars later, and the space was completely transformed… for the most part.

DIY Master Bathroom renovation - JENNA BURGER DESIGN

DIY Projects:
How to Paint + Glaze a Cabinet
How to Make a Curtain into a Shower Curtain
How to Install Luxury Vinyl Tile (to look like ceramic tile)

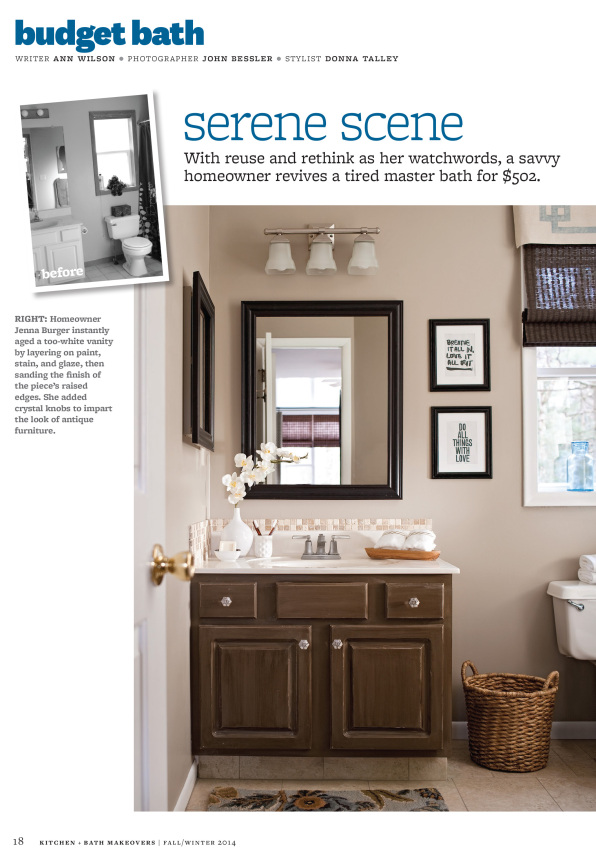
And if you can believe it, the renovated space even ended up in a national publication, Kitchen + Bath makeovers, Fall/Winter 2014 

Better Homes & Garden Kitchen + Bath Makeover magazine - SAS Interiors Kitchen and Master Bath feature

Bathroom Makeover featured in KBMO Fall/Winter 2014, produced by Donna Talley & photographed by John Bessler

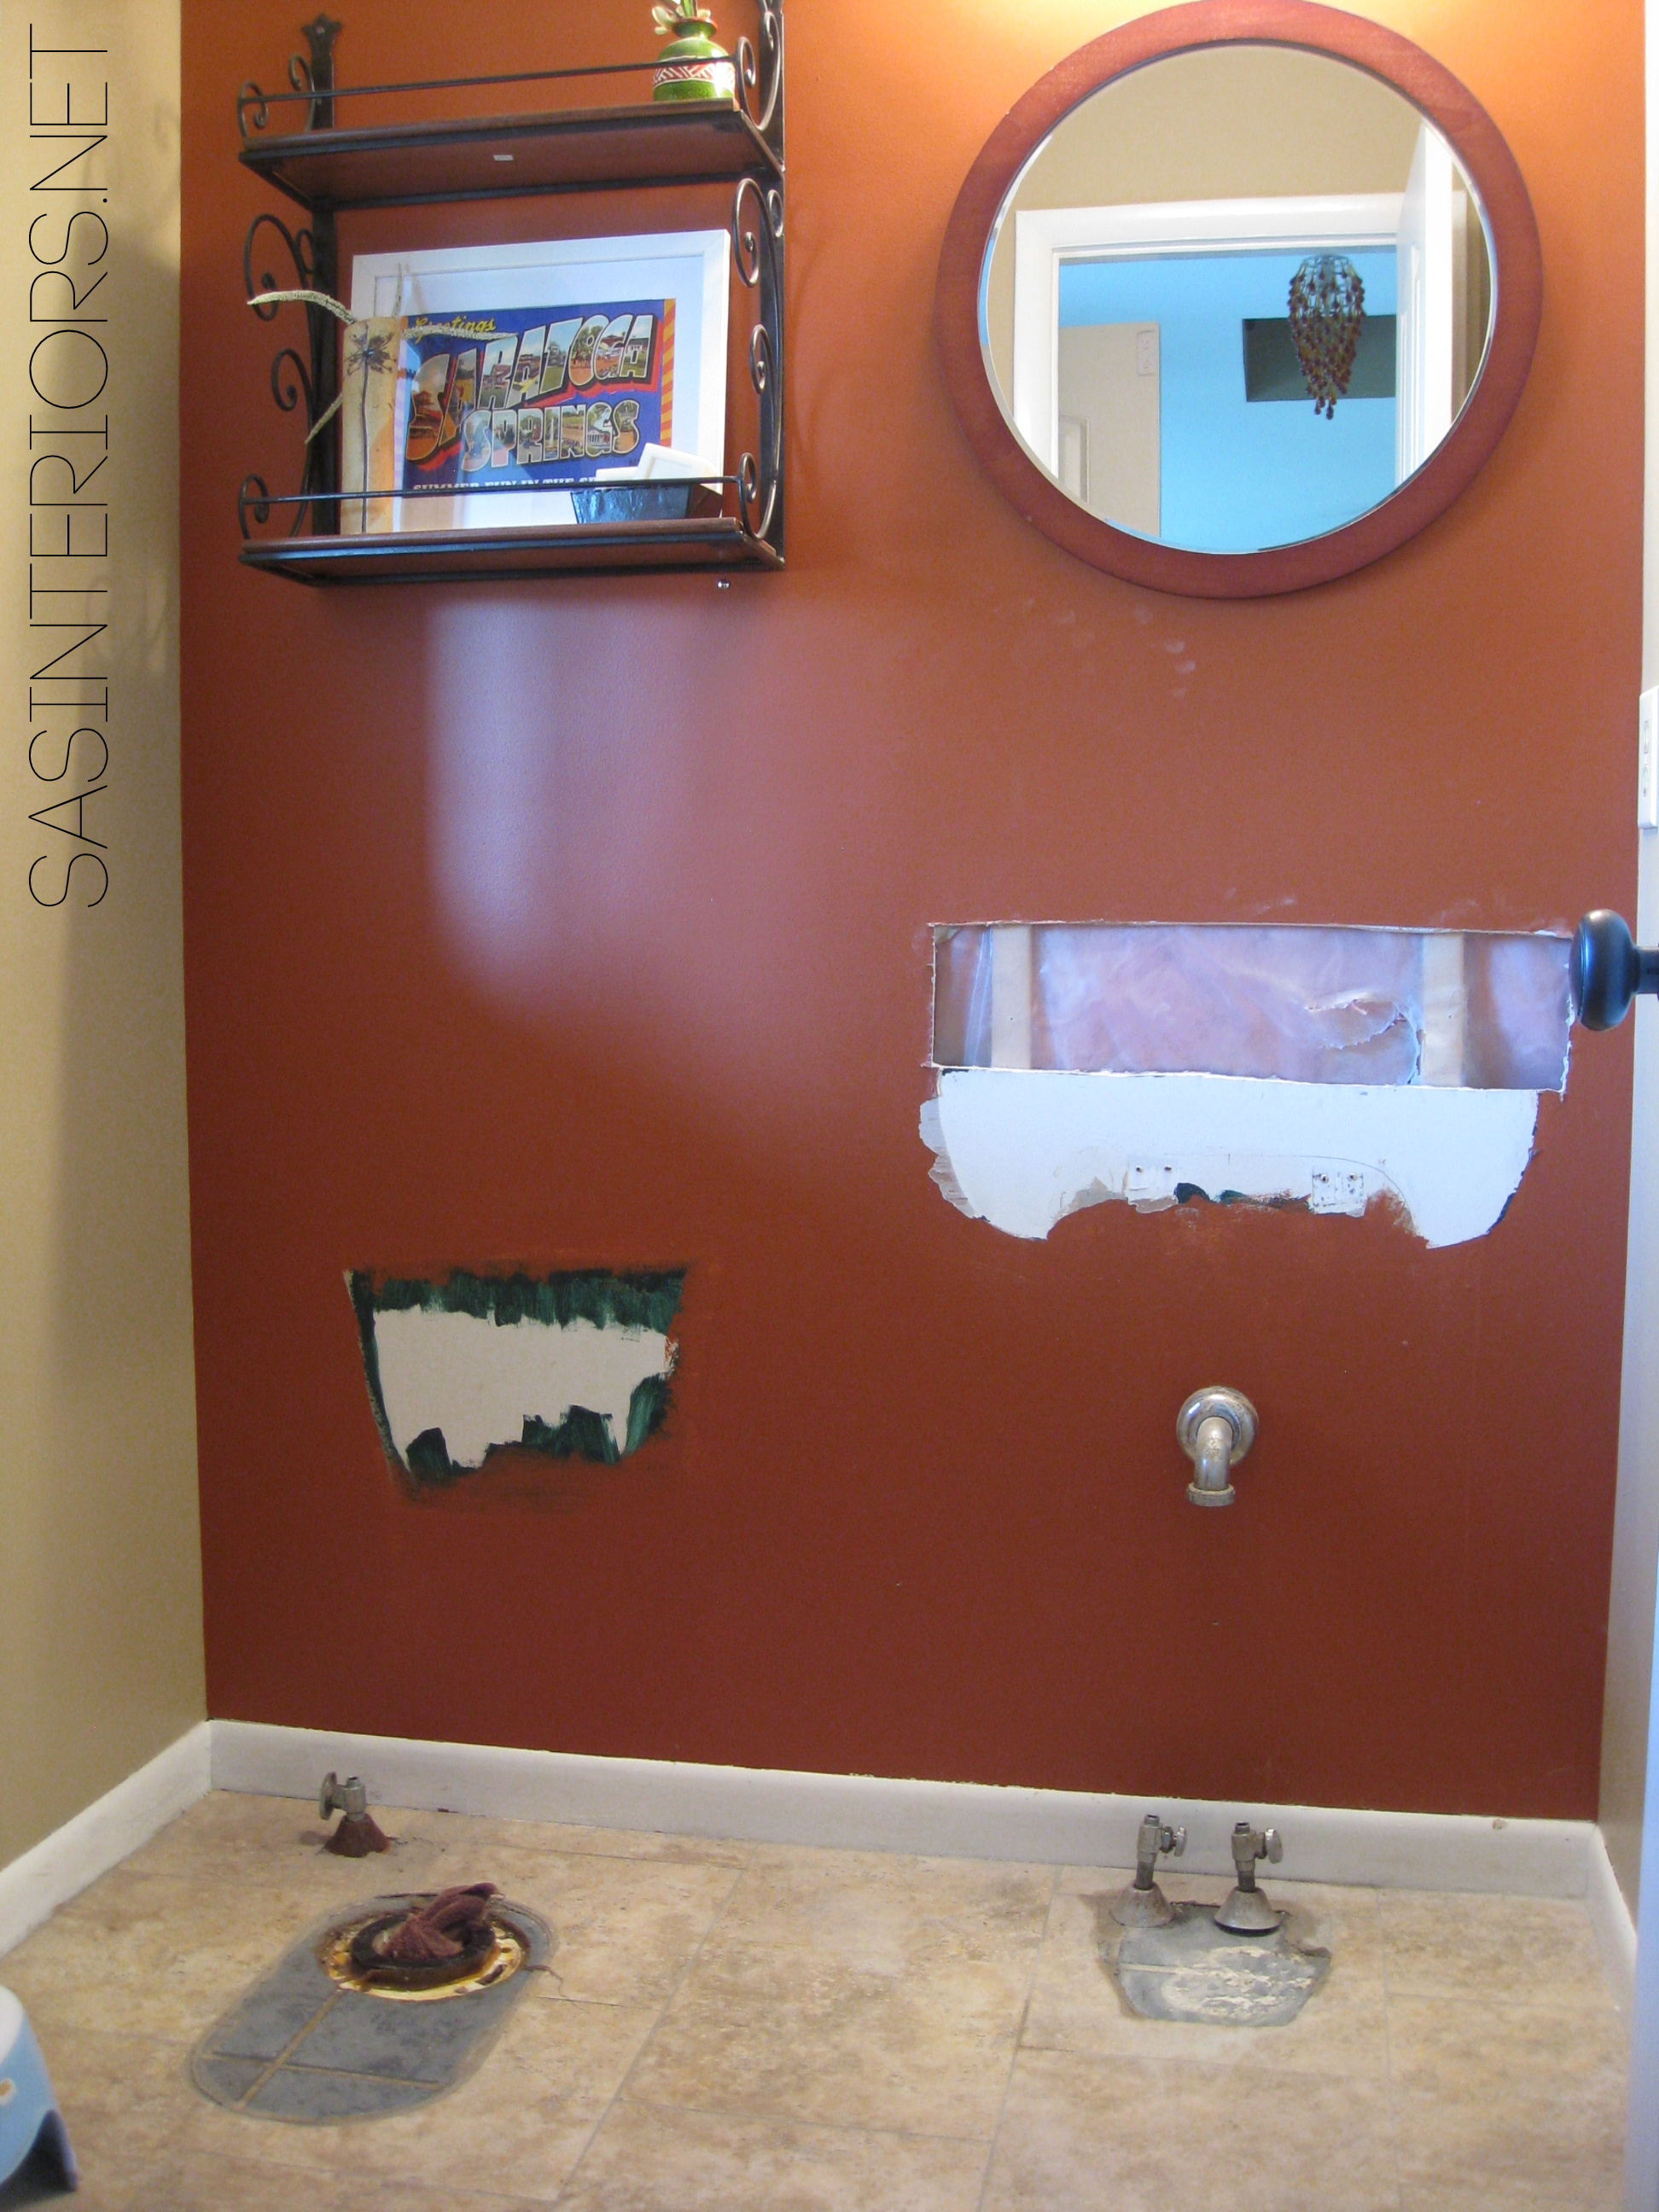
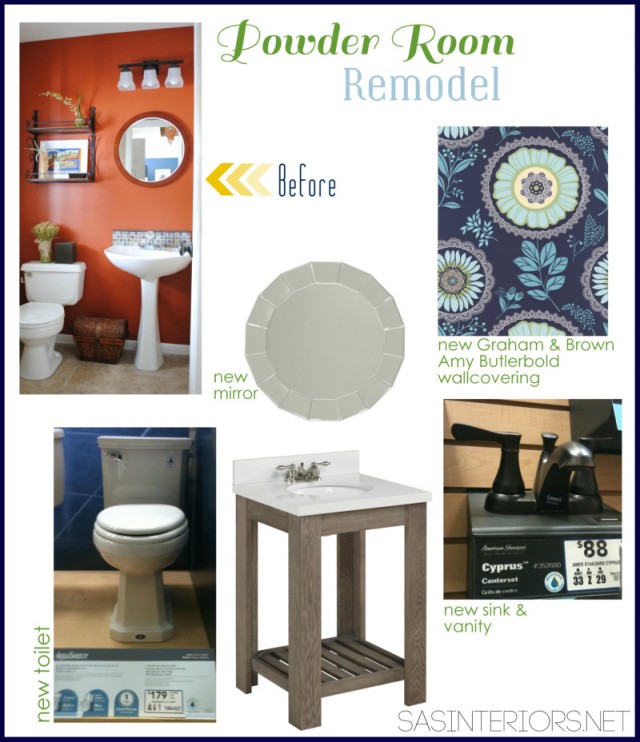
But after 4 years of using the bathroom day in + day out, it needed a makeover. A real makeover. The pre-fab tub was drear and the builder-grade cabinet had seen it’s life span.

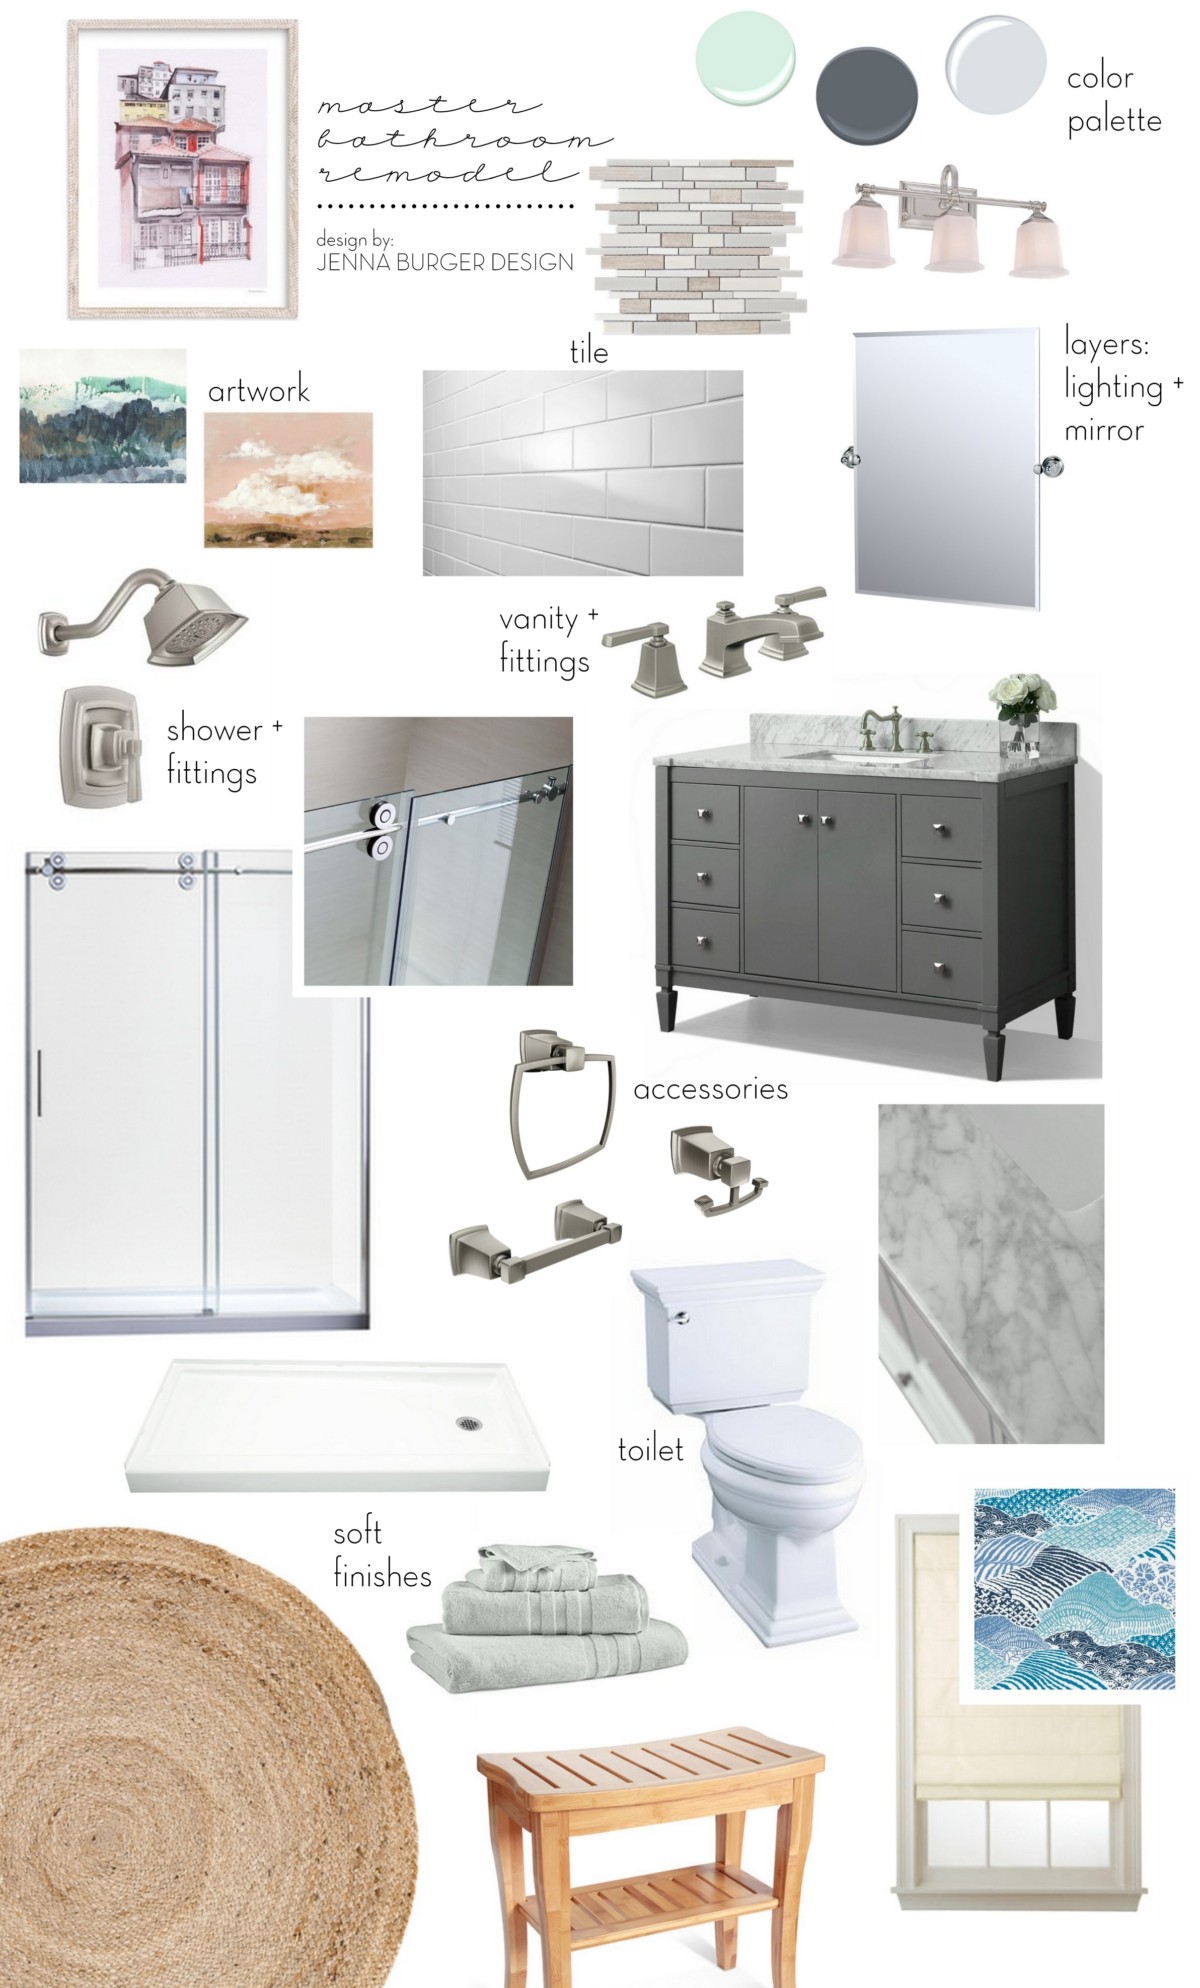
I envisioned Carrara. White. Clean. Fresh. Fun…

…And created a vision board.

Master Bathroom Renovation mood board - JENNA BURGER DESIGN

eek!  It’s all so pretty and fabulous.

Sophisticated, but casual.

Elegant, but inviting.

I am really excited about this new bathroom. You know me, I adore a striking + bold color, but for this space, I need it to feel tranquil and serene.  With being pulled in 92 directions each day, I want to start off and end each precious day in a calming way.

Thanks to my friends at Lowe’s, who I have worked with for years, for choosing to partner with me on this project to create an inviting and peaceful place.

Here is what I have planned…

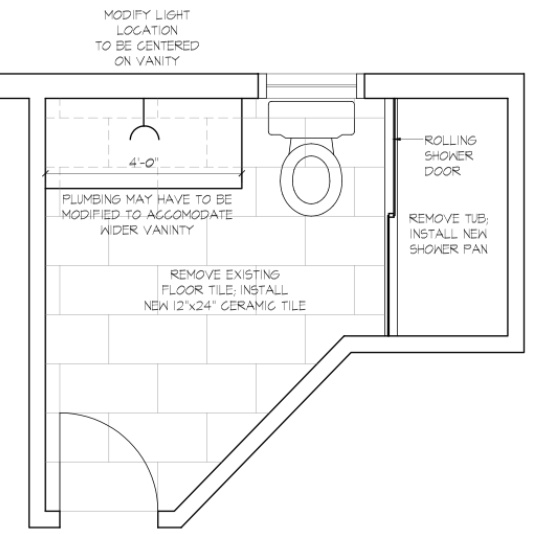
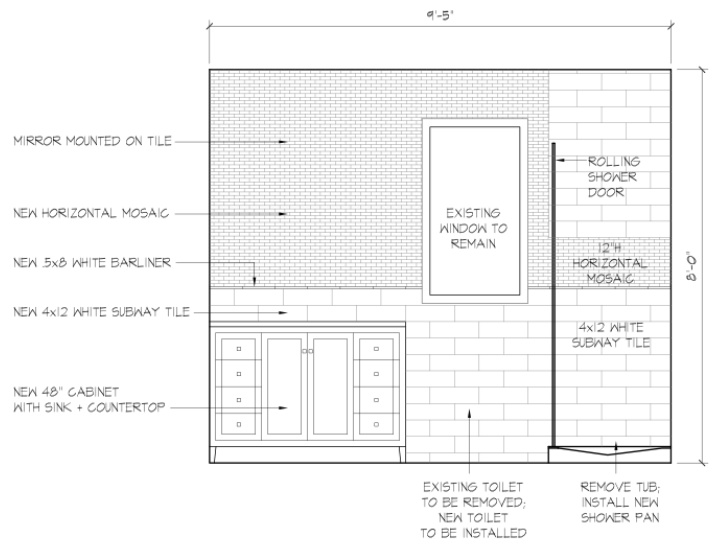
> The tub will be changing from a pre-fab bathtub to a shower with a frameless rolling glass door

> New Tile will be added from floor to ceiling in the tub space and will continue on the entire wall of the vanity

> The main tile will be 4 x 12 white subway with an accent glass/natural mosaic tile

> The walls will be painted a light mint green hue

> The 36″ vanity will be replaced with a 48″ vanity in a dark gray finish to give contrast and a white cararra countertop will be added to give a finished luxury look

> To finish the space, artwork and a fabric window valance in hues of blue will add pattern and color

These are the specific items I plan to use (and are shown in the mood board above):

Vanity
Toilet
Shower Door
Main Subway Tile
Glass Mosaic Tile
Sconce
Mirror
Artwork
Fabric Valance

This is the overall layout plan + elevations that I created:

Floor Plan

Bathroom Elevation

DIY + Calling in the PROS!

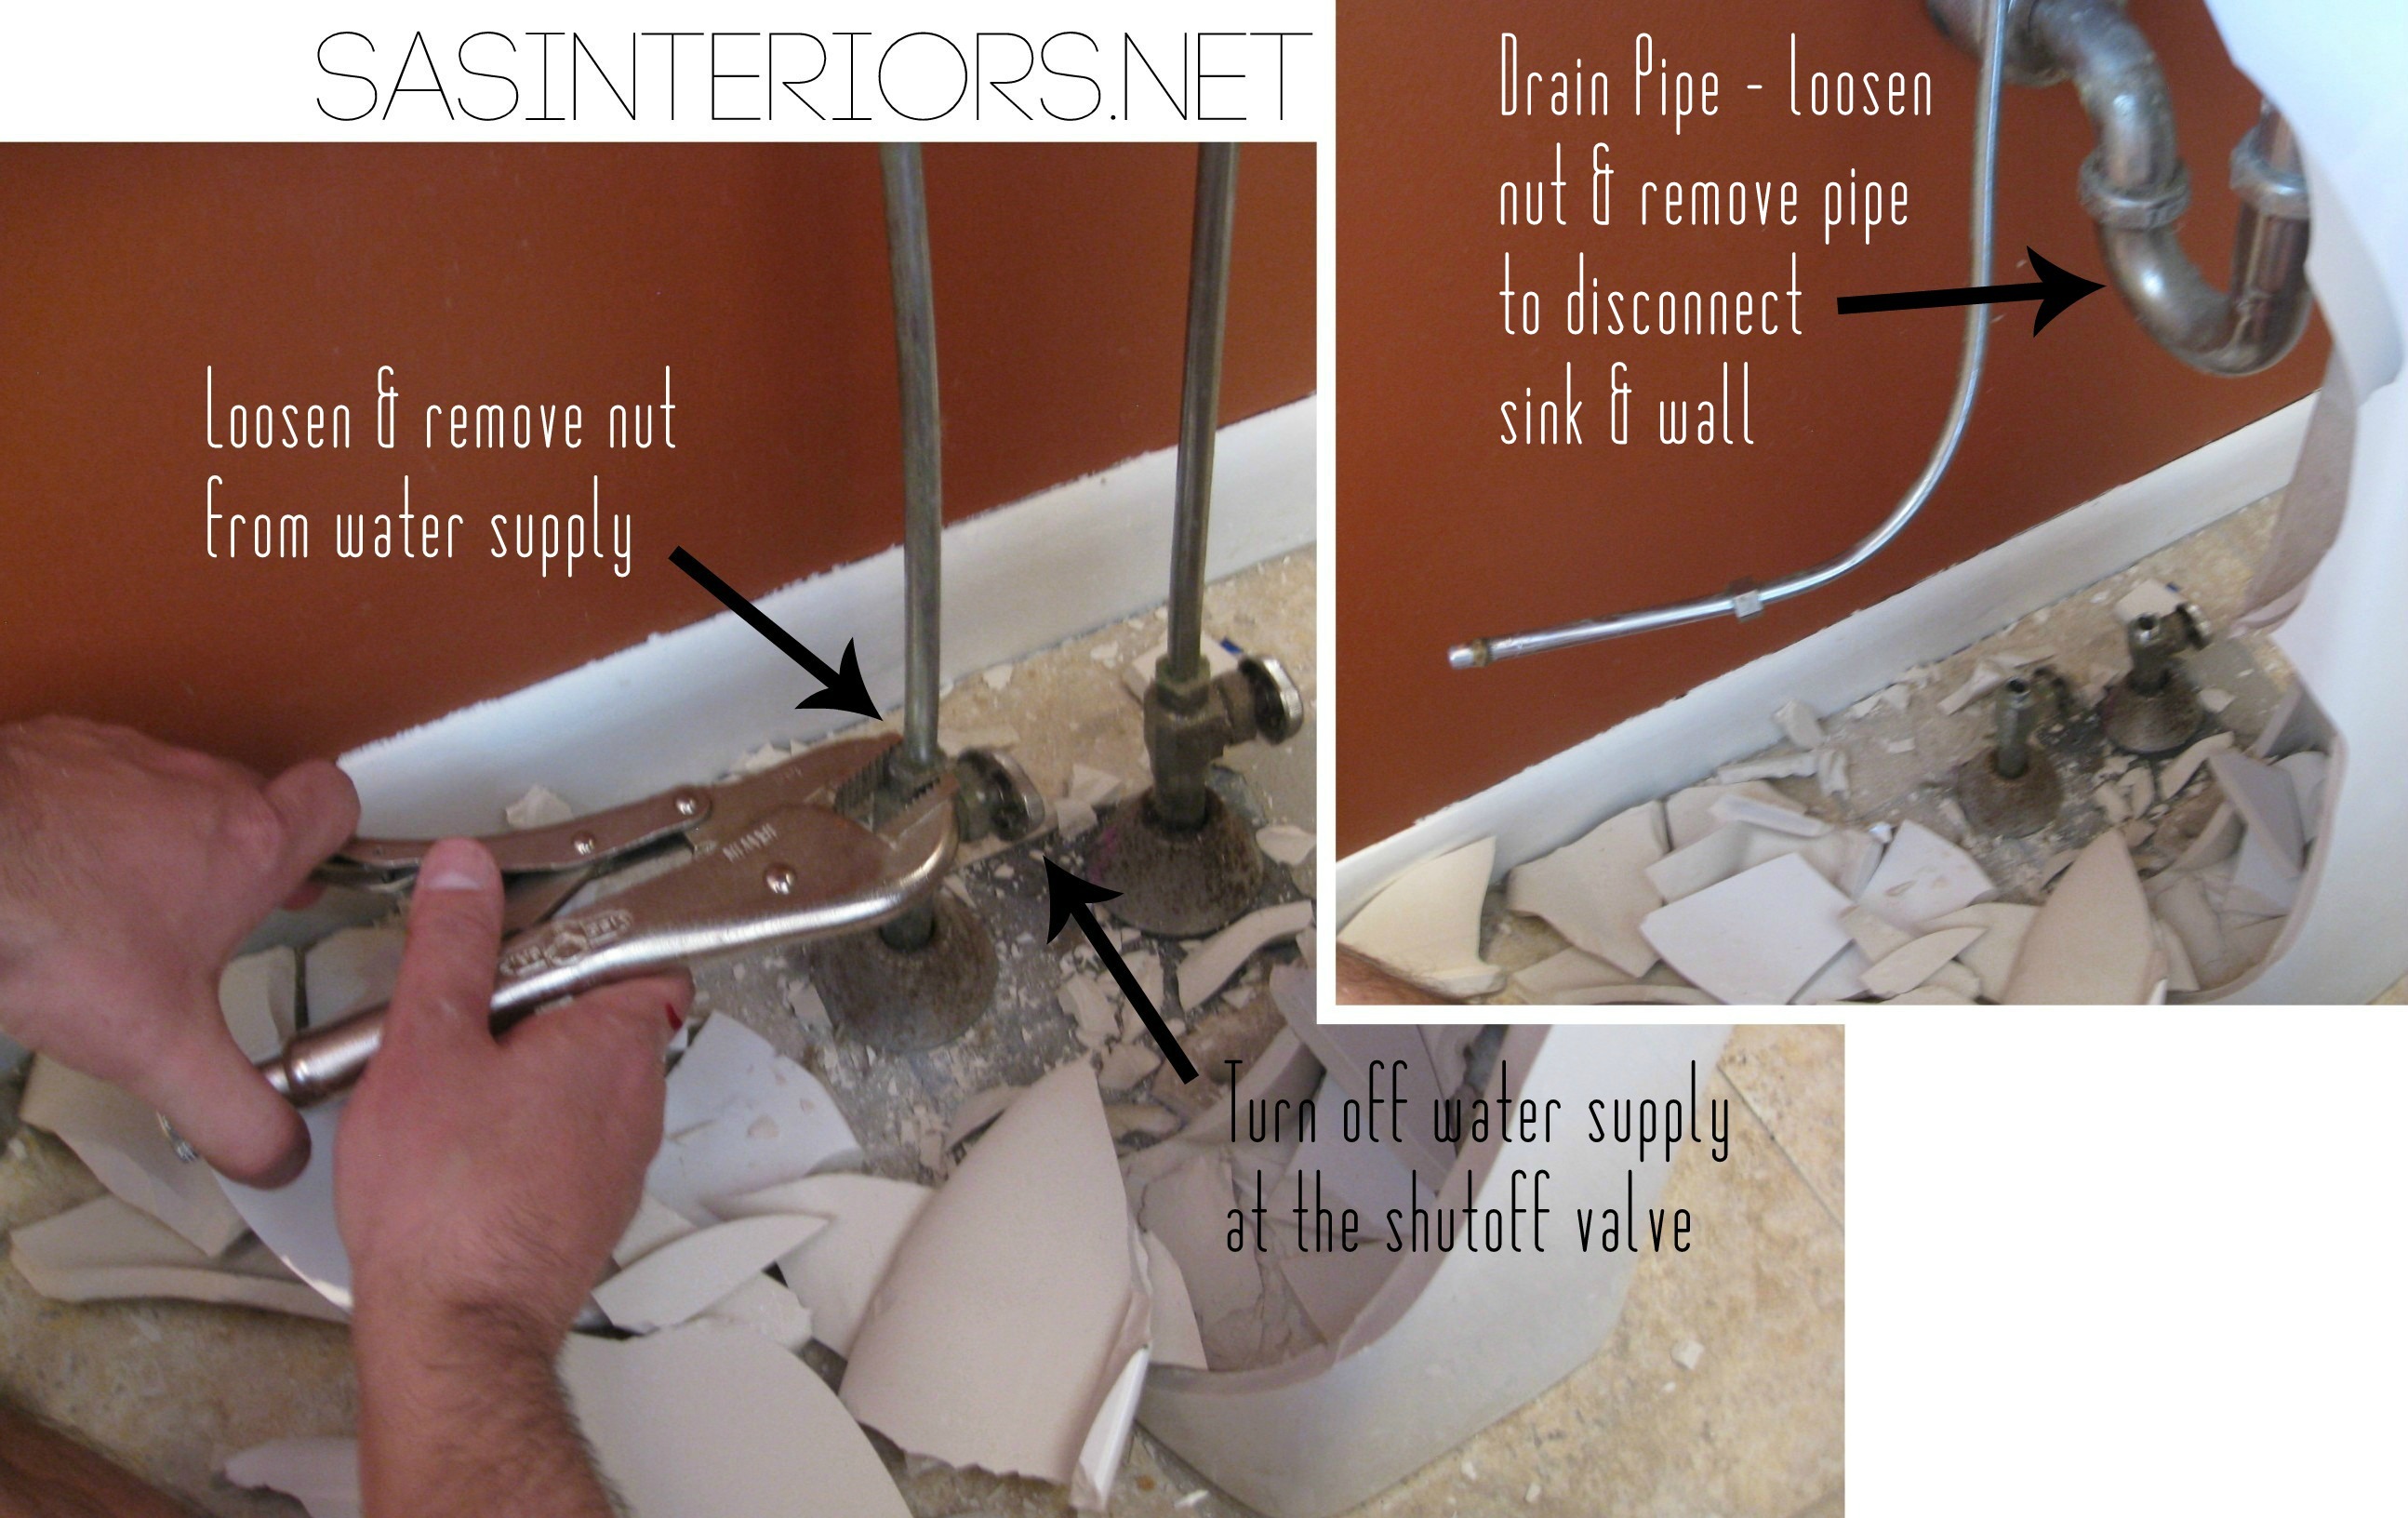
This bathroom renovation, like the last one I tackled, isn’t going to be a devoted do-it-yourself project.  For 2 reasons.  One, I don’t want to be without a bathroom for months AND I want to stay somewhat sane. Two, other than the basics, the Mister & I don’t know much about plumbing and leave those things to the experts.

As with the previous bathroom renovation, we worked with a contractor to demo the bathroom and install the major components.  What is on our list to tackle for this renovation is: tile installation (there’s A LOT of tile!), paint, baseboard, installing the light, installing the accessories, hanging artwork, etc.

By splitting up a project with tackling some of it on our own and calling in the pros where needed, we’ll save money AND our sanity (i hope)!

There you have it… for now.

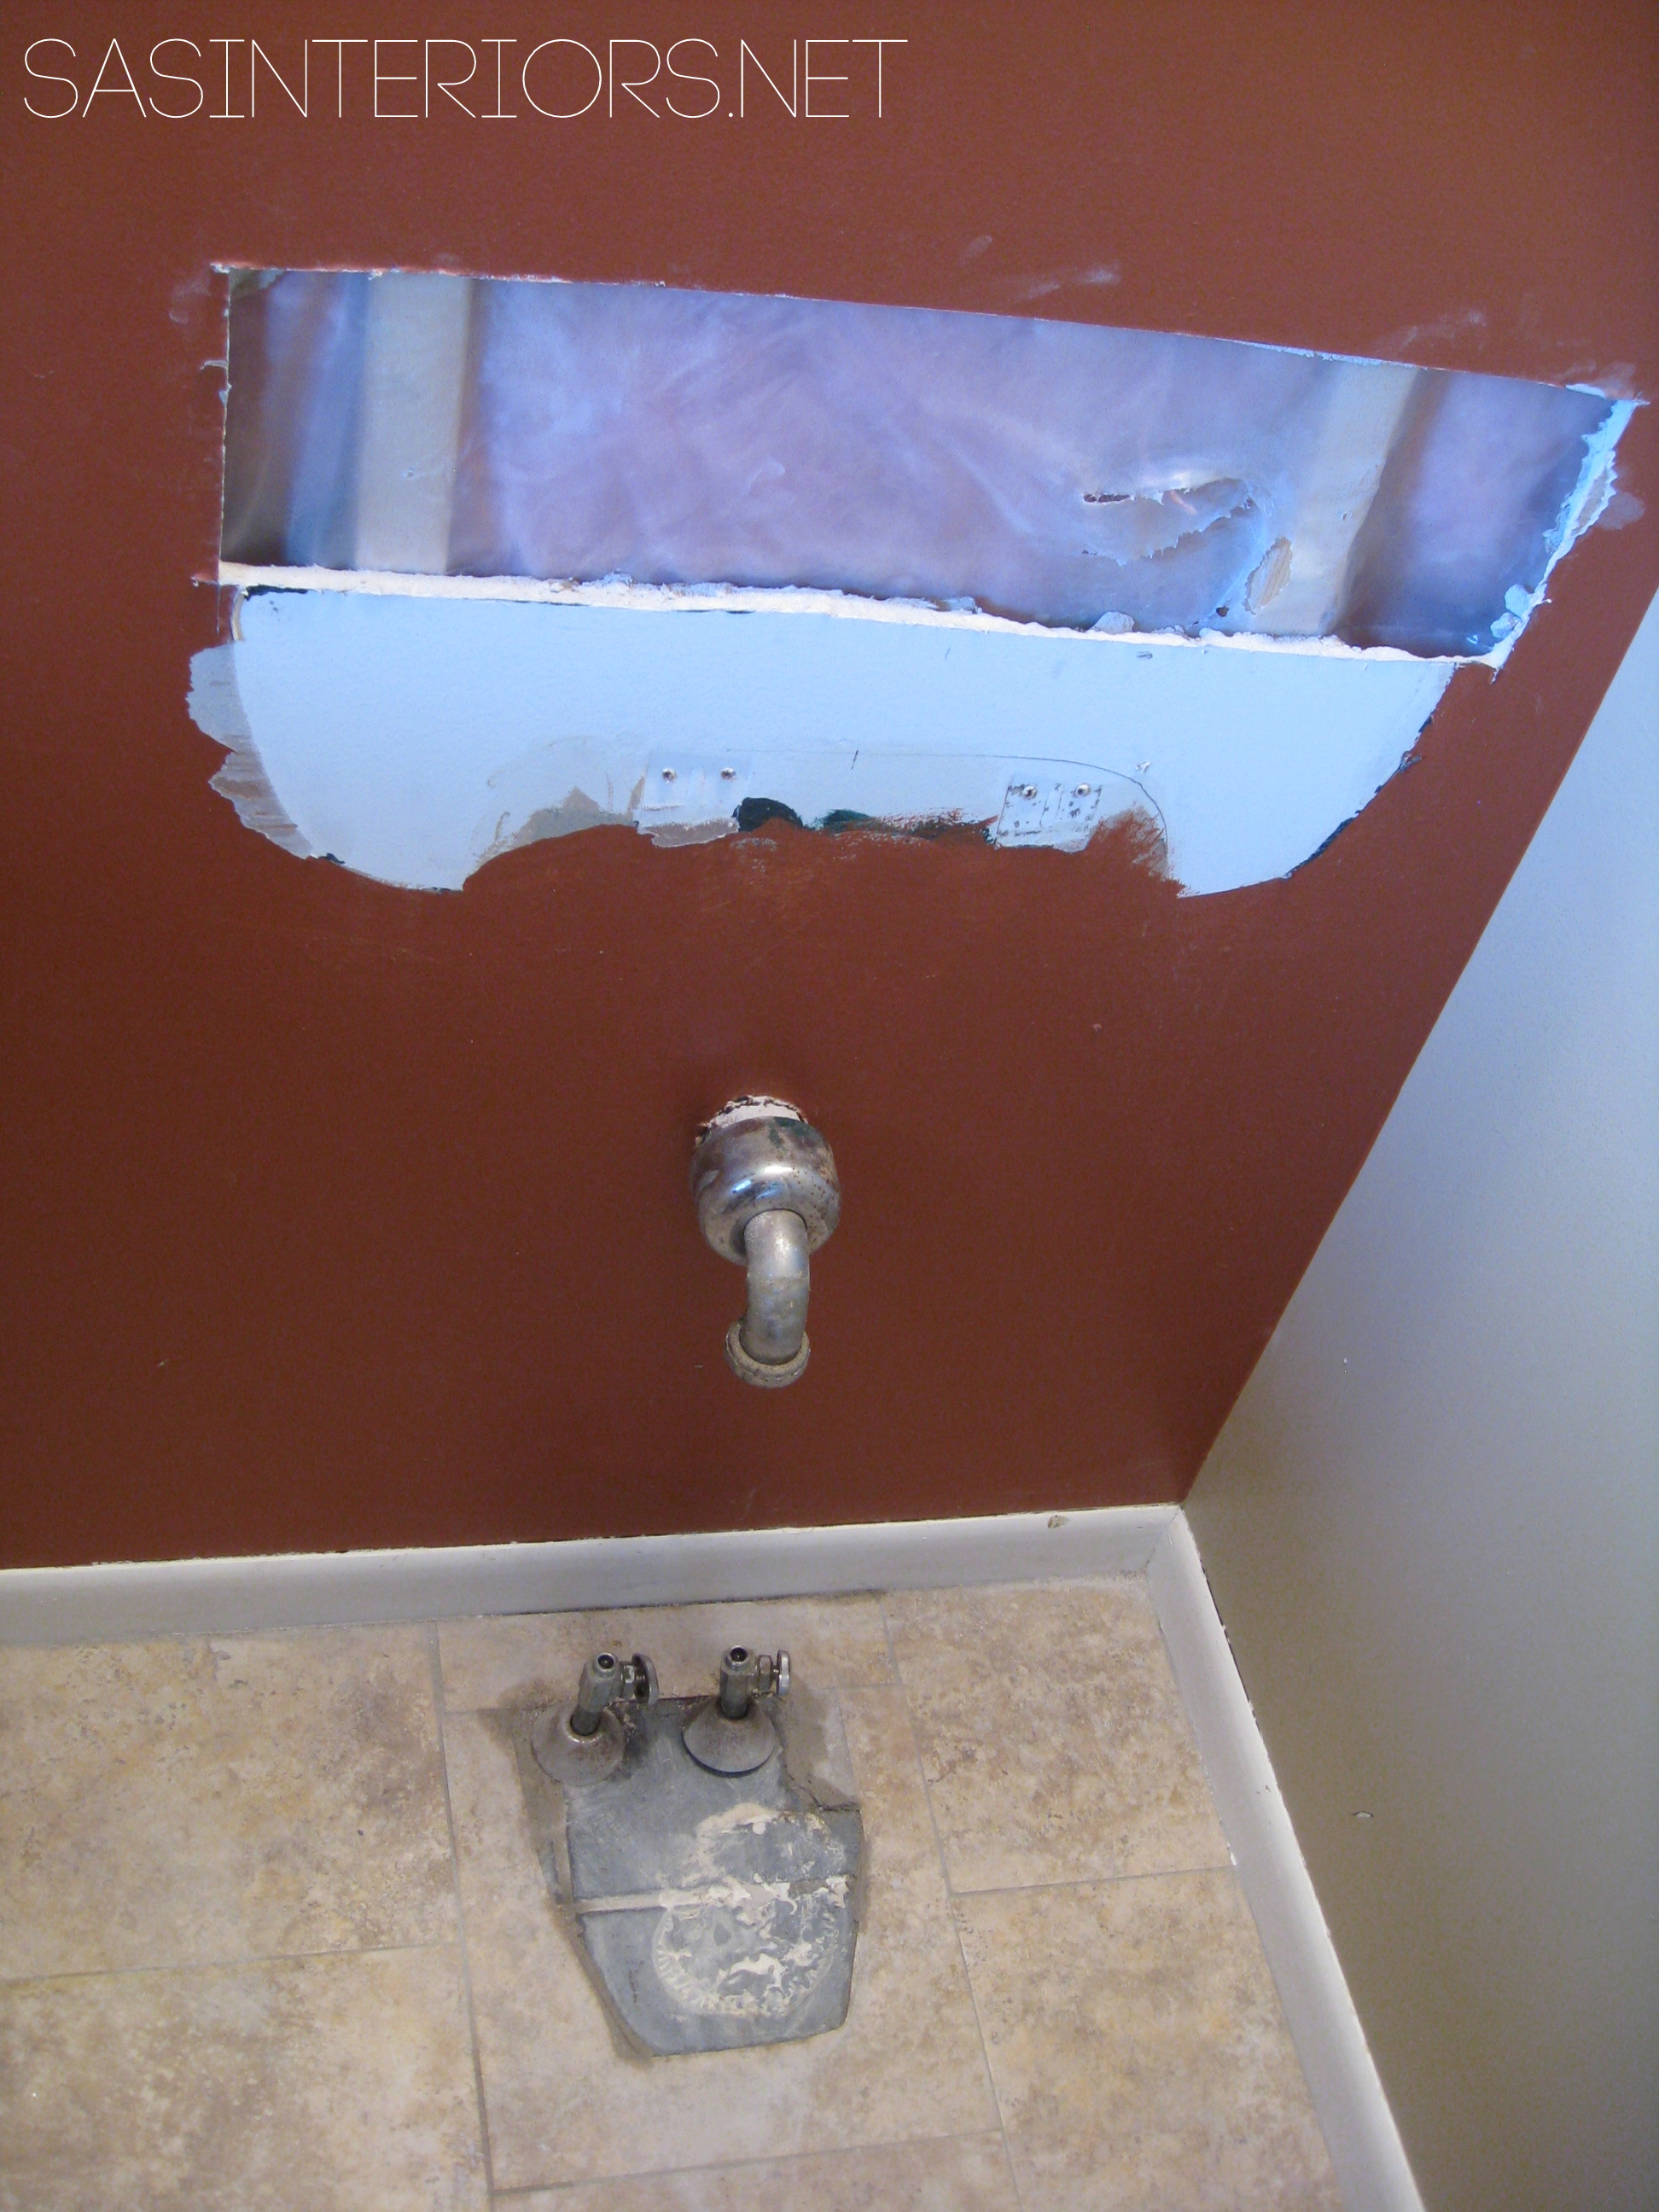
Demo has begun.  Wish me luck.  I’ll need it 😉

DISCLAIMER: THIS BATHROOM RENOVATION IS A COLLABORATION WITH LOWE’S. ALL OPINIONS + SELECTIONS ARE MY OWN.

Bathroom Makeover: Resources

So you guys really like the bathroom makeover???  I am thrilled!  Those of you who left comments about the transformation on the blog or on facebook + instagram – thank you so much.  Your kind, sweet words mean the world to me!

As promised, I am back today to share the specific resources for the bathroom revamp.  The other day my post went on and on with pictures of the newly finished space and today’s post is all about the details…

As I’ve mentioned throughout the process of renovating this bathroom, my design approach was to create a space with neutral, classic basics and layer in the bold + unexpected.  The main items in the bathroom – tub, vanity, toilet, etc. – are basic bath elements typical of many homes.  What makes it above and beyond the norm are the details & layers – the wallpaper, towels, shower curtain, etc.  Those layered elements give the sophisticated wow-punch!  At the end of the day, it’s all about the layered colors + patterns and how they work together to create an overall beautiful composition.

On to the resources…

Starting with the original mood board – some of the elements changed, but the overall idea/aesthetic stayed the same…

Bathroom Makeover details: the specific resources for this classic bath with bold layers.  Designed by Jenna Burger Design, www.jennaburger.com

From wall to wall, these are the specifics…

Bathroom Makeover details: the specific resources for this classic bath with bold layers.  Designed by Jenna Burger Design, www.jennaburger.com

Bathroom Makeover details: the specific resources for this classic bath with bold layers.  Designed by Jenna Burger Design, www.jennaburger.com

Bathroom Makeover details: the specific resources for this classic bath with bold layers.  Designed by Jenna Burger Design, www.jennaburger.com

Resources

1. Wallpaper – Serena and Lily

2. Framed prints – frames from AC Moore and prints were a DIY project

3. Decorative tile border – Lowe’s

4. Herringbone accent tile – Lowe’s

5. 3×6 Subway tile – Lowe’s

6. Showerhead – Lowe’s

7. Tub fittings (replacement fittings for the old Moen fittings) – Lowe’s

8. Tub – Lowe’s

9. Shower curtain – Target

10. Towels – Homegoods

11. Metal Allen & Roth baseboard vent – Lowe’s

12. Toilet – Lowe’s

13. Shelf – DIY project; materials from Lowe’s – tutorial coming soon

14. Light – Lowe’s

15. Mirror – Lowe’s

16. Accessories: soap dispenser, toothbrush holder, cup – Lowe’s

17. Faucet – Lowe’s

18. Vanity – Lowe’s

19. Toilet paper holder – Lowe’s

20. Tiled Niche – DIY project >>> click for tutorial

21. Hand towel holder by Moen – Lowe’s

22. Burlap baskets – Lowe’s

Bathroom Makeover details: the specific resources for this classic bath with bold layers.  Designed by Jenna Burger Design, www.jennaburger.com

From start to finish, these are all the posts pertaining to this bathroom remodel
Plan of Action
Demo: Removal + Installation of the Tub & Walls
How-To Tile + Grout the Bathroom Walls
Installing Wallpaper
Adding a Tile Accent Border
Creating a Tiled Niche
Bathroom Makeover Reveal
Resources

Bathroom Makeover: Tile Accent Border {Day 18}

Since the wallpaper, the last phase of the bathroom makeover, was fairly quick taking only a day from start to finish, I was able to move on the next step pretty quick.  With the completion of the dynamic + bold wallpaper, I am feeling so happy with how the bathroom is coming along.  There were a few points that I questioned my decisions + selections, but I feel the wallpaper really pulled it together and added the interest needed to make this new space + funky against the stark white tile.  It’s all about the balance and the contrast…

Onto the next phase to get this space done.  I’m on Day 18 of this Bathroom Makeover in 30 Days Challenge and it was spent adding a tile accent (trim) border to finish the edge of the subway tile.

Take a look…

Adding a Tile Trim Border in a bathroom to give a finished edge!

From the start, I had intention of using a tile board to finish off the subway tile, but once the installation of the horizontally layed subway tile was complete, it confirmed that something was definitely needed to finish the ends.  I chose a pretty decorative tile at Lowe’s that was the perfect complement to the subway tile.

American Olean Linea Gloss Ice White Ceramic Chair Rail Tile (Common: 2-in x 6-in; Actual: 2-in x 6-in)I chose to use the border tile vertically to border the shower tile and then turn it horizontally to border the subway tile on the walls outside of the shower space.  Originally I was going to use this accent barliner to border the herringbone tile in the shower as well, but I chose a simpler tile instead > see it here.   Like I said before, this has been my biggest tile job EVER.  I HAVE NEVER ventured into a project as big, so I was learning as I worked.  I questioned my skillset a few times along the way, but in the end I am very happy with the result.

For the tile border, I started with the corner pieces because they had to be cut on a 45 degree angle.  I measured and cut the two pieces using a wet saw and then worked my way up vertically and over horizontally.

Adding a Tile Trim Border

I installed the accent tile using the same method as I did for the subway tile.  To learn more about installing the tile, check out my post on How-To Tile + Grout Bathroom Walls

Once the tile border was in place, I used painters tape to tape off the wallpaper so the grout would not get on it.  After installing that gorgeous paper, the last thing I wanted was to get it ruined!

Then it was time to grout.  After mixed + made the grout mixture, I put it in a ziploc bag and cut one corner creating a small hole for the grout to come out of.  Kind of like icing a cake…  Then I worked the grout into the cracks & crevices.

Adding a Tile Trim Border

It was a little messy, but using the Ziploc bag was very helpful to direct the grout where I wanted it, instead of going on the entire tile surface.

Adding a Tile Trim Border

Once I filled all the holes and crevices, I used a damp sponge to smooth out the grout.  This not only cleans the tile face but smooths out the grout joints.

Adding a Tile Trim Border

If your walls are painted or have wallpaper on them, like mine, go slow + be careful so the wall surface doesn’t get grout on it otherwise it’ll become hazy.  Thankfully the wallpaper was easy to wipe off, but I am sure paint wouldn’t be as simple.  I guess you could always touch up those spots…

BEFORE THE GROUT DRIES, REMOVE THE TAPE!  This is in caps because if not the tape will dry into the grout.  Yes, it’s happened to me (not on this project thankfully).  As soon as you finish grouting while the grout is still moist, pull the tape off.

Adding a Tile Trim Border

From start to finish…

Adding a Tile Trim Border in a bathroom to give a finished edge!

And the result…

Adding a Tile Trim Border

BathroomAdding a Tile Trim Border in a bathroom to give a finished edge!

Adding a Tile Trim Border in a bathroom to give a finished edge!

Adding a Tile Trim Border in a bathroom to give a finished edge!

And a peek at a few other things happening {art + accessories}…

Adding a Tile Trim Border in a bathroom to give a finished edge!

The tile accent border is truly a beautiful addition.  Not only did it hide a lot of little mistakes and imperfect spots, but it has given this bathroom such an elegant + sophisticated finished look.  I am so happy that I installed the wallpaper before adding the border because it has really given a nice clean edge.  If / when I ever want to remove the wallpaper, my plan would be to score the edge of the accent tile with a sharp blade and then peel the paper off.

Adding a tile accent border on Day 18 is complete!  Up next… creating a tiled niche.  I removed the old medicine cabinet and replaced the space with a tiled niche.  More to come next week!

The installation of the tile accent border took about 4 hours on one day

From start to finish, these are all the posts pertaining to this bathroom remodel
Plan of Action
Demo: Removal + Installation of the Tub & Walls
How-To Tile + Grout the Bathroom Walls
Installing Wallpaper
Adding a Tile Accent Border
Creating a Tiled Niche
Bathroom Makeover Reveal
Resources

{Day 18} Tile Accent Border – Complete!  12 more days to go…

This post is sponsored by Lowe’s, but all thoughts and opinions are 100% my own.  I am thrilled (and a bit nervous) about tackling this project, but very excited to be partnering with Lowe’s on creating an entirely new bathroom space.  I’d love for you to follow along on this new project!

Powder Room Remodel – Phase 1: Removing the Existing Toilet and Pedestal Sink

My feet are sore and my fingers have a few blisters, but it’s well worth the pain for how much work around the house was accomplished this past weekend.  It was the first days of really nice weather and aside from a baseball game and a birthday celebration, much of the weekend was spent cleaning out the garage, sprucing up the exterior, and starting the powder room remodel.

I shared details of my plans for the powder room a few weeks ago and was thrilled to finally get started. To begin the process the old had to come out before the new goes in, so the Mister and I got our tools out and got to work on removing the existing toilet and pedestal sink. I actually didn’t know the process of how to remove either plumbing fixture, but thankfully the Mister has done this before and helped me out – of course with a few bumps along the way – can’t be a DIY project without…

Powder Room Remodel- Phase 1: Tutorial on how to remove an existing toilet and pedestal sink. It's not as difficult as it may seem. Pin NOW, check out later. @Jenna_Burger, WWW.JENNABURGER.COM #powderroomremodel

Do you know where and how to start the process of removing a toilet and sink?  If not, this post is for you! Keep on reading, but I’ll worn you, this tutorial is ultra detailed, but the pictures aren’t pretty.

Removing an existing toilet.

1. Turn off the water supply.  The oval valve at the side or back of the toilet is the water supply.  Using a vice grip or adjustable wrench, turn the valve so you turn off the water.  Then flush the toilet a few times to empty the tank.  Using old rags, put them in the tank and/or bowl to soak up any left over water.  It’s best to use gloves during the process as the toilet bowl isn’t a pretty place.

Powder Room Remodel- Phase 1: Tutorial on how to remove an existing toilet and pedestal sink. It's not as difficult as it may seem. Pin NOW, check out later. @Jenna_Burger, WWW.JENNABURGER.COM #powderroomremodelYup, that’s a closeup of my toilet… Not something you probably expected to see on a Monday mornin’

2. Remove the tank bolts. Remove the (2) plastic caps on each side of the toilet base.  Once exposed, you will see the tank bolts, also sometimes referred to as “Johnny Bolts”.  Remove the nut, which is easiest to do using a vice grip or adjustable wrench, and the bolt will be exposed.

Then carefully loosen the toilet, rocking it from side to side to loosen the wax seal, and lift it up. Residual water may spill, but that’s fine.

 Powder Room Remodel- Phase 1: Tutorial on how to remove an existing toilet and pedestal sink. It's not as difficult as it may seem. Pin NOW, check out later. @Jenna_Burger, WWW.JENNABURGER.COM #powderroomremodel

I warned you this post wasn’t pretty, BUT it sure will be helpful when you want to upgrade that sad looking toilet.  There surely isn’t a need to hire a plumber because you CAN do it yourself.

Powder Room Remodel- Phase 1: Tutorial on how to remove an existing toilet and pedestal sink. It's not as difficult as it may seem. Pin NOW, check out later. @Jenna_Burger, WWW.JENNABURGER.COM #powderroomremodel

3. Remove the old wax. Once the toilet is lifted, the existing wax will need to be removed.  Using a putty knife, scrape away the wax from the pipe flange. It’s definitely important to use gloves too (of course we didn’t, but I suggest you do).

Powder Room Remodel- Phase 1: Tutorial on how to remove an existing toilet and pedestal sink. It's not as difficult as it may seem. Pin NOW, check out later. @Jenna_Burger, WWW.JENNABURGER.COM #powderroomremodel

We also removed the tank bolts and plan on replacing them when we install the new toilet.

Here is the hole, free and clear of wax.

Pretty sight, right?

NOT! But at least you now know it’s not that difficult of a process.

Powder Room Remodel- Phase 1: Tutorial on how to remove an existing toilet and pedestal sink. It's not as difficult as it may seem. Pin NOW, check out later. @Jenna_Burger, WWW.JENNABURGER.COM #powderroomremodel

If there is a time lapse between removing and installing a new toilet, it is very important to plug the drain opening with a rag to prevent sewer gases leaking into your home.

Removing an existing pedestal sink.

Toilets are toilets, and are fairly similar, but there are a range of sink configurations, so I’m sharing the details of my situation, but yours may be different.

The process of removing our pedestal sink was tricky because we could not get our hand in the back to turn off the water supply.  After years of wear, the valve had rusted making it very difficult to turn off.  So what did we do?  We broke the sink.  Not what we anticipated doing, but it had to be done.

Powder Room Remodel- Phase 1: Tutorial on how to remove an existing toilet and pedestal sink. It's not as difficult as it may seem. Pin NOW, check out later. @Jenna_Burger, WWW.JENNABURGER.COM #powderroomremodel

After that we…

1. Turn off the water supply. Just like the toilet, turn the oval valve at the back of the sink so the water is shut off.  Remove the nut from the water supply.  Then put a bucket under the drain trap to collect any residual water, and loosen the nut to remove the trap.

Powder Room Remodel- Phase 1: Tutorial on how to remove an existing toilet and pedestal sink. It's not as difficult as it may seem. Pin NOW, check out later. @Jenna_Burger, WWW.JENNABURGER.COM #powderroomremodel

Disconnect any additional plumbing connections and remove the sink.  For us, we had to unscrew the sink bowl section of the pedestal from the wall and then remove the tile backsplash I added a few years ago.  New sheetrock will need to be installed before anything else.

Powder Room Remodel- Phase 1: Tutorial on how to remove an existing toilet and pedestal sink. It's not as difficult as it may seem. Pin NOW, check out later. @Jenna_Burger, WWW.JENNABURGER.COM #powderroomremodel

And this is the result…

Powder Room Remodel- Phase 1: Tutorial on how to remove an existing toilet and pedestal sink. It's not as difficult as it may seem. Pin NOW, check out later. @Jenna_Burger, WWW.JENNABURGER.COM #powderroomremodel

Powder Room Remodel- Phase 1: Tutorial on how to remove an existing toilet and pedestal sink. It's not as difficult as it may seem. Pin NOW, check out later. @Jenna_Burger, WWW.JENNABURGER.COM #powderroomremodel

The entire room will look pretty in no time…

Powder Room Makeover Phase 1: Tutorial on how to remove an existing toilet and pedestal sink. It's not as difficult as it may seem. Pin NOW, check out later. @Jenna_Burger, WWW.JENNABURGER.COM #powderroomremodel

Plan of Action for #powderroomremodel:

  • Choose and buy sink
  • Choose and buy toilet
  • Choose and buy faucet
  • Remove sink
  • Remove toilet
  • Repair hole with new sheetrock
  • Repair floor @ sink and toilet
  • Hang wallpaper
  • Paint
  • Add crown moulding (yes, my 1st moulding ever)
  • Assemble sink
  • Install sink and faucet
  • Install toilet
  • Accessorize – mirror, pictures, etc.

That’s quite a list for a little space…

Please tell me you’ve found this post helpful.  The Mister thought I was kinda insane for taking pictures of a toilet, one of the ickiest parts of the home.  I know it’s not the prettiest post ever, but who knows when it’ll come in handy.

Before you read this post did you know the details on how to remove a toilet or sink?  Not to difficult, right?!

Happy Monday to ya!