
Tag: Fall decorating

Fall Front Porch… with COLOR

Fall Front Porch using lots of COLOR + seasonal favorites including pumpkins, gourds, cornstalks, and mums! Full tour of this Fall Front Porch @ www.JennaBurger.com

Welcome!

It’s officially Fall – HAPPY FALL Y’ALL!

This might look more like a Spring porch than an entry decorated for Fall, but you know me…

I love color.  When color-opportunity knocks… I quickly answer.

I’ve been wanting to spruce up the front porch for a while with a few new elements, but of course didn’t want to spend a lot of $$$.

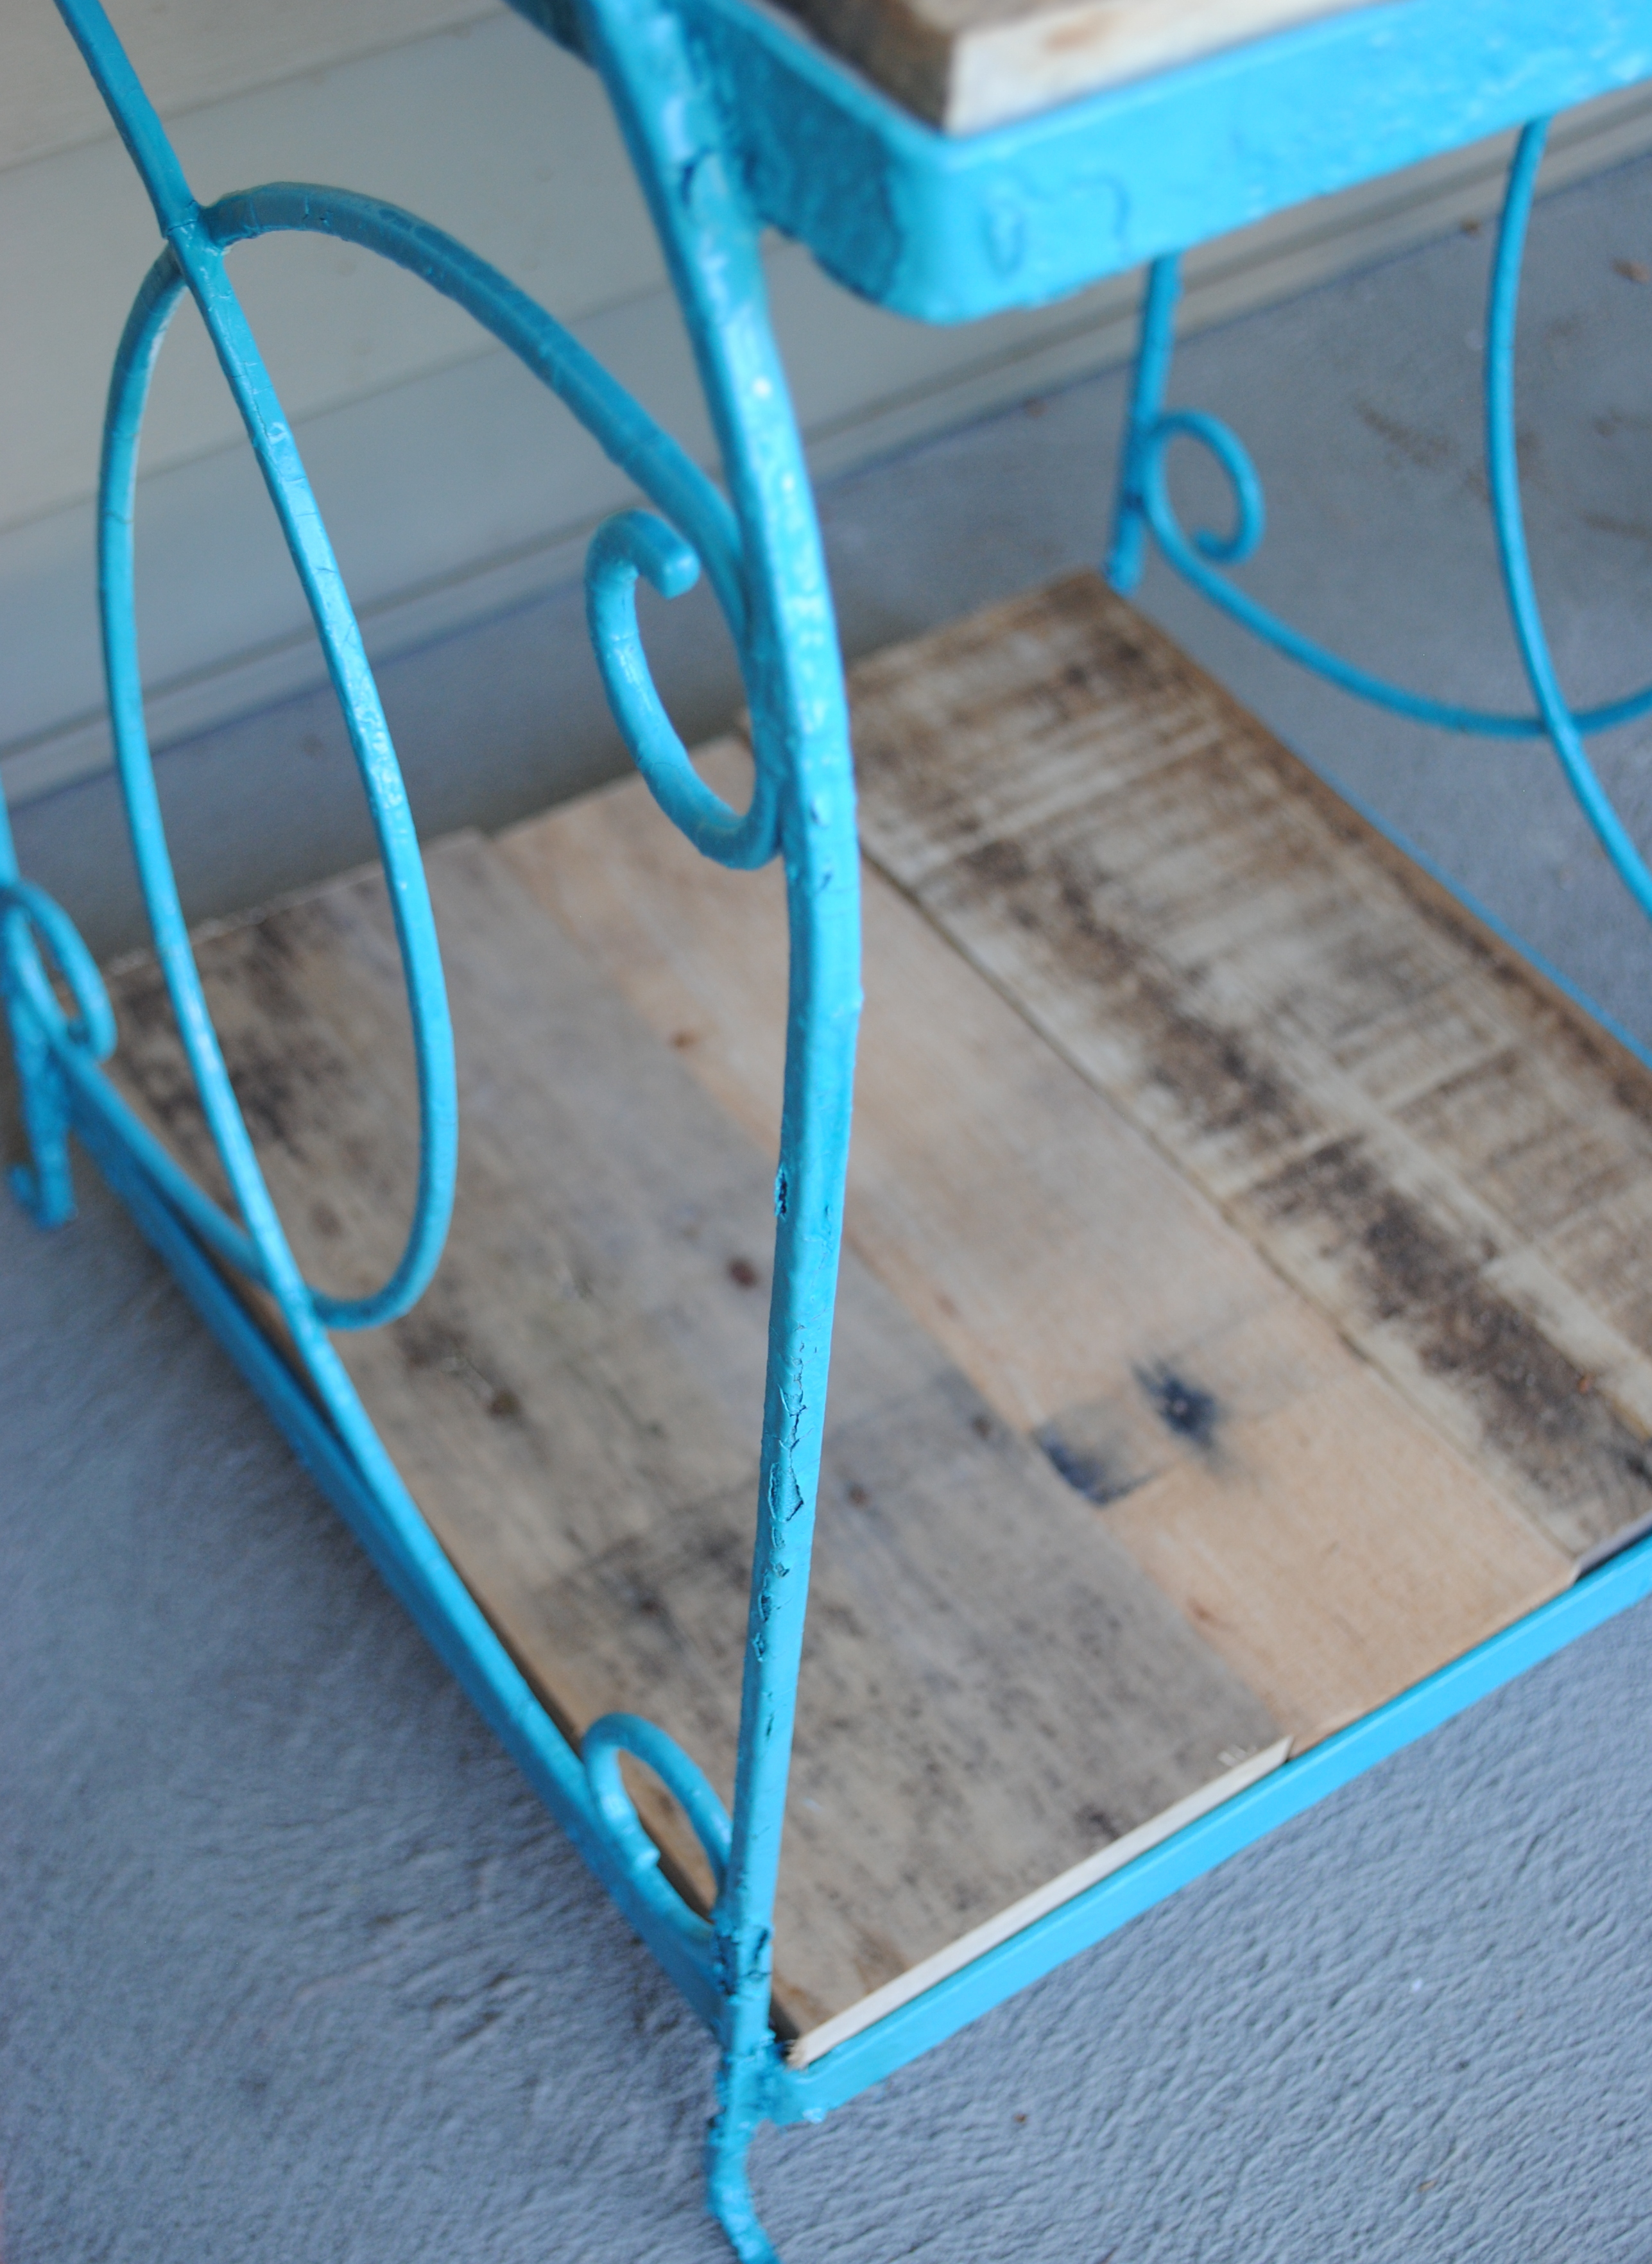
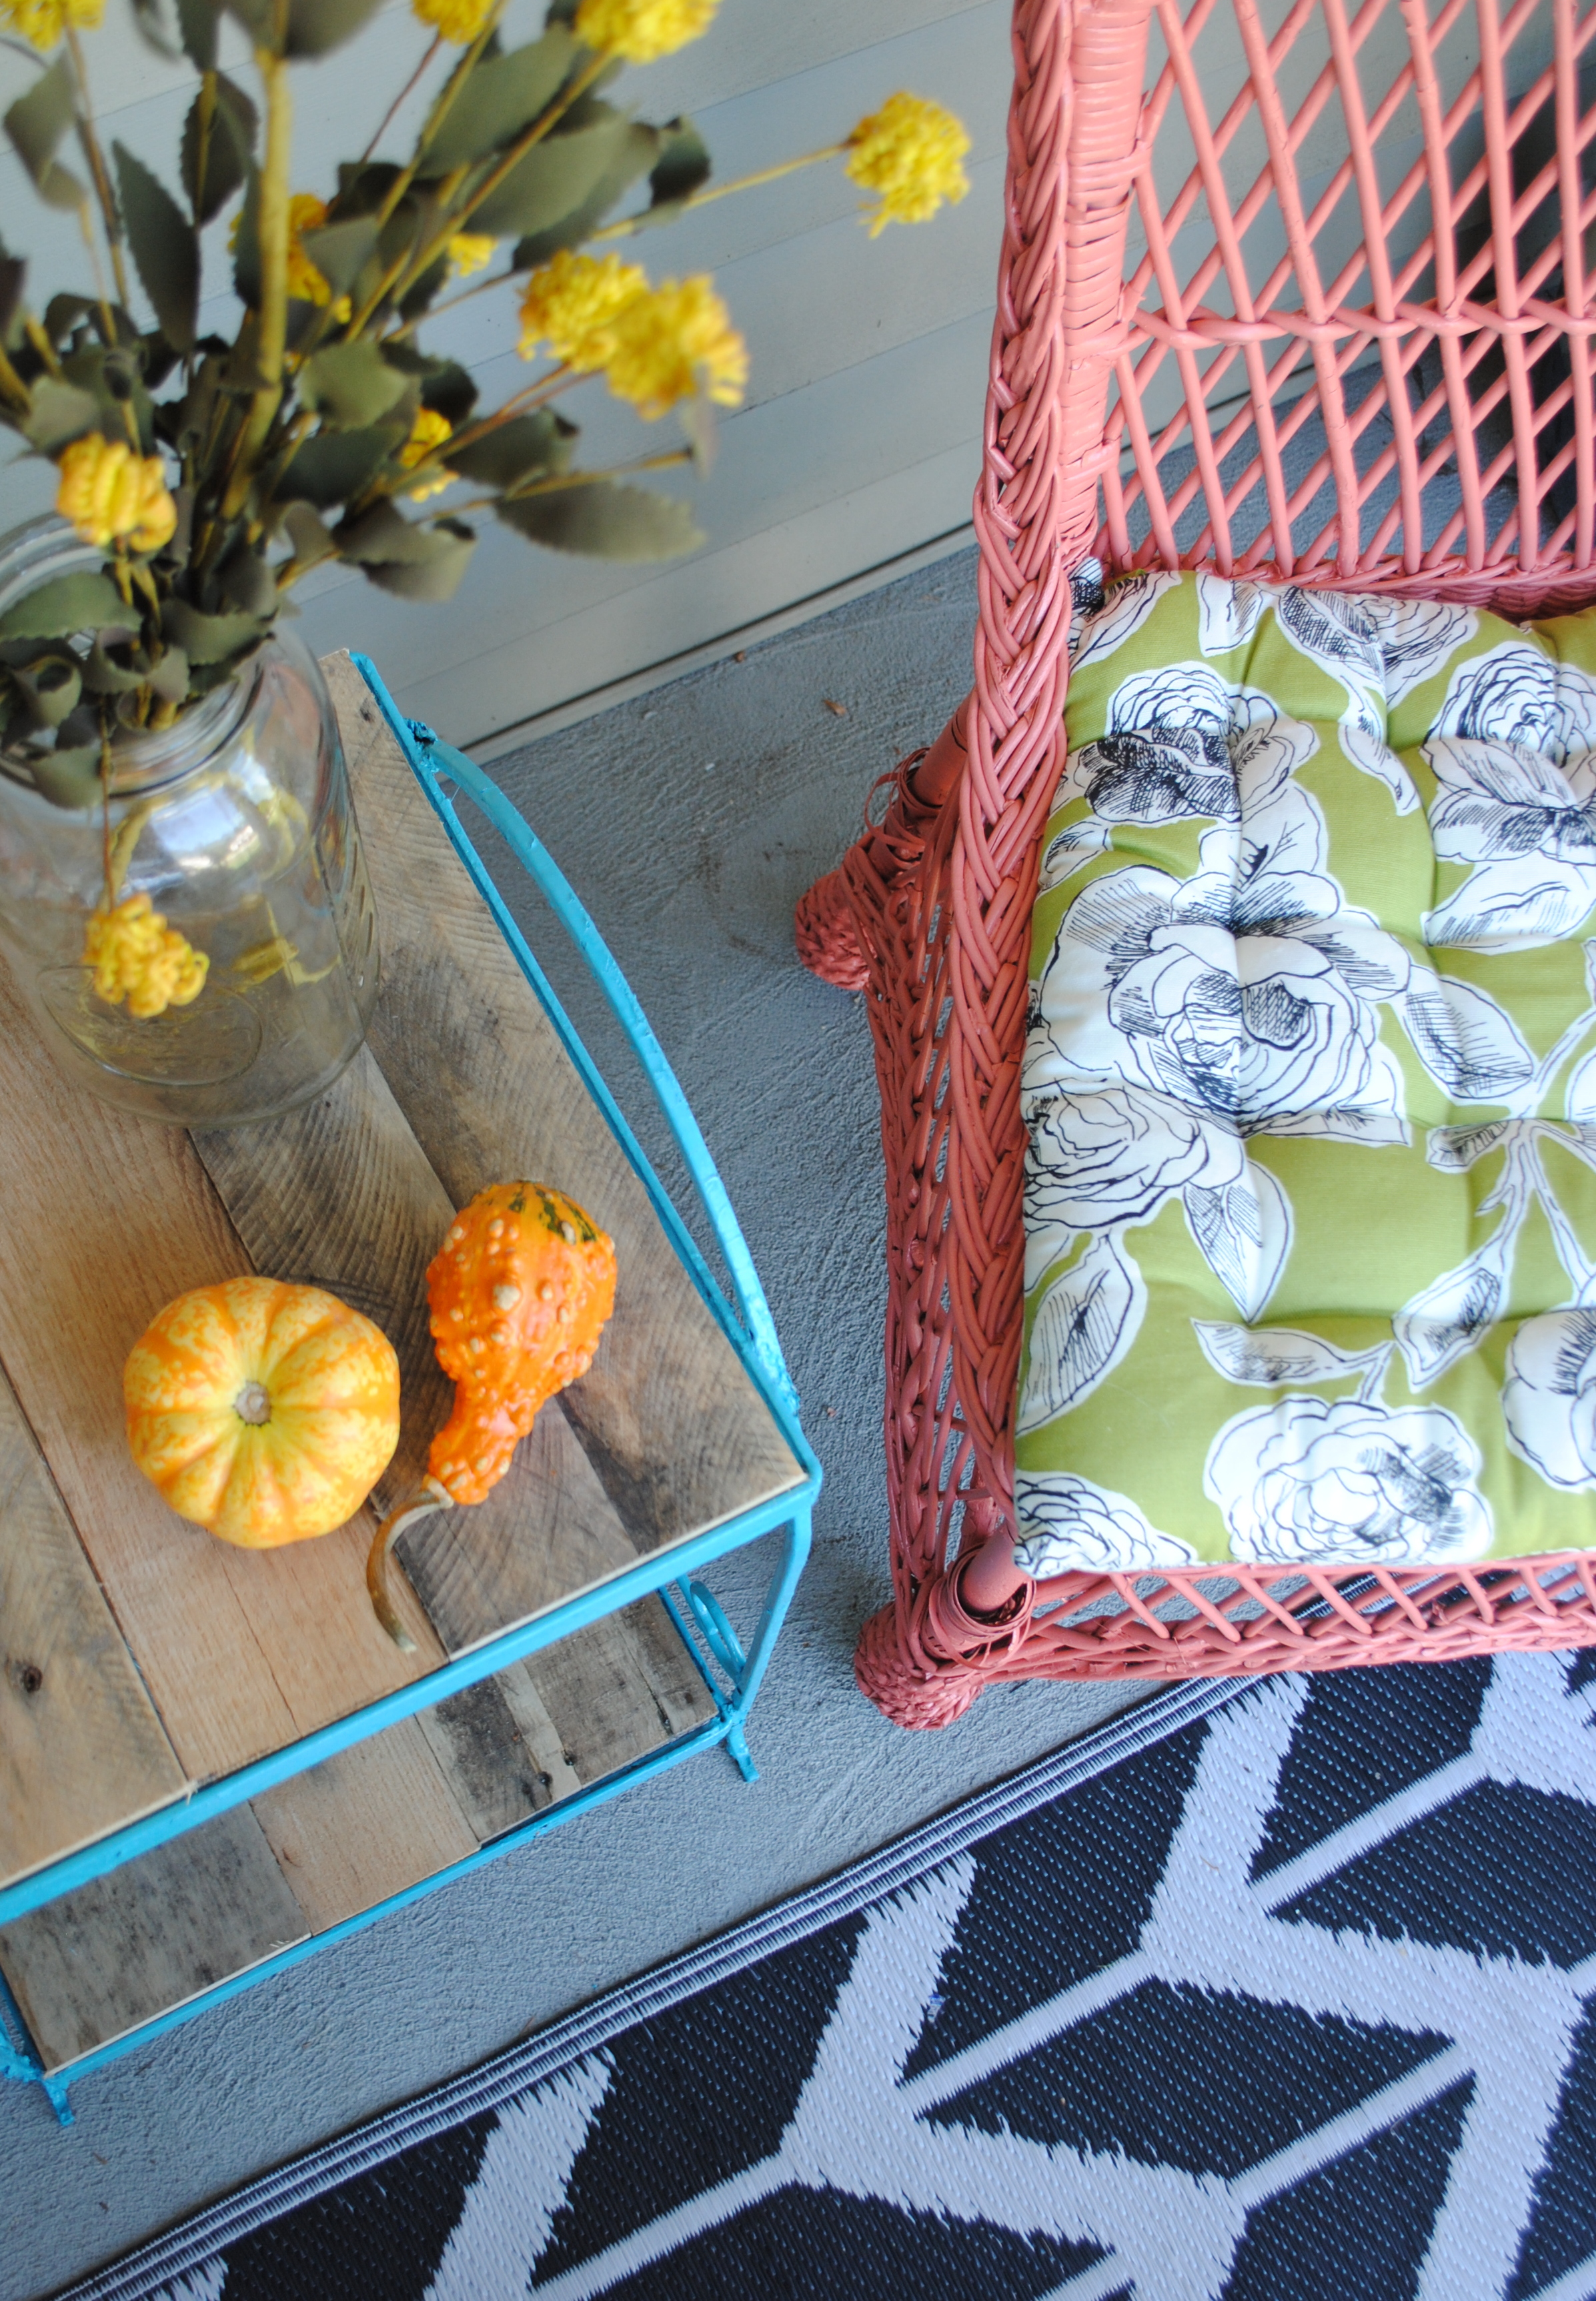
With my newly painted coral wicker chairs + a newly spray painted vibrant turquoise table, our front porch has taken on a new life + a whole new look.

Fall Front Porch using lots of COLOR + seasonal favorites including pumpkins, gourds, cornstalks, and mums! Full tour of this Fall Front Porch @ www.JennaBurger.com

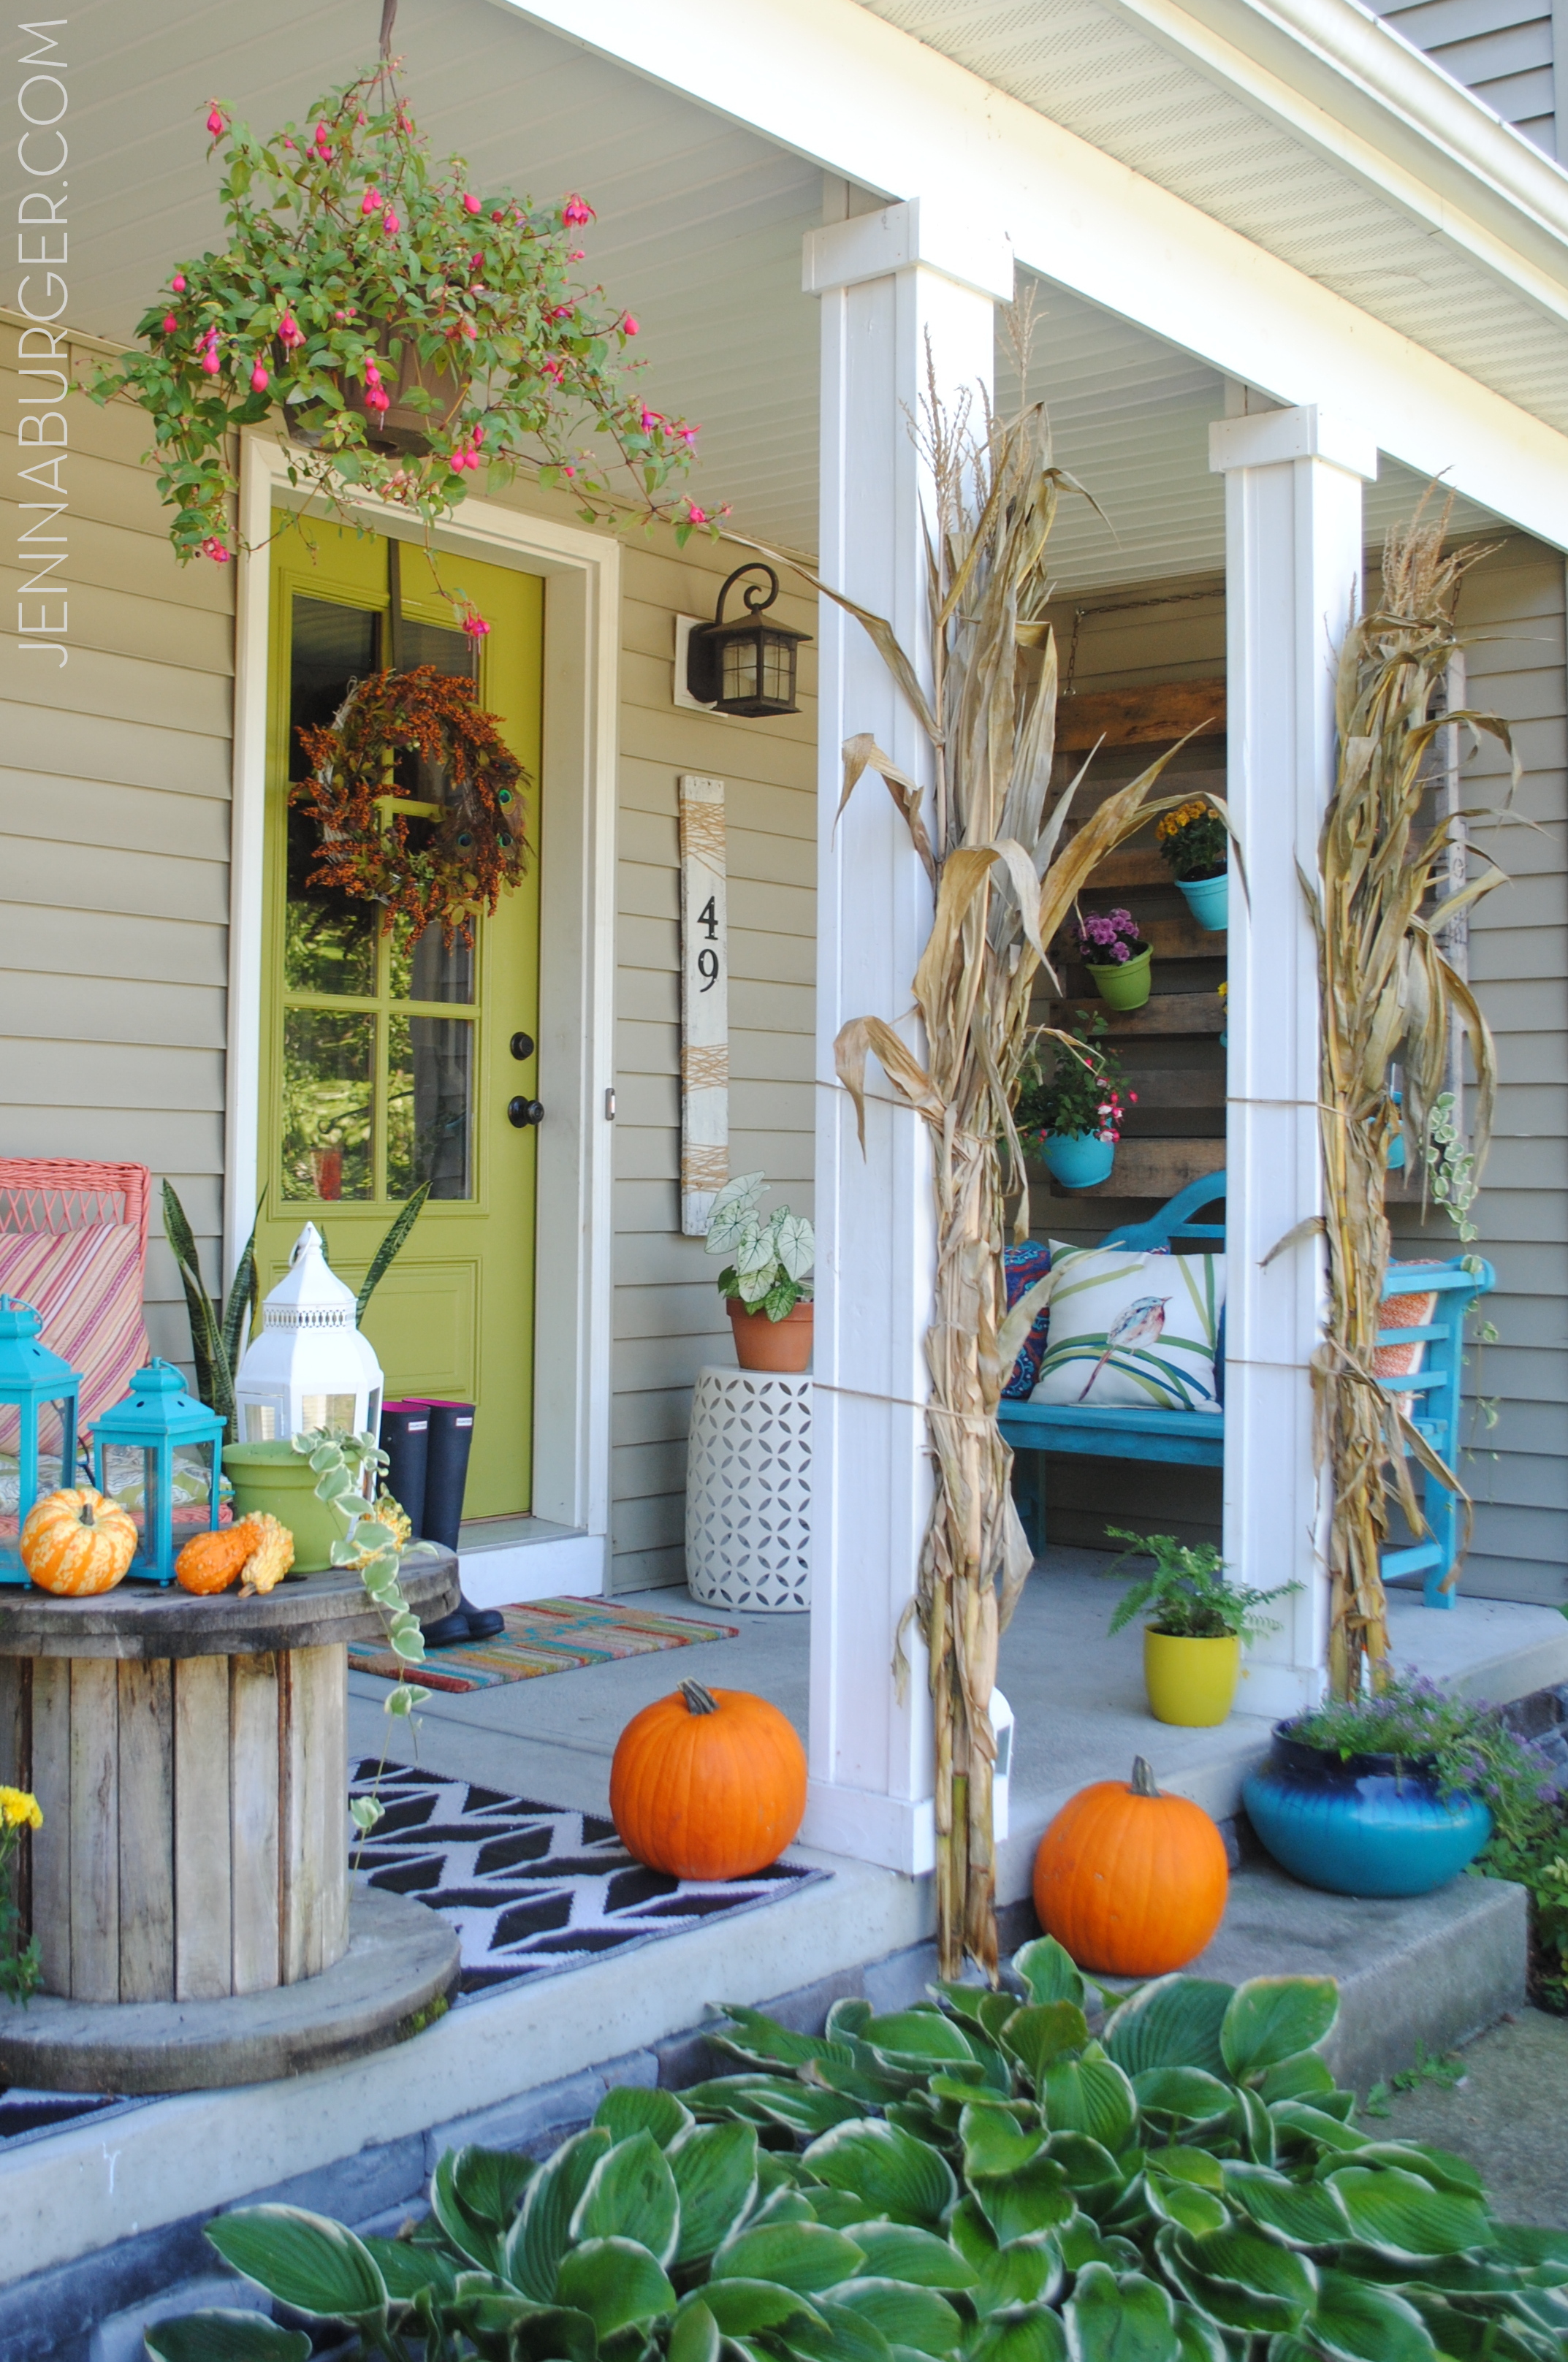
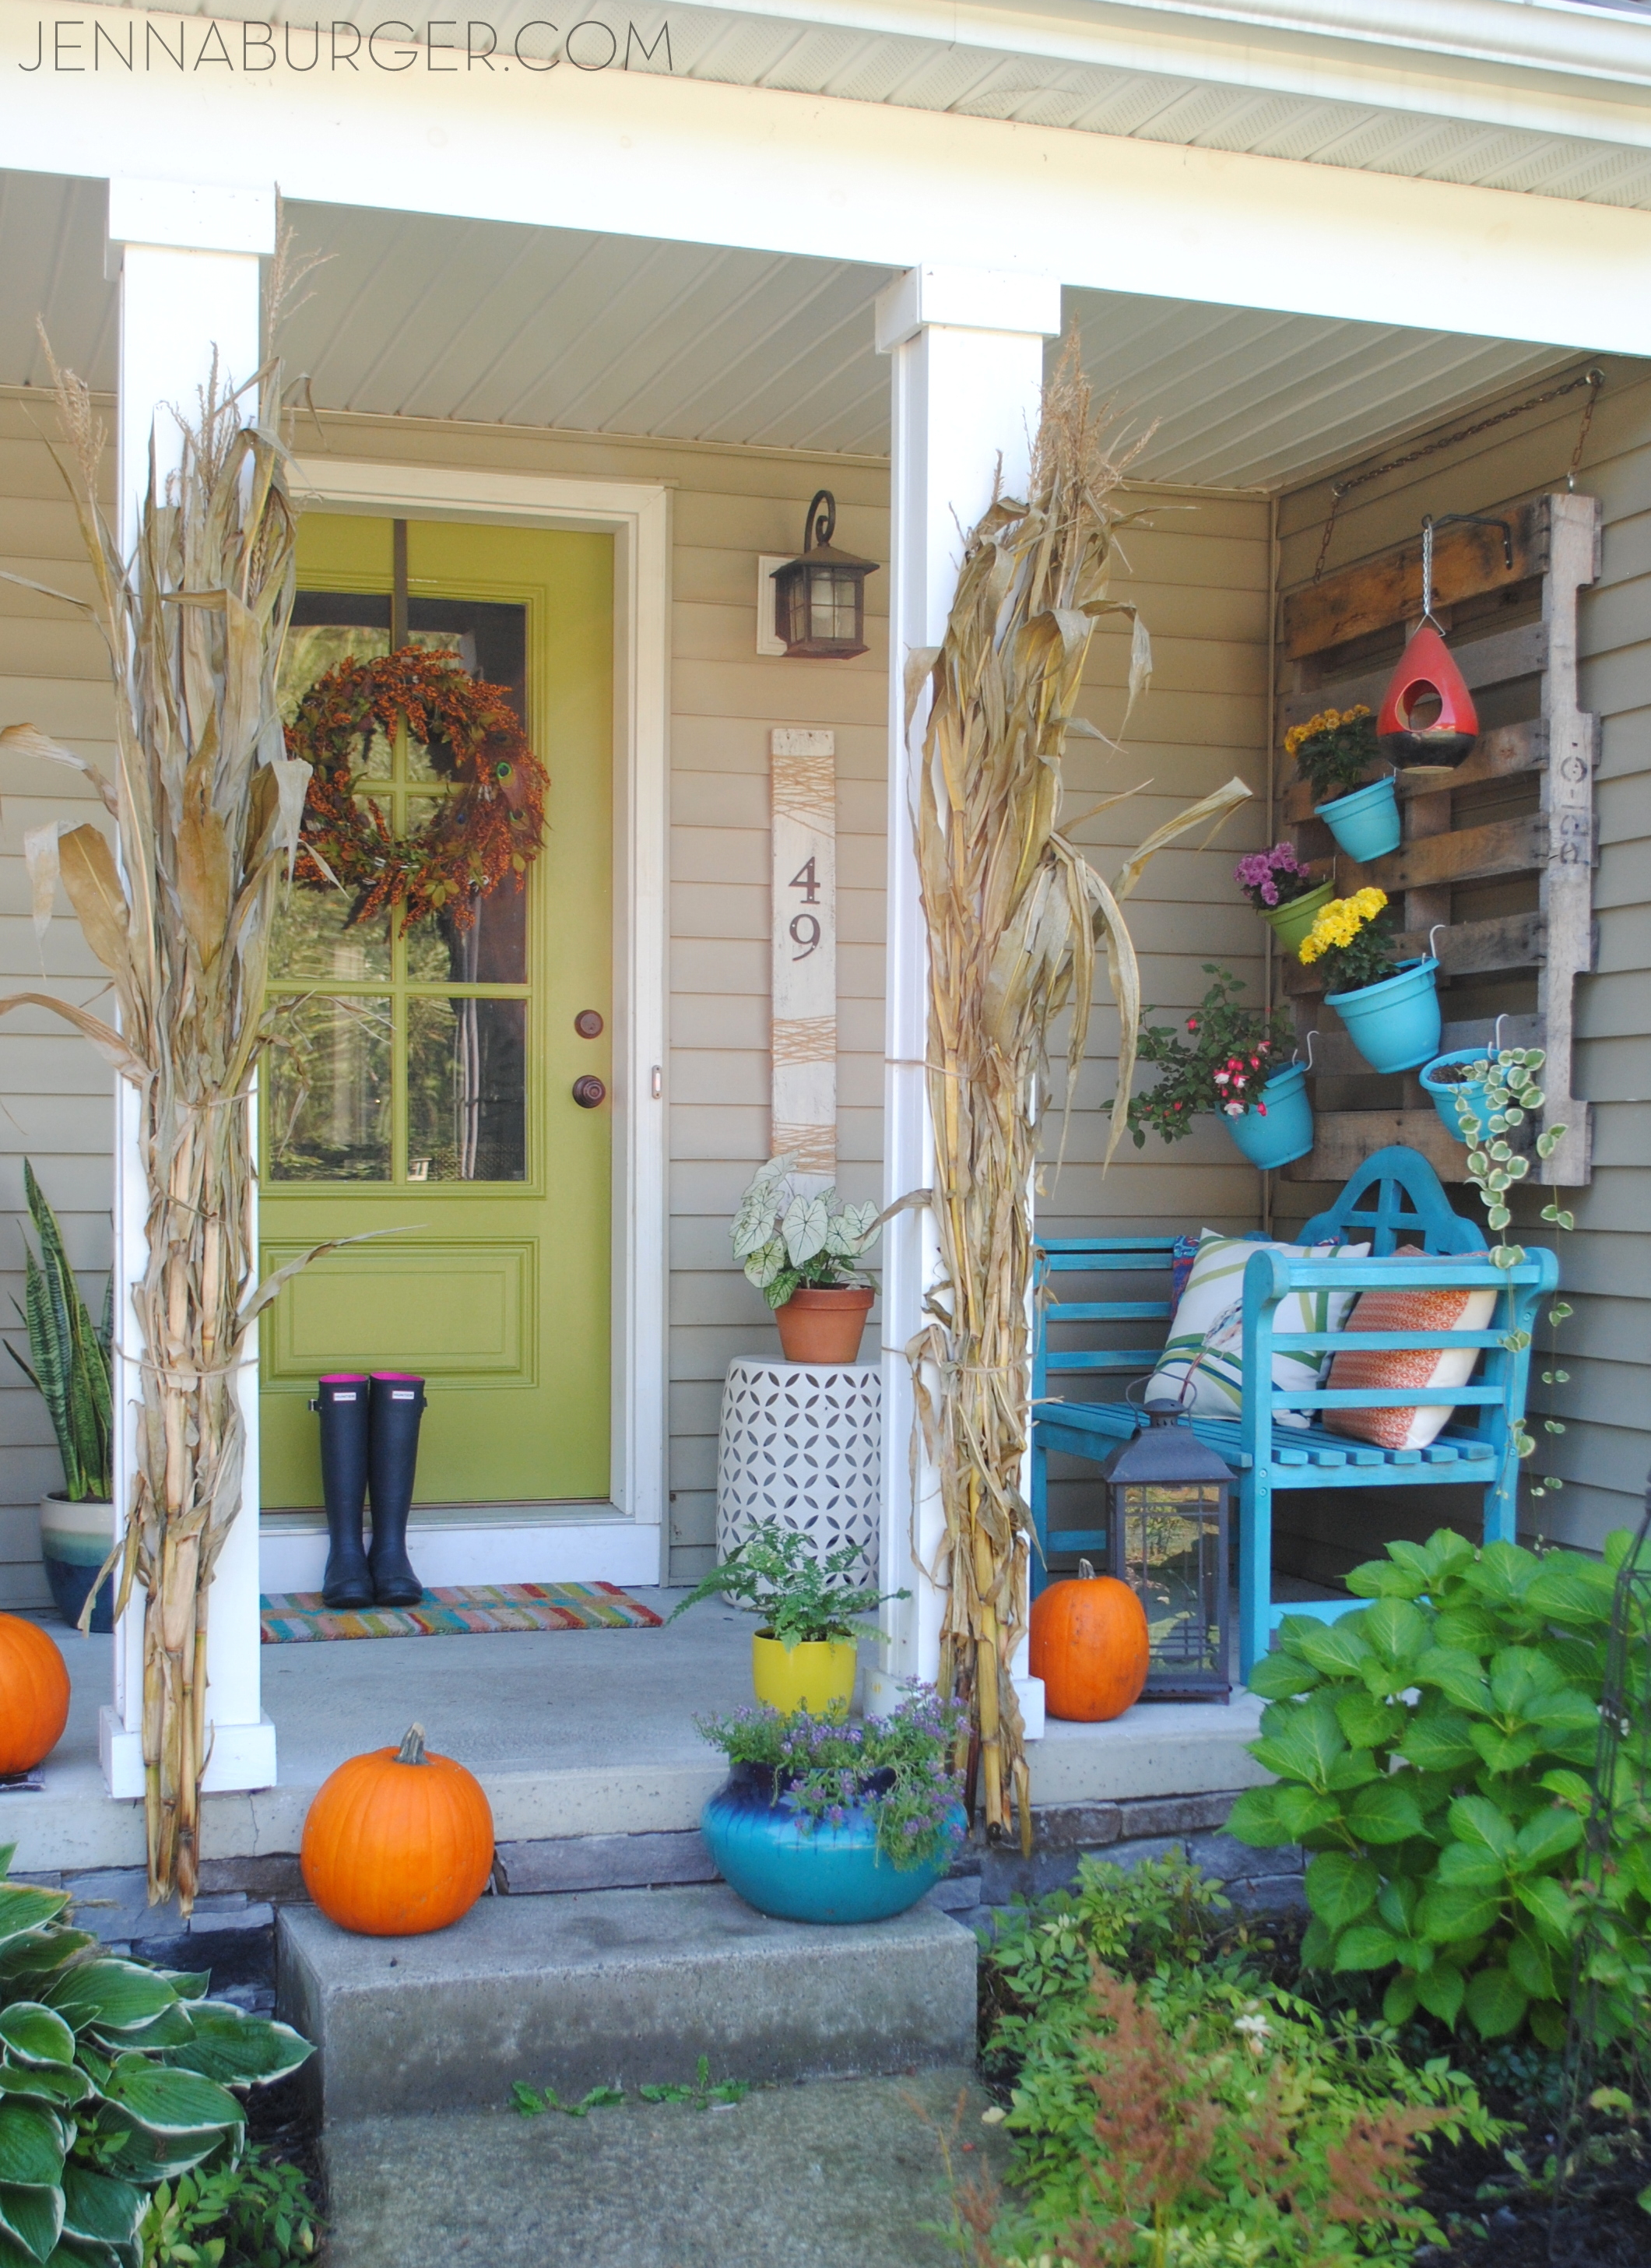
Our front porch is certainly not a big space, but it’s cozy & Oh So Inviting; The perfect welcoming into our home.

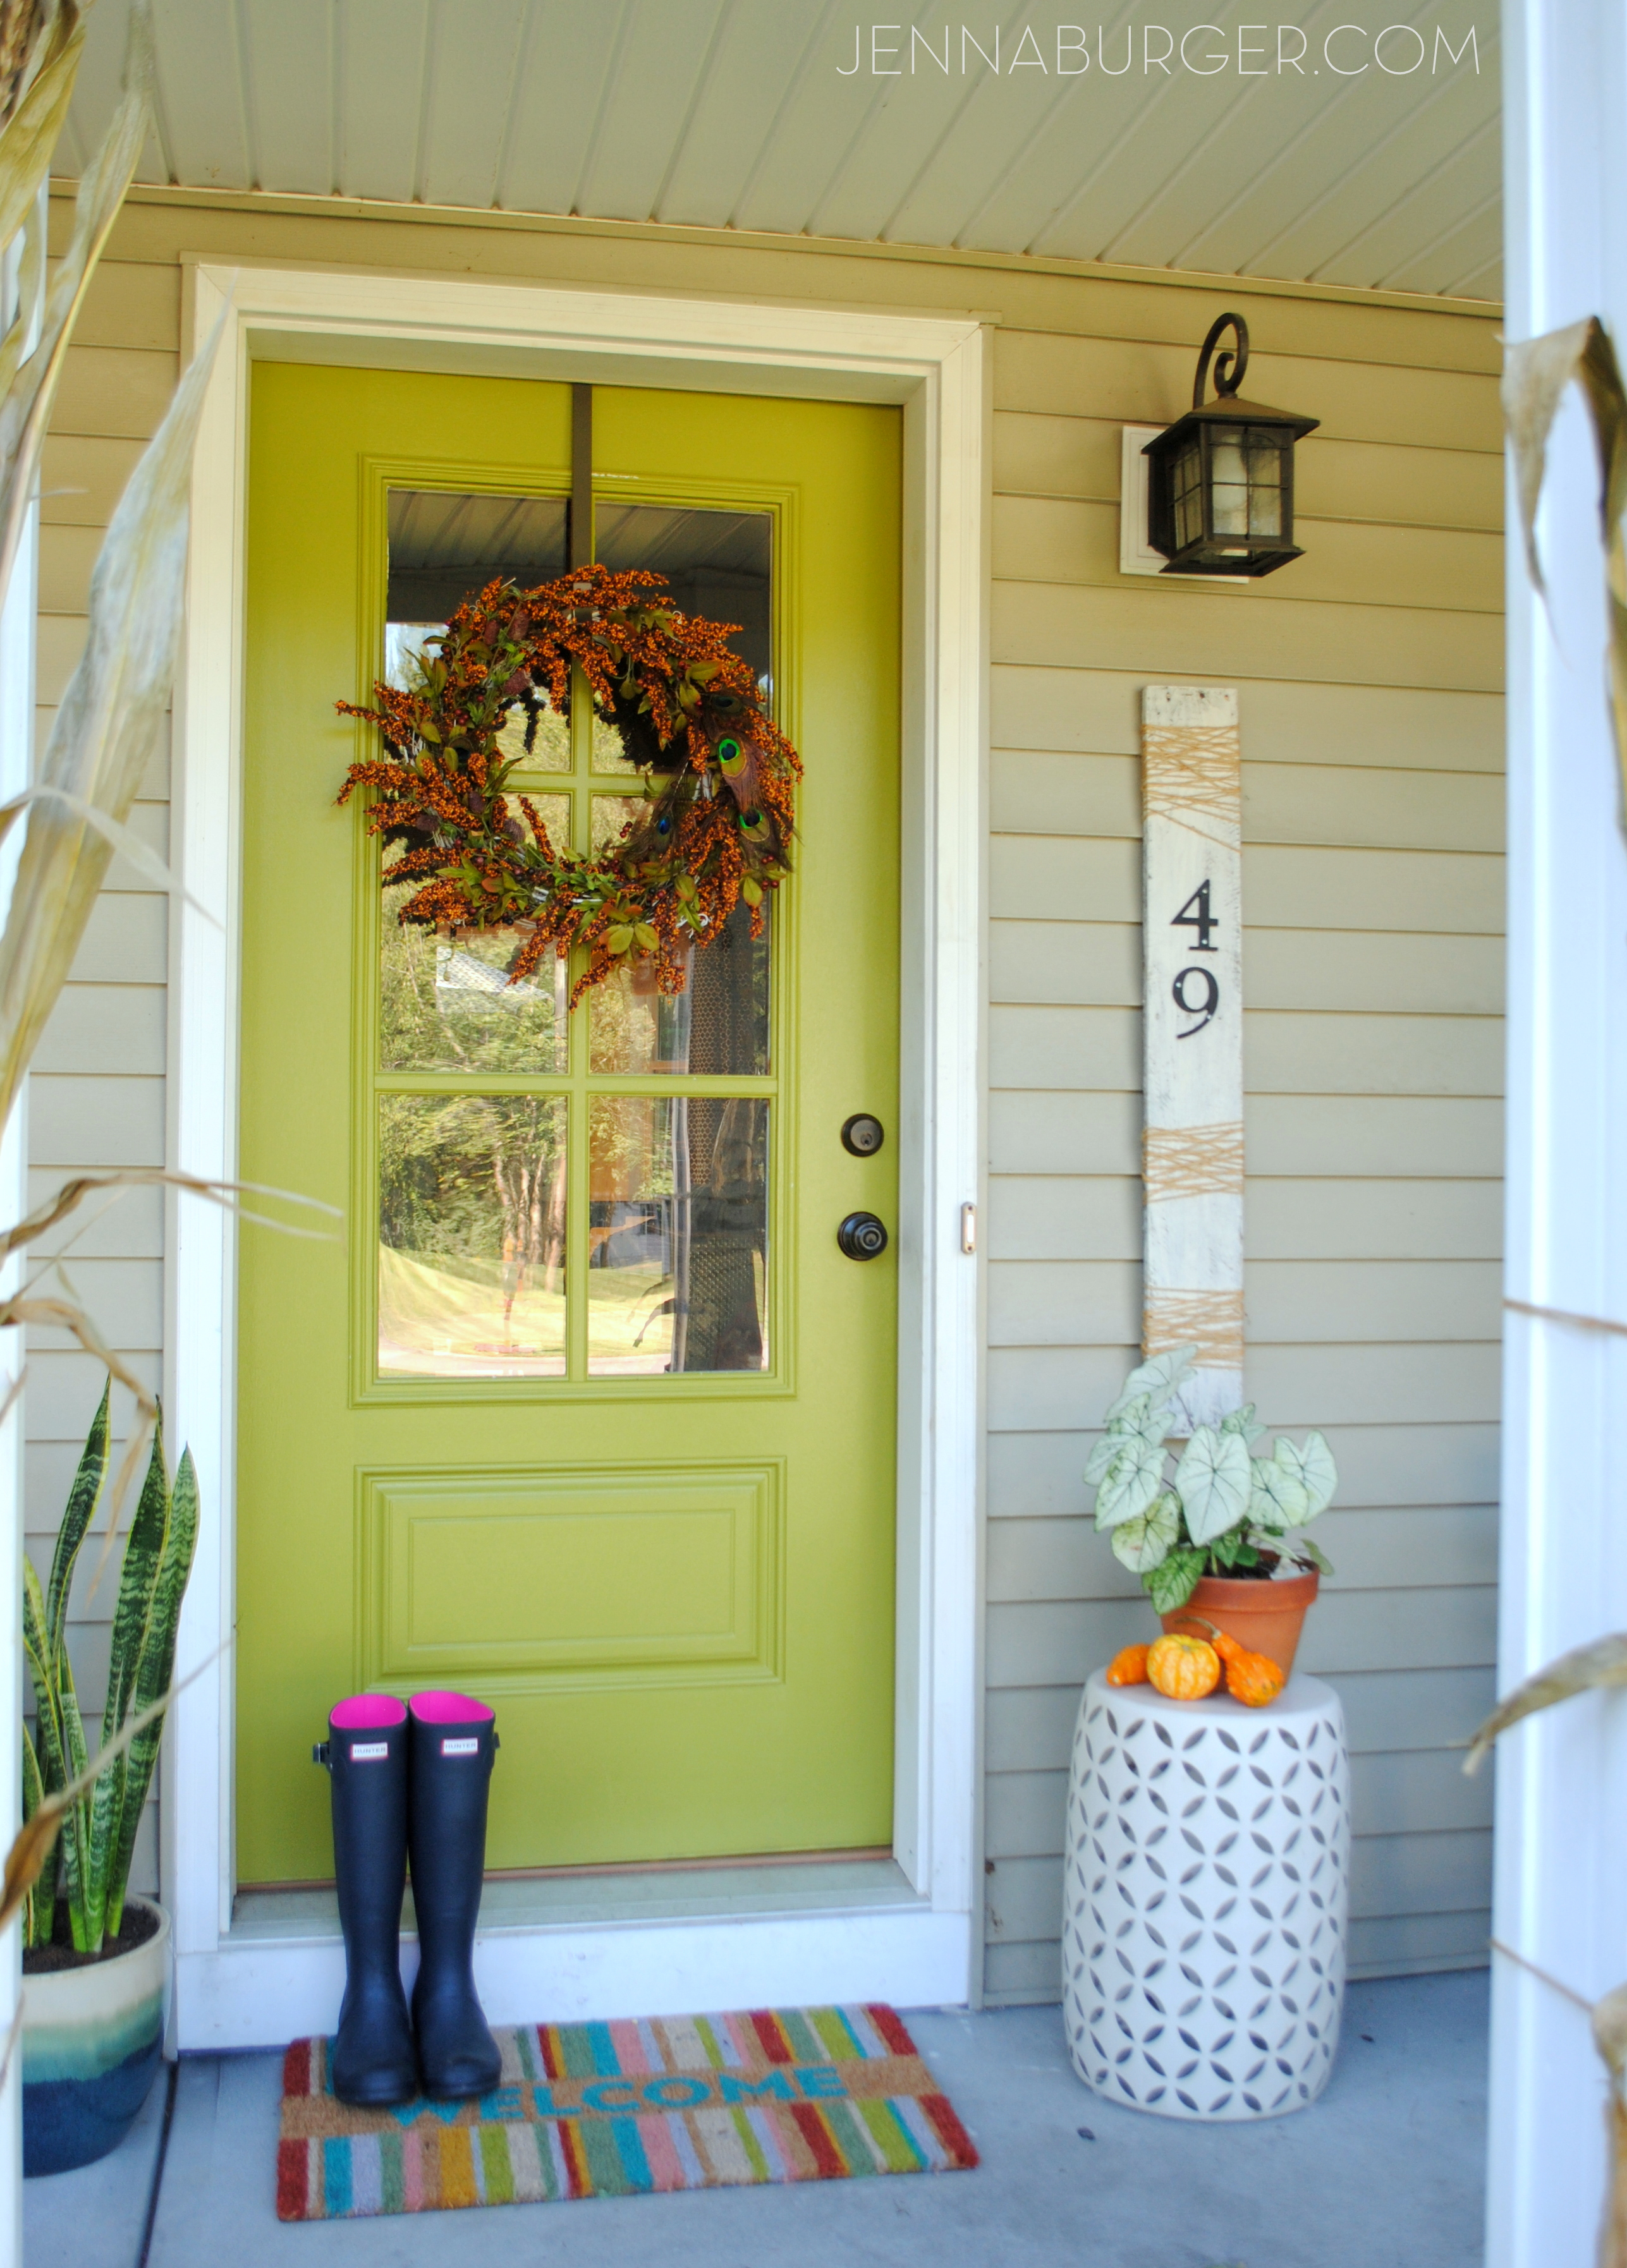
The front door is the center point of this quaint outdoor space.  It took me a while to choose a color for the door, but I went with my tried & true favorite apple green hue, Valspar Crushed Oregano.

Fall Front Porch using lots of COLOR + seasonal favorites including pumpkins, gourds, cornstalks, and mums! Full tour of this Fall Front Porch @ www.JennaBurger.com

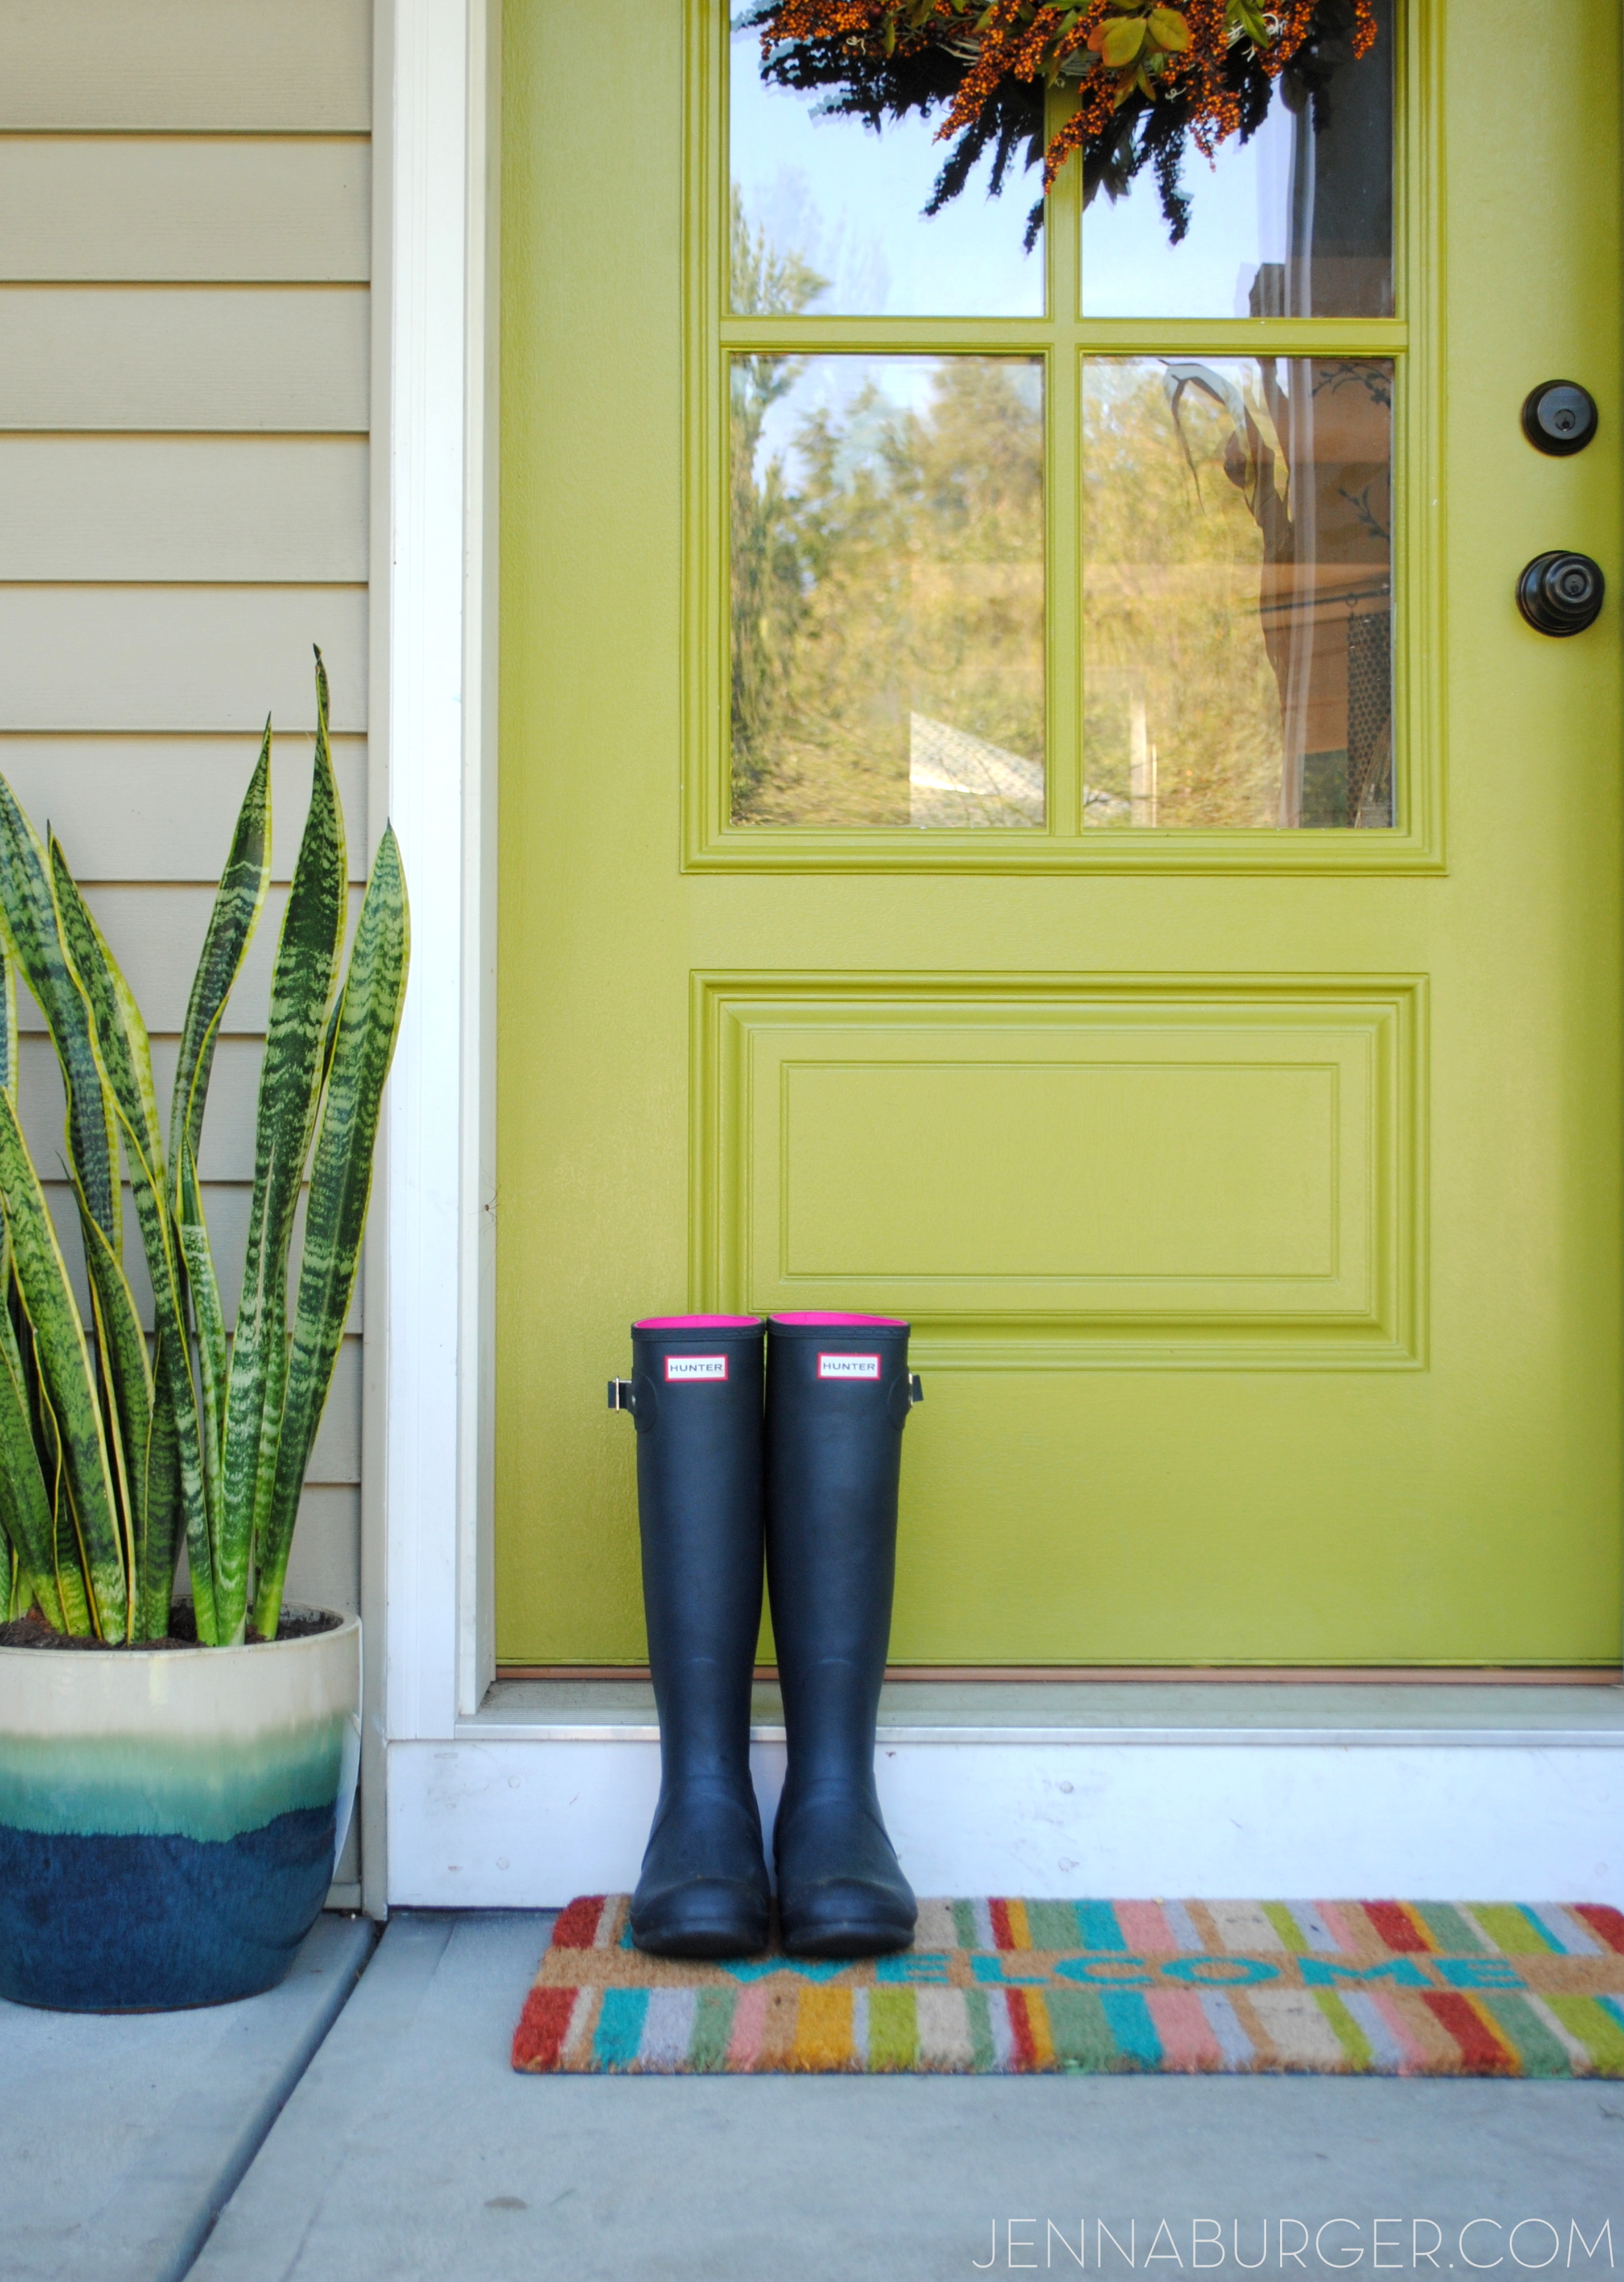
When the time came to paint the new front door this past Spring, I knew I wanted to introduce the color of coral, but the door wasn’t the right place – it was quite the dilemma choosing a color.  In the end green was the right choice and I have loved it ever since + this door which is 3/4 glass allows so much light to filter into our foyer.

Fall Front Porch using lots of COLOR + seasonal favorites including pumpkins, gourds, cornstalks, and mums! Full tour of this Fall Front Porch @ www.JennaBurger.com

I’m not a big proponent of seasonal decorating (I don’t have a huge amount of extra time + money for it), but I do enjoy adding a few touches by layering in elements amongst my everyday decor.  Layers are key!

For this revamped front porch for Fall, the main elements were adorned with simple seasonal favorites.

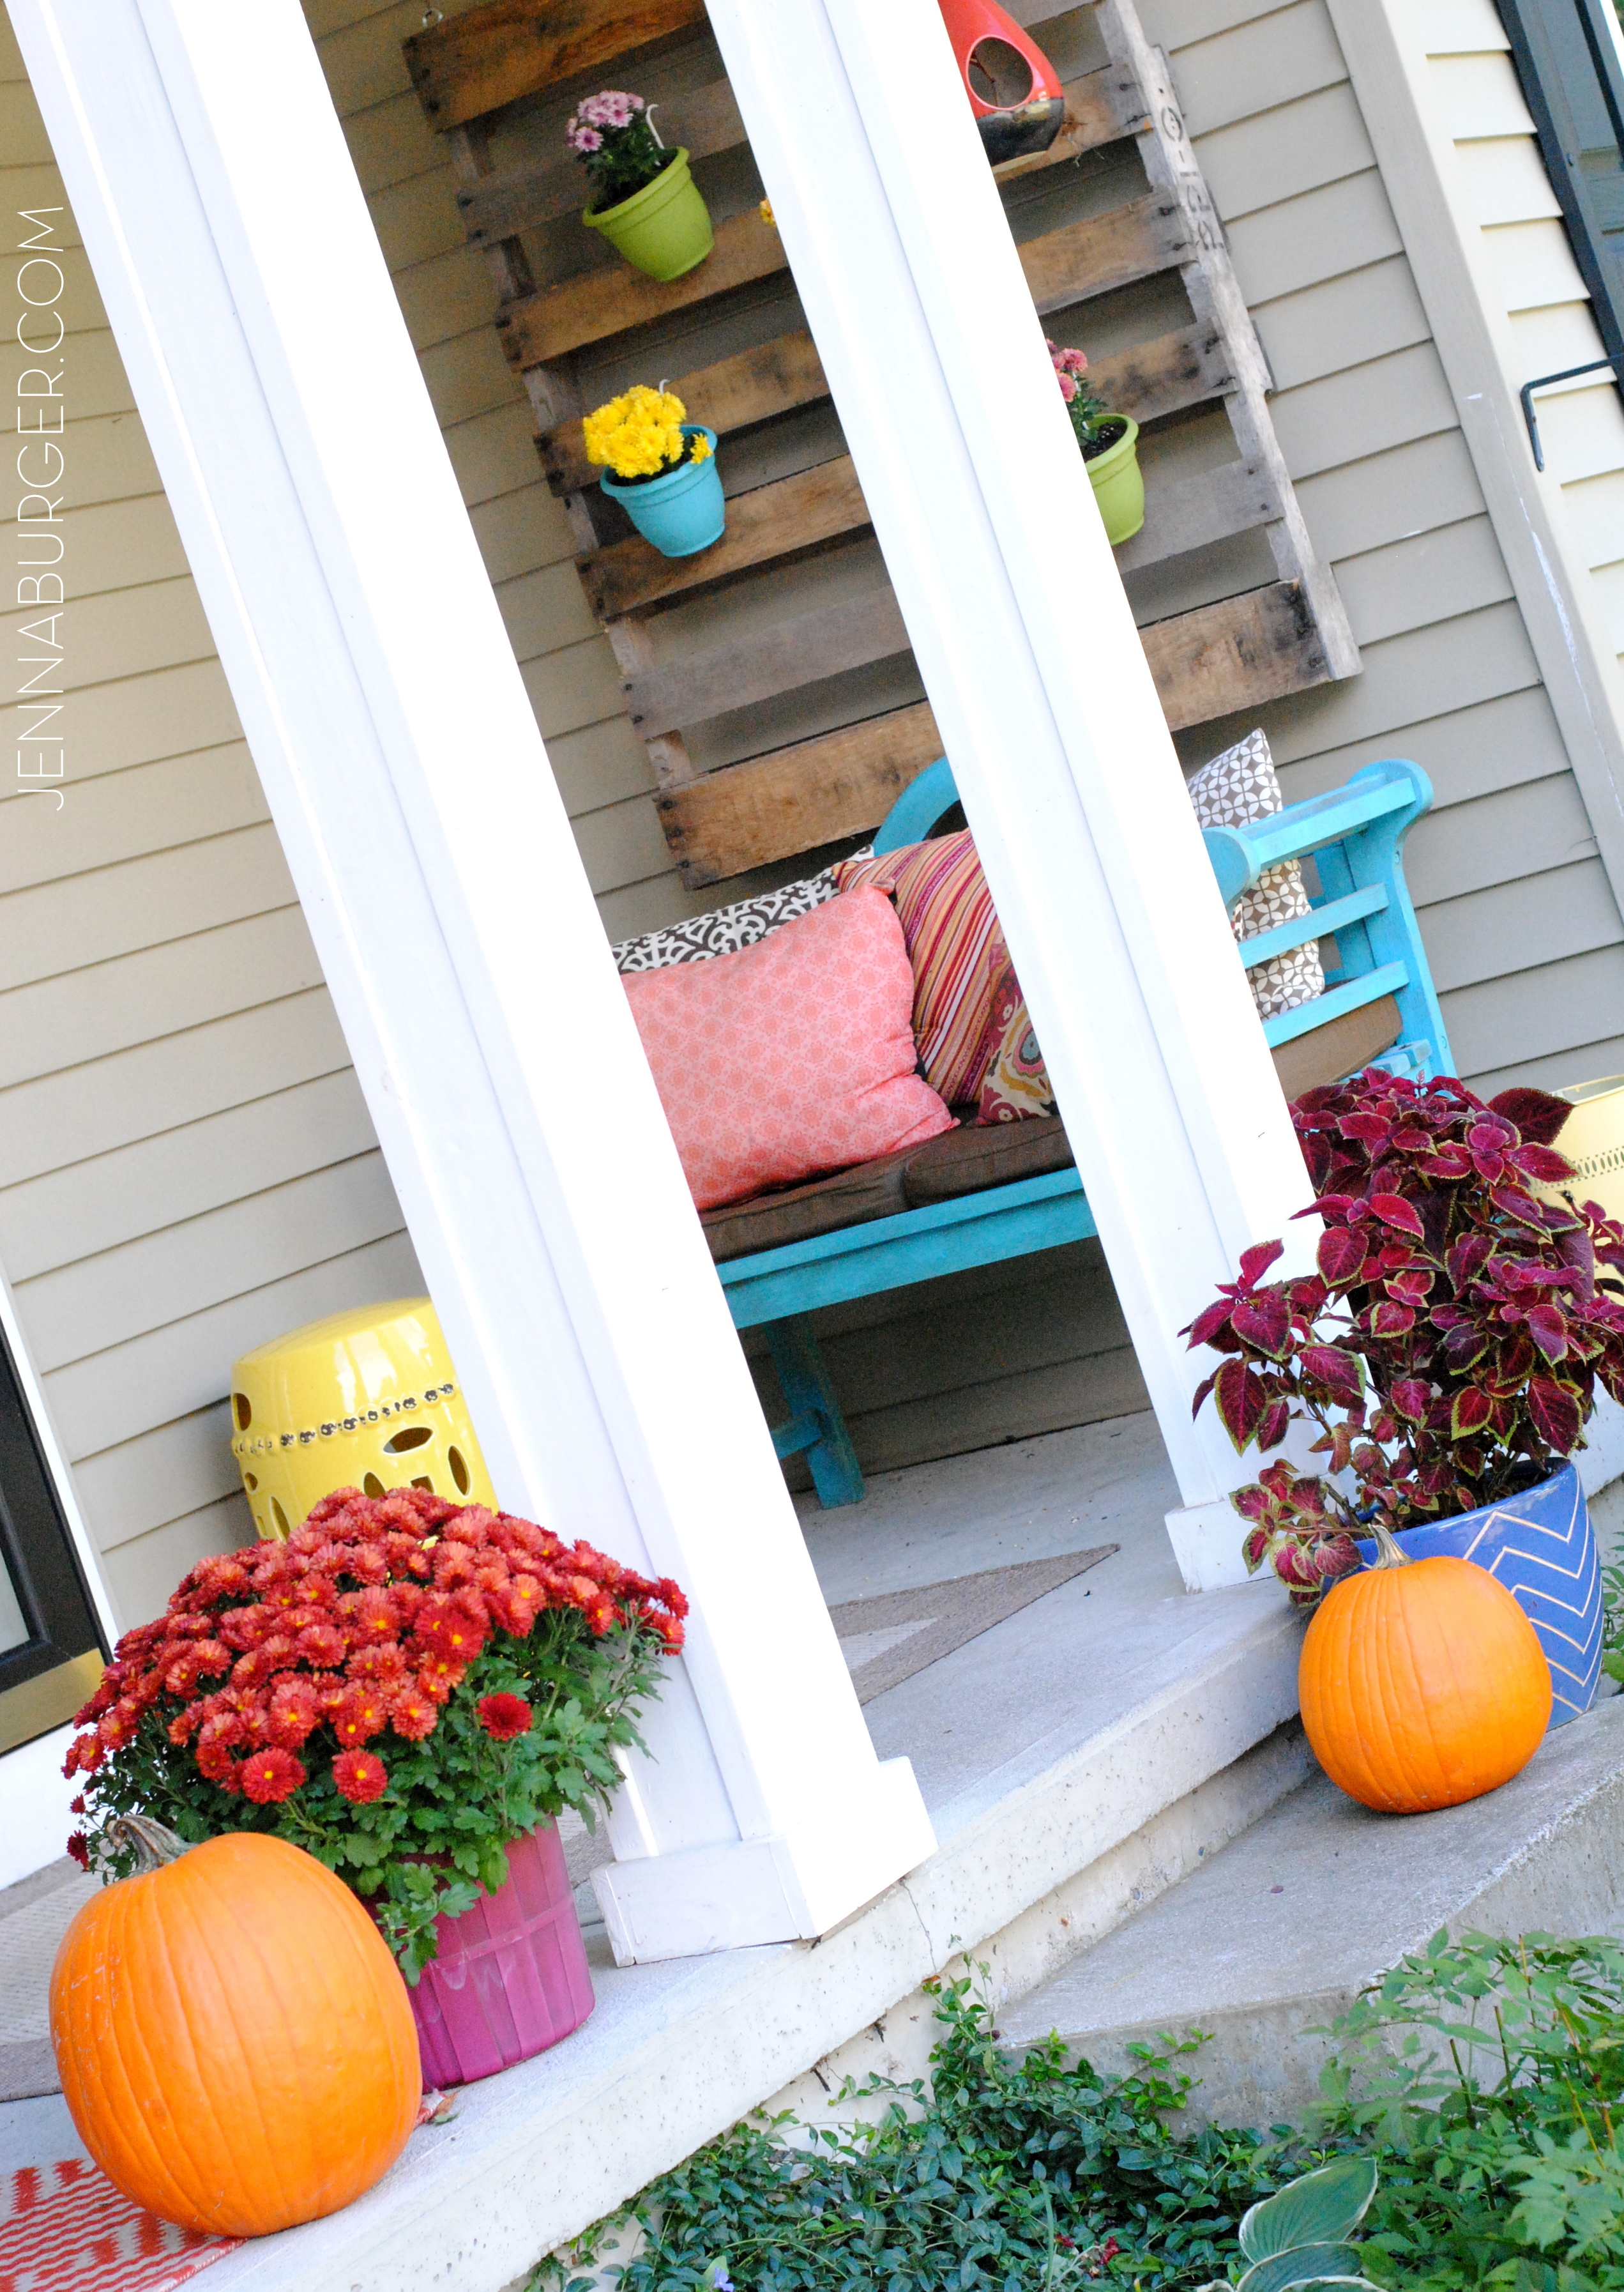
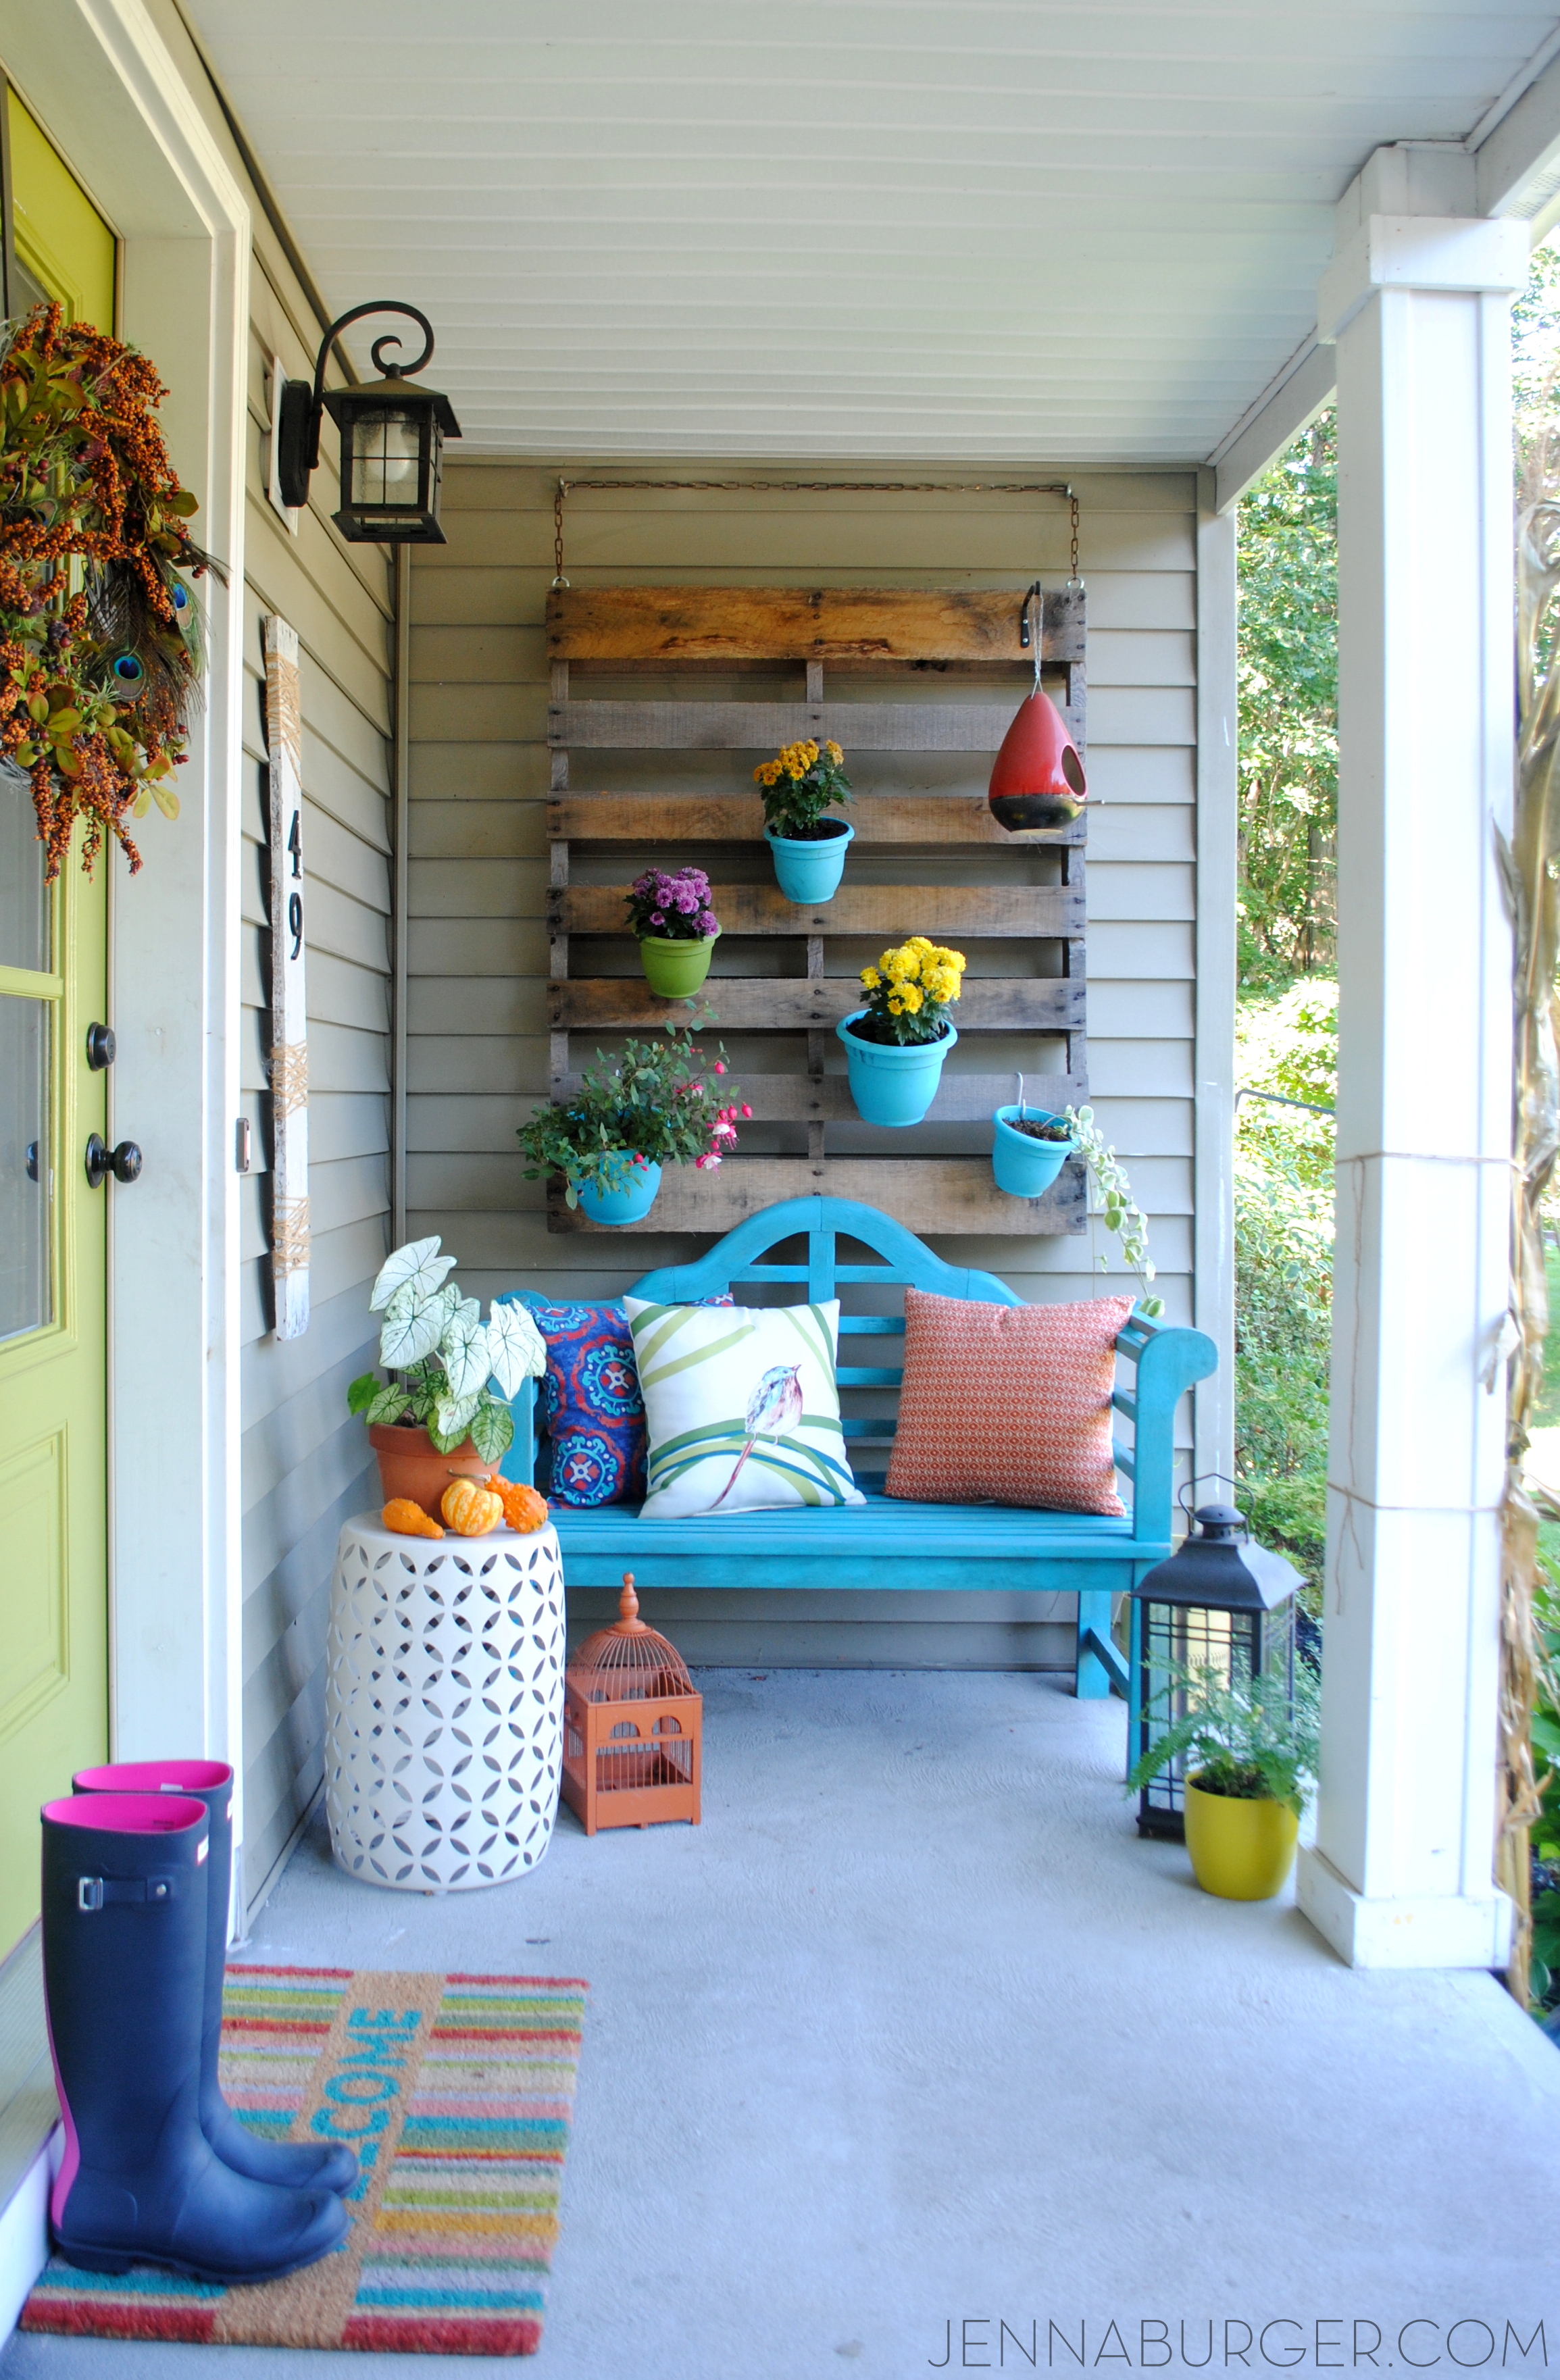
I added mums to the vertical pallet hanging on the siding.

I tied cornstalks to the face of the pillars.

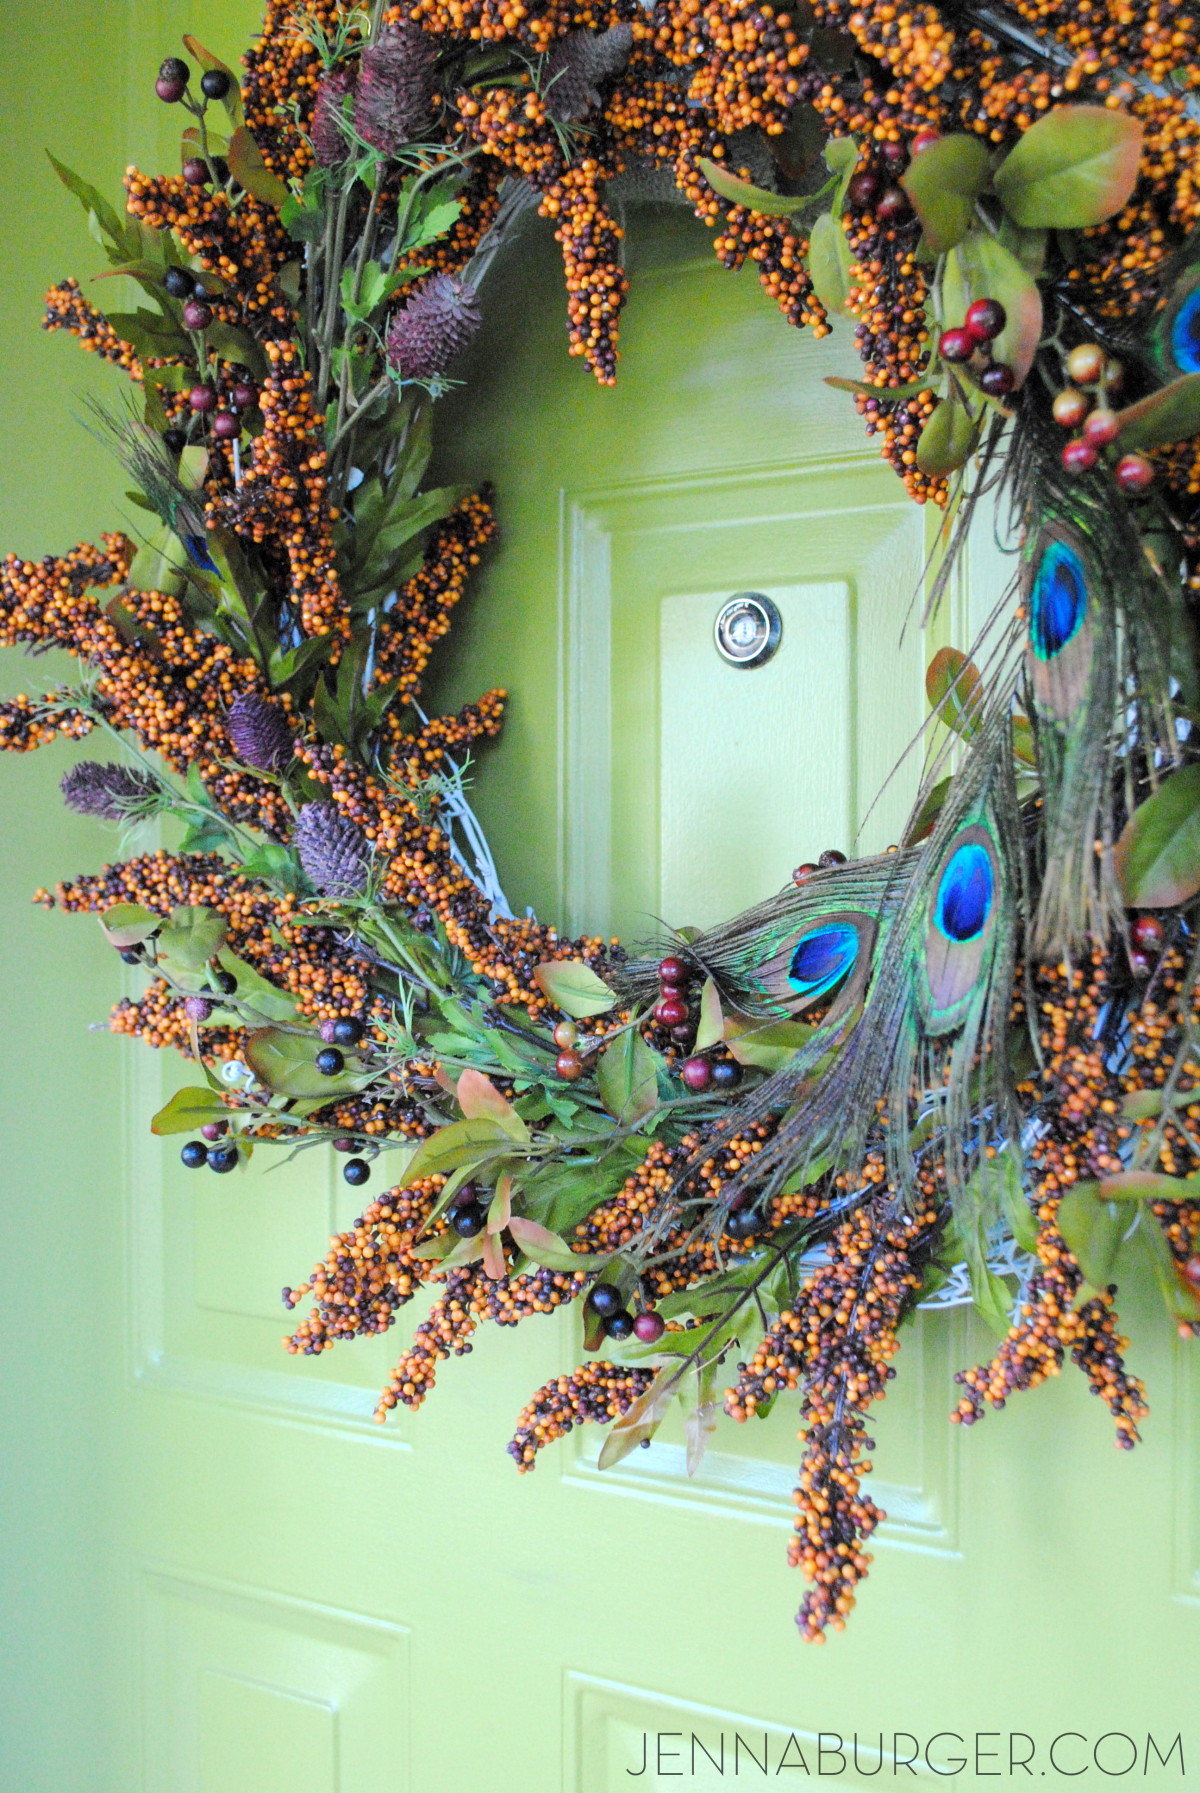
I adorned my door with a festive wreath.

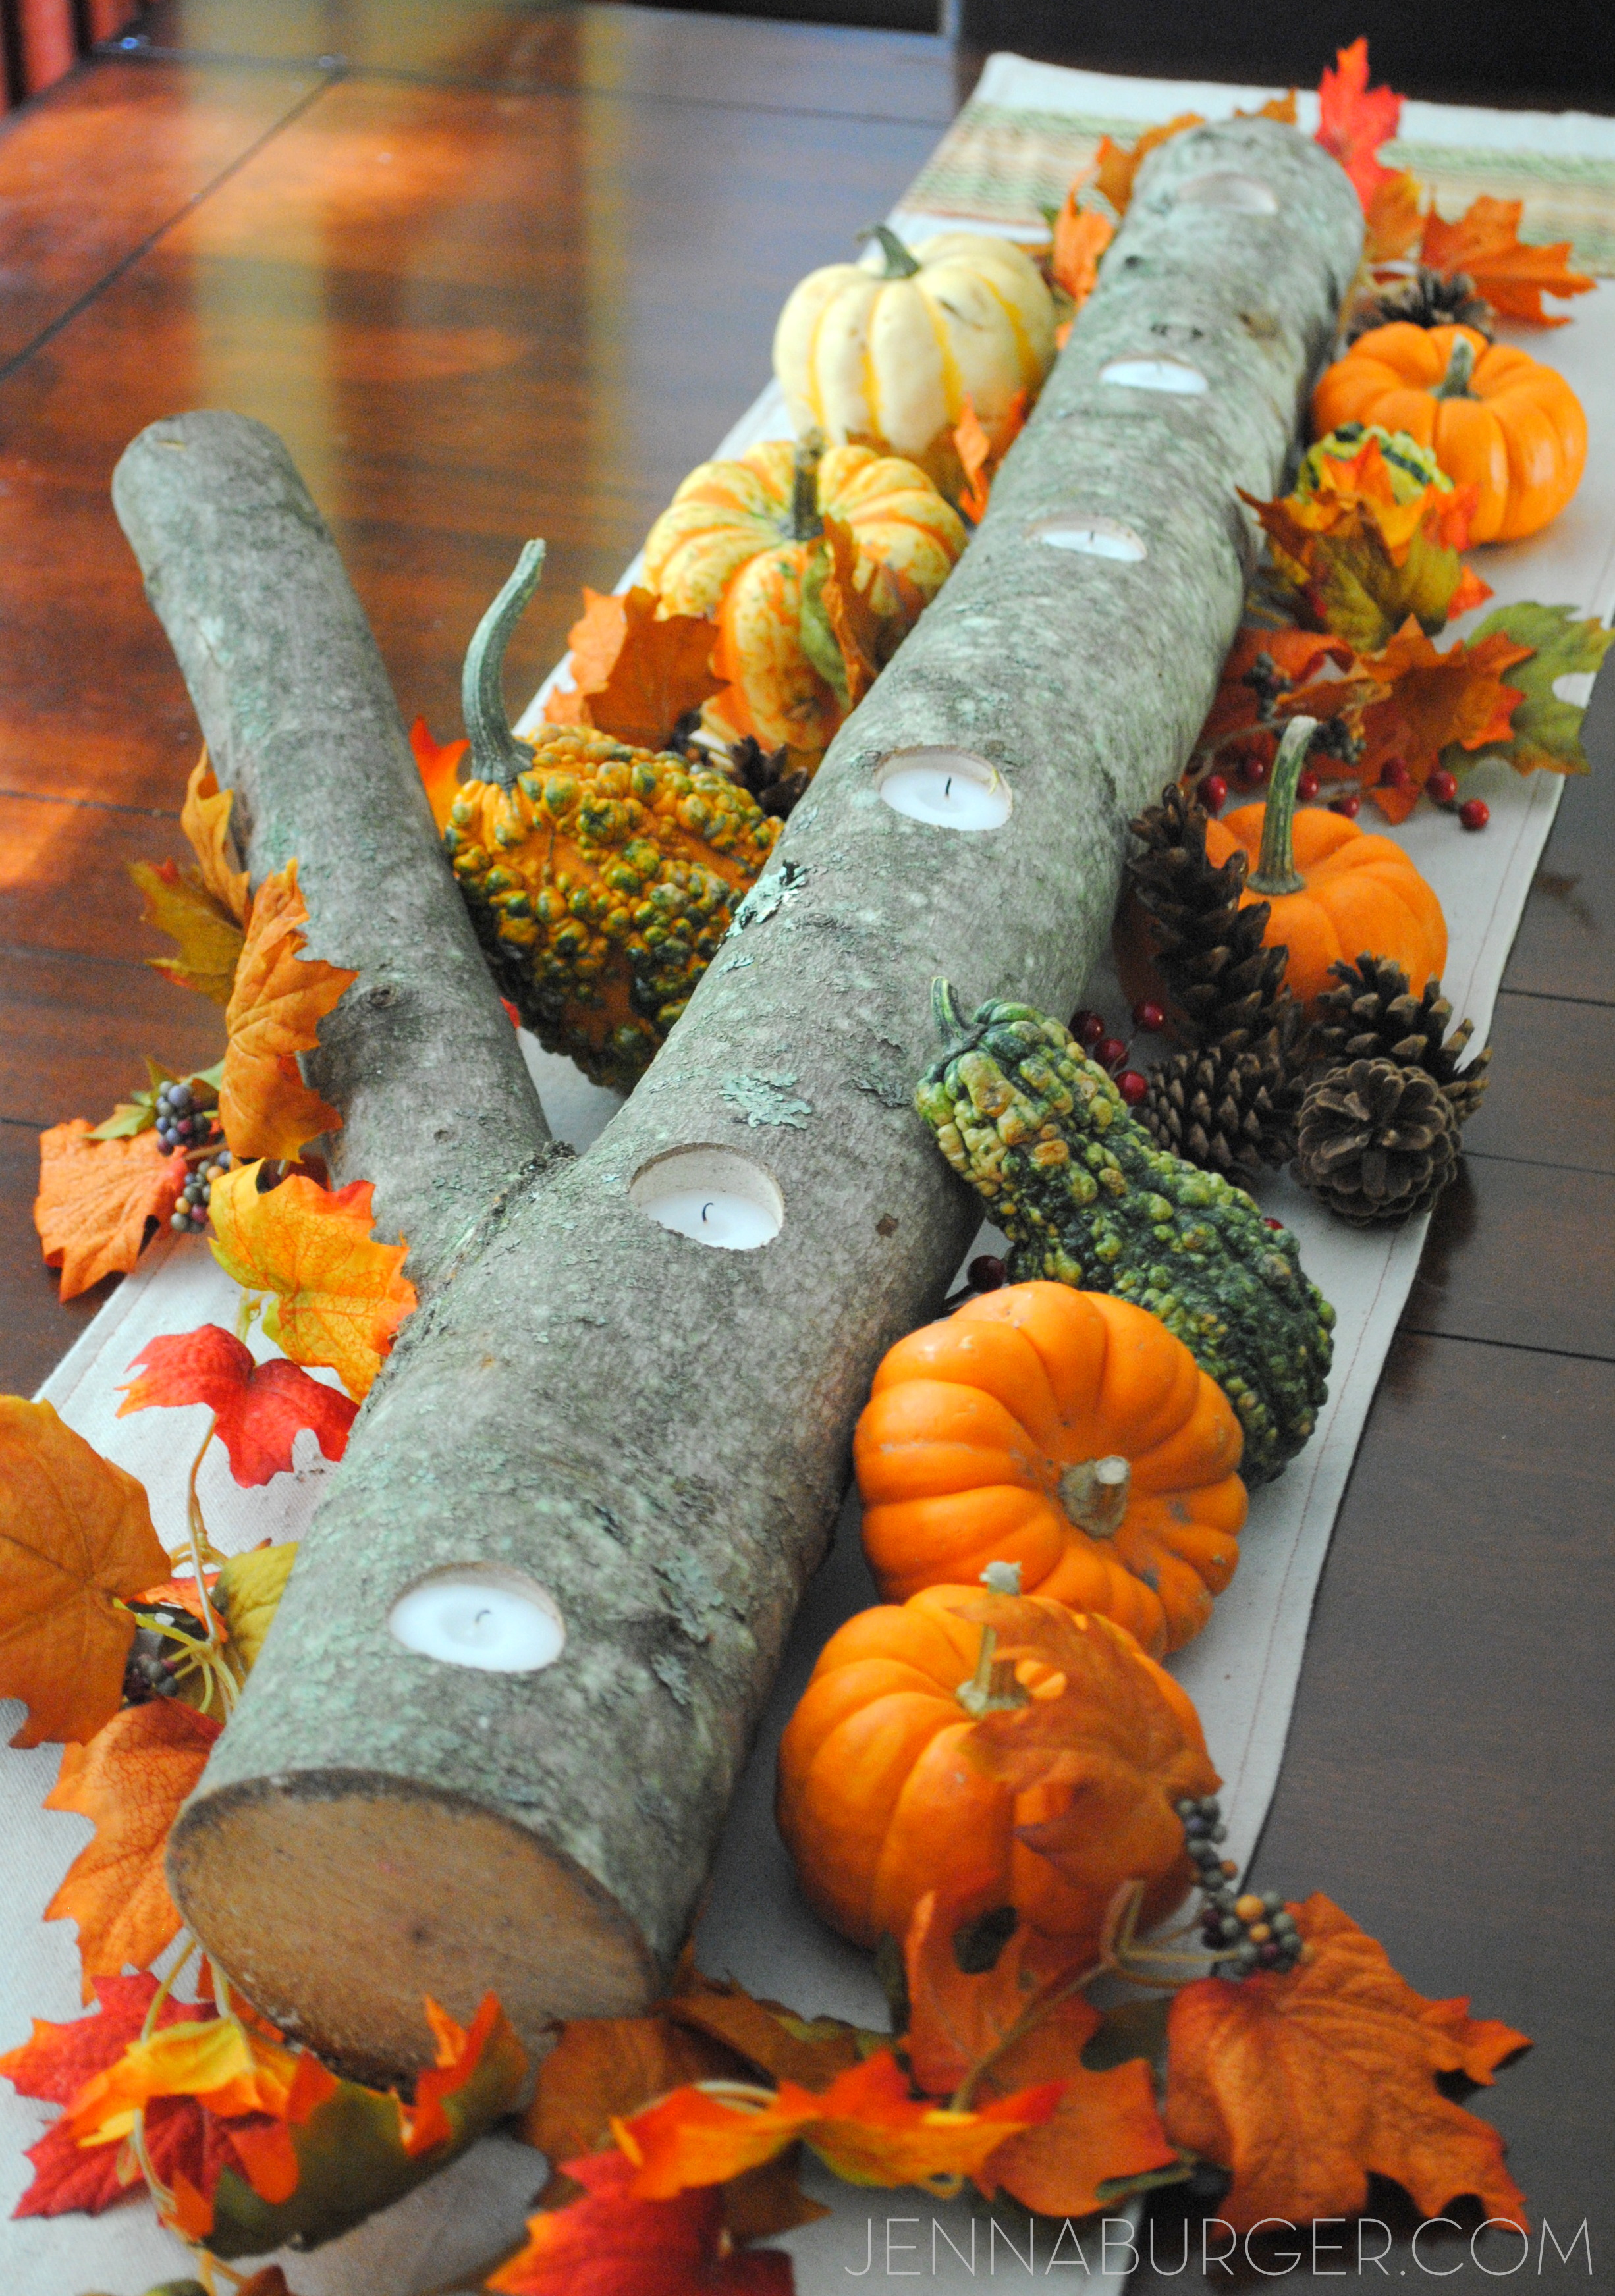
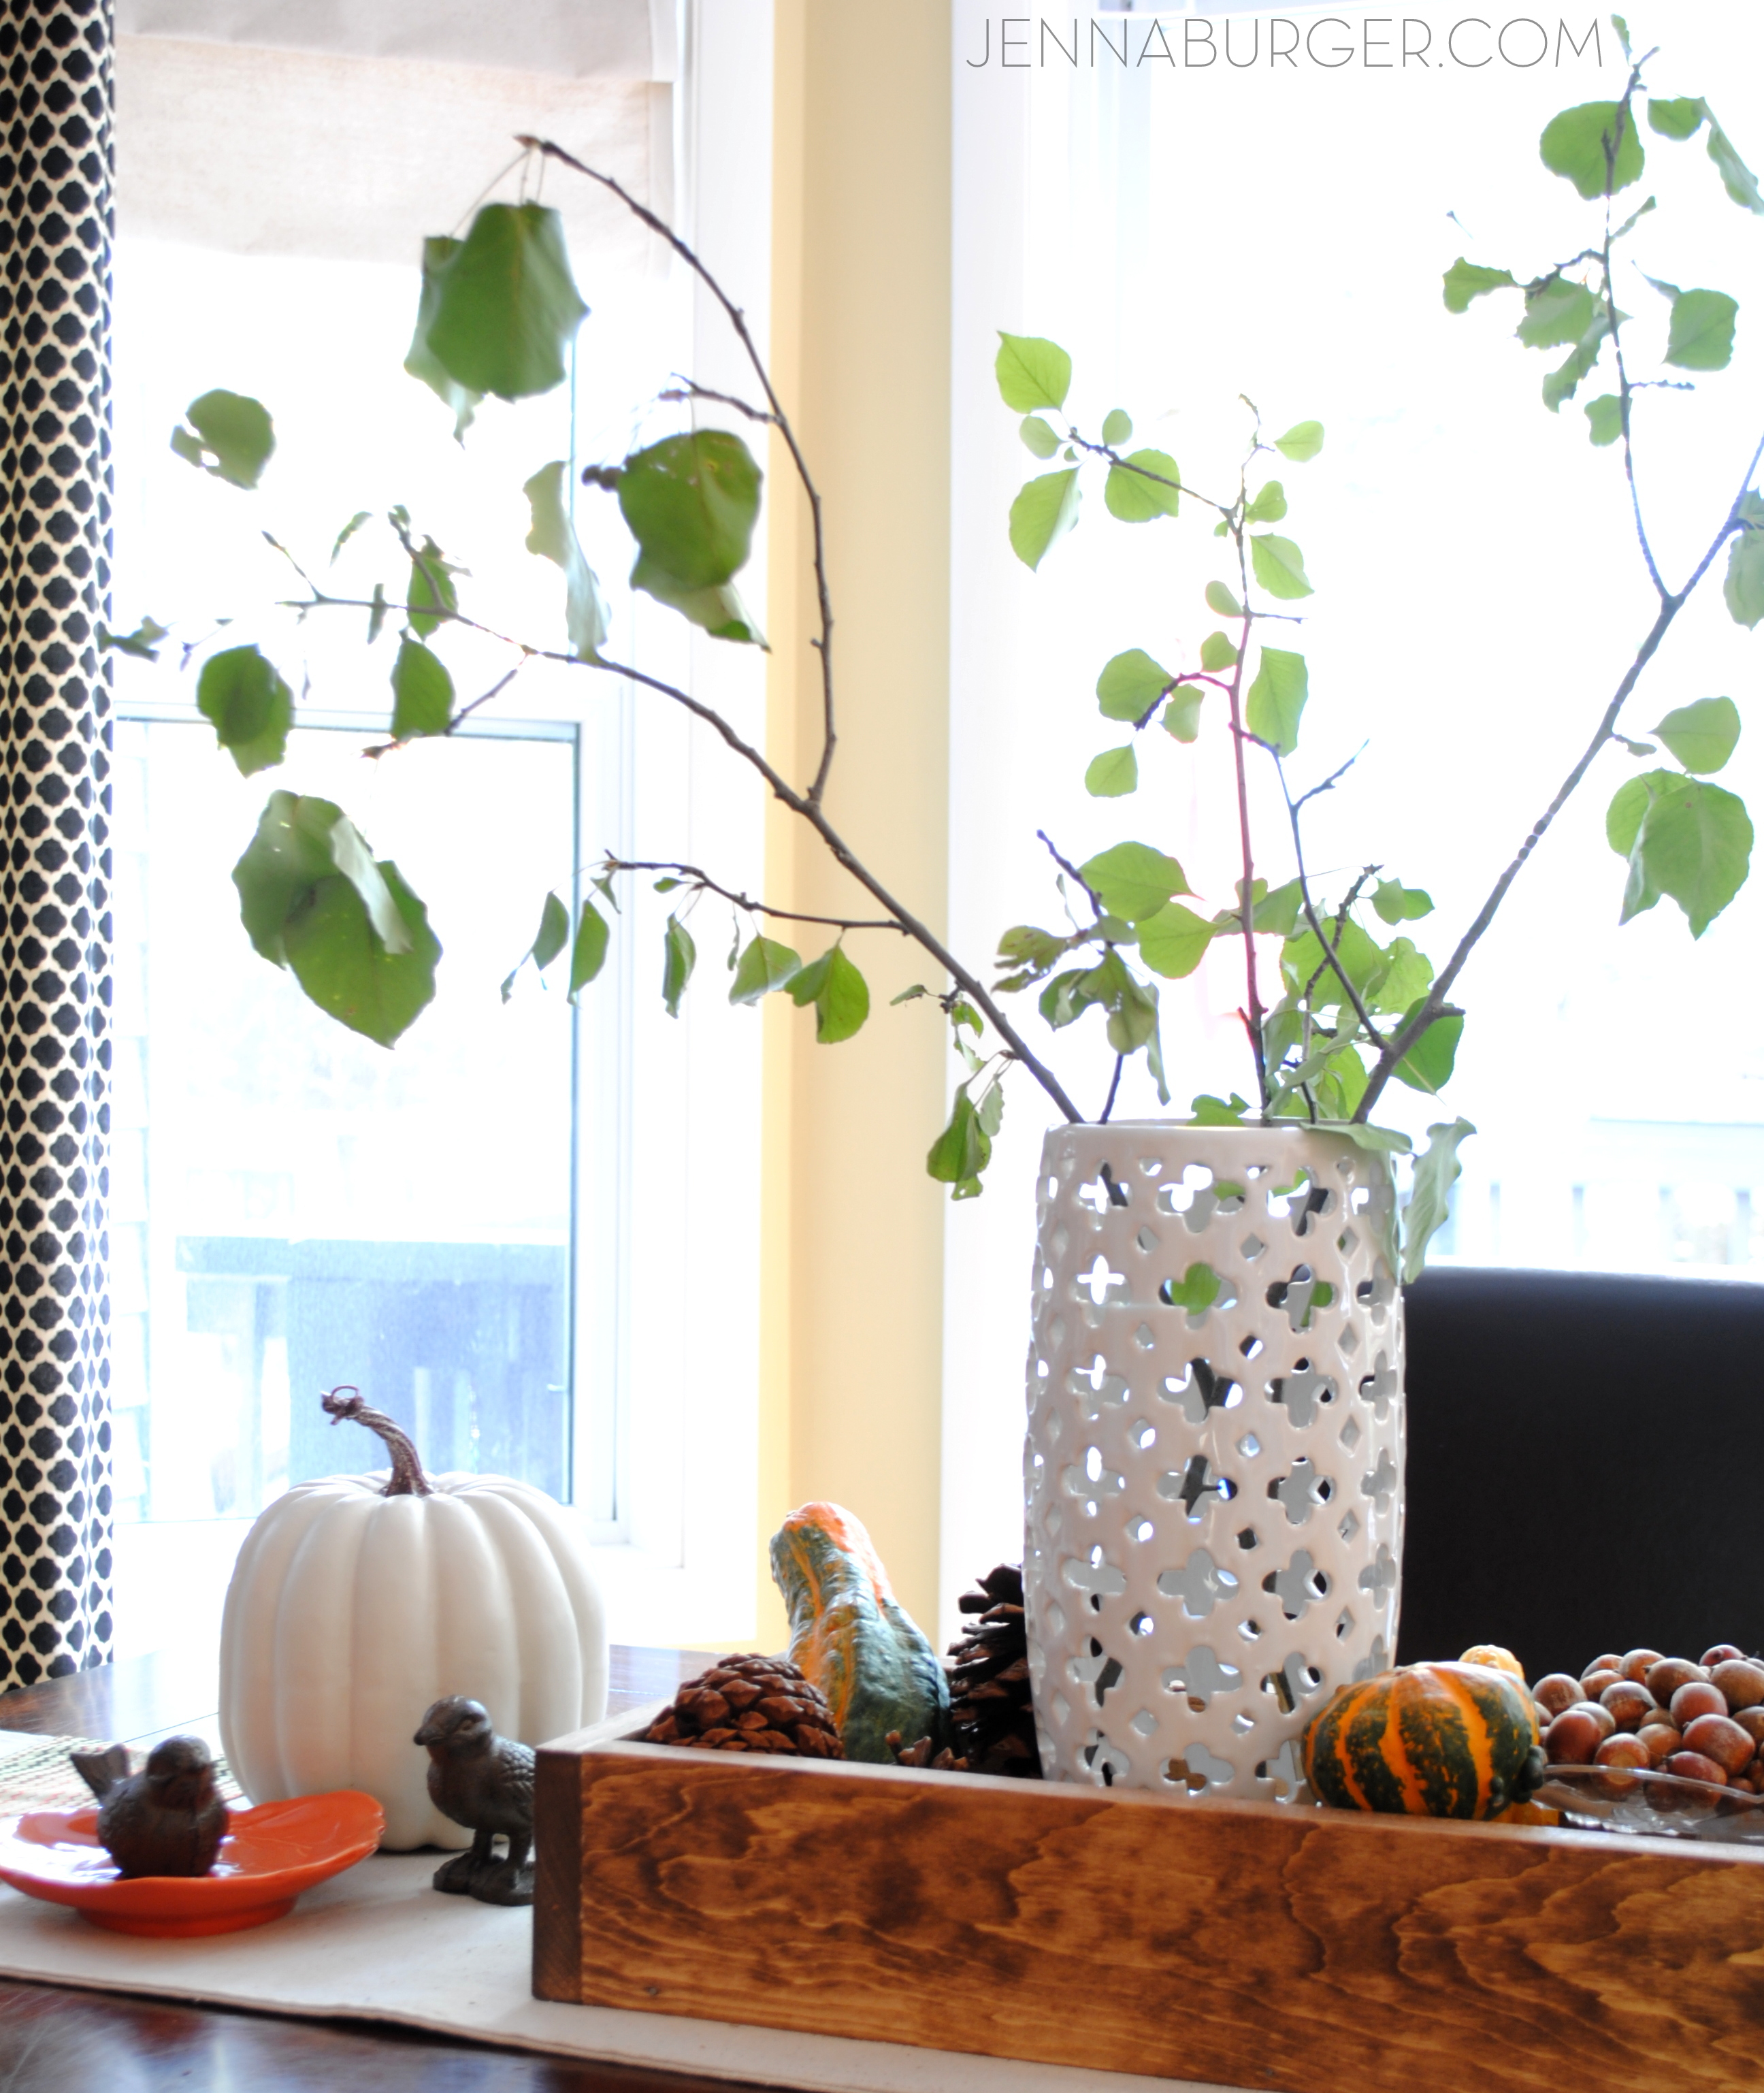
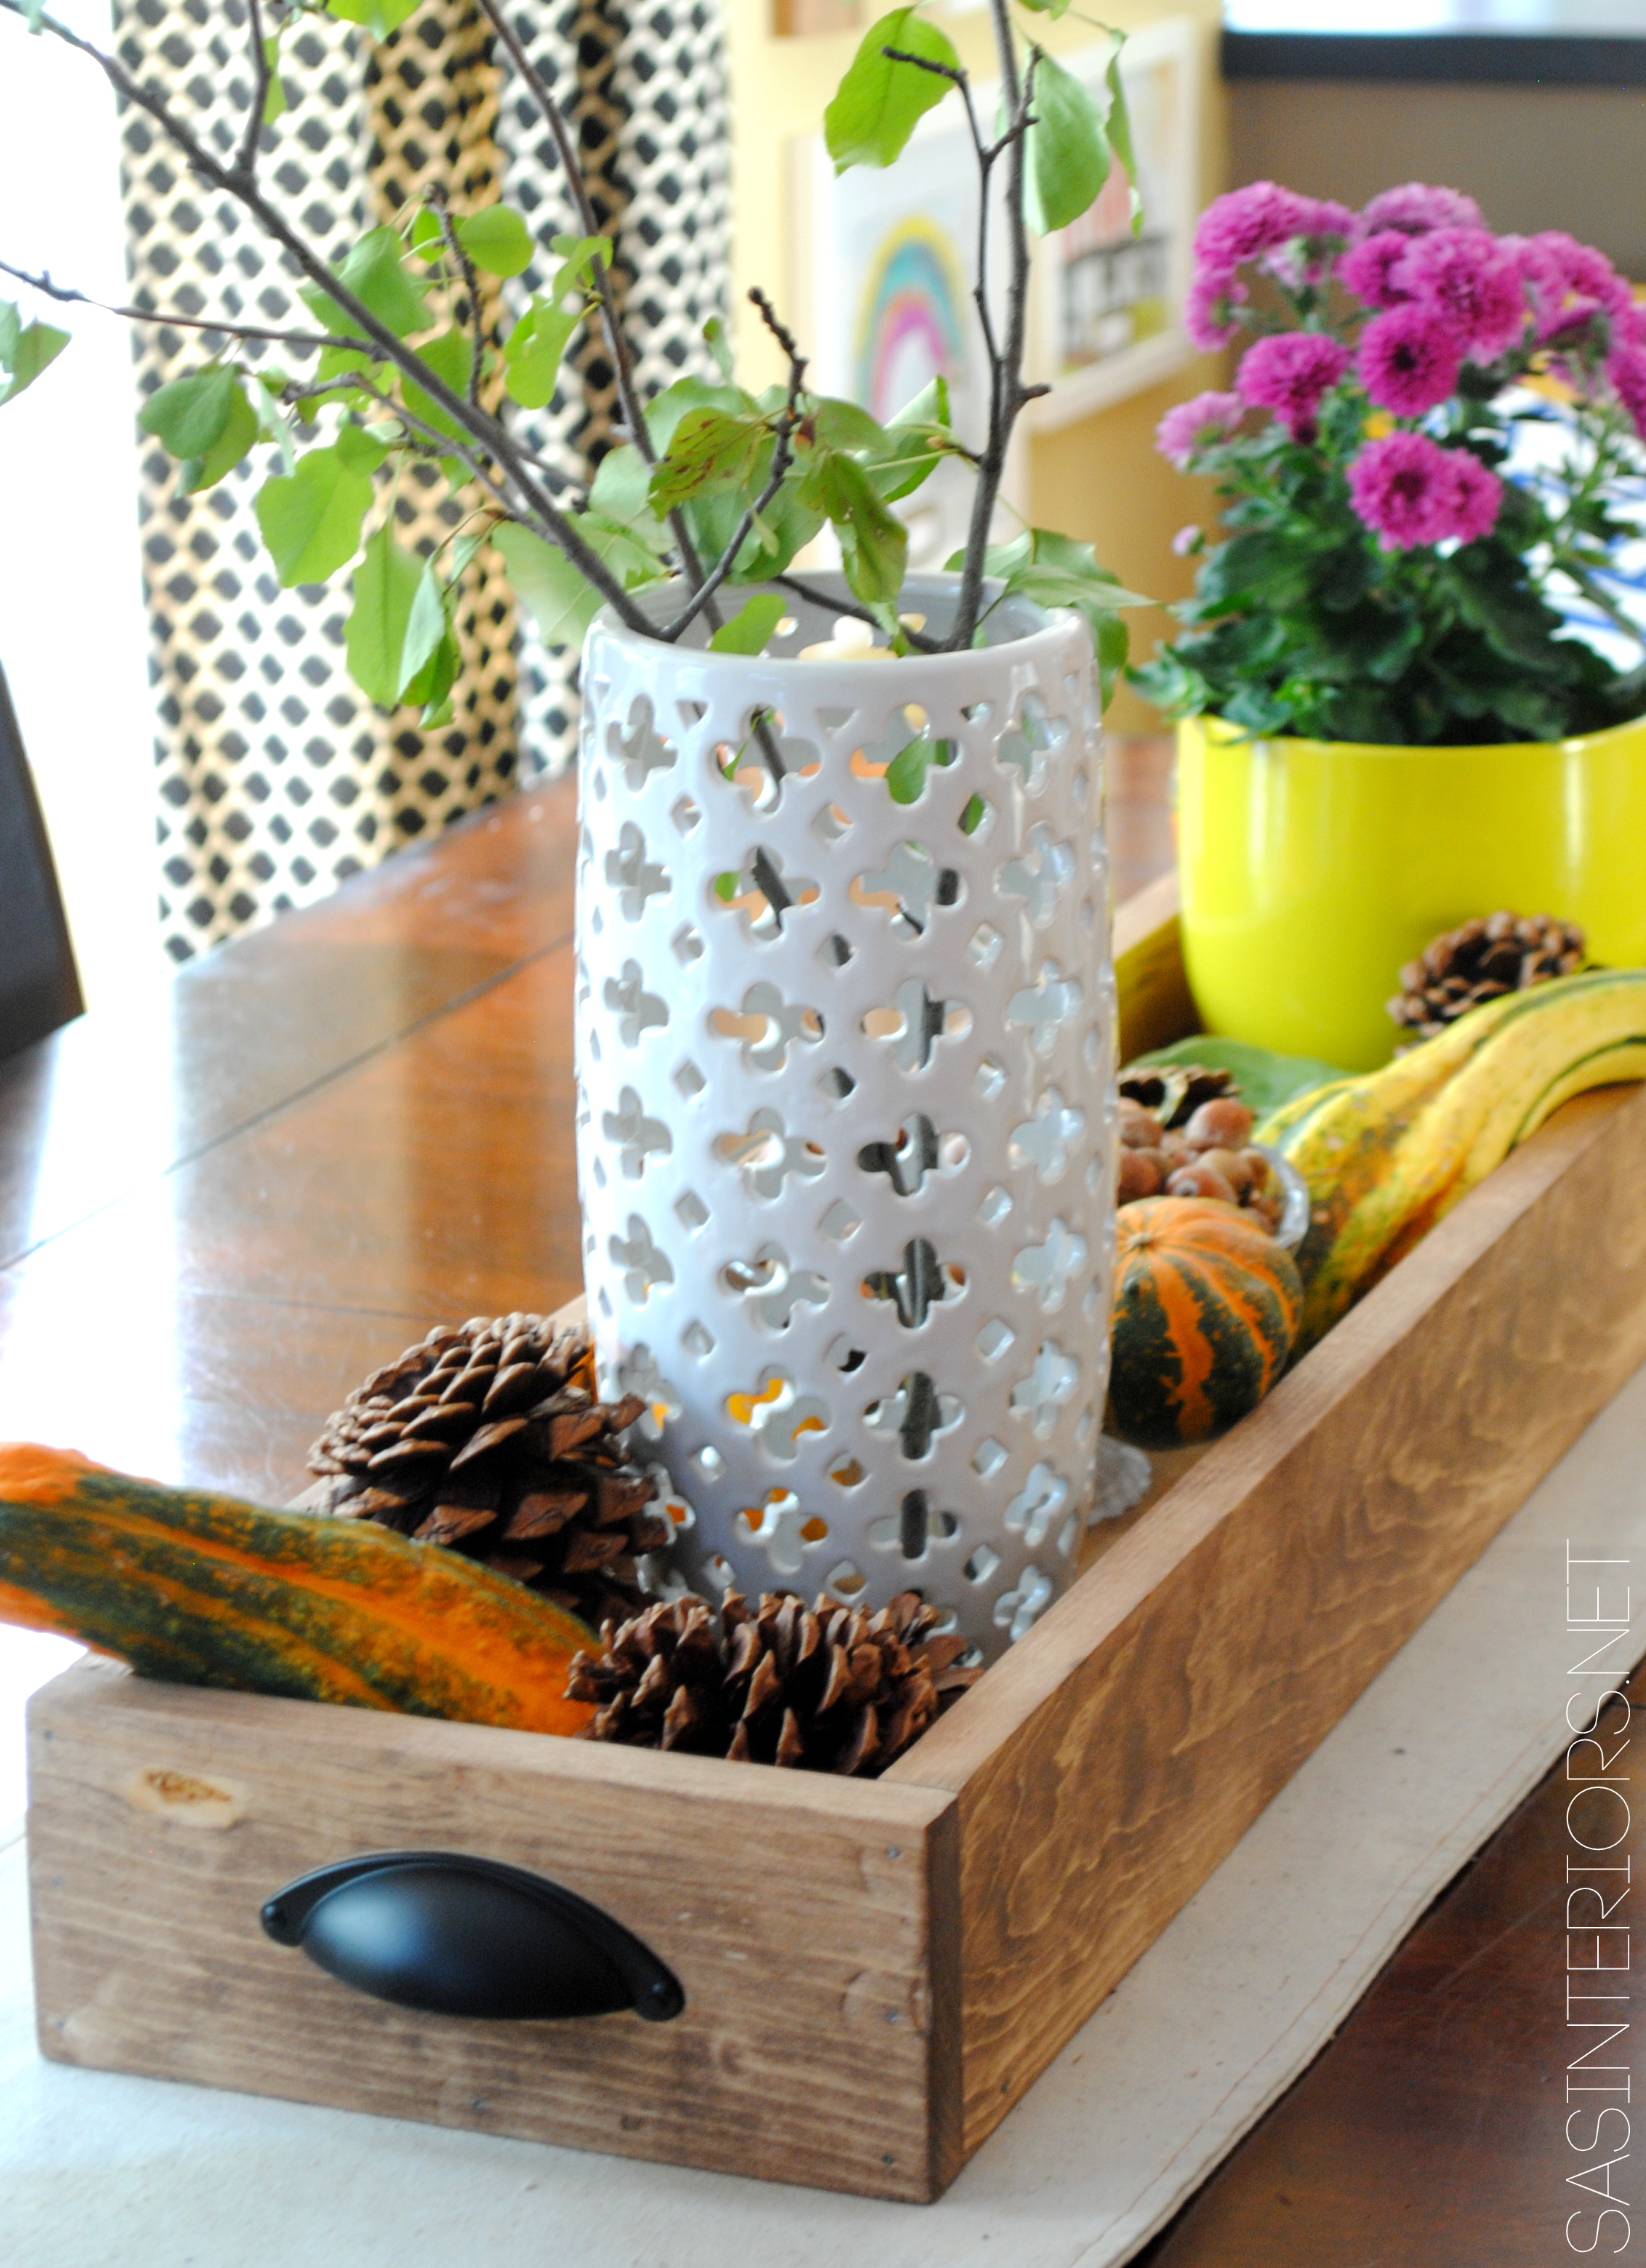
And I layered in pumpkins & gourds in varying shapes and sizes.

All of which I got at Lowe’s – not only my go to for building items, but seasonal needs.

Fall Front Porch using lots of COLOR + seasonal favorites including pumpkins, gourds, cornstalks, and mums! Full tour of this Fall Front Porch @ www.JennaBurger.com

That is pretty much it for specific decor for the season.  But even just those easy + simple touches layered in have a created a festive setting.

Fall Front Porch using lots of COLOR + seasonal favorites including pumpkins, gourds, cornstalks, and mums! Full tour of this Fall Front Porch @ www.JennaBurger.com

Many of the other elements for the porch were either in the same place as before or repurposed from someplace else in my house.  I also rotate items in and out throughout the year or season to keep things fresh and interesting.  When I find something I love, and especially if it’s affordable, I snag it.  I may use it immediately or hold on to it until the time comes when I have the ideal ‘home’.

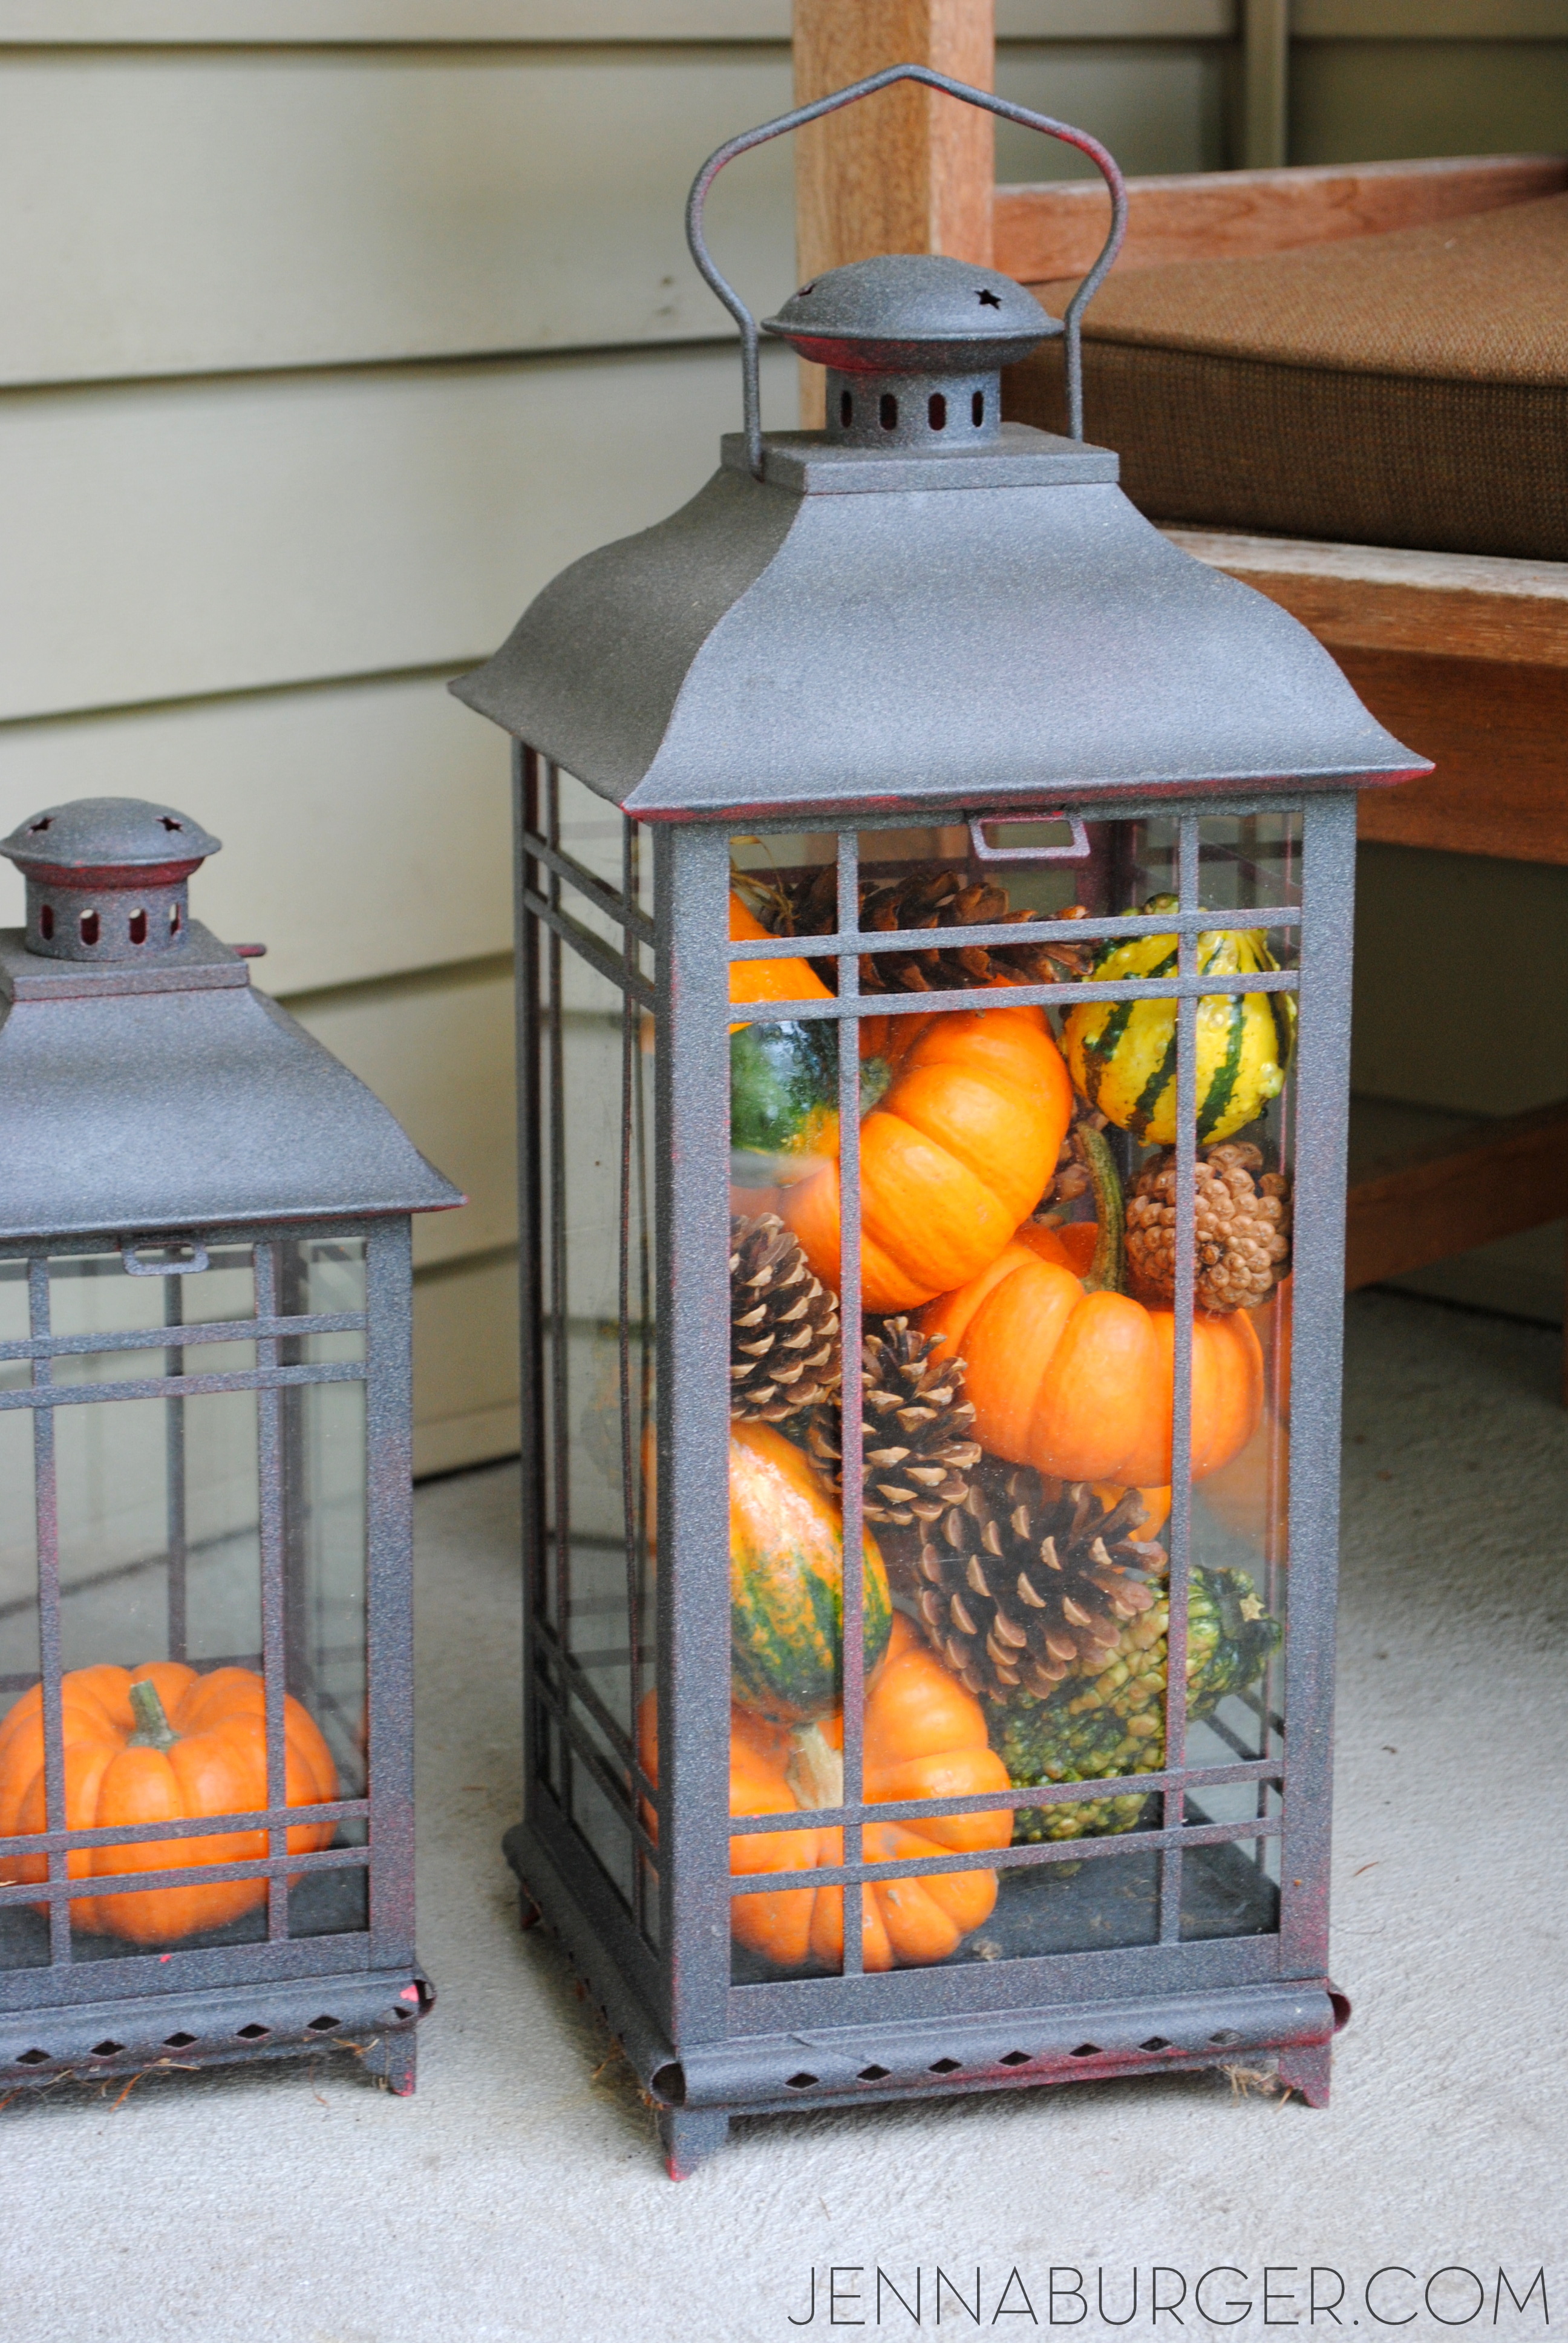
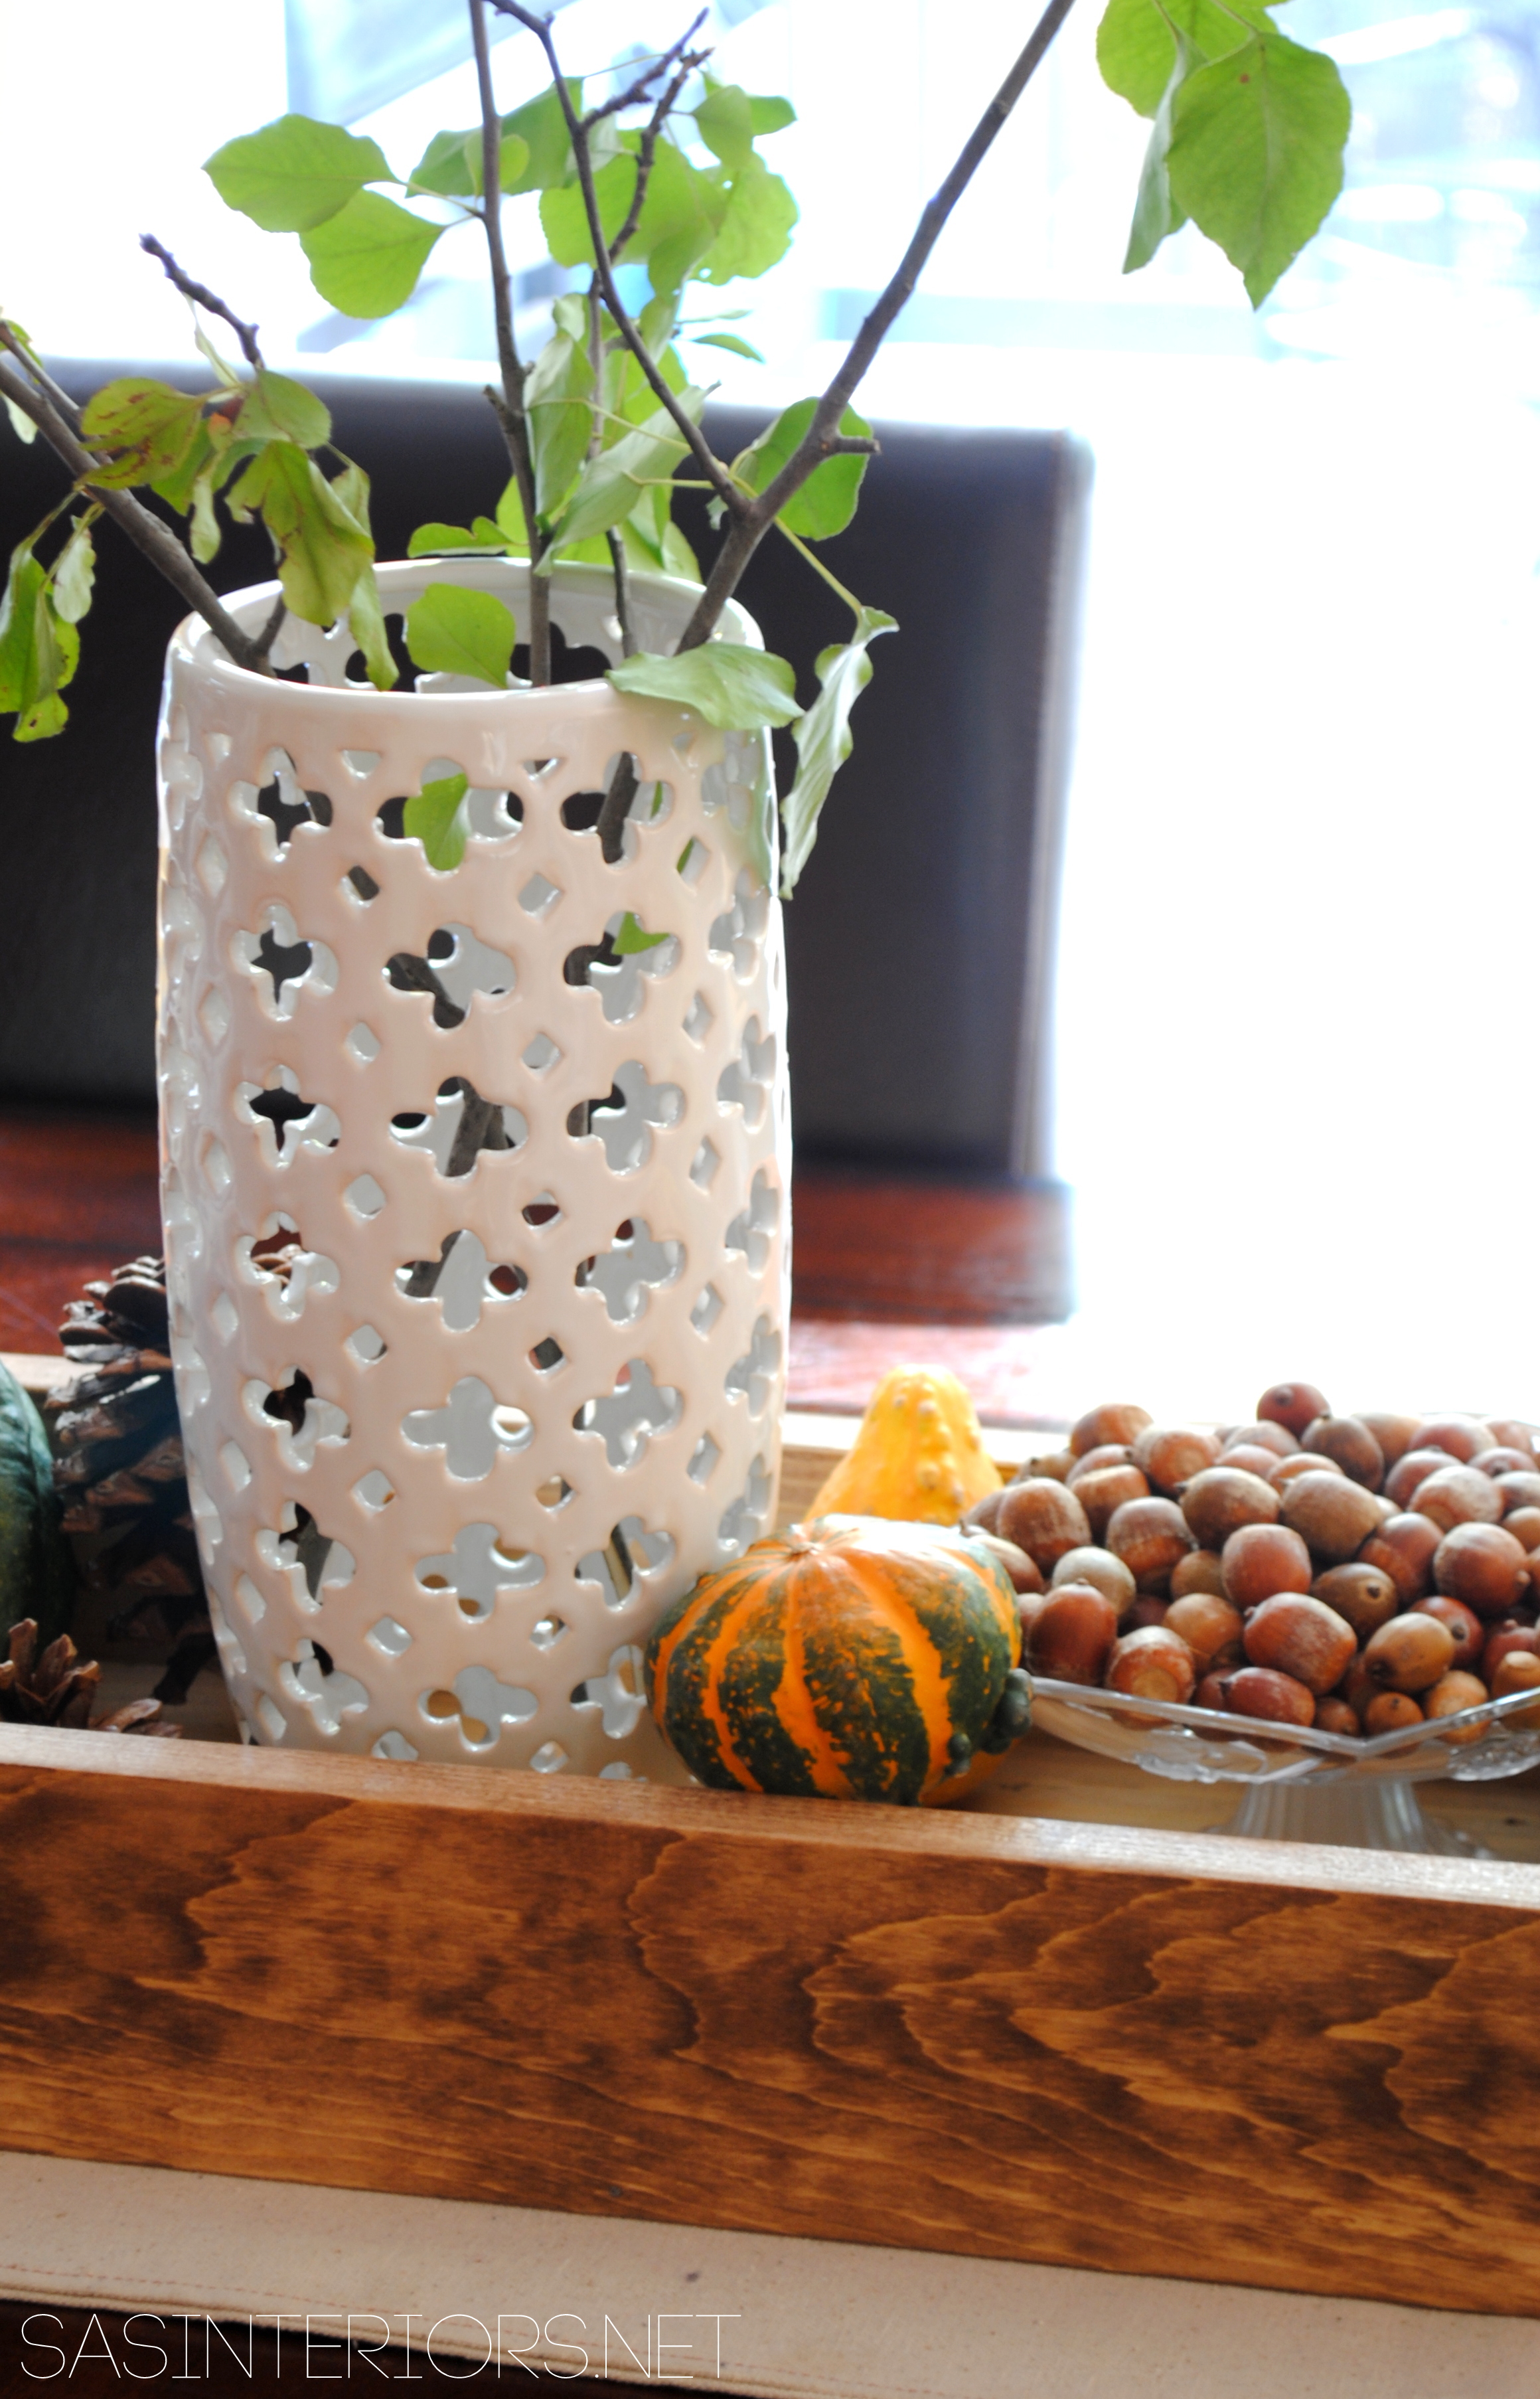
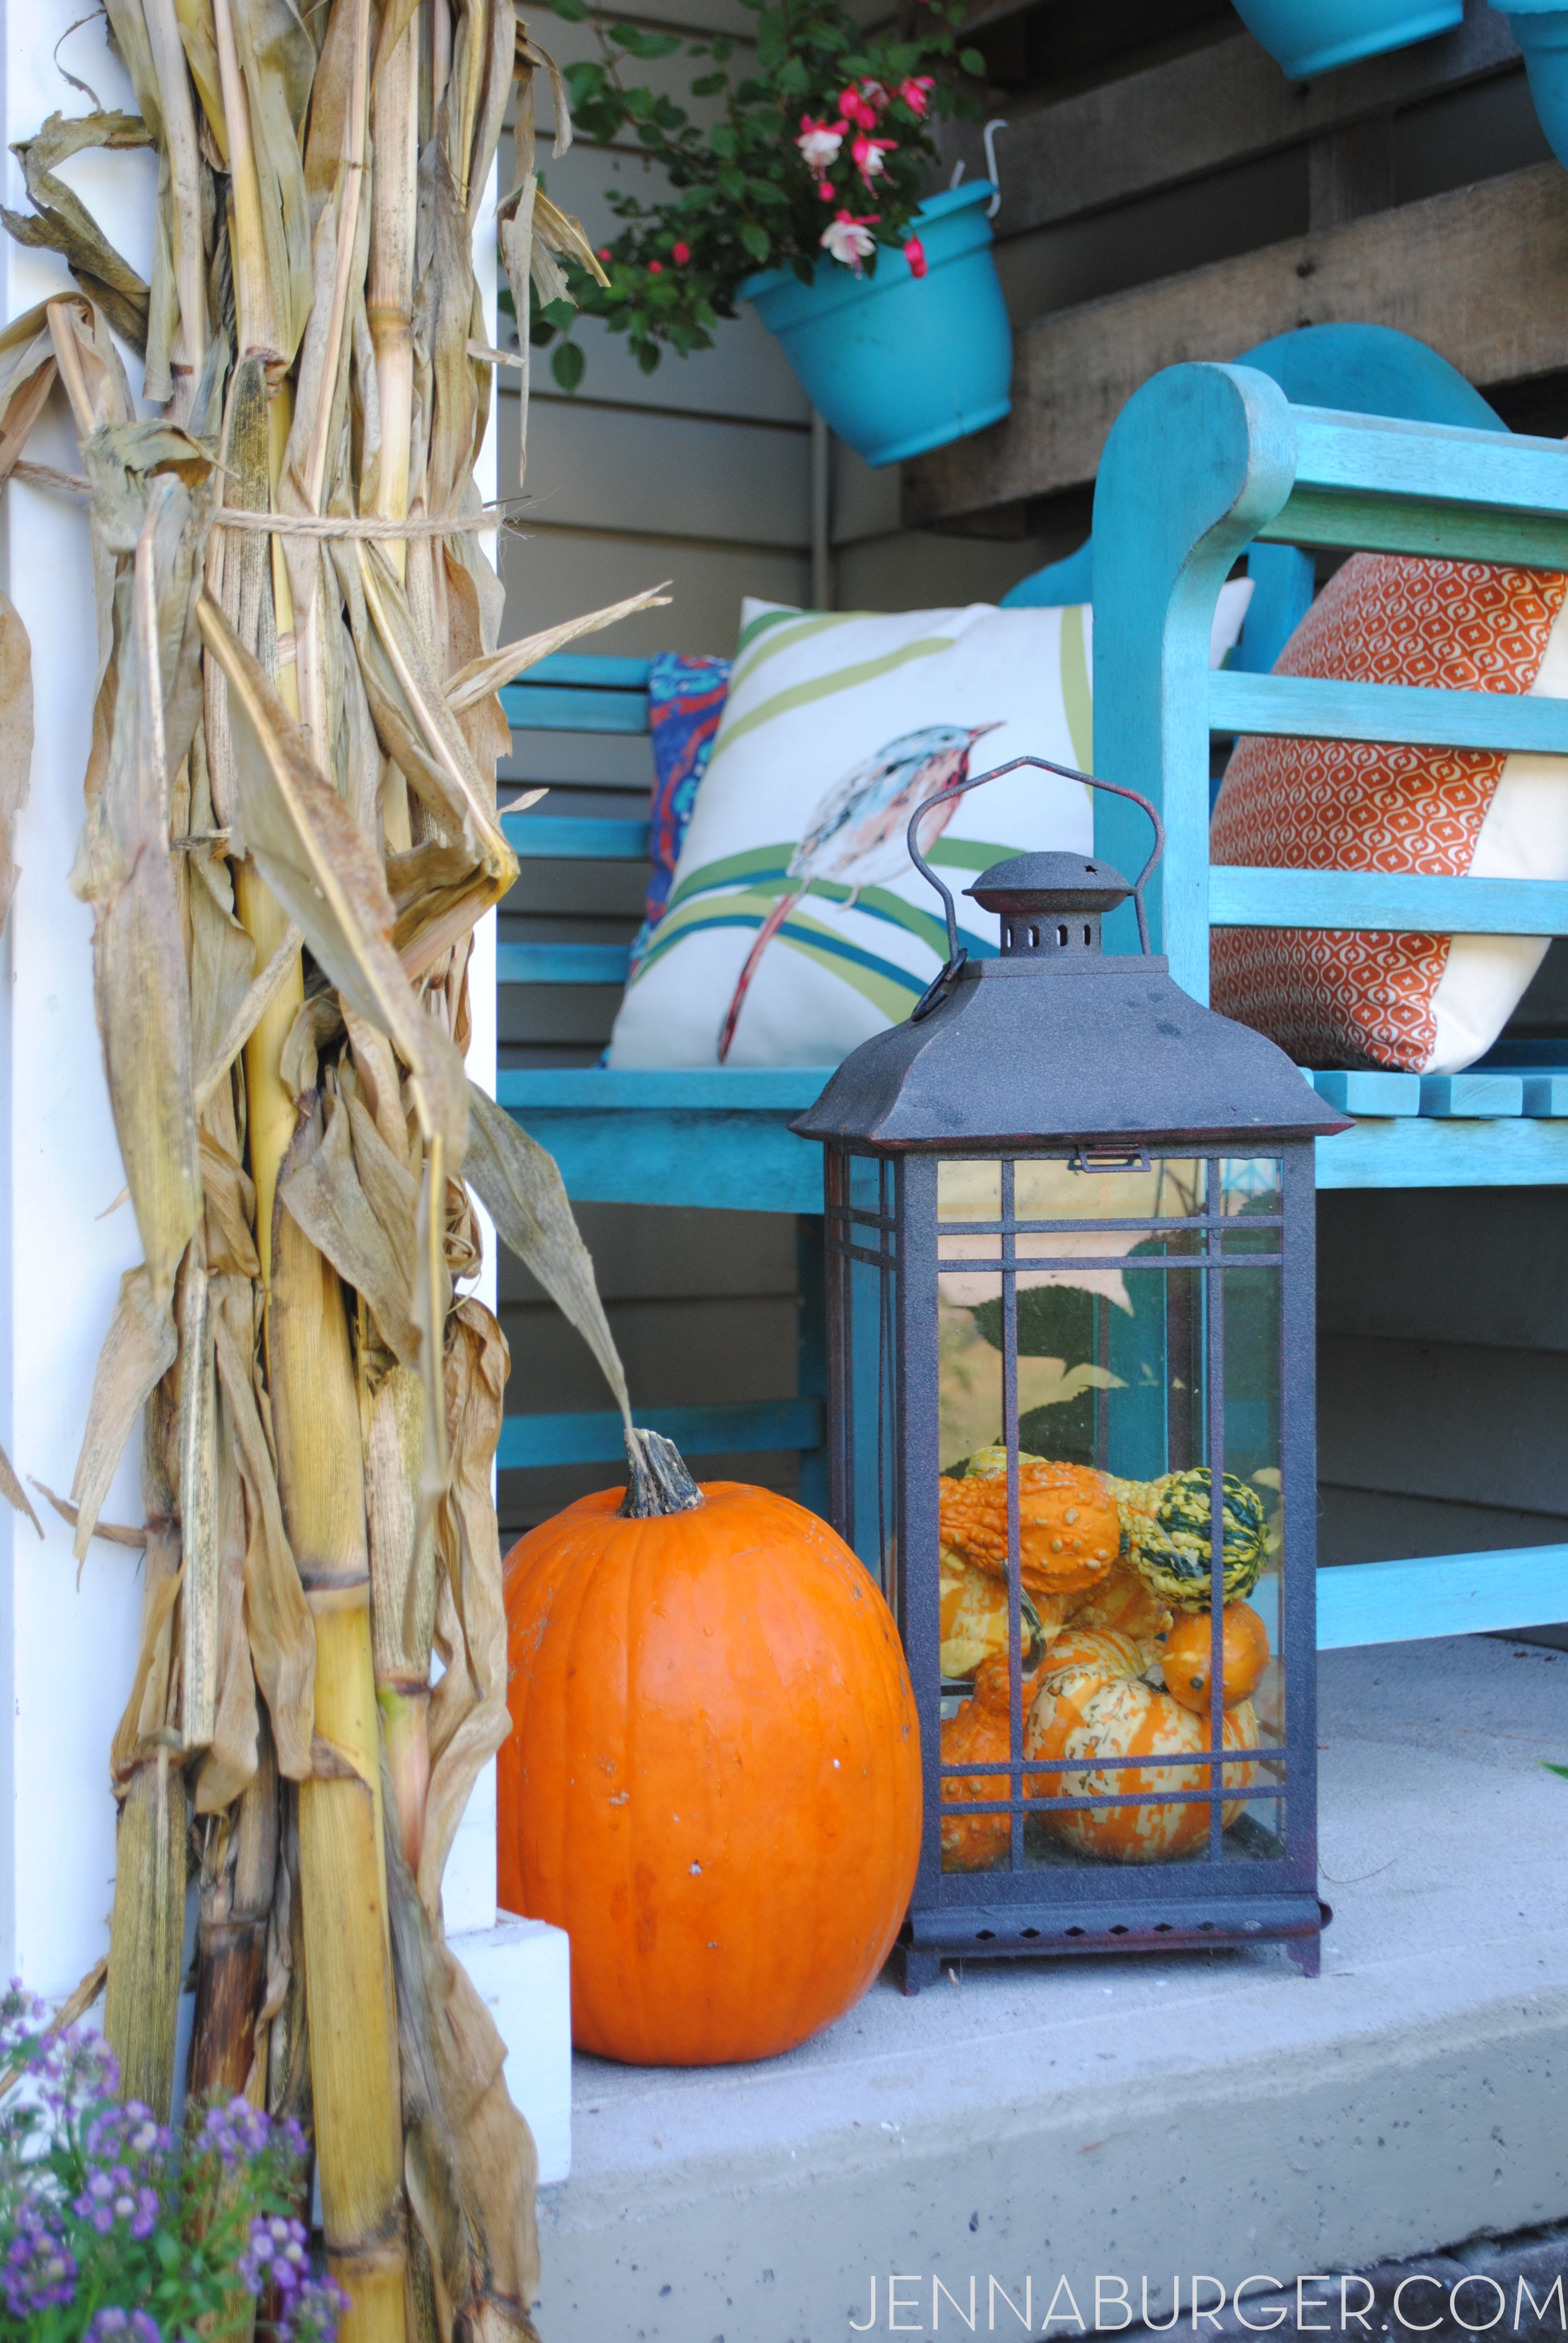
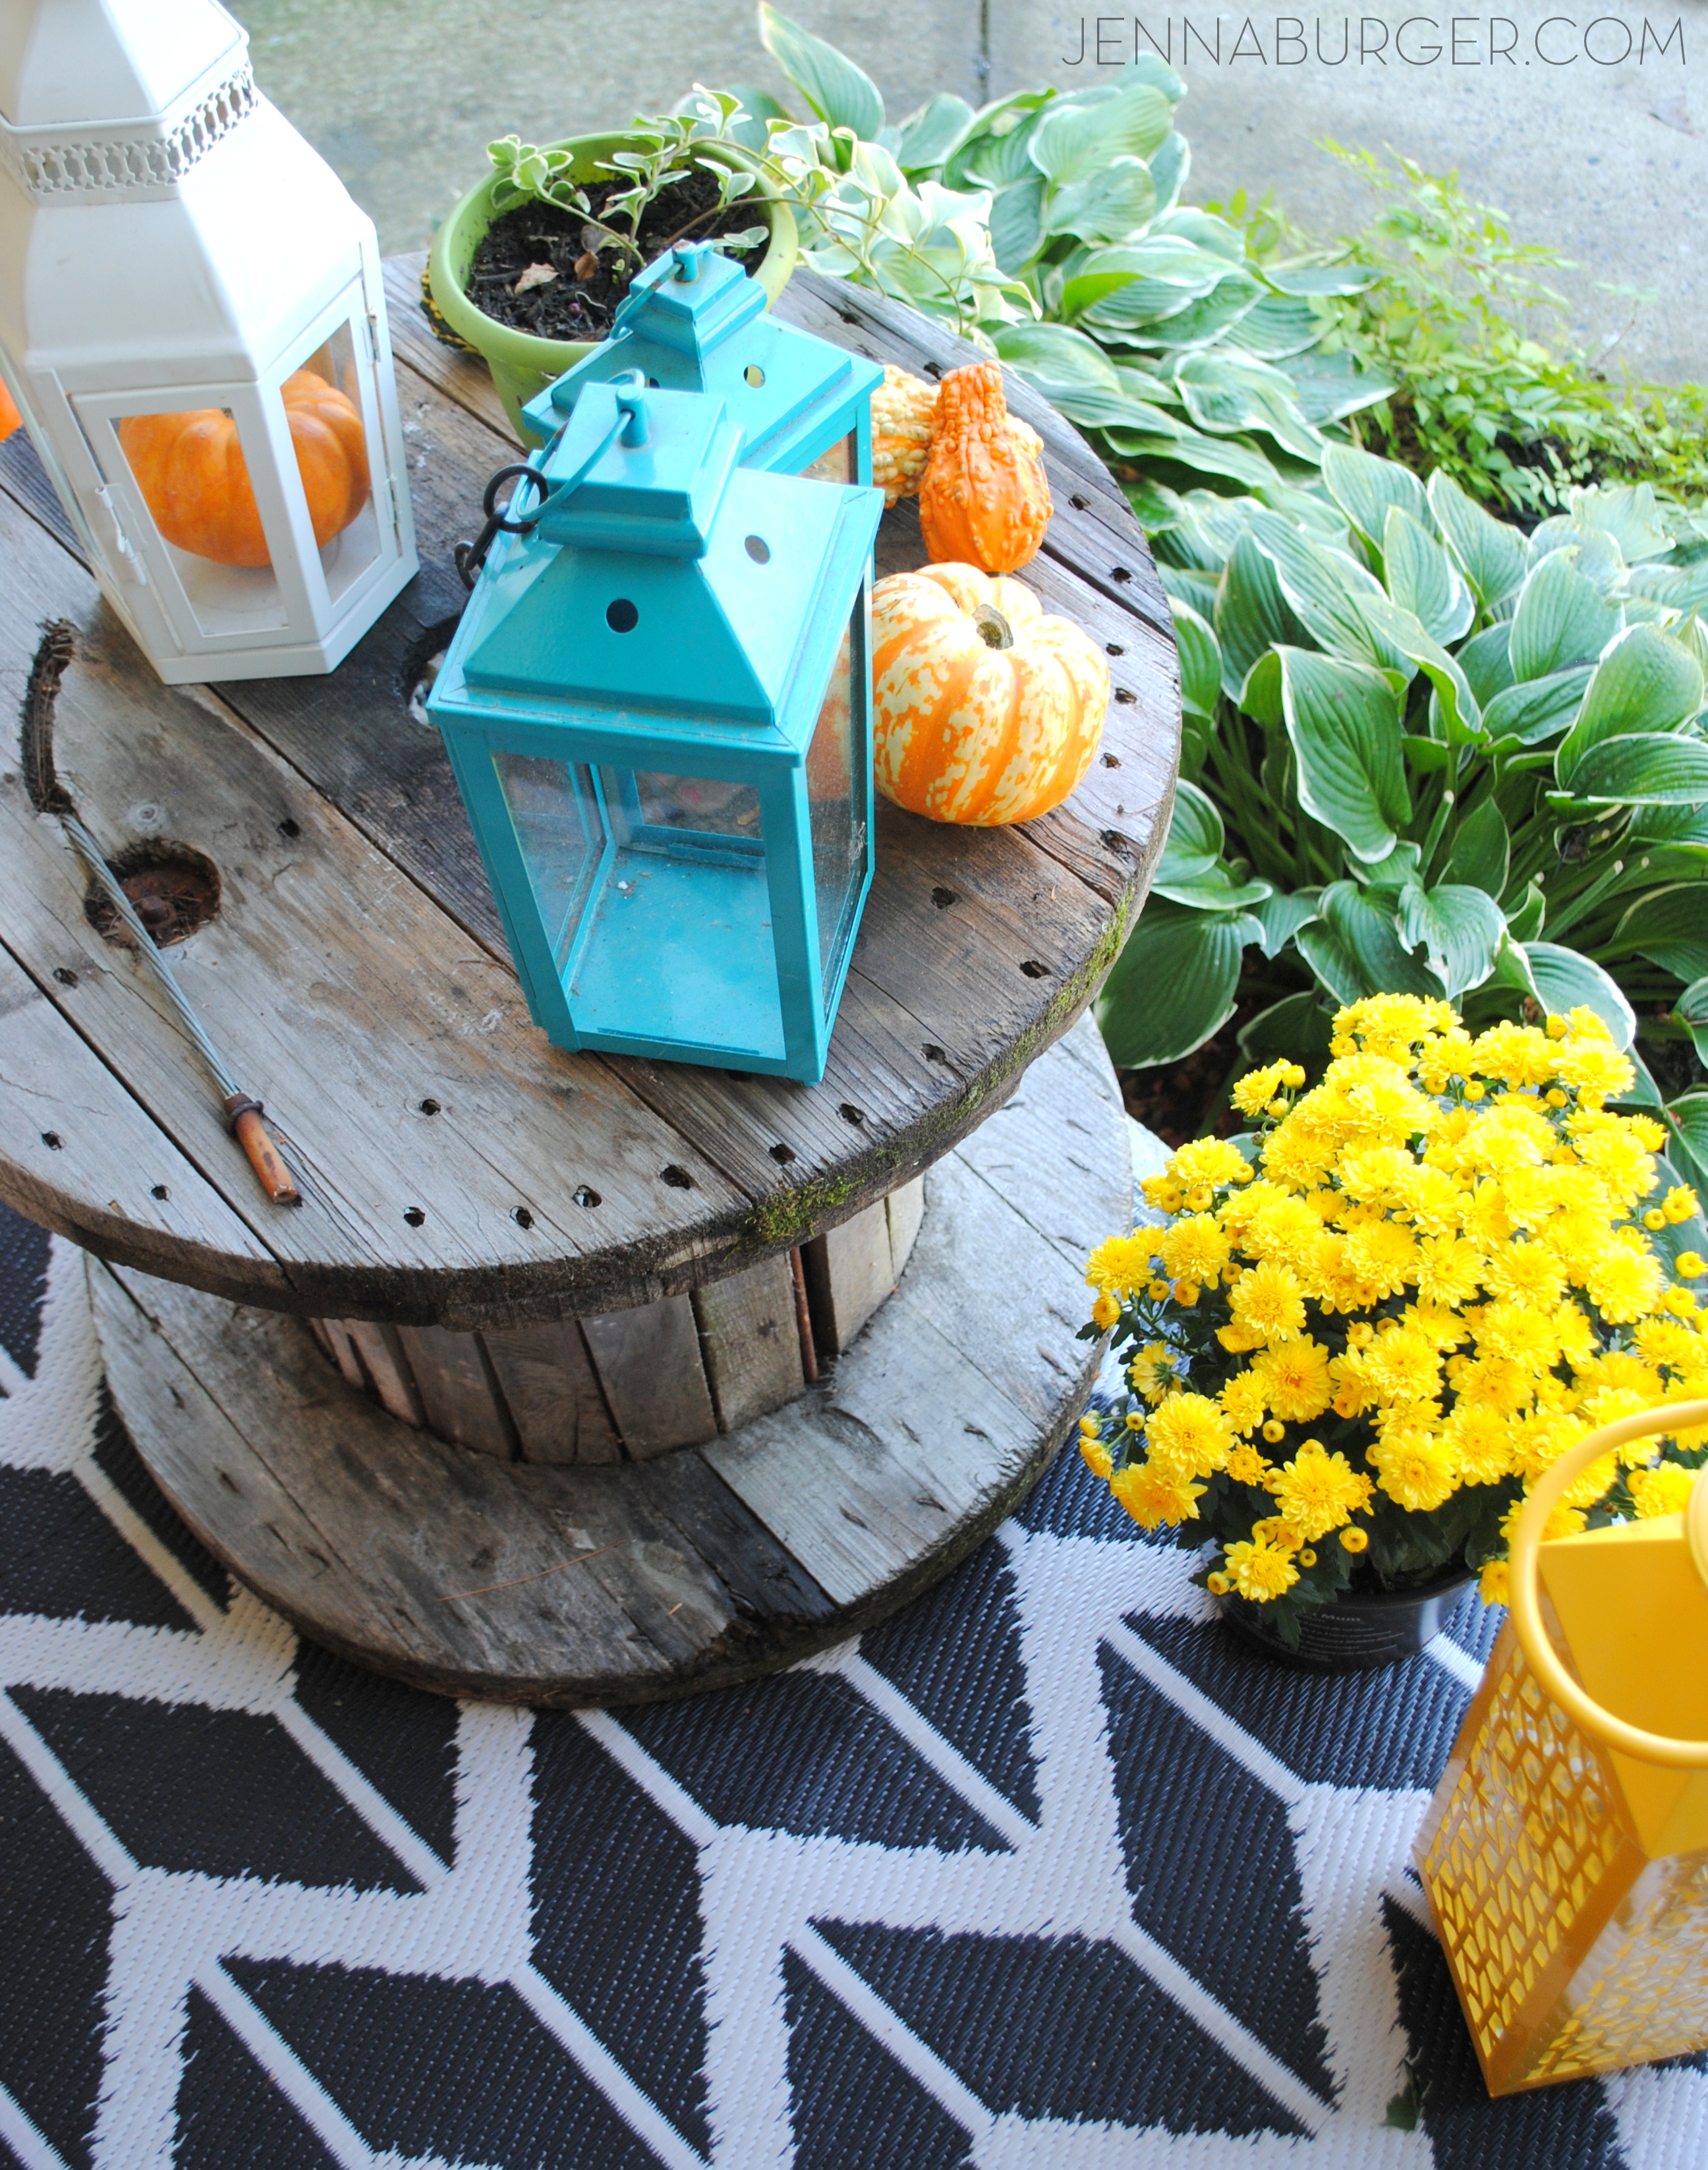
Lanterns are a favorite to fill with Fall favorites…

Fall Front Porch using lots of COLOR + seasonal favorites including pumpkins, gourds, cornstalks, and mums! Full tour of this Fall Front Porch @ www.JennaBurger.com

Some (keyword is, some) plants I started growing in the Spring are still going strong – surprising, I know.  This beauty is great for shaded spots and it actually ‘died’ soon after I got it.  I never got around to throwing it away after all the leaves curled up and fell off.  But guess what, it came back to life and has been doing great ever since.

Adding in a few pumpkins at it’s base has instantly brought it from Summer to Fall.

Fall Front Porch using lots of COLOR + seasonal favorites including pumpkins, gourds, cornstalks, and mums! Full tour of this Fall Front Porch @ www.JennaBurger.com

Fall Front Porch using lots of COLOR + seasonal favorites including pumpkins, gourds, cornstalks, and mums! Full tour of this Fall Front Porch @ www.JennaBurger.com

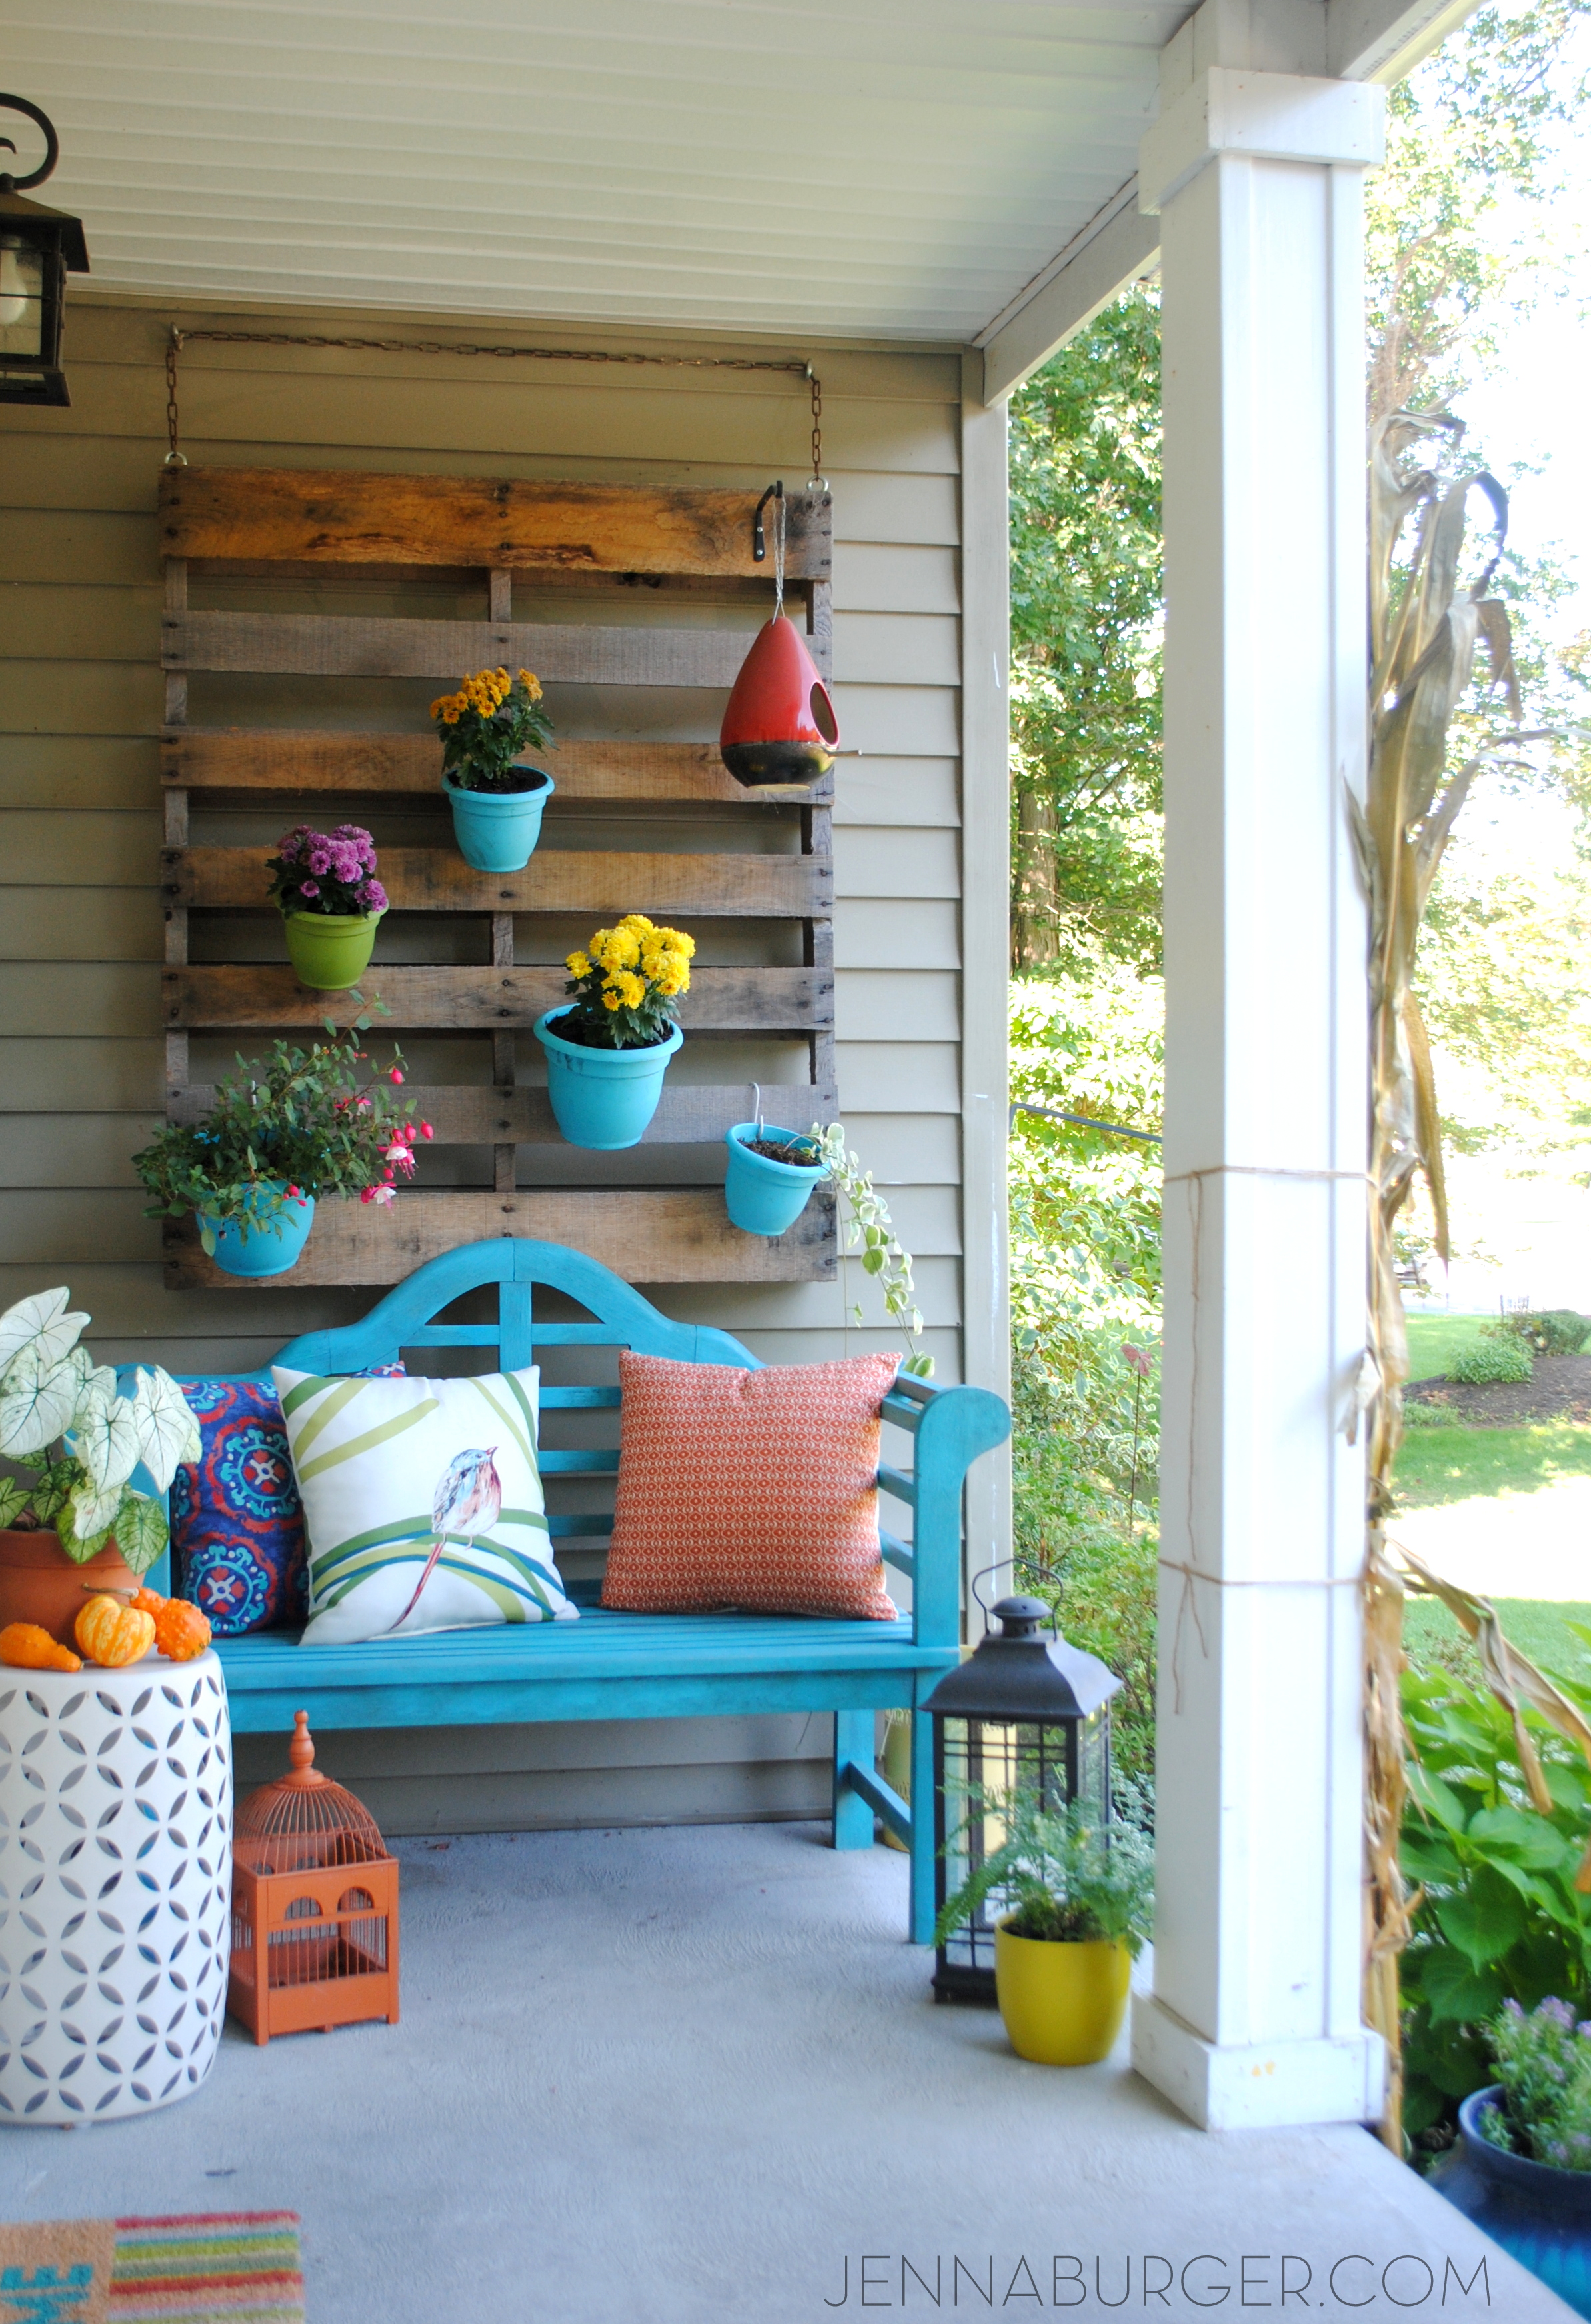
I love the burst of color that the pumpkins + gourds have brought to the porch.  They mix in beautifully with the turquoise lutchens bench & other elements like the orange birdhouse & yellow planted fern.

Fall Front Porch using lots of COLOR + seasonal favorites including pumpkins, gourds, cornstalks, and mums! Full tour of this Fall Front Porch @ www.JennaBurger.com

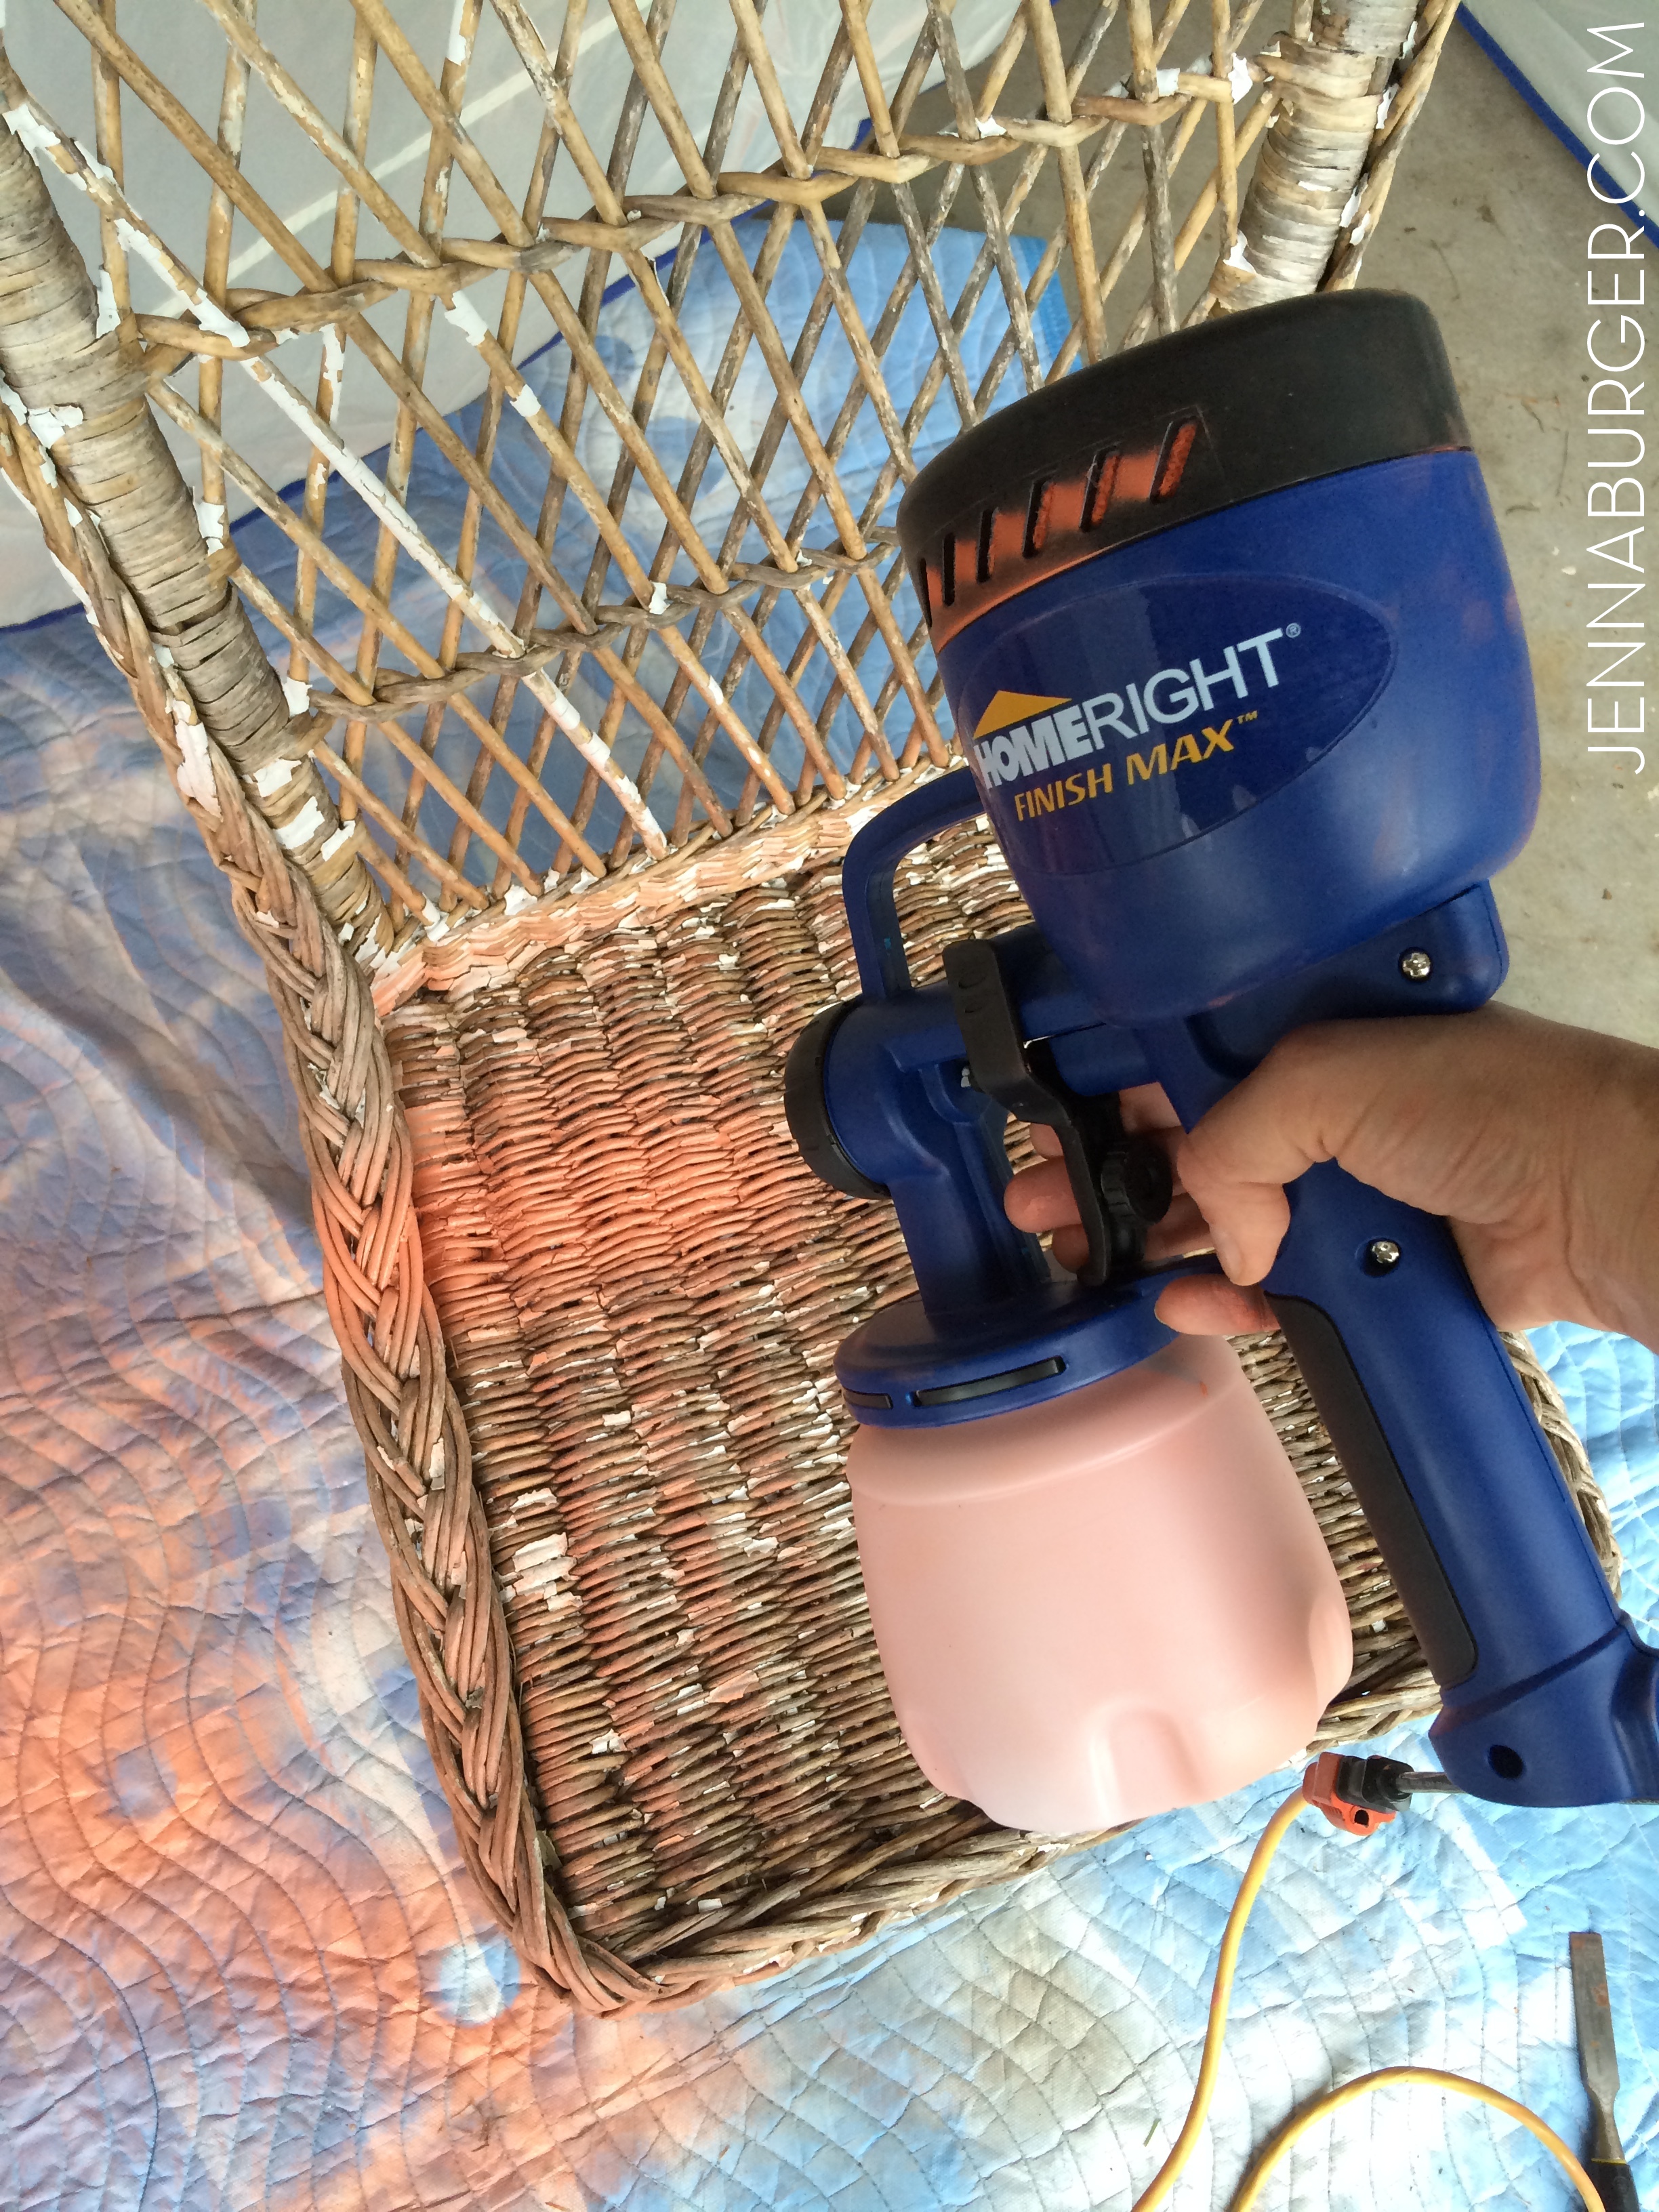
This side of the porch got a revamp with 2 new chairs & a table.  The cedar chairs from before had lived long enough. I wanted to bring in a splash of color to which 2 new chairs, specifically wicker, were the perfect spot.

Fall Front Porch using lots of COLOR + seasonal favorites including pumpkins, gourds, cornstalks, and mums! Full tour of this Fall Front Porch @ www.JennaBurger.com

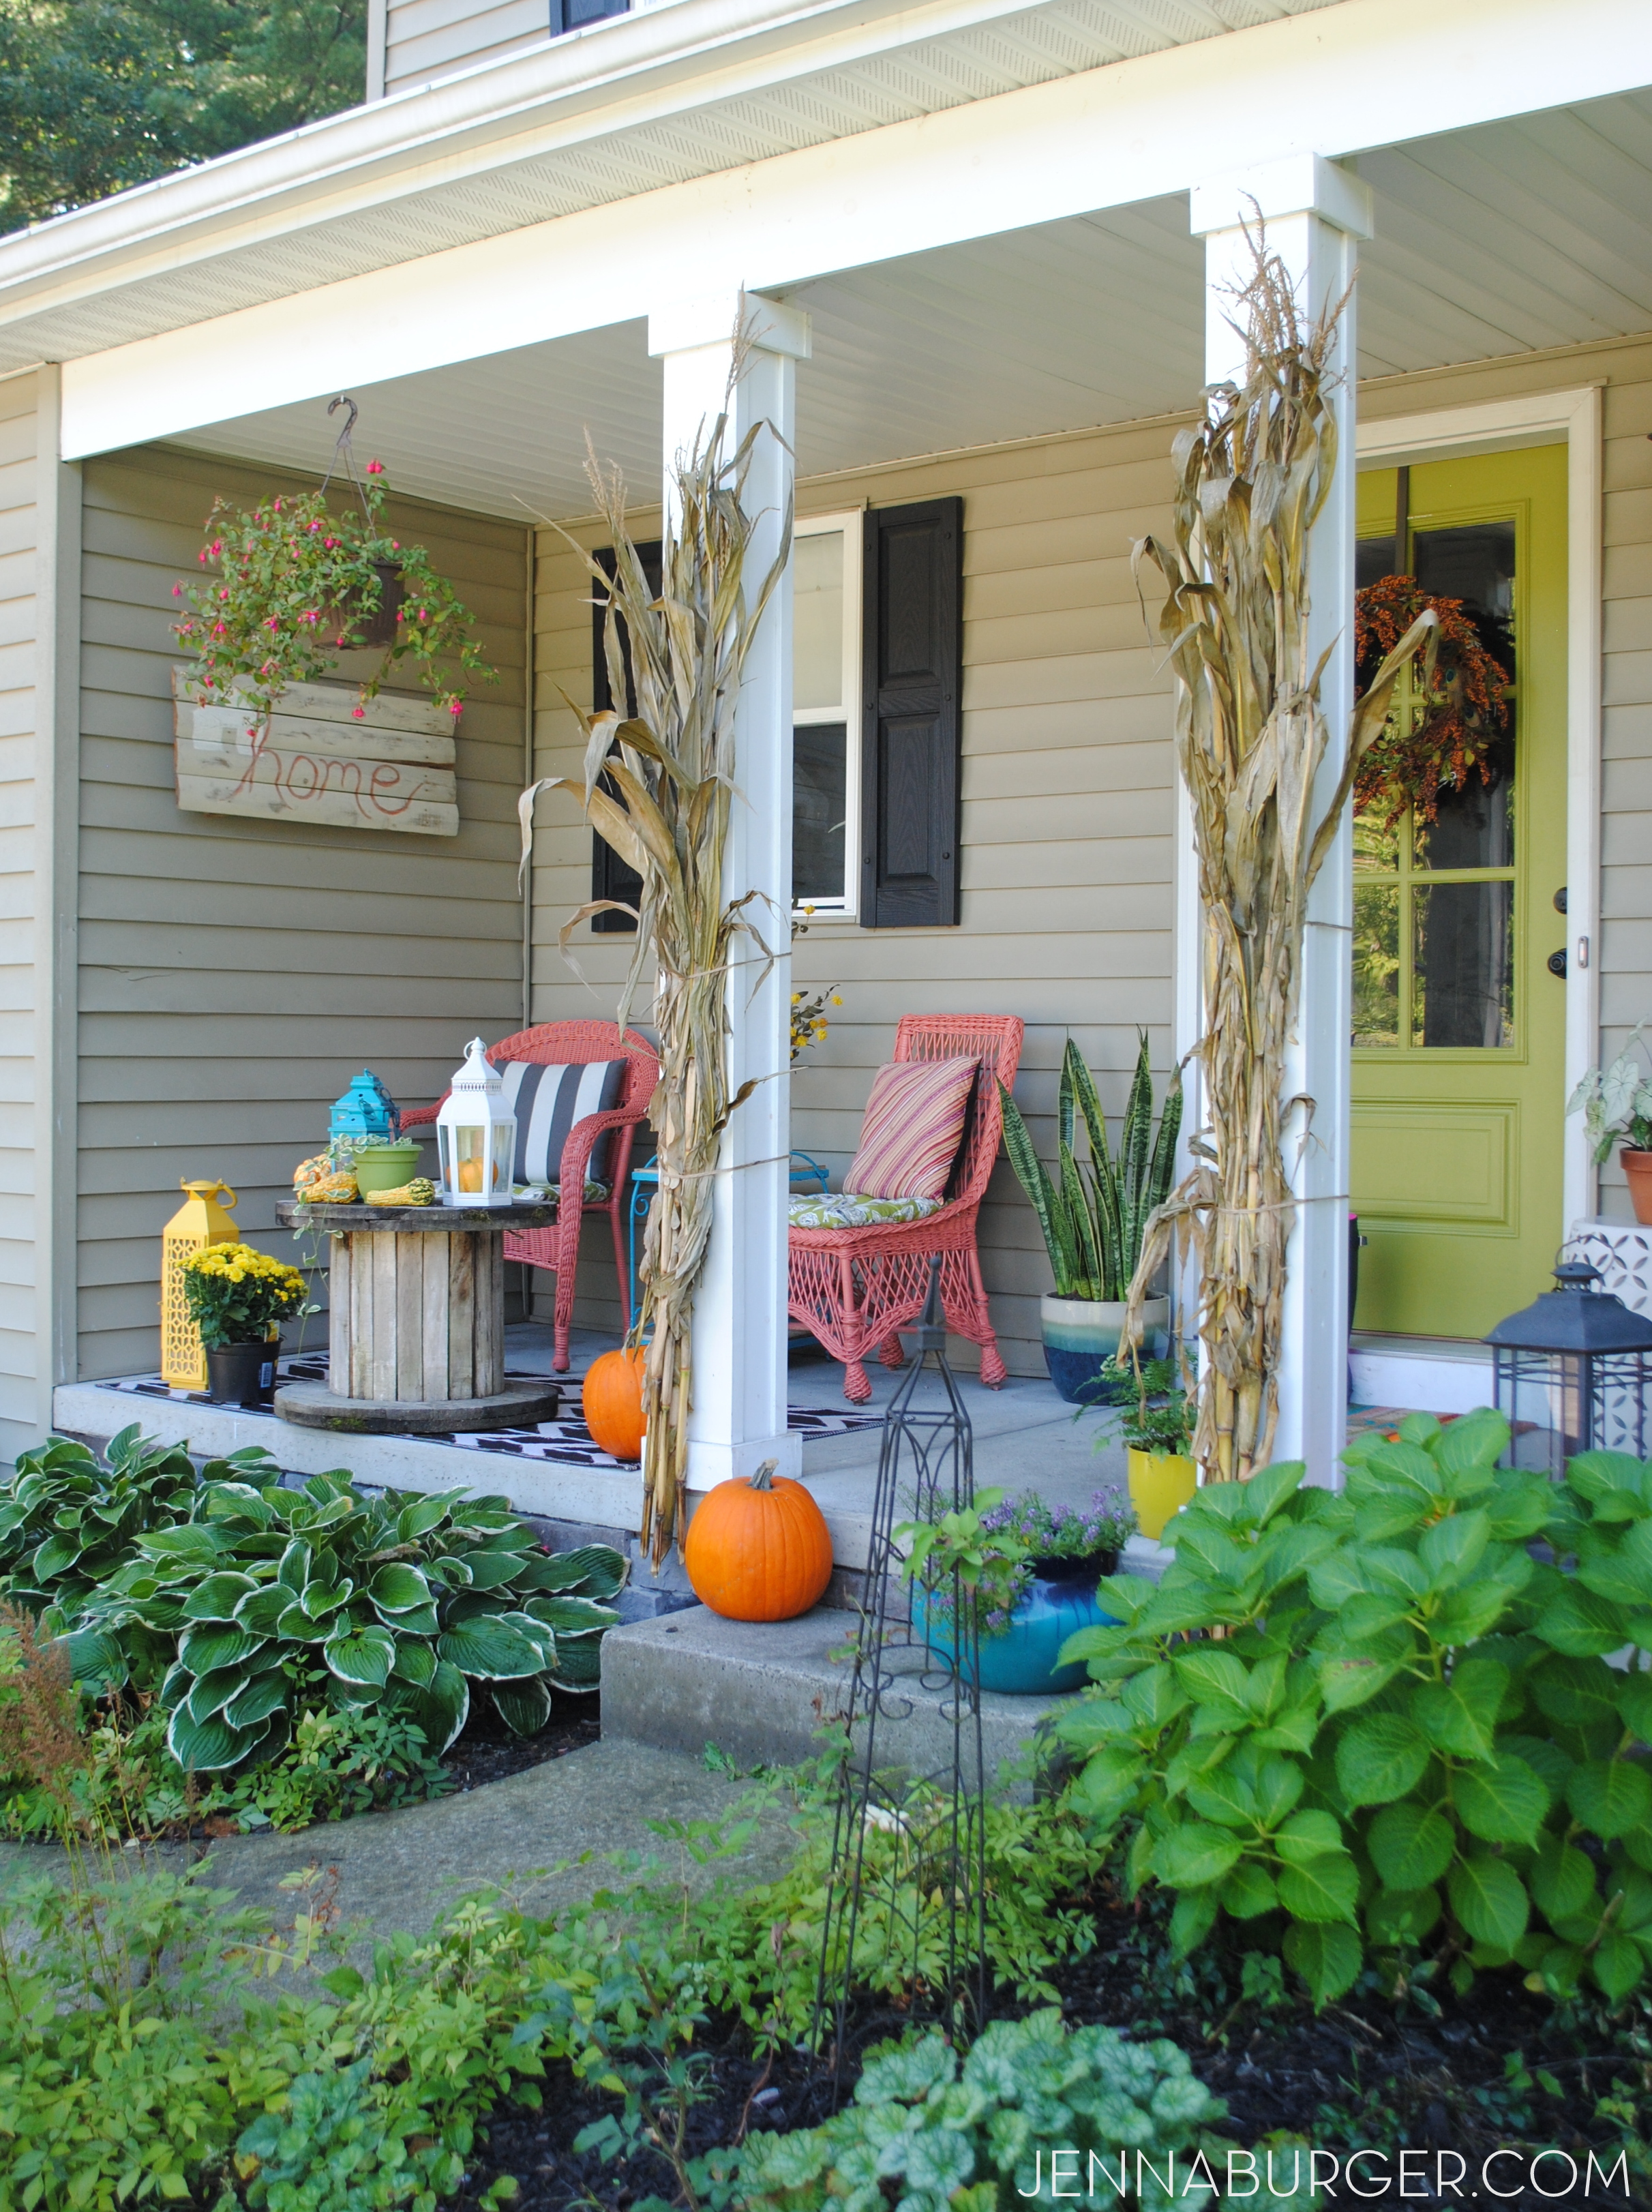
It’s amazing that these 2 chairs were falling apart & completely different colors.  Even though they are differing styles, they are unified by the vibrant coral hue.

Using the HomeRight Finish Max hand sprayer to paint them made my life so much easier (TUTORIAL FOR > PAINTING WICKER)

DIY tutorial for painting wicker using the HomeRight finish max hand sprayer. I painted 2 wicker chairs in less than 10 minutes. That would be impossible with a paint brush. A hand sprayer is a MUST TOOL for paint projects. Check out a step-by-step tutorial + video of how fast it covers > www.jennaburger.com

Fall Front Porch using lots of COLOR + seasonal favorites including pumpkins, gourds, cornstalks, and mums! Full tour of this Fall Front Porch @ www.JennaBurger.com

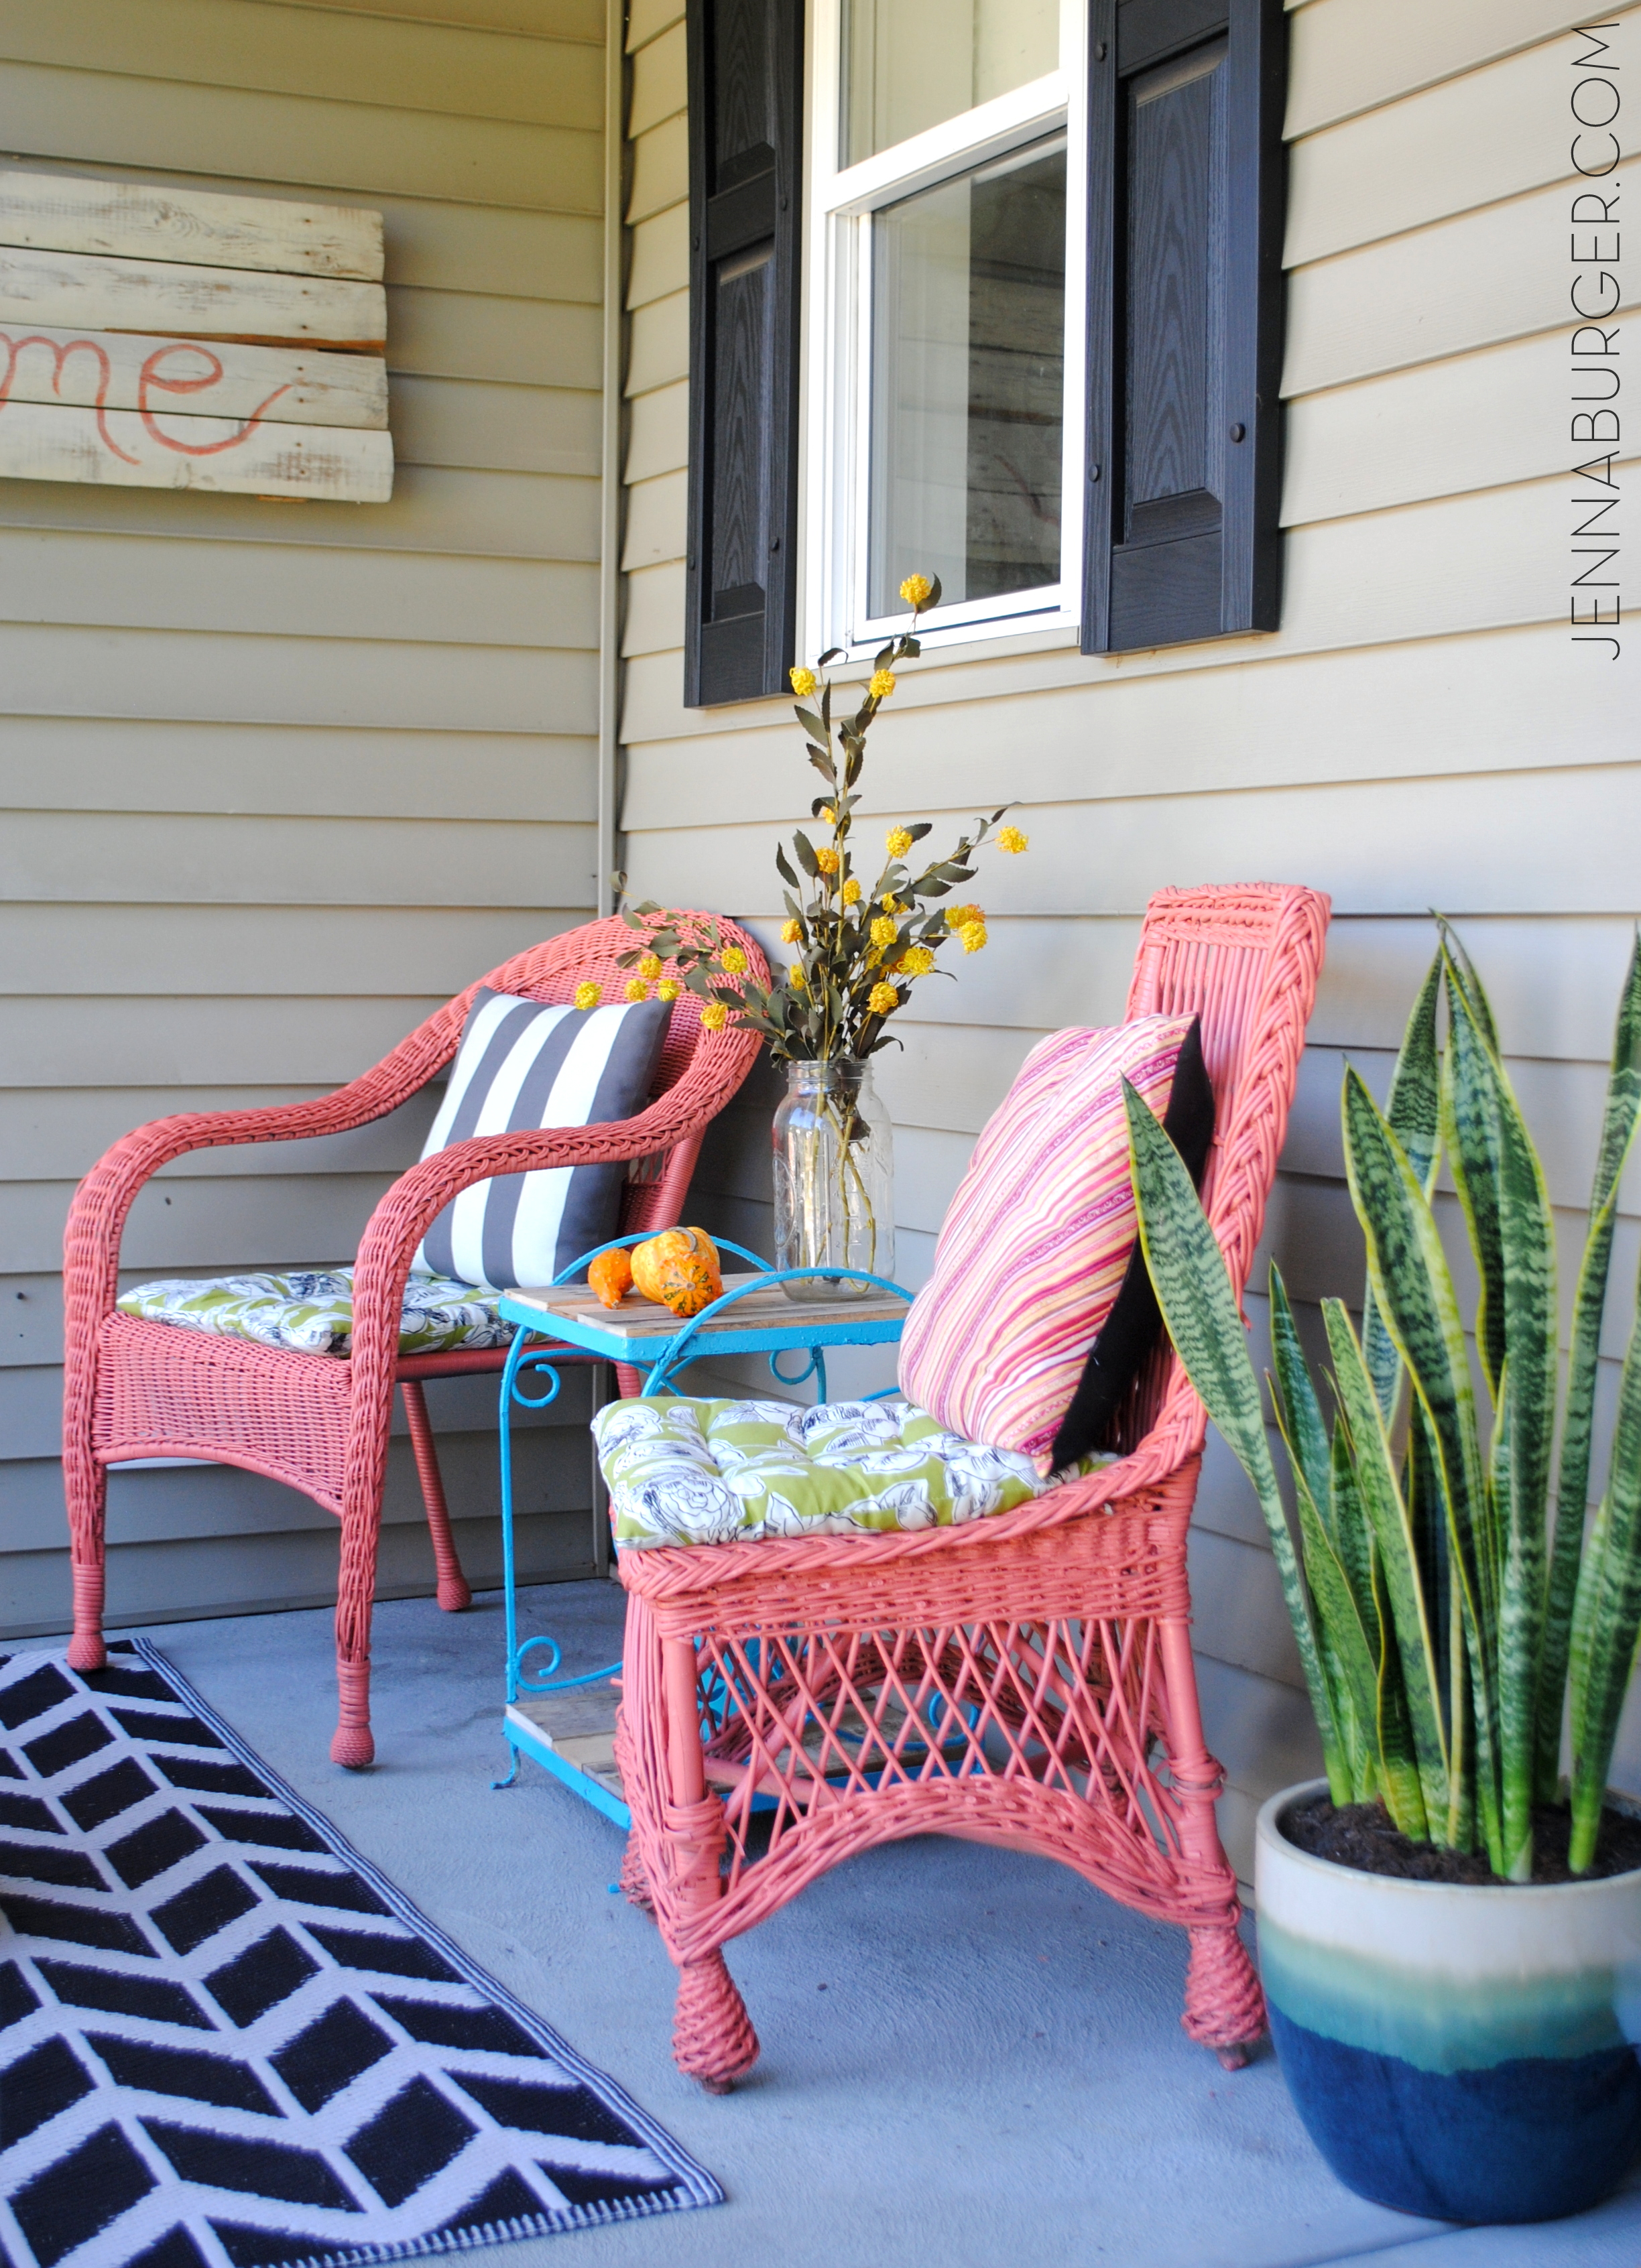
I adore how the turquoise table with the rustic wood planks that I added looks great with the coral.  This table is the same turquoise as the lutchens bench so it’s the perfect extension of color.

Before and After garage sale metal table transformed with spray paint

Fall Front Porch using lots of COLOR + seasonal favorites including pumpkins, gourds, cornstalks, and mums! Full tour of this Fall Front Porch @ www.JennaBurger.com

Our family are definitely front porch sitters (versus back deck loungers) and we spend a lot of time here.  From watching the kids ride bikes to enjoying a cup of coffee + book, many hours are spent enjoying this front porch.

Along with spots for sitting, I also needed a place to rest our drinks or play a card game.  Along with the turquoise table, I repurposed the round wire spool as a “coffee table” in front of the chairs.

That wood spool for winding large wire + cable was found on the side of the road years ago.  I still love it.  What I do for ‘treasures’ would amaze you.  Or freak you out…

Fall Front Porch using lots of COLOR + seasonal favorites including pumpkins, gourds, cornstalks, and mums! Full tour of this Fall Front Porch @ www.JennaBurger.com

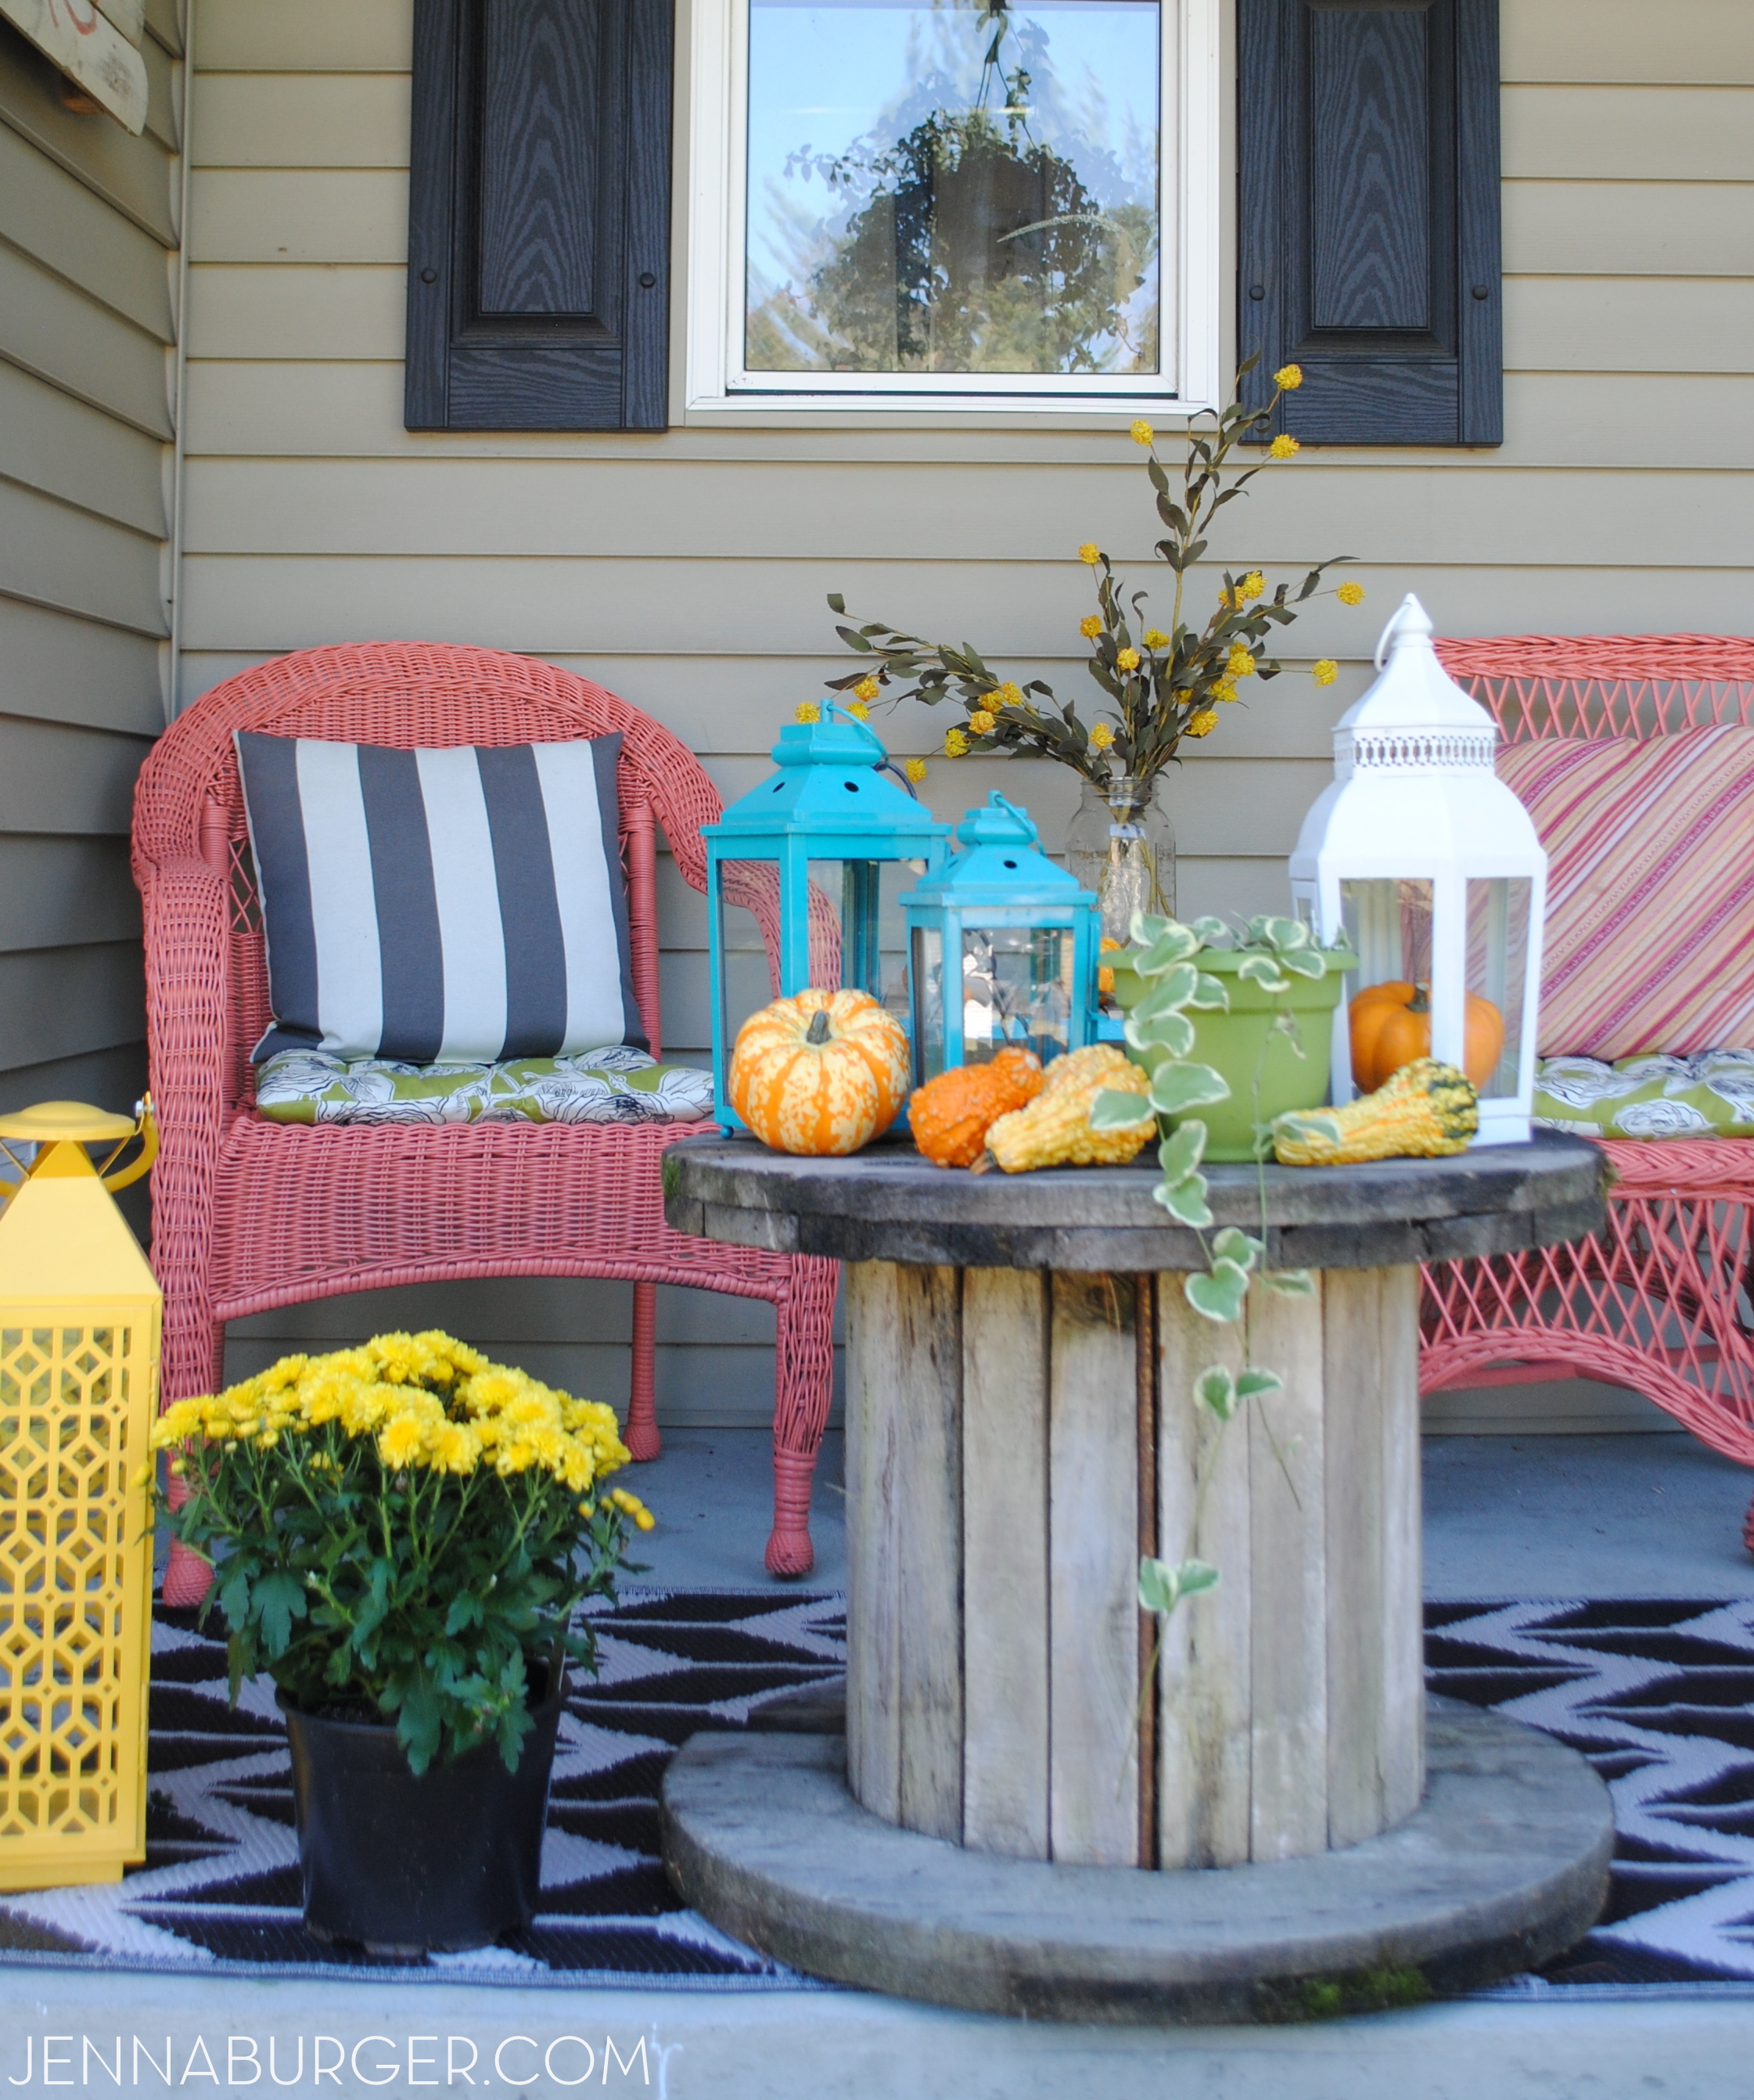
The wood spool “table” is about 24″ round so it’s the perfect size for a pretty vignette of lanterns + gourds.

Fall Front Porch using lots of COLOR + seasonal favorites including pumpkins, gourds, cornstalks, and mums! Full tour of this Fall Front Porch @ www.JennaBurger.com

An overall view.

Fall Front Porch using lots of COLOR + seasonal favorites including pumpkins, gourds, cornstalks, and mums! Full tour of this Fall Front Porch @ www.JennaBurger.com

SHOP MY SPACE.

Create a front porch like mine by shopping your home or purchasing similar items.

front door color -Valspar Crushed Oregano 6000-6C, semi-gloss finish
wreath – DIY tutorial
white garden stool – Lowe’s
turquoise lutyens bench
vertical pallet garden – DIY tutorial
bird pillow – Lowe’s
blue / turquoise ceramic pot -Lowe’s
two toned blue planter (on step) – Lowe’s
coral chairs – DIY tutorial
chevron rug – Five Below
tall yellow lantern – Homegoods
turquoise lanterns – Target
white lanterns – Lowe’s
pumpkins + gourds + cornstalks + mums – Lowe’s

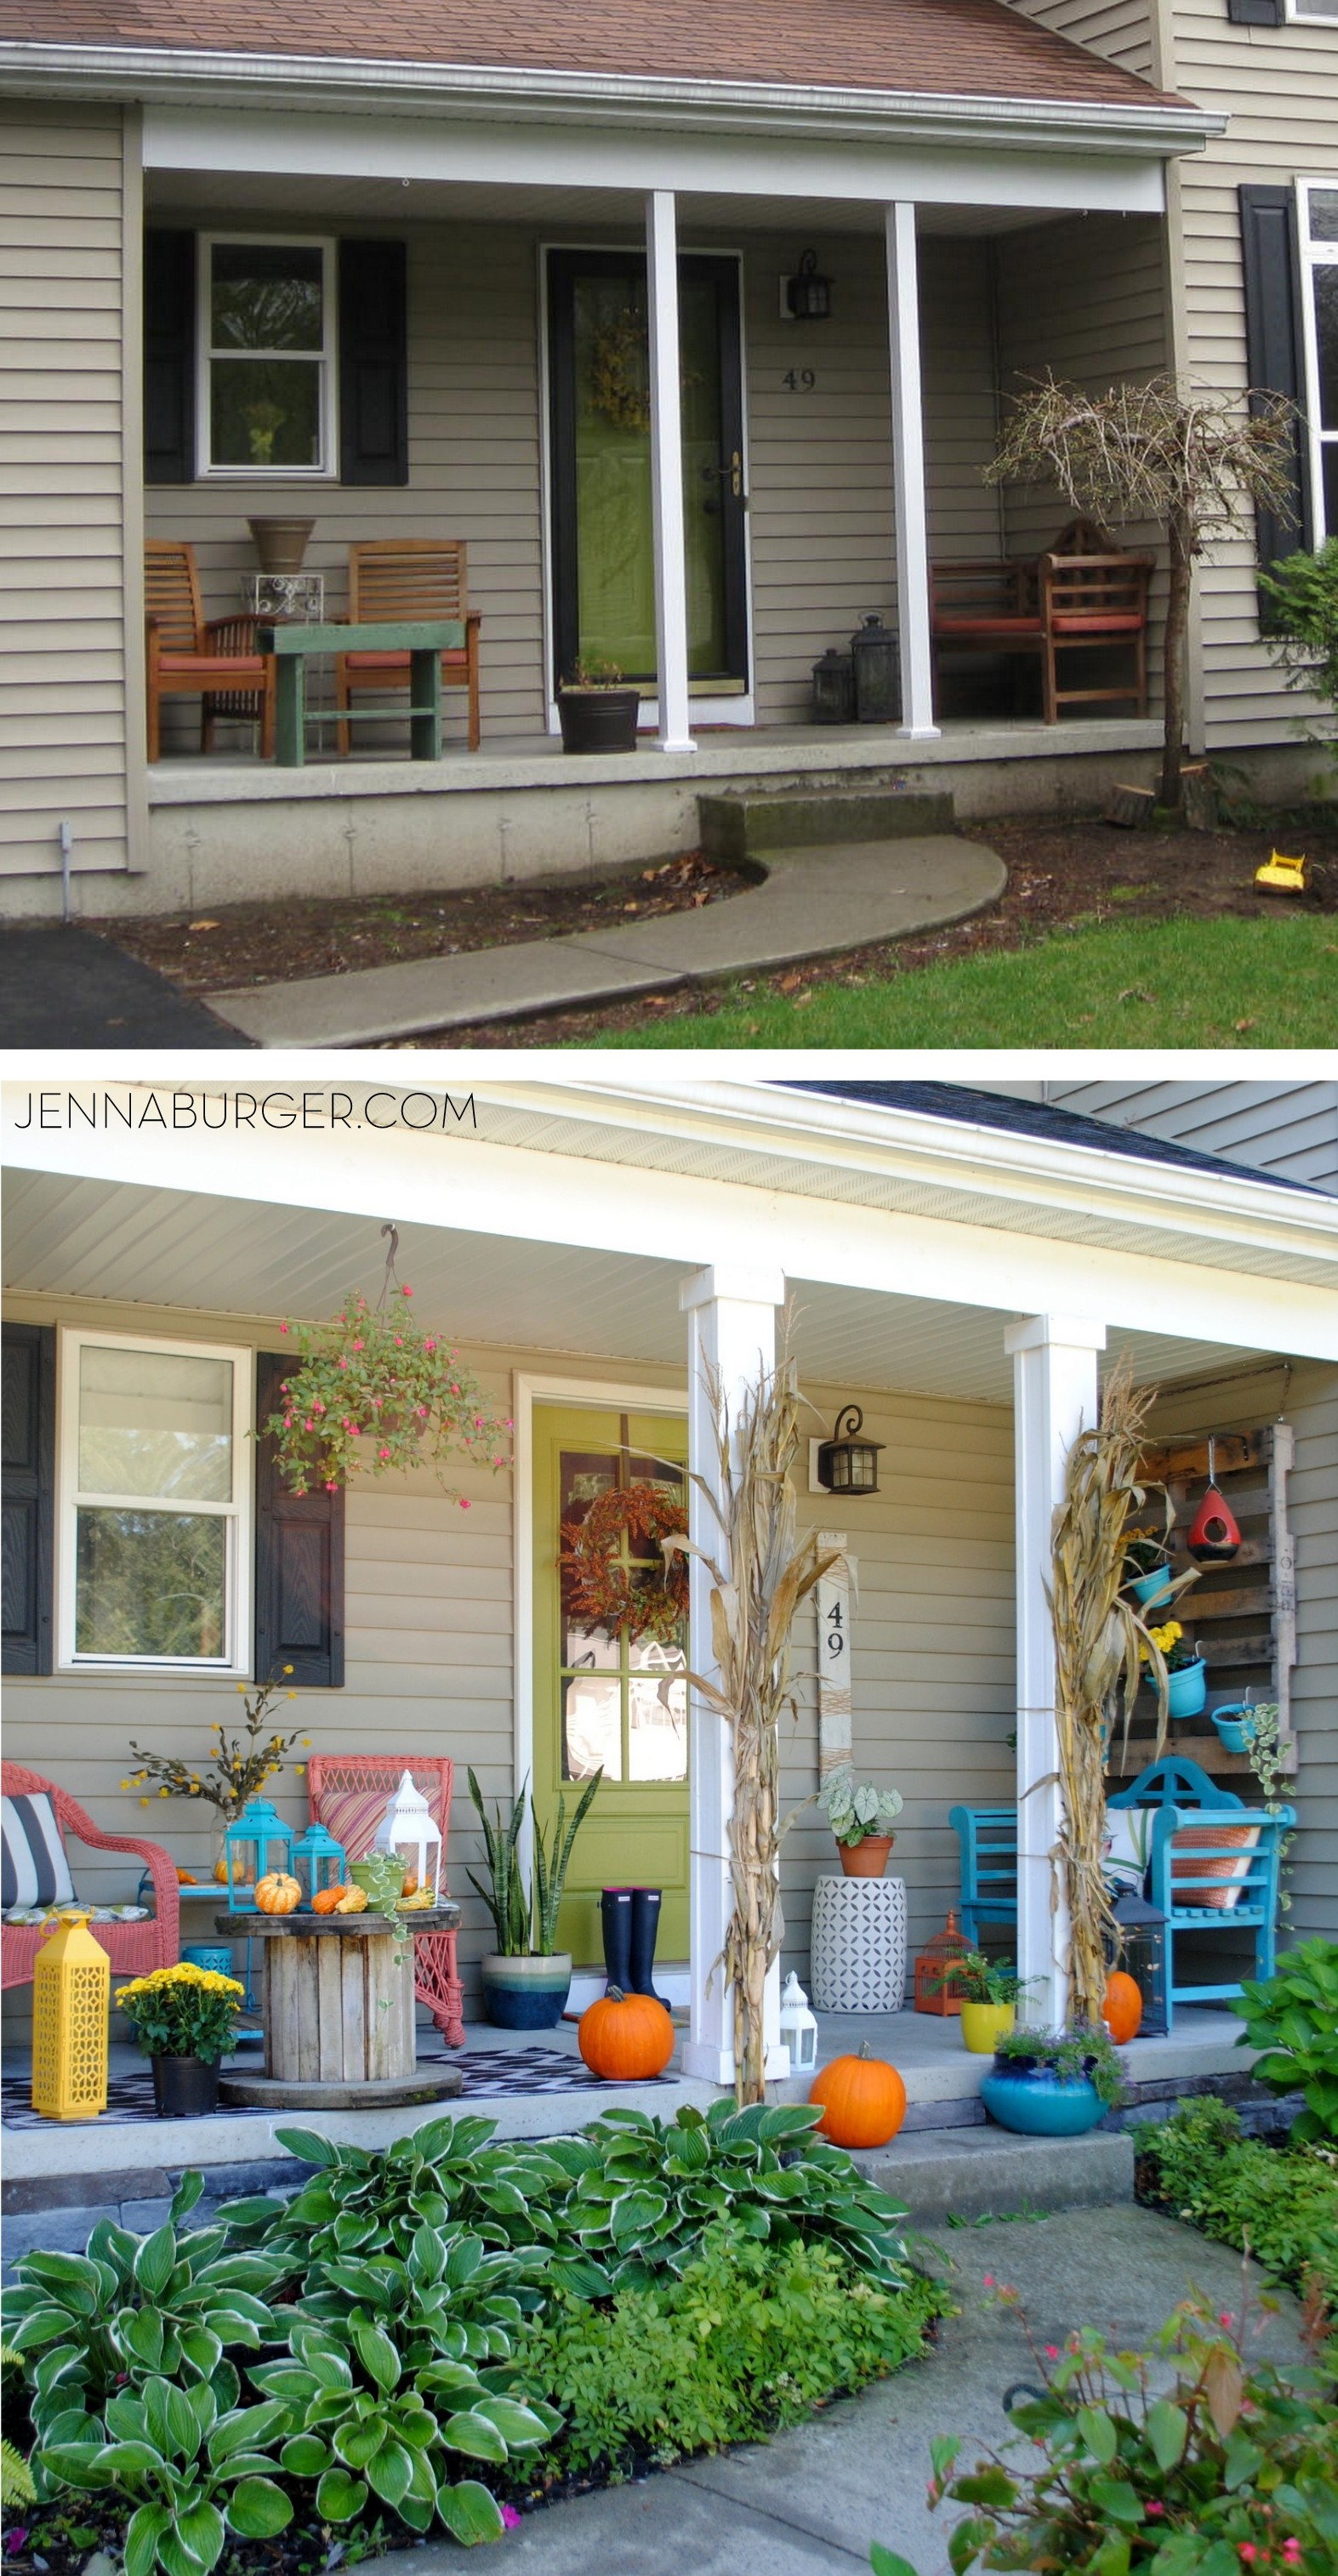
Lastly, I have to show a before & after of where this front porch started years ago and how it looks now…

Before & After front porch

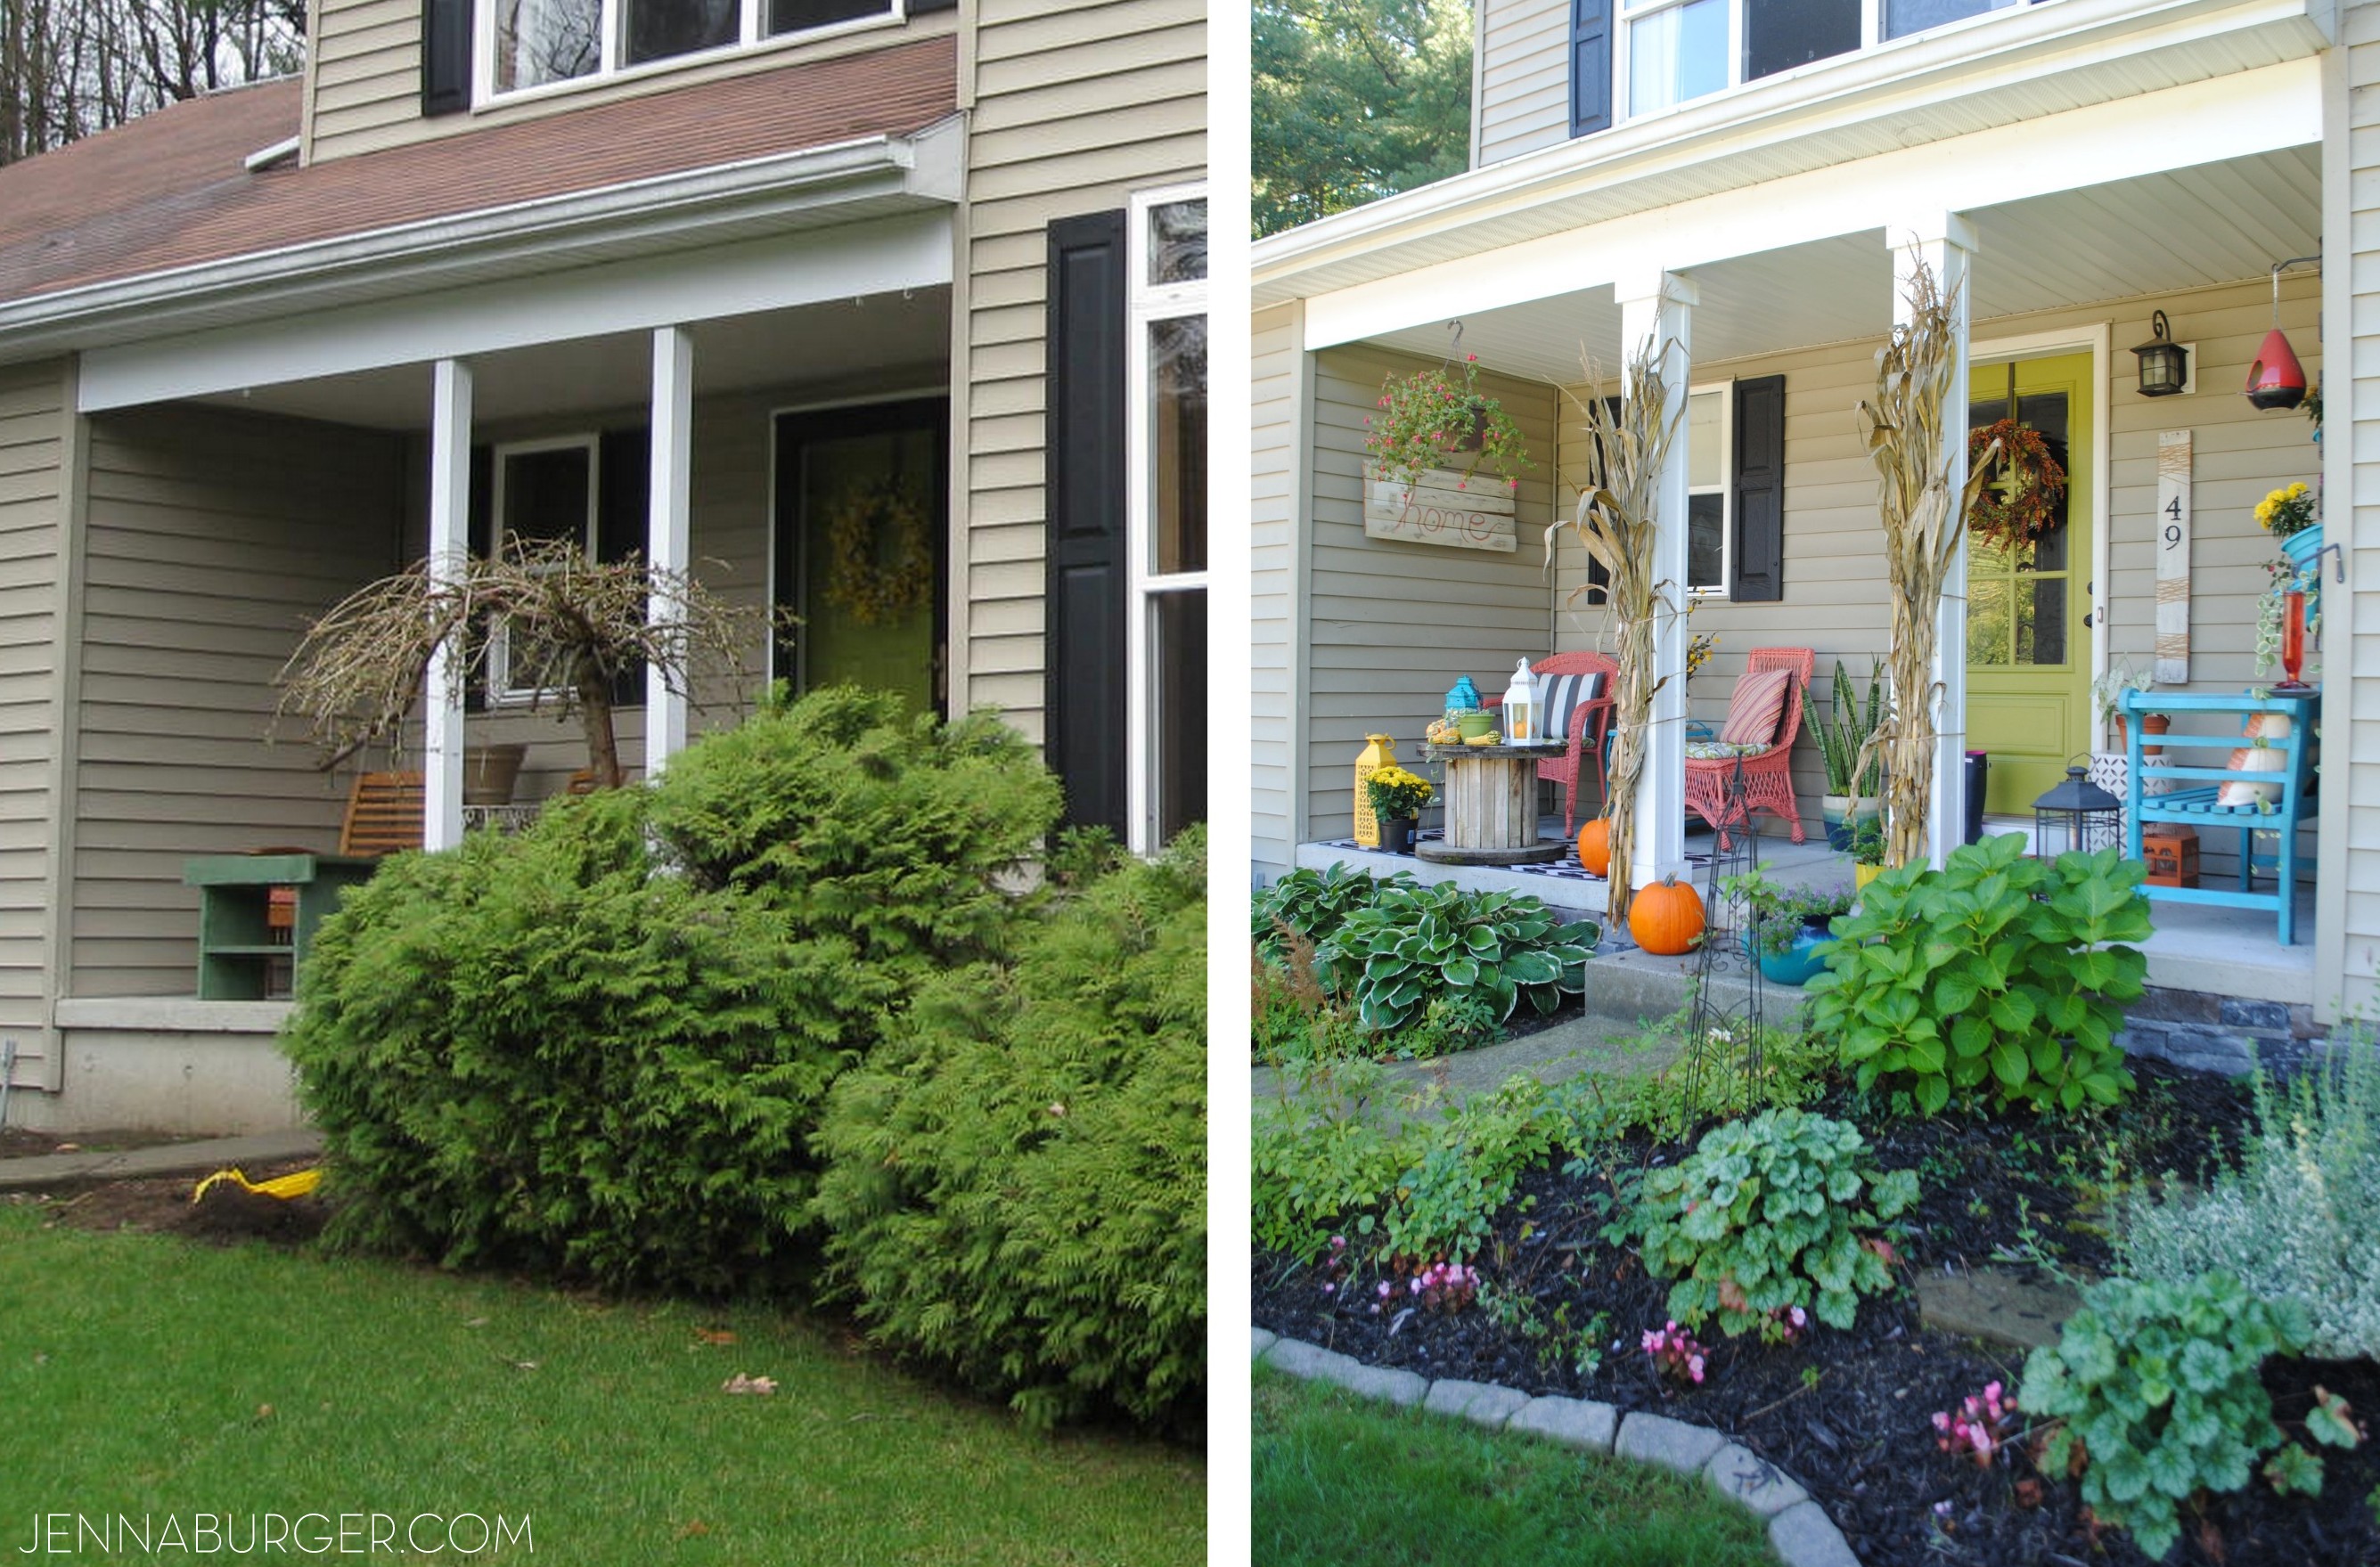
The stone base that we added this past Summer has really “dressed” up the foundation of the house so much. Tutorial for > Adding Stone Veneer to a House Foundation

Before & After front porch

Thanks for stopping by and taking the tour of my Fall front porch!  I wish you could stay a while…

DISCLOSURE: THIS IS A SPONSORED POST WITH LOWE’S.  ALL WORDS + OPINIONS ARE 100% MY OWN.  AFFILIATE LINKS ARE ALSO INCLUDED IN THIS POST.

Decorating the Home using Fall Favorites

The chill is in the air and I’m wearing a sweater today.  I’m actually lovin’ it!

How about in your neck of the woods…  Does it feel like Fall yet?

Aside from my favorite Fall things like wearing oversized cable knit sweaters, going apple picking, and Sunday football with the family, I love the changing over of blankets from light linen to heavy wool, and the swapping out of pillows from bright hues of yellow to deeper plums and emerald.

And that was exactly what I did last weekend.

Check out this living room shot I snapped & shared on Instagram

Decorating for Fall: changing over of blankets from light linen to heavy wool, and swapping out of pillows from bright hues of yellow to deeper plums and emerald

Even though I am not completely ready to say goodbye to the long, warm days of Summer, Fall has a special place in my heart. It’s the season when I got married, it’s the time of year when my daughter was born, and it’s when a routine can once be established as the kids head back to school.

Whether you love the look of warm, rich hues (all year round) or simply adore the Fall and want some inspiration for making a few seasonal updates, there are a simple ways to spruce up your home décor using Fall Favorites…

PUMPKINS, GOURDS, PINECONES, APPLES
Fall is all about nature, and layering in as many seasonal favorites amongst your everyday décor can make a simple, but big impact look.

> Pumpkins in a platter.

> Gourds on the mantel.

> Pinecones as a centerpiece.

These are all easy and beautiful ways to decorate for the season. Gathering leaves from the yard (or faux from the craft store) can be the perfect base as seasonal go-to’s are layered atop. Or after your family apple picking adventure, put together an overflowing collection of apples in a low bowl or basket that can adorn the dining table.

All simple ideas that make a big impact!

Still one of my favorites EVER… a log centerpiece with leaves + pumpkins.

DIY: Log Centerpiece - perfect for the table or mantel. More Decorating ideas for the Home using Fall Favoritestutorial for >>> log centerpiece

Pumpkins, gourds, leaves on the mantel. More Decorating ideas for the Home using Fall FavoritesFall mantel with feather

Pumpkin filled lantern. More Decorating ideas for the Home using Fall Favorites.Lantern filled with pumpkins

DECORATE WITH NATURE
You may not need to go far or spend any money to adapt your décor for the coming season. Be inspired by your surroundings. Head outdoors to collect leaves, branches, and any natural materials that would be ideal to create an eye-catching table centerpiece or wreath. Arrange a bunch of branches with leaves of varying colors in a vase or glass mason jar and display them on a dining table or entry table vignette.

One other idea is to press your leaf findings and display them in a picture frame as I did with these ferns found in my yard.

Fall Tablescape: More Decorating ideas for the Home using Fall Favorites.Fall tablescape {gourds galore}

Fern Art in a foyer. More Decorating ideas for the Home using Fall Favorites.tutorial for >>> Fern Art

'leaves' in a vase. More Decorating ideas for the Home using Fall Favorites.

ADORN YOUR DOOR
The front door, often thought of as the “mouth” of a home, is the perfect place to make a statement. Have little time or a small budget, focus on the areas of the home that get the most traffic. Adorning your front door with a beautiful seasonal wreath or decorating a front porch with colorful mums will truly create an inviting and welcoming first impression.

Other seasonal favorites to decorate with can be indian corn, hay bales, and varying sizes and colors of pumpkins. Adding in a plaid throw or tweed pillow can truly create the feeling of a textural cornucopia of color for the season as well as the springboard for what’s to come in the homes interior.

Fall Wreath. More Decorating ideas for the Home using Fall Favoritestutorial for >>> Autumn wreath with plum + peacock accents

SEASONAL COLORS + PATTERNS
The unique and range of seasonal hues including reds, oranges, and yellows can lighten up not only your spirits but add warmth and contrast to your everyday interior. Beyond the typical warmer colors of Fall, other favorites include deep plum, emerald, mustard, and winter white – all ideal to layer in for the coming Fall season.

Fall is all about feeling cozy and warm. Swapping your everyday décor staples with ones that have more texture (like a new linen lampshade), will give an instant boost for the season. The simplest and least expensive way to update a space for Fall is to swap out those lighter, brighter throw pillows of Summer for a style that is more lush and soft. Try fabrics like velvet, wool, and flannel in hues of chocolate, golds, and warm pastels.

Another big impact look would be to introduce a new rug that will set the tone for the rest of the space. A rug can anchor a room and can instantly change the aesthetic of a space. A rug with warm hues and an interesting pattern could be the perfect change to immediately update a room.

Fall Porch. More Decorating ideas for the Home using Fall Favorites.Fall Front Porch

Fall Tablescape: More Decorating ideas for the Home using Fall Favorites

Fall Tablescape: More Decorating ideas for the Home using Fall FavoritesFall tablescape {gourds galore}

SMELL MATTERS
Home is not only about how it looks, but also how it feels and smells. Making a natural air freshener using cinnamon and apples can truly make for a yummy, cozy, welcoming aroma. Or try a candle that has a wood or spice scent.

3 yummy favs…

Favorite Fall candlesRetwined candle / Baies Scented CandleWoodwick Gingered Pumpkin

Autumn is truly like no other as the days turn crisp and the leaves reflect the hues of colorful candy corn. Seasonal décor doesn’t have to be elaborate or time consuming.

A few simple touches go a long way – the simpler, the better.

World Market NYC + Shop My Dining Space

Sad to say but I wasn’t able to attend the World Market event 2 weeks ago as planned.  Real life came knocking on the door and unfortunately my son came down with a stomach bug + 103 temp at THE. WORST. TIME.  Yup, can you believe it?!

World Market Party VS. caring for my sick child?  Hands down, my family comes first.  Not attending was hard to swallow as I was super excited for this amazing opportunity because I truly adore the company + I was so looking forward to seeing friends that I haven’t been with in ages.  But life throws you curveballs once in a while AND I chose what was most important.

No worries, I have pictures from the event to share + I had the chance to do a little shopping and chose to give my dining space a freshening up.  Perfect timing as we are transitioning into Fall!

THE EVENT.

Even though I was absent from the sneak peek shin-dig, I was following along with my friend Kelly of Eclectically Vintage + Diane of In My Own Style.  They schmoozed, mingled, and shopped!

The new World Market in Chelsea evokes a chic industrial rustic aesthetic with bold color + engaging texture.  The store is located at 18TH & 6TH, 620 6TH AVENUE in the heart NYC amongst many top design stores.

The sneak peek opening 2 weeks ago was filled with editors + designers + bloggers.  Also the fun & fabulous Kelly Osborne was in attendance to kick off the festivities.

World Market NYC Grand Opening sneak peek event. Store Open NOW!If you’re in the New York area, drop everything and get to this store!  Well maybe not everything, but seriously this new space is not to be missed.  The store is more furniture based (whereas their other stores have a mix of decor, jewelry, food, furniture, and more), but has lots of take & go items – pillows, dishes, lighting, etc.  The rest of what you love can easily be ordered and shipped to your home!

For me, I LOVE a great lighting fixture, so when I saw their new lighting vignette, I almost went to heaven.  They have really great hanging fixtures + lamps.  So stylish AND affordable!

World Market NYC Grand Opening sneak peek event. Store Open NOW!

World Market NYC Grand Opening sneak peek event. Store Open NOW!

With all this goodness, I couldn’t hold myself back from bringing some World Market beauty into my home.  Check out my spruced up dining space for Fall…

Fall Dining Table: Resources + Details for this dining room revamp for the Fall season @ JennaBurger.com

Shop My Dining Space: Resources + Details for this dining room revamp @ JennaBurger.com

When decorating a table, it’s all about mixing the intense with the calm.

For this Fall dining table, I started with a bold, mixed-print tablecloth (there are lots of tablecloths to choose from at World Market) that has a detailed paisley pattern + a geometric, modern border.  Atop I added a large mirror with a weathered edge as a base for the centerpiece and layered on a minimal amount of simpler elements – vase, small cutting board, oil bottle, cloth napkins.

A simpler centerpiece is perfect too for when the food comes… the main course + sides can easily be added amongst the surrounding decor.

Shop My Dining Space: Resources + Details for this dining room revamp @ JennaBurger.com

Shop My Dining Space: Resources + Details for this dining room revamp @ JennaBurger.com

Any opportunity I get, I decorate with natural elements.  From the mantel to the tabletop, I love incorporating bits of nature through plants, flowers, and greenery.  For this table, I chose two natural beauties.  In the large, high vase (you always need varying heights when creating a table vignette), I clipped a few branches from a tree in my yard.  So simple AND free! The branches remind me of a fig tree and since I don’t have one (insert big ole’ pout), the beautiful limbs from this tree will do.

Honestly though, the tall vase filled with branches makes the table!

Shop My Dining Space: Resources + Details for this dining room revamp @ JennaBurger.com

Here is another view of the centerpiece looking at my raspberry colored china cabinet (still one of my favorite projects ever).  I adore the fluidity and simplicity of the oversized vase looks against the striking + bold cabinet.  A space comes together when their is a balance of bold and calm, pattern and solid.

Shop My Dining Space: Resources + Details for this dining room revamp @ JennaBurger.com

Simple woven chargers are the perfect separation between the strong tablecloth and the pretty patterned plates.  The simple cloth napkins atop the plates are the perfect organic layer.

Shop My Dining Space: Resources + Details for this dining room revamp @ JennaBurger.com

Shop My Dining Space: Resources + Details for this dining room revamp @ JennaBurger.com

Sometimes pattern + pattern just makes sense.  And on this dining table there is no lack of pattern! From the pillows on the chairs to the tablecloth adorning the table to the plates the food will rest on, the eye will certainly not get board…

Shop My Dining Space: Resources + Details for this dining room revamp @ JennaBurger.com

… Yet, there is an overall calmness and inviting nature that this Fall table evokes.

Dining Room Revamp: freshening up the dining space for the Fall adding seasonal colors, patterns, and textures. www.jennaburger.com

I’m so happy + content at how this seasonal table resulted.  I wish it could stay like this all Fall.  I have kiddos and the reality of it looking like this tomorrow is slim…  “Mom, what’s all this stuff on the table”.

In the meantime, for the few dinner parties + occasions we will host over the coming months, I have a go-to set up.  It’s easy + simple + sophisticated and is perfect for the Fall!

Shop My Dining Space: Resources + Details for this dining room revamp @ JennaBurger.com

Shop My Dining Space: Resources + Details for this dining room revamp @ JennaBurger.com

A step back view of the overall space from the kitchen, looking into the dining space, and the living room beyond…

Shop My Dining Space: Resources + Details for this dining room revamp @ JennaBurger.com

Want to know all the details that went into this revamp for Fall?

SHOP MY SPACE.

Details for you to enjoy & shop.

Shop My Dining Space: Resources + Details for this dining room revamp @ JennaBurger.com[1] Dining Table (similar)
[2] Side Chairs (similar)
[3] Bench (similar)
[4] Mirror
[5] Dinner Plates
[6] Cloth Napkins (similar)
[7] Appetizer Plates
[8] Flatware
[9] Glasses
[10] Vase
[11] Oil Bottle
[12] Cutting Board / Cheese Cutting Board
[13] Throw Pillows

If you live or plan on visiting NYC, be sure to check out the new World Market in Chelsea.

Thanks for checking out my dining space revamp for Fall!  Are you ready for the season change? I don’t blame you…  Not so sure myself.

THIS IS A SPONSORED POST BY COST PLUS WORLD MARKET.  THEY HAVE REQUESTED I SHARE INFORMATION ON THIS STORE OPENING AND RETURN HAVE BEEN COMPENSATED FOR MY TIME.  ALL THOUGHTS + WORDS ARE 100% MY OWN.

Fall Tablescape with Gourds Galore

Howdy folks!  Fall is in full-swing in northern New York and as we’ve been enjoying the colorful foilage (did you see how we spent our weekend? I posted a peak on IG) , I’m finally feeling the urge to turn the house over for the season.   I still have my hands filled caring for my little 3 month old + transforming my latest Craigslist find, but that hasn’t stopped me from adding in a few Fall touches.  My perfect spot for the ideal seasonal setup… the dining table.

Alas, this years Fall Tablescape.

Fall Tablescape (perfect for Thanksgiving too) filled with ghords, pinecones, mums, and seasonal favorites! All in an easy-to-make handmade wood box. You'll want to make this TODAY!

Filled with gourds, mums, pinecones, and a few of my go-to styling / decor favorites, my table is all set for the season and will lead us right into our Thanksgiving feast.  Don’t you just love when one thing works for multiple purposes + occasions?!

And check out the cute box.  I made it.  Details on that in a bit…

Everything on my table for Fall is from Lowes, my favorite big box store because it’s my go-to spot for everything I need to build, paint, make, and decorate.  Seriously!  When this month’s challenge came and it was focused around Fall decorating {mums + ghords}, the dining table was just the spot.  And you know I love creating a pretty centerpiece (this seasonal favorite has been pinned over 88,000 times)!

So we all know, I’m a mush for trays.  Almost every surface around my home has a tray.  Why?  Because they are easy to move.  Because they’re pretty.  Because they create the most perfect horizontal vignette.  So this years seasonal tablescape had to have a tray!  And an easy one to make, of course.

DIY Tutorial - How To Make a Wood Box to display on a dining table! 20 minute, easy-to-make do it yourself project. You'll want to make lots of these boxes for all over the home.

How-To Build a Wood Tray

My cut list:

  • (2) 1″ x 4″ x 48″ long
  • (1) 1″ x 8″ 48″ long
  • (2) 1″ x 4″ x length TBD (explained in tutorial below)
  • stain (I used Minwax Special Walnut)
  • (2) cup pulls (kitchen style drawer pulls work great – I got mine for $3+ in the hardware section of Lowe’s)

1. I decided the length of my tray would be 48″ finished and I determined this according to the length of my table.  When people are sitting at the table, the tray will probably be moved, but it doesn’t have to.  At 48″ long, there is still plenty of room for people to fit around the table & have enough space at their seat.  That being said, if you want to make a similar try, it can be any size you’d like.

I made a mark for my cut and used my circular saw to cut the first piece.

DIY Tutorial - How To Make a Wood Box to display on a dining table! 20 minute, easy-to-make do it yourself project. You'll want to make lots of these boxes for all over the home.

2. Then (without measuring) I layed the 1″ x 4″ x 48″ cut piece onto the uncut piece and marked where to make the cut #2.   Following that, I cut the 1″ x 8″ piece (for the bottom) the same way.

DIY Tutorial - How To Make a Wood Box to display on a dining table! 20 minute, easy-to-make do it yourself project. You'll want to make lots of these boxes for all over the home.

3. Using 1″ wood nails (which have a small head), I attached the sides to the bottom.

DIY Tutorial - How To Make a Wood Box to display on a dining table! 20 minute, easy-to-make do it yourself project. You'll want to make lots of these boxes for all over the home.

DIY Tutorial - How To Make a Wood Box to display on a dining table! 20 minute, easy-to-make do it yourself project. You'll want to make lots of these boxes for all over the home.

4. Then I measured the ends and using another 1″ x 4″ board, I cut it to size.

DIY Tutorial - How To Make a Wood Box to display on a dining table! 20 minute, easy-to-make do it yourself project. You'll want to make lots of these boxes for all over the home.

5. Then nailed the ends onto the sides and the bottom.

DIY Tutorial - How To Make a Wood Box to display on a dining table! 20 minute, easy-to-make do it yourself project. You'll want to make lots of these boxes for all over the home.

6. Once the box was complete, I drilled holes at each of the shorter ends for the cup pulls and screwed them in.

DIY Tutorial - How To Make a Wood Box to display on a dining table! 20 minute, easy-to-make do it yourself project. You'll want to make lots of these boxes for all over the home.

One last step… stain!

7. Using Minwax Special Walnut and a lint-free cloth (an old white cotton t-shirt to be exact), I applied the stain and immediately wiped it away because I wanted to keep the look of the box a medium depth (not too dark, not too light) since the table is fairly dark.

DIY Tutorial - How To Make a Wood Box to display on a dining table! 20 minute, easy-to-make do it yourself project. You'll want to make lots of these boxes for all over the home.

The result…

DIY Tutorial - How To Make a Wood Box to display on a dining table! 20 minute, easy-to-make do it yourself project. You'll want to make lots of these boxes for all over the home.

Once the box was complete, within a few hours it was ready to fill.  The power of stain can make life quite grand!

I started off with positioning the tall white vase (a recent purchased from Joss and Main) and filled it with branches that I cut down from a tree outside (a non-fruit bearing pear tree to be exact).  I’ve been doing this all Spring, Summer, and Fall long and they make the best table centerpiece – they’re beautiful + cost nothing!!  They wilt after a few days, but who cares, they’re free.  I love the height they bring to the table.

Fall Tablescape (perfect for Thanksgiving too) filled with ghords, pinecones, mums, and seasonal favorites! All in an easy-to-make handmade wood box. You'll want to make this TODAY!

Fall Tablescape (perfect for Thanksgiving too) filled with ghords, pinecones, mums, and seasonal favorites! All in an easy-to-make handmade wood box. You'll want to make this TODAY!

A few days earlier, my kids collected a whole lotta acorns and upon putting them in a tall glass bowl, they made the next perfect addition for the wood box.

Fall Tablescape (perfect for Thanksgiving too) filled with ghords, pinecones, mums, and seasonal favorites! All in an easy-to-make handmade wood box. You'll want to make this TODAY!

Then I added the pretty plum mum.  Fall = mums.  Am I right?!  I had grabbed a bunch in an array of colors for the outside porch a few weeks back and I chose the plum colored one for the box.  Deep colored purple, plum, is one of my favorite Fall hues.

Fall Tablescape (perfect for Thanksgiving too) filled with ghords, pinecones, mums, and seasonal favorites! All in an easy-to-make handmade wood box. You'll want to make this TODAY!

Fall Tablescape (perfect for Thanksgiving too) filled with ghords, pinecones, mums, and seasonal favorites! All in an easy-to-make handmade wood box. You'll want to make this TODAY!

Once I had some elements of varying heights and sizes, the base of the box needed to be filled.  The colorful gourds and the textured pinecones were the icing on the cake for this Fall Tablescape.

Fall Tablescape (perfect for Thanksgiving too) filled with ghords, pinecones, mums, and seasonal favorites! All in an easy-to-make handmade wood box. You'll want to make this TODAY!

Fall Tablescape (perfect for Thanksgiving too) filled with ghords, pinecones, mums, and seasonal favorites! All in an easy-to-make handmade wood box. You'll want to make this TODAY!

Fall Tablescape (perfect for Thanksgiving too) filled with ghords, pinecones, mums, and seasonal favorites! All in an easy-to-make handmade wood box. You'll want to make this TODAY!

Fall Tablescape (perfect for Thanksgiving too) filled with ghords, pinecones, mums, and seasonal favorites! All in an easy-to-make handmade wood box. You'll want to make this TODAY!

8a

So pretty + colorful, right?!  I’m in love.  Now that the china cabinet is almost complete, this is the perfect addition to the dining space.  More details on the china cabinet makeover coming in the next few days.

Disclosure: I am part of the Lowe’s Creative Team and was provided with a Lowe’s gift card to purchase items for my project.  I was also compensated for my time to use the products.  No one told me what to create, what to buy, how to use the product, or what to write.  All opinions are 100% mine!

Autumn Mantel

I’ve been loving the cool temps over the past few days, have you?  For me, there’s no transition time once September hits.  A switch goes off in my head that says “Fall, Fall, Fall”.  Thankfully I haven’t dug out the sweaters yet, BUT I did gather some decor for my newest mantel for the coming season.

Autumn is almost here and after sharing a fun roundup of Fall Fireplace Mantels earlier this week, I’m ready to reveal mine.  But before we begin, I have a confession to make… I never showed you my summer mantel.  I had great intentions to, but it never happened.  No worries, because for Fall I didn’t change much and basically the reasoning is that I just love it. This years Autumn Mantel isn’t overly “themed” and actually isn’t really “fallish”.  Basically I kept it simple and added a few festive elements.  Take a look…

The change from my Summer mantel to now wasn’t that different or difficult.  Since you didn’t see the Summer mantel, this is what it looked like.  With the addition of the starfish for the warm months and the simple switchout to pumpkins and ghords for Fall, the mantel was updated in minutes.

I have to say, I’m really happy with the simplicity and monochromatic look of this year’s Fall Mantel.  For this mantel, I shopped my home for everything, except one piece – the tall white jar.  I had been on the search for something like it and when I saw this beautiful pierced ginger jar at TJ Maxx a few months, I snagged it up – it was attractive and for under $20 it was a must-have!  It’s height and detail bring so much character to the mantel.  Don’t ya think?!

All the other elements in this Fall decor were seen in last years mantel or were someplace else around the house.  The white pumkpins were a great score last year and weren’t always white.  If you recall, this is what I did…

It’s amazing what a little white craft paint can do!

In continuing my simple white aesthetic, I spray painted the candle stick white as well.  In my other mantels, it was brass, but not anymore.  Continuing, my estate sale found mason jars are still filled with lentils and beautiful, bumpy, bright orange ghords were added throughout.  I had to add some color.  right?!

Those tall glass jars are killer – loved them since the day I bought them which was a gazzillion years ago (more like 10+) from Crate and Barrel.  Ya gotta love the Crate!

The birds are another recent find that I purchased at a local home store.  They are dark brown, similar to the mantel color and almost blend right in, but they are so cute and add a whimsical touch to the mantel decor.

I think it’s so important to add varying heights and layers when creating a mantel.  Think of your mantel composition as a wave – it should go up and down as it moves across.  Need more tips on mantel decor? Check out my post on How-To Decorate a Mantel.  Looking at others mantels will also help inspire and give ideas.  That’s where my roundup comes in handy!

Here’s the overall Fall Mantel.

You might have noticed in some of the pictures that there’s somethin’ different on the wall?  Yup, that’s new.  There used to be a mirror there, but that got revamped and moved to the dining area. In it’s place is a new distressed stained sign, which was easy to create and is an awesome backdrop. Want to create something similar?  Here’s how…

Create a Distressed Stained Sign

1. Measure and cut lumber to the size desired (I used (3) 2″ x 12″ x 48″ pieces of pine)
2. Use (2) horizontonal pieces of lumber to secure the vertical pieces (I used (2) 2 x 4, but any size lumber would really work)
3. Distress the sign using a chain, hammer, nails, etc. to add as much or as little distressing as desired
4. Stain your sign.  I used the stain that I had leftover from my staircase which was Ebony, but you can use a lighter stain depending on the depth of color you want to achieve.

Pretty simple, right?!  I love how it brings height and depth to the space, yet still creates a great backdrop to the mantel decor.  And against the burnt orange wall, it really makes a statement.

Simple and Chic Autumn Mantel. Yes, I’m happy 😉

Have you started your decorating for Fall yet?  I’ve got my mums and ghords, and this weekend we’re headed to the apple orchard.  O, do I LOVE Fall!

I link my projects to some of these parties: Skip to My Lou, Dittle Dattle, Between Naps on the Porch, Today’s Creative Blog, Stories of A to Z, All Things Heart & Home, Savvy Southern Style, House of Hepworths, Finding Fabulous, Creation Corner, The Shabby Nest, Serenity Now, Tatertots and Jello, Thrifty Decor Chick, Tip Junkie

5 Minute Autumn Centerpiece

This past weekend when I got my DIY groove back, I made a centerpiece for my dining table that literally took less than 5 minutes and cost nothing!  The pictures, staging, and post took longer than the actual project.  Thankfully I am SO pleased with the results and now my dining table is complete for the Fall season.  Here’s a sneak peak of the final outcome, but let me take you through the steps so you can make one for your table!

Log Centerpiece that takes minutes to create and can be used for so many holidays & occasions!  Designed by @Jenna_Burger of www.sasinteriors.net

A few weeks ago, while going for an evening walk around the neighborhood, there were a pile of cut down trees on the side of the road ready for the next day’s garbage pickup.  I couldn’t stop myself, and ended up grabbing this 4′ beauty and piled it into the Radio Flyer wagon along with the two kids (the remainder of the trip home sure was tight for the kiddos).

As soon as I set my eyes on this log, I knew exactly what I wanted to do – make a centerpiece with tea lights.  I envisioned a simple, yet sophisticated backdrop that can be updated and changed throughout the seasons and holidays!

Unfortunately, it sat and sat in my garage for too long.  Then this weekend, my husband FINALLY got a drill bit that was large enough (1.5″ diameter) to drill into the log to create what I was desiring – My centerpiece creation was finally coming to fruition.

The mister and I drilled 6 holes about 10″ apart, and it was done!  Finito!!  It was that easy and it took less than 5 minutes to create this beautiful centerpiece.

And here it is.  Complete and shining bright!

So simple, yet so beautiful!

I had planned on putting it on my dining table and leaving it alone.  I thought it would “speak” for itself and it’s organic appeal would shine.  I still plan on doing that since we eat at this table everyday, but I also wanted to see how it would look all “dressed up”.  Soooo I took some of the Fall decor from the other vignettes I created and embellished this new log centerpiece.

I surrounded the log centerpiece with varying sizes of sugar pumpkins, pinecones, berries, and artificial leaves – perfect for a Thanksgiving table!

I was so happy to finally get this project complete and I love how it turned out.  How do you decorate your table for Fall?

I link to these parties: Cottage Instincts, Skip to My Lou, Dittle Dattle, Between Naps on the Porch, Today’s Creative Blog, Stories of A to Z, The Lettered CottageAll Things Heart & Home, Savvy Southern Style, House of Hepworths, Shabby Chic Cottage, Finding Fabulous, Creation Corner The Shabby Nest, Tatertots and Jello, Funky Junk, Under the Table & Dreaming

Fall Wreath with Fabric Flowers

Fall is right around the corner and what better way to celebrate a new season than to don a new wreath on the front door.  The front door is often thought of as the “mouth” of a home, the entry point of comfort, happiness, and where great opportunities begin. For me the front door, signifies the “entrance of”, so let’s enter this new season with my new Autumn Wreath.

I loved last year’s wreath because it was different and unique, but for a long time, I’ve wanted to jump on the bandwagon and make a burlap round wreath with fabric flowers.  I was going to make this style wreath in the Spring, but made another wreath instead. So finally the time came, when that wreath came down and this new colorful one went in it’s place.

1. To start off, I purchased a round straw wreath from AC Moore which cost just under $3.  (FYI: I left the plastic cover on)

2. I dismantled my Valentine Burlap Wreath and used the burlap from it, to create this wreath.  I was a little tired of that wreath and plan on making something new and different for next V-day.  But I still have the felt flowers and plan on using them again somewhere on something!

If you are starting with new burlap, cut 3″ wide strips (the length doesn’t matter).  Dab alittle hot glue on the back side of the wreath and wrap the burlap around, creating an overlapping pattern (see picture) .  Then again,  dab alittle hot glue on the back of the wreath to complete and hold the burlap strip in place.

3. Continue wrapping the burlap around and around and around (don’t get dizzy…), until the entire wreath is covered!

DONE! Onto creating the fabric flowers…

How-To Make Fabric Flowers

4. Cut 1/2 – 3/4″  strips of fabric. The length of the fabric will depend on how large you want the flower to be.  I created varying sized flowers to give an overlap effect – keep on reading to find out what I’m chattin’ about…

(fuzzy picture sorry 🙂 – I was working on this project kind of late into the evening)

5. Starting from the end of the fabric (which will be the center of your flower), twist and bunch it together, while wrapping it around and around. After about 2 turns, dab alittle hot glue to hold it together.

6. Continue twisting and bunching around and around, and occasionally dab on some hot glue to hold the flower in place.

Continue until you have the perfect sized flower that you want!

7. Once your flower is complete, flip it over and add a backing.  You can use any heavy fabric material or felt is good too.  I had this heavy twill fabric left over from my Chair Makeover

And you’re done! Make as many fabric flowers as your little heart desires!  Use solid colors. Use patterned fabric. Make them different sizes.  I’ll warn you, it’s quite addicting!  I’ve got a few other thoughts on what I want to make more fabric flowers for (headbands, pins, necklaces, etc. – so many ideas, so little time).

Here’s a little grouping ~ so PUR-TAY!

Onto making the wreath with these pretty little additions!

Ta-Da

Layering the Flowers – I first placed the larger flowers on as a base, and layered the smaller flowers on top.  To give a 3-dimensional look, I raised some of the smaller flowers by hot gluing burlap underneath to give them more height.

Here’s a closeup~

And this is how it looks on my apple green colored door~

Any time I show pictures of my front door, I always get the burning question ~ What color is that?

So here’s the info: Valspar Olive Tree WV34010

Welcome, please come and stay awhile.  Want to Tour the rest of my home? Visit HERE

Have you created a beautiful Autumn wreath?  Share it with me and I’ll include it in my Wreath Inspiration Roundup!

Decorating for the Fall

Well, my favorite time of year is here again….FALL!  I was excited by this cool weather, and went out this afternoon to buy mums and pumpkins to decorate my front porch.  From that, I was inspired to provide some affordable tips on decorating the front entry of your home.  The entryway and/or porch of your house, is the first thing everyone will see when visiting.  First start off with hanging a festive wreath that has leaves, berries, sugar pumpkins, fall ribbon, and/or sticks.  I prefer a wreath that is simple using only one element, but this focal point into your home can be as ornate as you’d like.  For a step further, get some hay bales and set them up on your porch or at your entry way.  Then arrange some pumpkins, gourds, Indian corn, and/or leaves on the hay bales.  Also add a candle or a small birdhouse to make it even more unique!  Lastly, place the mums in decorative pots that you’re no longer using for your summer flowers and arrange them around the hay bale(s).

Enjoy the Fall!