
Tag: Fall Table

Fall Tablescape with Gourds Galore

Howdy folks!  Fall is in full-swing in northern New York and as we’ve been enjoying the colorful foilage (did you see how we spent our weekend? I posted a peak on IG) , I’m finally feeling the urge to turn the house over for the season.   I still have my hands filled caring for my little 3 month old + transforming my latest Craigslist find, but that hasn’t stopped me from adding in a few Fall touches.  My perfect spot for the ideal seasonal setup… the dining table.

Alas, this years Fall Tablescape.

Fall Tablescape (perfect for Thanksgiving too) filled with ghords, pinecones, mums, and seasonal favorites! All in an easy-to-make handmade wood box. You'll want to make this TODAY!

Filled with gourds, mums, pinecones, and a few of my go-to styling / decor favorites, my table is all set for the season and will lead us right into our Thanksgiving feast.  Don’t you just love when one thing works for multiple purposes + occasions?!

And check out the cute box.  I made it.  Details on that in a bit…

Everything on my table for Fall is from Lowes, my favorite big box store because it’s my go-to spot for everything I need to build, paint, make, and decorate.  Seriously!  When this month’s challenge came and it was focused around Fall decorating {mums + ghords}, the dining table was just the spot.  And you know I love creating a pretty centerpiece (this seasonal favorite has been pinned over 88,000 times)!

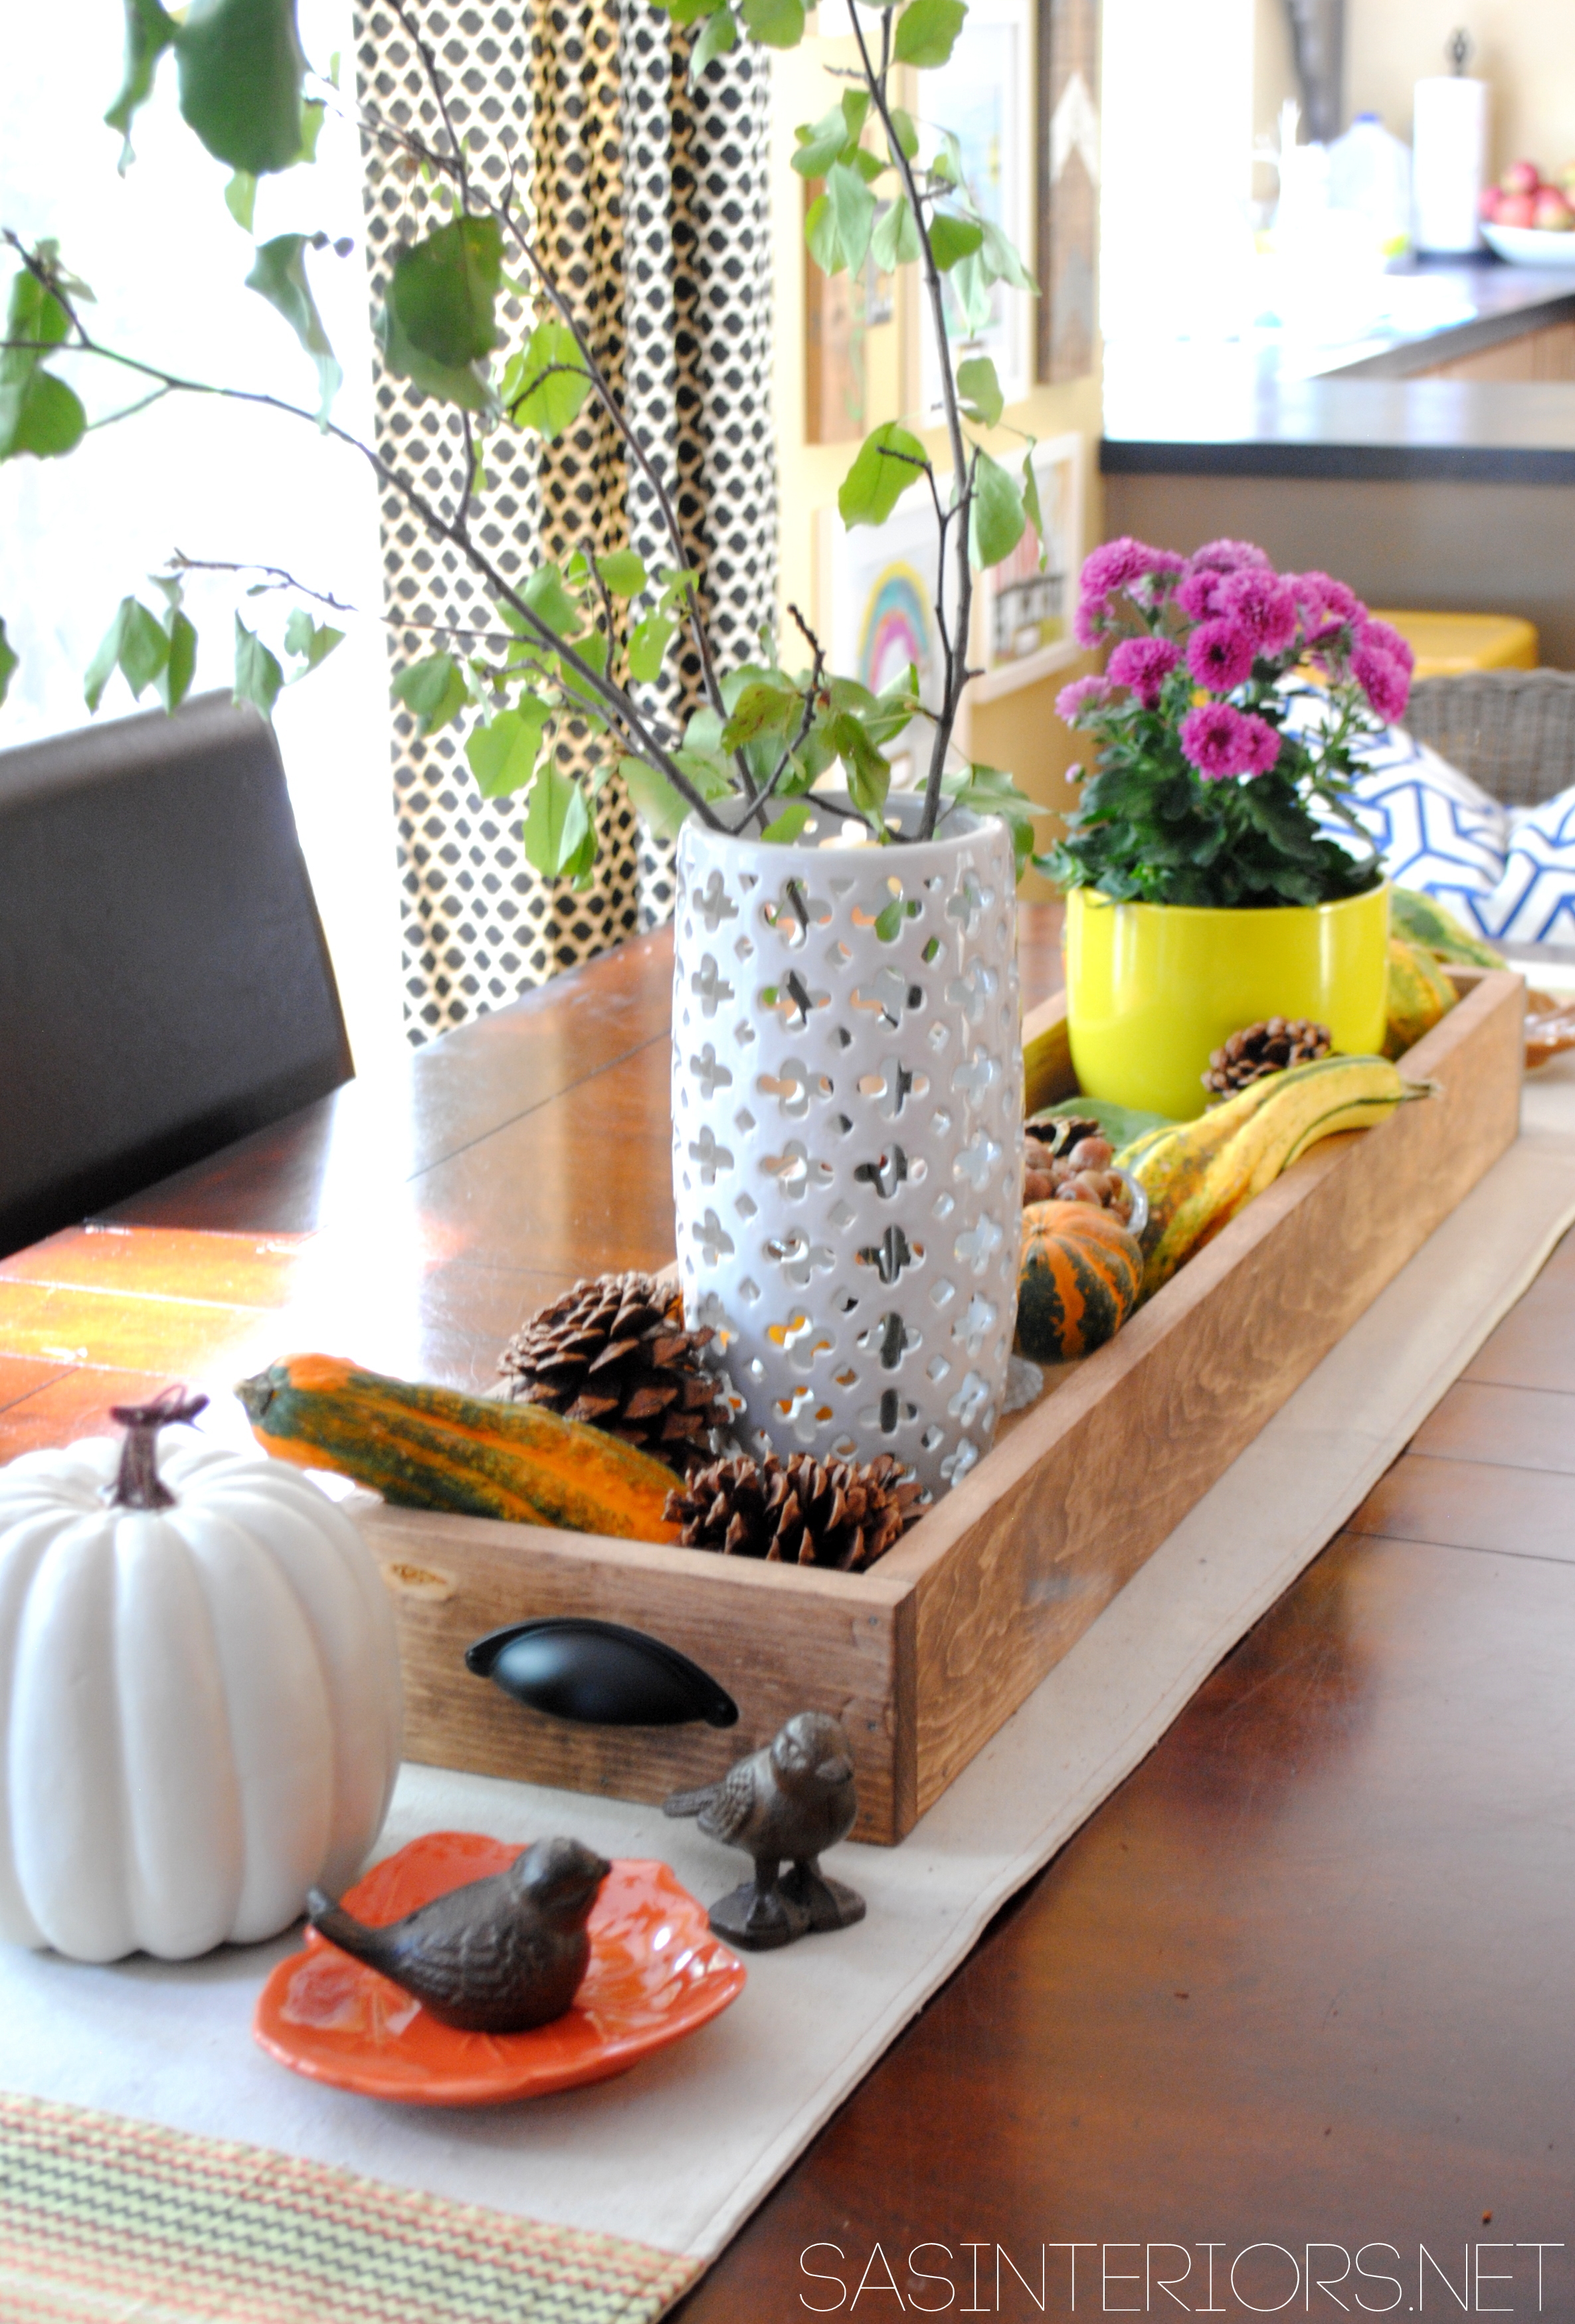
So we all know, I’m a mush for trays.  Almost every surface around my home has a tray.  Why?  Because they are easy to move.  Because they’re pretty.  Because they create the most perfect horizontal vignette.  So this years seasonal tablescape had to have a tray!  And an easy one to make, of course.

DIY Tutorial - How To Make a Wood Box to display on a dining table! 20 minute, easy-to-make do it yourself project. You'll want to make lots of these boxes for all over the home.

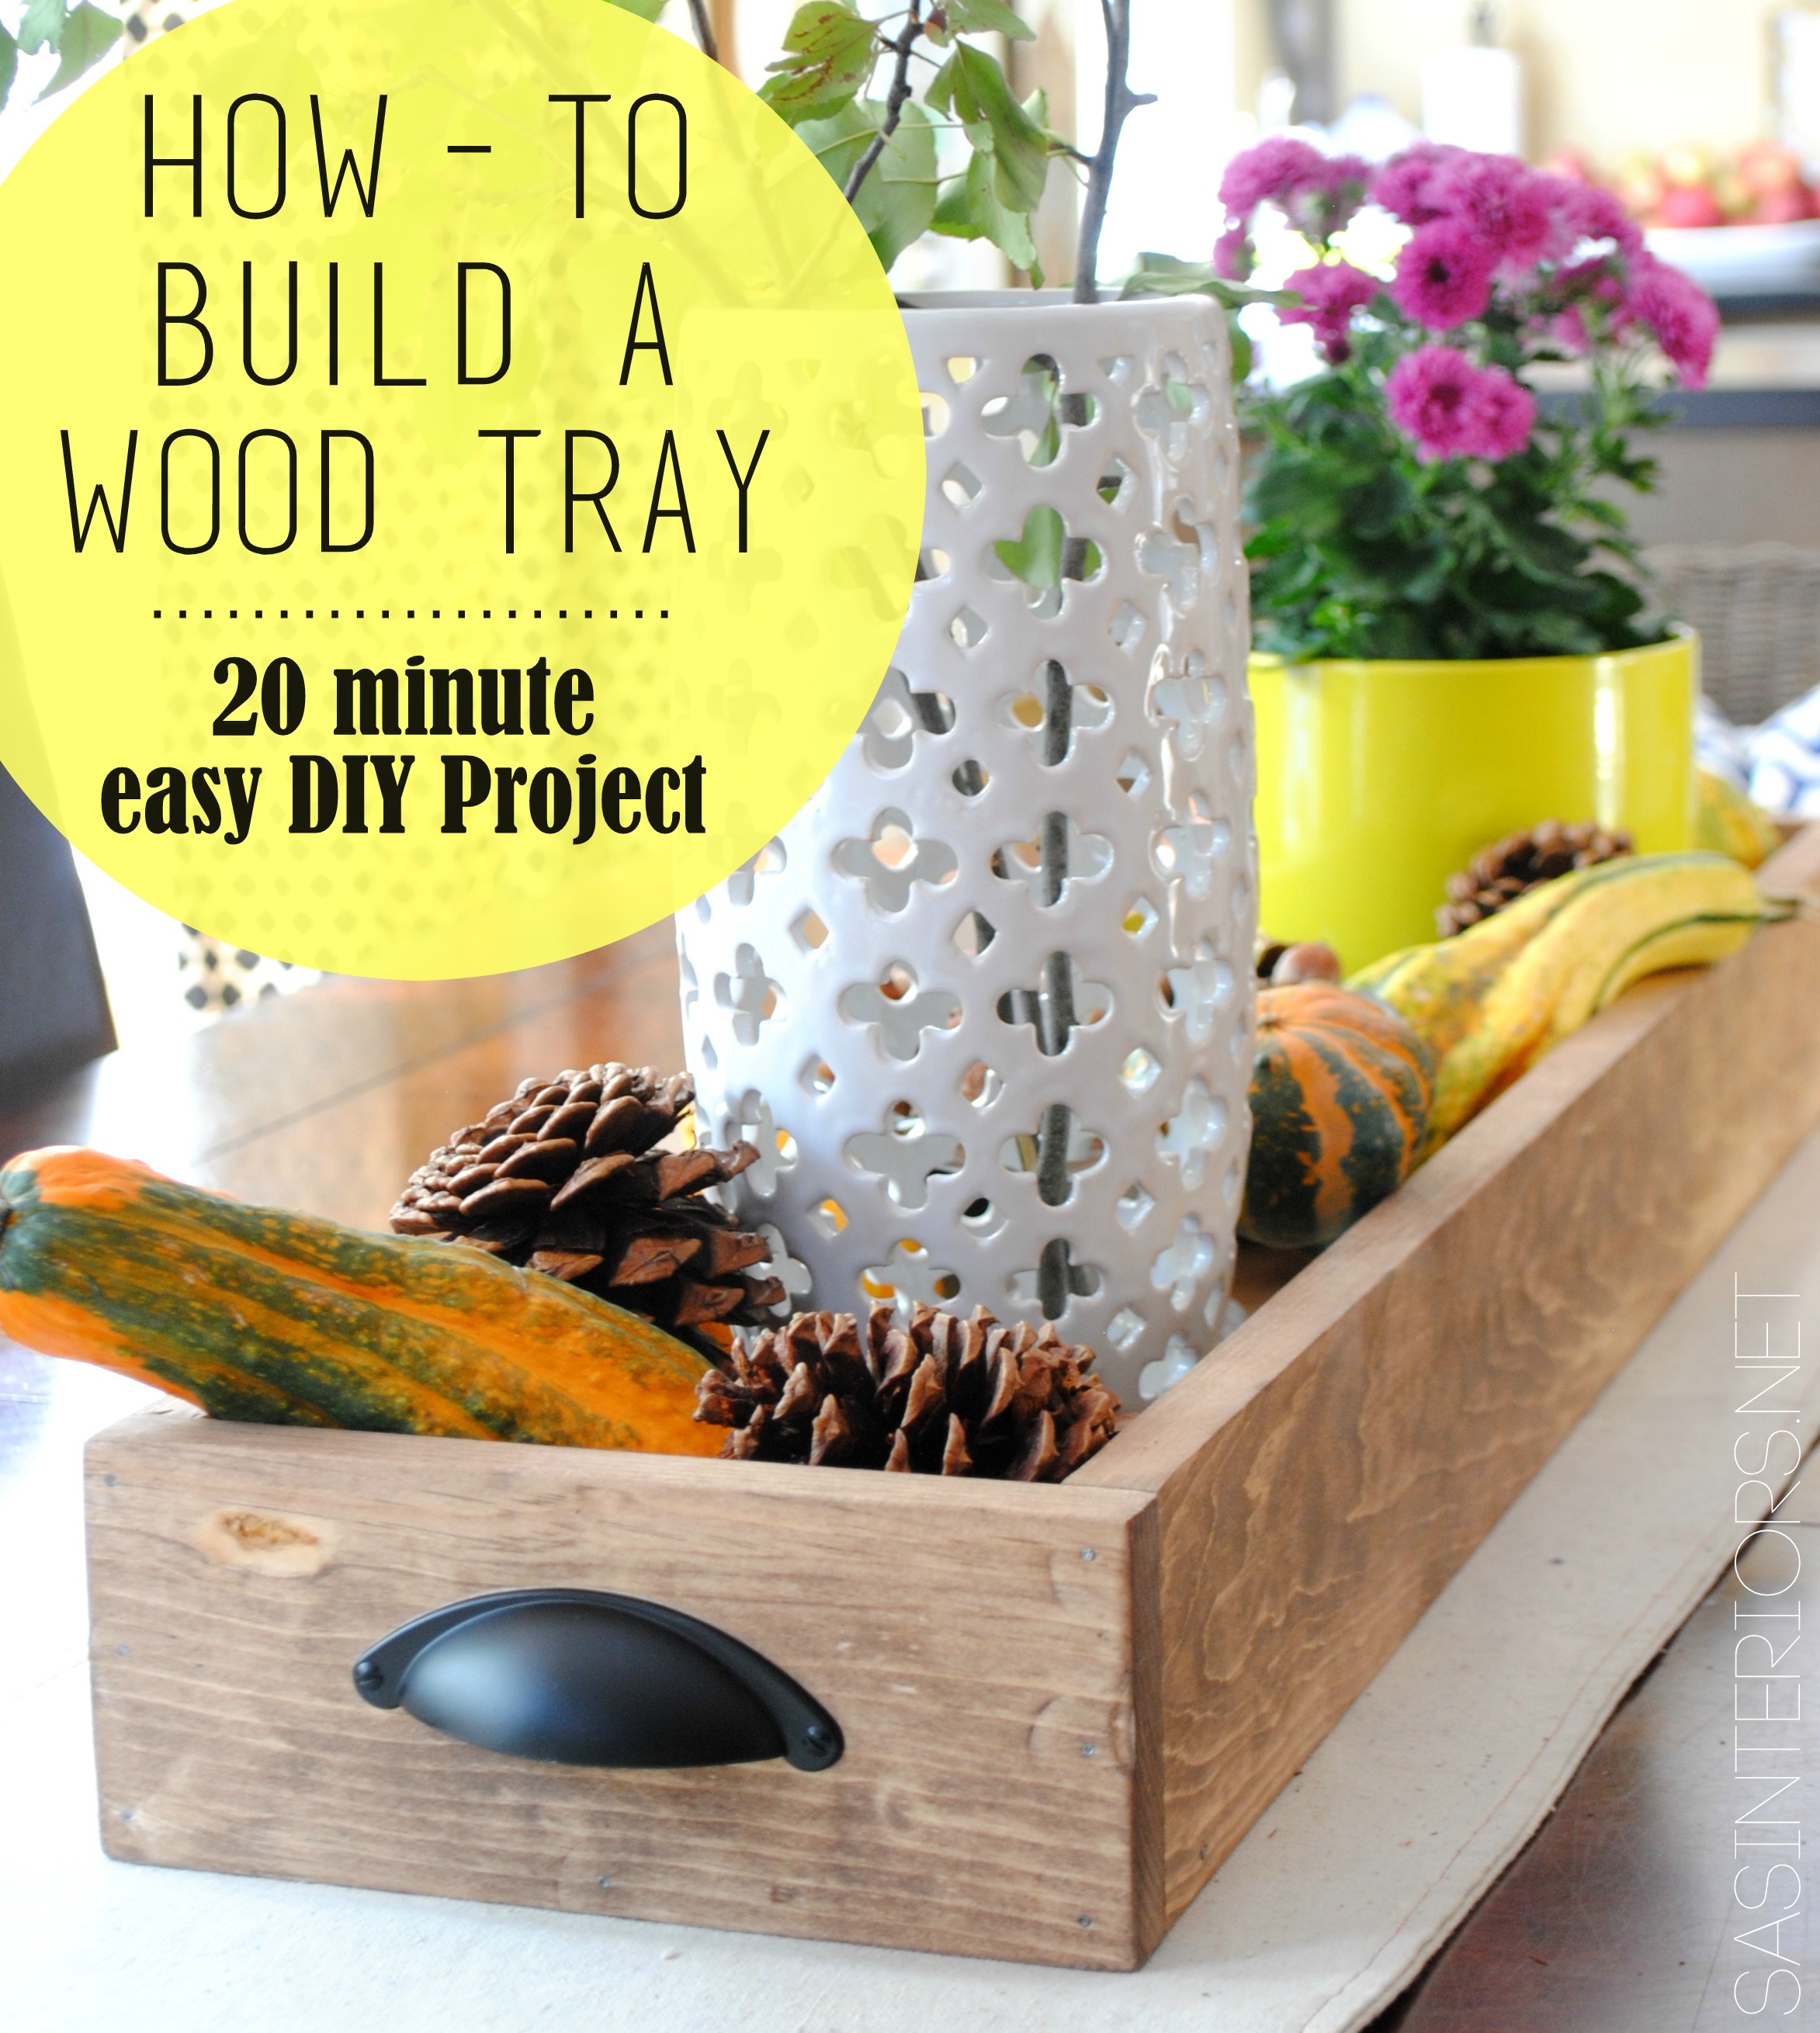
How-To Build a Wood Tray

My cut list:

  • (2) 1″ x 4″ x 48″ long
  • (1) 1″ x 8″ 48″ long
  • (2) 1″ x 4″ x length TBD (explained in tutorial below)
  • stain (I used Minwax Special Walnut)
  • (2) cup pulls (kitchen style drawer pulls work great – I got mine for $3+ in the hardware section of Lowe’s)

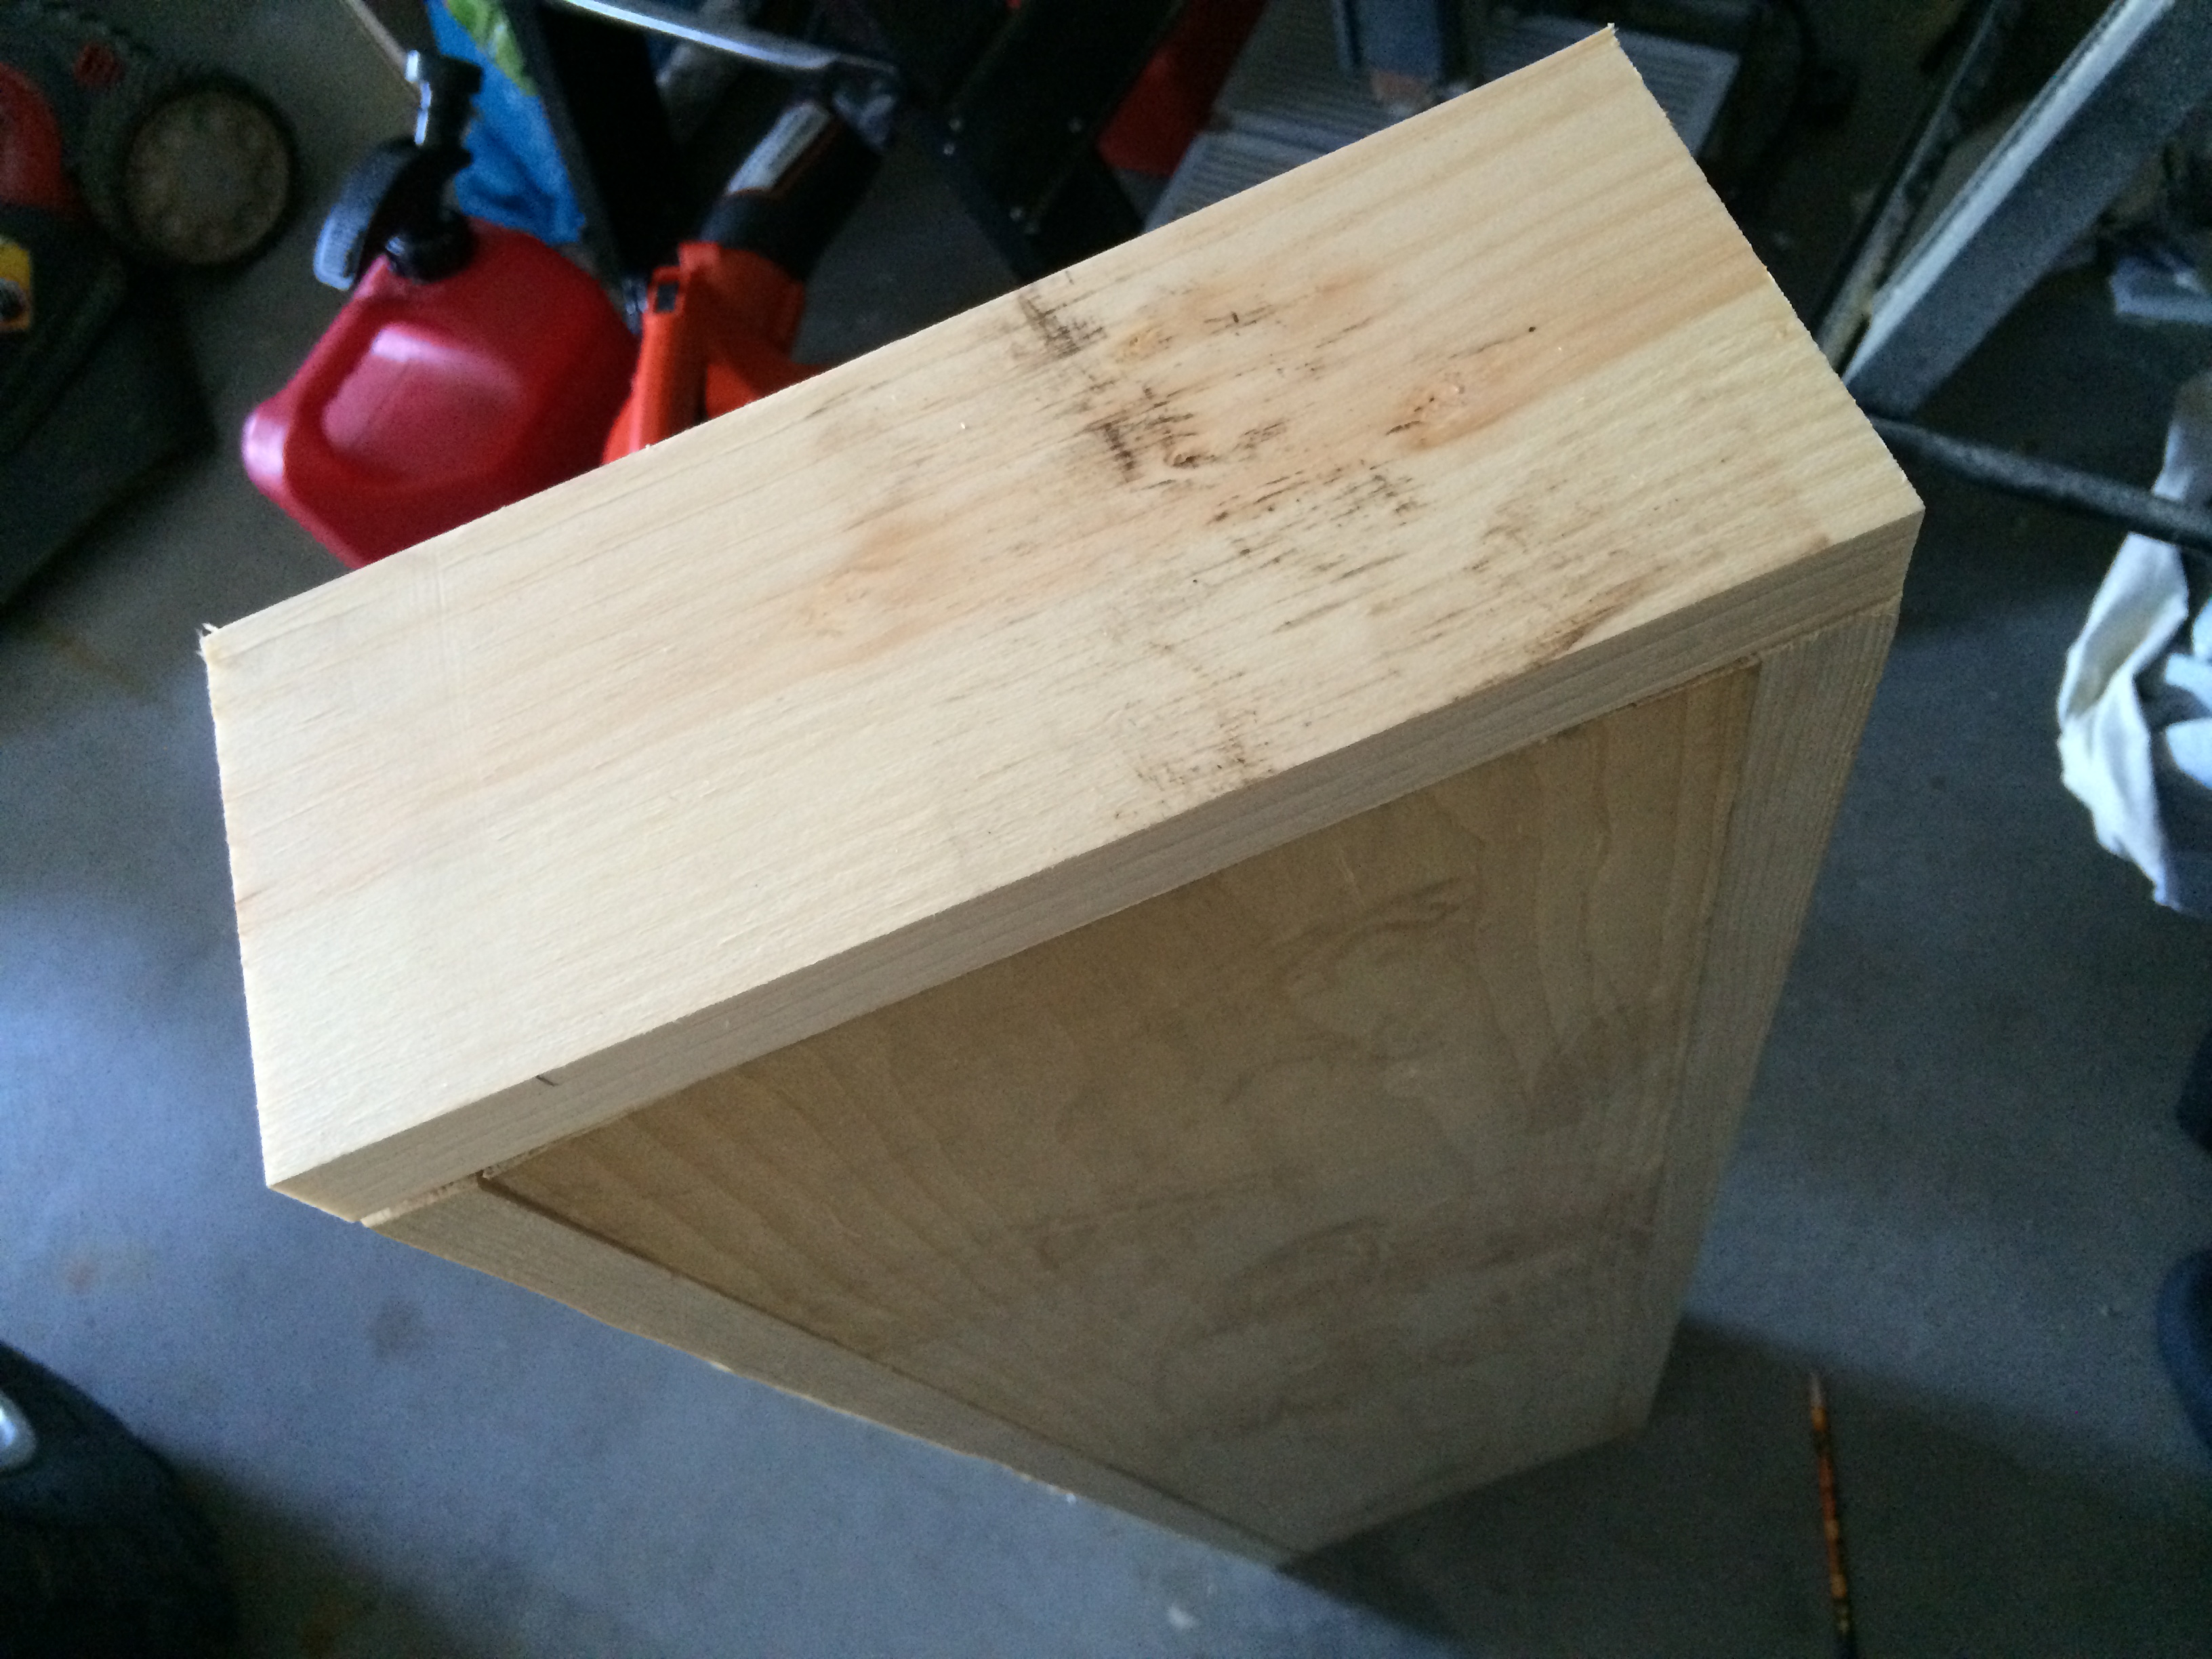
1. I decided the length of my tray would be 48″ finished and I determined this according to the length of my table.  When people are sitting at the table, the tray will probably be moved, but it doesn’t have to.  At 48″ long, there is still plenty of room for people to fit around the table & have enough space at their seat.  That being said, if you want to make a similar try, it can be any size you’d like.

I made a mark for my cut and used my circular saw to cut the first piece.

DIY Tutorial - How To Make a Wood Box to display on a dining table! 20 minute, easy-to-make do it yourself project. You'll want to make lots of these boxes for all over the home.

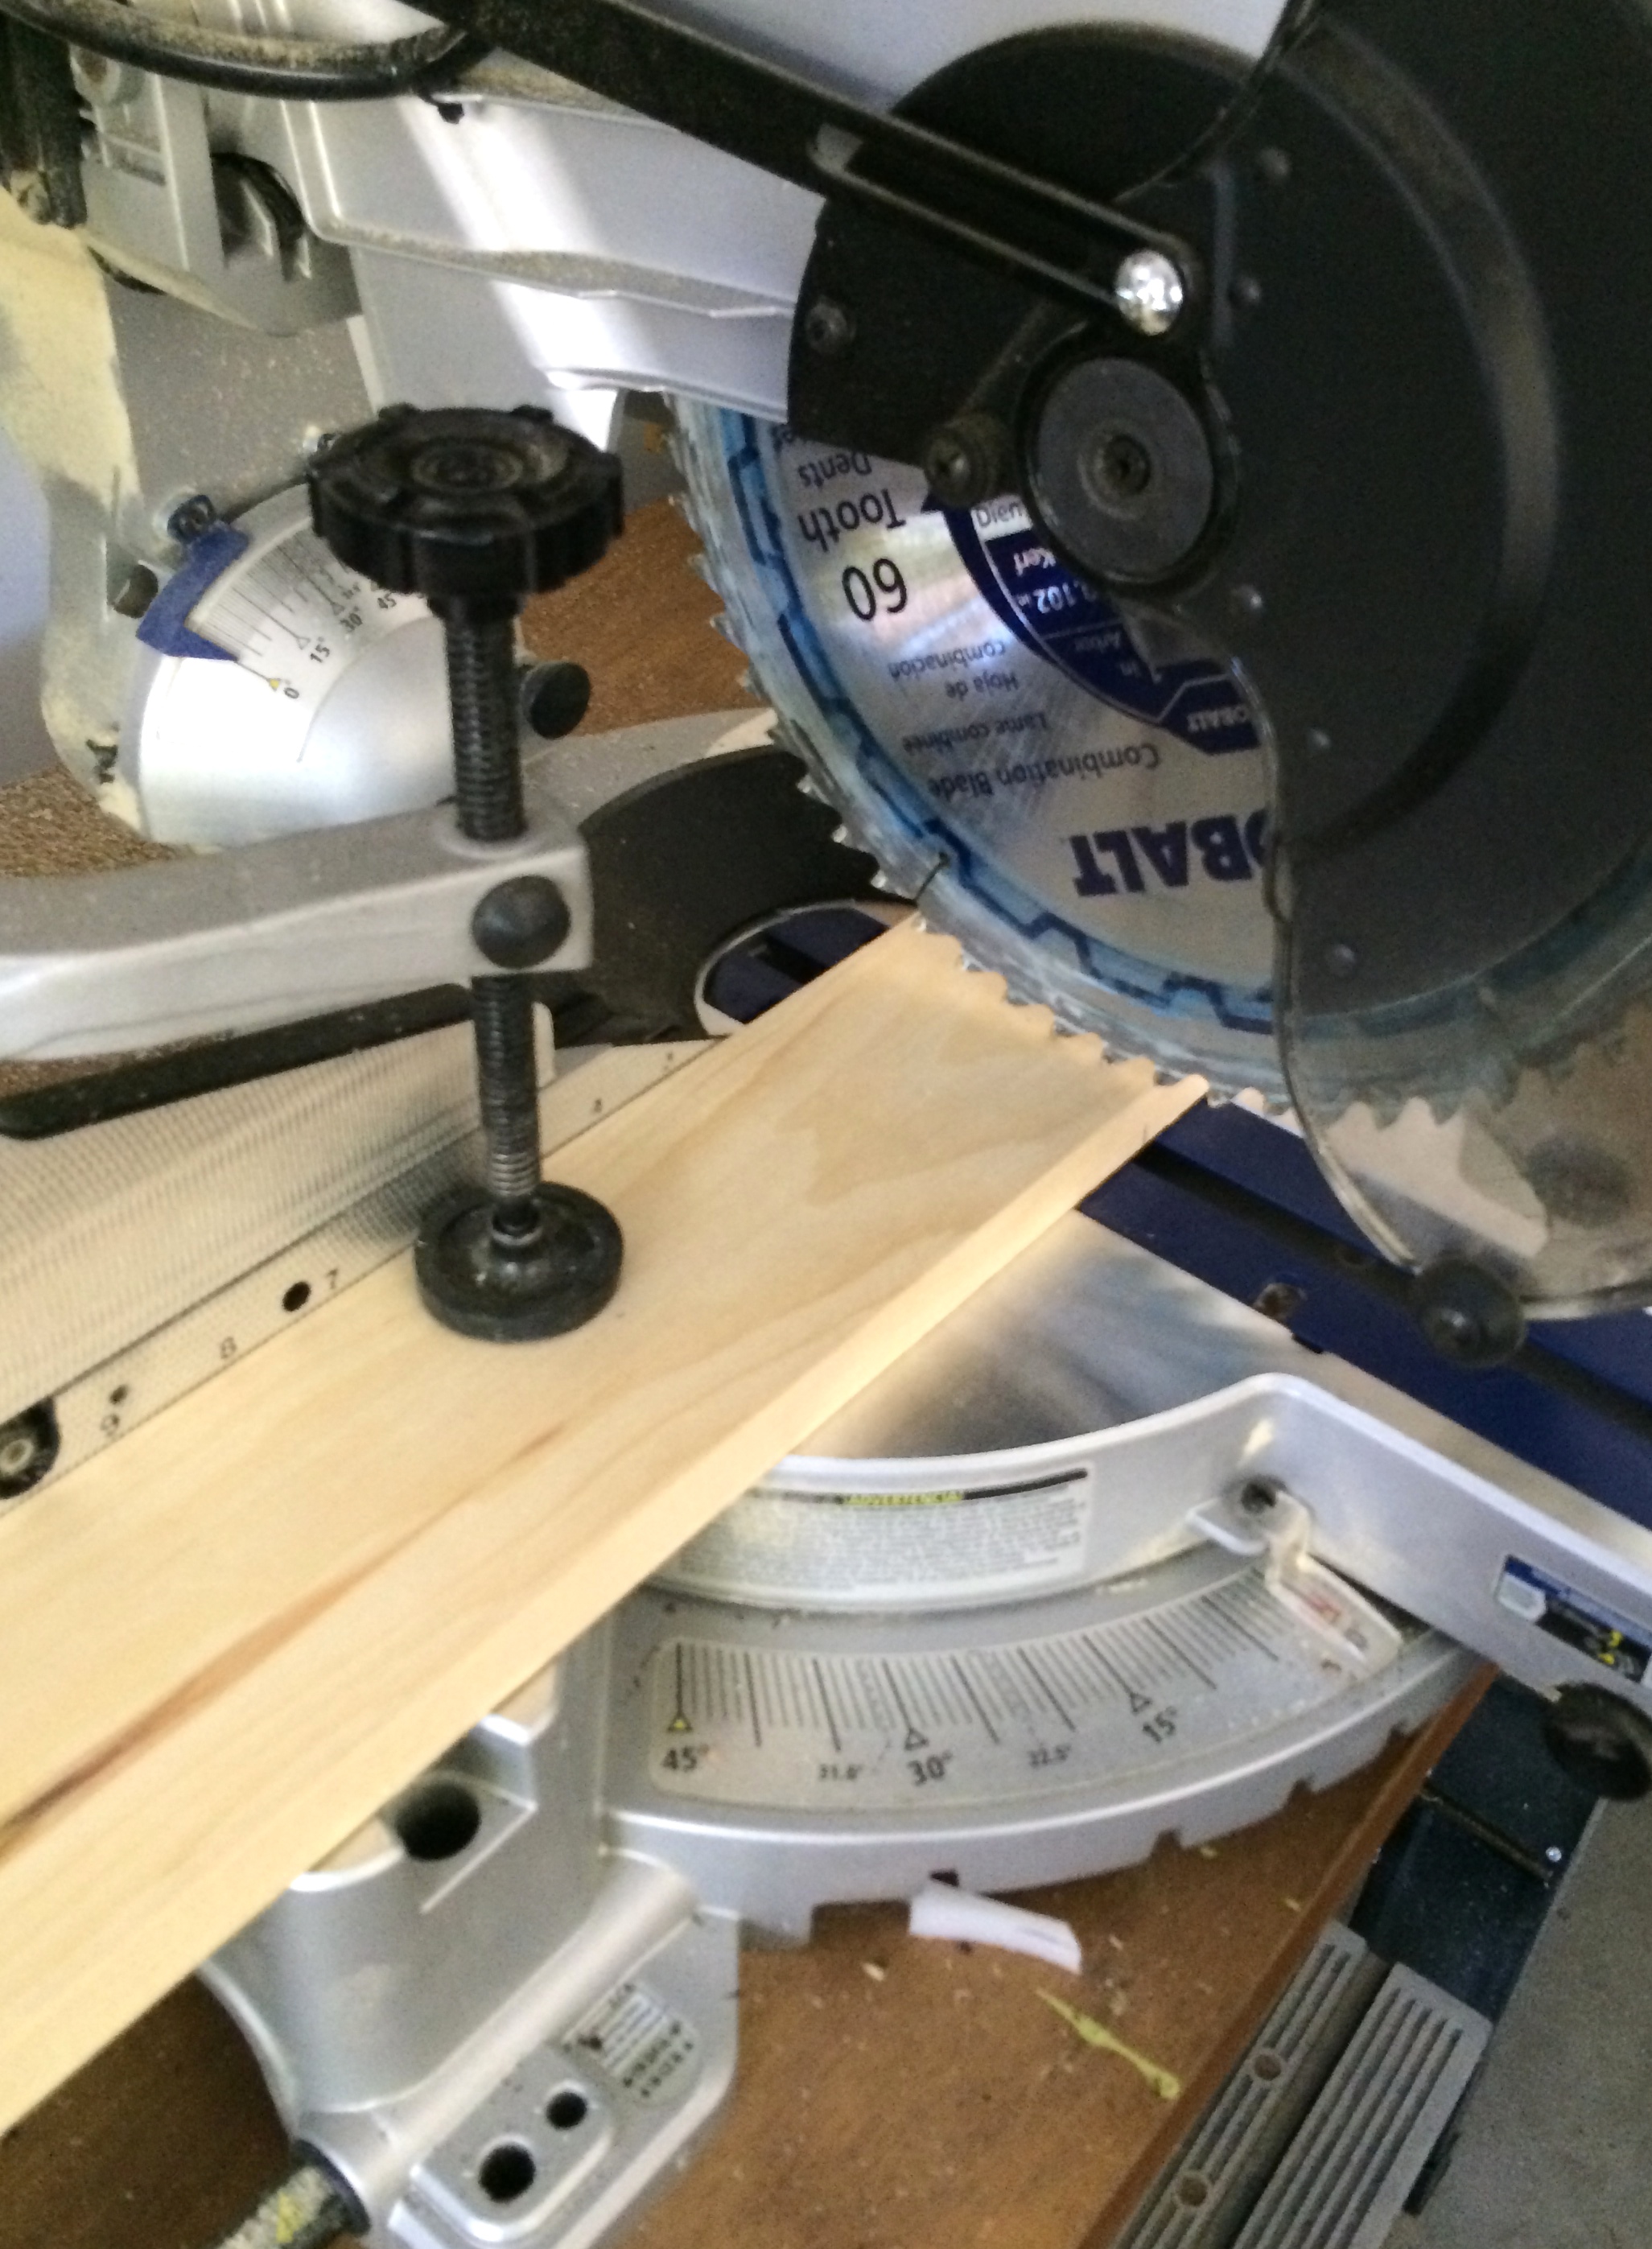
2. Then (without measuring) I layed the 1″ x 4″ x 48″ cut piece onto the uncut piece and marked where to make the cut #2.   Following that, I cut the 1″ x 8″ piece (for the bottom) the same way.

DIY Tutorial - How To Make a Wood Box to display on a dining table! 20 minute, easy-to-make do it yourself project. You'll want to make lots of these boxes for all over the home.

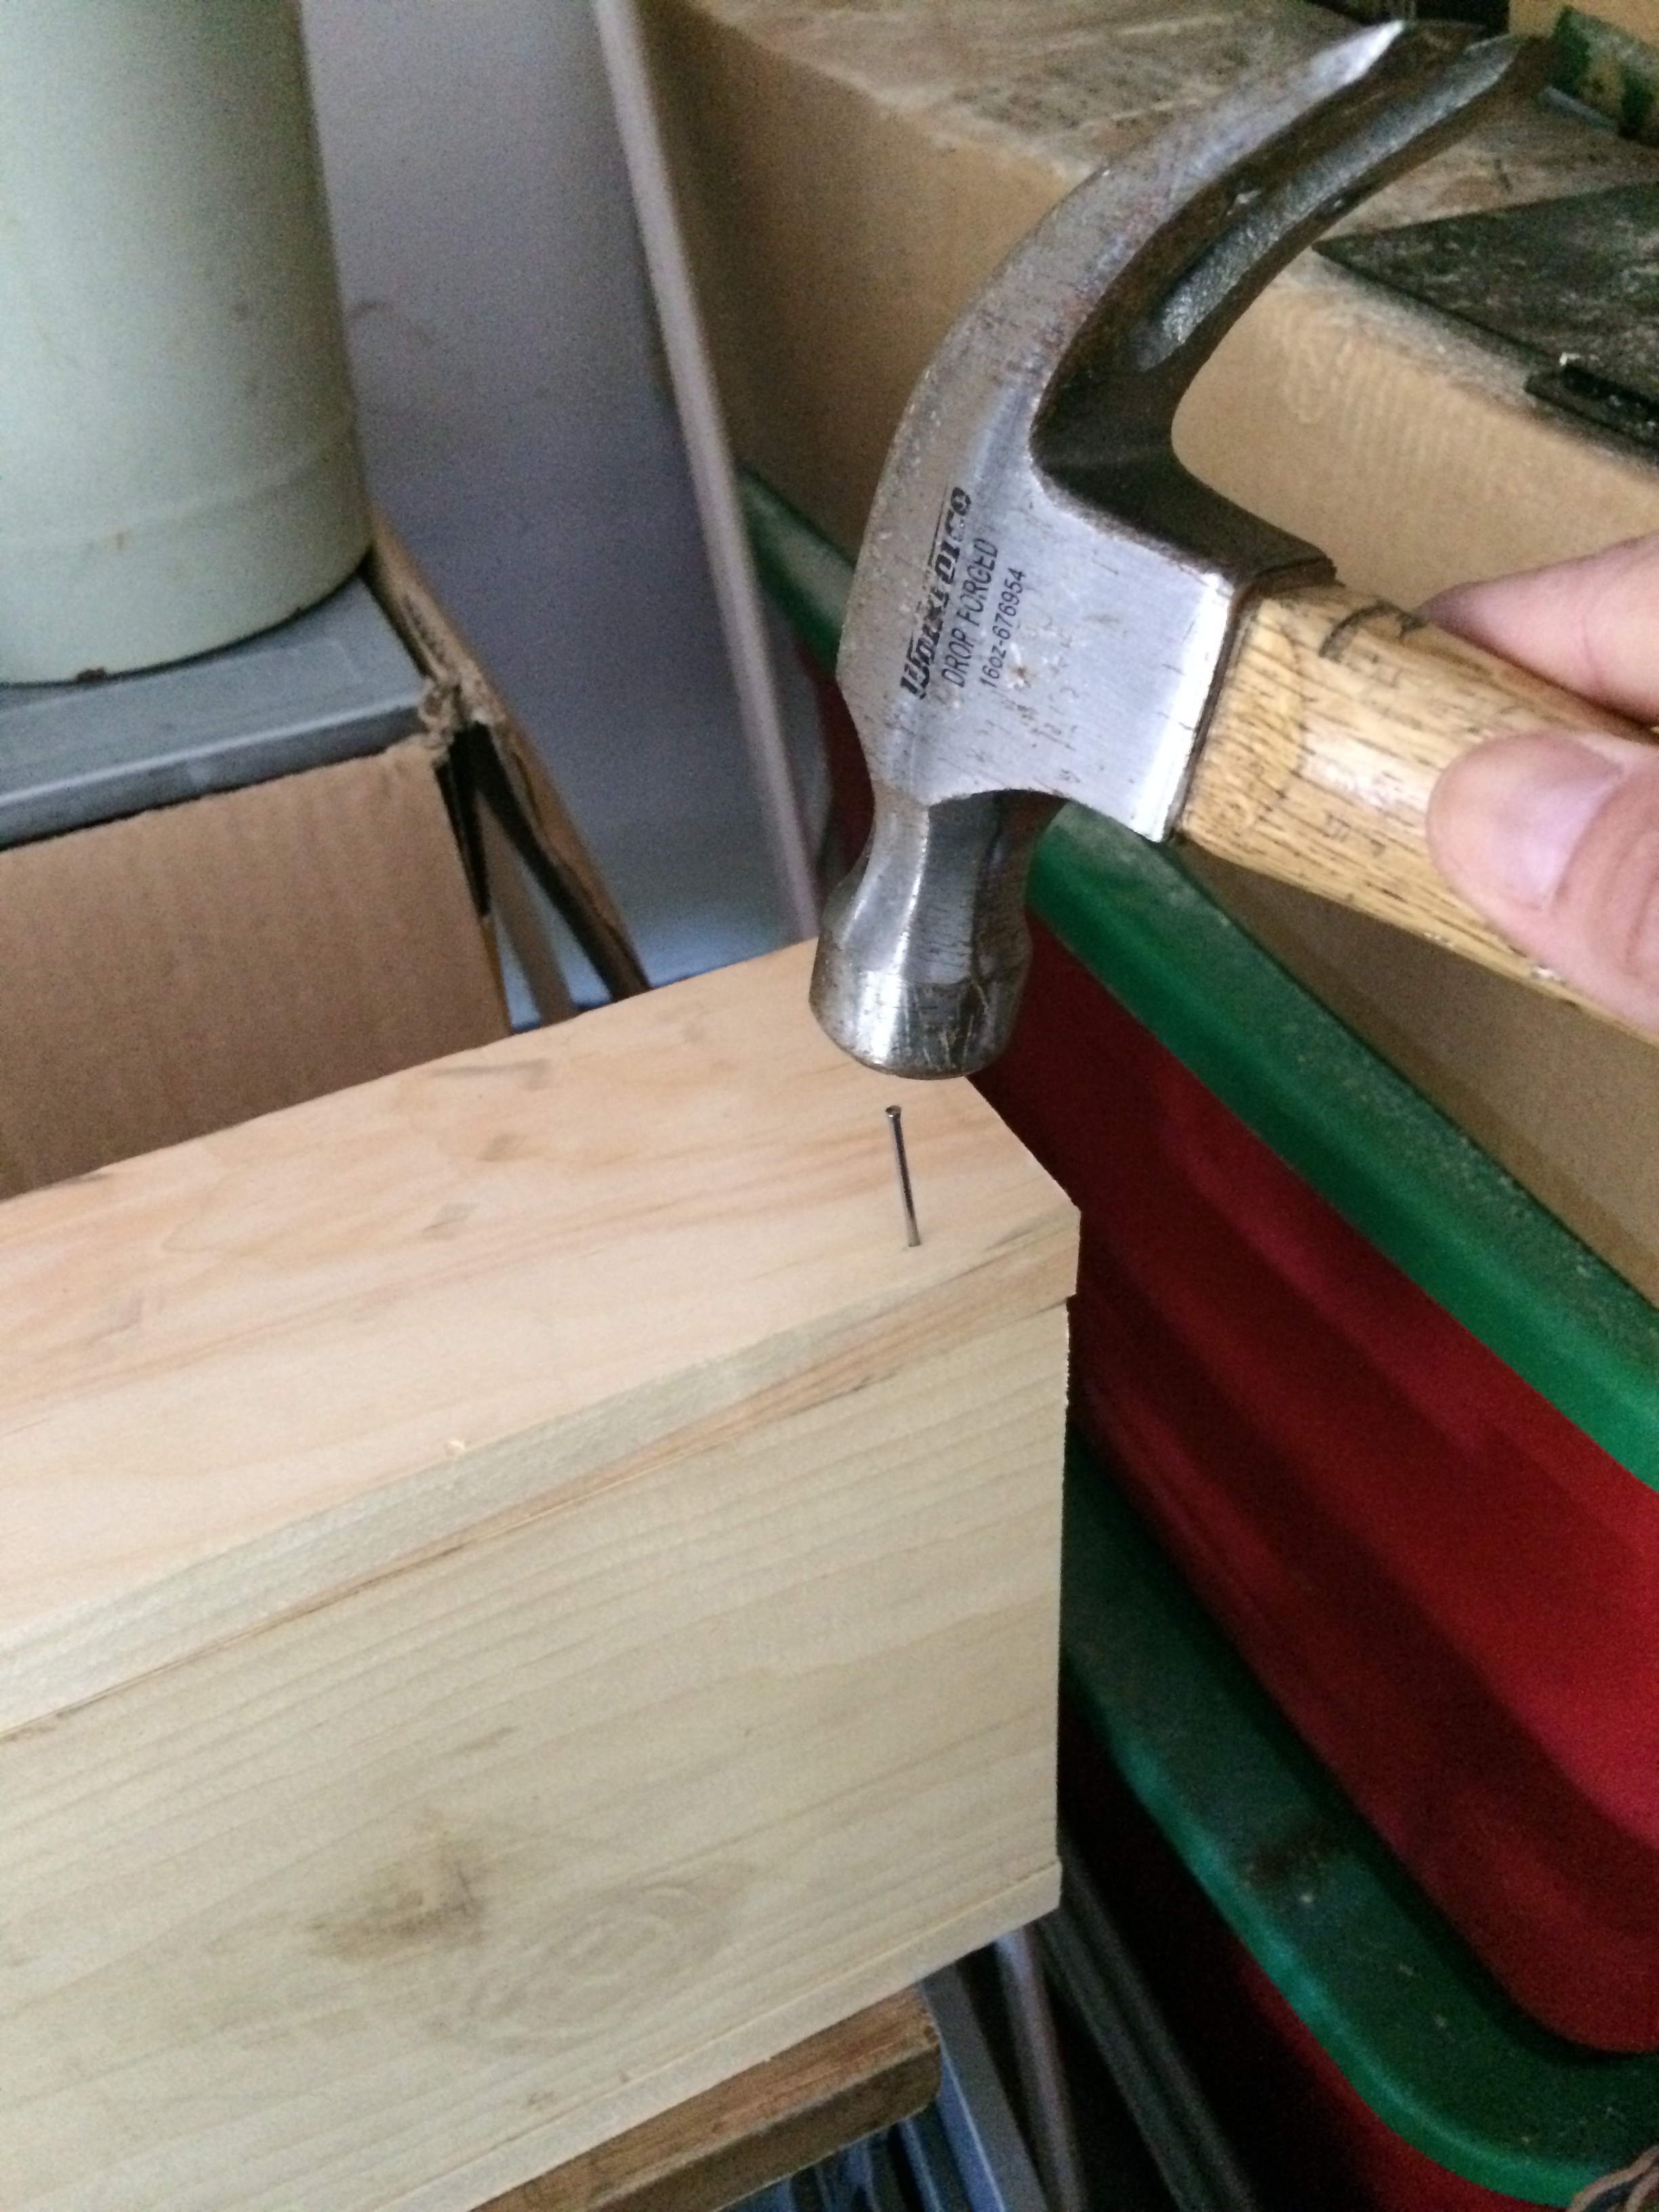
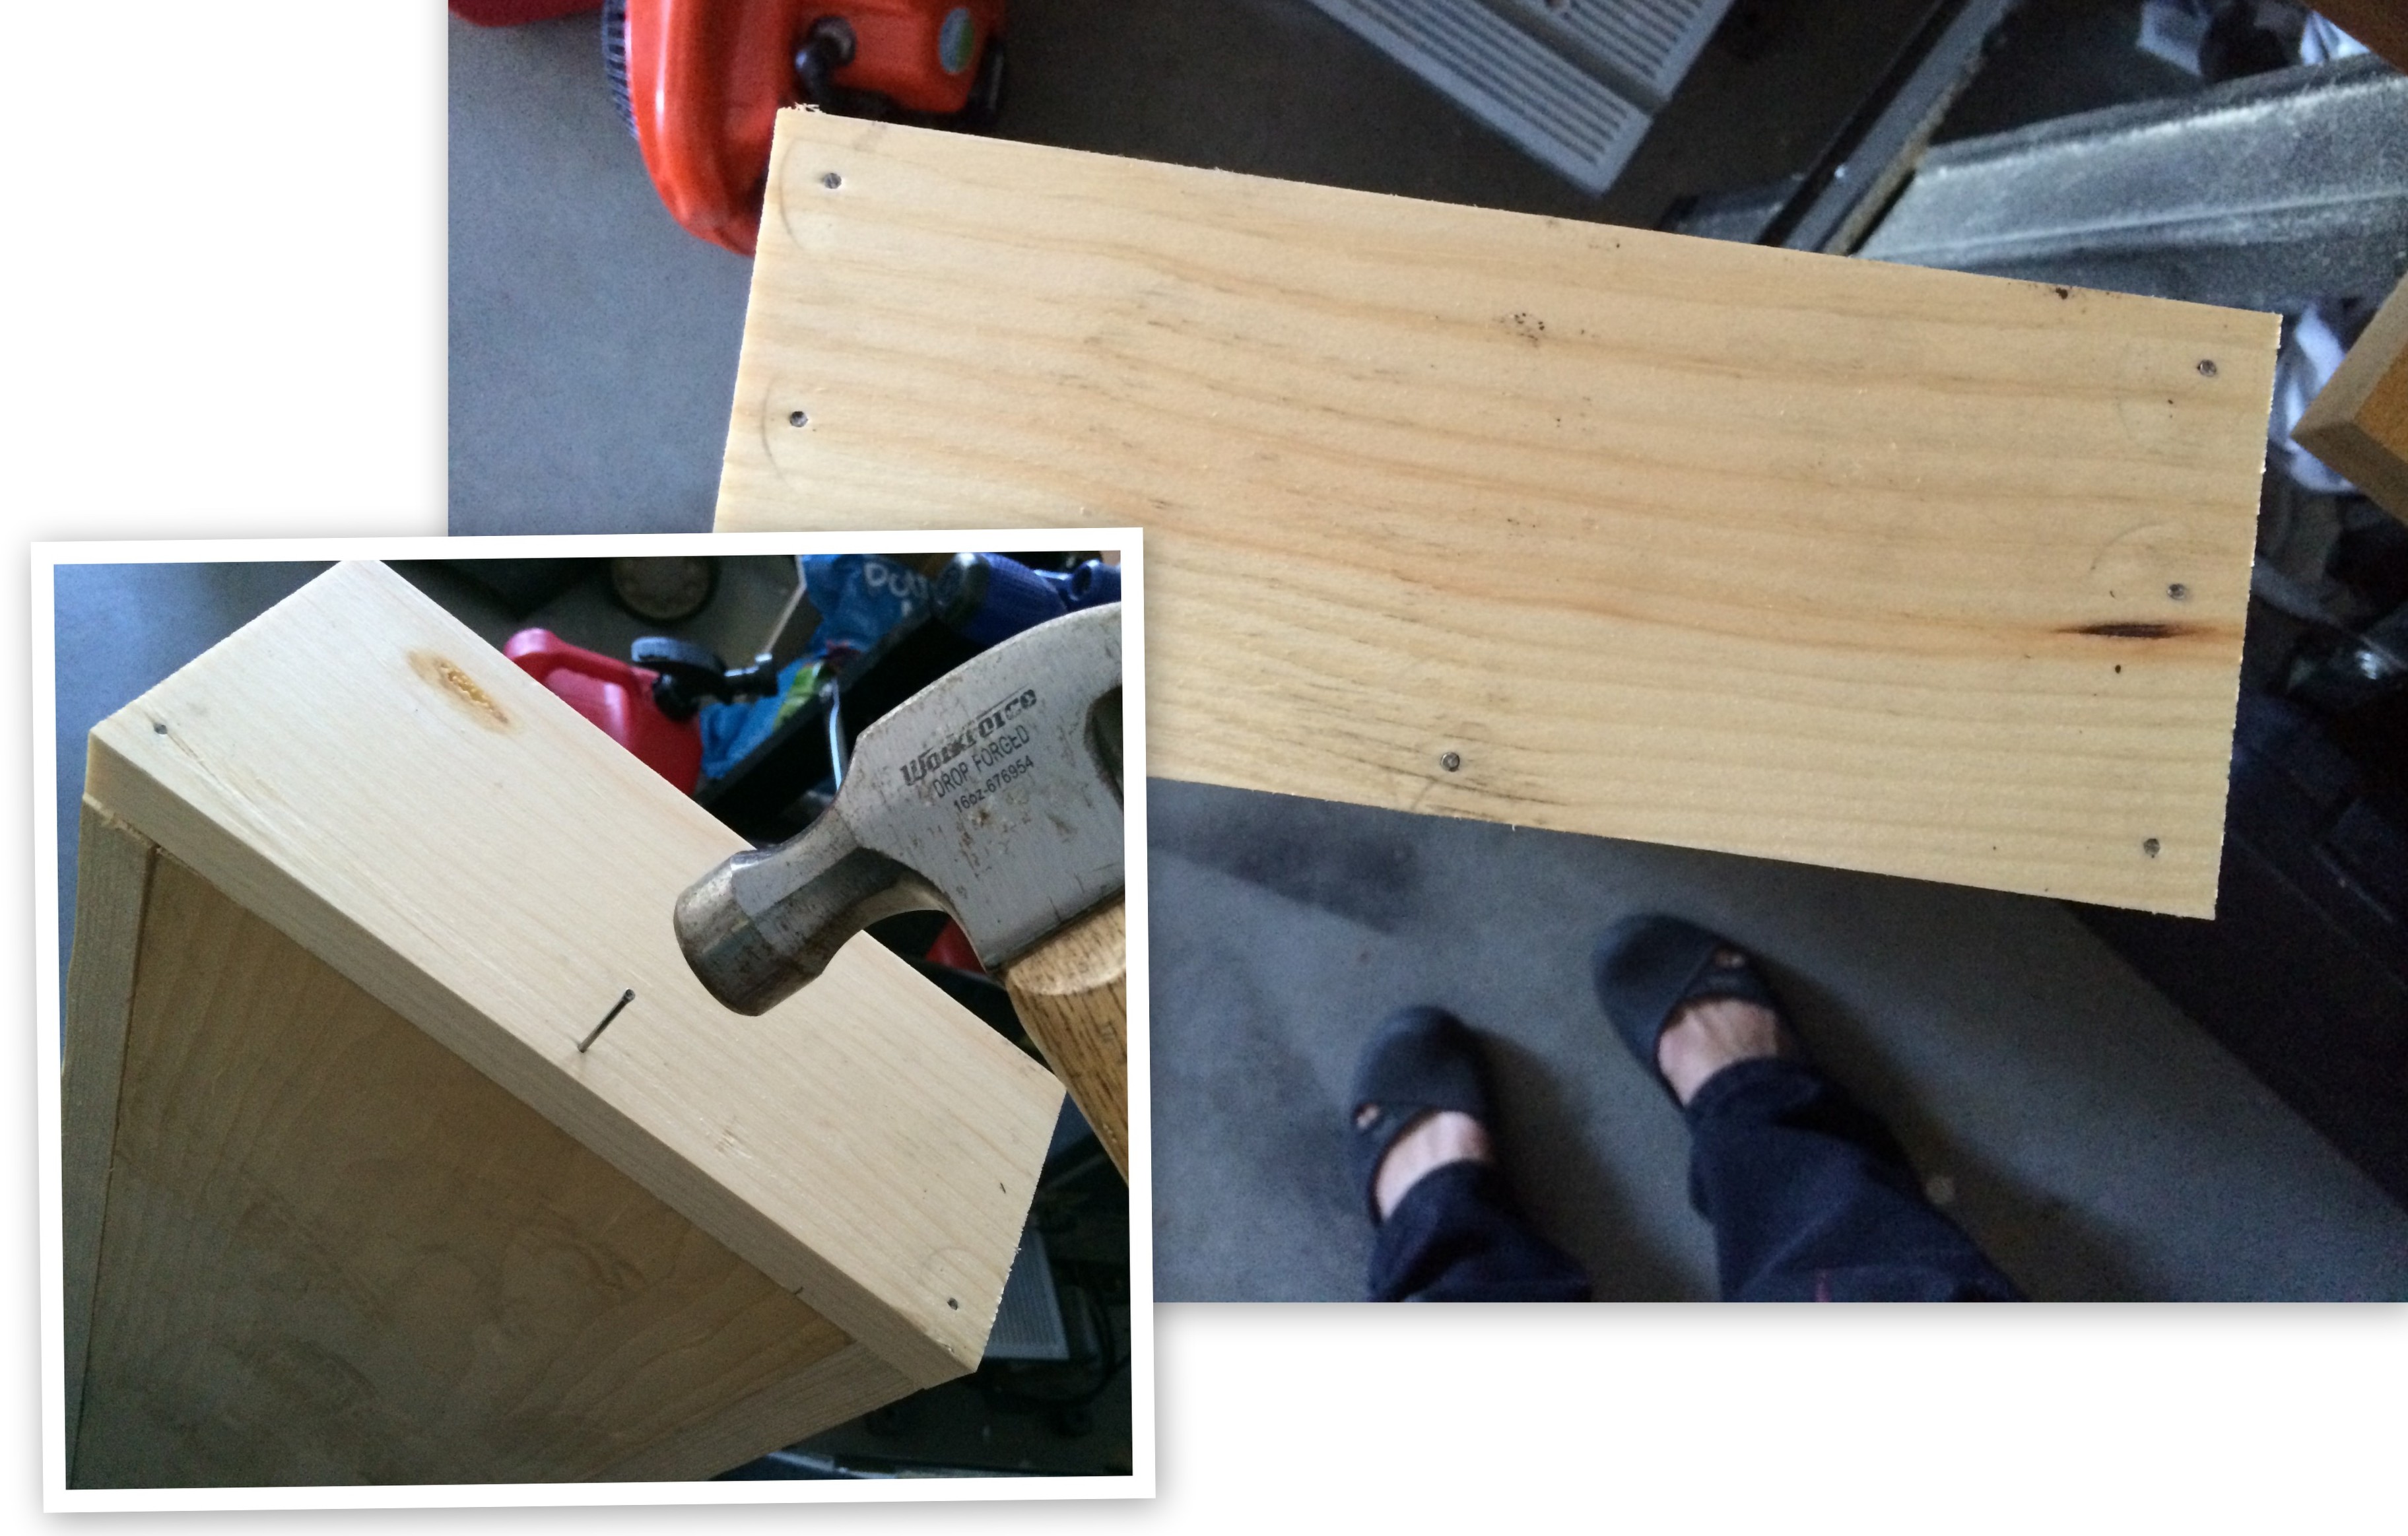
3. Using 1″ wood nails (which have a small head), I attached the sides to the bottom.

DIY Tutorial - How To Make a Wood Box to display on a dining table! 20 minute, easy-to-make do it yourself project. You'll want to make lots of these boxes for all over the home.

DIY Tutorial - How To Make a Wood Box to display on a dining table! 20 minute, easy-to-make do it yourself project. You'll want to make lots of these boxes for all over the home.

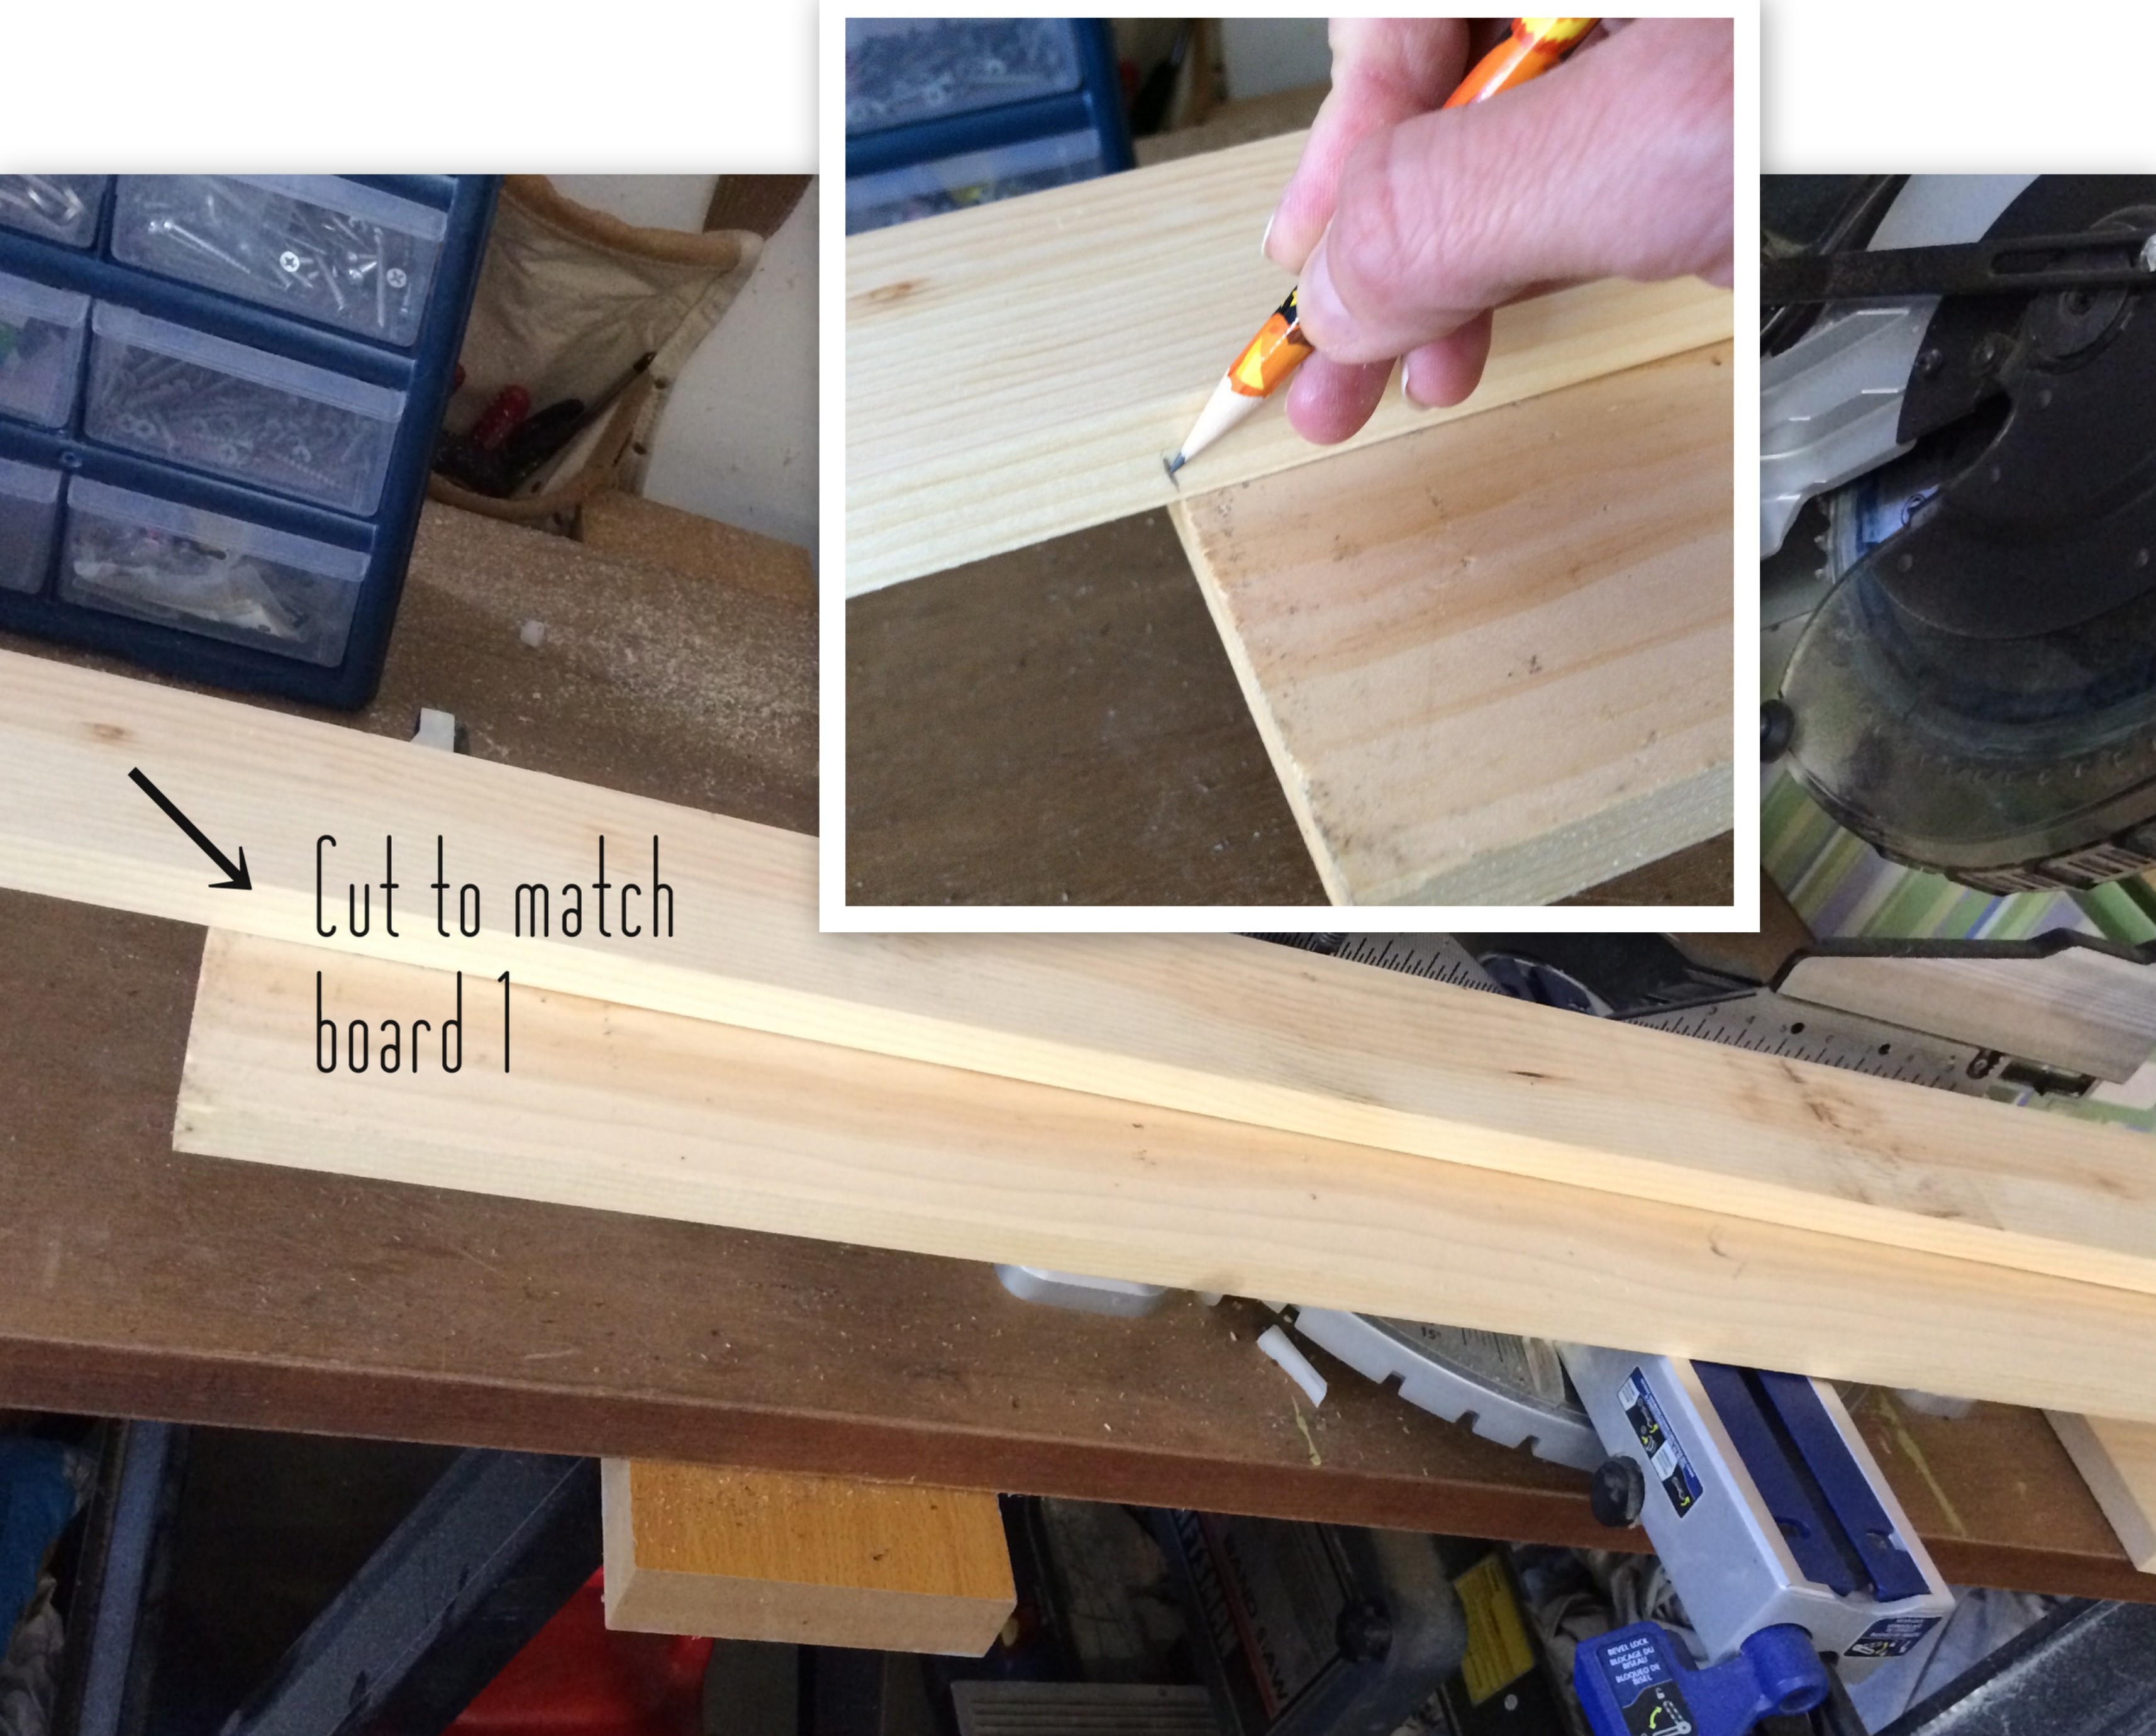
4. Then I measured the ends and using another 1″ x 4″ board, I cut it to size.

DIY Tutorial - How To Make a Wood Box to display on a dining table! 20 minute, easy-to-make do it yourself project. You'll want to make lots of these boxes for all over the home.

5. Then nailed the ends onto the sides and the bottom.

DIY Tutorial - How To Make a Wood Box to display on a dining table! 20 minute, easy-to-make do it yourself project. You'll want to make lots of these boxes for all over the home.

6. Once the box was complete, I drilled holes at each of the shorter ends for the cup pulls and screwed them in.

DIY Tutorial - How To Make a Wood Box to display on a dining table! 20 minute, easy-to-make do it yourself project. You'll want to make lots of these boxes for all over the home.

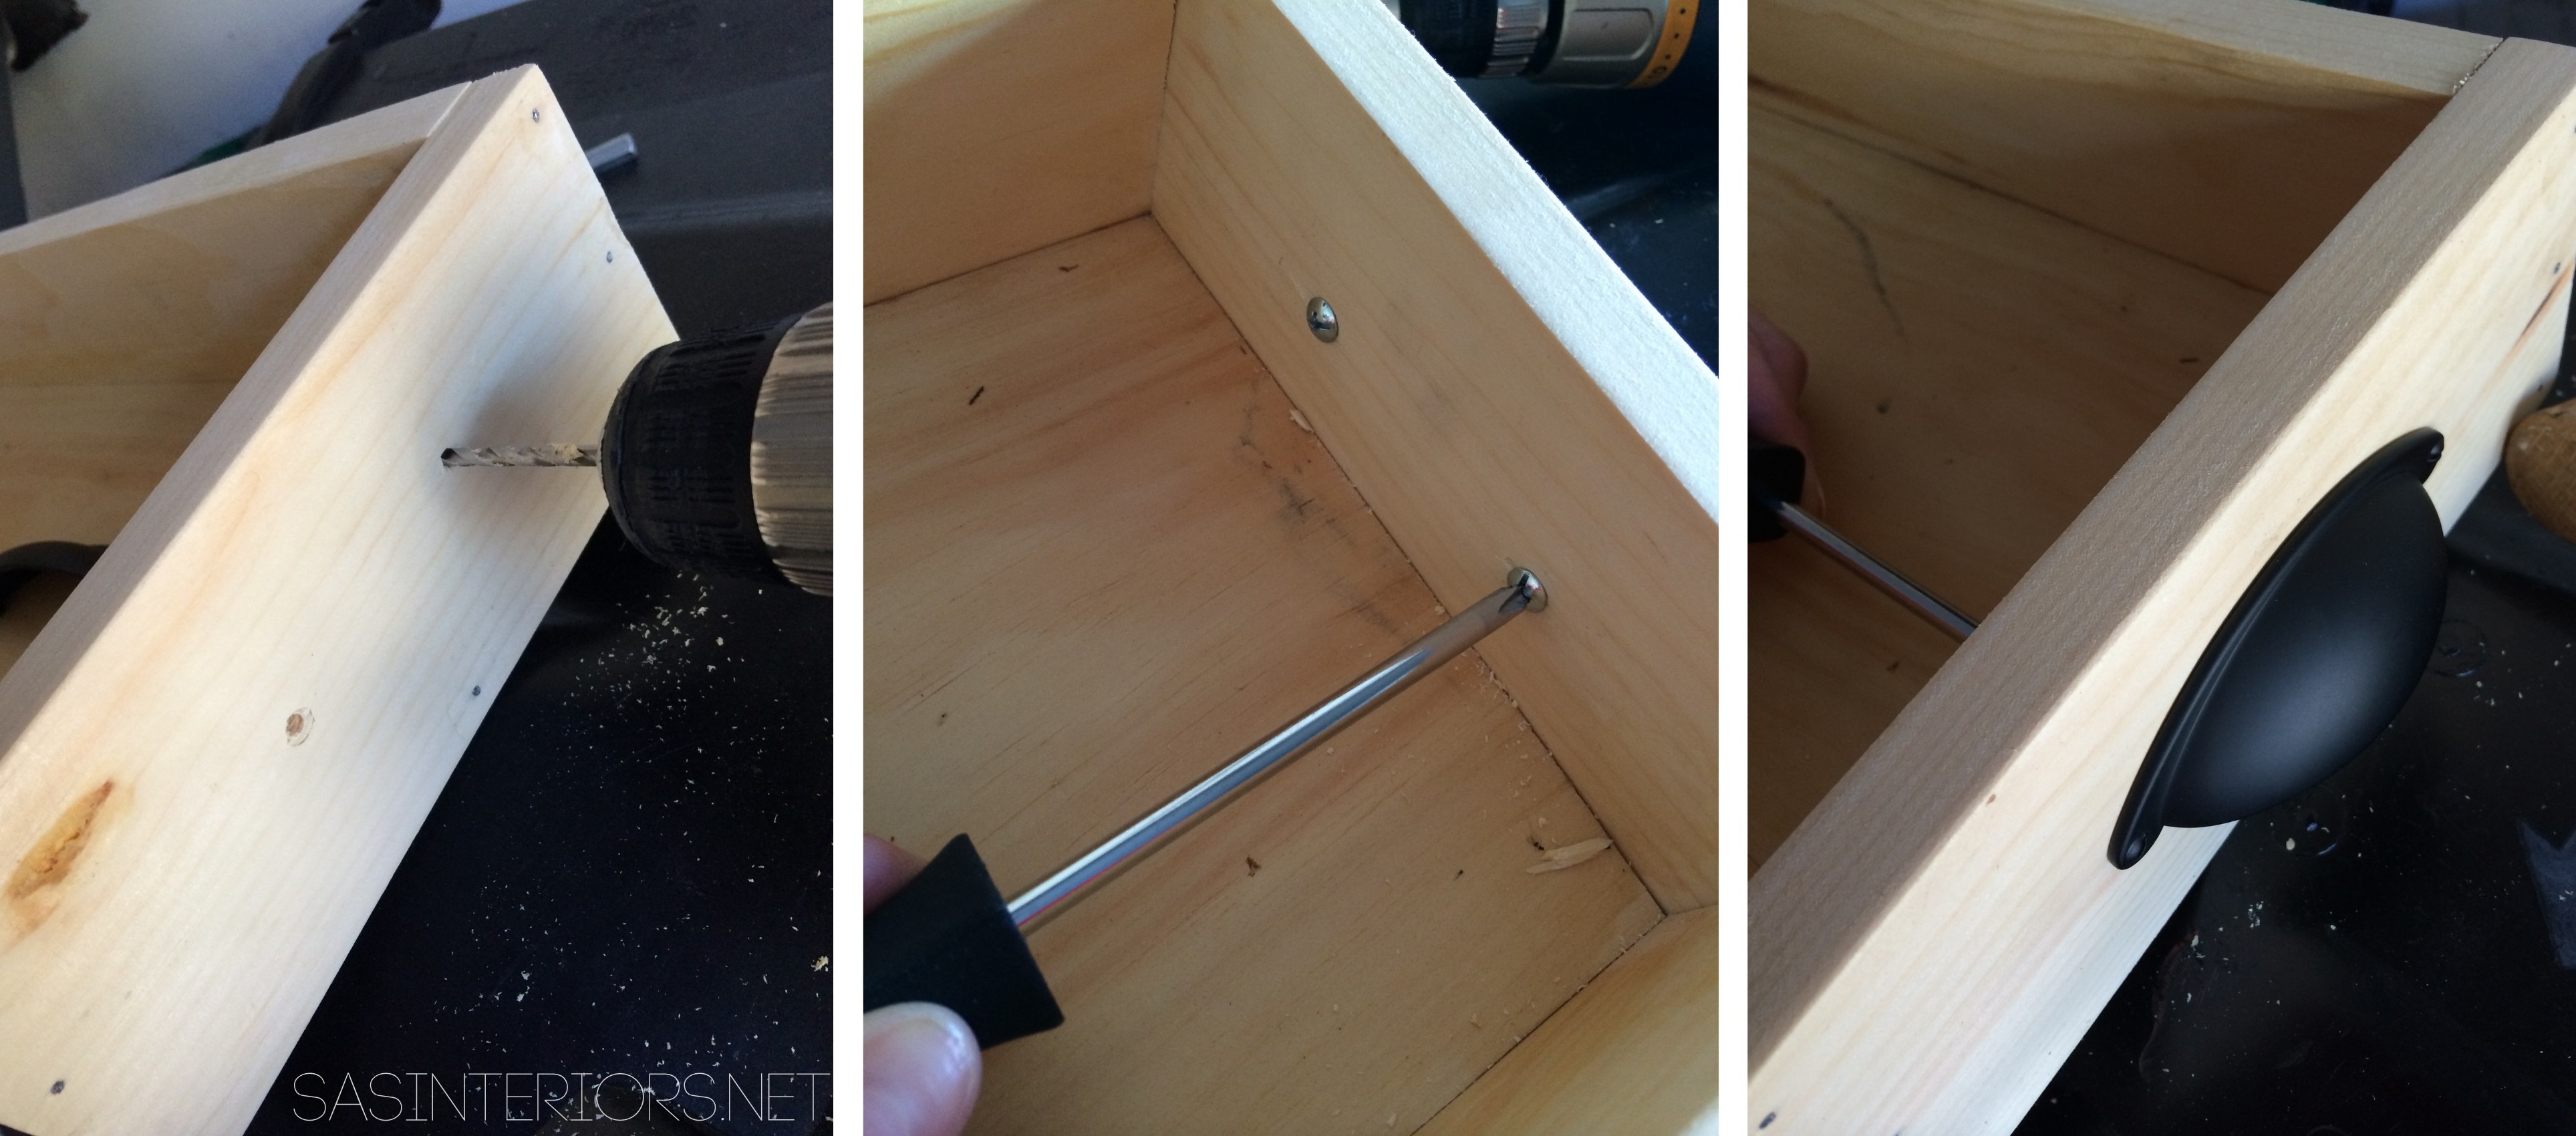
One last step… stain!

7. Using Minwax Special Walnut and a lint-free cloth (an old white cotton t-shirt to be exact), I applied the stain and immediately wiped it away because I wanted to keep the look of the box a medium depth (not too dark, not too light) since the table is fairly dark.

DIY Tutorial - How To Make a Wood Box to display on a dining table! 20 minute, easy-to-make do it yourself project. You'll want to make lots of these boxes for all over the home.

The result…

DIY Tutorial - How To Make a Wood Box to display on a dining table! 20 minute, easy-to-make do it yourself project. You'll want to make lots of these boxes for all over the home.

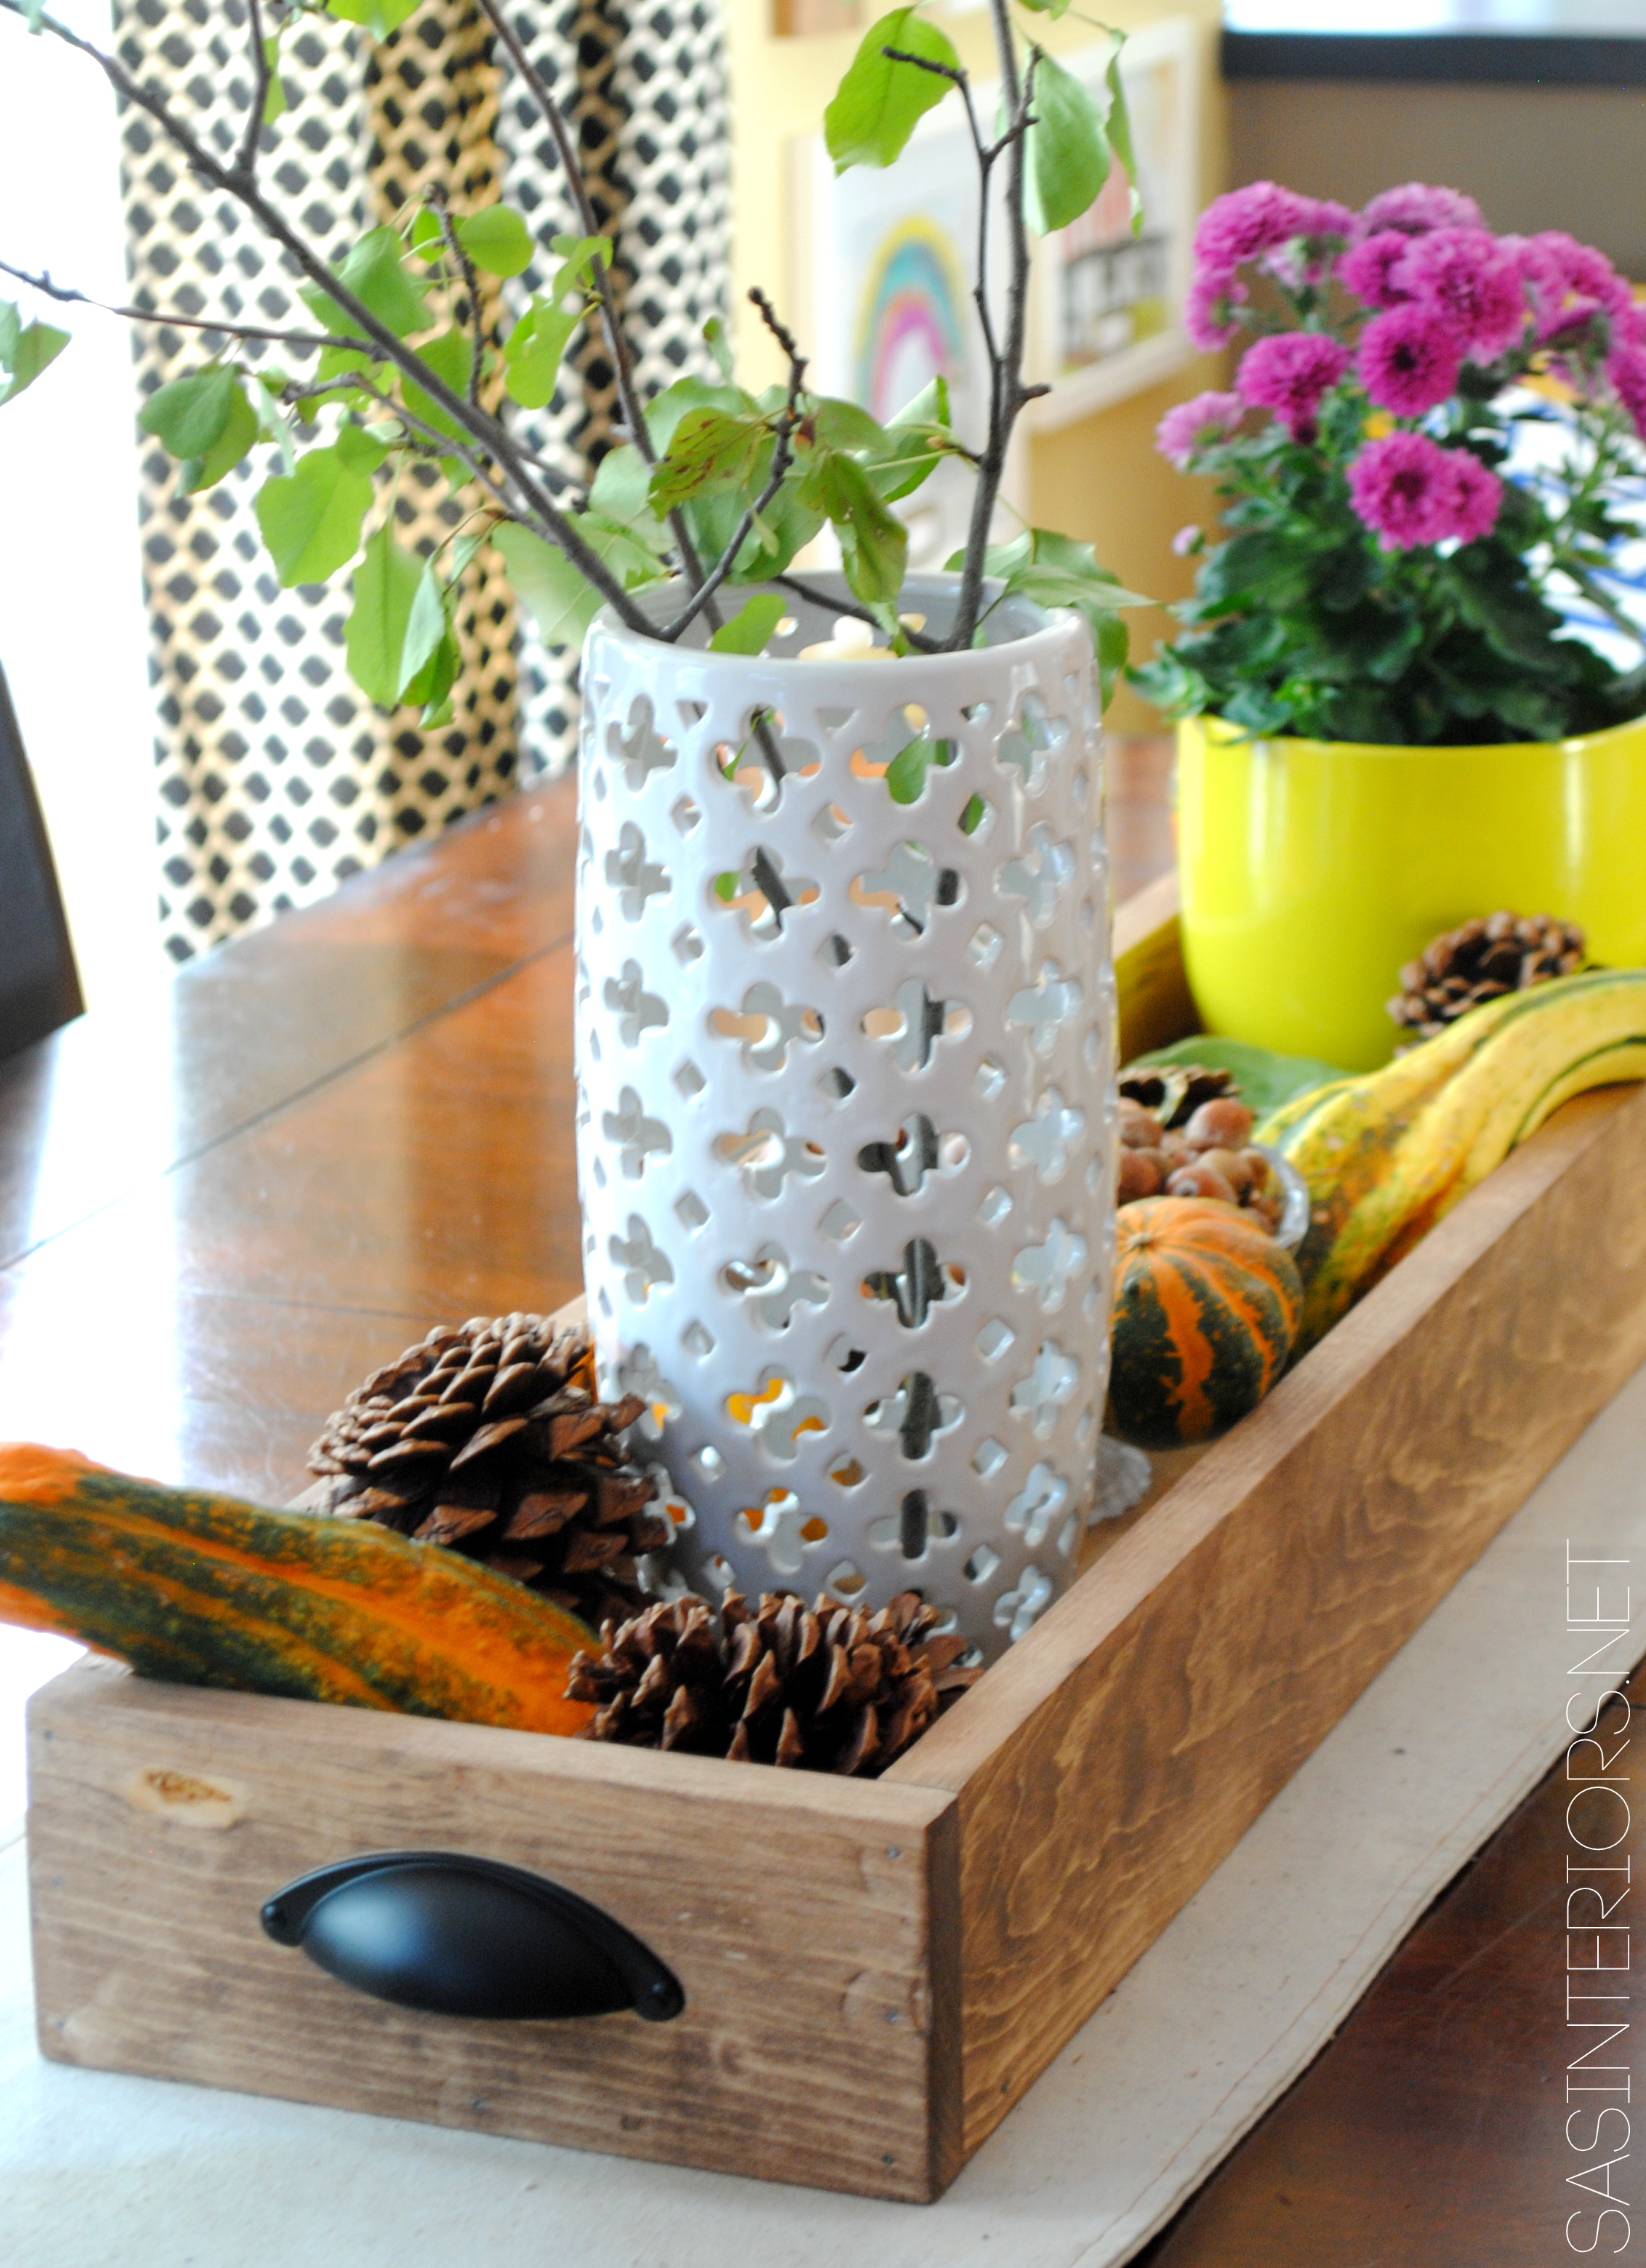
Once the box was complete, within a few hours it was ready to fill.  The power of stain can make life quite grand!

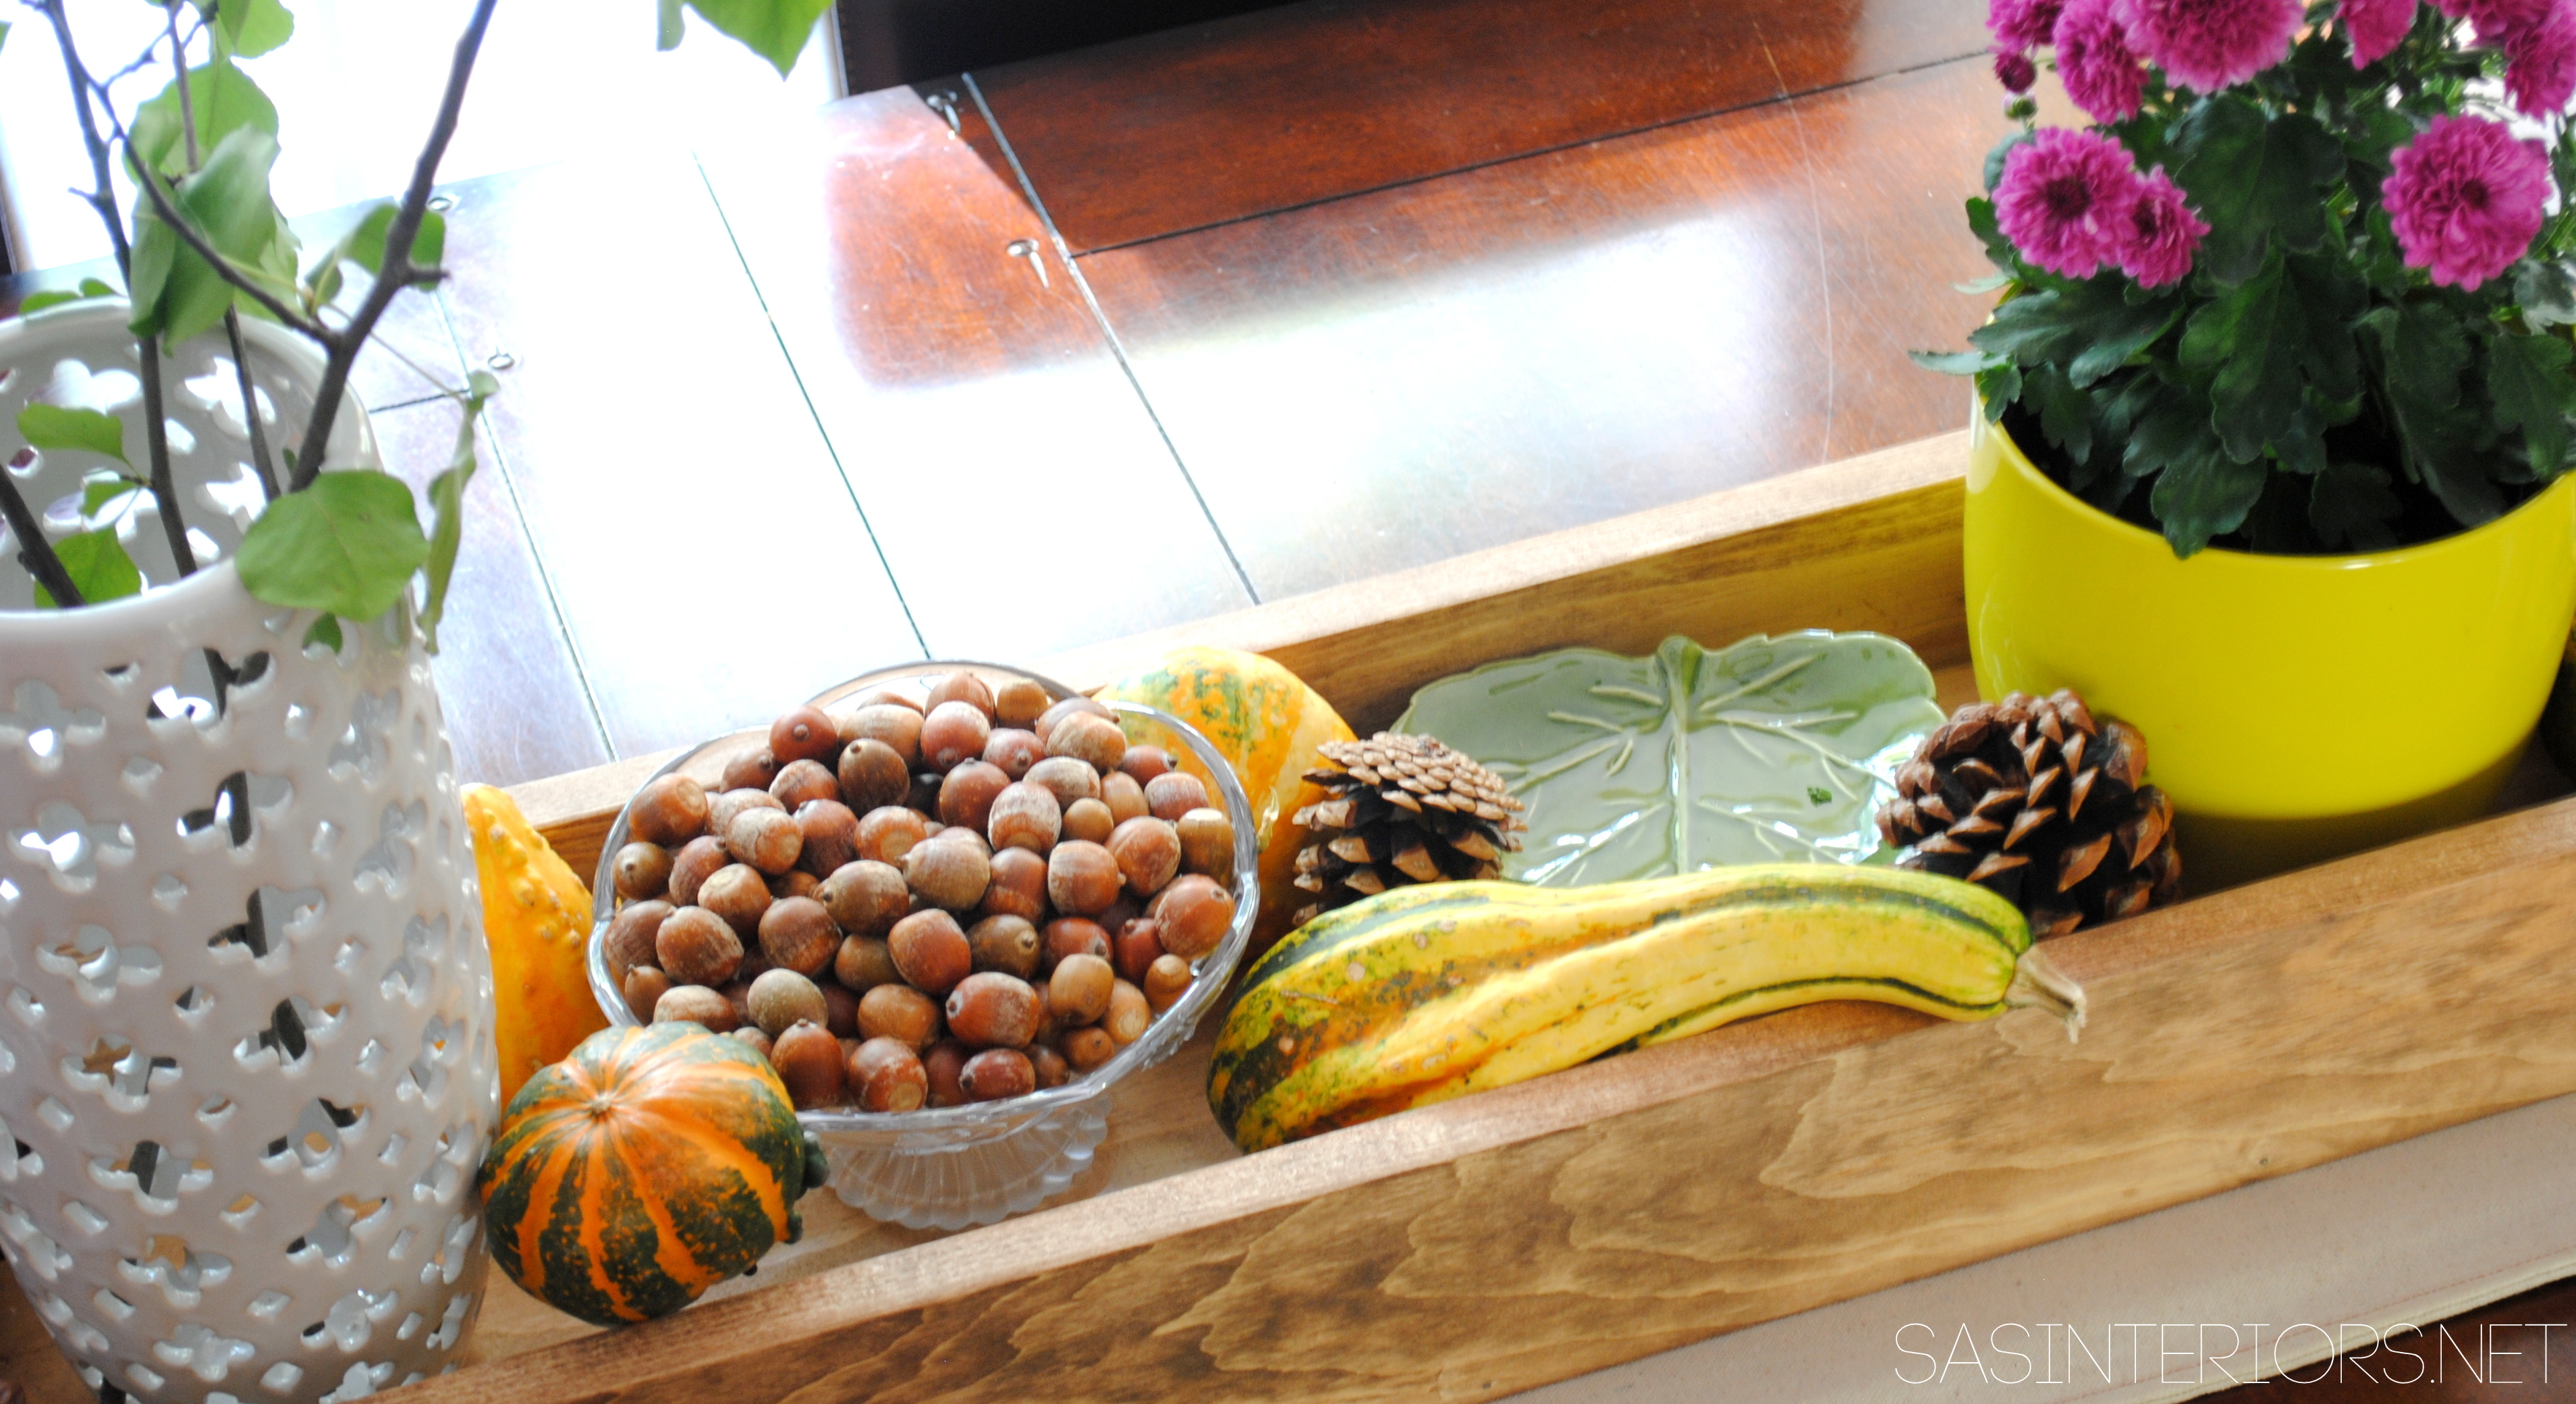
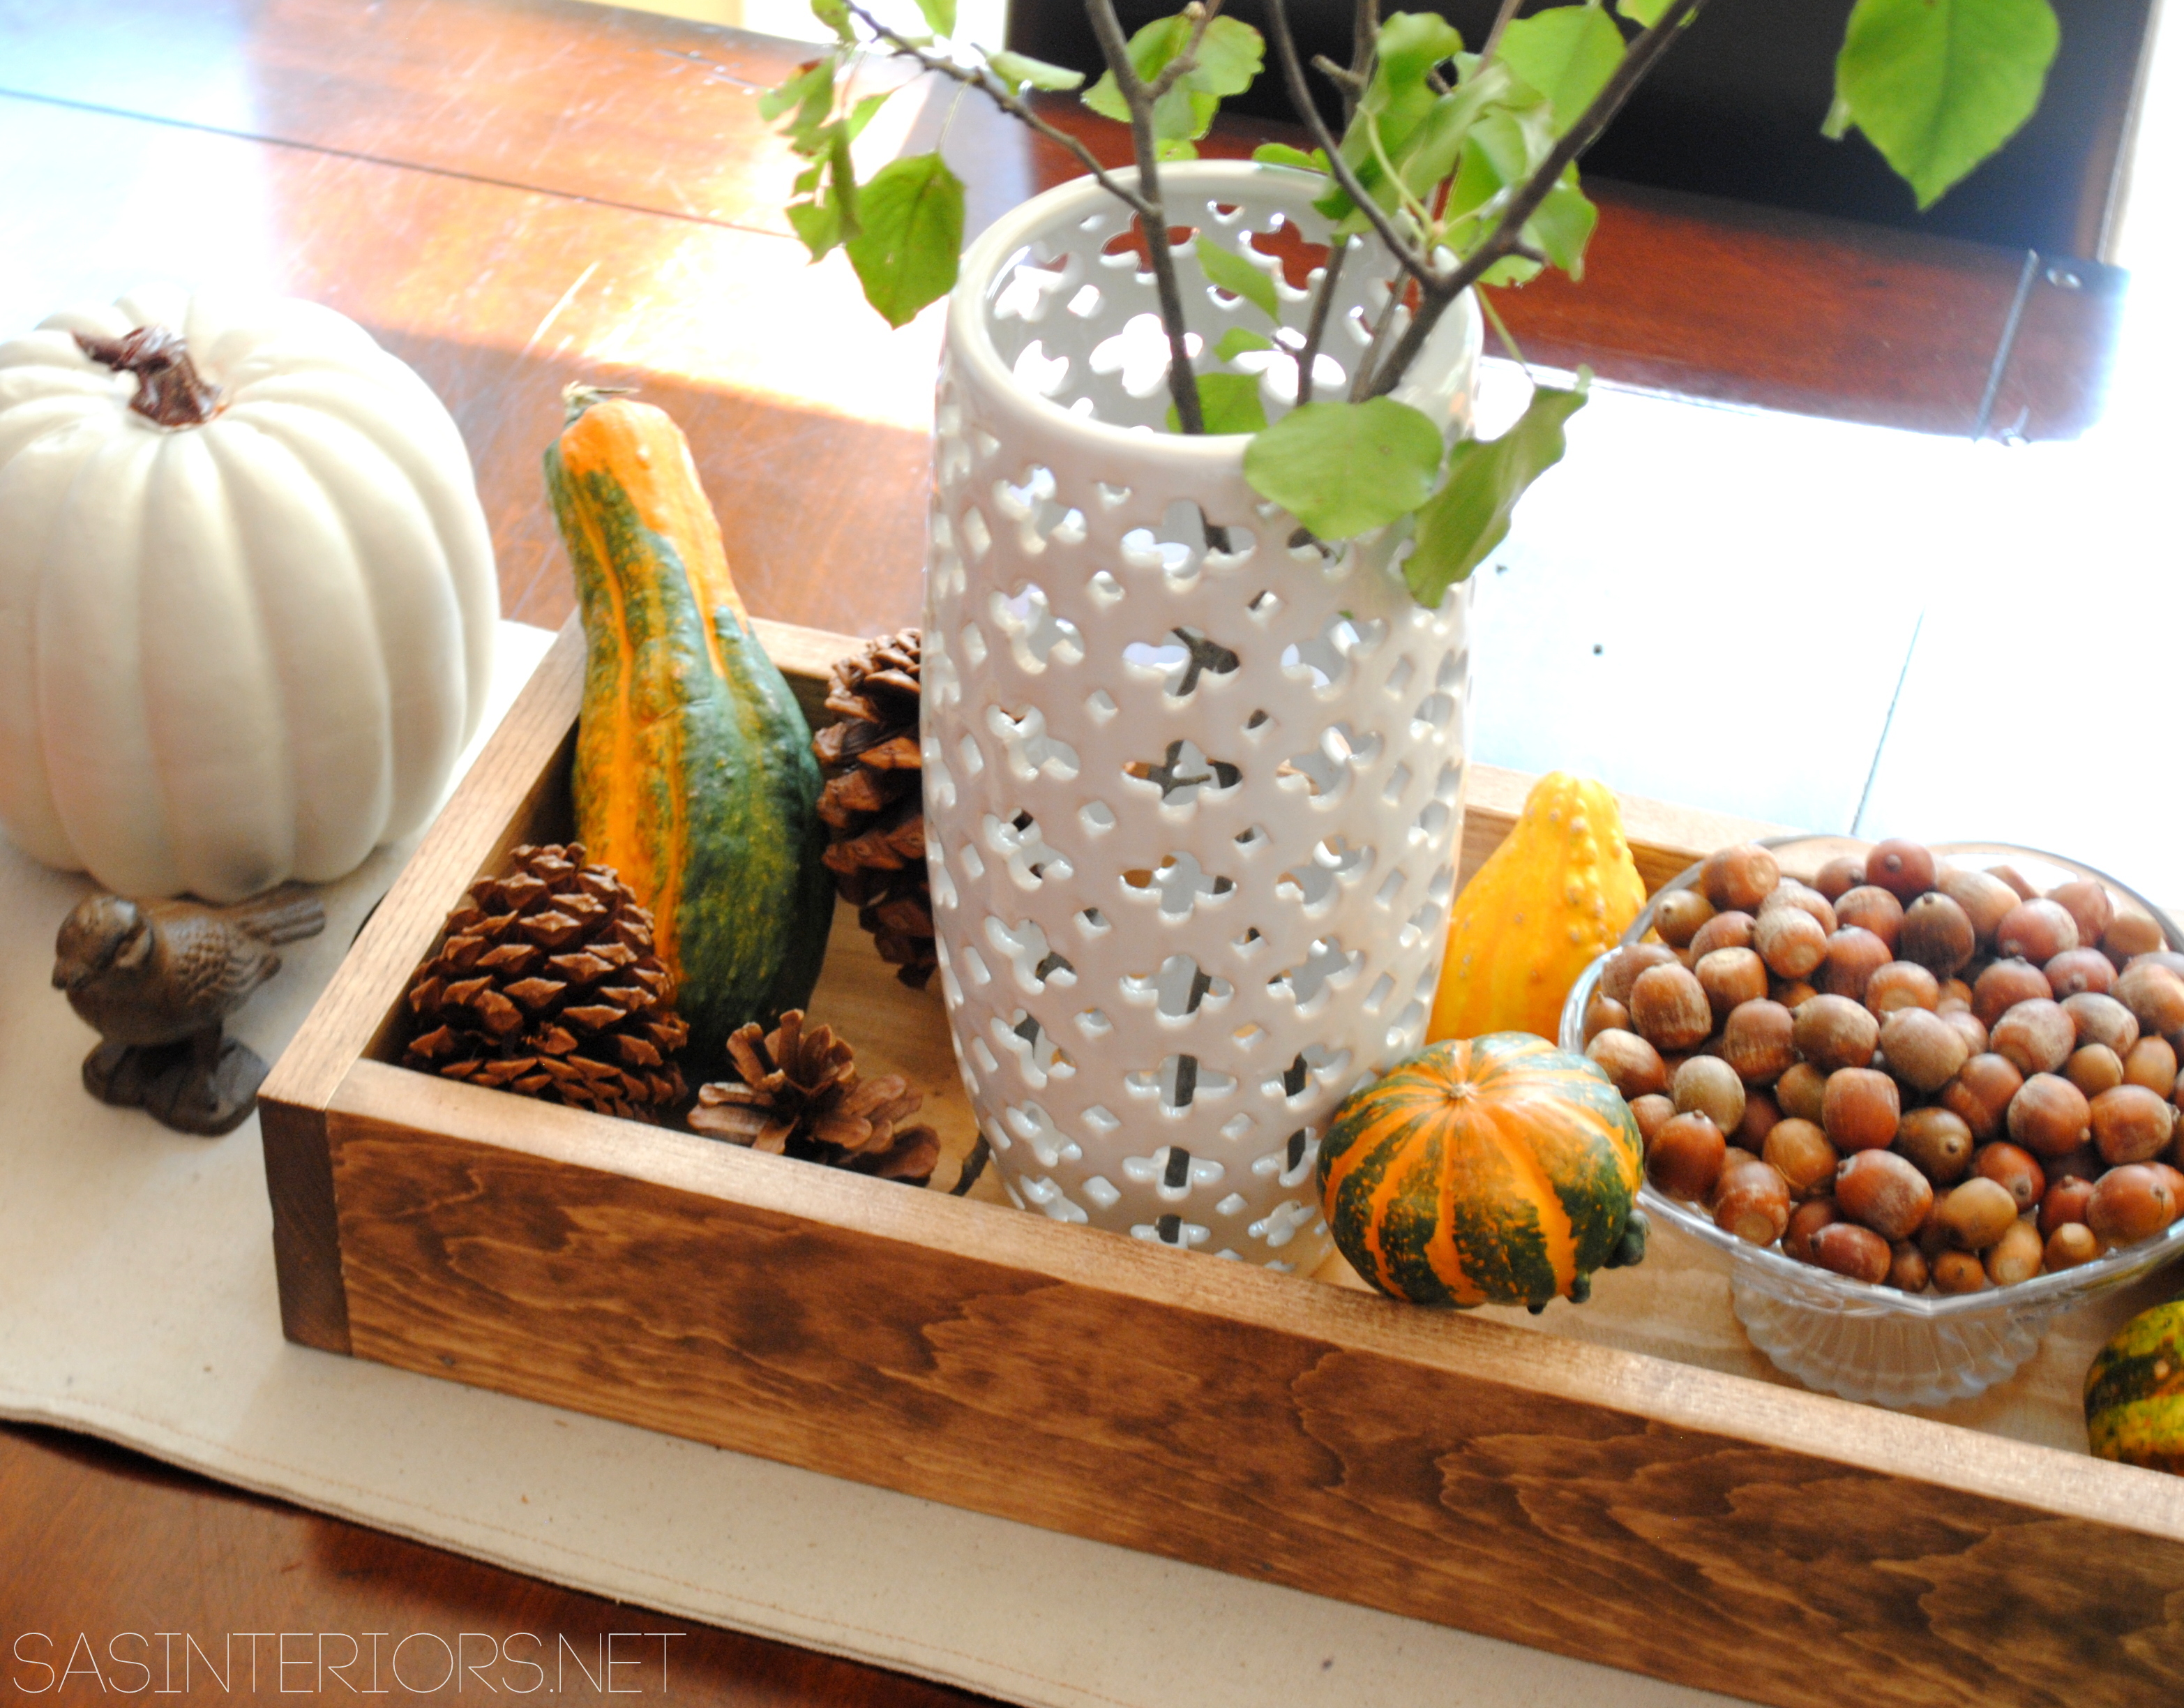
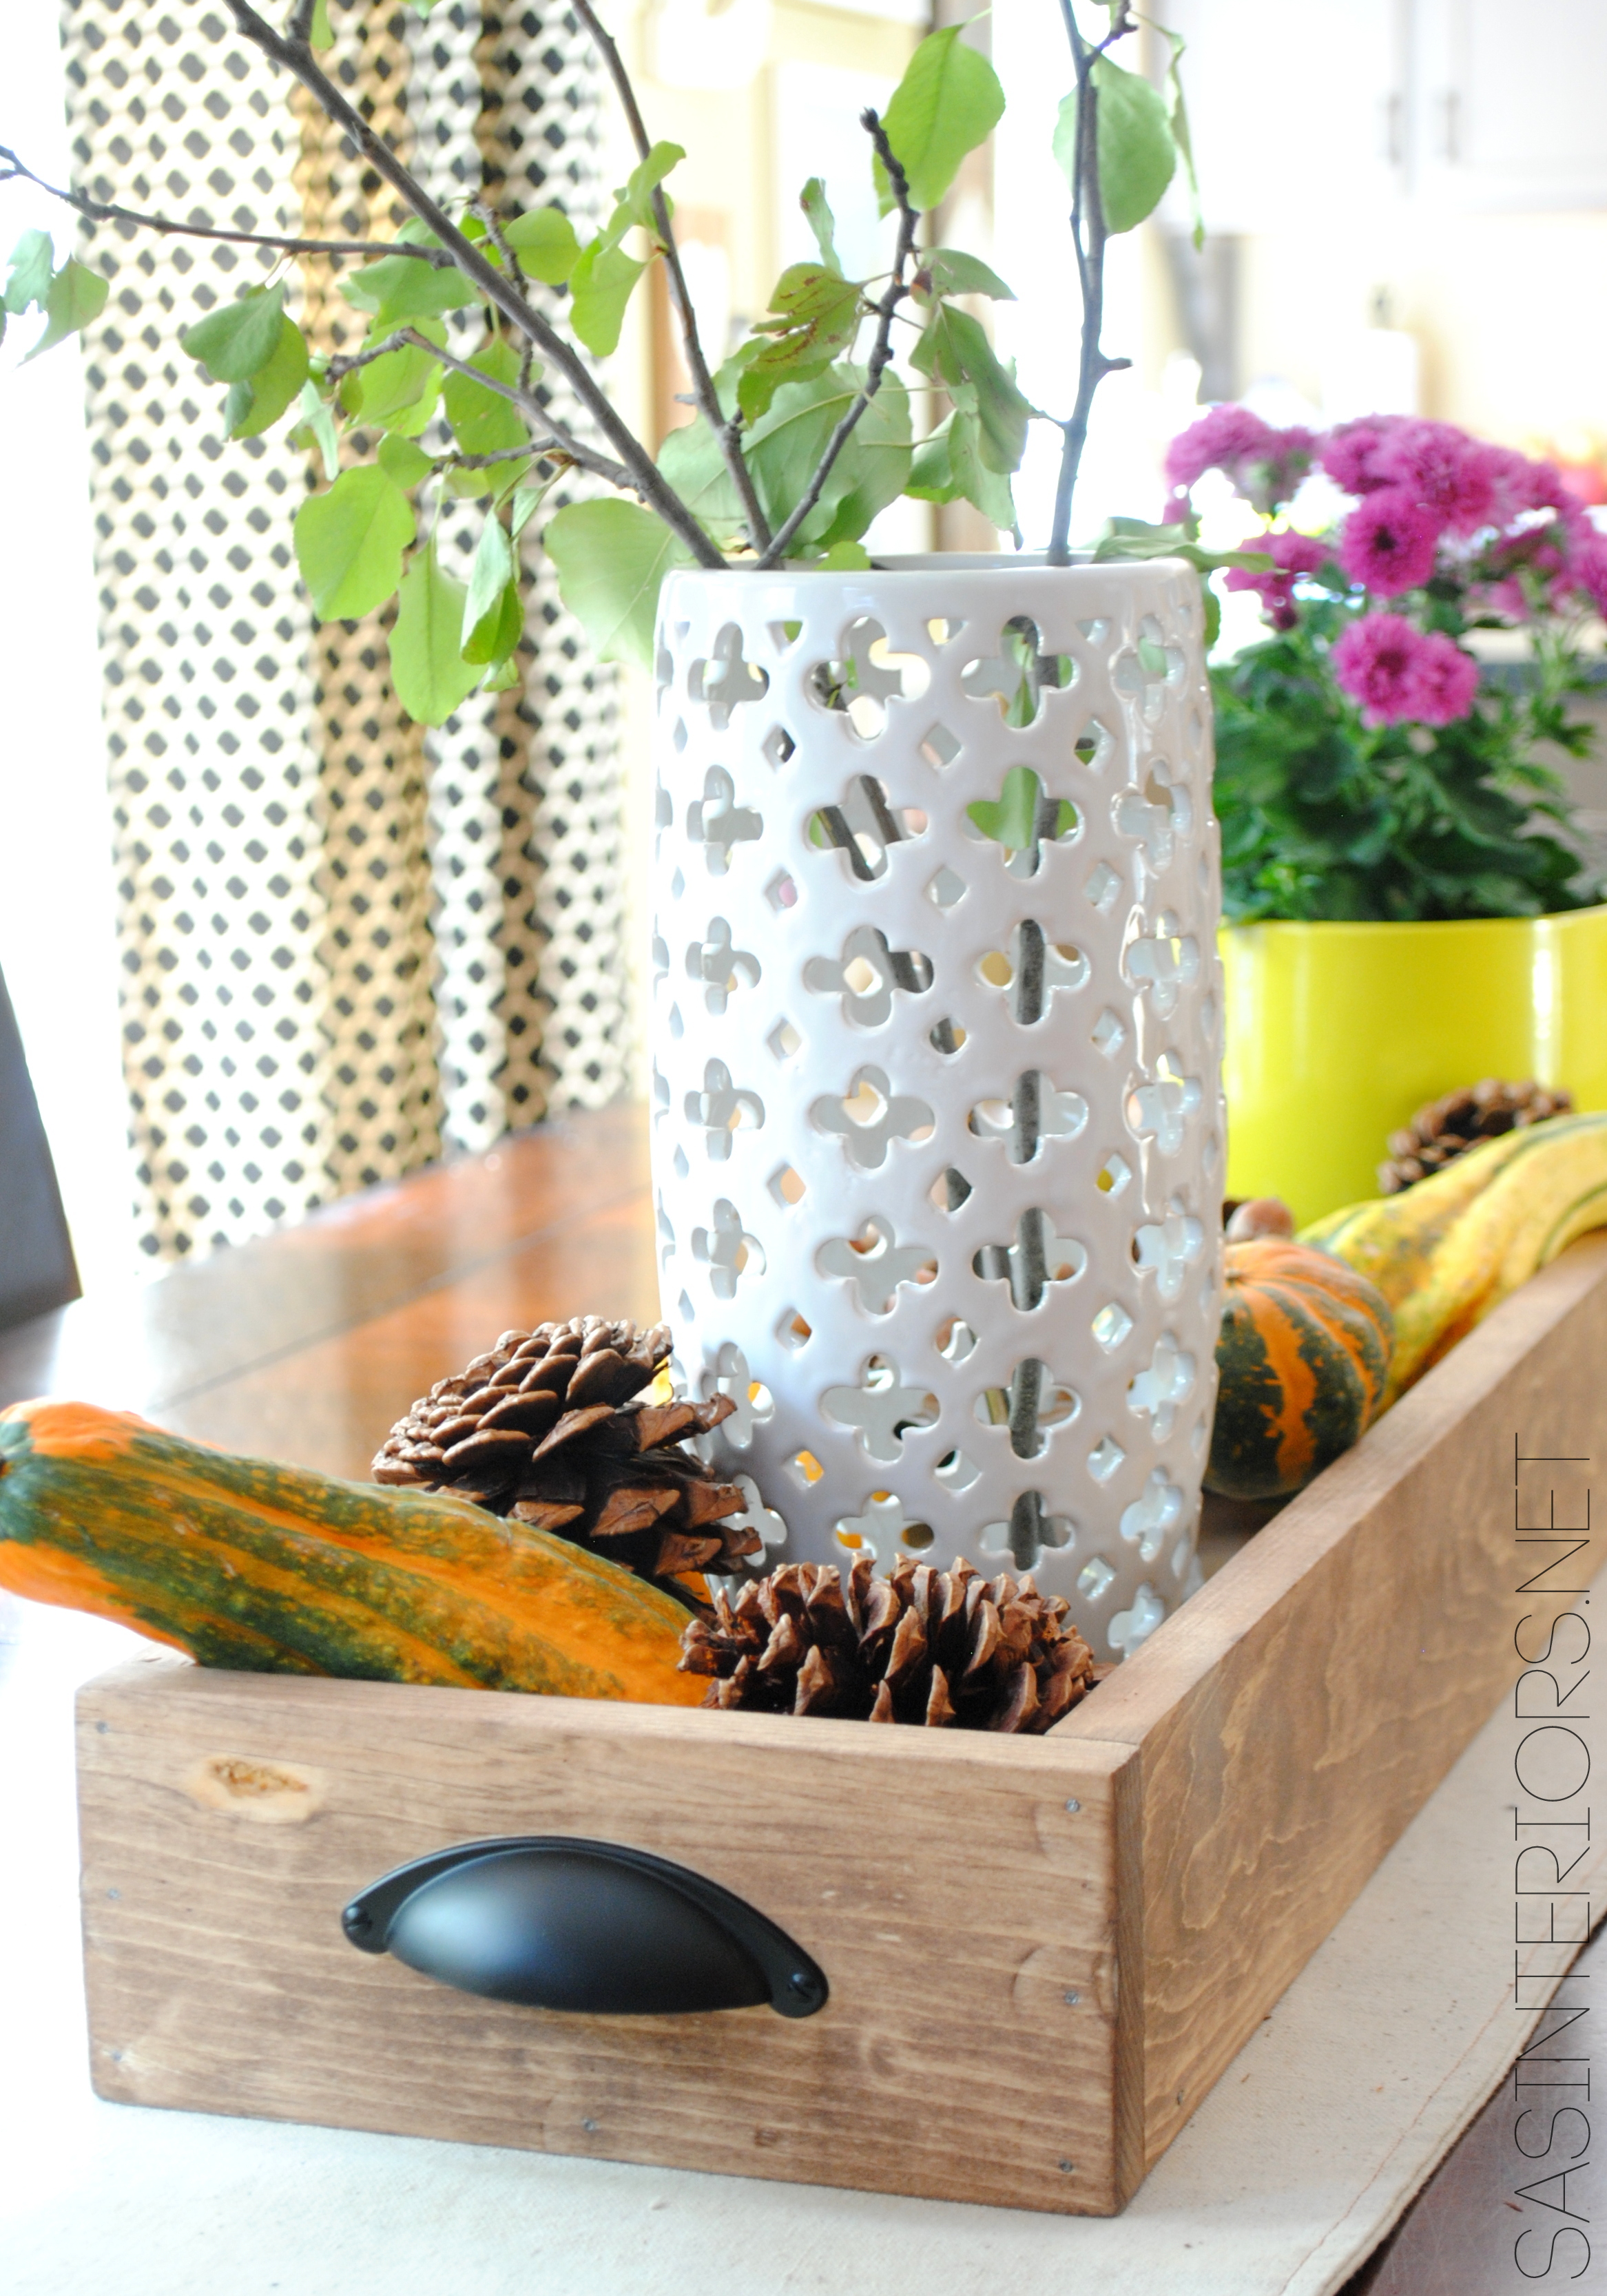
I started off with positioning the tall white vase (a recent purchased from Joss and Main) and filled it with branches that I cut down from a tree outside (a non-fruit bearing pear tree to be exact).  I’ve been doing this all Spring, Summer, and Fall long and they make the best table centerpiece – they’re beautiful + cost nothing!!  They wilt after a few days, but who cares, they’re free.  I love the height they bring to the table.

Fall Tablescape (perfect for Thanksgiving too) filled with ghords, pinecones, mums, and seasonal favorites! All in an easy-to-make handmade wood box. You'll want to make this TODAY!

Fall Tablescape (perfect for Thanksgiving too) filled with ghords, pinecones, mums, and seasonal favorites! All in an easy-to-make handmade wood box. You'll want to make this TODAY!

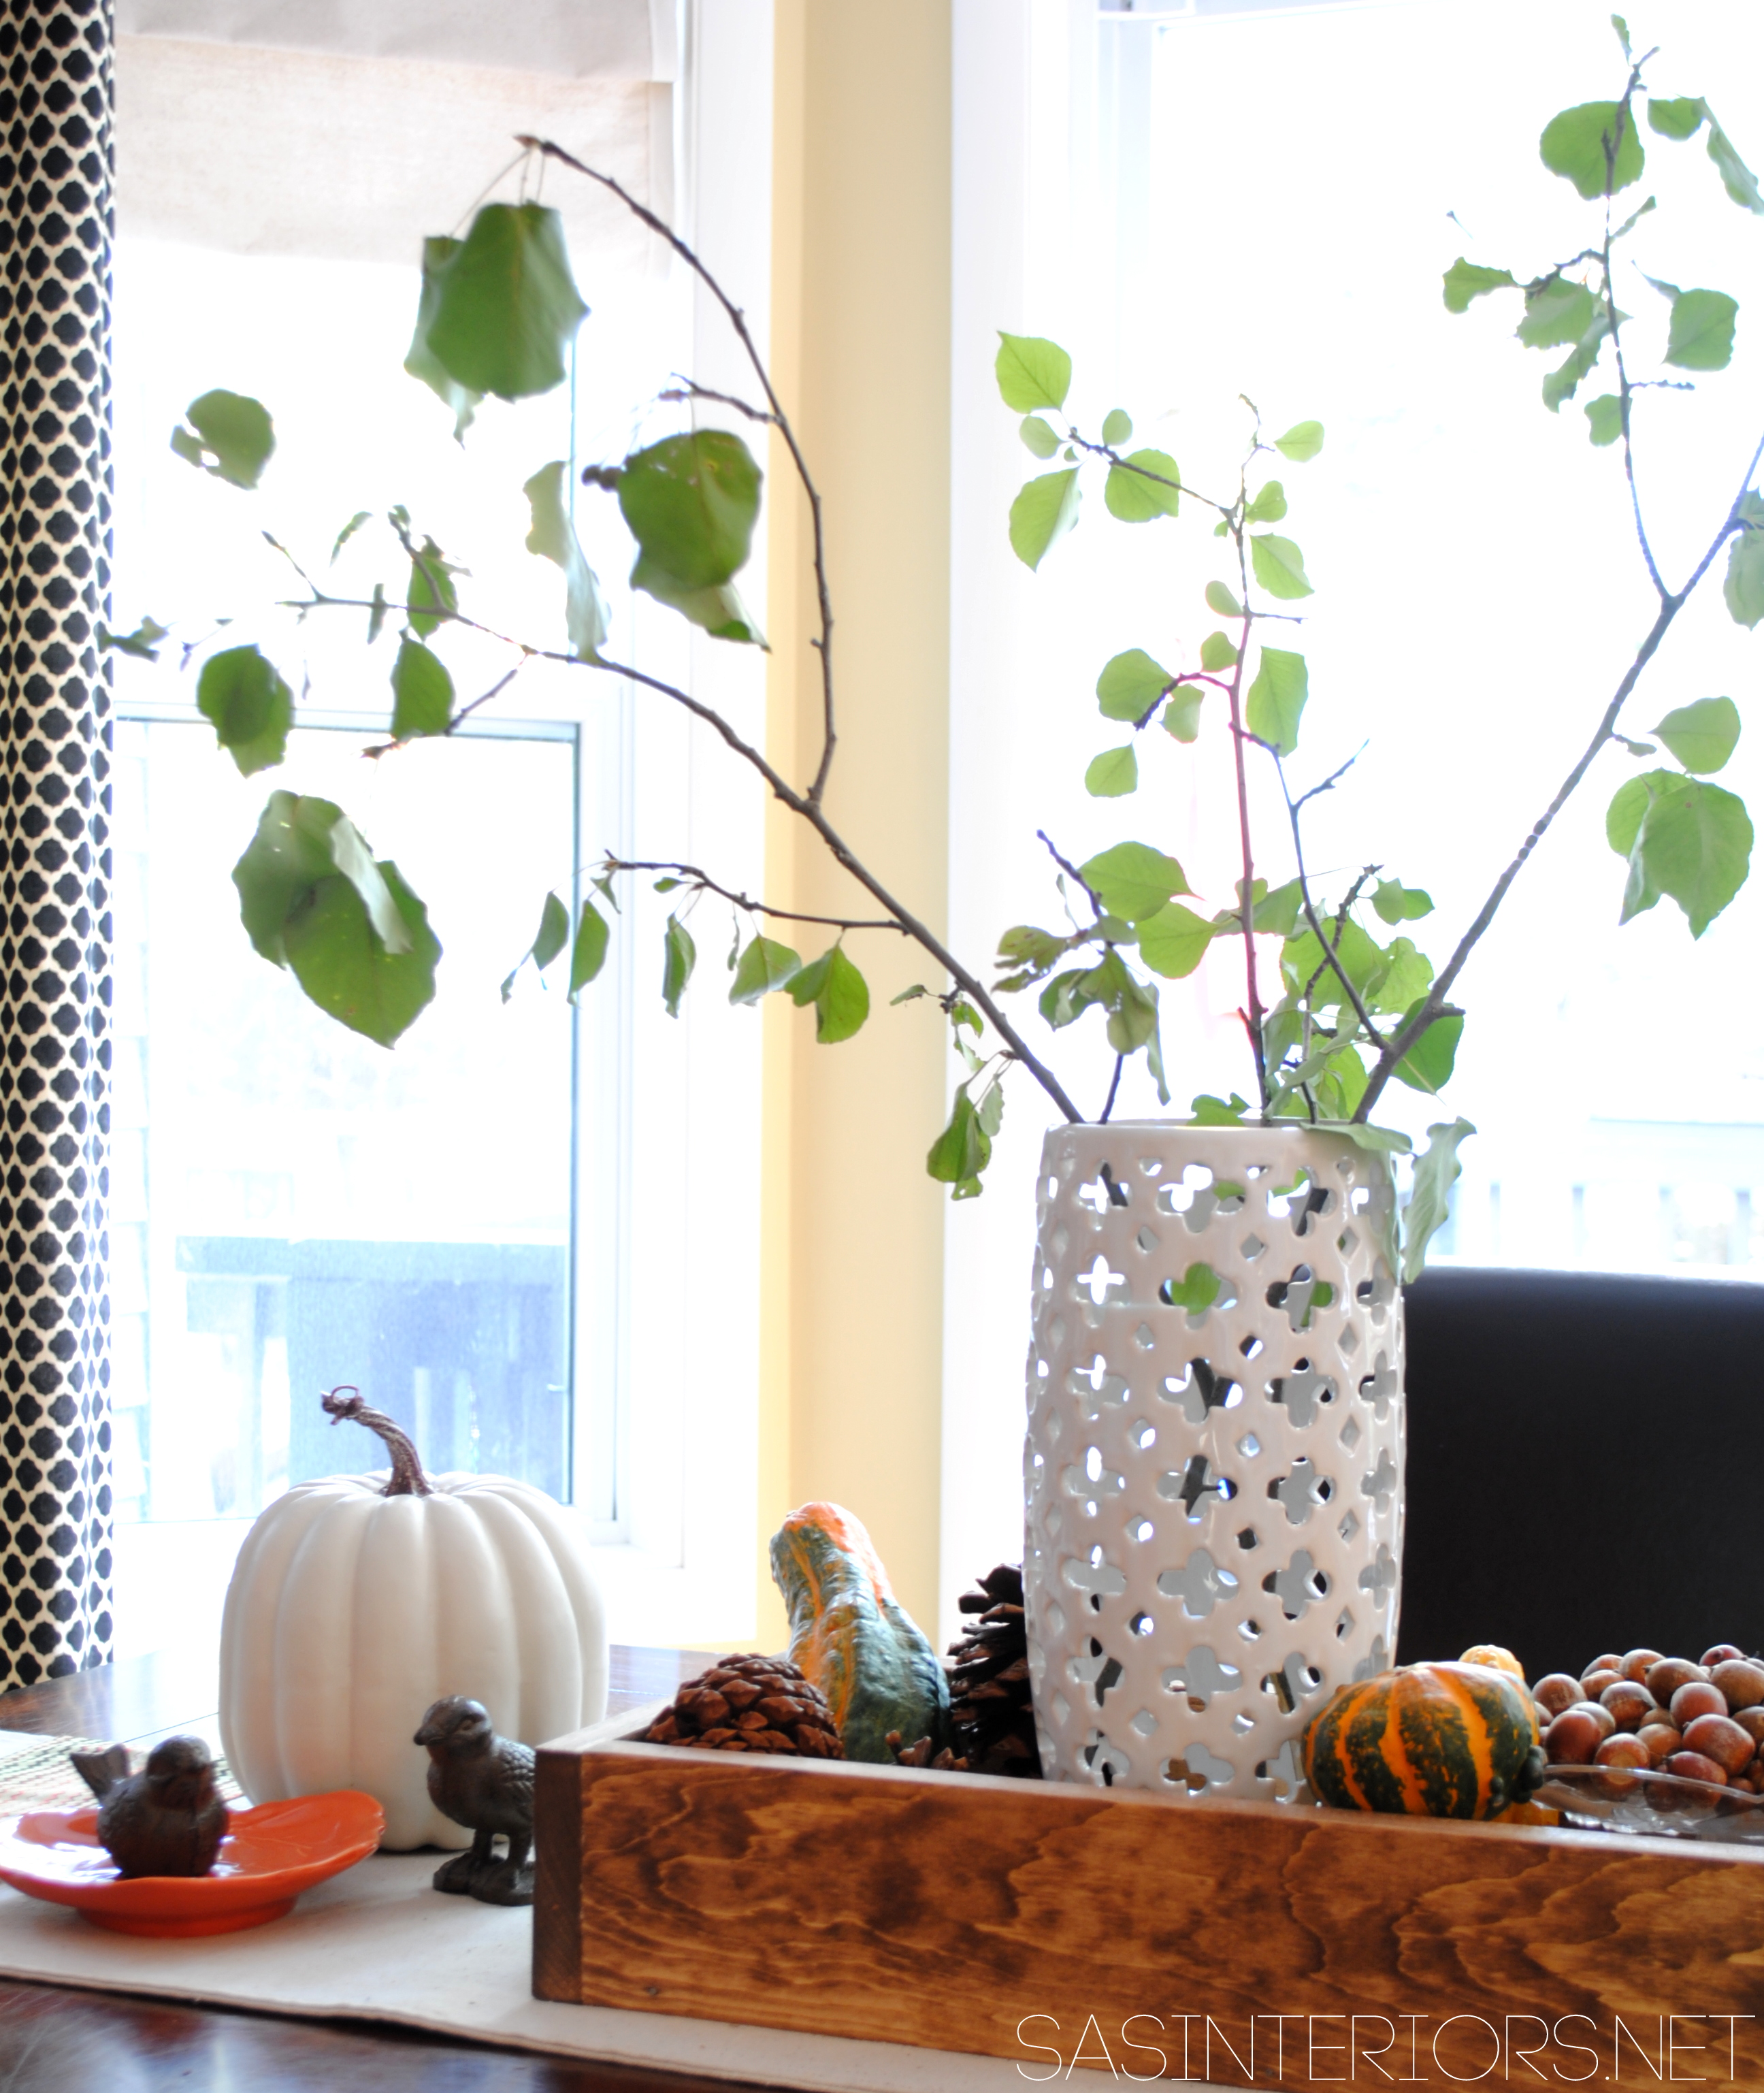
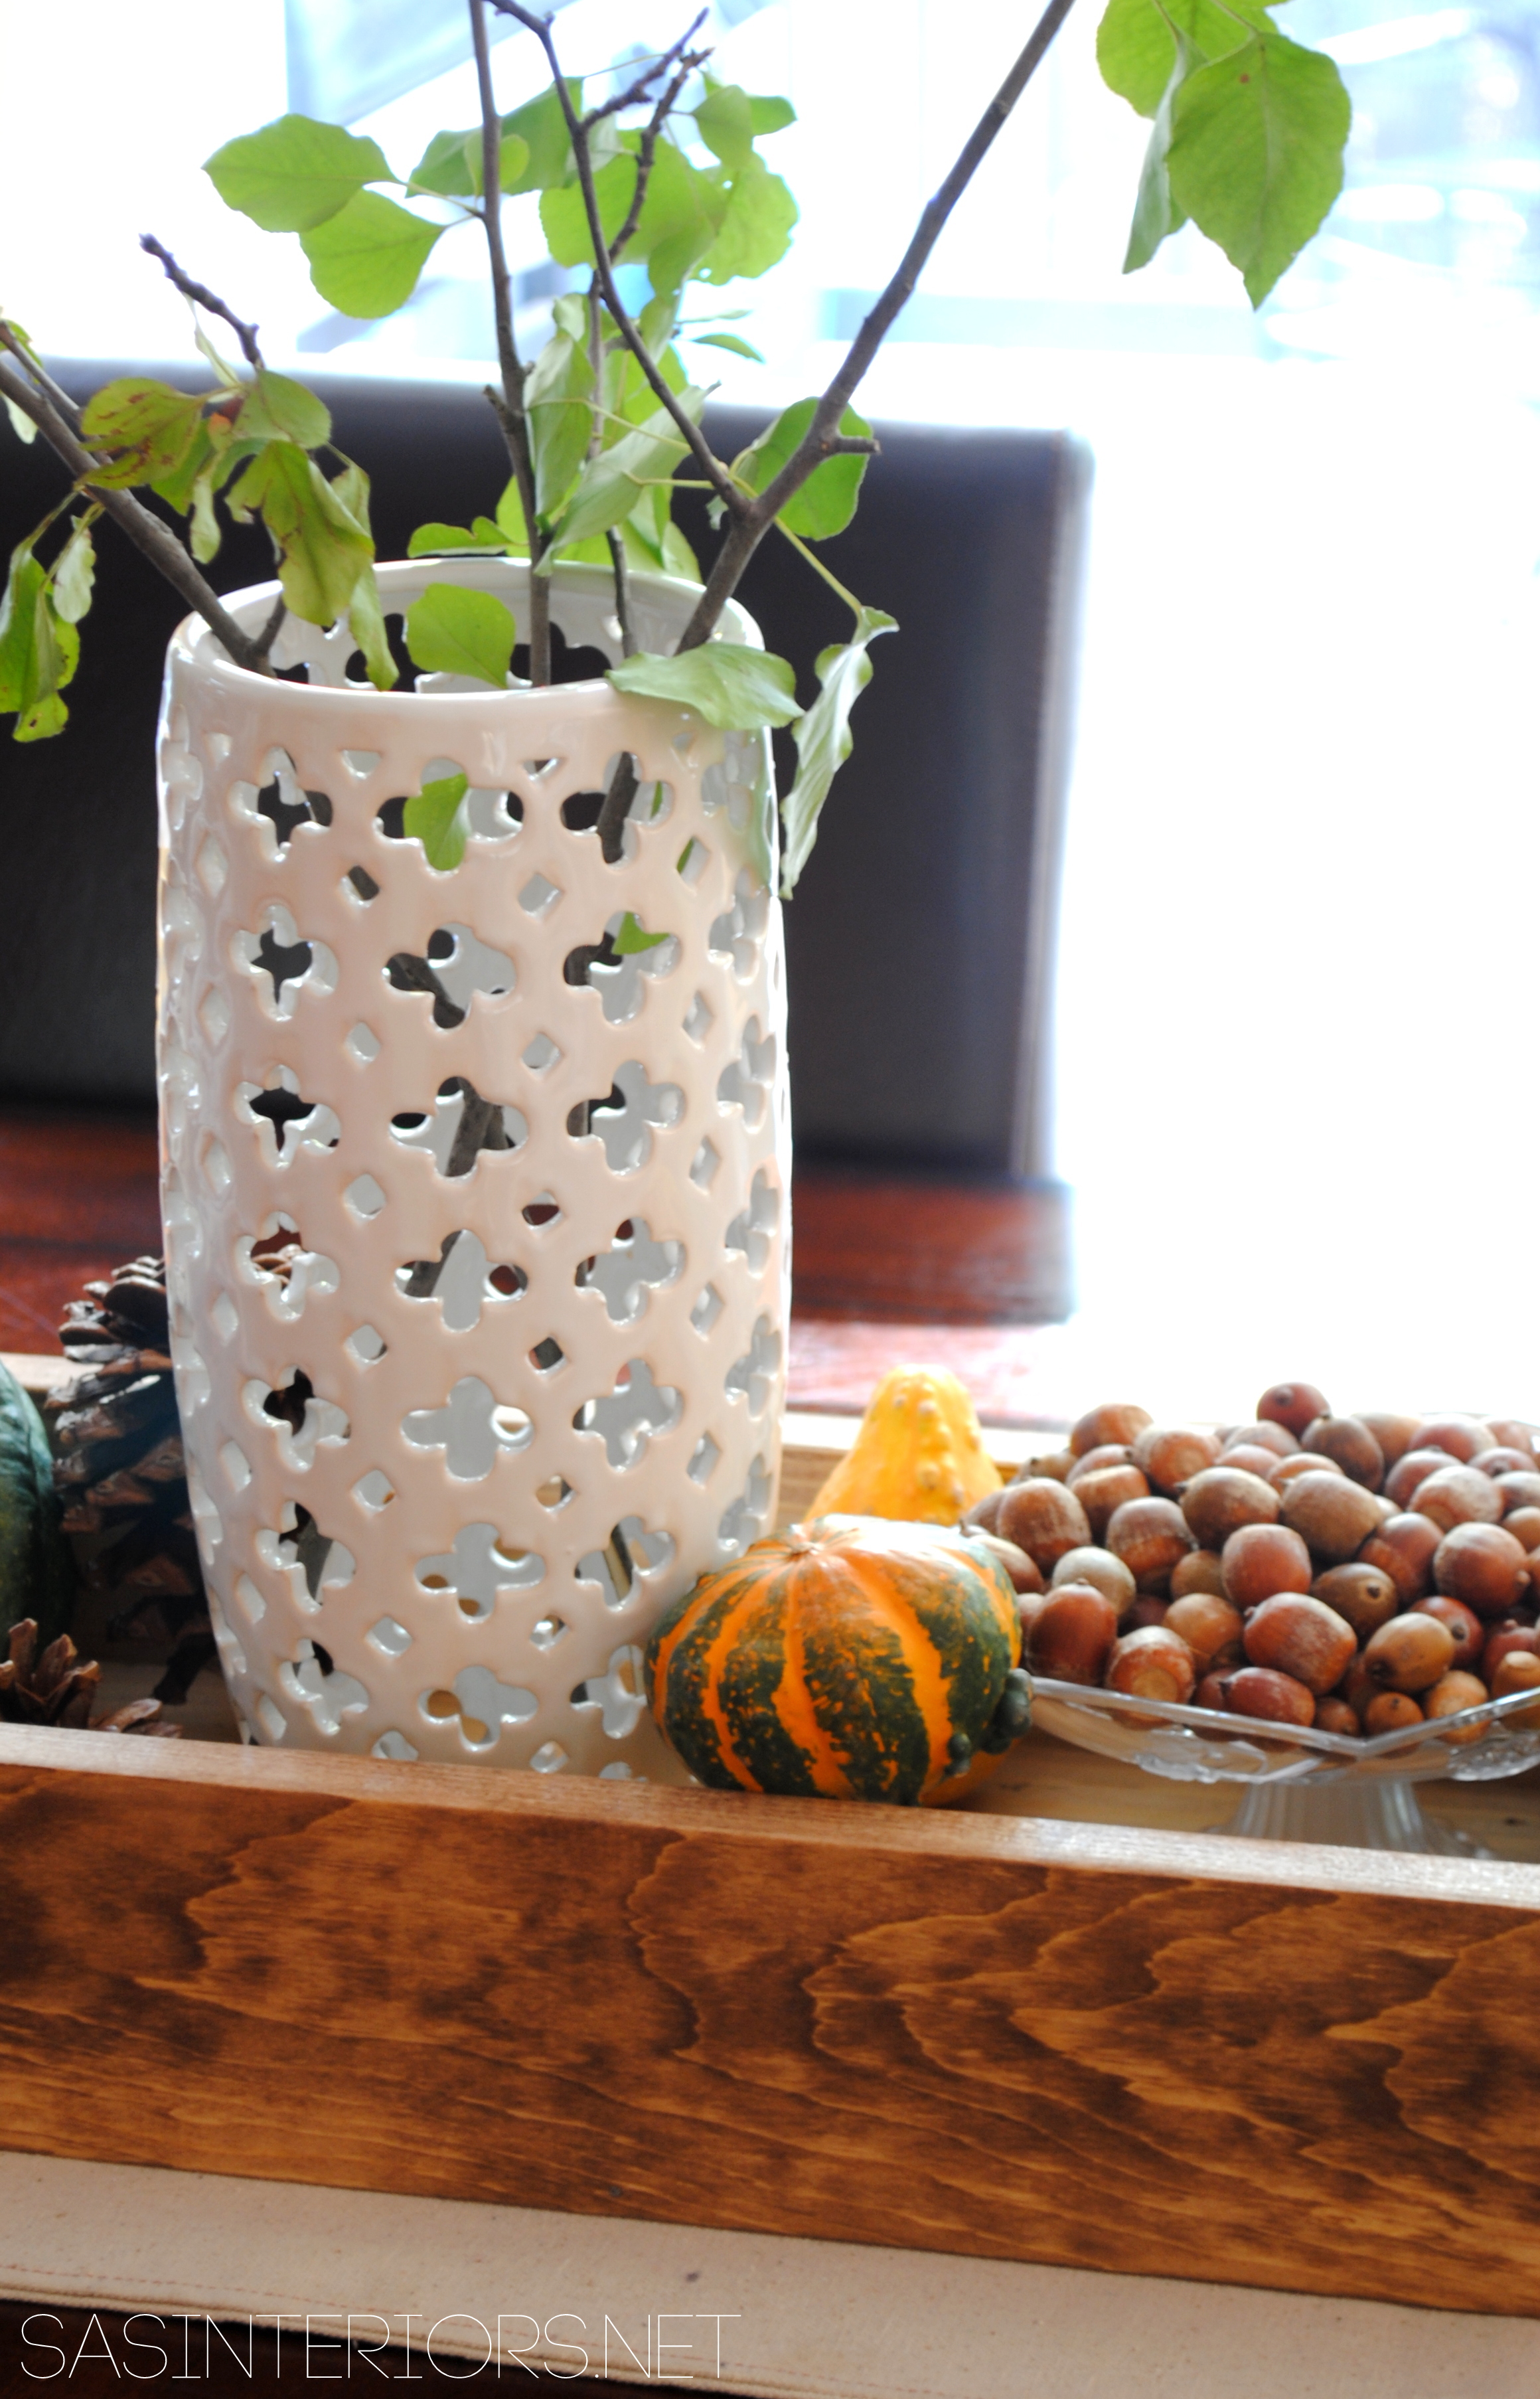
A few days earlier, my kids collected a whole lotta acorns and upon putting them in a tall glass bowl, they made the next perfect addition for the wood box.

Fall Tablescape (perfect for Thanksgiving too) filled with ghords, pinecones, mums, and seasonal favorites! All in an easy-to-make handmade wood box. You'll want to make this TODAY!

Then I added the pretty plum mum.  Fall = mums.  Am I right?!  I had grabbed a bunch in an array of colors for the outside porch a few weeks back and I chose the plum colored one for the box.  Deep colored purple, plum, is one of my favorite Fall hues.

Fall Tablescape (perfect for Thanksgiving too) filled with ghords, pinecones, mums, and seasonal favorites! All in an easy-to-make handmade wood box. You'll want to make this TODAY!

Fall Tablescape (perfect for Thanksgiving too) filled with ghords, pinecones, mums, and seasonal favorites! All in an easy-to-make handmade wood box. You'll want to make this TODAY!

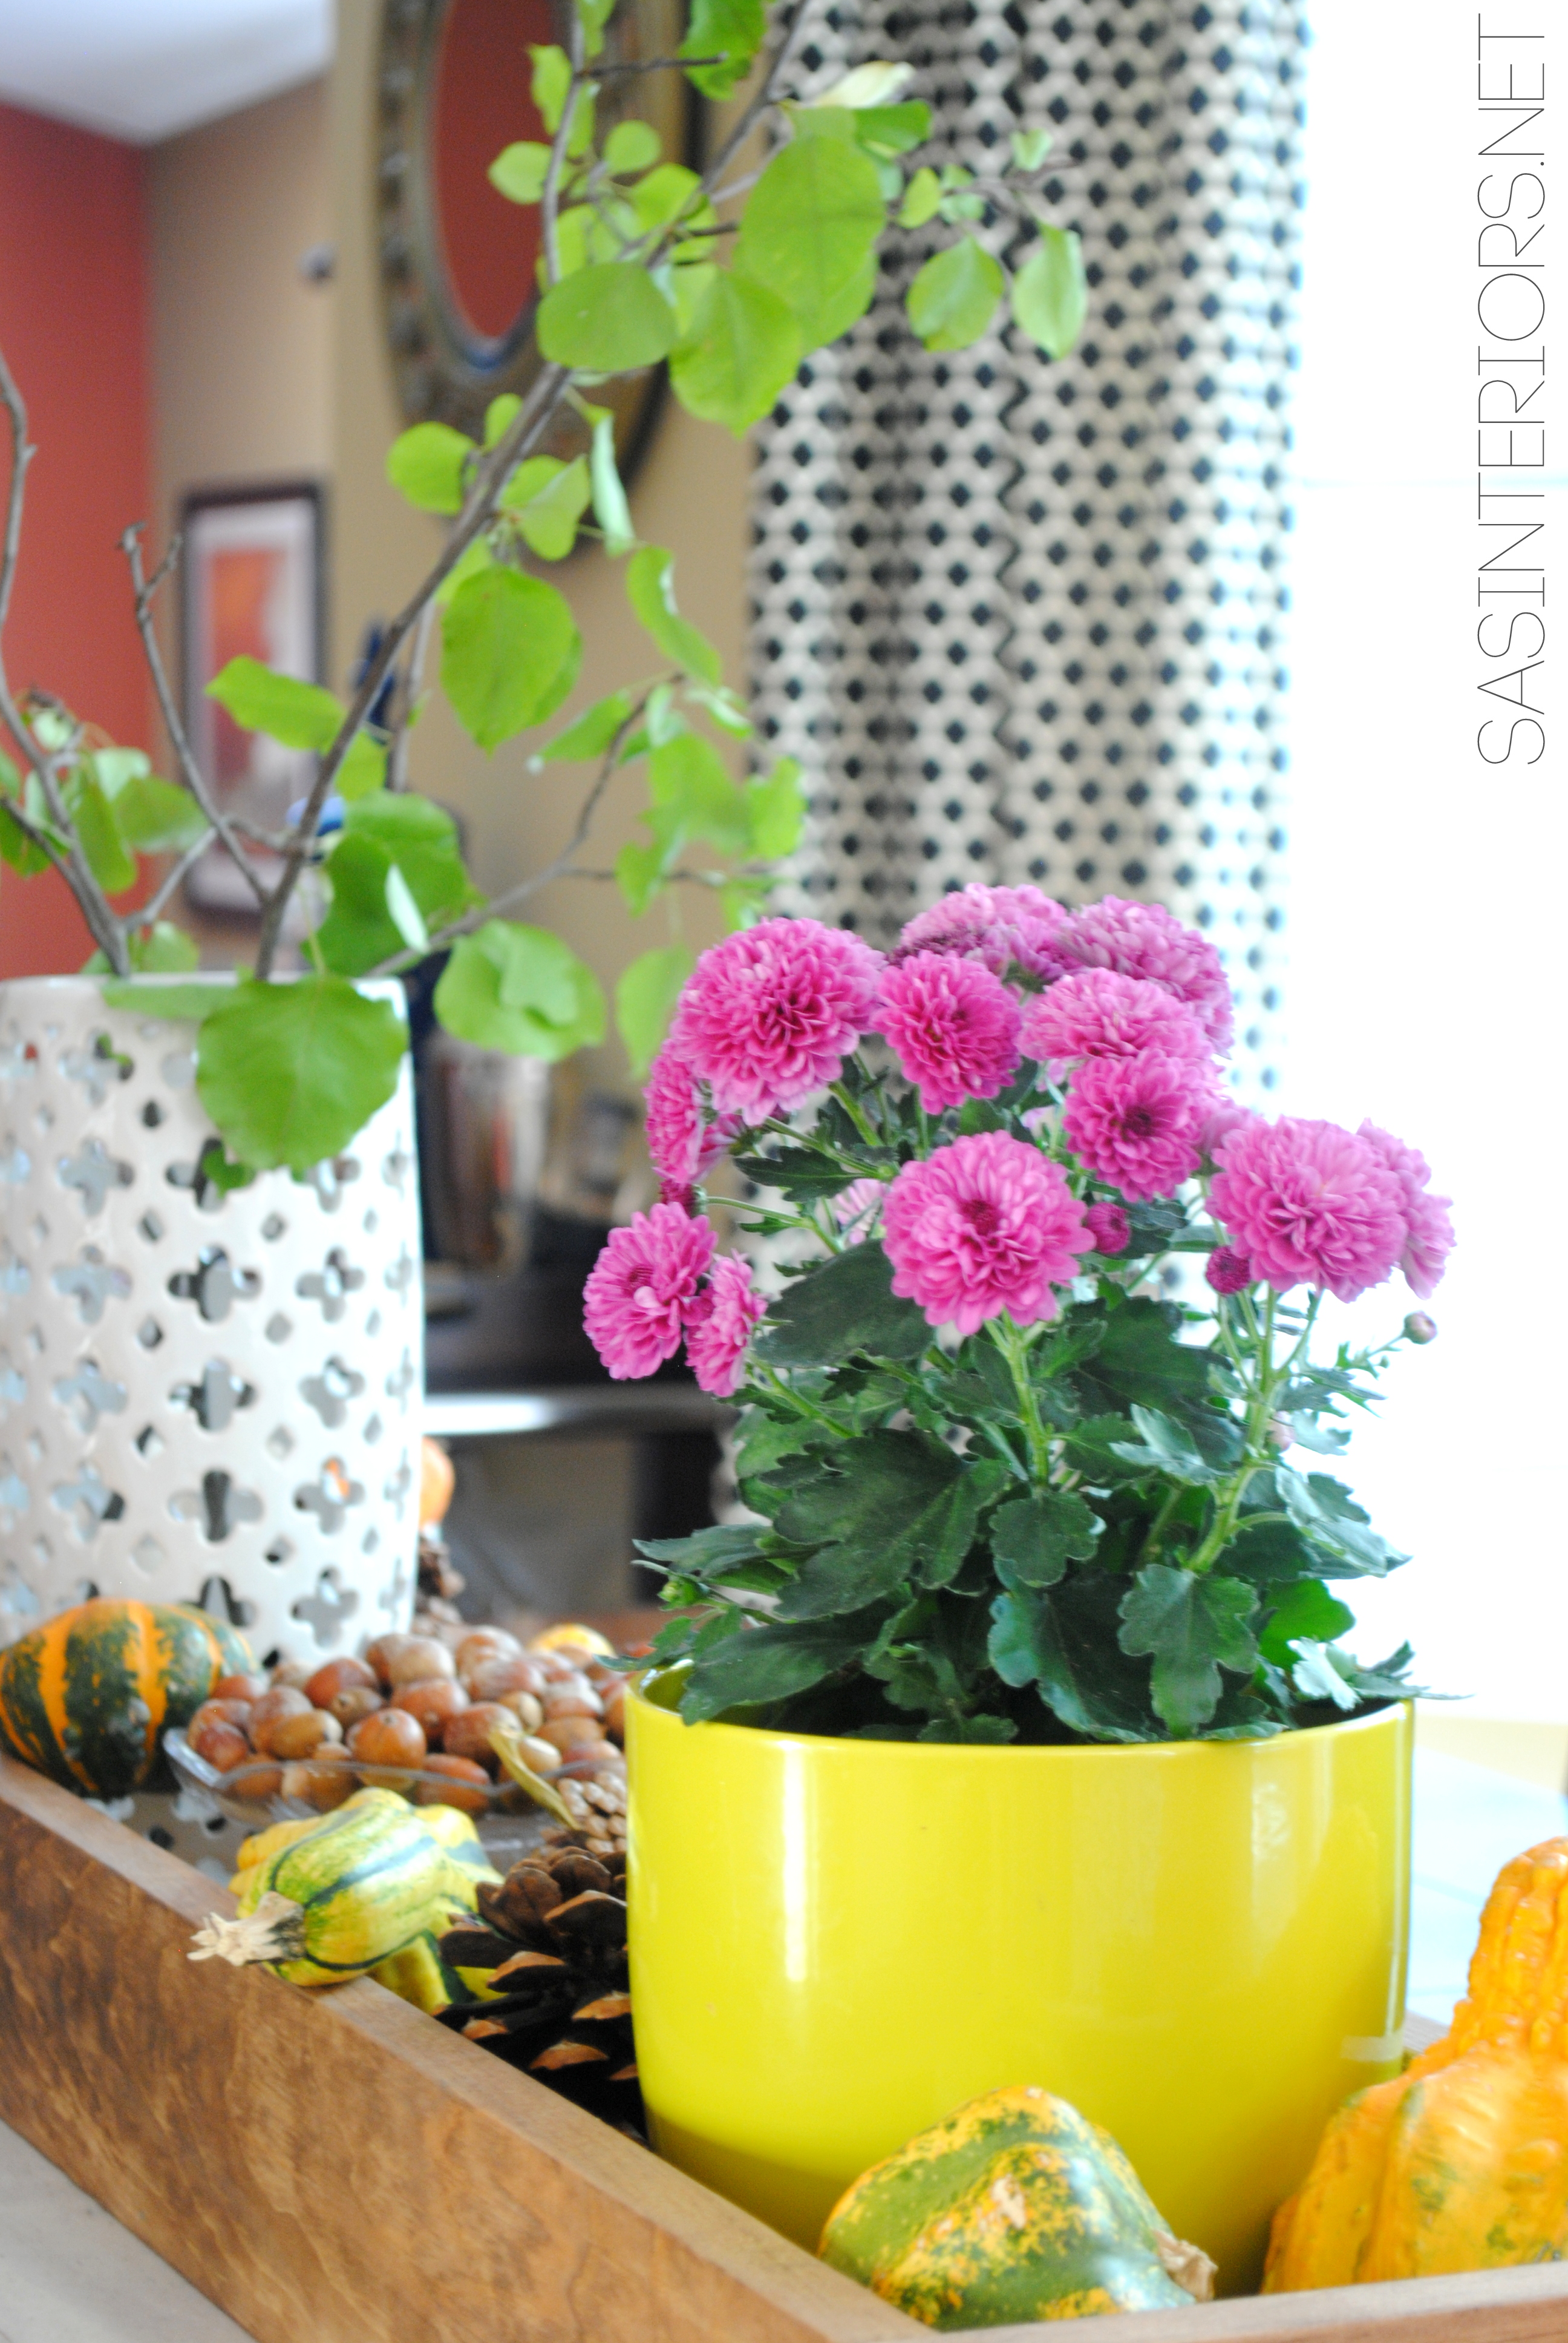
Once I had some elements of varying heights and sizes, the base of the box needed to be filled.  The colorful gourds and the textured pinecones were the icing on the cake for this Fall Tablescape.

Fall Tablescape (perfect for Thanksgiving too) filled with ghords, pinecones, mums, and seasonal favorites! All in an easy-to-make handmade wood box. You'll want to make this TODAY!

Fall Tablescape (perfect for Thanksgiving too) filled with ghords, pinecones, mums, and seasonal favorites! All in an easy-to-make handmade wood box. You'll want to make this TODAY!

Fall Tablescape (perfect for Thanksgiving too) filled with ghords, pinecones, mums, and seasonal favorites! All in an easy-to-make handmade wood box. You'll want to make this TODAY!

Fall Tablescape (perfect for Thanksgiving too) filled with ghords, pinecones, mums, and seasonal favorites! All in an easy-to-make handmade wood box. You'll want to make this TODAY!

8a

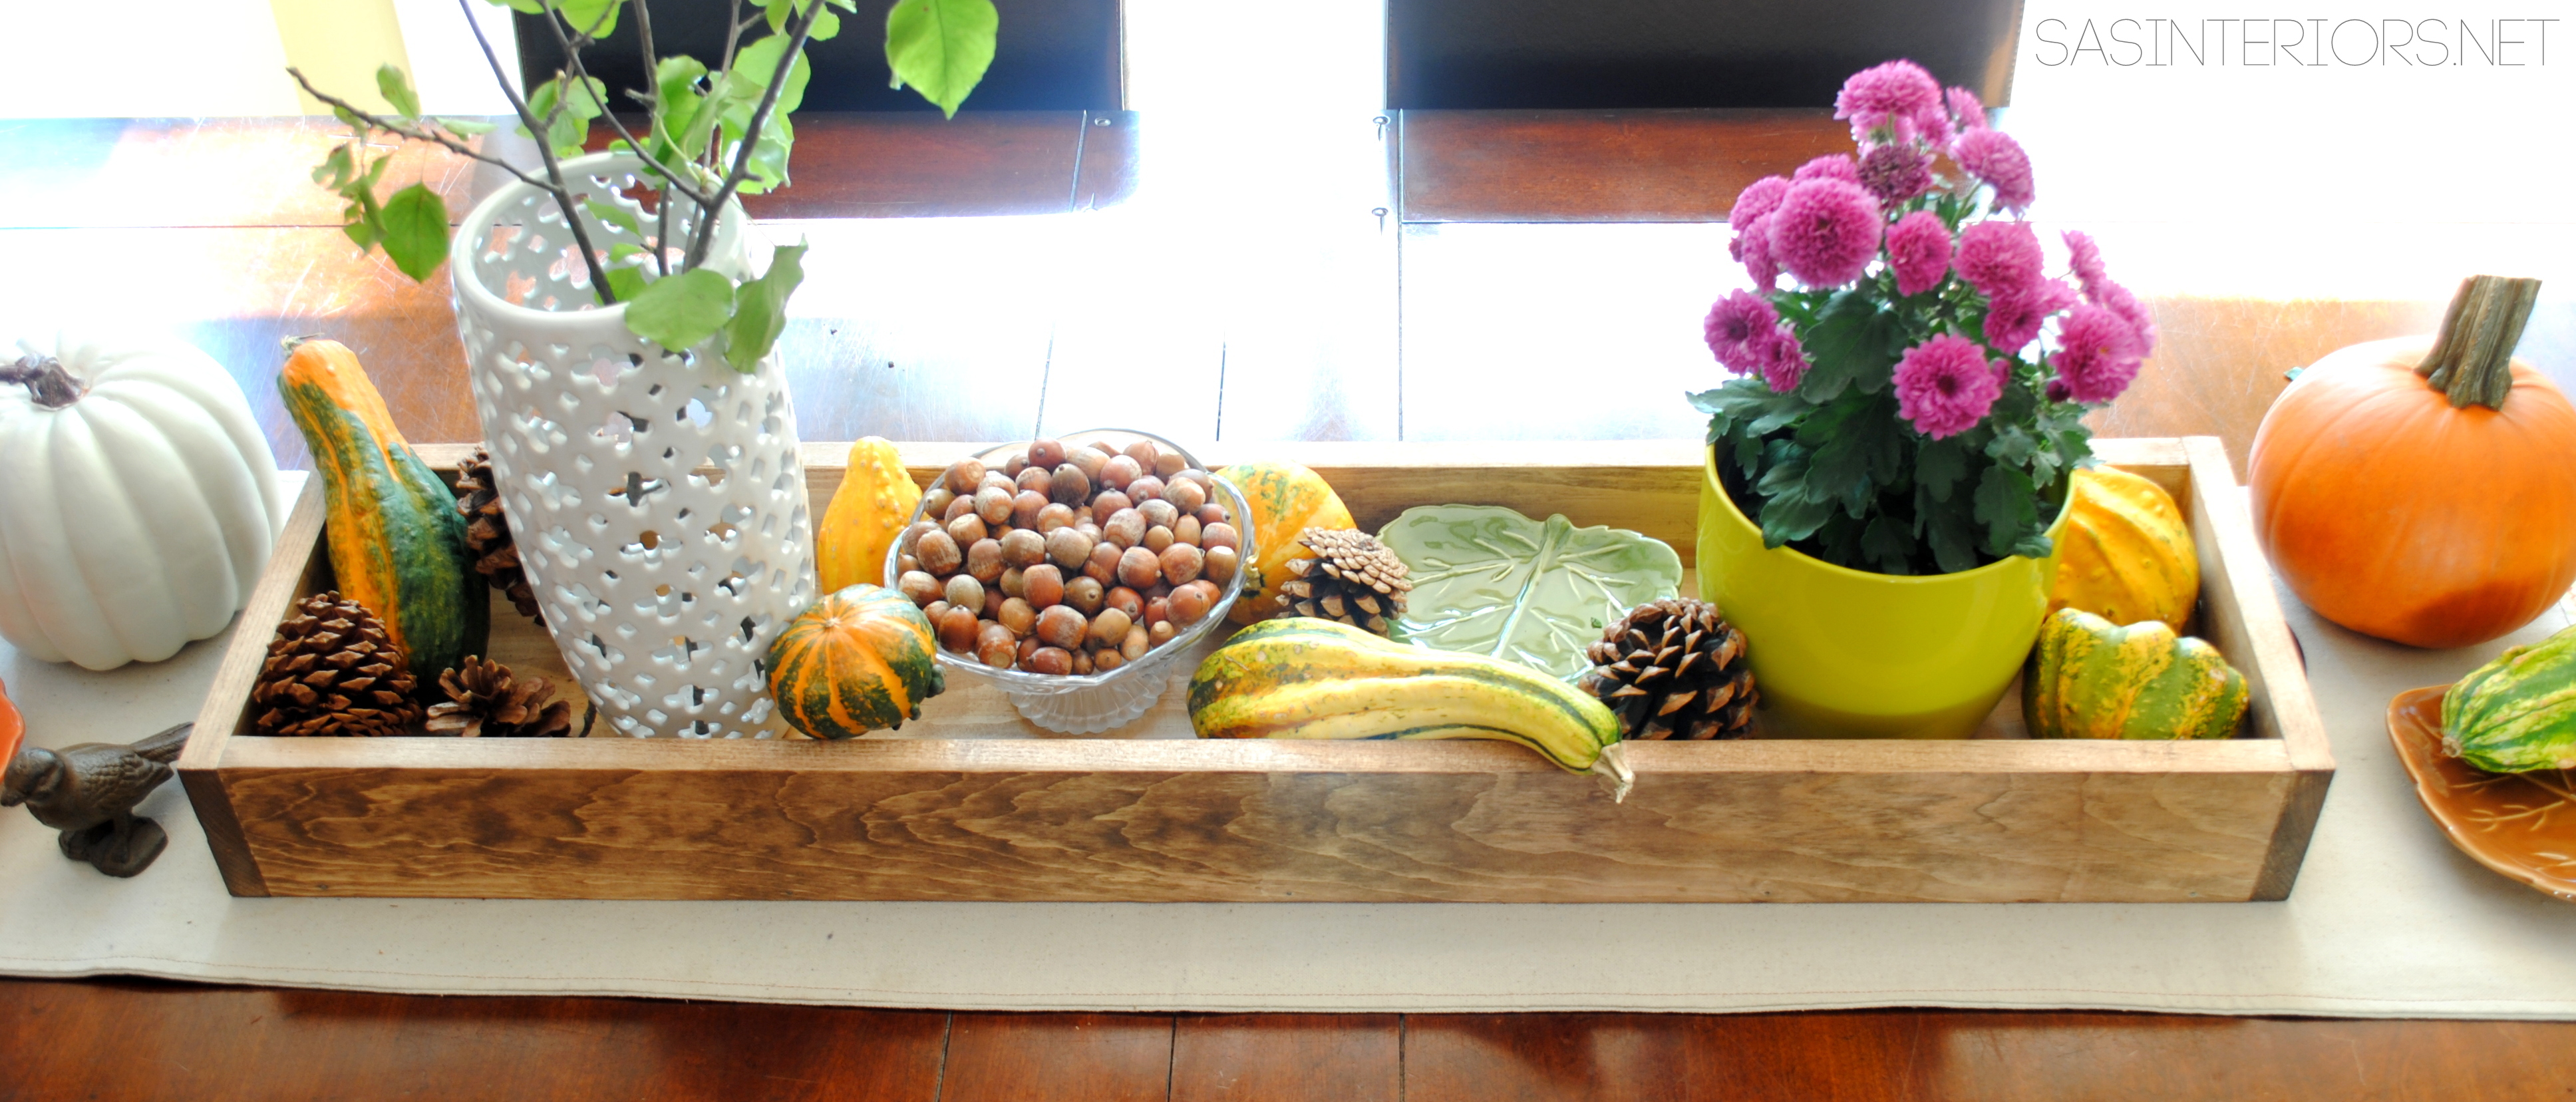
So pretty + colorful, right?!  I’m in love.  Now that the china cabinet is almost complete, this is the perfect addition to the dining space.  More details on the china cabinet makeover coming in the next few days.

Disclosure: I am part of the Lowe’s Creative Team and was provided with a Lowe’s gift card to purchase items for my project.  I was also compensated for my time to use the products.  No one told me what to create, what to buy, how to use the product, or what to write.  All opinions are 100% mine!

5 Minute Autumn Centerpiece

This past weekend when I got my DIY groove back, I made a centerpiece for my dining table that literally took less than 5 minutes and cost nothing!  The pictures, staging, and post took longer than the actual project.  Thankfully I am SO pleased with the results and now my dining table is complete for the Fall season.  Here’s a sneak peak of the final outcome, but let me take you through the steps so you can make one for your table!

Log Centerpiece that takes minutes to create and can be used for so many holidays & occasions!  Designed by @Jenna_Burger of www.sasinteriors.net

A few weeks ago, while going for an evening walk around the neighborhood, there were a pile of cut down trees on the side of the road ready for the next day’s garbage pickup.  I couldn’t stop myself, and ended up grabbing this 4′ beauty and piled it into the Radio Flyer wagon along with the two kids (the remainder of the trip home sure was tight for the kiddos).

As soon as I set my eyes on this log, I knew exactly what I wanted to do – make a centerpiece with tea lights.  I envisioned a simple, yet sophisticated backdrop that can be updated and changed throughout the seasons and holidays!

Unfortunately, it sat and sat in my garage for too long.  Then this weekend, my husband FINALLY got a drill bit that was large enough (1.5″ diameter) to drill into the log to create what I was desiring – My centerpiece creation was finally coming to fruition.

The mister and I drilled 6 holes about 10″ apart, and it was done!  Finito!!  It was that easy and it took less than 5 minutes to create this beautiful centerpiece.

And here it is.  Complete and shining bright!

So simple, yet so beautiful!

I had planned on putting it on my dining table and leaving it alone.  I thought it would “speak” for itself and it’s organic appeal would shine.  I still plan on doing that since we eat at this table everyday, but I also wanted to see how it would look all “dressed up”.  Soooo I took some of the Fall decor from the other vignettes I created and embellished this new log centerpiece.

I surrounded the log centerpiece with varying sizes of sugar pumpkins, pinecones, berries, and artificial leaves – perfect for a Thanksgiving table!

I was so happy to finally get this project complete and I love how it turned out.  How do you decorate your table for Fall?

I link to these parties: Cottage Instincts, Skip to My Lou, Dittle Dattle, Between Naps on the Porch, Today’s Creative Blog, Stories of A to Z, The Lettered CottageAll Things Heart & Home, Savvy Southern Style, House of Hepworths, Shabby Chic Cottage, Finding Fabulous, Creation Corner The Shabby Nest, Tatertots and Jello, Funky Junk, Under the Table & Dreaming