
Tag: Jenna Burger

Pegboard Baseball Cap Organizer

99.98% of men + boys I know have an extensive collection of baseball caps.  From teams they follow, to giveaways, to a gift shop purchase as a momento, baseball caps are a stable for most guys wardrobes.

So then the big question arises…  Where do all those caps go?   How does one organize the growing collection of baseball caps?

MY SOLUTION?  A pegboard baseball cap organizer…

DIY: Pegboard Baseball Cap Organizer - The perfect 'home' for the hat collection. Do It Yourself Tutorial @ www.jennaburger.com

I made this a couple months ago and it’s been a life saver.  Or should I say a hat saver, lol…

Honestly though, the collection of caps that my boy has acquired has gotten out of control and now they all finally have a happy home!

The best part of all, this organizer was easy to make.

MATERIALS

> (4) 1″ x 2″ x 4′ long wood pieces – cut to size

> 2′ x 4′ piece of pegboard (I purchased a 4′ x 4′ piece @ Lowe’s and they cut it to my desired size)

> “L” brackets

> Paint

1

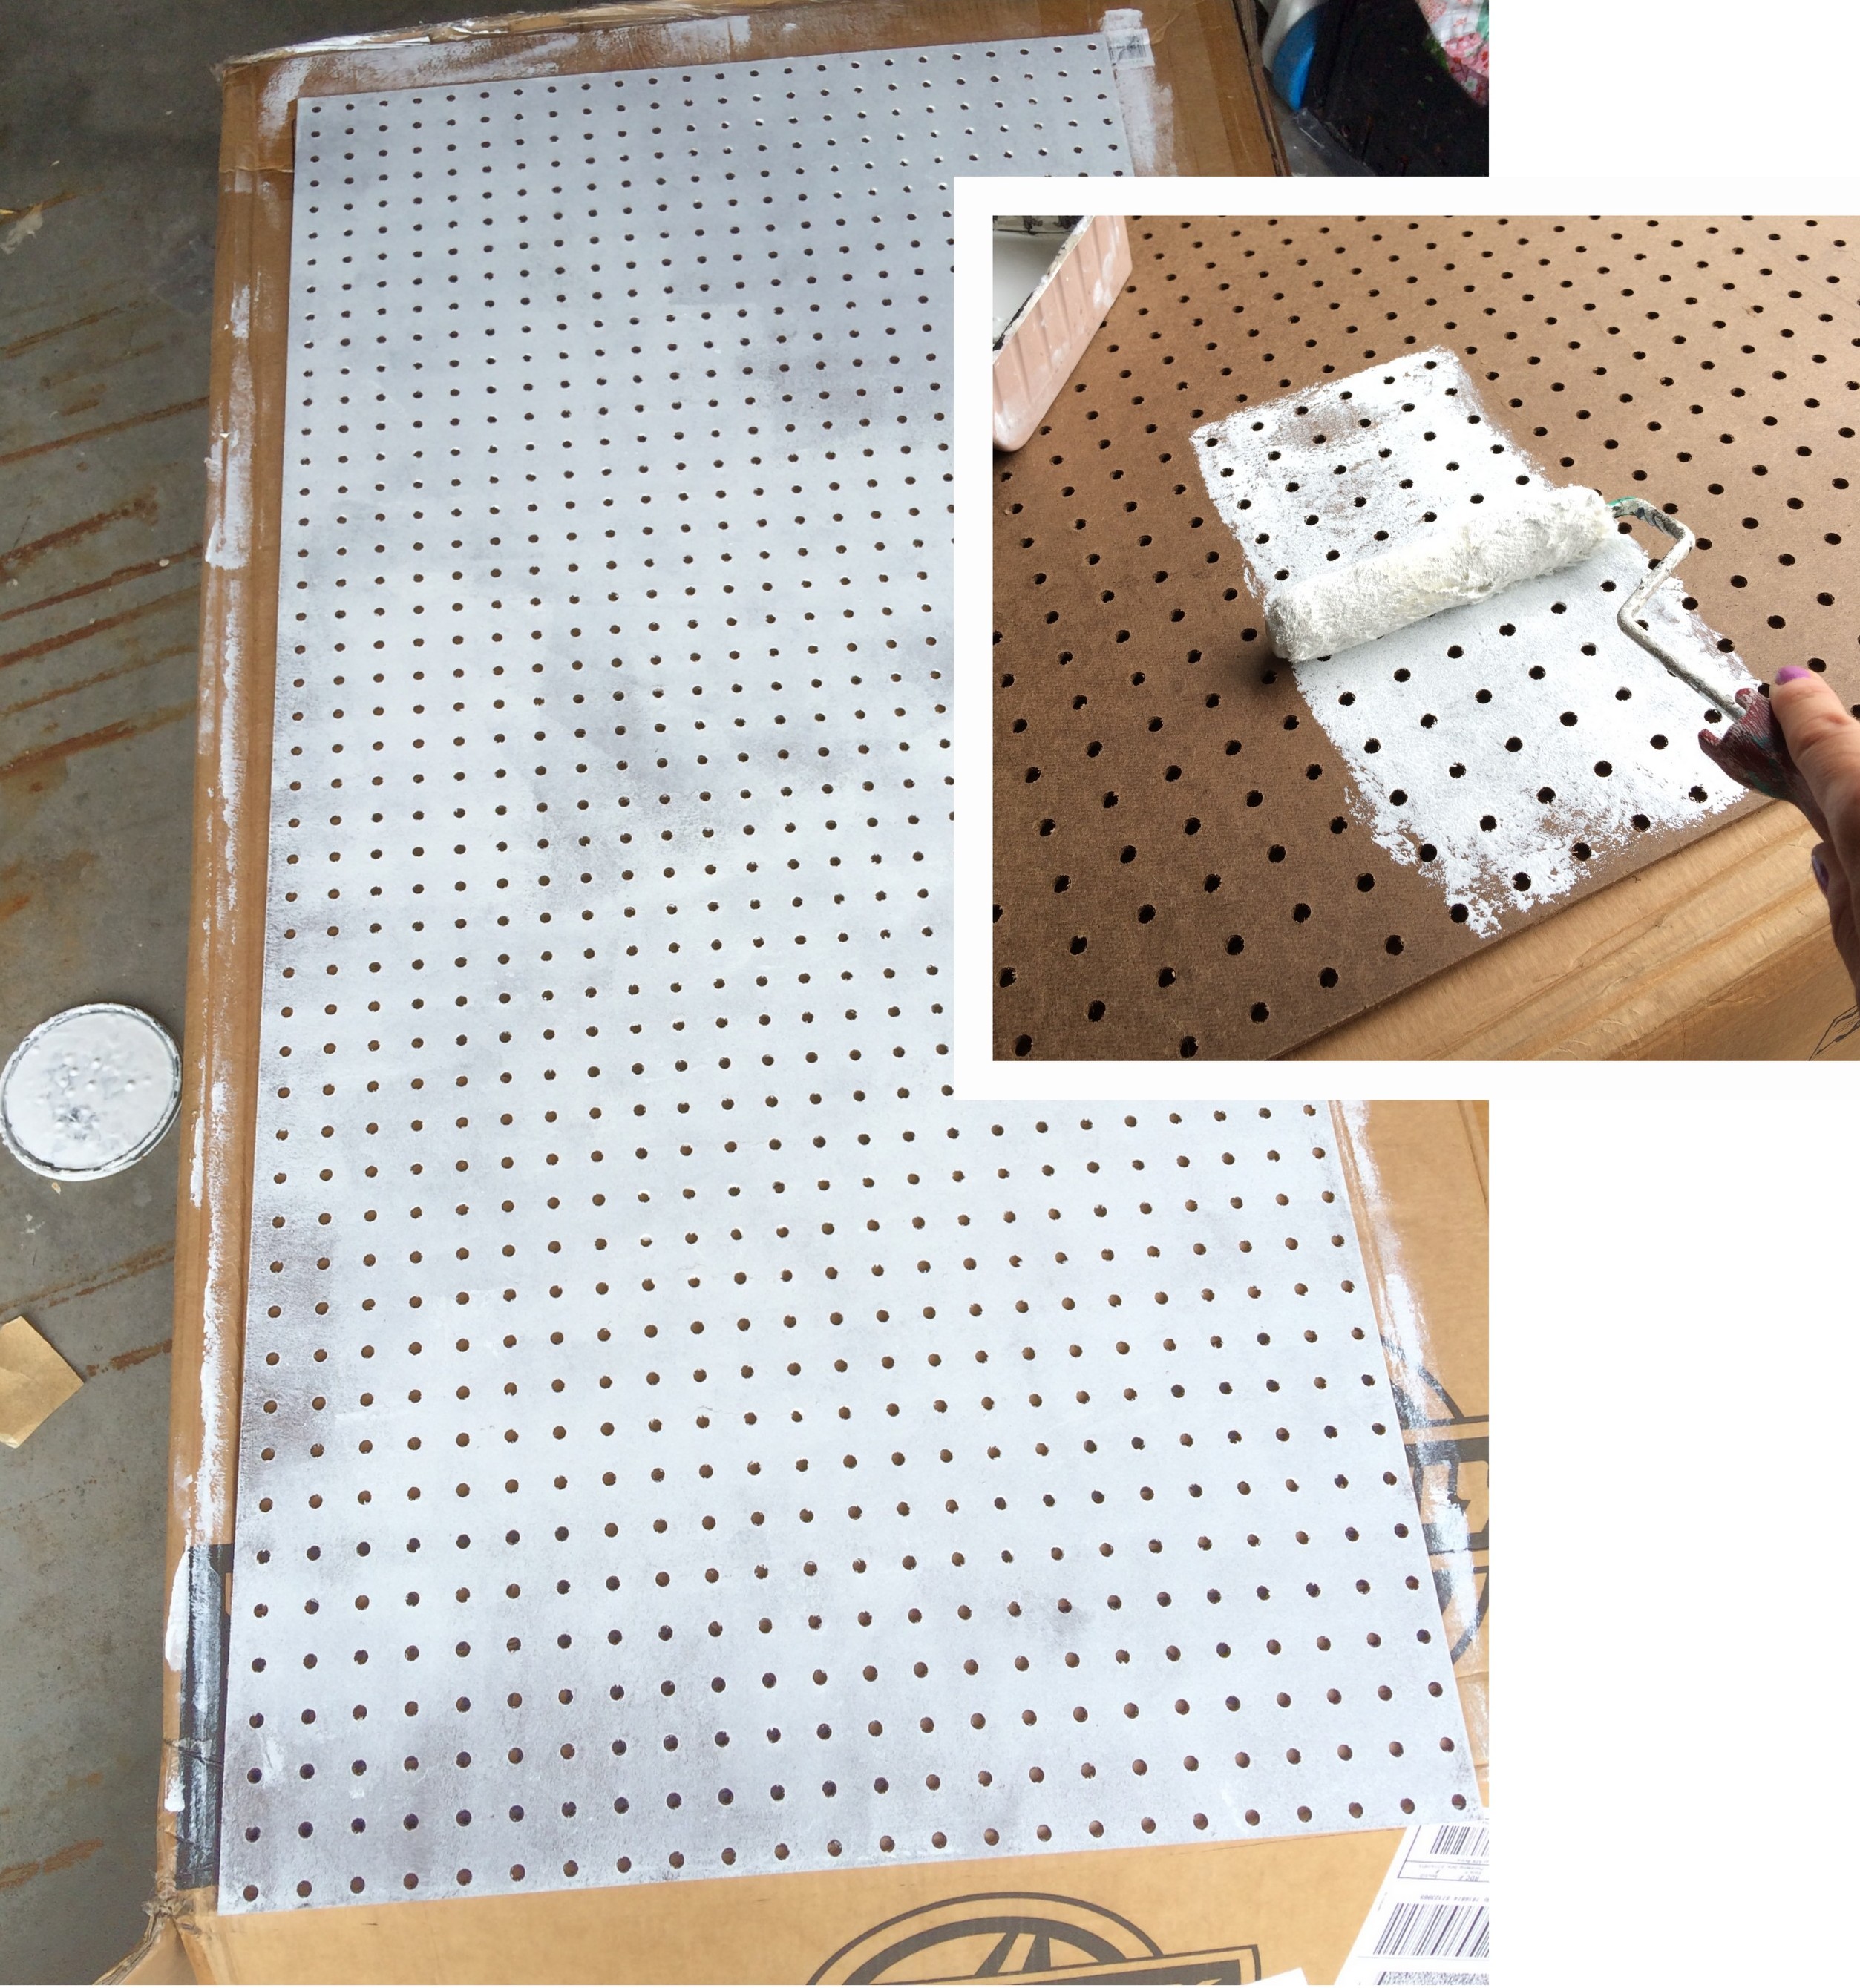
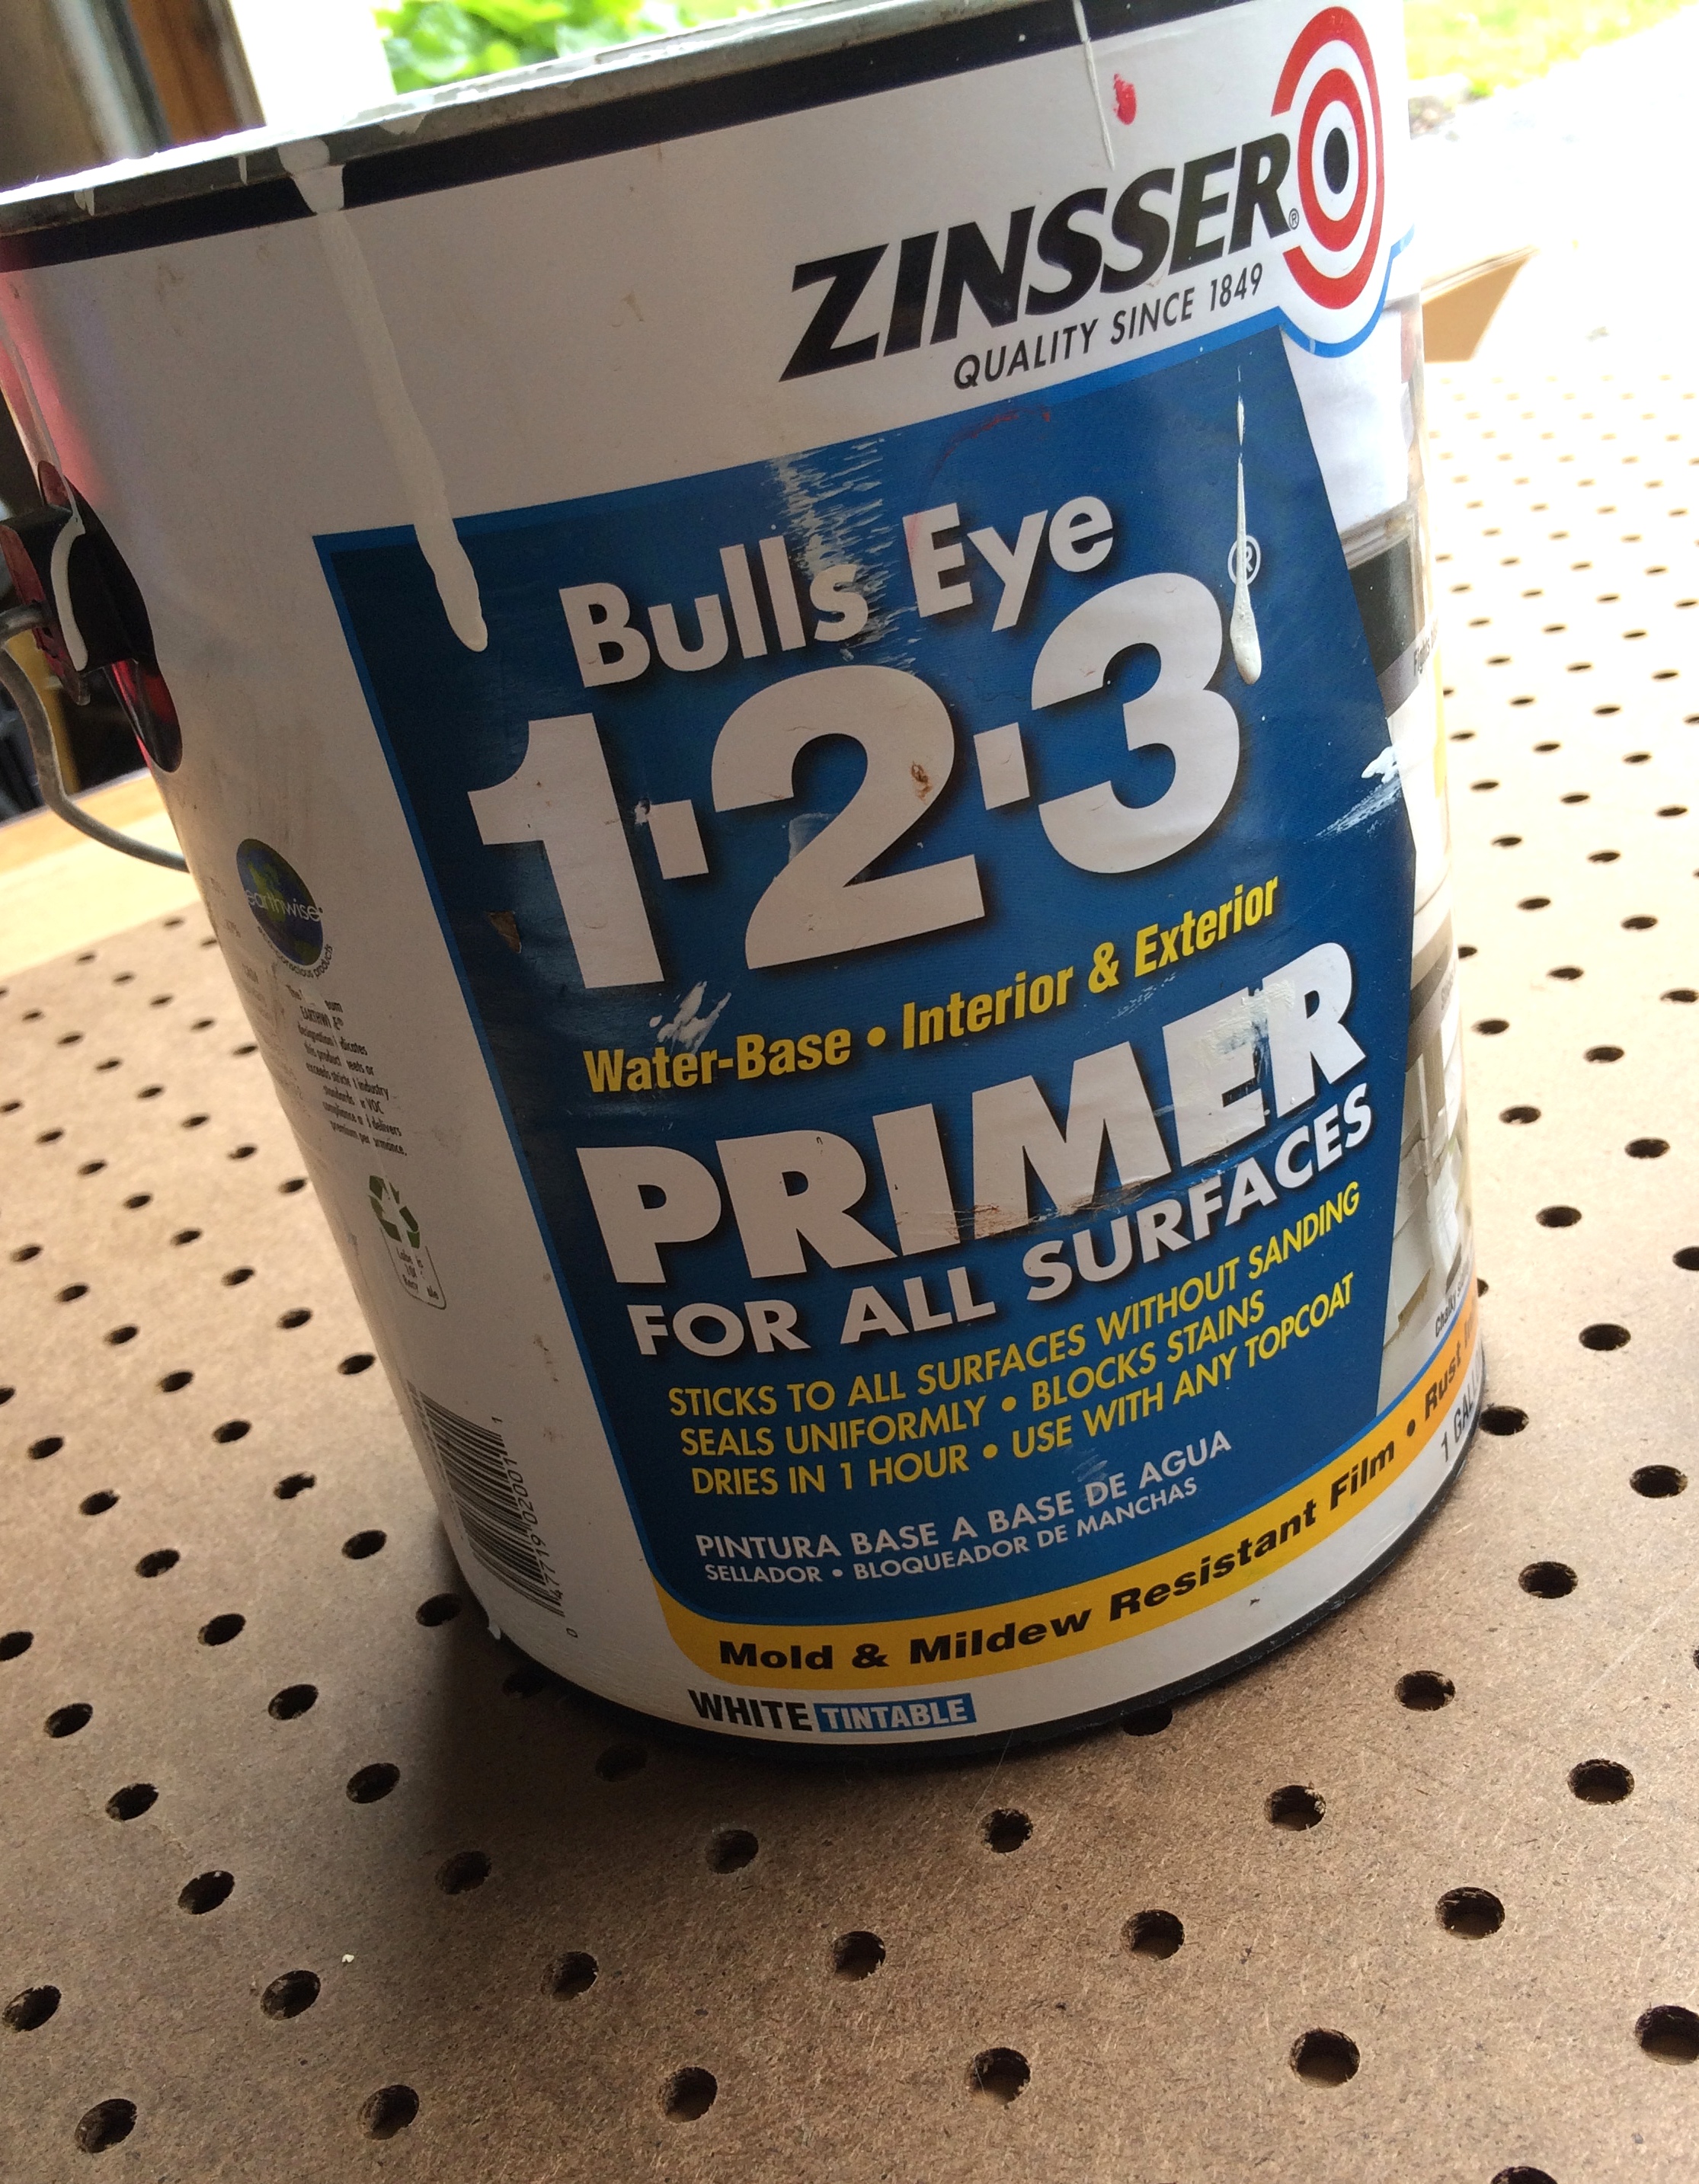
Some pegboard already comes primed or white, but my local Lowe’s only had the brown, unfinished version.  Similar to painting walls or furniture, it’s important to use primer first.  So first I gave the face of my pegboard a quick coat of Zinsser Primer.

DIY: Pegboard Baseball Cap Organizer - The perfect 'home' for the hat collection. Do It Yourself Tutorial @ www.jennaburger.com

DIY: Pegboard Baseball Cap Organizer - The perfect 'home' for the hat collection. Do It Yourself Tutorial @ www.jennaburger.com

2

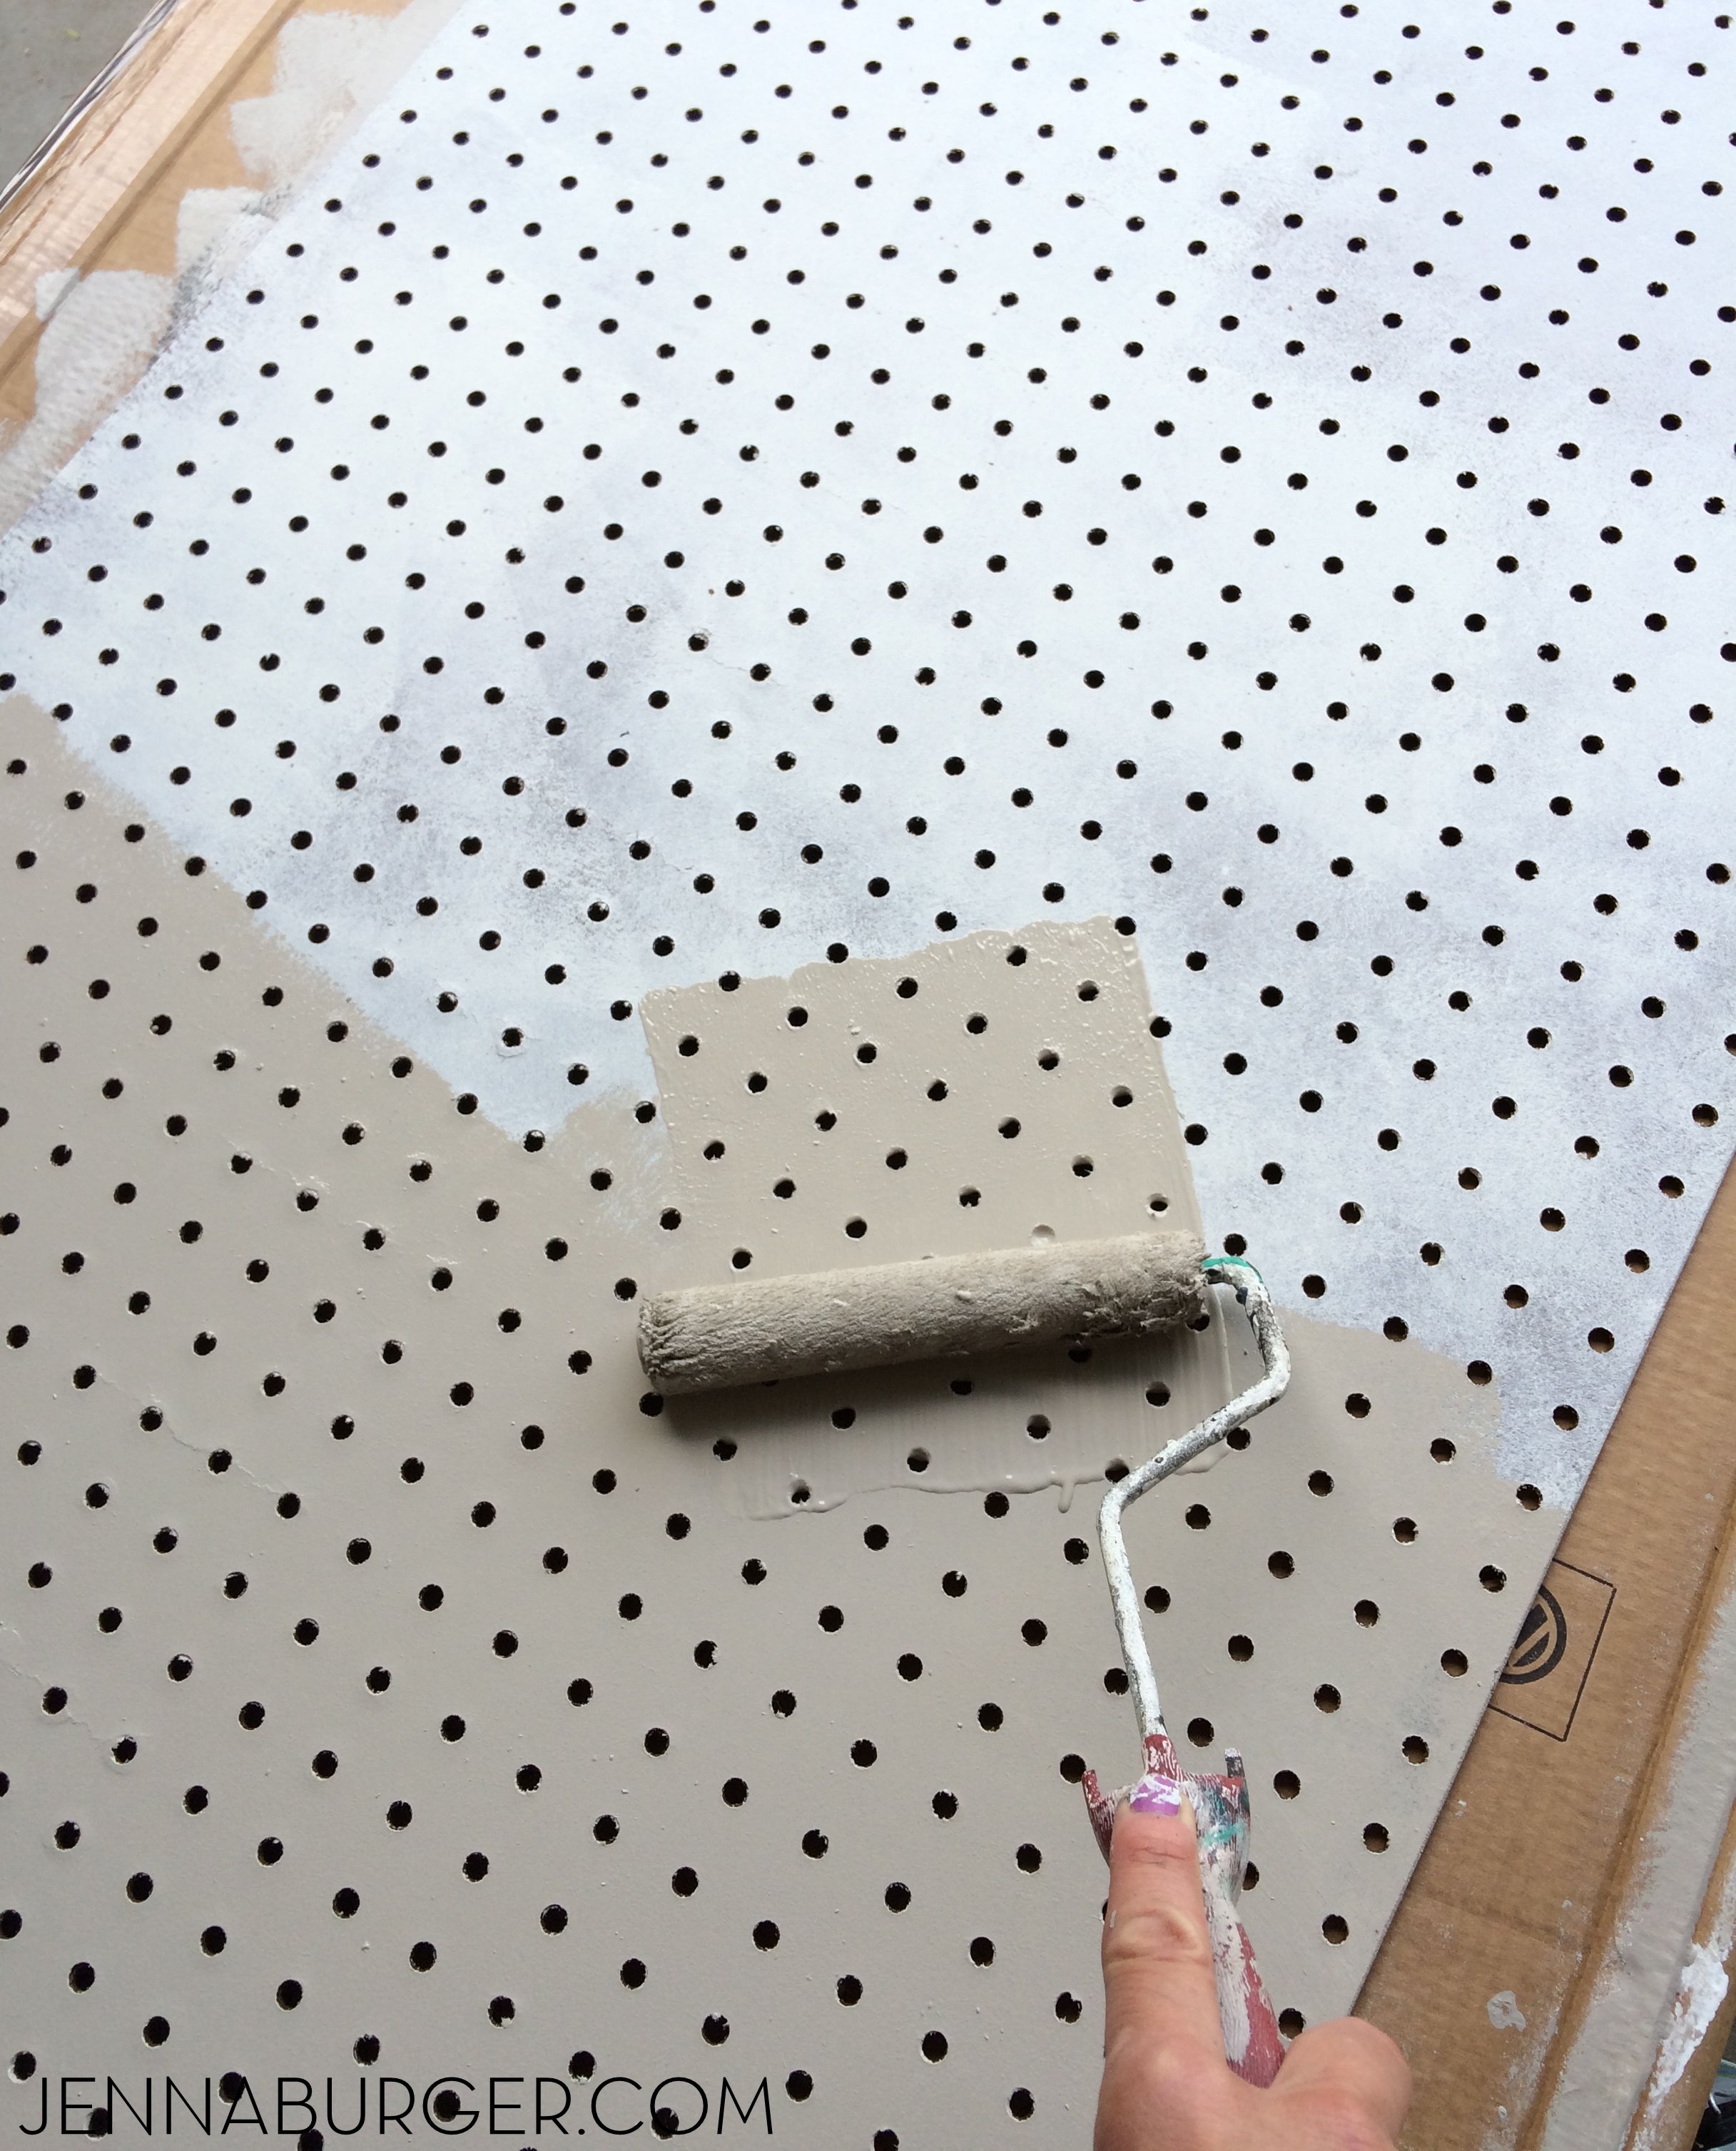
Once it was primed, I painted the pegboard with 2 fresh coats of color with a roller – a taupe-y hue was created by mixing a few leftover colors together

DIY: Pegboard Baseball Cap Organizer - The perfect 'home' for the hat collection. Do It Yourself Tutorial @ www.jennaburger.com3

For the frame, I layed the 2′ x 4′ pegboard on the wood strips allowing 1″ of exposed frame around, and marked them with a pencil.

Using a miter saw (my recommendation for a good one) I cut the wood pieces as needed.  If you don’t have a miter saw or tool to cut the wood, Lowes will cut it to your desired length.

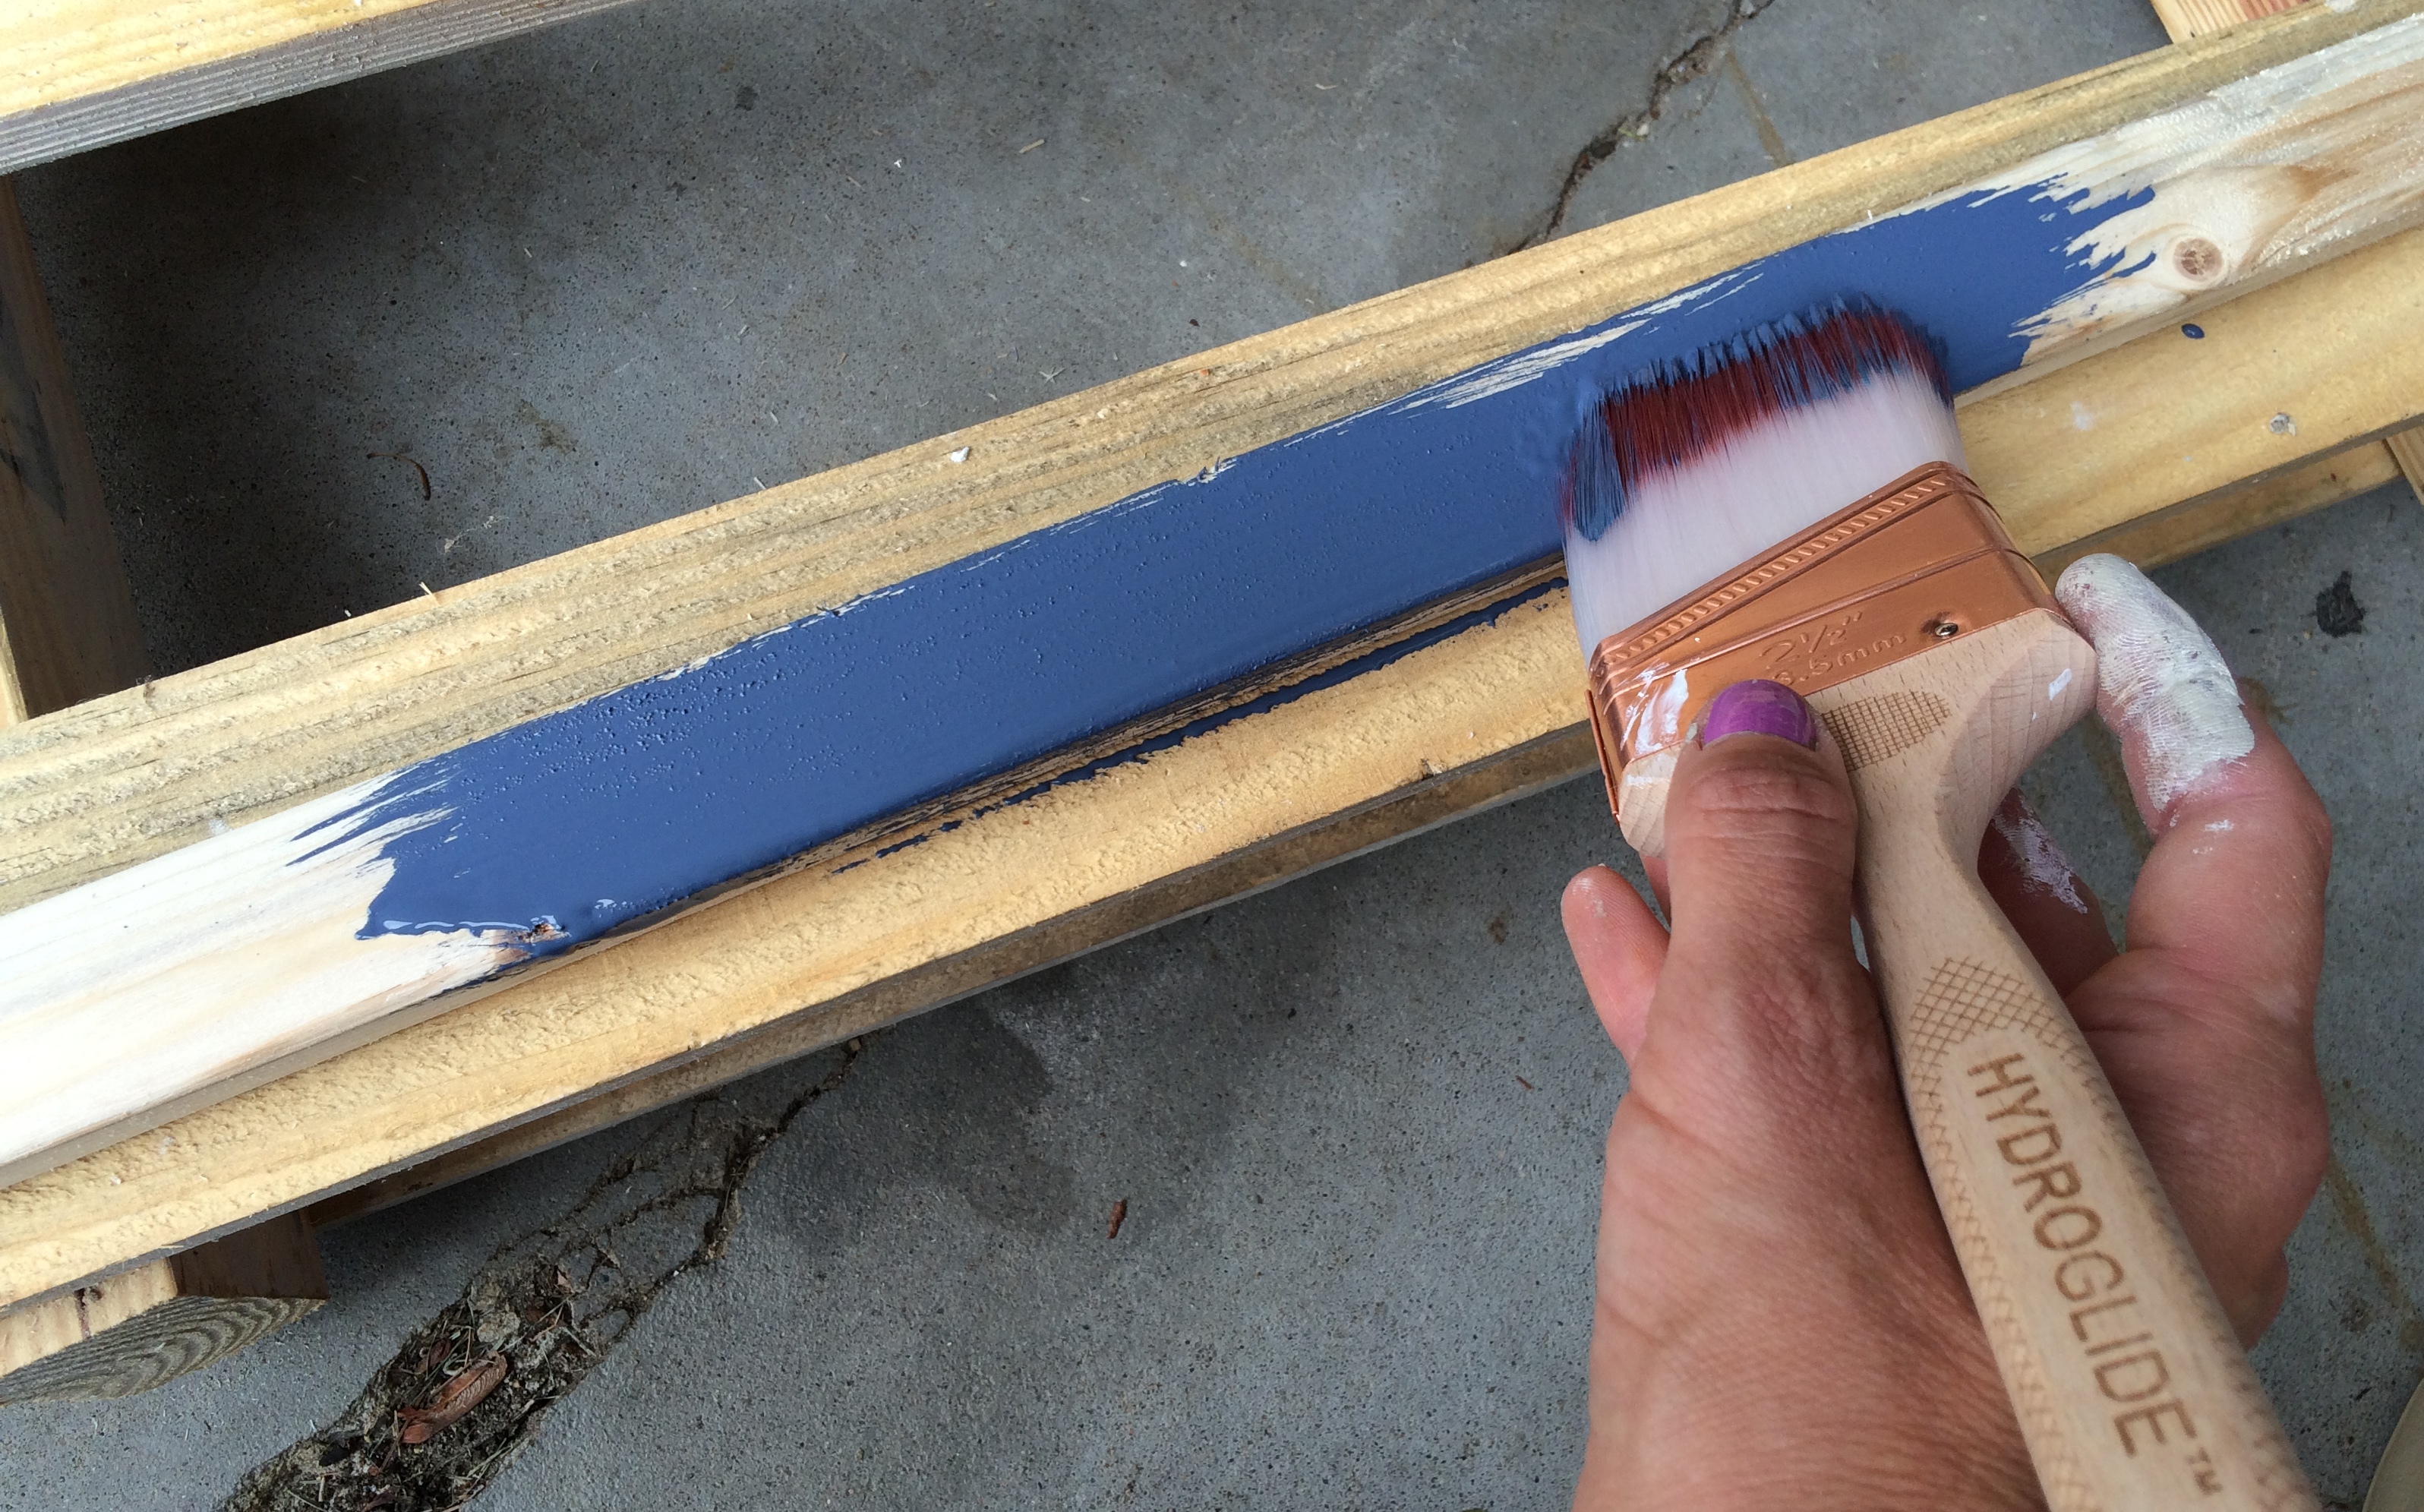
Then I painted the wood pieces using more leftover paint.  Since this pegboard was slated for my sons room, I coordinated the blue hue with the color I used for painting his closet door

/ Color: Benjamin Moore Van Deusen Blue
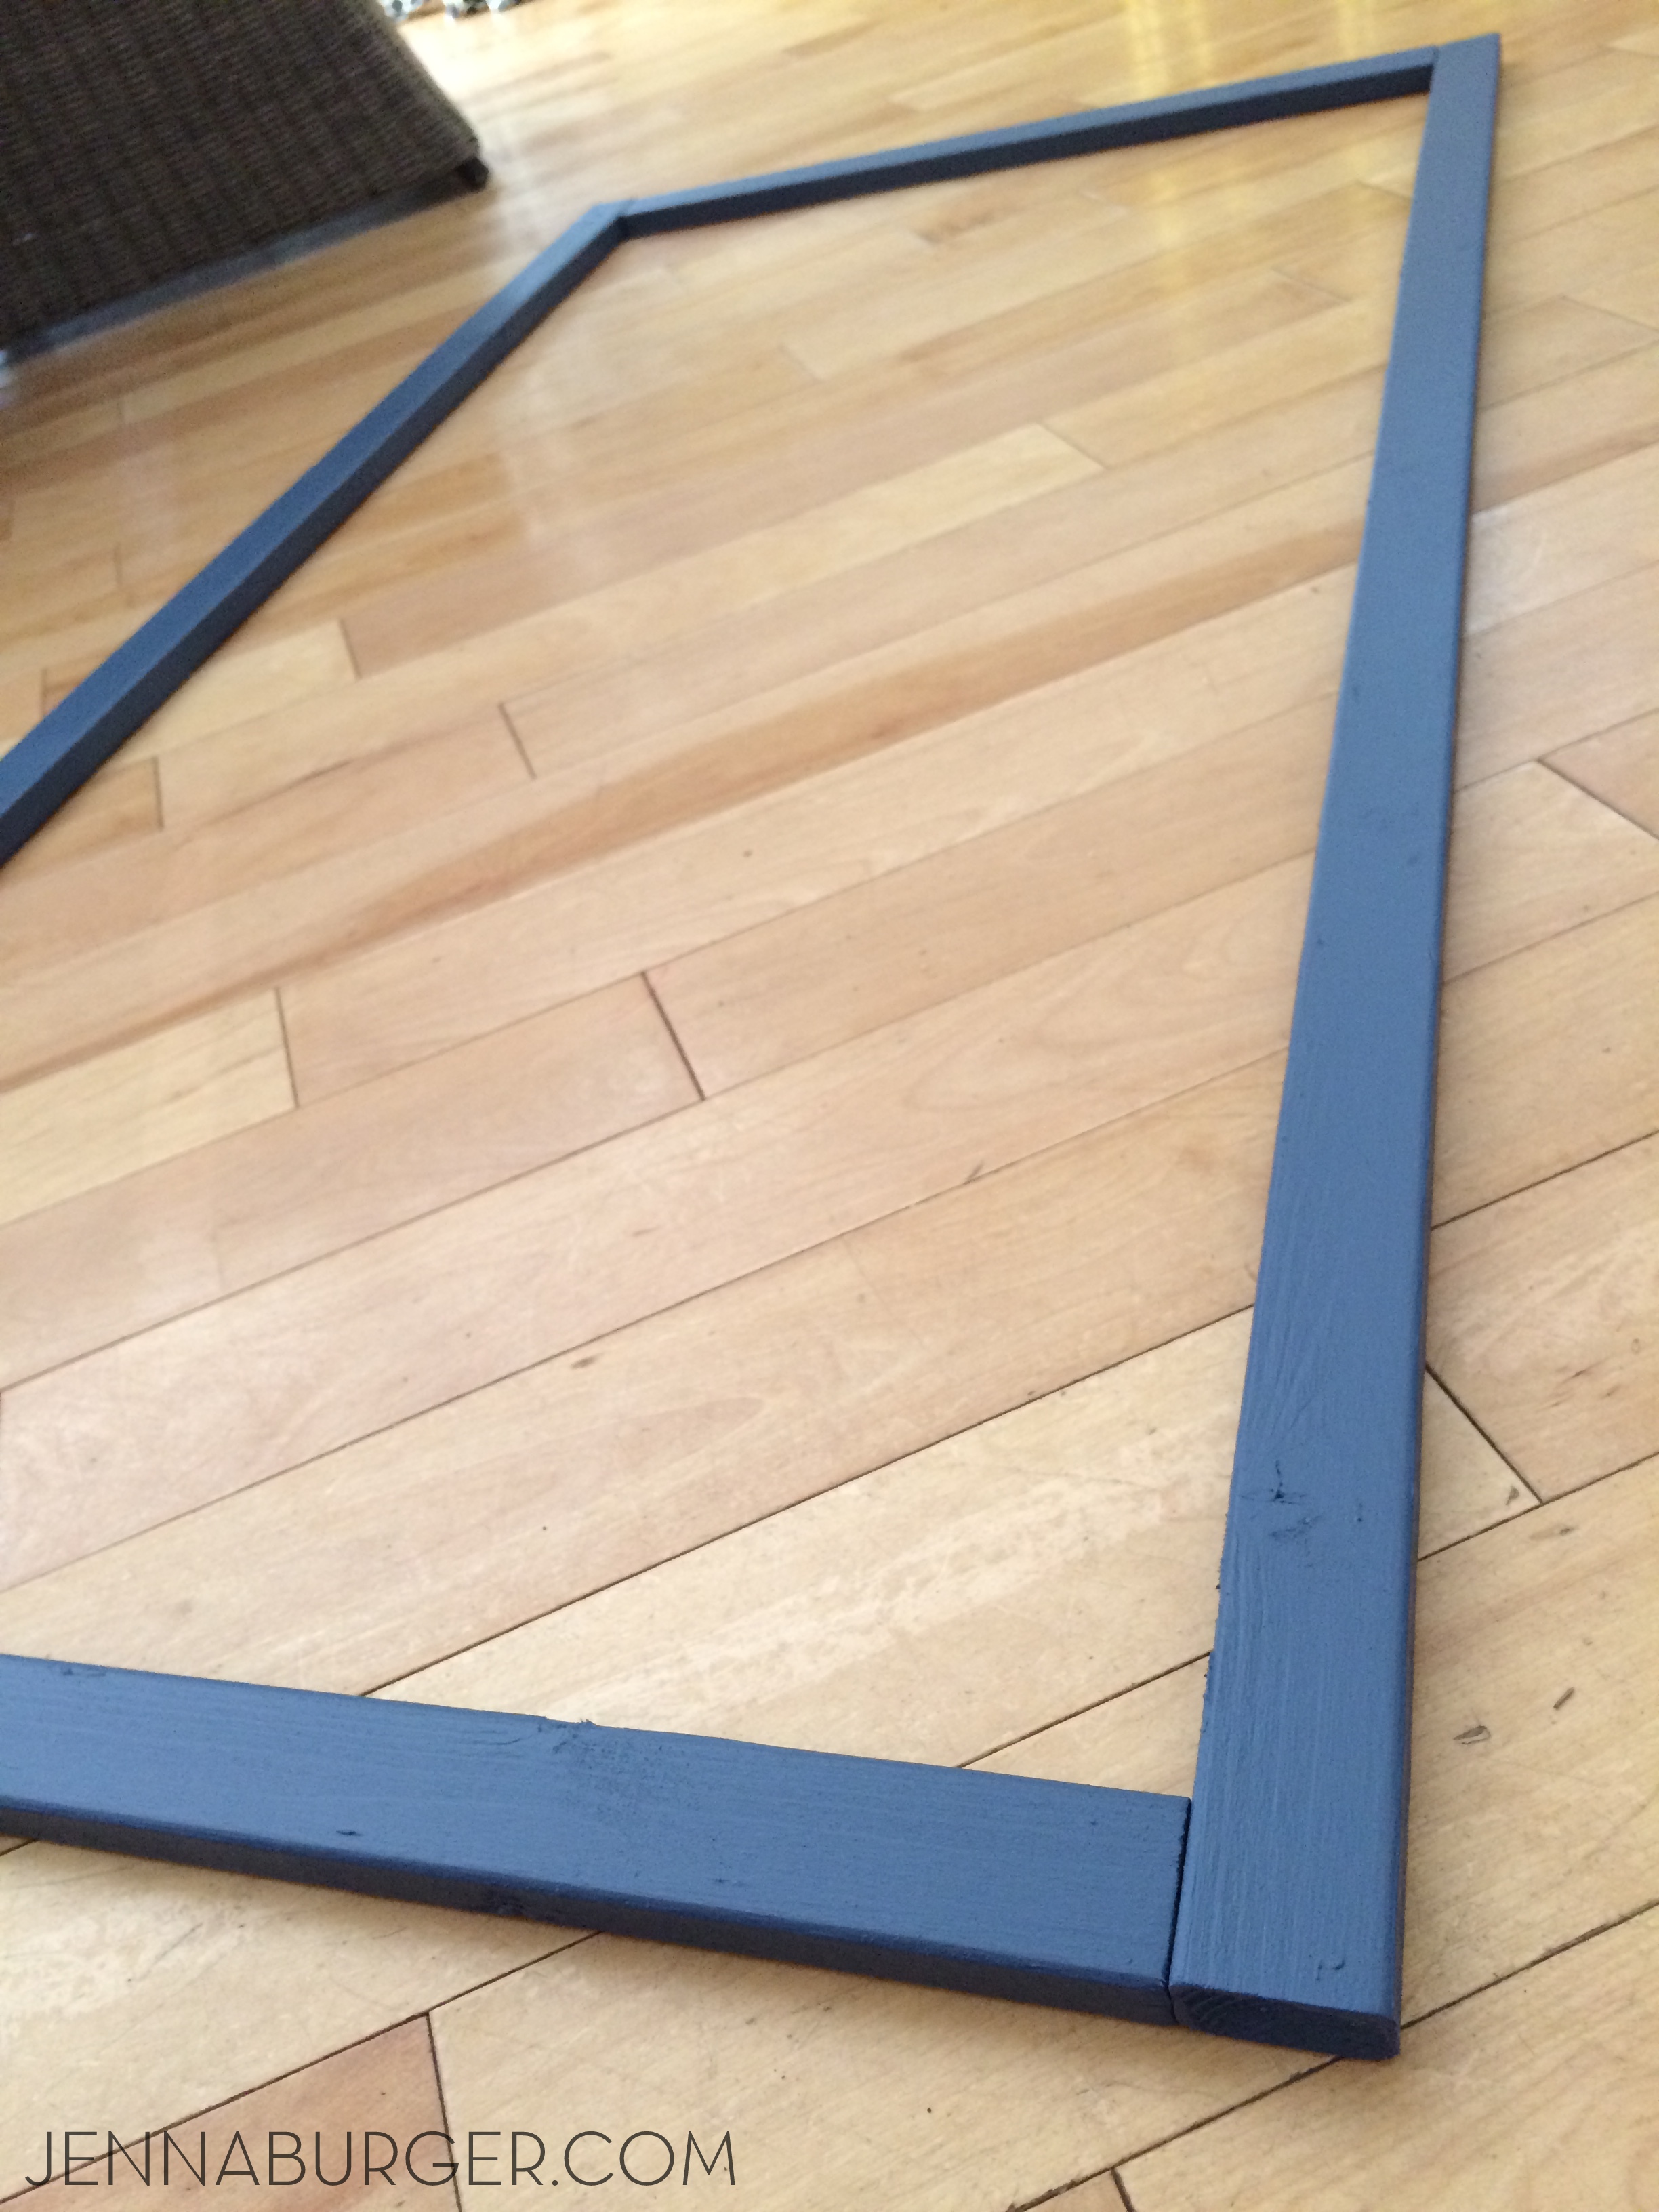
DIY: Pegboard Baseball Cap Organizer - The perfect 'home' for the hat collection. Do It Yourself Tutorial @ www.jennaburger.com

4

Once the wood pieces were painted + dried, I arranged them on the floor…

DIY: Pegboard Baseball Cap Organizer - The perfect 'home' for the hat collection. Do It Yourself Tutorial @ www.jennaburger.com

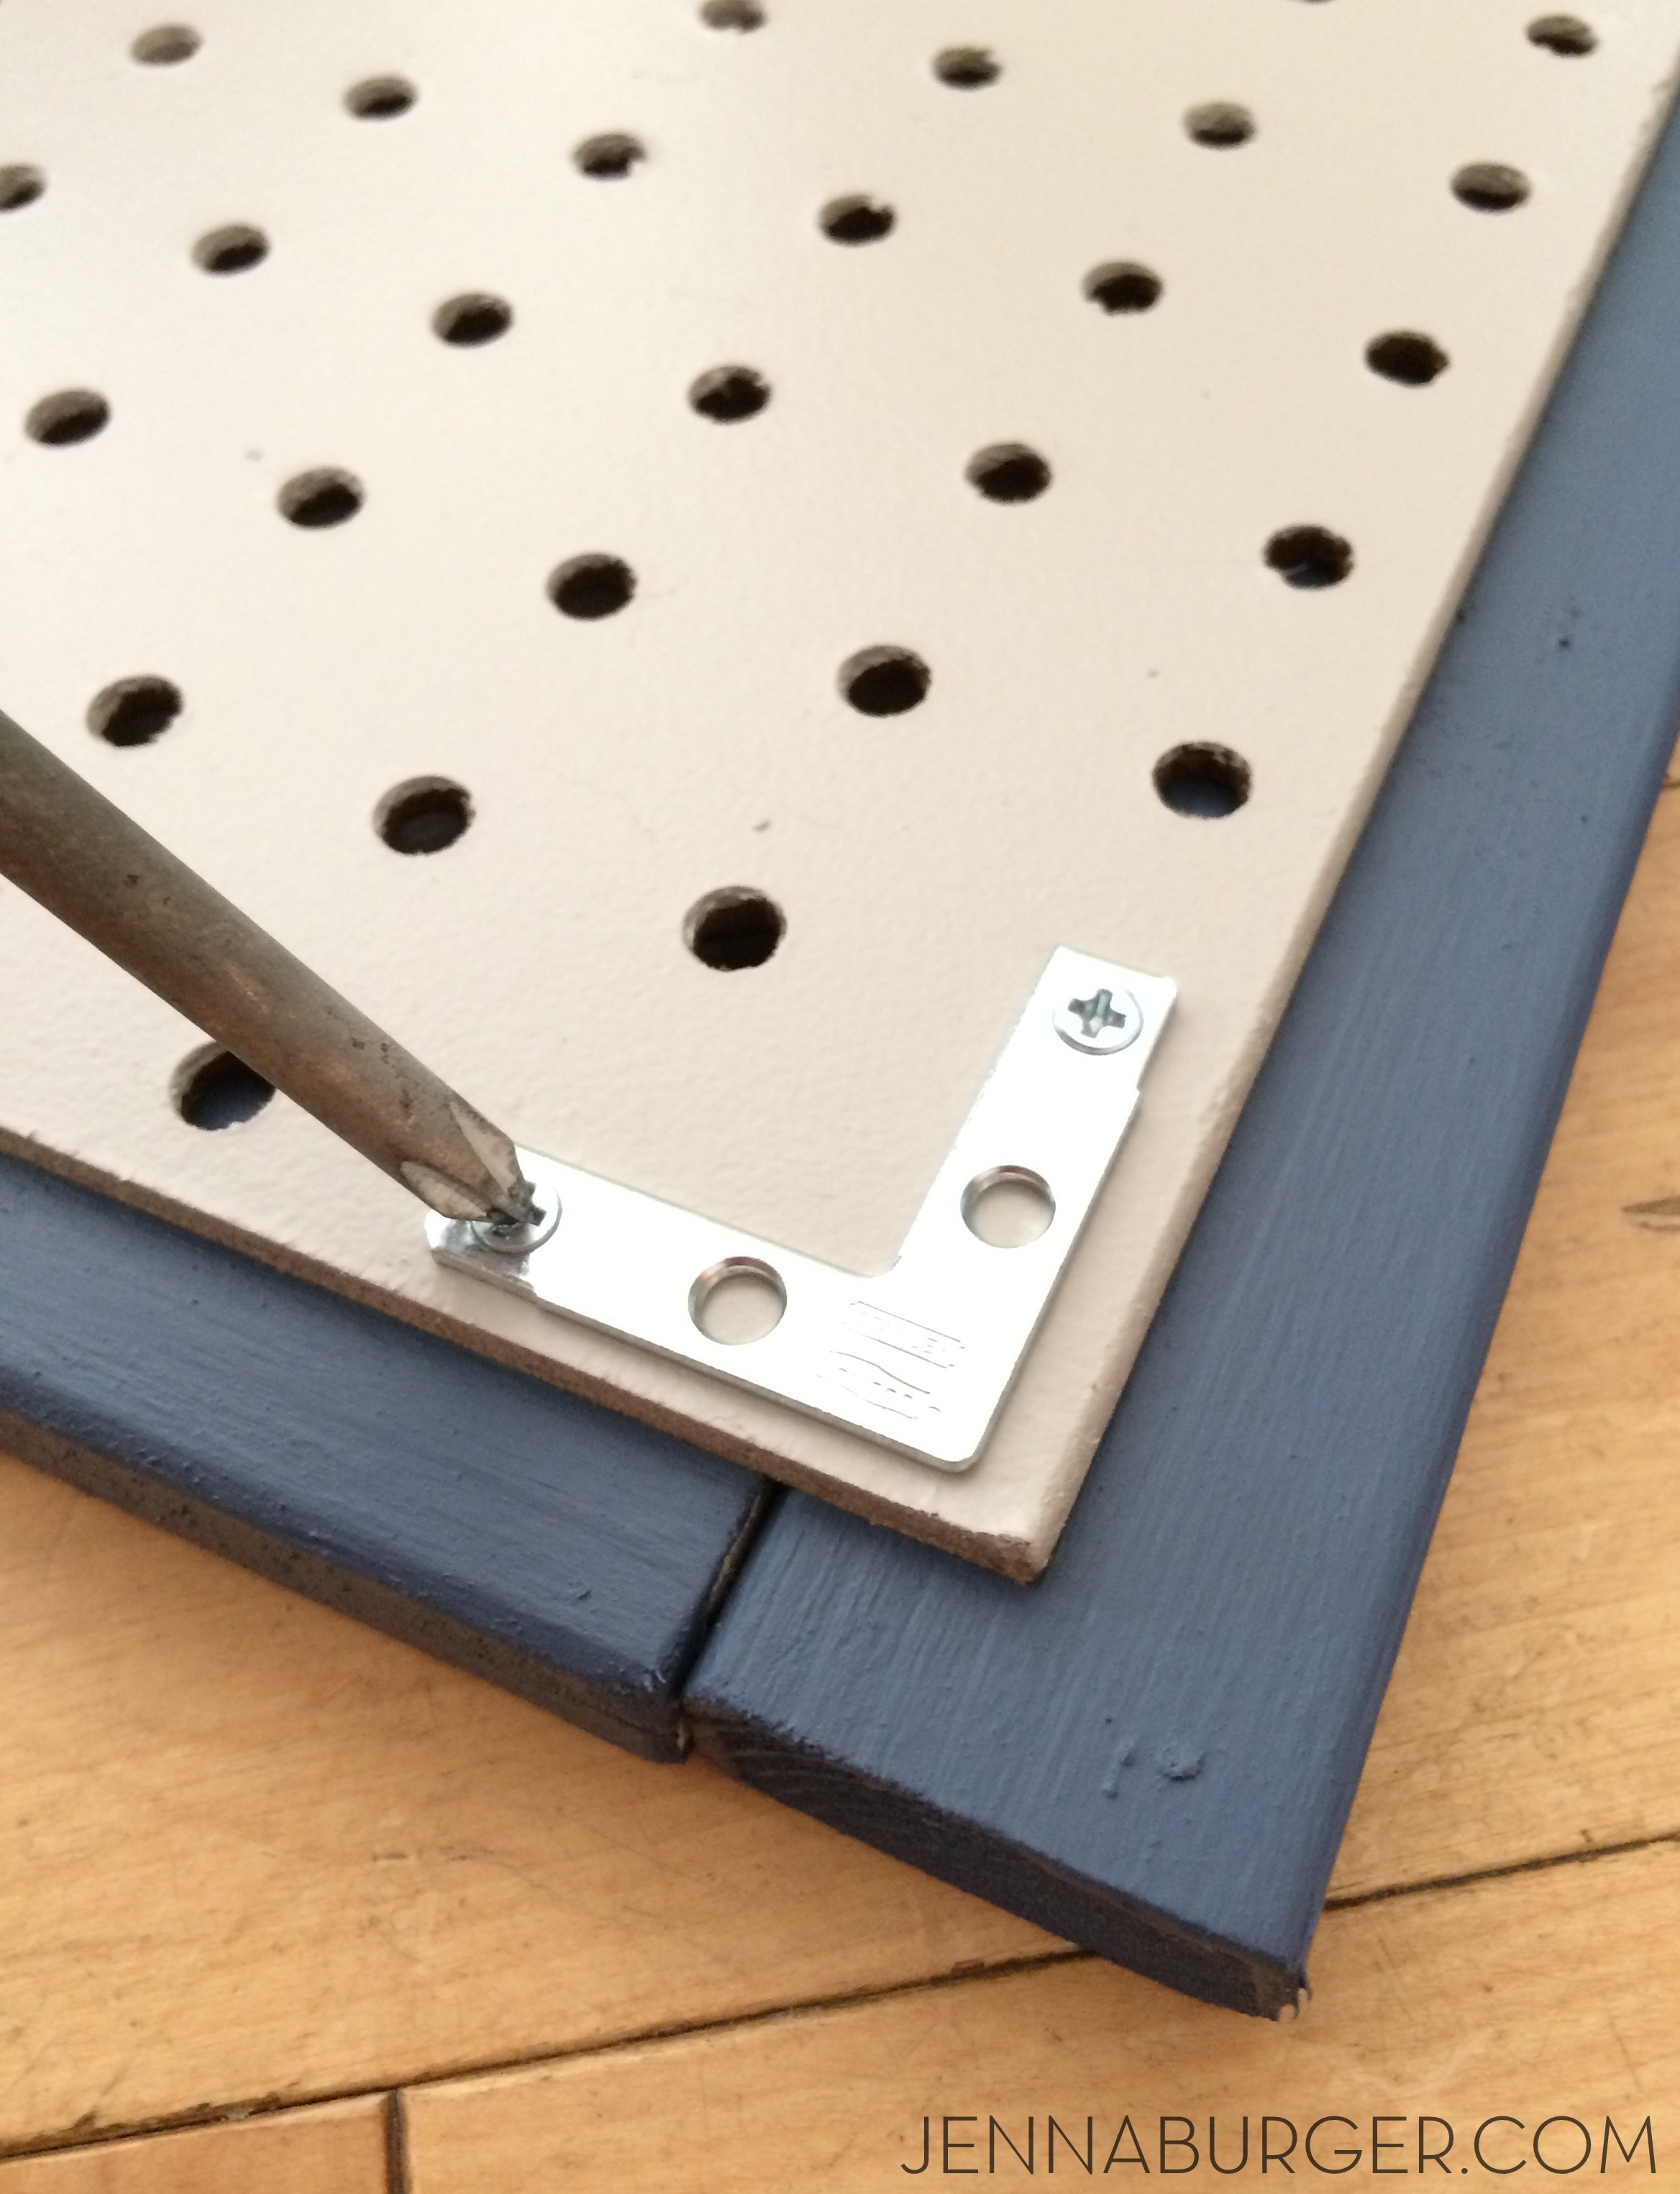
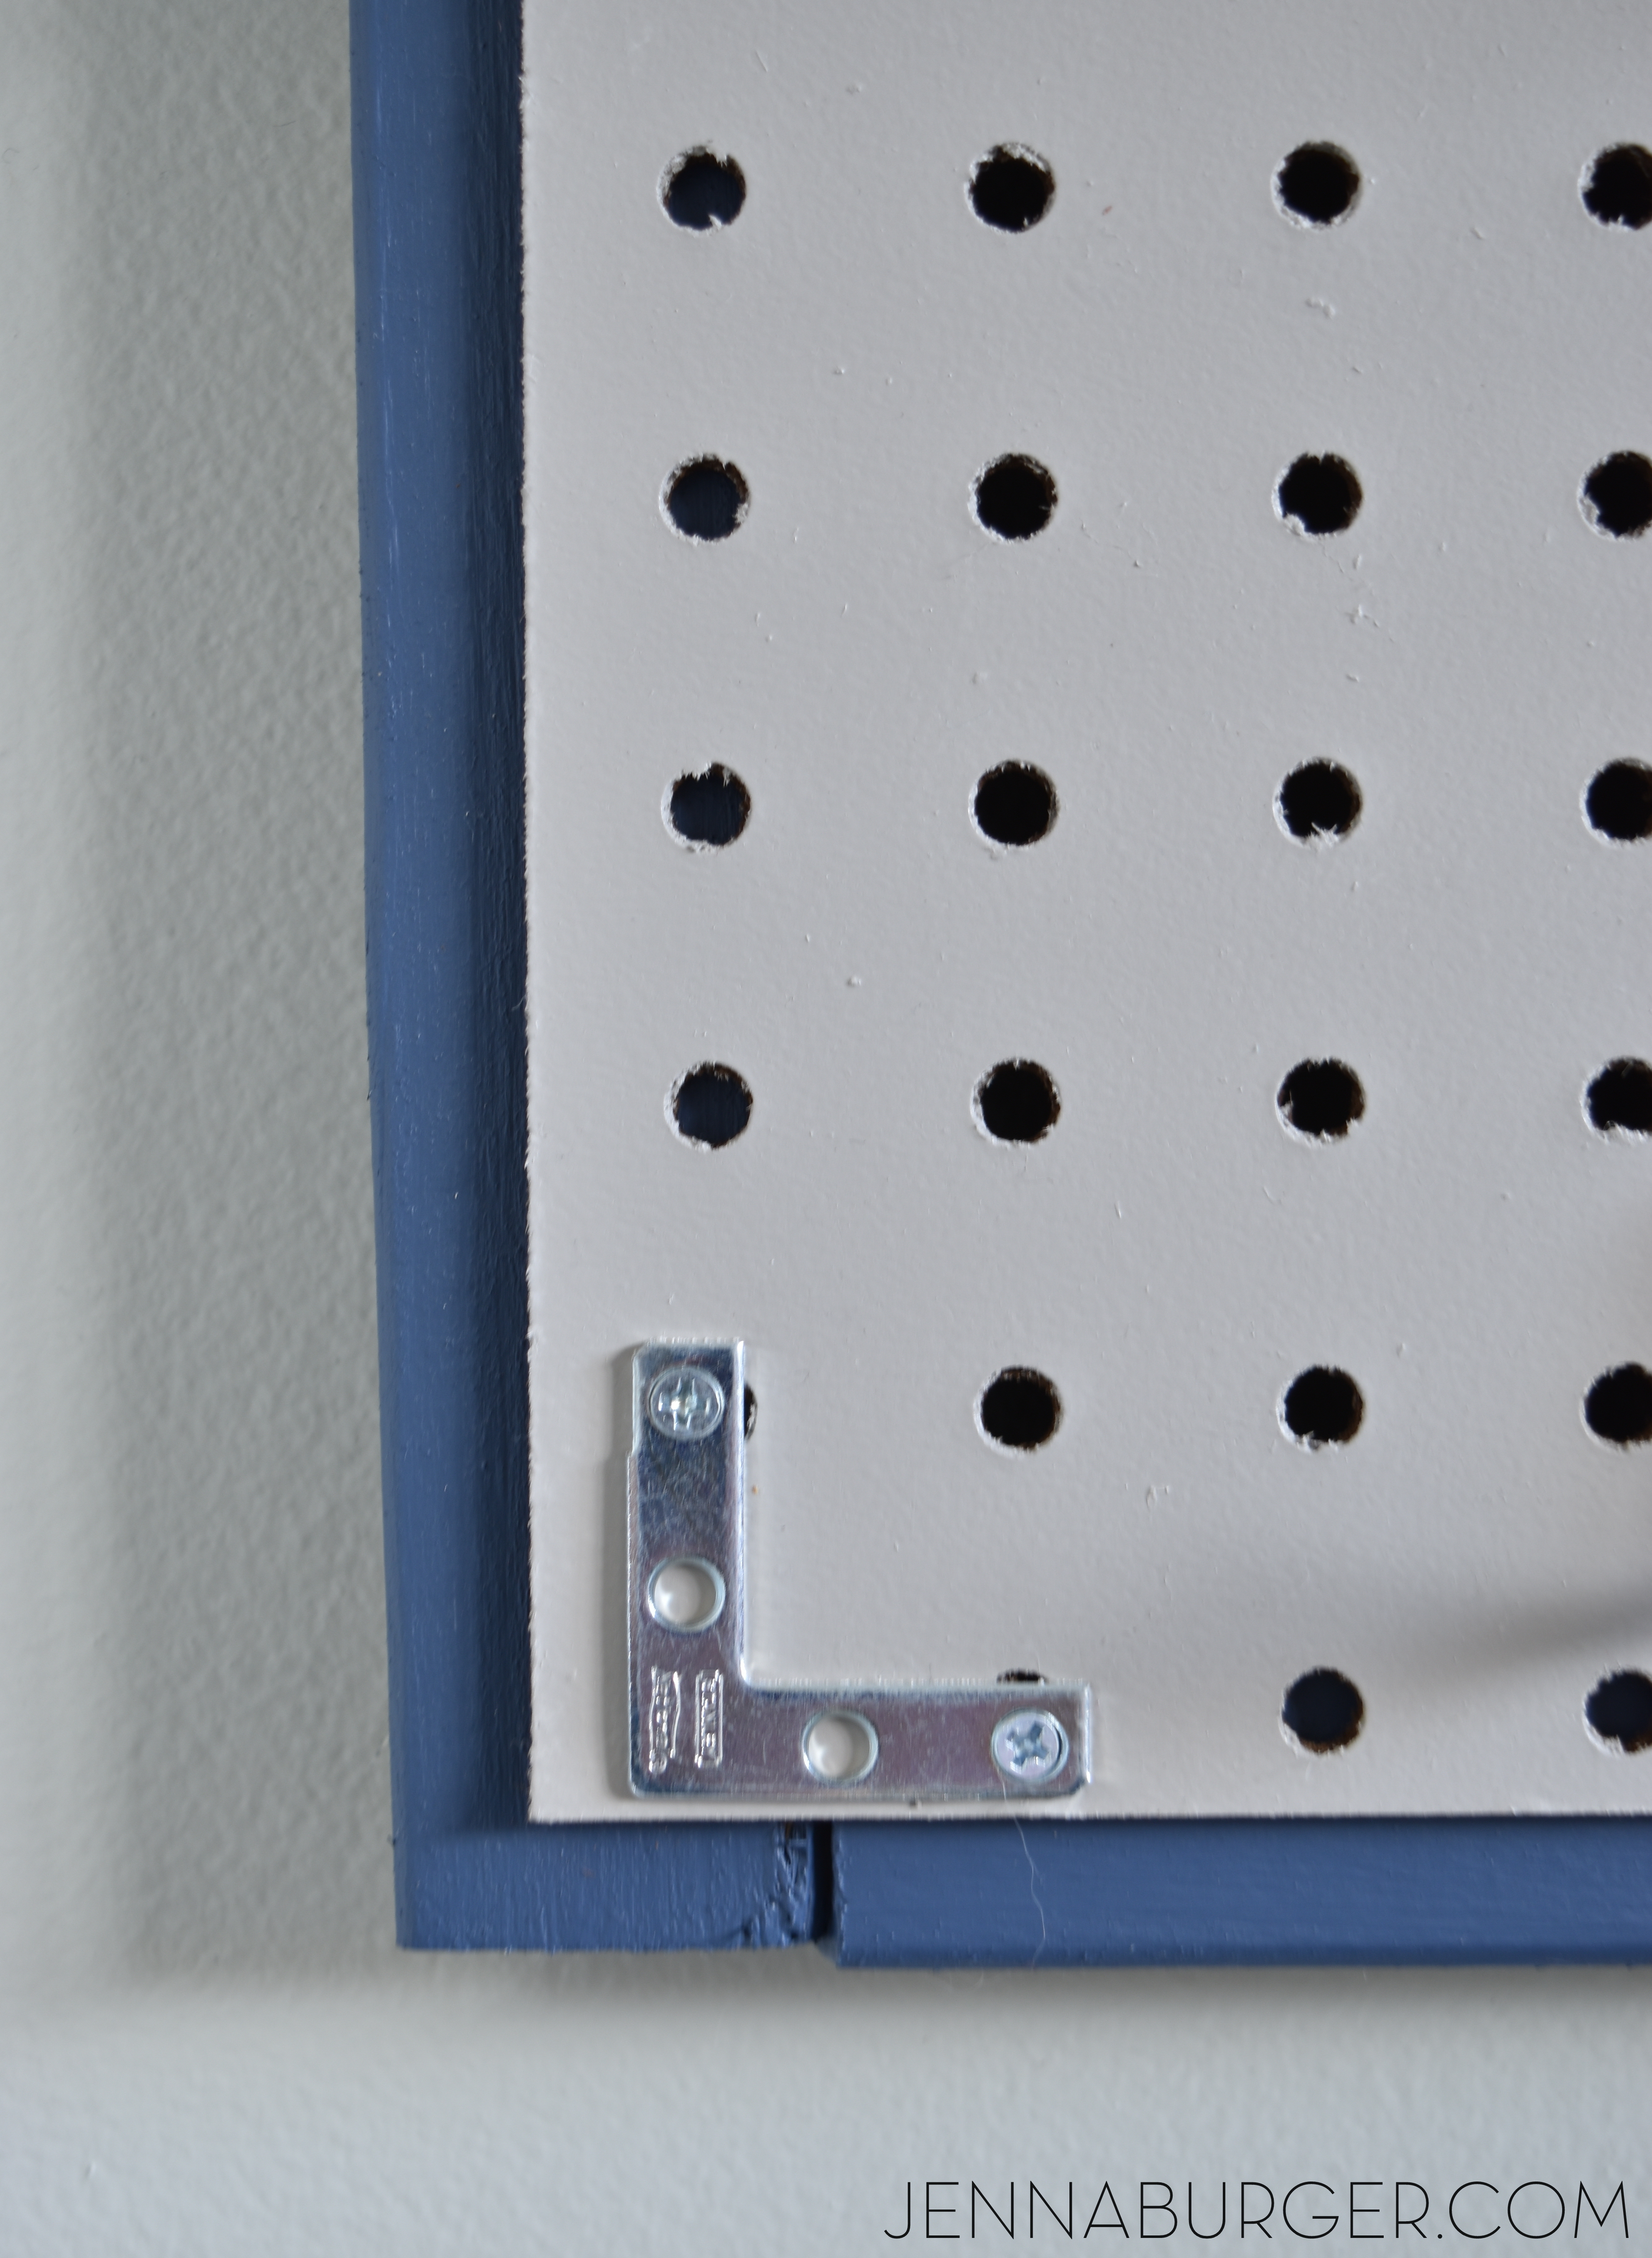
…and layed the pegboard on top.  Then I aligned the 4 “L” brackets at the corners and fastened them through the pegboard and wood frame surround.

DIY: Pegboard Baseball Cap Organizer - The perfect 'home' for the hat collection. Do It Yourself Tutorial @ www.jennaburger.com

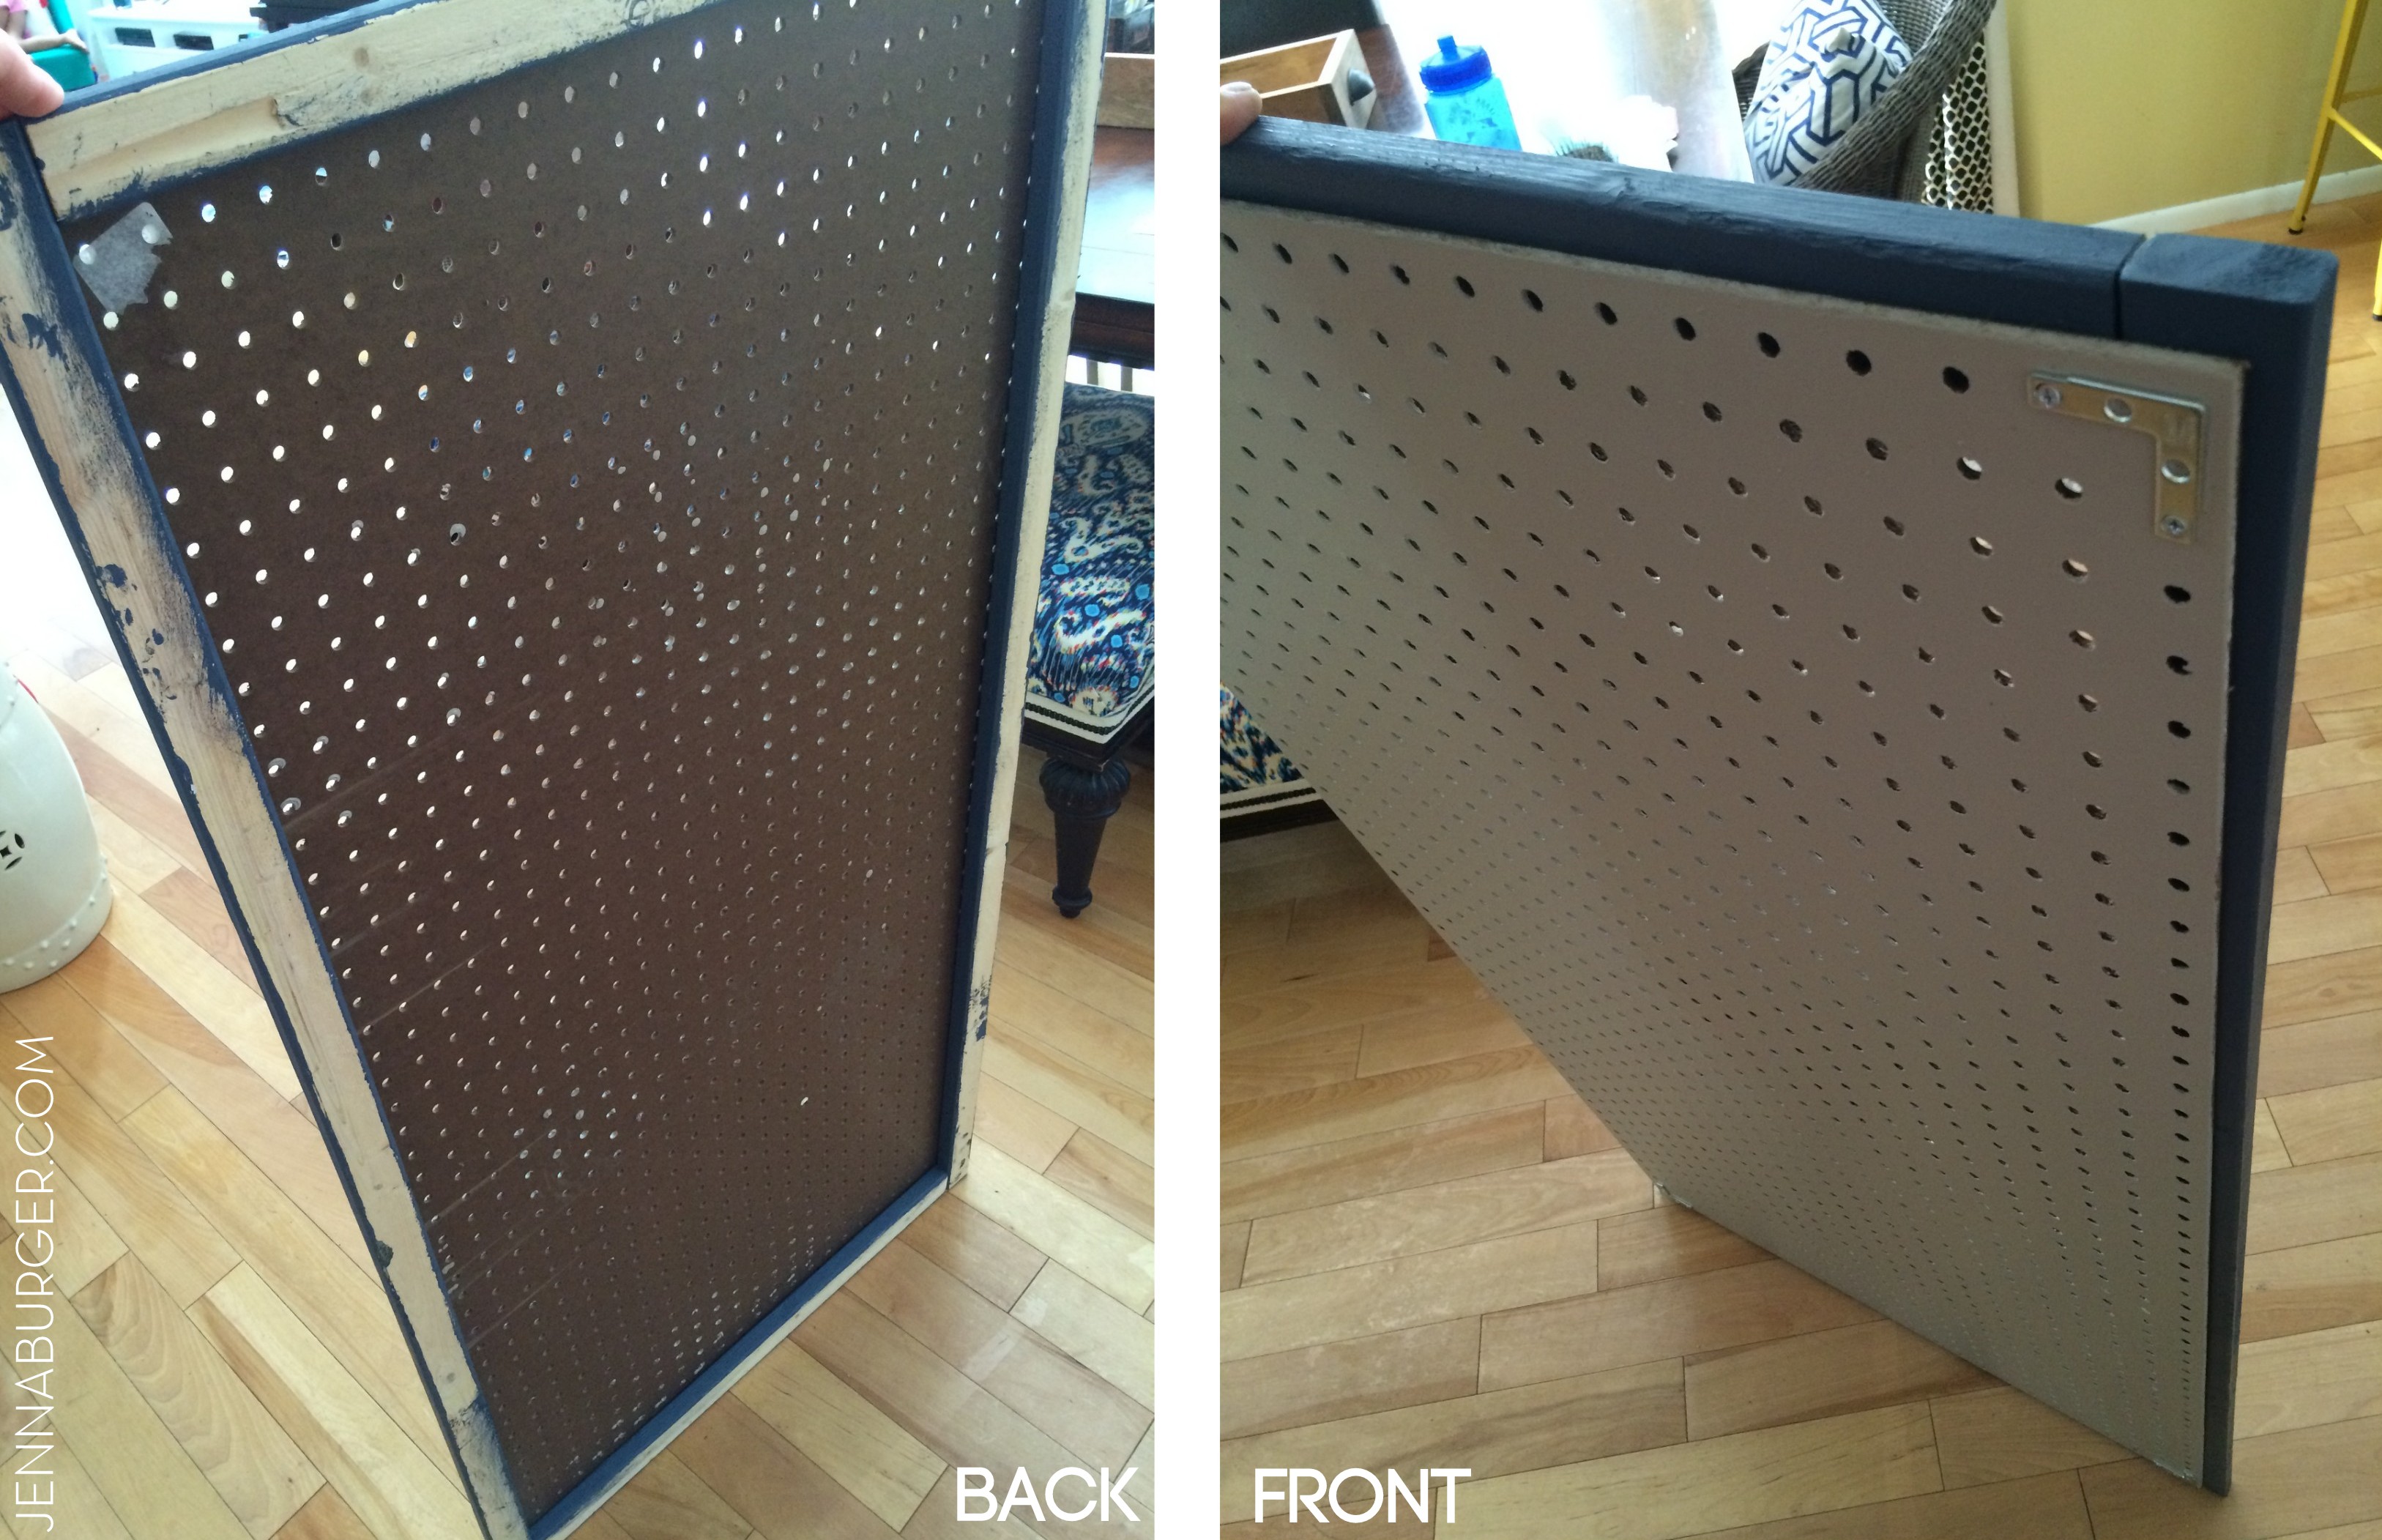
This is a view of the front and back when all 4 corners were complete.

DIY: Pegboard Baseball Cap Organizer - The perfect 'home' for the hat collection. Do It Yourself Tutorial @ www.jennaburger.com

DIY: Pegboard Baseball Cap Organizer - The perfect 'home' for the hat collection. Do It Yourself Tutorial @ www.jennaburger.com

5

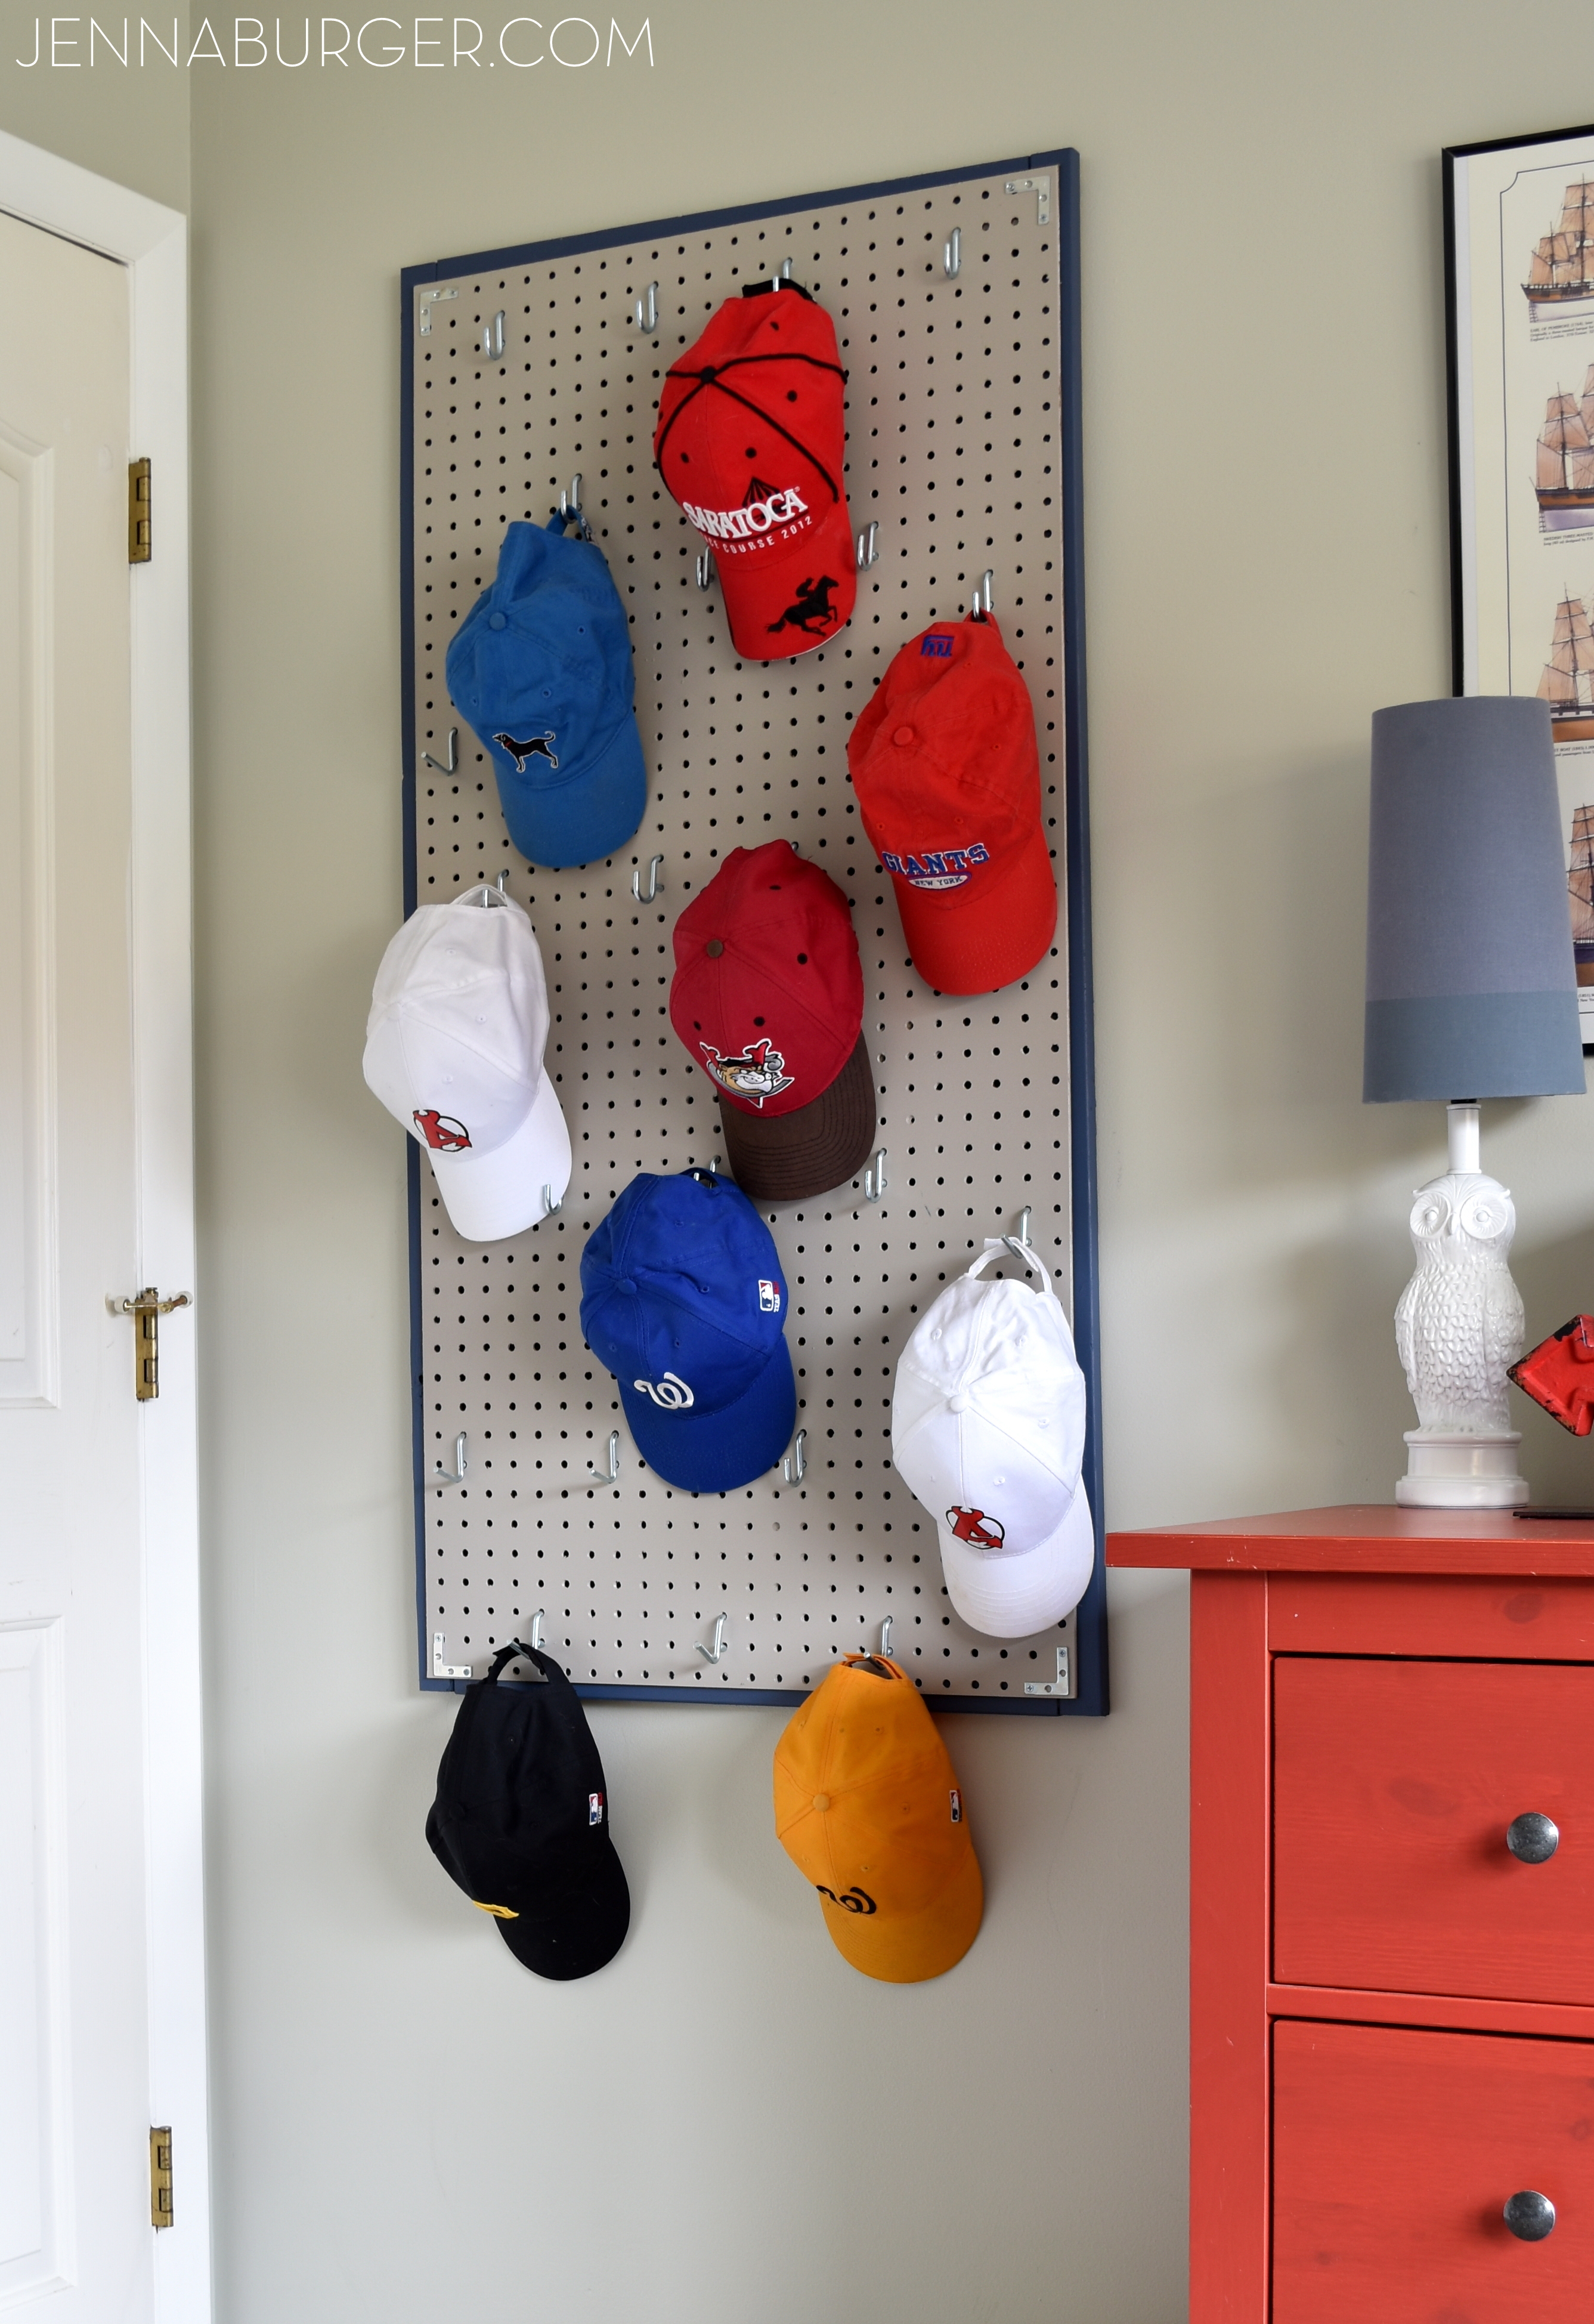
I installed 2 screws + anchors into the wall and hung the framed pegboard.

I quickly + excitedly added these curved hooks.  I attempted to create a pattern to maximize the amount of hats that could hang, but it only kinda worked, so the hooks are hung part pattern / part random.

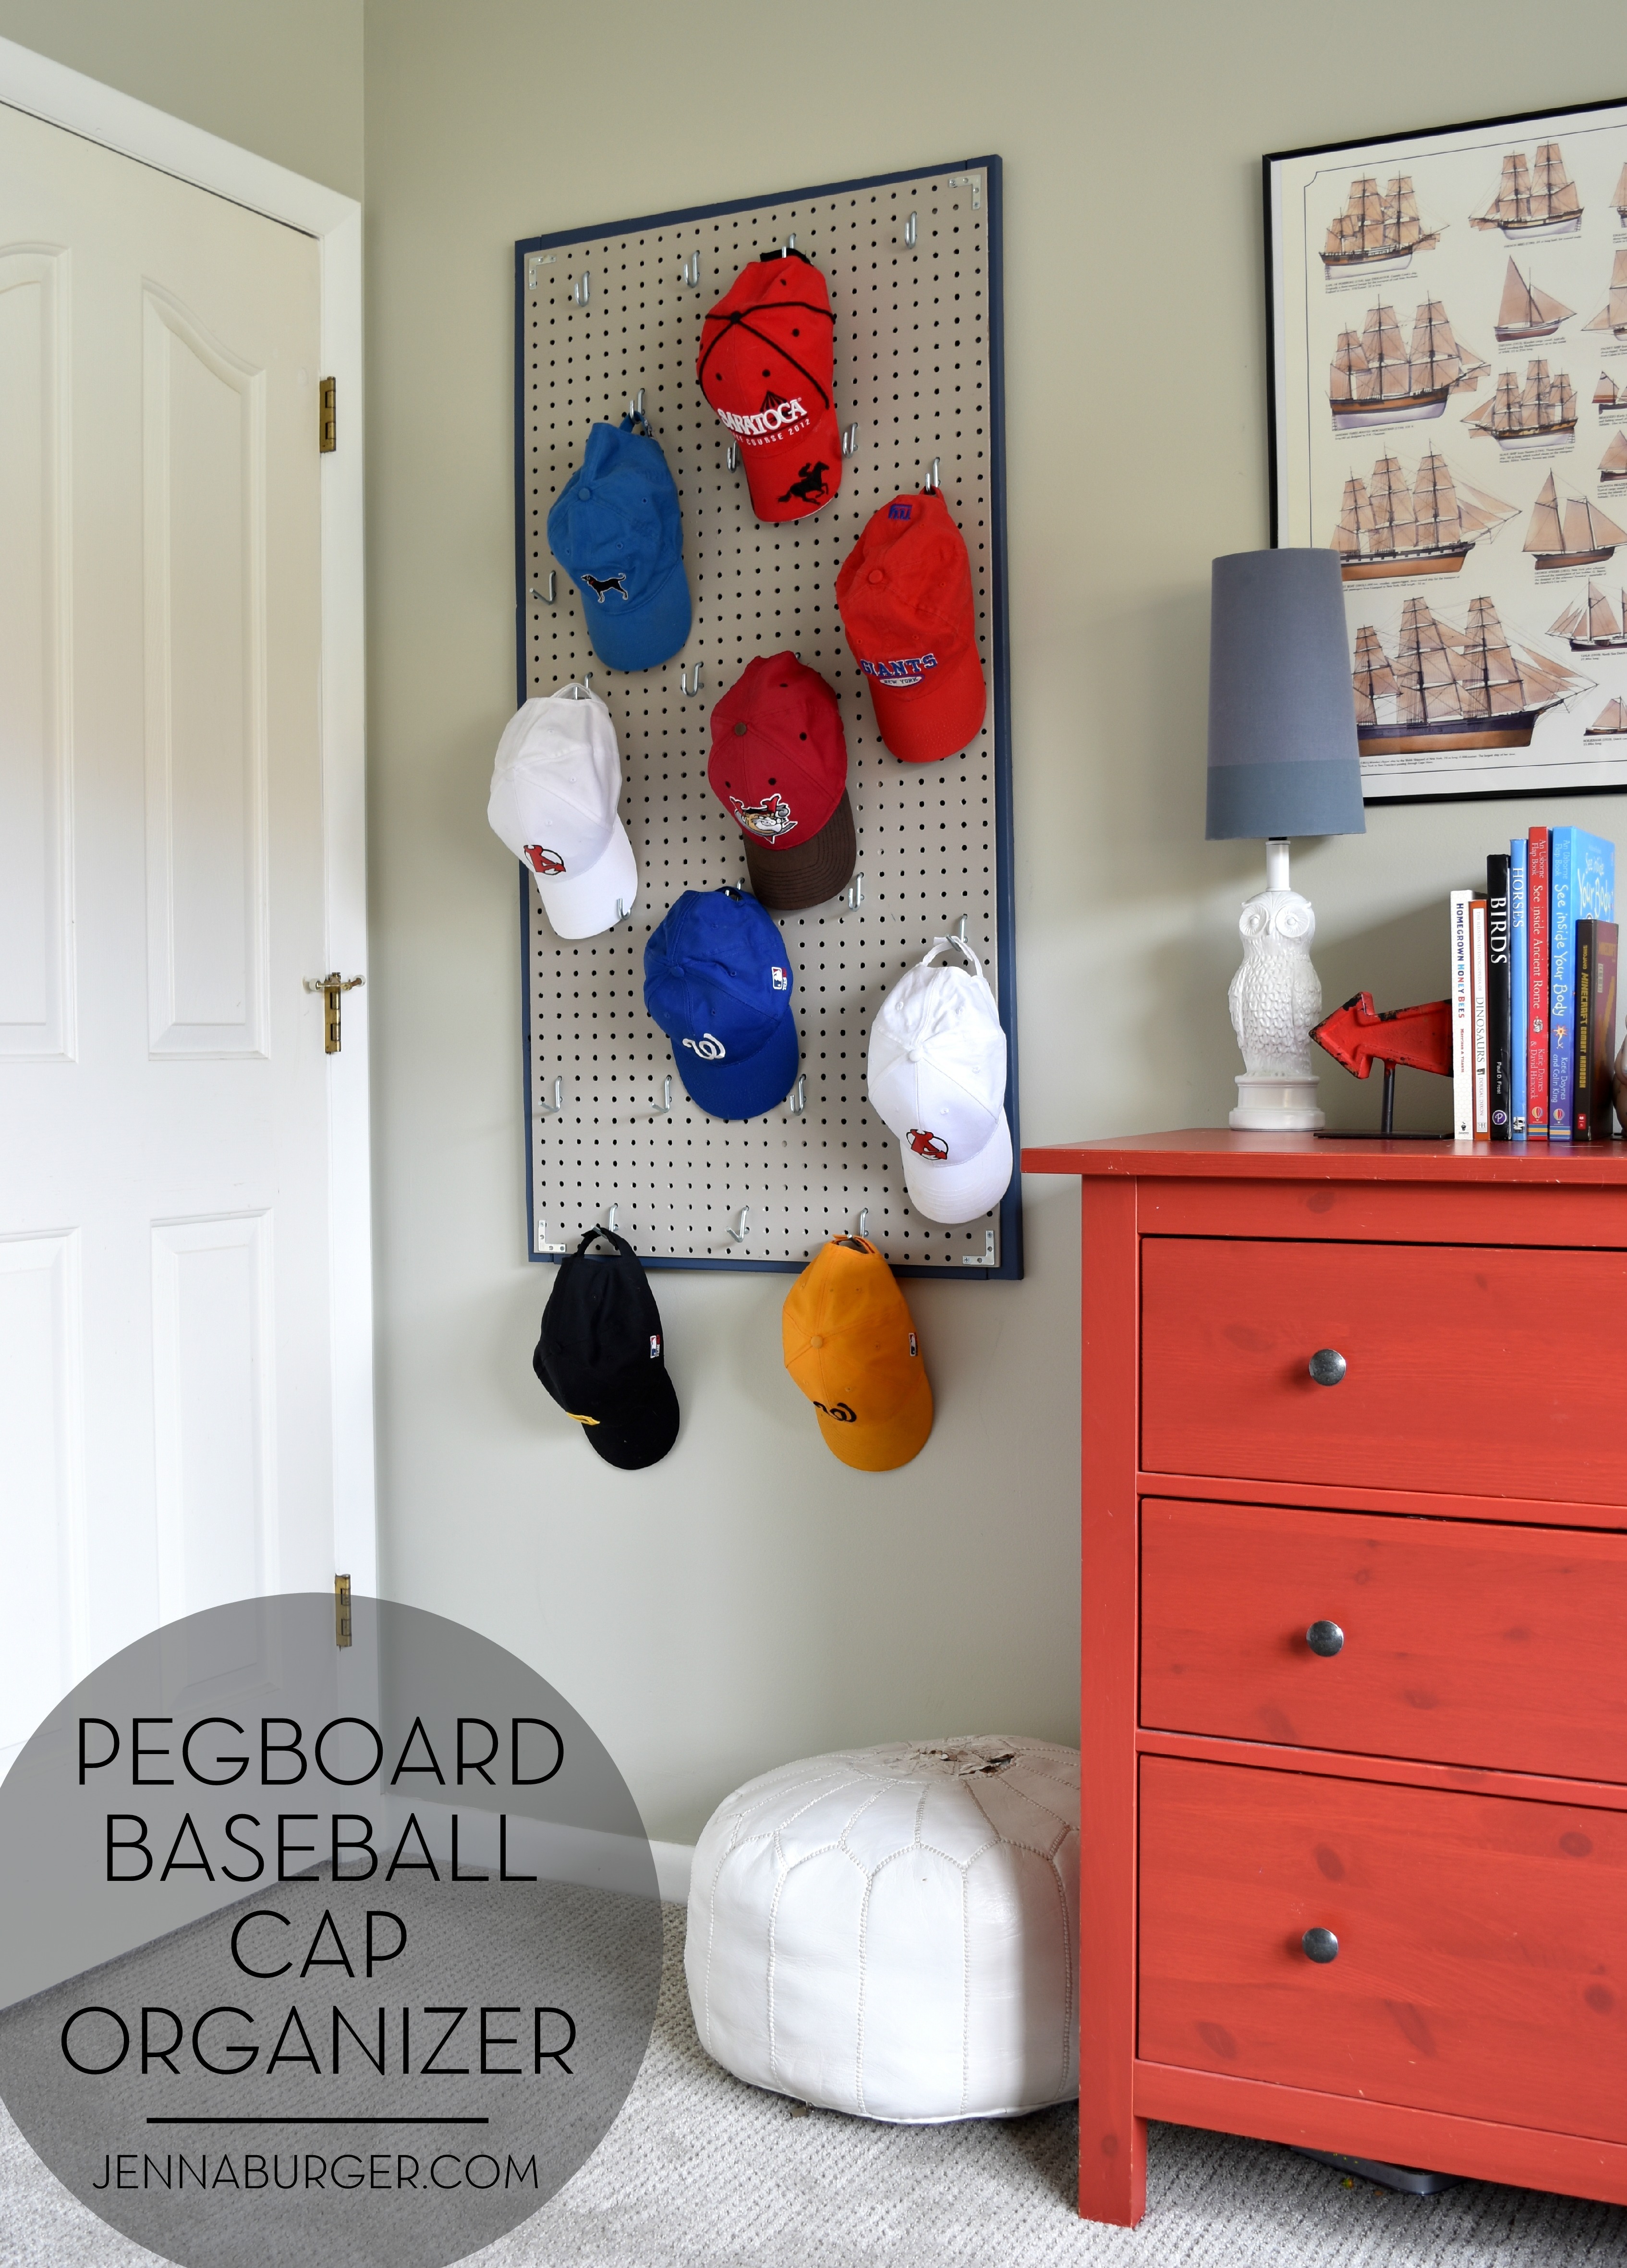
This 2′ x 4′ pegboard can hold a lot of hats. About 25 total. And it looks pretty!

DIY: Pegboard Baseball Cap Organizer - The perfect 'home' for the hat collection. Do It Yourself Tutorial @ www.jennaburger.com

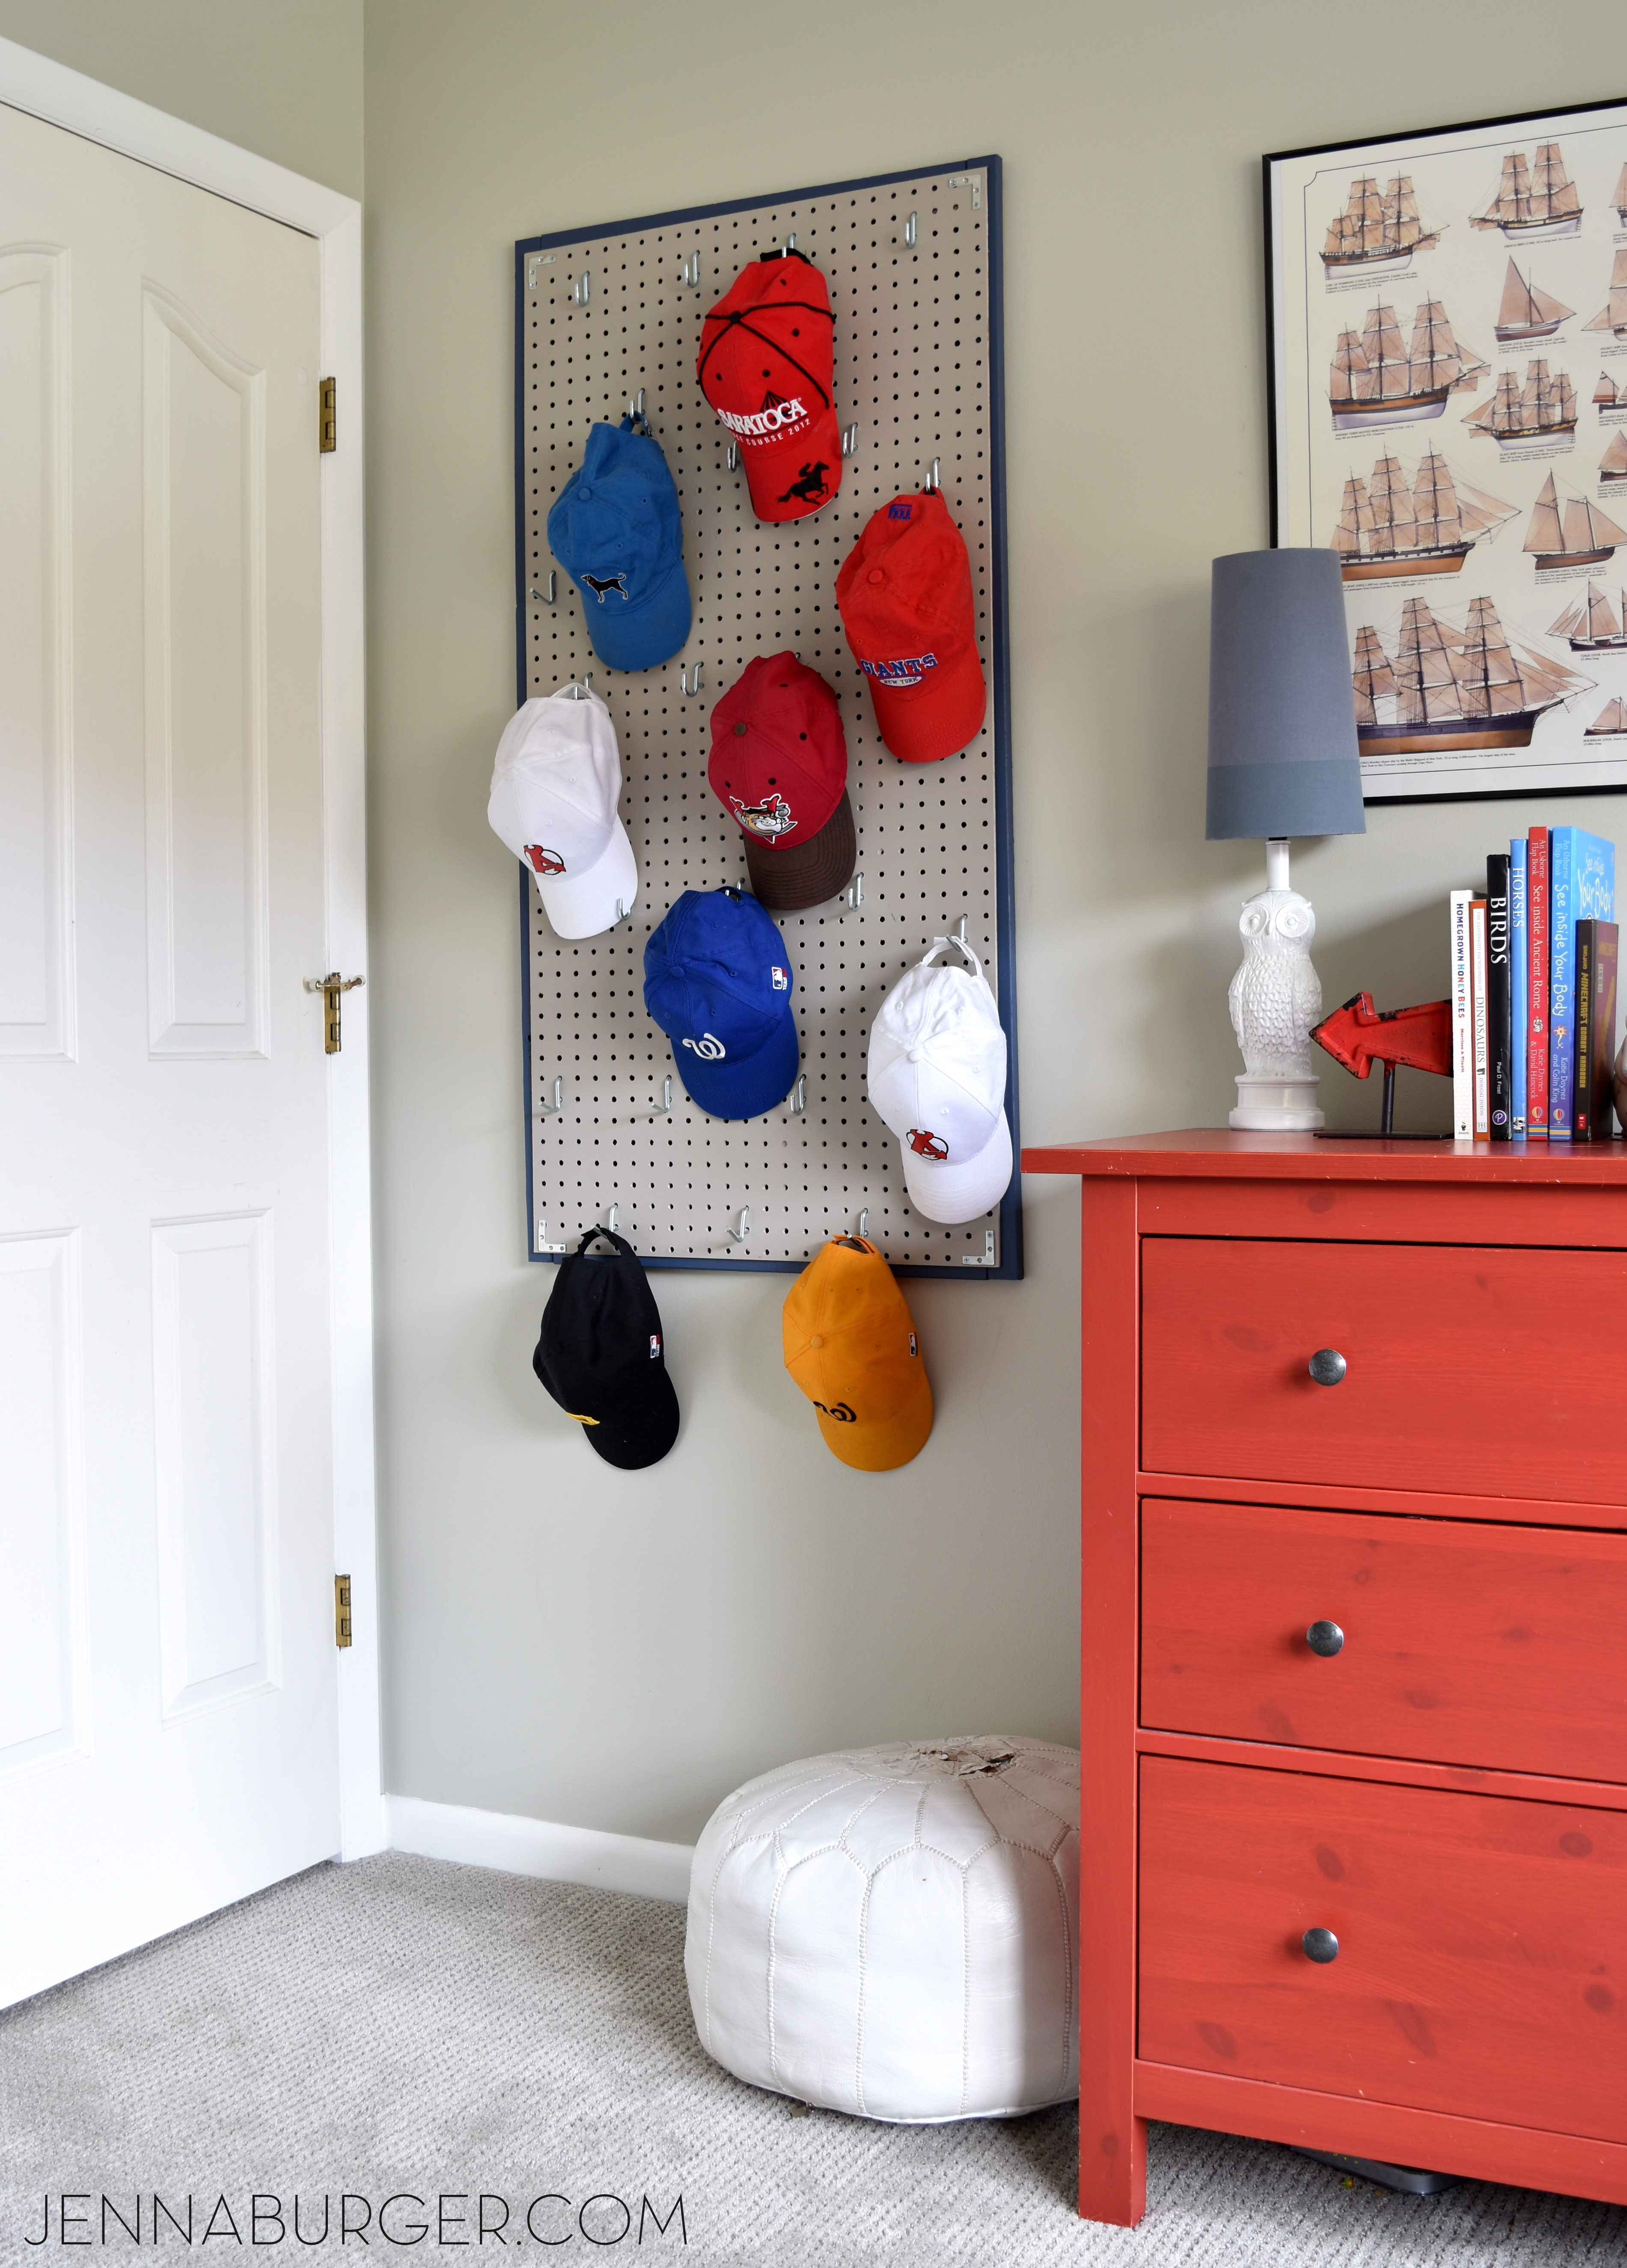
This is the finished pegboard baseball cap organizer.

It fits perfectly behind my little guys door…

DIY: Pegboard Baseball Cap Organizer - The perfect 'home' for the hat collection. Do It Yourself Tutorial @ www.jennaburger.com

A similar pegboard organizer would be perfect for a slew of other things like jewelry, crafts, pantry items, kitchen essentials, etc.

The potential is endless…  Let the ideas start to flow!

DIY: Pegboard Baseball Cap Organizer - The perfect 'home' for the hat collection. Do It Yourself Tutorial @ www.jennaburger.com

His room is such an awesome space!  If you want to see the entire room, click on over for a full tour.

Since creating a similar pegboard project for my office, I’ve been hooked on this amazing element to organize with.  To “house” all of my office supplies, I also made a frame, but used a different technique + I stenciled a pretty design on the front.

Take a look > an organized office using pegboard

Pegboard Organization in the Office!

I’m on to my next organizational project using pegboard.  I can’t get enough!!

Creating a Meaningful Home: Just Destiny Mag

CREATING A MEANINGFUL HOME blog series featuring Bloggers sharing the story of their home: FEATURED is Destiny of Just Destiny Mag - a MUST READ story!

Today’s guest post for Creating a Meaningful Home blog series: Year 3 is Destiny of Just Destiny Mag. Welcome Destiny…

Hello!

My name is Destiny and I blog over at Just Destiny Mag! I believe that whether it’s through a smile, laugh, fresh flowers, bike rides, hiking in search for the sun rise, chocolate chip cookies, a made bed, or a painted wall, being authentic, genuine and loving are all ingredients to a meaningful life and home!

I’m so happy + honored to be guest posting here today and that Jenna asked me to be apart of this yearly series with some other amazing bloggers.

Here are a few things that I intentionally do make my home meaningful.

COMFORTABLE

Comfort is the number one thing I think about when designing any room in our home. It can look as pretty as a magazine but if it’s not comfortable then it’s not live able. Comfort just doesn’t come in the form of pillow and blankets. It’s familiar pictures of vacations past, it’s having a place that says “come sit down” instead of ” do not touch”  it’s having a place for everyone to sit and read, watch tv, or have hard conversations.

Our family room is definitely the heat of our home. It’s were we invite friends over, have movie nights, laugh, cry, relax and play games. I used a big sectional for tons of seating with the extra luxury of down filled cushions so we can really sink in on those hard days:0) Plus pillows, carpets floors and drapes add to the overall coziness to the room. I also love using neutrals because it keeps things in our home quiet. If you know us personally we have enough personality to fill these walls with all types of colors! SO I think the neutrals balance out life out very well.

BUT, I could never not have any color in my home so I always add a pop of color to each room. In our family room it’s green…

CREATING A MEANINGFUL HOME blog series featuring Bloggers sharing the story of their home: FEATURED is Destiny of Just Destiny Mag - a MUST READ story!

CREATING A MEANINGFUL HOME blog series featuring Bloggers sharing the story of their home: FEATURED is Destiny of Just Destiny Mag - a MUST READ story!
In our guest room it’s blue…

CREATING A MEANINGFUL HOME blog series featuring Bloggers sharing the story of their home: FEATURED is Destiny of Just Destiny Mag - a MUST READ story!

COLLECTIONS

I don’t have many collections in my home right now but I feel like in the future we will have plenty. We are still a pretty young family but that doesn’t stop me from collecting some of my favorite things.

Below is a small collection of green glass from Goodwill. It goes so well with the green in our family room!

CREATING A MEANINGFUL HOME blog series featuring Bloggers sharing the story of their home: FEATURED is Destiny of Just Destiny Mag - a MUST READ story!

In my kitchen I have this fun collection of cake plates. I just can’t resist a pretty cake plate as you can see! Displayed on these open shelves in my kitchen helps me show them off instead of hiding them in a closet!

Collections are so wonderful because it’s something that you can pass down from generation to generation! I hope one day my little girl will want to have some of my collection in her home!

INSPIRATION

I love using inspiration in my home by using gallery walls! It’s the perfect way to let your family’s memories and personality shine in the home. Plus you can incorporate gentle reminders, including bible verses and family mission statements so everyone can be inspired daily.

CREATING A MEANINGFUL HOME blog series featuring Bloggers sharing the story of their home: FEATURED is Destiny of Just Destiny Mag - a MUST READ story!

CREATING A MEANINGFUL HOME blog series featuring Bloggers sharing the story of their home: FEATURED is Destiny of Just Destiny Mag - a MUST READ story!

FUN AND FUNCTIONAL

You can have all of the things above but if your home isn’t fun and functional then you’re missing out on one of the best part of designing! Like I said before my home is pretty neutral. That’s they way I like it. But when it came to my office I wanted it to be FUN but FUNCTIONAL! So I experimented a little and came up with a space I LOVE to be in. Boxes and painted dressers house all of my crafts that I do on my blog plus it’s a place where I feel motivated and inspired to create, which lead to a meaningful life for my entire family!

CREATING A MEANINGFUL HOME blog series featuring Bloggers sharing the story of their home: FEATURED is Destiny of Just Destiny Mag - a MUST READ story!

CREATING A MEANINGFUL HOME blog series featuring Bloggers sharing the story of their home: FEATURED is Destiny of Just Destiny Mag - a MUST READ story!

CREATING A MEANINGFUL HOME blog series featuring Bloggers sharing the story of their home: FEATURED is Destiny of Just Destiny Mag - a MUST READ story!

Thanks so much for having me Jenna! Fall and Winter seasons are big for us over at Just Destiny Mag! SO, I would love for you to hang out with us for some inspirational crafts and home decor >>> www.justdestinymag.com

“A smile, laugh, fresh flowers, bike rides, hiking in search for the sun rise, chocolate chip cookies, a made bed, or a painted wall, being authentic, genuine and loving are all ingredients to a meaningful life and home!” How true is that?!  Destiny always has me in awe with the creations + rooms she creates.  Her style is so fresh + crisp, yet comfortable + inviting.

Along with the gorgeous spaces she creates, she also has a great sense + style for making beautiful printables for the home.  She recently made this fun pineapple printable (that can be printed free) for Summer…

Pineapple Art Print for free by Just Destiny

Head on over to Just Destiny Mag, and give Destiny a BIG HELLO!

Check out all the Bloggers that have contributed to this series on
Creating a Meaningful Home

Plus don’t miss out on all the previous Bloggers who contributed to this series in 2013 and 2014!


DECORATE WITH… Mirrors

DECORATE WITH... MIRRORS!  Ideas + Inspiration + Fabulous Finds for decorating with mirrors in your home decor

No matter the size, we’re always looking for ways to make a room appear bigger!  Introducing mirrors – of any size and in any room – will give the illusion of a larger space, as well as providing visual interest + depth.

It often seems like with decorating, there are rules to follow to create a balanced, proportional space, but when you mix in mirrors, there really aren’t any rules to follow.  Aside from being great wall “fillers”, mirrors can bring depth and light into a room.

Whether your desire is to display one large mirror, a grouping of the same mirrors, or a collage of different style mirrors, you truly will create a statement wall of art!  Mirrors provide dimension and depth, and can be the focal point and conversation piece for any room.

INSPIRATION.

DECORATE WITH... MIRRORS!  Ideas + Inspiration + Fabulous Finds for decorating with mirrors in your home decorPicture inspiration via Coco Cozy

Kate of Centsational Girl always creates beautiful mantels for the seasons + holidays, but consistantly she will use her one large mirror as a backdrop to make a dramatic, bold statement…

DECORATE WITH... MIRRORS!  Ideas + Inspiration + Fabulous Finds for decorating with mirrors in your home decorSpring Mantel

DECORATE WITH... MIRRORS!  Ideas + Inspiration + Fabulous Finds for decorating with mirrors in your home decorFall Mantel

DECORATE WITH... MIRRORS!  Ideas + Inspiration + Fabulous Finds for decorating with mirrors in your home decorPicture inspiration via Rue Magazine

DECORATE WITH... MIRRORS!  Ideas + Inspiration + Fabulous Finds for decorating with mirrors in your home decorPicture inspiration via Rue Magazine

DECORATE WITH... MIRRORS!  Ideas + Inspiration + Fabulous Finds for decorating with mirrors in your home decorLarge round mirror behind a nightstand via HGTV

DECORATE WITH... MIRRORS!  Ideas + Inspiration + Fabulous Finds for decorating with mirrors in your home decorSimple vintage mirror wall by Christina’s Adventures

Check out how Diane of In My Own Style used a mirror to dress up a door opening…  So clever!

DECORATE WITH... MIRRORS!  Ideas + Inspiration + Fabulous Finds for decorating with mirrors in your home decor

TIPS.

> Check out some helpful tips + tricks for adding mirrors – big and small – into a space…

1 Forgo one large mirror, and instead group smaller mirrors in varying sizes to make a large, bold statement.

mirror7Mirror collection by Wisteria

2 Unify a collection of mirrors by choosing a similar frame shape, size, or style.

IMG_81971Varying sized sunburst mirrors in a bedroom by The Lettered Cottage

3 Use a mirror on the wall behind a tabletop vignette to create a backdrop, then add layers of accessories in front to give depth.

DECORATE WITH... MIRRORS!  Ideas + Inspiration + Fabulous Finds for decorating with mirrors in your home decorTabletop vignette with mirror behind, by StoneGable

DECORATE WITH... MIRRORS!  Ideas + Inspiration + Fabulous Finds for decorating with mirrors in your home decorThis intricately detailed mirror by Wisteria makes a beautiful backdrop to a foyer tabletop entry.

4 Layer mirrors to make an architectural statement & to create the look of art.  Add a decorative smaller mirror (or just a frame) over a larger simple mirror like this…

DECORATE WITH... MIRRORS!  Ideas + Inspiration + Fabulous Finds for decorating with mirrors in your home decorLayered mirrors in this vignette by My Blessed Life

5 Don’t want to commit or put nails into he wall, try a large leaning mirror.

DECORATE WITH... MIRRORS!  Ideas + Inspiration + Fabulous Finds for decorating with mirrors in your home decorLarge leaning mirror on a table top vignette in the home of Vicki Lee, painter and founder of lifestyle brand TheTwentyTwo, featured on My Domaine

DECORATE WITH... MIRRORS!  Ideas + Inspiration + Fabulous Finds for decorating with mirrors in your home decorLeaning mirror with a rustic reclaimed wood frame in the living room of YES Spaces

6 Forgo pictures by add a collage or wall of mirrors to make a bold, unexpected composition.

Back in the day, my grandmother had a wall of mirrors in her living room and it looked SO dated… but like they say “everything old is new again”  and the wall of mirrors has made the return, but with a twist.  Here are 3 ideas…

DECORATE WITH... MIRRORS!  Ideas + Inspiration + Fabulous Finds for decorating with mirrors in your home decorDiane of In My Own Style displays a beautiful collection of mirrors over a dresser

mirror+7Different mirrors all in the same color (gorgeous kelly green) by Dimples & Tangles

A client project of mine that I recently finished… It is amazing how each mirror reflects the light shining through from the windows that sit opposite

1Check out the house tour of this homes kitchen + living room!

FABULOUS FINDS.

DECORATE WITH... MIRRORS!  Ideas + Inspiration + Fabulous Finds for decorating with mirrors in your home decor3 FAVORITES / starburst mirror / jaipur mirror / gothic mirror

I hope you’re inspired with how to DECORATE WITH… mirrors!  So much inspiration.  So many ideas.


Publication Features + Happenings on the Homestead

As the Summer approaches, my plan was to *try* to slow down since the kids will be out of school in less than a week, but once the warm weather hit this year, everyone & their moms seemed to come out of the woodwork wanting to revamp their homes.  To say the last weeks have been busy, is an understatement.  Certainly no complaints though  – busy is good in my book.

Before I share more news on what’s been happening on the homestead, I am excited to tell you that there a few publications currently on newsstands that I am featured in…

NATIONAL PUBLICATION FEATURE

First up, the June issue of This Old House magazine has an article on E-design and since I offer virtual design services to anyone in the US of A, they reached out to me a few months back gathering some insight on how it works and it’s success.

Publication Feature in This Old House magazine on E-Design

My “feature” is small (3 lines on page 28), but a quote or 2 in a national publication is pretty rad! The whole article is about a homeowner in California who worked with an E-Designer to create a new kitchen space, which in my opinion came out gorgeous.

Publication Feature in This Old House magazine on E-Design

I loved this thought by the homeowner…

“I didn’t need a full-service designer to hold my hand, but I did need someone experienced to give me good, solid answers.”

YES!  That’s it.  I’ve worked with many folks around the country through email, skype, and phone that share the same thoughts on working with me.  I love pointing homeowners in the right direction to get them on track to revamp their space.

[Learn more about my E-Design services here]

Publication Feature in This Old House magazine on E-Design

LOCAL PUBLICATION FEATURES

Onto the next 2 features, which are in local (to me) publications… Saratoga Mama + Simply Saratoga

Simply Saratoga and Saratoga Mama publication feature

Both of these magazine features are articles I wrote.

In Saratoga Mama, I shared my DIY Kids Tent tutorial that I made for my kiddos a few Summers back.  The entire issue is based on Summer Unplugged, so these fun & simple-to-make tents seemed like the perfect addition.  And they really are easy to make!

If you’re local, definitely snag a copy of this Summer staple.

Saratoga Mama magazine featuring my DIY kids tents

[click to check out the full tutorial on making these DIY Kids Tents]

DIY Kids Play Tent

For Simply Saratoga magazine, I wrote a feature on Creating an Outdoor Oasis, which is similar to the post I shared a few weeks back here on the blog.

Simply Saratoga magazine featuring an article on Creating an Outdoor Oasis

About a month ago, I was full-steam ahead with getting the outdoors spruced up for the Summer and creating an outdoor living space on the patio, porch, and deck.   I’ve calmed a bit since…

[Check out more ideas on Creating an Outdoor Living Space]

Creating an Outdoor Living Space

It’s always amazing to me and such a blessing to be featured in a magazine!

onto other things…

HAPPENINGS ON THE HOMESTEAD

What’s on the boards?  I am working on a slew of exciting projects – more for clients than myself.

I just finished up 3 teen rooms (all siblings), which was a first for me.  Their parents wanted to give them the opportunity to create a space that truly reflects them & their unique style.  Before our initial meeting, I took pictures + measurements of the 3 rooms, and each teen wrote a list of wants / needs.  I met with each of them to discuss their vision and then created these mood boards…

Teen Room 1

Teen Room - Creative Vision Board

Teen Room 2

Teen Room - Creative Vision Board

Teen Room 3

Teen Room - Creative Vision Board

They’re going to do most of the “shopping” so I am excited to see how it’ll come together!

Along with those 3 rooms, I am also working on 2 kitchens, one of which is almost done – countertop is being installed tomorrow!

Kitchen Remodel

So crisp + fresh with new white and gray.  It’s a whole lot different than the dated look of the wood in the “before” space.

Here was the vision board I created for the kitchen…

Kitchen Remodel creative vision board

Plus I have an exciting restaurant project I am working on – pinch me – with a rustic industrial aesthetic… It’s going to be awesome.  More on that in the near future

As you can see, a lot is happening!  All good things which is wonderful.

LAST BUT NOT LEAST

One more bit of “what’s happening”, Year 3 of the Creating a Meaningful Home Series starts next Monday the 22nd!  I’m screaming from the rooftops with excitement.  Can you believe this is the 3rd year of the series?!

Creating a Meaningful HomePhoto Credit: home of Hanni Liliedahl and Jesse Silacci, featured on Design Sponge

“We love that our belongings honor where we are from and where we have been.  Our home houses our story.”

If you haven’t been following along with the blog for that long (shame, shame, lol), the CAMH blog series is a 2-3 month long series that I host where other Home + Design Bloggers share a guest post on my blog featuring their homes and how they’ve created meaning in their space!  It’s a wonderful series on a subject near & dear to my heart.  This years lineup of guest bloggers is pretty awesome.

[Click here to see & read all the Blogger stories from Year 1]

[Click here to see & read all the Blogger stories from Year 2]

Last year, the incredibly talented Melissa of The Inspired Room (not only a fellow Blogger, but Author of the beautiful book, Love The Home You Have ) kicked off the series and this year I have a very different, but equally talented friend who will be starting the series.

SO DON’T MISS IT! The series kickoff will be next Monday, the 22nd!

Well that’s just a bit of what’s happening on the ole’s homestead, along with a million other things… 

What’s happening in your neck of the woods?

Lessons Learned from a Failed DIY Project

My blog is based on sharing DIY projects and creative decorating solutions.  I document and share many of my do-it-yourself creations / projects from around my homestead in hopes to inspire and empower YOU!  But let me set reality straight… not every project is a success.  And to be 100% honest, many projects along the way have been failures.  A few I’ve shared, but most I just walk away from in complete annoyance – the sooner I forget, the better…

Yes, the failures are frustrating – time + money + energy are wasted!  And I won’t even disclose to you the choice words I’ve used when something doesn’t result how I intended…  BUT, with every fail is a learning experience.  AND with every fail, in some way, a success is the result.  Maybe not the successful result of a great project, but the success from trying something new and the knowledge gained.  The true outcome more often than not, is something even better!  In the moment it’s difficult to comprehend and deal with, but it’s important to remember without trying there is nothing gained.

Hence a DIY project I tackled a few months ago… An amazing, genius wallpaper idea that developed into a project and resulted in a complete FAIL, with a capital F.

Learning from a Project FAIL!  Not every project will have an amazing result, but without the risk, there can't be a reward!

Who records pulling off wallpaper? I do (raising my hand in embarassment)…   Seems silly, I know, but at least it felt liberating.  So what am I referring to?  Let me take a step back and start from the beginning.

When I was in the midst of revamping the living room earlier this year and had finally decided to add built-in bookcases flanking the fireplace, I thought it would be a very smart idea to add the wallpaper to the backs of the built-in BEFORE installing them.  At the time, I thought it would save time and be easy to do before it was all in place.

So I got this pretty grasscloth paper and adhered it to the back of the laminate bookcase using wallpaper paste. Basically, gluing paper on paper. Perfect! I’ve wallpapered before, it shouldn’t be too difficult.  The result has always been great and so will this project (NOT I found out later)…

Learning from a Project FAIL!  Not every project will have an amazing result, but without the risk, there can't be a reward! As it started drying, the paper started to buckle, but I still went with it (no one would be able to see the bubbles).  I finished putting the laminate bookcases together and installed the newly wallpapered back, then installed the new permanent built-in to the wall.

A few days later as the wallpaper cured onto the bookcase back, the center seam (the only seam where the two widths joined together) started to separate A LOT. Yikes.  So the white beyond was very apparent.  Again, ignorance is bliss and I tried to ignore it.

A few more days went by and the seam space was really bugging me.  Thinking about ways to fix it, I realized the wallpaper wasn’t even adhered to the backing anymore.  WHAT?!  How?!  Glue on paper to paper, why wouldn’t it stick? Anyway, long story short, one day I just pulled off all the wallpaper.

Now if you remember back, I adhered the paper BEFORE installing the back panel, so not-so-smart me had to use an sharp blade to get all the wallpaper pieces off.  IT WAS A MESS. And especially since they were BUILT-IN, yes permanent!

Thankfully the back panel is just a backdrop and many books + accessories are layered in front.

A frustrating learned lesson, absolutely!  BUT it could have also been a really good idea if I did it different.

THE TAKEAWAY?  No reward without the risk. I get myself backed into a corner many times with do it yourself projects and have to think of savvy solutions to get the result I had hoped for.

After thinking about my wallpaper project gone wrong, it really was a foolish endeavour from the beginning.  Not every project is picture-perfect worthy.  And for all the beauty that’s out there on the web, in magazines, and in friends homes, it couldn’t have been achieved without thinking outside the box and encountering failures along the way.  No one or nothing is perfect and we all need WHAT WAS I THINKING? moments in our lives!

My friend Melissa wrote about a project failure awhile back and I loved these words…

No one can be skilled in everything, but all of us can be pretty good at what we need to do or choose to do — and what we put our minds to. You can achieve your goals and enjoy almost every hardworking minute of it, as long as you are going after goals you are passionate about.

Yes, love that! If you have the drive + passion, you can get it done somehow, someway.

I’ve marked this project in the books as a fail and I am moving on to bigger and better.  Tomorrow, I am going to show you the result of my built-in bookcases and I can confidently say I am in love with them.  Again without the attempt, I’d still only be dreaming about them.  Be sure to come back to check out how I made laminate bookcases into built-in bookshelves –  a $1000 look for just about $100!

Have you ever had a DIY fail?

Adding Stone Veneer to a Concrete Foundation Wall

#DIY Tutorial for Adding a Stone Veneer to a Concrete Foundation Wall: Give a bare, untreated foundation wall a finished look with an affordable stone facing!  Easy-to-Follow tutorial @ www.jennaburger.com

May was A-MAY-zing (hehe, corny but true)! Really though, it was a wonderful month of sunshine + warmer temps for us in the North Country of New York – June not so much as of yet…

Anyway, with the warm, beautiful days last month we were able to tackle most of our yearly outdoor maintenance work + had some time to fit in a few new projects.  While the Mister worked on the grass, I spruced up the front porch (which I shared last week), then we both came together to tackle the new stone garden border + the DIY project featured today of adding stone veneer to the concrete foundation wall...

#DIY Tutorial for Adding a Stone Veneer to a Concrete Foundation Wall: Give a bare, untreated foundation wall a finished look with an affordable stone facing! Easy-to-Follow tutorial @ www.jennaburger.com  #DIY Tutorial for Adding a Stone Veneer to a Concrete Foundation Wall: Give a bare, untreated foundation wall a finished look with an affordable stone facing! Easy-to-Follow tutorial @ www.jennaburger.com

It’s typically for many homes – new and old –  to have a bare, “naked” foundation wall at the gap between where the siding stops and the ground starts.  Depending on the grade of the land, as little as a few inches or as much as 2’+ may be exposed giving an unattractive, unfinished appearance.

One way to make the plain wall look more finished is to add stone veneer to the foundation walls surface.

Stone veneer products, which are made from concrete, come in a range of colors + shapes and can be used for a variety of projects.  Their ‘pro’ is that they are lighter weight than real stone, less expensive, and only about 1″ – 2″ thick. And the best part of all… You really don’t need ANY EXPERIENCE to apply / install them.

Check out the before & after on the far side of our front facade where over 2 feet of bare foundation wall was previously exposed.  What a difference!

#DIY Tutorial for Adding a Stone Veneer to a Concrete Foundation Wall: Give a bare, untreated foundation wall a finished look with an affordable stone facing!  Easy-to-Follow tutorial @ www.jennaburger.com

The stone veneer I chose is StoneCraft Pennsylvania Ledgestone Flats from Lowe’s.  The coloring has touches of grays & blues, with a medium-range stone size in a horizontal, linear pattern.

MATERIALS + COST

For the front facade only, I calculated about 45 square feet would be needed.   All the stone veneers at Lowe’s are special order and I ordered 6 boxes (@ 9 sq.ft. /per box), which gave me quite a bit extra for mistakes.  In the end, I had a full box and a half leftover.   Additionally, I ordered one box with corner pieces only.  Each of those boxes covers 7 linear feet, but I only needed about 3′-4′ linear feet.

Each box (which covered 9 sq. ft. + the corners which covered 7 linear ft.) was about $72, so the total was about $630

Other materials needed:

>  Circular Saw

> Masonry Blade

> Trowel (same as when tiling)

> Large bucket (to mix mortar)

> Type S mortar (this is similar to what I purchased)

> Water (to mix mortar)

mortar

CREATING A PATTERN

The most difficult challenging part of this entire project wasn’t the actual install, but instead creating a pattern with an even mix of sizes & colors.  There was no tutorial or “how-to” for this so it took some thinking, looking, and analyzing along the way.

It’s important to vary the colors (in our case there was a mix of grays, taupes, blues, and blacks) and to vary the size + shapes of the stones.  With the pattern we chose, we stuck with a linear, horizontal direction, but it was kind of like a jigsaw puzzle.

As we worked along from one end to the other, we would “dry install” a few stones, confirm we liked how it looked, then removed them to add the mortar.

#DIY Tutorial for Adding a Stone Veneer to a Concrete Foundation Wall: Give a bare, untreated foundation wall a finished look with an affordable stone facing!  Easy-to-Follow tutorial @ www.jennaburger.com

Important note: If you have corners, start with them first, then work your way over!

MIXING MORTAR

Using a large bucket (I used a 5 gallon bucket), add the mortar “powder”, then the water to make a mix that is pasty and that stays on the trowel without falling off when vertical.  If there is not enough water in the mix, the mortar will not join the stone to the wall, but if it’s too watery, the mix will run right off.

Sorry that I can’t be more specific or share an exact ratio, but it’ really trial and error.  There is a mixing ratio on the back of the bag, but it’s for the entire bag at one time and I don’t recommend doing that unless you work fast, have a large area to cover, and plan on using it all at one time.

This is a picture of the mortar mix just as I was about to begin the install of the stone…

#DIY Tutorial for Adding a Stone Veneer to a Concrete Foundation Wall: Give a bare, untreated foundation wall a finished look with an affordable stone facing!  Easy-to-Follow tutorial @ www.jennaburger.com

Once the mortar mix is ready, take a trowel and add a good amount to the back of the stone (the beauty of veneer is that the back is completely flat).

#DIY Tutorial for Adding a Stone Veneer to a Concrete Foundation Wall: Give a bare, untreated foundation wall a finished look with an affordable stone facing!  Easy-to-Follow tutorial @ www.jennaburger.com

Spread out the mortar so the entire stones back is covered, then run the grooved section of the trowel over the mortar to create “ridges” which gives the stone a better adhesion to the foundation wall.

#DIY Tutorial for Adding a Stone Veneer to a Concrete Foundation Wall: Give a bare, untreated foundation wall a finished look with an affordable stone facing!  Easy-to-Follow tutorial @ www.jennaburger.com

Then stick the stone in place…

#DIY Tutorial for Adding a Stone Veneer to a Concrete Foundation Wall: Give a bare, untreated foundation wall a finished look with an affordable stone facing!  Easy-to-Follow tutorial @ www.jennaburger.com

If you’ve ever tiled before, it’s a very similar process!  [tutorial on How-To Tile + Grout a Bathroom]

CUTTING STONE VENEER

Just as with tiling a bathroom, it’s inevitable that some stones will need to be altered / cut.

We used a Circular Saw (see my favorites tools) with a new Masonry Blade (it has an abrasive edge with no teeth) to cut the stones.  It was fairly easy to do and took little time to make cuts.  Be sure to clamp the stone down so it’s secure and slowly make the cut.

#DIY Tutorial for Adding a Stone Veneer to a Concrete Foundation Wall: Give a bare, untreated foundation wall a finished look with an affordable stone facing!  Easy-to-Follow tutorial @ www.jennaburger.com


#DIY Tutorial for Adding a Stone Veneer to a Concrete Foundation Wall: Give a bare, untreated foundation wall a finished look with an affordable stone facing!  Easy-to-Follow tutorial @ www.jennaburger.com

A Masons Chisel also comes in handy to cut small edges and/or make minor alternations.

Masons Chisel

#DIY Tutorial for Adding a Stone Veneer to a Concrete Foundation Wall: Give a bare, untreated foundation wall a finished look with an affordable stone facing!  Easy-to-Follow tutorial @ www.jennaburger.com

Check out the difference with part of the stone installed & the other side with the bare foundation wall…

#DIY Tutorial for Adding a Stone Veneer to a Concrete Foundation Wall: Give a bare, untreated foundation wall a finished look with an affordable stone facing!  Easy-to-Follow tutorial @ www.jennaburger.com

The total project took about 6 hours.  At times it was tiring being on the ground so long + our backs and knees were quite sore the next day, but it was really all worth the effort!

#DIY Tutorial for Adding a Stone Veneer to a Concrete Foundation Wall: Give a bare, untreated foundation wall a finished look with an affordable stone facing!  Easy-to-Follow tutorial @ www.jennaburger.com

THE RESULT

This was a 2 thumbs up project in our book.  Curb appeal is so important to how it ‘speaks’ to those visiting your home (and of course to those that live there).  Yes for many, $700 is a lot of money, but in the long term the addition of the stone veneer to the front of our home has made a big impact on the overall look.

#DIY Tutorial for Adding a Stone Veneer to a Concrete Foundation Wall: Give a bare, untreated foundation wall a finished look with an affordable stone facing!  Easy-to-Follow tutorial @ www.jennaburger.com

#DIY Tutorial for Adding a Stone Veneer to a Concrete Foundation Wall: Give a bare, untreated foundation wall a finished look with an affordable stone facing!  Easy-to-Follow tutorial @ www.jennaburger.com

#DIY Tutorial for Adding a Stone Veneer to a Concrete Foundation Wall: Give a bare, untreated foundation wall a finished look with an affordable stone facing!  Easy-to-Follow tutorial @ www.jennaburger.com

#DIY Tutorial for Adding a Stone Veneer to a Concrete Foundation Wall: Give a bare, untreated foundation wall a finished look with an affordable stone facing!  Easy-to-Follow tutorial @ www.jennaburger.com

The new stone veneer absolutely enhances the front facade of our home and looks like it’s always been there.   It’s a beautiful complimentary addition to the other changes we’ve made!

#DIY Tutorial for Adding a Stone Veneer to a Concrete Foundation Wall: Give a bare, untreated foundation wall a finished look with an affordable stone facing!  Easy-to-Follow tutorial @ www.jennaburger.com

#DIY Tutorial for Adding a Stone Veneer to a Concrete Foundation Wall: Give a bare, untreated foundation wall a finished look with an affordable stone facing!  Easy-to-Follow tutorial @ www.jennaburger.com

BEFORE + AFTER

In just a few years, here’s the progress…

#DIY Tutorial for Adding a Stone Veneer to a Concrete Foundation Wall: Give a bare, untreated foundation wall a finished look with an affordable stone facing!  Easy-to-Follow tutorial @ www.jennaburger.comone more…

#DIY Tutorial for Adding a Stone Veneer to a Concrete Foundation Wall: Give a bare, untreated foundation wall a finished look with an affordable stone facing! Easy-to-Follow tutorial @ www.jennaburger.com

Can I say, ‘I think we’re done outdoors?’…  Not quite yet.  All the big + more involved outdoor projects we wanted to tackle this year are finished, but I do have a few ideas that I want to focus on for the deck in the back of our house.  That will be a in a few weeks. For now, I just need to put my feet up & take a breather so I can truly enjoy what’s been accomplished.

I hope I’ve inspired you to look at what you have and enhance it to make it even more beautiful!  Curb appeal at it’s finest…


The Perfect Border for your Beds

As I mentioned last week while sharing ideas on creating an outdoor oasis, we’ve been fast + furious over the past few weeks on sprucing up the outdoors of our humble abode.

It’s what’s happening around our little ole’ homestead in the North Country and I am excited to share the updates we’ve been making!  First up, the garden beds in the front yard…

Granted the front beds have received a whole lotta TLC over the 5 years we’ve lived here, but I still felt like there needed to be more definition between the grass and the gardens.  After cleaning out the beds and before laying the mulch, I installed a stone garden edge that not only defines the line between the grass & garden, but gives character and texture…

The Perfect Border for your Beds: Defining a gardens edge with inexpensive stone that fit any shape or size garden bed.  Details @ www.jennaburger.com

This is the garden bed that is against the front of our home and it looks much different than when we moved in a few years ago.  It’s had quite the transformation…

Garden before

Without giving too much away (the full ‘tour’ of this years Spring porch coming later this week), this is how the front of the house looks now…

The Perfect Border for your Beds: Defining a gardens edge with inexpensive stone that fit any shape or size garden bed.  Details @ www.jennaburger.com

One of the many reasons I love having a blog is documenting the evolution of our home. It’s wonderful to look back and see how much we’ve done!

So back to…

CREATING A GARDEN EDGE USING STONE

I found these edging stones at Lowe’s for $1.28 each.

Stone to edge garden beds

These stones are a trapezoid shape – about 7″ long on one side, about 5″ long on the other side.  Because of the stones shape, they can be layed in a straight line (by changing the direction with each one) OR on a curve (tight curve or gradual curve) to border a garden.  One row high is just enough (that’s what I did) or these inexpensive stones can be stacked (staggering the joint) to create a taller garden border or retaining wall.  They can also be used to create a firepit.

The best part about these stones aside from the price is that there is truly no installation!  You simply set it & forget it (I sound like an infomercial, but it’s really that easy).

The Perfect Border for your Beds: Defining a gardens edge with inexpensive stone that fit any shape or size garden bed.  Details @ www.jennaburger.com

The garden beds bordering the front of the house & in the yard had a natural trench at the edge, so I followed the line and layed the stones in place.  A few tweaks needed to be in some spots to create a nicer curve but in all it took minutes to lay them all.

BEFORE & AFTER

Just a few weeks ago before the flowers started coming to life & before the mulch was added, I snapped the before picture.  Now look how the new stones define the garden…

The Perfect Border for your Beds: Defining a gardens edge with inexpensive stone that fit any shape or size garden bed.  Details @ www.jennaburger.com

The Perfect Border for your Beds: Defining a gardens edge with inexpensive stone that fit any shape or size garden bed.  Details @ www.jennaburger.com

Once the stone edge was set, I planted a few annuals amongst the growing perennials and filled in the garden with mulch.

The Perfect Border for your Beds: Defining a gardens edge with inexpensive stone that fit any shape or size garden bed.  Details @ www.jennaburger.com

The Perfect Border for your Beds: Defining a gardens edge with inexpensive stone that fit any shape or size garden bed.  Details @ www.jennaburger.com

And it was complete…

The Perfect Border for your Beds: Defining a gardens edge with inexpensive stone that fit any shape or size garden bed.  Details @ www.jennaburger.com

The Perfect Border for your Beds: Defining a gardens edge with inexpensive stone that fit any shape or size garden bed.  Details @ www.jennaburger.com

It’s far from an award-winning garden, but it’s ours that we created.

The Perfect Border for your Beds: Defining a gardens edge with inexpensive stone that fit any shape or size garden bed.  Details @ www.jennaburger.com

Each day the flowers show more of their beauty.

The Perfect Border for your Beds: Defining a gardens edge with inexpensive stone that fit any shape or size garden bed.  Details @ www.jennaburger.com

I’ll admit, because I am a bit Type A & love instant gratification, gardening isn’t top on my list of favorite things to do.  I often get frustrated & annoyed each Spring season not knowing what will bloom again. Thankfully looking back on old pictures, I am able to truly appreciate all the hard work we’ve put into creating a home we love.  What an incredible lesson of patience, right?!

This stone edge was truly a simple + high impact DIY project to jazz up the front of our home.  I am thrilled that it was inexpensive + easy to do – how much better does it get?!

The Perfect Border for your Beds: Defining a gardens edge with inexpensive stone that fit any shape or size garden bed.  Details @ www.jennaburger.comThe front facade of our home also got another big upgrade.  More on that coming soon…  In the meantime, if you have garden beds that merge into the grass, adding a stone edge will surely create the definition needed to add character & texture to your landscaping beds!

DISCLOSURE: I am part of the Lowe’s Creative Team and was provided with a Lowe’s gift card to purchase items for my project.  I was also compensated for my time to use the products.  No one told me what to create, what to buy, how to use the product, or what to write.  All opinions are 100% mine!

Creating an Outdoor Living Space

I don’t know about you, but around our homestead, it takes a solid 3 weeks to get the outdoors prepped + spruced to enjoy for the coming warmer months ahead.

As the final piles of snow melted only a little over a month ago, work began on Summerizing the exterior.  FINALLY after many trips to the garden center, the last flowers & plants were purchased yesterday, so our exterior living spaces are almost complete and I can’t wait to share them with you… coming soon.

In the meantime, I’ll inspire you with fresh ways + ideas to bring the indoors out with budget-friendly ideas for creating an outdoor living space

Bring the indoors OUT... Helpful budget-friendly ideas to create an outdoor oasis!

Whether a deck, porch, or patio there are ways to bring the indoors out to create a beautiful, serene, and inviting outdoor oasis. With comfortable seating, stylish layers, and lots of flowers and greenery, your outdoor space will become the most used “room” in, and outside, of the home for the Summer months.

BRING THE INDOORS OUT
Surround yourself with what you love by bringing the indoors out. Creating an outdoor living room that is truly an outdoor oasis is similar to designing an interior haven. Surround yourself with things that are most meaningful to you and elements that bring you happiness.  Make an outdoor space fun and unexpected by introducing a pretty patterned table cloth, wind chimes that blow in the breeze, and pops of color through pillows.

Bring the indoors OUT... Helpful budget-friendly ideas to create an outdoor oasis!

Similar to a room inside your home, once you have your basics, add in layers – lanterns, candles, flowers, and plants.

Our Summer Deck 2014Bring the indoors OUT... Helpful budget-friendly ideas to create an outdoor oasis!

COMFORTABLE SEATING
An outdoor oasis isn’t complete without lots of comfortable seating. Once the summer months arrive, almost every waking moment will be spent outdoors soaking up the sun. Be the house where everyone gathers on weekend evenings.

Bring the indoors OUT... Helpful budget-friendly ideas to create an outdoor oasis!Our Patio Paradise 2014

Bring the indoors OUT... Helpful budget-friendly ideas to create an outdoor oasis!

Either individual oversized Adirondack chairs or an outdoor sofa fit for two (or more) is a necessity for outdoor living. Load up on comfy pillows and you may never head back indoors.

Put your feet up by adding a few outdoor ottomans that are waterproof to truly create an outdoor living room.

There are many local furniture stores and online shops that have a wide selection of outdoor sofas and chairs that are similar to the comforts of your living room. Or make your own, like I did with shipping pallets.

Bring the indoors OUT... Helpful budget-friendly ideas to create an outdoor oasis!Tutorial for DIY Pallet Sofa

STORAGE
Similar to the indoors, space for storage is a must. No matter if you’re an empty nester or a family of 5, it’s essential to have a spot to store the outdoor pillows, BBQ necessities, and sand toys.

Many outdoor furniture pieces have built-in storage compartments or a stylish storage box that compliments the setting. Alternatively, try an outdoor ottoman flip top that duals as storage.

Outdoor Storage ideasleft to right: resin wicker box / wicker storage chest / wood storage bench

LAYERS
An outdoor setting isn’t complete without a stylish rug. Adding a rug to a porch or patio isn’t just needed to make a space pretty, but it also provides a comfy spot to kick off the flip flops without the fear of a stubbed toe or unwanted splinter. Kids can walk around barefoot (which most love to do in the summer months) while having a barrier between their toes and the hard surface.

Outdoor rugs are a favorite because they can live outdoors for the summer and be brought indoors during the winter. Rugs made for the elements, are also ideal for foyers, mudrooms, and even under dining room tables (especially with youngsters in the home).

I am loving the outdoor rugs made of polypropylene because they are super easy to clean, fold up tight for storage, and are fairly inexpensive!

Bring the indoors OUT... Helpful budget-friendly ideas to create an outdoor oasis!

A sneak at this years front porch with a new 3′ x 6′ rug (upper left) that I found at Five Below for $5…

Bring the indoors OUT... Helpful budget-friendly ideas to create an outdoor oasis!

FLOWERS
Last, but certainly not least, an outdoor oasis isn’t complete without surrounding it with greenery. Whether your favorite spot is in the sun or the shade, surround your exterior setting with lush plants and colorful flowers in varying sized pots.

Bring the indoors OUT... Helpful budget-friendly ideas to create an outdoor oasis!Potted herbs are a great alternative to flowers. Or try perennials in a pot, then transfer them into the ground at the end of the Summer season so they can be enjoyed again next year.

And there you have it…  5 ways to extend the beauty on the inside to the outdoors.  I’m off to finish up the last potted plants, lay mulch in the side garden, and finally snap some pictures so I can share what I’ve been working on for the last weeks.

Have a wonderful memorial day weekend!

Freshen Up The Home for Spring

Freshen up the home for SPRING with room inspiration + 6 items that every room can use to give a freshened look! Easy Inspirational ideas by @Jenna_Burger, www.jennaburger.com

Yes, there is still snow on the ground.  Yes, the temps are still only in the 30s.  But it’s officially SPRING!

It has been a looooong winter with a cycle of sickness that our party of 5 can not seem to break out of.  Thankfully, with 50s in the forecast for later this week I am feeling happy + hopefully that Spring is on it’s way and that of course means I am feeling the itch to freshen up our home for Spring.

As Spring starts to spring (hehe) and we begin the process of coming out of hibernation, it organically feels like the best time of year to freshen things up.  To bring in the spirit of the season, here are some of my favorite spaces for Spring that I am pulling inspiration from…

INSPIRING SPACES.

Living Room, Dining Room, and Bedroom spaces filled with a white backdrop + pops of coral, tangerine, yellow, and turquoise – all perfect hues for Spring leading into Summer. Images via HomeditFreshen up the home for SPRING with room inspiration + 6 items that every room can use to give a freshened look! Easy Inspirational ideas by @Jenna_Burger, www.jennaburger.comA dreamy desk for any gal!  via m{pression

Freshen up the home for SPRING with room inspiration + 6 items that every room can use to give a freshened look! Easy Inspirational ideas by @Jenna_Burger, www.jennaburger.com

Light & airy is ideal for Spring!  Fresh pops of color in greens & blues makes this breakfast nook so inviting by Heather of At the Picket Fence.

Freshen up the home for SPRING with room inspiration + 6 items that every room can use to give a freshened look! Easy Inspirational ideas by @Jenna_Burger, www.jennaburger.com

More color + texture in the breakfast room by YHL.

Freshen up the home for SPRING with room inspiration + 6 items that every room can use to give a freshened look! Easy Inspirational ideas by @Jenna_Burger, www.jennaburger.com

White + black + layers of color make this a favorite space of mine for Spring.  Black can be intense, but when incorporated in small doses, it can give incredible depth to a room! This amazing space was created by the gals of Classy Clutter.

Freshen up the home for SPRING with room inspiration + 6 items that every room can use to give a freshened look! Easy Inspirational ideas by @Jenna_Burger, www.jennaburger.com

Master Bedroom with soft hues + floral by Hi Sugarplum.

Freshen up the home for SPRING with room inspiration + 6 items that every room can use to give a freshened look! Easy Inspirational ideas by @Jenna_Burger, www.jennaburger.com

And of course, Spring means flowers and a home filled with flowers of the season is incredibly warm + inspiring…

via BHG

Freshen up the home for SPRING with room inspiration + 6 items that every room can use to give a freshened look! Easy Inspirational ideas by @Jenna_Burger, www.jennaburger.com

For even more inspirational spaces decorated for Spring, you must check out my favorite Pinterest board, Inspirational Spaces & Vignettes!

Freshening up doesn’t mean go out and buy more!  Seasonally, I may snag 1 or 2 new great decor items (that I can’t live without), but I often recycle / restyle what I have on hand to create new vignettes (who really wants to buy more + spend more $$$).  It’s amazing how moving things from one room/space to another makes them look like new!

If you are on the search (or want to shop your home) for a few new things for Spring, every room can come together in a snap with these 6 perfect picks

1 / Pillows bold hues mixed with softer Spring tones will make your sofa perfect for season.
Try hues of coral, pink, mint, and gray for a refreshing pick-me-up.

2 / Mirrors the perfect layer to make a space feel larger. 
Try one large mirror on a wall or a collection in varying sizes.

3 / Vases from the mantel to the coffee table to the desk, one vase filled with your favorite flowers or a collection in multiple tones, vases are a beautiful + inexpensive way to update a space & give depth, height, and color.

4 / Curtains changing up curtain panels for the season can give a room an instant update.  From heavy herringbone for the winter to a light & airy floral, a space can feel like Spring in no time & for little money.  On a tight budget? DIY new curtain panels (give this tutorial a whirl) or try using a flat sheet in a pattern you love.

5 / Plants whether real or faux (as long as it looks good), plants or flowers instantly give a fresh look + feel to a space.

6 / Trays my love for trays will never die. I am a tray addict (I have way too many & all are my favorite) because they are not just functional, but give color + texture + interest to a space or vignette.  A tray can break up a vast coffee table surface or can help keep a bedside table organized with books, reading glasses, and more.

Here are my 6 must-have layers for the Spring season in action…

Freshen up the home for SPRING with room inspiration + 6 items that every room can use to give a freshened look! Easy Inspirational ideas by @Jenna_Burger, www.jennaburger.com

Resources: Paris Map Wooden Tray / Diamond Wooden Tray / Geometric Tray / Floral Print Pillow / Nate Berkus Embellished Printed Pillow / Graphic Print Pillow / Velvet + Linen Pillow / Taped Solid PillowPurple Vase / Mercury Vase / Textured Glass Vase / Climbing Vine Curtain / Pink + Orange Ikat Curtain / Wood Circle Mirror / Capiz Mirror / White Orchid / Succulent / Faux Fiddle Fig

Whether you prefer a minimal modern lamp or a traditional print in paisley, these 6 favorite accessories will absolutely create the layers for a freshened space for Spring.  Whether the living room, family room, or bedroom, these items are ideal to make any room in the home instantly come together – you won’t go wrong.

Embracing the Beautifully Imperfect Home

Live with intention by embracing your beautifully imperfect home NOW!

As the snow is piling up in my neck of the woods (it’s about 3′ + high) , as of late I’ve been spending a lot of time indoors.  As much as it feels suffocating at times, it’s also been enjoyable to take in the beauty of our home that is coveted by the surrounding walls & roof above.

I started out the year with a focus – not a goal because that is just too overwhelming for me – to live more with intention.  Living with purpose and meaning isn’t easy but with mindful thoughts, I’ve taken on less with more intentional focus.  Believe me, it hasn’t been easy and it’s not every day that I ‘live in the moment’, but I have gotten a wee-bit better and as long as I work on it, I feel like I am going in the right direction.

Embracing the Beautifully Imperfect Home

As I continue to strive towards living with intention, I am also working on accepting + embracing the beautiful of today. The beauty that lies within our 4 walls NOW.  I wrote an article recently for a local magazine and I was asked by a few friends to share it as it’s something many feel, but sometimes have difficulty expressing (as do I and admittedly it took me 2x longer than anything I’ve ever written before.  Tapping into my deeper, more meaningful side doesn’t come easy).

Living with Intention quote

When decorating a home, it can often be difficult to accept the now because of the constant striving for better or more so, the striving for perfection. There is no such thing as the perfect home, the perfect furniture, or the perfectly decorated walls. A home is more than the roof above and the 4 walls that surround us, it’s a place memories are made with unpredictable messy moments and a place we should embrace today.

In our Pinterest-perfect world, it can often be debilitating to do your own thing because the bar has been set so high with the best holiday crafts, the gorgeous room makeovers, and the looks-to-go-to-eat desserts. The reality is though on any given day in my home, no room is magazine-ready or perfect for Pinterest. There are dishes in the sink, crumbs on the floor, and those pictures I’ve been wanting to hang are still sitting in the corner. A home shouldn’t be about striving for the ideal or the perfect, but instead should truly be filled with what is most meaningful and decorated how YOU want, which in turn will bring the most acceptance, happiness, and joy.

Embracing the Beautifully Imperfect Home

Admittedly as a Designer, I often feel it’s expected that my home look perfect, showroom ready when someone comes through the door, but the reality is like most, I live in a chaotic, busy home of 5, and perfect is impossible. As I’ve gotten older (and a little wiser), I have learned (and am still learning) to let go of every room looking photo-ready at all times. As much as I want my home to look perfect, it already IS perfect and that is beauty. The imperfections and the lived-in feel are what make a home beautiful and meaningful. Even though I have a list of changes and updates, I accept and embrace the NOW which means slowing down and enjoying what we have today. This is our life; the home we’ve created. For others, it means accepting the imperfect, unfinished space instead of putting off doing things because perfect is too hard or too much work. Letting go of the Pinterest-perfect ideal will open up the opportunity to take risks to create a home that’s always been desired. Like the old saying, “Beauty is in the eye of the beholder”.

I recently received the book, It Doesn’t Have to be Perfect to be Beautiful by MyQuillyn Smith, a.k.a. The Nester, and cover to cover, it was eye opening and freeing. Even though I live and breathe design every day, it allowed me to accept our now home and confirmed that embracing what I already have created, is beautiful. Photo-ready with everything picture-perfect isn’t welcoming and it isn’t relatable. What is inviting about not being able to put a coffee cup on a table or move a pillow to sit on the sofa?

Embracing the Beautifully Imperfect Home

We all have different styles and there is no one size fits all. Decorating a home is a process that is ever-evolving and what’s most meaningful is the intangible beauty that resonates with love and laughter. A perfect home is what you make of it and its beauty is already there. A home is most meaningful when it is unique, personal, and authentic. And that is beautiful…

Embracing the Beautifully Imperfect Home

– Live with Intention –