It’s been quite some time – about a year – since we tackled a full-on big room renovation. To put it plain + simple, the kitchen remodel last Fall just wiped me out… and we didn’t even do too much on our own. When it was done, I was desperate for a break. Then life got busy. Sports. Work. School. Appointments. You know the drill… But when this past Summer turned into Fall and the kids were back to school and a everyday routine was once again established, I was finally feeling the itch to get my hands dirty… again.
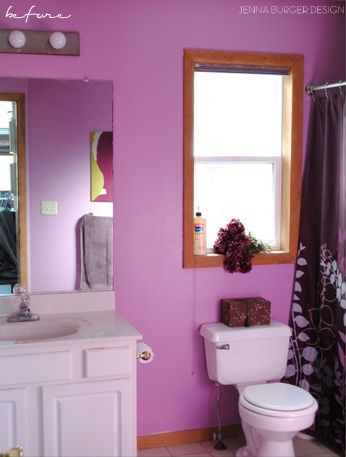
If you remember back about 4-1/2 years ago, one of the last spaces in our home to get attention after moving in was the master bathroom. The walls were a horrendous purple/pink hue with dated + dusty brass accents. It all had to go…
…but it didn’t all go.
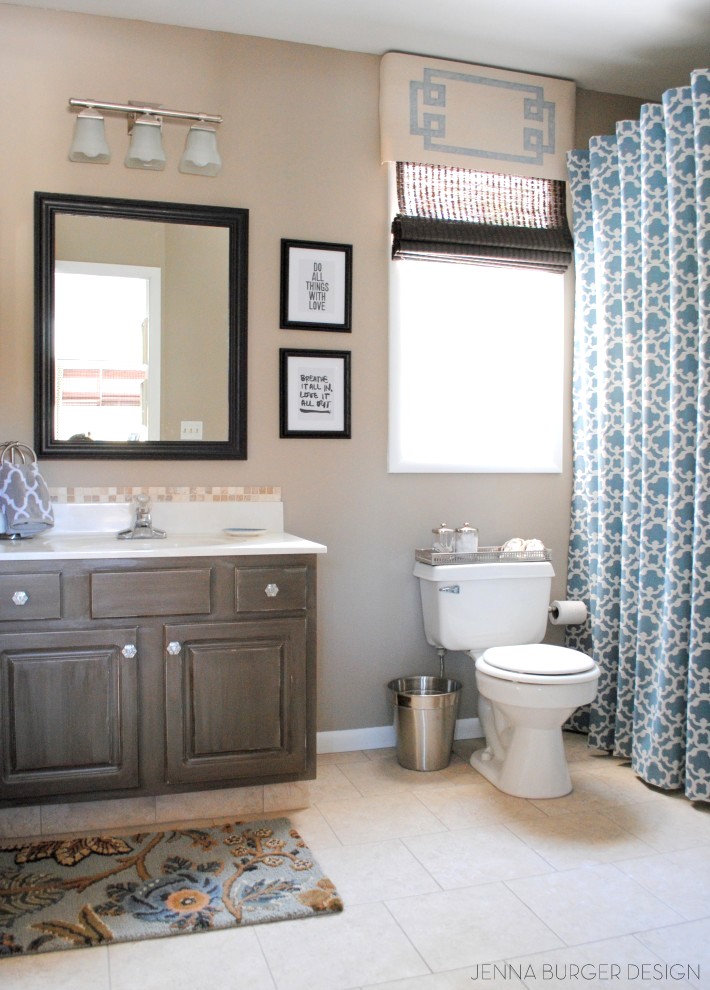
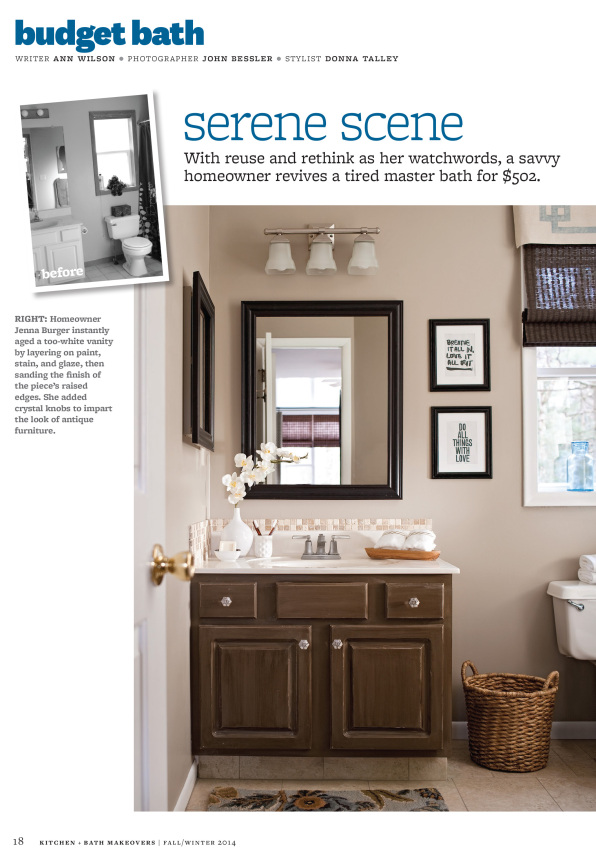
With a few cans of paint, I transformed the walls, the trim, and the cabinet with a whole new color palette. Then to finish it, I laid a new floor using luxury vinyl tile, hung a new mirror, and changed the light. A few hundred dollars later, and the space was completely transformed… for the most part.
But after 4 years of using the bathroom day in + day out, it needed a makeover. A real makeover. The pre-fab tub was drear and the builder-grade cabinet had seen it’s life span.
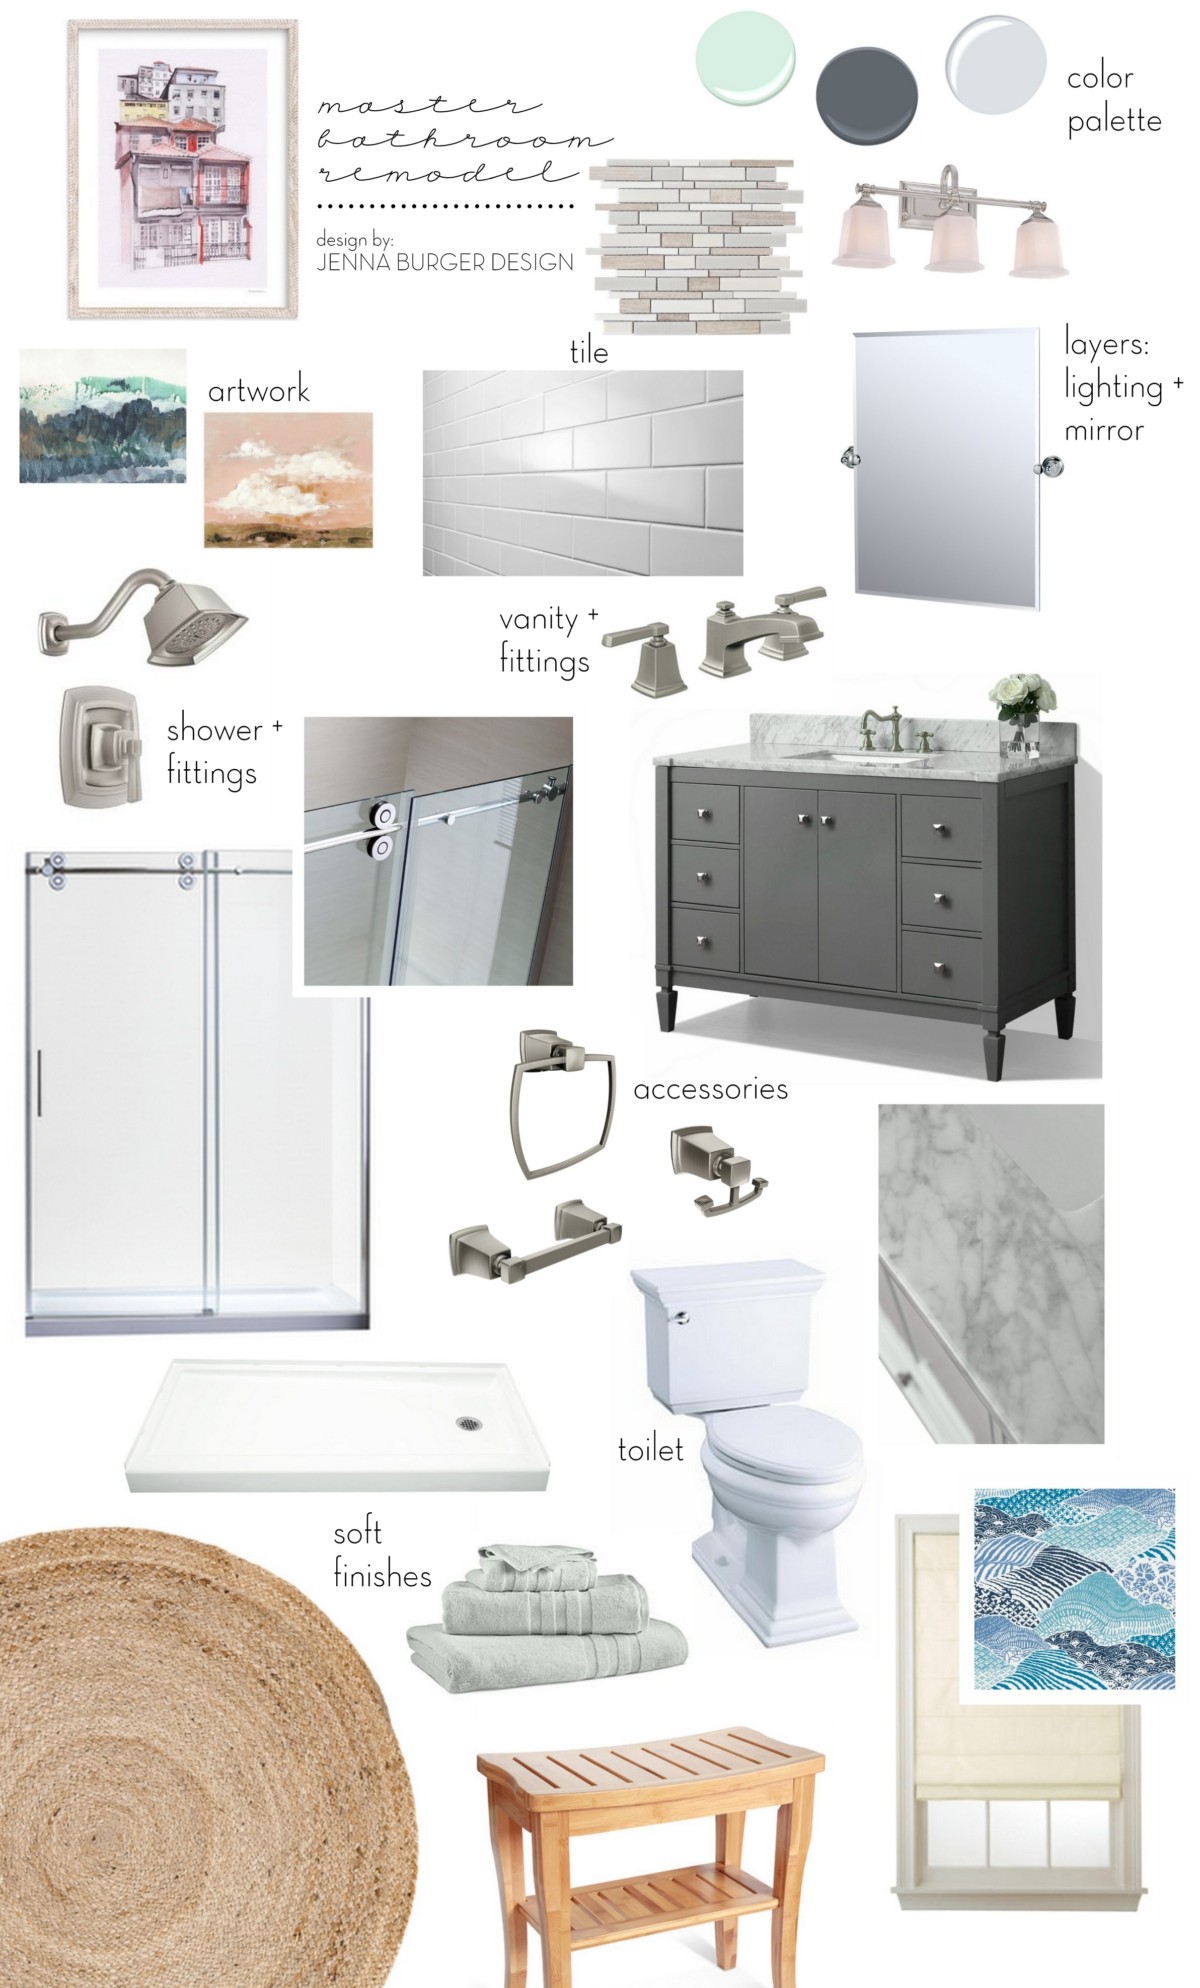
I envisioned Carrara. White. Clean. Fresh. Fun…
…And created a vision board.
eek! It’s all so pretty and fabulous.
Sophisticated, but casual.
Elegant, but inviting.
I am really excited about this new bathroom. You know me, I adore a striking + bold color, but for this space, I need it to feel tranquil and serene. With being pulled in 92 directions each day, I want to start off and end each precious day in a calming way.
Thanks to my friends at Lowe’s, who I have worked with for years, for choosing to partner with me on this project to create an inviting and peaceful place.
Here is what I have planned…
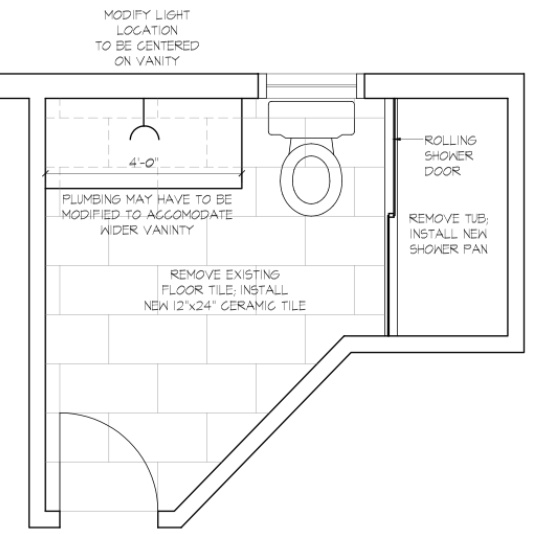
> The tub will be changing from a pre-fab bathtub to a shower with a frameless rolling glass door
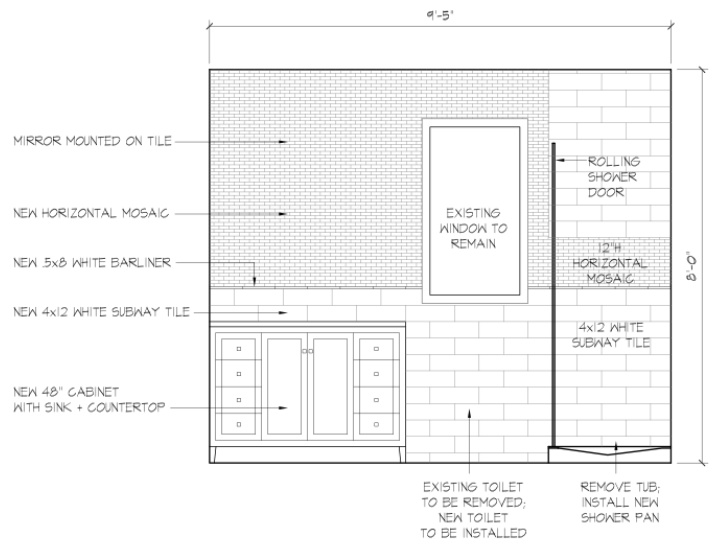
> New Tile will be added from floor to ceiling in the tub space and will continue on the entire wall of the vanity
> The main tile will be 4 x 12 white subway with an accent glass/natural mosaic tile
> The walls will be painted a light mint green hue
> The 36″ vanity will be replaced with a 48″ vanity in a dark gray finish to give contrast and a white cararra countertop will be added to give a finished luxury look
> To finish the space, artwork and a fabric window valance in hues of blue will add pattern and color
These are the specific items I plan to use (and are shown in the mood board above):
This is the overall layout plan + elevations that I created:
DIY + Calling in the PROS!
This bathroom renovation, like the last one I tackled, isn’t going to be a devoted do-it-yourself project. For 2 reasons. One, I don’t want to be without a bathroom for months AND I want to stay somewhat sane. Two, other than the basics, the Mister & I don’t know much about plumbing and leave those things to the experts.
As with the previous bathroom renovation, we worked with a contractor to demo the bathroom and install the major components. What is on our list to tackle for this renovation is: tile installation (there’s A LOT of tile!), paint, baseboard, installing the light, installing the accessories, hanging artwork, etc.
By splitting up a project with tackling some of it on our own and calling in the pros where needed, we’ll save money AND our sanity (i hope)!
There you have it… for now.
Demo has begun. Wish me luck. I’ll need it 😉
DISCLAIMER: THIS BATHROOM RENOVATION IS A COLLABORATION WITH LOWE’S. ALL OPINIONS + SELECTIONS ARE MY OWN.
There are some do-it-yourself projects that are wham-bam-done and then there are those DIY creations that seem to take as long as building a house…
Well I just wrapped up a fantastic, in my eyes, DIY project but it didn’t come without a hundred hurdles along the way. BUT we – yes, the Mister lent a hand for this one – kept chugging along and made it to the end.
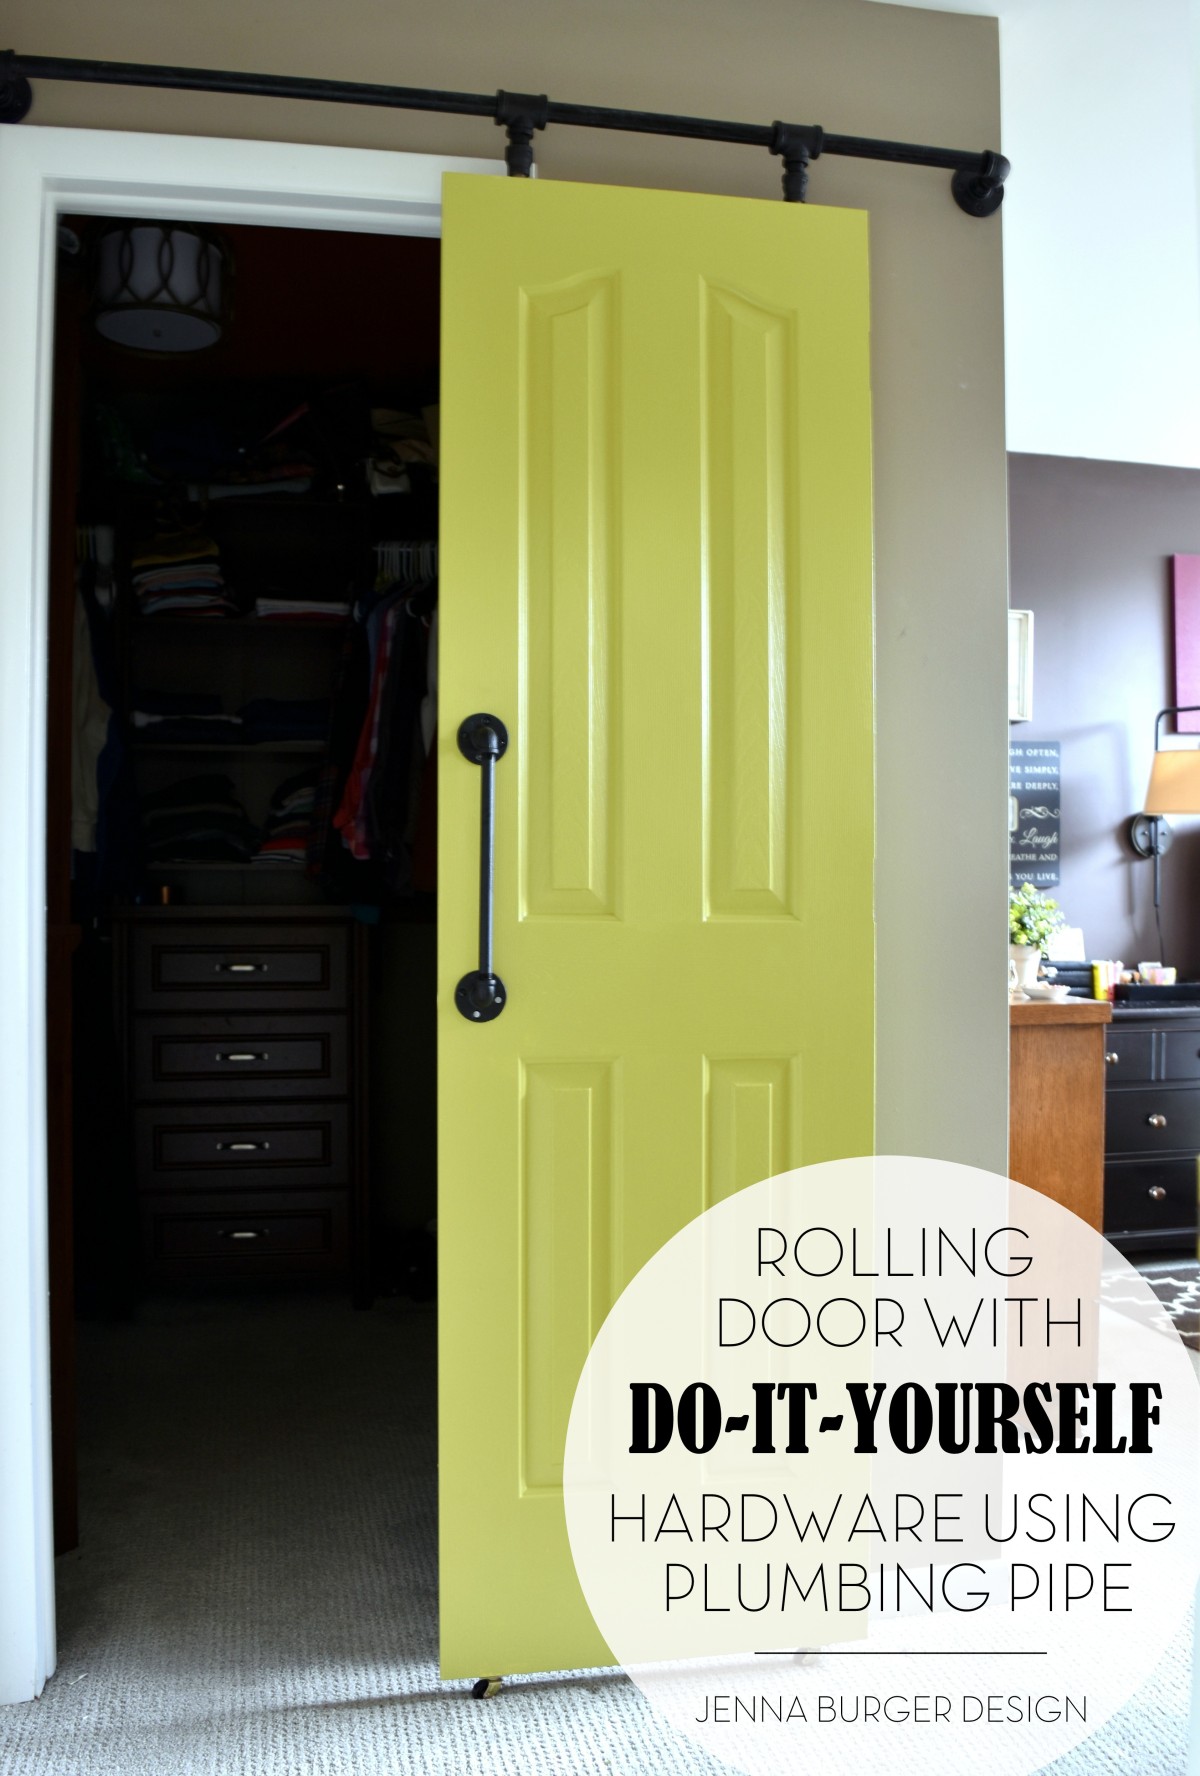
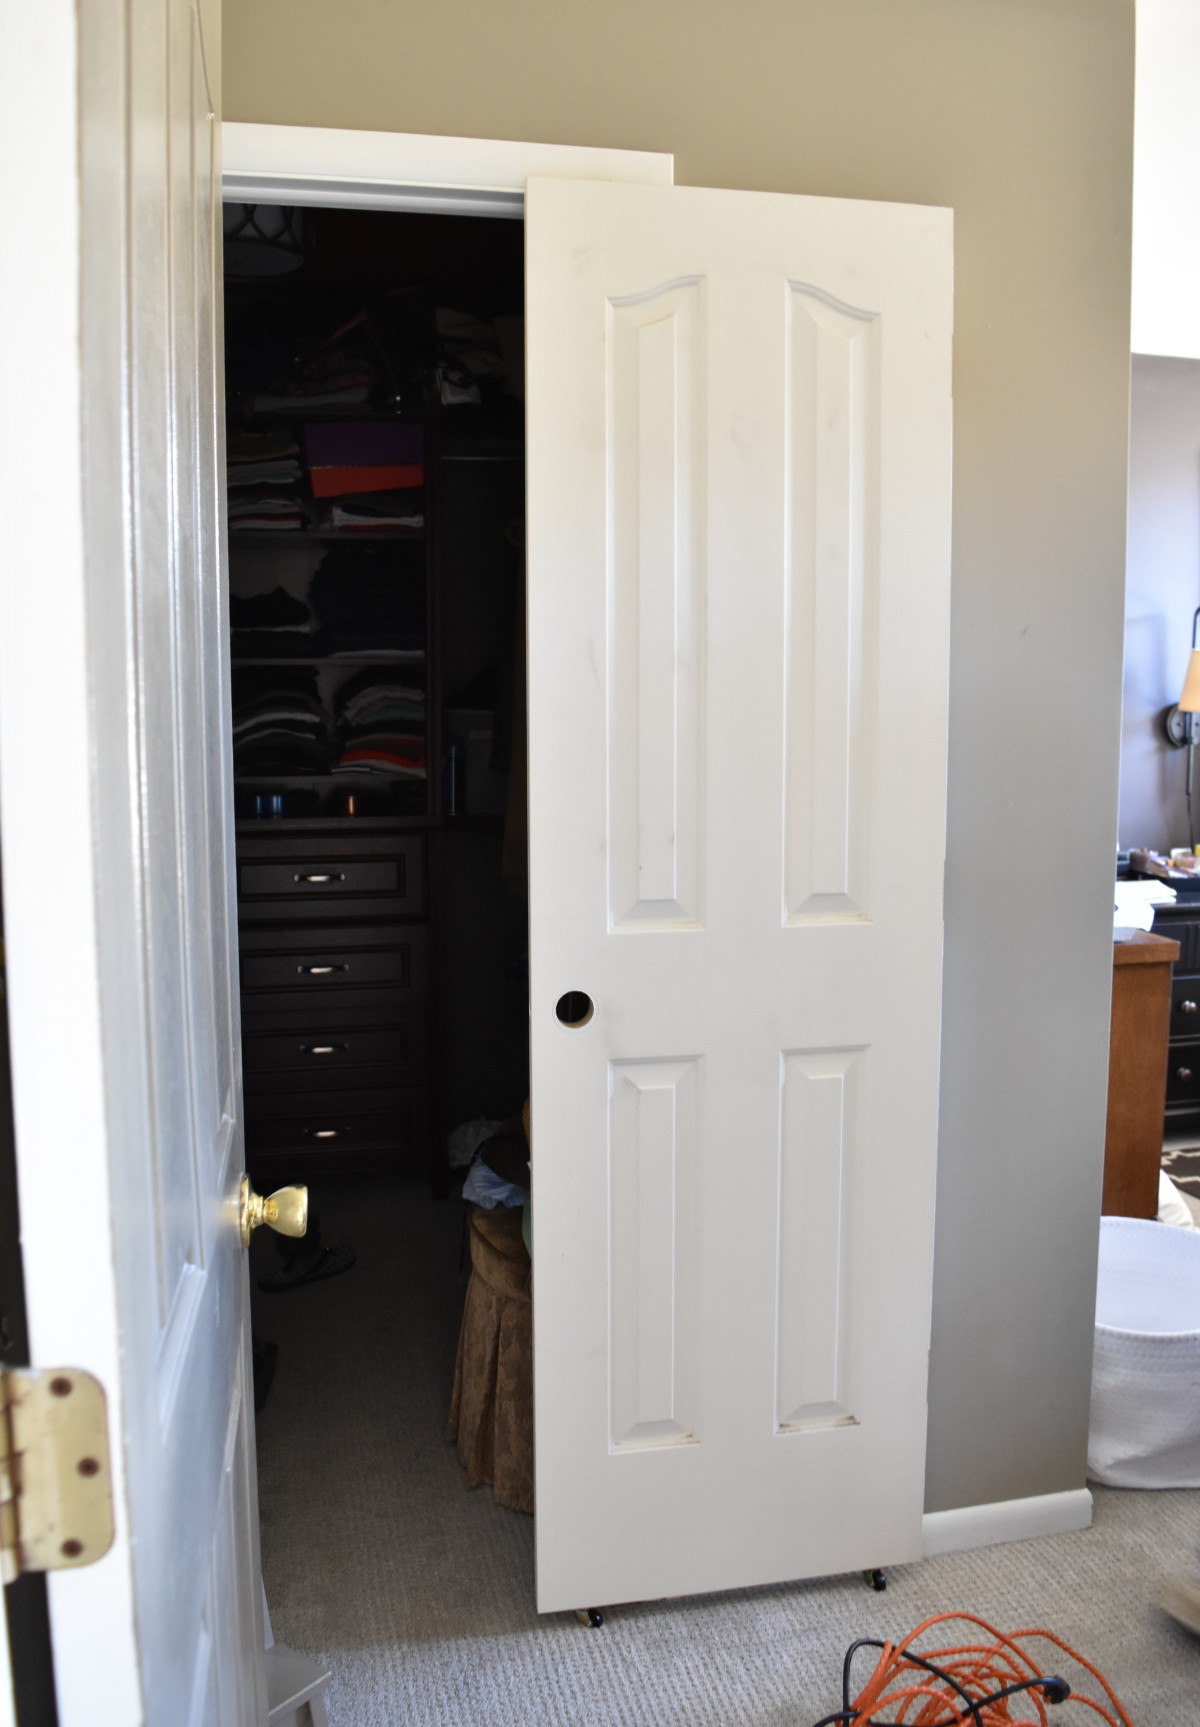
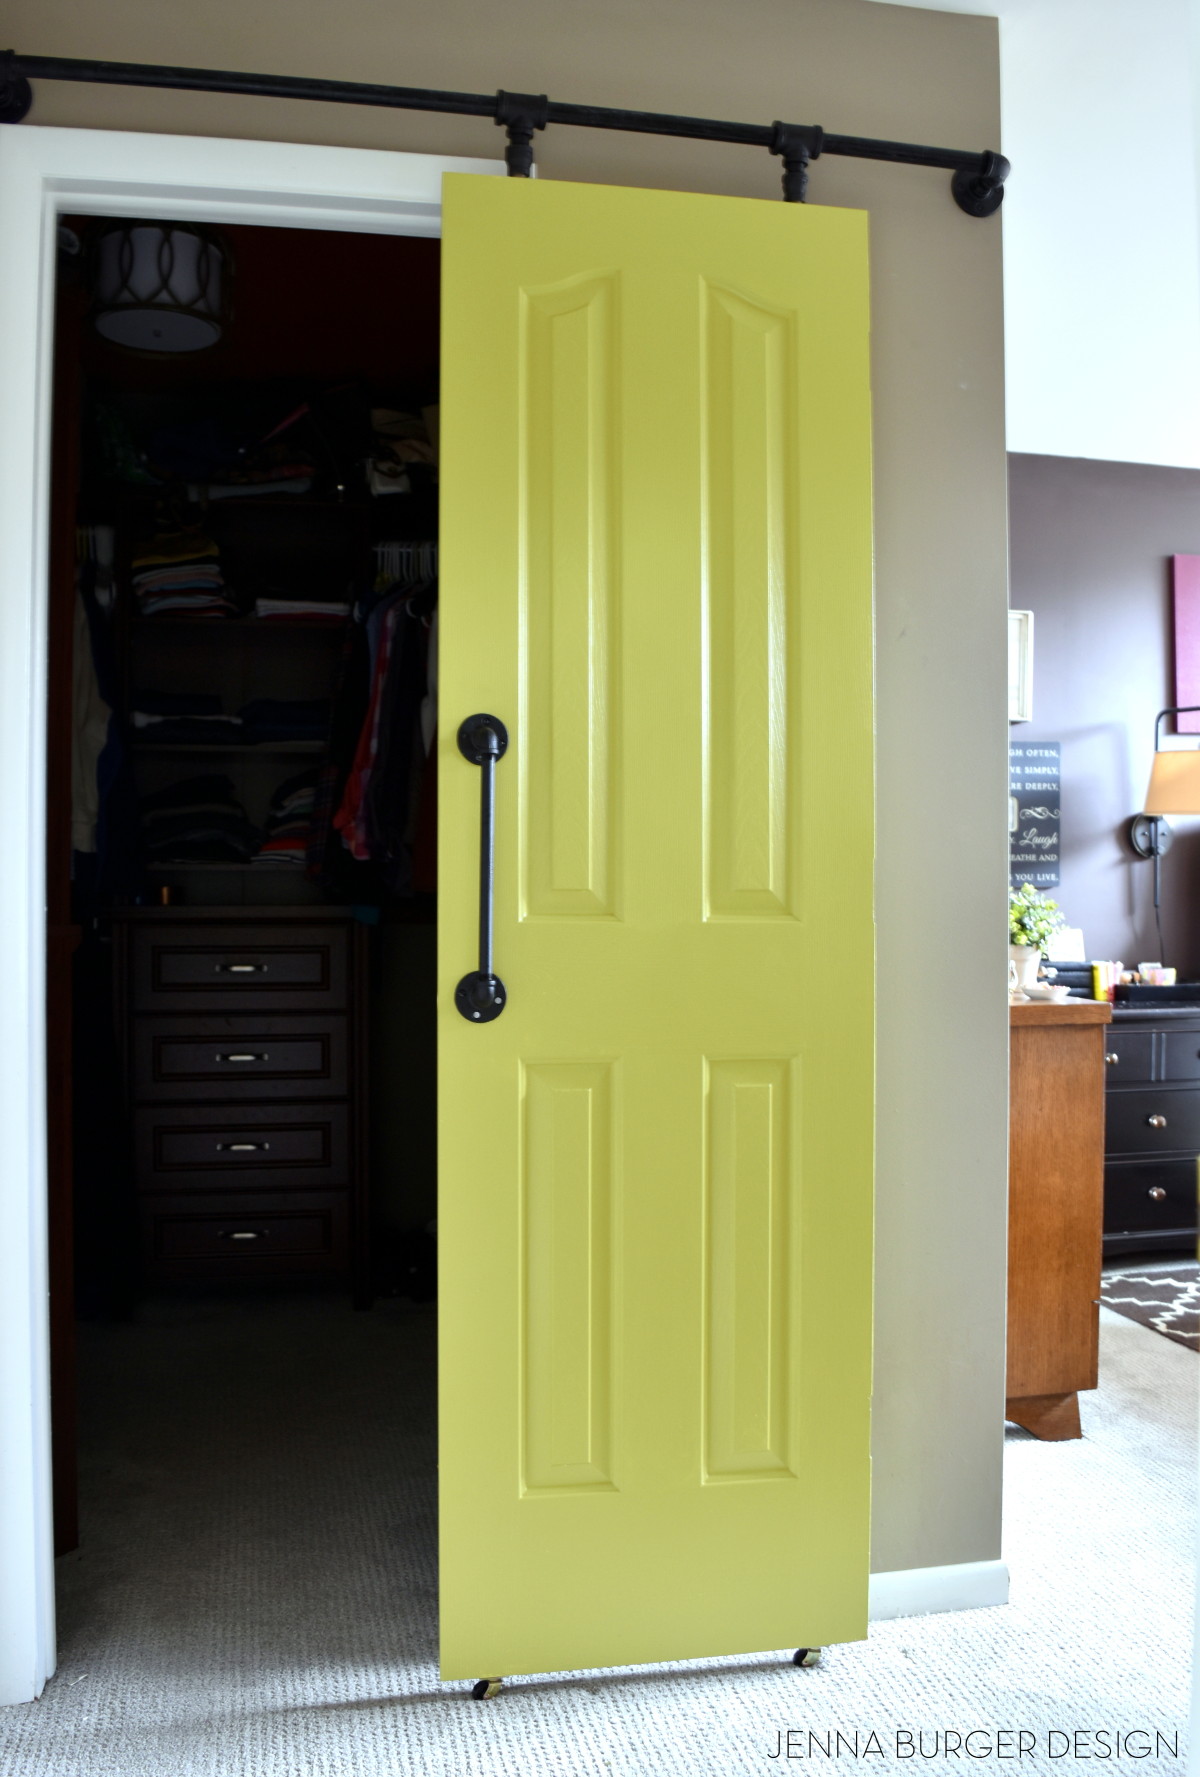
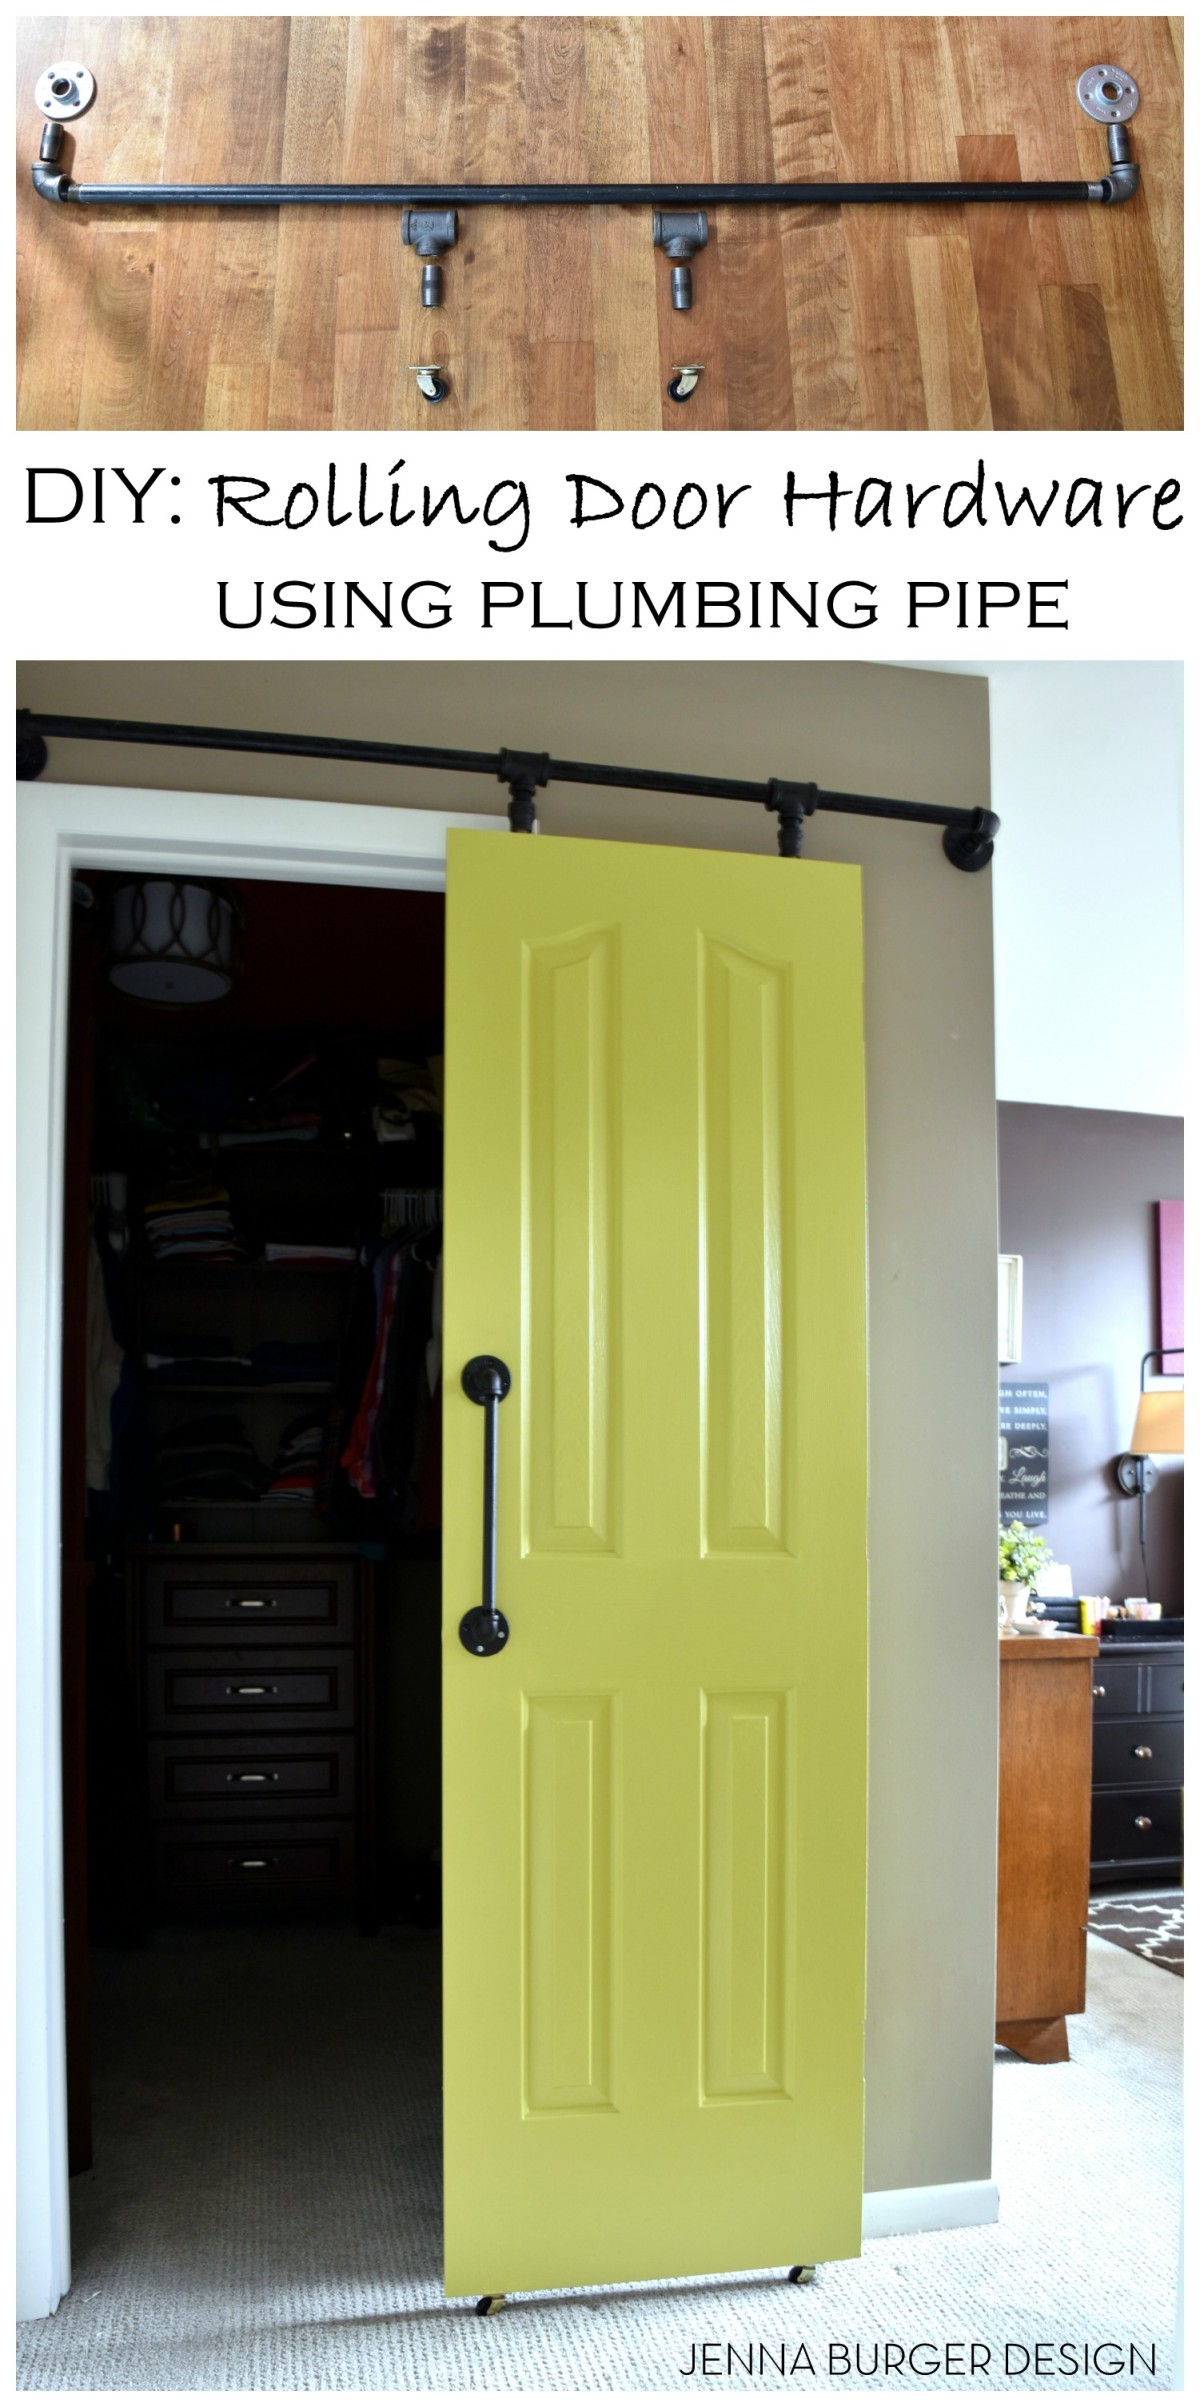
My latest + greatest project? A rolling door with DIY hardware using plumbing pipe. The popularity of rolling doors continues and even though I’m not in favor of following every trend, adding a door of this style was the only solution for our master closet.
The door to the closet was removed a few years back when revamping the space to maximize on shelf area. Since then there’s been no door… Solution? A rolling door to give privacy + a splash of color.
The result of this challenging, but rewarding result…
Let me explain where the hurdles + difficulties arose with this project…
I had anticipated using a reclaimed door, so the hunt was on. After scouring local thrift stores + ‘junk’ spots, I found the perfect door with the 29″ width that I needed. Brought the door home. Went to sand it but it was an old door, and we assumed it was lead paint. So we stripped the door using a liquid stripper. It didn’t work. Hours spent + poor results = a very frustrated DIYer. We painted over the door to seal it. Went to hang it and the door was 6″ TOO SHORT. The salvaged door I spent hours prepping couldn’t be used – UGH. In the end we used the hinged door that was originally used for this opening. The width is not ideal, but it works.
Let’s move forward with the tutorial. There are a lot of parts, so let’s dive in…
MATERIALS NEEDED
1 – Flange (qty 2)
2 – 3/4″ x 1″ Black Steel Nipple Fitting (qty 2)
3 – 3/4″ Elbow (qty 2)
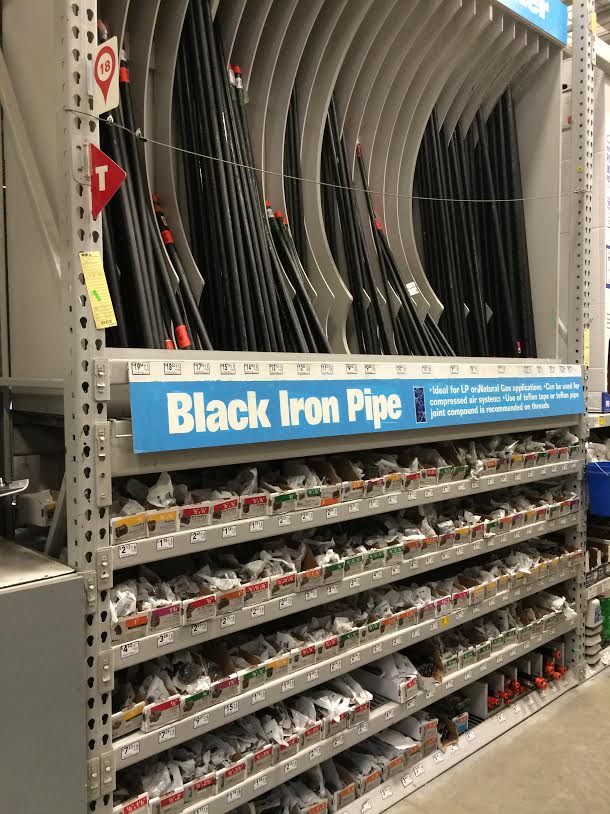
4 – 3/4″ Black Iron Pipe – can be cut to size (qty 1)
5 – 3/4″ Black Iron Tee (qty 2)
6 – 3/4″ x 1/2″ Black Steel Nipple Fitting (qty2)
7 – Casters (qty 2)
8 – Black Iron Reducing Coupling (qty 2)
> Screws + anchors (if there are no studs)
> Drill
> Door to your liking
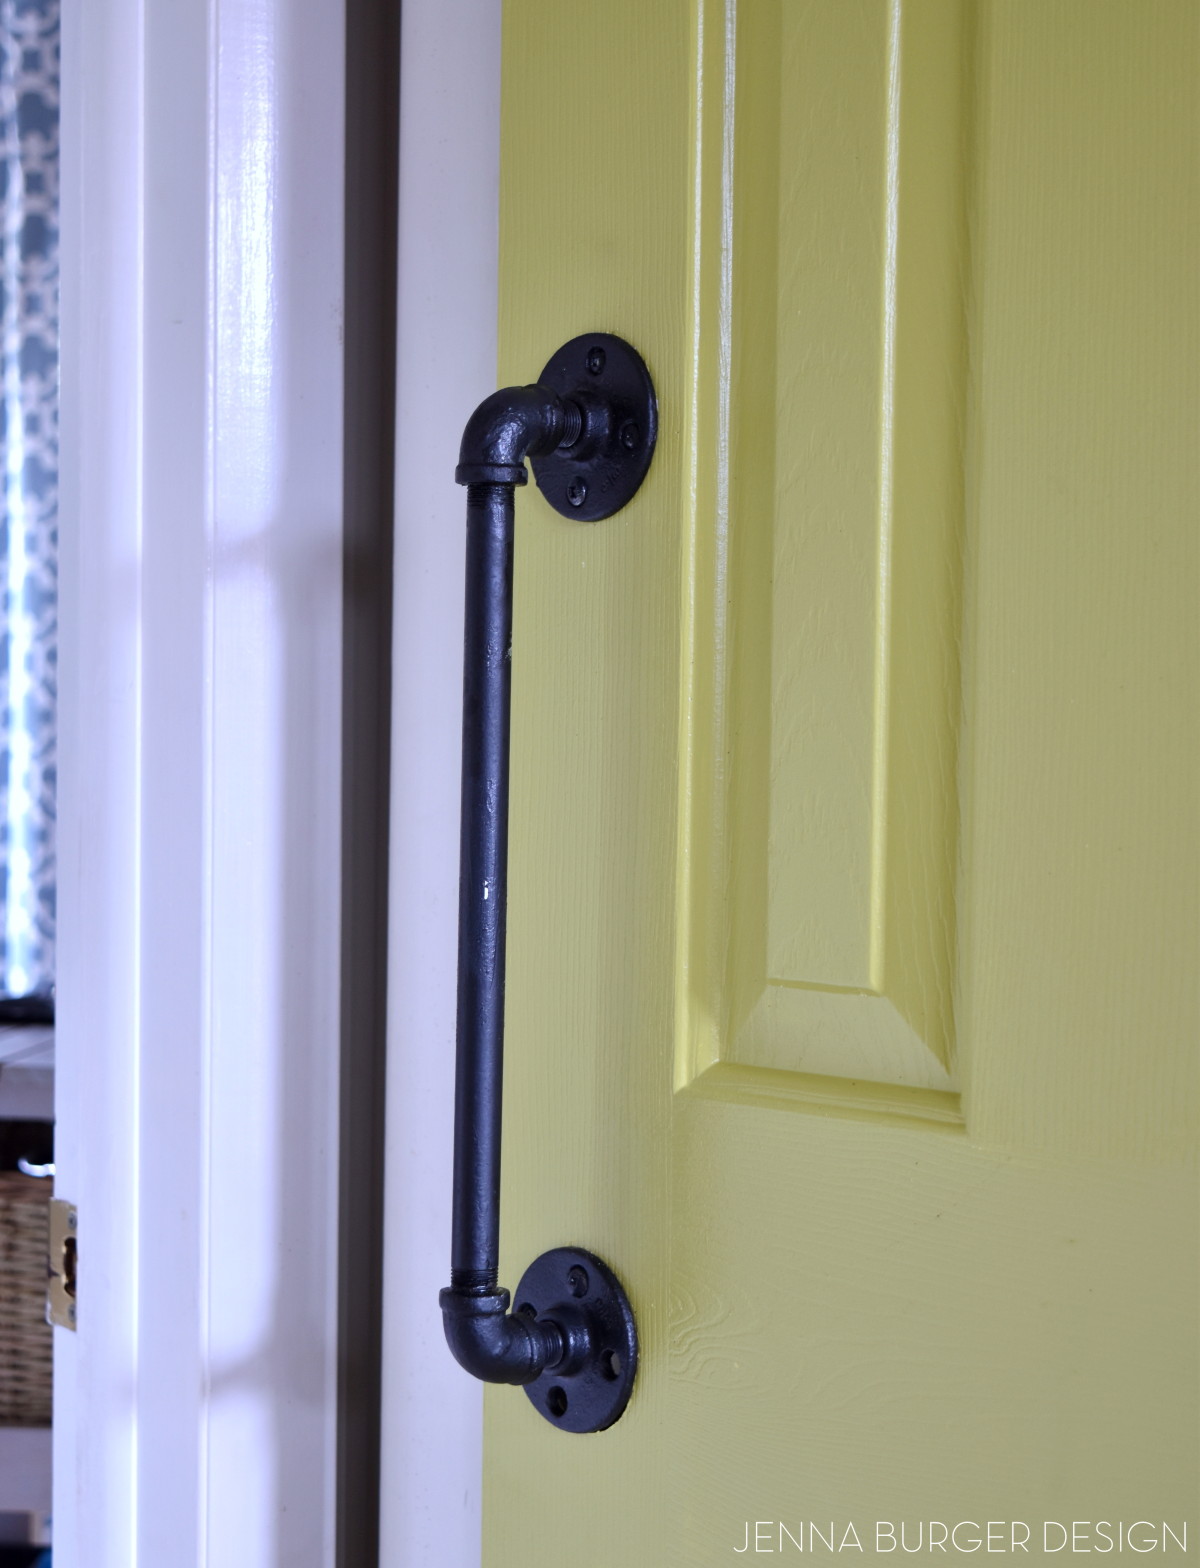
> Handle – plumbing pipe handle is made with (2) flanges + (2) elbows + (1) 12″ L x 1/2″ W pipe
These *should* be all the hardware that is needed, but of course, every project / condition is different. In my initial trip to Lowe’s for the supplies, I got all of the above with the exception of the Reducing Coupling part. That was needed because the pipe needed to be reduced from 3/4″ to 1/2″ to fit in the door…
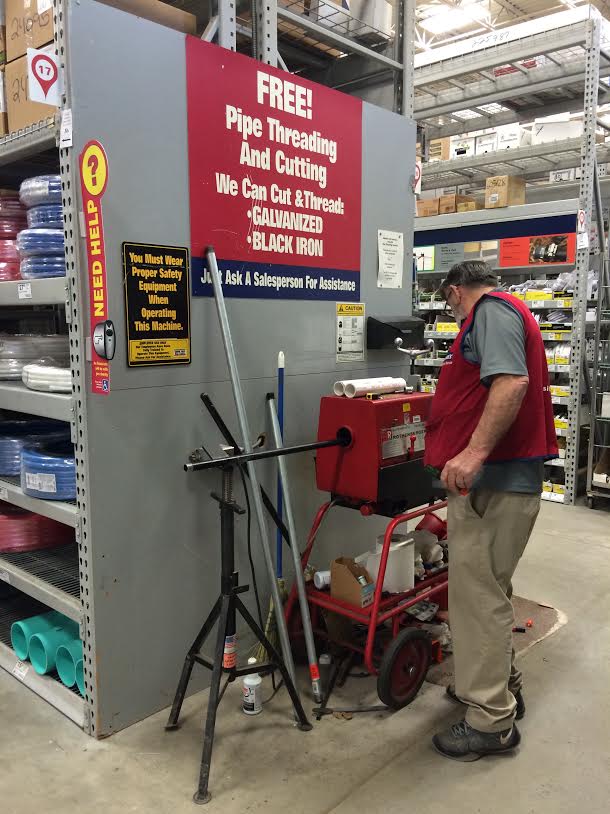
I shopped for all the plumbing parts at my local Lowe’s. Using their cutting machine, they were able to cut the long pipe to fit my exact length. For large plumbing pipe projects like a bookcase, this is a great source.
DIY ROLLING DOOR HARDWARE TUTORIAL
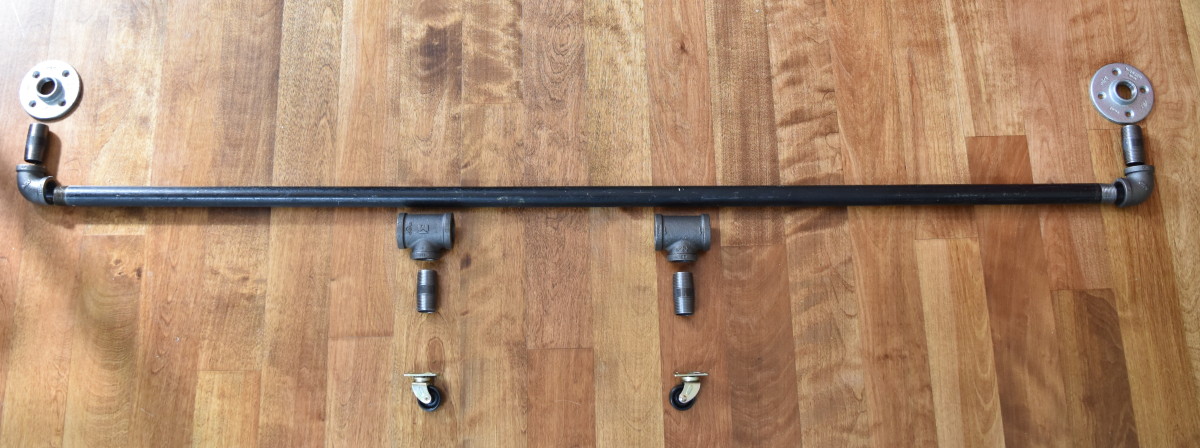
1 To start off, I laid out all of the parts for the rolling door track.
2 Then I connected the pipes together. Before threading pipe to pipe, it’s best to use a pipe lubricant to make the connection easier + smoother.
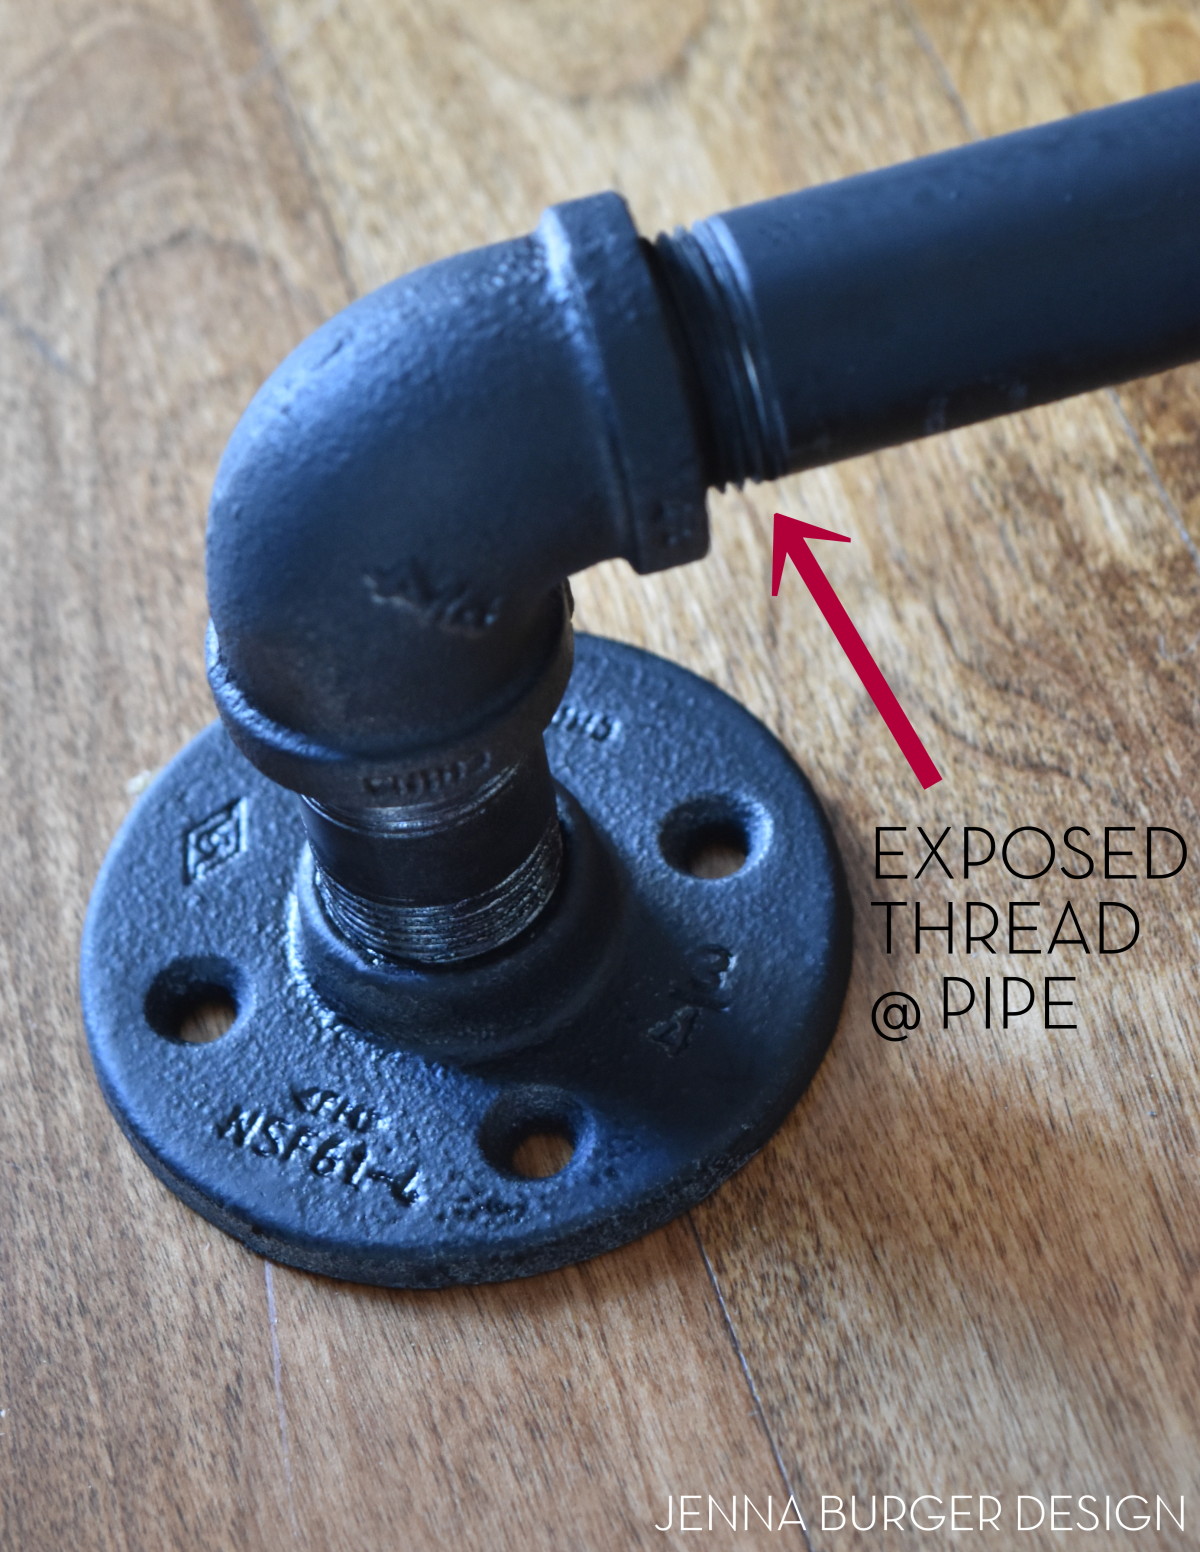
Note, connecting the pipes can be slightly challenging. I anticipated screwing each connection the entire way so no threading would be exposed. That is impossible. A section of the pipe showing the threading will be exposed. Account for that when taking measurements.
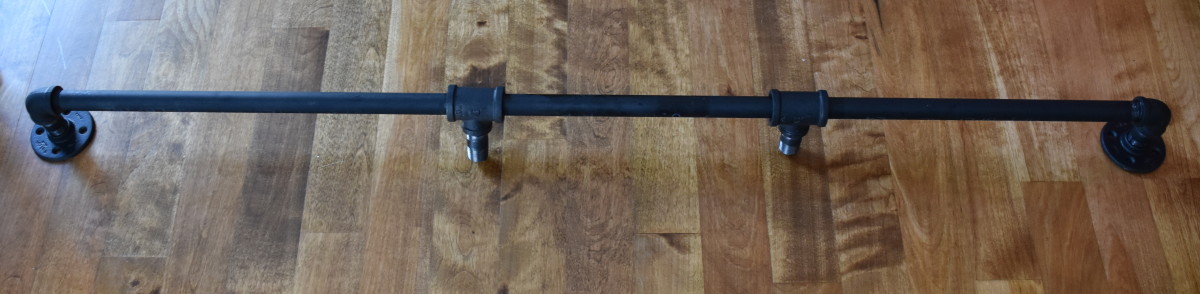
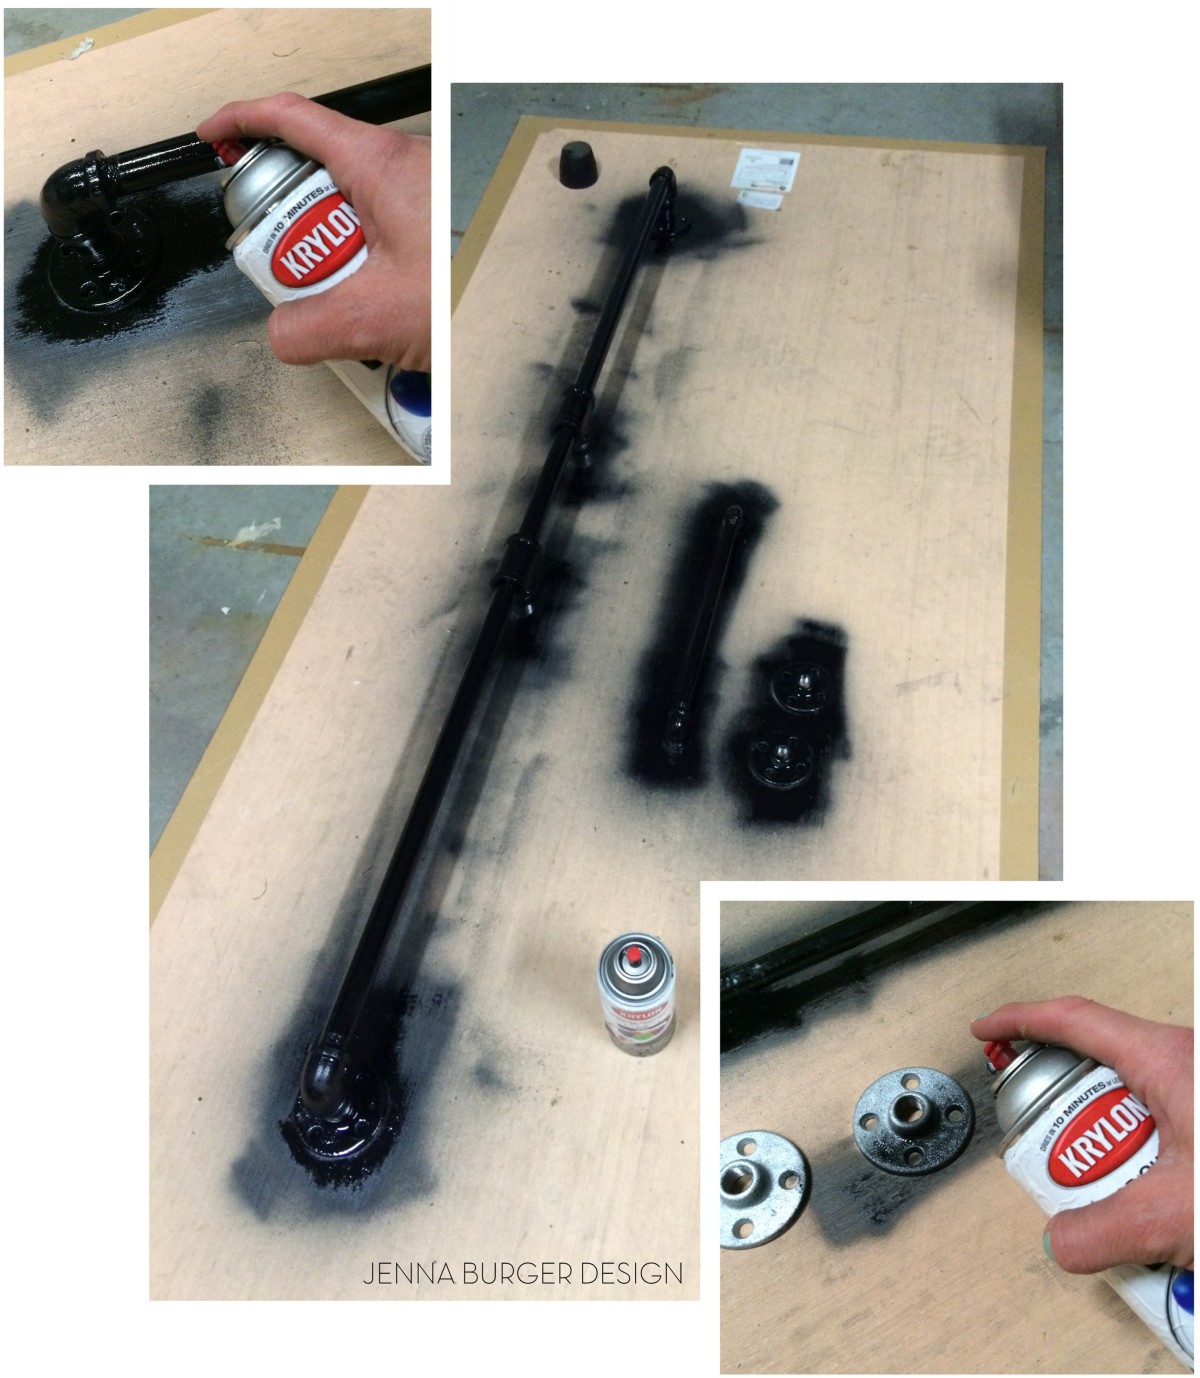
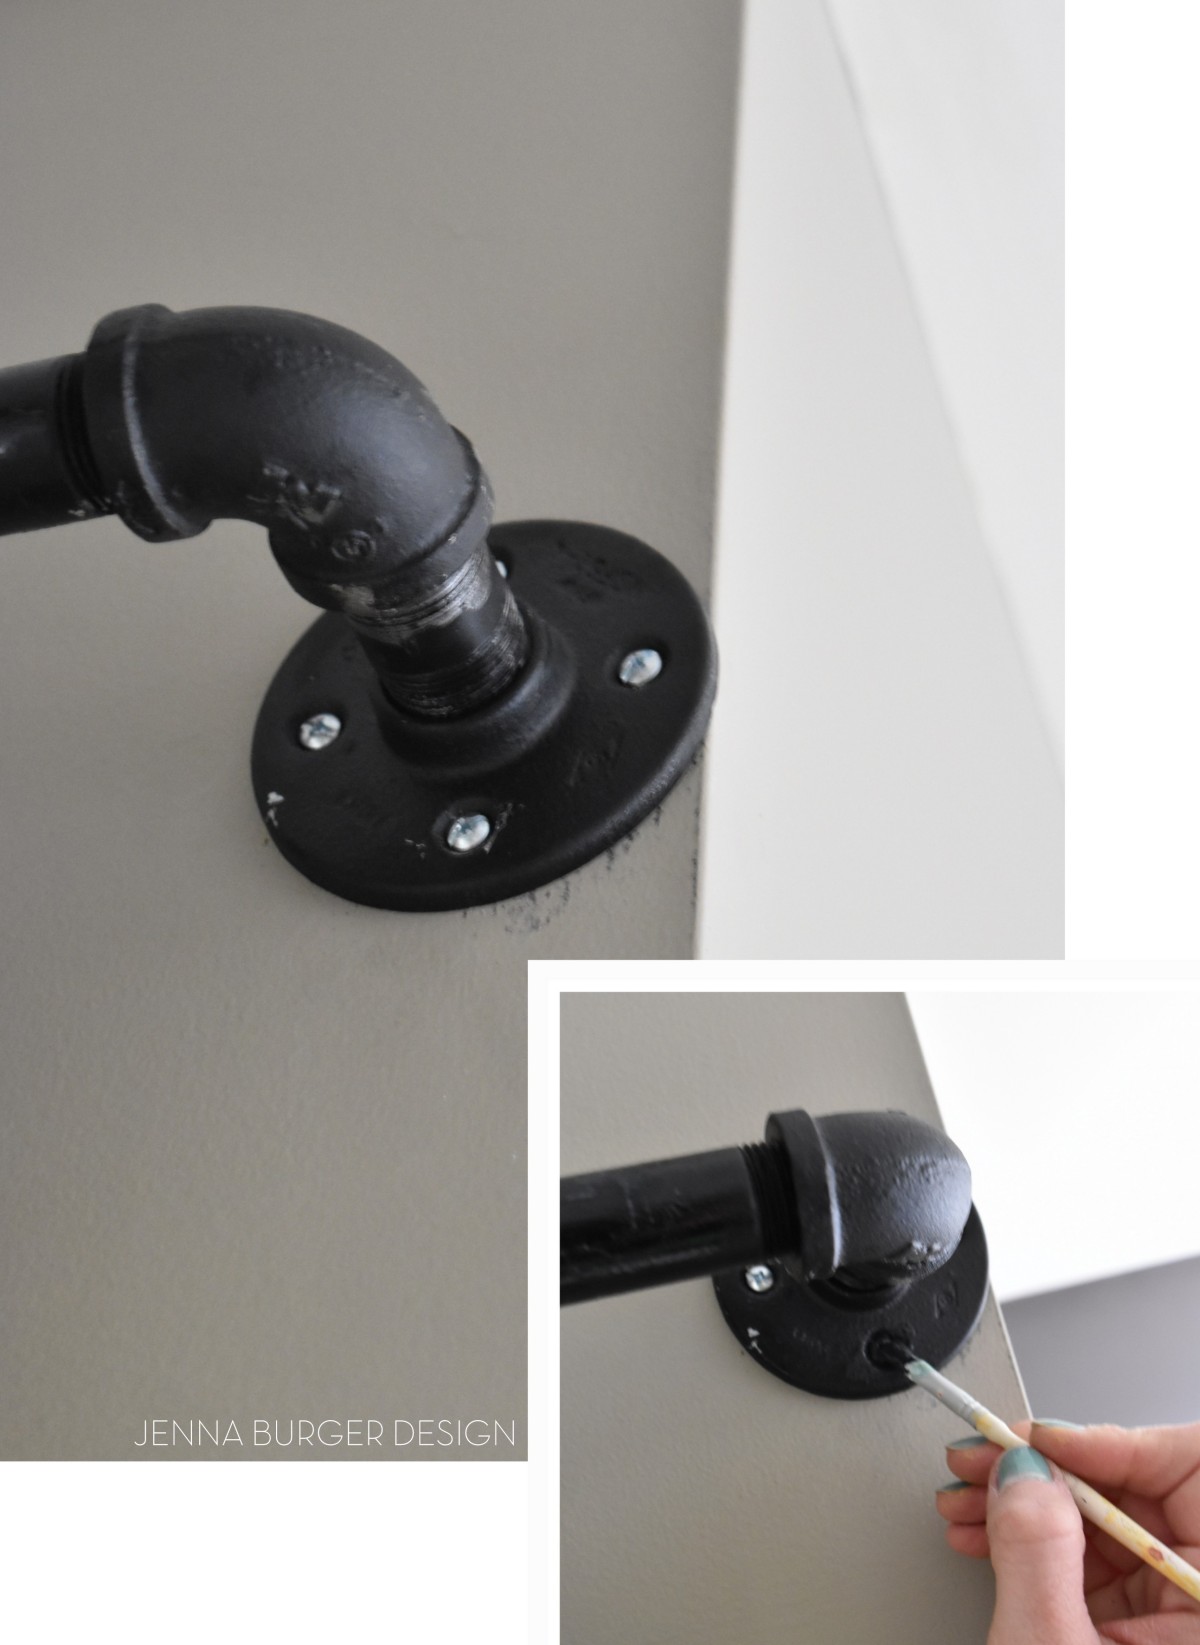
3 The plumbing pipes didn’t match in color, so to give them a unified look, I spray painted the track using a flat black color.
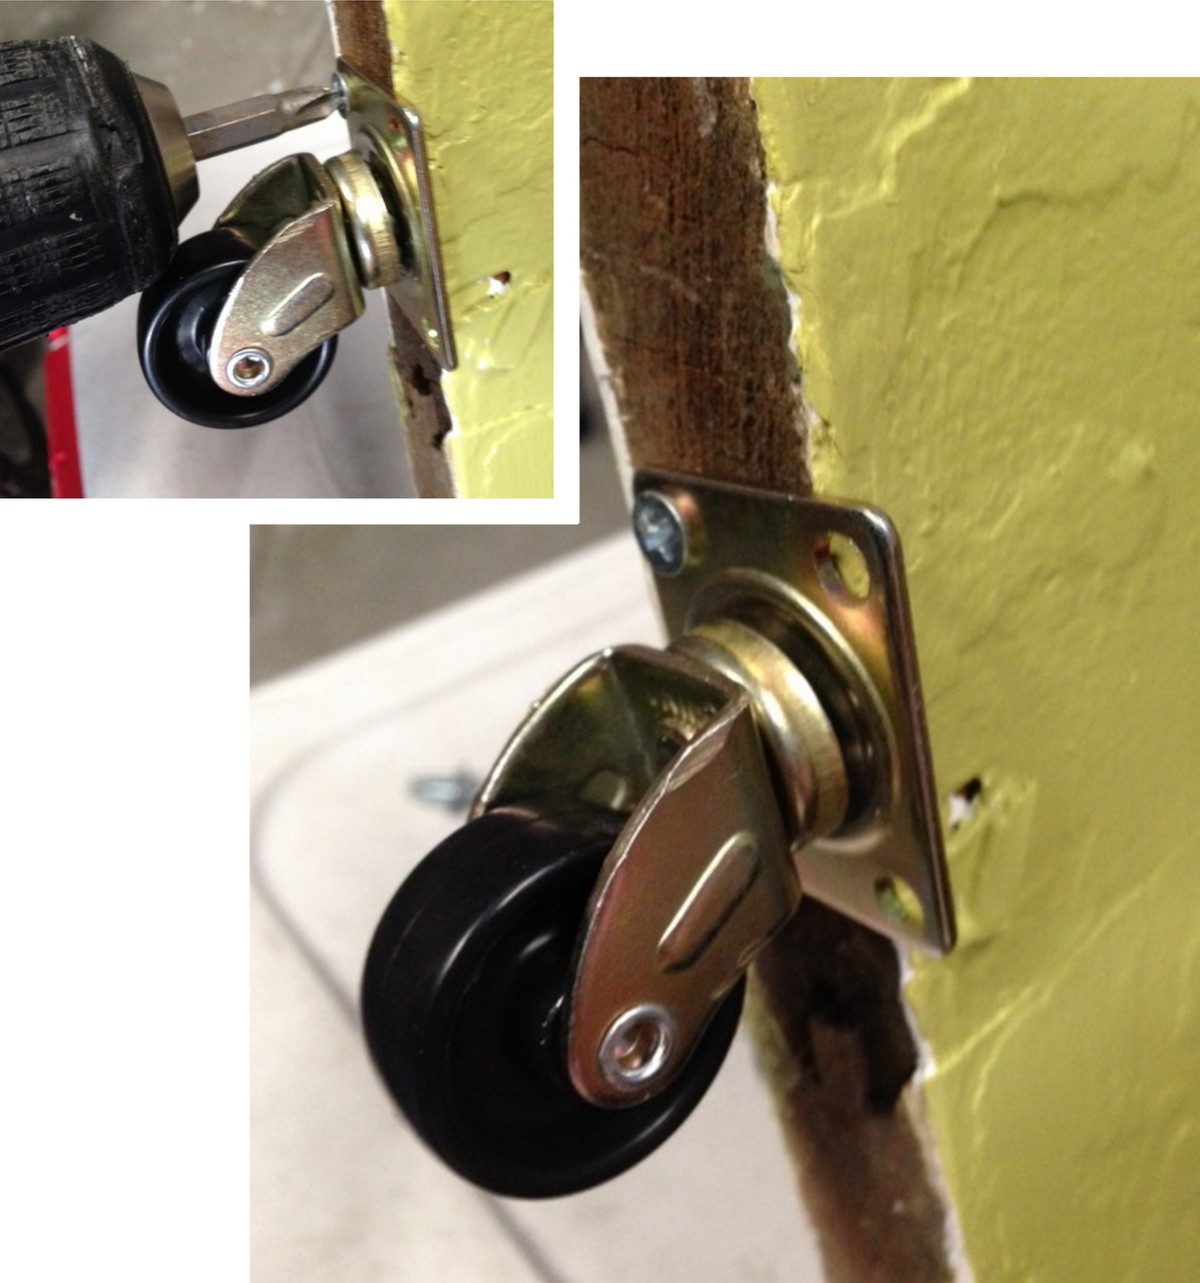
4 As I mentioned above, I ended up using the door that was previously hinged. I added two caster wheels to the bottom of the door.
WHY? Plumbing pipe will bend under tension. If the door was hung from the pipe with no wheels support, the pipe would bend in time. The wheels support the door and the track keeps the door in place.
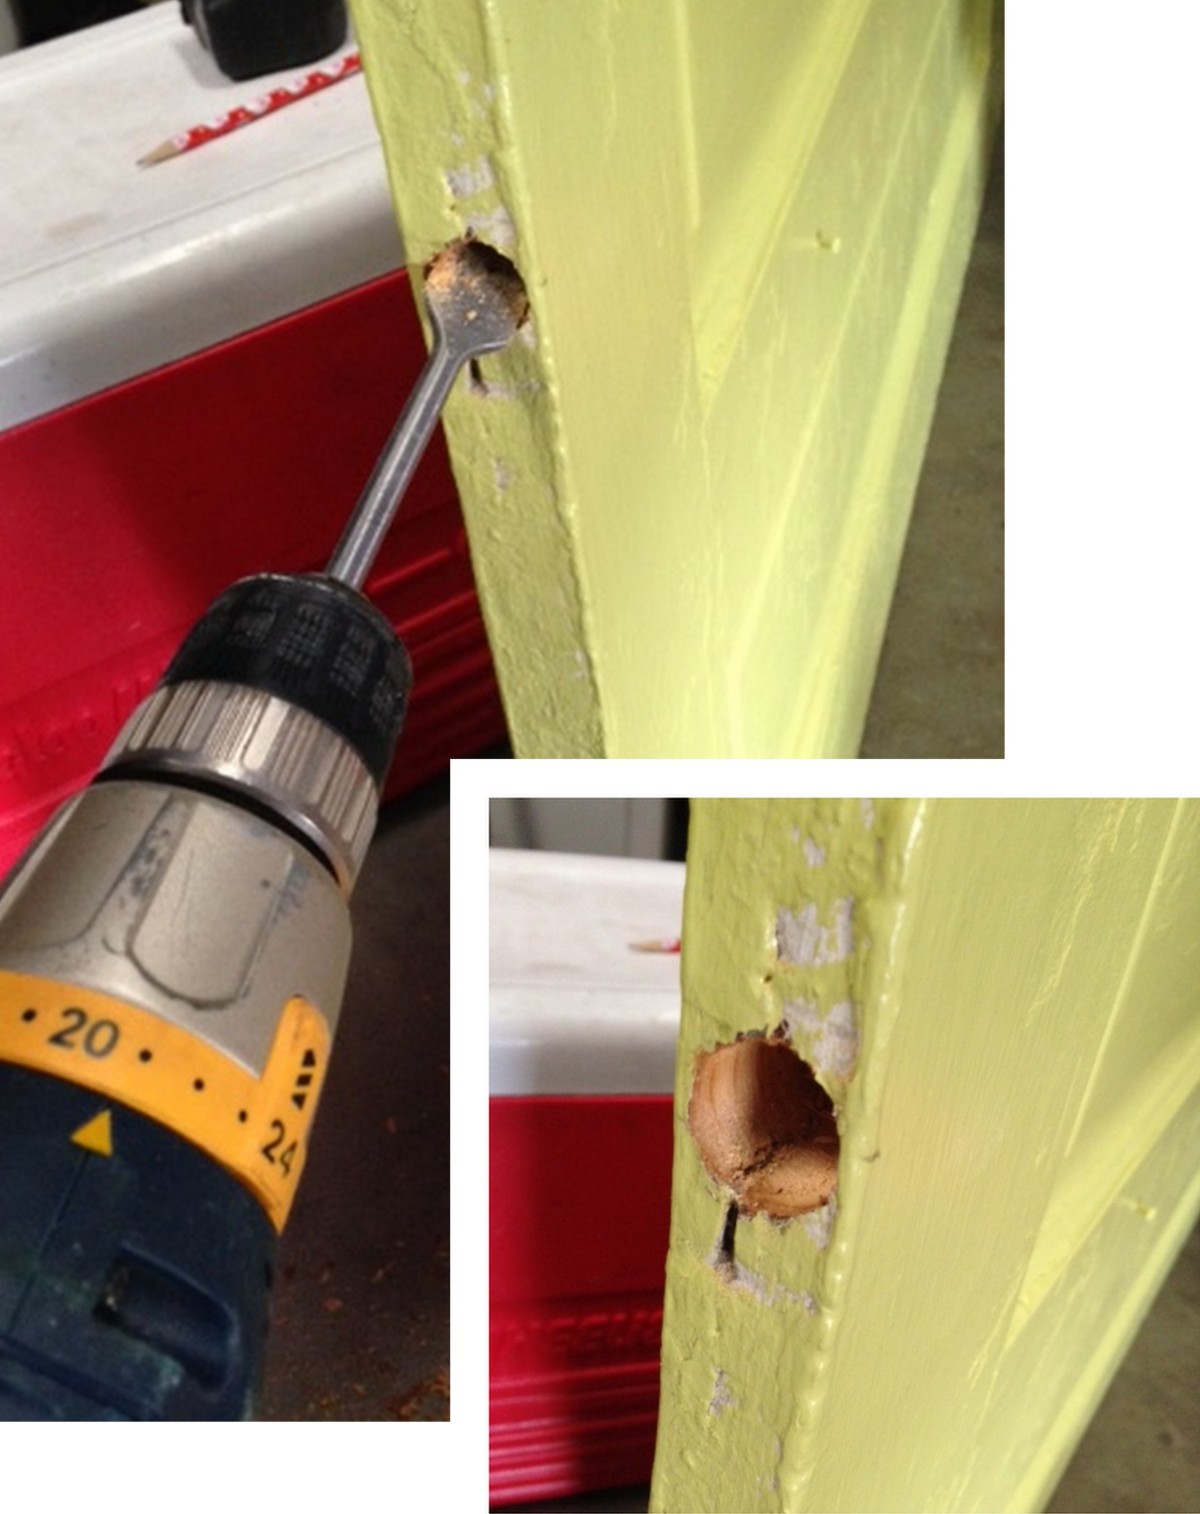
5 (2) Holes were drilled at the top of the door for which the nipple fittings will fit into.
6 With the casters installed on the bottom + the holes drilled on the top, I got the door in position and measured out where the plumbing pipe track should be installed.
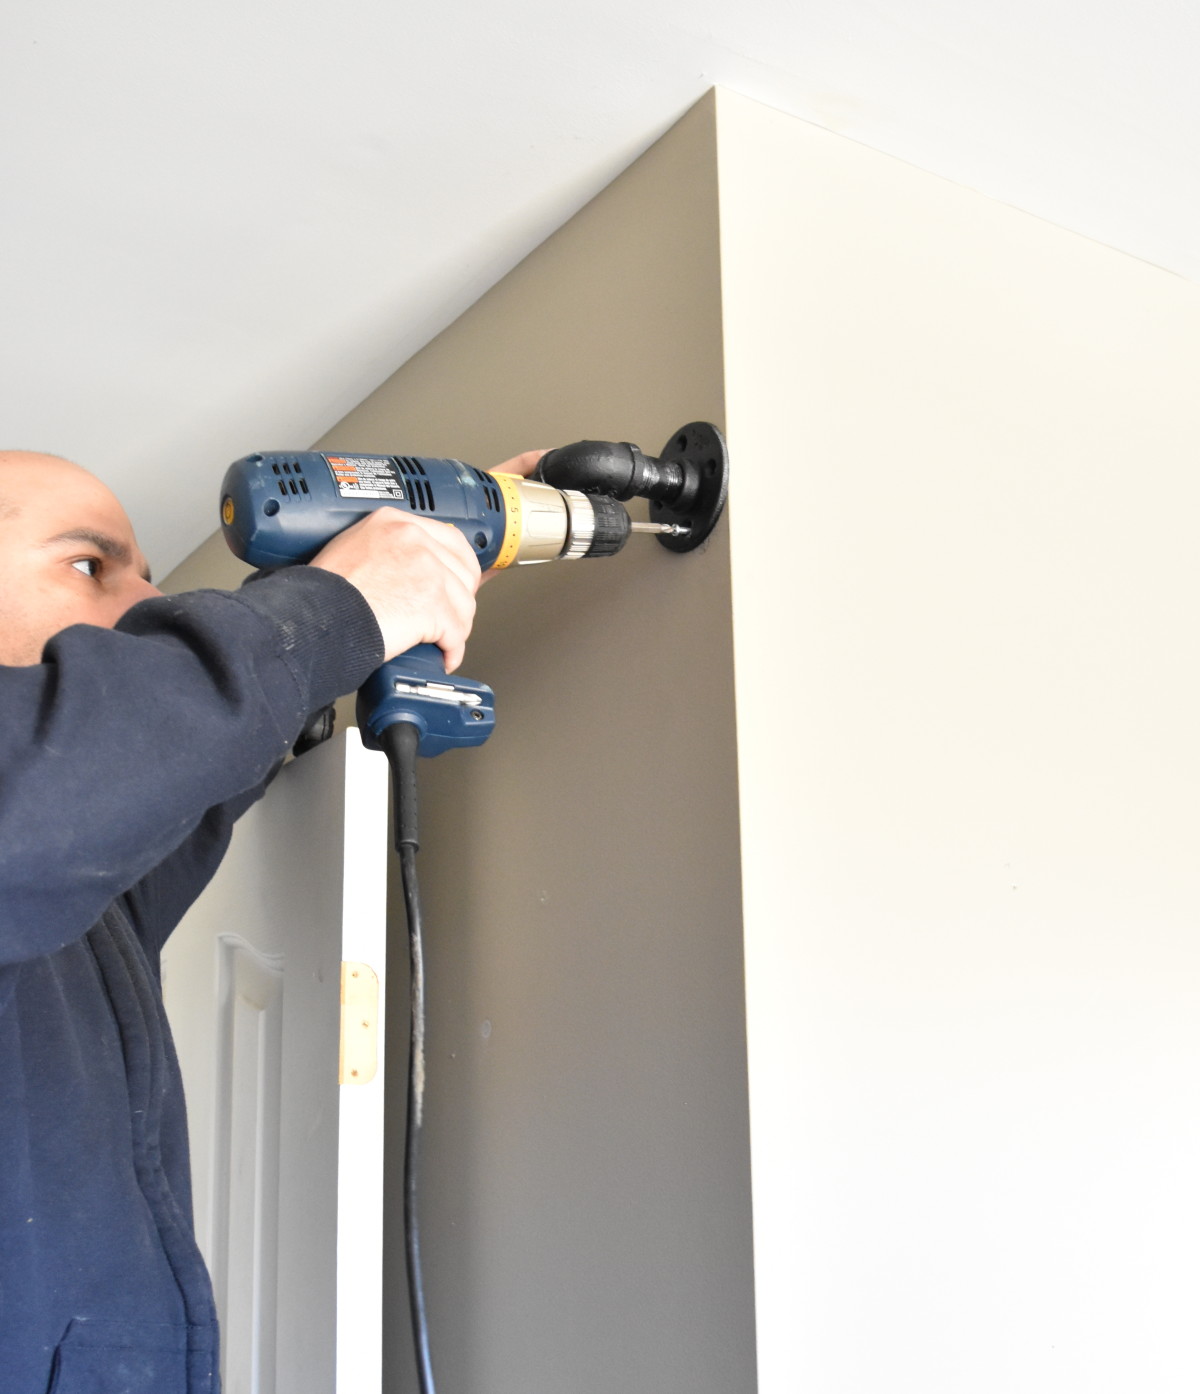
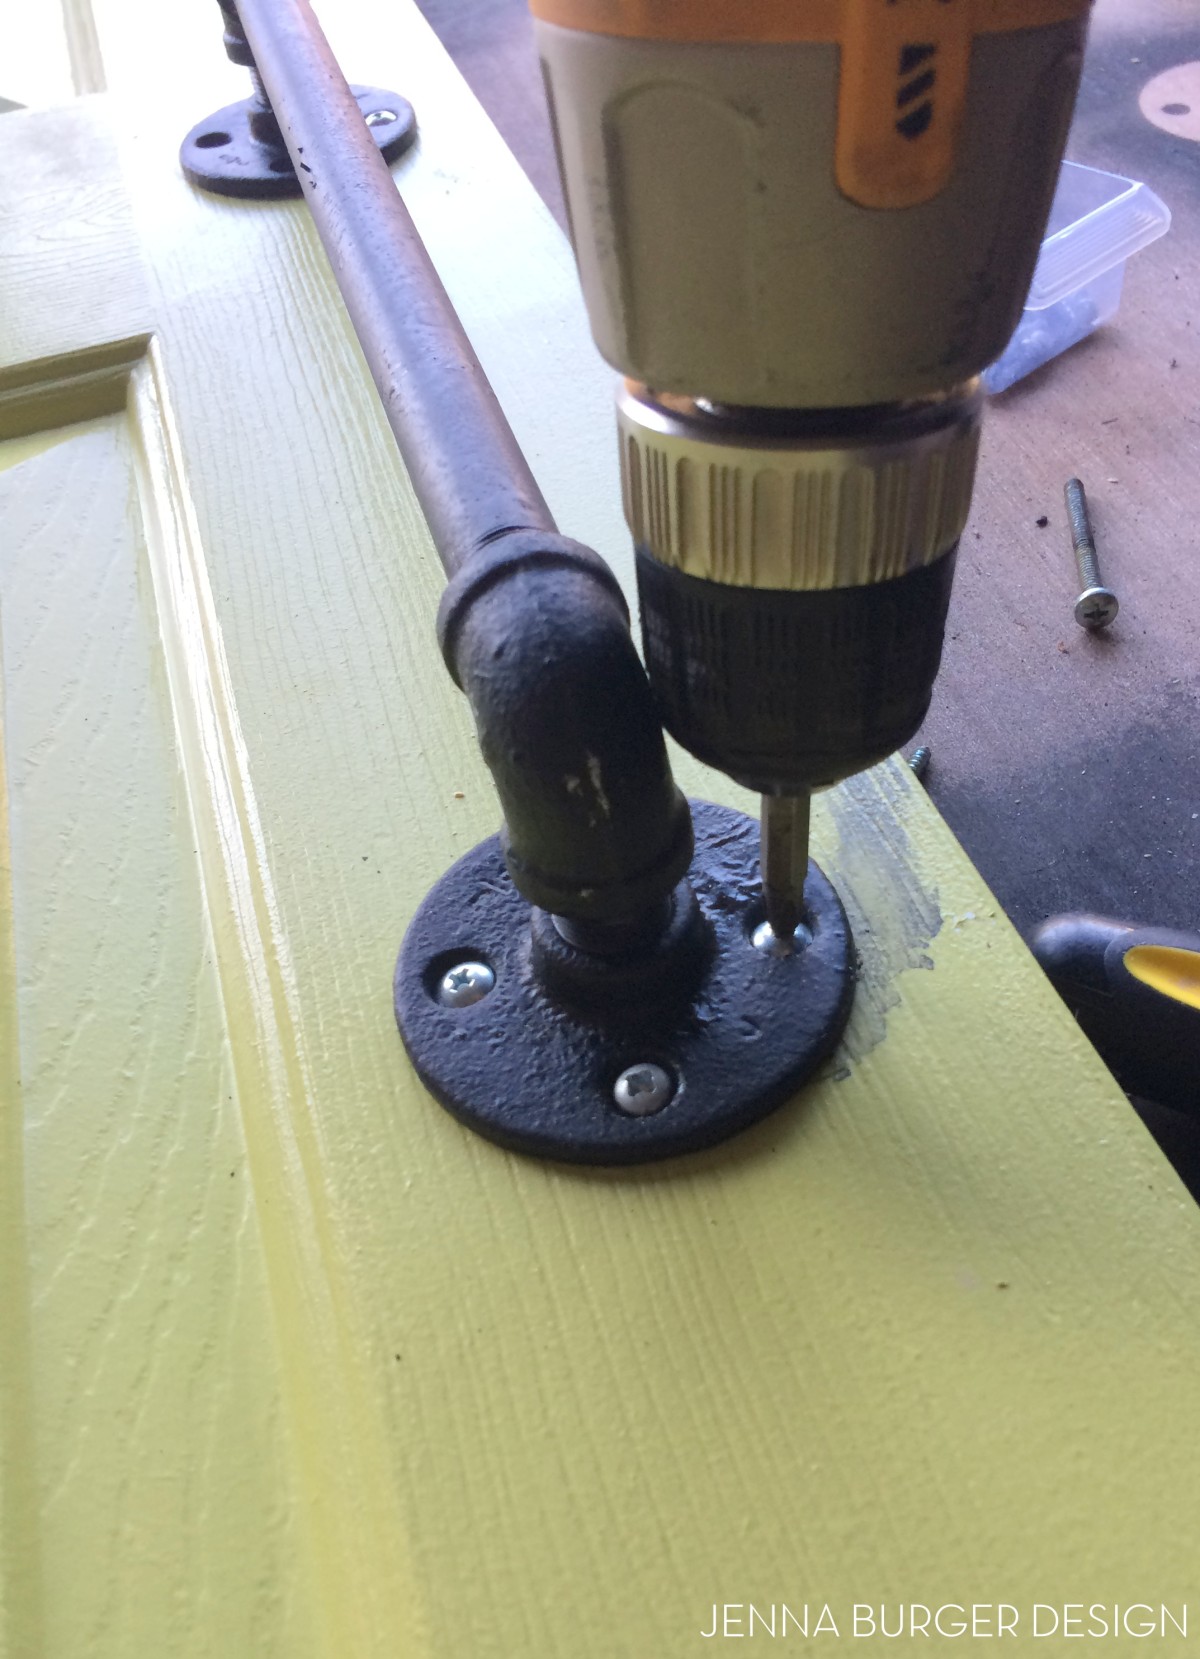
7 Upon measuring and marking the wall (sorry, no pictures, all hands on deck), we were set to install the plumbing pipe. Using 1.5″ long screws (no anchors needed because we drilled into a stud) we installed the (2) flanges to the wall.
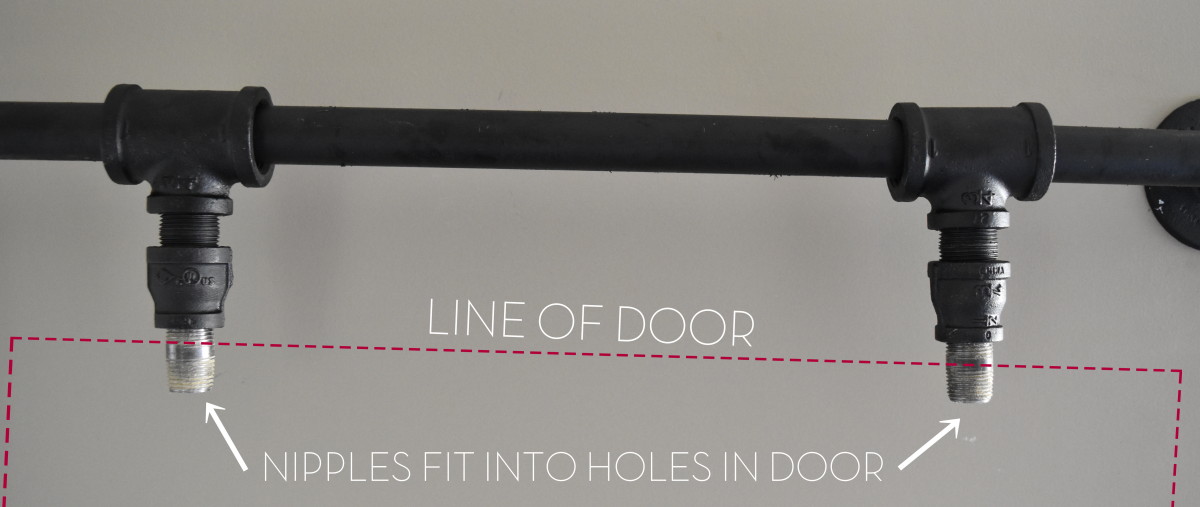
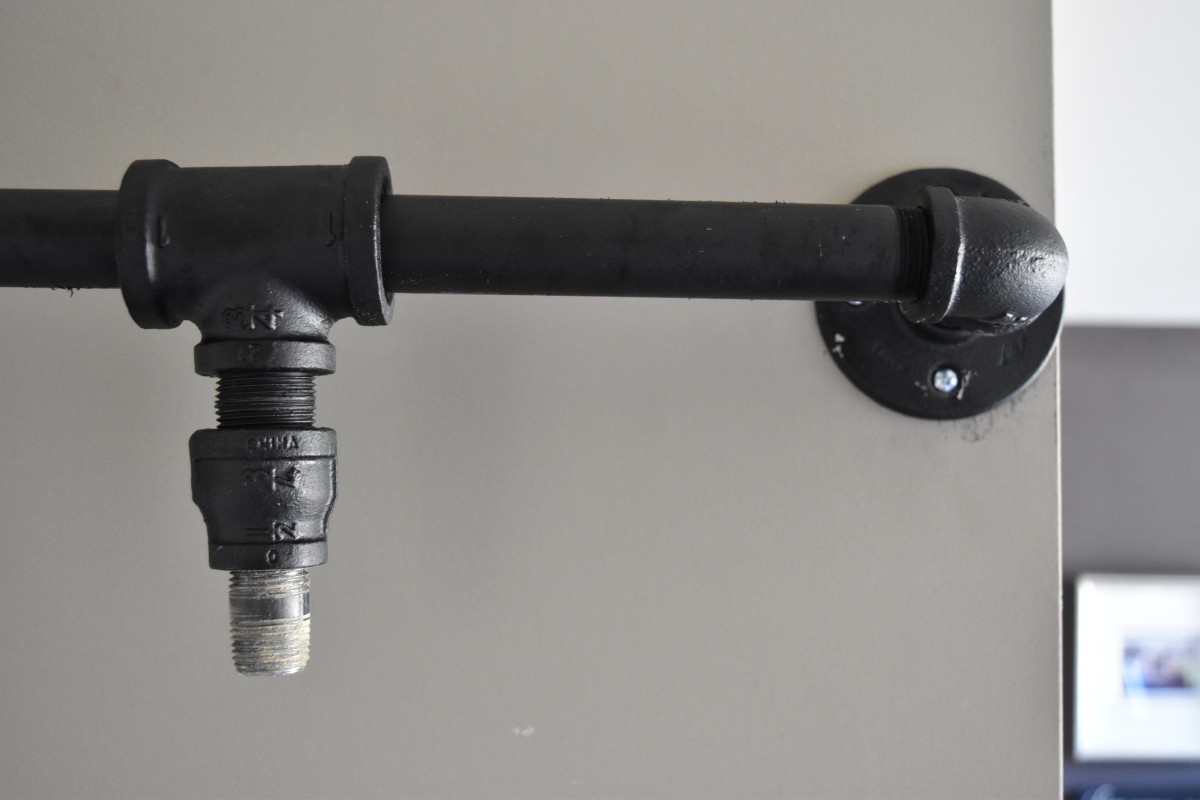
The nipple fittings held on by the tee fittings slide into the holes in the top of the door. The drilled holes are just slightly larger than the nipples so they fit snug, BUT the door can easily come out any time.
The reducing coupling fitting wasn’t originally planned for. That was a part we added later because the 3/4″ nipple fitting (that comes out of the tee fitting) was too large to fit into a hole in the top of the door. This reducing coupling fitting allows the transition from a 3/4″ nipple fitting to a 1/2″ nipple fitting.
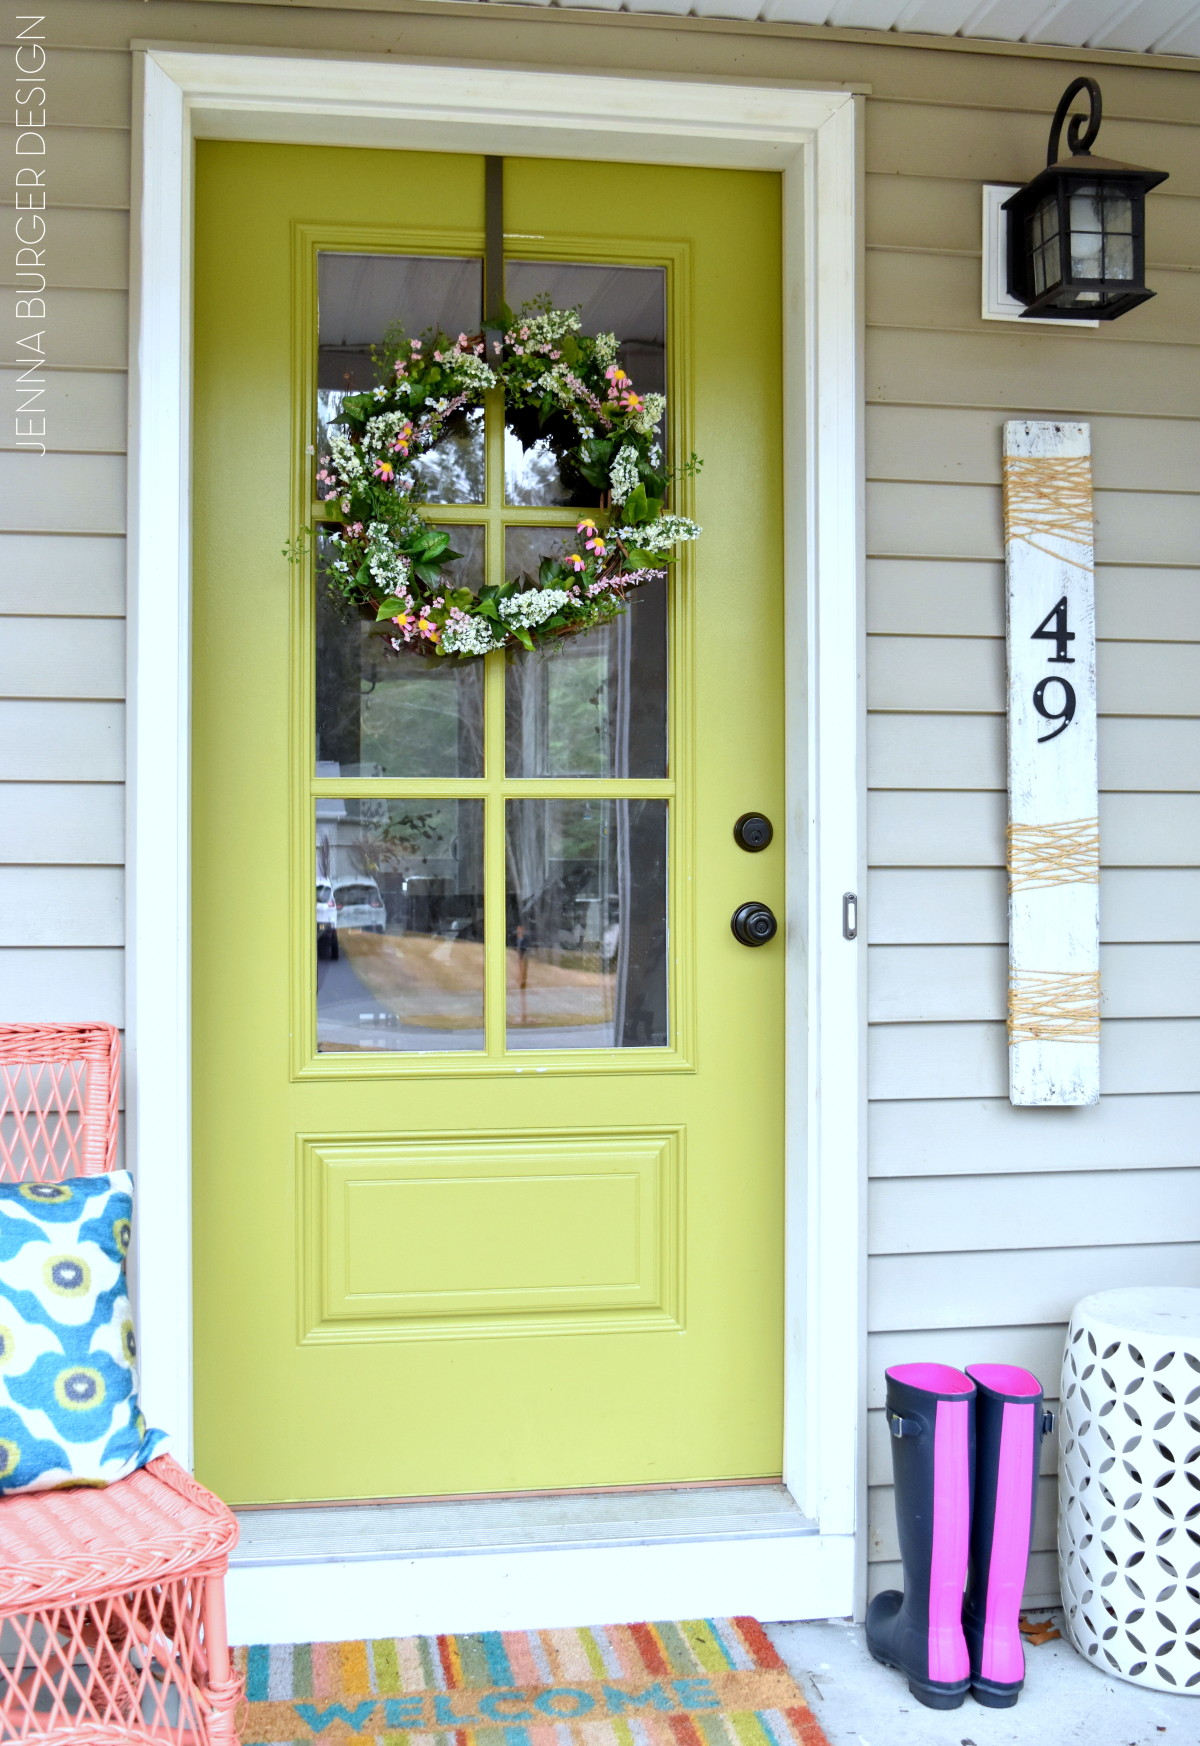
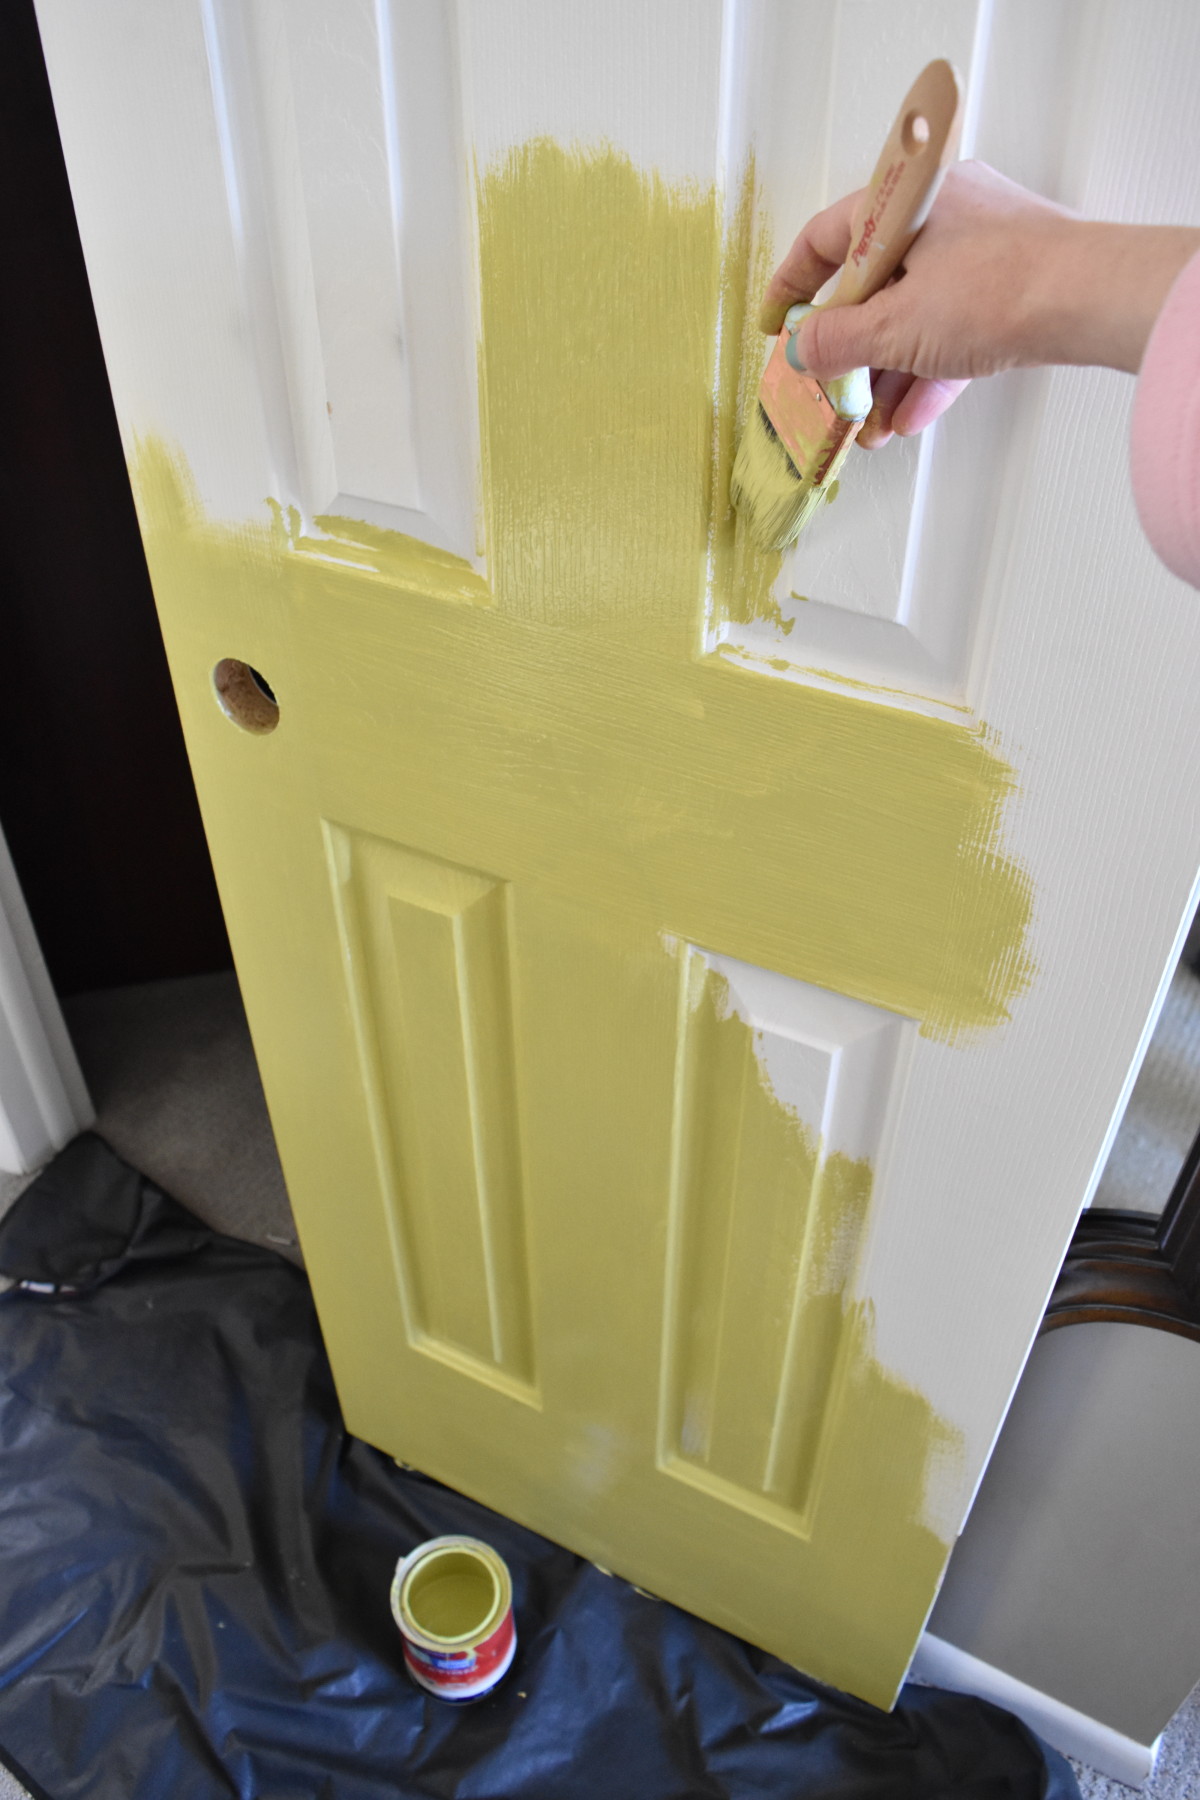
8 Once the track + door were place, I painted it a fun + vibrant green hue – it ties with the same color used for the DIY chalk paint desk transformation. The color is Benjamin Moore Martini Olive CSP-890, which I had color matched at Lowe’s using Valspar Signature Paint.
9 I also painted the screws that hold the track using black paint.
10 Once the I painted the door face with 2 coats of paint, I added a door handle using plumbing pipe parts.
And finally, finally, finally, it was COMPLETE! Phew, it took a village to get this project done…
With any DIY project there is a learning curve and hopefully if you tackle this project, it’ll be smoother sailing with the kinks ironed out from my experience.
THE RESULT
Something to note, this is a DIY track with parts that are metal on metal. The door will go back and forth, but not with ease as a typical rolling door track. When I first installed the track, it was very difficult to “slide” the door – another hurdle – but I added a lot of lubricant (actually I used petroleum jelly) to the long pole. Adding the lubricant has made moving the door a lot easier.
That being said, this DIY track is a whole lot less expensive than true rolling door hardware, BUT I wouldn’t use it for areas that need privacy with high-traffic use multiple times a day. For us, this is DIY door is perfect for the master closet since most of the time it’s left open. As a main hall closet, maybe not so much.
This DIY rolling door came together in part with the tutorial by Kristi @ Addicted 2 Decorating+ some sleuthy thinking and planning on my part for how to make it work for this space. Because of the limited wall area, a standard track was too big, so without going custom, this was the only solution.
In the end, I love the result. I’ll be honest though, it didn’t come without a few hiccups and flaws, but it absolutely suits the purpose for the setting.
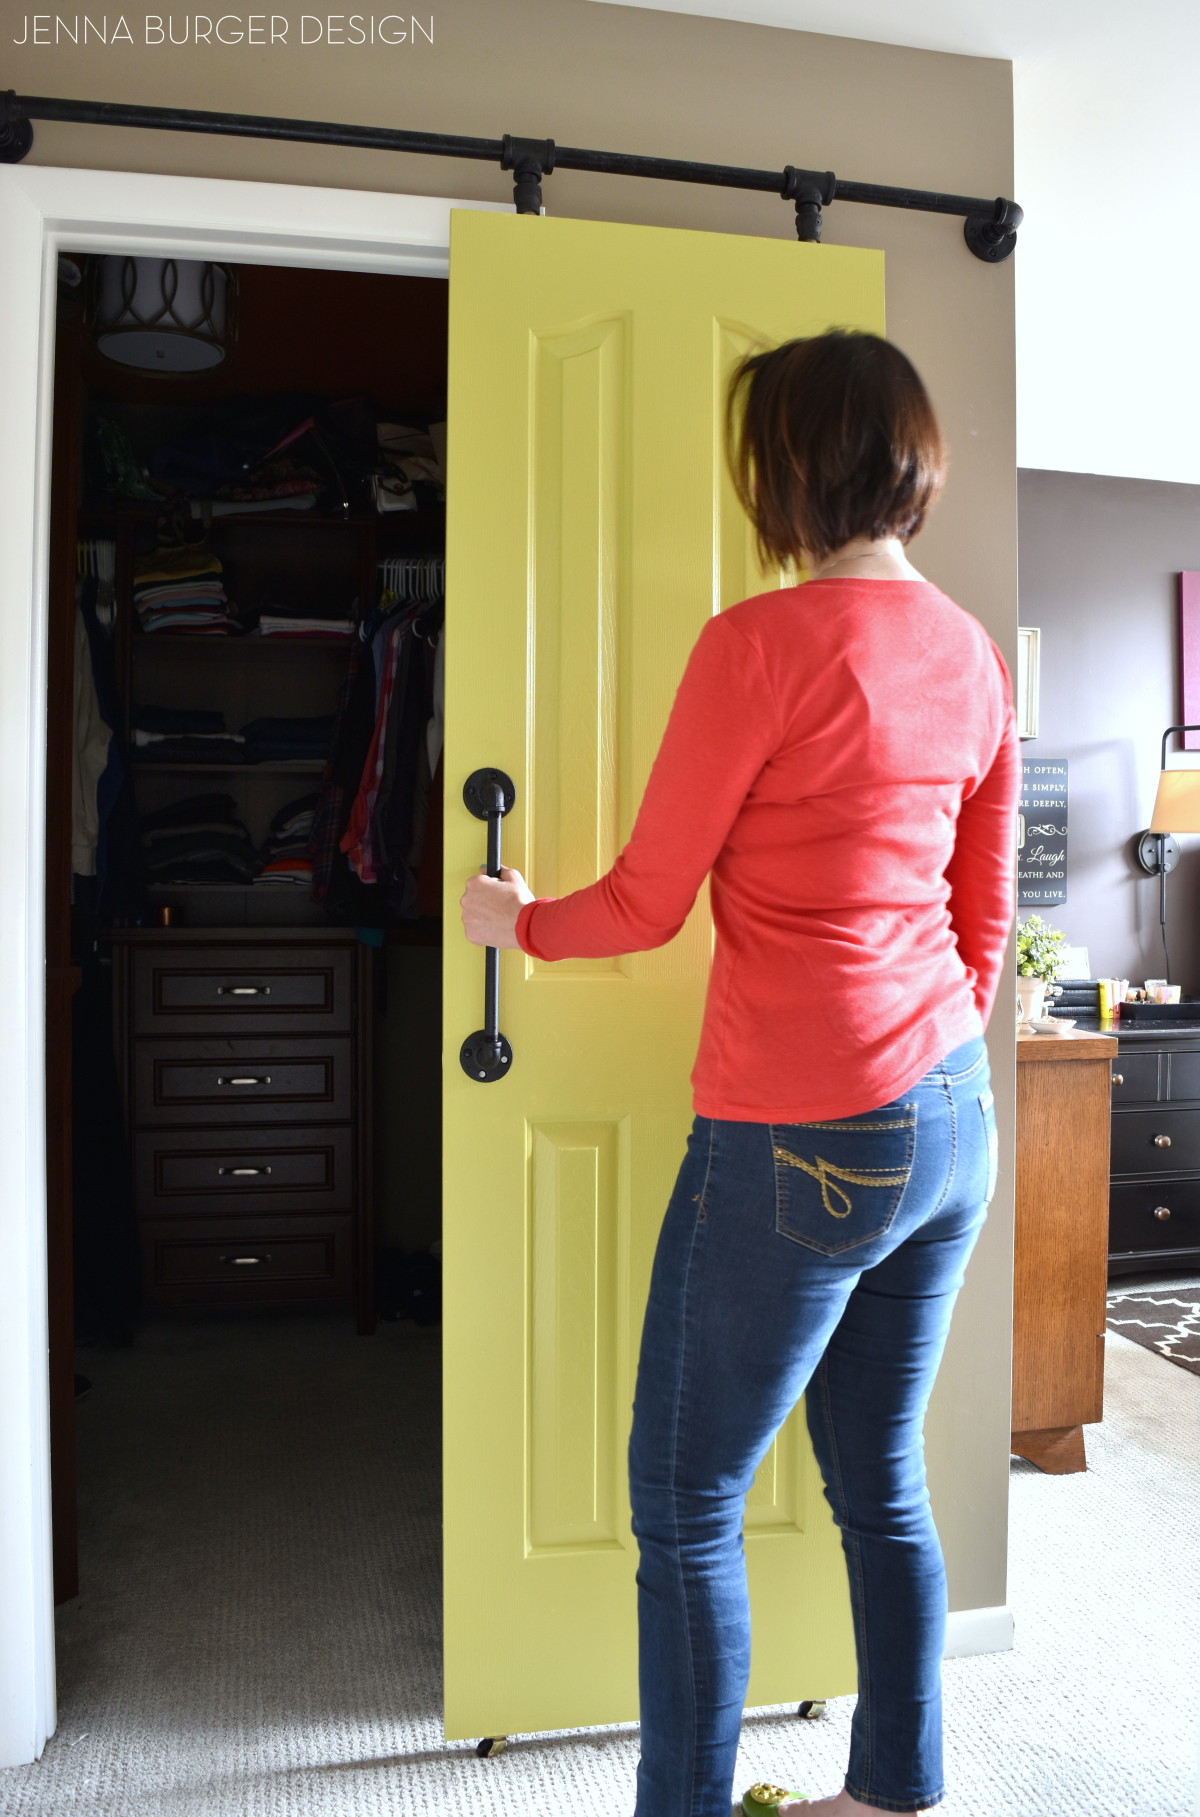
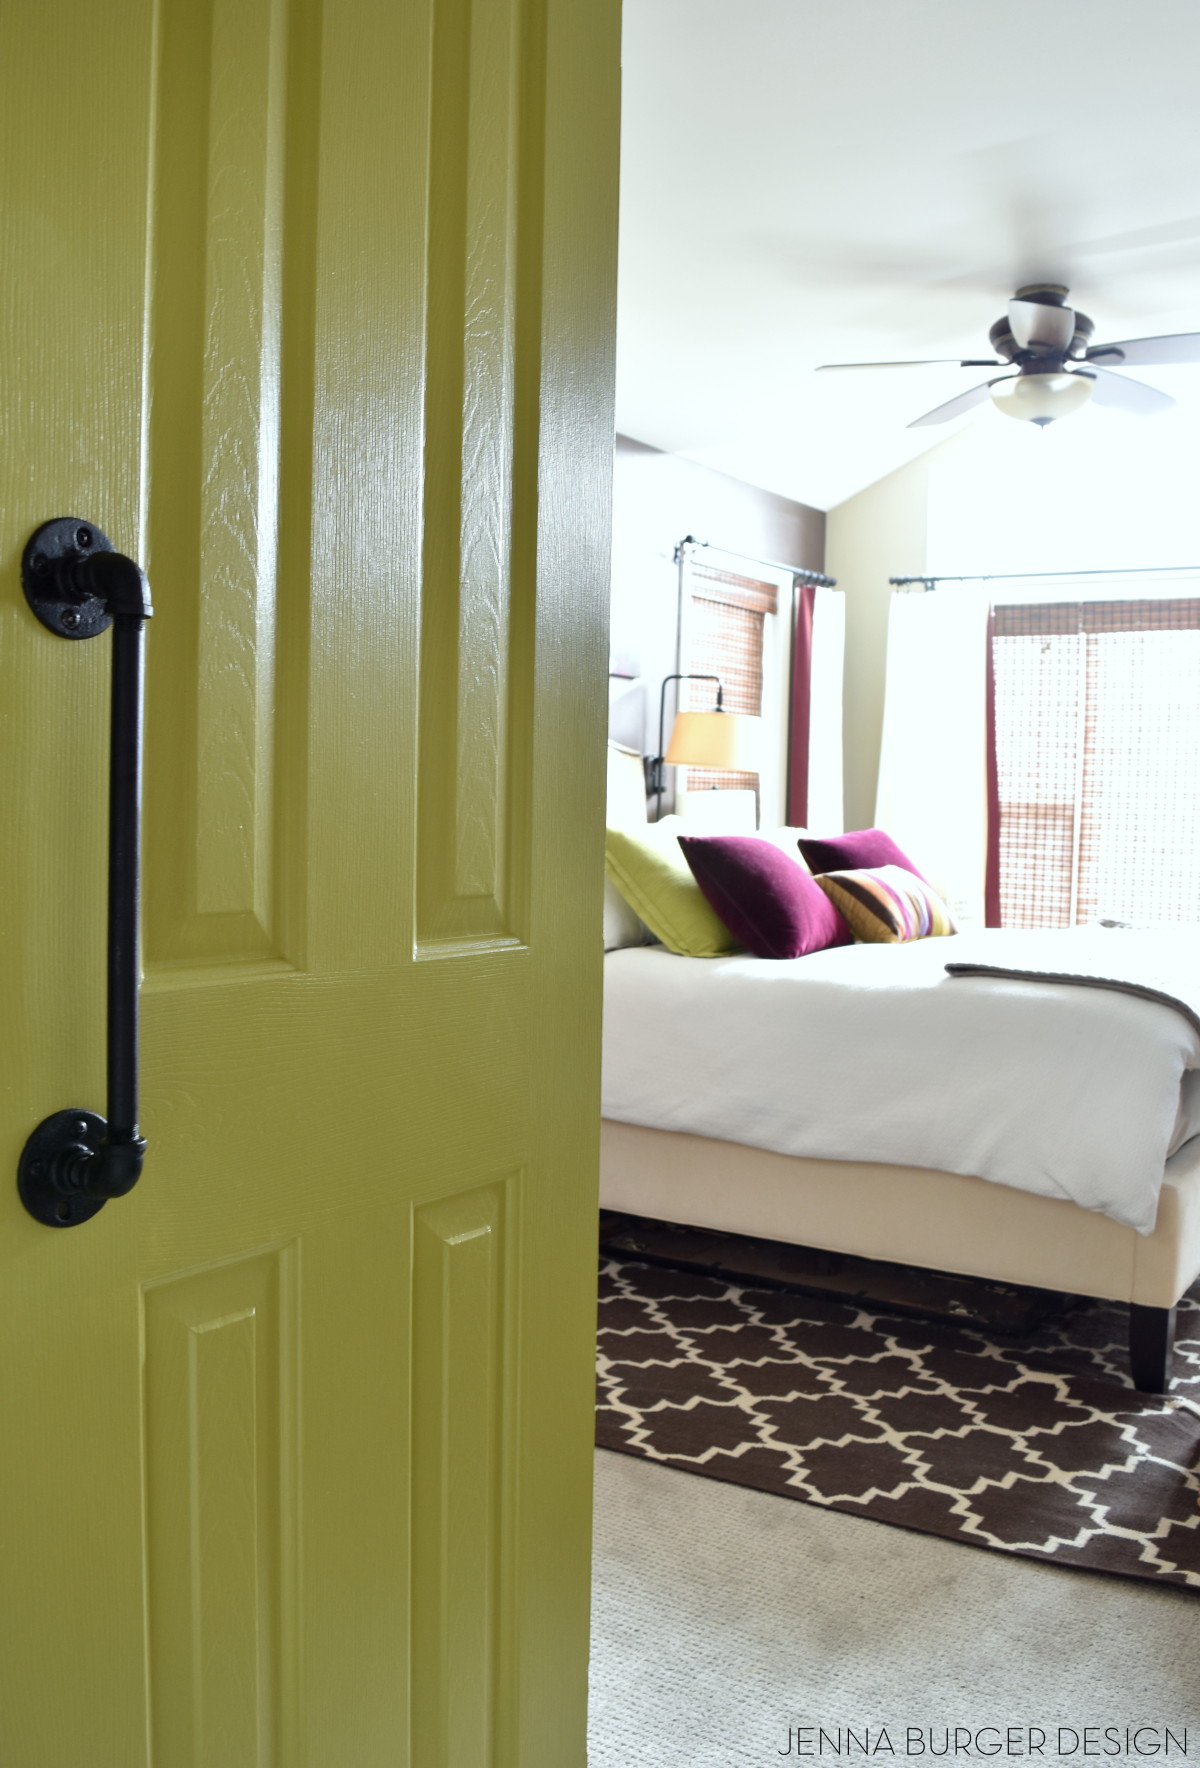
It’s definitely been nice to get some privacy – on a rare occasion – and see a pop of color when entering into the room.
AND on the random days when I don’t want to clean up the closet, I just close the door…
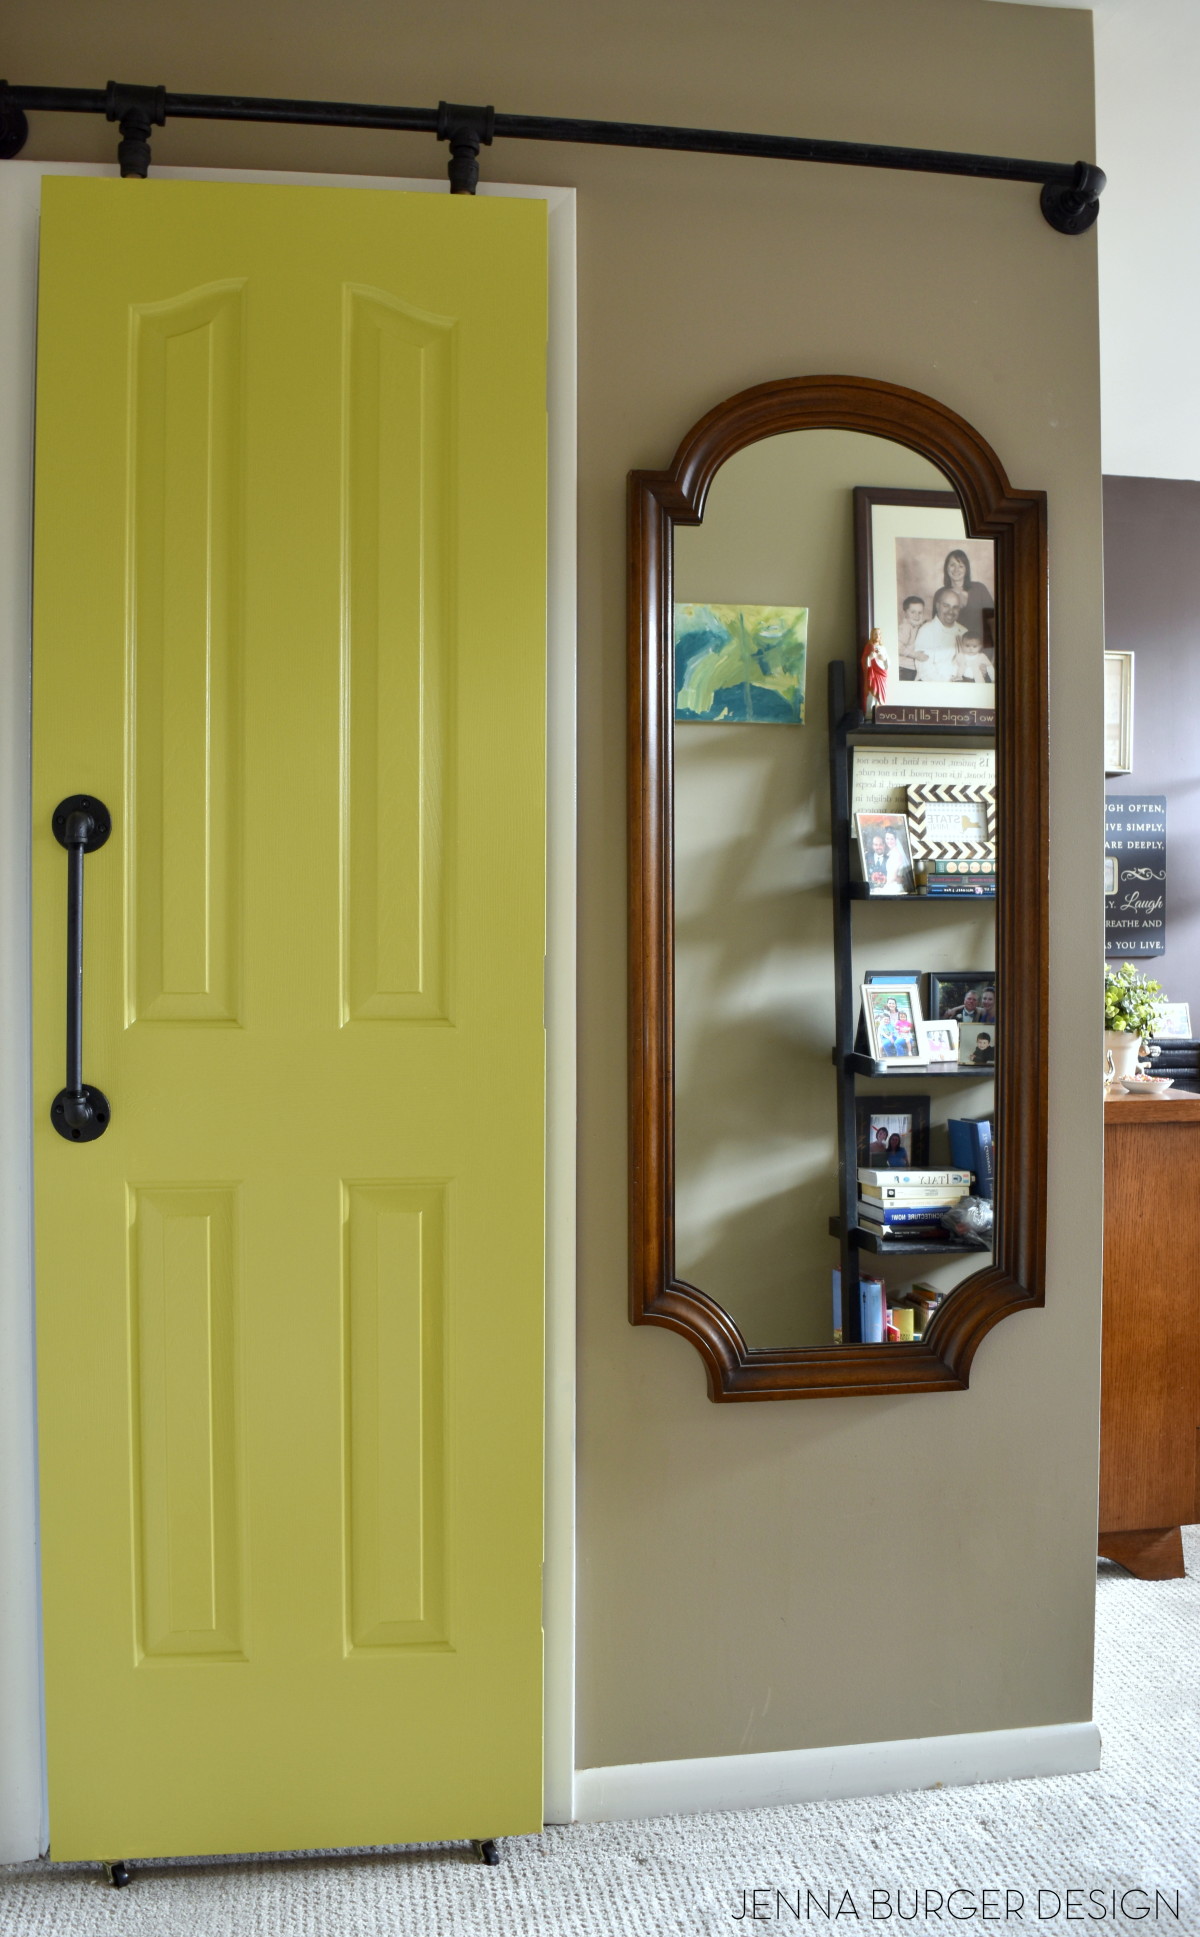
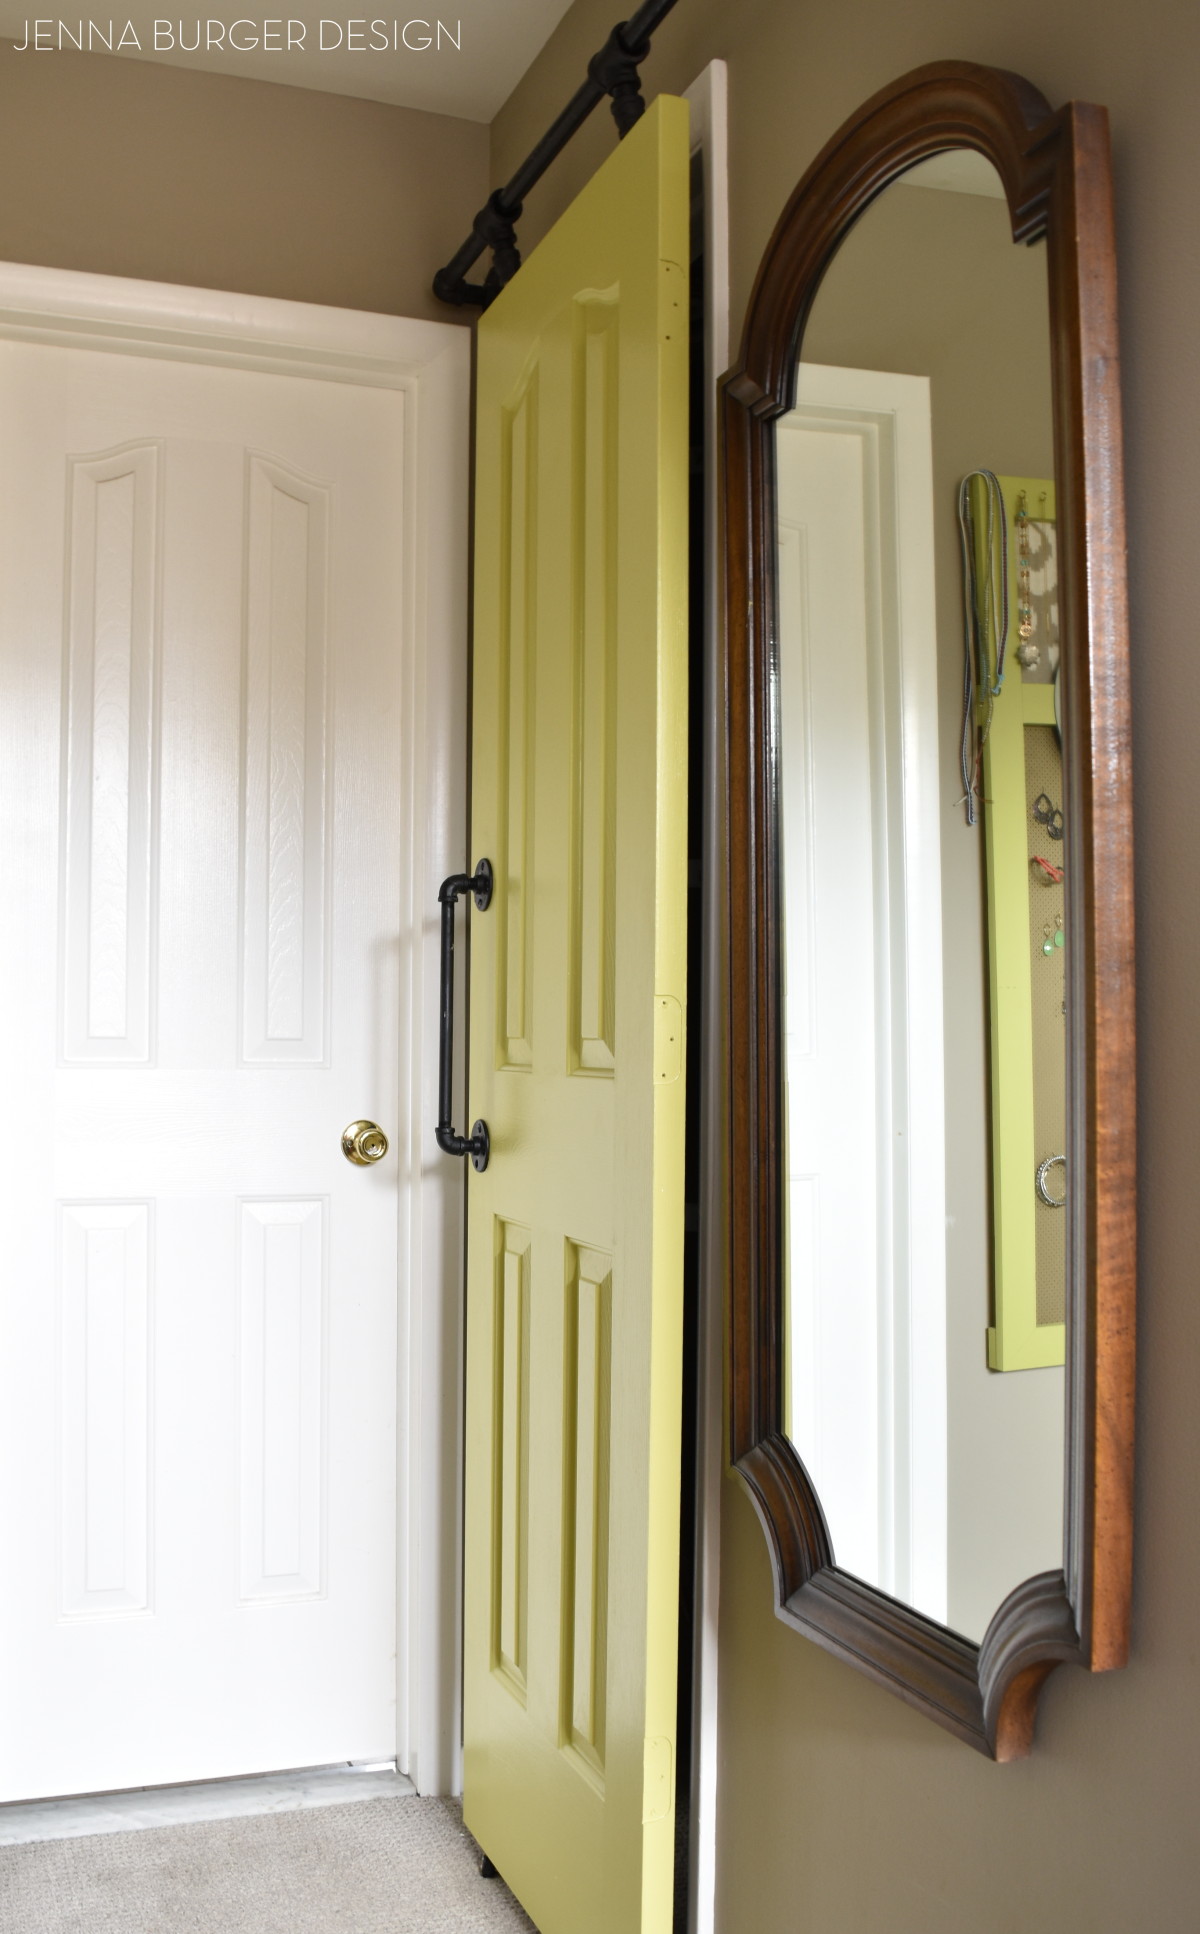
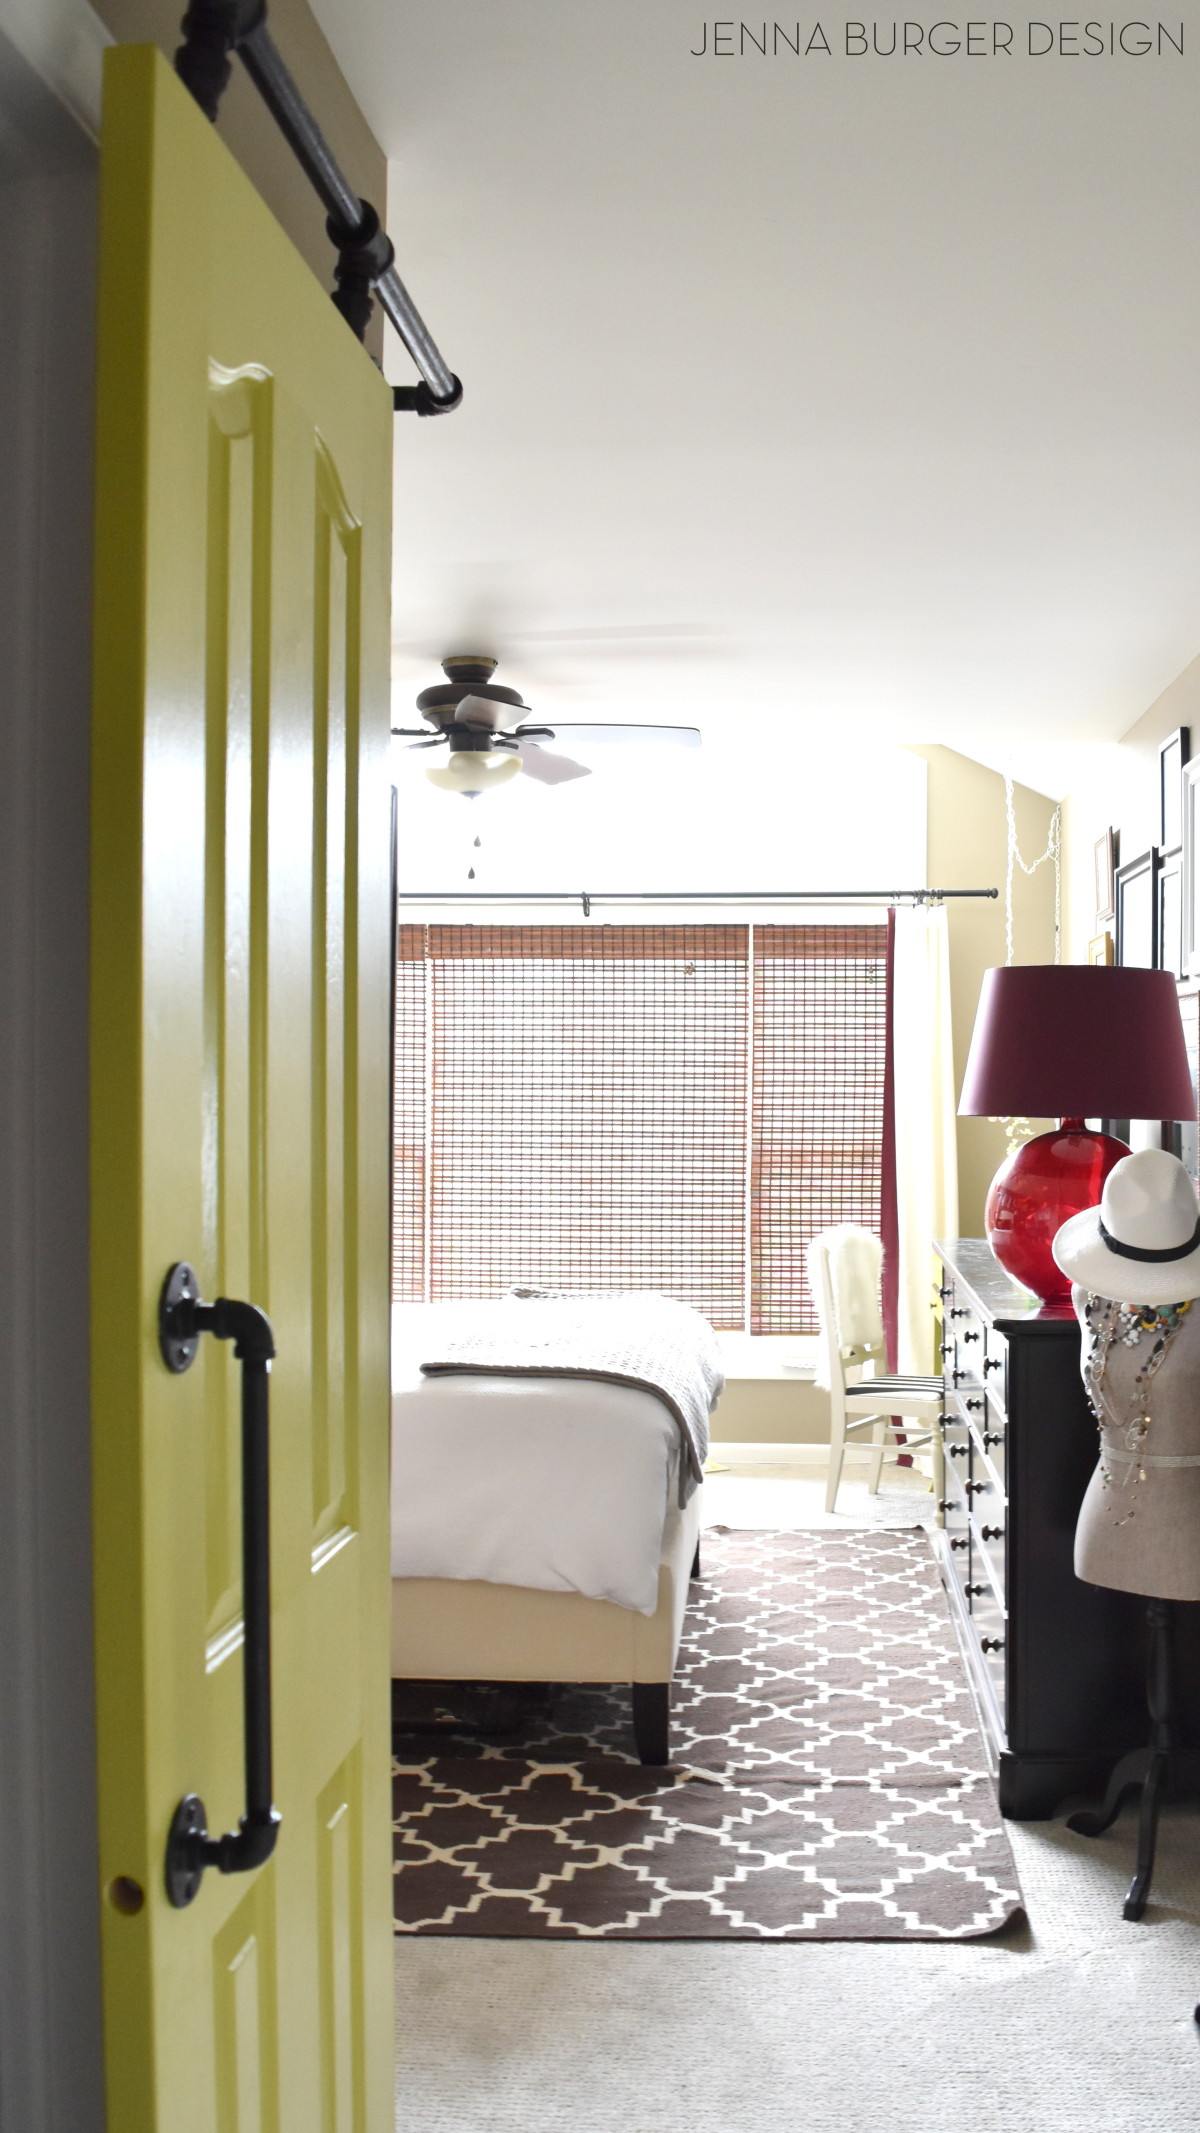
The view from the side. Thankfully the projection of the door on the track allowed enough room for my mirror to stay in place.
Now you see it… Now you don’t…
Here’s a peek at how the door looks with the rest of the bedroom. There are pops of this citron color all over…
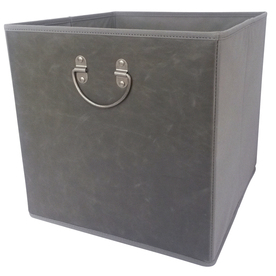
While I was working on the closet, I got a bit sidetracked and gave it a mini-makeover. Some new organizational items – hooks + bins – made all the difference to jazz this space up.
Lowe’s has these awesome new bins that are faux leather. I feel in love when I saw them. They are oversized too (13″ x 13″), so they hold alot. They’re perfect for holding scarves, small bags, and summer flip flops.
Here’s a peek at the inside of my closet…
That’s a wrap!
Love this project and want to tackle it now or later? Save or Pin it to your favorite DIY board…
Despite my challenges, the result of this project for the price is a great one. Even though it resulted in my grays than I hoped, it was worth the few tears to achieve the style + function + look I was hoping for, and at the end of the day that’s what I call a success!
DISCLAIMER: THIS DO IT YOURSELF PROJECT WAS IN COLLABORATION WITH LOWE’S. THE PROJECT IDEA + ALL OPINIONS ARE MY OWN.
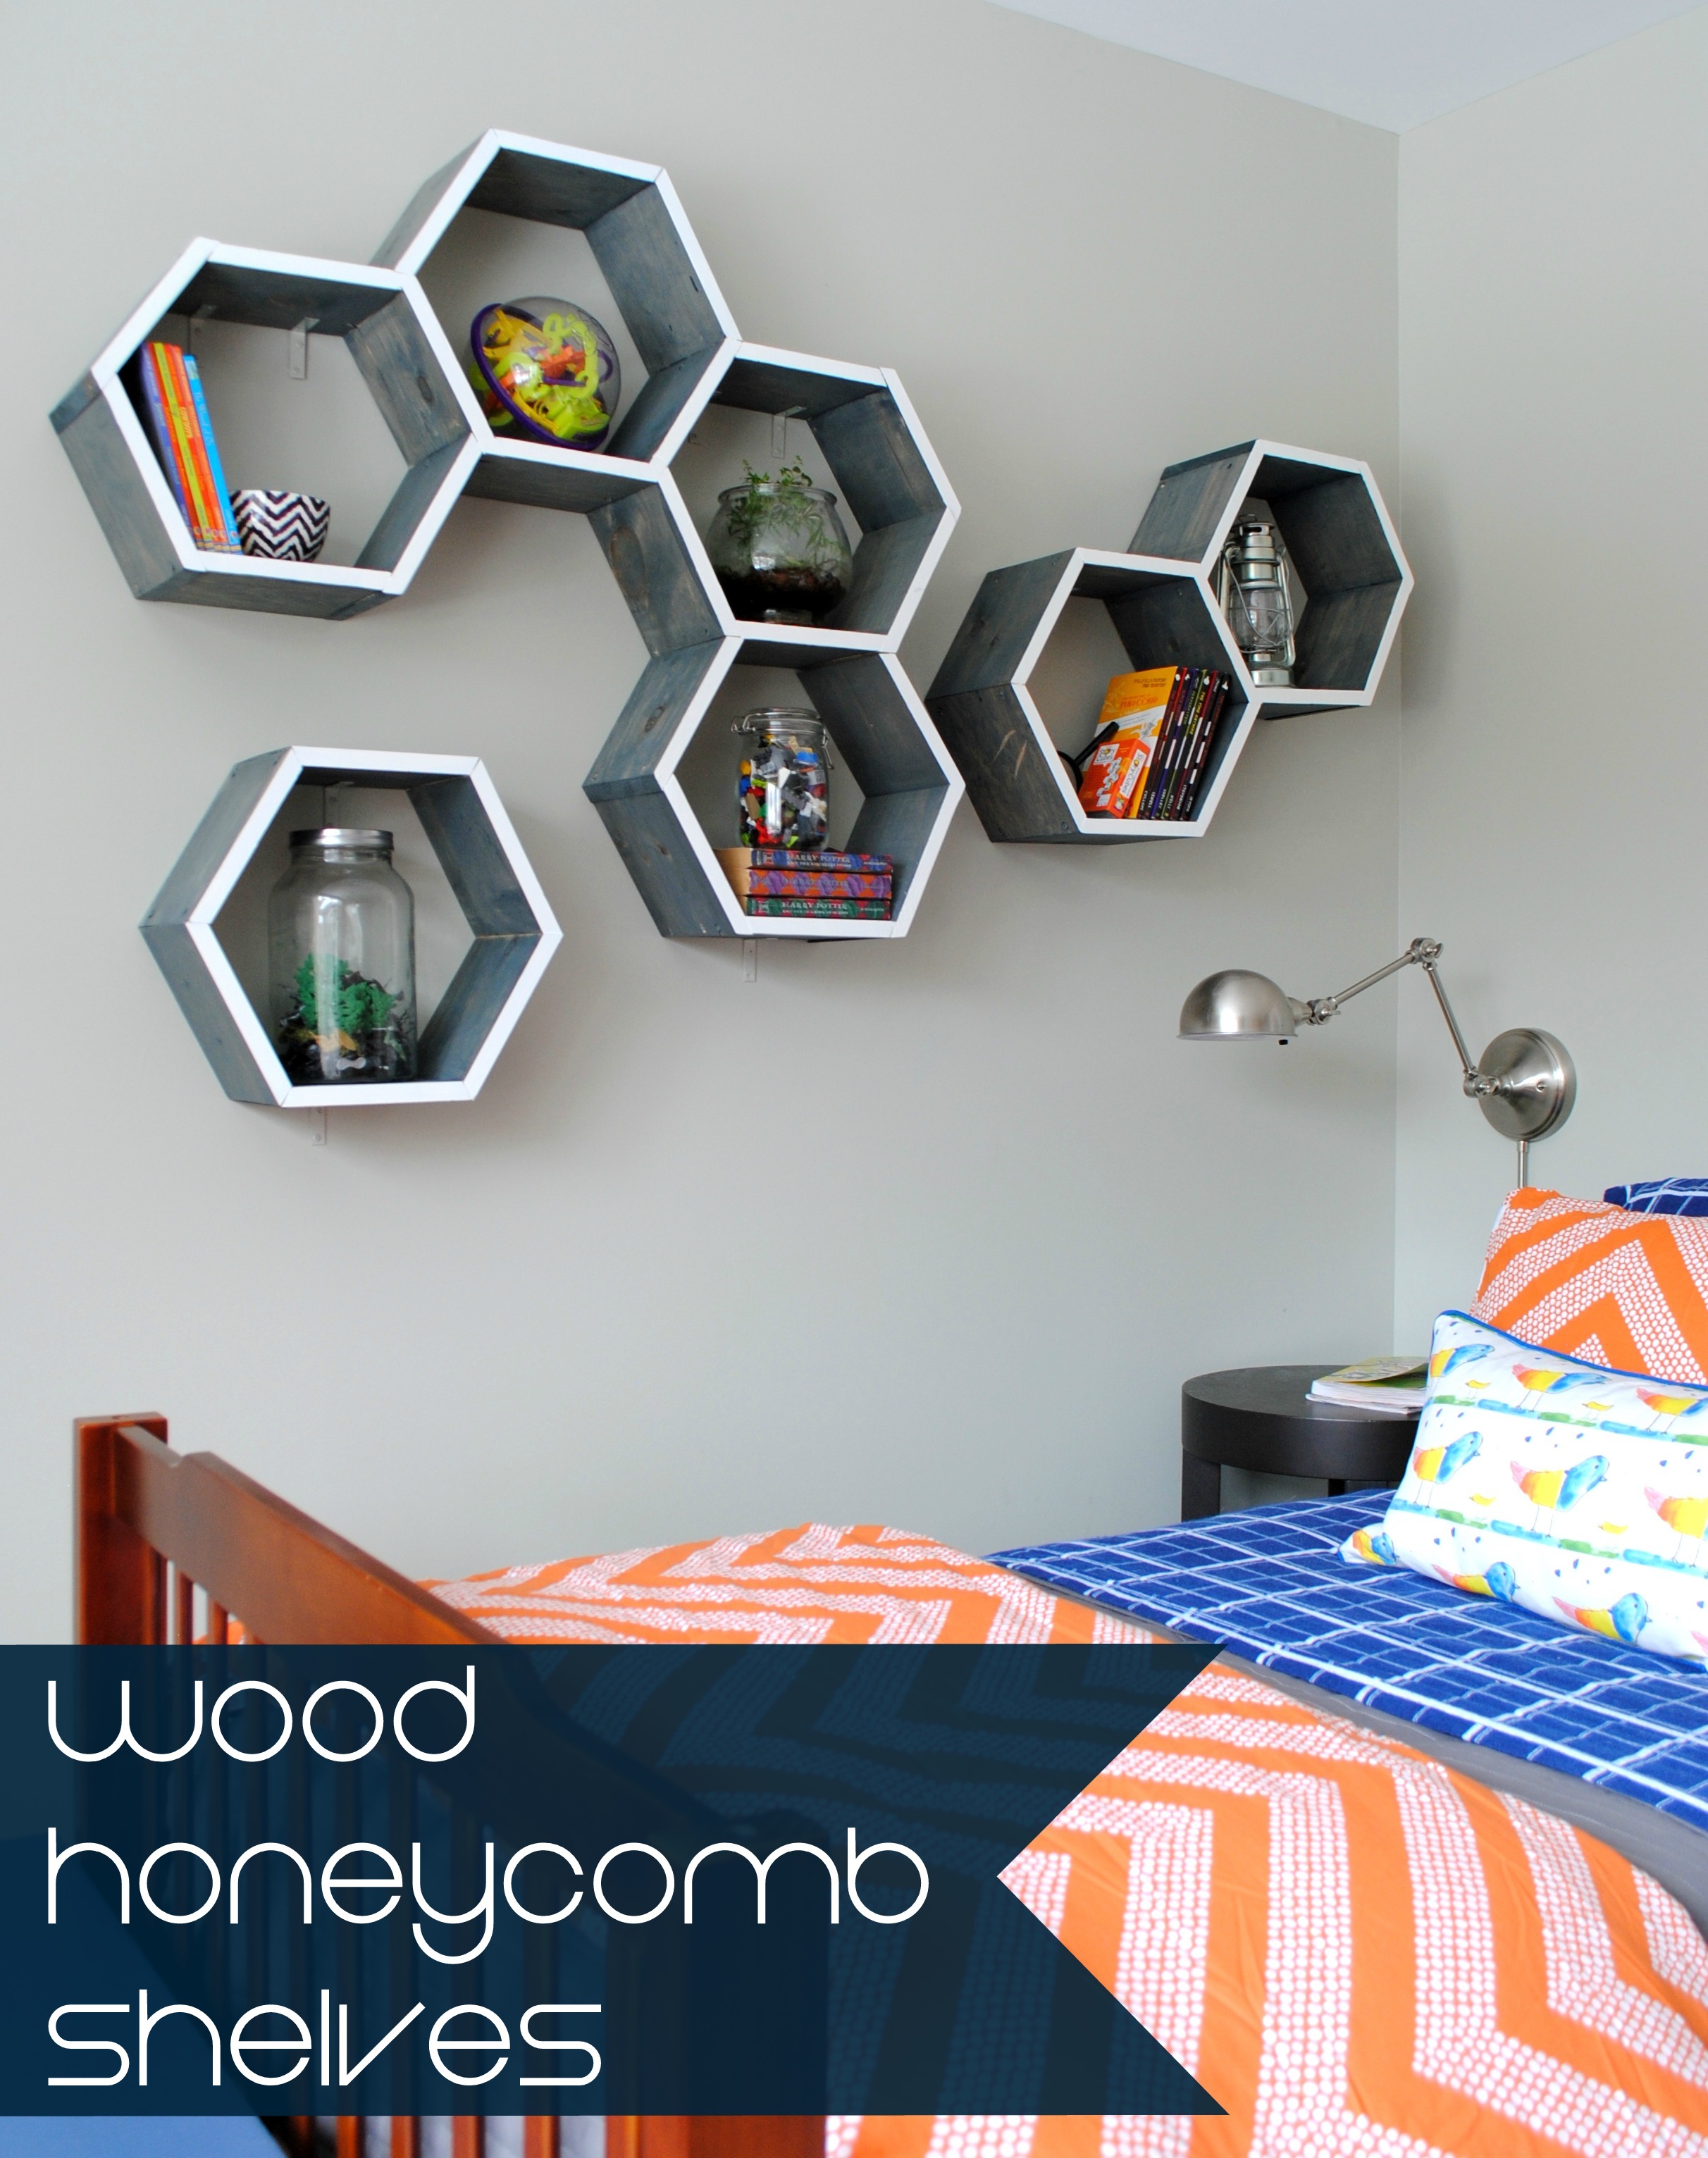
Even though we veered away from the original design for the revamped shared kids space, my son had his heart set on honeycomb shelves after I showed him the Land of Nod style. And since this mama can’t let her boy down, I had to pull through.
But instead of buying, what did I do? DIYed them, of course. After a little research & this post by A Beautiful Mess, I was confident to move forward.
Not only are these honeycomb / hexagon shelves functional, the whole ensemble is like a piece of art. And instead of painting the shelves a color or staining them a traditional wood finish, I chose an interesting blue hue which is in-trend and spot on with the other tones that I’ve introduced into the room.
Take a look…
The entire shelf composition runs the length of the twin bed, which is about 80″ long, and makes the entire wall truly come alive. This “installation” also parallels with my Lowe’s Creative challenge project for this month which focuses on introducing the submerged color trend of watery, cool blue hues into a project. With the size + interesting finish, this project is by far one of my favorites!
———————————–
Before we move forward, it has to be said that this project was a big challenge, but the bigger the venture, the better the result. I don’t often do large-scale woodworking projects and at times I thought it was going to be a big F-A-I-L, but in the end the honeycomb shelves MAKE THE ROOM. Take Away? Don’t be afraid to challenge yourself. Push through because in the end, it’ll be worth it!
———————————–
Like usual, before starting a larger scale project, I sketched out my idea and figured out the supplies I needed. This was the first sketch…
And then the shelves ended up evolving into this layout instead so not all of the shelves are actually attached…
Supplies I used:
(7) 1″ x 6″ x 6′ long pieces of wood – each shelf took approximately (1) board
1-1/2″ wood screws
1-1/2″ corner brackets
Plastic toggle anchors
Stain or Paint – depending on how you want to finish the shelf surface
Other supplies: miter saw, tape measure, drill, sander, level, pencil
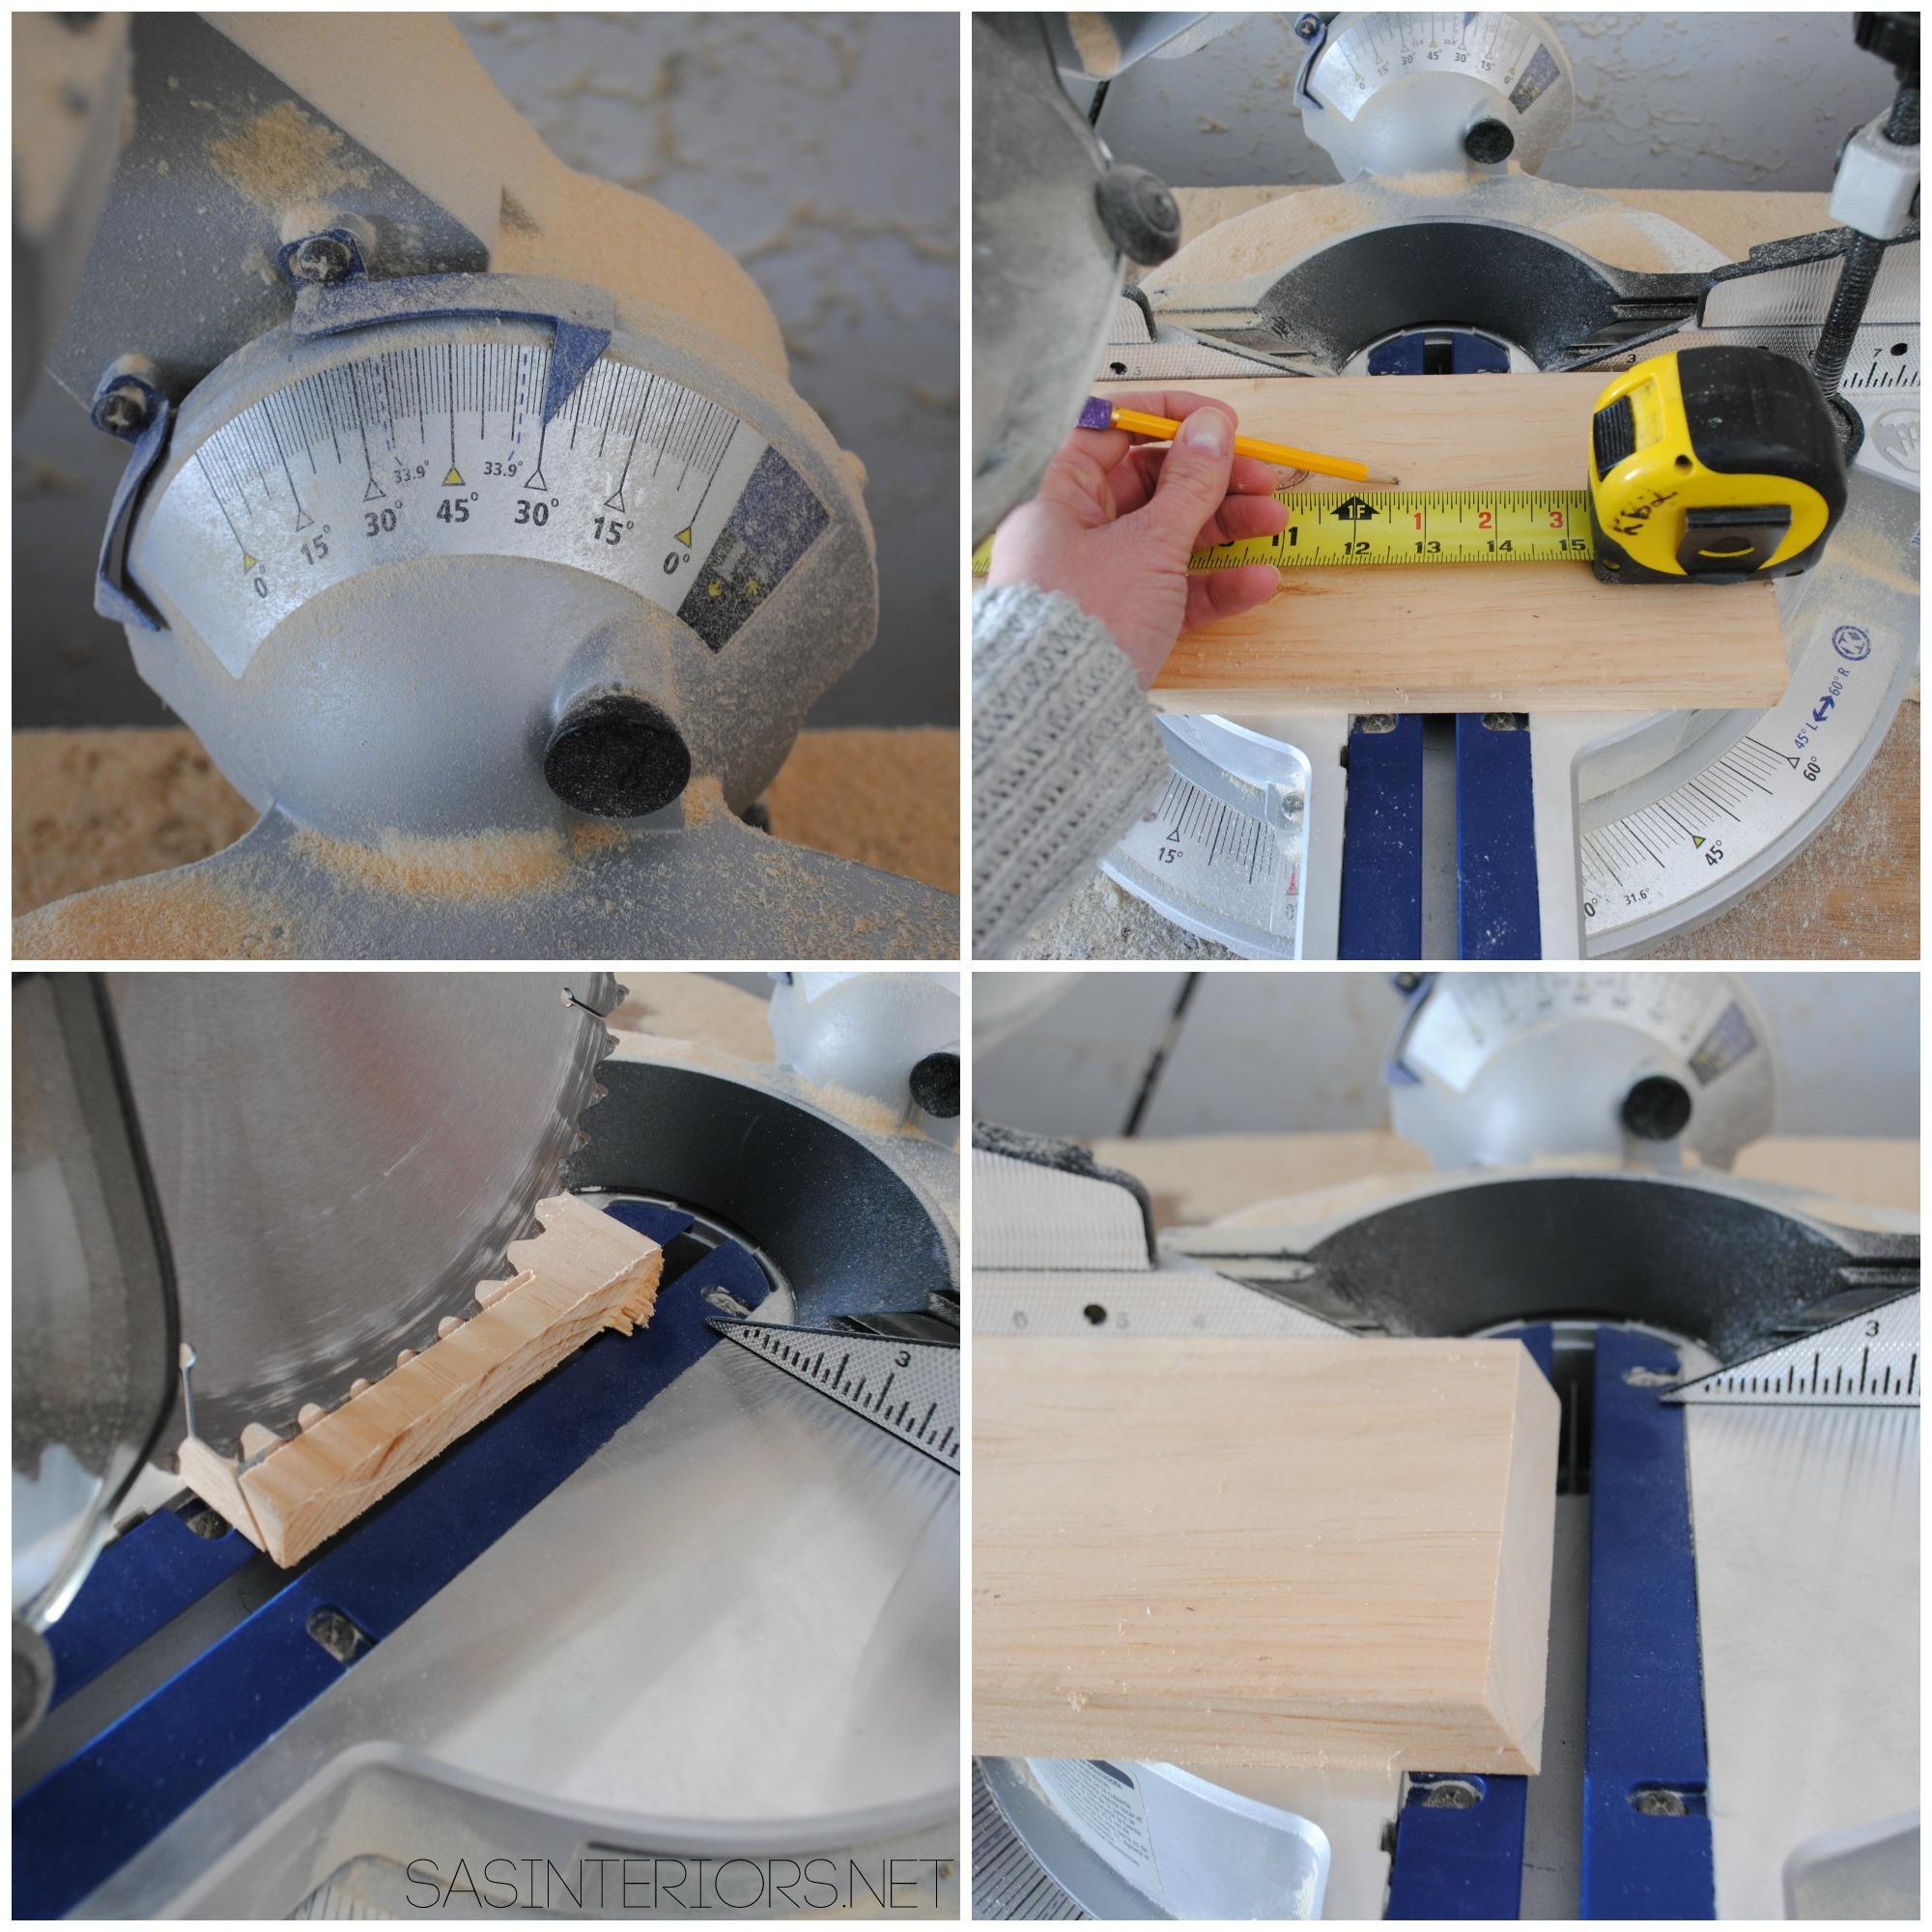
To save on time, I often have my wood cut while at shopping at Lowe’s, but for this project, I cut it at home because of the quantity needed + the angles.
Here are the steps I took:
1. I set the miter saw to 30 degrees and never touched the saw again for the entire project. This angle is crucial so each of the 6 pieces will make the perfect hexagon shape. I approximated that I wanted each finished shelf to be an overall dimension of about 14″ x 14″, and chose the length of 7″ for the long side of each piece.
After marking the wood with my tape measure + pencil, I made the first cut using the miter saw. Then I flipped the piece of wood over to make the second angled cut.
This is what the first piece looked like when cut.
Then I cut about 42 more…
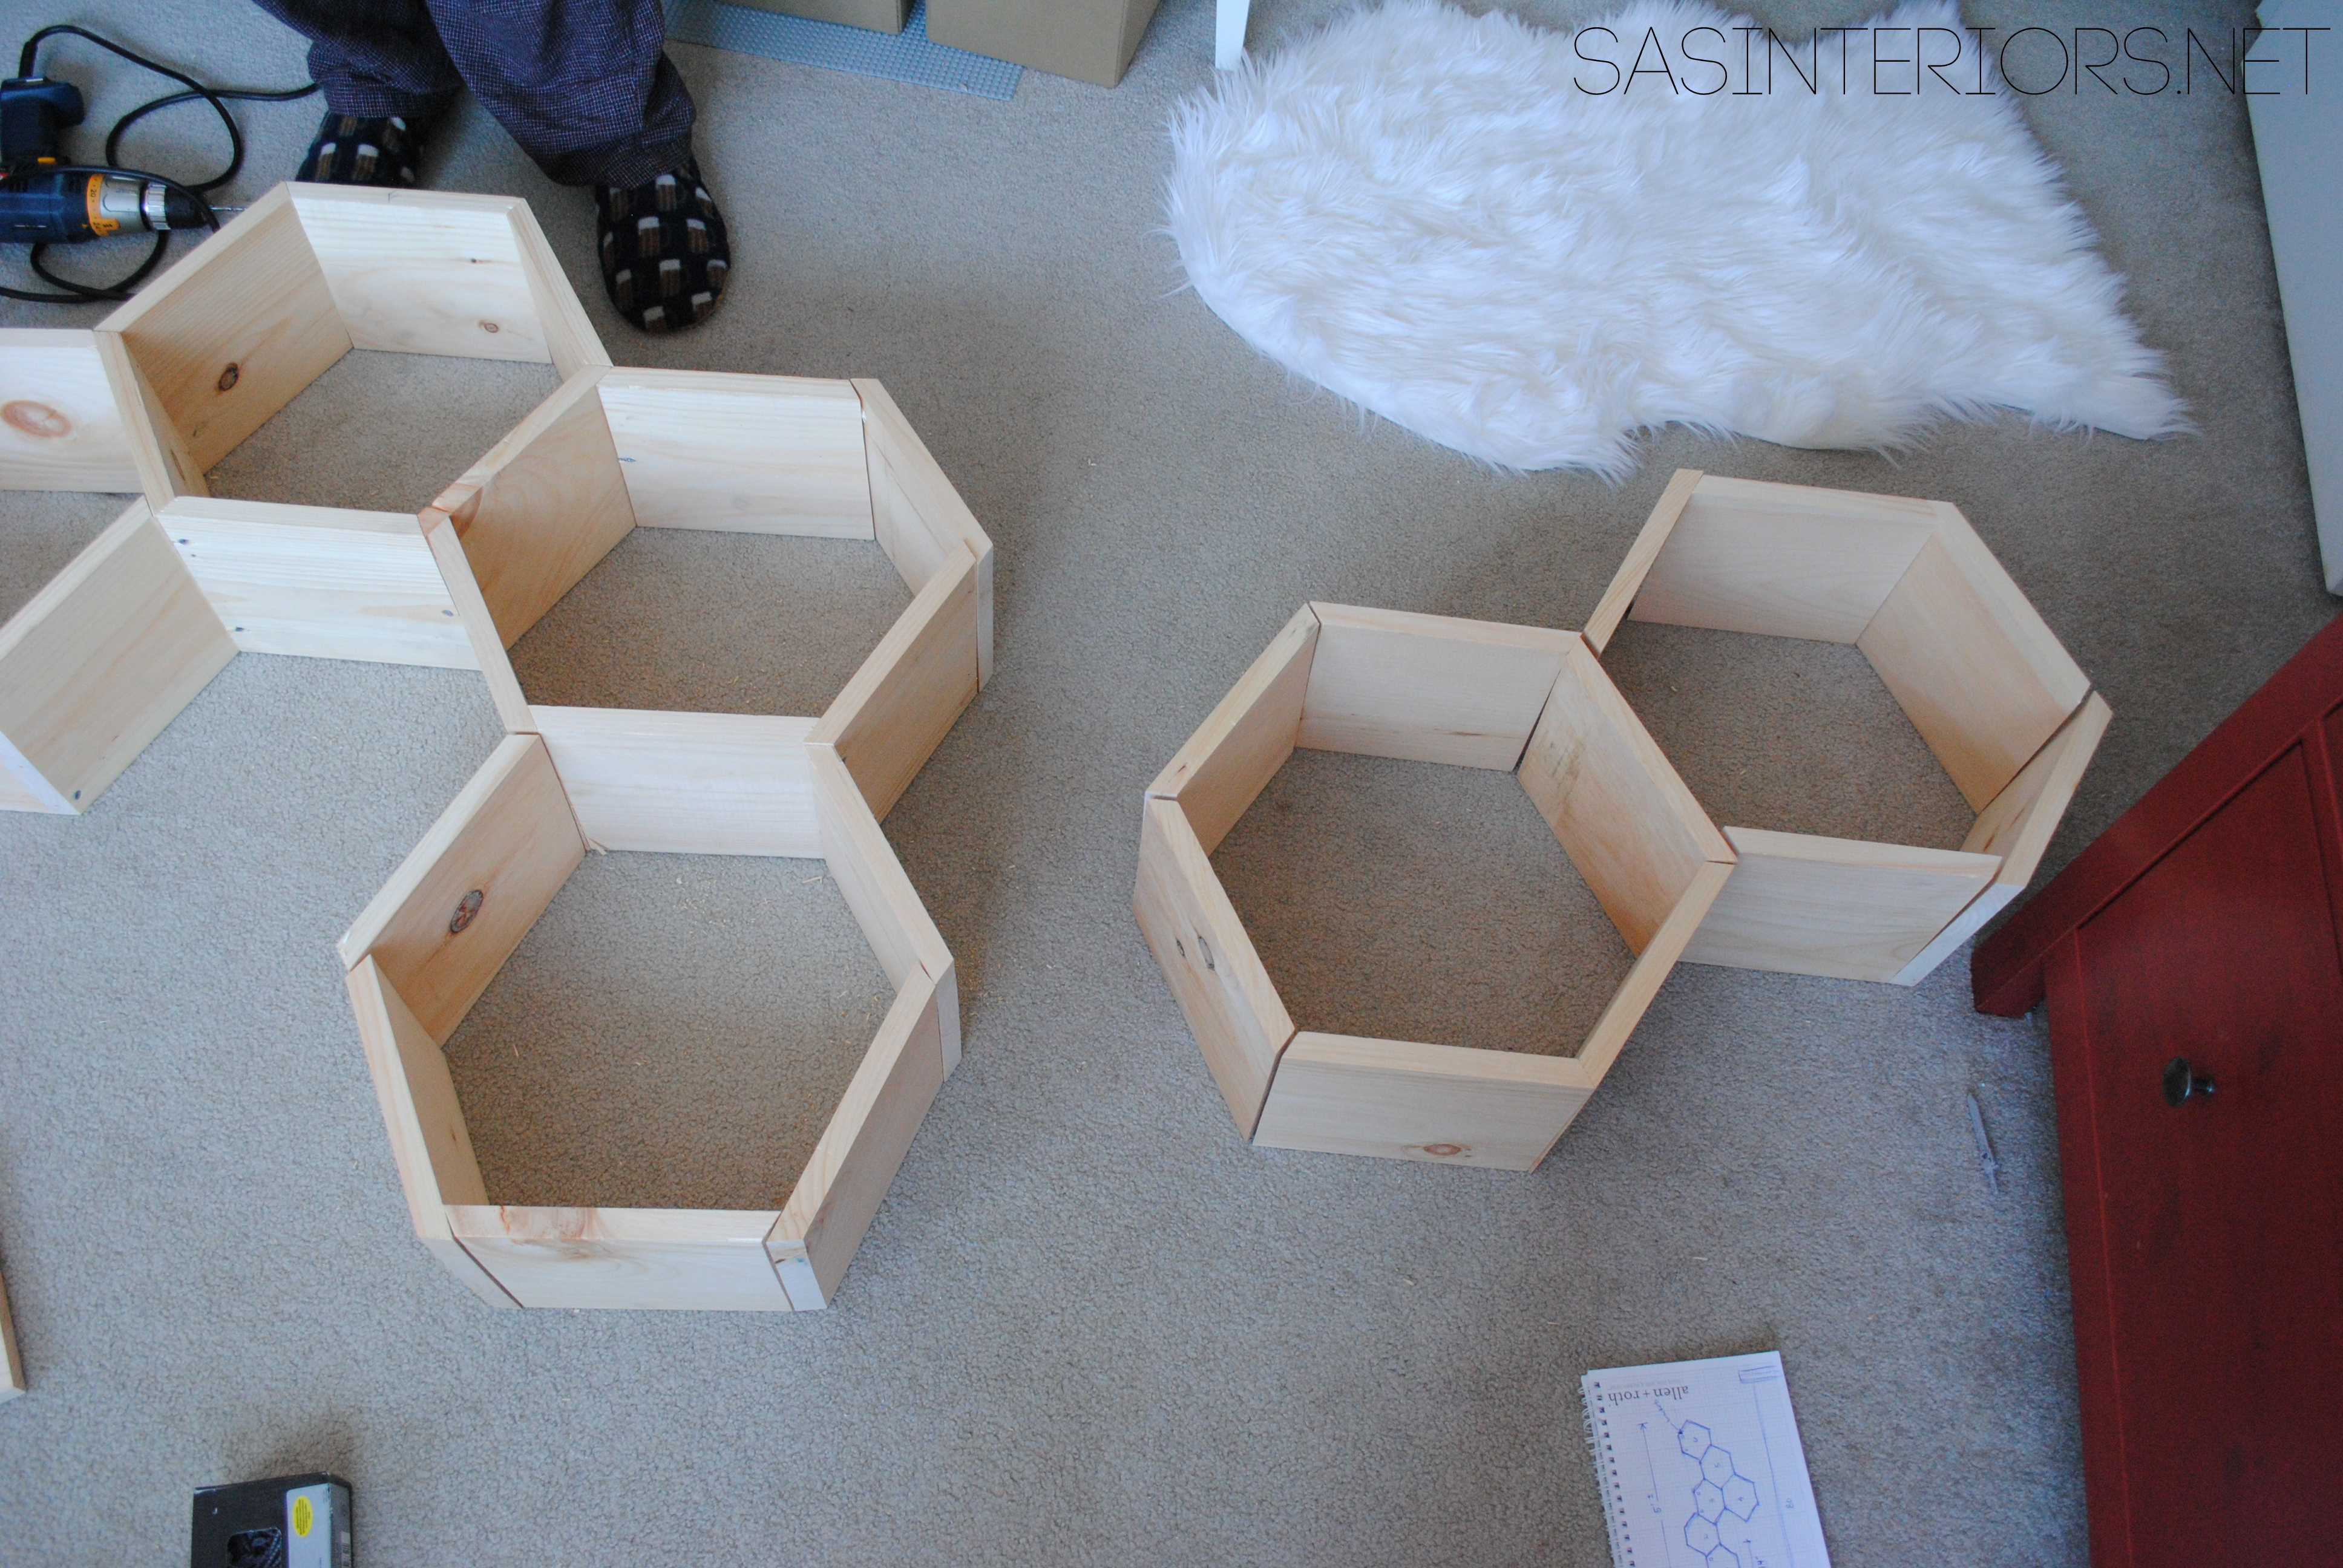
2. Before taking the next steps of attaching each piece to make the shelves, I layed all the pieces out to see how they’d actually go together.
3. Then we were ready to chug forward and attach these bad boys…
The first hexagon box was created using 6 pieces and all the angles faced each other. It’s best to stand them up on their sides, so the floor acts like the wall. The Mister (who was a huge part of this project as well) and I actually moved from the carpet to a flat, hard surface so the pieces would lay flat. The carpet was too cushy.
TIP: You must use wood screws for this project. We started out with screws, but it wasn’t working right (because we didn’t pre-drill), then changed over to using nails. BIG MISTAKE.
Once you have the angled wood pieces in position, first pre-drill the holes, then drill in the wood screws. If you don’t pre-drill the holes, the wood will probably split, which is what happened to us atfirst. Using a nail won’t work because they’ll pull out and the overall shelf won’t be stable / sturdy. Believe me, these are all lessons we learned along the way!
4. When the first box is complete, you can either be done or add on to it to create a multi-honeycomb shelf like ours. If you continue adding on to the first hexagon, you’ll use one side of the original hexagon to create the second hexagon. This time though, the cut angles won’t touch each other, but instead overlap. I’ll be honest, it does get tricky at this point and the shelves become a big jigsaw puzzle. We ended up with (1) 3 box shelf, (1) 2 box shelf, and (1) stand alone shelf.
Once all the shelves were screwed together, we were ready for the next steps… finish the surface + install.
It took me some time to determine how I wanted to finish the shelves. At first I was going to paint them, but then steered away because I wanted to see the wood grain shine through. That meant stain. But, what stain? In the end, I chose a gray / blue water-based stain by Minwax. The submerged color seemed perfect with the other hues in the room and was ideal with what’s on-trend right now.
5. First, I gave the edges and all the surfaces a good sanding with my orbital sander. Then using a rag, I applied the wood stain and almost instantly wiped it away so very little actually soaked into the wood. Because of this, the drying time was very quick.
6. About a day later, the shelves were ready to install. I first attached the metal angle brackets to the shelves. Then I determined the height + positioning of where the shelves would be hung.
Next, the Mister + I marked the holes through the brackets and pre-drilled the holes into the wall. As with hanging anything, I always love using plastic toggle drywall anchors (I shared a pic recently on Instagram).
Once the anchors were in each hole, we repositioned the shelves in place and screwed them in using a drill + screw. It’s key to use a level as well so the shelf doesn’t get installed crooked!
At this point, the shelves were almost done…
I loved the look of the blue shelves against the lighter gray walls, but I still wanted to make them pop. To do so, I chose to paint the front edge of the shelves a white color which matches the moulding throughout the room. Two coats later with a small, flat brush did the trick.
Lastly, so the metal brackets didn’t stand out so much, I painted those as well using the wall paint color.
These shelves are perfect to fill with books, toys in containers, and any fun thing(s) to display.
And here is a pretty pinnable picture if you want to remember this project for a later date…
So what do you think?
Do you like the honeycomb / hexagon look? Have you incorporated this new trend into your home? What has been your most difficult DIY project endeavour?
To gather even more unique, fun, and creative ideas for your indoor and outdoor Spring spaces, I would definitely suggest downloading the Lowe’s Creative Ideas app on your iphone and/or ipad. I’m always checking out the FREE app for great seasonal + do-it-yourself inspiration.
Disclosure: I am part of the Lowe’s Creative Team and was provided with a Lowe’s gift card to purchase items for my project. I was also compensated for my time to use the products. No one told me what to create, what to buy, how to use the product, or what to write. All opinions are 100% mine!
I hope you had a nice weekend and if you’re in Sandy’s path, stay safe! We’ll see what she brings our way later today and tomorrow.
In the meantime, I spent much of last week working on my next Lowe’s Creative Team challenge. This month’s project was a “create anything” project and it was the perfect opportunity to redo the foyer floor. This project has been one that I’ve wanted to tackle since moving into our home. The difficulty always has been, how.
The entrance into our home is not only the foyer, but also the space that leads to the garage, our laundry room, pantry, coat closet, and powder room. As being the major entrance and exit path into the home + all these important spaces, I couldn’t grasp the idea of a long period of downtime for this area. With 2 kids and a busy schedule, it was mere impossible to not make this an easy 1 day project. So that’s where the how came in. How could it happen?
Well about a year ago, I learned about Groutable Luxury Vinyl Tile. This treasure has changed my life and saved a whole lotta headaches! I shared my first LVT project earlier this year when I redid my parents floor, and since have used it in many other spots like my bathroom and the kids.
When the time came to tackle this project, it was really the only product that would provide the desired look of ceramic tile (you would never know it’s vinyl) , plus the quick turnaround of starting and finishing in ONE DAY.
What’s incredible about this tile is that once it’s finished, it looks and feels EXACTLY like ceramic tile. You would never know it’s vinyl. Believe me, I would not use something that has a fake look!
My existing floor was in really good condition. None of the tiles were cracked or chipped, and the real reason for the new floor was to aesthetically update the space.
If you plan on tackling this project, it’s important to evaluate the condition of your existing floor. You may need to remove the existing floor or put down a leveler before installing the new floor. Chat with your local Lowe’s customer service peeps. My local guy was really helpful in directing me in the right direction.
To start off, I gathered my supplies for the tile installation part:
Triangle Ruler
X-acto Blade
Spacers ( I used 1/8 spacers)
A pencil
Snips
Cutting surface
There are various ways to start laying the tile. Most commonly, experts say to start the first tile in the center of the room, but for me I wanted a whole tile when you walk into the front door, so I started at that point. Since the room isn’t a perfect square, there really is no “center”.
Installing the tiles is really easy. Similar to regular peel-and-stick tiles (even though these luxury vinyl tiles are much thicker and more durable), you do just that…
Peel the backing off the corner edge (not the entire tile).
Using spacers, lay down the tile starting at the corner edge.
Once the tile is positioned in place, peel off the remainder of the paper backing.
For my foyer floor, I layed as many whole tiles first, then went back and tackled all the tiles that needed to be cut afterwards.
For the tiles that need to be cut, here’s how I tackled them…
Mark the cut with a pencil.
Use a triangle to draw a line and mark the cut.
Score the tile surface 2-3 times with an X-acto blade.
Gently snap the tile where it was scored.
For difficult, none straight cuts, here’s how I tackled them…
Sketch the design to be cut on the tile surface.
Cut out the design using an X-acto blade.
See if it fits and make needed adjustments.
Stick it down. It doesn’t need to be perfect because once it’s grouted, many imperfections aren’t obvious.
I put together a quick video (it’s pretty amateur, so don’t poke fun please) of how I cut the pieces if you need more know-how!
Ok, so once the tiles are set, you can move RIGHT ON TO GROUTING. That’s one of the beauties about groutable vinyl tile – there’s no downtime or waiting like with ceramic tile or natural stone.
To prep for grouting, it’s important to cover the areas where you don’t want grout. Basically that’s the base mouldings around the room. For this, I find it easiest and best to apply painters tape around the perimeter of the room.
Onto my favorite part because at this point, you’re more than halfway done 🙂
For the grouting steps, I gathered my supplies of:
Bowl of water
Tile sponge (one side has a sponge, the other side is abrasive)
Tile float
Luxury Vinyl Tile Grout
The tiling process for vinyl tile is exactly the same as if it were ceramic, but the grout itself is different. There is specially made pre-mixed grout specific for luxury vinyl tile. I used pre-mixed grout made by Precision Components which I found at Lowe’s in the same section as the groutable vinyl tiles. This premixed sanded acrylic grout has “good flexural strength and adhesion†and is recommended to use over traditional cement grouts.
*Don’t use sanded grout that you mix yourself!
I started applying the grout by the stairs, so I knew I could back out of the space without stepping on what I just grouted. Even though it’s okay to walk on the tiles, the grout does need time to set and dry. Once ready to apply the grout, I found it best to use a low angle and then a higher angle to wipe the excess away. Once the joint is filled with grout, you want to wipe as much away as possible so not to have huge clumps of grout left on the tile – it just makes more work to clean up.
Once you’ve got a section of about 3′ x 3′ covered in grout, use a damp sponge to wipe away the grout.
You can easily notice the areas that have been grouted and the areas that haven’t (yet).
Once the grout is completed, I took the tape off. It’s very important – and I’m only sharing this from a bad experience – to remove the tape when the grout is still somewhat wet otherwise once it’s hardened it’s near impossible (been there, done that).
Once the tape is off, the floor was done! YES. Major Project COMPLETE. This is a huge checkmark off my DIY list. Here’s the result…
This is the hallway that leads to the garage with the doors to the washer/dryer on the left and the doors to the coat closet/pantry on the right. I recently added a splash of color to this door and since it’s metal, it’s been a great place to display the kids artwork, coupons, etc. I’ll share more on that in a future post.
Do you see a little something sitting at the front door? That’s our new little 4 month old kitty. She’s so cute and she loves the new floor – hehe!
Groutable Vinyl Tile PROS and CONS
Affordable – Luxury Vinyl Tile runs about $1.00 – $2.00 sq. ft. and compared to ceramic or natural stone, it is very inexpensive. The tiles which I purchased from Lowe’s were $1.18 and the premixed grout (for my 200 sq. ft. space, I used 2 tubs) cost $8/each. Ceramic tile is available in a range of prices, but usually starts at $2 per sq. ft. , so the savings right there is 50%.
No Experience Required – And I’m completely being honest with you. It’s easy and if you’ve never tiled before, you can do it! I think a person with little experience can complete this project with ease. Measuring and cutting is really the most difficult part of the project, so take your time and measure correctly! Installing ceramic tile is not difficult, but it is tricky and experience is helpful. Cutting ceramic tile can often be difficult and time consuming. For prior ceramic tile projects, I’ve used tile snips, a tile cutter, and a wet saw. A wet saw is the best for cutting ceramic tile, but it’s not easy – I’ve made alot of mistakes. In my estimation, ceramic tile would take about double the time for installation compared to installing groutable vinyl tile.
Grout Right Away – Immediately after you install the groutable vinyl tiles, you can start the grouting process. This makes the entire process possible to complete in one day. With ceramic tile, after you finish laying it, you have to let the adhesive dry for 24 hours before grouting, which results in a 2+ day project, so essential ceramic tile takes double the time.
Availability and Selection – I purchased this groutable vinyl tile at Lowe’s, but other home improvement stores also offer similar products. The selection is not as vast as ceramic tile (which is a con), but I was surprised by the wide range of colors and textures.
One important part to mention is that the surface must be level underneath. If there is any flexibility in the subfloor, ie: gaps between the tiles and the subfloor, then the grout could crack and pull away from the tiles – this could happen with ceramic tile and LVT. Overall though, it’s a great product with an amazing result. As being a huge part of our home, this new floor sure brings a smile to my face!
Onto the giveaway, which is HUGE!
Now’s your chance to try this project in your home or something completely new and different. Lowe’s is generously giving one winner a $100 Gift Card to their store – how cool?!
This is the first giveaway that I’m using rafflecopter, so please email me if you’re having trouble – jburger.design@gmail.com (fingers crossed it works!).
Disclosure: I am part of the Lowe’s Creative Team and was provided with a Lowe’s gift card to purchase items for my project. I was also compensated for my time to use the products. No one told me what to create, what to buy, how to use the product, or what to write. All opinions are 100% mine!