Happy Monday! Yes, it’s Spring, but sadly it doesn’t feel like it (at least here in NY).
I am so ready for the warmer days ahead and am yearning for the array of colorful flowers, the endless chirping of birds, and the sounds of outdoor laughter. I know it’ll be here soon, but I am just ready for winter (and the endless snow) to be over.
In my search for all things Spring, I decided this years seasonal mantel had to include elements of the outdoors. Last Friday when perusing the aisles of Lowe’s, specifically the outdoor section, I saw a huge display of succulents. I immediately knew they’d be the ideal addition for my Spring mantel!
While in the gardening section, I gathered a variety of succulents in different sizes and styles, along with a new bag of potting mix. I wasn’t going to dare dig through the garage in search of leftover soil from last year, plus I saw this soil that is fast draining and made for cactus type plants. I thought I’d give it a try, since I don’t have a great track record with keeping greenery alive. Yes, I admit, I don’t have a green thumb…
Once home, I collected a bunch of glass vases, dishes, and bowls that I had laying around the house. A few I picked up last week at TJ Maxx, but most I’ve had for a long time stored in the closet.
Then it was time to transplant these beauties into their new homes.
Choosing the right size bowl / vase for the size of the succulent is important. One rule of thumb that I always try to follow is to be sure that the plant isn’t too big for the pot (or bowl / vase in my case) so it has room to grow. The teeny size succulents (which I bought for $2.98/each) went in the smaller bowls and the larger styles ($3.98/each) went into the clear glass vases (which are my favorite because you can see the soil and plant roots – so interesting).
Once the right size “home” was chosen, I loosened up the roots and made the transfer. A few minutes later, all my succulents were planted and ready to add to the mantel.
Gardening in the kitchen isn’t something I would suggest, but with 30 degree temps, I wasn’t going to dare be outdoors longer than I had to. A little mess wasn’t too bad to clean up…
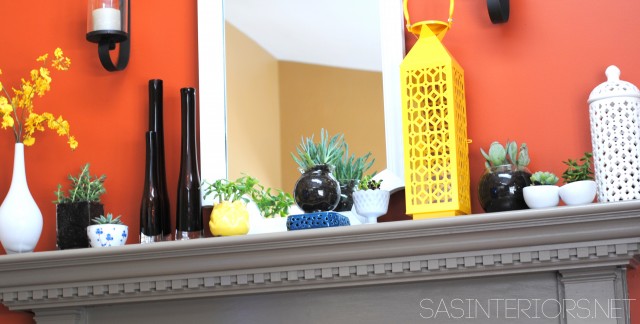
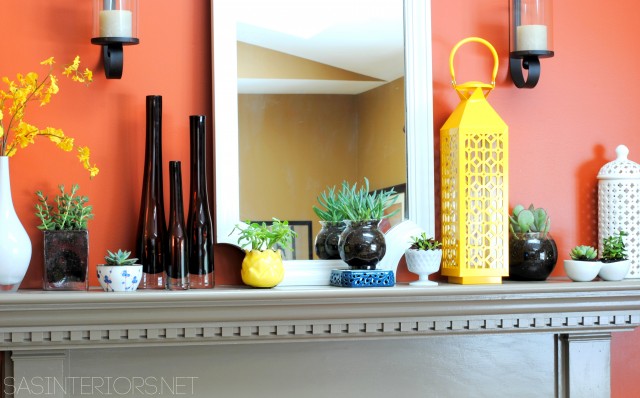
Then the fun started and here’s the result of my natural Spring mantel using sensational succulents…
It’s a beautiful collection of natural elements mixed in with colorful favorites.
Any style bowl, vase, cup, or container will make for the perfect holder to display succulents. My collection includes a clear glass round vase, a similar square style, a plain white double dish, a decorative ceramic bowl, and a white milk glass cup.
Choosing succulents of varying sizes allows for an interesting mantel composition.
Despite the frigid temps, the Lowe’s gardening section is already stocking up on their summer displays including an array of flowers, plants, and a large selection of outdoor furniture.
To gather even more unique, fun, and creative ideas for your indoor and outdoor Spring decor, I would definitely suggest downloading the Lowe’s Creative Ideas app on the iphone and ipad. I’m always checking out the FREE app for great inspiration. Consider following Lowe’s on Facebook, Pinterest, and Instagram as well.
Disclosure: I am part of the Lowe’s Creative Team and was provided with a Lowe’s gift card to purchase items for my project. I was also compensated for my time to use the products. No one told me what to create, what to buy, how to use the product, or what to write. All opinions are 100% mine!
I hope you had a nice weekend and if you’re in Sandy’s path, stay safe! We’ll see what she brings our way later today and tomorrow.
In the meantime, I spent much of last week working on my next Lowe’s Creative Team challenge. This month’s project was a “create anything” project and it was the perfect opportunity to redo the foyer floor. This project has been one that I’ve wanted to tackle since moving into our home. The difficulty always has been, how.
The entrance into our home is not only the foyer, but also the space that leads to the garage, our laundry room, pantry, coat closet, and powder room. As being the major entrance and exit path into the home + all these important spaces, I couldn’t grasp the idea of a long period of downtime for this area. With 2 kids and a busy schedule, it was mere impossible to not make this an easy 1 day project. So that’s where the how came in. How could it happen?
Well about a year ago, I learned about Groutable Luxury Vinyl Tile. This treasure has changed my life and saved a whole lotta headaches! I shared my first LVT project earlier this year when I redid my parents floor, and since have used it in many other spots like my bathroom and the kids.
When the time came to tackle this project, it was really the only product that would provide the desired look of ceramic tile (you would never know it’s vinyl) , plus the quick turnaround of starting and finishing in ONE DAY.
What’s incredible about this tile is that once it’s finished, it looks and feels EXACTLY like ceramic tile. You would never know it’s vinyl. Believe me, I would not use something that has a fake look!
My existing floor was in really good condition. None of the tiles were cracked or chipped, and the real reason for the new floor was to aesthetically update the space.
If you plan on tackling this project, it’s important to evaluate the condition of your existing floor. You may need to remove the existing floor or put down a leveler before installing the new floor. Chat with your local Lowe’s customer service peeps. My local guy was really helpful in directing me in the right direction.
To start off, I gathered my supplies for the tile installation part:
Triangle Ruler
X-acto Blade
Spacers ( I used 1/8 spacers)
A pencil
Snips
Cutting surface
There are various ways to start laying the tile. Most commonly, experts say to start the first tile in the center of the room, but for me I wanted a whole tile when you walk into the front door, so I started at that point. Since the room isn’t a perfect square, there really is no “center”.
Installing the tiles is really easy. Similar to regular peel-and-stick tiles (even though these luxury vinyl tiles are much thicker and more durable), you do just that…
Peel the backing off the corner edge (not the entire tile).
Using spacers, lay down the tile starting at the corner edge.
Once the tile is positioned in place, peel off the remainder of the paper backing.
For my foyer floor, I layed as many whole tiles first, then went back and tackled all the tiles that needed to be cut afterwards.
For the tiles that need to be cut, here’s how I tackled them…
Mark the cut with a pencil.
Use a triangle to draw a line and mark the cut.
Score the tile surface 2-3 times with an X-acto blade.
Gently snap the tile where it was scored.
For difficult, none straight cuts, here’s how I tackled them…
Sketch the design to be cut on the tile surface.
Cut out the design using an X-acto blade.
See if it fits and make needed adjustments.
Stick it down. It doesn’t need to be perfect because once it’s grouted, many imperfections aren’t obvious.
I put together a quick video (it’s pretty amateur, so don’t poke fun please) of how I cut the pieces if you need more know-how!
Ok, so once the tiles are set, you can move RIGHT ON TO GROUTING. That’s one of the beauties about groutable vinyl tile – there’s no downtime or waiting like with ceramic tile or natural stone.
To prep for grouting, it’s important to cover the areas where you don’t want grout. Basically that’s the base mouldings around the room. For this, I find it easiest and best to apply painters tape around the perimeter of the room.
Onto my favorite part because at this point, you’re more than halfway done 🙂
For the grouting steps, I gathered my supplies of:
Bowl of water
Tile sponge (one side has a sponge, the other side is abrasive)
Tile float
Luxury Vinyl Tile Grout
The tiling process for vinyl tile is exactly the same as if it were ceramic, but the grout itself is different. There is specially made pre-mixed grout specific for luxury vinyl tile. I used pre-mixed grout made by Precision Components which I found at Lowe’s in the same section as the groutable vinyl tiles. This premixed sanded acrylic grout has “good flexural strength and adhesion†and is recommended to use over traditional cement grouts.
*Don’t use sanded grout that you mix yourself!
I started applying the grout by the stairs, so I knew I could back out of the space without stepping on what I just grouted. Even though it’s okay to walk on the tiles, the grout does need time to set and dry. Once ready to apply the grout, I found it best to use a low angle and then a higher angle to wipe the excess away. Once the joint is filled with grout, you want to wipe as much away as possible so not to have huge clumps of grout left on the tile – it just makes more work to clean up.
Once you’ve got a section of about 3′ x 3′ covered in grout, use a damp sponge to wipe away the grout.
You can easily notice the areas that have been grouted and the areas that haven’t (yet).
Once the grout is completed, I took the tape off. It’s very important – and I’m only sharing this from a bad experience – to remove the tape when the grout is still somewhat wet otherwise once it’s hardened it’s near impossible (been there, done that).
Once the tape is off, the floor was done! YES. Major Project COMPLETE. This is a huge checkmark off my DIY list. Here’s the result…
This is the hallway that leads to the garage with the doors to the washer/dryer on the left and the doors to the coat closet/pantry on the right. I recently added a splash of color to this door and since it’s metal, it’s been a great place to display the kids artwork, coupons, etc. I’ll share more on that in a future post.
Do you see a little something sitting at the front door? That’s our new little 4 month old kitty. She’s so cute and she loves the new floor – hehe!
Groutable Vinyl Tile PROS and CONS
Affordable – Luxury Vinyl Tile runs about $1.00 – $2.00 sq. ft. and compared to ceramic or natural stone, it is very inexpensive. The tiles which I purchased from Lowe’s were $1.18 and the premixed grout (for my 200 sq. ft. space, I used 2 tubs) cost $8/each. Ceramic tile is available in a range of prices, but usually starts at $2 per sq. ft. , so the savings right there is 50%.
No Experience Required – And I’m completely being honest with you. It’s easy and if you’ve never tiled before, you can do it! I think a person with little experience can complete this project with ease. Measuring and cutting is really the most difficult part of the project, so take your time and measure correctly! Installing ceramic tile is not difficult, but it is tricky and experience is helpful. Cutting ceramic tile can often be difficult and time consuming. For prior ceramic tile projects, I’ve used tile snips, a tile cutter, and a wet saw. A wet saw is the best for cutting ceramic tile, but it’s not easy – I’ve made alot of mistakes. In my estimation, ceramic tile would take about double the time for installation compared to installing groutable vinyl tile.
Grout Right Away – Immediately after you install the groutable vinyl tiles, you can start the grouting process. This makes the entire process possible to complete in one day. With ceramic tile, after you finish laying it, you have to let the adhesive dry for 24 hours before grouting, which results in a 2+ day project, so essential ceramic tile takes double the time.
Availability and Selection – I purchased this groutable vinyl tile at Lowe’s, but other home improvement stores also offer similar products. The selection is not as vast as ceramic tile (which is a con), but I was surprised by the wide range of colors and textures.
One important part to mention is that the surface must be level underneath. If there is any flexibility in the subfloor, ie: gaps between the tiles and the subfloor, then the grout could crack and pull away from the tiles – this could happen with ceramic tile and LVT. Overall though, it’s a great product with an amazing result. As being a huge part of our home, this new floor sure brings a smile to my face!
Onto the giveaway, which is HUGE!
Now’s your chance to try this project in your home or something completely new and different. Lowe’s is generously giving one winner a $100 Gift Card to their store – how cool?!
This is the first giveaway that I’m using rafflecopter, so please email me if you’re having trouble – jburger.design@gmail.com (fingers crossed it works!).
Disclosure: I am part of the Lowe’s Creative Team and was provided with a Lowe’s gift card to purchase items for my project. I was also compensated for my time to use the products. No one told me what to create, what to buy, how to use the product, or what to write. All opinions are 100% mine!


 Happy Monday! Yes, it’s Spring, but sadly it doesn’t feel like it (at least here in NY).