
Tag: Spring

Simple Spring Wreath

I’m ready for spring.

Winter – thankfully – didn’t hit us hard this year in the North Country of NY, but I’m still ready for warm + sunny weather to once again appear.

To welcome the coming change of season, I wanted to adorn my door with something new. Typically when April hits, I change over the front porch for Spring and kick-off-the-season by hanging my beloved forsythia wreath. This year I wanted something new…

The past weeks have been incredibly busy with little spare time to create + DIY, but last weekend, I squeezed in a few quiet moments to make a new wreath.

Quick + Simple, AND pretty.  A new wreath to adorn my door…

SPRING WREATH: A simple + easy 10-minute creation to adorn the front door. It couldn't be easier to make and a lot less expensive than buying. Easy-to-follow tutorial @ www.JennaBurger.com

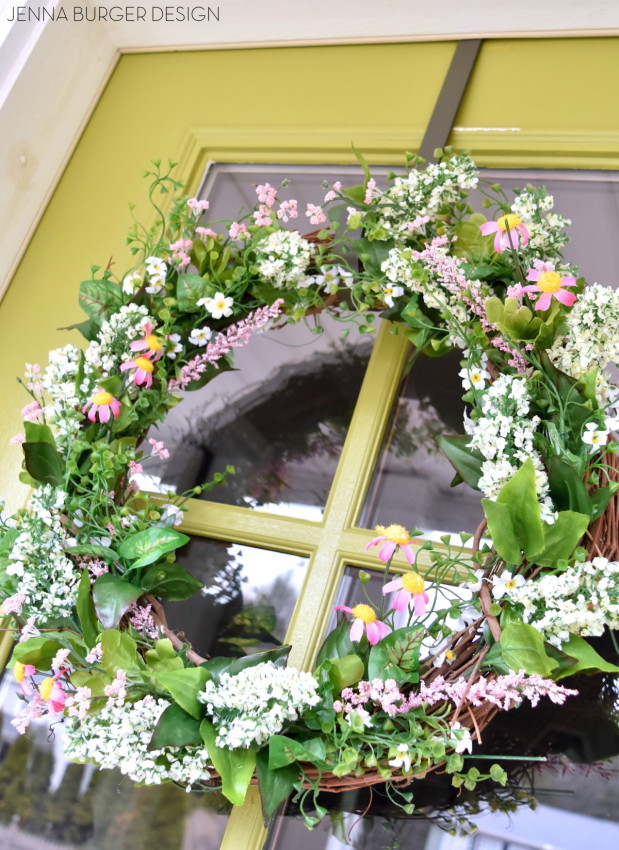
I adore my yellow forsythia wreath – my go to for Spring – but I was wanting something lighter + brighter to give contrast to the apple green painted front door.

After food shopping last week, I popped into AC Moore and saw so many vibrant + colorful faux flowers for Spring.  Their whole collection was on sale, so I picked up 3 bunches – about $15 total – in soft colors of white, greens, and a pop of pink.

I was excited to get started…

TUTORIAL FOR A SIMPLE 10-MINUTE SPRING WREATH

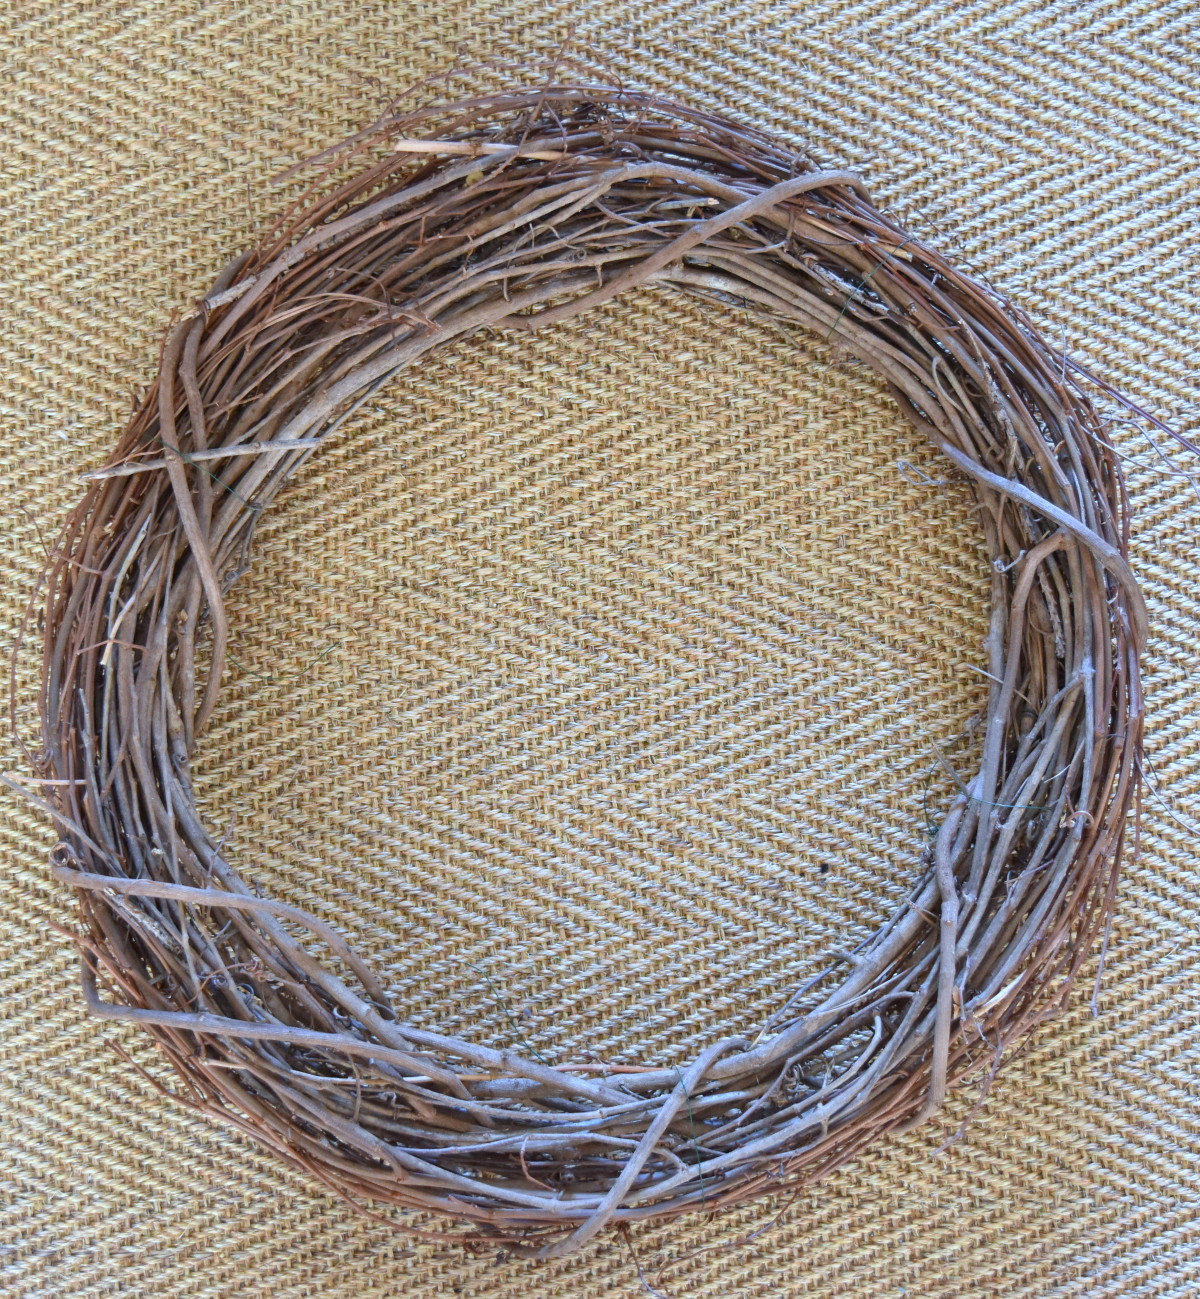
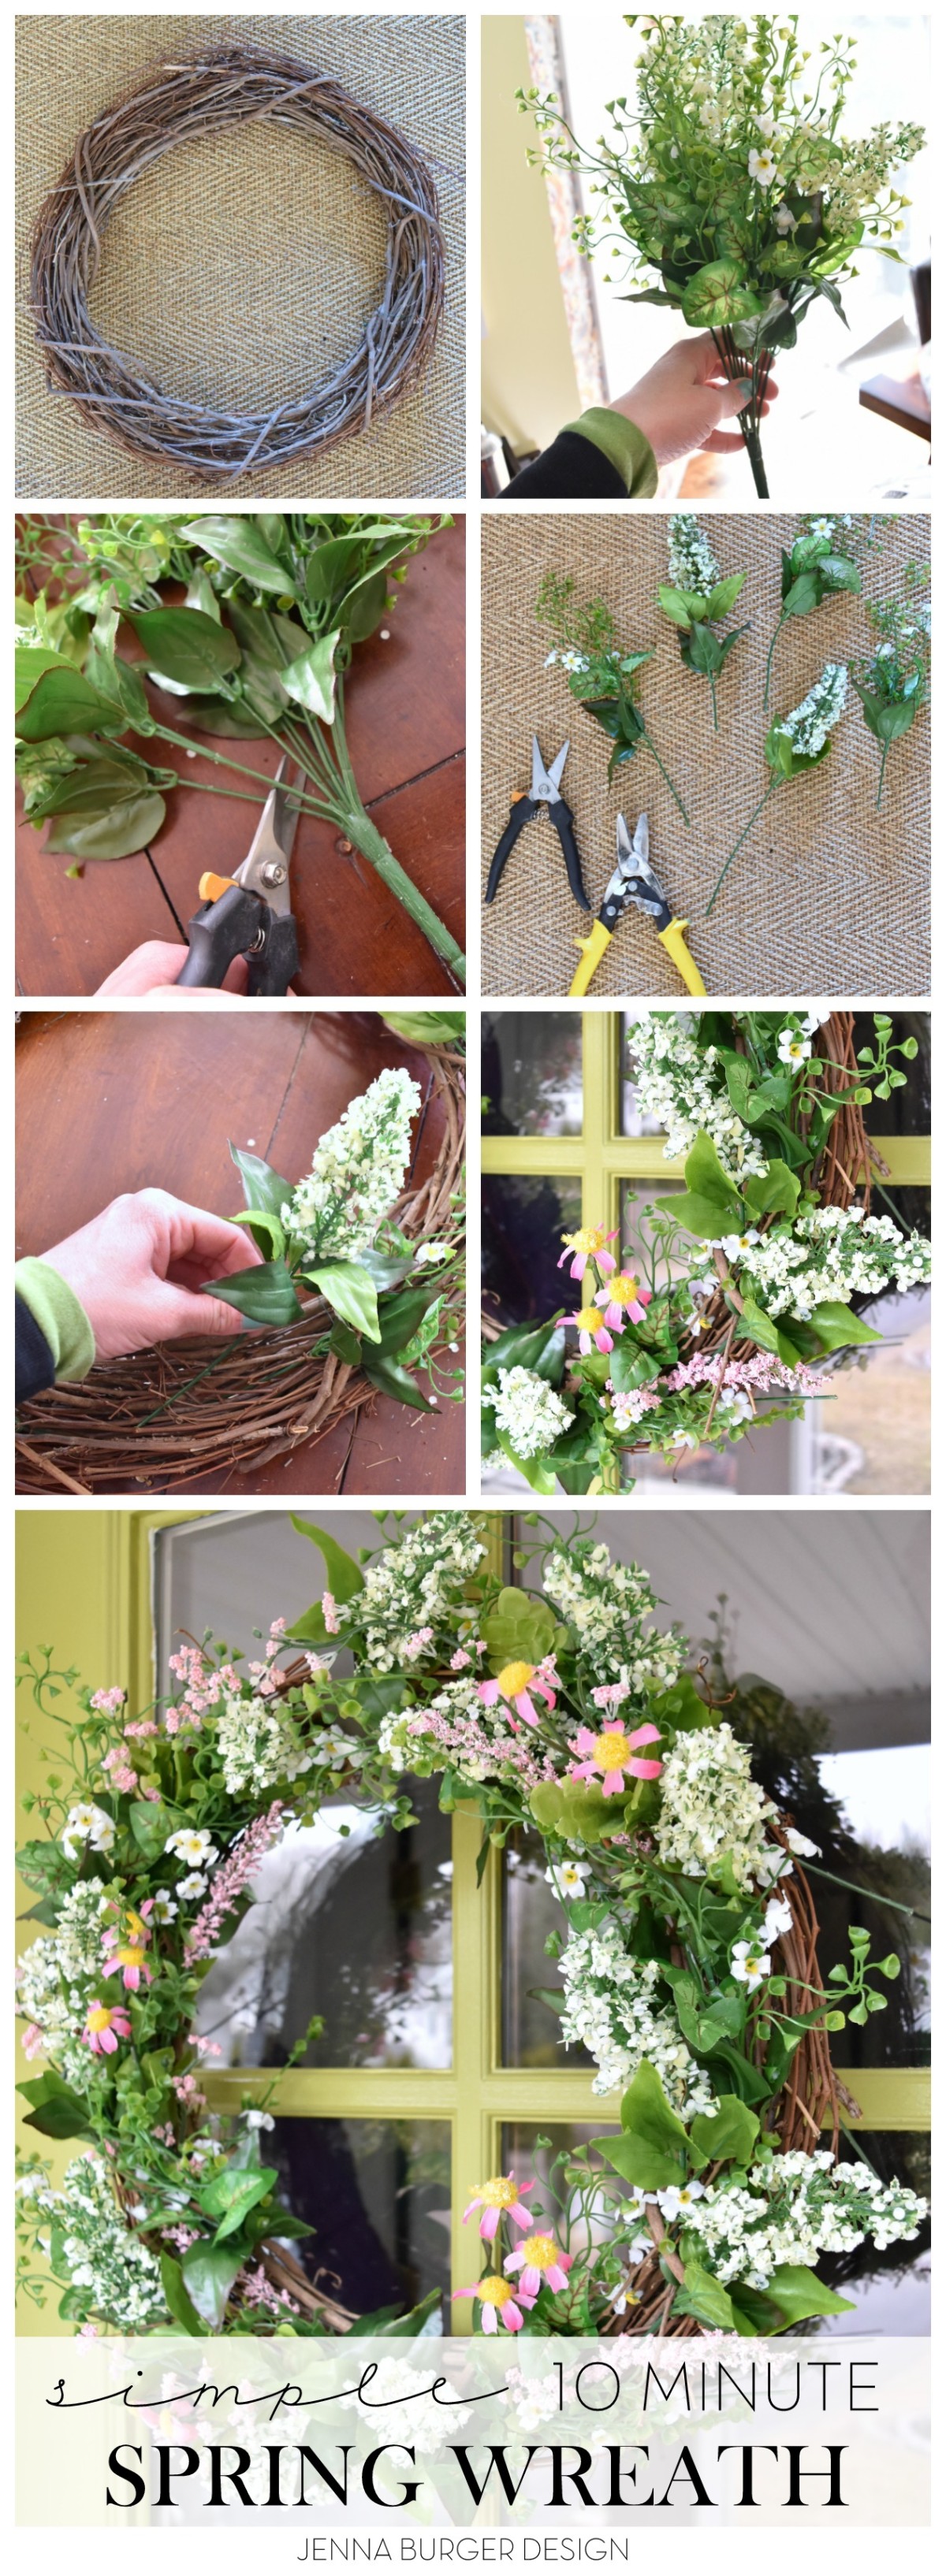
I started off with an 18″ grapevine wreath that I had on hand – but you can find them at most craft stores (even Walmart has them) for around $5.

SPRING WREATH: A simple + easy 10-minute creation to adorn the front door. It couldn't be easier to make and a lot less expensive than buying. Easy-to-follow tutorial @ www.JennaBurger.com

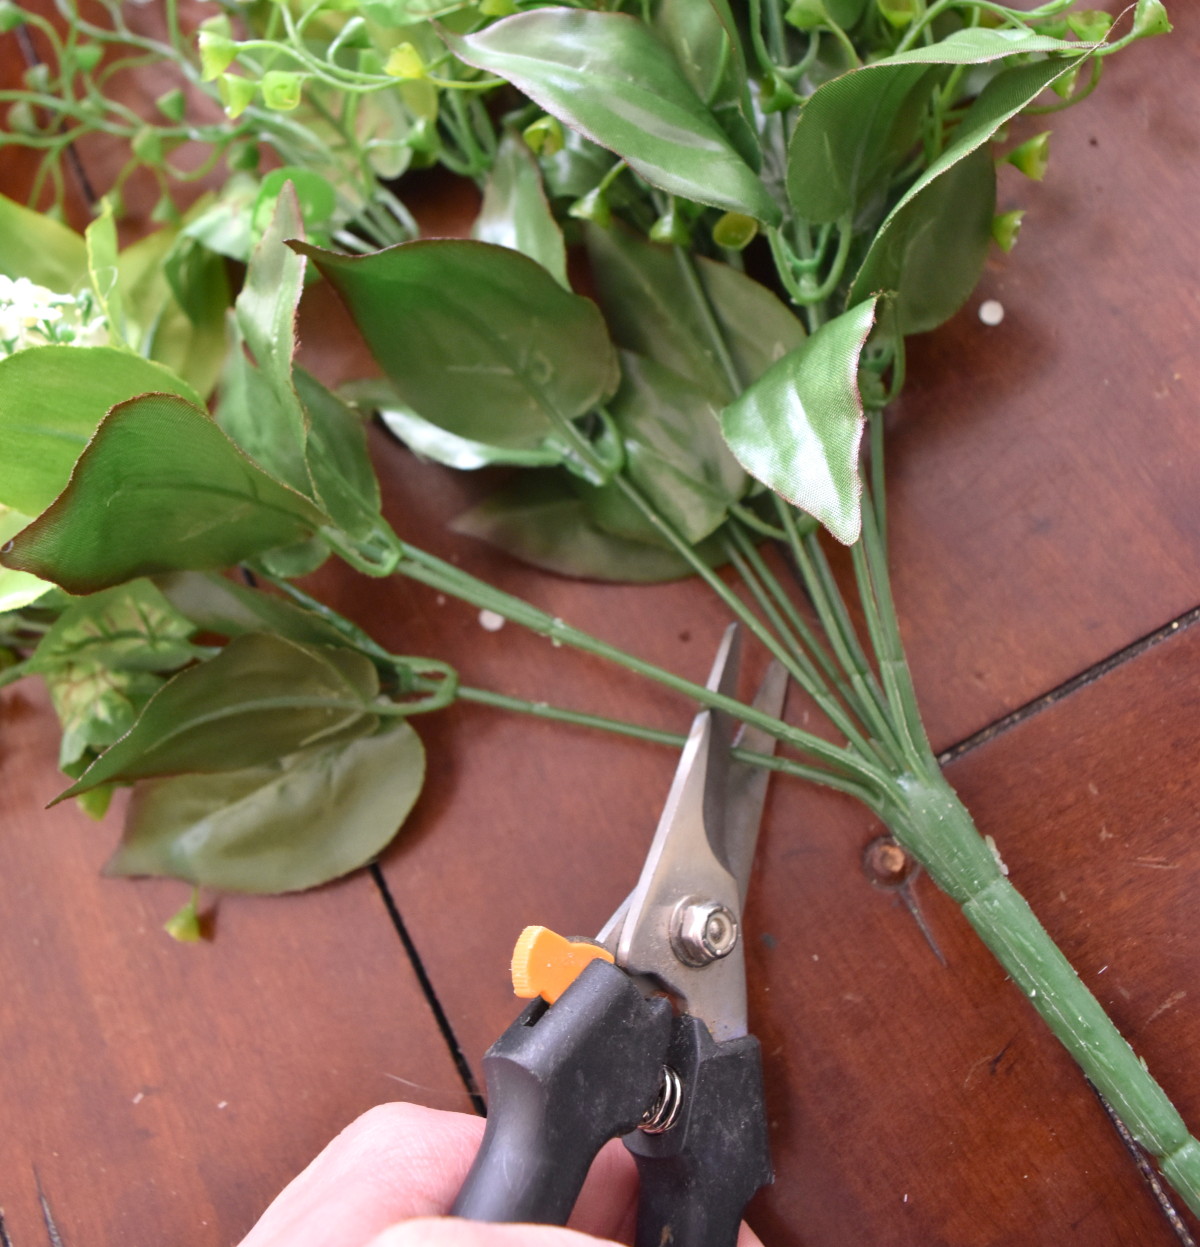
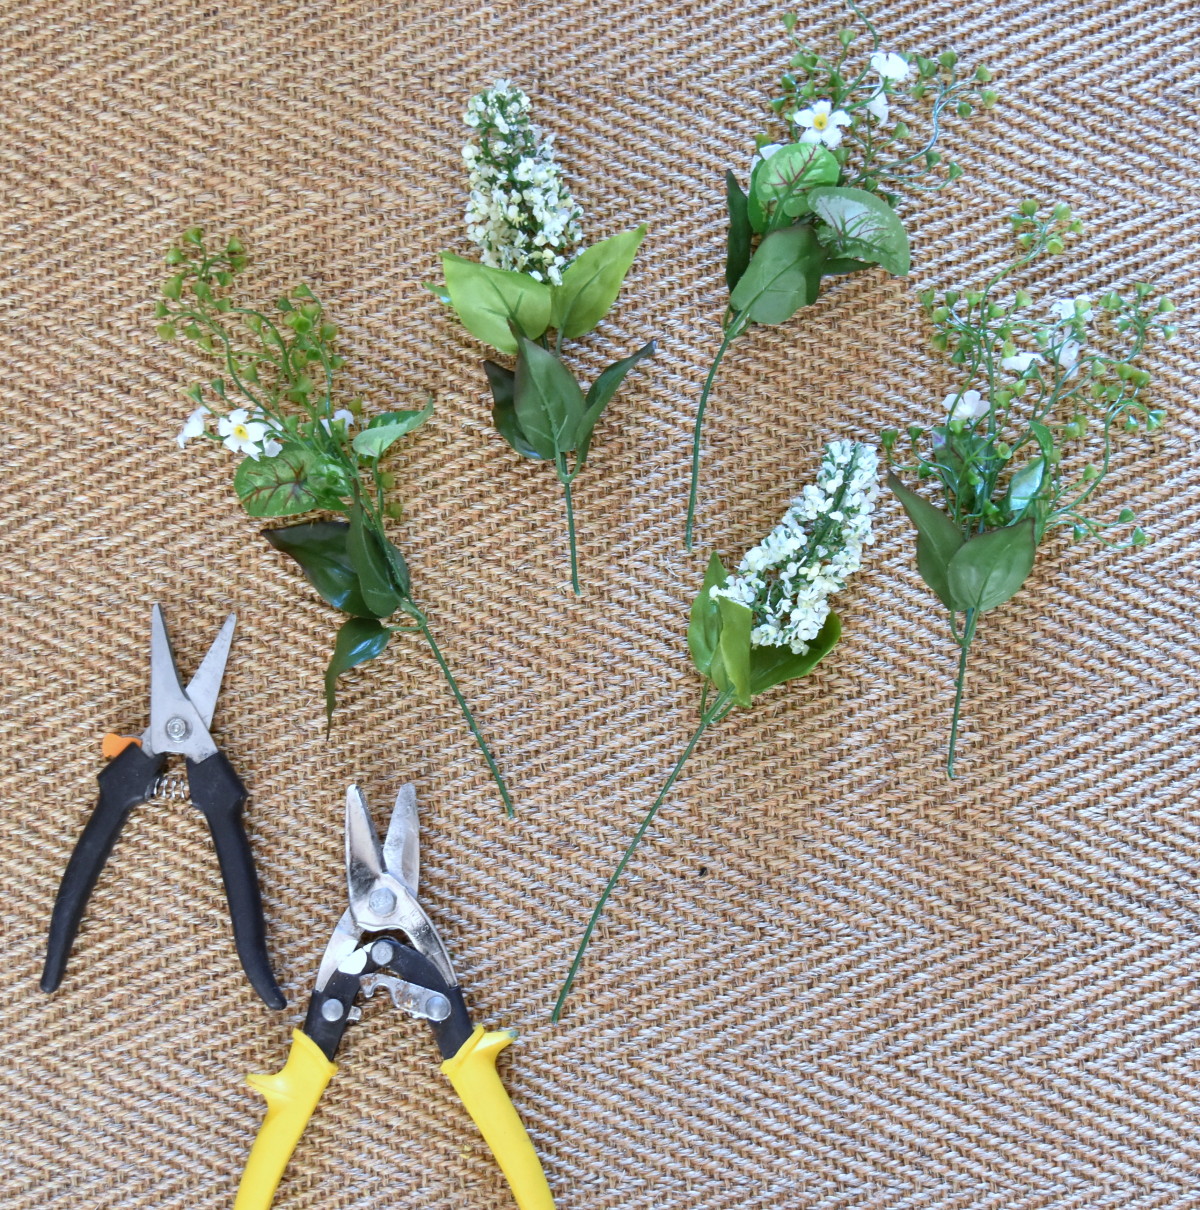
And my 3 bunches of Spring flowers.

SPRING WREATH: A simple + easy 10-minute creation to adorn the front door. It couldn't be easier to make and a lot less expensive than buying. Easy-to-follow tutorial @ www.JennaBurger.com

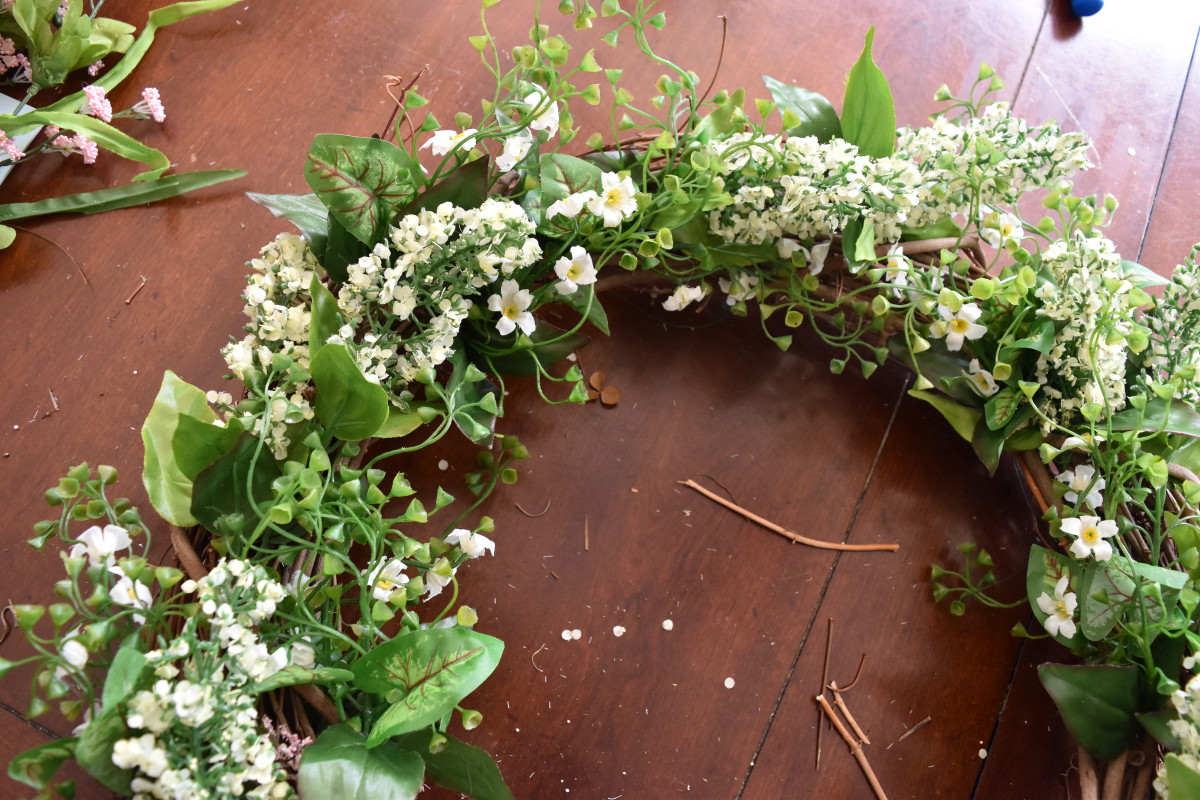
Using snips, I broke apart the flower cluster and was left with individual stems, which gives the flexibility + freedom to place the stems where they look best to give a real-looking result.

SPRING WREATH: A simple + easy 10-minute creation to adorn the front door. It couldn't be easier to make and a lot less expensive than buying. Easy-to-follow tutorial @ www.JennaBurger.com

SPRING WREATH: A simple + easy 10-minute creation to adorn the front door. It couldn't be easier to make and a lot less expensive than buying. Easy-to-follow tutorial @ www.JennaBurger.com

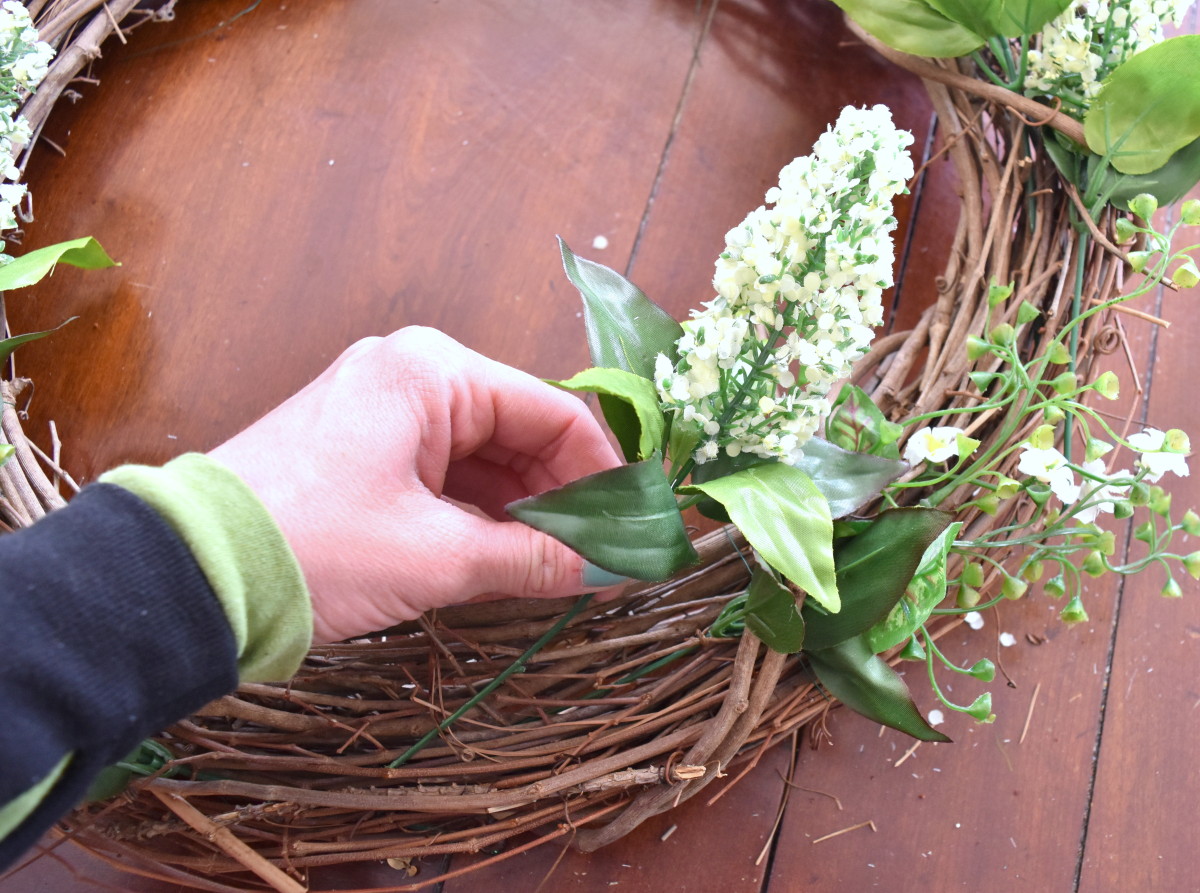
Once all the stems are separated, start weaving them into the wreath.  Secure with floral wire if needed.

SPRING WREATH: A simple + easy 10-minute creation to adorn the front door. It couldn't be easier to make and a lot less expensive than buying. Easy-to-follow tutorial @ www.JennaBurger.com

In about 5-8 minutes, I was done and had a new wreath to adorn my door.

SPRING WREATH: A simple + easy 10-minute creation to adorn the front door. It couldn't be easier to make and a lot less expensive than buying. Easy-to-follow tutorial @ www.JennaBurger.com

And here it is… hung and pretty!

SPRING WREATH: A simple + easy 10-minute creation to adorn the front door. It couldn't be easier to make and a lot less expensive than buying. Easy-to-follow tutorial @ www.JennaBurger.com

SPRING WREATH: A simple + easy 10-minute creation to adorn the front door. It couldn't be easier to make and a lot less expensive than buying. Easy-to-follow tutorial @ www.JennaBurger.com

Well unfortunately I think I jinxed myself.  Spring was on it’s way, but over the coming days it’s supposed to feel like winter again.  Ugh.  Soon.  I know it’ll be here soon.

For now, this new wreath will keep me going to send Spring vibes our way.

SPRING WREATH: A simple + easy 10-minute creation to adorn the front door. It couldn't be easier to make and a lot less expensive than buying. Easy-to-follow tutorial @ www.JennaBurger.com

SPRING WREATH: A simple + easy 10-minute creation to adorn the front door. It couldn't be easier to make and a lot less expensive than buying. Easy-to-follow tutorial @ www.JennaBurger.com

SPRING WREATH: A simple + easy 10-minute creation to adorn the front door. It couldn't be easier to make and a lot less expensive than buying. Easy-to-follow tutorial @ www.JennaBurger.com

SPRING WREATH: A simple + easy 10-minute creation to adorn the front door. It couldn't be easier to make and a lot less expensive than buying. Easy-to-follow tutorial @ www.JennaBurger.com

Want to make something similar for your door, here’s a quick recap of how to make it.  I swear, it is simple.  Anyone can tackle this in a cinch!

Sprng Wreath Collage

Want to see more wreaths I’ve made?  Check out my DIY wreath page with lots of easy-to-follow tutorials.

Happy Spring.

Soon.

Simple Spring Mantel

Simple accessories + Seasonal Succulents = A perfectly styled Spring Mantel.  Design by @Jenna_Burger. www.jennaburger.com

Goodness the last 2 weeks have been crazy busy.  Spring arrived, and off we went… sports, activities, it doesn’t stop!  I have a slew of projects that I want to share with you (and I will, no worries) from the living room makeover + more, but I haven’t had 2 seconds to pull it all together.

Anyway, when photographing the living room space last week, I couldn’t stop shooting different angles of the fireplace mantel.

For the ‘reveal’, I wanted the mantel to be fairly minimal + simple since it was more about the overall space and not just that one element.  But as I started styling the 6″ deep vignette, I couldn’t stop myself from adding layers + pretty accessories + seasonal succulents.

Knowing myself (and how I can keep anything the same for 5 minutes), it will continually change with the coming seasons + holidays, but for now, it’s perfectly set for Spring…

Simple accessories + Seasonal Succulents = A perfectly styled Spring Mantel.  Design by @Jenna_Burger. www.jennaburger.com

This simple, but seasonally sensational mantel is filled with accessories + layers that I already owned.  Nothing is new.

Simple accessories + Seasonal Succulents = A perfectly styled Spring Mantel.  Design by @Jenna_Burger. www.jennaburger.com

With every mantel creation, there has to be varying heights to create an interesting & engaging vignette. [more tips on mantel decorating here]

For this quick mantel styling, I anchored it with the rope wrapped vase I created which gives the overall composition beautiful texture.  It’s of a medium size, so it’s a good size + weight item for the end.

Simple accessories + Seasonal Succulents = A perfectly styled Spring Mantel.  Design by @Jenna_Burger. www.jennaburger.com

To bring height + whimsy, I filled a yellow colored glass vase with one faux flower sprig – it’s similar to a forsythia branch, but slightly different.  I adore this pretty, and very real looking, sprig!  I’ve use it a lot on the mantel, but with the new black wall, it has really taken on a completely new + different look.

Simple accessories + Seasonal Succulents = A perfectly styled Spring Mantel.  Design by @Jenna_Burger. www.jennaburger.com

To balance out the tall elements, I added in a few lower items too.  I wrapped three books with white copy paper (how easy?) and topped them with a small potted succulents (1 is real, 2 are fake – can you tell which is which?  bet you can’t).

Simple accessories + Seasonal Succulents = A perfectly styled Spring Mantel. Design by @Jenna_Burger. www.jennaburger.com

For the backdrop of the mantel, I used my go-to tall mirror (my thrift store find that went from wood to white after I painted it) which I leaned on the wall.  Layered on top, I added in a new sign (I was wrong, one item on the mantel is new – don’t you love the quote?!) from World Market, as well as a framed fern (that I snagged from the foyer) –> tutorial on how to create framed fern art.

Simple accessories + Seasonal Succulents = A perfectly styled Spring Mantel. Design by @Jenna_Burger. www.jennaburger.com

Love this… life does not have to be perfect to be wonderful

Simple accessories + Seasonal Succulents = A perfectly styled Spring Mantel. Design by @Jenna_Burger. www.jennaburger.com

The overall simple, seasonal Spring mantel…

Simple accessories + Seasonal Succulents = A perfectly styled Spring Mantel.  Design by @Jenna_Burger. www.jennaburger.com

Take a step back to check out the new space.  So different from the previous! Check out the entire revamped living room.

Simple accessories + Seasonal Succulents = A perfectly styled Spring Mantel. Design by @Jenna_Burger. www.jennaburger.com

Here are some past Spring mantels…

(click on the images to go to the original post)

Spring Mantel

Spring Mantel

Happy Spring + Mantel Decorating!

DIY: Vertical Pallet Garden

The warmer weather has got me movin’ and groovin’ outdoors.  This past weekend I got my DIY mojo on for this months Lowe’s challenge and created (what I think) is something pretty cool.  Check out my newly created Vertical Pallet Garden using colorful pots…

DIY: Vertical Pallet Garden by @Jenna_Burger, WWW.JENNABURGER.COM

Though the flowers are finally starting to peak through around the yard, I was in need of color NOW to start decorating my front porch for Spring.  I, of course, hit up my local Lowe’s garden center to get my color fix.  It’s still the early days of Spring, so the selection (at my local Lowe’s in NY) was limited, but I was able to find a few perennials for shaded areas that would be ideal for under the front covered porch.  I chose a few colorful perennials & vines because they could easily be transplanted to the garden at the end of the season (smart & savvy thinking).

Pallets have been all-the-rage for a while, but I just don’t get tired of them – probably because they’re free.  I’ve created so many DIY projects with pallets and I just love their old, worn texture and aesthetic.  When thinking about this seasons porch, my major desire was to add height.  Height = drama, and that was my goal. 

DIY: Vertical Pallet Garden by @Jenna_Burger, WWW.JENNABURGER.COM

For this project, the materials I used were:

  • Pallet (which I snagged – with their permission of course – for free in the back on my local Lowe’s)
  • (4) Eye hooks for 100 lbs+
  • 3′ of metal chain
  • Plastic pots (I used lime green and turquoise from Lowe’s)
  • Drill with 1/4″ drill bit
  • 3″ S hooks (found in the outdoor section of Lowe’s)
  • Vise Grip

DIY: Vertical Pallet Garden by @Jenna_Burger, WWW.JENNABURGER.COM

Here’s the DL (downlow for short) on how I created the Vertical Pallet Garden

1. At the top of the pallet (slats oriented horizontally), screw in (1) eye hook at about 2-3″ in from each end. It’s best to start out by using a large nail to start the hole.  Once the hole is started, screw in the eye hooks with the help of a vise grip to get leverage.  Unless you’re the Hulk, it’ll probably be impossible with just your bare hands.

2. With the Misters help, we then unlinked one of the chain links and linked it through the eye hook. (one side only – the other side has to wait until hung)

DIY: Vertical Pallet Garden by @Jenna_Burger, WWW.JENNABURGER.COM

3. Heading over to the house, we installed the eye hooks (using a drill to start the hole) through the siding and into the house about 2″ below the ceiling plane at the same distance apart as the hooks in the pallet.

DIY: Vertical Pallet Garden by @Jenna_Burger, WWW.JENNABURGER.COM

4. Once the eye hooks were in, we took the loose end of the chain of the pallet, slipped it through the eye hooks, and secured the chain on the other side.

DIY: Vertical Pallet Garden by @Jenna_Burger, WWW.JENNABURGER.COM

The pallet base is complete!

DIY: Vertical Pallet Garden by @Jenna_Burger, WWW.JENNABURGER.COM

Then it was time to create the “garden”.

5. Using varying sized plastic pots in fun colors, drill a 1/4″ hole about 1″ down from the top rim. Using a 3″+/- S hook, slip it through the hole.

DIY: Vertical Pallet Garden by @Jenna_Burger, WWW.JENNABURGER.COM

6. Plant the pretty flowers…

DIY: Vertical Pallet Garden by @Jenna_Burger, WWW.JENNABURGER.COM

…And it was complete!

DIY: Vertical Pallet Garden by @Jenna_Burger, WWW.JENNABURGER.COM

DIY: Vertical Pallet Garden by @Jenna_Burger, WWW.JENNABURGER.COM

DIY: Vertical Pallet Garden by @Jenna_Burger, WWW.JENNABURGER.COM

The vertical pallet garden adds so much color to the front porch.

DIY: Vertical Pallet Garden by @Jenna_Burger, WWW.JENNABURGER.COM

S-hooks make it easy to move the flower pots around or bring them into the sun.

DIY: Vertical Pallet Garden by @Jenna_Burger, WWW.JENNABURGER.COM

A beautiful focal point for the porch.

DIY: Vertical Pallet Garden by @Jenna_Burger, WWW.JENNABURGER.COM

If you’re wondering about the pretty white wreath, that was a DIY project that was featured on Jen’s blog.  It was created for Valentine’s Day, but I took off the paint chip flowers and just hung the wreath plain and simple.  Who knows how I will transform it for another holiday or season to come.

DIY: Vertical Pallet Garden by @Jenna_Burger, WWW.JENNABURGER.COM

I’m still working on the rest of the porch since it’s still in need of more color and pizazz.  By late May, I hope to have that done and ready to share.  Right now we’re still getting alot of rain and most nights are still way too chilly to get my gardening-on.

DIY: Vertical Pallet Garden by @Jenna_Burger, WWW.JENNABURGER.COM

I couldn’t be more thrilled with the outcome of this fun and easy DIY project.  It’s brought gorgeous height and beautiful color to my Spring front porch.

To see more creations of mine using pallets, click on the links below:
How-To Make a Pallet Shelf
Monogrammed Pallet Chevron Tray
Pallet Picture Holder
Eclectic Family Gallery Wall

Disclosure: I am part of the Lowe’s Creative Team and was provided with a Lowe’s gift card to purchase items for my project.  I was also compensated for my time to use the products.  No one told me what to create, what to buy, how to use the product, or what to write.  All opinions are 100% mine!

Spring Mantel with Sensational Succulents #LowesCreator

Happy Monday!  Yes, it’s Spring, but sadly it doesn’t feel like it (at least here in NY).

I am so ready for the warmer days ahead and am yearning for the array of colorful flowers, the endless chirping of birds, and the sounds of outdoor laughter.  I know it’ll be here soon, but I am just ready for winter (and the endless snow) to be over.

In my search for all things Spring, I decided this years seasonal mantel had to include elements of the outdoors. Last Friday when perusing the aisles of Lowe’s, specifically the outdoor section, I saw a huge display of succulents.  I immediately knew they’d be the ideal addition for my Spring mantel!

Spring Mantel with Sensational Succulents - Creative ideas for bringing in natural elements by @Jenna_Burger, SASinteriors.net

While in the gardening section, I gathered a variety of succulents in different sizes and styles, along with a new bag of potting mix.  I wasn’t going to dare dig through the garage in search of leftover soil from last year, plus I saw this soil that is fast draining and made for cactus type plants.  I thought I’d give it a try, since I don’t have a great track record with keeping greenery alive. Yes, I admit, I don’t have a green thumb…

Once home, I collected a bunch of glass vases, dishes, and bowls that I had laying around the house.  A few I picked up last week at TJ Maxx, but most I’ve had for a long time stored in the closet.

Spring Mantel with Sensational Succulents - Creative ideas for bringing in natural elements by @Jenna_Burger, SASinteriors.net

Then it was time to transplant these beauties into their new homes.

Choosing the right size bowl / vase for the size of the succulent is important.  One rule of thumb that I always try to follow is to be sure that the plant isn’t too big for the pot (or bowl / vase in my case) so it has room to grow.  The teeny size succulents (which I bought for $2.98/each) went in the smaller bowls and the larger styles ($3.98/each) went into the clear glass vases (which are my favorite because you can see the soil and plant roots – so interesting).

Once the right size “home” was chosen, I loosened up the roots and made the transfer.  A few minutes later, all my succulents were planted and ready to add to the mantel.

Spring Mantel with Sensational Succulents - Creative ideas for bringing in natural elements by @Jenna_Burger, SASinteriors.net

Gardening in the kitchen isn’t something I would suggest, but with 30 degree temps, I wasn’t going to dare be outdoors longer than I had to.  A little mess wasn’t too bad to clean up…

Spring Mantel with Sensational Succulents - Creative ideas for bringing in natural elements by @Jenna_Burger, www.JENNABURGER.COM

Then the fun started and here’s the result of my natural Spring mantel using sensational succulents…

Spring Mantel with Sensational Succulents - Creative ideas for bringing in natural elements by @Jenna_Burger, www.JENNABURGER.COM

It’s a beautiful collection of natural elements mixed in with colorful favorites.

Spring Mantel with Sensational Succulents - Creative ideas for bringing in natural elements by @Jenna_Burger, www.JENNABURGER.COM

Spring Mantel with Sensational Succulents - Creative ideas for bringing in natural elements by @Jenna_Burger, www.JENNABURGER.COM

Any style bowl, vase, cup, or container will make for the perfect holder to display succulents. My collection includes a clear glass round vase, a similar square style, a plain white double dish, a decorative ceramic bowl, and a white milk glass cup.

Spring Mantel with Sensational Succulents - Creative ideas for bringing in natural elements by @Jenna_Burger, www.JENNABURGER.COM

Spring Mantel with Sensational Succulents - Creative ideas for bringing in natural elements by @Jenna_Burger, www.JENNABURGER.COM

Choosing succulents of varying sizes allows for an interesting mantel composition.

Spring Mantel with Sensational Succulents - Creative ideas for bringing in natural elements by @Jenna_Burger, www.JENNABURGER.COM

Spring Mantel with Sensational Succulents - Creative ideas for bringing in natural elements by @Jenna_Burger, www.JENNABURGER.COM

Spring Mantel with Sensational Succulents - Creative ideas for bringing in natural elements by @Jenna_Burger, www.JENNABURGER.COM

Spring Mantel with Sensational Succulents - Creative ideas for bringing in natural elements by @Jenna_Burger, SASinteriors.net

Spring Mantel with Sensational Succulents - Creative ideas for bringing in natural elements by @Jenna_Burger, www.JENNABURGER.COM

Despite the frigid temps, the Lowe’s gardening section is already stocking up on their summer displays including an array of flowers, plants, and a large selection of outdoor furniture.

Lowe's Creative Ideas App - Great ideas & Inspiration

To gather even more unique, fun, and creative ideas for your indoor and outdoor Spring decor, I would definitely suggest downloading the Lowe’s Creative Ideas app on the iphone and ipad.  I’m always checking out the FREE app for great inspiration. Consider following Lowe’s on Facebook, Pinterest, and Instagram as well.

Disclosure: I am part of the Lowe’s Creative Team and was provided with a Lowe’s gift card to purchase items for my project.  I was also compensated for my time to use the products.  No one told me what to create, what to buy, how to use the product, or what to write.  All opinions are 100% mine!

I link my projects to some of these parties: Skip to My Lou, Dittle Dattle, Between Naps on the Porch, Today’s Creative Blog, Stories of A to Z, All Things Heart & Home, House of Hepworths, Finding Fabulous, The Shabby Nest, Serenity Now, Tatertots and Jello, Thrifty Decor Chick, Tip Junkie

Whimsical Spring Forsythia Wreath

I was so completely inspired when putting yesterday’s post together on Spring Wreath Inspiration.  There are so many amazing and talented bloggers out there and I was so happy to showcase their work!

Now it’s my turn….

I created a lot of wreaths over the past months for the various seasons and holidays.  Now it’s time to celebrate the arrival of SPRING!  YAY!!

Here’s a sneak peak at my NEW Whimsical Spring Wreath ~

This is how the wreath looked before… BIG change, right?

My mom gave me this wreath quite awhile ago and it had been sitting in my garage for months.  My repurposing mind was in action and the transformation began.

To start off, I un-decorated the wreath.(If you want to create a wreath like mine, you obviously can skip the above step and start with a fresh, new wreath)

I wanted to create a whimsical wreath for the Spring ~ fun and flowery was my goal.  I decided to use (faux) Forsythia branches.  Similar to my faux centerpieces, I cut and separated the branches, then started to weave them through the wreath and used floral wire to secure.

Here it is…done~

WOOO…not quite yet…it’s missing something.  Seems kind of BLAH.
Let’s add alittle Wild Daisy, like this ~

Now it’s COMPLETE!

Simple, but just what I wanted!

WELCOME to my HOME

Have you seen my other wreaths?  If you missed them, here they are ~

My green door has been through many transformations!  I painted it this apple green color only a year ago, but I’m thinking that ‘It’ needs it’s own transformation for Spring….hmmm.  What do you think?

How to Make Fake Flowers Look Real

Even though it’s technically Spring, it’s difficult to believe, with all the snow still on the ground here in NY.  Thankfully my mindset is already on pretty Spring flowers to get me through the final days of the long drawn-out Winter.  I’m continually changing and updating my Dining Room display depending on the season and holiday.  I love the look of fresh flowers (who doesn’t?), but sometimes an artificial arrangement is simpler and more practical to maintain.

When shopping for your arrangement, look for flowers that have a natural, “real” appearance and that hang similar to a real flower.  Vary the size and texture of the faux flowers.  If your chosen flower is in a bunch, separate it, so you have individual stems.  By taking apart the pre-made flower bunch, it’ll give you more freedom to vary the heights and  discard parts of the bunch you may not want to use.

Like always, it’s important to use the appropriate tools for the job! Wire Cutters are perfect for this project.

Let’s get started…

Start arranging your flowers just like you would if using real flowers.  I chose a vase with a small opening, but the look of the arrangement will depend on the size, shape, and opening of the vase you choice.   Hot Tip: If you decide on a vase with a large opening, make a grid using clear tape. This will keep the flowers in place and the arrangement looking full.

I scored this vase at TJ Maxx for less than $4!

Begin by placing a handful of the flowers in the vase.  Then remove and trim them one by one. Vary the heights and sizes to create a balanced arrangement. Remember, just like when arranging “real” flowers, it won’t be perfect and that’s the beauty of it.

With the busy lives we lead, buying and maintaining fresh cut bouquets is sometimes just NOT possible.  If done right,  an artificial arrangement can look just as beautiful and the enjoyment of flowers can still be achieved.

Here is my completed arrangement…

O, I forgot to mention, I made two…

And here is an overall photo of my dining space…

I’m usually a “real” girl, but fake can sometimes do the trick!

I’ll be linking up {here}