
Tag: staining tutorial

Kitchen Progress: Staining Hardwood Floors

Kitchen Renovation: Patch, Repair, and Stain the Hardwood Floors

We are still full-force ahead with the kitchen renovation through Lowe’s.

Last week was equal to a roller coaster ride with lots ups & downs, but we kept chugging along and now another week is upon us.  I *think* I can say, I see the light…

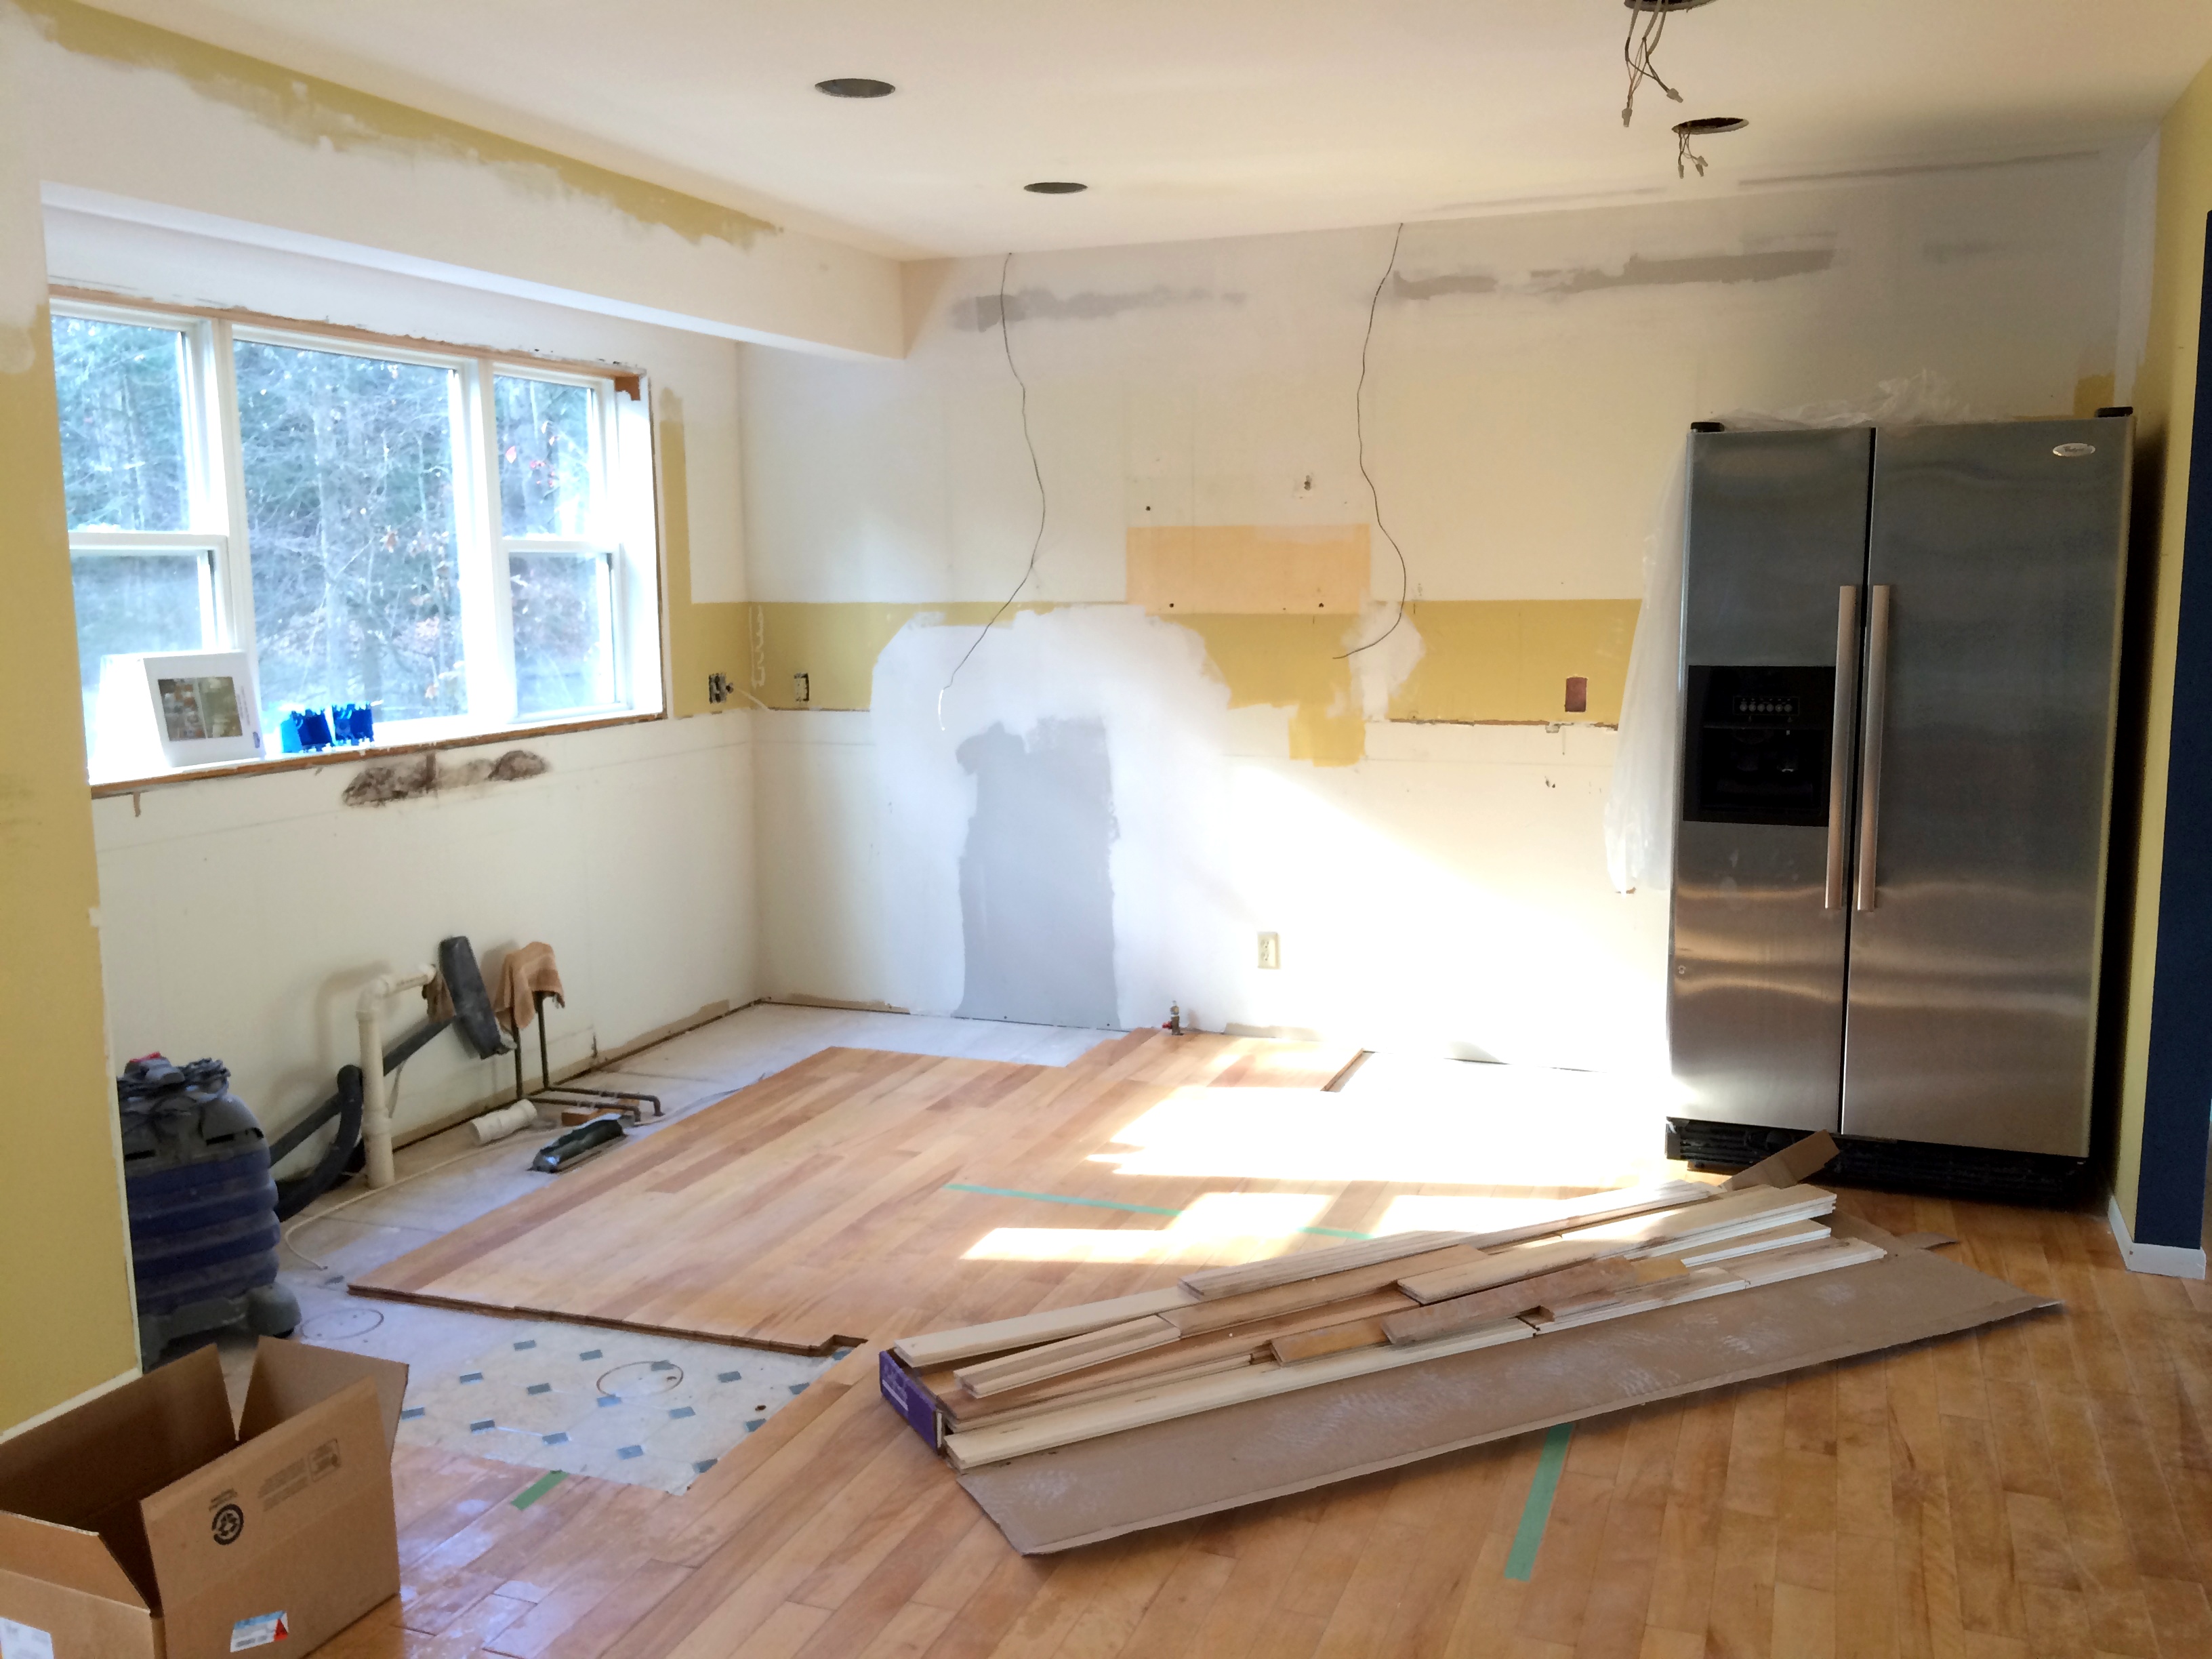
Since I left off last, a lot of progress has been made.  Day one of Demo was very exciting + eye-opening.  It was amazing how we woke in the morning with a full working kitchen, but by the days end, it was completely taken apart with only the shell of the space remaining…

The remainder of week one was filled with patching and repairing the walls, moving electrical openings (in the walls + ceiling), and sanding the walls to prepare for the cabinet installation.

Demo Day: Steps to Demolishing an Existing Kitchen + Creating a new renovated space. Remodel by www.jennaburger.com

Once the vertical surfaces were complete, the next area of focus was the hardwood floor, which started out week two of renovations.

Because of the new cabinetry layout, there was an area of hardwood where the dishwasher used to sit that needed to be patched with new material. Once patched, it would all be sanded, then stained…

Kitchen Renovation: Patch, Repair, and Stain the Hardwood Floors

The major stresser started with locating material…  Our existing hardwood is 3-1/4″ wide maple and it was challenging to find material in a short amount of time – literally we had less than 2 days.

Hardwood should be in the home 3- 7 days before installation so it can acclimate to the setting.  After locating enough material at Lumber Liquidators, we were good to go.

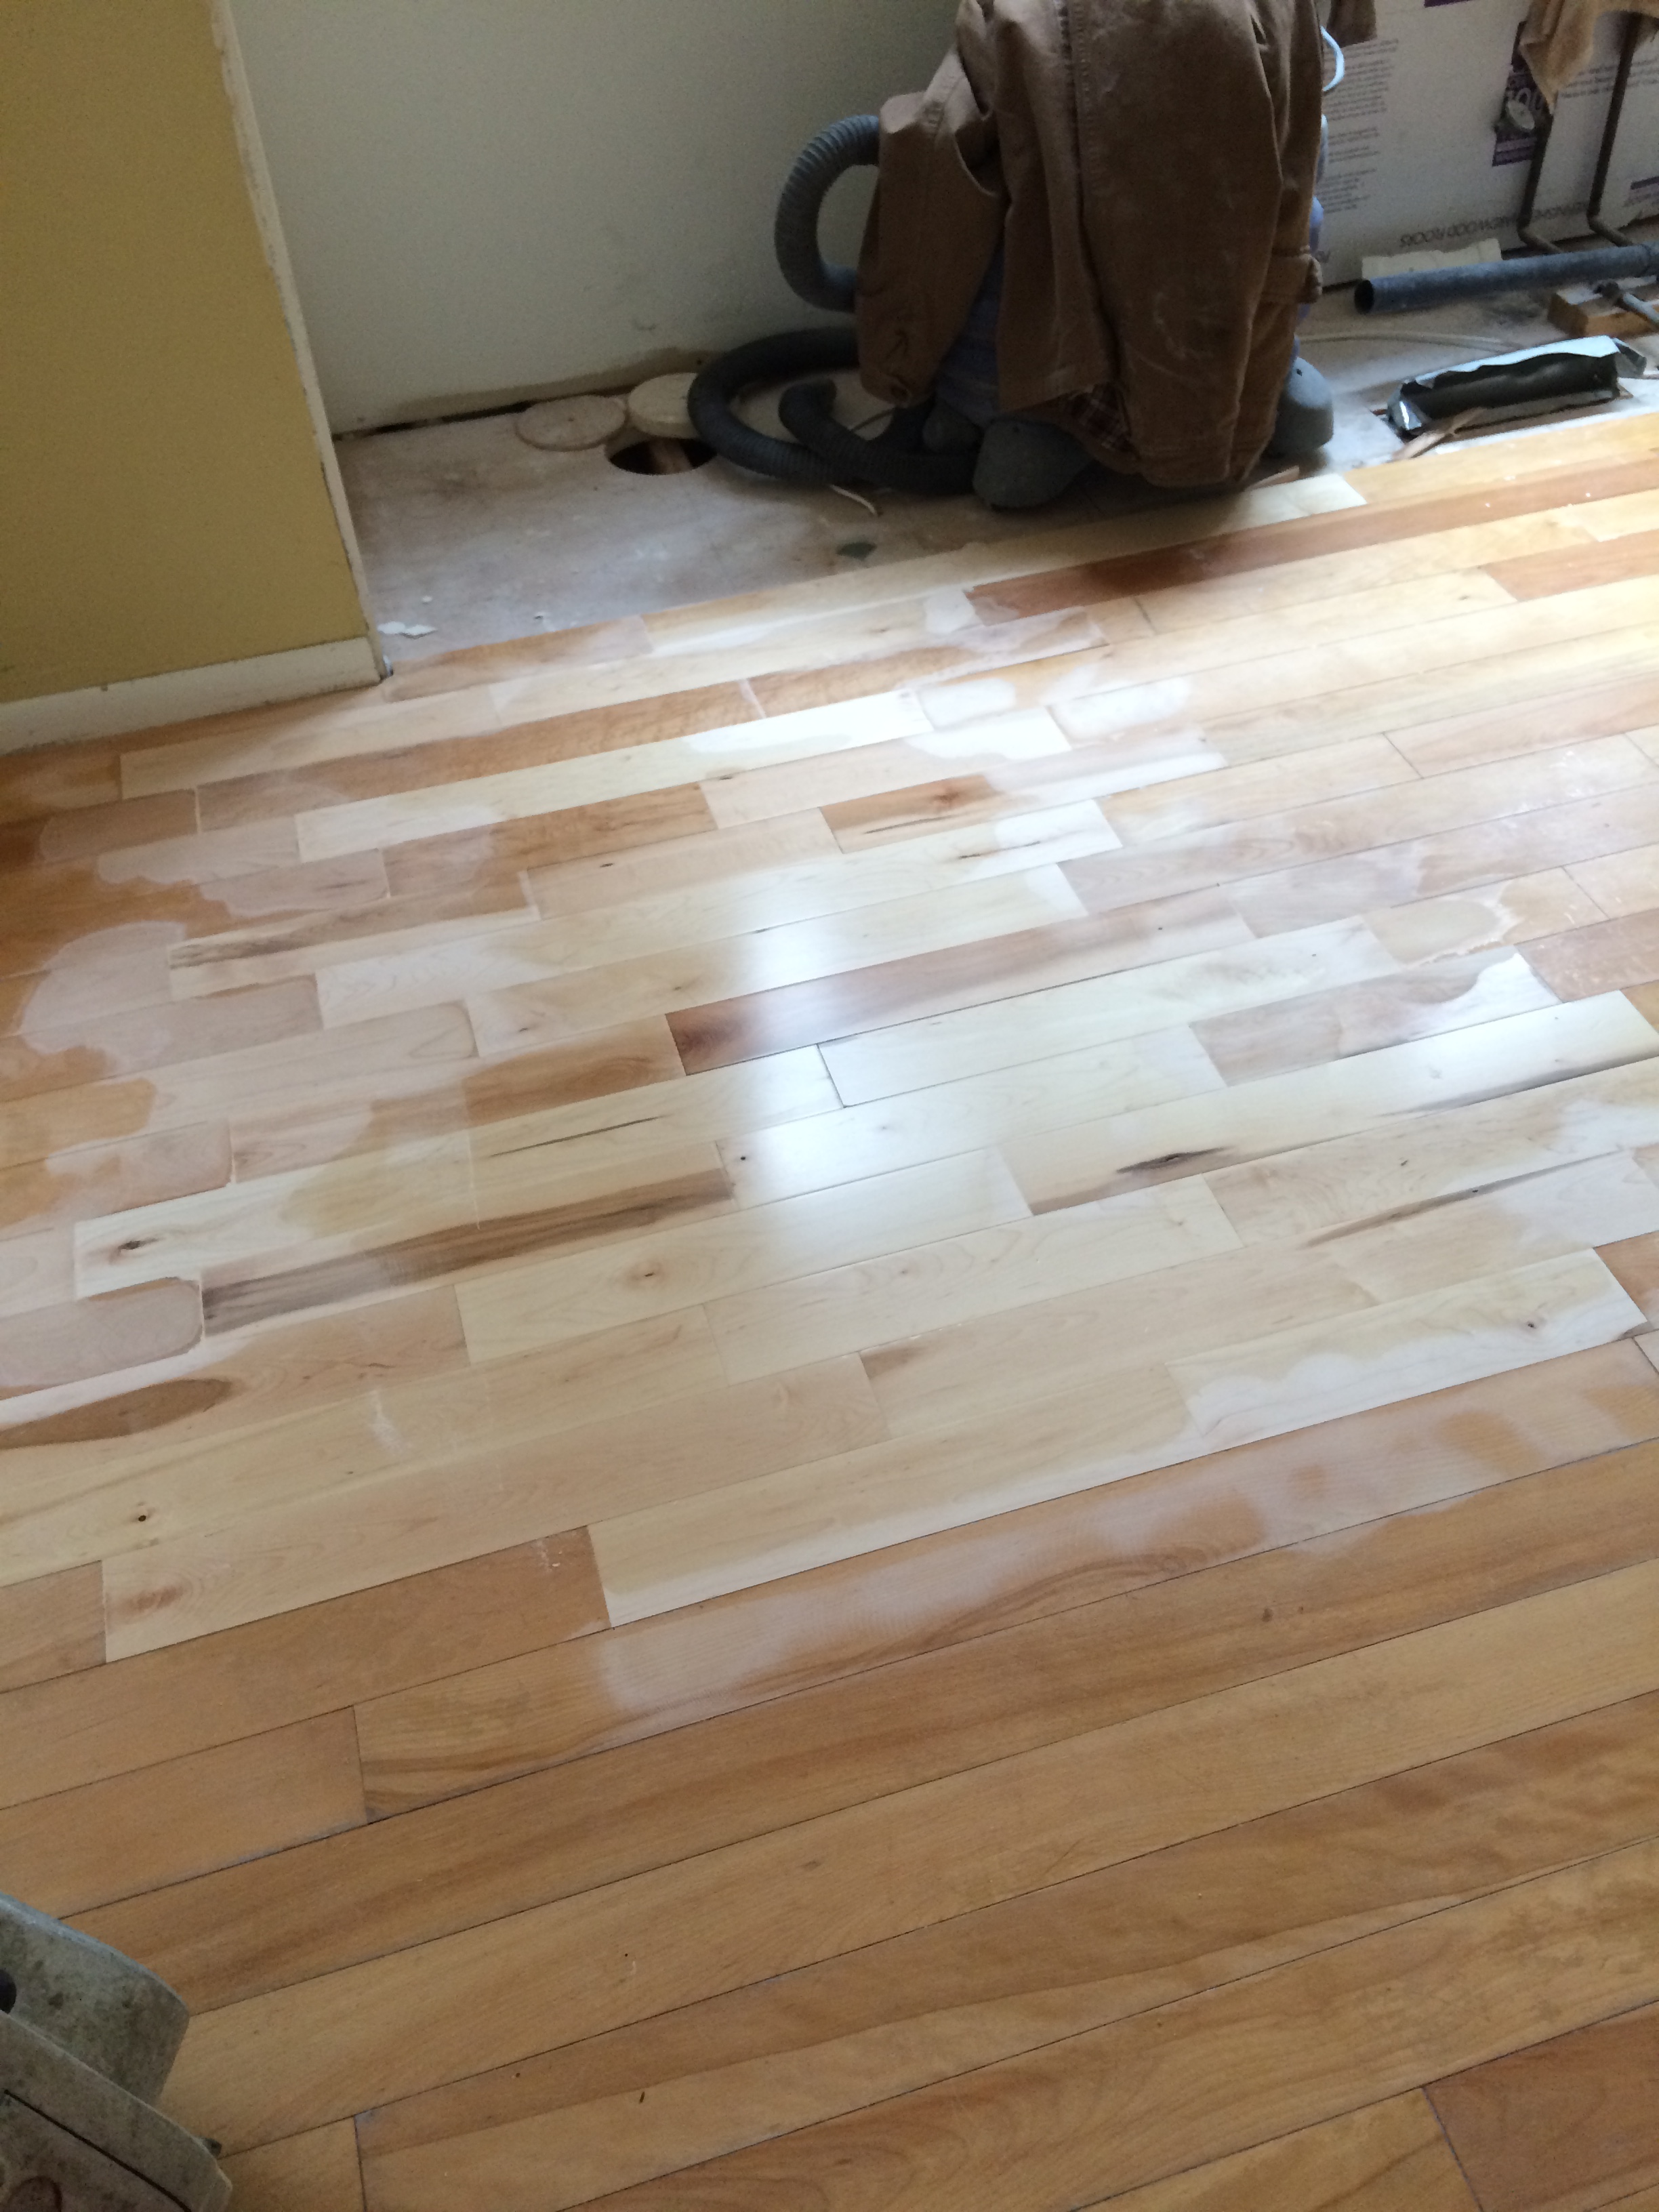
It took about 3 hours to weave in the new hardwood material to patch the vacant area.

The new material is lighter than the existing, but no worries, because it would all be sanded down to bare wood…

Kitchen Renovation: Patch, Repair, and Stain the Hardwood Floors

At this point, we ‘moved out’ of the house because despite it smelling bad, all of our furniture was piled high in the family room & it was like walking through a maze in the foyer…

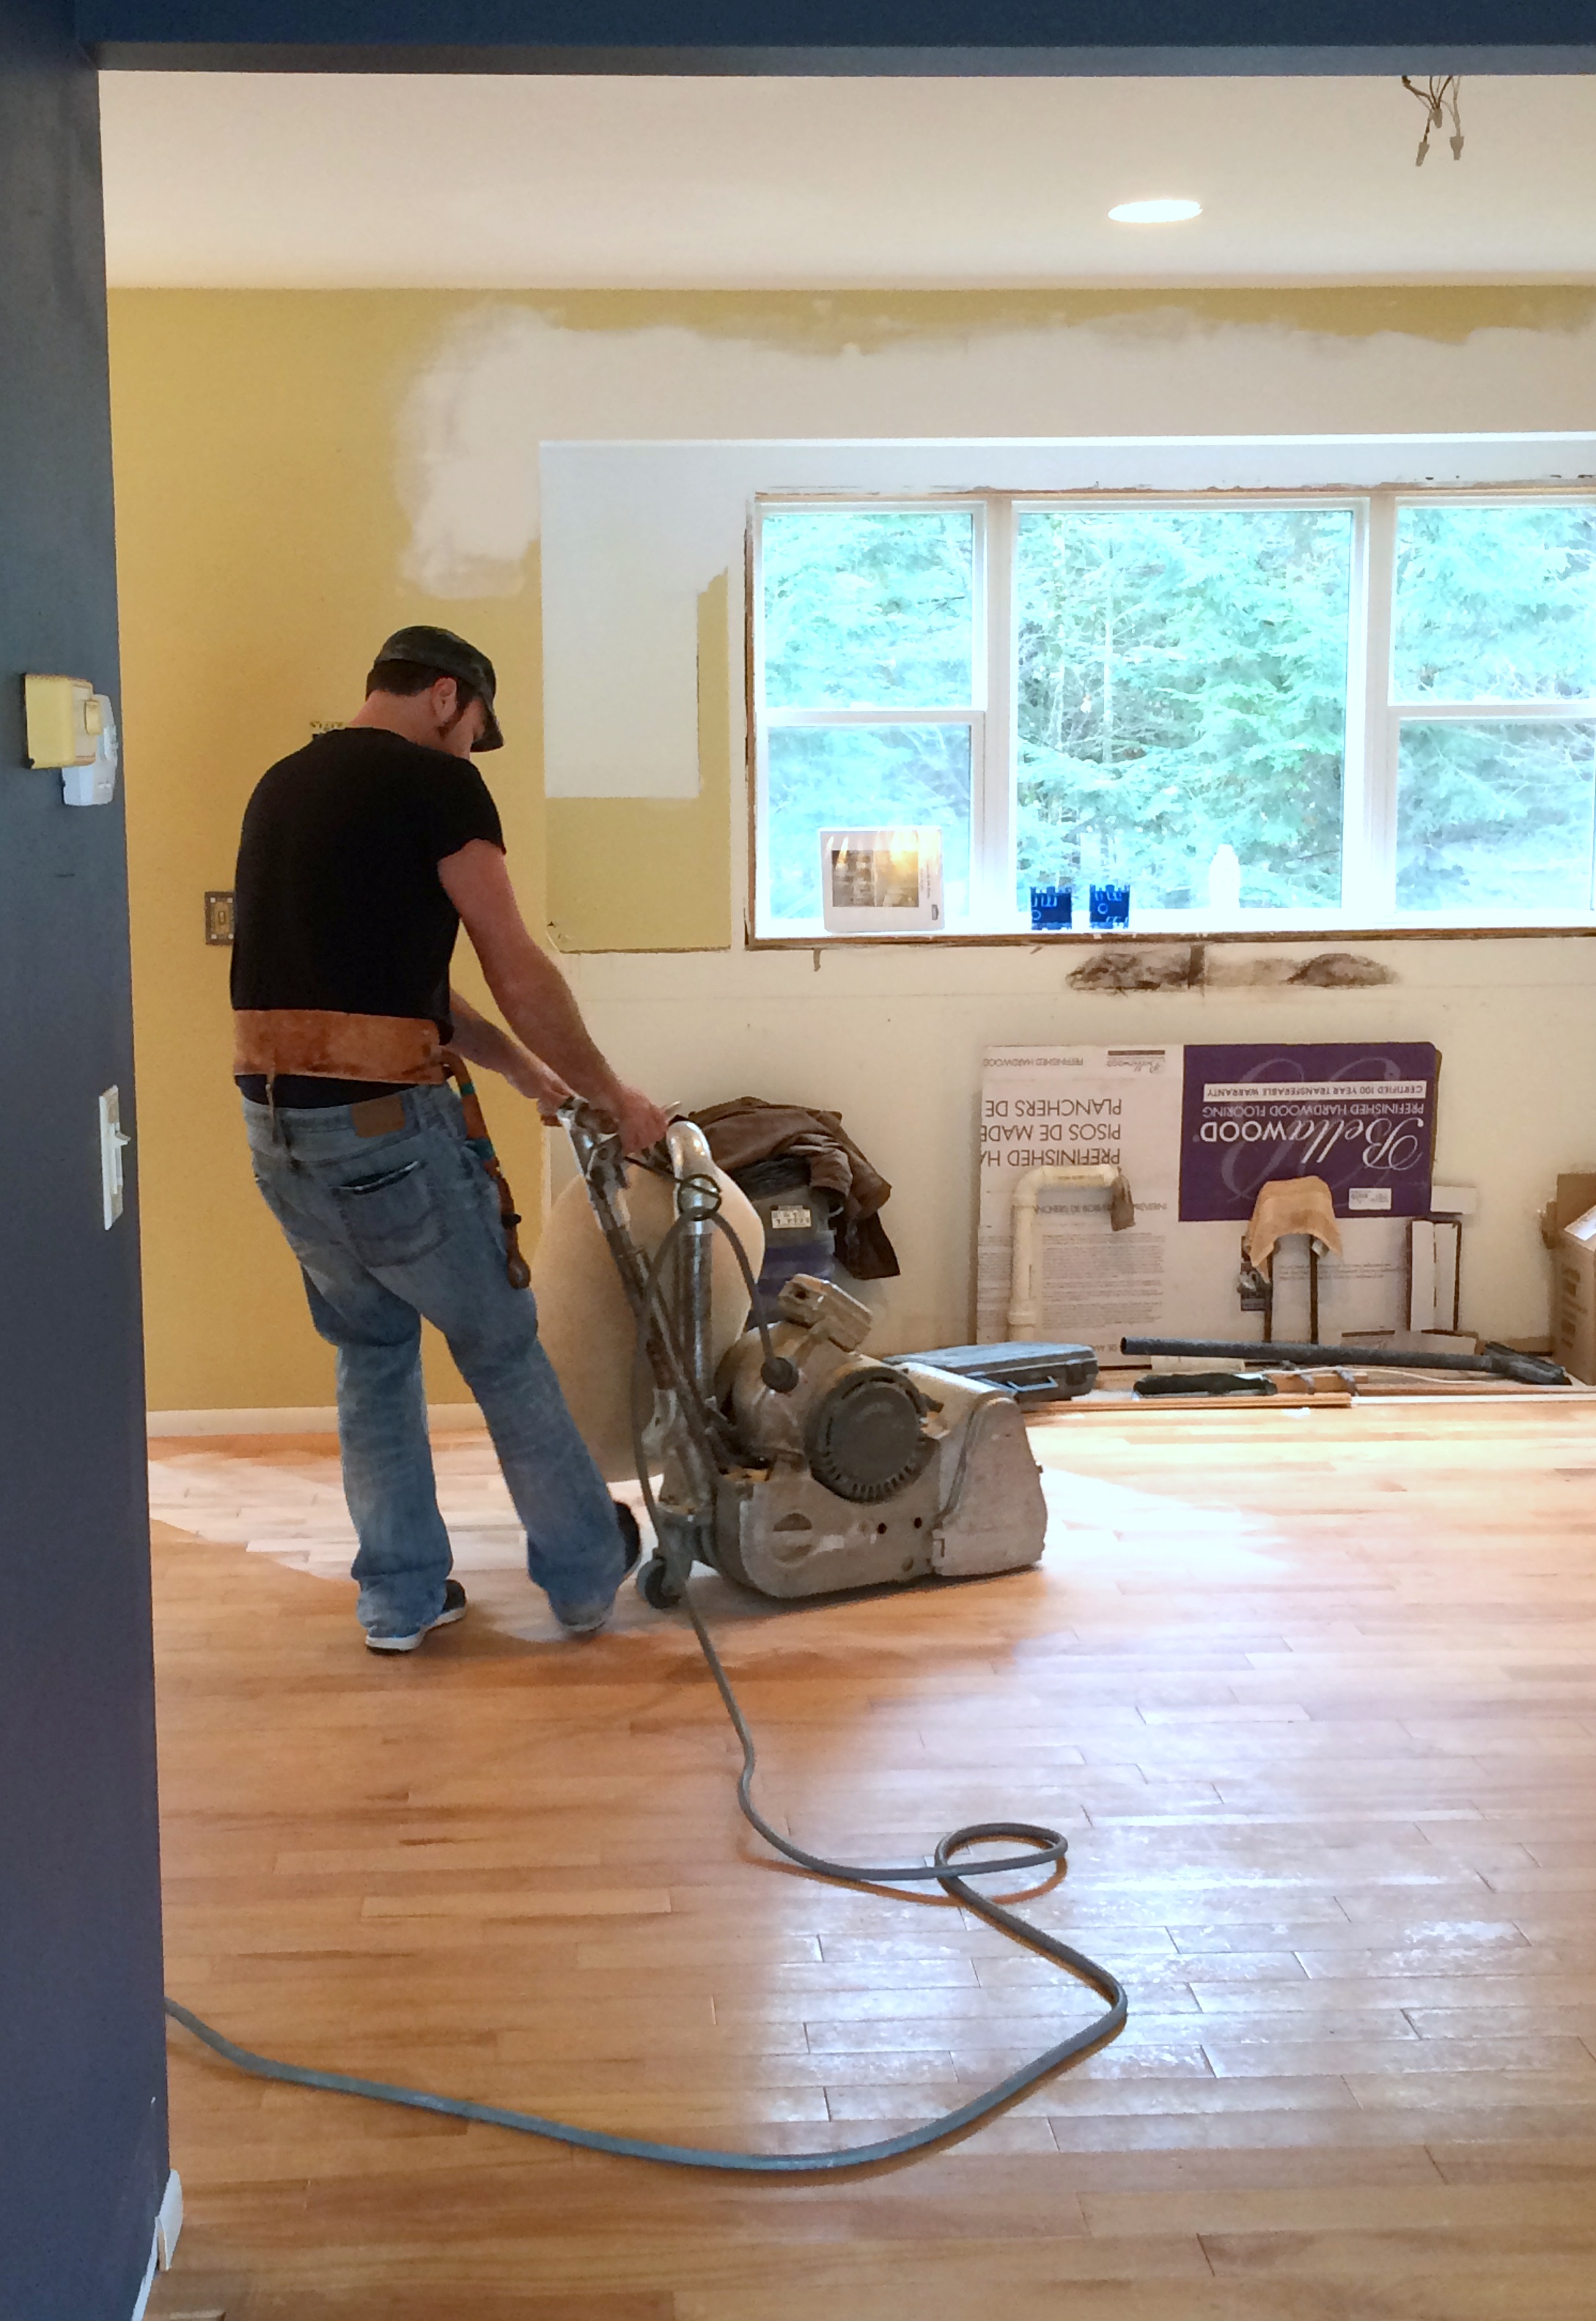
Next step for the floors, sanding…

We hired out for the floors through our Lowe’s independent contractor, who used an industrial sander to sand all the floors down to the bare wood.  When finished, the gorgeous maple shined through, but in my taste they had to go darker especially with the new white cabinets.

Kitchen Renovation: Patch, Repair, and Stain the Hardwood Floors

Here were a few samples of stains that they applied…

Kitchen Renovation: Patch, Repair, and Stain the Hardwood Floors

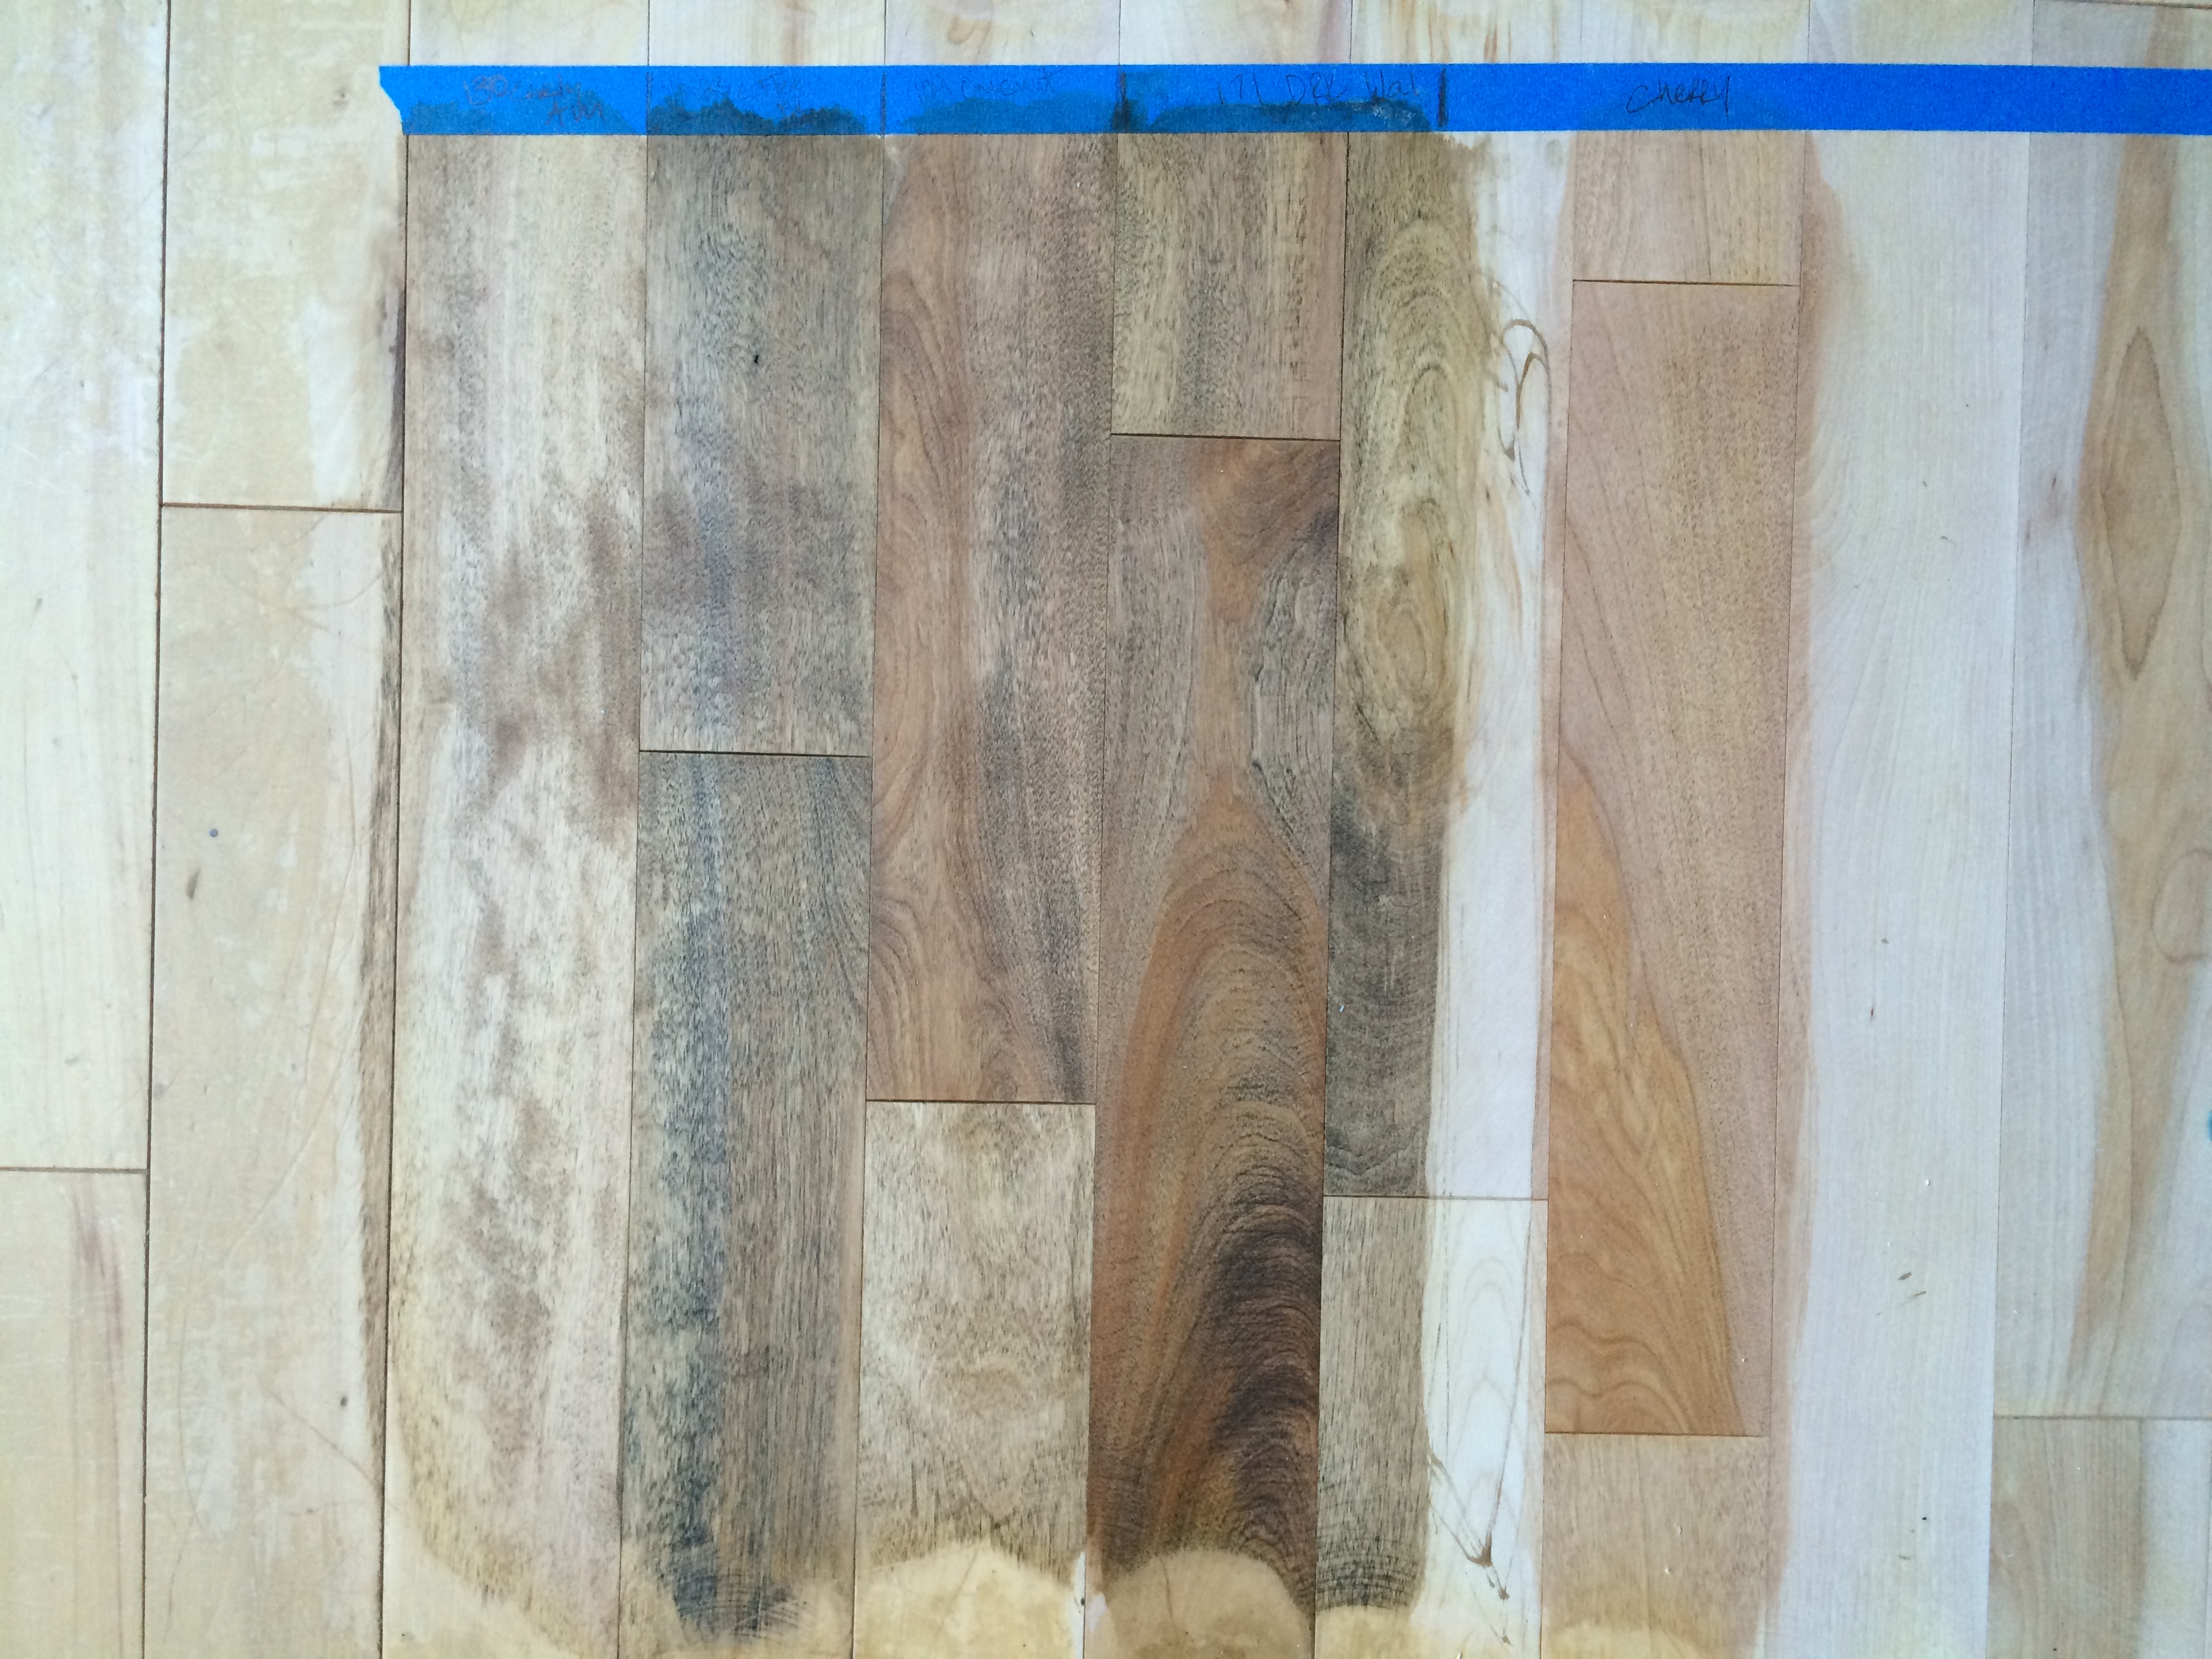
In the end, I chose a stain called COFFEE and it’s the 2nd board from the left. It was the perfect medium brown hue with no red or orange.

After the floors were sanded on day 2, they stained the floors, and applied a clear coat of oil sealer in a glossy finish.

Kitchen Renovation: Patch, Repair, and Stain the Hardwood Floors

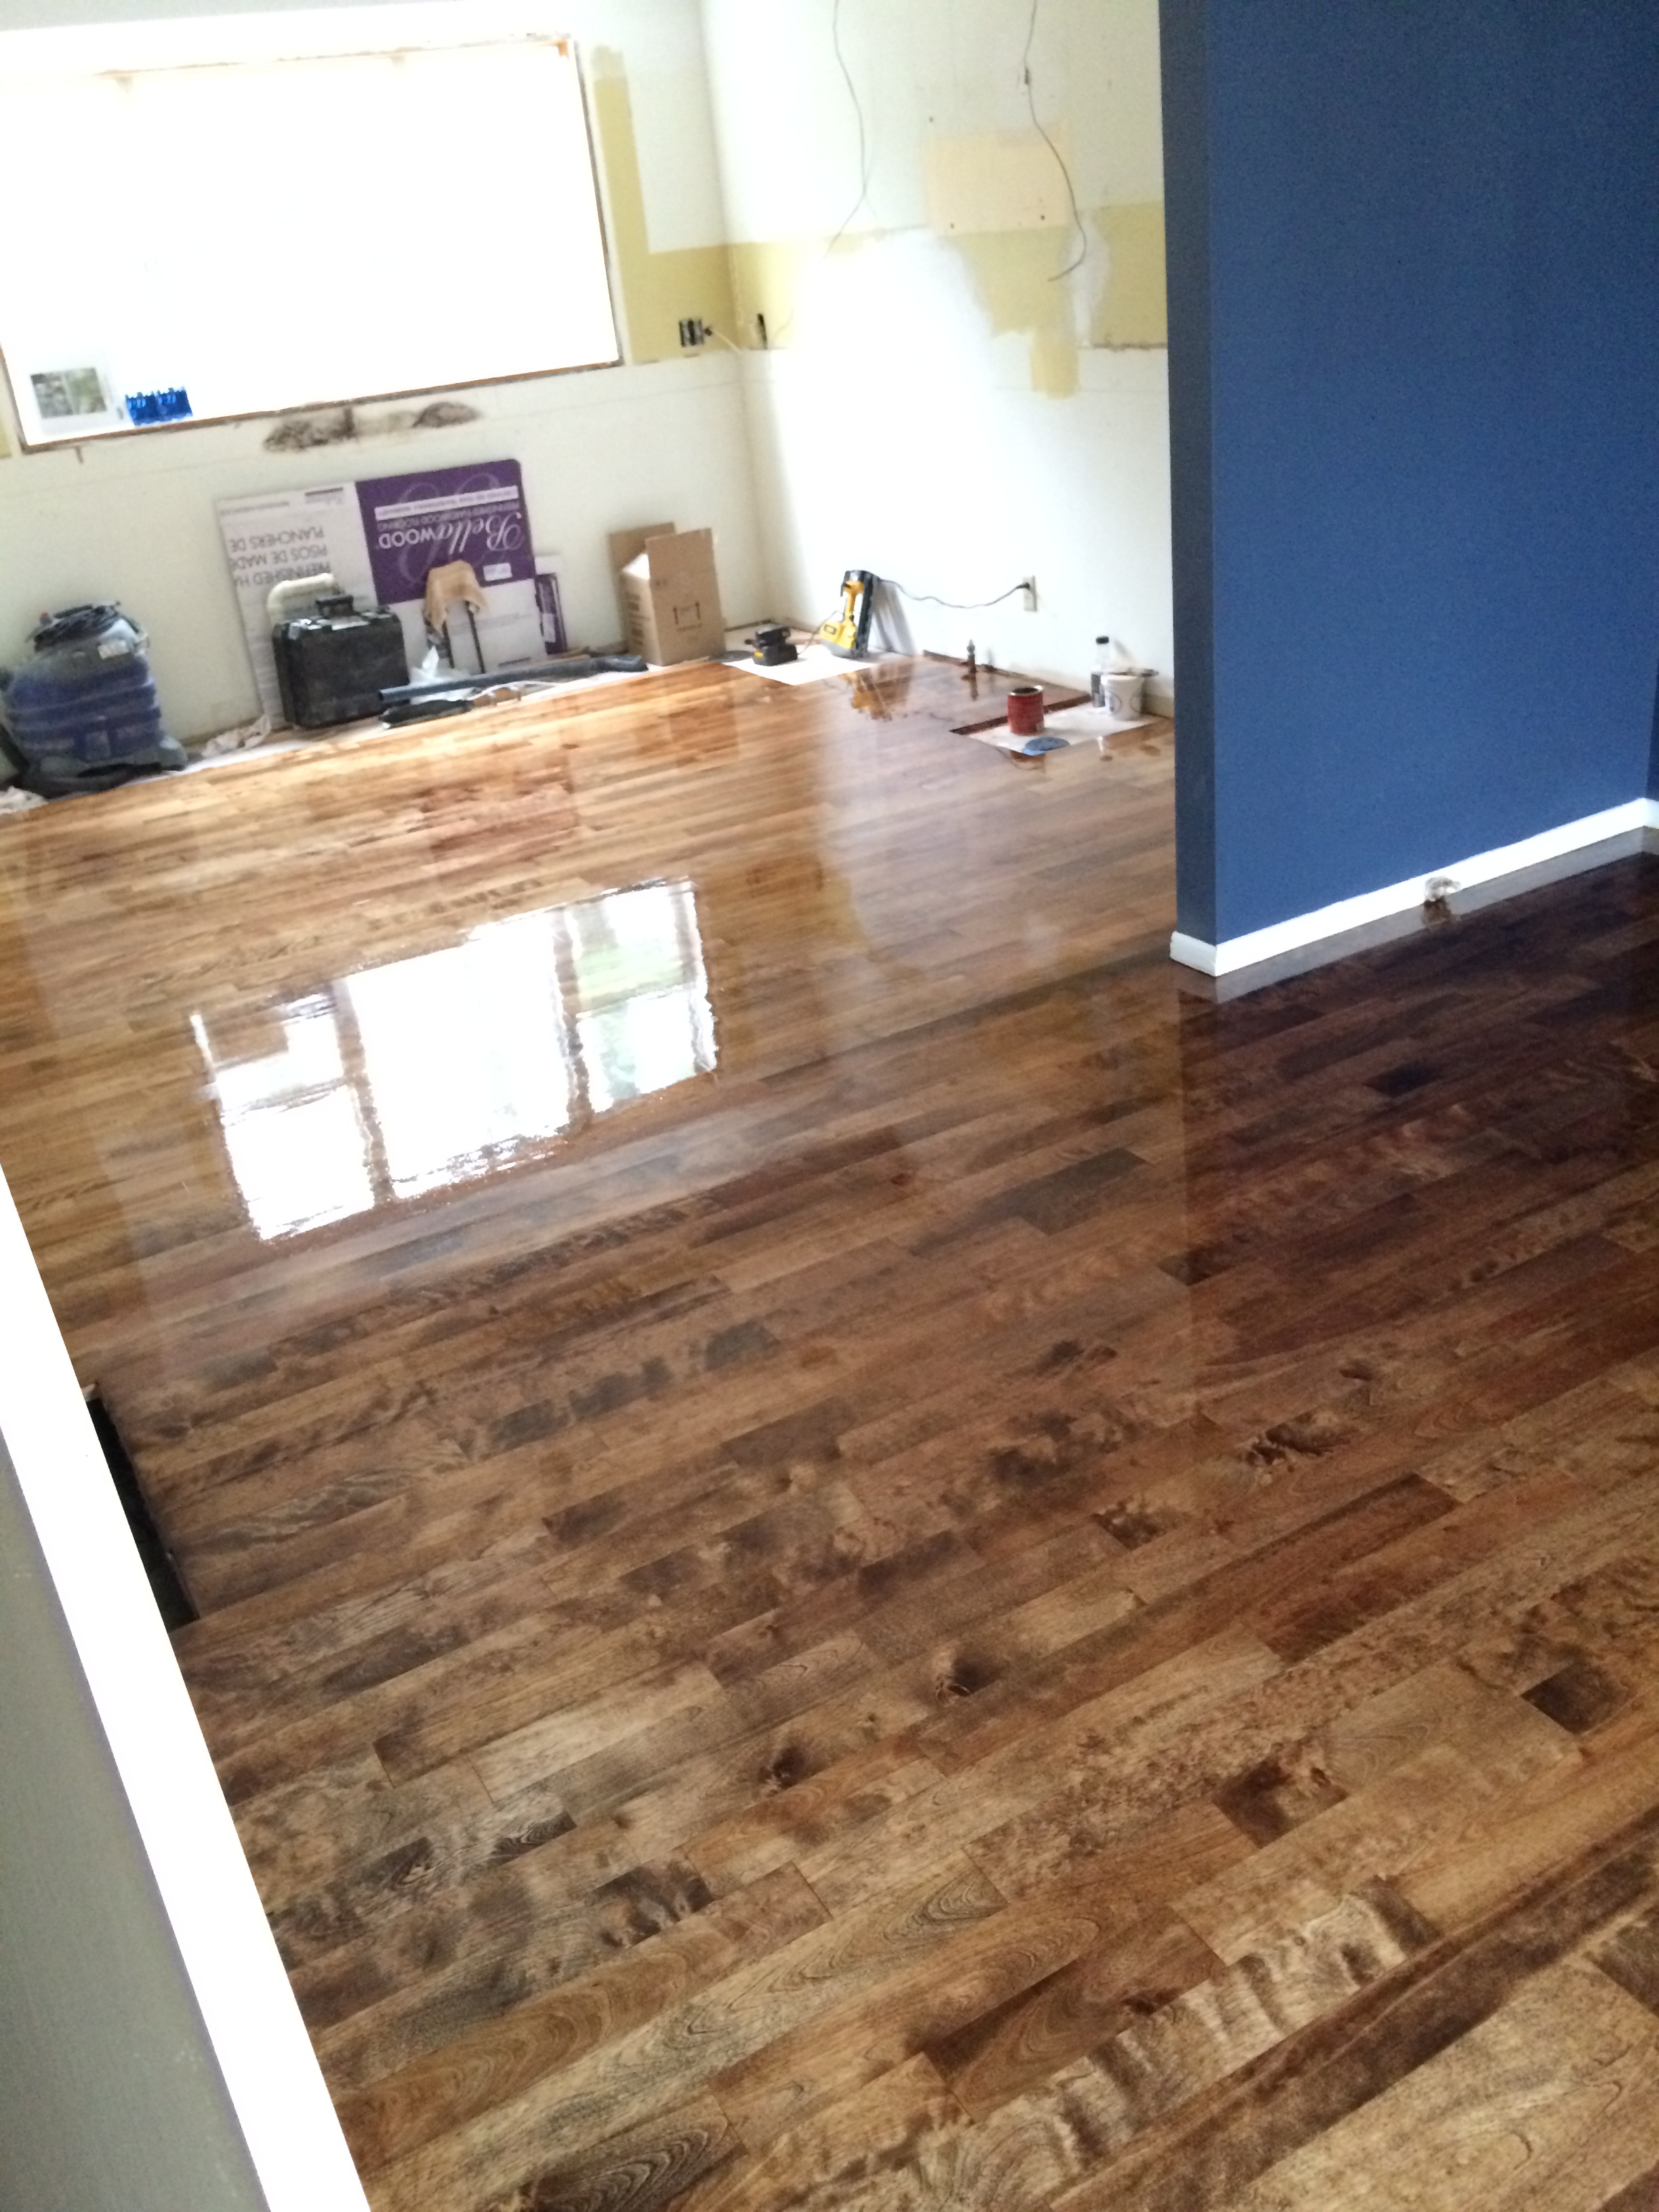
It looked like a gym floor with the high-gloss finish but this wouldn’t be the final finish.  They apply this high-gloss finish (2 applications) because it is most durable.  Once dry (2 days later), the floors were lightly sanded again and the final coat of sealer in a satin finish was applied.

After 5 days we moved back home – yay – and this is how the floors look now…

Kitchen Renovation: Patch, Repair, and Stain the Hardwood Floors

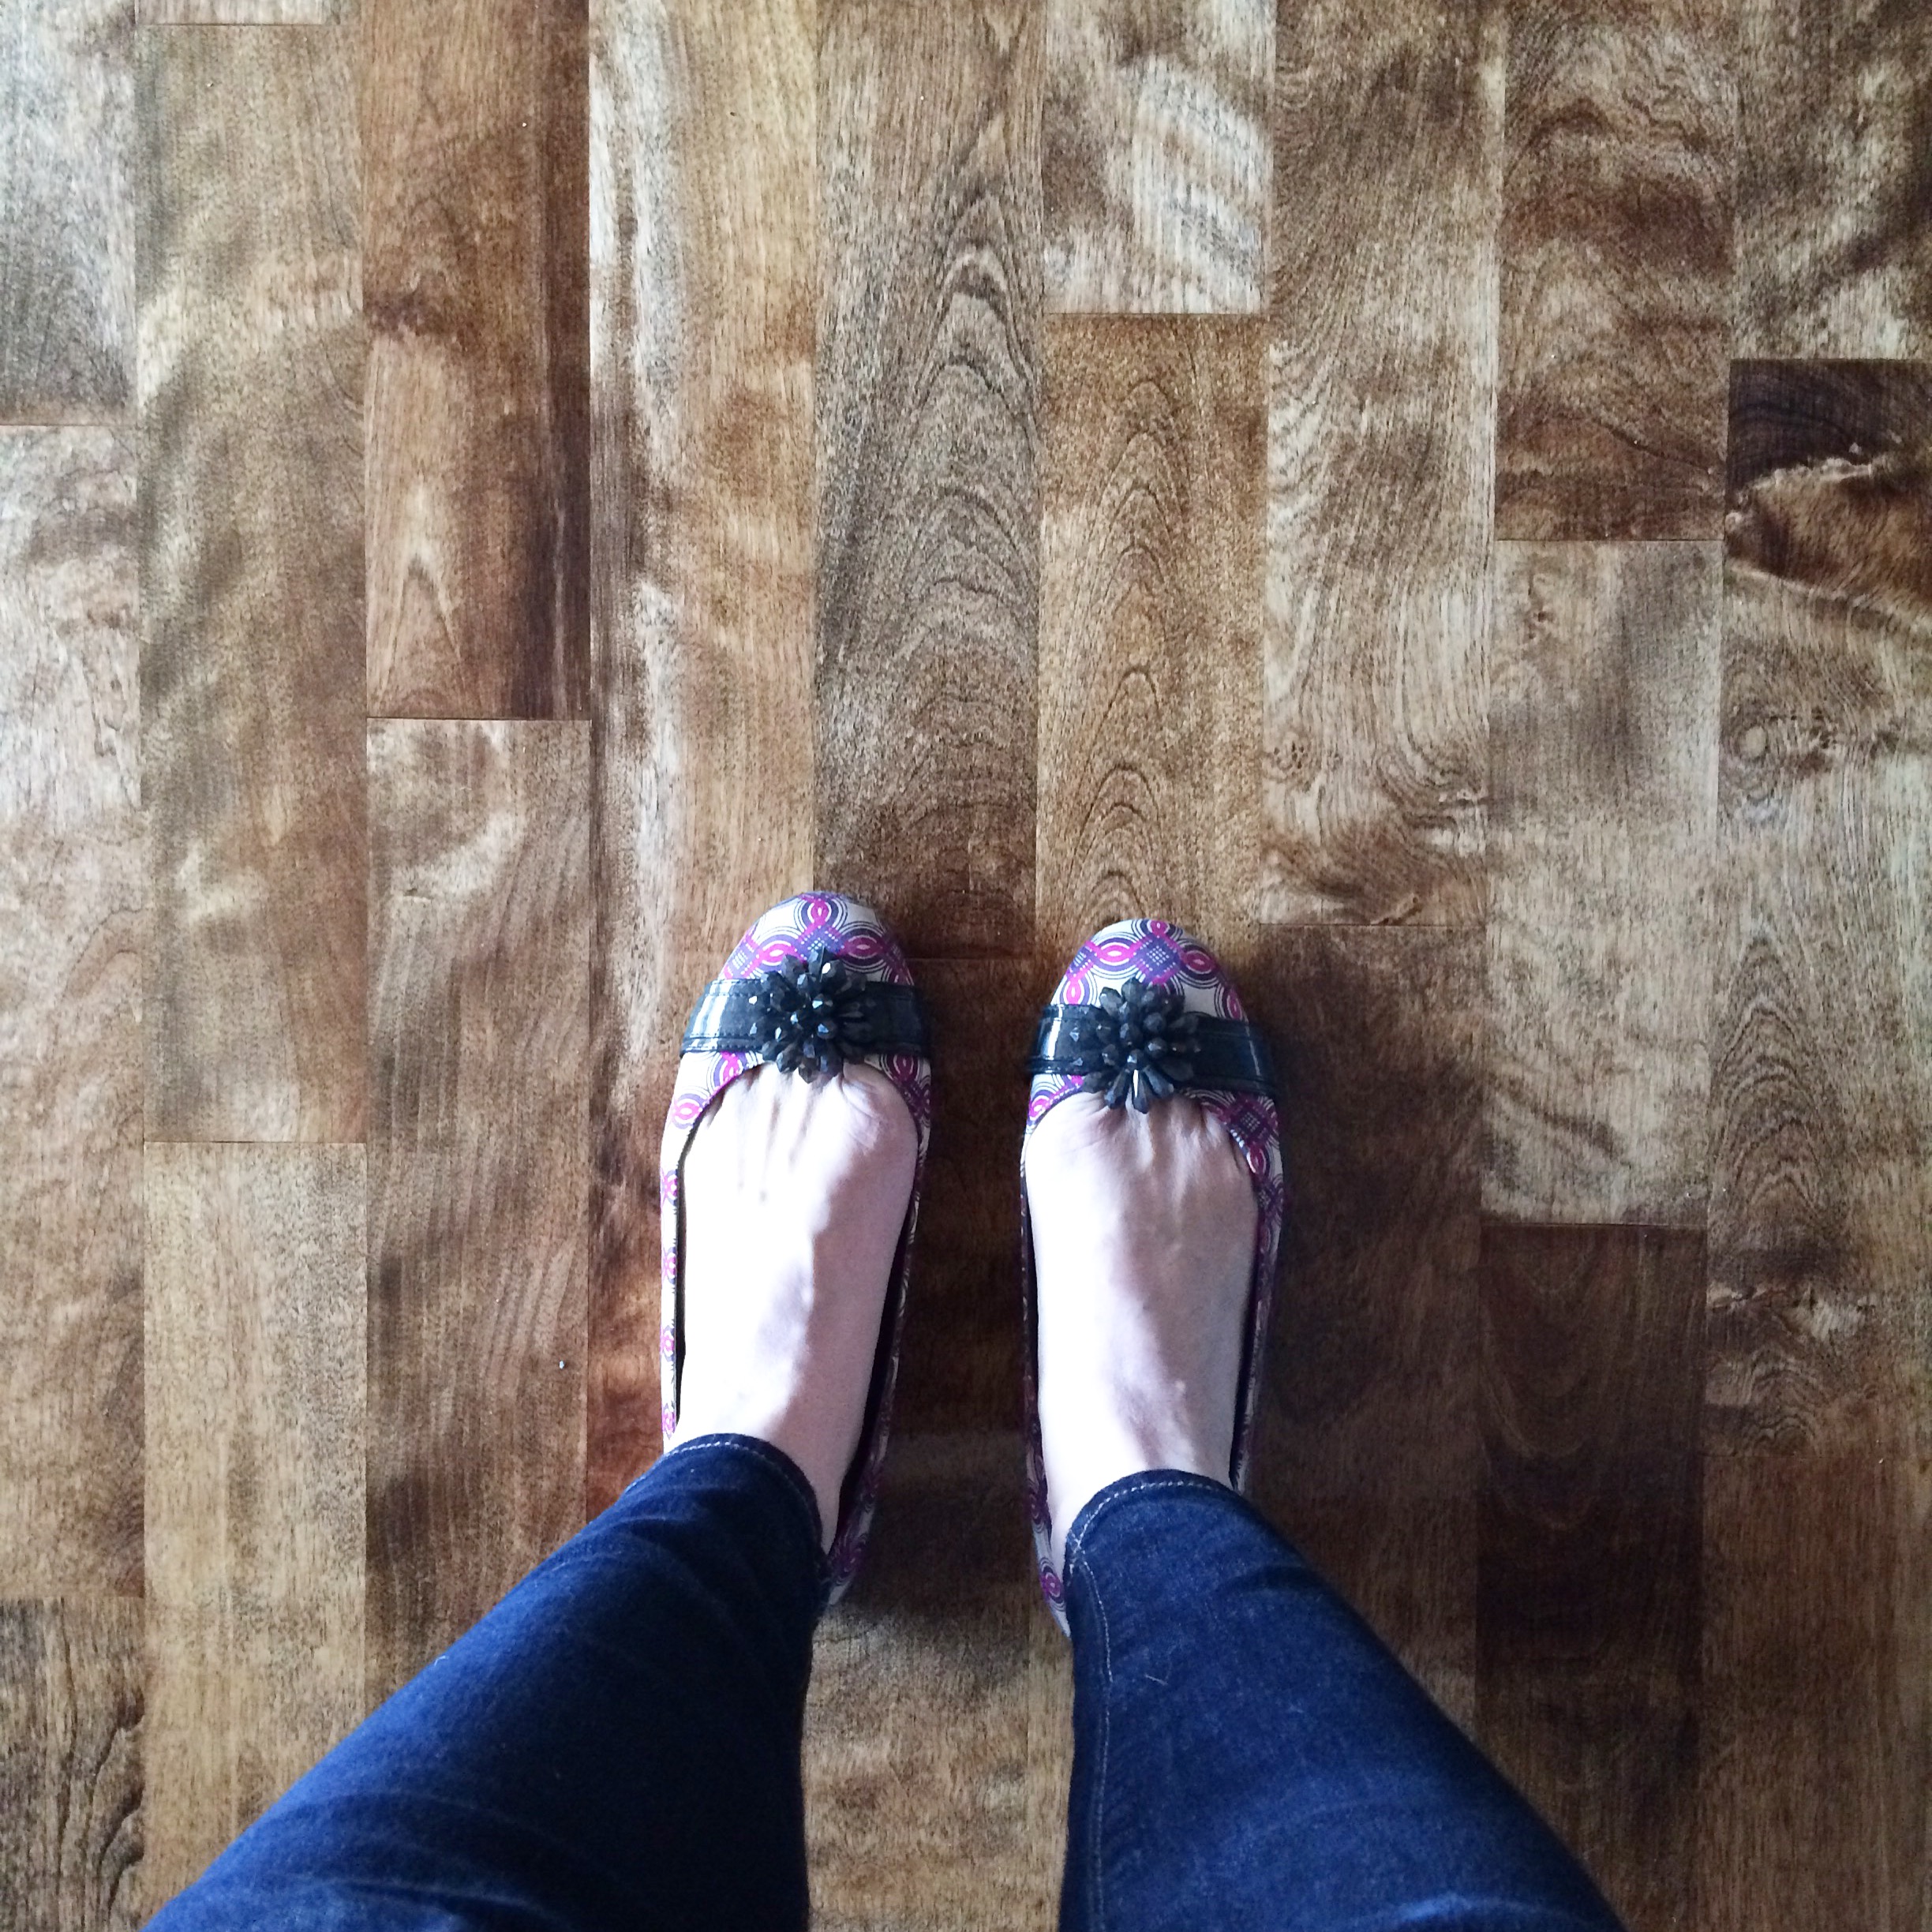
I just can not contain my love for them…

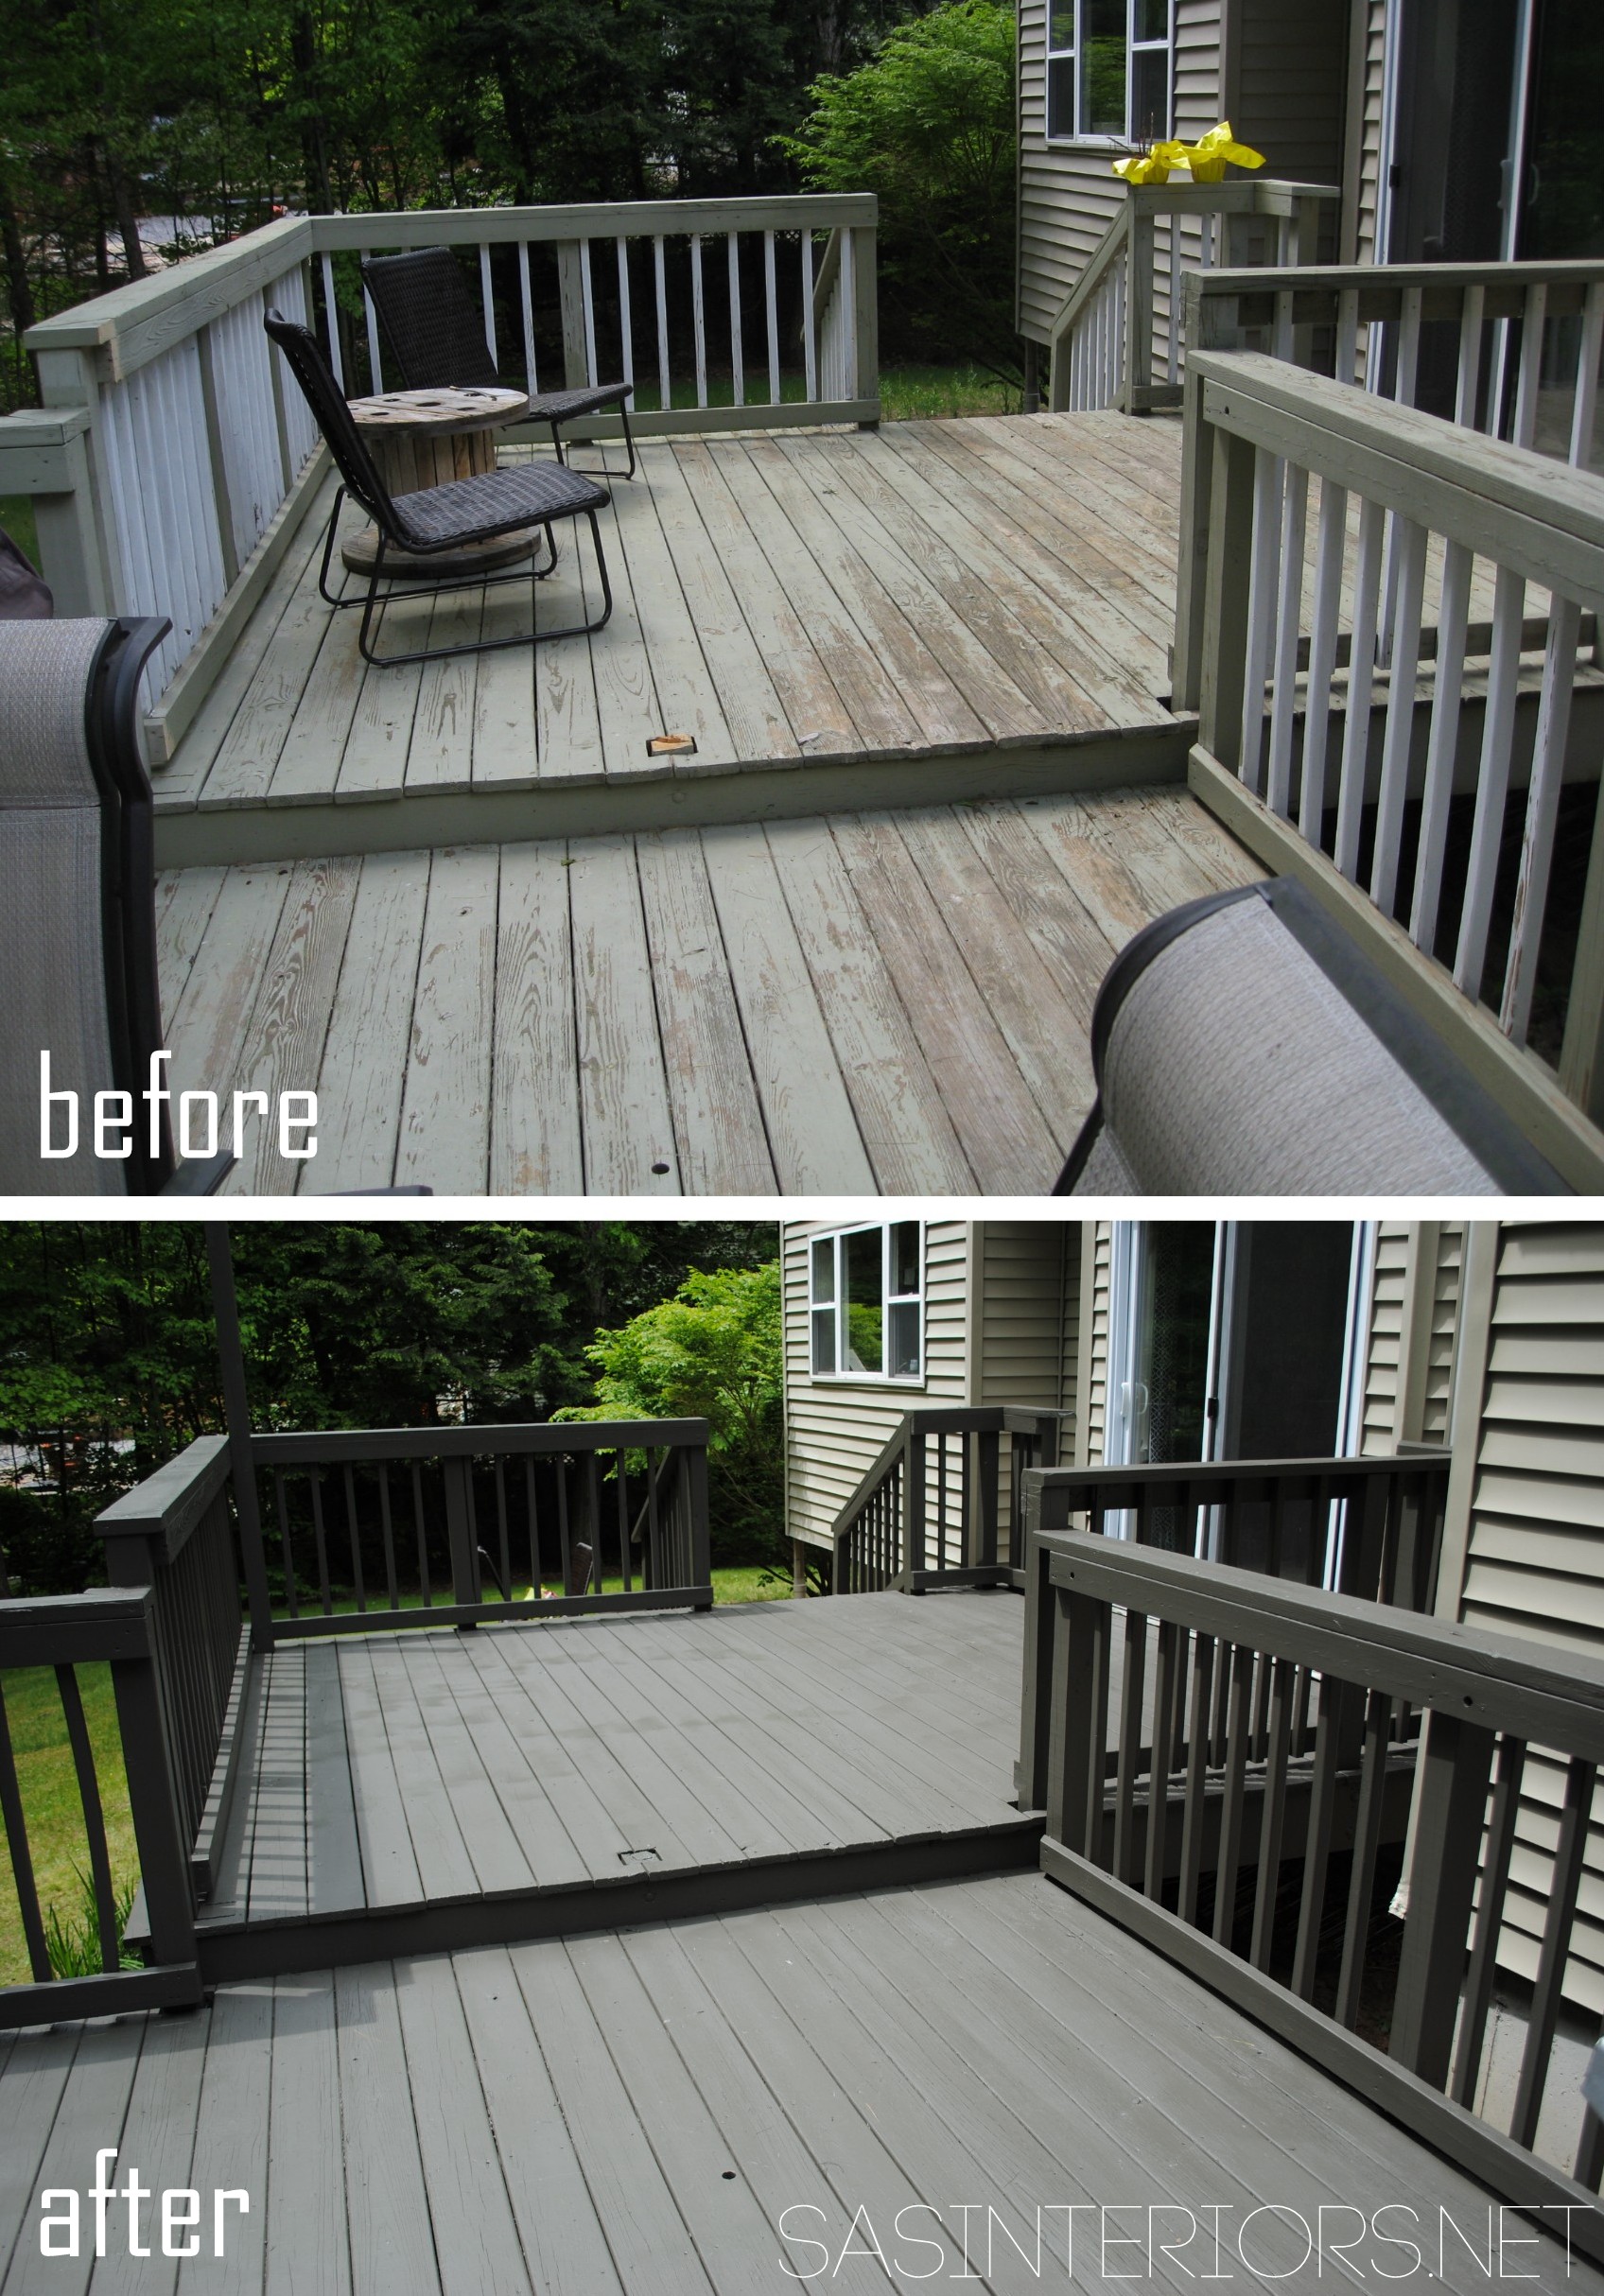
The before & after is breathtaking.  It looks like a completely new space!

Kitchen Renovation: Patch, Repair, and Stain the Hardwood Floors

They are so rich + warm.

I’m in love.

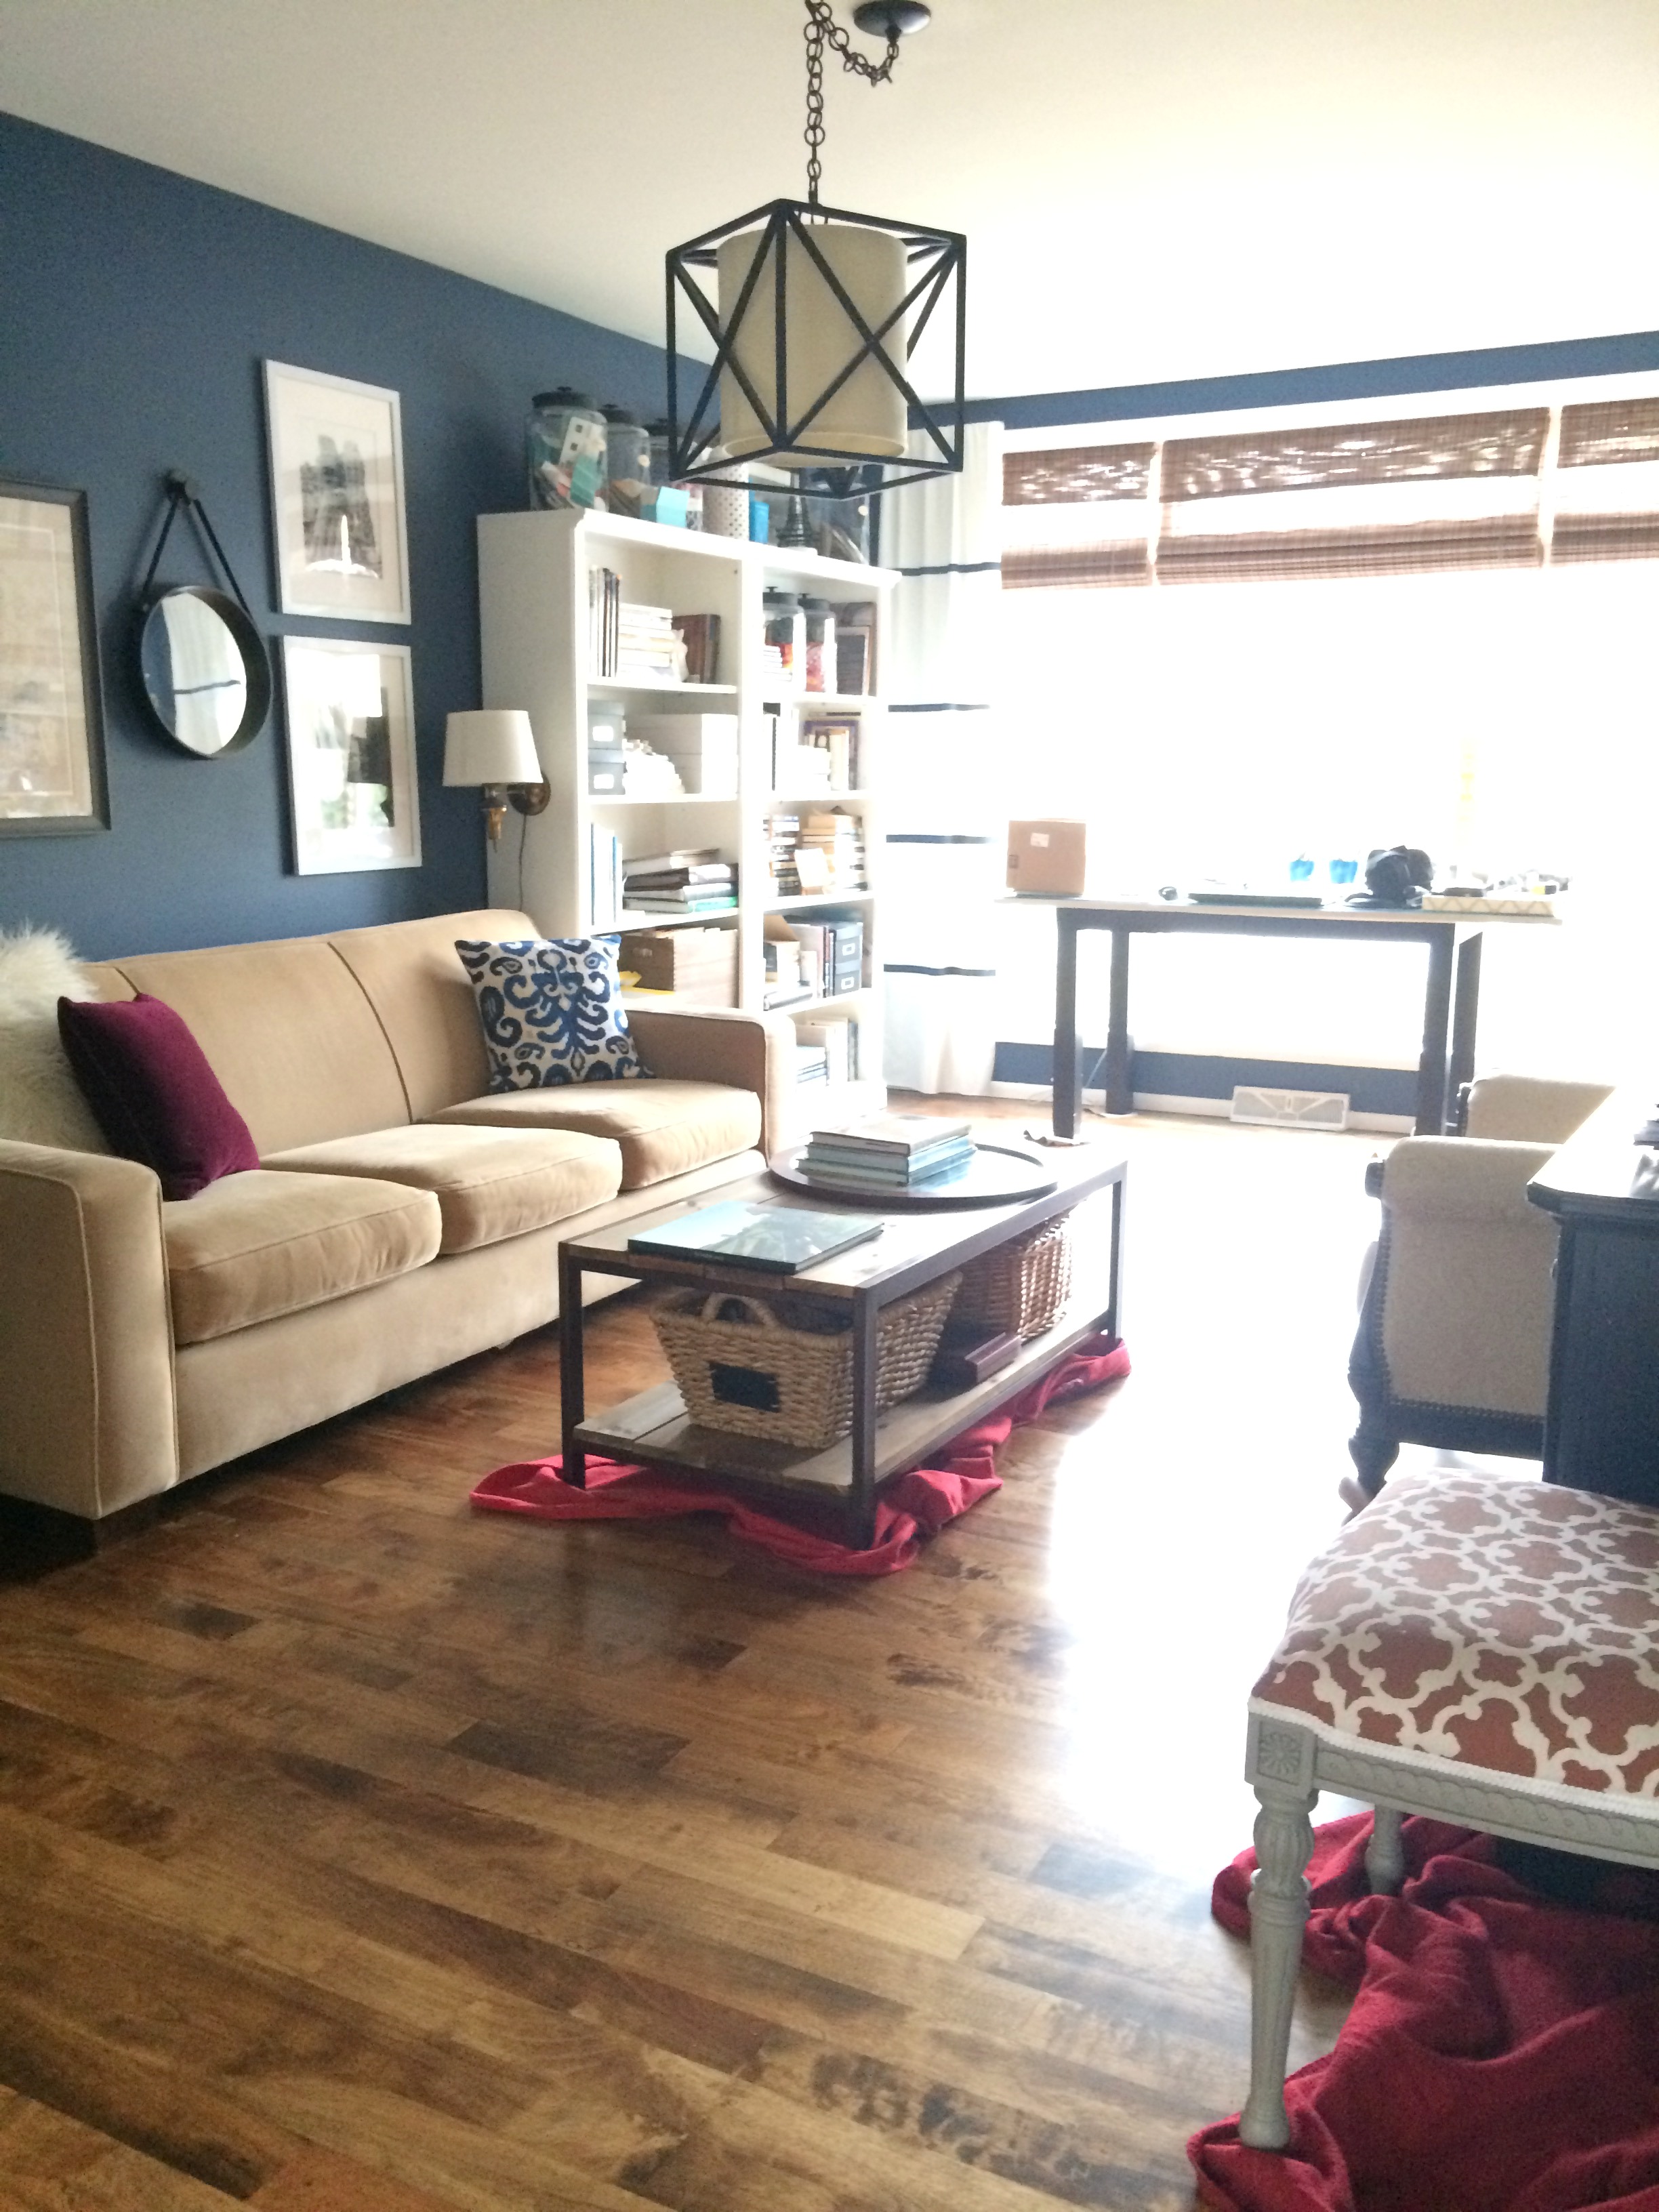
The floors will take 30 days to fully cure, just like paint on a wall, so for now all the furniture is placed on blankets, craft paper, or felt.  I want to protect these bad boys!

Look how beautiful the front room looks with the new floors (ignore the bright red blankets, lol)…

Kitchen Renovation: Patch, Repair, and Stain the Hardwood Floors

And there you have it.  Walls complete. Wood complete.

Next up cabinets + appliances!  They will be arriving in the coming days…

RECAP

Before I leave you, here is a recap for staining hardwood floors:

Staining hardwood floor can be quite an undertaking.  It’s not difficult, but time consuming and involved.  A good sander + high-quality product is key!

THE PROCESS FOR STAINING HARDWOOD FLOORS

– 1 –  Clean + Clear out the room(s)

– 2 –  Sand floors to bare wood – coarse grit sandpaper to fine grit sandpaper

– 3 –  Stain floors (a roller works best)

– 4 –  Polyurethane floors (3 times using a roller)

– 5 –  Let the poly cure for at least 48 hours

– 6 –  Move back in!

>>> Polyurethane takes 30 days to full cure, so no shoes.  Be Remember to place furniture down, don’t drag!

Steps to Staining Hardwood Floors to achieve a beautiful new finished floor! www.JennaBurger.com

If you want to see all the posts documenting the kitchen renovation, here they are from start to finish:
Wonderful White Kitchen Inspiration
Kitchen Remodel: Before + Plan of Action
Demo Day: Steps for Demolishing the Kitchen
Kitchen Progress: Staining Hardwood Floors
The Cabinets Arrive + Get Installed
Natural Quartz Countertops in the Kitchen
10 Countertop Materials to Consider for the Kitchen
Subway Tile Installation + Choosing the RIGHT Subway
Kitchen Backsplash Tile Options + Inspiration
Choosing a Paint Color + Wallpaper for the Kitchen and Dining Room
Kitchen Renovation: The Appliances
Dissecting the Details
Kitchen Renovation: REVEAL + RESOURCES

DISCLAIMER: THIS KITCHEN RENOVATION IS A COLLABORATION WITH LOWE’S.  ALL OPINIONS + SELECTIONS ARE MY OWN WITH THE ASSISTANCE OF THE LOWE’S DESIGN TEAM.

How-To Stain a Wood Deck

For the past few years, we knew something major had to happen with our exterior wood deck, but with SO much work (most of it do-it-yourself projects) to do in other areas of the yard, it kept being put on the back-burner.  Well… Baby didn’t want to be put in the corner no more (I know, that was cheesy), so this year was the year for a makeover.  And boy does she look smokin’…

How to Stain a Wood Deck - Before and After Wood Deck Makeover

I think (well, actually I know) one of the hesitations of the deck was the process.  Well, so I thought.  Honestly, it was so much easier and more manageable than I ever thought possible.  One of the major reasons for that was the use of a hand sprayer. WOW, was spraying easier than hand rolling and/or brushing.  We did that last year with the exterior fence and boy did it take ALL SUMMER LONG.

With a sprayer, the stain is applied (slightly) thicker and the coverage is much more even.  But best of all, it takes way less time and is much less labor intensive.

Before we get to any more of the process or the after pictures, here is what the deck looked like before.

How to Stain a Wood Deck - Before and After Wood Deck Makeover

How could a deck get so bad?  I dunno!  Living in this house for only 3 years, I have no clue as to when the last time the deck was done.  Also come to find out, the deck was previously painted, not stained.  Paint on the outside (especially if it’s not the right paint) does not last nearly as long as stain.  Also if you take a look, the spindles were white and after looking closely, they were only primed.  What I suspect happened, is that when the deck was painted last, someone got lazy, and only went as far as painting the deck surface and the handrail around.  Geesh.

Learning from that, for this before and after deck makeover project, we decided to use Cabot Solid Stain.  Because we were applying it over a painted surface and didn’t want to sand down to the raw wood, a solid stain seemed like the best choice.  Cabot is known for their quality wood products, so there was no doubt that they’d definitely get the job done (after being a disaster for so long)!

How to Stain a Wood Deck - Before and After Wood Deck Makeover

Supplies for staining a deck:

  • Stain (I used a solid stain, but also available are wood tone finishes, semi-transparent finishes, and semi-solid finishes)
  • Tools to clean / prep the deck surface (I used a power washer, as well as a bristle brush to get dirt off, as well as flaking wood chips)
  • Sprayer (this is a great one that I would recommend <=affiliate link)
  • Plastic wrap (for protecting areas you don’t want stained)

1. To start off it’s a must to give the deck a good cleaning.  Whether previously coated or bare wood, cleaning the wood deck surface is the MOST IMPORTANT step of the staining process.  A few weeks ago, I borrowed our neighbors power washer and went to town on it.  It was amazing how much dirt and mildew washed away with a quick sweep of the hose. Plus all the chipped and peeling paint was stripped right off.  Because of the power washers strength, it really made a nice clean surface for staining.

How to Stain a Wood Deck - Before and After Wood Deck Makeover

A brush like this with firm bristles is great for removing excess dirt and peeling wood chips.  This was used right before the staining process started.

How to Stain a Wood Deck - Before and After Wood Deck Makeover

2. The house and areas we didn’t want touched were covered with clear plastic wrap.

How to Stain a Wood Deck - Before and After Wood Deck Makeover

3. With the wood deck clean and completely dry, we started staining using a hand sprayer.

How to Stain a Wood Deck - Before and After Wood Deck Makeover

JUST LIKE with spray painting, the key to hand spraying is to:

  • Shake Shake Shake the stain before applying
  • Spray about 7-10″ away for the surface
  • Move back and forth in a steady, rapid motion in the same direction as the wood grain
  • Don’t concentrate the nozzle in any one place at any given time
  • Start spraying in a conspicuous spot (in case is spatters at the start), then continue in a consistent sweep
  • Wear a mask – the fumes aren’t great to breathe in

Most importantly (which has nothing to do with hand spraying, but with staining in general), read the directions.  Apply only the recommended number of coats and be sure not to overapply.

How to Stain a Wood Deck - Before and After Wood Deck Makeover

I will be honest, we had someone help us with the deck (due to lack of time) and he used a more powerful hand sprayer.  Even though it’s smaller, the one I mentioned above would still work great for a deck or fence.  Same rules applies.

And then it was done.

How to Stain a Wood Deck - Before and After Wood Deck Makeover

Let the SUMMER BEGIN!

How to Stain a Wood Deck - Before and After Wood Deck Makeover

I can not wait to get this deck filled with my Summer Essentials – a spot to  eat, a spot to grill, and of course a spot to relax!

How to Stain a Wood Deck - Before and After Wood Deck Makeover

The details on the stain…

I wanted a darker color for the deck so it would stand out against the neutral taupe / beige siding.  As I mentioned before, I decided on a solid stain because I wanted to skip the process of stripping the deck.  I chose Burnt Hickory for the color.  It’s perfect.  I was worried that it would be too dark, but it’s just the right depth of color that I was looking for.

O, you just wait to see what’s coming…  It’s going to be a party deck before you know it!

How to Stain a Wood Deck - Before and After Wood Deck Makeover

Huge difference, right?!

And about 24-48 hours, the deck was ready to use and being transformed as we speak.  Many more deck details to come.  Overall, the process of staining the deck wasn’t at all as difficult as I had envisioned.  Yes it was time consuming.  Yes, it was laborious.  But all well worth it to get this finished look!

Have you ever stained a deck or fence before?  If so, how was your experience?  And how was the result?

Disclosure: Cabot has provided me product for my project.  No one told me what to create, what to buy, how to use the product, or what to write.  All opinions are 100% mine! I truly believe Cabot has a great selection of wood staining products.