
Turquoise Table with Wood Top

Howdy there friends!  Happy Monday!!

I was brought many smiles last week from all the praises I received on my Fall front porch.  It’s fun to know that so many of you love color too.

Today’s post is going to be short, but good!

As I mentioned during the Fall front porch tour, I introduced a few new elements including the recently painted coral wicker chairs + the turquoise table, both of which were garage sale finds.

It’s amazing what paint can do.

For the wicker chairs, I used my new Homeright hand spray painter but for the table that I turned turquoise, I used good ole’ spray paint in a can.

Here it is on the Fall front porch…

Turquoise Table Before & After: table that was falling apart with no top got a makeover using turquoise spray paint & pallets.

It didn’t always look like that.

This is a quick pic I snapped and shared on Instagram of my finds a few weeks back…

Garage sale finds

3 items that were desperate for attention.

The table was rusted.

It’s paint was peeling + chipping off.

And it didn’t even have a top.

THE TRANSFORMATION.

I started off by scraping off the chipping paint and sanding some of the edges.  To be honest, I didn’t go crazy with that.  I knew it would never be perfectly smooth and I was okay with that.  After I cleaned it up a bit, I whipped out a new can of turquoise spray paint.

Turquoise Table Before & After: table that was falling apart with no top got a makeover using turquoise spray paint & pallets.

A few coats later, it was complete.

Turquoise Table Before & After: table that was falling apart with no top got a makeover using turquoise spray paint & pallets.

THE WOOD TOP.

A few days later when the paint was completely dry, it was time to add a top.

My neighbor had recently finished a pallet project (per my recommendation – wink, wink) and had a bunch of pallet boards left over.  They were already disassembled, cleaned, AND sanded, so all I had to do was cut them to size.

I measured the length of the table and using the powered miter saw (see my recommendation + favorite tools), I cut them to the correct length so the boards would set in to the existing lip around the edge of the table top.

Turquoise Table Before & After: table that was falling apart with no top got a makeover using turquoise spray paint & pallets.

Once cut, I set them into place.

Turquoise Table Before & After: table that was falling apart with no top got a makeover using turquoise spray paint & pallets.

Turquoise Table Before & After: table that was falling apart with no top got a makeover using turquoise spray paint & pallets.

The boards took no time at all to cut and place in the lip – maybe 10 minutes.

And transformed table that was once garbage-bound now sits beautifully on my front porch.

Turquoise Table Before & After: table that was falling apart with no top got a makeover using turquoise spray paint & pallets.

Turquoise Table Before & After: table that was falling apart with no top got a makeover using turquoise spray paint & pallets.

Turquoise Table Before & After: table that was falling apart with no top got a makeover using turquoise spray paint & pallets.

The turquoise hue gives the front porch such a vibrant pop of color, especially along with the coral chairs + the green door.

It’s amazing what spray paint + a bit of TLC can do!

>>> If you haven’t seen it, don’t miss out on taking a tour of this years Fall Front Porch


WOW to Painting Wicker

I’ve been excited all weekend to share an amazing WOW, Ah-Ha moment!

For the past few weeks, I’ve slowly been transitioning my decor to Fall by adding in seasonal favorites.  NO huge updates or changes, but a few touches here and there around the home to welcome the season.  One main focus has been the front porchI even shared a peek at it last week on Instagram when my prop assistant ran away with my gourds.  I feel like the entry of the home is a good place to put the most effort since it’s the first area you & your guests see as they enter the home AND a little effort can make a big impact.

I bought mums (some of which died – my black thumb has returned) and I have a few new trash-to-treasure items that I’ve slowly been introducing.  You got a peek of them a few weeks back – remember?

One new-to-me item was a wicker chair.  I was looking for a sister, and I found “her”.   They needed a bit of sprucin’ up, but I wasn’t in the mood to paint them.  Who wants to paint wicker?  NOT ME!  So they sat.

BUT THEN, I decided to finally use my hand paint sprayer that has been sitting in the garage for months and voila, no joke, 20 minutes total THEY. WERE. DONE.

THE RESULT.

DIY tutorial for painting wicker using the HomeRight finish max hand sprayer. I painted 2 wicker chairs in less than 10 minutes. That would be impossible with a paint brush. A hand sprayer is a MUST TOOL for paint projects. Check out a step-by-step tutorial + video of how fast it covers > www.jennaburger.com

And guess what I didn’t do most of the work. WHAT? Why?

Yup, my 9 year old took over the job.  Literally we had so much fun spraying these 2 wicker chairs that we were battling who got the sprayer.  #hewon

DIY tutorial for painting wicker using the HomeRight finish max hand sprayer. I painted 2 wicker chairs in less than 10 minutes. That would be impossible with a paint brush. A hand sprayer is a MUST TOOL for paint projects. Check out a step-by-step tutorial + video of how fast it covers > www.jennaburger.comSeriously though, this hand spray painter by HomeRight is amazing.  It is incredible.  I am just mad at myself that I have not used it sooner.

REWIND.

Before I get ahead of myself with excitement, let’s rewind…  A few weeks back I had major success at a garage sale and snagged a bunch of new-to-me ‘trash treasures’.

I had shared this picture on InstagramGarage sale finds

I transformed the planter with the most gorgeous green hue…

Before and After planter - $1 garage sale find transformed with Green Citrus spray paint

…And now it was time to finally paint the wicker chair (plus another one I found) a fun coral color.

It took a few days to choose a color, but I decided on Sherwin Williams HGTV Home (available @ Lowe’s) Lei Flower – SW6613.

DIY tutorial for painting wicker using the HomeRight finish max hand sprayer. I painted 2 wicker chairs in less than 10 minutes. That would be impossible with a paint brush. A hand sprayer is a MUST TOOL for paint projects. Check out a step-by-step tutorial + video of how fast it covers > www.jennaburger.com

I was ready to GO!

DIY tutorial for painting wicker using the HomeRight finish max hand sprayer. I painted 2 wicker chairs in less than 10 minutes. That would be impossible with a paint brush. A hand sprayer is a MUST TOOL for paint projects. Check out a step-by-step tutorial + video of how fast it covers > www.jennaburger.com

I didn’t want the paint to spray everything in sight, so the Spray Shelter by HomeRight really came in handy.  It too was my first time using it, but set-up took about 5 minutes and I had my son helping me a bit.  Assembly was just like putting a tent or beach shelter together.

The instructions are attached directly to the bag that the shelter comes in, which is genius!

DIY tutorial for painting wicker using the HomeRight finish max hand sprayer. I painted 2 wicker chairs in less than 10 minutes. That would be impossible with a paint brush. A hand sprayer is a MUST TOOL for paint projects. Check out a step-by-step tutorial + video of how fast it covers > www.jennaburger.com

Right when I was done erecting the shelter, it started to rain.  Just my luck, ha.  So I moved it to the garage…

DIY tutorial for painting wicker using the HomeRight finish max hand sprayer. I painted 2 wicker chairs in less than 10 minutes. That would be impossible with a paint brush. A hand sprayer is a MUST TOOL for paint projects. Check out a step-by-step tutorial + video of how fast it covers > www.jennaburger.com

NOW, I was ready!

Being totally honest, I was nervous to use this ‘machine’, but there really was no learning curve and there was little set-up / clean-up.  I hate reading directions, but HomeRight has made it so easy with a one-page Fast Start Quick Reference Guide.  Within 3 minutes of opening the box, I was ready!

DIY tutorial for painting wicker using the HomeRight finish max hand sprayer. I painted 2 wicker chairs in less than 10 minutes. That would be impossible with a paint brush. A hand sprayer is a MUST TOOL for paint projects. Check out a step-by-step tutorial + video of how fast it covers > www.jennaburger.com

With the paint in the canister (read my helpful tips below before starting), I was ready to start.  I pushed the trigger and the paint started to flow.

DIY tutorial for painting wicker using the HomeRight finish max hand sprayer. I painted 2 wicker chairs in less than 10 minutes. That would be impossible with a paint brush. A hand sprayer is a MUST TOOL for paint projects. Check out a step-by-step tutorial + video of how fast it covers > www.jennaburger.com

Details on the HomeRight Finish Max Fine Sprayer

VIDEO

I never take videos, but I couldn’t resist.  I had to show you how quick + easy the paint covered the chair.

On to the next chair…

DIY tutorial for painting wicker using the HomeRight finish max hand sprayer. I painted 2 wicker chairs in less than 10 minutes. That would be impossible with a paint brush. A hand sprayer is a MUST TOOL for paint projects. Check out a step-by-step tutorial + video of how fast it covers > www.jennaburger.comIn about 10 minutes, both chairs were covered with coat #1.   A bit later I sprayed them again with a second coat and they were done.

DIY tutorial for painting wicker using the HomeRight finish max hand sprayer. I painted 2 wicker chairs in less than 10 minutes. That would be impossible with a paint brush. A hand sprayer is a MUST TOOL for paint projects. Check out a step-by-step tutorial + video of how fast it covers > www.jennaburger.com

TIPS + TRICKS

Here are some tips + tricks I learned along the way (plus my friends Jaime & Ashley shared a few tips with me on Instagram) so you too can ditch the nervousness of using this sprayer…

> Get full coverage of all nooks & crannies by moving the piece of furniture to spray at different angles – I especially had to do this with wicker!

> Paints & Stains need to be watered down so they flow through the sprayer properly.  With the sprayer comes a handy gadget to determine the appropriate water needed + there is a helpful chart in the instruction booklet.

> The Finish Max can spray horizontal, vertical, or in a cone pattern.  You can easily choose the direction by turning the dial on the front of the sprayer.

> There is no need to clean the sprayer between coats. Leave the paint or stain in the container (of course if time between coats is days long, then clean it).

My new coral chairs looks Ah-Mazing on my front porch and it’s almost complete for Fall.

Want a peek?

Enjoy.

DIY tutorial for painting wicker using the HomeRight finish max hand sprayer. I painted 2 wicker chairs in less than 10 minutes. That would be impossible with a paint brush. A hand sprayer is a MUST TOOL for paint projects. Check out a step-by-step tutorial + video of how fast it covers > www.jennaburger.com

More to come later this week…

Want to save this tutorial for a later date – you know you want to try this sprayer 😉

PIN IT!

DIY tutorial for painting wicker using the HomeRight finish max hand sprayer. I painted 2 wicker chairs in less than 10 minutes. That would be impossible with a paint brush. A hand sprayer is a MUST TOOL for paint projects. Check out a step-by-step tutorial + video of how fast it covers > www.jennaburger.com

DISCLOSURE: THIS IS A SPONSORED POST WITH HOMERIGHT.  ALL WORDS + OPINIONS ARE 100% MY OWN – I TRULY LOVE THIS PRODUCT.  AFFILIATE LINKS ARE ALSO INCLUDED IN THIS POST.

A Green Planter + A Turquoise Table + A Coral Chair

Before picture of my garage sale finds— a before shot of my garage sale finds that I shared on my instagram page last week —

This Summer I have been in complete survival mode. Simply surviving, making sure to create memories each day with the kids so they have the Best Summer Ever.  BUT as each night falls, this mama is just d-o-n-e. It’s been a blast, but it’s been tiring. And we still have 2+ more weeks till school starts…

Packed days have left little time for personal creating, but after a quick stop at a garage sale last week where I picked up some ‘trash treasures’, I found myself with a few spare minutes + 2 cans of spray paint.  And that makes this gal gitty with excitement!

First up, Green Citrus (by Rustoleum)…

Before and After planter - $1 garage sale find transformed with Green Citrus spray paint

Isn’t that such a vibrant, unexpected, fun color?! For $10 I made out well after stopping on a whim at a garage sale last Wednesday…

I picked up a wicker chair, a planter, and a table.  ALL need a bit of TLC, but I am confident that ALL will look great with a splash of color!

THE PLANTER.

The planter update is complete.  I chose to spray paint it a lime green hue called Green Citrus in a glossy finish…

Before and After planter - $1 garage sale find transformed with Green Citrus spray paint

A few coats later, it was complete.

Before and After planter - $1 garage sale find transformed with Green Citrus spray paint

And ready to fill with a pretty plant.

Before and After planter - $1 garage sale find transformed with Green Citrus spray paint

Now it sits beautifully on the front porch and looks awesome with the green front door.

Before and After planter - $1 garage sale find transformed with Green Citrus spray paint

Definitely one of the best + EASIEST before and afters ever…

Before and After planter - $1 garage sale find transformed with Green Citrus spray paint

THE TABLE.

A splash of turquoise spray paint gave this falling-apart-table new life.  It’s still rusty but I find that beautiful.  The new color is complete, but there is still work to be done – it needs a top.  I’ve got some ideas, but still need to put it together…

Before and After Table: $3 garage sale find transformed with turquoise spray paint

Want to know how to spray paint like a PRO?  Need Tips?
Check out these 2 helpful posts:

Simple Steps to Spray Painting Success

5 Surfaces to Spray Paint

THE CHAIR.

The chair hasn’t been touched, but I have a plan. CORAL is the COLOR that is going to make this chair shine again.  I first need to prime it, then I’m going to paint it.  I think I’m going to skip spray painting this one and instead try a hand sprayer.  I’ve had one sitting in the garage forever and I think this is just the project to try it on…  Wish me luck 😉

Plans to spray paint this chair a new coral hue

Plans to spray paint this chair a new coral hue

I’m looking for a wicker sibling to go along with this beauty.  Not a twin, but a something alike.  Have a wicker chair?  Share details.

I’ve got plans for these new green + turquoise + coral additions.

You’ll see them finished soon. AND all together.

Somewhere around the homestead.

Before I let you go, here is another great score from the weekend.  The fam & I were up & out early on Saturday at a ‘biggest yard sale’ event & I found these 2 headboards for the girls room (in a couple years).  Oh the potential!  Here is a picture I shared on my Instagram page

Headboard find!


How To Paint Pegboard + Build a Pegboard Frame

Thanks for all your kind + sweet words on my latest DIY endeavour of organizing my work space + creating a command center.  No joke, I have been so motivated + productive over the past week since clearing the clutter!

The highlight of my newly organized office, hands-down, is the addition of the pretty pegboard.  This was my 1st project using pegboard, but I have wanted to create something using pegboard for quite some time.  When I first thought about the idea, I was bewildered at how the hooks would mount if the pegboard was attached to the wall…  Right?  Same thought you had?  humor me please…

Well anyway, a few seconds later, I realized there does need to be some space behind the pegboard for the hooks to attach.  Alas, build a frame. But how?  I’ve got 2 ways, one of which I am sharing today!

DIY: How-To Paint Pegboard + Build and Install a Frame Surround. Pegboard is an organizational dream fit for every room in the house. Check out this easy-to-follow tutorial at Jenna Burger Design

The easiest way to build a frame (for anything) is with a Kreg Jig, but I know many of you don’t have one, so here is a down & dirty way using tools most of you have. I hope.  And if you don’t, go buy them… you won’t regret it 😉

MATERIALS.

> (3) 1″ x 2″ x 8′ long wood pieces

> 2′ x 4′ piece of pegboard (I purchased a 4′ x 4′ piece @ Lowe’s and they cut it to my desired size)

> “L” brackets

> Wood screws, 1″ length

DIY: How-To Paint Pegboard + Build and Install a Frame Surround. Pegboard is an organizational dream fit for every room in the house. Check out this easy-to-follow tutorial at Jenna Burger Design

HOW TO BUILD A FRAME.

I started off by cutting the 1″ x 2″ pieces of wood using a miter saw (my recommendation for a good one) so they fit to size around the 2′ x 4′ pegboard.  If you don’t have a miter saw or tool to cut the wood, Lowes will cut it to your desired length.

> Arrange the 1″ x 2″ pieces so they lay on the short side.

DIY: How-To Paint Pegboard + Build and Install a Frame Surround. Pegboard is an organizational dream fit for every room in the house. Check out this easy-to-follow tutorial at Jenna Burger Design

Once your wood sides are the right lengths around the pegboard, attach them using “L” brackets (if you have a Kreg Jig, then use it to connect the corners).  Lay the “L” bracket on the front face of the wood and screw in.

DIY: How-To Paint Pegboard + Build and Install a Frame Surround. Pegboard is an organizational dream fit for every room in the house. Check out this easy-to-follow tutorial at Jenna Burger Design

Then at the 4 inner corners of the frame, add a 2″ x 2″ wood block which the pegboard will be secured to so it sits proud of the wall creating space behind so hooks can be easily added.

DIY: How-To Paint Pegboard + Build and Install a Frame Surround. Pegboard is an organizational dream fit for every room in the house. Check out this easy-to-follow tutorial at Jenna Burger Design

HOW TO PAINT PEGBOARD.

Some pegboard already comes primed or white, but my local Lowe’s only had the brown version.  Similar to painting walls or furniture, it’s important to use primer first.  So first I gave the face of my pegboard a quick coat of Zinsser Primer.

DIY: How-To Paint Pegboard + Build and Install a Frame Surround. Pegboard is an organizational dream fit for every room in the house. Check out this easy-to-follow tutorial at Jenna Burger Design

DIY: How-To Paint Pegboard + Build and Install a Frame Surround. Pegboard is an organizational dream fit for every room in the house. Check out this easy-to-follow tutorial at Jenna Burger Design

Once it was dry, I added 2 coats of my desired taupe-y color (I mixed a few hues to get the color just right).

DIY: How-To Paint Pegboard + Build and Install a Frame Surround. Pegboard is an organizational dream fit for every room in the house. Check out this easy-to-follow tutorial at Jenna Burger Design

Once it was dry, I was going to call it DONE… buuuut, I couldn’t stop myself and thought it would be really fun + unique to jazz it up even more, so I added a pretty stencil design.

DIY: How-To Paint Pegboard + Build and Install a Frame Surround. Pegboard is an organizational dream fit for every room in the house. Check out this easy-to-follow tutorial at Jenna Burger Design

Tutorial on > HOW TO PAINT USING A STENCIL

A few touch-ups and THEN the painting steps were complete!

DIY: How-To Paint Pegboard + Build and Install a Frame Surround. Pegboard is an organizational dream fit for every room in the house. Check out this easy-to-follow tutorial at Jenna Burger Design

I attached the dry pegboard to the frame using pretty gold wood screws…

DIY: How-To Paint Pegboard + Build and Install a Frame Surround. Pegboard is an organizational dream fit for every room in the house. Check out this easy-to-follow tutorial at Jenna Burger Design

…and then it was time to hang.

I used the screws that were already in place from the large inspiration board that was there before.  The screws were anchored in the wall and at just the right height.

DIY: How-To Paint Pegboard + Build and Install a Frame Surround. Pegboard is an organizational dream fit for every room in the house. Check out this easy-to-follow tutorial at Jenna Burger Design

Because there is relief behind the pegboard, the frame was able to simply rest on the screws. The result…

DIY: How-To Paint Pegboard + Build and Install a Frame Surround. Pegboard is an organizational dream fit for every room in the house. Check out this easy-to-follow tutorial at Jenna Burger Design

Pretty cool, right?!  And super simple.  Pegboards are THE BEST organizational component for any room in the house. AND they can be jazzed up to look great for all decor styles. Maybe I should do a round up post of great uses for pegboards around the house…  What do you think?  Yay or Nay??

Anyway, after the pegboard was in, I was ready to start getting organized…

DIY: How-To Paint Pegboard + Build and Install a Frame Surround. Pegboard is an organizational dream fit for every room in the house. Check out this easy-to-follow tutorial at Jenna Burger Design

DIY: How-To Paint Pegboard + Build and Install a Frame Surround. Pegboard is an organizational dream fit for every room in the house. Check out this easy-to-follow tutorial at Jenna Burger Design

Here is how it all came together…

WORK SPACE REVAMP: getting organized and creating an office command center using a framed pegboard and organizational supplies. Office Revamp by Jenna Burger Design

Check out my WORK SPACE REVEAL >>>>>>> click here

Where do you find pegboard most useful around your home?

Check back soon for details on how to build another simple frame for a pegboard!

Work Space Revamp: Creating an Office Command Center

THIS IS A SPONSORED POST THROUGH NATIONAL HARDWARE.  ALL OPINIONS ARE 100% MY OWN!

Last week I hit a breaking point with my office niche.  I just had enough with the clutter, piles of paper, and disorganization.

Since I’ve given up hope on keeping the rest of the house tidy while the kids are still out of school on Summer break (still a month to go till school starts in our neck of the woods…), I thought it’d be best to put my time + attention + energy on my little nook in the home, my desk…

For a while I’ve been thinking about saying adios to my beloved large inspiration board.  As much as I love it, I knew the large span of wall could be better utilized.  It was a bit sad to take down all the pretty + inspiring pictures (no worries, I didn’t toss them but instead stuck them in a folder for now), but once the board was removed, a world of ideas came fluttering to my head.

In no time (well it did take some time), I had a plan of action, my desk space was spruced up, and a new command center for my office supplies was created…

WORK SPACE REVAMP: getting organized and creating an office command center using a framed pegboard and organizational supplies. Office Revamp by Jenna Burger Design

The command center all came together around the new pegboard.

WORK SPACE REVAMP: getting organized and creating an office command center using a framed pegboard and organizational supplies. Office Revamp by Jenna Burger Design

I have wanted to work on a project using pegboard for a long time.  From the garage to the office to the laundry room, pegboard is great for organizing any nook & cranny of the home and there are a plethora of peg hooks in a range of shapes and sizes to hold and hang whatever you need! For my project, I got my pegboard from Lowe’s and all the hooks came from National Hardware.

When working with pegboard, it needs to have a frame surround to create space behind for the hooks to connect in the holes.  For the pegboard in my office, I had the kind people at Lowe’s cut me a 2′ x 4′ piece.  Then I painted on a stencil design + created a frame around the outer edge – click for tutorial  (I have an alternate pegboard frame tutorial coming soon too).

Before I decked out my new pegboard with all the organizational hooks, this is how it looked…

Stenciled Pegboard before

Let’s get started…

WORK SPACE REVAMP: getting organized and creating an office command center using a framed pegboard and organizational supplies. Office Revamp by Jenna Burger Design

Organizing jars and small trays were the ideal solution for all the smaller necessities in my office.  I found the jars perfect for holding pins, paper clips, erasers, labeling tags, etc.  And the trays are just the right size for post-its, business cards, and larger tags + labels.  As I was laying out my new command center, I was astonished at how much I had to fill these organizational tools!

WORK SPACE REVAMP: getting organized and creating an office command center using a framed pegboard and organizational supplies. Office Revamp by Jenna Burger Design

WORK SPACE REVAMP: getting organized and creating an office command center using a framed pegboard and organizational supplies. Office Revamp by Jenna Burger Design

Another need for organization was a home for my growing washi tape collection.  The angle hooks and the hanging bar (from the assortment pack) gave me enough room for all my favorites + space to store more in the future (room for expansion – bonus).

WORK SPACE REVAMP: getting organized and creating an office command center using a framed pegboard and organizational supplies. Office Revamp by Jenna Burger Design

I love that everything is so accessible and easy to get at, yet has a designated spot.  And it really is all so pretty to look at too, don’t you think?!  I love all the color & patterns.

WORK SPACE REVAMP: getting organized and creating an office command center using a framed pegboard and organizational supplies. Office Revamp by Jenna Burger Design

Also on the new organizational pegboard, I was able to add a hook for my scissors (using a curved hook), hole punch (using a pliers holder), and clipboard that I take with me to client meetings.  Above I was able to add a small shelf using shelf brackets.

WORK SPACE REVAMP: getting organized and creating an office command center using a framed pegboard and organizational supplies. Office Revamp by Jenna Burger Design

WORK SPACE REVAMP: getting organized and creating an office command center using a framed pegboard and organizational supplies. Office Revamp by Jenna Burger Design

WORK SPACE REVAMP: getting organized and creating an office command center using a framed pegboard and organizational supplies. Office Revamp by Jenna Burger Design

My revamped work space feels so fresh and new, even though all the elements, with the exception of the pegboard, were here before. It’s amazing how a space can take on a new life with a few simple moves + freshening up!

WORK SPACE REVAMP: getting organized and creating an office command center using a framed pegboard and organizational supplies. Office Revamp by Jenna Burger Design

My work space was freshened up 2+ years ago, and then got an overhaul when it was photographed for Storage magazine (which was on the cover).  The stylist brought in the white console table and other organizational items like the baskets, white desk caddy, and orange boxes.   I’ve lived with them + loved them for the last years, but found my office wasn’t functioning anymore as my needs have changed.

Over the years, I’ve collected many samples which I’ve organized nicely in the orange boxes which sit on the console top. It is so handy to have them right there to grab and go.  And if I want, I can easily put the lids on the boxes for those moments when I want them hidden.  I do feel though I am more accountable for keeping tidy + neat when things are open and visible – my laundry room is still looking good since the doors were removed.

WORK SPACE REVAMP: getting organized and creating an office command center using a framed pegboard and organizational supplies. Office Revamp by Jenna Burger Design

These 12″ x 12″ boxes, which were purchased from Homegoods, are ideal for storing all the office supplies.  From business cards, to envelopes, to receipts, to paper, everything has a spot!

In the box on the bottom shelf, I store all my camera supplies + cables…

WORK SPACE REVAMP: getting organized and creating an office command center using a framed pegboard and organizational supplies. Office Revamp by Jenna Burger Design

I am a bit bummed not to have my large inspiration board anymore, so I added a small strip of cork (used from a 1/2″ thick sample) about 2″ wide X 24″ long under the pegboard frame to pin special, striking images that I can’t live without…  I have another spot that I am thinking of to add more cork panels – my office isn’t complete without having inspiration surround me.

WORK SPACE REVAMP: getting organized and creating an office command center using a framed pegboard and organizational supplies. Office Revamp by Jenna Burger Design

And there you have it. My complete revamped work space.  Here’s another overall…

WORK SPACE REVAMP: getting organized and creating an office command center using a framed pegboard and organizational supplies. Office Revamp by Jenna Burger Design

WORK SPACE REVAMP: getting organized and creating an office command center using a framed pegboard and organizational supplies. Office Revamp by Jenna Burger Design

What do you find keeps your office organized?

A few other blogger friends have been hard at work organizing too.  Come check out what others have done using pegboard…

Jessica_FGORJessica – Four Generations One Roof
Back to School Homework Station

under desk ombre pegboard with attachmentsBecky – Organizing Made Easy
Office Organization

z1Karianne – Thistlewood Farm
Garage Organization

DecorChickEmily – Decor Chick
Garage Organization

disclosure: This post is sponsored by National Hardware.  They reached out to me about sharing organization tips using pegboard with their many organizational components.  They did not tell me what to create or what to say – the project + my words are all 100% my own!

How-To Make a Laminate Bookcase Look Like a Built-In Bookshelf

Now that the outdoor spaces are pretty much complete for the Summer season, today I want to jump back indoors to share a project with you that I worked on when revamping the living room earlier this year.  This DIY endeavour was something I had always dreamt about, but never had the guts courage to tackle.  If you remember back just a day ago… being afraid of failure can put a hinderness on creating something really great. There’s no reward without risk!

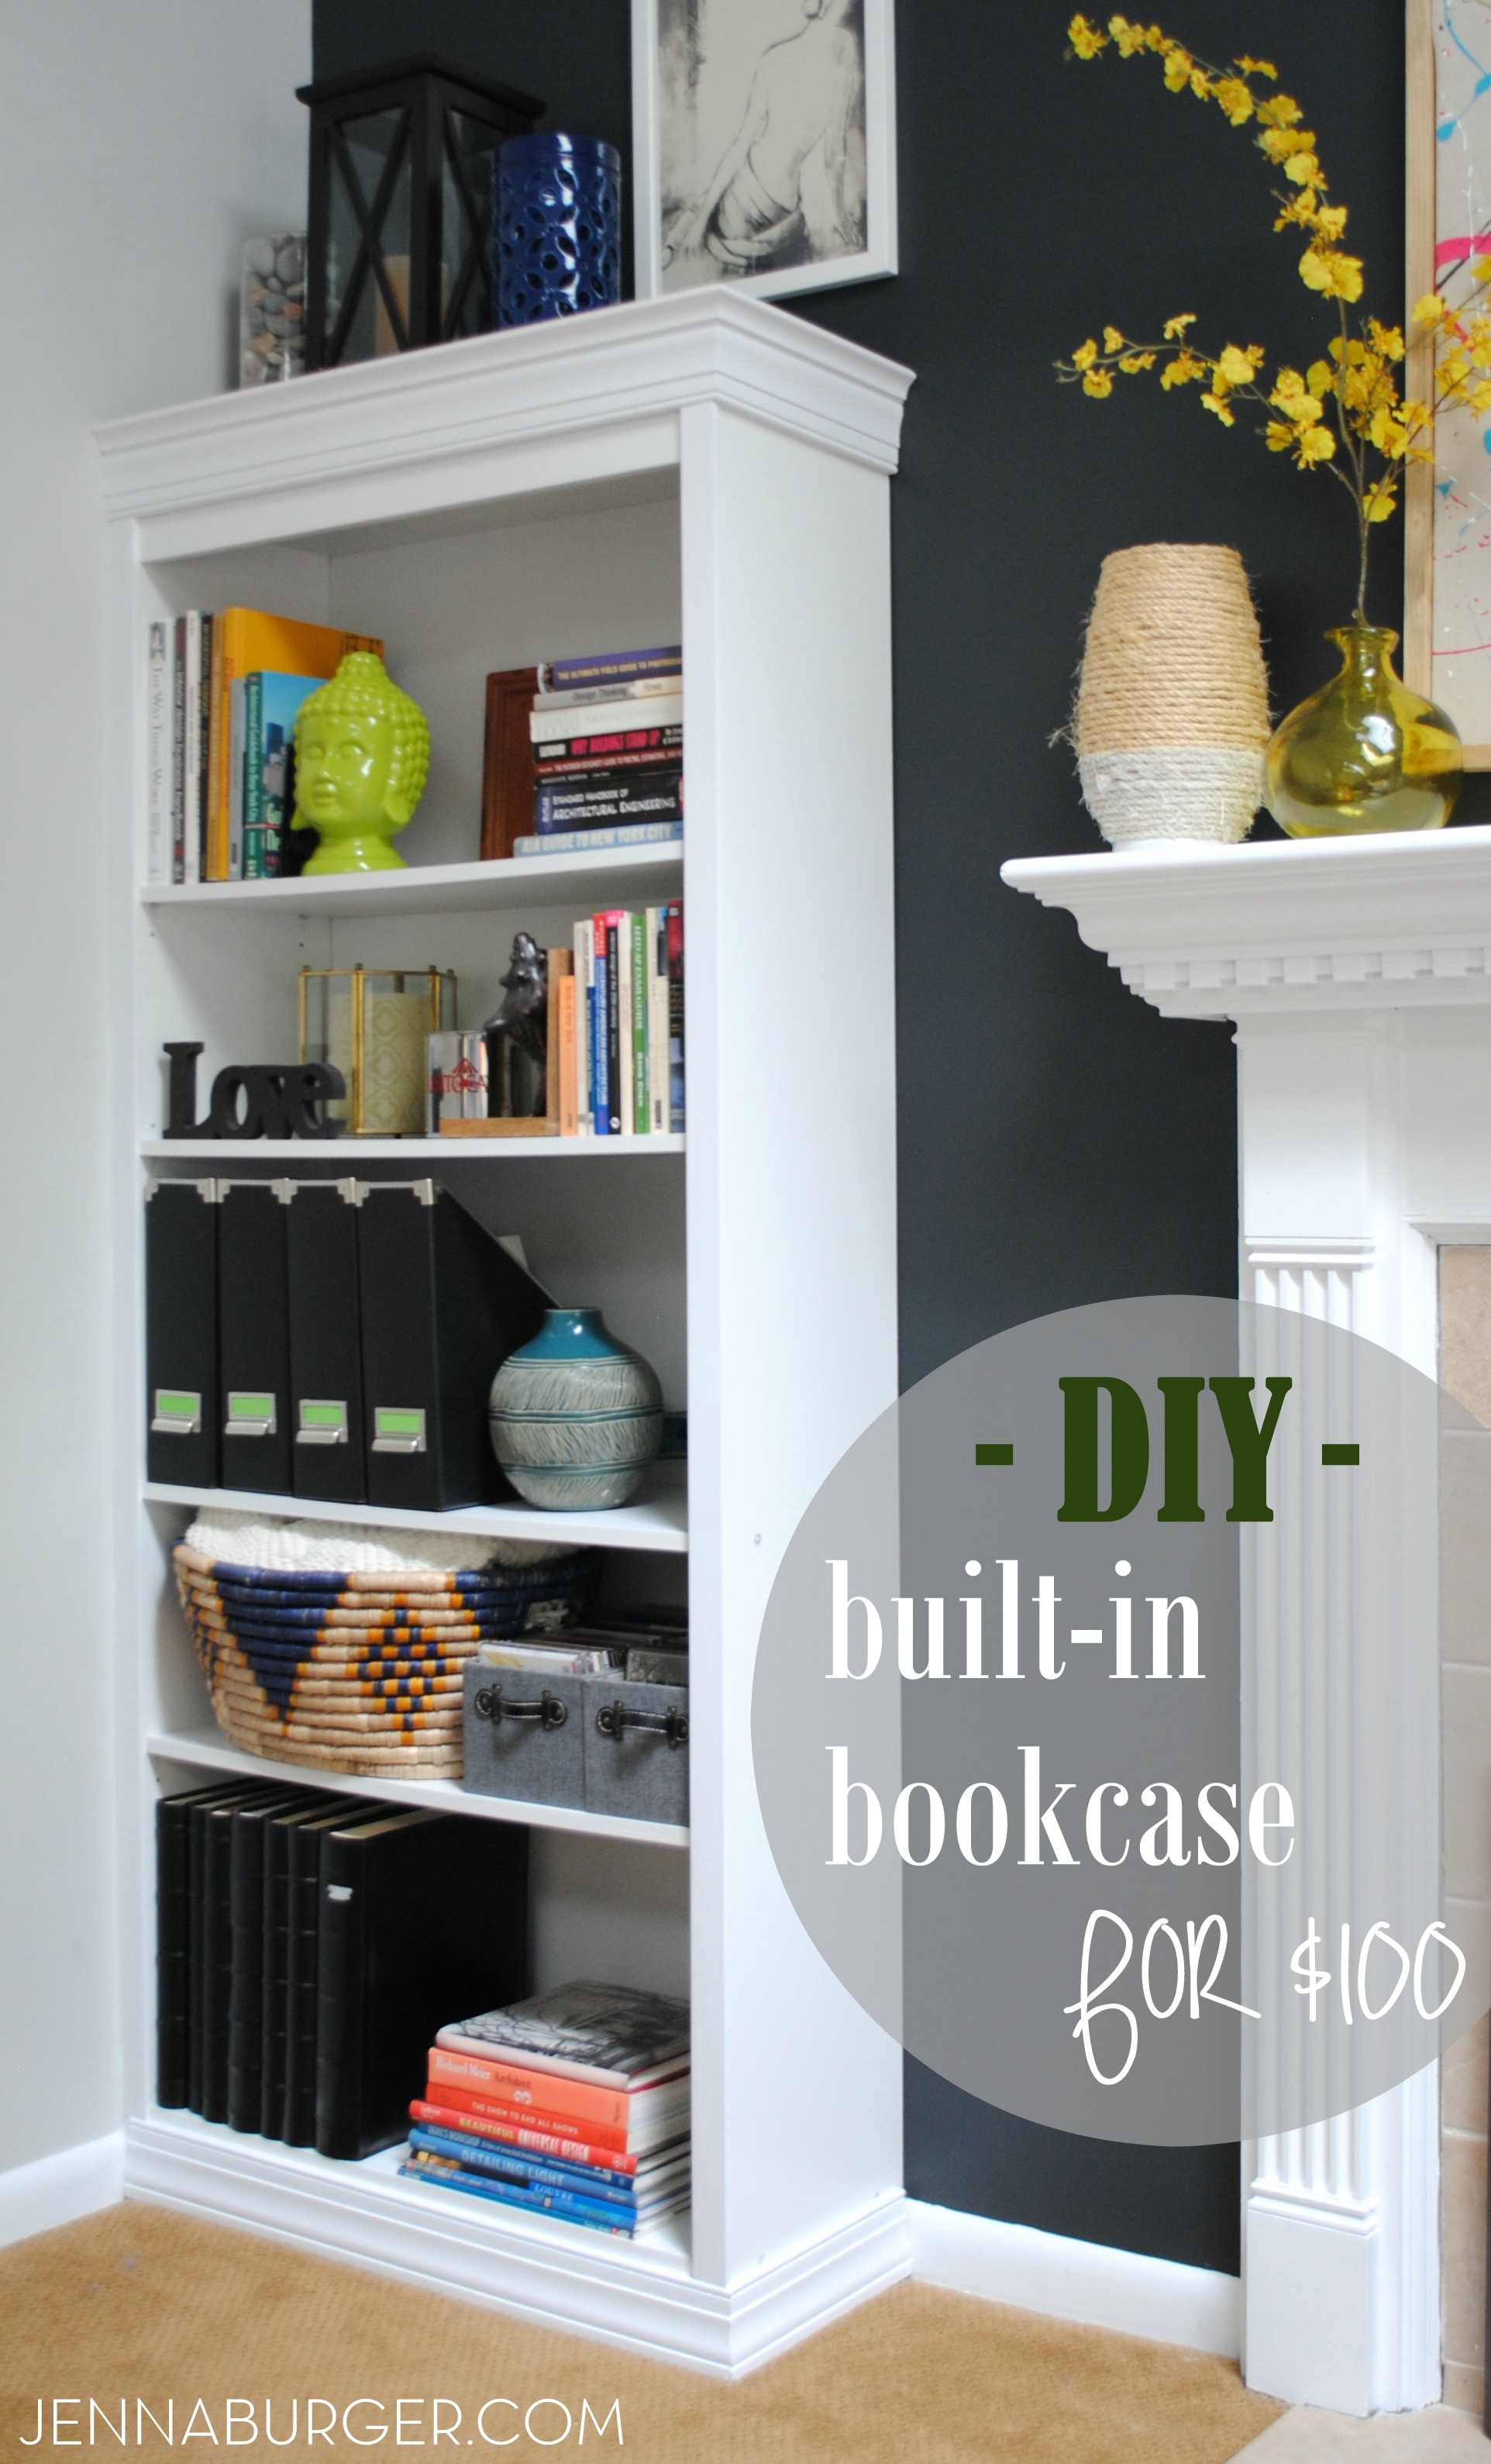
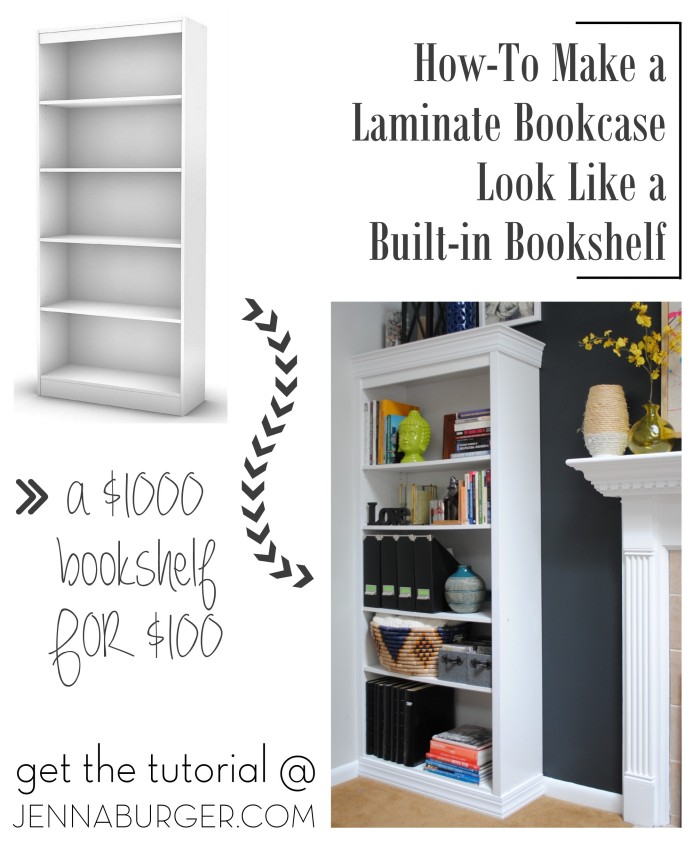
When the time came to jazz up the wall of the fireplace, I knew it had to be built-ins.  But custom built-ins are major money!  Believe me, I’ve designed many for my design clients and they can cost thousands…  I had seen other blogger friends give the very affordable Ikea Billy bookcases a custom look, so I thought I’d give it a try myself.  Thus the creation of how I made this laminate bookcase look like a custom built-in bookshelftimes 2.

#DIY #Tutorial How-To Make a Laminate Bookcase Look Like a Custom Built-in Bookshelf.  A $1000 or more bookshelf for just about $100  - Similar Look, HUGE SAVINGS! Tutorial @ www.jennaburger.com

#DIY #Tutorial How-To Make a Laminate Bookcase Look Like a Custom Built-in Bookshelf.  A $1000 or more bookshelf for just about $100  - Similar Look, HUGE SAVINGS! Tutorial @ www.jennaburger.com

I’m forewarning you… this is a long tutorial (not difficult, just lengthy), but if you’ve ever dreamt of having custom built-ins for your office, living room, or bedroom, then it’ll be worth reading from start to finish.

WHAT I BOUGHT

> 5-shelf laminate bookcase (no Ikea near me, so I purchased this bookcase @ Lowe’s for about $90)

> Multipurpose Tool Kit or small cutting saw (this will be used to cut the existing base moulding)

> Hammer & Crow Bar

> Decorative Moulding for base and crown

> Compound Miter Saw (or miter box)

> Primed lattice slats (1.5″ w X 1/4″ thick)

> Wood glue

> Basic tools

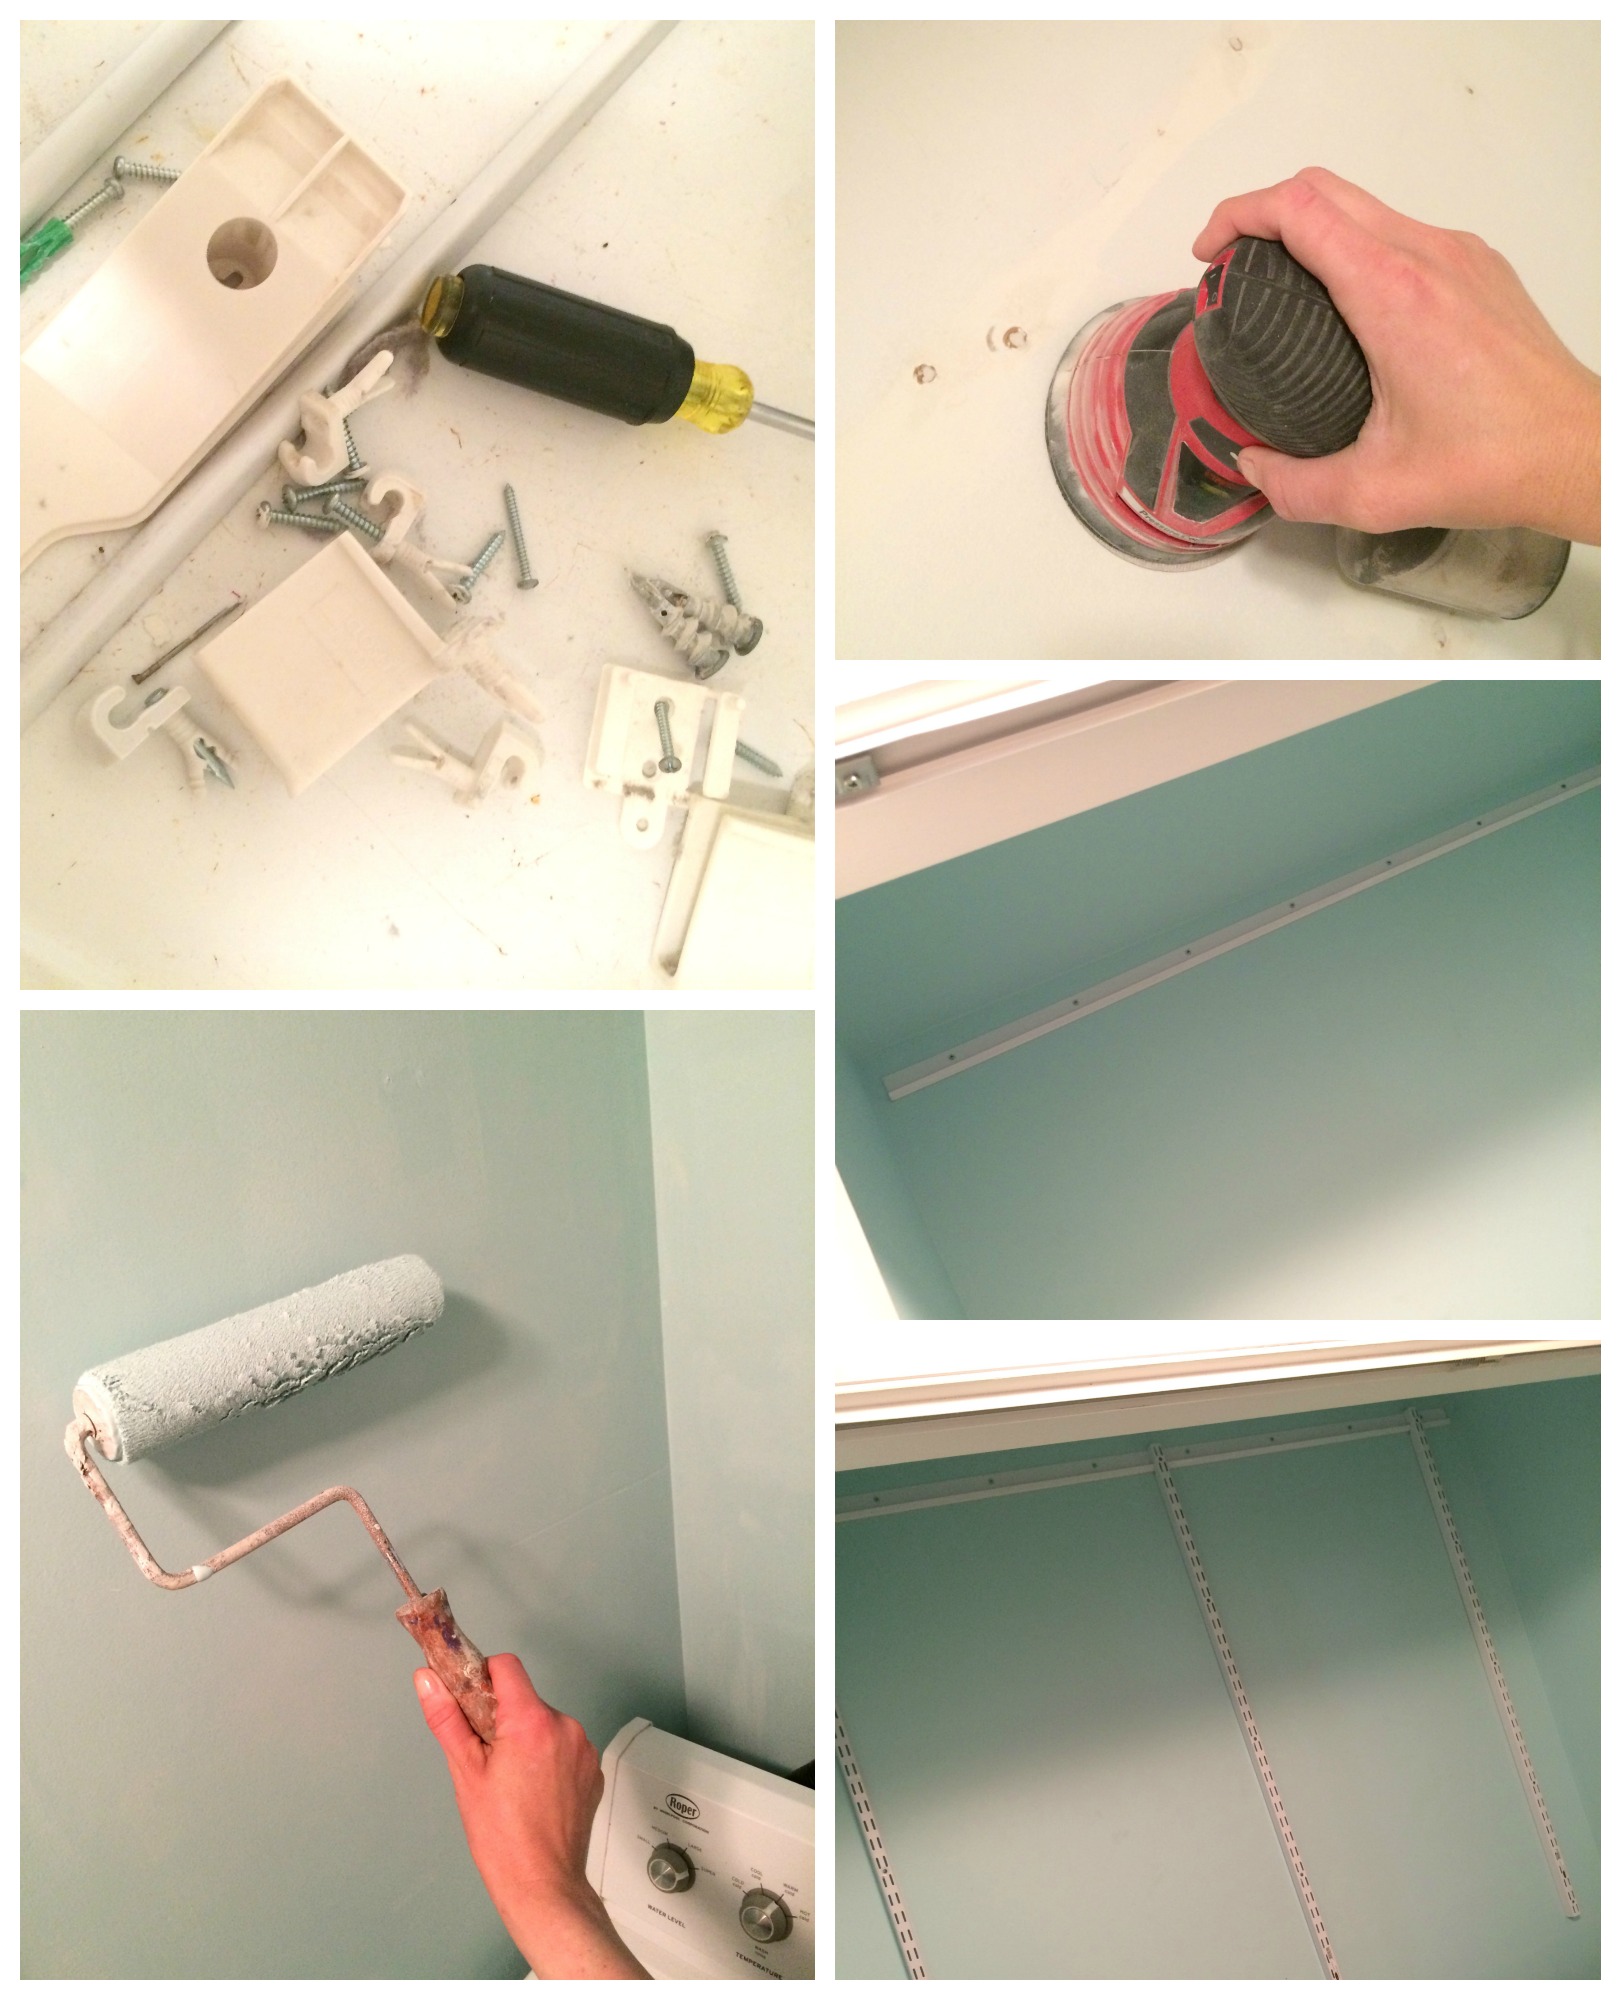
ASSEMBLING + INSTALLING THE BOOKCASE

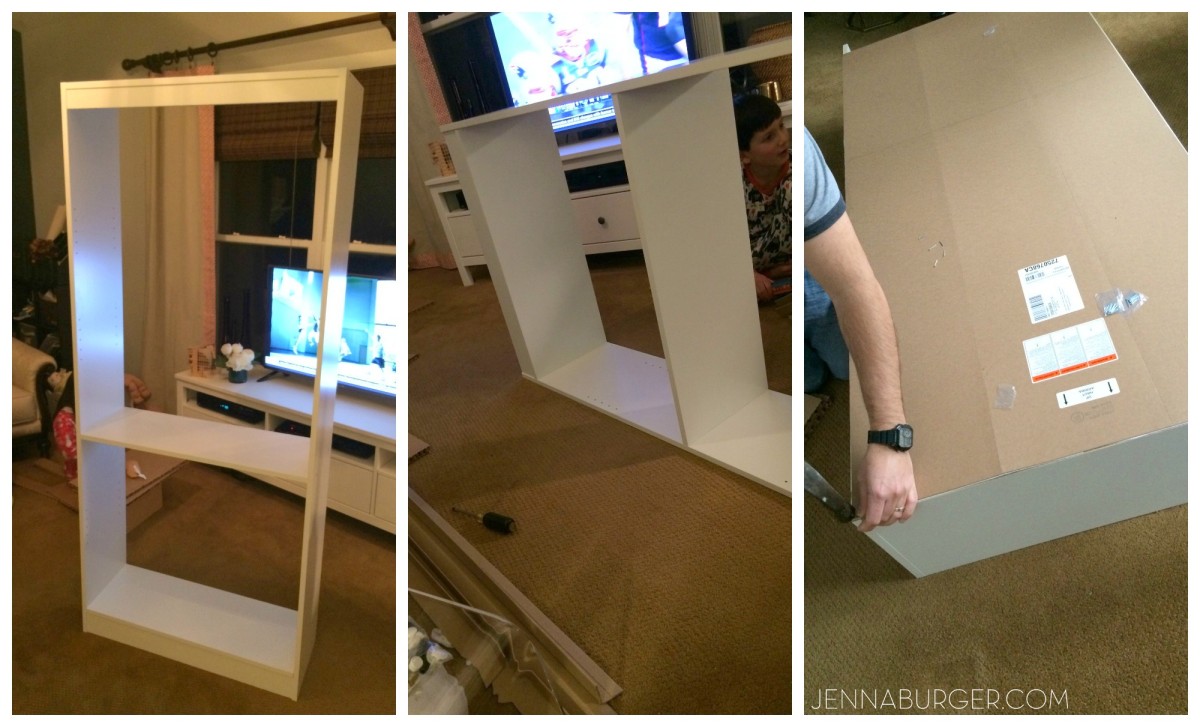
I ordered the (2) 5-shelf bookcases from Lowe’s and about a week later they arrived.  Assembly was very easy – with just 5 parts, there wasn’t too much that could go wrong.  Once the top, bottom, and sides were put together, we attached the back so they were ready to set in place.

#DIY #Tutorial How-To Make a Laminate Bookcase Look Like a Custom Built-in Bookshelf.  A $1000 or more bookshelf for just about $100  - Similar Look, HUGE SAVINGS! Tutorial @ www.jennaburger.comcom

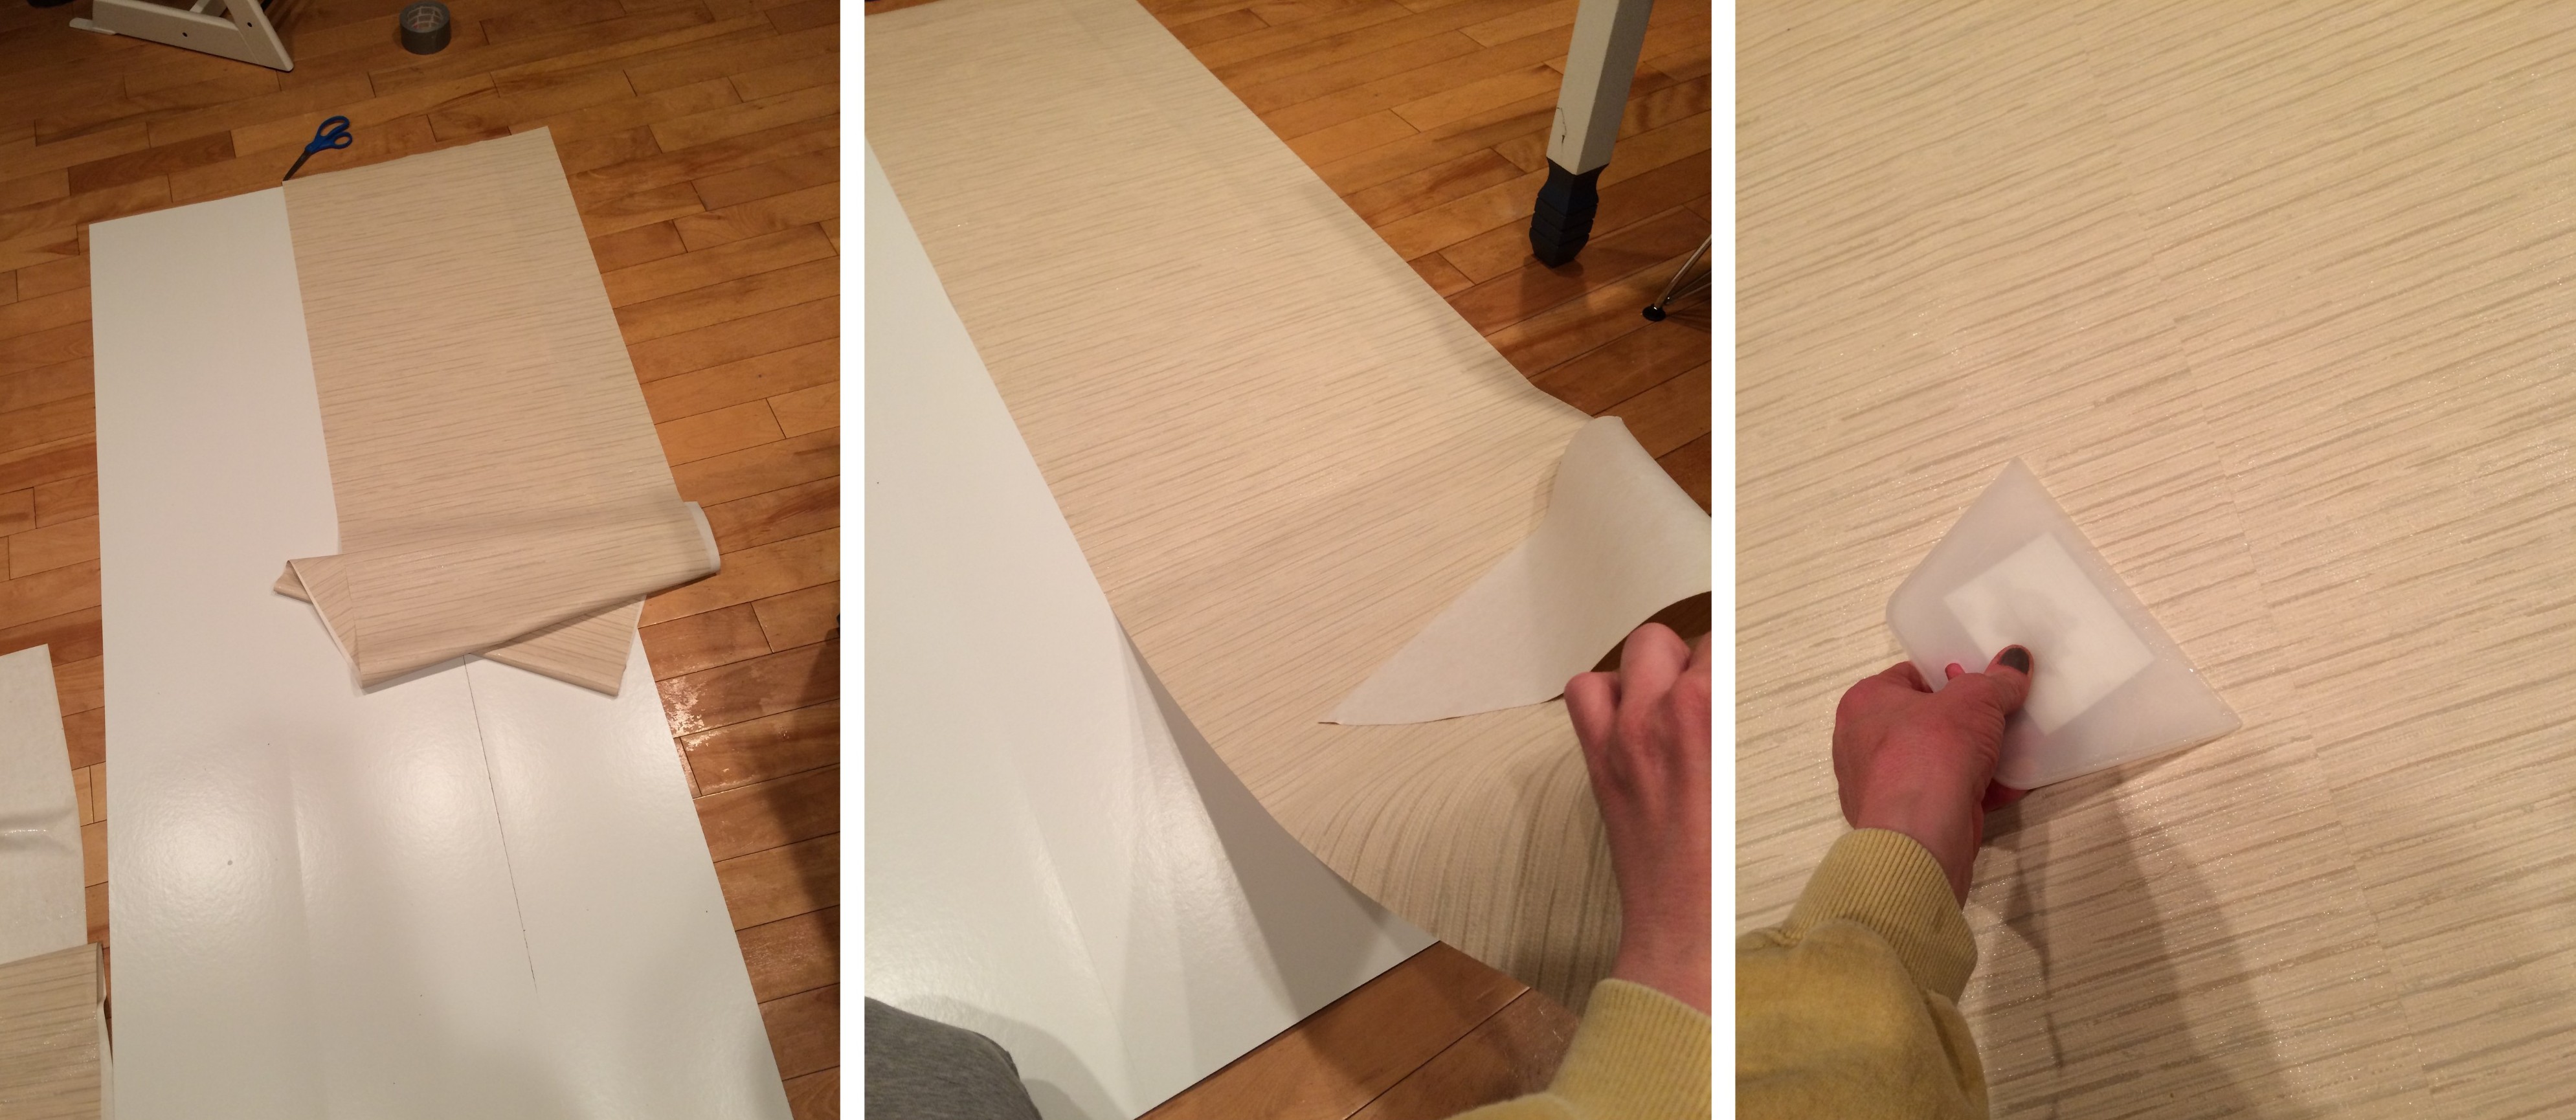
I’m going to pass right on over my major project fail of installing grasscloth wallpaper to the backs.  If you want to read more on that DIY blunder, check out yesterday’s post

Once the bookshelves were assembled, they were ready to attach to the wall – permanently like a custom bookcase!

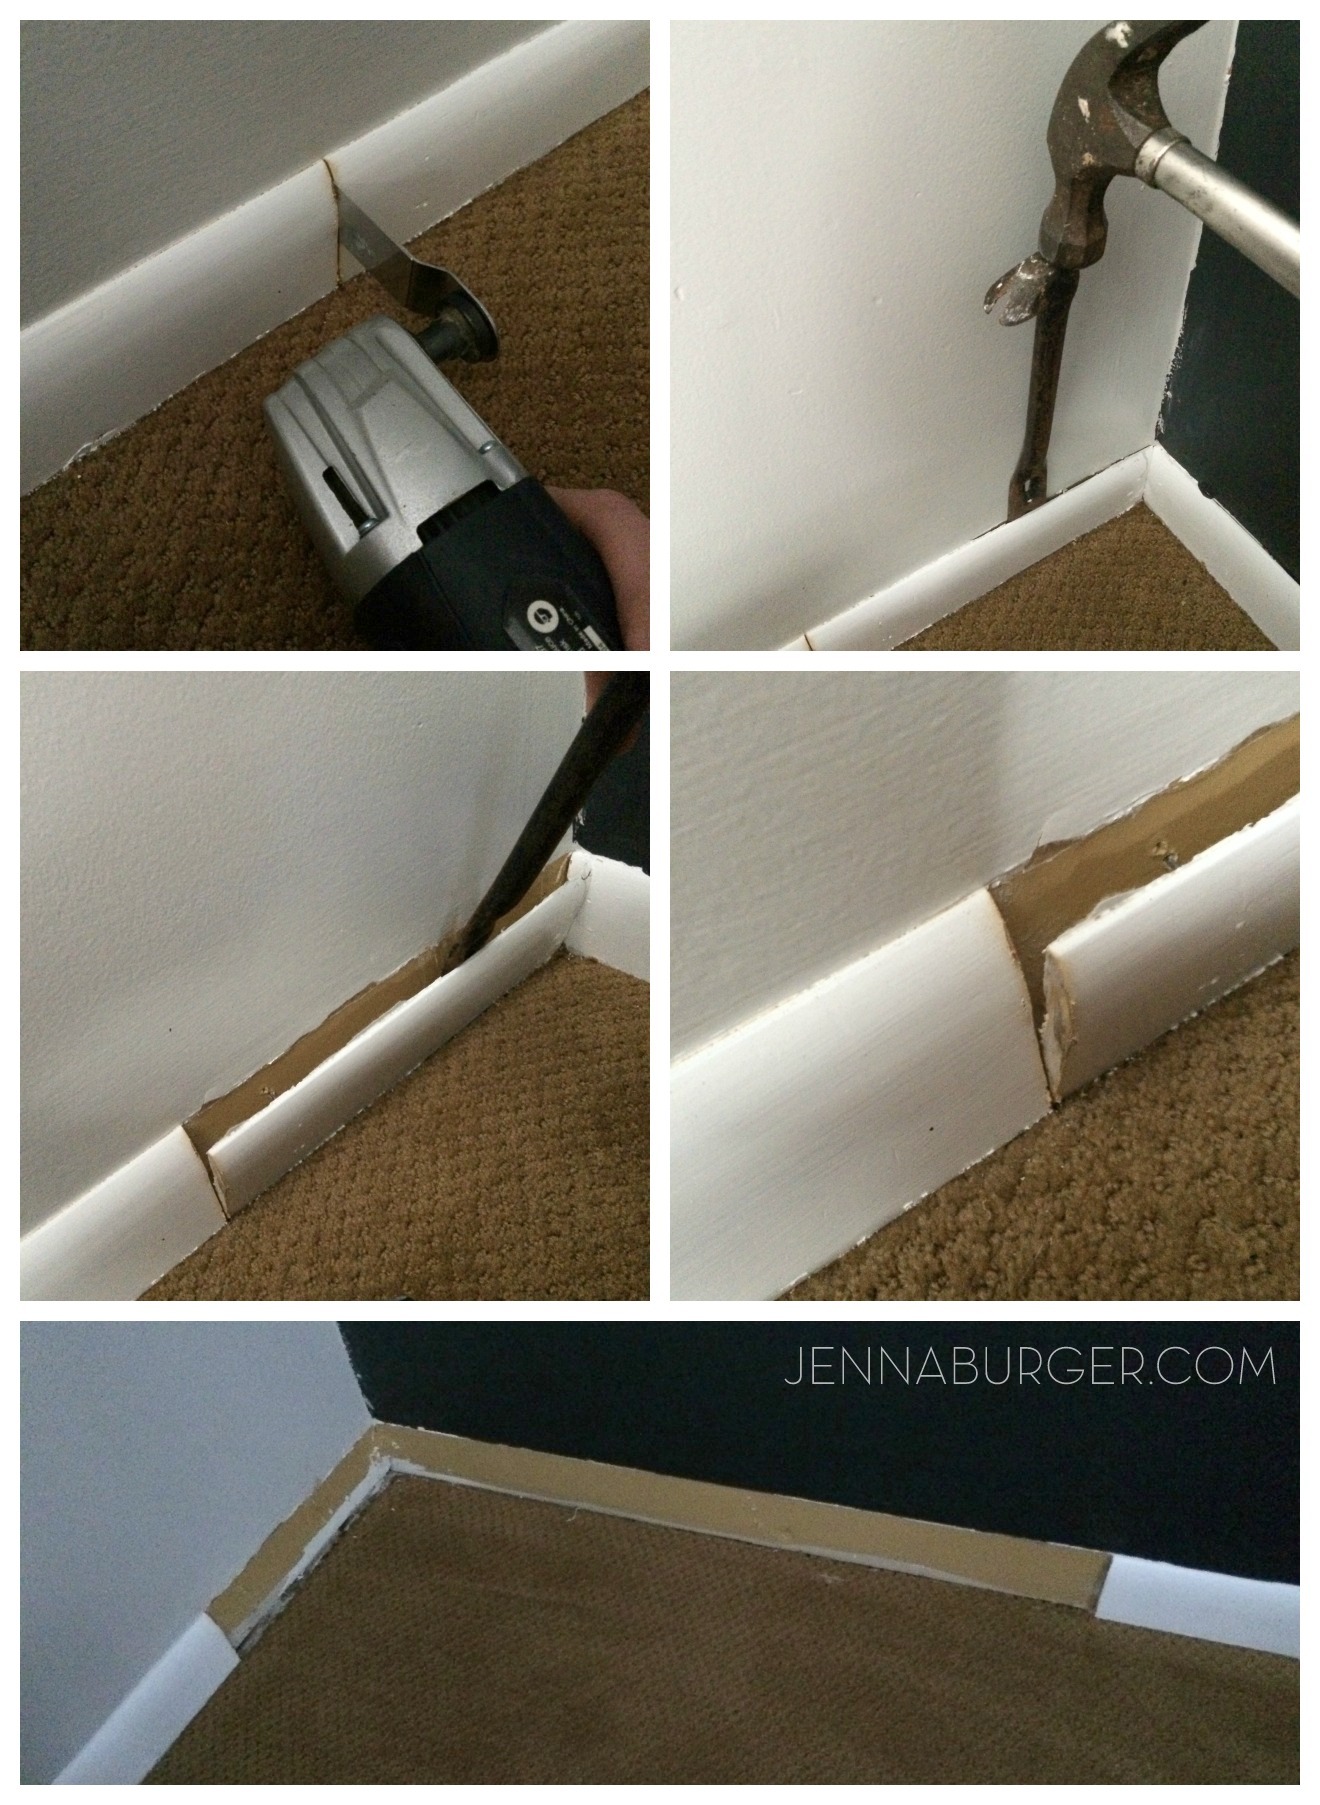
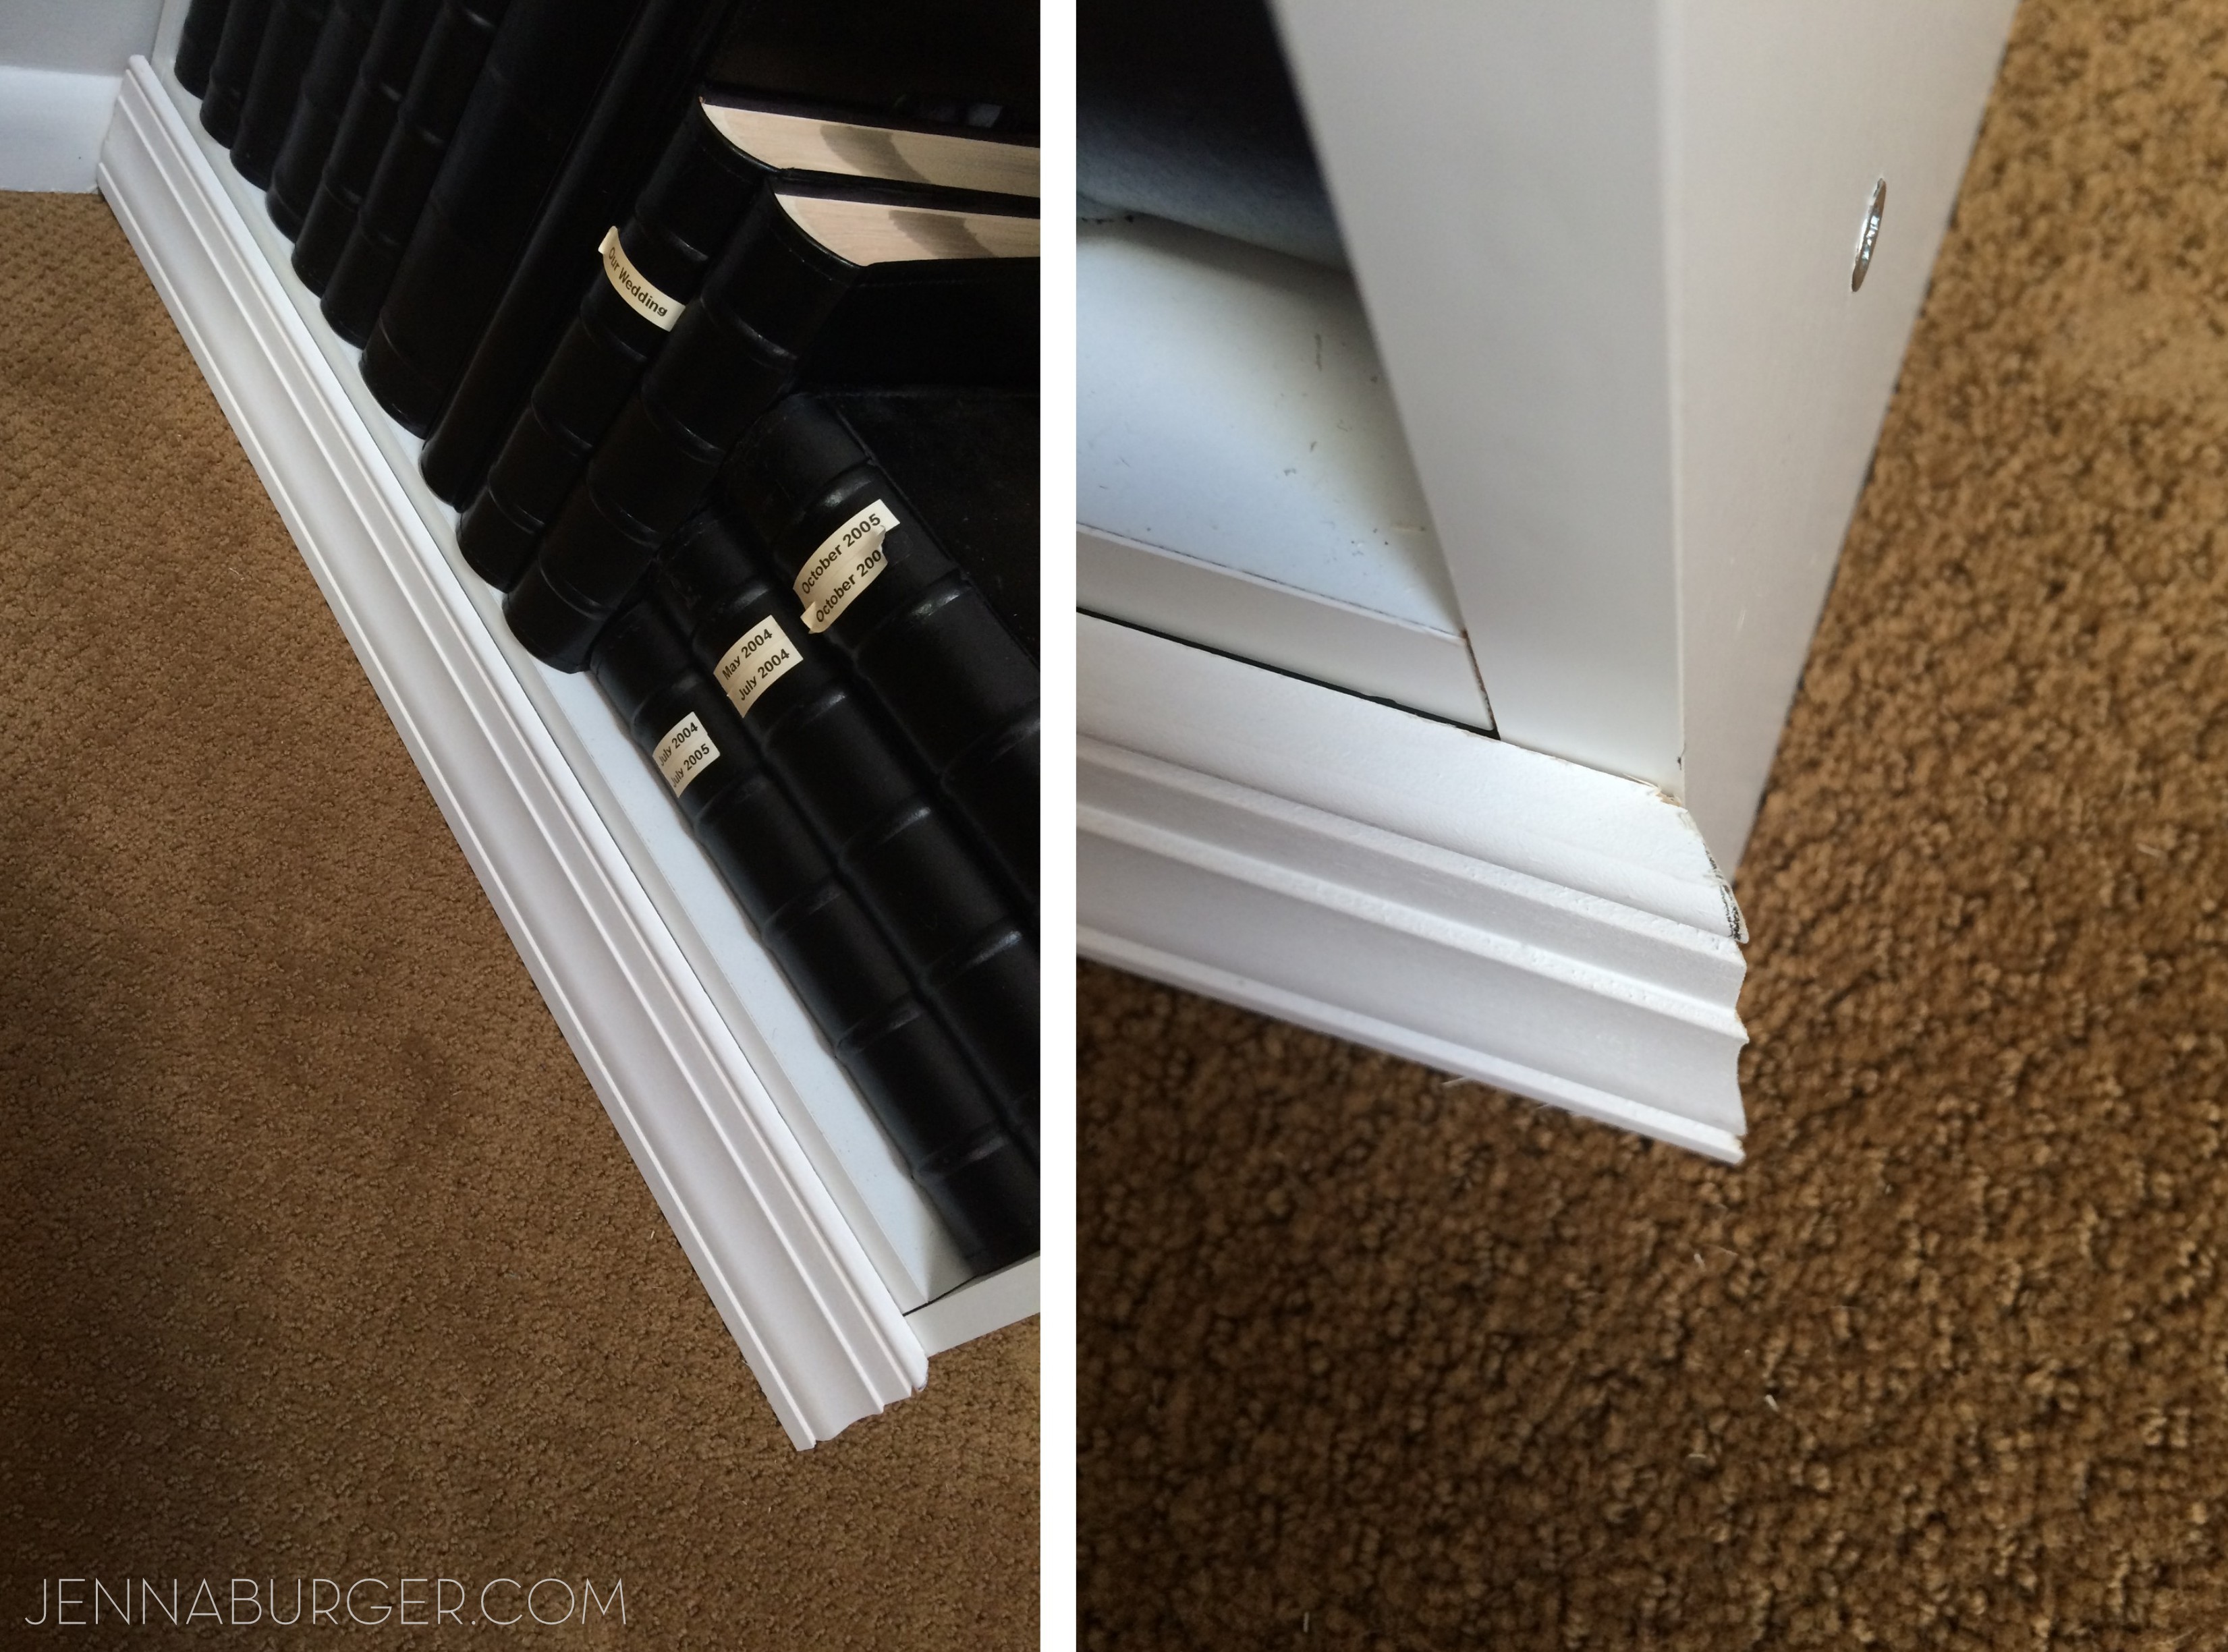
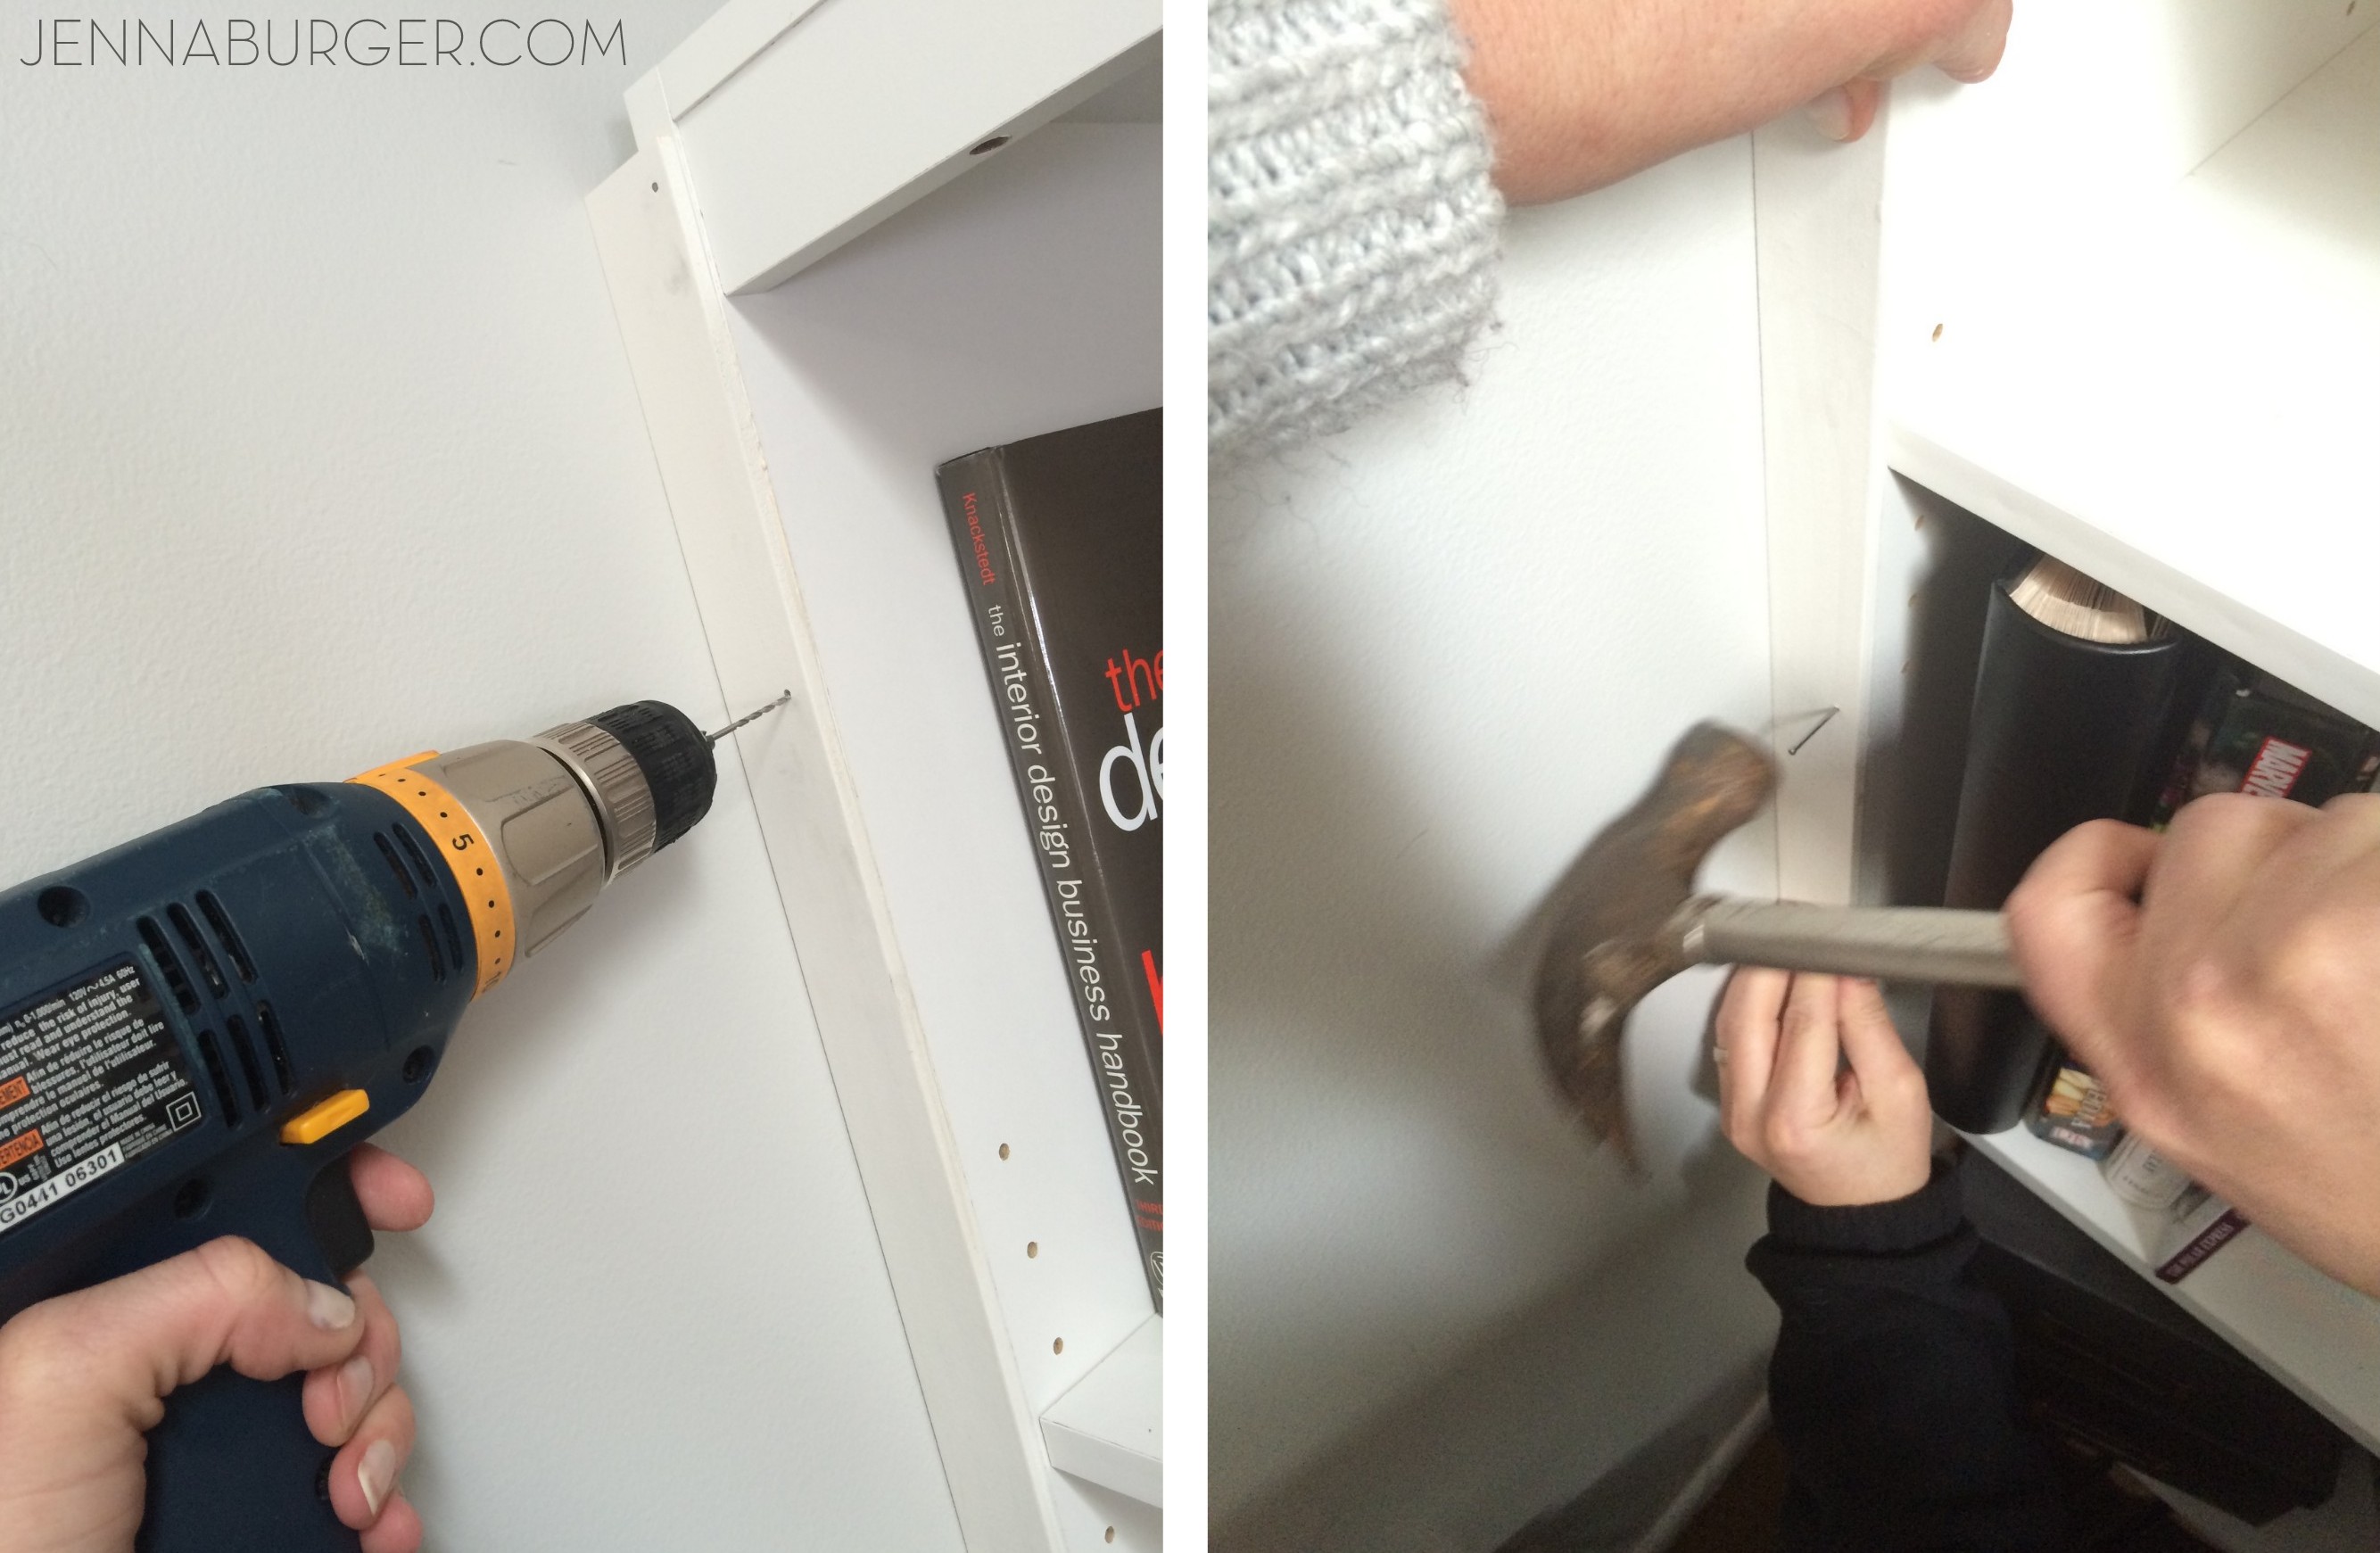
I measured the side of the bookcase (11.5 deep) and the width (30.75 wide).  Then I measured & marked those measurements on the wall.  Using a multipurpose tool (like a dremel), I made a clean cut in the existing moulding and with the help of a hammer and crow bar, the moulding came right off the wall.

#DIY #Tutorial How-To Make a Laminate Bookcase Look Like a Custom Built-in Bookshelf.  A $1000 or more bookshelf for just about $100  - Similar Look, HUGE SAVINGS! Tutorial @ www.jennaburger.com

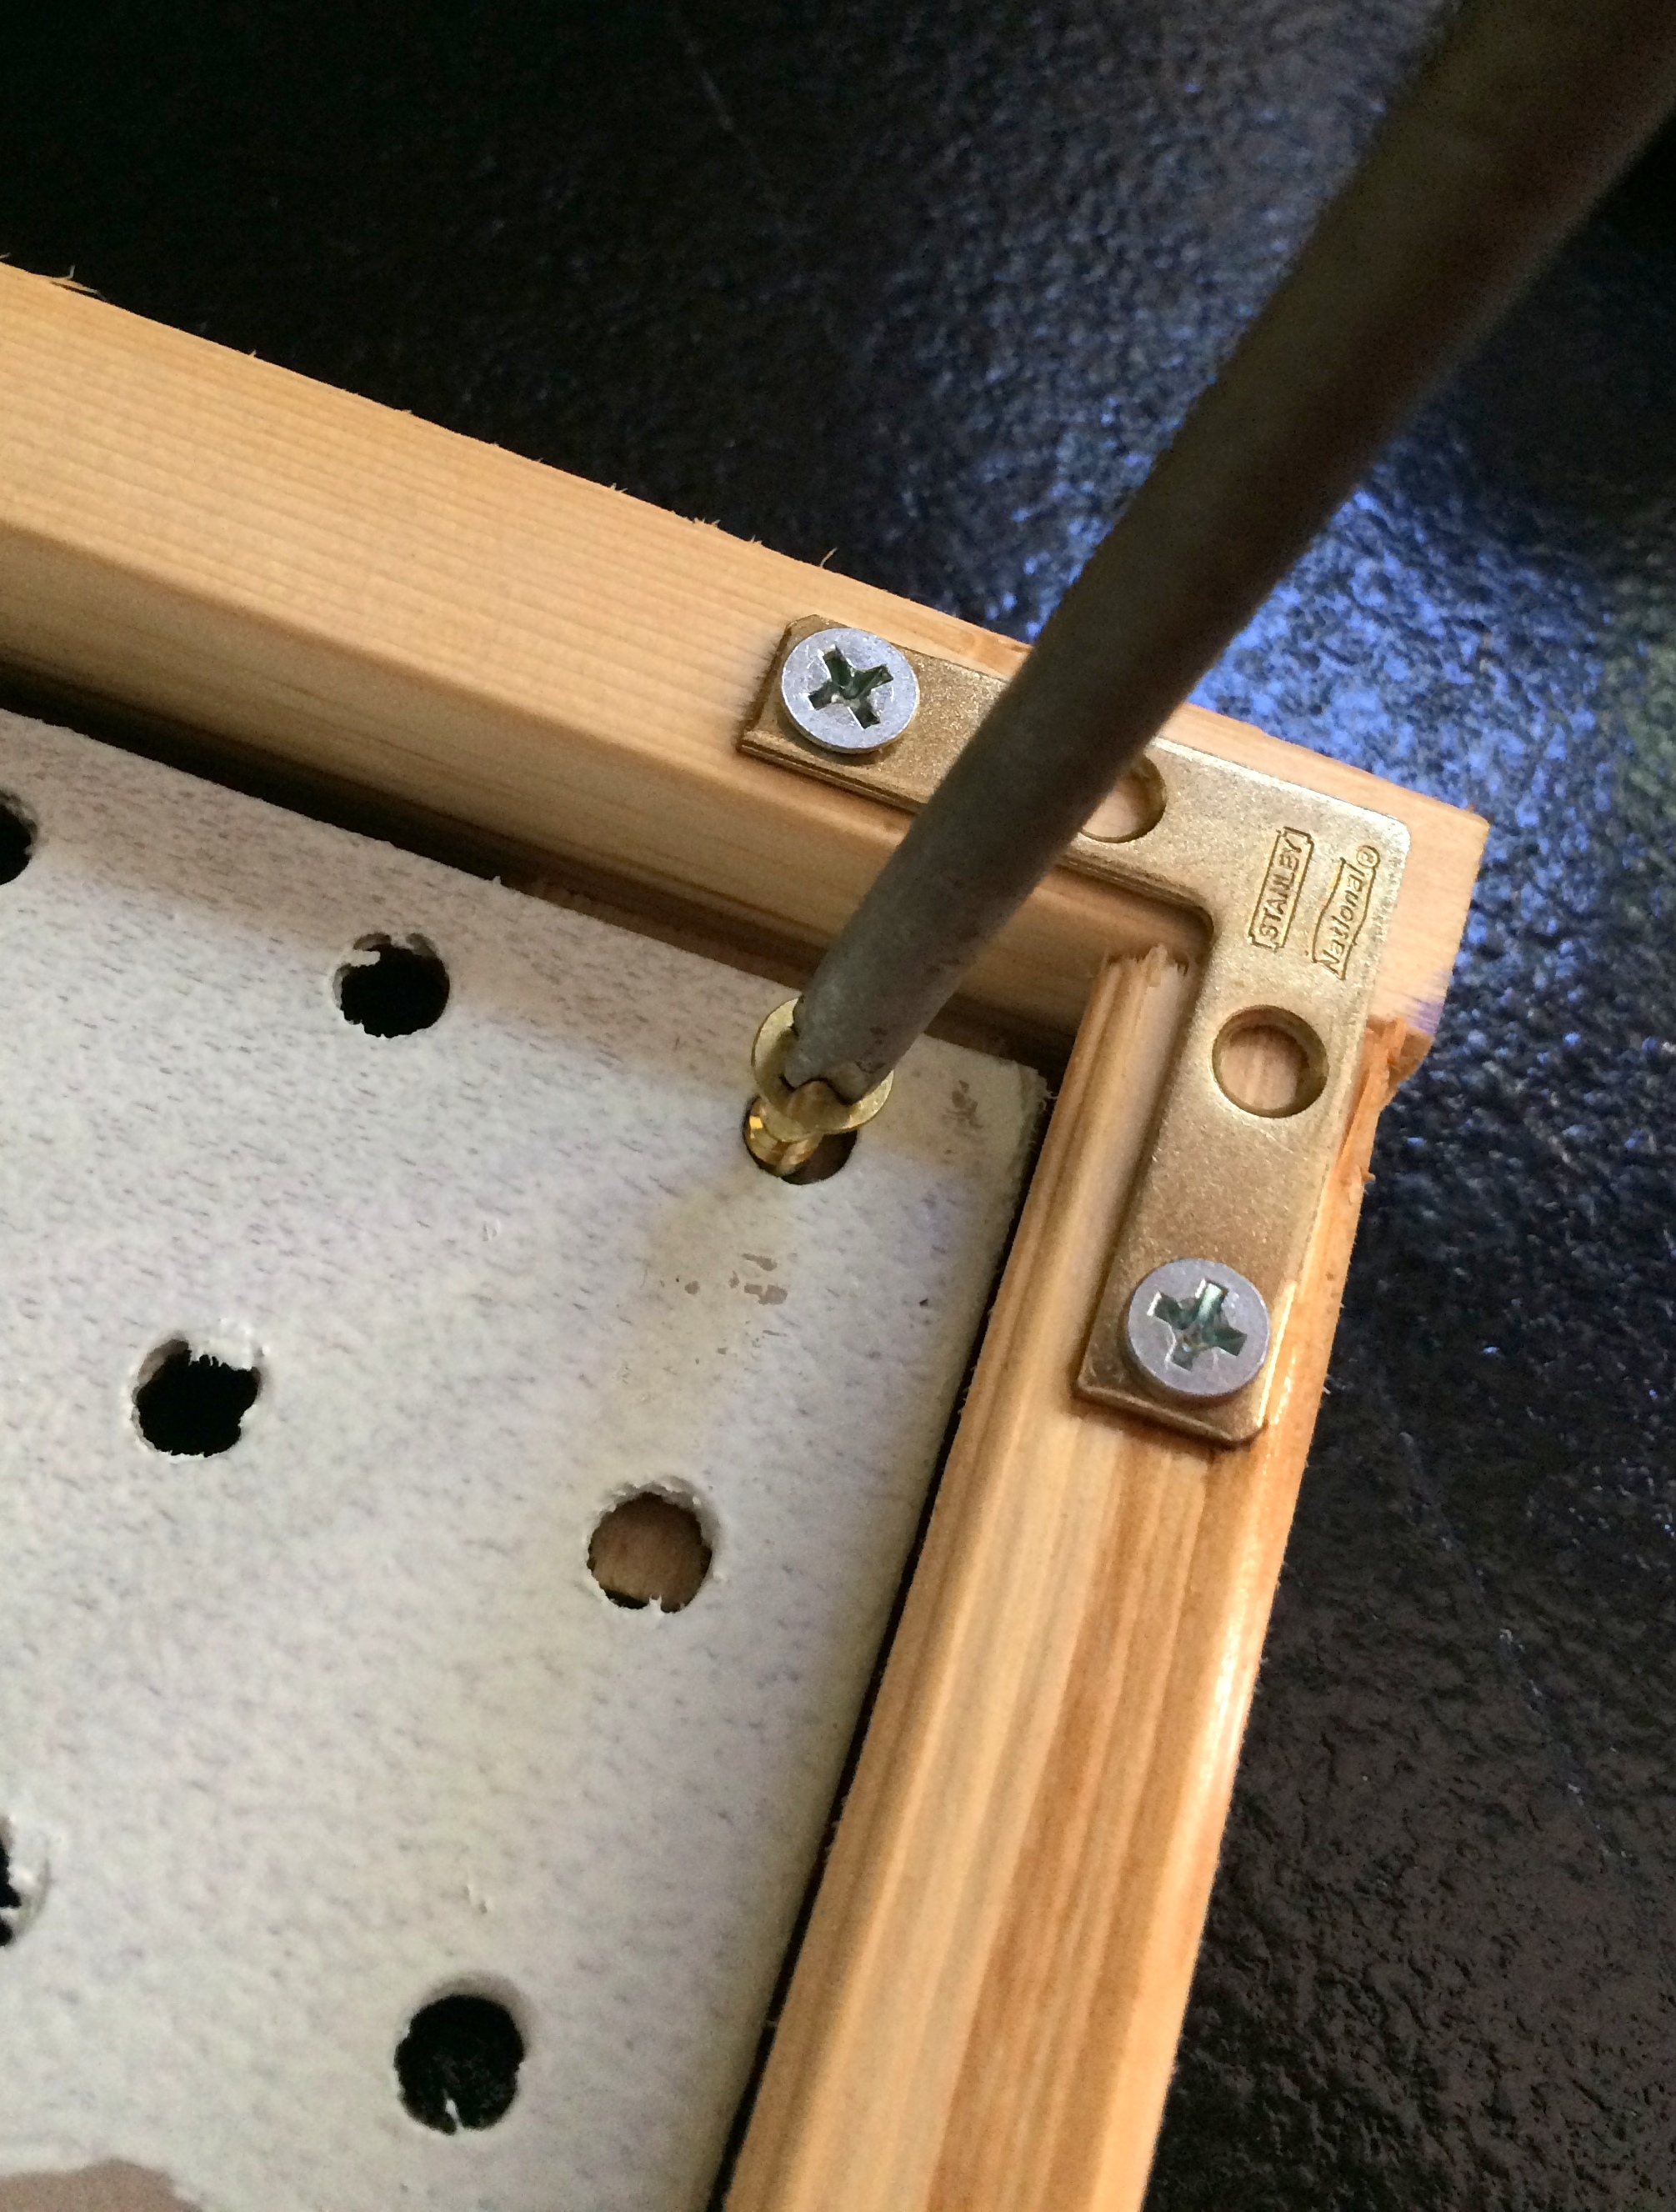
Soon the bookcase would be freestanding no more!  We set the bookcase in place, and using the “L” brackets that came with the piece, we installed /attached them to the top of the bookcase with a cordless drill.  This baby is going no where!

#DIY #Tutorial How-To Make a Laminate Bookcase Look Like a Custom Built-in Bookshelf.  A $1000 or more bookshelf for just about $100  - Similar Look, HUGE SAVINGS! Tutorial @ www.jennaburger.com

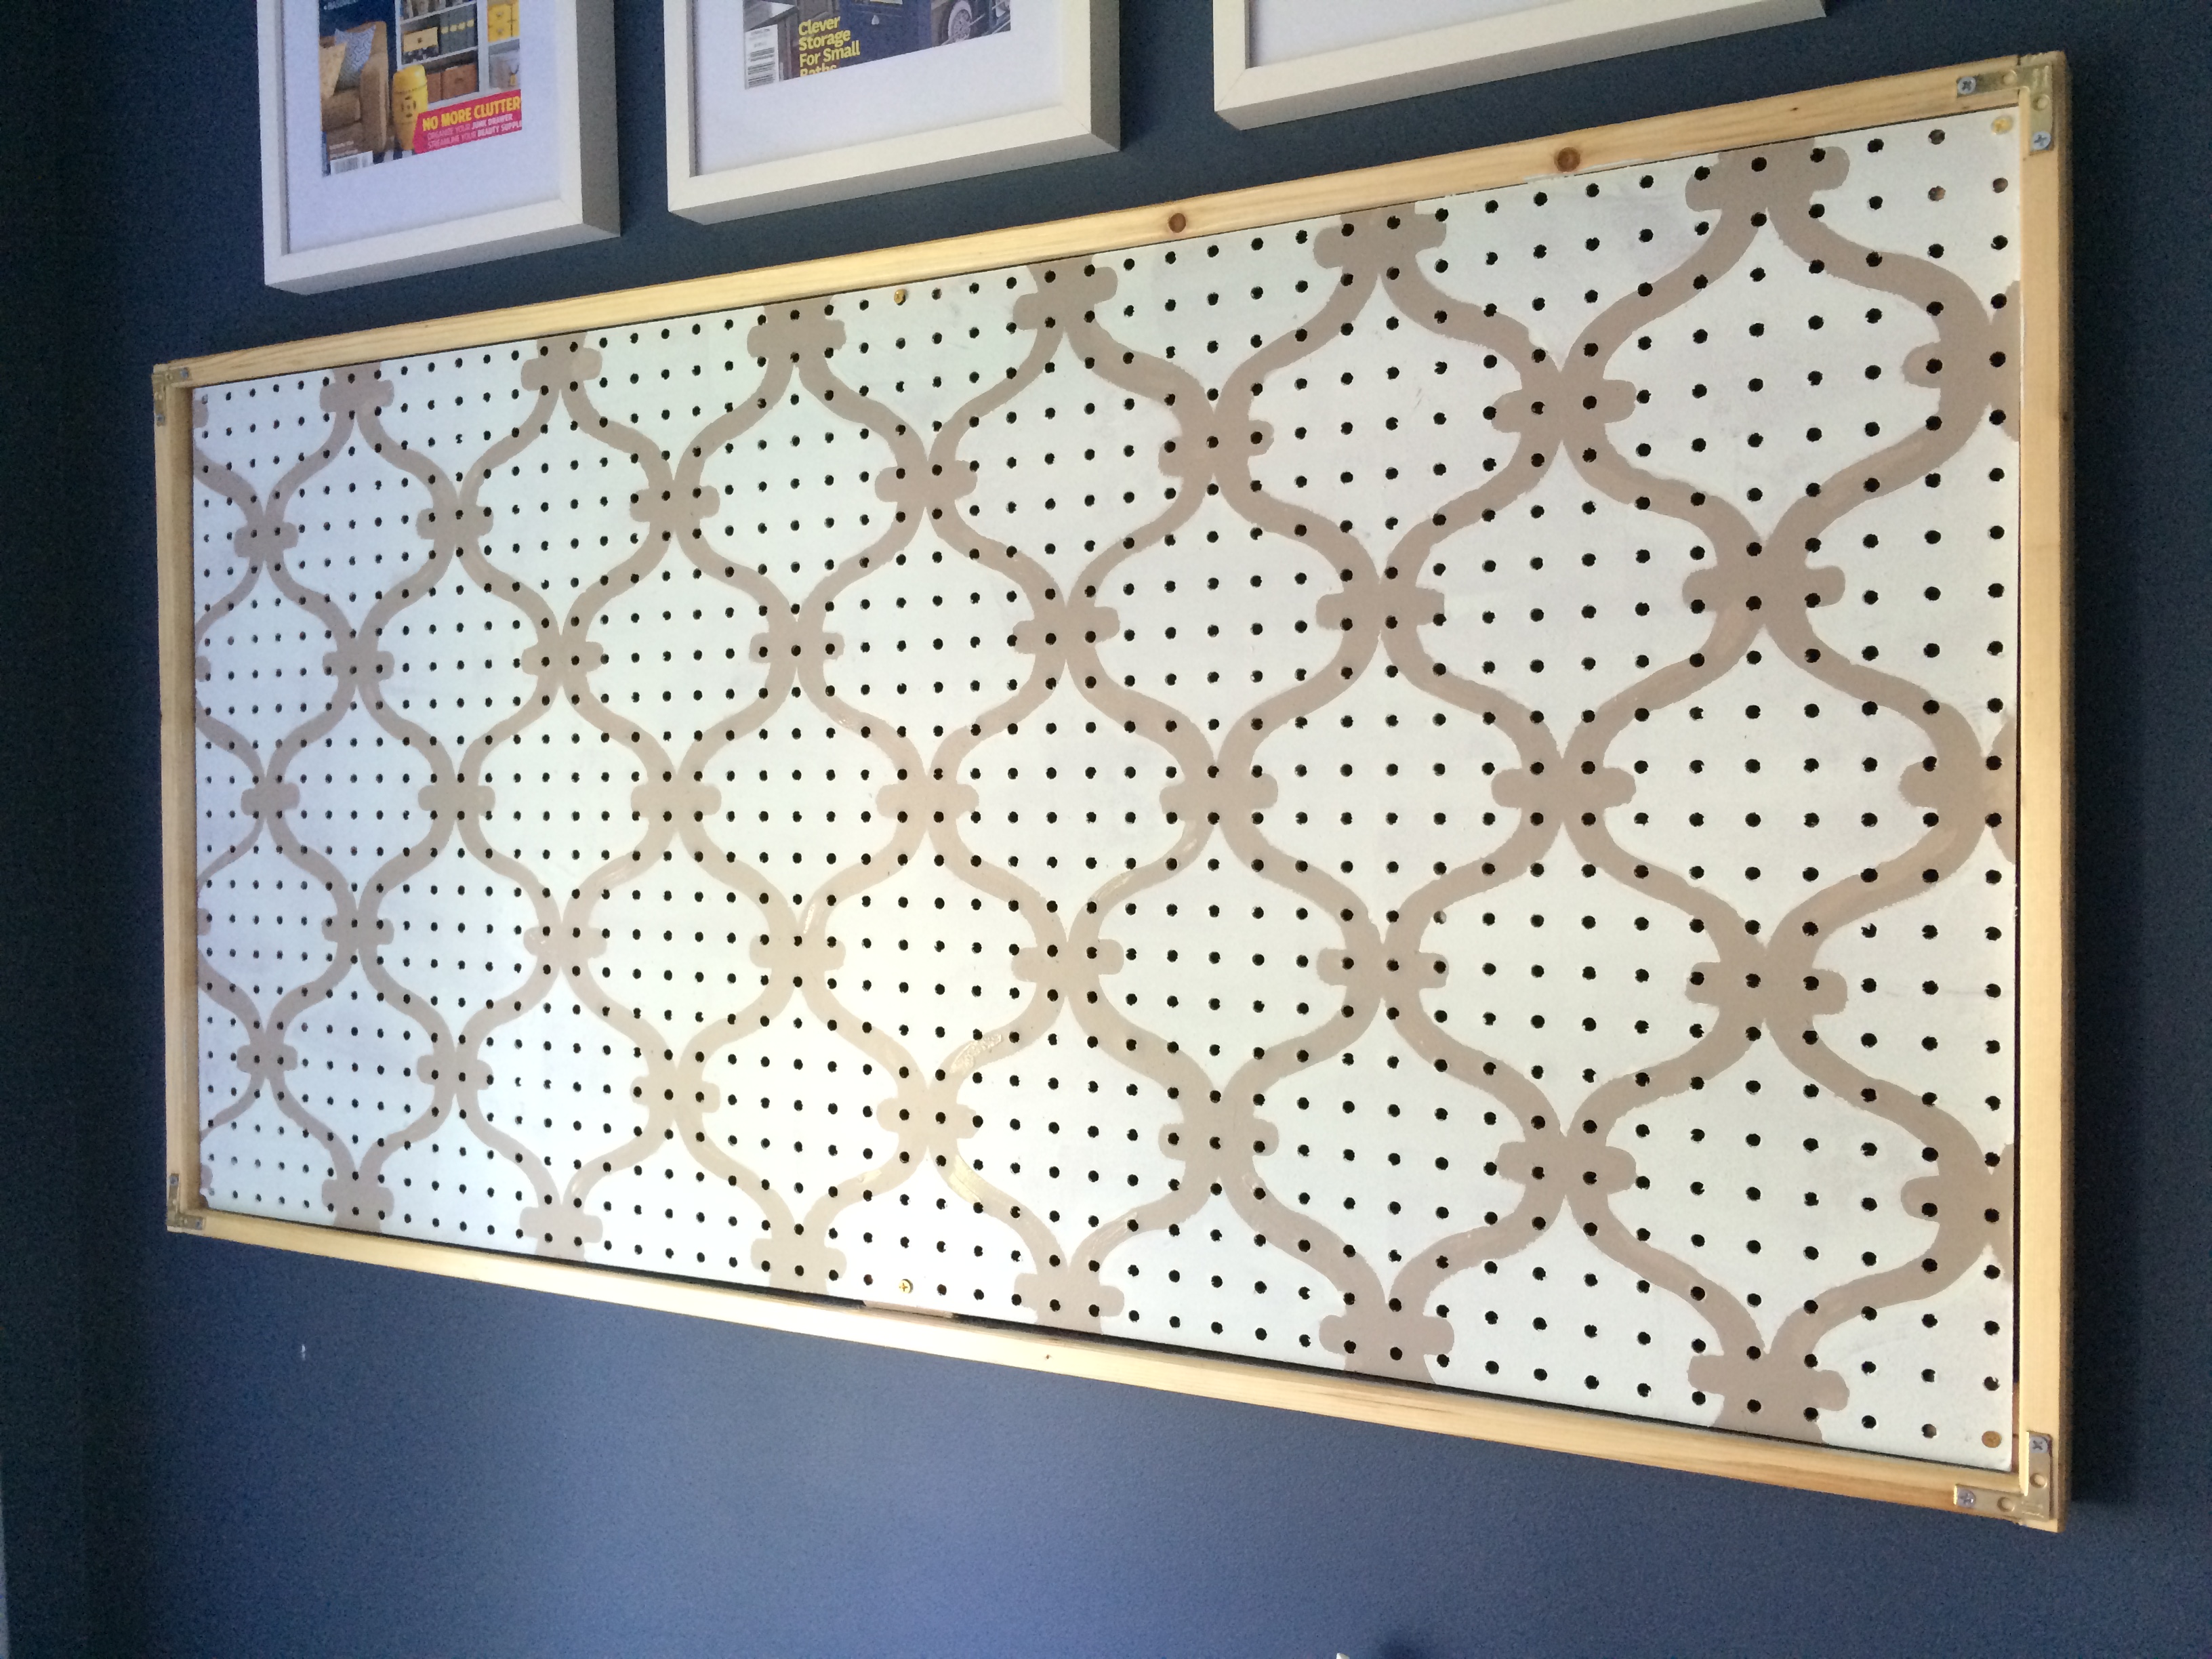
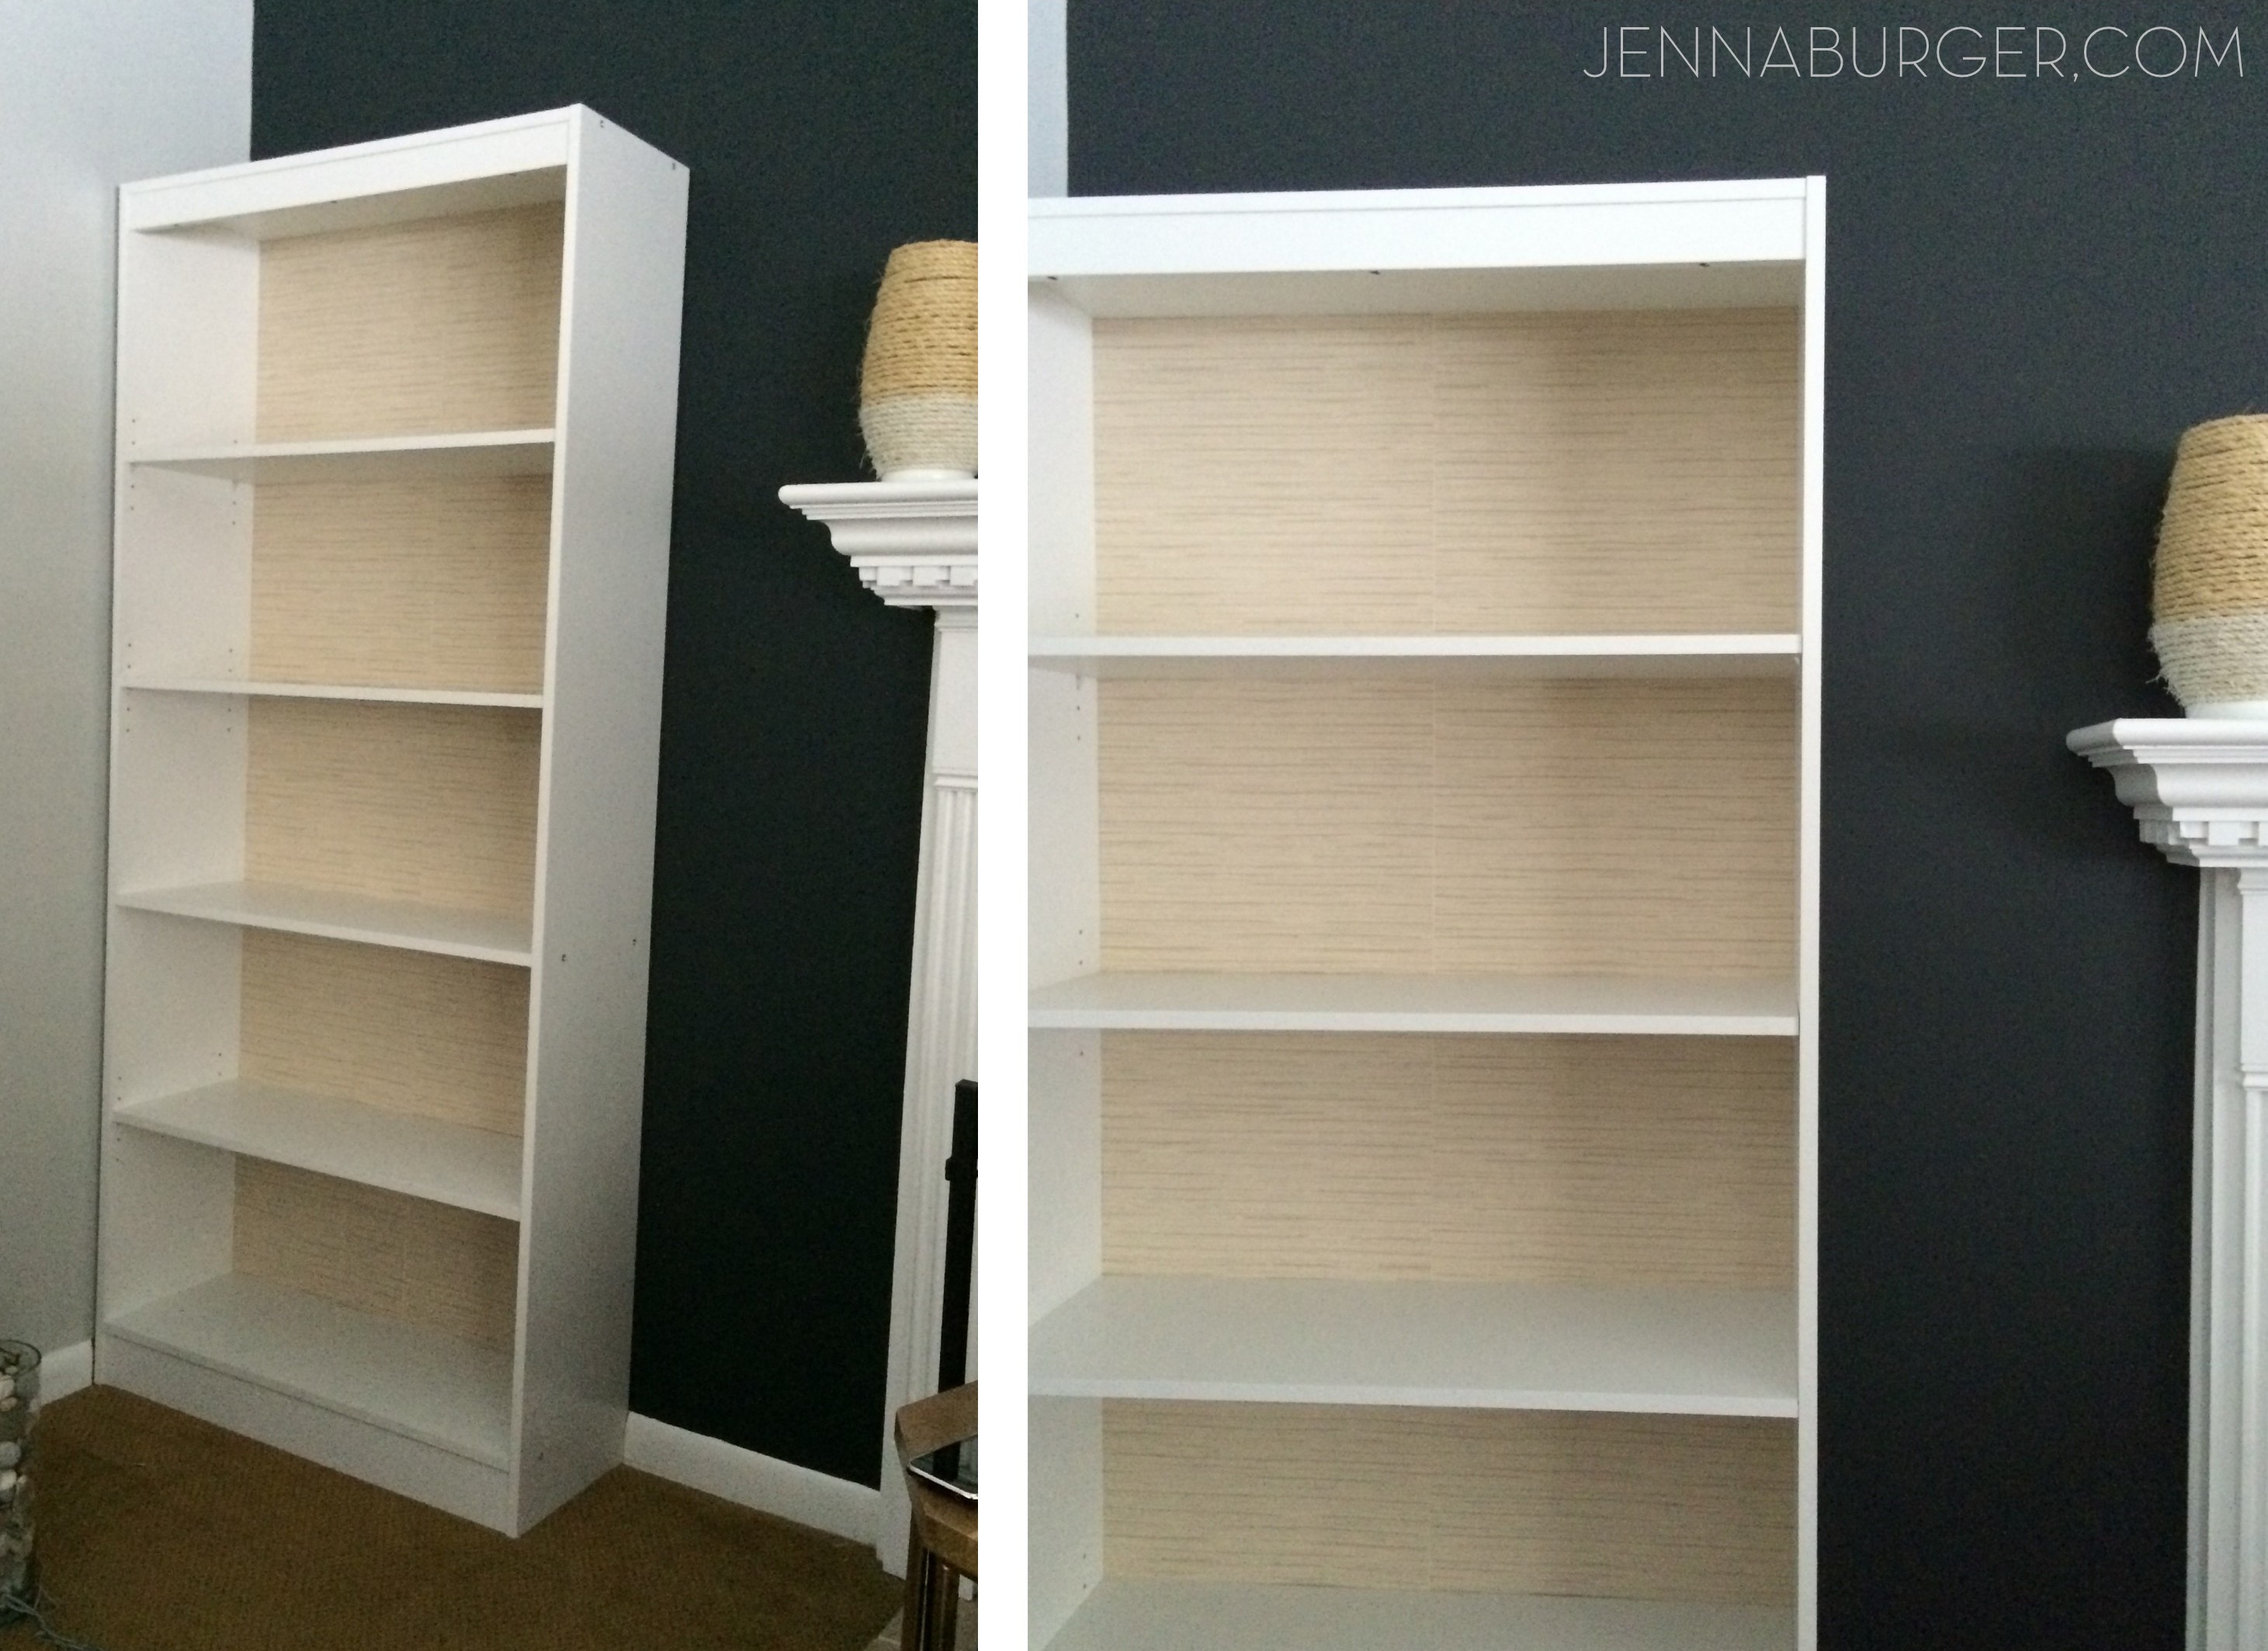
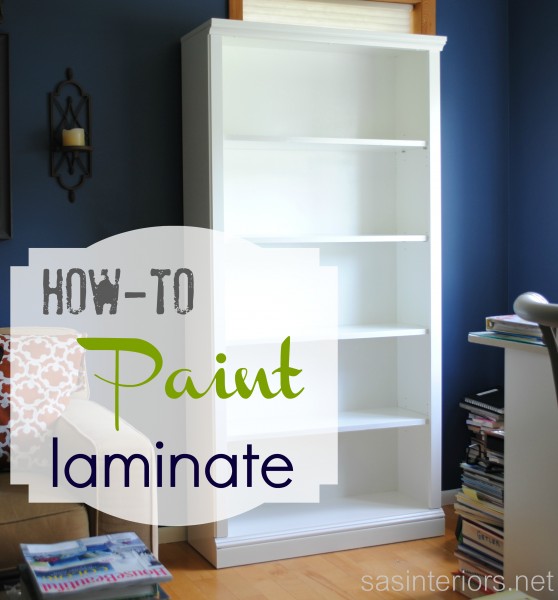
This is what the bookcase looked like installed and totally bare…

#DIY #Tutorial How-To Make a Laminate Bookcase Look Like a Custom Built-in Bookshelf.  A $1000 or more bookshelf for just about $100  - Similar Look, HUGE SAVINGS! Tutorial @ www.jennaburger.com

Not bad, but very plain and typical!

Here comes the good part…

ADDING MOULDING TO THE BOOKCASE

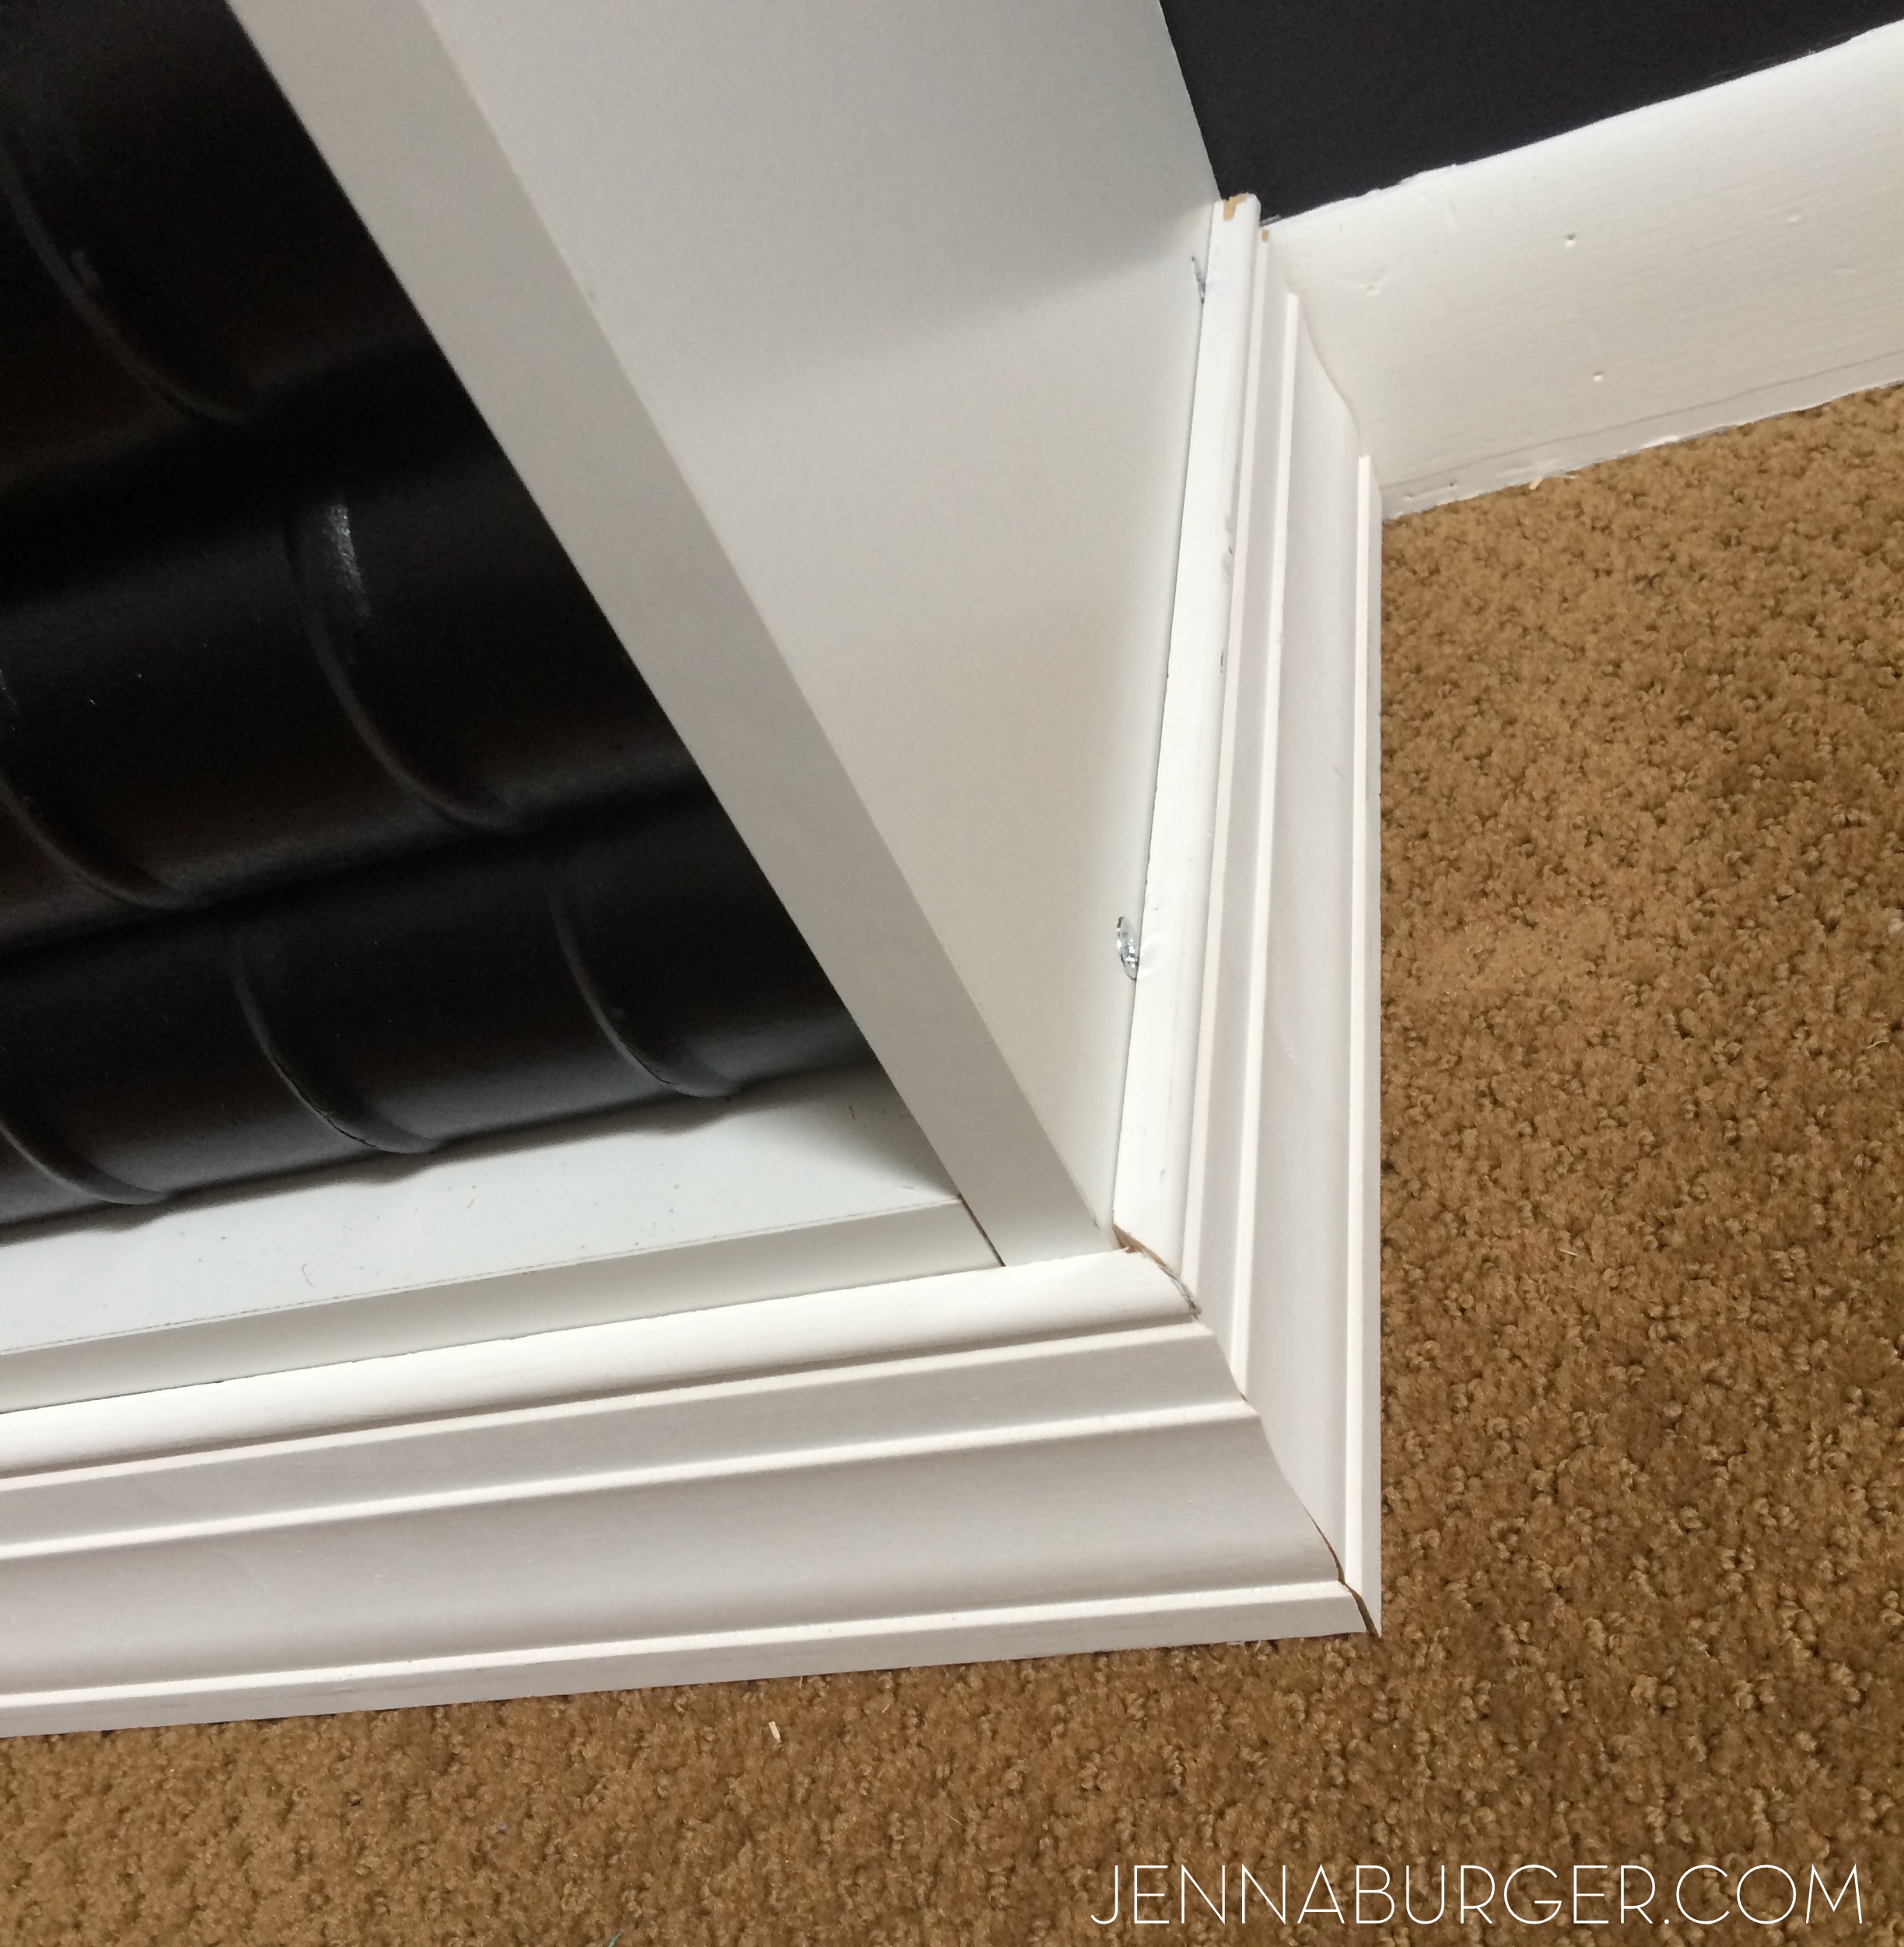
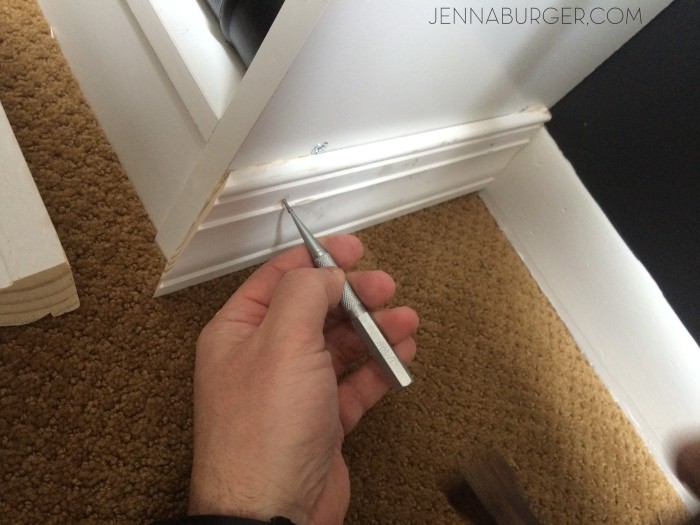
I thought it would be best to go from the bottom up, so the Mister and I started with installing the base moulding first.  I measured and cut the moulding for the length of the bookcase (the left side had a straight cut, the right side was a 45 degree angle as it wraps around the side).

I added wood glue to the back of the moulding, then using finishing nails, I lightly tapped the base into place.

#DIY #Tutorial How-To Make a Laminate Bookcase Look Like a Custom Built-in Bookshelf.  A $1000 or more bookshelf for just about $100  - Similar Look, HUGE SAVINGS! Tutorial @ www.jennaburger.com

That was followed by cutting the other leg for the base moulding and fitting it into place.  To “drive home” the finishing nails, I recommend using a nail punch set.  This will allow the head of the nail to be deeper than the moulding, which then can be filled in with wood putty before painting.

#DIY #Tutorial How-To Make a Laminate Bookcase Look Like a Custom Built-in Bookshelf.  A $1000 or more bookshelf for just about $100  - Similar Look, HUGE SAVINGS! Tutorial @ www.jennaburger.com

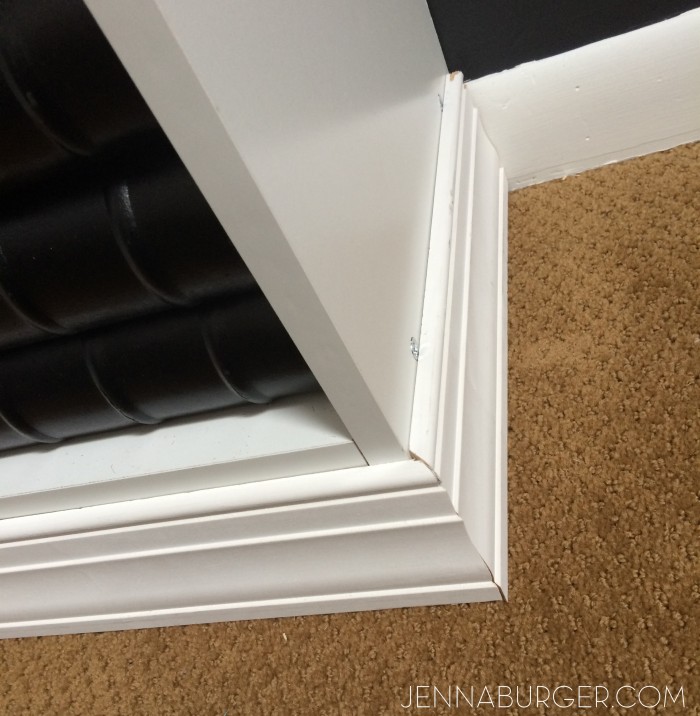
And this is the result of the base moulding…

#DIY #Tutorial How-To Make a Laminate Bookcase Look Like a Custom Built-in Bookshelf.  A $1000 or more bookshelf for just about $100  - Similar Look, HUGE SAVINGS! Tutorial @ www.jennaburger.com

Working our way up to customizing this bookcase, we added sides to the shelf to give it a more bolder, prominent look.  I had intended on using 1 x 2’s but was concerned that they would stick out too much.  My savior of a husband, found white primed (that saved a step) fencing lattice.  THEY WERE PERFECT.  The depth is only 1/4″ and the width is about 1.5″ – perfect for the sides!

Because the lattice is thin, we predrilled the holes before nailing them into place –  This avoided possible splitting of the wood because it’s thin. Once the holes were drilled, we added wood glue to the back, and nailed them home!

#DIY #Tutorial How-To Make a Laminate Bookcase Look Like a Custom Built-in Bookshelf.  A $1000 or more bookshelf for just about $100  - Similar Look, HUGE SAVINGS! Tutorial @ www.jennaburger.com

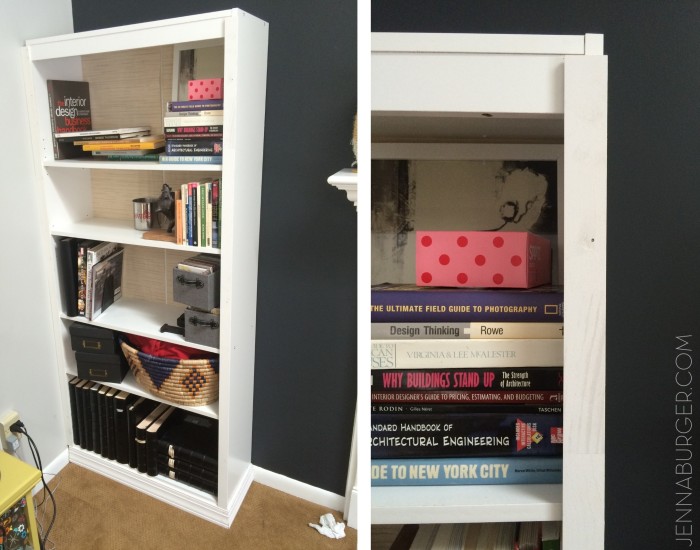
Once the sides were complete, this is what it looked like…

#DIY #Tutorial How-To Make a Laminate Bookcase Look Like a Custom Built-in Bookshelf.  A $1000 or more bookshelf for just about $100  - Similar Look, HUGE SAVINGS! Tutorial @ www.jennaburger.com

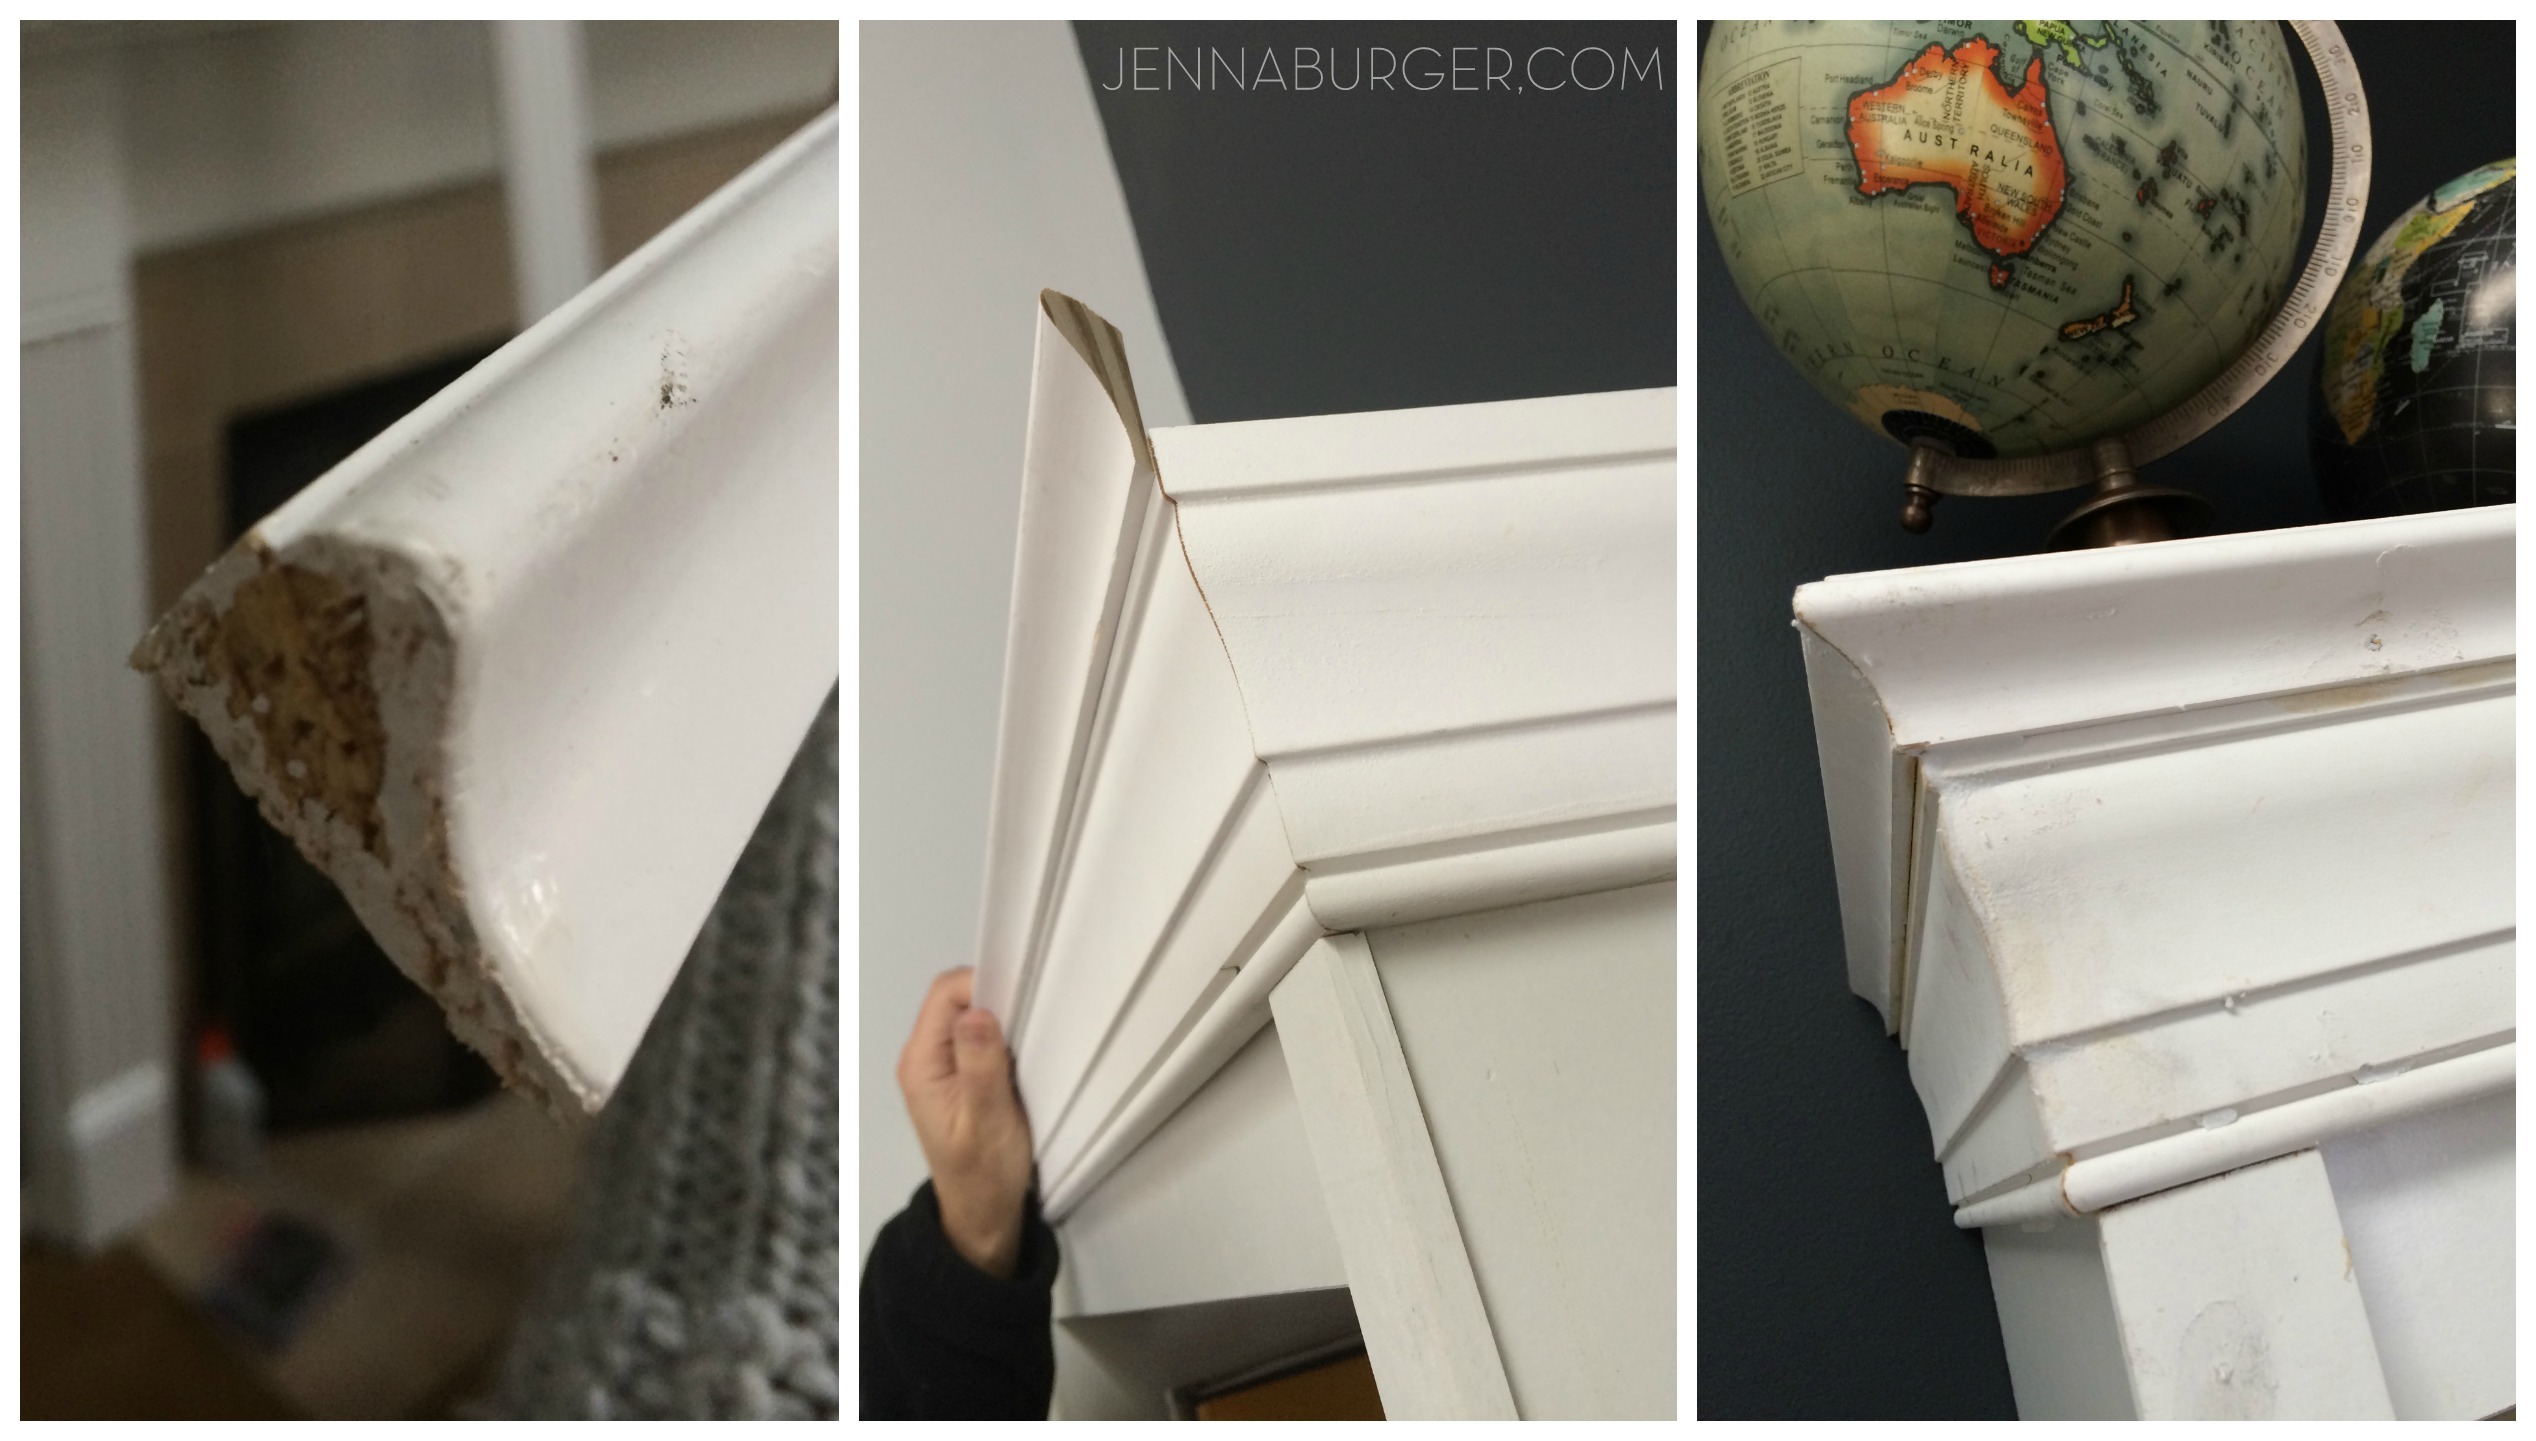
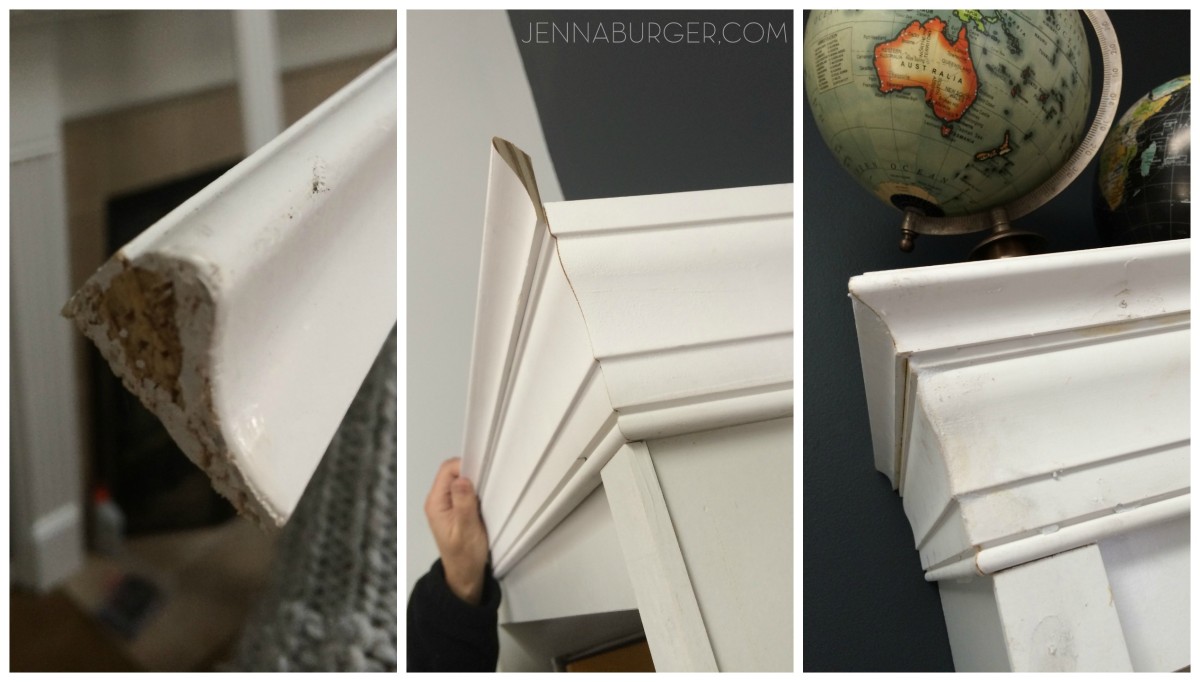
Last moulding steps… The Crown.

For the crown moulding on the built-in bookshelf, we used the same base moulding but inverted it (flipped it around) and also added an additional piece of moulding to make it stand out more.

The “crown” (actually base moulding) isn’t a true crown moulding so there are no special angles to figure out – thank goodness!  After measuring the length, we simply had to cut the moulding on a 45 degree angle using the compound miter saw.

#DIY #Tutorial How-To Make a Laminate Bookcase Look Like a Custom Built-in Bookshelf.  A $1000 or more bookshelf for just about $100  - Similar Look, HUGE SAVINGS! Tutorial @ www.jennaburger.com

Again when it came to installing, we first predrilled the holes using a cordless drill, then nailed it into place.

#DIY #Tutorial How-To Make a Laminate Bookcase Look Like a Custom Built-in Bookshelf.  A $1000 or more bookshelf for just about $100  - Similar Look, HUGE SAVINGS! Tutorial @ www.jennaburger.com

Adding this crown moulding also made the bookcase even taller = bonus!

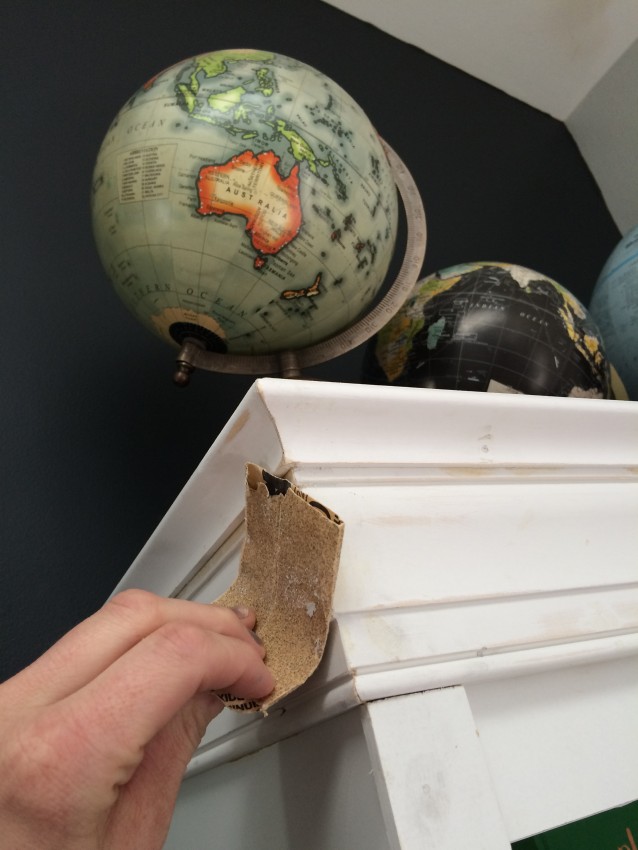
It looked like a mess after installing, but it’s amazing what wood filler + sanding + painting can do!

#DIY #Tutorial How-To Make a Laminate Bookcase Look Like a Custom Built-in Bookshelf.  A $1000 or more bookshelf for just about $100  - Similar Look, HUGE SAVINGS! Tutorial @ www.jennaburger.com

For the paint, I chose a color that was very close to the laminate, so I only painted the new moulding + trim, not the entire built-in.  That would have been A LOT OF WORK and you can not even tell there are differing materials (laminate and wood).

#DIY #Tutorial How-To Make a Laminate Bookcase Look Like a Custom Built-in Bookshelf.  A $1000 or more bookshelf for just about $100  - Similar Look, HUGE SAVINGS! Tutorial @ www.jennaburger.com

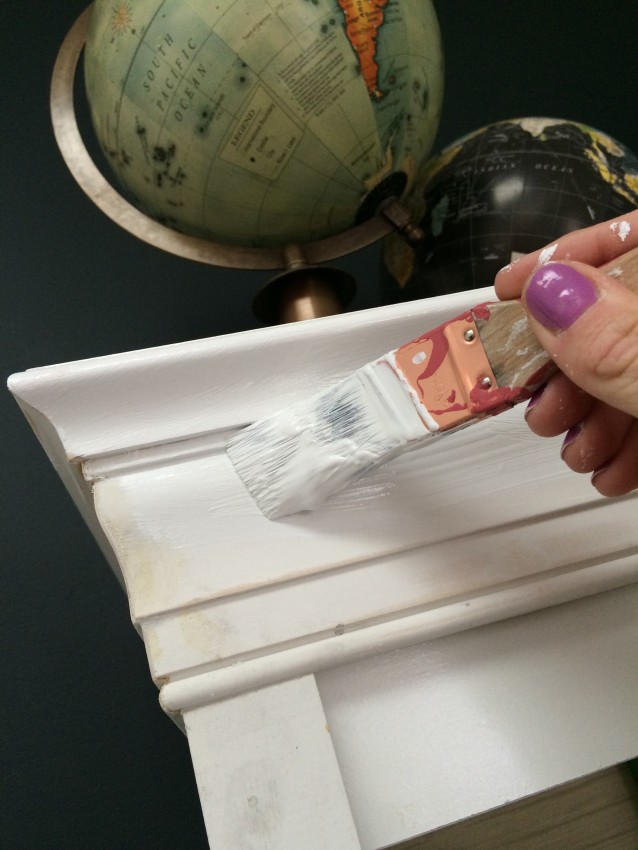
Sidenote: If you are interested in painting an existing laminate piece of furniture, you should take a look at this tutorial of mine…
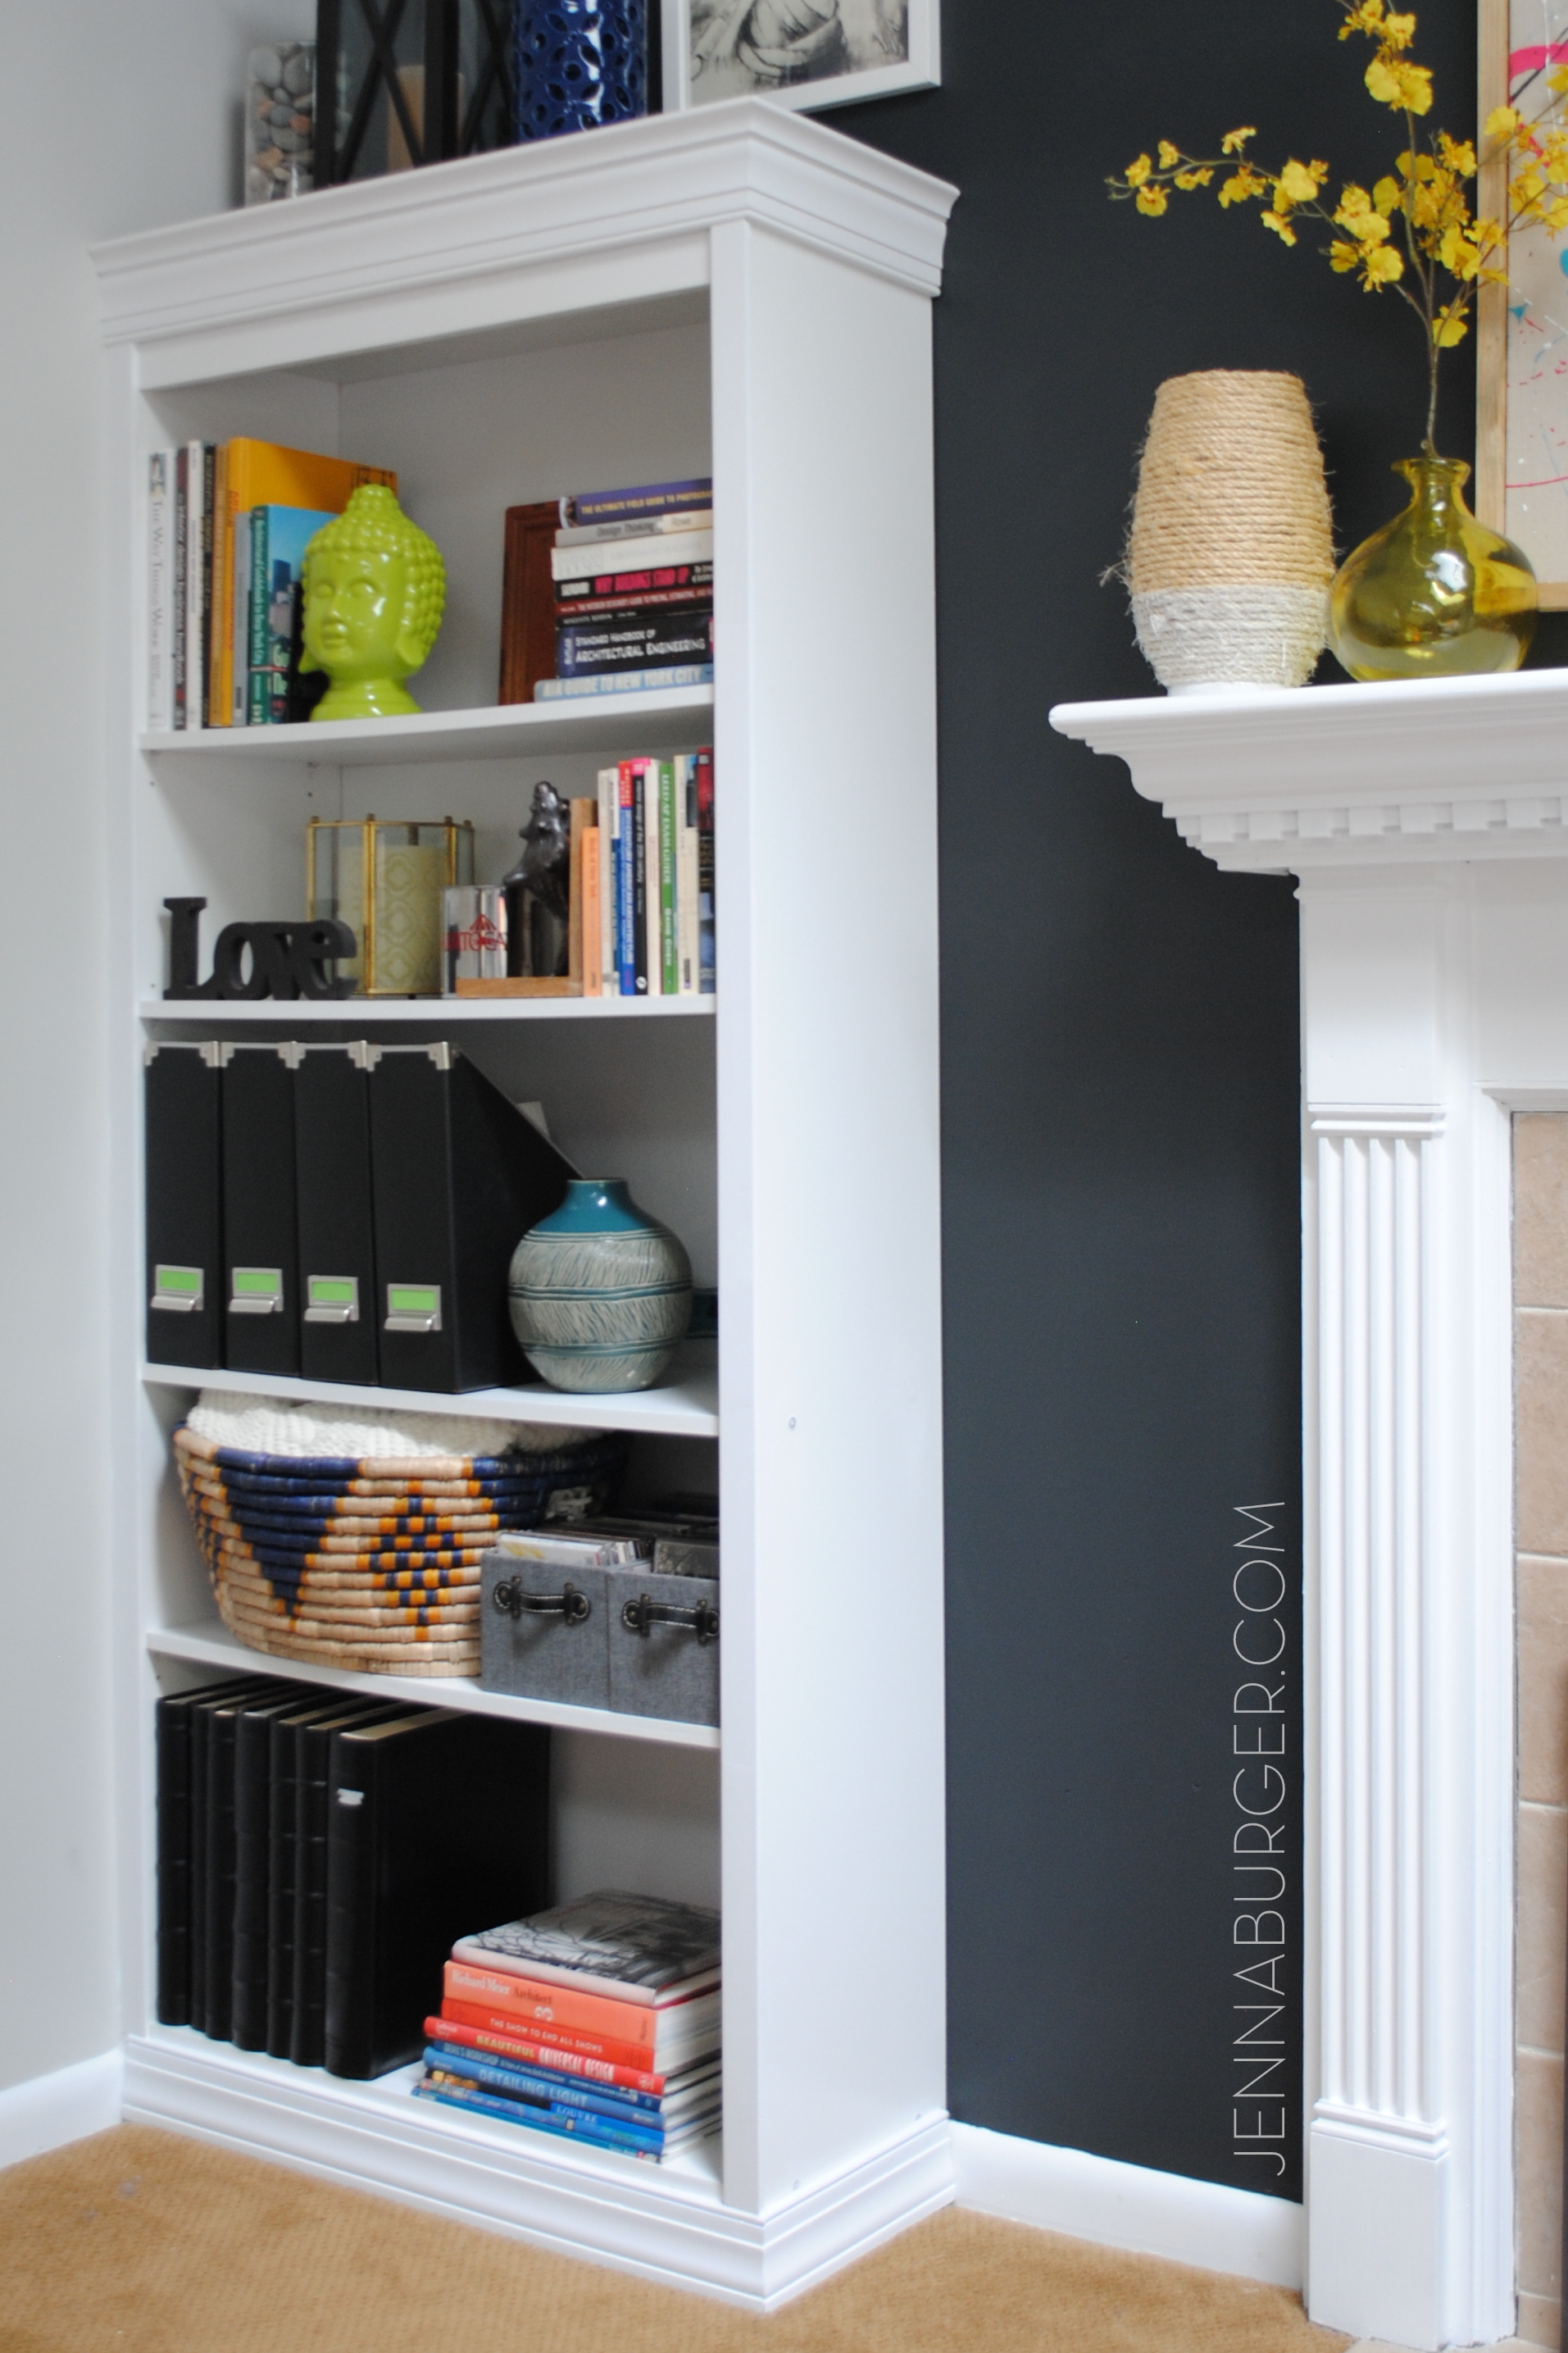
How-To Paint laminate furniture: tutorial with step by step instructions on painting laminate material

THE RESULT

#DIY #Tutorial How-To Make a Laminate Bookcase Look Like a Custom Built-in Bookshelf.  A $1000 or more bookshelf for just about $100  - Similar Look, HUGE SAVINGS! Tutorial @ www.jennaburger.com

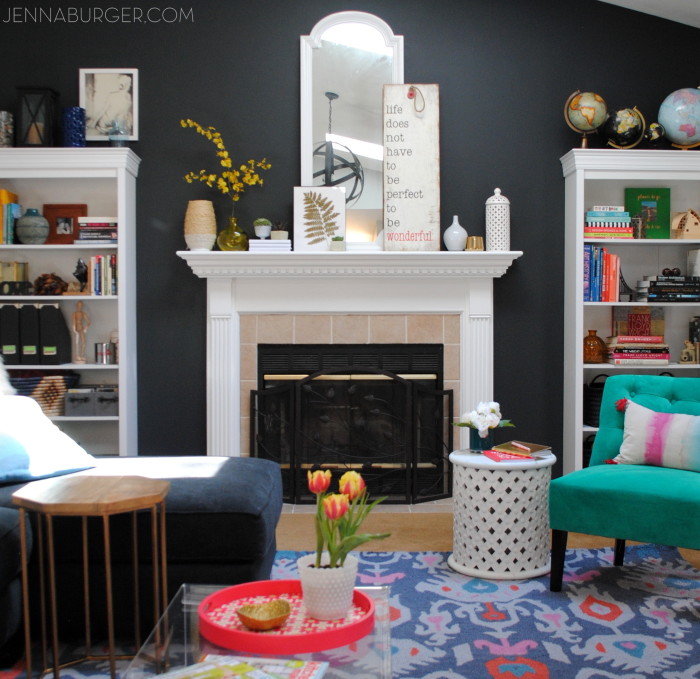
We didn’t build just one.  There’s 2.

#DIY #Tutorial How-To Make a Laminate Bookcase Look Like a Custom Built-in Bookshelf.  A $1000 or more bookshelf for just about $100  - Similar Look, HUGE SAVINGS! Tutorial @ www.jennaburger.com

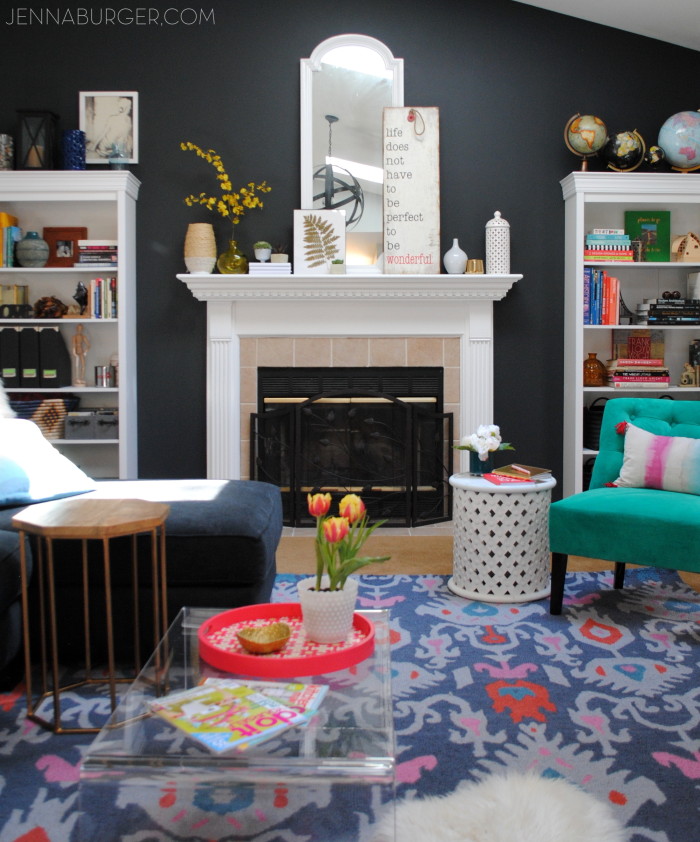
Check out the completed living room {reveal}

#DIY #Tutorial How-To Make a Laminate Bookcase Look Like a Custom Built-in Bookshelf.  A $1000 or more bookshelf for just about $100  - Similar Look, HUGE SAVINGS! Tutorial @ www.jennaburger.com

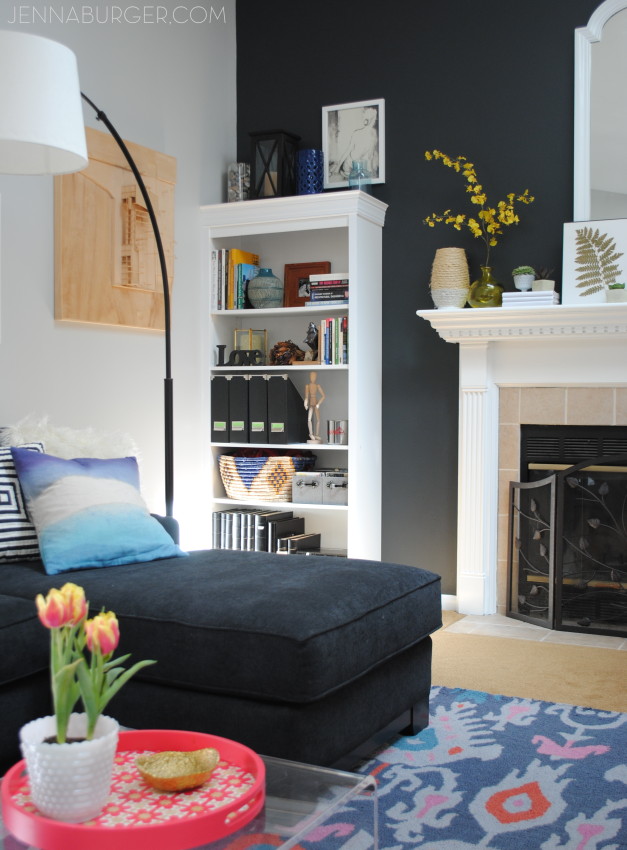
I certainly don’t want to downplay the work of a true millworker / cabinet maker.  Their work far exceeds what I created, but since my option was nothing or DIYing a bookshelf (a $1000 bookshelf is not within my budget), I went with the latter.

Want to save this project for later? Pin It!

#DIY #Tutorial How-To Make a Laminate Bookcase Look Like a Custom Built-in Bookshelf.  A $1000 or more bookshelf for just about $100  - Similar Look, HUGE SAVINGS! Tutorial @ www.jennaburger.com

I am very happy with the result of my built-in version!  It certainly isn’t perfect.  There are mistakes (remember failures happen), but it’s only something my eyes can see.  I hope I’ve inspired you with this do it yourself project.

If you’ve never thought a built-in was possible in your home due to budget constraints, think again!

DISCLOSURE: I am part of the Lowe’s Creative Team and was provided with a Lowe’s gift card to purchase items for my project.  I was also compensated for my time to use the products.  No one told me what to create, what to buy, how to use the product, or what to write.  All opinions are 100% mine!

Lessons Learned from a Failed DIY Project

My blog is based on sharing DIY projects and creative decorating solutions.  I document and share many of my do-it-yourself creations / projects from around my homestead in hopes to inspire and empower YOU!  But let me set reality straight… not every project is a success.  And to be 100% honest, many projects along the way have been failures.  A few I’ve shared, but most I just walk away from in complete annoyance – the sooner I forget, the better…

Yes, the failures are frustrating – time + money + energy are wasted!  And I won’t even disclose to you the choice words I’ve used when something doesn’t result how I intended…  BUT, with every fail is a learning experience.  AND with every fail, in some way, a success is the result.  Maybe not the successful result of a great project, but the success from trying something new and the knowledge gained.  The true outcome more often than not, is something even better!  In the moment it’s difficult to comprehend and deal with, but it’s important to remember without trying there is nothing gained.

Hence a DIY project I tackled a few months ago… An amazing, genius wallpaper idea that developed into a project and resulted in a complete FAIL, with a capital F.

Learning from a Project FAIL!  Not every project will have an amazing result, but without the risk, there can't be a reward!

Who records pulling off wallpaper? I do (raising my hand in embarassment)…   Seems silly, I know, but at least it felt liberating.  So what am I referring to?  Let me take a step back and start from the beginning.

When I was in the midst of revamping the living room earlier this year and had finally decided to add built-in bookcases flanking the fireplace, I thought it would be a very smart idea to add the wallpaper to the backs of the built-in BEFORE installing them.  At the time, I thought it would save time and be easy to do before it was all in place.

So I got this pretty grasscloth paper and adhered it to the back of the laminate bookcase using wallpaper paste. Basically, gluing paper on paper. Perfect! I’ve wallpapered before, it shouldn’t be too difficult.  The result has always been great and so will this project (NOT I found out later)…

Learning from a Project FAIL!  Not every project will have an amazing result, but without the risk, there can't be a reward! As it started drying, the paper started to buckle, but I still went with it (no one would be able to see the bubbles).  I finished putting the laminate bookcases together and installed the newly wallpapered back, then installed the new permanent built-in to the wall.

A few days later as the wallpaper cured onto the bookcase back, the center seam (the only seam where the two widths joined together) started to separate A LOT. Yikes.  So the white beyond was very apparent.  Again, ignorance is bliss and I tried to ignore it.

A few more days went by and the seam space was really bugging me.  Thinking about ways to fix it, I realized the wallpaper wasn’t even adhered to the backing anymore.  WHAT?!  How?!  Glue on paper to paper, why wouldn’t it stick? Anyway, long story short, one day I just pulled off all the wallpaper.

Now if you remember back, I adhered the paper BEFORE installing the back panel, so not-so-smart me had to use an sharp blade to get all the wallpaper pieces off.  IT WAS A MESS. And especially since they were BUILT-IN, yes permanent!

Thankfully the back panel is just a backdrop and many books + accessories are layered in front.

A frustrating learned lesson, absolutely!  BUT it could have also been a really good idea if I did it different.

THE TAKEAWAY?  No reward without the risk. I get myself backed into a corner many times with do it yourself projects and have to think of savvy solutions to get the result I had hoped for.

After thinking about my wallpaper project gone wrong, it really was a foolish endeavour from the beginning.  Not every project is picture-perfect worthy.  And for all the beauty that’s out there on the web, in magazines, and in friends homes, it couldn’t have been achieved without thinking outside the box and encountering failures along the way.  No one or nothing is perfect and we all need WHAT WAS I THINKING? moments in our lives!

My friend Melissa wrote about a project failure awhile back and I loved these words…

No one can be skilled in everything, but all of us can be pretty good at what we need to do or choose to do — and what we put our minds to. You can achieve your goals and enjoy almost every hardworking minute of it, as long as you are going after goals you are passionate about.

Yes, love that! If you have the drive + passion, you can get it done somehow, someway.

I’ve marked this project in the books as a fail and I am moving on to bigger and better.  Tomorrow, I am going to show you the result of my built-in bookcases and I can confidently say I am in love with them.  Again without the attempt, I’d still only be dreaming about them.  Be sure to come back to check out how I made laminate bookcases into built-in bookshelves –  a $1000 look for just about $100!

Have you ever had a DIY fail?

Laundry Room “Closet” {Reveal}

If you didn’t see yesterday’s post, you have to read that first.  This is one of those makeovers where… you have to see the ‘before’ to truly appreciate the ‘after’. 

As I mentioned in yesterday’s post, last weekend was a busy one around the ole’ homestead.  In between activities for the kids + prepping the outdoor gardens for new flowers, we also tackled a revamp to the laundry room (aka the laundry closet because it is just that… a 4′-6″ wide x 2′ deep space).

Our home isn’t huge and the laundry isn’t lavish, but it’s a space that is used A LOT & needs to be as functional as possible.  Sadly over the weeks, months (and probably even years), it’s become a dropping zone for everything from clothes (obviously), tools, paper goods, cleaning supplies, etc.  You name it and it was probably piled high on top of the dryer or on one of the above shelves.  Honestly Embarrassing how messy it was!  The space was REALLY in need of love + attention.

No more chit-chat, here is the result of our weekend DIY Laundry Revamp

LAUNDRY ROOM (closet) REVAMP in one weekend!  New paint, More storage, and Pops of color!  All for about $150.  This laundry "closet" is now 100% functional & pretty on the eyes.  Before & After by Jenna Burger Design, www.jennaburger.com

What a change!

Light. Airy. Functional. Pretty. Organized.

Our laundry area gets a lot of use and with it being right off the foyer, it’s a space that holds more than a typical laundry area.   Not only do we wash + dry + hang clothes in this “closet”,  but it’s also a storage spot for dishtowels, cleaning supplies, rags, napkins + paper towels, tablecloths, paper goods (paper plates, cups, plastic ware), and more.

A view from the foyer…

LAUNDRY ROOM (closet) REVAMP in one weekend!  New paint, More storage, and Pops of color!  All for about $150.  This laundry "closet" is now 100% functional & pretty on the eyes.  Before & After by Jenna Burger Design, www.jennaburger.com[tutorial for how I created a Kids Art Display on our garage entry door]

When revamping this space, I started off by making a list of what was working and what wasn’t (guess which list was longer…).

Then I removed all the existing shelving.

The process of cleaning & prepping for the laundry room revamp

Followed by cleaning the walls (we had a dryer issue a few months ago that left our walls full of lint – it’s since been fixed), spackling the holes, and sanding them.

The process of cleaning & prepping for the laundry room revamp

Once the walls were clean, I was ready to paint (the Mister helped too – gotta give him props for helping me out 😉

The process of cleaning & prepping for the laundry room revamp

After the two coats of paint were applied to the walls, I installed the top rail of the closet system that I got at Lowe’s.  I love these types of closet systems because the installation takes little time (the top rail took about 15 minutes total to install).  Once the top rail was in, I hung the uprights off of it (no install needed) and then attached the shelves.

The process of cleaning & prepping for the laundry room revamp

Once the shelves were on, I added a piece of wood on top that runs the same length as the wire shelf.  With wire shelving there is a gap / small space that sometimes smaller things fall through or don’t stand right straight.  This always frustrated me with this closet, so the wood provides a solid surface for anything I want to store.

LAUNDRY ROOM (closet) REVAMP in one weekend!  New paint, More storage, and Pops of color!  All for about $150.  This laundry "closet" is now 100% functional & pretty on the eyes.  Before & After by Jenna Burger Design, www.jennaburger.com

LAUNDRY ROOM (closet) REVAMP in one weekend!  New paint, More storage, and Pops of color!  All for about $150.  This laundry "closet" is now 100% functional & pretty on the eyes.  Before & After by Jenna Burger Design, www.jennaburger.com

Yes wood shelves could have been installed instead of the wire shelving, but a lot more labor + time would have been needed & there would be no way the shelves could be adjusted in the future (the flexibility to move the wire shelves is another huge bonus).

Once the shelves were in, I filled them right away.  The boxes, bins, and baskets are a mix of new & old.

Items like dishtowels, light bulbs, batteries, sponges, etc. are now stored in the smaller fabric bins on the bottom shelf.  They are easy to grab at any time and I love that everything has a place! This shelf only goes half way across (above the dryer) so there is space for hanging clothes below the middle shelf, above the washer.

LAUNDRY ROOM (closet) REVAMP in one weekend!  New paint, More storage, and Pops of color!  All for about $150.  This laundry "closet" is now 100% functional & pretty on the eyes.  Before & After by Jenna Burger Design, www.jennaburger.com

Adding labels to the bins has taken the guess work out of wondering, what goes where

LAUNDRY ROOM (closet) REVAMP in one weekend!  New paint, More storage, and Pops of color!  All for about $150.  This laundry "closet" is now 100% functional & pretty on the eyes.  Before & After by Jenna Burger Design, www.jennaburger.com

On the middle shelf are the cleaning supplies, a basket filled with extra paper towels & napkins, and the laundry detergents.

On the highest shelf (items I don’t need to access every day) are new wire bins from Lowe’s that are filled with extra paper goods (plates, cups, napkins, etc) & tablecloths / linens.

LAUNDRY ROOM (closet) REVAMP in one weekend!  New paint, More storage, and Pops of color!  All for about $150.  This laundry "closet" is now 100% functional & pretty on the eyes.  Before & After by Jenna Burger Design, www.jennaburger.com

Using every inch of this closet was important, so no wall was left untouched.  On the right wall, I have a new folding ironing board hanging from a hook and above I have the iron in a holder.  This is SO MUCH MORE CONVENIENT than where it was before (both were in the basement – don’t ask me why).

LAUNDRY ROOM (closet) REVAMP in one weekend!  New paint, More storage, and Pops of color!  All for about $150.  This laundry "closet" is now 100% functional & pretty on the eyes.  Before & After by Jenna Burger Design, www.jennaburger.com

On the back wall, I added another hook for the Bona mop (1 of 6 ways I make my home feel instantly clean!) and the space between the washer and dryer, sits the clothing rack.  Lastly, on the right wall is another hook for the broom.  (there is still space above that I am sure will be filled soon).

LAUNDRY ROOM (closet) REVAMP in one weekend!  New paint, More storage, and Pops of color!  All for about $150.  This laundry "closet" is now 100% functional & pretty on the eyes.  Before & After by Jenna Burger Design, www.jennaburger.com

The “pretty” for this space was added in the Float art print (love the colors & the whimsy of the woman floating in the water) that I added to the back wall which kind of hides the ugly plumbing cords, as well as the colorful hangers I snagged from Target.  I love how the citrine color looks with the mint hues.

LAUNDRY ROOM (closet) REVAMP in one weekend!  New paint, More storage, and Pops of color!  All for about $150.  This laundry "closet" is now 100% functional & pretty on the eyes.  Before & After by Jenna Burger Design, www.jennaburger.com

In all, this Laundry Room / Closet revamp was about $200 total.  $30 for the paint (I used a quart) / $80 for the closet components / $20 for the wood / $25 for the wire storage bins / $10 ironing board / $8 iron holder / $5 for the hooks (broom & mop I had).

One bit of information that I forgot to add is that since this space looks so good, I decided to take the doors off.  Honestly, they were open almost all day, every day and ALWAYS getting in the way.  I took the doors off when I painted the trim and the hallway felt so much larger.  Now that the laundry closet is so much more organized, I actually enjoy looking at it (where before, no way!).  Plus keeping the space open for all to see will keep me more accountable to keep the space looking snazzy clean + organized!  FYI, the hardware is still in place if we ever want to put the doors back.

LAUNDRY ROOM (closet) REVAMP in one weekend!  New paint, More storage, and Pops of color!  All for about $150.  This laundry "closet" is now 100% functional & pretty on the eyes.  Before & After by Jenna Burger Design, www.jennaburger.com

It’s really amazing that this space went from this, to this, in just a few hours…

LAUNDRY ROOM (closet) REVAMP in one weekend!  New paint, More storage, and Pops of color!  All for about $150.  This laundry "closet" is now 100% functional & pretty on the eyes.  Before & After by Jenna Burger Design, www.jennaburger.com

DETAILS.

> PAINT: HGTV Sherwin Williams Mint To Be (Lowe’s)

> SHELVING: Rubbermaid closet system – hanging rail, uprights, brackets, 12″ white wire shelves / Wood – 1″ x 12″ x 4′ length

> WIRE BIN (top shelf): Antique Grey Iron Basket (Lowe’s)

> FABRIC BIN WITH LABEL: Closetmaid Fabric Bin (Target)

> IRONING BOARD: Countertop Ironing Board (Target)

> IRON HOLDER: Plastic Iron & Board Holder (Amazon)

> ART: Float art print (Minted)

> HANGERS: Room Essentials 18 pack hangers, yellow (Target)

And there you have it.  It’s amazing what a bit of paint + a little TLC can do.  Small changes + Little Money can really make a BIG IMPACT!

I’m off to do some more laundry…

THIS IS A SPONSORED POST BY LOWE’S.   I REACHED OUT TO THEM ABOUT THIS PROJECT AND THEY CHOSE TO WORK WITH ME ON THIS LAUNDRY REVAMP. I HAVE BEEN PROVIDED WITH PRODUCT FOR THIS PROJECT, BUT AS ALWAYS I WAS NOT TOLD WHAT TO BUY OR WHAT TO WRITE.

A Not-So-Lavish Laundry Room

This past weekend was a busy one at the ole’ homestead!  From exterior work on the garden to shuffling kids to various sports activities, it was non-stop.  And when we did have a few minutes of “down time”, we started a new project inside…

It’s a horrid-looking space that has been a catch-all for stuff for way too long.  Well I should say, was a catch-all because in just a few hours this space I am referring to got a complete new revamp and I am over-the-hill happy!  What space am I referring to?

THE LAUNDRY!

Honestly, I use the word ‘space’ because it’s not at all a room… I wish!  Our laundry area is essentially a closet. A small closet.  A small closet that holds a lot and until now was completely disorganized + a complete MESS.

I dread sharing this, but here WAS (that’s an important word, WAS) the before…

A not-so-lavish laundry room: The Before

Gutsy, huh?!  Yup, no holding back here. My goodness, I can’t believe I just shared that picture.  And you thought all the spaces in my home were beautiful at all times… NOT!

This laundry closet (it’s literally a closet that is 4′-6″ wide) is just off the foyer.  Across from it is the coat closet / pantry and the hallway leads to the garage.  It’s a tight space that is used a lot, and needed a revamp to be as efficient as possible.  It’s something that has been on my radar for a while and I knew with some TLC, it would shine up like a pretty penny (and it sure did – more on that in a moment).

WHAT THIS LAUNDRY SPACE NEEDED.

> More Storage (big & small) for dishtowels, cleaning supplies, rags, napkins + paper towels, tablecloths, paper goods (paper plates, cups, plastic ware)

> Wall Storage for holding the iron, ironing board, broom, mop

> New Shelving

> New Paint on the walls + trim

> Layers: Pops of color + pictures (to make it pretty)

THE PLAN OF ACTION.

Before tackling this space, I made some quick notes on what was working (not much) + what wasn’t (a lot) + what I needed to store on the new shelves that I planned on installing.

After that, I created a quick creative vision board to help me stay on track for how to best tackle the aesthetics for this laundry revamp…

REVAMPED LAUNDRY ROOM: plan of action for this not-so-lavish laundry room

More specifically, this is what each element in the new space will be used for…

REVAMPED LAUNDRY ROOM: plan of action for this not-so-lavish laundry room

And here’s how it played out in a brief timeline…

FRIDAY AFTERNOON: Removed the existing shelving that was falling apart / Cleaned walls of dust build-up / Patched the 92 holes in the wall

EARLY SATURDAY MORNING: Sanded the walls (the orbital sander took a lot less time than hand sanding – there were a lot of holes!) / Applied the first coat of new paint (love the color!)

SATURDAY AFTERNOON: Applied coat #2 of the paint (and done – YAY)

EARLY SUNDAY MORNING: Installed the top rail for the shelving unit / Installed the shelves (one shelf was wrong so the Mister headed back to Lowe’s for trip #2) / Started organizing

SUNDAY NIGHT: Finished organizing the shelves with some old + some new baskets & bins

* this makeover certainly could have been tackled in one day, but with our hectic lives, nothing ever gets accomplished that quickly.

A few sneak peek progress pictures…

REVAMPED LAUNDRY ROOM: progress images for this not-so-lavish laundry room

For a gal that dreads laundry day (which seems like every day of the week with my clan of 5), I have to admit that for the last 2 days, it hasn’t been so bad.  I am LOVING my newly revamped laundry ‘closet’ and even though it still isn’t so lavish it certainly is 1,000,000 times better than it was.

The AFTER coming tomorrow.  Brace Yourself!


Front Door: New Style + New Color

Typically I can choose a paint color within minutes.  Rarely do I sit, ponder, question, and debate.  But my wham-bam-paint-color-decision-making streak is over since I had the most difficult dilemma choosing a color for our new front door.

Choosing a new paint color for the front door

Late last year we said farewell to our solid front door and in it’s place we welcomed a new beauty that now fills our foyer with lots of light all year round!  The door arrived primed in a drear barn red hue.  At the time of installation, it was too chilly outside to paint, so for 6 months it stayed as is. When the temps finally got above 50 degrees about 2 weeks ago (even though we had snowshowers last week – #forreal), it was finally time to give life to our new addition.

I was so excited to give a splash of color to our entryway, but I could not for the life of me choose a color…  What color would suit our home best – inside and out?…  Turquoise? Coral? Red? Navy? Yellow? Apple Green?

Inspiration + color swatches filled my world for days…

Front Door-012

Then one moment I had a revelation.  I finally chose a color.

Taking into account the other colors on the porch + tying in the colors inside of our home to make a cohesive thread, I chose…

My tried & true APPLE GREEN!

New paint color on the front door: Valspar Crushed Oregano

It may be a surprising choice because I like change & am continually making updates to our home with new colors + new layers.  For years our front door was apple green and with a new door, you would probably think, choice a new color.  Many of you said hues of blue would be your color of choice, which I love too, but in the end the apple green, pistachio hue was me.  This color is just who I am – bold, vibrant, surprising.  All the other colors that I oh-so-badly photoshopped on our front door (take a look at this post to see the other colors I considered), would have looked great too, but this green color just made the most sense.

Take a look…

New paint color on the front door: Valspar Crushed Oregano

The color is a bit different than the previous apple green colored front door.  This time I chose the color Valspar Crushed Oregano 6000-6C in a semi-gloss finish.

New paint color on the front door: Valspar Crushed Oregano

New paint color on the front door: Valspar Crushed Oregano

I’ll tell you, with the glass, this front door took a bit more time to paint.

Using painters tape @ the edge, I covered all the glass…

New paint color on the front door: Valspar Crushed Oregano

Then used an angled brush to apply the paint.  No roller for this small job…

New paint color on the front door: Valspar Crushed Oregano

New paint color on the front door: Valspar Crushed Oregano

About 3 coats later, the door was complete and the result from before to after was huge!

New paint color on the front door: Valspar Crushed Oregano

What a simple + fast weekend (it really can be done in one day) project to give new life to the entry of your home!   Choosing a color that expresses you, your style, and your interior can truly set the stage for what’s to come on the inside.

I am so happy that I went back to my original inspiration to guide me to make the decision that I feel fits best with our home…

Green Door Inspiration

Now that the color is set, I’ve got some work to do to spruce up this porch for Spring!  More on that coming soon…