
Tag: saratoga springs interior design firm

How-to Prep + Season a New Chalkboard Wall

It’s August – WOW!  Where has the Summer gone?!  Obviously for me with a newborn (+ 2 older kids), it’s been a busy few weeks, but I just can’t believe the days are passing by so quickly.  For some of you back to school is only a few short days away.  For us, school doesn’t start till after Labor Day so we get to enjoy few more weeks of late mornings, lazy days, and soaking up the sun!

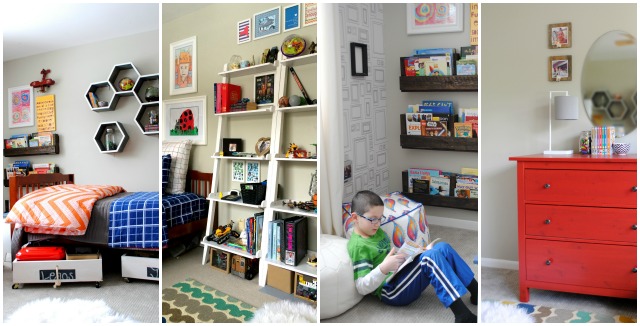
Since I have 3 kids now, lately I’ve been trying to be overly organized and prepared.  Thinking + prepping ahead of time is my M.O.  With back to school around the corner, Lowe’s put the Creative Team to the challenge to create something that would be appropriate for the jump back to the classroom.  Since I’ll now have 2 in elementary school – yikes – I started thinking about what my kids will need to do to get up & moving in the mornings!  Outside of the bedrooms + hall bath is a small space that I thought would be perfect for something.  After some thought, I decided on creating a chalkboard wall {which makes 3 in the house…  you can never have enough wall to write on – the other 2 chalkboard walls are in the basement and at our family central command center}.  It was the perfect idea since they’re fun & easy to update.

Back to School chalkboard wall

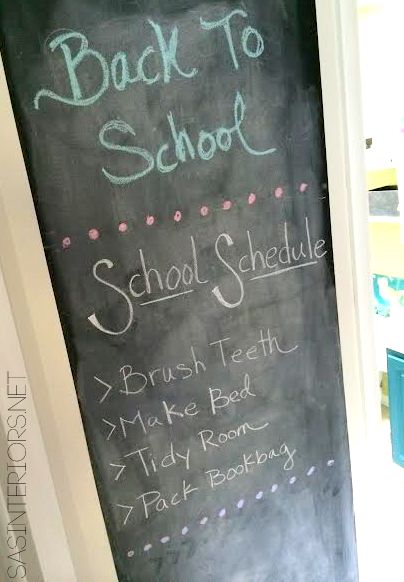
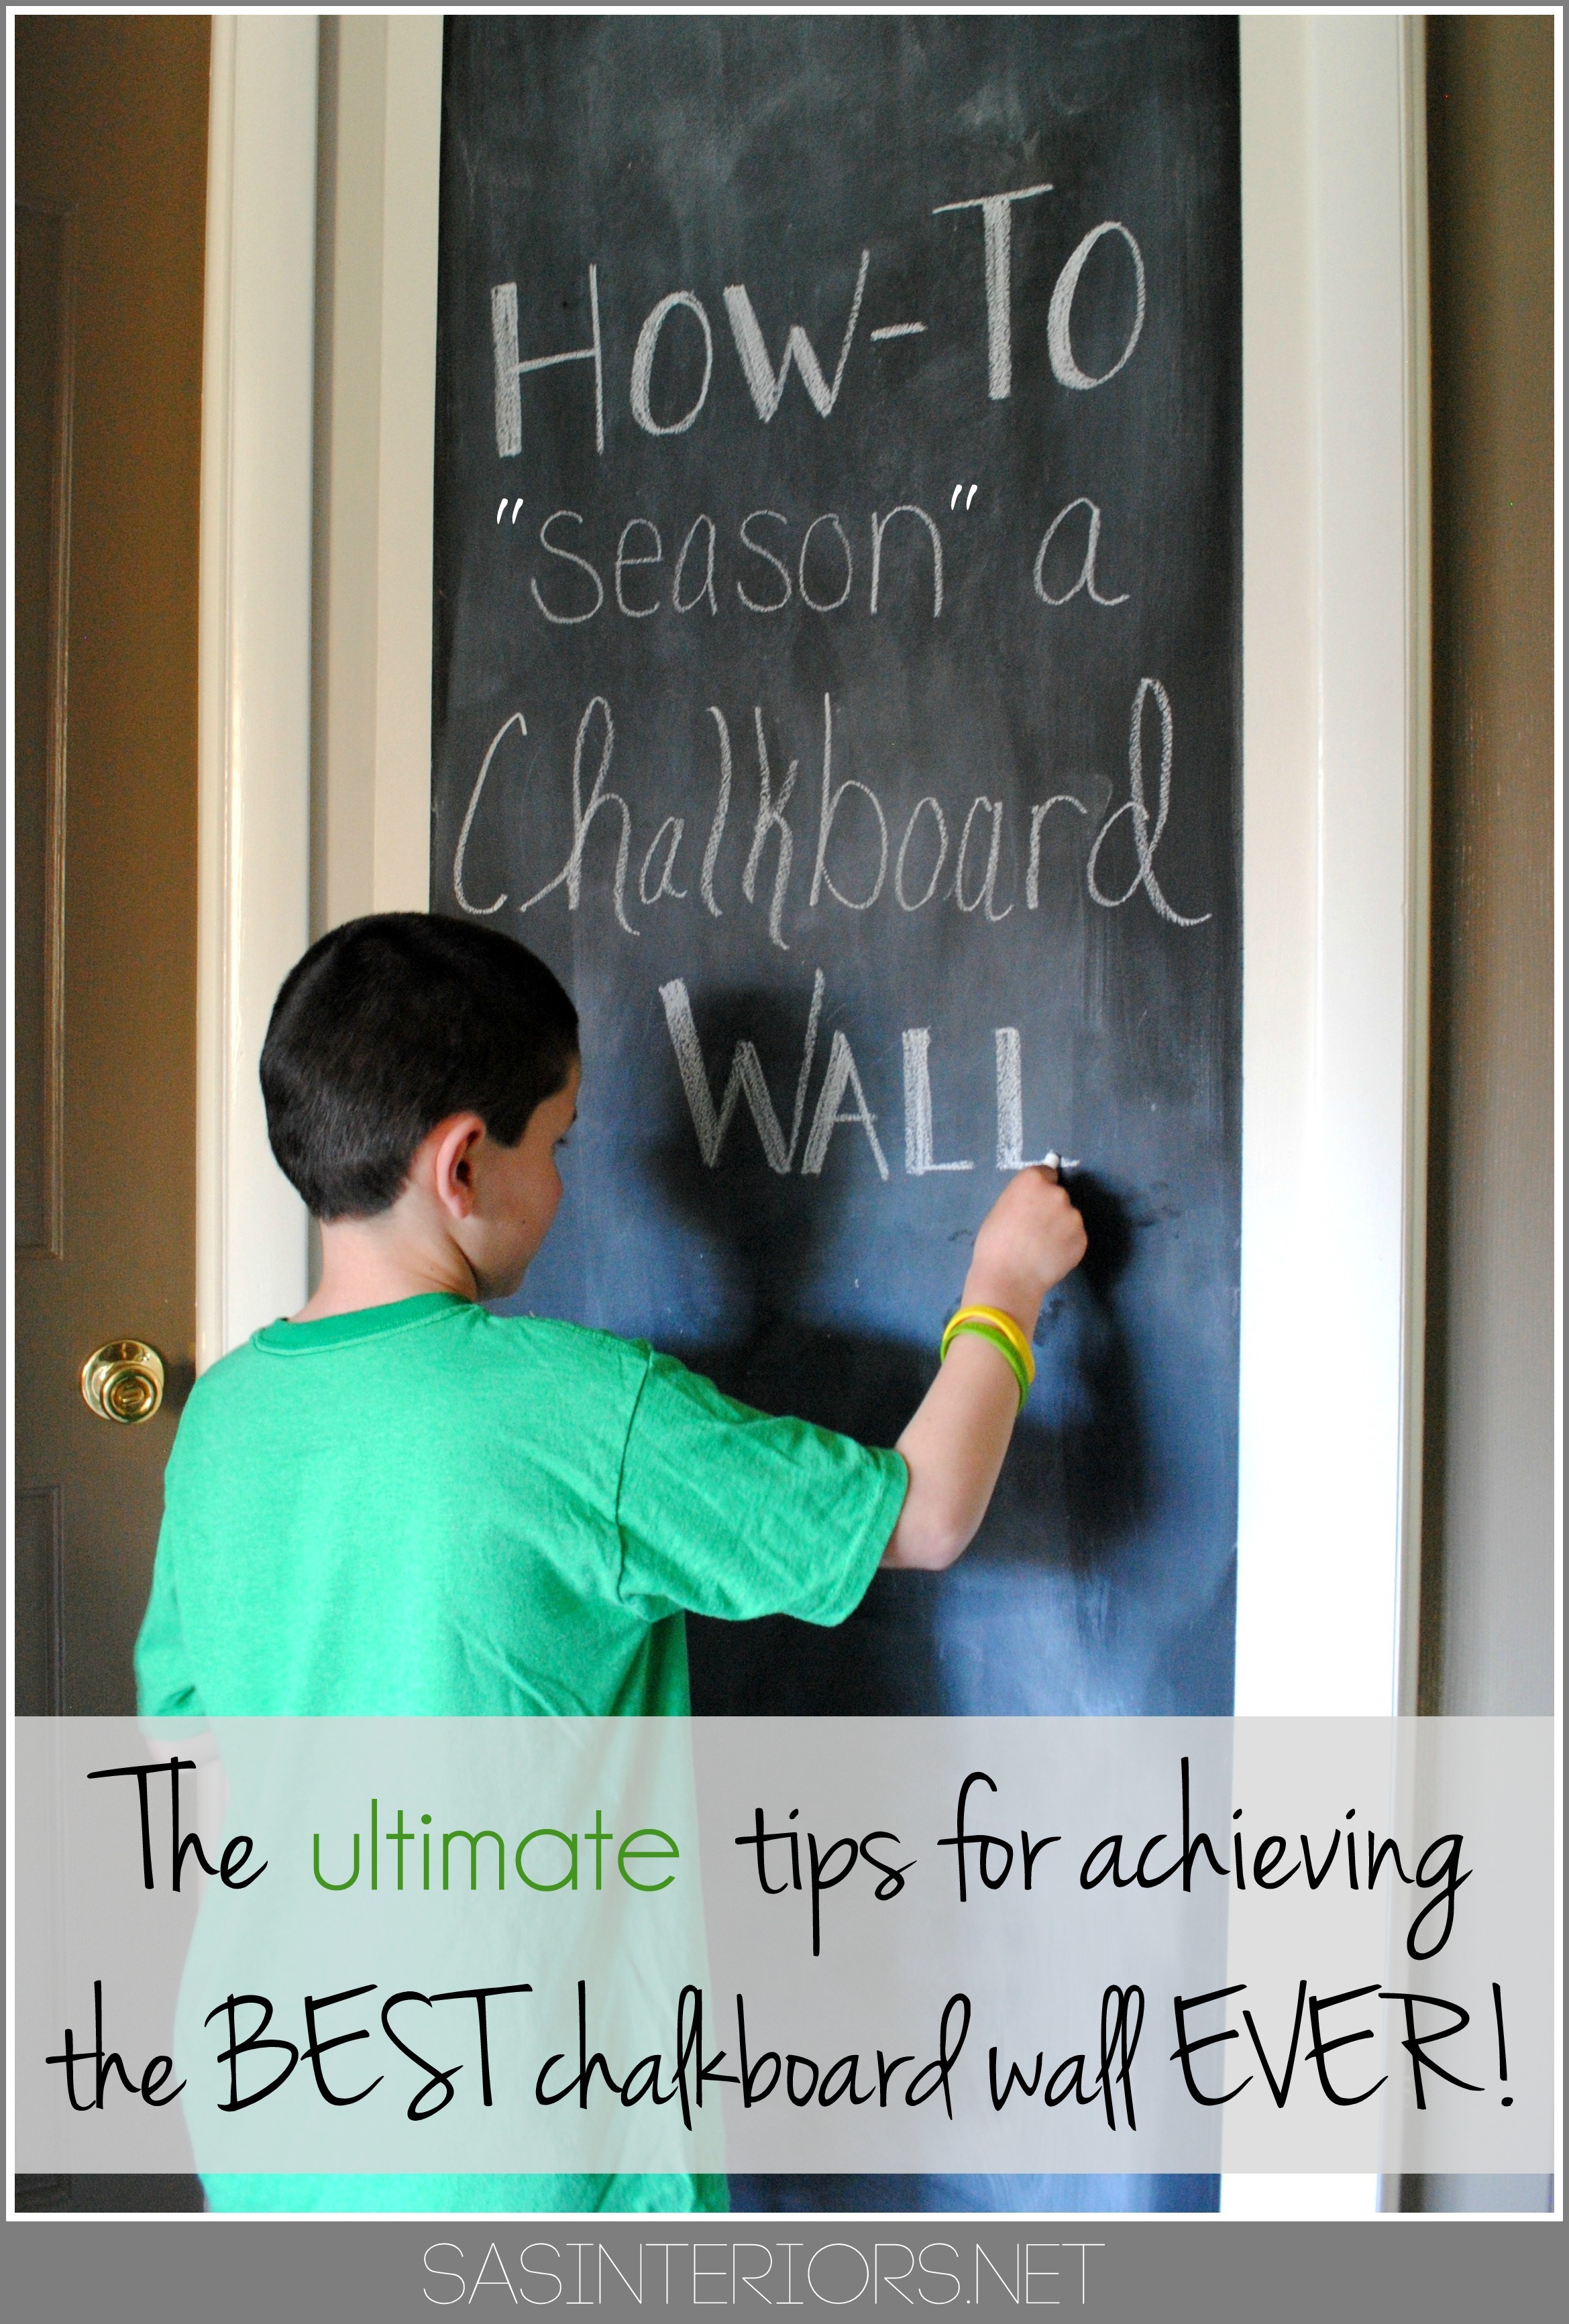
Since this is our 3rd writable wall for chalk, I though I would share a few tips + tricks that I’ve learned along the way.  Here is the ultimate + best way to PREP & SEASON a new chalkboard wall.

How-To PREP + 'SEASON' a Chalkboard Wall before using it. It's the ultimate + best way to get the most out of a new creative palette!

The Prep

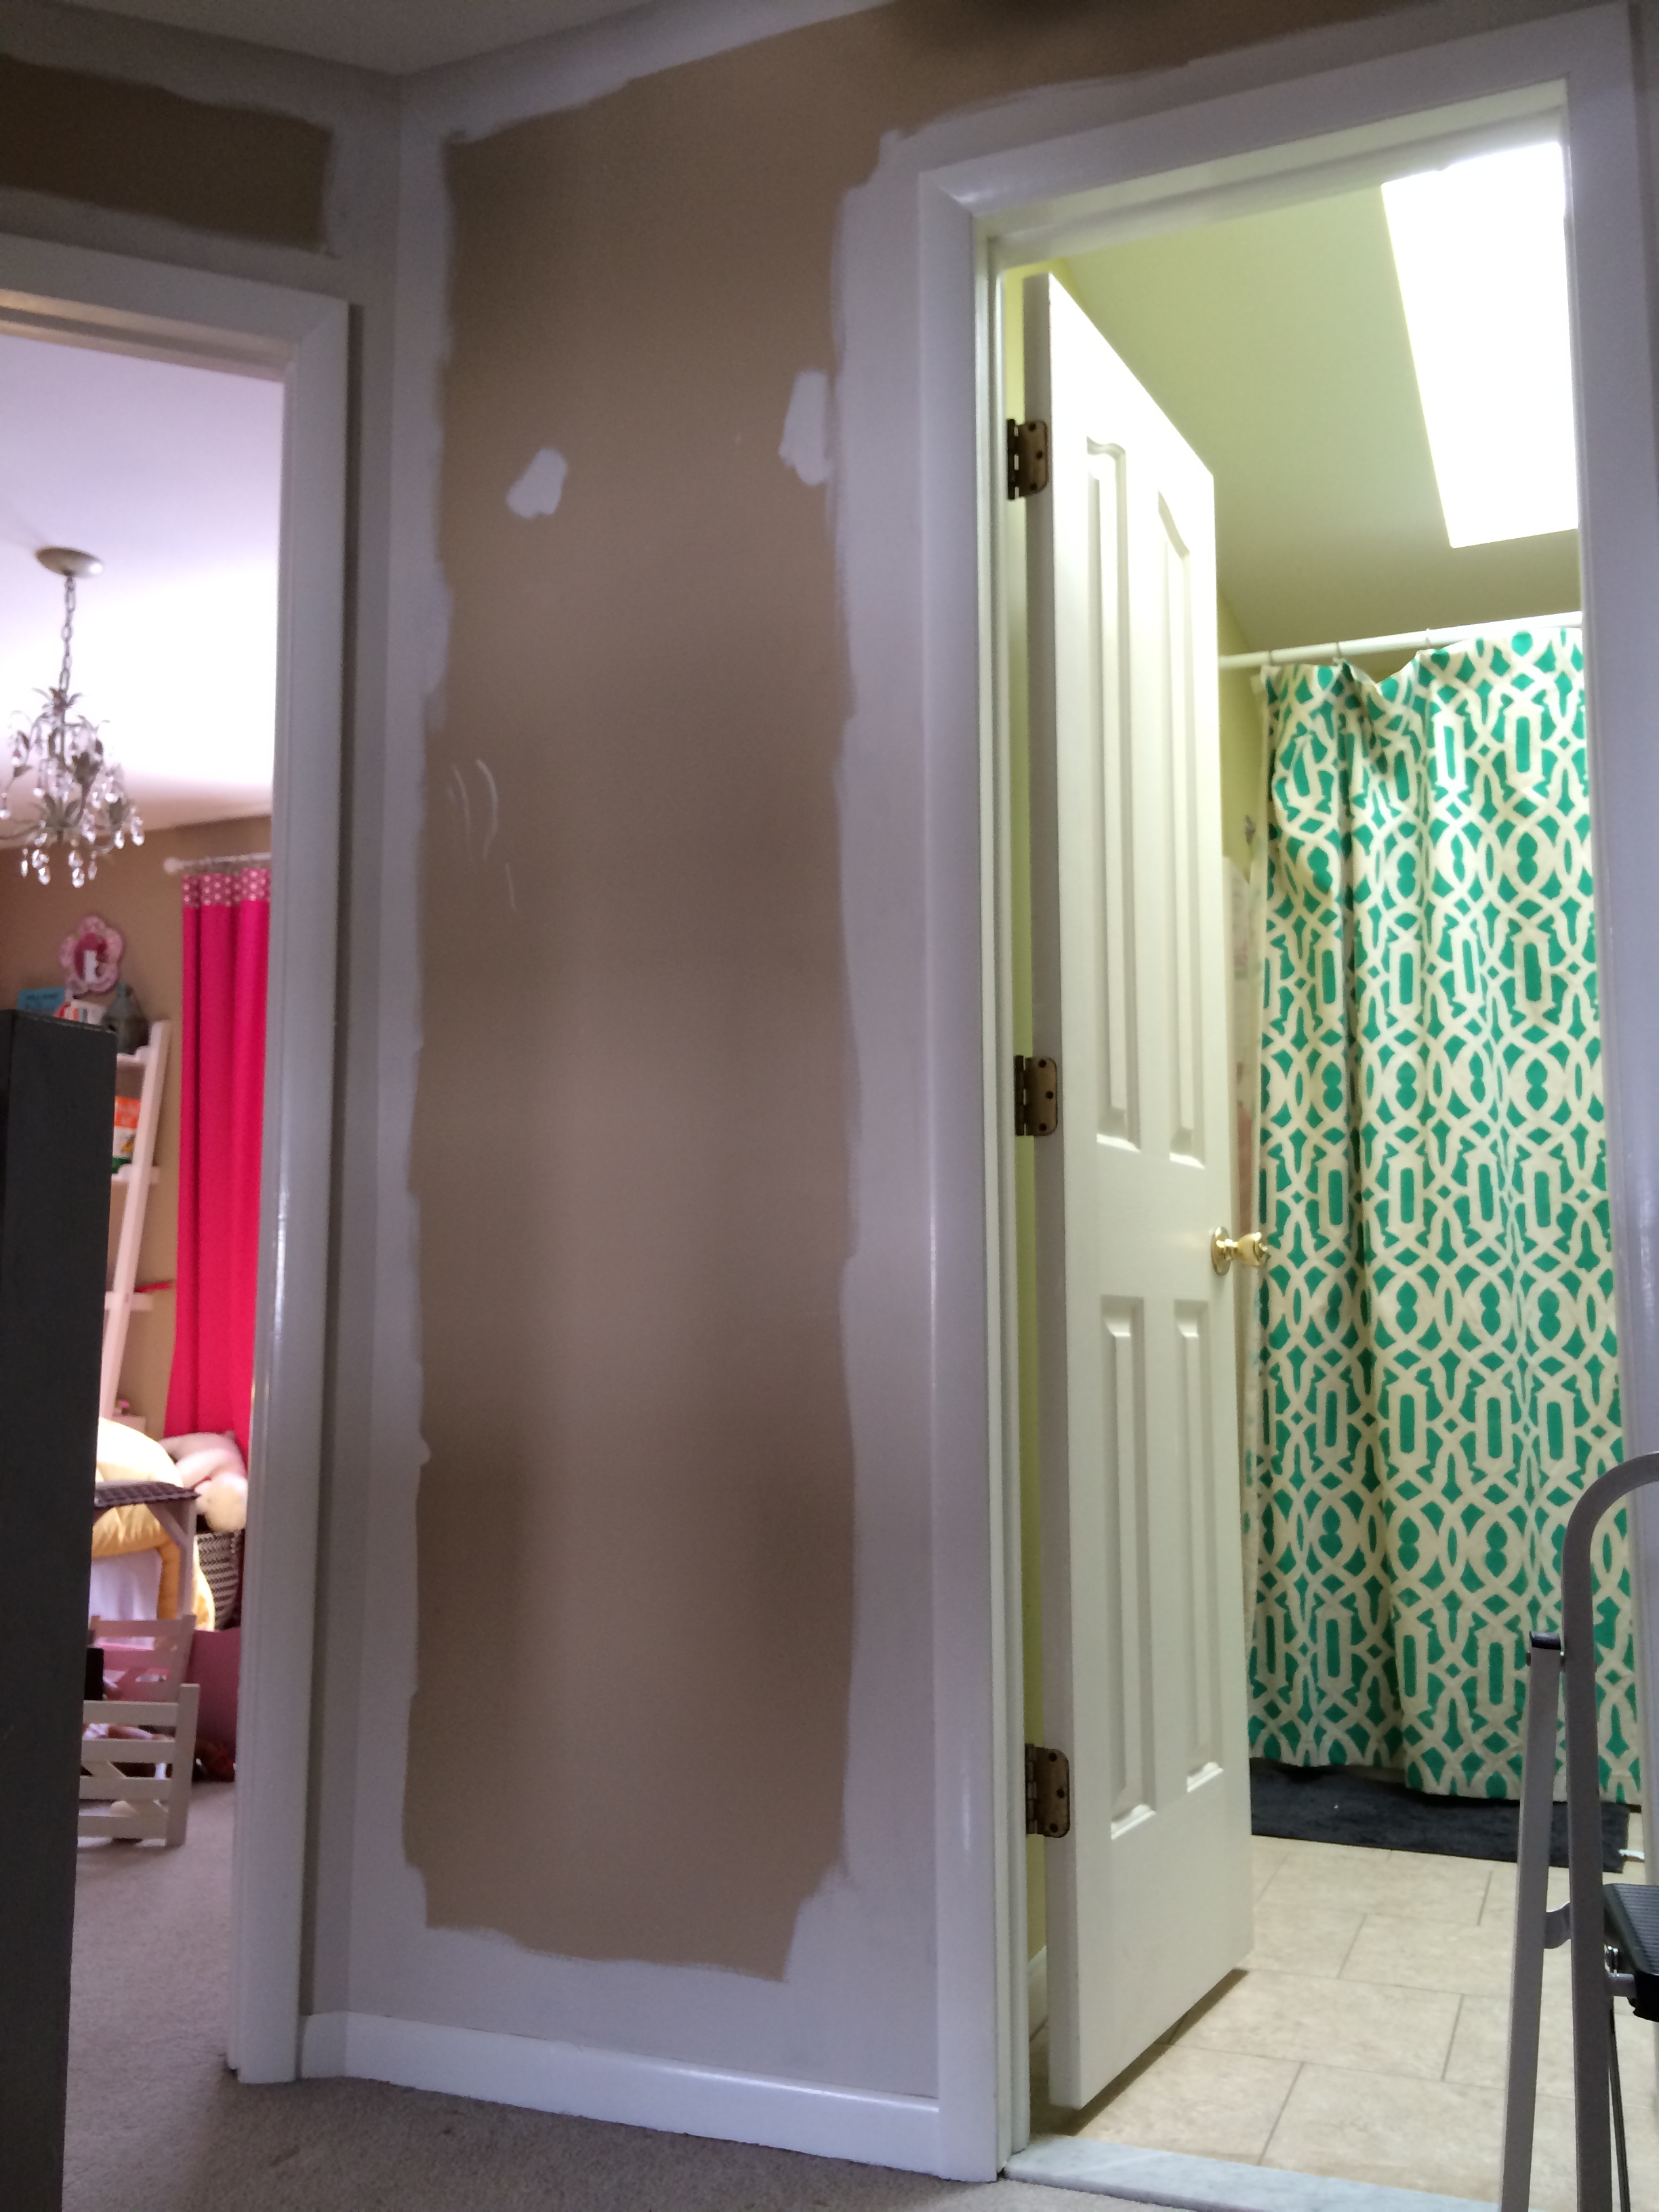
To start off, I chose to give the upstairs hallway a fresh new coat of paint.  The color ‘before’ was the same as the foyer before it got striped.  It was way too beige for my current taste, so I chose a lighter + brighter feel.

How-To PREP + 'SEASON' a Chalkboard Wall before using it. It's the ultimate + best way to get the most out of a new creative palette!
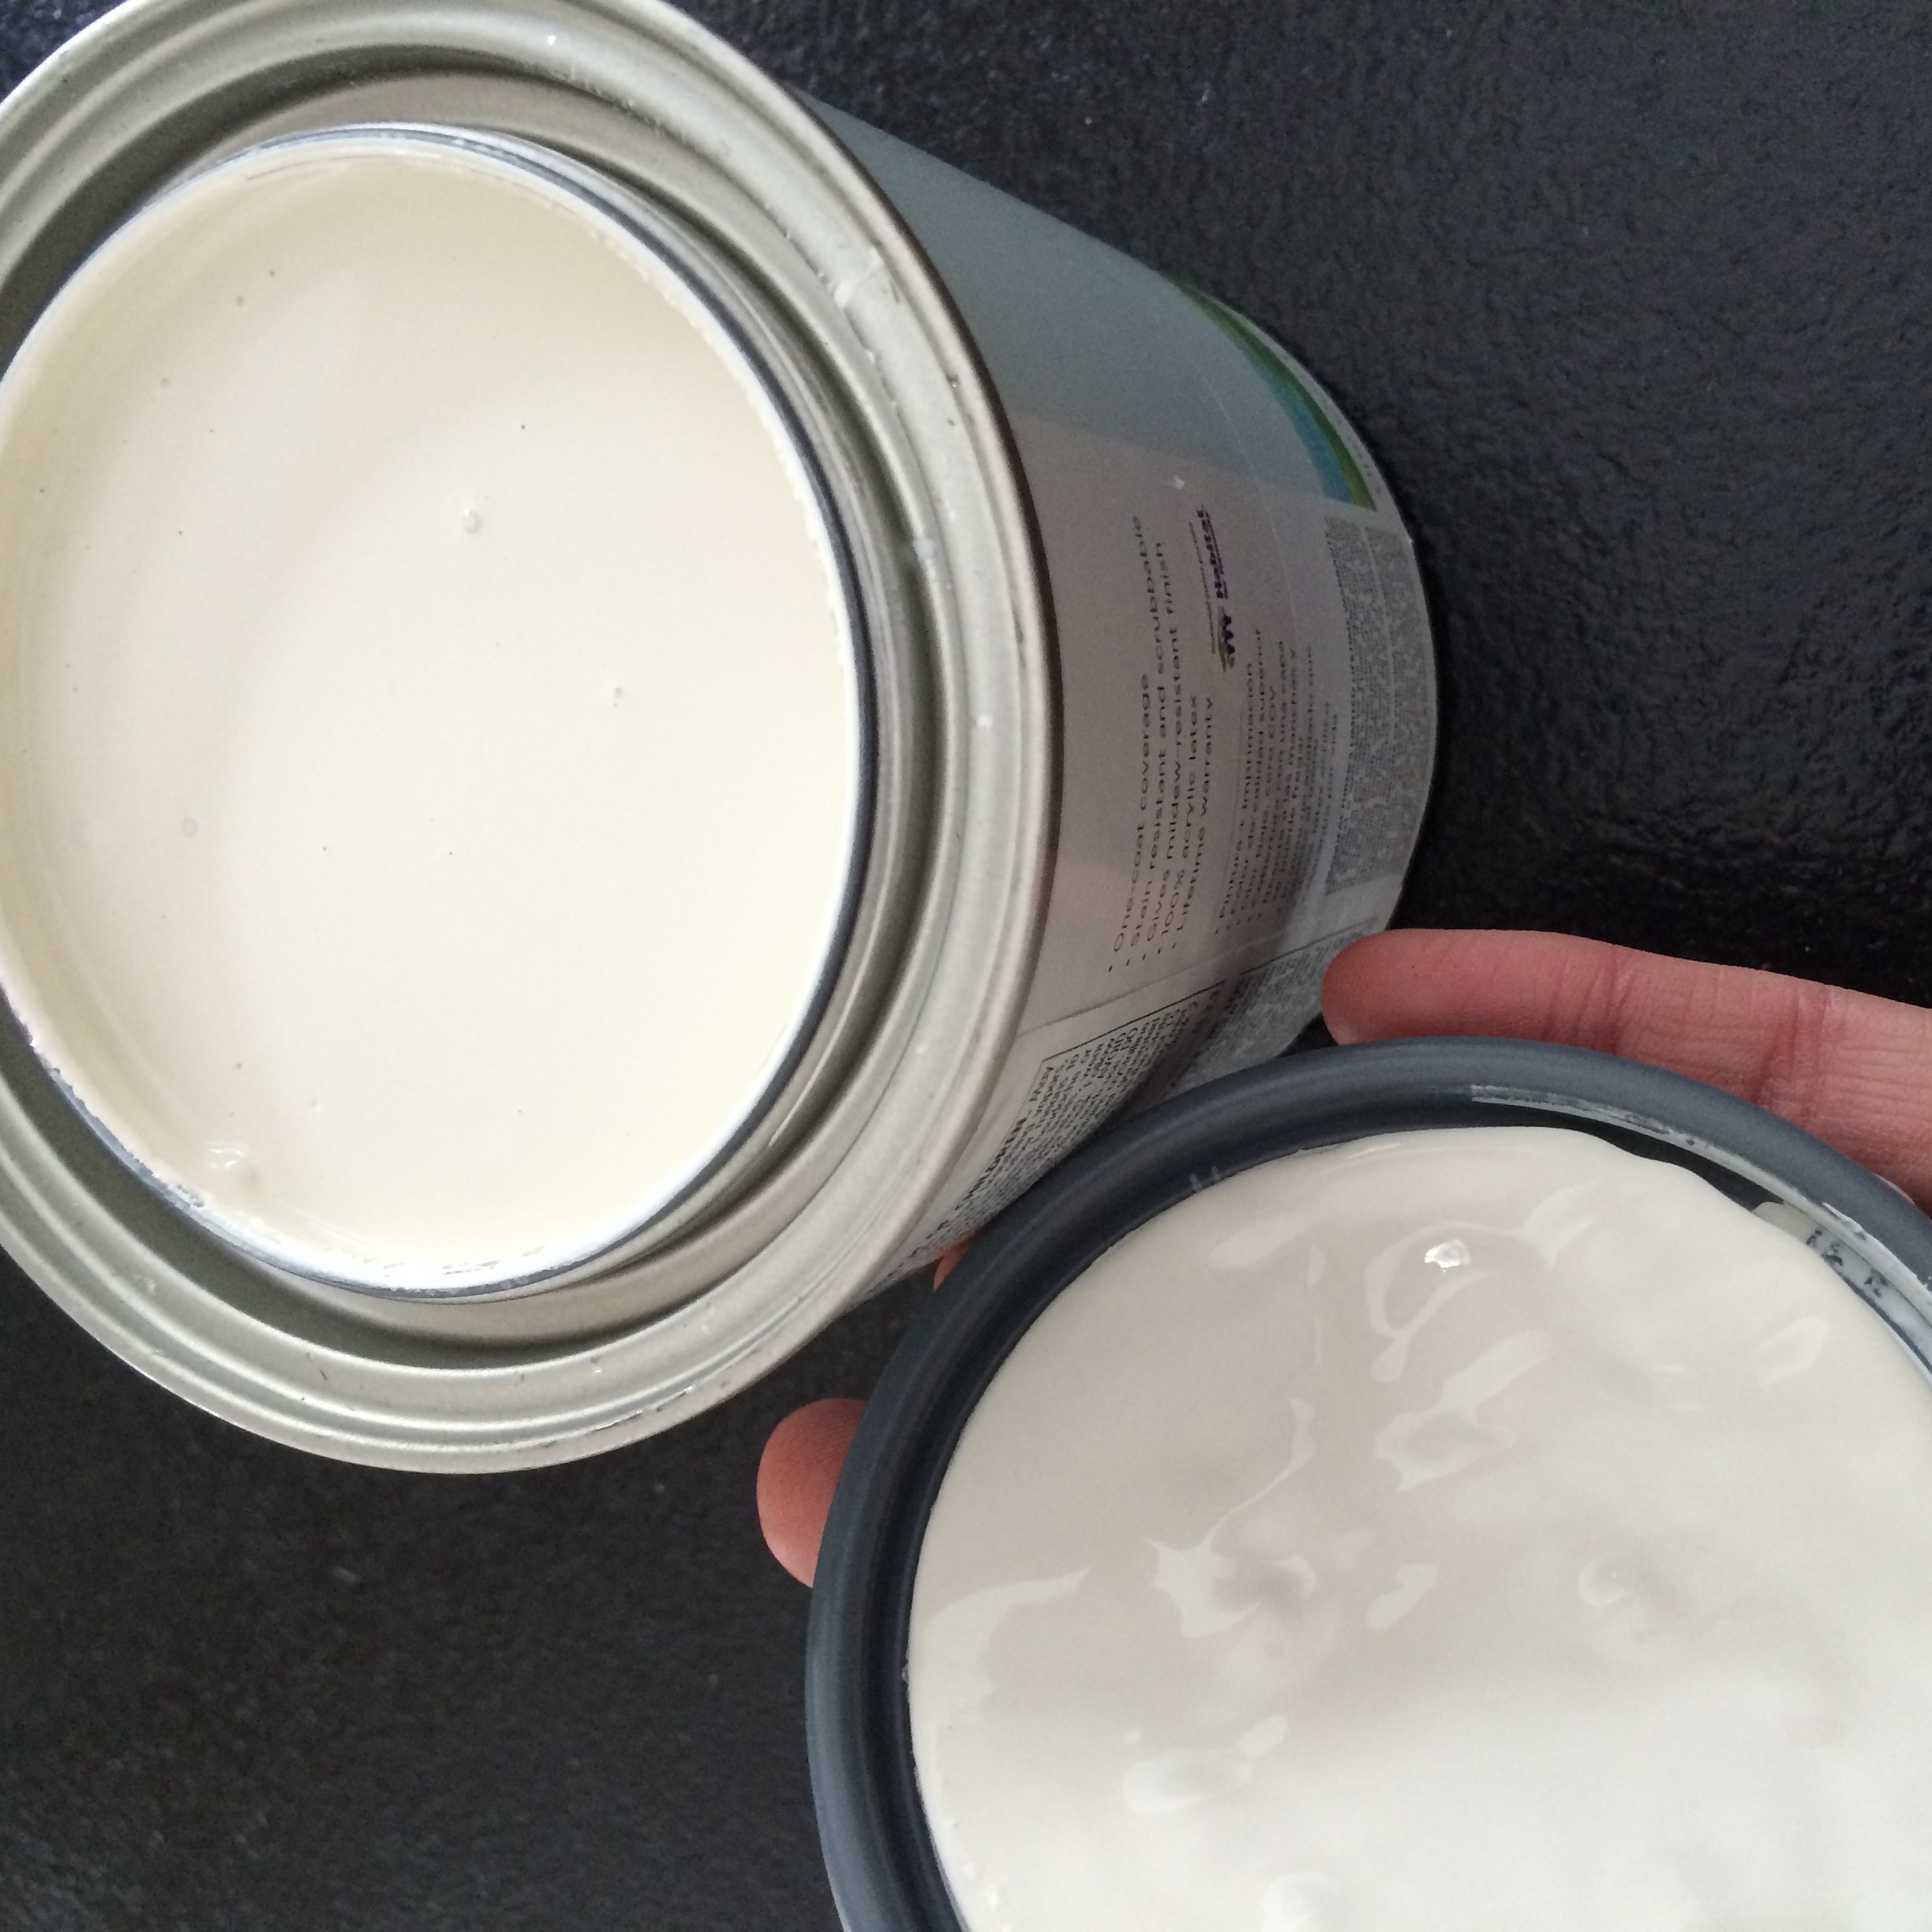
The new hallway color: Benjamin Moore Plaster of Paris (I used Valspar paint, which Lowe’s color matched for me)

Once the walls were done, which took no time at all since the space is small,  the area for my new chalkboard wall was ready to start.  I didn’t bother painting the space where the chalkboard wall was going because that would have just been a waste of time + paint, so I left that the old color.

How-To PREP + 'SEASON' a Chalkboard Wall before using it. It's the ultimate + best way to get the most out of a new creative palette!

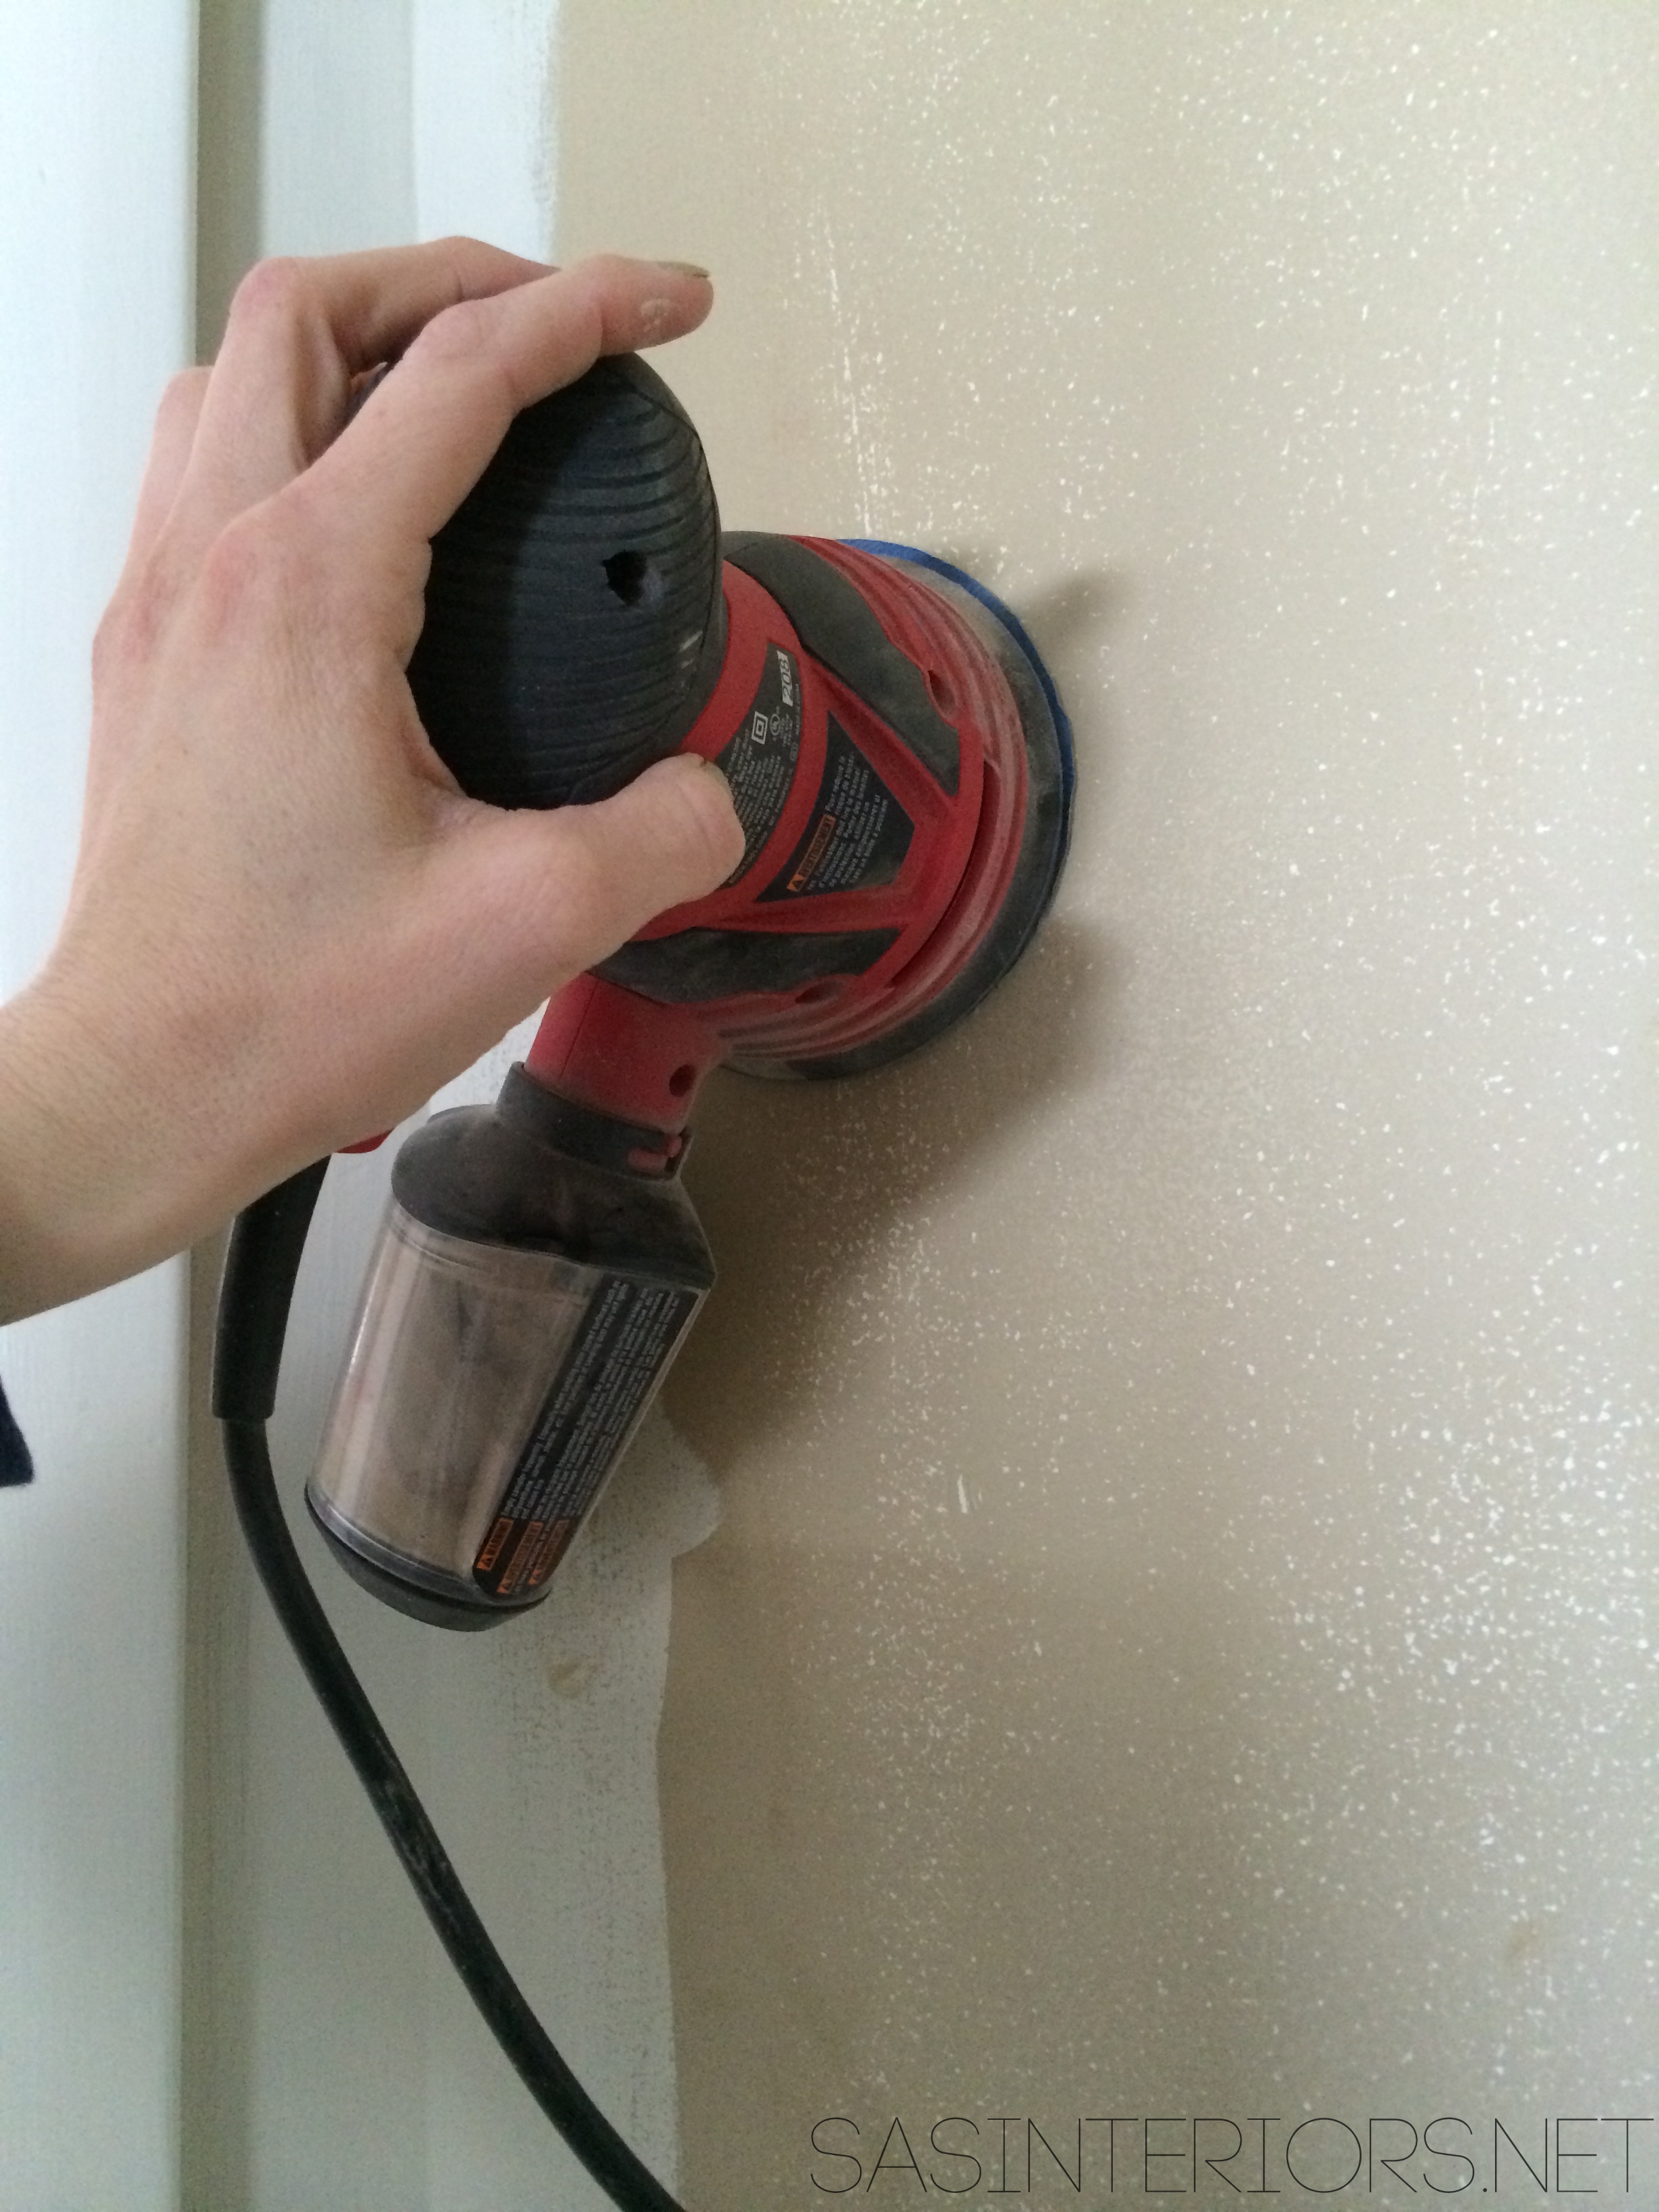
> Tip #1: Sand to Create the Best Chalkboard Wall Surface

You Must Sand the wall!  Typical chalkboard is super smooth – no bumps, no lumps. So the wall needs to be as smooth as possible so the chalk will adhere well & so it will erase well.

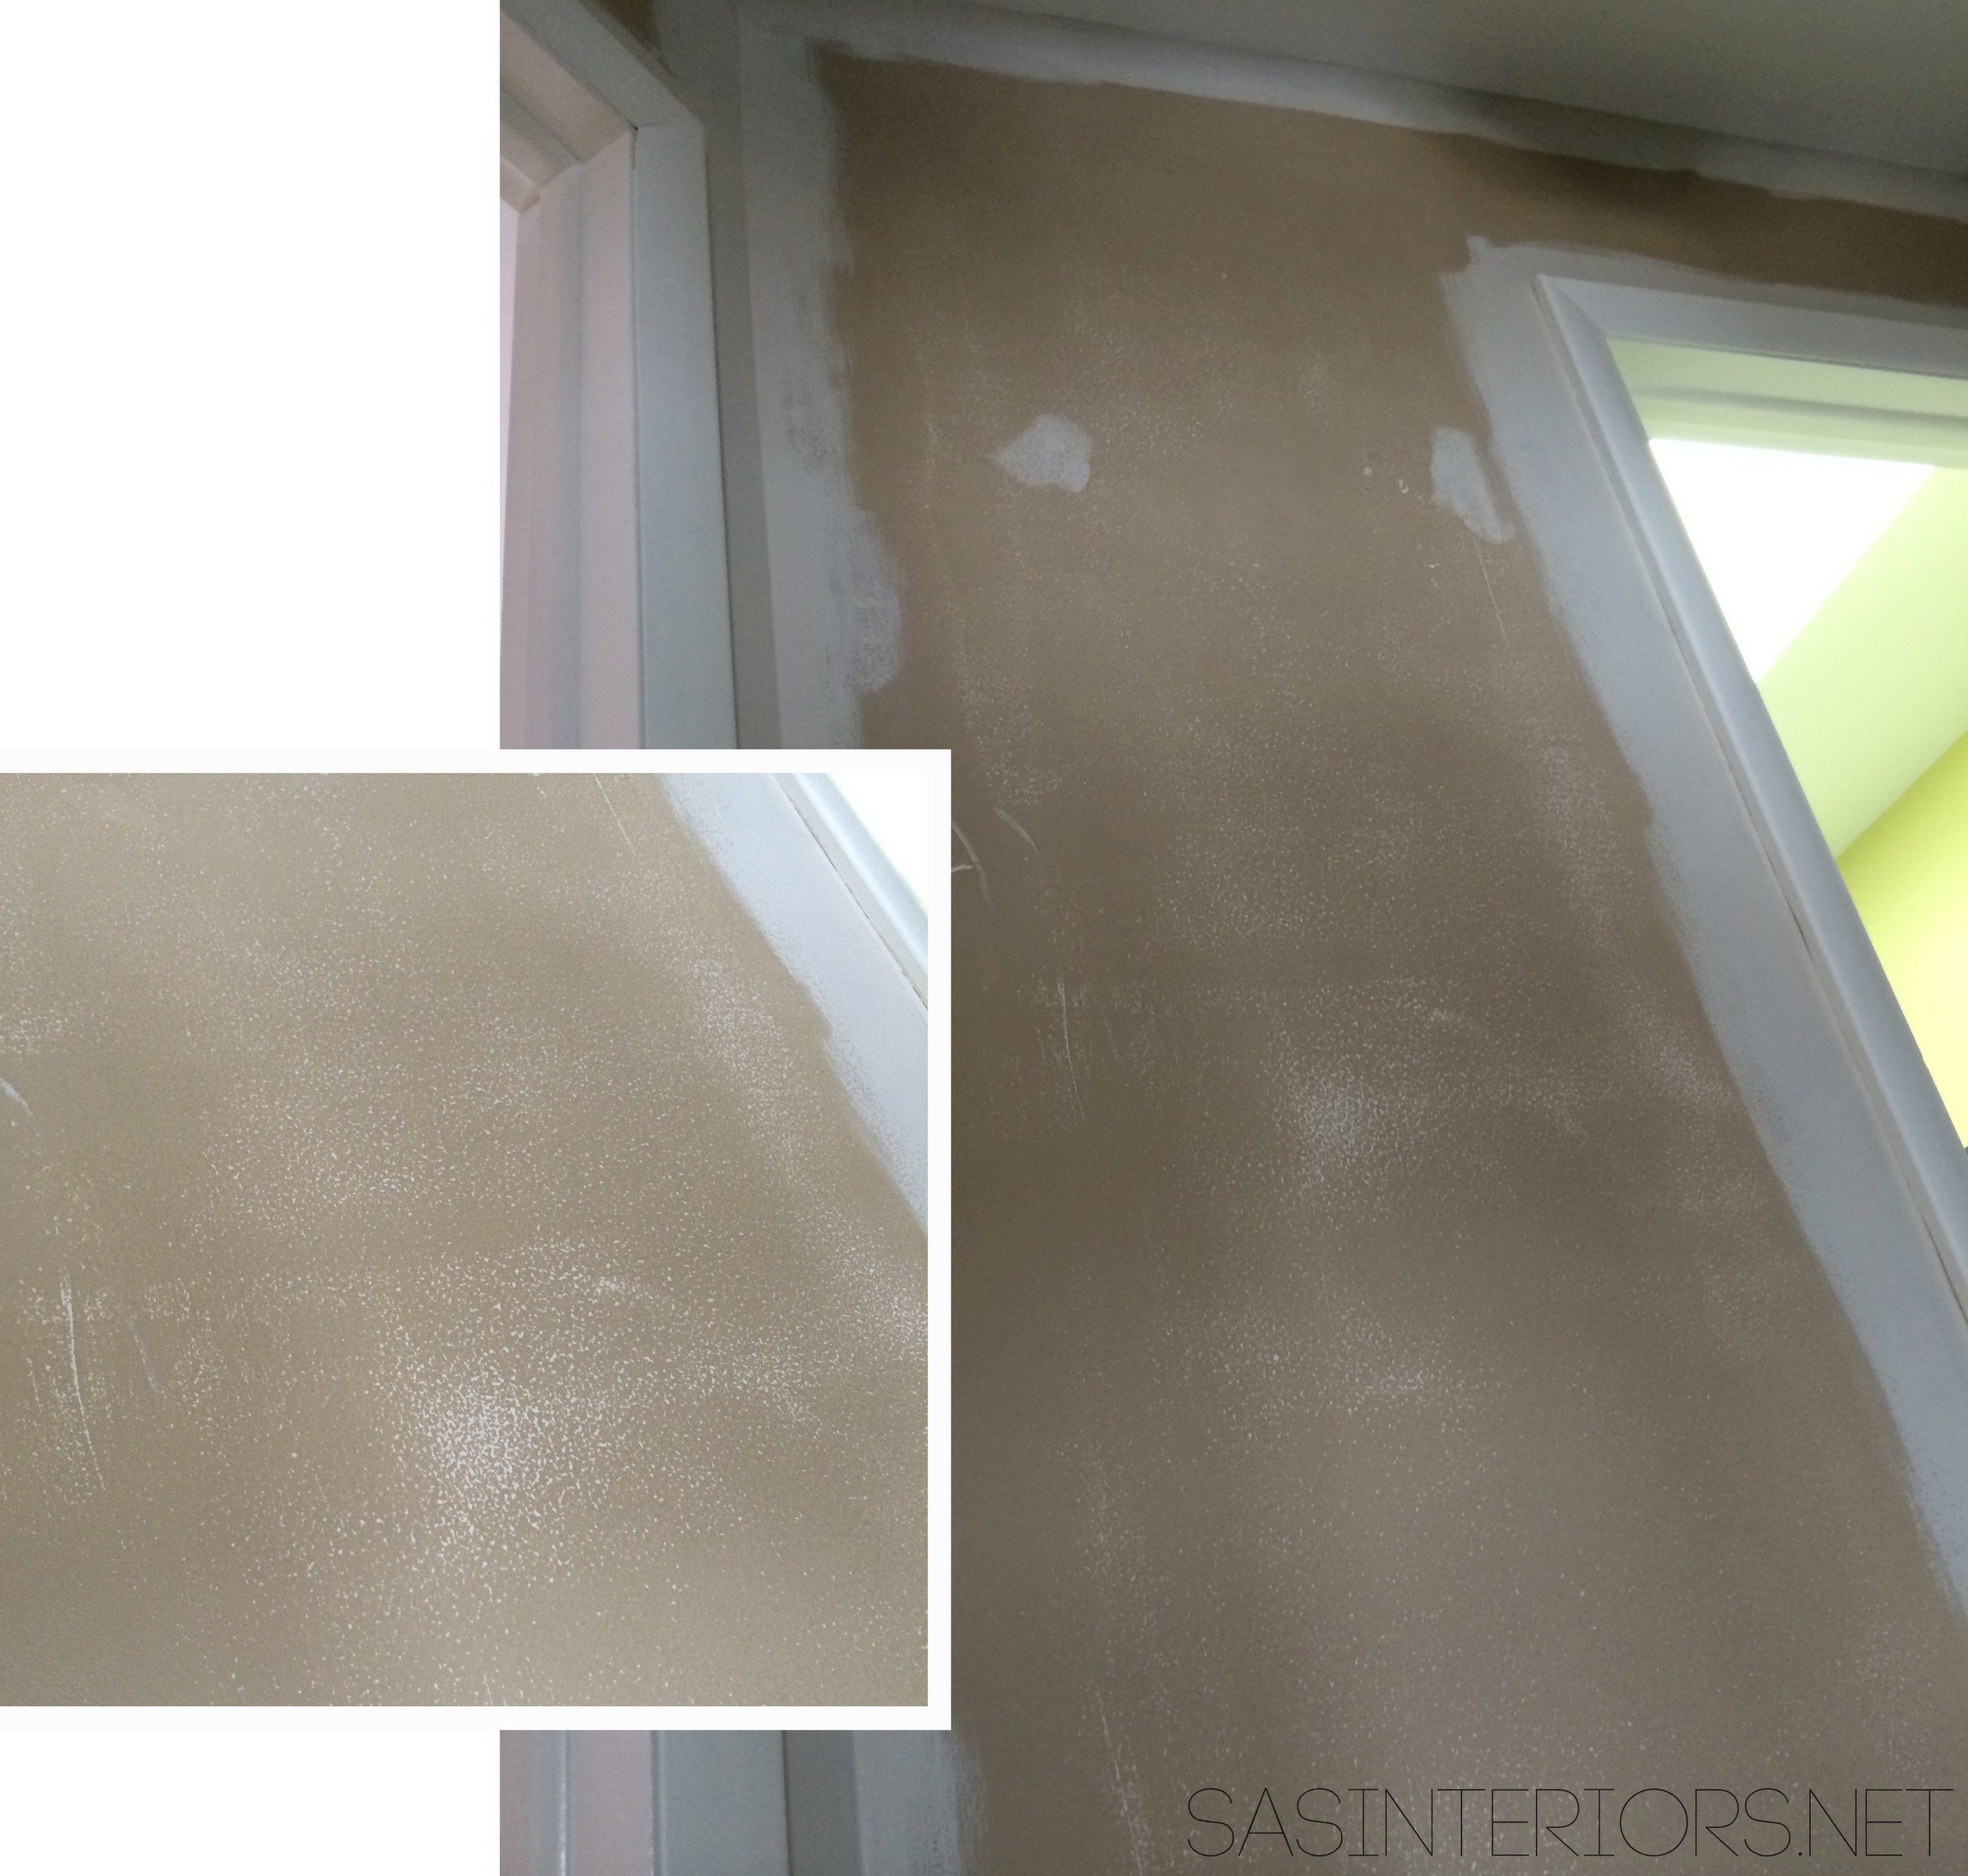
Using my favorite go-to tool, my orbital sander, I gave the entire wall a really good sanding.  This wall is a typical sheetrock wall with NO extra textural details, but it was amazing how “bumpy” it was.  You can see from the picture below after only a few minutes of sanding, how many “bumps” were smoothed out using the sander.  Once the surface was fairly smooth, it was done.  It wasn’t 100% bump-free, but it was much better than before.

Overall, this step took about 8-10 minutes and I do recommend a hand sander versus sanding by hand.  Your arm will ache if you go that route.

How-To PREP + 'SEASON' a Chalkboard Wall before using it. It's the ultimate + best way to get the most out of a new creative palette!

How-To PREP + 'SEASON' a Chalkboard Wall before using it. It's the ultimate + best way to get the most out of a new creative palette!

Once the sanding was complete, it was time to paint.  Before that though, I chose to add a border edge around my new chalkboard surface, similar to what I did for our Central Command Center.  I felt adding this edge would give the wall a cleaner, more finished/polished look.

Using 1″ wide painters tape, I added a 2″ border on all 4 sides…

How-To PREP + 'SEASON' a Chalkboard Wall before using it. It's the ultimate + best way to get the most out of a new creative palette!For a more thorough tutorial on creating a border, check out my post on How-To Create a Framed Chalkboard Wall

Once the border was done, it was time to get my paint-on!

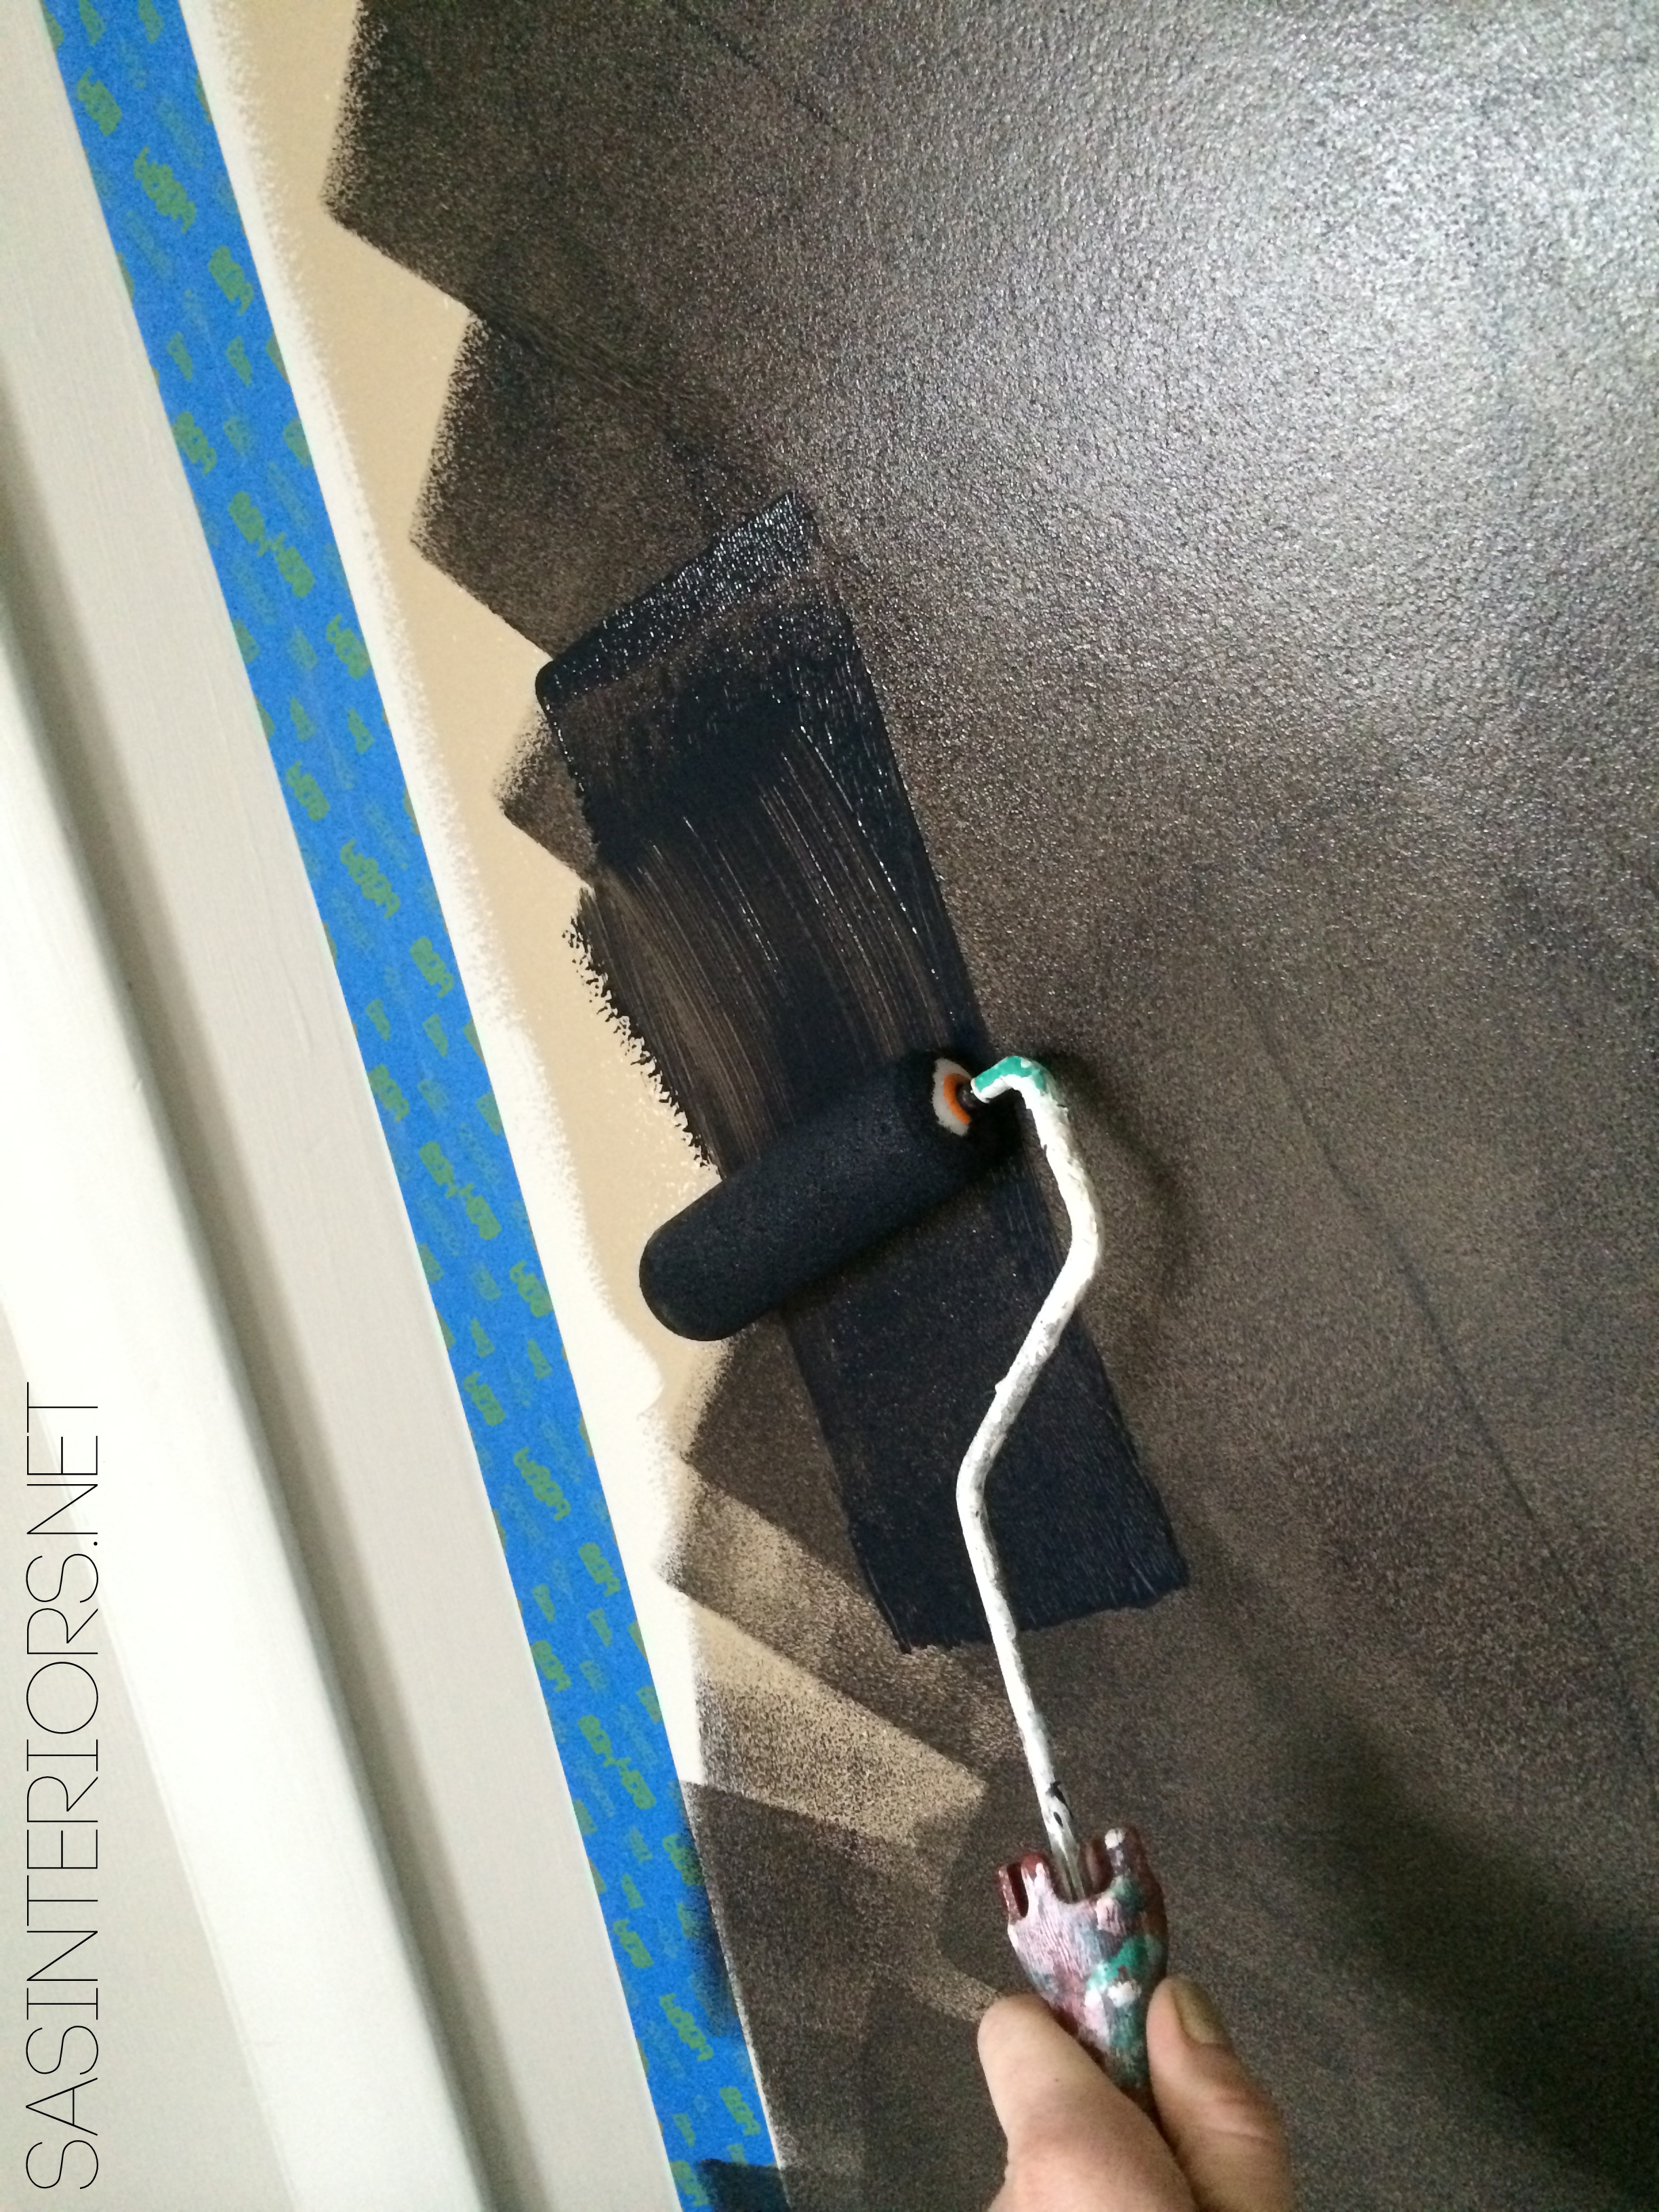
> Tip #2: Use a Roller for a Smooth Finish

Using a roller instead of a brush will get a much smoother finish.  It’s also key to apply multiple light coats of chalk paint instead of 1-2 thicker coats.

Roll on the paint and smooth it out as much as possible by painting in all different directions.  You want to be sure to avoid any streaks or lumps on the wall.

Overall, unlike typical wall paint which takes 2 coats, I did 4-5 light coats.  It dries quickly, so there wasn’t too much downtime between coats.

How-To PREP + 'SEASON' a Chalkboard Wall before using it. It's the ultimate + best way to get the most out of a new creative palette!

This is what I used…

When the last coat was applied, I immediately removed the painters tape.  By removing it when the paint is still wet will allow it to peel off the wall easier rather than when it’s dry.

Time to ‘Season’

The chalk paint is typically dry a few days after your last coat, but be sure to read the product instructions on the exact drying time before moving forward.  Once you’re good to go, it’s time to ‘season’ the newly created chalkboard wall.  I had previously never done this step and it really makes a BIG DIFFERENCE for how the chalkboard wall wears & erases.

Basically there is one easy + fast step…

1. Using the side of a piece of chalk, roll it on the entire surface of the chalkboard wall.

2. Then erase it away.

So simple, but So important!

How-To PREP + 'SEASON' a Chalkboard Wall before using it. It's the ultimate + best way to get the most out of a new creative palette!

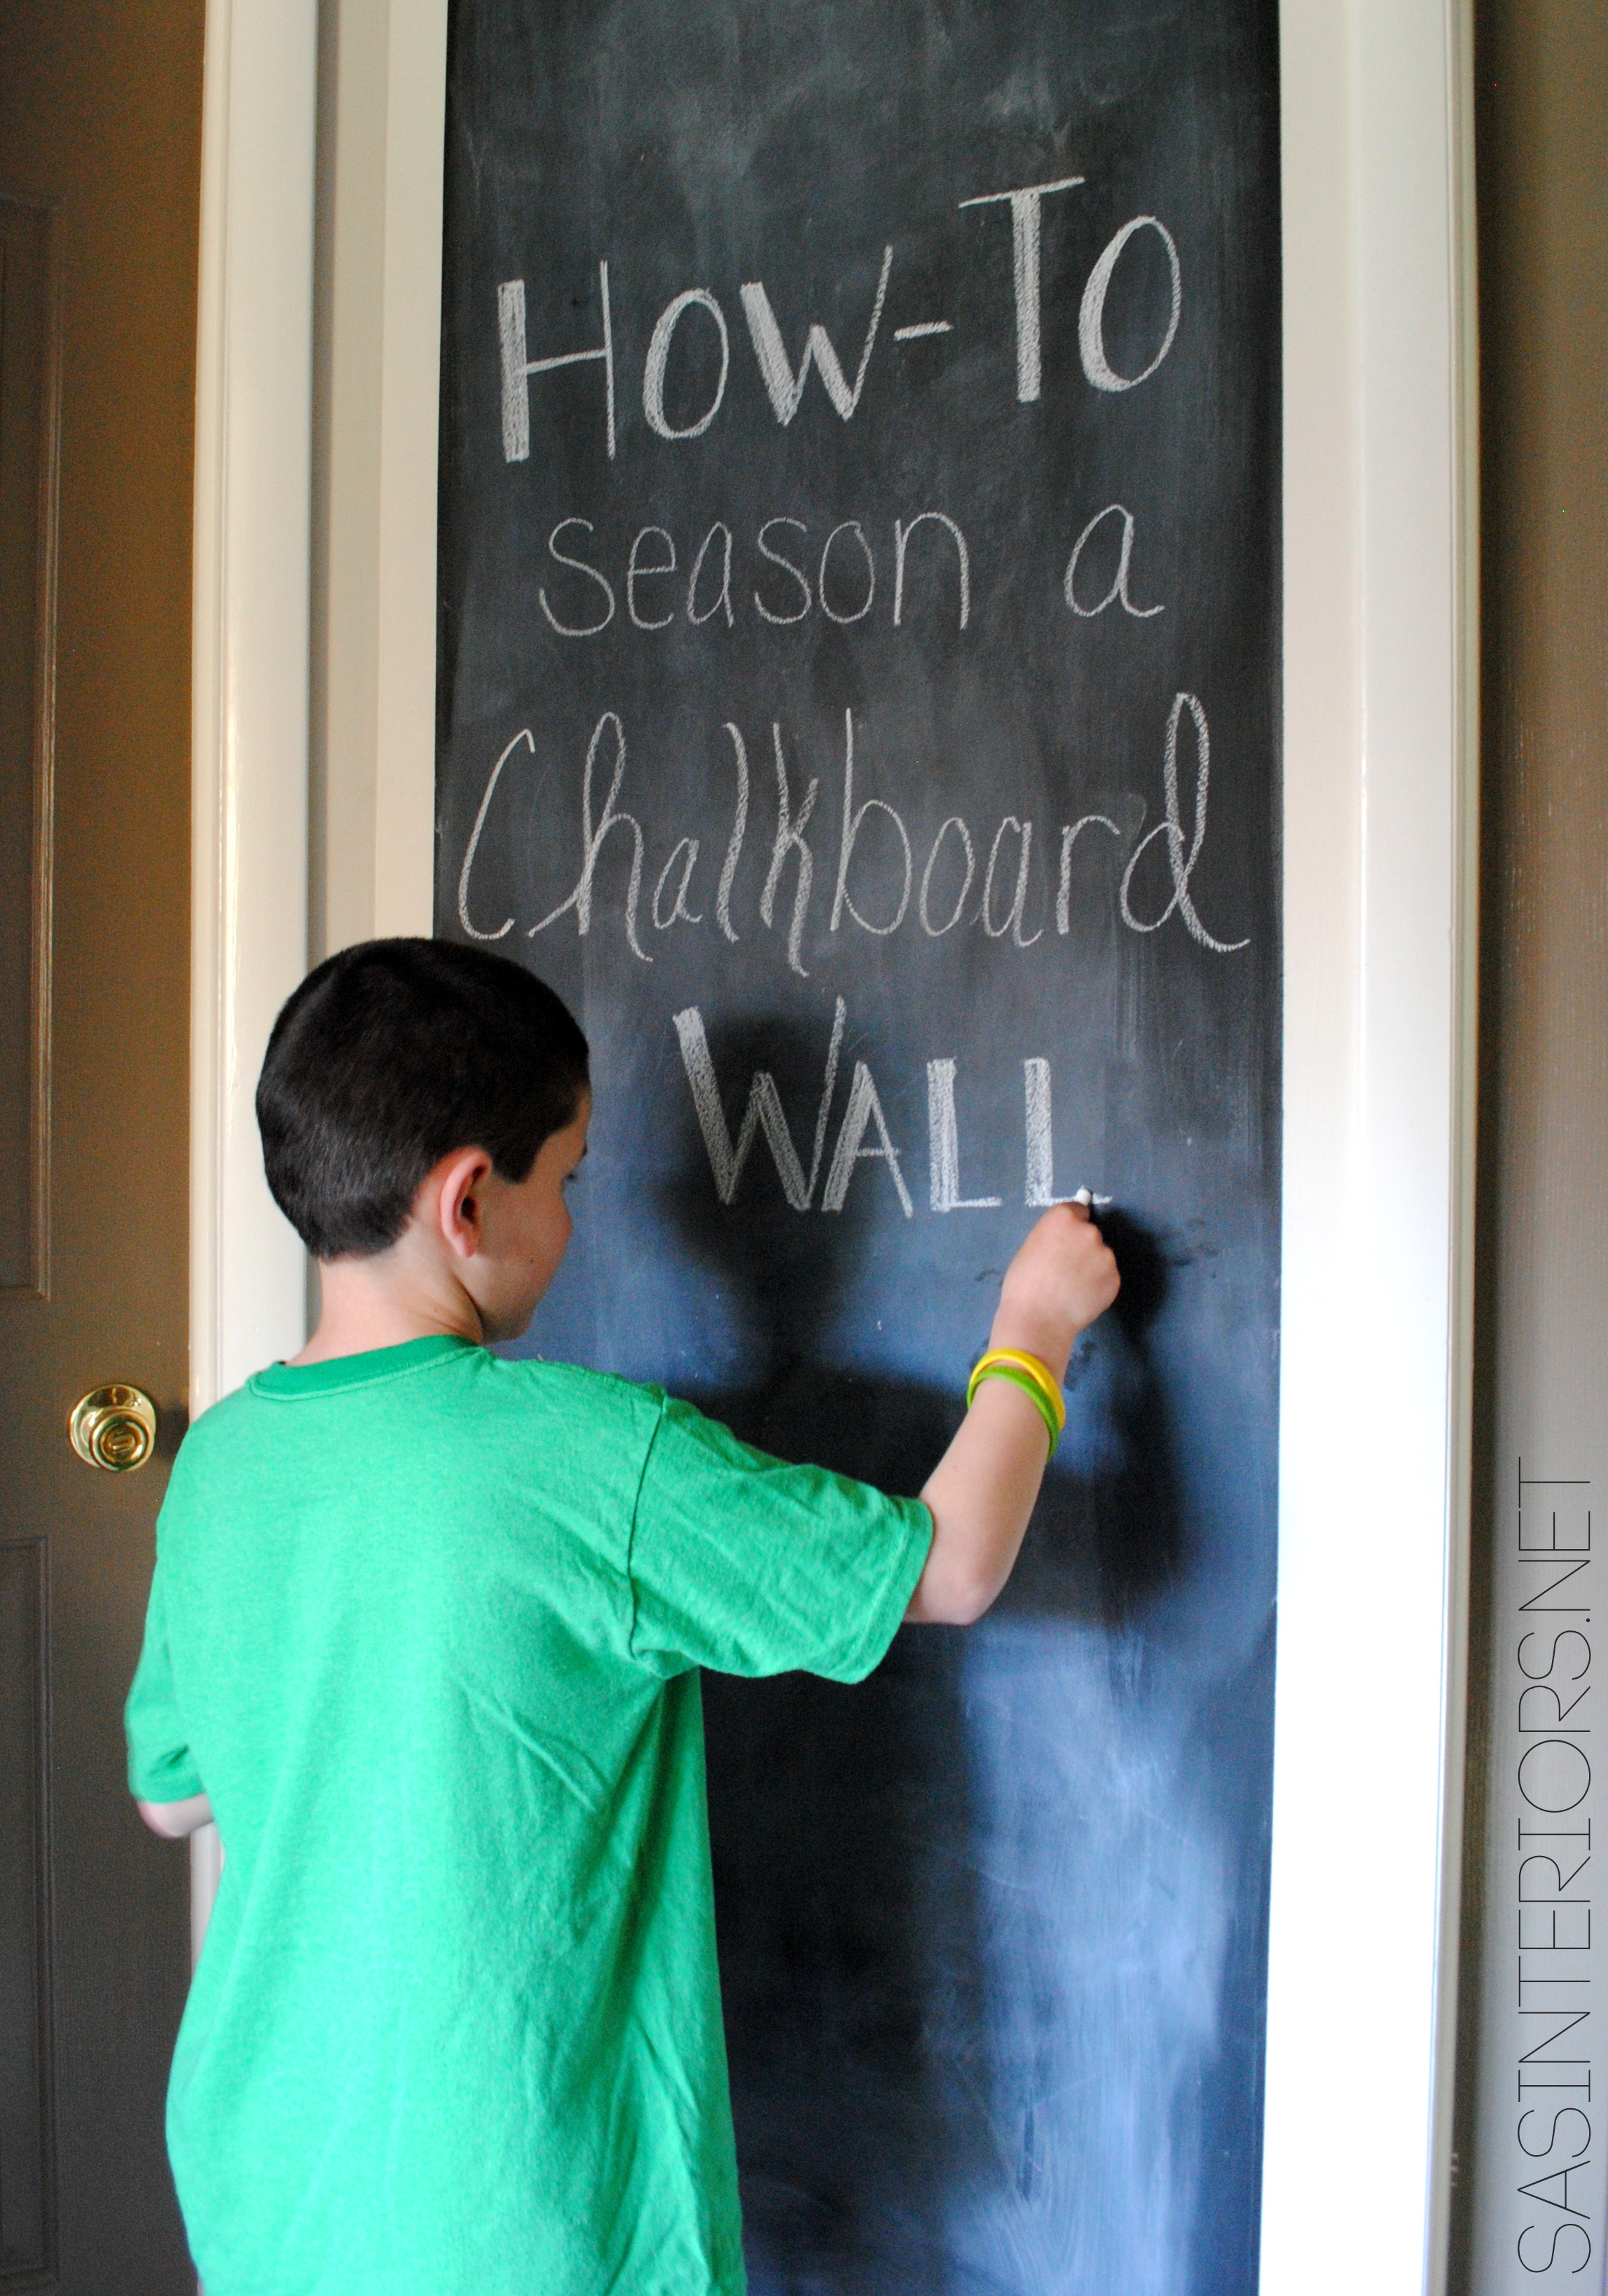
And here is the result…

How-To PREP + 'SEASON' a Chalkboard Wall before using it. It's the ultimate + best way to get the most out of a new creative palette!

A perfectly prepped + seasoned chalkboard board wall!

It’s ready to use…

How-To PREP + 'SEASON' a Chalkboard Wall before using it. It's the ultimate + best way to get the most out of a new creative palette!

You + Your Kids will love it!

Now we have the ultimate spot to keep the kids on schedule each morning – I hope. I’ll probably still have to give about 20 reminders as well. 

Back to School chalkboard wall

This new hallway, even though small, feels so much fresher & 100% usable.  I love using every square inch of our pad, don’t you?!

How-To PREP + 'SEASON' a Chalkboard Wall before using it. It's the ultimate + best way to get the most out of a new creative palette!

Have you ever created a chalkboard wall?  Whether for fun or organization, chalkboard walls are perfect for any space in the house!

Disclosure: I am part of the Lowe’s Creative Team and was provided with a Lowe’s gift card to purchase items for my project.  I was also compensated for my time to use the products.  No one told me what to create, what to buy, how to use the product, or what to write.  All opinions are 100% mine!

Boy Bedroom Makeover: Reveal

Right before baby #3 arrived only a few short weeks ago, I finished the final touches for my sons new space.  The window treatments had me hung up (no pun intended, hehe) for a while as they were the last item to finish.  I just couldn’t decide what to do, but I finally went simple and I am thrilled with the less is more design decision.

I adore the result of this cool room and honestly, I often walk in, sit down, and stare to soak it all up.  It feels so bright and cheerful.

Come have a look.

This is the view when you walk in to the space… Welcome.

Boy Bedroom {MAKEOVER} - Gray walls, picture frame wallpaper, pops of orange & blue. The perfect space for a young boy to teen. You won't want to miss all the creative DIY ideas in this room!

My son’s room has had many evolutions (take a look what it used to look like here & here) over the past 4 years, but I feel with the creation of this new space, he’ll be able to grow with it through the teen years (unless I change it again…).  It’s versatile, engaging, and a fun place to hang out!

When you step into the room, directly to the right are 2 white leaning shelves filled with books, toys, and important (to my son) keepsakes!  I shared my love for leaning shelves a while back and I think this new element in the room has not only provided a ton of storage, but has introduced height, openness, and color.  The shelves are from Target and were super affordable at around $100/each!

[check out my favorite leaning shelves to decorate with here]

Boy Bedroom {MAKEOVER} - Gray walls, picture frame wallpaper, pops of orange & blue. The perfect space for a young boy to teen. You won't want to miss all the creative DIY ideas in this room!

Most of the artwork in my boy’s room was repurposed from his last space.  The inspirational quotes that used to be above his desk are now lined up over the leaning shelves and some of the artwork – made by him – is above his bed.  I love decorating with items that have beautiful meaning and he loves to wake up seeing things he’s created.

Boy Bedroom {MAKEOVER} - Gray walls, picture frame wallpaper, pops of orange & blue. The perfect space for a young boy to teen. You won't want to miss all the creative DIY ideas in this room!

Even though it took some time to get used to, I’m happy with the decision of the lighter wall hue – Benjamin Moore Hazy Skies.  It really is a beautiful gray tone and provides the perfect backdrop for the layers of colors in the books, toys, and artwork.

The honeycomb shelves… the honeycomb shelves…  The biggest, most difficult, yet THE MOST REWARDING do it yourself endeavour yet.  When creating the design for this new space, my son had his heart set on honeycomb shelves after I showed him the Land of Nod style.  And since this mama can’t let her boy down, I had to pull through.  Instead of buying, what did I do?  DIYed them, of course.  They are absolutely the focal point of the new room…

{click for the tutorial of the honeycomb shelves}

Boy Bedroom {MAKEOVER} - Gray walls, picture frame wallpaper, pops of orange & blue. The perfect space for a young boy to teen. You won't want to miss all the creative DIY ideas in this room!

The bed is actually part of the bunkbeds we had and dismantled a few years ago.  He used to have the other twin in his room too, but to provide more floor space, we took it out.  The bedding is a new addition and was a great score from Target – orange comforter set and blue plaid flannel sheets (similar style).  The arm light on the wall, which I found at Lowe’s, was such a smart solution instead of a table lamp.  There is limited room on his nightstand, so this gives him the light needed for reading yet doesn’t clutter up the table surface.  Speaking of nightstand… it’s actually a side table from West Elm that I “found” in the basement that didn’t have a home.  It might not be the forever nightstand, but it serves the purpose for now.

Boy Bedroom {MAKEOVER} - Gray walls, picture frame wallpaper, pops of orange & blue. The perfect space for a young boy to teen. You won't want to miss all the creative DIY ideas in this room!

One of the ways we’ve resolved toys ALL OVER THE PLACE is with the addition of the new under-the-bed toy storage bins I made. They large wood boxes are on wheelies and easy to roll in and out from under the bed.

{click for the tutorial of the under-the-bed toy storage bins}

Boy Bedroom {MAKEOVER} - Gray walls, picture frame wallpaper, pops of orange & blue. The perfect space for a young boy to teen. You won't want to miss all the creative DIY ideas in this room!

As you make your way around the room, we come to The Book Nook.  We still love the stained pallet shelves that I created a few years ago, so they had to stay.  I removed them from the old location next to the door and repositioned them towards the end of the bed to create our new little ‘reading nook’ spot.  My boy loves to gather his poufs (the colorful one is by MiraJean Designs) and ‘chill’.  It’s his escape and relaxation place (and the spot he can hide from his sister)!

Boy Bedroom {MAKEOVER} - Gray walls, picture frame wallpaper, pops of orange & blue. The perfect space for a young boy to teen. You won't want to miss all the creative DIY ideas in this room!

{click for the tutorial of the pallet shelves}

One of the most exciting additions in the room is the picture frame wallpaper.  I went with a lighter tone wall color – Benjamin Moore Hazy Skies – so the wallpaper could ‘speak’ and have ‘it’s moment’.  An entire room of this wallpaper could have been a bit overwhelming, but one wall of it is fun, unique, and just enough.  Here’s a progress shot of the paper going up…

Boy Bedroom {MAKEOVER} - Gray walls, picture frame wallpaper, pops of orange & blue. The perfect space for a young boy to teen. You won't want to miss all the creative DIY ideas in this room!

{click for the tutorial of how to hang wallpaper like a PRO!}

And here it is complete…

Boy Bedroom {MAKEOVER} - Gray walls, picture frame wallpaper, pops of orange & blue. The perfect space for a young boy to teen. You won't want to miss all the creative DIY ideas in this room!

With the window treatments, I decided to go understated and reuse what was already there.  How much easier can you get?!  To jazz up the existing white drapes that I purchased from Ikea about 8 years ago, I added a woven trim to the leading edge.  The trim that I found at Hobby Lobby is black and is a great contrast to the all-white panels.  I simply sewed the trim onto the panel edge and it was complete.  This is an easy & very inexpensive way to customize window treatments to give them a designer look!

Boy Bedroom {MAKEOVER} - Gray walls, picture frame wallpaper, pops of orange & blue. The perfect space for a young boy to teen. You won't want to miss all the creative DIY ideas in this room!

{click for a similar project tutorial on adding a leading edge}

When rearranging the furniture, I liked the idea of positioning the desk so my boy can look outside the window.  The desk that was in his room was moved out and is now in the garage (I have plans for using it in another room in the future).  Since it was big and clunky, I didn’t want it to hide the new, fun wallpaper.  So in it’s place, I purchased a white, more modern desk from Target and chose to pair it with a clear ghost chair.  Again, letting the wallpaper have “it’s moment”.  A few black storage bins that I found at Lowe’s completed the look.

Boy Bedroom {MAKEOVER} - Gray walls, picture frame wallpaper, pops of orange & blue. The perfect space for a young boy to teen. You won't want to miss all the creative DIY ideas in this room!

On the desk top, I added the most adorable owl lamp that I found at Walmart and paired it with a black shade (again, playing with contrasts).  Also on the desk are a few of my boys favorite books and the cutest metal arrow bookends that I got from The Painted Fox, when I worked with them on creating The Nursery Nook.  A telescope and microscope are a few other favorite, everyday things he loves.

As we continue around the room, we can take a look at the closet and the dresser.  I had some fun with the closet door and chose to give it a splash of color with a deep blue hue.  Because the walls are neutral, adding a pop of color as I did for the door, is a fun way to add depth to a space.

Boy Bedroom {MAKEOVER} - Gray walls, picture frame wallpaper, pops of orange & blue. The perfect space for a young boy to teen. You won't want to miss all the creative DIY ideas in this room!

[click for the tutorial on how to paint a door]

Boy Bedroom {MAKEOVER} - Gray walls, picture frame wallpaper, pops of orange & blue. The perfect space for a young boy to teen. You won't want to miss all the creative DIY ideas in this room!

Opposite of the bed / honeycomb wall is the dresser.  This dresser has had many lives and even though it’s a bold color (red/orange mix) it’s lived through all the room updates.  It’s from Ikea and was purchased about 8 years ago.  For the dresser top I got 2 new lamps – clearance from Target – that flank each end and added some books + a clear jar of Legos… my boys favorite!

The rug.  The rug. From preview pics of this space, many of you have loved & commented on it.  I got it from Joss and Main through one of their flash sales.  Sorry that I don’t have more info to share 🙁  Isn’t it fun though?  I love how it brings all the colors together.

Boy Bedroom {MAKEOVER} - Gray walls, picture frame wallpaper, pops of orange & blue. The perfect space for a young boy to teen. You won't want to miss all the creative DIY ideas in this room!

Above the dresser is an oval mirror (which is from Lowe’s) that I took from the kids bath (which is now mirrorless, hehe – it happens…) and the new instagram picture holders I made.

Boy Bedroom {MAKEOVER} - Gray walls, picture frame wallpaper, pops of orange & blue. The perfect space for a young boy to teen. You won't want to miss all the creative DIY ideas in this room!

{click for the tutorial of the toy animal instagram photo holders}

Boy Bedroom {MAKEOVER} - Gray walls, picture frame wallpaper, pops of orange & blue. The perfect space for a young boy to teen. You won't want to miss all the creative DIY ideas in this room!

And there you have it… an awesome boy bedroom makeover filled with DIY projects & repurposed items.  Thankfully my son loves his new room, as do I.  It’s a keeper (for now, lol).

Boy Bedroom {MAKEOVER} - Gray walls, picture frame wallpaper, pops of orange & blue. The perfect space for a young boy to teen. You won't want to miss all the creative DIY ideas in this room!

Thanks for stopping by for a tour. To see more spaces in my home, along with other room reveals, head on over to my House Tour!

Color Block Hanging Succulents

I love a quick, wham bam thank you ma’ma kinda DIY project!  Yes, I love the gratification of a big ole’ DIY challenge that takes brains + braun (hello honeycomb shelves), but at the same time something simple is just as satisfying (& takes a whole lot less time).

Now that our baby girl has arrivedand I have no free time to do anything, my mind is all for easy + fast…  I’m in git er’ done mode.  I could never give up DIYing, even if I had 8 kids (which will never happen), so instead of tackling something difficult & timely, I’m going for simple.  My latest & greatest – Color Block Hanging Succulents…

Pre-made succulent hanging basket from Lowe's jazzed up with paint to create a unique Color Block Succulent Basket {EASY DIY}

Just to be honest and not have you think I am wonder woman, I worked on this project before the baby arrived, then snapped the final pictures for the post yesterday.  Over the last few days, I really have tried to just sit back, rest, and relax – well for the most part.

So on to this really cool & super easy creation…  When I was shopping at Lowe’s for supplies for a few projects last month, I had to hit the succulent / plant section.  Succulents are my favorite this time of year – Spring & Summer – and I love planting smaller and larger sized succulents in pots, cups, or anything that is container-like.  Last years Spring mantel is a great example of a succulent display using all different style containers.

Spring Mantel

While loading up on different sized succulents at Lowe’s, I found a a pre-made wicker-style hanging basket filled with about 4 different style succulents.  How much better does it get than already made?!

Succulent Shopping

Pre-made succulent hanging basket from Lowe's

I immediately the hanging baskets would look great in the kitchen at the large window that overlooks the backyard.  I knew I would enjoy them immensely while doing dishes at the sink or prepping dinner.

But of course I had to jazz them up…

I first figured out where the baskets would best be placed to hang from the ceiling.  I made a mark, installed an anchor, then a hook.

Hanging Succulent baskets

Pre-made succulent hanging basket from Lowe's jazzed up with paint to create a unique Color Block Succulent Basket {EASY DIY}

Here comes the easy DIY idea to customize and make them one-of-a-kind, unique pieces.

Using paint that I had on-hand (I had the hardest time choosing the color) and a firm crafting brush, I painted the bottom 1/3 of the wicker / stick basket.  In the end I chose to use plain white and a popping citron green hue (Valspar Olive Tree, which matches the front door).

Color Block Succulent Hanging Baskets - Simple + Fast DIY creation. Sometimes easy is best!

I could have used tape to make sure the line was straight around, but instead I simply “eyed it”.  I added the paint on thick so it got into all the nooks & crannies.

Color Block Succulent Hanging Baskets - Simple + Fast DIY creation. Sometimes easy is best!

Within minutes, I made my way around the entire edge and to dry, I hung them by the hooks.  And that’s it.  Down & Dirty easy DIY!

Here’s the result…

Pre-made succulent hanging basket from Lowe's jazzed up with paint to create a unique Color Block Succulent Basket {EASY DIY}

Pre-made succulent hanging basket from Lowe's jazzed up with paint to create a unique Color Block Succulent Basket {EASY DIY}

Pre-made succulent hanging basket from Lowe's jazzed up with paint to create a unique Color Block Succulent Basket {EASY DIY}

Pre-made succulent hanging basket from Lowe's jazzed up with paint to create a unique Color Block Succulent Basket {EASY DIY}

So fun, right?!  I love how they look and in just 2 weeks they have grown a lot.  I guess they love the light that filtrates through the large window.

Pre-made succulent hanging basket from Lowe's jazzed up with paint to create a unique Color Block Succulent Basket {EASY DIY}

Gosh, I just can not get enough of succulents!

Pre-made succulent hanging basket from Lowe's jazzed up with paint to create a unique Color Block Succulent Basket {EASY DIY}

Pre-made succulent hanging basket from Lowe's jazzed up with paint to create a unique Color Block Succulent Basket {EASY DIY}

Do you love easy DIY creations?  Would you rather start projects from scratch or do you like ‘jazzing’ up something pre-made?

Disclosure: I am part of the Lowe’s Creative Team and was provided with a Lowe’s gift card to purchase items for my project.  I was also compensated for my time to use the products.  No one told me what to create, what to buy, how to use the product, or what to write.  All opinions are 100% mine!

DIY: Homemade Circle Crib Mobile

No baby yet.  Still waiting… In the meantime though, thank you all for the kind thoughts on the Nursery Nook that I created for our new soon-to-arrive (any minute) bundle!

For the new ‘nook’ I created this adorable easy-to-make and completely homemade crib mobile too…  As promised, I’m happy to show you all the steps.

DIY: Homemade / Handmade Circle Crib Mobile: a beautiful & inexpensive way to crib a focal point for your baby! Check out this easy-to-follow tutorial

This type of circle crib mobile is nothing new.  I’m sure you’ve seen it before in stores and/or created by others (I’ve seen a few here & there and of course on pinterest), but I’ve always adored the look and how much color + height it brings to a room.  Plus most importantly of all, how much it can grab a baby’s attention!  Copy cat, who cares…  I love it, so I made it.

Looking back I often laugh, because for baby #1 (my son) I chose and purchased some of the most neutral pieces.  The crib mobile, specifically, was whites + creams and those are colors newborns don’t see.  Color is what they need.  For baby 3, making her way soon, this mobile will be very entertaining.

DIY: Homemade / Handmade Circle Crib Mobile: a beautiful & inexpensive way to crib a focal point for your baby! Check out this easy-to-follow tutorial

Crib mobiles can often be very costly as well.  Not this handmade creation!  It was super inexpensive and most of the materials I already had on hand.

The supplies I gathered were:

  • Scrapbooking paper
    • At AC Moore I found a 4″ x 4″ book of colorful modern patterned papers.  They were on sale for $5 a book and I snagged 2.
  • Circle Puncher
    • I used a 2″ round circle cutter
  • Wood quilt hoop in 2 sizes
    • I used an 8″ and 12″ diameter hoop
  • Yarn, ribbon, or string (to hang hops from ceiling)
  • Sewing Machine + sewing essentials

1. I started off by using the circle puncher and cut about 200 circles (it sounds like a lot, but it really doesn’t take long.  It’s a good time to catch up on your DVRed shows).

DIY: Homemade / Handmade Circle Crib Mobile: a beautiful & inexpensive way to crib a focal point for your baby! Check out this easy-to-follow tutorial

2. Once the punching out of the circles was done, it was time to attach the circles to each other…  I had never sewn paper before, so I thought it was going to be difficult.  I was wrong.  It was really easy.  Basically I sewed through one circle, continued with a few more stitches and then added another circle.  Because the design was only on one side (other side is white), I would alternate every 2 or 3 circles with the plain white side.  In the end, the circles are always moving (dancing as my daughter calls it), but I didn’t want it to be noticeable that one side had all pattern and the other side was all white.

DIY: Homemade / Handmade Circle Crib Mobile: a beautiful & inexpensive way to crib a focal point for your baby! Check out this easy-to-follow tutorial

For the small wood hoop, I made 10 strands of 11 connected circles and for the larger hoop (which is the lower tier), I made 12 strands of 9 connected circles to each other.  There really is no right or wrong way or specific height that is a must.  Each strand of circles resulted in slightly different lengths, but that’s what makes it interesting + homemade.  FYI:  The room has 8′ ceilings and the mobile resulted about 30″ high.

3. Once the circle strands were complete, I tied them on to the wood hoop.  It’s important to leave about 6″ of extra thread on one side so it can be attached to the hoop. Once tied, trim the thread.

DIY: Homemade / Handmade Circle Crib Mobile: a beautiful & inexpensive way to crib a focal point for your baby! Check out this easy-to-follow tutorial

4. Once the strands of connected circles are attached to the wood hoops, it was time to attached the wood hoops together.  An extra set of hands is best for this quick step, but it can be done on your own.  I used white yarn to connect the hoops and tried to keep the upper (small hoop) tier parallel to the bottom (larger hoop) tier.

DIY: Homemade / Handmade Circle Crib Mobile: a beautiful & inexpensive way to crib a focal point for your baby! Check out this easy-to-follow tutorial

The mobile is so light weight that I attached it to the ceiling with a small white hook.  Voila, it was complete…

DIY: Homemade / Handmade Circle Crib Mobile: a beautiful & inexpensive way to crib a focal point for your baby! Check out this easy-to-follow tutorial

I used white thread for the project and I love how you can see it on the darker colored circles.

DIY: Homemade / Handmade Circle Crib Mobile: a beautiful & inexpensive way to crib a focal point for your baby! Check out this easy-to-follow tutorial

Here’s how the homemade circle crib mobile looks in the new Nursery Nook.

DIY: Homemade / Handmade Circle Crib Mobile: a beautiful & inexpensive way to crib a focal point for your baby! Check out this easy-to-follow tutorial

The paper I used for the mobile is scrapbooking paper which I found at AC Moore.  It came as a 4″ x 4″ book with many colorful designs & patterns – perfect for the space.  I also made these adorable origami butterflies using the same paper…

Nursery Nook: Gallery Wall - New creative wall with a combination of pictures, artwork, quotes, and special keepsakes. Come see the evolution of the 'nook'

I’m thrilled with how this “nook” came out and I’m extra thrilled with the creation of my simple mobile…

DIY: Homemade / Handmade Circle Crib Mobile: a beautiful & inexpensive way to crib a focal point for your baby! Check out this easy-to-follow tutorial

DIY: Homemade / Handmade Circle Crib Mobile: a beautiful & inexpensive way to crib a focal point for your baby! Check out this easy-to-follow tutorial

This crib mobile was what I had my heart set on and even though it’s something done before by many others, I’m happy that I went with what I loved & I know my baby will love just as much.

What attention grabbing mobile do you (or did you) have for your baby?

Patio Paradise: Before & After Patio Makeover

A revamped patio with new outdoor furniture + a Pergola. This new space is surrounded by flowers & the sounds of water from a small pond. A tranquil & ideal oasis for the Summer!

For the past 2 months we’ve been plotting, planning, shopping, implementing, and transforming our outdoor patio.  It’s been a labor of love to get this space to be an inviting oasis that we always envisioned and now can truly enjoy.

We bought our home in the middle of winter when there was over a foot of snow on the ground.  Once Spring hit, the melting snow revealed what we were up against a lot of work – much more than we anticipated.  In the sideyard, there was an above ground pool, which had seen better days, plus 20+ overgrown trees that made the entire yard look dark & cavernous.

In the last 4 years, we’ve done a lot of work & spent a lot of money to upgrade the area (things that we had to hire out because we couldn’t tackle on our own).  We’ve made progress over the years, but more work to really pull this outdoor space together needed to be done…

If you haven’t seen the before in previous posts (and this is actually after a lot of work had already been done), this is how the outdoor area looked before…

Before

Yikes!

Before

Our objective: To use the patio we already had (no money in the budget for something new) and to create a little slice of paradise with colorful decor!  I’m no expert on outdoor landscaping (or even keeping a flower alive for that matter), but I put my mad decorating skills to the test to transform this space…

If I can do it, so can you!

Before we could sit back, enjoy, and relax, there were a whole lotta steps that went into pulling this patio together.

First, the shopping.

It started with the pergola.  I first spotted it at Lowe’s in late Winter and fell in love.  We’ve always wanted a pergola, but were hesitant on building it from scratch.  Fear sometimes gets the best of us. Anyway, the black steel pergola seemed like the perfect (and much easier) way to go.

Prepping the patio with a new pergola

After that the layers.  Pillows + lanterns + pots + lighting + flowers!  I found all of these beauties at Lowe’s.  They have a great new outdoor collection this year with bold colors & patterns.

Prepping the patio

Once back at the house, one of the first things I tackled was painting the doors to the shed.  I was going for an orange vibe a few years ago, but that idea was ditched and the new outdoor space called for blue.  I started off attempting to spray paint the doors and that didn’t work.  Then I used the HomeRight Mini Paint Stick + a paint brush, and that was just the trick for an easy project makeover…

Prepping the patio with a new color on the shed doors

The patio set we chose was incredibly easy to put together.  So easy that each chair took about 2 minutes and 34 seconds… no joke!  The sides + the back literally snapped into the seat and voila it was done.  No nails, no screws, no allen keys, just wam-bam done!

Prepping the patio with new furniture

The chairs were REALLY heavy, but my man could handle it.  With one hand – WOW.  totally kidding, they are actually incredibly light, but don’t tell him that because he was super impressed with himself.

Ya gotta laugh along the way, right?!

And of course with creating an outdoor oasis, there is a lot of planting involved.  From weeding, planting, and mulching, it took a few weekends to tackle.  Plus there was the cleaning of the pond, the removal of an old fence, and the putting together of the outdoor fireplace – which is a must for a Patio Paradise – so we’ve been busy to say the least…

Prepping the Patio

…but in the end it’s all been worth it because this is the result of our beautiful space.

A revamped patio with new outdoor furniture + a Pergola. This new space is surrounded by flowers & the sounds of water from a small pond. A tranquil & ideal oasis for the Summer!

Too fuzzy?  Want a clearer picture?  Check it out…

Come join me on the patio.

A revamped patio with new outdoor furniture + a Pergola. This new space is surrounded by flowers & the sounds of water from a small pond. A tranquil & ideal oasis for the Summer!

The garden which was created (not by us, but by a previous homeowner) with a retaining wall sits about 2′ high than the patio and brings nice height and elevation to the patio setting. When you come down to the patio level, you are greeted by a blooming, oversized (not yet, but by mid-summer it’ll be huge) Russian Sage perennial.

A revamped patio with new outdoor furniture + a Pergola. This new space is surrounded by flowers & the sounds of water from a small pond. A tranquil & ideal oasis for the Summer!

The pond, which until last week was a muddy, gross mess, brings such a special touch to this area of our yard.  There is nothing like the calming sounds of water.  We’re also still loving the garden sculpture created 2 years ago from an old barrel. It’s such a pretty focal point.

A revamped patio with new outdoor furniture + a Pergola. This new space is surrounded by flowers & the sounds of water from a small pond. A tranquil & ideal oasis for the Summer!

The cushions for the chairs & sofa are incredible because the rain beads away instead of soaking in.  I found that out the other day by mistake.  Typically we put the cushions away each night, but they were accidentally left out.  The next day I was super bummed {enter mad-at-myself-face}, but when I touched them, they were completely dry!  They are made of Sunbrella fabric & I’m really impressed.

With the patio furniture set came different pillows, but instead of being matchy-matchy, I swapped them for a few others that I was drawn to at Lowe’s.

A revamped patio with new outdoor furniture + a Pergola. This new space is surrounded by flowers & the sounds of water from a small pond. A tranquil & ideal oasis for the Summer!

A revamped patio with new outdoor furniture + a Pergola. This new space is surrounded by flowers & the sounds of water from a small pond. A tranquil & ideal oasis for the Summer!

Lantern Love…

A revamped patio with new outdoor furniture + a Pergola. This new space is surrounded by flowers & the sounds of water from a small pond. A tranquil & ideal oasis for the Summer!

A revamped patio with new outdoor furniture + a Pergola. This new space is surrounded by flowers & the sounds of water from a small pond. A tranquil & ideal oasis for the Summer!

Want some drinks? Let’s chill at the table.

I took this beautiful Indian throw that I typically have on a chair indoors and used it as a table cloth.  The colors are so vibrant + bold, so it really brought a fun & festive vibe to the new patio.  Again, using what I have on-handmade makes it easier and less costly.

A simple pallet box that the Mister made is set as the centerpiece filled with colorful annuals.

10

Can you blame me for not wanting to leave my house for the next 2 months?!

A revamped patio with new outdoor furniture + a Pergola. This new space is surrounded by flowers & the sounds of water from a small pond. A tranquil & ideal oasis for the Summer!

For the underside of the pergola, I hung a lantern that I purchased a few years ago and draped lights from each corner to the center.

A revamped patio with new outdoor furniture + a Pergola. This new space is surrounded by flowers & the sounds of water from a small pond. A tranquil & ideal oasis for the Summer!

Important Info: The pergola came with 6″ stakes to anchor it into the ground.  First, we positioned the pergola on the patio, so the stakes wouldn’t work.  Secondly, I would be reluctant using stakes because I could still see the pergola pulling away.  The pergola has received rave reviews on the Lowe’s site, but the anchoring to the ground has been the only issue.  With an intense gust of wind, the fabric could easily act as a sail.

To make the pergola sturdy and in-place, we first used a masonry drill bit to make a hole into the concrete patio.  Then we used Tapcon concrete screws (see them here) in each of the 4 holes on the 4 posts.  It was a fairly easy process which took about 10 minutes.

Patio Pergola

A revamped patio with new outdoor furniture + a Pergola. This new space is surrounded by flowers & the sounds of water from a small pond. A tranquil & ideal oasis for the Summer!

A revamped patio with new outdoor furniture + a Pergola. This new space is surrounded by flowers & the sounds of water from a small pond. A tranquil & ideal oasis for the Summer!

Now that it’s all complete {thank goodness}, we can sit back and simply enjoy!

A revamped patio with new outdoor furniture + a Pergola. This new space is surrounded by flowers & the sounds of water from a small pond. A tranquil & ideal oasis for the Summer!

We’ve already enjoyed our first fire.  And within minutes of us starting it, some neighbors popped over.  That’s what Summer is all about…

A revamped patio with new outdoor furniture + a Pergola. This new space is surrounded by flowers & the sounds of water from a small pond. A tranquil & ideal oasis for the Summer!

And it melted my heart when the kids grabbed the poufs and started to read side-by-side.  It didn’t last long (I’m not going to pretend we are some kind of ‘perfect’ family where our kids always get along), but for the short moment, it was a treasure which I bookmarked in my mind.

A revamped patio with new outdoor furniture + a Pergola. This new space is surrounded by flowers & the sounds of water from a small pond. A tranquil & ideal oasis for the Summer!

If you missed (or didn’t see) the mood board I created for the patio outdoor space, this was the original vision that I created.  It always helps to have a ‘plan of action’ when shopping & executing a new space – either indoors or out.   Sources (with links) for all the elements are in last week’s post: The Plan.

Patio Paradise Mood Board: Creating an inviting, relaxing patio oasis

No landscape expert designed this outdoor room, just lil’ ole’ me & I’m pretty darn satisfied!

Here’s a recap of the before & after…

A revamped patio with new outdoor furniture + a Pergola. This new space is surrounded by flowers & the sounds of water from a small pond. A tranquil & ideal oasis for the Summer!

Want to see another outdoor space of ours that I just finished?  Check out the deck

An Outdoor Deck for Outdoor Living: sharing our outdoor oasis where we'll be spending lots of time over the next few months!

You know where we will be all Summer!  Come join us!!

Thanks for coming over for a tour of our new patio paradise.  It’s a dream that this space (+ the deck) are finished.  I can now sit back & enjoy the Summer days to come!

What outdoor projects have you tackled this year?  Do you have a patio or deck that you transformed or plan on transforming?

Disclosure: I am part of the Lowe’s Creative Team and was provided with a Lowe’s gift card to purchase items for my project.  I was also compensated for my time to use the products.  No one told me what to create, what to buy, how to use the product, or what to write.  All opinions are 100% mine!

7 Savvy Tips for Finding Thrifted Treasures

Once Spring hits, my brain goes immediately to the thoughts of garage sales & thrifting. We finally come out of Winter hibernation to get our feet wet and hands dirty in the garage by upcycling and transforming those blah finds to be beautiful.

7 Savvy Tips for Finding Thrifted Treasures - Tips + Tricks + Ideas for finding the perfect 'something'... Some of these simple ideas you may never thought of.

Hitting up a weekend garage sale or visiting a local thrift store is a great way to introduce unique, interesting, and inexpensive décor into your home. That “something special” is unlikely to be the same piece your neighbor picked up last week. Thrifting allows the opportunity to bring elements into a home that are meaningful and/or have the potential to be transformed or upcycled for little money. With the warmer days to come, it’s the perfect time of year to find some new fun and fabulous thrifty treasures.

With some garage sale + thrift hunting experience under my belt, these are 7 tips + tricks that I find helpful to find the perfect thrifted treasure…

1. The Best Spots for Thrifting
There are various types of venues to find used and/or thrifted items, including but certainly not limited to: thrift stores, garage sales, flea markets, antique malls, and even the side of the road (my personal favorite because the “treasure” is usually free – major score!)

Here’s my favorite side-of-the-road before & after

Thrifted treasures can be found anywhere. A garage sale, thrift store, or even the side of the road. That's where this chair beauty was found. Check out the before & after!

Thrifted treasures can be found anywhere. A garage sale, thrift store, or even the side of the road. That's where this chair beauty was found. Check out the before & after!

2. Keep a List
Looking for thrifted treasures can sometimes be overwhelming when you finally get to your destination, so having a list is key to staying focused. Either keep an ongoing list (I keep a list in myphone) or create one before you leave home. It will help keep you focused and evaluate what things you really need. If you have your eye out for a piece of furniture, take wall measurements ahead of time, so you’re fully prepared and aren’t questioning the size when you finally find “the one”.

3. Look for Good Bones
When on the prowl for thrifted decor, especially furniture, look at how it’s constructed; be sure it has good “bones”. The stability and structure of a piece of furniture is important for it’s longevity. If it gets the approval, using it as is or giving it a fresh new coat of paint will make the perfect addition in your home.

I found this beauty on Craigslist.  It had dovetail joints on the drawers and felt very stable.  At $50 it was a great score.  After a paint makeover, it was perfect for my boys room makeover

To find awesome thrifted treasures, look for good bones in old furniture!

Before & After Craigslist Desk. With some paint & TLC this desk got a complete makeover.

4. Think Outside the Box
When on the search for a new treasure, look beyond the items current state and imagine what it could be with a little TLC. Whether you decide to upcycle, repurpose, or revamp, think outside the box at the items potential.

Take a step back from an object and ask:

  • Can I paint it?
  • Can I reupholster it?
  • Can I use it for a different purpose it’s original intent?

This is my FAVORITE part of thrifting… finding an ugly duckling that just needs a little DIY love!  Like this clock to mirror makeover…

Before & After: Clock to Mirror

Before & After: Clock to Mirror

5. Look High. Look Low. Look Everywhere in Between.
Finding a secret treasure can sometimes be a challenge, but in the end, the result is often worthwhile. When shopping at a thrift store or garage sale, take an extra minute to scan all surfaces – the lower shelves, the higher ones, and every spot in between. O, and since the back corners are usually forgotten, they often have the best, hidden treasures.

Thrifted Treasures are all around you - high, low, in every nook & crannie

6. Do you really need it?
When thrifting, having your list in hand will help you stay on track. When you find something, ask yourself, “Do I really need this?” or “Where and how will I use this?”. Even if the item is a great deal, it’s worth nothing if it can’t be used. And if you’re unsure, take a minute to think about it.

My most recent find which fell short of a treasure because of the price tag, is this awesome life-size metal windmill.  How cool is it?!  I spotted it while driving by a local shop & had to take a closer look.  I asked myself, “Do I really need it even though I love it?”… At over $500 I passed, but I’m still thinking of a way to make it myself!

Thrifted Find

7. Negotiate.
One of the beauties about garage sales or thrift stores is the possibility of getting your treasure for a lower price than marked. It doesn’t hurt to ask. If they say no, then you can ask yourself if the item is really worth it and how much money needs to go into it, if any. Again, it doesn’t hurt to ask!

The best garage sale finds are usually snagged right away, so grab a cup of coffee and start your day early. As for thrift stores, if you want a great deal, ask them if there are specific days they put out new inventory (I do the same thing with stores like HomeGoods & TJ Maxx). If you’re looking for something specific, ask them to call you if the item comes their way.

I hope these tips help you prepare and get you excited for thrifting season. And don’t forget, shopping is always better with others, so put on your comfy shoes and team up with friends or family who also enjoy a finding a treasure!

What have been your favorite garage sale or thrift store finds?

Patio Paradise: The Plan + Mood Board

Patio Paradise Mood Board: Creating an inviting, relaxing patio oasis

I hope you had a fabulous Memorial Day weekend!   Not only did we spend time thanking those who served our country, but we enjoyed much of the long weekend soaking up the sun + enjoying the beautiful outdoors.  BUT like always, with playtime comes worktime.  Before setting our sights on BBQing & the beach, we worked all day Saturday on the outdoors.

Over the past month, we have been spilling hours into transforming our sideyard into a Patio Paradise!  I’m thrilled to be partnering with Lowe’s on this project to create a space that is inviting, relaxing, and truly a magical oasis.  With the new baby coming in just a few short weeks, I am banking on this new area being our stay-cation spot for the Summer.

Here’s a peek at the shopping and prepping that has gone into to making this Patio Paradise come to fruition…

Progress on creating a Patio Paradise

When you have a blah blank slate, there is alot that can be done. Only a few years ago, the area where our new oasis now sits was filled with a dilapidated above-ground pool + 15 overgrown trees.  It surely has taken a turn (for the better) since then!

Before

Before

I’m super excited for this outdoor space to be done & to share it with you.  As I’ve mentioned once and again (and maybe 48 other times), I don’t have a green thumb + many perennials are difficult to grow in my neck of the woods because of the long winters.  But, I can say that new buds are popping each day.  In no time, this space will be done and I’ll be able to share with you my new Patio Paradise!  In the meantime, if you’ve got your eye on any of the elements in my mood board, here are direct links to the sources…

Patio Paradise Mood Board: Creating an inviting, relaxing patio oasis

1. Outdoor Lights
2. Pergola
3. Garden Pot (navy)
4. Lanterns – Large & Small
5. Pillows – Blue Multi / White Medallion / Bird
6. (2) Side Chairs + Pillows
7. Loveseat + Coffee Table
8. White Garden Stool
9. Planter
10. Outdoor Rug
11. Pouf
12. Outdoor Fireplace

Once our Patio Paradise is complete, we’ll be ready for a big ole’ bash!  I wish you could all come.  The reveal + party pics coming soon.  In the meantime, later this week (or possible next week) I’ll be sharing the other outdoor spaces around our home.  Along with the patio, we’ve been busy updating the back deck + the front porch.  I better get back to work…

What updates have you made to your outdoor spaces this Spring?

Disclosure: I am super excited to be partnering with Lowe’s on this outdoor project.  I love working with Lowe’s because they offer a range of items with great design qualities.  As always, they did not tell me what to write, what to choose, and all thoughts are 100% my own.  They gave me free-reign on everything so my design ideas + thoughts are 100% genuine.

Easy Project, Big Impact: Reupholstered Chair Seat

Easy Project, BIG IMPACT RESULT: Reupholstered Chair Seat. Completely NO EXPERIENCE NEEDED! All you need is a scrap piece of fabric (about 1/4 yard) + a staple gun. 2 minutes later, you're done. Change any chair NOW!

Most posts I have planned out a few days, or at least a day, before going live.  But not today’s.  I have been trying to check things off my to-do list and this project, start to finish, literally was done just a few minutes ago.  I posted a pic on Instagram (I’d love for you to follow along if you’re not already) and I thought I’d share a blog post about it.

Ready for a super easy, yet BIG IMPACT project?  Check out how I brought this old chair alive again with a simple change of fabric.  It’s so simple and I swear that ANYONE can do this.  Even if you’ve never DIYed anything in your life, you can do this.

Ready?  Here goes…

(By the way, these aren’t the best pics because they were taken with my iphone.  That’s how quick this project + post was pulled together)

Easy Project, BIG IMPACT RESULT: Reupholstered Chair Seat. Completely NO EXPERIENCE NEEDED! All you need is a scrap piece of fabric (about 1/4 yard) + a staple gun. 2 minutes later, you're done. Change any chair NOW!

I’m sure you can pretty much “get it” from the picture, but basically you’ll need about 1/4 yard of fabric (this 1″ black & white striped fabric I snagged from the Online Fabric Store while at Haven Conference last year).

1. Lay the fabric right side down on a hard surface, then set the seat face down.  Rearrange the fabric as needed so it’s positioned as you’d like.  I wanted to make sure my stripes were even, so I adjusted the seat positioning accordingly.

2. Then, using a staple gun, start with one fabric edge, pull taught and staple.  Then work your way around the entire seat.

And voila, 2 minutes later or less, you’re done!

Super easy and look how much of an impact a simple seat cover makes!

A few years ago the seat started out like this after finding it at a thrift store…

BEFORE: Side Chair

After a little paint + a new seat cover, it looks totally fabulous & updated…

Easy Project, BIG IMPACT RESULT: Reupholstered Chair Seat. Completely NO EXPERIENCE NEEDED! All you need is a scrap piece of fabric (about 1/4 yard) + a staple gun. 2 minutes later, you're done. Change any chair NOW!

Easy Project, BIG IMPACT RESULT: Reupholstered Chair Seat. Completely NO EXPERIENCE NEEDED! All you need is a scrap piece of fabric (about 1/4 yard) + a staple gun. 2 minutes later, you're done. Change any chair NOW!

Now the chair sits beautifully in my master bedroom

Easy Project, BIG IMPACT RESULT: Reupholstered Chair Seat. Completely NO EXPERIENCE NEEDED! All you need is a scrap piece of fabric (about 1/4 yard) + a staple gun. 2 minutes later, you're done. Change any chair NOW!

Projects don’t always have to be difficult and timely.  Sometimes the projects with the best +biggest results are the easiest!  Cheers to a fabulous Memorial Day weekend!

What has been your simplest and/or easiest DIY project, craft, or upcycle?

Toy Animal Instagram Photo Holder

I’ve been a little slow on sharing the progress of my boys room makeover, but believe me it’s almost done!  Except for the window panels that are still plain white (an idea will come to me at some point to jazz them up), the room is about 96.74% complete.  From the new wall color + the wallpaper, to the honeycomb shelves + the wood rolling toy bins, to the new leaning shelves, this room has been fully transformed from what it looked like before

One of the first DIY ideas that I thought about for this makeover (after seeing these animal photo holders) was to create something cute that could hold instagram pics (or any adorable picture for that matter).  It had to be something that pictures could easily be changed / swapped out.  And I loved the idea of using toy animals since we have a gazillion..

Voila, the creation of the Toy Animal Instagram Photo Holder

DIY: Toy Animal Instagram Photo Holder. So cute & easy to make. Perfect for a kids room or any eclectic space! Full tutorial at www.jennaburger.com

These cute little picture holders were pretty easy to make and I love how they give a new look to this part of my boys room.  The Ikea dresser was something we’ve had since he was about 2 years old, the mirror was repurposed from the kids bathroom (now they are mirror-less, o well), and the lamps were a recent clearance find at Target.

A few other accessories + layers and this space is coming together…

DIY: Toy Animal Instagram Photo Holder. So cute & easy to make. Perfect for a kids room or any eclectic space! Full tutorial at www.jennaburger.com

Want to see how I made them?  This is my original sketch, along with my supply list…

supply list

Here’s the supplies I used:

  • 2″ x 8″ x 4′ cut into into 8″ x 8″ squares (there will be wood leftover)
  • 3/4″ Round Magnets
  • Gorilla Glue (or any heavy duty, super sticky glue)
  • Toy Animals (I ransacked my kids toy bin, but you can find similar animals in the dollar bin or toy section)
  • Stain (I used leftover stain I had on-hand)
  • Command Strips
  • Level
  • Miter Saw (or have Lowe’s or other big box store cut the squares)
  • Coping Saw

DIY: Toy Animal Instagram Photo Holder. So cute & easy to make. Perfect for a kids room or any eclectic space! Full tutorial at www.jennaburger.com

Here’s the tutorial:

1. Using the miter saw, I started off by cutting the 4′ long wood board into (4) 8″ x 8″ squares.

DIY: Toy Animal Instagram Photo Holder. So cute & easy to make. Perfect for a kids room or any eclectic space! Full tutorial at www.jennaburger.com

2. Once the 4 squares were cut, I drilled a 3/4″ diameter hole (same size as the magnet) about 1.5″ from the edge. The hole only needs to be the depth of the magnet (don’t drill all the way through the wood) so it sits flush with the wood.  Once drilled, I placed the magnet in the hole to see if it was a good fit.

DIY: Toy Animal Instagram Photo Holder. So cute & easy to make. Perfect for a kids room or any eclectic space! Full tutorial at www.jennaburger.com

3. After all 4 squares had the magnet holes, I gave the surface a quick wipe-on / wipe-off staining.  I used espresso stain that I had on hand.  As soon as I poured it on, I wiped it away with a piece of lint-free cloth.  I still wanted to see the beauty of the grain, which is why I used stain versus paint.

DIY: Toy Animal Instagram Photo Holder. So cute & easy to make. Perfect for a kids room or any eclectic space! Full tutorial at www.jennaburger.com

4. Once the stain was dry, I adhered the magnet to the hole with Gorilla Glue.

DIY: Toy Animal Instagram Photo Holder. So cute & easy to make. Perfect for a kids room or any eclectic space! Full tutorial at www.jennaburger.com

Onto the toy animals…

5. Using a coping saw, the mister cut the animals in half.  It was a little weird & sad to chop these little guys in half, but it was all for good reason…

Tip: Toy animals that have a solid inside work best.  2 of the animals we cut were solid, 2 were hollow.  For the hollow animals, I packed them with play-doh, then inserted the magnet so it sit flush with where it was cut.  A few days later, the playdoh was completely hardened and the magnet fit snug inside just like the solid animal.  If needed, once the play-doh is hard, remove the magnet and add some gorilla glue or crazy glue.

DIY: Toy Animal Instagram Photo Holder. So cute & easy to make. Perfect for a kids room or any eclectic space! Full tutorial at www.jennaburger.com

6. Once the animal was cut, I drilled a 3/4″ diameter hole (same as the wood) for the magnet to sit inside.  Then I secured it with Gorilla Glue.

DIY: Toy Animal Instagram Photo Holder. So cute & easy to make. Perfect for a kids room or any eclectic space! Full tutorial at www.jennaburger.com

Let’s hang it!

7. I wanted the wood squares to sit flush with the wall versus using a picture hook, so I used Command Strips to hang them. And of course, I made sure they were level…

DIY: Toy Animal Instagram Photo Holder. So cute & easy to make. Perfect for a kids room or any eclectic space! Full tutorial at www.jennaburger.com

Once hung, the toy animal instagram photo holders were complete…

DIY: Toy Animal Instagram Photo Holder. So cute & easy to make. Perfect for a kids room or any eclectic space! Full tutorial at www.jennaburger.com

I filled the wood boards with a few of my boys favorite + funny instagram pics.  I actually just printed them from my computer, but there a bunch of places that develop instagram photos.  Or regular 4 x 6 or 5 x 7 photos will work too.

DIY: Toy Animal Instagram Photo Holder. So cute & easy to make. Perfect for a kids room or any eclectic space! Full tutorial at www.jennaburger.com

DIY: Toy Animal Instagram Photo Holder. So cute & easy to make. Perfect for a kids room or any eclectic space! Full tutorial at www.jennaburger.com

I love how this space turned out.  Here’s an overall…

DIY: Toy Animal Instagram Photo Holder. So cute & easy to make. Perfect for a kids room or any eclectic space! Full tutorial at www.jennaburger.com

DIY: Toy Animal Instagram Photo Holder. So cute & easy to make. Perfect for a kids room or any eclectic space! Full tutorial at www.jennaburger.com

Think this tutorial is fun + you may just want to try it?  Pin It or Save It for later…

DIY: Toy Animal Instagram Photo Holder. So cute & easy to make. Perfect for a kids room or any eclectic space! Full tutorial at www.jennaburger.com

Never thought you could do something with toy animals?  O, there are lots of ideas.  I have more interesting creative ideas coming soon… Stay Tuned!

5 Ways to Update a Bathroom on a Budget

There have been some really qualified “entries” for the ugly bathroom makeover.  I’m not going to lie…  some of you are in desperate need of direction & a plan on how to jazz up your bathrooms.  Most of the bathrooms I received pictures for, have good bones and are similar in layout of many homes, but they need to be taken to the next level to be practical and pretty!

Lowe’s and I are going through the pictures and next Monday will be the day when you’ll get to see what reader submitted bathroom we chose, along with a Creative Vision Board + ‘plan of action’ for the space.  In the meantime, I wanted to share my thoughts + ideas with ALL of you on 5 Budget-Friendly Ways to Update a Bathroom

5 Ways to Upgrade a Bathroom on a Budget: Don't neglect a needed bathroom revamp because of cost + no-experience. Instead, embrace what you have and revamp the layers of the existing!

I’ve been working on my fair share of client kitchens lately, which I adore, but I’m equally obsessed with revamping bathrooms.  Having an educational and professional background in architecture and interior design, I love how all the components- cabinetry, hardware, and all the details in between – come together and interlink to create an incredible result.  Even more so, I love all the added layers + color that can be brought into a bathroom to make it not only a functional space, but a magical oasis – remember I said last week, who doesn’t sneak away to the bathroom here and there for some peace + quiet?!

Unlike a typical 4 walled room in a house, bathrooms (as well as kitchens) can seem daunting when thinking about a makeover.  There’s plumbing, electrical, tile, and more that is involved in changing.  BUT, instead of neglecting the idea of an overwhelming revamp, embrace what you have and revamp the layers of the existing.  Not only will a budget-friendly bathroom makeover increase the value of your home, but it will also simply make you happy!

Ditch those apprehensive, scary thoughts and let me share my 5 Ways to Update a Bathroom on a Budget…

1. Paint

Easy (well fairly easy) and cheap!  There is nothing like a fresh new coat of paint on the walls!  And for a typical bathroom, from start to finish, it should really only take a few hours. Since the fixtures of a bathroom are often white or light-colored, think about adding a pop of color on the walls.  Or, if you’re desiring a serene and calming space, go light  – not white, but light.

Let’s start off with a bang.  Check out one of my all-time favorite before and after bathroom makeovers that incorporates a splash of color + fun on the walls, via BHG

Splash of color on the walls of the bathroom

To step it up a notch, consider painting the existing bathroom cabinet.  It’s not uber difficult to remove / upgrade a bathroom cabinet, but it does involve plumbing and the possible install of a new countertop and/or sink.  If that’s not within your wheelhouse, a new coat of paint will be the answer.

Whether wood or laminate, the bath cabinet can most likely be revamped.  If it’s not structurally stable or you don’t love the look, ditch it, but if it can be used there is a little prep work before you paint…  Start by removing the doors and give them a good cleaning (diluted all-purpose cleaner, wood cleaner, or white vinegar with a little warm water usually works). Lightly sand the surface – using a hand sander is best.  Then add a primer to seal the wood underneath and to give a solid base coat for the paint to adhere to. Then using a roller / brush combination or a hand sprayer, apply at least two coats of paint (read all instructions ahead of time and follow the directions on the product). The transformation will be breathtaking.

Check out this awesome bathroom upgrade with a newly painted cabinet…

hall-bathroom

5 Ways to Upgrade a Bathroom on a Budget: 'After' picture of a newly painted cabinetBefore and After Bathroom space by Centsational Girl

2. Hardware

The layers of any space are key to making it unique and interesting.  An easy upgrade in a bathroom is adding or changing the hardware on the bath cabinet.  I’ve found that bath cabinets often don’t have any knobs or pulls, and once added the cabinet always comes alive.  The cheap builder-grade vanity in my master bath had no hardware, so using a drill, I drilled 2 holes, added crystal knobs, and now the “black dress” is accessorized!

Jazz up an old cabinet with new hardware!

Check out how great this bathroom upgrade looks by The Turquoise Home

Jazz up an old cabinet with new hardware!

Jazz up an old cabinet with new hardware!

I love the new paint color on that cabinet & the new hardware looks fabulous!

3. Lighting

I feel the light fixture in a space is so important.  A fixture can truly make or break a room, and typically I live by the motto GO big, or GO home!  How many of you have those old eye-ball style fixtures with 3 or 5 or 7 bulbs across and every time you walk into the bath you cringe because it’s so bright? {It’s okay to raise your hand}.  Ditch em’!  I’m all for good light in a bath space, but you don’t need a blinding light that is glaring into your eyes every time you enter.  Upgrade to a fixture(s) that is different and maybe not typical for a bathroom.

I’m still loving the $17 light that I found at Lowe’s for my powder room.  The ‘before’ light was fine, but expected.  This light is functional + exciting >

DSC_0165

Unique + Functional lighting in a bathroom can "make" a space!

If you’re on a tight budget for your bath, grab a can of spray paint + a few new glass bulbs, to revamp an old, drab fixture. Check out how Lindsay of Makely Home transformed her bath light >

If you're on a tight budget for your bath, grab a can of spray paint + a few new glass bulbs, to revamp an old, drab fixture.Lindsay also has a great post on finding the perfect bathroom light!

4. Flooring

I know, it sounds like a big, scary project, but it doesn’t have to be!  As you may know, I continually profess my love for groutable luxury vinyl tile (LVT).  It’s a quick, easy (no experience needed), and budget-friendly way to cover up the ugly mess of a floor that you may have.  And if you don’t have an ugly mess of a floor, you might just want a change and LVT flooring is the answer.   There are also a bunch of other flooring out there that you may love and adore, but either way, new flooring will truly jazz up a bathroom hands-down!

Here’s a recent update I shared on how the groutable luxury vinyl tile floor has held up after 2 years.  If you’re thinking of installing this type of flooring in a bath or any space of a home, this is a must-read!

master bathroomm floor

Want proof that a new floor can make for a killer new bathroom, take a look at this before and after bathroom transformation by Roeshel of DIY Show Off

bathroom-makeover-before

New Groutable Luxury Vinyl Tile transforms this blah bathroom into an incredible space

Another idea for an easy flooring upgrade is wood laminate, which most of the time can be installed directly over your existing floor.  Take a look what Jen of I Heart Organizing did with her bathroom reno…

New Groutable Luxury Vinyl Tile transforms this blah bathroom into an incredible space

5. Layers

Last, but certainly not least, but actually the most important…  The Layers!  If you’re on a bare bones budget and have very little to spend, focus on the layers.  What layers? a pretty shower curtain, a simple window treatment (if you’re bath has a view of the exterior), artwork, hooks, shelving, etc.  The layers in any room of the home speak your style and share the story of who you are.

You saw a peek of Jen’s bathroom above, and here is the finished revamp >

The layers of a space are the most important. In a bathroom, incorporate a pretty shower curtain, shelving, artwork, and anything that simply makes you happy.How fabulous of a space and it ‘s mostly all existing and/or DIY!

Another amazing transformation is Paige’s hall bath of Lively Green Door >

The layers of a space are the most important. In a bathroom, incorporate a pretty shower curtain, shelving, artwork, and anything that simply makes you happy.

And lastly, check out this fun bathroom space.  With a few new elements (no fixture changes), look how it has come alive with new paint, a killer light fixture, and a gorgeous shower curtain.

The layers of a space are the most important. In a bathroom, incorporate a pretty shower curtain, shelving, artwork, and anything that simply makes you happy.via BHG

Are you now convinced that a bathroom doesn’t need a full gut to be fabulous?  Who’s ready for a makeover? 

As always, incorporate elements you love & those that are truly meaningful.  Look for inspiration around you before executing, and remember it’s not a race.  Now I’ve gotta get back to looking through all those ugly bathrooms to see which would be perfect for a makeover!  Be sure to check back on Monday to see if it’s yours!

Want to pin & save for later, here you go…

5 Ways to Upgrade a Bathroom on a Budget: Don't neglect a needed bathroom revamp because of cost + no-experience. Instead, embrace what you have and revamp the layers of the existing!

Kitchens are another space in the home that homeowners fear to upgrade because of time and budget.  Totally understandable!  BUT just as the bathroom can be revamped on a budget, so can a kitchen.  Check out my thoughts for 5 Upgrades to a Killer Kitchen

5 Upgrades for a Killer Kitchen