Many of us have a door in our home that leads to the garage. It’s a metal door and so it’s magnetized, leaving the perfect opportunity to jazz it up, bring color into the room, and display kids artwork, coupons, or much more.
I’m always looking for new nooks and crannies to organize and make life easier! The entrance door to the garage is a perfect spot because it’s the way many of us enter and exit our homes.
As I mentioned (and gave you a sneak peak on) the other day when sharing my new foyer floor, our foyer space is not only the entrance area, but also the spot where the powder room, laundry, coat closet, and pantry are located. Lots of functions in just one area and a place I spend alot of time in (mostly doing laundry!)
The door before was a blah white and with the old darker floor, it was a cavernous hallway. Once deciding to paint the door, I chose the same color as my front door – Valspar Olive Tree WV34010. I really love the cheerful apple green color and with all the other vibrant colors going on, adding another hue would be overload.
So here’s the before & after…
It’s amazing what a little paint can do! I started off by grabbing a small trial size container of Valspar paint at Lowe’s. Since the door has no texture, I used a foam roller to apply the paint. It took quite a few coats – about 5 in all.
Once it was finally done, the space already looked so different, but it still needed more.
I had seen this cute idea a while back and thought it would be fun to try it out on this door.
I wanted to make “sections” for the kids artwork, plus a spot for pictures, coupons, and/or school announcements and invitations. Using a ruler and pencil, I outlined the “sections”.
And then painted over the lines with chalkpaint in old white.
Okay, so after it was done, I wasn’t loving the result. I liked the look in the inspiration picture, but it wasn’t working with my white-against-green door. Onto idea #2.
Isn’t it truly incredible what a little paint can do?! Plus this is such a nice area to display some of the kids artwork, especially since the new refrigerator is stainless and non-magnetized.
Do you have a splash of color on your garage entry door? Do you hang anything on it?
I hope you had a nice weekend and if you’re in Sandy’s path, stay safe! We’ll see what she brings our way later today and tomorrow.
In the meantime, I spent much of last week working on my next Lowe’s Creative Team challenge. This month’s project was a “create anything” project and it was the perfect opportunity to redo the foyer floor. This project has been one that I’ve wanted to tackle since moving into our home. The difficulty always has been, how.
The entrance into our home is not only the foyer, but also the space that leads to the garage, our laundry room, pantry, coat closet, and powder room. As being the major entrance and exit path into the home + all these important spaces, I couldn’t grasp the idea of a long period of downtime for this area. With 2 kids and a busy schedule, it was mere impossible to not make this an easy 1 day project. So that’s where the how came in. How could it happen?
Well about a year ago, I learned about Groutable Luxury Vinyl Tile. This treasure has changed my life and saved a whole lotta headaches! I shared my first LVT project earlier this year when I redid my parents floor, and since have used it in many other spots like my bathroom and the kids.
When the time came to tackle this project, it was really the only product that would provide the desired look of ceramic tile (you would never know it’s vinyl) , plus the quick turnaround of starting and finishing in ONE DAY.
What’s incredible about this tile is that once it’s finished, it looks and feels EXACTLY like ceramic tile. You would never know it’s vinyl. Believe me, I would not use something that has a fake look!
My existing floor was in really good condition. None of the tiles were cracked or chipped, and the real reason for the new floor was to aesthetically update the space.
If you plan on tackling this project, it’s important to evaluate the condition of your existing floor. You may need to remove the existing floor or put down a leveler before installing the new floor. Chat with your local Lowe’s customer service peeps. My local guy was really helpful in directing me in the right direction.
To start off, I gathered my supplies for the tile installation part:
Triangle Ruler
X-acto Blade
Spacers ( I used 1/8 spacers)
A pencil
Snips
Cutting surface
There are various ways to start laying the tile. Most commonly, experts say to start the first tile in the center of the room, but for me I wanted a whole tile when you walk into the front door, so I started at that point. Since the room isn’t a perfect square, there really is no “center”.
Installing the tiles is really easy. Similar to regular peel-and-stick tiles (even though these luxury vinyl tiles are much thicker and more durable), you do just that…
Peel the backing off the corner edge (not the entire tile).
Using spacers, lay down the tile starting at the corner edge.
Once the tile is positioned in place, peel off the remainder of the paper backing.
For my foyer floor, I layed as many whole tiles first, then went back and tackled all the tiles that needed to be cut afterwards.
For the tiles that need to be cut, here’s how I tackled them…
Mark the cut with a pencil.
Use a triangle to draw a line and mark the cut.
Score the tile surface 2-3 times with an X-acto blade.
Gently snap the tile where it was scored.
For difficult, none straight cuts, here’s how I tackled them…
Sketch the design to be cut on the tile surface.
Cut out the design using an X-acto blade.
See if it fits and make needed adjustments.
Stick it down. It doesn’t need to be perfect because once it’s grouted, many imperfections aren’t obvious.
I put together a quick video (it’s pretty amateur, so don’t poke fun please) of how I cut the pieces if you need more know-how!
Ok, so once the tiles are set, you can move RIGHT ON TO GROUTING. That’s one of the beauties about groutable vinyl tile – there’s no downtime or waiting like with ceramic tile or natural stone.
To prep for grouting, it’s important to cover the areas where you don’t want grout. Basically that’s the base mouldings around the room. For this, I find it easiest and best to apply painters tape around the perimeter of the room.
Onto my favorite part because at this point, you’re more than halfway done 🙂
For the grouting steps, I gathered my supplies of:
Bowl of water
Tile sponge (one side has a sponge, the other side is abrasive)
Tile float
Luxury Vinyl Tile Grout
The tiling process for vinyl tile is exactly the same as if it were ceramic, but the grout itself is different. There is specially made pre-mixed grout specific for luxury vinyl tile. I used pre-mixed grout made by Precision Components which I found at Lowe’s in the same section as the groutable vinyl tiles. This premixed sanded acrylic grout has “good flexural strength and adhesion†and is recommended to use over traditional cement grouts.
*Don’t use sanded grout that you mix yourself!
I started applying the grout by the stairs, so I knew I could back out of the space without stepping on what I just grouted. Even though it’s okay to walk on the tiles, the grout does need time to set and dry. Once ready to apply the grout, I found it best to use a low angle and then a higher angle to wipe the excess away. Once the joint is filled with grout, you want to wipe as much away as possible so not to have huge clumps of grout left on the tile – it just makes more work to clean up.
Once you’ve got a section of about 3′ x 3′ covered in grout, use a damp sponge to wipe away the grout.
You can easily notice the areas that have been grouted and the areas that haven’t (yet).
Once the grout is completed, I took the tape off. It’s very important – and I’m only sharing this from a bad experience – to remove the tape when the grout is still somewhat wet otherwise once it’s hardened it’s near impossible (been there, done that).
Once the tape is off, the floor was done! YES. Major Project COMPLETE. This is a huge checkmark off my DIY list. Here’s the result…
This is the hallway that leads to the garage with the doors to the washer/dryer on the left and the doors to the coat closet/pantry on the right. I recently added a splash of color to this door and since it’s metal, it’s been a great place to display the kids artwork, coupons, etc. I’ll share more on that in a future post.
Do you see a little something sitting at the front door? That’s our new little 4 month old kitty. She’s so cute and she loves the new floor – hehe!
Groutable Vinyl Tile PROS and CONS
Affordable – Luxury Vinyl Tile runs about $1.00 – $2.00 sq. ft. and compared to ceramic or natural stone, it is very inexpensive. The tiles which I purchased from Lowe’s were $1.18 and the premixed grout (for my 200 sq. ft. space, I used 2 tubs) cost $8/each. Ceramic tile is available in a range of prices, but usually starts at $2 per sq. ft. , so the savings right there is 50%.
No Experience Required – And I’m completely being honest with you. It’s easy and if you’ve never tiled before, you can do it! I think a person with little experience can complete this project with ease. Measuring and cutting is really the most difficult part of the project, so take your time and measure correctly! Installing ceramic tile is not difficult, but it is tricky and experience is helpful. Cutting ceramic tile can often be difficult and time consuming. For prior ceramic tile projects, I’ve used tile snips, a tile cutter, and a wet saw. A wet saw is the best for cutting ceramic tile, but it’s not easy – I’ve made alot of mistakes. In my estimation, ceramic tile would take about double the time for installation compared to installing groutable vinyl tile.
Grout Right Away – Immediately after you install the groutable vinyl tiles, you can start the grouting process. This makes the entire process possible to complete in one day. With ceramic tile, after you finish laying it, you have to let the adhesive dry for 24 hours before grouting, which results in a 2+ day project, so essential ceramic tile takes double the time.
Availability and Selection – I purchased this groutable vinyl tile at Lowe’s, but other home improvement stores also offer similar products. The selection is not as vast as ceramic tile (which is a con), but I was surprised by the wide range of colors and textures.
One important part to mention is that the surface must be level underneath. If there is any flexibility in the subfloor, ie: gaps between the tiles and the subfloor, then the grout could crack and pull away from the tiles – this could happen with ceramic tile and LVT. Overall though, it’s a great product with an amazing result. As being a huge part of our home, this new floor sure brings a smile to my face!
Onto the giveaway, which is HUGE!
Now’s your chance to try this project in your home or something completely new and different. Lowe’s is generously giving one winner a $100 Gift Card to their store – how cool?!
This is the first giveaway that I’m using rafflecopter, so please email me if you’re having trouble – jburger.design@gmail.com (fingers crossed it works!).
Disclosure: I am part of the Lowe’s Creative Team and was provided with a Lowe’s gift card to purchase items for my project. I was also compensated for my time to use the products. No one told me what to create, what to buy, how to use the product, or what to write. All opinions are 100% mine!
When planning out the room, I knew I wanted to keep the long window panels, but add some embellishments to dress em’ up a bit.
They are typical 86″ long panels that I purchased 2+ years ago from Bed, Bath, and Beyond and are a deep fuschia color with a small herringbone pattern. I always liked them but thought they were a wee-bit boring… until now.
Adding trim, a leading edge, or edge band, is a simple and inexpensive way to give an updated look and a bit of flair to any window treatment. Plus now my revamped drapes are unique and one-of-a-kind, and so can yours.
To get the look is pretty easy and costs only a few dollars.
The before panels were okay, but the after is “bam”!
To start off, the panels definitely needed to be raised alittle higher towards the ceiling (the higher the better), and adding a decorative trim band at the top, bottom, and inner side was the answer to give them a designer look.
I found this fun fabric for $3.97/yard, and one yard was just enough for the project.
To start off, I determined that I wanted a 3″ +/- leading edge band on the 3 sides.
I cut 6-1/2″ strips of fabric.
The fabric strips were not long enough for the length of the curtain panel, so I simply took the fabric ends, put right sides together, sewed, and ironed flat to create 1 long strip.
Once the long strip was created for the length and I cut two strips for the top and bottom (x2 for the other panel), I folded the strips in half (wrong sides together) and ironed.
I then aligned the unfinished edge of the trim fabric with the right side of the panel edge…
Sewed using a 1/2″ inseam….
And finished by ironing the seam flat.
After adding the leading edge band to the inner side, the bottom, and the top, it was time to focus on the corners.
Where the corners meet, I left extra fabric and rolled one side under the other to create a 90 degree angle. Then sewed the edge.
Pictures might explain it better. Take a look…
And here’s the result of my $5 Designer Update.
O, I forgot to mention that I also updated the drapery rod too. The before rod was purchased from Ikea years ago. No reason to get a new one when a little spray paint does a world-of-wonder!
Hello to Gloss White.
If you happened to miss the whole space, it’s a true treasure.
It’s amazing with a little fabric and/or trim, how a typical store-bought drape can be jazzed up to look designer-made!
I hope you’re having a great week and I want to thank all of you who left such kind comments about my daughter’s room makeover. I already shared one DIY creation in the room (the washi tape initial) and I’m back today to share another part of the space for my first challenge as a Lowe’s Creative Team Member (learn more about that here).
One of my favorite parts of the room was creating a play tent. My kids, as most kids do, love creating forts and tents with blankets and pillows. They love the idea of a hidden place to play, read books, and tell stories. When embarking on this makeover, I thought a play tent would be the perfect addition for a small space in the corner of her room. I didn’t want to make the tent dominate the space, but I also didn’t want it to be too small because what fun is that?!
My solution for the dilemma… A 3-in-1 tent with long panels to allow room for 1 child or 5.
Kids love options – am I right?! You never know if they want to play by themselves in a little cocoon or if they want all their friends around to have a tea party, play barbies, or battle like droids (parents of Star War fans know what I’m talking about).
When starting this project, I of course, headed to Lowe’s to gather my supplies.
1 x 6 board
flexible wood board (I ended up using a 4″ wide x 8′ long) wood toe kick thanks to the suggestion by a Lowe’s sales person)
nails, screws, and anchors
fabric of your choice
ribbon of your choice
drapery panels
To start off, I headed to my favorite home improvement store, Lowe’s, to gather my supplies.
1. Once home, I cut the 1″ x 6″ board into a 38″ piece and a 26″ piece (Lowe’s will also cut your wood pieces to size). The nailed the two ends together.
2. Using anchors and screws ( I always use the self-screwing kind), I attached to the two pieces of wood to the corner space. Then for the curve, I cut the 4″ wide x 8′ long toe kick in half. Using finishing nails, I attached the flexible curved wood to the end of each 1″ x 6″ to finish the canopy base.
The curved wood was a little flimsy (obviously so it can bend), so I secured it in the back by hot gluing on paint sticks.
Once the base was done, the fun part started… adding the fabric.
In knowing that I was going to use white long panels, I wanted to add a bit of whimsy and fun to the valance, so I used a fun Duralee Ikea fabric along with drop cloth and a white pom-pom trim.
3. I cut a piece of drop cloth that was slightly larger that the valance, then wrapped it around the front of the valance and secured it in the back with hot glue. The curved front sits about 1/2″ from the ceiling so I was able to wrap the fabric at the top as well.
Time to jazz it up!
4. After the drop cloth was in place, I added the colorful Ikat fabric. I determined that I wanted to have a 3″ band of the fabric and marked it along the valance. Then once again, I hot glued on the fabric. Easy-Peasy!
secured the fabric in the front…
secured the fabric on the back…
5. Then I added the cute white pom-pom trim. Of course with hot glue… again.
For the last part of this 3-in-1 Kids Play Tent, are the panels.
Ok, so let’s take a step back and let me explain how and why I created these panels. Because of the dynamic fuschia in the room, I thought white panels would be a quieter, fresh contrast. I also wanted them to feel light and airy, so decided on a sheer panel with a small pattern (sheers from Target). The overall length was only 84″ and needed to be much longer, so I added a solid white cotton fabric (used from Ikea window panels) to the bottom. They look pretty for the tent, but could also be used as drapery panels at a later date – I love creating things that can be used now AND later.
6. With right sides together, I sewed the two short ends of the panels. I wasn’t worried about the length because the longer the better – this is how the large canopy is created.
7. Once the two panels were created, I attached them with staples to the ceiling on the inside of the valance. I also overlapped the two panels creating a natural opening / closure.
8. Lastly, I added metal tie backs that I purchased at Lowe’s. These tiebacks are perfect to pull back the panels and have the space wide open – like a stage for the kids to put on a play.
And it’s done. An exciting 3-in-1 Kids Play Tent.
1 – Panels completely pulled back
2 – A cozy hidden nook with panels drawn
3 – Panels pulled out creating a larger “tent”
What a fun spot! Within minutes of having this space done, my kids had all their stuffed animals, blankets, and pillows tucked away inside.
Well my little girl is calling me to go back into her tent – I gotta go!
You can find more DIY creations in the Lowe’s Creative Magazine or the Lowe’s Ipad App for FREE!
Disclosure: I am part of the Lowe’s Creative Team and was provided with a Lowe’s gift card to purchase items for my project. I was also compensated for my time to use the products. No one told me what to create, what to buy, how to use the product, or what to write. All opinions are 100% mine!
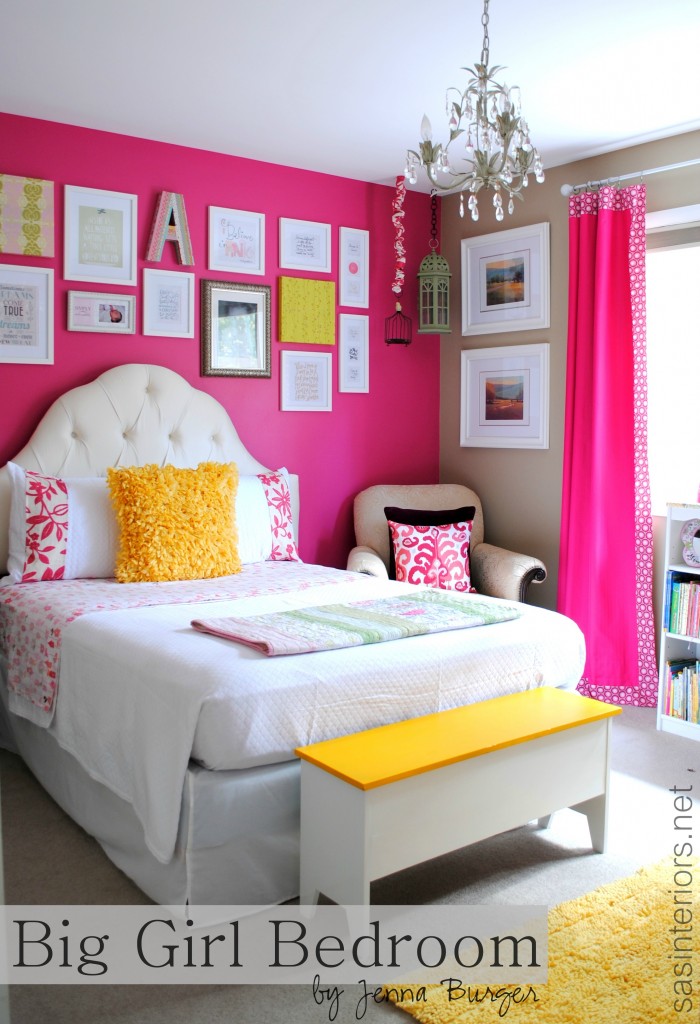
It was a beautiful space, but since turning 3, she was in need of a big girl room with a big girl bed. Many of the elements in her room stayed, while others got “jazzed up” a bit.
Here was the room concept…
and, here’s the result…
My favorite element in the room is definitely the new tufted headboard – and I have to confess, I didn’t make it, but instead bought it. It’s an off-white scalloped headboard and pops against the strong and vibrant fuschia focal wall. When I chose the color for the space, which was painted before honeysuckle was named Pantone’s Color of the Year in 2010, I was hoping it would “live” through my daughter’s growing ages and stages. Thankfully I can stay it has. It sure was nice to start the work in her room without having to repaint.
My other love in this room is the new kids play tent that I created in the corner of the room to the right as you walk in. It was the ideal little nook to add height, drama, and a little secret hideaway.
The corner cabinet was in the nursery space before, but I revamped it by adding fabric and ribbon within the 4 panels. By measuring and cutting pieces of drop cloth, I added ribbon trim surround and then secured it with a pretty thumbtack in each corner. Then to finish the look, I reused the bird wall appliques from the nursery and added them to the drop cloth panels. It was a fairly easy update and softens the look of the cabinet.
The leaning book rack is part of “A’s” old crib. I love this idea, but can’t take credit for it. I saw it on Lindsay’s blog a few months ago and filed it away (in my head) for this new room. I love for Miss A to see the actual book covers and similar to the pallet shelves I made for my son’s room, I love how the book covers bring so much color into the space.
And lastly above, I mounted “A’s” baptismal dress and hat into two different sized white framed shadow boxes. (I gotta give the mister credit for this one – it was his idea)
I have a soft spot for quotes and inspirational words.
I often share special sayings on my FB page and my Great Quote board is a favorite on Pinterest. For a while, I’ve been wanting to create an inspiration wall.
When the ideas started to flow for this room, I knew “A’s” room was the best opportunity to display all the wise words said by wise people. There’s no symmetry to the wall (which allows the possibility for the wall to grow), and I mostly stuck with simple white frames while adding in a a few pictures and fabric wrapped canvases.
The “before” room was a combo of fuschia with soft greens, but for this new space I wanted it to be even more pow and decided a bright yellow would be the perfect addition. And just a little goes a long way.
For the windows, they got a slight update as well. First of all, I took the curtain rods and spray painted them a glossy white finish. They were silver with clear ball finials purchased from Ikea about 5 years ago for my son’s first room. Since I took them off the wall for the update, I also thought raising them higher was a must. To reuse, but change the curtains / drapery panels, I added a 3″ decorative trim band to the top, side, and front of the curtain. This gave them a designer, custom look for pennies. A tutorial on how to do this is coming soon!
Lastly, I painted all the mouldings – window trim and base trim – in the room to white and what a BIG difference that made.
I also needed another spot for more books. I upcycled an old wood bookcase from the basement, sanded it down and painted it white. Then to add a little pizazz to the top, I purchased this pretty decorative paper from a store in my home town. I then added a few coats of mod podge to protect it, and it was completely revamped!
To sum up all the details, here’s a breakdown…
1. Thrift Store Nightstand – was previously used as a sidetable in the nursery and is now a nightstand 2. NON-DIYed headboard, but I love it – Wayfair tufted high arch headboard 3. Quilt and shams – Joss and Main (sale expired) – I added a large fabric band at the edge of each sham; Yellow pillow – Homegoods; Sheets – Target on sale for $12 4. Washi Tape Initial (click here for tutorial) 5. Birdhouses – hung from ceiling and added a fabric cover to the chain 6. Inspiration Wall – white frames from AC Moore; Square fabric covered canvases from nursery 7. Pillows on side chair – plum colored pillow from Crate and Barrel; Ikat pillow made by me with fabric from Duralee 8. Window Panels – fuschia panels purchased for nursery from Bed, Bath, and Beyond. I added a 3″ decorative trim band at the top, side, and bottom (click here for tutorial) + used white spray painted on the old silver rod and raised it to be higher. 9. Bench with hinged top – found at a garage sale last year. It was wood which I primed and painted white on the sides and yellow on the top
10. Corner Cabinet – Added fabric & decorative ribbon in panels 11. Reused crib mobile – DIY created crib mobile using a stick and fabric birds 12. Framed baptismal dress – Shadow box purchased from AC Moore to display baptismal dress and hat 13. Crib Railing Book Display 14. DIY: Kids Play Tent (click here for tutorial)
I have to say, I just love spending time in this new totally girly room with my big girl… and she loves it too! Thank you for checking out the reveal of this room makeover. I’ve got a few DIY tutorials coming up for this space, plus my first Lowe’s Creative Team challenge projectlater this week.
Gone with the white wire and hello to gorgeousness wood (well faux-wood to be exact)!
Despite the slight hiccup of yesterday’s light failure, I quickly resolved the issue, installed a new light (well the mister did that actually) and I can officially say the space is DONE! I spent a few hours photographing the space this morning and here it is…
WOW, it feels good to have all my clothes back in one place, instead of laying all over my bedroom floor like it’s been for over a month. The new shelving is a dream. I walk into the space and pinch myself each time because I can’t believe it’s in my home. So if you remember back to Mid-August, in the middle of the night, all the shelving fell. It was a disaster and since then the closet and our bedroom have been a mess. Here’s a quick before and after (long) picture.
The space is really a nice size (about 8′ x 7′), but a wee bit awkward with the angled wall, so it was difficult to photograph the room in it’s entirety. Like last time, I put a video together so you can check out all the nooks-and-crannies!
Here are some more pictures of the new Master Closet…
Having the shelving so high (about 80″ above the floor) allows so much space for storage of baskets (for belts, scarves, flip flops), pocketbooks, bags, extra sweaters, etc. Literally every inch of wall is used!
Drawers in a closet are dreamy! I’ve never had drawers in any closet before and it’s a great place to stash all your under wares!
And here’s a quick video ( I promise) of the entire space! Sit back with your popcorn and enjoy…
So there you have it. A space fully made over. O, and I forgot to share this tid bit with you… I took off the closet door when we were working on the space and I’m not putting it back. I really enjoy looking at the clothes and the cabinetry – plus it reminds me of the 15+ hours it took to install the cabinets and how hard the mister and I worked!
Disclaimer: I was provided product from ClosetMaid to share the result with my readers. Once received, I put the entire system together on my own. All opinions about the product are 100% mine!
The makeover has been takin’ a wee-bit longer than anticipated, not because of design challenges (thankfully) but because of her actually using the room (to sleep, to play, etc.), lol. I tackle many of my projects while the kids are fast asleep and dreaming, so to actually work in her room has been challenging.
Thankfully I had some time this past weekend to get my hands dirty and this is a project that I just finished up and couldn’t wait to share… Washi Tape Initial Wall Decor.
Have you heard of washi tape (don’t be embarrassed to say no)? Until recently, I didn’t. I had seen this crafty goodness all over the web but didn’t actually know what it was or how to use it. So what did I have to do? Buy it, of course!
Here’s the DL on washi tape It’s basically pretty patterned tape. Imagine typical tape with a pattern. So it’s easy to add to anything to dress it up a bit -paper, a present, anything…
I recently was asked to check out the new online craft store, Consumer Crafts. While searching the site I found a huge selection of washi tape, plus this awesome large initial letter that I had been searching for, for a while. Since not using washi tape before, I didn’t really know what I was getting myself into it, but in the end, I…. well you’ll just have to keep reading to see what I thought.
Once my package arrived (within a day or two – it was amazing how fast my supplies came), I laid everything out – Large initial letter, washi tape, and mod podge (I was initially thinking of using duct tape, but opted not to) – and got to work.
The most difficult part of using the Consumer Crafts website was stopping myself from filling my basket with $100s of dollars of stuff – they really have everything pertaining to crafting! Once I narrowed down my list, and got started on my project, I was good as gold. The colors in my daughters room are vibrant and strong, so the colors of the washi tapes were perfect.
I began at the edge of the “A” with a fun pink and white striped tape, wrapping it around at the top and bottom.
I continued with different washi tape styles and added them edge to edge on the diagonal parts of the “A”, and then continued taping the inner and outer edges.
Lastly, I tackled the connector of the “A”. Washi tape is fairly thin, so it’s easy to cut. I lightly laid out the tape, then using an X-acto blade, trimmed the edge.
Within about 10-15 minutes, the washi tape was done. YAY! To seal it all, I added 2 coats of Mod Podge in Matte – another goodie I ordered from Consumer Crafts.
A few hours later it was dry and DONE!
So my thoughts on washi tape is that it’s GREAT! It’s just like tape with added color and cuteness. I might never use ordinary tape again.
Have you ever used washi tape before? If so, what have you created with this crafty goodness?
Disclaimer: I was given a gift card to order product and test-out the online craft store, Consumer Crafts. I was also compensated for my time to use the products. No one told me what to create, what to buy, how to use the product, or what to write. All opinions are 100% mine!


 Many of us have a door in our home that leads to the garage. It’s a metal door and so it’s magnetized, leaving the perfect opportunity to jazz it up, bring color into the room, and display kids artwork, coupons, or much more.